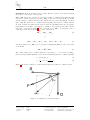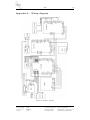
1
Technical Documentation UAV with stabilized camera Version 0.2 Author: Therese Kjelldal Date: December 7, 2010 Status Reviewed Approved Course name: Project group: Course code: Project: Control Project Laboratory UAV TSRT10 UAV E-mail: Document manager: Author’s E-mail: Document name: [email protected] Therese Kjelldahl [email protected] Technical Documentation Project Identity Group E-mail: Homepage: Orderer: Customer: Course Responsible: Project Manager: Advisors: [email protected] http:// Per Skoglar, Linköping University Phone: +46 13 282636, E-mail: [email protected] David Törnqvist, Linköping University Phone: +46 13 281882 , E-mail: [email protected] David Törnqvist, Linköping University Phone: +46 13 281882, E-mail: [email protected] Erik Lindén Sina Khoshfetrat Pakazad, Linköping University Phone: +46 13 13281253 , E-mail: [email protected] Group Members Name Responsibility Hamdi Bawaqneh Olof Bäckman Magnus Degerfalk Fredrik Eskilsson Per Johansson Erik Jonsson Holm Therese Kjelldal Erik Lindén Gustav Öst Aircraft Tests Gimbal Design Documents Project Manager Information E-mail (@student.liu.se) hamba208 oloba221 magde580 frees868 perjo871 erijo975 thekj512 erili277 gusos234 Document History Version 0.1 0.2 Date 2010-12-06 2010-12-07 Course name: Project group: Course code: Project: Changes made First draft. Minor changes Control Project Laboratory UAV TSRT10 UAV Sign Reviewer EL, TK E-mail: Document manager: Author’s E-mail: Document name: [email protected] Therese Kjelldahl [email protected] Technical Documentation Contents 1 Introduction 1 1.1 Who is involved . . . . . . . . . . . . . . . . . . . . . . . . . . . . . . . . . . . . . . . . . . 1 1.2 Goals 1 1.3 Usage . . . . . . . . . . . . . . . . . . . . . . . . . . . . . . . . . . . . . . . . . . . . . . . 1 1.4 Background information . . . . . . . . . . . . . . . . . . . . . . . . . . . . . . . . . . . . . 1 1.5 Definition of terms . . . . . . . . . . . . . . . . . . . . . . . . . . . . . . . . . . . . . . . . 1 . . . . . . . . . . . . . . . . . . . . . . . . . . . . . . . . . . . . . . . . . . . . . . . 2 Overview of the system 2 2.1 Product components . . . . . . . . . . . . . . . . . . . . . . . . . . . . . . . . . . . . . . . 2 2.2 Dependency on other systems . . . . . . . . . . . . . . . . . . . . . . . . . . . . . . . . . . 3 2.3 Included subsystems . . . . . . . . . . . . . . . . . . . . . . . . . . . . . . . . . . . . . . . 3 2.4 What is not included . . . . . . . . . . . . . . . . . . . . . . . . . . . . . . . . . . . . . . . 3 2.5 Design philosophy . . . . . . . . . . . . . . . . . . . . . . . . . . . . . . . . . . . . . . . . 3 2.6 Implementation . . . . . . . . . . . . . . . . . . . . . . . . . . . . . . . . . . . . . . . . . . 3 3 Definition of coordinate systems Relationships between coordinate systems . . . . . . . . . . . . . . . . . . . . . . . 5 3.0.2 Obtaining and transforming the target vector to the gimbal coordinate system . . 6 4 Subsystem 1 - Aircraft 4.1 8 Hardware . . . . . . . . . . . . . . . . . . . . . . . . . . . . . . . . . . . . . . . . . . . . . Overview and connection . . . . . . . . . . . . . . . . . . . . . . . . . . . . . . . . 8 4.1.2 ArduPilot . . . . . . . . . . . . . . . . . . . . . . . . . . . . . . . . . . . . . . . . . 8 4.1.3 ArduIMU-1 . . . . . . . . . . . . . . . . . . . . . . . . . . . . . . . . . . . . . . . . 11 4.1.4 Actuators . . . . . . . . . . . . . . . . . . . . . . . . . . . . . . . . . . . . . . . . . 12 4.1.5 Electronic speed control . . . . . . . . . . . . . . . . . . . . . . . . . . . . . . . . . 12 4.1.6 Motor . . . . . . . . . . . . . . . . . . . . . . . . . . . . . . . . . . . . . . . . . . . 12 4.1.7 Voltage regulator . . . . . . . . . . . . . . . . . . . . . . . . . . . . . . . . . . . . . 13 4.1.8 GPS . . . . . . . . . . . . . . . . . . . . . . . . . . . . . . . . . . . . . . . . . . . . 13 4.1.9 XBee 14 . . . . . . . . . . . . . . . . . . . . . . . . . . . . . . . . . . . . . . . . . . . . . . . . . . . . . . . . . . . . . . . . . . . . . . . . . . . . . . . . . 14 Software . . . . . . . . . . . . . . . . . . . . . . . . . . . . . . . . . . . . . . . . . . . . . . 15 4.2.1 ArduPilot . . . . . . . . . . . . . . . . . . . . . . . . . . . . . . . . . . . . . . . . . 15 4.2.2 ArduIMU-1 . . . . . . . . . . . . . . . . . . . . . . . . . . . . . . . . . . . . . . . . 15 5 Subsystem 2 - Gimbal 5.1 5.2 8 4.1.1 4.1.10 Radio receiver 4.2 5 3.0.1 16 Hardware . . . . . . . . . . . . . . . . . . . . . . . . . . . . . . . . . . . . . . . . . . . . . 16 5.1.1 Overview and connection . . . . . . . . . . . . . . . . . . . . . . . . . . . . . . . . 16 5.1.2 Camera mount . . . . . . . . . . . . . . . . . . . . . . . . . . . . . . . . . . . . . . 16 5.1.3 Servos . . . . . . . . . . . . . . . . . . . . . . . . . . . . . . . . . . . . . . . . . . . 17 5.1.4 ArduIMU-2 . . . . . . . . . . . . . . . . . . . . . . . . . . . . . . . . . . . . . . . . 18 Software . . . . . . . . . . . . . . . . . . . . . . . . . . . . . . . . . . . . . . . . . . . . . . 19 5.2.1 Overview . . . . . . . . . . . . . . . . . . . . . . . . . . . . . . . . . . . . . . . . . 19 5.2.2 Filters and estimations . . . . . . . . . . . . . . . . . . . . . . . . . . . . . . . . . . 20 5.2.3 The functions in the IMU-2 software . . . . . . . . . . . . . . . . . . . . . . . . . . 20 5.2.4 Modifications to original plans . . . . . . . . . . . . . . . . . . . . . . . . . . . . . 22 5.2.5 Future work . . . . . . . . . . . . . . . . . . . . . . . . . . . . . . . . . . . . . . . . 6 Subsystem 3 - Simulation and software 6.1 6.2 25 Simulation environment . . . . . . . . . . . . . . . . . . . . . . . . . . . . . . . . . . . . . 25 6.1.1 Description of the models . . . . . . . . . . . . . . . . . . . . . . . . . . . . . . . . 25 6.1.2 Airplane and autopilot model . . . . . . . . . . . . . . . . . . . . . . . . . . . . . . 25 6.1.3 Gimbal and gimbal controller model . . . . . . . . . . . . . . . . . . . . . . . . . . 27 6.1.4 Analysis of models . . . . . . . . . . . . . . . . . . . . . . . . . . . . . . . . . . . . 29 Path generation . . . . . . . . . . . . . . . . . . . . . . . . . . . . . . . . . . . . . . . . . . 30 6.2.1 Stationary target . . . . . . . . . . . . . . . . . . . . . . . . . . . . . . . . . . . . . 30 6.2.2 Moving target . . . . . . . . . . . . . . . . . . . . . . . . . . . . . . . . . . . . . . . 35 7 Subsystem 4 - Video 7.1 7.2 23 38 Hardware . . . . . . . . . . . . . . . . . . . . . . . . . . . . . . . . . . . . . . . . . . . . . 38 7.1.1 Overview . . . . . . . . . . . . . . . . . . . . . . . . . . . . . . . . . . . . . . . . . 38 7.1.2 Video camera . . . . . . . . . . . . . . . . . . . . . . . . . . . . . . . . . . . . . . . 38 7.1.3 Video transmitter . . . . . . . . . . . . . . . . . . . . . . . . . . . . . . . . . . . . 38 7.1.4 Video antenna . . . . . . . . . . . . . . . . . . . . . . . . . . . . . . . . . . . . . . 39 7.1.5 Video receiver . . . . . . . . . . . . . . . . . . . . . . . . . . . . . . . . . . . . . . . 39 7.1.6 VR-glasses . . . . . . . . . . . . . . . . . . . . . . . . . . . . . . . . . . . . . . . . 40 7.1.7 USB video adapter . . . . . . . . . . . . . . . . . . . . . . . . . . . . . . . . . . . . 40 Software . . . . . . . . . . . . . . . . . . . . . . . . . . . . . . . . . . . . . . . . . . . . . . 41 8 Communication 42 8.1 I2C . . . . . . . . . . . . . . . . . . . . . . . . . . . . . . . . . . . . . . . . . . . . . . . . . 42 8.2 XBee . . . . . . . . . . . . . . . . . . . . . . . . . . . . . . . . . . . . . . . . . . . . . . . . 42 8.2.1 43 Problems . . . . . . . . . . . . . . . . . . . . . . . . . . . . . . . . . . . . . . . . . 9 Ground Control Station Course name: Project group: Course code: Project: Control Project Laboratory UAV TSRT10 UAV 44 E-mail: Document manager: Author’s E-mail: Document name: [email protected] Therese Kjelldahl [email protected] Technical Documentation UAV 1 1 Introduction The purpose of the project is to modify an existing control system for an autonomous unmanned aerial vehicle (UAV) and to steer and stabilize a camera placed on a gimbal on the UAV. The camera is able to look at specific points on the ground and the image is sent to a computer via a wireless video link. The platform that is used in the project is the airplane Multiplex Easystar and the control system ArduPilot. The positioning system of the UAV is based on a GPS and an IMU. The gimbal is built by the group members. 1.1 Who is involved The customer is David Tornqvist and the orderer is Per Skoglar, both at the Department of Electrical Engineering (ISY). The project group consists of 10 students taking the project course TSRT10. Four of these study M (Mechanical Engineering), five study Y (Applied Physics and Electrical Engineering) and one studies I (Industrial Engineering and Management). 1.2 Goals Surveillance utilizing small, unmanned aircraft will become increasingly common in the future, as police, rescue services, security companies etc starts to use the technology. The goal of this project is to develop a system where a user can specify a flight path for an UAV. A camera which will be able to lock onto points of interest on the ground will be mounted. 1.3 Usage The system can be used in a number of different ways. For example: surveying damage to power lines or forests after a storm, or to look for missing persons. Another possible use is recording orienteering competitions for television broadcast. 1.4 Background information In this project a platform consisting of the model aircraft Multiplex EasyStar and the control system ArduPilot is used. The control system is developed as an Open Source project with extensive documentation, and can therefore be modified if needed. A gimbal, constructed from a gimbal kit, was used for mounting of the camera while the control system to stabilize it was developed by the group. 1.5 Definition of terms ArduPilot - Open source control system for model airplanes ArduIMU - A complete board consisting of an IMU unit and a micro controller to correct for the drift in the IMU unit itself, with the aid of data from the GPS Xbee - Wireless modem from airplane to ground IMU - Inertial Measurement Unit RC - Radio Communication GPS - Global Positioning System UAV - Unmanned Aerial Vehicle HIL - Hardware In the Loop, the system is connected to the simulation environment Course name: Project group: Course code: Project: Control Project Laboratory UAV TSRT10 UAV E-mail: Document manager: Author’s E-mail: Document name: [email protected] Therese Kjelldahl [email protected] Technical Documentation UAV 2 I2C - Inter-Integrated Circuit ESC - Electronic Speed Control, a unit controlling the speed of the aircraft motor GCS - Ground Control Station A.S.L - Above Sea Level 2 Overview of the system A model aircraft, capable of autonomous flight, is with the aid of a camera placed on a gimbal able to view specified points on the ground. 2.1 Product components Figure 1: Basic overview of the system The product consists of the model aircraft Multiplex EasyStar controlled by the opensource control system ArduPilot, which makes use of a GPS and an IMU to navigate. The aircraft is equipped with a video camera mounted on a two-axis gimbal, and is also equipped with an IMU. The video camera transmits the image via a separate video link to a receiver on the ground. Wireless communication between the aircraft and a computer is done via the Xbee modem interface. Figure 1 shows a schematic diagram of how the different components interact. There is also an object oriented environment for simulating the aircraft and the gimbal. A more detailed connection scheme is described in figure 22 in Appendix A. Course name: Project group: Course code: Project: Control Project Laboratory UAV TSRT10 UAV E-mail: Document manager: Author’s E-mail: Document name: [email protected] Therese Kjelldahl [email protected] Technical Documentation UAV 2.2 3 Dependency on other systems The aircraft depends on a computer where the user generates the desired flight path. The flight path is either specified by selecting spots in desired order on a map in the software tool Config Tool, provided from the ArduPilot home page. The other choice is to place a number of targets in Config Tool and then run the script path generation in Matlab (see section path generation). The script will then calculate a path for the UAV to follow to be able to survey selected targets. The route is written to the memory of the ArduPilot in Config Tool and the UAV will follow the desired path. To determine the position of the UAV, it uses the GPS satellite navigation system. The software Ground Station GCS is provided by the ArduPilot home page and is used to keep track of the UAV during flight. It displays real-time telemetry as well as which waypoint the UAV is currently aiming at. 2.3 Included subsystems The system can be devided into the following subsystems: - Aircraft - Hardware - Software - Camera unit - Hardware - Software - Simulation environment and software - Video 2.4 What is not included Because of the analogue nature of the video data, no image processing is performed. This means that the camera is not able to track arbitrary targets. The flying is performed primarily in good weather conditions, and with simple paths. 2.5 Design philosophy In order for the group to work in an efficient way, it has been important that the different components of the product has been developed and evaluated individually. Computer code used has been written as generally and easy to survey as possible. 2.6 Implementation The code used for the ArduPilot is open source code, downloaded from the ArduPilot home page. This code is written i C. Modifications to the existing code has been done to improve the performance of the UAV and to make it work as desired. Also implementation of new functions for steering, stabilizing and regulating the gimbal and for communication between the IMU placed on the plane and the IMU placed on the gimbal amongst others has been done. The code is modified in the program Arduino, through which the code is uploaded to the ArduPilot. The simulation environment has been developed in Matlab, Course name: Project group: Course code: Project: Control Project Laboratory UAV TSRT10 UAV E-mail: Document manager: Author’s E-mail: Document name: [email protected] Therese Kjelldahl [email protected] Technical Documentation UAV 4 this is done with object orientation. The path generation algorithm has been implemented in Matlab as well. To make the Ground Station GCS work satisfactory modifications to this program has been done. The Ground Station has been developed in LabVIEW meaning changes to this software has been done in LabVIEW. Course name: Project group: Course code: Project: Control Project Laboratory UAV TSRT10 UAV E-mail: Document manager: Author’s E-mail: Document name: [email protected] Therese Kjelldahl [email protected] Technical Documentation UAV 3 5 Definition of coordinate systems The system effectively uses 3 different orthogonal, right oriented coordinate systems to describe positions, velocities and vectors. Also the universal World Geodetic System is used by the GPS equipment. The fixed earthbound system is defined using the aviation convention NED, with the x-axis pointed North, y pointing East and z pointing Down. The 2 non-fixes coordinate systems is defined as FRD, with F in the forward direction, R to the right and D down. See figure 2 for a description of the orientation for the different coordinate systems. They are fixed in the following positions: - World Geodetic System. Abbreviated (W). GPS coordinates are defined using this system. Origin is at the centre of the earth, with the z-axis pointing at the geographic north pole and the x axis pointing through the Greenwich zero meridian. It is used by the operator when generating paths and target coordinates. - Earth system. Abbreviated (e). N is pointing at geographic north pole, D is pointing down. Origin is defined somewhere in the vicinity of where we are flying, preferably the take off position. - Aircraft system. Abbreviated (a). F is pointing through the nose of the aircraft and D down through the fuselage. It is primarily used by the ArduPilot to successfully navigate and stabilize the aircraft. The IMU-1 unit generates R̄(a2e) fully describing the orientation of this coordinate system. Origin in the IMU-1 unit. - Gimbal system. Abbreviated (g). F is pointing forward through the camera lens. Due to hardware problem this coordinate isn’t used in calculations. Figure 2: Orientation of the coordinate systems 3.0.1 Relationships between coordinate systems Since all GPS coordinates are given in the geodetic (W) system lat/long/height format, a system to convert these to the Cartesian (e) system is first needed. Assuming that we are primarily flying short distances in the vicinity of LIU, we can approximate the transformation of a point expressed in the (W) to the (e) system as the difference in the GPS latitudes, in radians, multiplied by the radius of the earth to get N and the difference in GPS longitudes, in radians, multiplied by the distance to the earth axis to get E. The height difference simply translates as the (negative) D coordinate. The relationship between each non-fixed coordinate system and the earth-bound (which is approximates as fixed and Cartesian) can be described by a directional cosine matrix, Course name: Project group: Course code: Project: Control Project Laboratory UAV TSRT10 UAV E-mail: Document manager: Author’s E-mail: Document name: [email protected] Therese Kjelldahl [email protected] Technical Documentation UAV 6 or DCM, R̄. This rotational matrix is computed and continuously updated by the corresponding ArduIMU unit, and consists of a 3x3 orthogonal matrix (with 4 independent elements). The matrix transforms the vector v(a) , expressed in the coordinate system (a), to the vector v(e) , expressed in the earthbound system, in the following way: v(e) = R̄(a2e) v(a) (1) −1 R̄(a2e) v(e) (2) v(a) = or, since R̄(a2e) is always orthogonal, equivalently T v(a) = R̄(a2e) v(e) (3) To calculate in what direction to point the camera, which operates in its own (a) system, to T observe a given target coordinate the R̄(a2e) matrix can be used to conveniently transform the vector describing the camera direction in the (e) system (which is obtained by a simple vector subtraction) to the corresponding vector in the (a) system. Having this vector, since all vectors and matrices are normalized, the pan and tilt angles for the camera can be obtained as the trigonometric functions of the corresponding elements in the directional vector. See section 3.0.2 for a more explicit example. 3.0.2 Obtaining and transforming the target vector to the gimbal coordinate system The controller in the gimbal has 2 signals with which to influence the direction of the camera, the pan (ϕ) and tilt (θ) angles. The pan is the (approximately, depending on orientation) horizontal angle, rotating the camera around the D axis, with 0 is at the F direction and positive direction towards the R axis. Tilt is the (again, approximate) up and down angle. It rotates the camera around the R axis, with 0 at the F axis and positive direction is towards the D axis. See figure 4 for further reference. To calculate these angles, the controller need only to know the directional vector from the plane to the target in the plane coordinate system, (a). Figure 3: Relationships between vectors in different coordinate systems Course name: Project group: Course code: Project: Control Project Laboratory UAV TSRT10 UAV E-mail: Document manager: Author’s E-mail: Document name: [email protected] Therese Kjelldahl [email protected] Technical Documentation UAV 7 Definitions: O is an arbitrary point of origin, A is the position of the plane and X is the position of the target on the ground. Note: AB denotes the “general” vector from point A to point B, without implying that a special coordinate system is being used. AB(z) is the vector from point A to point B, described using coordinate system z. The same is true for points, A is simply a point in space, while A(z) is the set of coordinates describing this point in the z coordinate system. To start off with, the GPS and the user provides the ArduIMU (after the appropriate transformation from (W) to (e)) with the coordinates of its current position A(e) and the target X(e) , respectively (figure 3). To obtain the vector AX(a) , an arbitrary point of origin O(e) is introduced. Now AX(e) can be expressed as: AX(e) = OX(e) − OA(e) (4) ↔ AX(e) = (X(e) − O(e) ) − (A(e) − O(e) ) = X(e) − A(e) (5) Now the required vector AX(a) can be obtained by multiplying AX(e) by the correct form of the DCM: T AX(a) = R̄(a2e) AX(e) (6) T The ϕ and θ angles can be obtained using the components f, r, d of the vector AX(a) in the following formulas (similar to those used for standard spherical coordinate systems): ϕ = arctan 2(r, f ) d π ) θ = − arccos ( 2 |AX(a) | (7) (8) Figure 4 shows the orientation of pan and tilt angles in the gimbal coordinate system. Figure 4: Obtaining the pan and tilt angles Course name: Project group: Course code: Project: Control Project Laboratory UAV TSRT10 UAV E-mail: Document manager: Author’s E-mail: Document name: [email protected] Therese Kjelldahl [email protected] Technical Documentation UAV 4 4.1 4.1.1 8 Subsystem 1 - Aircraft Hardware Overview and connection The aircraft itself is a Multiplex Easy Star model airplane. It is made out of durable ELAPOR foam, and has in its basic configuration a backwards mounted electric motor, two actuators for controlling the rudder and the elevator and a radio receiver for operation. There is also a battery pack and a speed control for the motor. In this project the system is expanded with a ready-made autopilot, ArduPilot, developed as an open source project. Using the out-of-the-box features of this autopilot, the aircraft is able to fly autonomously using user defined GPS coordinates, perform FBW (Fly By Wire), stabilize the aircraft when controlled by operator, loiter around a specified point, and return to launch if connection is lost. To be able to estimate its position and orientation, the aircraft is using an ArduIMU and a GPS unit. For the aircraft to communicate with a laptop on the ground during flight a wireless serial modem, Xbee, is connected to the ArduPilot. All wires where at first connected to the ”break away connectors” on the boards but some where later soldered directly on the boards to prevent loose connections. A detailed wiring diagram of the whole system is shown in Appendix A 4.1.2 ArduPilot The ArduPilot is an open source autopilot system, capable of controlling and stabilizing a model aircraft in autonomous flight. It consists of a micro controller, Atmel Atmega328 16 MHz. When equipped with a GPS receiver and/or a IMU unit, it can navigate a simple flight path consisting of GPS coordinate way-points. It acts as the centre of the aircraft system, collecting signals from most of the components and controlling the aircraft actuators according to its internal control strategy. If the autopilot is not in use, the signals from the operator on the ground is passed straight through the ArduPilot. However it is possible to log data, if desired. The circuit board is mounted together with ArduIMU-1 using Velcro on a plywood board. This board is then placed in the aircraft’s ”cockpit”, over the battery, Figure 5. Course name: Project group: Course code: Project: Control Project Laboratory UAV TSRT10 UAV E-mail: Document manager: Author’s E-mail: Document name: [email protected] Therese Kjelldahl [email protected] Technical Documentation UAV 9 Figure 5: ArduPilot and IMU-1 mounted on plywood in the cockpit The ArduPilot is connected to the RC receiver and to the following actuators: rudder servo, elevator servo and the speed controller (ESC). The ArduIMU-1 (with the GPS) and ArduIMU-2 is connected to the ArduPilot through the I2C bus. The signal cable between ArduPilot and the XBee module on the aircraft can also serve as input port for the FTDI cable when programming ArduPilot. Two wires are needed to be soldered on the bottom of the board to enable the throttle input channel, see Figure 6. Course name: Project group: Course code: Project: Control Project Laboratory UAV TSRT10 UAV E-mail: Document manager: Author’s E-mail: Document name: [email protected] Therese Kjelldahl [email protected] Technical Documentation UAV 10 Figure 6: Bottom side of the ArduPilot board Voltage received from: - Li-Po battery (11.1 V) through the voltage regulator (5V) Voltage distributed to: - Rudder/elevator servo - ArduIMU-1 - ArduIMU-2 - XBee - RC receiver Signals received from: - ArduIMU-1 - Aircraft orientation information; roll, pitch and yaw in degrees - GPS coordinates; longitude and latitude in degrees∗107 , altitude in decimeters a.s.l. and speed in cm/s - RC Receiver - Rudder/elevator servo and ESC control signals - Autopilot engage/disengage flag Course name: Project group: Course code: Project: Control Project Laboratory UAV TSRT10 UAV E-mail: Document manager: Author’s E-mail: Document name: [email protected] Therese Kjelldahl [email protected] Technical Documentation UAV 11 Signals sent to: - ESC (Speed control signal) - Rudder and Elevator servos - ArduIMU-2 - GPS coordinates of camera target; longitude and latitude in degrees∗107 , altitude in decimeters a.s.l. - GPS coordinates of the aircraft - Aircraft orientation information; roll, pitch and yaw in degrees - speed of the aircraft i cm/s - XBee modem - Updated UAV flight data; longitude and latitude in degrees∗107 , altitude in decimeters a.s.l. and speed in cm/s 4.1.3 ArduIMU-1 The ArduIMU-1 is used to estimate the orientation and velocity of the aircraft. It consists of a board with three accelerometers, three gyros and a micro controller (Atmel Atmega328 16 MHz). The micro controller is used to compute the DCM and to correct for gyro drift and numerical errors in the output, using input from the GPS and accelerometers as reference. This was already implemented in the open source code and is used as-is in the project. The unit obtains measurements from its on-board sensors and the connected GPS, processes this information and forwards the orientation and position information to the ArduPilot through the I2C bus. The ArduIMU-1 is mounted together with ArduPilot on the plywood board in the aircraft’s ”cockpit”. Voltage received from: - ArduPilot (5V) Signals received from: - GPS unit - GPS coordinates; longitude and latitude in degrees∗107 , altitude in decimetres a.s.l. and speed in cm/s Signals sent to: - ArduPilot - Aircraft orientation information; roll, pitch and yaw in degrees - GPS coordinates; longitude and latitude in degrees∗107 , altitude in decimeters a.s.l. and speed in cm/s Course name: Project group: Course code: Project: Control Project Laboratory UAV TSRT10 UAV E-mail: Document manager: Author’s E-mail: Document name: [email protected] Therese Kjelldahl [email protected] Technical Documentation UAV 4.1.4 12 Actuators The aircraft has two actuators to control its flight, the elevator and the rudder. These are controlled by two servo motors, mounted on the sides of the aircraft, connected to the ArduPilot. When in manual mode, the signals received from the RC-receiver are passed straight through the ArduPilot, i.e. the operator is in direct control of the actuators. In autopilot mode the ArduPilot controls the actuators. Voltage/signal received from: - ArduPilot 4.1.5 Electronic speed control The electronic speed control (ESC) is the device controlling the speed of the propeller’s electric motor, therefore controlling the speed of the aircraft. As with the actuators, the reference signal to the ESC can be either under direct manual control, or be handled by the ArduPilot, depending on if the autopilot mode is engaged or not. The ESC is mounted on top of the aircraft. Voltage received from: - Battery (11.1 V) Voltage/signal sent to: - Motor Signals received from: - ArduPilot (Motor ref. speed) 4.1.6 Motor The propulsion of the aircraft is controlled by a backwards mounted electric motor with a attached propeller. The motors revolution speed is controlled by the ESC. Voltage/signal received from: - ESC Course name: Project group: Course code: Project: Control Project Laboratory UAV TSRT10 UAV E-mail: Document manager: Author’s E-mail: Document name: [email protected] Therese Kjelldahl [email protected] Technical Documentation UAV 4.1.7 13 Voltage regulator The Voltage regulator is mounted on top of the aircraft and distributes 5 V voltage to the entire system through ArduPilot. It also distributes 12 V voltage to the camera and the video transmitter. The 5 V voltage was in the beginning distributed through the ESC but the output voltage was too high. A new ESC gave a correct voltage but didn’t manage the current, with generation of too much heat as result. The solution was a separate voltage regulator. Voltage received from: - Battery (11.1 V) Voltage distributed to: - ArduPilot - Camera - Video transmitter 4.1.8 GPS The GPS is a uBlox GPS receiver which is connected to ArduIMU-1 and mounted on the aircraft vertically behind the gimbal, with the antenna pointing to the sky. An EM406 GPS unit was used in the beginning but was later replaced by the better uBlox GPS. Voltage received from: - ArduIMU-1 (5V) Signals sent to: - ArduIMU-1 - GPS coordinates; longitude and latitude in degrees∗107 , altitude in decimeters a.s.l. and speed in cm/s Course name: Project group: Course code: Project: Control Project Laboratory UAV TSRT10 UAV E-mail: Document manager: Author’s E-mail: Document name: [email protected] Therese Kjelldahl [email protected] Technical Documentation UAV 4.1.9 14 XBee XBee is a wireless serial modem, and enables wireless communication between the UAV system and a laptop. It is used for logging flight data and can communicate during missions while airborne. The XBee is mounted on the side of the aircraft, behind the elevator servo, to prevent interference from the rest of the components. The XBee on the aircraft communicates with an XBee on the ground, mounted on an XBIB-U-DEV development board which is connected to a computer through a USB cable. Voltage received from: - ArduPilot Signals received from: - ArduPilot - Updated UAV flight data; longitude and latitude in degrees∗107 , altitude in decimeters a.s.l. and speed in cm/s Signals sent to: - Computer - Updated UAV flight data; longitude and latitude in degrees∗107 , altitude in decimeters a.s.l. and speed in cm/s 4.1.10 Radio receiver Three channels on the RC receiver is used for rudder servo, elevator servo and for the speed controller. A fourth channel on the RC receiver is used to enable or disable the autopilot. The unit is placed inside the aircraft’s ”cockpit”. Voltage received from: - ArduPilot Signals received from: - Ground operator (Actuator/motor ref. signals) Signals sent to: - ArduPilot Course name: Project group: Course code: Project: Control Project Laboratory UAV TSRT10 UAV E-mail: Document manager: Author’s E-mail: Document name: [email protected] Therese Kjelldahl [email protected] Technical Documentation UAV 4.2 4.2.1 15 Software ArduPilot The Ardupilot code used is already implemented as an open source project and is modified in this project to support I2C communication instead of serial communication between ArduIMU-1, ArduIMU-2 and ArduPilot. The ArduPilot will be the master. The I2C communication is described in the I2C section below. The ArduPilot will communicate with the Xbee through the serial port. The GPS protocol is changed to ”ArduIMU” in the code and all parameters is calibrated to fit the aircraft in this project. There are some built in flight modes in ArduPilot and those are specified below: ArduPilot can act as a simple flight stabilization system or a sophisticated autopilot. Flight modes are controlled through the radio or through logic, using the events.pde file. Those modes are: - Manual - Regular RC control with no stabilization. - Stabilize - RC control with stabilization; The operator on the ground controls the aircraft manually, but ArduPilot stabilizes the aircraft when the sticks are left unadjusted. - Fly by wire - ”Beginner mode”. The operator points the sticks in the direction he/she wants the aircraft to go, and the ArduPilots controls the aircraft to get there. Can be used with manual or automatic speed control. - Auto - The aircraft follows a path consisting of GPS way-points set by the user. - Return to launch - If ArduPilot discovers that connection with the RC transmitter on the ground is lost, it will return to launch point and loiter there until manual control can be regained. - Loiter - The aircraft will circle around its current position. The file EEPROM.pde file has been modified so that the last way-point in the memory is actually the camera target: wp total = eeprom read byte((uint8 t *) EE WP TOTAL) - 1; ... target = get wp with index(wp total+1); The ArduPilot’s autopilot mode was overrated in the beginning since it didn’t work as expected and had difficulties in following the desired path. 4.2.2 ArduIMU-1 The uBlox GPS protocol is chosen and user-modifiable options is changed to fit the aircraft in this project. Code is written to handle the I2C protocol where ArduIMU-1 is set to be slave. Course name: Project group: Course code: Project: Control Project Laboratory UAV TSRT10 UAV E-mail: Document manager: Author’s E-mail: Document name: [email protected] Therese Kjelldahl [email protected] Technical Documentation UAV 5 5.1 5.1.1 16 Subsystem 2 - Gimbal Hardware Overview and connection The gimbal subsystem consists of a ready made camera mount with a video camera, rotatable in 2 directions by servo motors (pan and tilt). It has an ArduIMU unit which was originally meant to be used to estimate the orientation and position of the gimbal, and therefore also what the camera is looking at. The IMU-2 became eventually only the unit that calculates and controls the the direction of the camera to look at points of interest on the ground. Information from ArduPilot is sent by the I2C bus. A detailed wiring diagram of the whole system is shown in Appendix A 5.1.2 Camera mount The camera mount is a commercial unit made out of lightweight fibreglass plates and some bearings. It can be rotated by two servo motors, and has a mount for a video camera. It is positioned on a ”platform”, made of plywood and Styrofoam,which is mounted with Velcro over the plane’s ”cockpit”, Figure 7. This is not optimal for observing points on the ground, but moving it to a better position on the aircraft, eg underneath it, would make the it very difficult to land safely. A higher platform would improve the field of view and give more room for the wires underneath but would also make the gimbal mount more unstable. Course name: Project group: Course code: Project: Control Project Laboratory UAV TSRT10 UAV E-mail: Document manager: Author’s E-mail: Document name: [email protected] Therese Kjelldahl [email protected] Technical Documentation UAV 17 Figure 7: The gimbal mount 5.1.3 Servos The gimbal has two servo motors directing the camera in pan and tilt direction to achieve the desired orientation. They are controlled by the ArduIMU-2, and are connected to its two servo outputs. Voltage/signal received from: - ArduIMU-2 Course name: Project group: Course code: Project: Control Project Laboratory UAV TSRT10 UAV E-mail: Document manager: Author’s E-mail: Document name: [email protected] Therese Kjelldahl [email protected] Technical Documentation UAV 5.1.4 18 ArduIMU-2 The ArduIMU-2, physically positioned in the immediate presence of the video camera, was originally meant to be used to estimate the orientation and velocity of the gimbal but became eventually only the unit that calculates and controls the the direction of the camera. It consists of a board with three accelerometers, three gyros and a micro controller (ATmega328 16 MHz from Atmel). It receives the target GPS coordinates from the ArduPilot, calculates the desired orientation of the camera and adjusts the pan and tilt servos accordingly. The original control strategy was to only receive GPS coordinates of the plane from ArduPilot by the I2C bus and use ArduIMU-2’s own accelerometers to estimate and compensate changes in orientation and speed between these updates. It was difficult to use this strategy due to unfortunate placement of the ArduIMU-2; ArduIMU is supposed to lie horizontal with its z-axis pointing downwards. The information about the orientation is instead received from ArduIMU-1, which is leveled with the plane, through ArduPilot and ArduIMU-2. Voltage received from: - ArduPilot (5V) Signals received from: - ArduPilot - GPS coordinates of camera target; longitude and latitude in degrees∗107 , altitude in decimeters a.s.l. - GPS coordinates of the plane - orientation of the plane - speed of the plane. Signals sent to: - Pan and tilt servos Course name: Project group: Course code: Project: Control Project Laboratory UAV TSRT10 UAV E-mail: Document manager: Author’s E-mail: Document name: [email protected] Therese Kjelldahl [email protected] Technical Documentation UAV 5.2 5.2.1 19 Software Overview The basic task of the software on IMU-2 is to gather orientation and position data on the aircraft, coordinates to the target, process this information in a suitable way and adjust the pan and tilt angles accordingly. Figure 8 shows a flow diagram of how the software operates. Initialize NO Receive Event YES Save old yaw angles Update orientation Set Extrapolation variables to zero YES Receive IMU NO Update Position Set Extrapolation variables to zero Receive GPS Filter yaw angle data Calculate extrapolation variables YES Turning Reset extrapolation position NO Calculate extrapolation angles Calculate target vector Calculate servo angles Save old pan and tili angles Filter servo angles Set servos YES Receive Event NO Figure 8: Flow diagram of the IMU-2 software Section 5.2.3 contains a more detailed description of the software and it’s main functions. Course name: Project group: Course code: Project: Control Project Laboratory UAV TSRT10 UAV E-mail: Document manager: Author’s E-mail: Document name: [email protected] Therese Kjelldahl [email protected] Technical Documentation UAV 5.2.2 20 Filters and estimations To smooth the movement of the camera between the I2C and GPS updates, the code on IMU-2 was cleaned out and sped up to around 200 Hz, and a number of measures were taken: The yaw signal was filtered, since it can only be obtained in degrees represented as integers. The position of the aircraft between the GPS updates, (≈ 4Hz), was estimated, using old GPS position, heading and speed. When the aircraft is flying close to its target, 4 position updates a second would otherwise make image noticeably jerky. The Euler angles of the aircraft between updates, (≈ 40Hz), was estimated, using the last angles and the Euler backward derivative of the angles. The output angles themselves were filtered using their old values. By using these filters and estimators, the speed of the camera was affected somewhat. But since the priority was to produce a smooth, steady image, this was considered acceptable. 5.2.3 The functions in the IMU-2 software The code running on the IMU-2 is written C code developed in the open source environment Arduino. In this section a basic rundown of the various functions of the code running on the IMU-2 code is given. Initialize and definitions - In the start up of the software all global variables and parameters are defined. Also a few user settings are defines, such as what filters are to be used, what the filter constants should be, if debug messages are to be printed etc. The GPS location of the origo in the NED system, see Section 3, is also defined here. It is currently set to the model aircraft field south west of Linkı̈¿½pings Universitet, where the test flights were performed. It should be set to the vicinity of any new flight locations prior to flight. setup() - The first function to run after the definitions is the function setup(). It sets the correct in and output ports of the board, starts the I2C bus and calls the function init PWM() which initializes the timers and interrupts controlling the PWM signals to the servos. main() - This is the main loop, running at 200 Hz. It calls the functions Define ref() and Generate PanTilt(), which generates the pan and tilt angles and sets the servos accordingly. G dt is the real time of the previous main loop, used for the extrapolation of positions and angles. Course name: Project group: Course code: Project: Control Project Laboratory UAV TSRT10 UAV E-mail: Document manager: Author’s E-mail: Document name: [email protected] Therese Kjelldahl [email protected] Technical Documentation UAV 21 Receive event() - Here the data received on the I2C bus from ArduPilot is handled and stored. Data is of either two different kinds, either GPS data or IMU data: - If GPS data is received, it is first stored in lat/long in degrees times 107 , and altitude as meters above sea level times 102 . This is then converted into NED coordinates in the following way: T oRadians(Latitude −Latitude ) origo plane · R, N= 10000000 T oRadians(Longitudeplane −Longitudeorigo ) E= · R · cos (Latitudeplane ) 10000000 Altitudeplane −Altitudeorigo D= 100 where R is the mean radius of the earth. It is thereby assumed that the positional difference between plane and target is relatively small, such that sin(θ) ≈ θ is valid. Thereby it is also important to change the location of the NED origo to the vicinity of flight, set in the initial definitions in the main code. There is also a fail-safe check performed, used to prevent obviously corrupted or false (unlocked) GPS data from swinging the gimbal around at random. If any of the GPS coordinates are obviously wrong, the position of the plane is locked in latitude 15.00°, longitude 58.00°, altitude 70 meters, which is just outside of Tranı̈¿½s. If the airplane is to be used outside the region long∈ [15, 16] and lat∈ [58, 59], it is important to change the conditions in this check. Any extrapolation of position is also reset here. - If IMU data is received, it is first stored in degrees before it is converted to radians. A few adjustments to the received data is made, to represent negative angles. A simple filtering of the yaw data is performed to smooth out the whole degrees received. The filter operates as: Y awt = λ3 Y awt−3 + λ2 Y awt−2 + λ1 Y awt−1 + (1 − λ3 − λ2 − λ1 )Y awt where 0 ≤ λ1 + λ2 + λ3 <1 If a new target is set, it is sent at the end of the IMU package. It is converted to the NED system in the same way as the coordinates for the plane in the description above. Define ref() - This function calculates the target vector that decides in what direction the camera should point. The position of the air plane is extrapolated between the points where new GPS-data is received. This in order to have a smooth motion of the camera. The extrapolation is done by assuming that the plane will maintain the present speed until the next GPS-update and in that way continuously calculate new positions. Due to the fact that a straight forward motion is assumed between two updates, problem will occur if the plane is turning. To avoid this a turn detection function is implemented; if the plane turns the extrapolation stops until the plane going strait froward again. Also the roll, pan and yaw angles are extrapolated between updates and used for continuously recalculate the DCM matrix for the air plane. Finally a target vector is calculated from position for the plane and the target (see equations in section 3.0.2). Course name: Project group: Course code: Project: Control Project Laboratory UAV TSRT10 UAV E-mail: Document manager: Author’s E-mail: Document name: [email protected] Therese Kjelldahl [email protected] Technical Documentation UAV 22 Generat PanTilt() - This function calculates the reacquired angles (pan and tilt) between the air plane and the camera in order to get the camera to point at the target, or in other words calculate the servo angles. Equations for generating the angles are given above, see section 3.0.2. For the pan angle the servo and camera angle are the same but for the tilt angle the transfer between servo and camera angle are slightly non linear, to solve this a fraction of a higher order term is subtracted from the camera angle when calculating the servo angle. To get a smooth motion for the camera the angles are filtered before the function is called. The filters are constructed in such way that they put some weight on the old angle values, according to following equations. λ3 · ϕt−3 + λ2 · ϕt−2 + λ1 · ϕt−1 + (1 − λ1 − λ2 − λ3 ) · ϕ 0 ≤ λ1 + λ2 + λ3 <1 η · θt−1 + (1 − η) · θ 0 ≤ η<1 The pan angle ϕ is more noisy than the tilt angle θ. Due to this the filters are constructed in such way that ϕ depends on values from the last three samples while θ only depends on the previous. The back draw with implementing these filters are that they will cause some backlog in the movement. Since the gimbal is restricted to work in the interval ±90 degrees for ϕ and in 20 to -40 degrees for θ, constraints are put on the angles to not violate this. Another issue that can occur is when the target is located behind the plane, then the calculated angle will be around the brake point ±180 degrees. When switching between those values the gimbal will switch between it’s extremes and if it oscillates around ±180 degrees it will make the gimbal move in an uncontrollable way. To get rid of this problem a dead band is implemented from -150 to 150 degrees, if the gimbal is in this span the present output angle is set to the previous until the dead band is exceeded. set servos() - This function is called continuously throughout the main loop of the program, each call sets the servos to an increment of the calculated new value in the current step by the Generate PanTilt. It uses the desired angular position of the servos to calculate the corresponding pulse width of the PWM signal: P anP W M = (26.44 · P andegrees + 3150) T iltP W M = (32.44 · T iltdegrees + 3700) The values 3150 and 3700 are the values assigned to the signals resulting in the camera pointing level and straight ahead, and 26.44 and 32.44 are the changes in toggle counter generating a PWM change to move the camera 1°for the respective servos. 5.2.4 Modifications to original plans The original idea and the reason one ArduIMU unit was placed on the camera was to use it in two ways. The first one was the task it is originally built for, and that was to estimate the orientation of the board (=the camera), correcting for gyro drift and other errors using the GPS signals as reference. Secondly, it was to calculate the direction in which to point the camera, using excess processing capacity of the micro controller. This Course name: Project group: Course code: Project: Control Project Laboratory UAV TSRT10 UAV E-mail: Document manager: Author’s E-mail: Document name: [email protected] Therese Kjelldahl [email protected] Technical Documentation UAV 23 seemed like a fairly straightforward approach in the beginning of the project. However, it proved hard to realize for a number of reasons. Firstly, the GPS signals had to be split, in order for both IMU-1 and IMU-2 to receive continuous updates on the current position necessary for drift correction. A special cable was soldered together but instantly IMU-2 froze when it was connected, for unknown reasons. At first was sending GPS signals via the I2C bus to IMU-2 when received considered, but after a bit of study on the theory of operation of the IMU algorithm it was realized that it assumed the board was kept level in the direction of flight. Since the IMU-2 was mounted on the camera and would neither stay level nor in any particular direction, a serious revision of the IMU-2 code would have to be done to make use of it in this way. This was considered to be too time consuming and the outcome too unsure to pursue, so an alternative approach was decided on. Instead of using the gyros on IMU-2 to estimate the absolute position of the camera, orientation and position data of the aircraft is sent from IMU-1 to IMU-2, which then calculates and sets the pan and tilt angles from the plane reference system alone. Using this approach, the update frequency of the reference vector was dropped from 50 Hz, which is the loop frequency of the original DCM algorithm, to around 40 Hz which was the measured frequency at which IMU-2 received new orientation data from IMU-1. It was experimented with the possibility to use uncorrected gyro signals of IMU-2 to compensate for disturbances between IMU-1 updates, but since it meant a relatively small gain in performance (40Hz vs 50 Hz) other tasks were prioritized instead. 5.2.5 Future work Classic gyro stabilization usually means controlling the voltage output to one or more DC motors directing the camera, using a slow loop for generating the reference signal and a quicker one to correct for disturbances. See figure 9 for a diagram. In this project servos were used instead of DC motors, making the classical approach not directly applicable. Servos contain their own controller, and wants as input simply a pulse signal with the pulse width proportional to the reference angle. This makes them harder to control since only the final position of the servos, not their speed or acceleration, is influenced. The chosen method for generating the reference signal makes the user controlled pan and tilt, with separate gyro stabilization, as is discussed in the design specification unimplementable. However one could imagining generating the target coordinate based on joystick inputs, thereby producing much the same effect. Course name: Project group: Course code: Project: Control Project Laboratory UAV TSRT10 UAV E-mail: Document manager: Author’s E-mail: Document name: [email protected] Therese Kjelldahl [email protected] Technical Documentation UAV 24 Figure 9: Manual generation of reference angle Course name: Project group: Course code: Project: Control Project Laboratory UAV TSRT10 UAV E-mail: Document manager: Author’s E-mail: Document name: [email protected] Therese Kjelldahl [email protected] Technical Documentation UAV 6 6.1 25 Subsystem 3 - Simulation and software Simulation environment The simulation environment makes it possible to simulate the motion of the airplane and gimbal, as they are being controlled by an autopilot and a gimbal controller. To make it as realistic as possible and create conditions for HIL, the models are created with the same interface as the hardware. The use of the simulation environment is primary to test algorithms that are implemented in the real system. Moreover, it’s convenient to test if a given flight route and target coordinate will be possible to film or if constraints will make it impossible. The simulation environment of the UAV with stabilized camera consists of Matlab scripts that use object oriented programming. There exists a model for the airplane, autopilot, gimbal and gimbal controller and for each model there exists one superclass and one subclass. The superclass is used as a basis for the creation of more specifically designed classes, that is, subclasses. To call a method in a class, an object, or instance of a class, must be created. These operations are done in the file Simulation of UAV with stabilized camera.m, which is the file the user runs when executing the simulation. Here the user also sets waypoint and target coordinates or uses the predefined ones, given in latitude, longitude, altitude format. In figure 10 you schematically see the structure and the communication between the models. The autopilot sets control signals, which affects the airplane’s states. The generated states are input to the gimbal controller, which controls the gimbal. How the camera is pointed as the UAV flies its route is then visualized in plots. Figure 10: Model structure 6.1.1 Description of the models In this section all the models are described more detailed. Also, an analysis of the models in a broader perspective is carried out. 6.1.2 Airplane and autopilot model The state vector for the airplane model has eight states. They are presented in table 6.1.2 below: Course name: Project group: Course code: Project: Control Project Laboratory UAV TSRT10 UAV E-mail: Document manager: Author’s E-mail: Document name: [email protected] Therese Kjelldahl [email protected] Technical Documentation UAV State x1 x2 x3 x4 x5 x6 x7 x8 Represents Rudder deflection Elevator deflection Roll Pitch Yaw Latitude Longitude Altitude Unit degrees degrees degrees degrees degrees degrees degrees meters 26 Constraints -45 to 45 -21 to 21 -180 to 180 -180 to 180 0 to 360 -90 to 90 -180 to 180 inf Table 1: Airplane states The autopilot sets two control signals given in table 6.1.2 below: Input signal urud uelev Represents Rudder deflection Elevator deflection Constraints -90 to 90 -40 to 40 Table 2: Input signals airplane The airplane model is a simplified model of reality. However it takes important features into consideration, such as banking, limits in turning radius and limits in elevating performance. The airplane receives control signals from the autopilot. The control signals correspond to desired deflection of the aerodynamic control surfaces; elevator and rudder. Since the control signals aren’t immediately performed in reality, dynamics between control signal received from the autopilot and actual control surface deflection has been modelled. The dynamics were approximated with a first order linear system with low-pass characteristics. The rudder and elevator deflection determine the Euler angles roll, pitch and yaw of the airplane. States x3, x4, x5 simulates ArduIMU-1 and x6, x7, x8 simulates the GPS. The connection between control surface deflection and Euler angles are modelled linearly. However, this approximation is good enough to get a model with behaviour similar to the reality. The calculations of the next position and orientation are performed in a local Cartesian coordinate system, which is defined from a tangential plane to the earth, with its axis oriented north, east and down. The airplane position is thereafter transformed to latitude, longitude, altitude coordinates. The position and Euler angles are input to the autopilot. Given the condition of constant speed and that the UAV is already flying the autopilot calculates rudder and elevator and control signals. The autopilot sets the deflection of the airplane’s two control surfaces, rudder and elevator, by means of using a PI-regulator. The P and I parts can be set by the user when creating the autopilot object. The autopilot works principally as the Ardupilot, that is, calculates the difference between its heading and where it should head to reach the target and transforms this into desired deflections of the rudder and elevator. Course name: Project group: Course code: Project: Control Project Laboratory UAV TSRT10 UAV E-mail: Document manager: Author’s E-mail: Document name: [email protected] Therese Kjelldahl [email protected] Technical Documentation UAV 27 (a) UAV flight route (b) Control signals Figure 11: Upper: The UAV flies three circles defined from 24 waypoints. The black triangle shows where the autonomous flight starts. The blue line shows the flight route and the red stars are waypoints. Under: Control signals calculated by the autopilot when flying the same route. Figure 6.1.2 shows the airplane’s flight route while passing by 24 waypoints formed in three circles. The maximum allowed distance between airplane and waypoint is set to 10 meters and the speed is set to 15 m/s. Also, the control signals are presented below in figure 11(b). 6.1.3 Gimbal and gimbal controller model The state vector for the gimbal model is presented in table 6.1.3: The gimbal controller calculates reference angles given in table below: Course name: Project group: Course code: Project: Control Project Laboratory UAV TSRT10 UAV E-mail: Document manager: Author’s E-mail: Document name: [email protected] Therese Kjelldahl [email protected] Technical Documentation UAV State x1 x2 Represents Pan angle Tilt angle Unit Degrees Degrees 28 Constraints -90 to 90 -40 to 40 Table 3: Gimbal states Input signal upan utilt Represents Reference pan angle Reference tilt angle Constraints -90 to 90 -40 to 40 Table 4: Input signals gimbal The dynamics of the gimbal is approximated as a first order filter that takes the sample time into consideration. The rate of the servos has been determined from measurements of our own. x1 and x2 together with the airplane orientation simulates the ArduIMU-2. When the flight route and Euler angles has been generated they are used by the gimbal controller as input matrices to calculate reference signals, which tell where the gimbal should be pointed at every given position. The reference signals determine the pan and tilt angles and the modelled controller uses the same algorithms that operates in reality to calculate these, see section 5.2.3 for description of this. In addition to this the algorithms in the modelled controller can also handle a moving target. However, the airplane will only follow the predefined waypoints. When choosing the same set of waypoints and a target according to figure 11(a) the following plot was obtained. Course name: Project group: Course code: Project: Control Project Laboratory UAV TSRT10 UAV E-mail: Document manager: Author’s E-mail: Document name: [email protected] Therese Kjelldahl [email protected] Technical Documentation UAV 29 Figure 12: Camera mounted on UAV locked on a target. The black line represents the flight route and the red stars are the waypoints. The black cross on ground is the target. Red line: camera vector, i.e the orientation of the gimbal. Blue line: vector between airplane and target, which tell how the camera should be pointed. Figure 12 shows the airplane’s flight route while passing by the same flight route as in figure 11(a). In this particular simulation the gimbal constraints have been relaxed a bit in order to handle this flight route. At first, the gimbal is oriented in its initial state and therefore pointing wrong. Later it coincides with the blue line, which tells that the gimbal is correctly pointed and locks the focus well on the target. If zoomed towards the target you see that the gimbal is constantly pointing slightly wrong, due to limited servo rate, but this difference is so small it’s negligible. 6.1.4 Analysis of models The level of complexity needed to create a simple, yet realistic 3D airplane model is somewhat a matter of difficulty. When making a simple model the equations describing the motion need to be determined by the creators, unlike when using Newton’s laws of motion where the airplane’s behaviour follows automatically from the equations. This requires a good knowledge about airplane motion that can be used pragmatically. After the first approach, which modelled dynamics more ambitiously, was discarded we decided to further simplify the model in order to get a simple and intuitive model, nevertheless with dynamics. From the customer, a more sophisticated model than that wasn’t required, but internally the more advanced model, the better HIL could be performed. It’s interesting to analyze if a more advanced model, derived straight from Newton’s laws, could have been possible to create not using enormously more time. However, that would have required Course name: Project group: Course code: Project: Control Project Laboratory UAV TSRT10 UAV E-mail: Document manager: Author’s E-mail: Document name: [email protected] Therese Kjelldahl [email protected] Technical Documentation UAV 30 data collection in order to determine parameters, which wasn’t possible in the very early stage of the project. Anyhow, an attempt to accomplish HIL was carried out, but due to communication problems between the model and ArduPilot together with lack of time this wasn’t accomplished. If HIL would have been used, it could have helped tuning and testing the ArduPilot without having to do real tests. One could argue that the gimbal controller more rightfully should be called reference angle generator since that’s what it actually does today. However, the name gimbal controller has been kept for two reasons. First, this specific subclass happened to be more of a reference generator but future development might lead to an advanced controller, hence keeping the name could be appropriate. Second, by custom, it has been called gimbal controller since that start of the project and for simplicity reasons it’s easier to keep it. 6.2 Path generation There are two algorithms to generate flight paths: 1. In Matlab prior to flight, stationary target 2. Online path generation aimed for moving target The first algorithm can be used, and is attended, for several targets, although not tested for more than one. The second one is not tested because of problems with the XBee communication. 6.2.1 Stationary target This algorithm basically calculates waypoints on circles or parts of circles around each target in a smart way. The algorithm uses a text-file containing coordinates in Latitude, Longitude and Altitude (henceforth referred to as LLA) for the targets. The text-file is preferably generated in ConfigTool as described in the user-manual in section 3.3 Waypoints. The text-file is saved in the same folder as the path generating scripts and is named targets.txt. All the user has to do is calling the function function [] = pathgen nonmovingtarget(Radius,Part,Alt,NoWP) where Radius is the desired distance to the target when flying around it, Part is the quota of a circle to be flown around each target (Part = 1 equals flying one lap), Alt is the altitude for the generated path, NoWP is the number of waypoints to be generated. A brief explanation of the function follows. First the following function is called function [HOME latlongalt , TARGET latlongalt, HOME xyz, TARGET xyz, first row] = get targets from configtool It reads the text-file targets.txt and returns the vectors HOME latlongalt, TARGET latlongalt, HOME xyz, TARGET xyz and first row. HOME latlongalt is the coordinates for the home-position in LLA coordinates and HOME xyz in Earth Centred Earth Fixed coordinates (henceforth ECEF) , make sure you set this to the coordinate where you intend to start flying. TARGET latlongalt and TARGET xyz are vectors containing all target Course name: Project group: Course code: Project: Control Project Laboratory UAV TSRT10 UAV E-mail: Document manager: Author’s E-mail: Document name: [email protected] Therese Kjelldahl [email protected] Technical Documentation UAV 31 coordinates in the order the user specified them when creating the text-file. first row is the first row in targets.txt, used later to generate a text-file compatible with ConfigTool. The next step is to sort all the targets in a smart way to avoid flying an unnecessarily long route. This is solved through a TSP heuristics, the nearest-neighbour algorithm. By first calculating the target closest to home for k = 1:total target HOMEtoFIRST(k)=norm(HOME xyz-TARGET xyz(k,:)); end for k = 1:total target if norm(HOME xyz-TARGET xyz(k,:))==min(HOMEtoFIRST) ORDER latlongalt(1,:)=TARGET latlongalt(k,:); first target index=k; end end and then calculating all the distances between the targets for k = 1:total target for l = 1:total target if k6=l DISTANCES(k,l)=norm(TARGET xyz(k,:)-TARGET xyz(l,:)); end end end the targets can be sorted ind=2; tmp=first target index; while ind ≤ total target m = find(DISTANCES(tmp,:)==min(DISTANCES(tmp,:))); ORDER latlongalt(ind,:)=TARGET latlongalt(m,:); DISTANCES(tmp,:)=stort tal; DISTANCES(:,tmp)=stort tal; tmp = m; ind=ind+1; end After sorting, the targets are converted to targets in a local metric cartesian coordinate system with the home coordinate as origin for k = 1:total target ORDER NED(k,1) = (ORDER latlongalt(k,1) - HOME latlongalt(1,1)) * r; ORDER NED(k,2) = (ORDER latlongalt(k,2) - HOME latlongalt(1,2)) * r bar; ORDER NED(k,3) = (ORDER latlongalt(k,3)); end where r is the weighted earth radius calculated based on the position of the home coordinate and r bar is the length of the vector between home and ECEF-orgio projected in the X,Y-plane. After that, a starting point is chosen for each target-circle using the function function [x, y, z] = find tangent(x P, y P, z P, x T, y T, R, v) Course name: Project group: Course code: Project: Control Project Laboratory UAV TSRT10 UAV E-mail: Document manager: Author’s E-mail: Document name: [email protected] Therese Kjelldahl [email protected] Technical Documentation UAV 32 (this function works the same way the function pathgen described later does) returning a coordinate for the optimal tangent point on the target circle (with radius R) calculated taking into consideration the ”current position” and ”velocity” of the airplane (these vectors are simply the last waypoint on the preceding target circle and the difference between the two last waypoints). Starting from this coordinate a (part of a) circle is calculated around the target. This part of the code is a bit to long to be included in the text, see pathgen nonmovingtarget, lines 72-177. The resulting vector WAYPOINTS latlongalt contains a flight path with (parts of) circles around each target, with optimal starting points for each circle. The vector is then written to a text-file write wp to textfile(WAYPOINTS latlongalt,'nonmovingtarget.txt') ready to be loaded to ConfigTool and written to ArduPilot. An example: First, targets are selected in ConfigTool, as depicted in figure 13. Figure 13: Selected targets After running pathgen nonmovingtarget(50,1,75,45) the result looks as depicted in figure 14 in ConfigTool. Course name: Project group: Course code: Project: Control Project Laboratory UAV TSRT10 UAV E-mail: Document manager: Author’s E-mail: Document name: [email protected] Therese Kjelldahl [email protected] Technical Documentation UAV 33 Figure 14: Generated flight path Simulation of this flight path generates output as depicted in figure 15. Course name: Project group: Course code: Project: Control Project Laboratory UAV TSRT10 UAV E-mail: Document manager: Author’s E-mail: Document name: [email protected] Therese Kjelldahl [email protected] Technical Documentation UAV 34 Figure 15: Simulated flight path If instead running pathgen nonmovingtarget(50,1/2,75,25) the result looks like in figure 16. Course name: Project group: Course code: Project: Control Project Laboratory UAV TSRT10 UAV E-mail: Document manager: Author’s E-mail: Document name: [email protected] Therese Kjelldahl [email protected] Technical Documentation UAV 35 Figure 16: Generated flight path 6.2.2 Moving target Implementation of the algorithm for a moving target depends on a functioning communication from the ground station to ArduPilot, so this is more of a prototype to be further developed. The function used is function [x w, y w, z w] = pathgen(x P, y P, z P, x T, y T, R, v, alt) with input arguments x P, y P, z P that is the airplane’s current position obtained from GPS-data sent from ArduPilot, x T, y T that are the target’s current position, R that is the desired horizontal distance to target, v is the airplane’s velocity vector and alt is the desired altitude. The input, and output coordinates to this function are in a metric cartesian coordinate system and the transformation to LLA can either be handled outside the function or be added as in pathgen nonmovingtarget. The algorithm handles the two cases 1. Current position closer to target than the horizontal distance R 2. Current position further away from target than the horizontal distance R In the case where the airplane’s current position is closer to the target than the horizontal distance R (or equivalently, when it is inside the circle with the target as centre and radius R), the waypoint for the airplane to fly against is set in the same direction as Course name: Project group: Course code: Project: Control Project Laboratory UAV TSRT10 UAV E-mail: Document manager: Author’s E-mail: Document name: [email protected] Therese Kjelldahl [email protected] Technical Documentation UAV 36 current direction. That way, it will eventually reach the circle’s edge and case 2 is then valid. x = x P + v bar(1); y = y P + v bar(2); z = alt; In the other case, when the airplane is further away than desired, the waypoint is simply set in a direction towards the tangent point to a circle with radius R around the target. There are always two tangent points to the circle from any given point, so the best point is selected as the one that requires the least change in direction for the airplane. To avoid the situation where the airplane hits the target, it is always set at a distance the airplane will never reach. So, first of all the angles to all possible tangent points are calculated t1 = acos((-R * (x T - x P) + (y T - y P) * sqrt((x T - x P)ˆ2 + (y T - y P)ˆ2 - Rˆ2))/((x T - x P)ˆ2 + (y T - y P)ˆ2)), t2 = acos((-R * (x T - x P) - (y T - y P) * sqrt((x T - x P)ˆ2 + (y T - y P)ˆ2 - Rˆ2))/((x T - x P)ˆ2 + (y T - y P)ˆ2)); t3 = - acos((-R * (x T - x P) + (y T - y P) * sqrt((x T - x P)ˆ2 (y T - y P)ˆ2 - Rˆ2))/((x T - x P)ˆ2 + (y T - y P)ˆ2)); t4 = - acos((-R * (x T - x P) - (y T - y P) * sqrt((x T - x P)ˆ2 (y T - y P)ˆ2 - Rˆ2))/((x T-x P)ˆ2+(y T-y P)ˆ2)); ... ... + ... + ... and the x and y coordinates for the points are calculated for t1, t2, t3 and t4 x = x T + R * cos(t); y = y T + R * sin(t); The vectors from current position to the points defined by t1, t2, t3 and t4 are obtained by X = [x-x P;y-y P]/norm([x-x P;y-y P]); and the angle between the direction vector and the tangent vectors are calculated theta = acos(dot(v bar, X)); Depending on the relative position of the target to current position, the best tangent point is chosen. This is one case where current position is in the right hand plane relative the target if x P ≥ x T if abs(theta1) x = x1; y = y1; else x = x4; y = y4; end end ≤ abs(theta4) z = alt; Course name: Project group: Course code: Project: Control Project Laboratory UAV TSRT10 UAV E-mail: Document manager: Author’s E-mail: Document name: [email protected] Therese Kjelldahl [email protected] Technical Documentation UAV 37 After saving the correct tangent point in x and y, the waypoint is set in the tangent point direction on a distance of a factor times the velocity. This factor should be changed depending on the updating frequency of GPS-data in such a way the airplane never risks to reach the waypoint. waypointdirection=[x-x P,y-y P,z-z P]/norm([x-x P,y-y P,z-z P]); xyz w=waypointdirection*norm(v)*1.5+[x y z]; x w=xyz w(1); y w=xyz w(2); z w=xyz w(3); A simulated snapshot of the generated output is depicted in figure 17 Figure 17: Simulated pathgen output This algorithm is believed to work for all possible cases for velocities and direction changes of the target. If the target moves slower than the stall speed of the airplane, the airplane should start circle around the target, and if the target moves faster than the stall speed, the airplane should be able to fly on a straight course following it. Course name: Project group: Course code: Project: Control Project Laboratory UAV TSRT10 UAV E-mail: Document manager: Author’s E-mail: Document name: [email protected] Therese Kjelldahl [email protected] Technical Documentation UAV 7 38 Subsystem 4 - Video 7.1 7.1.1 Hardware Overview The video equipment consists of small 12 V analog video camera, a wireless video transmitter and a video receiver with an antenna. A pair of VR-glasses or computer with a USB video adapter is used to view what the camera is filming. 7.1.2 Video camera The video camera is a simple 12 V analog video camera mounted on the gimbal, Figure 18. It produces a constant composite video stream to the video transmitter. Voltage received from: - Voltage regulator (11.1 V) Signals sent to: - Video transmitter (composite video) 7.1.3 Video transmitter The video transmitter is a wireless analogue transmitter used to transmit the video stream from the camera to the video receiver on the ground. It is mounted with Velcro on starboard side of the aircraft to prevent interference from other components, Figure 18 Voltage received from: - Voltage regulator (11.1 V) Signal sent to: - Video receiver on the ground Course name: Project group: Course code: Project: Control Project Laboratory UAV TSRT10 UAV E-mail: Document manager: Author’s E-mail: Document name: [email protected] Therese Kjelldahl [email protected] Technical Documentation UAV 39 Figure 18: Camera and video transmitter mounted on the aircraft 7.1.4 Video antenna The Video antenna is mounted on the lid of the ground station briefcase and receives video signal from the video transmitter. 7.1.5 Video receiver The video receiver gets the signal from the video transmitter using the antenna. The signal is then forwarded to the VR-glasses or a computer through ordinary RCA cables. The receiver gets its power from a 12 V battery. Figure 19. Voltage received from: - 12 V Battery Signal received from: - Video transmitter using the antenna Signal sent to: - VR-glasses or computer through RCA cables. Course name: Project group: Course code: Project: Control Project Laboratory UAV TSRT10 UAV E-mail: Document manager: Author’s E-mail: Document name: [email protected] Therese Kjelldahl [email protected] Technical Documentation UAV 7.1.6 40 VR-glasses The glasses is a pair of virtual reality glasses from iTheatre. It receives signal from the video receiver and shows the image on its two small video screens. Figure 19. Voltage received from: - Its own 5 V battery (charged with USB) Signal received from: - Video receiver through RCA cable. 7.1.7 USB video adapter The Adapter is used to convert the composite video signal to a digital signal that can be processed with a computer. Figure 19. Signal received from: - Video receiver through RCA cable. Voltage received/Signal sent to: - A computer through a USB cable. Figure 19: Camera and video transmitter mounted on the aircraft Course name: Project group: Course code: Project: Control Project Laboratory UAV TSRT10 UAV E-mail: Document manager: Author’s E-mail: Document name: [email protected] Therese Kjelldahl [email protected] Technical Documentation UAV 7.2 41 Software The video stream from the camera is recorded on a computer with VLC media player. The recordings is however uncompressed and demands quite a lot of free space on the computer’s hard drive. Course name: Project group: Course code: Project: Control Project Laboratory UAV TSRT10 UAV E-mail: Document manager: Author’s E-mail: Document name: [email protected] Therese Kjelldahl [email protected] Technical Documentation UAV 8 42 Communication 8.1 I2C To be able so send data we decided to use I2C communication between the ArduPilot, ArduIMU-1 and ArduIMU-2. The code uses the Arduino Wire library and replaces the original serial communication between the units. There is some examples on how to implement I2C-communication in the Arduino (0020) program under File - Examples Wire. The I2C communication pins and adresses of the different units is described below: - ArduPilot Since the ArduPilot is the master of the I2C bus it has no adress. ArduPilot has it’s SDA (data line) on analog input pin 4, and the SCL (clock line) is on analog input pin 5. - ArduIMU-1 The ArduIMU-1 is a slave and has been given the adress 2 on the I2C bus. The SDA (data line) and SCL (clock line) pins is marked with ”SDA” and ”SCL” on the bottom side of the ArduIMU board. - ArduIMU-2 The ArduIMU-2 is a slave and has been given the adress 3 on the I2C bus. The SDA (data line) and SCL (clock line) pins is marked with ”SDA” and ”SCL” on the bottom side of the ArduIMU board. The SDA pins on these units are connected to each other and the same is true for the SCL pins. Since the ArduPilot is the master, it is responsible of the traffic on the I2C bus. It is requesting data from ArduIMU-1 frequently and if there is some new data available, the slave, in this case ArduIMU-1 takes over the SCL clock wire and sends the data over the data wire. If there is no new data available, the response is just a stop and the transfer is terminated. The ArduPilot then decides the data type, by reading byte number 6 in the received message. We have perserved the original DIYd packet coding. The first bytes consists of ”DIYd” in ASCII and is followed by length of the payload and packet type. Then the payload in the same number of bytes as the length byte and at the end is two checksum bytes. One is a sum and the other is another sum summing the old sum with the current sum for each byte. We have two types of packets from ArduIMU-1, either GPS or IMU data. Depending on the data type, different data is send to ArduIMU-2. If the data type is a GPS packet, ArduPilot send it directly to ArduIMU-2 and of course use the data for navigation. If the data type is IMU, ArduPilot first modified the data to include target coordinates before the data is sent to ArduIMU-2. The reason of this is that we had problems with I2C-packet longer than 32 bytes and since the IMU data packet is only 14 bytes, we included 10 bytes for our target data with the IMU-data instead of GPS data which would have been the obvious choice. The I2C/wire library is easy to use in arduino and the modified code for master and clients can be read in Appendix. The data is the same that is originally sent over the serial port. 8.2 XBee To make real-time telemetry possible XBee modules are needed to send flight data from the airplane to Ground Station. A transmitter is placed on the airplane and a receiver is Course name: Project group: Course code: Project: Control Project Laboratory UAV TSRT10 UAV E-mail: Document manager: Author’s E-mail: Document name: [email protected] Therese Kjelldahl [email protected] Technical Documentation UAV 43 placed in the Ground Station bag. The XBee data cable needs to be unplugged before the power is shut down, otherwise it will not work until it is re-flashed. The same procedure is required on start up. Only the power cable should be connected on start up, and then the data cable after the XBee board is powered up. If everything is working and ArduPilot is sending data to the XBee, the orange LED is lit a short while for each message. If the ground station XBee receives this, three green lights will be lit for a few seconds after last message. If no message is obtained, the XBee will fall back to power save mode, with only the red LED flashing. If the XBee stops working, a re-flash is needed. This is done by the X-CTU software from maxstream. First, choose COM port under ”PC settings”. Under the ”Modem Configuration”-tab, check ”Always update firmware” and press Restore. If this is not working, a hot flash might work. Follow the instructions above, but wait until after the Restore button is pressed and then put the XBee in its socket. This way, the serial port block is overridden and the flash is more likely to succeed. 8.2.1 Problems Our ambition was to be able to send wireless data to the airplane during flight to change target coordinates for the gimbal, change waypoints and perform manual steering of the gimbal. This was not successful at all. We didn’t manage to send data through the Xbee into the plane without data corruption. Sometimes we were able to send some individual chars but never more than a few before corruption or even losses occured. It worked fine when we used a serial cable and sent data from the ground station but not through the Xbee which is supposed to be invisible to the user. We had som luck and got it working with lowered voltage to around 4.7V instead of 5.0V one time but this was not repeatable and we gave up trying to send data to the plane. Course name: Project group: Course code: Project: Control Project Laboratory UAV TSRT10 UAV E-mail: Document manager: Author’s E-mail: Document name: [email protected] Therese Kjelldahl [email protected] Technical Documentation UAV 9 44 Ground Control Station We chose ArduPilot GCS for our flight logging and flight visualization needs. Since the program is made in LabView, the code is hard to display in a perspicuous way in a report. On the other hand, since it’s graphically easy to overview in LabView there shouldn’t be any problems to understand the code. We’ve only made two small changes to the original code, which will be covered below. Figure 20: The GCS running The GCS receives data from the UAV through Xbee communication and interprets this as strings sent through a serial connection. It has two different loops running, one for live visualization and one for logging. This is because we want the live feed to run continuously and have prio over the logging which isn’t as time dependent, as long as it gets done in the end. The GCS uses Google Earth to display our position on a map, and logs the data in both .txt files and .kml files which is used by Google Earth. Depending on the prefix of the string received, the GCS uses different methods to split up the data for displaying and logging purposes. If we take a look at the switch-case for the display loop in figure 21 we see that prefix ”!!!” means GPS-data. The next step is to reformat and forward the number after ”LAT:”, ”LON:” etc. to display on the front page of GCS. The GCS also has a display window for ”unidentified messages” such as waypoint error or checksum error. The loop for the logging works in a similar way. The only two changes we’ve made are that we’ve also chosen to display the output for the Course name: Project group: Course code: Project: Control Project Laboratory UAV TSRT10 UAV E-mail: Document manager: Author’s E-mail: Document name: [email protected] Therese Kjelldahl [email protected] Technical Documentation UAV 45 rudders as a check that everything is working ok, and also the way bearing and course over ground are displayed. Since our version of ArduPilot had to calculate course over ground as ranging from -180 to 180 degrees but still chose to calculate bearing as ranging from 0 to 360 these couldn’t be displayed in the same window. ArduPilot wanted the values to be defined this way, so we rearranged bearing so that when it’s sent down to the GCS it’s also ranging from -180 to 180 degrees, and changed the display to vary in that range. Course name: Project group: Course code: Project: Control Project Laboratory UAV TSRT10 UAV E-mail: Document manager: Author’s E-mail: Document name: [email protected] Therese Kjelldahl [email protected] Technical Documentation UAV 46 Figure 21: GPS case in display loop Course name: Project group: Course code: Project: Control Project Laboratory UAV TSRT10 UAV E-mail: Document manager: Author’s E-mail: Document name: [email protected] Therese Kjelldahl [email protected] Technical Documentation UAV 47 Appendix A - Wiring diagram Figure 22: Wiring diagram Course name: Project group: Course code: Project: Control Project Laboratory UAV TSRT10 UAV E-mail: Document manager: Author’s E-mail: Document name: [email protected] Therese Kjelldahl [email protected] Technical Documentation UAV 48 Appendix B - I2C code Master - ArduPilot 1 2 3 4 5 6 7 8 9 10 11 12 13 14 15 16 17 18 19 20 21 22 23 24 25 26 27 28 29 30 31 32 33 34 35 36 37 38 # include < Wire .h > Wire . begin (); // Master unit = no ID number void loop () { Wire . requestFrom (2 , 27); // Master while ( Wire . available ()) { int t =27 - Wire . available (); byte data_byte = Wire . receive (); data [ t ] = data_byte ; } switch ( data [5]){ case 0 x03 : // GPS Wire . beg inTra nsmiss ion (3); // Send data to adress ArduIMU - 2 Wire . send ( imu_gps_data ,27); // length =27 Wire . endTransmission (); decode_gps (); // Decode the gps data for navigation use break ; } case 0 x02 : // IMU // Insert the camera target GPS coordinates in the vector data [14] = lng_target &0 xFF ; data [15] = ( lng_target > >8)&0 xFF ; data [16] = ( lng_target > >16)&0 xFF ; data [17] = ( lng_target > >24)&0 xFF ; data [18] = lat_target &0 xFF ; data [19] = ( lat_target > >8)&0 xFF ; data [20] = ( lat_target > >16)&0 xFF ; data [21] = ( lat_target > >24)&0 xFF ; data [22] = alt_target &0 xFF ; data [23] = ( alt_target > >8)&0 xFF ; data [24] = ground_speed &0 xFF ; data [25] = ( ground_speed > >8)&0 xFF ; // Send data to ArduIMU - 2 Wire . be ginTra nsmiss ion (3); Wire . send ( data ,26); Wire . endTransmission (); } Course name: Project group: Course code: Project: Control Project Laboratory UAV TSRT10 UAV E-mail: Document manager: Author’s E-mail: Document name: [email protected] Therese Kjelldahl [email protected] Technical Documentation UAV 49 Client ArduIMU-1 1 2 3 4 5 6 7 8 9 10 11 12 13 14 15 16 17 18 19 20 21 22 23 24 25 26 27 28 # include < Wire .h > void setup () { Wire . begin (2); Wire . onRequest ( requestEvent ); append_vector [0]=0 x44 ; // ASCII - D append_vector [1]=0 x49 ; // ASCII - I append_vector [2]=0 x59 ; // ASCII - Y append_vector [3]=0 x64 ; // ASCII - d } void requestEvent () { if ( IMU_buffer [1]==0 x03 && ny_gps ==1) { ny_gps =0; for ( int i =4; i <27; i ++) { append_vector [ i ]= IMU_buffer [ i - 4]; } Wire . send ( append_vector ,27); } else if ( IMU_buffer [1]==0 x02 && ny_imu == 1) { ny_imu =0; for ( int i =4; i <14; i ++) { append_vector [ i ]= IMU_buffer [ i - 4]; } Wire . send ( append_vector ,14); } } Course name: Project group: Course code: Project: Control Project Laboratory UAV TSRT10 UAV E-mail: Document manager: Author’s E-mail: Document name: [email protected] Therese Kjelldahl [email protected] Technical Documentation UAV 50 Client ArduIMU-2 1 2 3 4 5 6 7 8 9 10 11 12 13 14 15 16 17 18 19 20 21 22 23 24 25 26 27 28 29 30 31 32 33 34 35 36 37 38 39 40 41 42 43 44 45 46 47 48 49 # include < Wire .h > void setup () { Wire . begin (3); // join i2c bus with address #3 Wire . onReceive ( receiveEvent ); } void receiveEvent ( int howMany ) { int plats = 0; while ( Wire . available ()) { byte test = Wire . receive (); imu_data [ plats ] = test ; plats ++; } switch ( imu_data [5]) { case 0 x03 : // GPS temp_lon = imu_data [9]*16777216+ imu_data [8]*65536 + imu_data [7]*256+ imu_data [6]; temp_lat = imu_data [13]*16777216+ imu_data [12]*65536 + imu_data [11]*256+ imu_data [10]; temp_alt = imu_data [15]*256+ imu_data [14]; temp_lon = constrain ( temp_lon ,150000000 ,160000000); temp_lat = constrain ( temp_lat ,580000000 ,590000000); XYZ_plane_NED [0]= ToRad (( temp_lat - origo [0])/10000000) *6363880; XYZ_plane_NED [1]= ToRad (( temp_lon - origo [1])/10000000) *3335473; XYZ_plane_NED [2]= - ( temp_alt - origo [2])/100; dx =0; dy =0; break ; case 0 x02 : roll_plane = imu_data [7]*256+ imu_data [6]; if ( roll_plane >32778) { roll_plane = roll_plane - 65536; } roll_plane = ToRad ( roll_plane /100); pitch_plane = imu_data [9]*256+ imu_data [8]; if ( pitch_plane >32778) { pitch_plane = pitch_plane - 65536; } pitch_plane = ToRad ( pitch_plane /100); yaw_plane = ToRad (( imu_data [11]*256+ imu_data [10])/100); target_lon = imu_data [17]*16777216+ imu_data [16]*65536 Course name: Project group: Course code: Project: Control Project Laboratory UAV TSRT10 UAV E-mail: Document manager: Author’s E-mail: Document name: [email protected] Therese Kjelldahl [email protected] Technical Documentation UAV 50 51 52 53 54 55 56 57 58 59 60 61 62 63 64 65 66 67 68 69 70 71 72 73 74 75 76 77 51 + imu_data [15]*256+ imu_data [14]; target_lat = imu_data [21]*16777216+ imu_data [20]*65536 + imu_data [19]*256+ imu_data [18]; target_alt = imu_data [23]*256+ imu_data [22]; ground_speed = ( imu_data [25]*256+ imu_data [24])/100; XYZ_target_NED [0]= ToRad (( target_lat - origo [0])/10000000) *6363880; XYZ_target_NED [1]= ToRad (( target_lon - origo [1])/10000000) *3335473; XYZ_target_NED [2]= - ( target_alt - origo [2])/100; DCM_Matrix_flyg [0][0]= cos ( pitch_plane )* cos ( yaw_plane ); DCM_Matrix_flyg [0][1]= sin ( roll_plane )* sin ( pitch_plane ) * cos ( yaw_plane ) - cos ( roll_plane )* sin ( yaw_plane ); DCM_Matrix_flyg [0][2]= cos ( roll_plane )* sin ( pitch_plane ) * cos ( yaw_plane )+ sin ( roll_plane )* sin ( yaw_plane ); DCM_Matrix_flyg [1][0]= cos ( pitch_plane )* sin ( yaw_plane ); DCM_Matrix_flyg [1][1]= sin ( roll_plane )* sin ( pitch_plane ) * sin ( yaw_plane )+ cos ( roll_plane )* cos ( yaw_plane ); DCM_Matrix_flyg [1][2]= cos ( roll_plane )* sin ( pitch_plane ) * sin ( yaw_plane ) - sin ( roll_plane )* cos ( yaw_plane ); DCM_Matrix_flyg [2][0]= - sin ( pitch_plane ); DCM_Matrix_flyg [2][1]= sin ( roll_plane )* cos ( pitch_plane ); DCM_Matrix_flyg [2][2]= cos ( roll_plane )* cos ( pitch_plane ); break ; } } Course name: Project group: Course code: Project: Control Project Laboratory UAV TSRT10 UAV E-mail: Document manager: Author’s E-mail: Document name: [email protected] Therese Kjelldahl [email protected] Technical Documentation