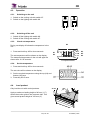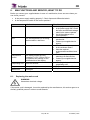
1
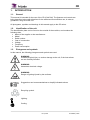
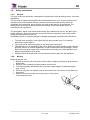
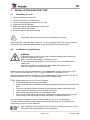
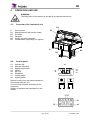
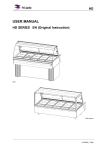
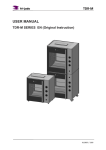
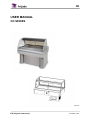
CD USER MANUAL CD SERIES CD with pedestal CD Square EN (Original Instruction) 9123949 / 1302 CD KEEP THIS USER MANUAL FOR FUTURE USE © 2013 Fri-Jado BV, Etten-Leur, The Netherlands. We advise you to contact your supplier for the guarantee period and conditions. Further we refer to our General Terms and Conditions for Sales and Delivery that are available upon request. The manufacturer does not accept any liability for damage or injury caused by failing to adhere to these regulations or by not observing the usual caution or care in actions, operation, maintenance or repair activities, even if not explicitly described in this manual. As a result of constant commitment to improvement, it may happen that your unit deviates in detail from what is described in this manual. For this reason, the given instructions are only a guideline for the installation, use, maintenance and repair of the unit referred to in this manual. This manual has been composed with the utmost care. The manufacturer shall, however, not be held responsible for any mistakes in this manual nor for any consequences thereof. The user is allowed to copy this manual for own use. Further all rights are reserved and nothing in this manual may be reproduced and/or made public in any way. Modifications: In case of unauthorised modifications in or on the unit, every liability on the part of the manufacturer becomes null and void. EN / 2‐24 9123949 / 1302 EN / 3‐24 CD 9123949 / 1302 CD CONTENTS 1. INTRODUCTION ....................................................................................................................... 6 1.1. General ............................................................................................................................ 6 1.2. Identification of the unit ................................................................................................. 6 1.3. Pictograms and symbols .................................................................................................. 6 1.4. Safety instructions ........................................................................................................... 7 1.4.1. General ........................................................................................................................ 7 1.4.2. Moving ......................................................................................................................... 7 1.4.3. Outdoor use restrictions ............................................................................................. 8 1.4.4. Hygiene ........................................................................................................................ 8 1.5. Service and technical support ......................................................................................... 8 1.6. Storage ............................................................................................................................ 8 1.7. Disposal ........................................................................................................................... 8 2. DESCRIPTION OF THE UNIT...................................................................................................... 9 2.1. Technical description ....................................................................................................... 9 2.2. Intended use .................................................................................................................... 9 2.3. Accessories ...................................................................................................................... 9 3. INSTALLATION AND FIRST USE .............................................................................................. 10 3.1. Unpacking the unit ........................................................................................................ 10 3.2. Installation and positioning ........................................................................................... 10 3.2.1. CD .............................................................................................................................. 11 3.2.2. CD‐Square .................................................................................................................. 12 3.3. 4. First use ......................................................................................................................... 13 OPERATION AND USE ............................................................................................................ 14 4.1. Overview of the (standard) unit .................................................................................... 14 4.2. Control panel ................................................................................................................. 14 4.3. Operation ...................................................................................................................... 15 4.3.1. Switching‐on the unit ................................................................................................ 15 4.3.2. Switching‐off the unit ................................................................................................ 15 4.3.3. Check set temperature .............................................................................................. 15 4.3.4. Set the temperature .................................................................................................. 15 4.4. 5. Load product ................................................................................................................. 15 CLEANING AND MAINTENANCE ............................................................................................ 16 5.1. Maintenance schedule .................................................................................................. 16 5.2. Clean the condenser ...................................................................................................... 16 5.3. Clean the condensation evaporating unit ..................................................................... 17 6. MALFUNCTIONS AND SERVICE; WHAT TO DO ...................................................................... 18 EN / 4‐24 9123949 / 1302 CD 6.1. Replacing the mains cord .............................................................................................. 18 6.2. Replacing a lamp ........................................................................................................... 19 7. TECHNICAL SPECIFICATIONS .................................................................................................. 20 EN / 5‐24 9123949 / 1302 1. 1.1. CD INTRODUCTION General This manual is intended for the user of the CD (Cold Deli). The features and controls are being described, along with directions for the safest and most efficient use, in order to guarantee a long life of the unit. All pictograms, symbols and drawings in this manual apply to the CD series. 1.2. Identification of the unit The identification plate can be found on the outside of the machine, and contains the following data: Name of the supplier or the manufacturer Model Serial number Year of construction Voltage Frequency Power consumption 1.3. Pictograms and symbols In this manual, the following pictograms and symbols are used: WARNING Possible physical injury or serious damage to the unit, if the instructions are not carefully followed. WARNING Hazardous electrical voltage. WARNING Danger of getting injured by hot surfaces. Suggestions and recommendations to simplify indicated actions. Recycling symbol. Lighting. Cooling. EN / 6‐24 9123949 / 1302 1.4. CD Safety instructions 1.4.1. General The user of the unit will be fully responsible for abiding the locally prevailing safety- rules and regulations. The unit may be operated by qualified and authorized persons only. Anyone working on or with this unit must be familiar with the contents of this manual and carefully follow all guidelines and instructions. Never change the order of the steps to be performed. The management must instruct the personnel on the basis of this manual and follow all instructions and regulations. The pictograms, labels, instructions and warning signs attached to the unit, are part of the safety measures. They may never be covered or removed, and have to be clearly visible during the entire lifetime of the unit. Immediately repair or replace damaged or illegible pictograms, warnings and instructions. To avoid short-circuiting, never clean the unit using a water hose. For cleaning instructions, see section 5. The unit must be cleaned regularly to ensure proper functioning. This appliance is not intended for the use by persons (including children) with reduced physical, sensory or mental capabilities, or lack of experience and knowledge, unless they have been given supervision or instruction concerning use of the appliance by a person responsible for their safety. Children should be supervised to ensure that they do not play with the appliance. 1.4.2. Moving When moving the unit: 1. Before moving the unit, first switch off the mains voltage by pulling the plug from the wall socket. 2. Remove pans containing a liquid product from the unit. 3. The units equipped with wheels are not suited to pass ledges or obstacles higher than 10 mm. 4. When moving the unit, always push at the centre of the unit. Never on top. Never at the bottom. 5. Make sure that the wheels can move freely, so they never touch the power lead. EN / 7‐24 9123949 / 1302 1.4.3. CD Outdoor use restrictions To avoid short-circuiting, the units may not be used outdoors or in a rainy or very moist environment. If setting the unit up outdoors, first contact your supplier. 1.4.4. Hygiene The quality of a fresh product always depends on hygiene. • Prevent fresh raw vegetables or already prepared, cooled products from coming into contact with raw meat products to avoid transmitting salmonella. • First thoroughly clean hands and/or tools that have touched raw meat. • Immediately remove products in damaged packaging from the equipment. Clean all components that that have come into contact with products from damaged packaging 1.5. Service and technical support The electrical schematics of your unit is included. In case of malfunctions you can contact your dealer/service agent. Make sure you have the following data available: Model. Serial number. This data can be found on the identification plate. 1.6. Storage If the unit will not be used temporarily, and will be stored, follow these instructions: Clean the unit thoroughly. Wrap the unit from getting dusty. Store the unit in a dry, non-condensing environment. 1.7. Disposal Dispose of the machine, any components or lubricants removed from it safely in accordance with all local and national safety and environment requirements. EN / 8‐24 9123949 / 1302 2. 2.1. CD DESCRIPTION OF THE UNIT Technical description The refrigerated displays make use of a cooling unit in the basis and an evaporator. This evaporator has been placed in the space beneath the flat plate in the basic model or beneath the gastro norm pans. Ventilating fans lead the cold air on the upper side over the products and on the lower side along the flat plate or the gastro norm pans. PL lamps have been placed into the top part. The cooling and the lamps can be switched on separately. The electronically controlled thermostat has been pre-programmed for the correct temperature in the model you have chosen and for fully automatic defrosting. An optional automatic condensation evaporating unit evaporates the released water. The sheeting is made of stainless steel SS 304. Flat plate Depending on the model, the length of the flat plate is 964mm (38 ˝), 1298mm (51 ˝) or 1630 mm (64 1/8 ˝). Dismountable pan-frame The display area has been provided with a dismountable pan-frame in which 1/3 and behind that 1/1 gastro norm pans can be placed with a maximal depth of 65 mm (2.5˝) immediately behind the front window. Depending on the model there are either 3, 4 of 5 pans next to each other. Combinations of other sizes of gastro norm pans are possible. 2.2. Intended use The refrigerated displays have been designed solely to keep packaged products cool and to display them. Any other use will not be regarded as intended use. The manufacturer accepts no liability whatsoever for loss or injury caused by failing to strictly adhere to the safety guidelines and instructions in this manual or due to carelessness during installation, use, maintenance and repair of the unit referred to in this manual and any of its accessories. Use the unit in perfect technical condition only. 2.3. Accessories Your unit contains the following standard accessories: User manual. Pedestal base. Basic base that can be supplied on legs or wheels. 3, 4 or 5 GN pan wide. Flat plate or adjustable frame. Sliding window for service model. Condensation evaporating unit. EN / 9‐24 9123949 / 1302 3. 3.1. CD INSTALLATION AND FIRST USE Unpacking the unit 1. 2. 3. 4. 5. Remove all parts from the unit. Remove the foil from all metal parts. Remove all packaging materials from the unit. Inspect the unit for damage. Make sure that all parts that belong to the model you have ordered are present. 6. Read the manual before proceeding. All packing materials used for this unit are suited for recycling. After unpacking, check the state of the unit. In case of damage, store the packing material, and contact the transporter within fifteen working days after receiving the goods. 3.2. Installation and positioning WARNING There should be at least 1 meter (40˝) clearance between the service side and other equipment or walls. Make sure that the openings in the basis are free. Do not position the equipment at a door opening or in a ventilated area or heating unit. Place the unit flatly on a sufficiently sturdy base using a spirit level. Take the weight of the unit into account. Make sure that the ambient temperature for the self-service model is not less than 10°C (50 °F) and not more than 22°C (71.6 °F) with a maximum air humidity of 65%. Make sure that the ambient temperature for the service model is not less than 10°C (50 °F) and not more than 25°C (77 °F) with a maximum air humidity of 60%. Find a suitable place for the unit. Points of interest: The products in the unit must be well visible. Keep in mind the unit’s accessibility in case any maintenance and service work needs to be done. The user must have sufficient freedom of movement to properly operate the unit. The minimum free distance must be at least 50 mm (2˝). While positioning, keep the unit out of children’s reach. The unit has a mains plug, and must be connected to a wall socket with the proper mains voltage. The wall socket must be mounted by a certified electrician. Have a recognized installer or service centre install the unit on an existing basis. Provide a suitable discharge for the water that is released during use and cleaning if an evaporating unit has not been opted for. After installation, wait at least half an hour before switching on the unit. This in connection with the stabilization of the refrigerant. EN / 10‐24 9123949 / 1302 3.2.1. CD CD 1. Clean the inside, the removable parts and the accessories thoroughly with a cleanser and water before putting the unit into use. 2. After cleaning, wipe the unit with a cloth moistened with clean water to remove cleanser residues and then dry the entire unit. 2 2x 33 1 7 1 5 6 5 7 4 4 3. Place all (optional) parts and/or accessories. For positioning the side windows and any sliding windows, carry out steps 1 – 3. If you have chosen for a pan-frame, carry out steps 4 – 7 as well. 4. Insert the plug into the socket. 5. Switch on the unit. 6. Let the unit cool for at least half an hour before filling it with products. EN / 11‐24 9123949 / 1302 3.2.2. CD CD-Square 1. Clean the inside, the removable parts and the accessories thoroughly with a cleanser and water before putting the unit into use. 2. After cleaning, wipe the unit with a cloth moistened with clean water to remove cleanser residues and then dry the entire unit. WARNING The top window can weigh up to 25 kg (55lb). Pay attention to this weight when lifting the top window. Use the appropriate tools for lifting. 3. Place all (optional) parts and/or accessories. Start with the glass top and side glasses. Secure the side glasses with screws as indicated in the figure above. 4. Place the frame (optional) for the GN-pans in the unit. Start with the exhaust plate (1), then place the frame parts between the front and back side (2) and finish with the shortest frame parts (3). See the figure above. EN / 12‐24 9123949 / 1302 CD 5. Place the slide windows in the unit as shown in the figure above. 3.3. First use Clean the interior When using the unit for the first time, clean the interior thoroughly with soap suds. Rinse with clean water to remove soap rests. EN / 13‐24 9123949 / 1302 4. CD OPERATION AND USE WARNING The filling point for the water tray and the lift-up cap can become hot. 4.1. Overview of the (standard) unit B2 A B1 B2 B3 B4 B5 Control panel Sliding windows (self-service model) PL lamps Flat plate Cooling unit with condenser Condensation evaporating unit (option) B1 A B4 B5 4.2. A1 A2 A3 A4 A5 A6 A7 A8 Control panel A3 Indicator ON Indicator defrosting Display temperature UP key SET key DOWN key Cooling switch Lighting switch A4 A5 A6 A1 A2 When the cooling unit has been switched on, the indicator lamp A1 is lit. A2 is lit during automatic defrosting of the evaporator. Display A3 indicates the temperature in the display. A7 A8 [American Models] EN / 14‐24 9123949 / 1302 4.3. CD Operation 4.3.1. Switching-on the unit 1. Switch on the cooling unit with switch A7. 2. Switch on the lighting with switch A8. A8 A7 4.3.2. Switching-off the unit 1. Switch off the lighting with switch A8. 2. Switch off the cooling with switch A7. 4.3.3. Check set temperature A3 During use display A3 shows the temperature in the unit. 1. Press and hold key A5 for three seconds. The set temperature will be shown on the display. The measured temperature in the unit will again be shown after 10..20 seconds. 4.3.4. A4 A1 A2 A5 A6 European Models Set the temperature 1. Press and hold key A5 for three seconds. The set value will be shown on the display. 2. Set the required temperature using the top (A4) and bottom (A6) keys. 3. Press key A5 to save. American Models 4.4. Load product Only load the unit with cooled products. 40 mm Apply a maximum leading height of 40 mm (1.5˝) above the suction grid on the customer side. This gives a total product height of 100 mm (4˝). EN / 15‐24 9123949 / 1302 5. CD CLEANING AND MAINTENANCE WARNING Never use a water hose for cleaning. Water can seep into the unit through the ventilation holes of the unit. Because of hygiene aspects and optimum condition of the unit it is of utmost importance to keep a daily cleaning pattern from first use onwards. You can best remove meat residues and grease shortly after use of the unit. Optimum cleaning results are achieved by using ‘Fri-Jado Clean’. If possible, leave the unit open at night. 5.1. Maintenance schedule Item Interior Exterior Condenser Condensation evaporating unit (if present) Action Switch the unit off. Remove the products from the equipment. Put the removable parts in a large basin with hot water and soapsuds or Fri-Jado Clean. Let these parts soak overnight and clean them the next day. Clean the interior with hot soapsuds or “Fri-Jado Clean”. After cleaning, dry the interior using a clean cloth. Make sure no traces of cleanser are left behind. Clean the external side of the equipment by using a soft brush or sponge and a small quantity of hot water with a mild cleaning agent. Dry the external side with a cloth. Clean the condenser of the cooling unit to ensure its continued proper functioning. See section 5.2 for the correct way of working. Clean the condensation evaporating unit to ensure its proper functioning. See section 5.3 for the correct way of working. Frequency Daily Daily Monthly Monthly Built-in units In case of built-in units the situation is different, but cleaning the condenser and the evaporating unit remains necessary. 5.2. Clean the condenser The condenser is accessible from the service side. 1. Remove the screws from the grid on the rear side of the right-hand leg and remove the grid. 2. The condenser is found in the left-hand side wall of the leg. Carefully clean this with a vacuum cleaner and/or a soft brush. 3. Reposition the grid. EN / 16‐24 9123949 / 1302 5.3. CD Clean the condensation evaporating unit WARNING Switch off the unit and unplug it from the mains socket outlet! Switching off the unit is not enough, as the evaporating unit will still be live. WARNING The entire condensation evaporating unit is hot. Let it cool down before cleaning. The optional condensation evaporating unit is accessible from the customer side as well as from the service side. 1. Switch off the unit and unplug it from the mains socket outlet. 2. Let the evaporating unit cool down. 3. Remove the front or rear plate between the legs of the basis, if present. In order to do this, lift up the plate and move it towards you. The plate is released from its suspension points. 4. Clean the evaporating unit with hot water and vinegar. 5. Reposition the front or rear plate. EN / 17‐24 9123949 / 1302 6. CD MALFUNCTIONS AND SERVICE; WHAT TO DO Before you contact your supplier/dealer in case of a malfunction, there are some items you can check yourself: Is the power supply working properly? Check fuses and differential switch. Is the temperature switch in the correct position? Item Malfunction Unit Does not work. Unit The set temperature is not being reached within a half-hour. Unit The temperature rises too much. Temperature control The display shows the fault message E1, E27, E29 or E30 or the symbols are flashing on the left-hand side of the display. Evaporating unit Does not function. Lamp A lamp is faulty. Possible action Is the plug in the outlet? Is the power supply OK? Check the fuses and the earth leakage switch in the meter cupboard. Are all the switches in the correct position? Close the sliding doors on the service side. Contact your supplier/service agency. Check the set temperature. Is the condenser clean? Have the required environmental conditions been met? Reset the equipment by switching it on and off once. Contact your supplier/service agency. Is the plug in the outlet on the evaporating unit? Replace, see section 6.2 Mains cord Damaged Replace, see section 6.1 6.1. Replacing the mains cord WARNING Hazardous electrical voltage. If the mains cord is damaged, it must be replaced by the manufacturer, his service agent or a similarly qualified person in order to avoid hazards. EN / 18‐24 9123949 / 1302 6.2. CD Replacing a lamp WARNING Remove the power plug from the wall socket. 2 1 1 1 The lamps are found in the upper cover. They are accessible via the service side. 1. Remove the plug from the outlet. 1. Remove the sliding windows from the unit (if present). 2. Dismount the window profile by removing the screws at the bottom side of the light cover (). 3. Carefully slide the window out of the frame by moving it toward you and place it in a safe place (). 4. Remove the PL lamp by pulling it lengthwise out of the holder. Do this carefully to avoid breaking. 5. Install the new PL lamp. 6. Carefully slide the window into the frame. 7. Mount the window profile and insert the screws. 8. Place the sliding windows into the unit. EN / 19‐24 9123949 / 1302 7. CD TECHNICAL SPECIFICATIONS WARNING Consult the identification plate to get the proper specifications of the unit. The electrical data may vary from country to country European Models Dimensions Weight CD 3 CD 4 CD 5 mm mm mm 1086 1058 1307 1419 1058 1307 1730 1058 1307 mm 1440 1440 1440 kg kg kg 195 200 [195] 37 1N~ 230V 50 3.8 866 Two-pole earthed plug approx. 2.40 < 70 225 230 [220] 40 1N~ 230V 50 4.6 1068 Two-pole earthed plug approx. 2.40 < 70 265 275 [245] 44 1N~ 230V 50 5.2 1198 Two-pole earthed plug approx. 2.40 < 70 Self-service 2M2 2M2 2M2 Full service 3M1 3M1 3M1 964 608 60 1298 608 60 1630 608 60 Width Depth Height Height with basis Self-service Full service Basis Voltage Frequency Max. rated current Power to be supplied Hz A W Plug Cable length Sound pressure Product temperature class according to ISO 23953-2 Display (flat part) m dB(A) Length Width Depth mm mm mm Maximum loading mm 100 100 100 height Refrigerant: As refrigerant has been used that complies with the environmental requirements applicable at the time of manufacturing of the unit, the type and the filling weight are indicated on the cooling unit. The specific CD-Square data is within [brackets]. EN / 20‐24 9123949 / 1302 CD American Models Dimensions Weight Basis Voltage Frequency Max. rated current Power to be supplied Plug Cable length Sound pressure Product temperature class according to NSF 7 Display (flat part) Width Depth Height Height with basis Full service CD 3 CD 4 CD 5 inch inch inch 42 6/8 41 5/8 51 1/2 55 7/8 41 5/8 51 1/2 68 1/8 41 5/8 51 1/2 inch 56 3/4 56 3/4 56 3/4 lb lb 441 [430] 82 1~ 115V 60 12.6 1446 NEMA 5-20P approx. 95 < 70 507 [485] 88 1~ 115V 60 18.3 2102 NEMA 6-30P approx. 95 < 70 606 [540] 97 1~ 115V 60 20.4 2344 NEMA 6-30P approx. 95 < 70 Type I Type I Type I 38 23 7/8 2 3/8 51 23 7/8 2 3/8 64 1/8 23 7/8 2 3/8 Hz A W inch dB(A) Full Service Length Width Depth inch inch inch Maximum loading inch 4 4 4 height Refrigerant: As refrigerant has been used that complies with the environmental requirements applicable at the time of manufacturing of the unit, the type and the filling weight are indicated on the cooling unit. The specific CD-Square data is within [brackets]. EN / 21‐24 9123949 / 1302 EN / 22‐24 CD 9123949 / 1302 EN / 23‐24 CD 9123949 / 1302 CD Fri-Jado BV Oude Kerkstraat 2 4878 AA Etten-Leur The Netherlands Tel: +31 (0) 76 50 85 400 Fax: +31 (0) 76 50 85 444 EN / 24‐24 9123949 / 1302