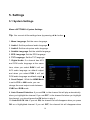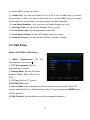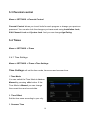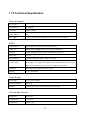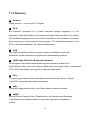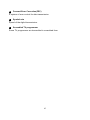
1
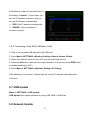
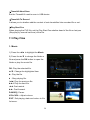
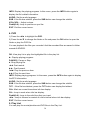
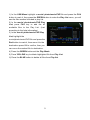
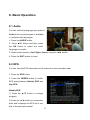
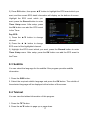
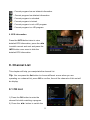
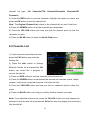
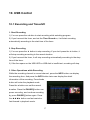
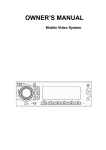
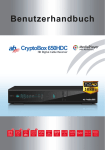
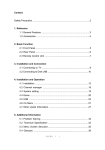
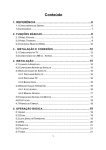
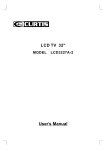
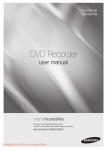
User Manual
CryptoBox
650HDC
HD Digital Cable Receiver
Content
0. Safety Precaution ····································································· 3
1. Reference ·············································································· 4
1.1 General Features ······························································ 4
1.2 Accessories ···································································· 5
2. Product Overview ···································································· 6
2.1 Front Panel····································································· 6
2.2 Rear Panel ····································································· 7
2.3 Remote Control Unit (RCU) ················································ 8
3. Installation ··········································································· 10
3.1 Powering On·································································· 10
3.2 Antenna Settings ····························································· 10
3.3 Auto Search··································································· 11
3.4 Blind Search ·································································· 11
3.5 Factory Default······························································· 11
4. Channel Manager···································································· 13
4.1 Edit Channel ·································································· 13
4.2 Edit Favorite ·································································· 14
4.3 Sort Channels································································· 15
4.4 User Channel List ···························································· 15
5. Settings ··············································································· 16
5.1 System Settings ······························································ 16
5.2 OSD Setup ···································································· 17
5.3 Parental control ······························································ 18
5.4 Times ·········································································· 18
5.5 CA Menu······································································ 20
5.6 Connecting to the LAN ····················································· 20
5.7 USB Update ·································································· 21
5.8 Network Update······························································ 21
5.9 About STB ···································································· 22
1
6. X-tras ················································································· 23
6.1 Calendar ······································································· 23
6.2 Games ········································································· 23
6.3 Network Apps ································································ 23
7. Multimedia ··········································································· 25
8.1 Basic Operations ····························································· 25
7.2 Setting ········································································· 27
7.3 Play Files······································································ 28
8. Basic Operation······································································ 32
8.1 Audio ·········································································· 32
8.2 EPG ············································································ 32
8.3 Subtitle ········································································ 33
8.4 Teletext ········································································ 33
8.5 Find channel ·································································· 34
8.6 Program Information ························································ 34
9. Channel List·········································································· 35
9.1 OK List ········································································ 35
9.2 Favorite List ·································································· 36
10. USB Control ········································································ 37
10.1 Recording and Timeshift ·················································· 37
10.2 PVR List ····································································· 38
11. Additional Information···························································· 38
11.1 Trouble Shooting ··························································· 39
11.2 Technical Specification···················································· 41
11.3 Glossary ····································································· 42
2
0. Safety Precaution
This STB has been designed and manufactured to satisfy the international safety
standards. Please read the following safety precautions carefully before operating
this receiver.
! Main Supply:
Before operating, please check the units operating voltage is 90~250V AC 50/60Hz.
! Overload:
Do not overload a wall outlet, extension cord or adapter, neither use damaged power
cord or touch it with wet hand as this may result in electric shock.
! Liquid:
The receiver shall not be exposed to dripping or splashing water, and that no objects
filled with liquids, such as base, shall be placed on the apparatus.
! Ventilation:
Keep the slots on top of the receiver uncover to allow sufficient airflow to the unit. Do
not put the receiver on soft furnishings or carpets. Do not expose the receiver to
direct light or do not place it near a heater or in humid conditions. Do not stack other
electronic equipments on top of the receiver.
! Cleaning:
Plug out the receiver from the wall outlet before cleaning. Clean the receiver by a
soft cloth or mild solution of washing-up liquid (no solvents).
! Connection:
Disconnect the receiver from the mains when you connect it to antenna cable.
Failure would possibly cause damage to the LNB.
! Location:
Put the receiver indoor in order to avoid lightening, raining or sunlight.
! Uncover:
Do not remove the cover, to reduce the risk of electric shock. Contact qualified and
licensed service personnel to repair the receiver, or contact your dealer.
3
1. Reference
1.1 General Features
DVB-C Compliant (MPEG-II/ MPEG-IV/ H.264)
Sensitive Tuner with Loop-Through
Blind search supported
PAL/NTSC Conversion
True full Color (32 bits) on screen display (OSD)
26 favorite group and parental lock supported
Multi-language menu supported
Multi-language audio supported
Multi-language DVB Subtitle output
7 days Electronic Program Guide (EPG)
Teletext output through VBI and OSD
USB 2.0 Interface
CI module Supported
Support many network functions
4
1.2 Accessories
l Users manual
l Remote Control Unit
l Batteries
Figure 1.Accessories
5
2. Product Overview
2.1 Front Panel
Figure 2. Front Panel
1. Power LED
Power indicator.
2. Display
It displays channel information. In standby mode it displays local time.
3. Power button
Switch between operation and standby modes.
4. CH+/CHChange channel in viewing mode and move the cursor up/down in menu mode.
6
2.2 Rear Panel
Figure 3. Rear Panel
1. Cable out
Connect another receiver.
2. Cable In
Connect the cable antenna.
3. USB2.0
Connect to the TV using a Scart cable.
4. SPDIF
Digital Audio output (Optical).
5. DV-OUT
Connect to the TV using an HDMI cable.
6. TV SCART
Connect to the TV using a Scart cable.
7. RS232
Connect to the computer using a serial line.
8. LAN
Connect to the internet using an Ethernet cable.
9. ON/OFF
Power on/off.
7
2.3 Remote Control Unit (RCU)
You can control this receiver by this remote controller with full function.
1.
STANDBY: Switch between operation and standby modes.
2. F1: Accessorial function.
3. SHIFT: Enable/Disable timeshift.
4. MUTE: Mute audio.
5. I I : Pause/Time shift.
6. ◄◄: Fast rewind.
7. ►►:Fast forward.
8. ●: Record.SLEEP: Set sleep time.
9. ►: Play.
10. ■:stop recording and playing.
11. MENU: Activate main menu.
12. EXIT: Exit current menu step by step..
13. ▲/▼/◄/► :Navigates through the Menus
14. OK: Confirm
15. RELOAD: Move to the previous viewed channel.
16. EPG (Electronic Program Guide): Display the program
guide.
17. V+/V- : Change volume in viewing mode.
18. P+/P-: Change program.
19. INFO: Display the program information.
20. FAV: Display favorite channel list you set before.
21. NUMERIC KEY (0~9): Enter a TV/radio channel number
or menu option number
22. PAGE-/PAGE+: Page up/down on menu or channel list.
23. MEDIA : Access to the USB menu.
24. SAT: Show the scanned program list.
Figure 4. Remote
25. SUB: Display the subtitle language list.
26. TV/RAD: Switch between TV and RADIO.
8
Control Unit
27. FIND: Quickly find channels which you want.
28. V-FORMAT: Set the screen mode.
29. TXT: Display the teletext.
30. AUDIO: Display the audio list
9
3. Installation
You should install the receiver when powering on your product for the first time after
purchase.
Tip: The default password is 0000. If you have forgotten your password, please
contact your local product distributor.
3.1 Powering On
1. Connect the power cord of the product to a wall outlet.
2. Ensure the ON/OFF switch at the rear of the product is switched to ON.
3. Power on by pressing the STANDBY button on the remote control or the
STANDBY button at the front of the product.
3.2 Antenna Settings
Antenna Settings allows you to configure the antenna setting parameters.
Menu->INTALLATION->Manual Search
1. Transponder (TP for short): Press
the ◄ /► button to change the TP.
Green button to add a new TP, If you
can not find it in the default TP list.
Yellow button to Edit the TP.
BLUE button to delete the TP.
2. Symbol Rate: Highlight the Symbol
rate and input the Symbol rate.
3. QAM: Press the ◄ /► button to change the QAM type.
10
4. Start search: Press RED Button to start search.
3.3 Auto Search
Menu->Installation->Auto Search
Enter the Auto Search Menu and press the OK button to search the pre-stored TP
after connecting to the signal cable.
3.4 Blind Search
Menu->Installation->Blind Search
When you don’t know what TP and channels will exist in the cable signal, you can
do blind search frequencies from 306000KHz to 858000KHz.
3.5 Factory Default
You can restore the product to the factory default and you can also setup it
according to the wizard.
Warning: Please note that once you perform Factory Default all, all data and
settings will be deleted.
1. Menu->Installation-> Factory Default
2. Highlight the option you want and press the OK button to execute it.
11
1) All: All data and settings will be deleted.
Tip: If you select “yes”, all data and setting will be lost. Then waiting a moment,
you will view the OSD language menu where you can select the language
according your mind.
2) Channel List Only: All channels data will be deleted.
3) Radio Channel Only: All radio channels data will be deleted.
4) Scramble Channel Only: All scramble channels data will be deleted.
12
4. Channel Manager
Tip: You can press the Sat button to choose different source according to the help
information, press OK to confirm, then all the channels of this sat will be display.
4.1 Edit Channel
Menu->EDIT CHANNEL->TV Channels / Radio Channels
Edit Channels enables you to move, delete, rename, lock/unlock, swap the
channels in the channel list conveniently.
Tip: Radio Channels operation similar to the TV Channels.
1. Move Channels
1) Press RED button to enter move mode.
2) Highlight the channel you want to
move and press OK to select the
channel.
3) Press the ▲/▼ button to the
destination in the channel list and press
the OK button.
1.1 Move Group Channels
1) Highlight the channel you want to
group move. Then press the BLUE
button to sign the channel.
2) Press the ▲/▼ or ◄/► button to highlight other channels you want to group move.
Then press the BLUE button to sign the channel one by one.
3) Press the ▲/▼ to the destination in the channel list and press OK to confirm.
13
2. Delete Channels
1) Highlight the Delete function using ◄/► button or press GREEN button directly.
2) Press the ▲/▼ to highlight the channel you want to delete, press the OK button
to sign the channel.
3) Press the EXIT button, here, select Yes will delete the chosen channels.
3. Lock/unlock Channels
1) Highlight the Lock function using ◄/► button or press YELLOW button directly.
2) Highlight the channel you want to lock, press the OK button to confirm.
3) Input the password to lock the channel. If you want to lock another channel, you
will not be asked to Input the password again until you press EXIT.
Note: If the highlighted channel is locked, press the OK button is switched into
Unlock.
4.2 Edit Favorite
Menu->EDIT CHANNEL-> Favorites
You can add or remove channels from
the favorite groups.
1. Highlight the channels you want to
add or remove from the favorite channel
list.
2. Press the ◄/► button to change the
favorite group and press the color
button to add the channel to the
corresponding favorite group.
3. Press the EXIT button to exit the
menu and save it.
14
Note:
If you select a favorite list, press the ▲/▼ button can only change the channels in this
favorite list and press the OK button can only display the channels in this favorite list.
4.3 Sort Channels
You can sort the channels list.
Menu-> EDIT CHANNEL ->Sort Channels
Highlight the option you want and press the OK button to sort the channel list. You
can sort byLCN, Alphabet, Transponder, FTAToCAS, Default, Favor , FTAToCAS +
Alphabet ,provider and Service ID.
4.4 User Channel List
User Channel List allows you to save or load all the data and settings.
1. Menu->EDIT CHANNEL-> User Channel List->Save User Data
2. Menu->EDIT CHANNEL-> User Channel List->Load User Data
15
5. Settings
5.1 System Settings
Menu->SETTINGS->System Settings
Tip: You can set all the settings here by pressing ◄ /► button.
1. Menu Language: Set the menu language.
2. Audio1: Set the preferred audio language.
3. Audio2: Set the sub-prime audio language.
4. Subtitle Language: Set the subtitle language.
5. EPG Language: Set the EPG language.
6. TXT Language: Set the TXT language.
7. Digital Audio: If a channel has AC3
and PCM audio language at the same
time, when you select RAW it will set
AC3 audio language as default output
and when you select PCM it will set
PCM audio language as default output.
8. Scart Output:While the HDMI Mode
is set to 576i or 480i mode, you can
change the scart output mode between
CVBS and RGB mode.
9. Auto Channel Selection: If you set ON, in the channel list will play automatically
when you highlight the channel. If you set OFF, in the channel list when you highlight
the channel, you should press the OK button to play it.
10. Auto Exit CH List: If you set ON, the channel list will disappear when you press
OK on a Highlighted channel. If you set OFF, the channel list will disappear when
16
you press OK on a playing channel.
11. Recall List: You can turn Recall List on or off. If you set ON, when you press
Recall button of RCU you can get the recall list. If you set OFF, when you press
recall button you can go back to the last program you have selected.
12. Low Power Standby:You can turn Low Power Standby on or off.
13. Standby Time: You can set the Standby Time on or off.
14. Front Panel Light: Set the brightness of the LED.
15. Front Panel Display: Set the LED display channel or clock.
16. Channel list type: You can set the Channel List wide or simple.
5.2 OSD Setup
Menu->SETTINGS->OSD Setup
1.
Menu
Transparency:
Set
the
transparency of all menus.
2. TXT Transparency: Set the
transparency of teletext.
3. Display Mode: Set the HD format
between 1080p, 1080i, 720p, 576i or
576p.
4. TV Type: Set the TV Type on
PAL/NTSC/Auto state.
5. Screen Mode: Set the display format according to the screen ratio. Select TV
screen mode either 4:3 or 16:9 according to the TV type, or press the MODE button
of RCU directly.
6. OSD Timeout: Set the display time of the program information.
17
5.3 Parental control
Menu-> SETTINGS ->Parental Control
Parental Control allows you to set limits for each program or change your previous
password. You can also lock the changes you have made using Installation Lock,
Edit Channel Lock and System Lock. And you can change Age Rating.
5.4 Times
Menu-> SETTINGS ->Times
5.4.1 Time Settings
Menu-> SETTINGS ->Times->Time Settings
Time Settings will set the time mode, time zone and summer time.
1.Time Mode
You can switch the Time Mode to Auto or
Manual by pressing ◄/► button. If the
Time Mode is Manual you can change
the current time and current date.
2. Time Offset
Set the time zone according to your city.
3. Summer Time
18
If your region needs summer time to correct the current time please make it ON by
pressing ◄/► button.
4. Time
You can select network or satellite.
5.4.2 Event Timer
Event Timer You can set 8 timer events. It will record or play the program
automatically according to the timer event list that you set.
1. Menu-> SETTINGS ->TIMES-> Event Timer or press the TIMER button directly.
2. Press the RED button to setup a timer, and press the OK button to save the timer
after setup.
Channel
Select the Channel from Channel List.
Date
Input start date of the timer.
Start/Stop
Set Start and Stop time of the timer.
Repeat
"
<1X> only one time.
"
<Day> Repeat every day.
"
<Weekly> Repeat the channel weekly.
"
<1-5> Repeat the channel from Monday to Friday.
"
<6-7> Repeat the channel from Saturday to Sunday.
Standby when Stop
If set YES, the receiver will go to standby mode after the timer, if set NO it won’t be
standby.
3. In Event Timer menu, highlight one event, press the RED button will cancel this
19
timer and press the YELLOW button can go to edit this timer.
5.4.3 Sleep Timer
SLEEP Timer can set the automatic turn off time.
5.4.4 APD Settings
APD Setting can set the power turn down automatically.
5.5 CA Menu
You can view the information about CA card.
Menu-> SETTINGS ->CA Menu
1. You must insert the smart card with gold chip down to CA slot.
2. You can read the detail information about the smart card after it initialize OK.
3. The Pay-TV which correspond to smart card standard can be decoded
5.6 Connecting to the LAN
5.6.1 IP Setting
1. Connect one end of the Ethernet cable to the product and the other end to the
LAN router.
2. Menu-> SETTINGS ->IP Setting
20
If the Ethernet cable is connected fine, it
will display “Connect”. In this menu, you
can set IP address manually, also you
can get IP address automatically.
#
RED: Get IP address automatically.
#
GREEN: Test the network if
connect correctly.
5.6.2 Connecting to the Wi-Fi (Wireless LAN)
1. Plug in the wireless USB dongle to the USB port.
2. Enter Menu->SETTINGS->Wireless Setting->Search Access Pointer.
3. Select the network name of your Wi-Fi access point from the list.
4. Press the OK button, then input the right password. And you can press RED button
to disable/enable the WI-FI.
5. Enter Menu-> SETTINGS->Wireless Setting->IP Setting.
If the Network is connected, it should get the correct IP address and display the
“Connect”.
5.7 USB Update
Menu-> SETTINGS ->USB update
USB Update can update software by using USB HDD or USB disk.
5.8 Network Update
21
Menu-> SETTINGS ->Network update
Network Update can update software by network.
5.9 About STB
Menu-> SETTINGS ->ABOUT STB
ABOUT STB can get the information about the STB, such as product name,
software & hardware version, and serial number and so on. When you need service
from the dealer you need to submit this information in order go get the correct and
fast after sales service.
22
6. X-tras
6.1 Calendar
Menu->X-tras-> calendar
Calendar can get the date information. And you can add the memo of the day.
6.2 Games
Menu->X-tras-> games
Games offer 9 funny games you can play.
6.3 Network Apps
Menu->X-tras-> Network Apps
6.3.1 Weather
Here you can input the city name to browse the weather of this city in future 5
days.
# RED: Change the city and unit of temperature.
# GREEN: Change the display mode.
# BLUE: You can browse the weather of this city in future 5 days or 10 days.
6.3.2 FTP Download
You can Download S/W, music, photo and other media files from the FTP.
23
1. Input the correct information for every option.
2. Highlight on the Connect Net, press the OK button to enter the FTP.
3. According to the prompted information select the file you want to download and
press the OK button to download it to USB device.
4. Press the RED button to enter the FTP_DOWNLOAD folder in USB.
6.3.3 RSS
You can press the RED button to add the RSS websites and then you can read
content of the websites. And also you can press the YELLOW button to delete the
RSS websites.
6.3.4 Stock View
You can view stock information.
6.4.8 IPTV
You can visit the IPTV To add a site to visit.
6.4.9 Email
You can access the mail in receiving or sending mail.
24
7. Multimedia
Menu->Multimedia or press the MEDIA button directly
Multimedia can play many kinds of media files, you can record program and
playback it and you can do various operations when using USB HDD or USB disk.
Note: It supports FAT, FAT32 and NTFS format USB disk or USB HDD.
8.1 Basic Operations
1. Tool
# Rename Files
1) Highlight the file or folder.
2) Press the RED button and Highlight the Rename.
3) Press the OK button can rename the file or folder.
# Delete Files
1) Highlight the file or folder.
2) Press the RED button and Highlight the Delete.
3) Press the OK button can delete the
file or folder.
# Move Files
1) Highlight the file or folder.
2) Press the RED button and Highlight the
Move To.
3) Select a destination folder.
4) Press the OK button to move the
highlight folder or file to destination folder.
25
# Copy Files
1) Highlight the file or folder.
2) Press the RED button and Highlight the Copy To.
3) Select another disk partition.
4) Press the OK button to copy the highlight folder or file to disk partition which you
selected.
# Create New Folder
1) Press the RED button and Highlight the Create New Folder.
2) Press the OK button to create a new folder in current folder.
# Sort
1) Press the RED button and Highlight the Sort.
2) Select the sort type. (First Name/Date/Size)
3) Press the OK button to sort by sort type which you selected.
# Format Disk
1) Highlight a disk partition or enter a disk partition.
2) Press the RED button and Highlight the Format Disk.
3) Press the OK button and then select a format mode (Fat and NTFS). Then press
OK button to confirm format. After formatting, all the files in current disk partition will
be lost.
2. Upload
# Upload Data to USB
1)
Enter the USB disk.
2)
Press the YELLOW button and highlight the Upload Data to USB.
3)
Press the OK button can upload the data and setting to usb disk.
# Upload to FTP
1)
Highlight the file or folder.
2)
Press the YELLOW button and highlight the Upload to FTP.
3)
Press the OK button can upload the highlight file or folder to FTP.
26
7.2 Setting
1. Play Mode
#Loop
Set the Loop state on Normal, Reverse,
Random, Single or Off.
#Slide Show Interval
Set the Slide Show Interval from 2S-10S.
#Photo View Mode
Set the Photo View Mode state on Full Screen, 2x2 Thumbnail or 2x3 Thumbnail.
2. PVR Setting
#Record Partition
Select the Partition where save your record or other result of your operation.
#Record Mode
Set the Record Mode Channel or
Transponder.
#Record Type
Set the Record Type TS or PS.
#Record Time
Set the Record Default Time off, 30, 60,
90, 120 minute or input number directly.
#Auto Timeshift
Set start the Timeshift if automaticly.
#Timeshift Buffer Size(MB)
Set the Timeshift Buffer Size off, 100, 200, 400, 800, 1600, 3200, 6400MB.
27
#Timeshift Need Save
Set the Timeshift if need to save in USB device.
#Timeshift To Record
It allows you to whether add the content of auto timeshifted into recorded file or not.
#Play Start Pos
When playing the PVR file, set the Play Start Pos whether head of the file or last pos
(Stop play by manual last time) of the file.
7.3 Play Files
1. Music
1) Press the ◄/► to highlight the Music.
2) Press the ▲/▼ to change the folder or
file and press the OK button to open the
folder or play the music file.
OK: Play the selected file.
▲/▼: Change the highlighted item.
►: Play the file.
■ : Stop playing file.
I◄◄: Play the previous file.
►►I: Play the next file.
◄◄: Fast rewind.
►►: Fast forward.
PAUSE/||: Pause.
VOL+/VOL-: Adjust volume.
EXIT: Exit playing state and return to file
list menu.
28
2. Picture
1) Press the ◄/► to highlight the Picture.
2) Press the ▲/▼ to change the folder or file and press the OK button to open the
folder or play the picture.
Tip: You can press the Green button to go to Play Mode Set the Photo View Mode
state on Full Screen, 2x2 Thumbnail or 2x3 Thumbnail in the USB menu. The
picture followed is 2x2 Thumbnail mode.
OK: View the photo.
▲/▼/◄/►: Highlighted the previous/next photo when photo view mode is 2x2
Thumbnail or 2x3 Thumbnail. ◄/► button also can rotate the picture when photo
display of full screen.
I◄◄: Play the previous file.
►►I: Play the next file.
PAUSE/||: Pause.
EXIT: Exit the current menu.
3. Movie
1) Press the ◄/► to highlight the Movie.
2) Press the ▲/▼ to change the folder or file and press the OK button to open the
folder or play the movie file.
OK: View play list or play the highlighted file in the play list.
►: Play the file.
PAUSE/||:Pause.
■: Stop playing file.
◄◄: Fast rewind.
►►: Fast forward.
I◄◄: Play the previous item.
►►I: Play the next item.
29
INFO: Display the playing progress. In this menu, press the INFO button again to
display the file’s detail information.
AUDIO: Set the audio language.
SUB: If the file has subtitle, press the SUB button can change the subtitle.
VOL+/VOL- : Adjust volume.
Find&(0-9): Jump to position as you like.
EXIT: Exit the current menu.
4. PVR
1) Press the ◄/► to highlight the PVR.
2) Press the ▲/▼ to change the folder or file and press the OK button to open the
folder or play the PVR file.
You can playback the files you recorded. And the recorded files are saved in folder
named ALIDVRS2.
OK: View play list or play the highlighted file in the play list.
►: Display playing progress.
PAUSE/||: Pause or Step.
■: Stop playing file.
◄◄: Fast rewind.
►►: Fast forward.
I◄◄: Play the previous item.
►►I: Play the next item.
INFO: Display playing progress. In this menu, press the INFO button again to display
the EPG information.
AUDIO: Set the audio language.
SUB: If the file has subtitle, press the SUB button can change the subtitle.
TXT:If the file has teletext, press the TXT button can display the teletext.
CH+: Mark on current time when info bar display.
CH-: Jump to mark when info bar display.
Find&(0-9): Jump to the valid time that you input.
◄/►: Jump to forward or rewind of a time interval when info bar display.
EXIT: Exit the current menu.
5. Play List
You can play the movie/photo/music/PVR files in the Play List.
30
1) In the USB Menu highlight a movie/ photo/music/PVR file and press the FAV
button to mark it, then press the GREEN button to enter the Play List menu, you will
see the files marked included in play list.
2) In the movie/ photo/music/PVR Play
List, press FAV key to add the all
available files to the Play List. (Just
according to the help information)
3) In the movie/ photo/music/PVR Play
List, highlight the
movie/photo/music/PVR file and press the
Red button to mark it, then move it to the
destination press OK to confirm, then you
can move the marked file to destination.
4) Press the GREEN button set the Play Mode.
5) Press YELLOW key to delete highlighted file from Play List.
6) Press the BLUE button to delete all files from Play list.
31
8. Basic Operation
8.1 Audio
You can select the language you prefer in
Audio if the current program is available
in multiple audio languages.
1. Press the AUDIO button.
2. Press ▲/▼ button and then press
the OK button to select the audio
language you prefer.
3. Select audio direction (Left, Right, Stereo) using the ◄/► button.
4. Press the EXIT button to close.
8.2 EPG
You can view the EPG information of all channels in time and date order.
1. Press the EPG button.
2. Press the GREEN button to switch
EPG mode between Weekly EPG and
Day EPG.
Weekly EPG:
1) Press the ▲/▼ button to change
program.
2) Press the ◄ /► button to change the
date, and it displays the EPG list in one
day of the selected channel.
32
3) Press OK button, then press ▲/▼ button to highlight the EPG event which you
want, and the current EPG detail information will display on the bottom of screen.
Highlight the EPG event which you
want, press the Record button to enter
Timer Setup menu. After setup, press
the OK button can add the EPG event
to the Timer.
Day EPG:
1) Press the ▲/▼ button to change
channel.
2) Press the ◄ /► button to change
EPG event of the highlighted channel.
3) Highlight the EPG event which you want, press the Record button to enter
Timer Setup menu. After setup, press the OK button can add the EPG event to
the Timer.
8.3 Subtitle
You can select the language for the subtitle if the program provides subtitle
information.
1. Press the SUB button.
2. Select the required subtitle language and press the OK button. The subtitle of
the selected language will be displayed at the bottom of the screen.
8.4 Teletext
You can view the teletext information of this program.
1. Press the TXT button.
2. Press the ▲/▼ button to page up or page down.
33
3. Press the NUMERIC(0-9) buttons
can go to the designated page directly.
4. Press the color button can back to the
previous page.
8.5 Find channel
You can find the channels you want
quickly just by pressing the FIND button directly. Or by pressing Blue button in OK
List/FAV List.
8.6 Program Information
You can view the program information by pressing the INFO button while watching a
program.
1.
General Information
: It is a FTA program.
: It is a scramble program.
: The sound of current program is not Dolby.
: The sound of current program is Dolby.
: Current program has no EPG information.
: Current program has EPG information.
34
: Current program has no teletext information.
: Current program has teletext information.
: Current program is unlocked.
: Current program is locked.
: Current program is not a HD program.
: Current program is a HD program.
2. EPG Information
Press the INFO button twice to view
detailed EPG information, press the ◄/►
to switch current and next and press the
INFO button once more to hide the
detailed EPG information.
9. Channel List
This chapter will help you manipulate the channel list.
Tip: You can press the Sat button to choose different source when you are
operating on a channel list, press OK to confirm, then all the channels of this sat will
be display.
9.1 OK List
1) Press the OK button to enter the
channel list while watching a program.
2) Press the ◄/► button to switch the
35
channel list type. (All Channels/FTA Channels/Scramble Channels/HD
Channels)
3) Press the RED button to sort the channels. Highlight the option you want and
press the OK button to sort the channel list.
Note: The Original Channel List is back to the channel list you sort it last time.
4) Press the GREEN button to list the channels by transponder.
5) Press the YELLOW button can help you find the channel quick by the first
character of name.
6) Press the BLUE button to enter the Quick Find menu.
9.2 Favorite List
1) If you have set several favorite lists,
press the FAV button can enter the
favorite list.
2) Press the ◄/► button to change
different favorite list and press the OK
button can select the a program in
current favorite list.
3) Press the RED button to sort the channels of the favorite list.
4) Press the GREEN button to manipulate the favorite list channels (move, delete,
rename, lock/unlock, swap the channels of the favorite list).
5) Press the YELLOW button can help you find out channels quick by their first
name.
6) Press the BLUE button can help you quickly find the channel you want.
Note: If you selected a favorite list, press the CH+/CH- button can only change the
channels in this favorite list and press the OK button can only display the channels in
this favorite list.
36
10. USB Control
10.1 Recording and Timeshift
1. Start Recording
1) You can press the ● button to start recording while watching program.
2) If you have set the timer, and set the Time Record on, it will start recording
automatically according to the start time of the timer.
2. Stop Recording
1) You can press the ■ button to stop recording. If you don’t press the ■ button, it
will stop recording according to the record duration.
2) If you have set the timer, it will stop recording automatically according to the stop
time of the timer.
3) If the free space on the USB HDD or USB disk is insufficient, recording will stop.
3. Other Operations while Recording
While the recording channel is current channel, press the INFO button can display
the recording time. And press the INFO button twice can display the detail
information of the recording. Press the ►
button will enter the playback mode.
Press the ● button can set the record
duration. Press the PAUSE/|| button can
pause recording, and continue recording
by press PAUSE/|| button again. Press
the ◄◄/►► button can fast rewind or
fast forward in playback mode.
37
4. Timeshift
Timeshifte allows you to pause a live broadcast and return to it later and continue
where you left off.
Press the || button to start timeshift. While it is in timeshift mode, press the ► button
can play the program, press the INFO button can display the recording information,
press the PAUSE/|| button can pause or play the program, press the ◄◄/►►
button can fast rewind or fast forward. Press the ■ button to stop timeshift. If you
change to another program or do other operations, it will stop timeshift but still
record.
10.2 PVR List
You can enter the PVR list directly and then play the PVR file. In the PVR list you
also can delete the PVR files.
1. Press ► button enter the PVR list when watching program.
2. Press the ▲/▼ to highlight the PVR file you want to play, press the OK button to
play in small screen.
3. You can press BLUE button to play the PVR file in full screen. And press Exit
button will return to the PVR List.
4. If you want to delete PVR files, first you must press the ▲/▼ to highlight the
PVR file you want to delete, and press the YELLOW button to delete.
38
11. Additional Information
11.1 Trouble Shooting
Before contacting your local service centre, please read the tips below carefully. If
the problem persists after completing the following procedure, please contact your
local product distributor or service centre for further instructions.
1. No message displayed on the front display. (The product will not switch on.)
• Check the main power cable and make sure it is plugged into a suitable power
outlet.
• Check that the mains supply is switched on.
• Connect the power cable to a different power outlet.
• Check that the power switch is on at the rear of the product. (where applicable)
2. No picture
• Make sure that the product is powered on and in operation mode. (Press the
STANDBY button)
• Make sure that the AV/HDMI/YUV cable is firmly connected to the TV.
• Make sure that the antenna cable is properly connected to the product.
• Be sure to activate channel search.
• Check the brightness level of the TV.
• Check if the channel is currently on air. Contact the broadcaster to ensure that the
channel is running.
3. Poor picture/sound quality
• Make sure there is no mobile phone or microwave oven near the product.
• Check that your cable alignment is correct.
• The signal level may be affected by weather conditions.
39
4. No or poor sound
• Check that your AV/HDMI cable is connected correctly.
• Check the volume levels of your TV set and the product.
• Check if the product or TV is on mute.
• Check audio type or soundtrack option. (where applicable)
5. Remote control does not operate.
• To control the product, the top end of the remote control should point directly
towards the receiving part of the product.
• Remove and reinsert the batteries in the remote control.
• Replace the batteries in the remote control for a new set.
6. Cannot connect network .
• Make sure the network of your family is good.
• Make sure the Ethernet cable is inserted firmly to the LAN router.
• Make sure the Wi-Fi can work on other device.
• Input the Wi-Fi password again.
• Get auto IP again.
• Restart the receiver again.
40
11.2 Technical Specification
Tuner & Channel
No. of Tuners
1
Input Frequency
51 - 860MHz
Input Level
40dBuv - 90dBuv
Input impedance
50Ω
Demodulation
4, 16, 32, 64, 128 and 256-QAM (ITU-T J.83 annex A, B and C compliant).
MPEG
Transport Stream
MPEG-2 ISO/IEC 13818Transport stream specification
Profile Level
MPEG1,MPEG-2 MP@ML,H.264, VC1, DV, DivX, and MPEG4
Input Rate
80 Mbps for MPEG Transport Stream and 25 Mbps for DV streams
Aspect Ratio
4:3, 16:9
Video Resolution
576i, 576p, 480i, 480p, 720p50, 720p60, 1080i.1080p
Audio Decoding
MPEG-2 layer I and II (Music cam),MPEG4 AAC and MPEG4 AAC-HE (AAC+),Dolby
Digital (AC-3) with bit rates up to 640 K bits /s, LPCM up to 48 KHz,MP3.
Audio Mode
Single channel/Dual channel/Joint stereo/Stereo
Sampling
32, 44.1 and 48 KHz
Power Supply
Input Voltage
AC 100 ~240V, 50/60Hz
Power Consumption
Max. 25 W
Protection
Separate internal fuse. Input shall have lightening Protection
Physical Specification
Weight (Net)
About 2.5kg
Operating Temp
0℃ to + 40℃
Storage Temp
-40℃ to + 65℃
41
11.3 Glossary
! Antenna
Cable antenna – source of the TV signal.
!
EPG
An electronic equivalent to a printed television listings magazine; it is an
application used with digital set top boxes and digital television sets to list current
and scheduled programs that are or will be available on each channel, including a
short summary or commentary for each program. The information supplied in the
EPG is sent and updated by the channel broadcaster.
! DVB
The Digital Video Broadcast group was created to establish a technical
framework for the introduction of digital video broadcasting systems.
!
HDMI (High-Definition Multimedia Interface)
An all-digital audio/video interface that supports standard, enhanced, or
high-definition video, plus multi-channel digital audio on a single cable. It transmits all
ATSC HDTV standards and supports 8-channel digital audio.
! GHz
The prefix giga means milliard, and Hertz means cycles per second. Signals
in the GHz range are often called microwaves.
! MHz
The prefix mega means million, and Hertz means cycles per second.
! MPEG
Moving Picture Experts Group. Established by the International Standards
Organization to provide the basis for a picture coding and compression
system.
42
! Forward Error Correction(FEC)
A system of error control for data transmission.
! Symbol rate
Speed of the digital transmission.
! Scrambled TV programmer
Some TV programmer are transmitted in scrambled form.
43
CryptoBox
650HDC
HD Digital Cable Receiver