1
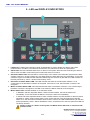
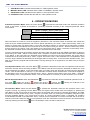
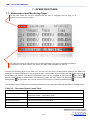
AMF 3.4L USER MANUAL ENKO AMF 3.4L User Manual AMF 3.4L USER MANUAL Table of Contents 1 - INTRODUCTION ......................................................................................................................... 3 1.1 - Functions ................................................................................................................................................ 3 1.2 – Inputs / Outputs ..................................................................................................................................... 3 2 - TERMINAL CONNECTIONS ...................................................................................................... 4 3 - BUTTON FUNCTIONS ............................................................................................................... 7 4 - AMF 3.4L CONNECTION DIAGRAM ......................................................................................... 8 5 - LED and DISPLAY INDICATORS .............................................................................................. 9 6 - OPERATION MODES ............................................................................................................... 10 7 - OPERATING PAGES ............................................................................................................... 11 7.1 - Measurement and Monitoring Pages ................................................................................................... 11 7.2 - Active Alarms Page .............................................................................................................................. 12 7.3 - Running and Maintenance Timers Page .............................................................................................. 12 8 - AMF 3.4L MENU PAGES ......................................................................................................... 13 8.1 - P1-PARAMETERS Page ...................................................................................................................... 13 8.2 - P2-ALARM LOG Page ......................................................................................................................... 15 8.3 - P3-EVENT LOG Page .......................................................................................................................... 17 8.4 - P4-Settings Page ................................................................................................................................. 18 9 - FAILURE STRUCTURE ........................................................................................................... 18 10 - DIGITAL INPUT and OUTPUT STRUCTURE ........................................................................ 21 10.1 - Digital Inputs ....................................................................................................................................... 21 10.2 - Digital Outputs .................................................................................................................................... 23 EN-KO Electronic Control Systems 2/24 10006 Sok. No:64 A.O.S.B Cigli-Izmir/TURKEY Tel: +90 (232) 3767806 (Pbx) Fax: +90 (232) 3767792 E-Mail: [email protected] Web: www.enkoelektronik.com AMF 3.4L USER MANUAL 1 - INTRODUCTION AMF 3.4L is a microprocessor-based controller, which monitors single or 3 phase Mains voltage, transfers the load between the Mains and the Generator and checks for system failures. The unit eliminates the need of common panel indicators, hence reduces the cost of the Generator panel. AMF 3.4L has 3 operation modes, which are Automatic, Manual, Test and Off modes. The desired operation mode can be set via the buttons located on the front panel. By pressing the Menu button for 3 seconds, the user can edit and save any parameter among the 425 parameters in the unit. This feature allows AMF 3.4L to be easily adapted to any engine without the need of a separate unit. 1.1 - Functions • Automatic Generator start and stop • Manual Generator start and stop • Start the Generator and transfer the load in the case of a Mains failure • True RMS voltage and current measurement • Sensing Generator failures • Automatic load transfer • Pre-heat function • Manual, Automatic, Test and Off operation modes • Measurement instruments which reduces the panel cost • Time and date stamped log of the last 15 failures • Time and date stamped log of the last 30 events • Record of engine running hours and indicate when maintenance needed • On-load and Off-load test in the Test mode • Ability to connect analog oil pressure, water temperature and fuel level probes • Screen saver while in sleep mode which provides battery economy • Comprehensive parameter menu where all the system limits, timers and operation modes can be set • Monitoring and parameter setting via communication port • Ability to update the microprocessor software via communication port • Failure notifications, parameter editing and operation mode changing over a telephone by communicating with an IT&T compatible GSM module. 1.2 – Inputs / Outputs • 3 phase Mains and Generator voltage inputs • 3 phase alternator current input • 12V or 24V power supply • Oil pressure, water temperature and fuel level analog inputs • 8 fully configurable digital inputs • Charge fail input • Crank relay output • Fuel solenoid relay output • Generator contactor relay output • Mains contactor relay output • 5 programmable auxiliary relay outputs EN-KO Electronic Control Systems 3/24 10006 Sok. No:64 A.O.S.B Cigli-Izmir/TURKEY Tel: +90 (232) 3767806 (Pbx) Fax: +90 (232) 3767792 E-Mail: [email protected] Web: www.enkoelektronik.com AMF 3.4L USER MANUAL 2 - TERMINAL CONNECTIONS Table 1.0 – Terminal Connections Table TERMINAL NO TERMINAL NAME 1 BATTERY + The positive terminal of the battery must be connected. The value of the terminal must be between 9 – 30V. 2 BATTERY - The negative terminal of the battery must be connected. The negative terminal of the battery should be grounded. 3 MAINS NO 4 COM 1 5 MAINS NC 6 GEN NO 7 COM 2 8 GEN NC 9 AUX OUT 1 Functional output. Please refer to parameters P254-P255. (250Vac 6A) 10 AUX OUT 2 Functional output. Please refer to parameters P256-P257. (250Vac 6A) DESCRIPTION The dry contact output, which controls the Mains contactor. This output is Normally Open. (250Vac 10A) The common input of Terminals No 3 and No 5 (MCB). (250Vac 10A) Caution: In order to enable the related Terminals to COM 1, this input must NOT be left empty. The dry contact output, which controls the Mains contactor. This output is Normally Closed. (250Vac 10A) The dry contact output, which controls the Generator contactor. This output is Normally Open. (250Vac 10A) The common input of Terminals No 6 and No 8 (GCB). (250Vac 10A) Caution: In order to enable the related Terminals to COM 2, this input must NOT be left empty. The dry contact output, which controls the Generator contactor. This output is Normally Closed. (250Vac 10A) EN-KO Electronic Control Systems 4/24 10006 Sok. No:64 A.O.S.B Cigli-Izmir/TURKEY Tel: +90 (232) 3767806 (Pbx) Fax: +90 (232) 3767792 E-Mail: [email protected] Web: www.enkoelektronik.com AMF 3.4L USER MANUAL Table 1.0 – Terminal Connections Table Continued 11 AUX OUT 3 12 COM 3 13 14 AUX OUT 4 AUX OUT 5 15 COM 4 16 17 18 A. GND W/L MPU 19 COM 5 20 OIL PRESURE SEND. 21 TEMP SEND. Analog water temperature sender is to be connected to this terminal. The settings related to this input can be changed via parameters P147-P203. 22 FUEL LEVEL SEND. Analog fuel level sender is to be connected to this terminal. The settings related to this input can be changed via parameters P299-P307. 23 CHARGE FAIL INP. 24 CRANK 25 COM 6 26 FUEL The fuel or stop solenoid is to be connected to this input. The settings related to this input can be changed via parameters P017 and P028. 27 COM 7 The common input of Terminals No 28, No 29, No 30 and No31. Can be connected to Battery - or Battery+. Because the digital inputs are bi-directional, when connected to Battery - the digital inputs are activated on Battery + voltage level and vice versa. Caution: If a battery connection is NOT made to COM 7 the related digital inputs will not be operational. 28 AUX INPUT 1 1 digital input. Can be configured via parameters P206-P211. 29 AUX INPUT 2 2 30 AUX INPUT 3 3 digital input. Can be configured via parameters P218-P223. 31 AUX INPUT 4 4 digital input. Can be configured via parameters P224-P229. 32 COM 8 33 34 AUX INPUT 5 AUX INPUT 6 Functional output. Please refer to parameters P258-P259. (250Vac 6A) The common output for Terminals No 9, No 10 and No 11. Caution: In order to enable the related Terminals to COM 3, this input must NOT be left empty. Functional output. Please refer to parameters P260-P261. (250Vac 6A) Functional output. Please refer to parameters P262-P263. (250Vac 6A) The common output for Terminals No 13 and No 14. Caution: In order to enable the related Terminals to COM 4, this input must NOT be left empty. To be connected to Generator chassis for the measurement inputs. Magnetic Pick-up or Charge Alternator W terminal. (2 -70 Vpick 10Hz -10KHz) Magnetic Pick-up or Tacho Generator. (2 -70 Vpick 10Hz -10KHz) The common terminal for Magnetic Pick-up (MPU). Caution: In order to enable the Magnetic Pick-up, this input must NOT be left empty. Analog oil pressure sender is to be connected to this terminal. The settings related to this input can be changed via parameters P084-P144. Charge alternator excitation winding is connected to this input. The panel excites the charge alternator by feeding constant current during cranking. This terminal feeds 120mA in 24V systems and 200mA in 12V systems. Crank solenoid is to be connected to this output. The common input of Terminals No 24 and No 26. Caution: In order to enable the related Terminals to COM 6, this input must NOT be left empty. st nd digital input. Can be configured via parameters P212-P217. rd th The common input of Terminals No 33, No 34, No 35 and No36. Can be connected to Battery - or Battery+. Because the digital inputs are bi-directional, when connected to Battery - the digital inputs are activated on Battery + voltage level and vice versa. Caution: If a battery connection is NOT made to COM 8 the related digital inputs will not be operational. th 5 digital input. Can be configured via parameters P230-P235. th 6 digital input. Can be configured via parameters P236-P241. EN-KO Electronic Control Systems 5/24 10006 Sok. No:64 A.O.S.B Cigli-Izmir/TURKEY Tel: +90 (232) 3767806 (Pbx) Fax: +90 (232) 3767792 E-Mail: [email protected] Web: www.enkoelektronik.com AMF 3.4L USER MANUAL Table 1.0 – Terminal Connections Table Continued th 35 AUX INPUT 7 7 digital input. Can be configured via parameters P242-P247. 36 AUX INPUT 8 8 digital input. Can be configured via parameters P248-P253. 37 38 39 N T S Mains Neutral input Mains T Phase input (20-500Vac) Mains S Phase input (20-500Vac) 40 41 42 43 44 R N W V U Mains R Phase input (20-500Vac) Alternator Neutral input Alternator W Phase input (20-500Vac) Alternator V Phase input (20-500Vac) Alternator U Phase input (20-500Vac) 45 46 47 48 49 ITIT+ ISIS+ IR- T Phase Current Transformer input - terminal (Max. 5A AC) T Phase Current Transformer input + terminal (Max. 5A AC) S Phase Current Transformer input - terminal (Max. 5A AC) S Phase Current Transformer input + terminal (Max. 5A AC) R Phase Current Transformer input - terminal (Max. 5A AC) 50 IR+ COM PORT EX. COM. PORT th R Phase Current Transformer input + terminal (Max. 5A AC) Used for ENKO Pro-Link SCADA PC connection (TTL to USB Convertor Cable Needed) Used for GSM Modem connection (TTL to RS485 Convertor Cable Needed) EN-KO Electronic Control Systems 6/24 10006 Sok. No:64 A.O.S.B Cigli-Izmir/TURKEY Tel: +90 (232) 3767806 (Pbx) Fax: +90 (232) 3767792 E-Mail: [email protected] Web: www.enkoelektronik.com AMF 3.4L USER MANUAL 3 - BUTTON FUNCTIONS 13 12 14 1 15 2 4 6 8 10 3 5 7 9 11 1. Alarm Reset / Mute Button: When pressed once, the alarm horn output is silenced. When pressed for the second time, if there are no alarms active in the system (the cause of the alarm has been disappeared) the alarm is acknowledged and the alarm LED is turned off. 2. Start Button: This button will start the Generator only when the AMF is in Manual operation mode. If there are any D, E or F class failures in the system, this button has no function. 3. Stop Button: This button will stop the Generator only when the AMF is in Manual operation mode. 4. Generator Contactor Close: This button is active only when the AMF is in Manual operation mode. If the alternator is running within limits, pressing this button will energize the Generator contactor. In the case where the Mains contactor is energized or the Generator contactor is already energized, this button has no function. 5. Generator Contactor Open: This button is active only when the AMF is in Manual operation mode. Pressing it will de-energize the Generator contactor. 6. Mains Contactor Close: This button is only active when the AMF is in Manual operation mode. If the Mains is stable, pressing this button will energize the Mains contactor. In the case where the Generator contactor is already energized, this button has no function. 7. Mains Contactor Open: This button is only active when the AMF is in Manual operation mode. Pressing it will de-energize the Mains contactor. 8. Manual Button: This button switches the AMF to Manual operation mode. 9. Test Button: This button switches the AMF to Test operation mode. 10. Auto Button: This button switches the AMF to Automatic operation mode. 11. Off Button: This button switches the AMF to Off operation mode. 12. Esc Button: This button is used to navigate from sub-pages to upper pages while in the AMF menu. It has no function while navigating monitoring screens. 13. Up Button: This button switches to the next page while navigating through the monitoring screens. While navigating through the menu pages, this button functions as next page, parameter index increase and parameter value increase. 14. Menu Button: By pressing this button for 3 seconds while navigating the monitoring screen, the user can enter the menu screen. When simply pressed and released while in the parameter settings page, the cursor is moved to the right. 15. Down Button: This button switches to the previous page while navigating through the monitoring screens. While navigating through the menu pages, this button functions as previous page, parameter index decrease and parameter value decrease. EN-KO Electronic Control Systems 7/24 10006 Sok. No:64 A.O.S.B Cigli-Izmir/TURKEY Tel: +90 (232) 3767806 (Pbx) Fax: +90 (232) 3767792 E-Mail: [email protected] Web: www.enkoelektronik.com 8/24 10006 Sok. No:64 A.O.S.B Cigli-Izmir/TURKEY Tel: +90 (232) 3767806 (Pbx) Fax: +90 (232) 3767792 E-Mail: [email protected] Web: www.enkoelektronik.com EN-KO Electronic Control Systems UTILITY 4 N T S R 1 40 25 crank 39 38 37 24 6 NEGATIVE TERMINAL OF THE BATTERY SHOULD BE GROUNDED 2 Battery Emergency Stop Crank relay 26 MCB charge Magnetic Pick-up 18 19 GCB contact Fuel solenoid/ Stop solenoid D+WL R 23 10 9 N 12 MCB contact T 14 13 15 11 GCB Common 4 Auxiliary Output 3 S Common 3 Auxiliary Output 4 LOAD Auxiliary Output 2 Auxiliary Output 1 (Default Horn) Auxiliary Output 5 5 20 Oil pressure 41 21 Temperature 42 22 Fuel Level 43 27 44 Auxiliary Input Common 1 Auxiliary Input 1 (Default Oil Pressure) 28 29 30 31 48 47 32 33 50 49 34 Mp V W 36 G Ex. Com. Port Com. Port DIESEL ENGINE GENERATOR Modbus RTU TTL U 35 AMF 3.4L CONTROL UNIT 46 45 Auxiliary Input Common 8 7 Auxiliary Input 2 (Default Tempreature) Auxiliary Input 3 (Default Coolant Level) Auxiliary Input 4 (Default Aux. Failure 1) Auxiliary Input 5 (Default Aux. Failure 2) Auxiliary Input 6 (Default Aux. Failure 3) Auxiliary Input7 (Default Aux. Failure 4) Auxiliary Input 8 (Default Aux. Failure 5) GSM Modem 4 - AMF 3.4L CONNECTION DIAGRAM AMF 3.4L USER MANUAL AMF 3.4L USER MANUAL 5 - LED and DISPLAY INDICATORS 1 8 2 6 3 4 9 5 7 10 1. LCD Screen: 128x64 pixel resolution Liquid Crystal Display is used to display the alarms and events, measurements, the status of the Mains and Generator, the maintenance timers and parameters. 2. Alarm LED: This LED indicates that there is an alarm in the system. When the LED is blinking the alarm is active, when the LED is continuously lit this means the alarm is not active. 3. Generator Status LED: This LED will be continuously lit if the values of the Generator (Oil pressure, RPM, Voltage, Frequency, Charge Voltage etc.) are stable within the limits defined by the parameters. In the case where the engine is cranked and the Alternator Started signal is received by the AMF, this LED will blink for the time period set by “P018 – General Failure Delay Timer”. 4. Generator Contactor Status LED: This LED indicates the status of the Generator contactor. If it is continuously lit, the Generator contactor is energized. If the LED is not lit, the Generator contactor is deenergized. 5. Mains Contactor Status LED: This LED indicates the status of the Mains contactor. If it is continuously lit, the Mains contactor is energized. If the LED is not lit then the Mains contactor is de-energized. 6. Mains Status LED: Indicates whether or not the Mains exists. • In MANUAL and OFF Operation Mode: If there is a Mains failure, the LED is switched off immediately. In the case where the Mains is normal, the LED is lit immediately. • In AUTO and TEST Operation Mode: If there is a Mains failure, the LED will blink for the time period specified by “P039 – Mains Failure Delay Timer”, and at the end of this time period the LED will switch off. In the case where the Mains returns back to normal, the LED will start blinking for the time period specified by “P038 – Mains Stabilization Timer”, and at the end of this time period the LED will constantly remain lit. Caution: If there is a failure in the system, the Mains Status LED acts as it would in OFF operation mode. EN-KO Electronic Control Systems 9/24 10006 Sok. No:64 A.O.S.B Cigli-Izmir/TURKEY Tel: +90 (232) 3767806 (Pbx) Fax: +90 (232) 3767792 E-Mail: [email protected] Web: www.enkoelektronik.com AMF 3.4L USER MANUAL 7. 8. 9. 10. TEST Button LED: Indicates that the AMF is in TEST operation mode. MANUAL Button LED: Indicates that the AMF is in MANUAL operation mode. AUTO Button LED: Indicates that the AMF is in AUTO operation mode. OFF Button LED: Indicates that the AMF is in OFF operation mode. 6 - OPERATION MODES Automatic Operation Mode: When the AUTO button is pressed the Generator enters the Automatic operation mode. In this mode, 3 phases of the Mains is constantly monitored according to the configured parameter values shown below. P036 P037 Mains Voltage Failure Lower Limit Mains Voltage Failure Upper Limit P040 P041 Mains Frequency Failure Lower Limit Mains Frequency Failure Upper Limit When the Mains is normal, the Load is supplied by the Mains. If the monitored values of the Mains are outside the limits set by the related parameters and the time period specified by the “P039 – Mains Failure Delay Timer” has passed, it means there is a Mains failure. In this case the Mains contactor is opened and the Generator is started. Once the Generator has started, the unit will wait for the time period set by the “P018 – General Failure Delay Timer” and will check for any failures. Then, after waiting for the time period set by “P006 – Generator Contact Delay Timer”, the Generator contactor will be closed and the Load is transferred to the Generator. Once the monitored values of the Mains are back and stays within the limits set by the related parameters for the time period set by the “P005 – Mains Contact Delay Timer”, the Mains contactor will be closed and the Load is transferred to the Mains. In the case where the Generator has supplied the Load since the engine started, the engine will be cooled down for the time period set by “P007 – Engine Cool-down Timer”. If the Generator has not supplied the Load since the engine started, the Generator will be stopped without cooling down. In the Automatic operation mode, if the AMF unit is receiving a signal that the Generator is running although it is not supposed to, the AMF will try to stop the Generator. Test Operation Mode: When the TEST Button I pressed the Generator enters the Test operation mode and the Generator will start without checking the Mains. If the Mains exists at the moment the Generator is started, the Load will be supplied by the Mains. In the case where there is no Mains when the Generator is started and the parameter “P008 – Test On-load Mode” is active (if =1), the Generator contactor will be closed and the Load will be supplied by the Generator at the end of the time periods set by “P018 – General Failure Delay Timer” and “P006 – Generator Contact Delay Timer”. If the parameter “P008 – Test On-load Mode” is not active (if =0) the Generator is run off-load. Manual Operation Mode: When the MAN Button is pressed the Generator enters the Manual operation mode. In this mode, starting the engine, stopping the engine, opening and Generator and the Mains is manually done by the user via their respective buttons. closing the contactors of the Off Operation Mode: When the OFF Button is pressed the Generator enters the Off operation mode. If the engine is running, by pressing the OFF Button once the engine will be cooled down then stopped, by pressing the OFF Button for the second time the fuel valve output is energized and the engine is stopped immediately. The AMF will wait for the time period set by “P007 – Engine Cool-down Timer” for the engine to completely stop (No Engine Running Feedback Signal). If the engine does not stop, an “Engine Start/Stop Failure” is indicated. Off operation mode disables the AMF. If the parameter “P010 – Failure Check in Off Mode” is not active the AMF will not check for failures in Off mode. While the AMF is in Off operation mode the measurement screen and menu can still be actively used. By pressing the OFF Button twice, the backlight of the LCD will be switched off. EN-KO Electronic Control Systems 10/24 10006 Sok. No:64 A.O.S.B Cigli-Izmir/TURKEY Tel: +90 (232) 3767806 (Pbx) Fax: +90 (232) 3767792 E-Mail: [email protected] Web: www.enkoelektronik.com 1 2 AMF 3.4L USER MANUAL 7 - OPERATING PAGES 7.1 - Measurement and Monitoring Pages The bar seen inside the red box indicates that the user is navigating the first page of 15 measurement and monitoring pages. The status bar located on the bottom of the screen highlighted in the red box indicates the status of the Generator. If an alarm exists in the system, the alarm code is displayed on this bar. Through the operating pages of the AMF 3.4L, the user can view all the measurements related to the Mains and Generator, configure parameters on the parameters page, view the alarm and event logs and change the settings such as language and contrast. The desired measurement page can be navigated by using the Up and Down Buttons. While viewing the Measurement and Monitoring pages, the menu screen can be accessed by pressing the MENU Button for 3 seconds. The user can return from this screen by pressing the ESC Button . The Generator status codes and their descriptions displayed on the Generator status bar are listed on the table below. Table 2.0 – Generator Status Codes Table GENERATOR STATUS DESCRIPTION PREPARING TO RUN The condition where the AMF is waiting for cranking operation for the time period specified by “P001 – Crank Delay Timer” GENERATOR PREHEATING Indicates the Pre-heat output is energized right before cranking operation GENERATOR STOP Indicates the Generator is at standstill GENERATOR CRANKING Indicates the crank output is energized CRANKING ATTEMPT: XX “XX” Indicates the number of crank attempts EN-KO Electronic Control Systems 11/24 10006 Sok. No:64 A.O.S.B Cigli-Izmir/TURKEY Tel: +90 (232) 3767806 (Pbx) Fax: +90 (232) 3767792 E-Mail: [email protected] Web: www.enkoelektronik.com AMF 3.4L USER MANUAL GENERATOR RUNNING Indicates the Generator Running Feedback is being received GENERATOR COOLING Indicates the engine will stop at the end of the time period set by “P007 – Engine Cool-down Timer” GENERATOR STOPPING Indicates the Fuel Solenoid output has been de-energized and the engine is expected to completely stop. 7.2 - Active Alarms Page The active alarms page displays the active alarms in the system. The most recent alarm is indicated on the bottom of the list. If the alarm is highlighted with a black bar, this indicates that the cause of the problem still exists in the system and cannot be reset until the problem disappears. In the case where there are more than 6 alarms on the list, the user can scroll down using the MENU Button and scroll back up using the ESC Button also displayed on the Generator status bar located on the bottom of the screen. . The most recent alarm is The alarm codes and descriptions displayed on the Generator status bar of AMF 3.4L are listed on the table on Table 4.0 - Alarm Codes Table. 7.3 - Running and Maintenance Timers Page The first two lines of the running and maintenance timers page indicates how long the control panel and how long the Generator engine has been running for. Below, the time remaining until next engine maintenance and general maintenance is indicated. These time periods can be set by “P329 – Periodic Engine Maintenance Timer Value” and “P330 – Periodic Maintenance Timer Value” parameters. The maintenance timers count backwards and indicate how many running hours are left until the next maintenance. If the timers are a negative value, this indicates the maintenance time has passed. EN-KO Electronic Control Systems 12/24 10006 Sok. No:64 A.O.S.B Cigli-Izmir/TURKEY Tel: +90 (232) 3767806 (Pbx) Fax: +90 (232) 3767792 E-Mail: [email protected] Web: www.enkoelektronik.com AMF 3.4L USER MANUAL 8 - AMF 3.4L MENU PAGES While viewing the measurement and monitoring pages, the user can enter the menu page by pressing the MENU Button for 3 seconds. The first page that appears is “P1-PARAMETERS” then “P2-ALARM LOG”, “P3-EVENT LOG” and “P4-SETTINGS” pages. The desired page can be navigated using the Up Button To return back to the meausurement and monitoring pages the user can press the ESC Button and Down Button . . 8.1 - P1-PARAMETERS Page The bar on the top left corner indicates the page number just like the measurement and monitoring pages. The Parameters menu allows the user to view and configure all the parameters, which defines the Generator operating functions. The full list of all the parameters with their parameter numbers, minimum, maximum and factory values and parameter descriptions can be found at the appendix of this user manual. Every parameter has 3 protection levels, which are determined by the password entered before entering the “P1-PARAMETERS” page. On the password entry page the user can increase and decrease the value of each digit by using the Up and Down Buttons. Pressing the MENU Button will shift the selected digit to the right. After typing the password, the user can enter it by pressing the MENU Button for 3 seconds. If the password entry is incorrect, “Incorrect Password” message will be displayed on the screen. The parameter selection screen is shown on the left. The top line spells “PARAMETER NO” and the line below it the parameter number is indicated. Below the “PARAMETER VALUE” line, the value of the selected parameter is indicated. The user can cycle through all the parameters using the Down Buttons. and Up EN-KO Electronic Control Systems 13/24 10006 Sok. No:64 A.O.S.B Cigli-Izmir/TURKEY Tel: +90 (232) 3767806 (Pbx) Fax: +90 (232) 3767792 E-Mail: [email protected] Web: www.enkoelektronik.com AMF 3.4L USER MANUAL In the parameter selection page, when the MENU Buttton is pressed, a right arrow will appear. If the user desires to skip to a parameter, they can do so by first bringing the cursor on the Parameter No using the Up and Down Buttons. When the MENU Button is pressed again the leftmost digit on the Parameter No will start blinking. The number value can be changed using the Up and Down Buttons. The selected digit can be shifted to the right using the MENU Button . Once the desired parameter number has been entered, the user can press the MENU Button for 3 seconds in order to go to that parameter. If the user desires to change the parameter value, the numerical value under the “PARAMETER VALUE” line must be highlighted by using the Down Button . An arrow pointed to the right will appear beside the parameter. The user can enter the Parameter Value Edit screen by pressing the MENU Button . Then the numerical value can be changed using the Up and Down Buttons. In the parameter value edit page, the box on the left side indicates the Maximum Value, Factory Value, Mininmum Value and the Previous Value. The leftmost digit of the parameter value will be blinking and the highlighted digit can be increased of decreased using the Up and Down Buttons, or shift the highlighted digit to the right using the MENU Button . After the desired parameter value is entered the user can save changes and finish editing the parameter by pressing the MENU Button for 3 seconds. To exit without saving changes, press the ESC Button . EN-KO Electronic Control Systems 14/24 10006 Sok. No:64 A.O.S.B Cigli-Izmir/TURKEY Tel: +90 (232) 3767806 (Pbx) Fax: +90 (232) 3767792 E-Mail: [email protected] Web: www.enkoelektronik.com AMF 3.4L USER MANUAL In the parameter value editing screen, the parameters which are in text format can also be edited just like numerical values using the same buttons. The only difference is that on the edit editing screen, the previous value is shown. Above, the parameter editing screen for “P264 – AUX Input 1 Label Text” is shown. 8.2 - P2-ALARM LOG Page Alarm Log page is a log where the AMF saves the alarms that have occurred on the Generator. By pressing the MENU Button , the list can be viewed. EN-KO Electronic Control Systems 15/24 10006 Sok. No:64 A.O.S.B Cigli-Izmir/TURKEY Tel: +90 (232) 3767806 (Pbx) Fax: +90 (232) 3767792 E-Mail: [email protected] Web: www.enkoelektronik.com AMF 3.4L USER MANUAL The Alarm Log consists of 15 records. The most recent alarm is shown on the top of the list in first place. The ranking number of the alarm can be found on the left, followed by the date and time the alarm occurred and below them the alarm code is listed. The user can scroll down the list using the Up and can go to the previous page using the ESC found on page 18. and Down Buttons Button. The table describing the alarm codes can be EN-KO Electronic Control Systems 16/24 10006 Sok. No:64 A.O.S.B Cigli-Izmir/TURKEY Tel: +90 (232) 3767806 (Pbx) Fax: +90 (232) 3767792 E-Mail: [email protected] Web: www.enkoelektronik.com AMF 3.4L USER MANUAL 8.3 - P3-EVENT LOG Page Event Log page is a log where the AMF saves the events that have occurred on the Generator. By pressing the MENU Button can be viewed. , the list The event log displays up to 30 events. The most recent event is shown on the top of the list in first place. The ranking number of the alarm can be found on the left, followed by the date and time the alarm occurred and below them the event code is listed. The user can scroll down the list using the Up and Down Buttons and can go to the previous page using the ESC Button. The table describing the event codes can be found on the list below. Table 3.0 – Event Codes Table EVENT CODE DESCRIPTIONS MAINS OK Indicates the Mains values are back to normal MAINS FAIL Indicates there is a Mains failure SWITCHED OFF MODE Indicates the panel has entered OFF mode from a different mode. SWITCHED MANUAL MODE Indicates the panel has entered MAN mode from a different mode. SWITCHED AUTO MODE Indicates the panel has entered AUTO mode from a different mode. SWITCHED TEST MODE Indicates the panel has entered TEST mode from a different mode. GENERATOR STARTED Indicates the engine running feedback has been received from the Generator engine GENERATOR STOPPED Indicates the engine has completely stopped GENERATOR ON LOAD Indicates the Generator contactor has been closed GENERATOR OFF LOAD Indicates the Generator contactor has been opened MAINS ON LOAD Indicates the Mains contactor has been closed MAINS OFF LOAD Indicates the Mains contactor has been opened ALARM RESET PROCESS Indicates the alarm has been reset EN-KO Electronic Control Systems 17/24 10006 Sok. No:64 A.O.S.B Cigli-Izmir/TURKEY Tel: +90 (232) 3767806 (Pbx) Fax: +90 (232) 3767792 E-Mail: [email protected] Web: www.enkoelektronik.com AMF 3.4L USER MANUAL 8.4 - P4-Settings Page From the settings page, the contrast and language settings of the panel can be changed. Under this menu P4.1CONTRAST and P4.2-LANGUAGE subpages can be found. The desired changes can be done using the menu buttons. 9 - FAILURE STRUCTURE The AMF 3.4L has a separate classification for each alarm. These classifications determine how the AMF will respond when a failure occurs. This allows the user to coordinate the Generator in the desired way when a failure occurs in the system. There are 6 alarm classifications. A Class: Only the alarm code is displayed on the status bar of the screen. B Class: Alarm code is displayed on status bar + Alarm output is energized. C Class: Alarm code is displayed on status bar + Alarm output is energized + Generator contactor is opened. D Class: Alarm code is displayed on status bar + Alarm output is energized + Generator contactor is opened + Engine is cooled-down then stopped. ñ E Class: Alarm code is displayed on the status bar + Alarm output is energized + Generator contactor is opened + Engine is instantly stopped. ñ F Class: Alarm code is displayed on the status bar + Alarm output is energized + Generator contactor is opened + Engine is instantly stopped + Mains contactor is opened. ñ ñ ñ ñ PE269 Over Current Failure Check PE270 Over Current Failure Class PE271 Over Current Failure Delay PE272 Over Current Failure Value PE273 Over Current Failure Auto-‐acknowledge The list above shows the parameters related to Over Current Failure. P269 indicates wether or not there is an Over Current Failure active in the system (if =1, active). P270 indicates the classification of the Over Current Failure. P271 indicates the time delay for this failure to occur. If the current value is above the value set by P272 for the time period set by P271, then an Over Current Failure occurs in the system. The P273 parameter activates the auto-acknowledge function (if =1, active). This means that the conditions causing the related failure are back to normal, the alarm will be automatically resetted. In order for the alarm to be reset, the current value must drop below the hysteresis value of P272. EN-KO Electronic Control Systems 18/24 10006 Sok. No:64 A.O.S.B Cigli-Izmir/TURKEY Tel: +90 (232) 3767806 (Pbx) Fax: +90 (232) 3767792 E-Mail: [email protected] Web: www.enkoelektronik.com AMF 3.4L USER MANUAL This failure structure is the same for all the failure parameters of the AMF 3.4L. The alarms that can be found on AMF 3.4L and their descriptions can be found on the table below. Table 4.0 – Alarm Codes Table ALARM CODE: LOW GEN. VOLTAGE HIGH GEN. VOLTAGE ALARM CAUSE Low Generator Voltage Alarm: If at least one of the Alternator U-V-W phases voltage value has dropped below “P058 – Alternator Voltage Lower Limit” for the time period set by “P057 – Alternator Voltage Failure Delay”, this alarm will be displayed. High Generator Voltage Alarm: If at least one of the Alternator U-V-W phases voltage value has increased above “P059 – Alternator Voltage Upper Limit” for the time period set by “P057 – Alternator Voltage Failure Delay”, this alarm will be displayed. LOW GEN. FREQUENCY Low Generator Frequency Alarm: If the Alternator frequency has dropped below “P065 – Alternator Frequency Failure Lower Limit” for the time period set by “P064 – Alternator Frequency Failure Delay”, this alarm will be displayed. HIGH GEN. FREQUENCY High Generator Frequency Alarm: If the Alternator frequency has increased above “P066 – Alternator Frequency Failure Upper Limit” for the time period set by “P064 – Alternator Frequency Failure Delay”, this alarm will be displayed. LOW ENGINE SPEED Low Engine RPM Alarm: If the engine RPM value drops below “P071 – Engine RPM Failure Lower Limit” for the time period set by “P070 – Engine RPM Failure Delay”, this alarm will be displayed. HIGH ENGINE SPEED START / STOP FAILURE LOW OIL PRESSURE HIGH TEMPERATURE CHARGE VOLTAGE FAIL LOW BATTERY SHUTDOWN HIGH BATTERY SHUTDOWN High Engine RMP Alarm: If the engine RPM value increases above “P072 – Engine RPM Failure Upper Limit” for the time period set by “P070 – Engine RPM Failure Delay”, this alarm will be displayed. Engine Start / Stop Alarm: 1-) After attempting to crank the engine for “P002 – Engine Crank Attempt Count” times, this alarm will be displayed. 2-) When the AMF releases the Fuel Valve, it will wait for the time period set by “P016 – Generator Stop Delay”. If the AMF still receives an engine running feedback after waiting, this alarm will be displayed. Low Oil Pressure Alarm: 1-) While the engine is running if the Oil Pressure Sender input is not active, after waiting for the time period set by the related delay timer, this alarm will be displayed. 2-) If while the engine is stopped, if the pressure value of the Analog Oil Pressure Sender is below the limit set by “P089 – Low Analog Pressure Alarm Value” for the time period set by “P085 – Analog Pressure Failure Delay”, this alarm will be displayed. High Engine Tempreature Alarm: 1-) If the Water Temperature Sender input is active, after waiting for the time period set by the related delay timer, this alarm will be displayed. 2-) If the temperature value of the Analog Water Temperature Sender is above the limit set by “P150 – Analog Temperature Alarm Value” for the time period set by “P149 – Analog Temperature Delay”, this alarm will be displayed. Charge Voltage Level Alarm: 1-) If the charge voltage level is below the “P079 – Charge Voltage Lower Level Value” for the time period set by “P078 – Charge Voltage Delay”, this alarm will be displayed. 2-) If the charge voltage level is above the “P080 – Charge Voltage Upper Level Value” for the time period set by “P078 – Charge Voltage Delay”, this alarm will be displayed. Low Battery Battery Shutdown Alarm: If the AMF has to shutdown because of low battery voltage level, and the battery level increases before the voltage is cut (because the battery has started to be charged), this alarm will be displayed on the screen when the AMF is powered. High Battery Voltage Shutdown Alarm: If the AMF has to shut down because of high battery voltage level, and the battery level decreases before the voltage is cut, this alarm will be displayed on the screen when the AMF is powered. EN-KO Electronic Control Systems 19/24 10006 Sok. No:64 A.O.S.B Cigli-Izmir/TURKEY Tel: +90 (232) 3767806 (Pbx) Fax: +90 (232) 3767792 E-Mail: [email protected] Web: www.enkoelektronik.com AMF 3.4L USER MANUAL Table 4.0 – Alarm Codes Table Continued LOW BATTERY WARNING Low Battery Voltage Warning: If the battery voltage is below the “P047 – Low Battery Voltage Warning Level” for the time period set by “P046 – Battery Voltage Warning and Shutfown Delay”, this alarm will be displayed. HIGH BATTERY WARNING High Battery Voltage Warning: If the battery voltage is above the “P048 – High Battery Voltage Warning Level” for the time period set by “P046 – Battery Voltage Warning and Shutdown Delay”, this alarm will be displayed. LOW COOLANT LEVEL Low Coolant Level Alarm: If the coolant switch input is active, after waiting for the time period set by the related delay timer, this alarm will be displayed. FUEL LEVEL WARNING Fuel Level Warning: If the fuel level is below the “P303 – Fuel Level Warning Lower Level” for the time period set by “P302 – Fuel Level Warning and Shutdown Delay”, this alarm will be displayed. FUEL LEVEL FAILURE Fuel Level Stop Alarm: If the fuel level is below the “P304 – Fuel Level Waring Lower Level” for the time period set by “P302 – Fuel Level Warning and Shutdown Delay”, this alarm will be displayed. OVER CURRENT Over Current Alarm: If the Alternator current value is above the “P272 – Over Current Failure Value” for the time period set by “P271 – Over Current Failure Delay”, this alarm will be displayed. OIL PRESSURE FAIL Pressure Sensor Alarm: If “P084 – Analog Oil Pressure Protection Function” NOT = 0, when the pressure sensor fails or is disconnected, this alarm will be displayed. HIGH KW FAILURE High KW Alarm: If the Generator KW level stays above the “P277 – KW Failure Value” for the time period set by “P276 – KW Failure Delay”, this alarm will be displayed. HIGH KVA FAILURE High KVA Alarm: If the Generator KVA level stays above the “P292 – KVA Failure Value” for the time period set by “P291 – KVA Failure Delay”, this alarm will be displayed. HIGH KVAR FAILURE High KVar Alarm: If the Generator KVar level stays above the “P282 – KVar Failure Value” for the time period set by “P281 – KVar Failure Delay”, this alarm will be displayed. POW. FACTOR FAILURE Power Factor Alarm: If the Generator PF level stays above the “P287 – Power Factor Failure Value” for the time period set by “P286 – Power Factor Failure Delay”, this failure will occur. SEISMIC FAILURE Earthquake Alarm: If the earthquake sensor input is active, after waiting for the time period set by the related delay timer, this alarm will be displayed. MODEM FAILURE GSM Modem Alarm: If the AMF cannot connect to the GSM modem, this alarm will be displayed. MODEM WRONG PIN GSM Modem PIN Code Incorect Alarm: If the "P425 - SIMCARD Pin Code" parameter is enetered incorrect, this alarm will be displayed. MODEM SMS FAILURE GSM Modem SMS Send Error Alarm: If there is a problem sending an SMS over the GSM modem, this alarm will be displayed. GCB FEEDBACK FAIL Generator Contactor Feedback Alarm: If the input, which its fuction is selected as “GCB Contact Feedback” is passive when the GCB is closed or active when the GCB is open, this alarm will be displayed. MCB FEEDBACK FAIL Mains Contactor Feedback Alarm: If the input, which its function is selected as “MCB Contact Feedback” is passive when the MCB is closed or active when the MCB is open, this alarm will be displayed. EMERGENCY STOP Emergency Stop Button Alarm: If the input, which its function is selected as “Emergency Stop” is active, this alarm will be displayed. EN-KO Electronic Control Systems 20/24 10006 Sok. No:64 A.O.S.B Cigli-Izmir/TURKEY Tel: +90 (232) 3767806 (Pbx) Fax: +90 (232) 3767792 E-Mail: [email protected] Web: www.enkoelektronik.com AMF 3.4L USER MANUAL Table 4.0 – Alarm Codes Table Continued THERMIC FAILURE Temperature Sensor Falure Alarm: If “P147 – Analog Temperature Check” = 1, when the temperature sensor fails or is disconnected, this alarm will be displayed. PHASE SEQUENCE Generator Phase Sequence Error Alarm: If the parameter “P022 – Phase Sequence Error” = 1 and U-V-W phases are connected wrong, this alarm will be displayed when the Generator is started. REVERSE POWER SELF RUN FAILURE Reverse Power Alarm: If the reverse power value stays above the “P297 – Reverse Power Failure Value” for the time period set by “P296 – Reverse Power Failure Delay”, this alarm will be displayed. Generator Self-start Alarm: If the engine is started by an external source other than the AMF 3.4L, an alarm will not be signaled. However if the engine is attempted to start when the AMF is in AUTO, MANUAL or TEST operation modes while the engine is already running, this alarm will be displayed. 10 - DIGITAL INPUT and OUTPUT STRUCTURE The AMF 3.4L has 8 digital inputs and 9 digital outputs (Refer to 2-TERMINAL CONNECTIONS). 10.1 - Digital Inputs The configurations of each digital input can be made via 6 parameters. For example, the parameters related to Digital Input 1 are listed on the table below. Each digital input has all 6 parameters listed below separately. PARAMETER NO 206 207 208 PARAMETER Digital Input 1 Function Digital Input 1 Alarm Clasification Digital Input 1 Delay MIN 0: Not Used 0: A Class 0 sec MAX 209 210 Digital Input 1 Alarm Auto-acknowledge Function Digital Input 1 Polarite 0: Passive 0: Normally Open 211 Digital Input 1 Check 0: Passive 20: No Mains 5: F Class 300 sec 1: Aktive 1: Normally Closed 2: Active When Engine Running + Engine Running Feedback Detection 10.1.1 - Digital Input (1...8) Function: This parameter determines the digital input function. Functions that can be assigned are as follows; • Not Used (=0): The input is not used. • Oil Pressure Switch (=1): Used to sense when the engine is running and to monitor the engine oil pressure. If “Digital Input Active Status” = 2 then, during cranking if the oil pressure rises, engine start has been detected and cranking will stop. • Water Temperature Switch (=2): If the input is activated, the AMF will signal a “HIGH TEMPERATURE” alarm. • Coolant Level Switch (=3): If the input is activated, the AMF will signal a “LOW COOLANT LEVEL” alarm. • External Alarm Input 1 (=4): If the input is activated, the AMF will signal an alarm that writes whatever text has been entered as parameter “P264 – Digital Input 1 Label”. • External Alarm Input 2 (=5): If the input is activated, the AMF will signal an alarm that writes whatever text has been entered as parameter “P265 – Digital Input 2 Label”. EN-KO Electronic Control Systems 21/24 10006 Sok. No:64 A.O.S.B Cigli-Izmir/TURKEY Tel: +90 (232) 3767806 (Pbx) Fax: +90 (232) 3767792 E-Mail: [email protected] Web: www.enkoelektronik.com AMF 3.4L USER MANUAL • External Alarm Input 3 (=6): If the input is activated, the AMF will signal an alarm that writes whatever text has been entered as parameter “P266 – Digital Input 3 Label”. • External Alarm Input 4 (=7): If the input is activated, the AMF will signal an alarm that writes whatever text has been entered as parameter “P267 – Digital Input 4 Label”. • External Alarm Input 5 (=8): If the input is activated, the AMF will signal an alarm that writes whatever text has been entered as parameter “P268 – Digital Input 5 Label”. • Mains Exists (=9): If the input is activated, the AMF accepts the Mains as existing regardless of the voltage and frequency values. • Remote Disable (=10): If the input is activated the Generator is disabled. • Alarm Check Disabled (=11): If the input is activated the AMF completely stops checking for alarms. • Emergency Stop (=12): If the input is activated, the AMF signals an “EMERGENCY STOP” alarm. • Remote Start (=13): If the input is activated, the engine will be started. If not active, the engine will be stopped. • GCB Contact Feedback (=14): Receives feedback from the GCB and checks for open and closed conditions. • MCB Contact Feedback (=15): Receives feedback from the MCB and checks for open and closed conditions. • GCB Disabled (=16): If the input is activated, the GCB will be opened. • MCB Disabled (=17): If the input is activated, the MCB will be opened. • Earthquake Sensor (=18): If the input is activated, the AMF signals a “SEISMIC FAILURE” alarm. This is always an F type alarm. • Panel Key Lock (=19): If the input is activated, all the buttons on the control panel will be disabled. • No Mains (=20): If the input is activated, the AMF accepts the Mains as non-existing regardless of the voltage and frequency values. 10.1.2 - Digital Input (1...8) Alarm Classification: If the input function is selected as an alarm, this parameter determines what classification the alarm will have (Refer to 8-FAILURE STRUCTURE). When the input is assigned functions like “Remote Start” or “Mains Exists”, this parameter has no use. 10.1.3 - Digital Input (1...8) Delay: If the input stays active during the time period set by this parameter, the input is activated and executes whatever function is assigned. 10.1.4 - Digital Input (1...8) Alarm Auto-acknowledge: If this parameter is active, when the input causing the alarm is switched from active to passive position the alarm is automatically acknowledged. 10.1.5 - Digital Input (1...8) Polarite: This parameter is set according to wether the contact connected to the input is Normally Open (NO) or Normally Closed (NC). 10.1.6 - Digital Input (1...8) Check: This parameter is used only when the digital input is selected as an alarm input. When this parameter is set to “0” it is not active, when “1” continuous alarm check is active, when “2” input is activated once engine is running. EN-KO Electronic Control Systems 22/24 10006 Sok. No:64 A.O.S.B Cigli-Izmir/TURKEY Tel: +90 (232) 3767806 (Pbx) Fax: +90 (232) 3767792 E-Mail: [email protected] Web: www.enkoelektronik.com AMF 3.4L USER MANUAL 10.2 - Digital Outputs PARAMETER NO 254 255 PARAMETER Digital Output 1 Function Digital Output 1 Active Status MIN MAX 0: Not Used 14:Stop Solenoid 0: Output is Normally Open 1: Output is Normally Closed The AMF 3.4L has 5 configurable outputs. The table above lists the parameters to configure Auxiliary Output 1 as an example. Parameter “P254” determines the function of the auxiliary output (Refer to the Parameter List). “P255” determines wether the output contact will be closed circuit (=0) or open circuit (=1) when the output is activated. EN-KO Electronic Control Systems 23/24 10006 Sok. No:64 A.O.S.B Cigli-Izmir/TURKEY Tel: +90 (232) 3767806 (Pbx) Fax: +90 (232) 3767792 E-Mail: [email protected] Web: www.enkoelektronik.com AMF 3.4L KULLANICI KILAVUZU