1
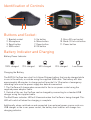
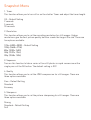
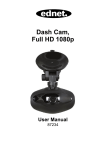
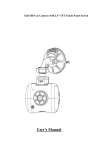
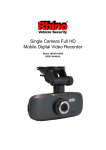
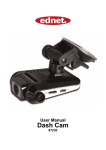
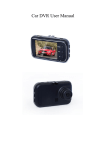
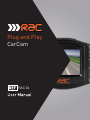
Plug and Play
CarCam
RAC 04
Introduction
Thank you for choosing the RAC04 Digital CarCam. Please read these instructions
carefully before use.
Product Features
Digital CarCam with a 120° field of view
Built-in lithium polymer battery
Full HD 1080p video recording
Built in Microphone and Speaker
Micro SD card socket (compatible up to 32GB)
Photo mode
Motion Detection
Infrared Illumination LED’s for low light recording
Unpacking
Unpack the contents of the box and ensure the following components are present.
RAC04 Camera
Mounting Bracket
In Car Power Adaptor
USB Cable
8GB Micro SD Card
User Manual
Identification of Controls
4
6
8
9
10
7
11
5
1
2
3
Buttons and Socket:
1. Bracket socket
2. Microphone
3. Reset button
4. USB socket
5. Up button
6. Menu button
7. Down button
8. OK button
9. Micro SD card socket
10. Mode / File Lock button
11. Power button
Battery Indicator and Charging
Battery Power Indicator
100% charged
75% charged
50% charged
25% charged
Low Power
Charging the Battery
The RAC 04 CarCam has a built in Lithium Polymer battery that can be charged while
in use in the vehicle, or outside using the supplied USB cable. The battery will take
approximately 60 minutes to charge and will provide 5 to 10 minutes of emergency
recording time once the power supply has been disconnected.
1. The CarCam will charge when connected to the in car power socket using the
supplied power adaptor cable.
2. Outside of the car, the CarCam can be charged by connecting to a standard USB
charger using the supplied cable.
The Red Power indicator LED will illuminate when the CarCam is being charged. This
LED will switch off when the charging is complete.
Additionally, when switched on and connected to an external power source such as a
USB charger or the in car power socket, the battery level indictor will change to a
charging indicator.
Preparing for Use
IMPORTANT: To get the best quality recordings when using this CarCam, always ensure
your windscreen is clean and free from dirt, smudges and fingerprints on both the
inside and outside of the windscreen. Dirt and smudges can, and will, affect the quality
of the video recorded.
Inserting the Memory Card
Insert the supplied Micro SD Card into the Memory Card Socket on the side of the
Carcam. The exposed contacts of the Micro SD Card should be placed into the slot
facing the rear (screen side) of the CarCam (see Identification of Controls). The card
can be removed by gently pushing the card further into the slot, at this point the card
will pop out for easy removal.
IMPORTANT:
Never remove the card while the unit is switched on.
Always ensure replacement cards are High Speed SDHC Class 6 or faster.
Installing the CarCam
1. Place the CarCam Bracket Socket onto the Mounting Bracket and slide securely
into place.
2. Insert the Power Adaptor cable into the USB socket on the side of the CarCam.
3. With the mounting bracket lever in the open (up) position, place the Mounting
Bracket suction pad on the inside of the windscreen and lock into place by pushing
the lever down. If there is a protective sleeve on the suction pad, please make sure
this is removed before fitting onto the windscreen.
4. Remove the protective film from the front of the lens and the LCD screen.
Important: Ensure the Mounting Bracket is located in such a way as to not block your
view while driving, or affect your ability to operate or control the car safely while driving.
Never mount the CarCam in a position that could interfere with the operation of any
Air Bags in the event of a collision.
Switching On and Recording
The CarCam is designed in such a way that it will automatically switch on a start
recording the moment it detects a connection to the car electrical system via the in
car power socket. It is important to note however that while some cars provide power
to the in car power socket even when the car ignition is off, other cars require the
ignition to be ON before providing power to the in car power socket.
1. Insert the free end of the Power Adaptor into the in car power socket.
Note: If your car provides power to the in car power socket even when the car ignition
is off, the CarCam will switch on and start recording immediately. If not, proceed to
step 2.
2. Switch on the car ignition. The CarCam will automatically switch on and start
recording.
3. If necessary, loosen the mounting bracket collar and adjust the CarCam to obtain
the optimum viewing angle. Tighten the collar to fix the CarCam securely.
4. The CarCam will continue to record for 10 seconds after the ignition has been
switched off or when the power adaptor is removed from the in car power socket.
5. To Stop recording at any time, press the OK button.
6. To switch OFF the CarCam, press and hold the
button for 2 seconds.
7. To switch ON the CarCam (for example, when outside of the car) press and hold
the
button for 2 seconds.
8. You can switch on or off the internal microphone by pressing the
button once.
Note: If the CarCam is switched on while connected to an external power source, it will
automatically start recording after it is switched on. If the CarCam is switched on
without a connection to an external power source (i.e. using the internal rechargeable
battery only), it will switch on but will NOT start recording automatically.
Setting the Time & Date
The CarCam has a Time & Date function which can be embedded onto all video footage
recorded for easy reference. To ensure the Time and Date is correct, adjust as follows:1. Switch on the CarCam by pressing and holding the
button for 2 seconds.
2. If the CarCam is recording, press the OK button to stop the recording.
3. Press the
button twice to enter the Setup Menu.
4. Press the
to select Set Date / Time then press OK.
5. Use the OK button to scroll through the Year, Month, Date, Hour, Minute & Second
options and use the
and
buttons to adjust each option.
6. When the Time and Date is set correctly, press the
button to exit the menu.
Switching Mode
The CarCam has three working modes:
Video Camera - This is the standard mode for recording video.
Snapshot - This mode allows you to take digital still photos.
Playback - This mode allows you to review all the videos and photos stored on the
memory card.
With the unit on, press the Mode Button to navigate through each of different modes.
Video Mode
While in video mode, the buttons perform the following functions:OK
M
Starts and Stops Video Recording.
File Lock. This locks the file being recorded and keeps it safe so it cannot
be overwritten later on.
Power
Night mode. Infrared LED’s on the front of the CarCam provide illumination
when light levels are low.
Up & Down Arrow: Digital Zoom in & out.
Menu
Mutes the Microphone when recording. Brings up the Video Menu when
not recording.
Switching Mode
Video Menu
In Video Camera mode, press the MENU button to enter Video Menu. You can navigate
this menu by pressing the Up & Down buttons to choose the option you want by pressing
the OK button. You can exit the menu at any time by pressing the Menu button once
again. The Video Menu options are:
1. Resolution
This function allows you to set the recording resolution. Higher resolutions give the
best picture quality but also create the largest file size. There are five options available:
1080HFD (1920*1080)
720P (1280*720)
WVGA (848 x 480)
VGA (640 x 480)
QVGA (320 x 240)
2. Loop recording
When recording continuous video, the CarCam saves the data in small manageable files.
These video files can be 1, 2, 3, 5 or 10 minutes in length. Once the memory card is full,
the CarCam will automatically overwrite the oldest file to make space so the latest video
is always recorded and stored. This function allows you to set the video file length.
There are four options available:
1 minute
3 minutes – Default Setting
5 minutes
10 minutes
3. EV
This function allows you to control the exposure of the image recorded in steps of 1/3rd
EV from +2 to -2. Numbers on the plus side will give a brighter image while numbers on
the negative side will give a darker image. The default option is +1/3
+2.0, +5/3, +4/3, +1.0, +2/3, +1/3, +0.0, -1/3, -2/3, -1.0, -4/3, -5/3, -2.0
4. Motion Detection
This function sets the CarCam to automatically record when movement is detected.
The default option is OFF.
5. Audio
This function turns on or off the built in microphone so that audio is either recorded or
muted during recording. The default option is ON.
6. Date Stamp
This function turns on or off the time and date stamp embedded into the recorded video.
The default option is ON.
7. G-sensor
In the event of a collision, this function locks the file being recorded and keeps it safe
so it cannot be overwritten later on. The sensitivity of the collision sensor can be
adjusted as follows:
Off
2G - Default Setting
4G
8G
8. Buttons Sound
This function turns off or on the beep sound when a key is pressed. The default option
is ON.
Snapshot (Stills Camera) Mode
While in Snapshot mode, the buttons perform the following functions:OK
M
Takes a still photo.
File Lock. This locks the file being recorded and keeps it safe so
it cannot be overwritten later on.
Power
Night mode. Infrared LED’s on the front of the CarCam provide illumination
when light levels are low.
Up & Down Arrow
Digital Zoom in & out.
Menu
Brings up the Snapshot Menu.
Snapshot Menu
1. Timer
This function allows you to turn off or on the shutter Timer and adjust the timer length.
Off – Default Setting
2 seconds
5 seconds
10 seconds
2. Resolution
This function allows you to set the recording resolution for still images. Higher
resolutions give the best picture quality but also create the largest file size. There are
five options available:
12Mp (4000 x 3000) – Default Setting
10Mp (3648 x 2736)
8Mp (3200 x 2400)
5Mp (2592 x 1944)
3Mp (2048 x 1536)
3. Sequence
Turn on this function to take a series of five still photos in rapid succession with a
single press of the OK button. The default setting is OFF.
4. Quality
This function allows you to set the JPEG compression for still images. There are
three options available:
Fine – Default Setting
Standard
Economy
5. Sharpness
This function allows you to set the picture sharpening for still images. There are
three options available:
Strong
Standard – Default Setting
Soft
6. White balance
This function allows you to set the White Balance for still images. There are five options
available:
Auto – Default Setting
Daylight
Cloudy
Tungsten
Fluorescent
7. Color
This function allows you to set the color mode for still images. There are three options
available:
Normal
Black & White
Sepia
8. ISO
This function allows you to adjust the light sensitivity of the sensor. Use a lower ISO n
umber in bright conditions and a higher ISO number in darker conditions. There are
four options available:
Auto – Default Setting
100
200
400
9. EV
This function allows you to control the exposure of the still images recorded in steps of
1/3rd EV from +2 to -2. Numbers on the plus side will give a brighter image while
numbers on the negative side will give a darker image. The default option is 0.0
+2.0, +5/3, +4/3, +1.0, +2/3, +1/3, +0.0, -1/3, -2/3, -1.0, -4/3, -5/3, -2.0
10. Anti-Shaking
Turn on this function to reduce blur on still images caused by vibration or camera shake.
The default setting is OFF.
11. Quick Review
This function allows you to select the time a still photo is shown on the display for
review before returning to live camera view. There are three options available.
Off – Default Setting
2 Seconds
5 Seconds
Playback Mode
Video and still photos recorded on the memory card can be reviewed in several ways.
1. The card can be removed from the CarCam and using a card reader, be reviewed on a
PC or other device using a default media player.
2. The CarCam can be connected to a PC or other device using the supplied USB cable.
When using this method, the CarCam will prompt you with a choice of ‘Mass Storage’ or
‘PC Camera’*. Select ‘Mass Storage’ and press the OK button so that the CarCam can be
read as a Removable Disk. Play the files using the default media player.
*The CarCam can also be used as a webcam if the ‘PC Camera’ option is selected.
The recorded video files and still photos can also be played back directly on the CarCam
in Playback mode. While in Playback mode, the buttons perform the following functions:-
OK
Displays gallery of recorded files
Enables navigation through the gallery of recorded file
Selects the video or still photo file to be seen in full size
When a Video file has been selected to be seen in full size:
OK
Menu
Plays & Pauses the currently selected video file
Adjusts the volume of the built in speaker
Brings up the Playback Menu
When a Still Photo file has been selected to be seen in full size:
Menu
Zooms in and out of the Still Photo
Brings up the Playback Menu
Playback Menu
1. Delete
This allows you to delete either the current file or all files on the memory card. Note that
files that are locked will not be deleted even when the Delete All option is selected.
2. Protect
Use this to lock or unlock files. Locked files cannot be deleted or overwritten even when
the card is full. This menu allows you to lock or unlock either single files or all files on
the card at once.
System Settings
In any mode (Video, Snapshot or Playback), provided no video is being recorded, pressing
the MENU button twice enters the System Setup menu.
1. Set Date/time
Sets the time & date.
2. Auto Power Off
Sets the time Auto Power Off time when the unit is disconnected from the power supply:
Off / 1minute / 3minutes
3. Language
Sets the OSD language: English/Deutsch/Espanol/Polski/Russia/Portuguese/Ukainian/
Czech/Romana/Slovakian/Latvian
4. Screen Saver
This option allows you to switch on the screen saver so that the display will turn off after
a certain period of time.
5. Image Rotation
This function rotates the display by 180 degrees so the image looks correct in the event
the CarCam is mounted in an inverted position.
6. Format
Formats the Micro SD memory card.
7. Default Setting
Resets all the options to their default settings.
8. Firmware Version
Displays the current firmware version.
Reset Button
Press the reset button to reset the unit in the event of any problems.
Battery
This product uses a Lithium-Ion battery. Do not use it in a humid, wet and / or corrosive
environment. Do not put, store or leave your product in or near a heat source, in a high
temperature location, in strong direct sunlight, in a microwave oven or in a pressurized
container and do not expose it to temperatures over 60°C (140°F). Failure to follow
these guidelines may cause the Lithium-Ion battery to leak acid, become hot, explode
or ignite and cause injury and / or damage. Do not pierce, open or disassemble the
battery. If the battery leaks and you come into contact with leaked fluids, rinse
thoroughly with water and seek medical attention immediately. For safety reasons and
to prolong the lifetime of the battery, charging will not occur at low temperature
(below 0°/32°F) or high (over 45°/110°F) temperatures.
THE LITIUM-ION BATTERY CONTAINED IN THE PRODUCT MUST BE RECYCLED OR
DISPOSED OF PROPERLY. USE RAC CARCAM ONLY WITH THE SUPPLIED DC POWER
LEAD AND AC ADAPTER FOR BATTERY CHARGING.
To recycle your RAC CarCam unit, please take it to your local recycling centre.
This product fully satisfies the requirements for CE marking when used in a residential,
commercial or light industrial environment.
This equipment complies with the essential requirements of EU Directive 99/5/EC
Do not use this product on board aircraft, or in hospitals, without first obtaining
permission.
Warranty
This RAC CarCam is warranted to be free from defects in materials or workmanship
from one year from the date of purchase. Within this period, ProofCam will repair or
replace any part or parts that fail provided such failure is not deemed to be as a
result of misuse or damage caused. The warranty does not apply to cosmetic damage
not to consumables such as batteries or storage cards. At our option, we will either
repair or replace any cameras that are deemed to be eligible under the terms of this
warranty. Any damage or fault caused by accident, misuse, unauthorised repair or
interference or similar is not covered under this warranty.
If you have a camera that requires service under warranty, then in the first instance
you should return it to the retailer from whom it was purchased.
Should you have any general or technical questions on your RAC 04 CarCam, please
email us at [email protected]. We will endeavor to answer your mail within
24 hours.
ProofCam Limited
EC1V 7LQ
ProofCam.com
You can also find general information, news, reviews and competitions on our ‘ProofCam’
Facebook pager and Twitter feed.
Technical Specification
LCD Screen
1.5” TFT display screen
Lens
120° Field of View
Language
English/Deutsch/Espanol/Polski/Russian/Portuguese/
Video format
AVI
Ukrainian/Czech/Romana/Slovakian/Latvian
Video Resolution
1080HFD 1920*1080 / 720P 1280*720
Motion detection
ON / OFF
Photo Resolution
12M / 10M / 8M / 5M / 3M
Photo Format
JPG
SD Storage
Micro SD Card 2GB-32GB
Mic / Speaker
Built in
Photo Mode
Single / Continuous Capture
Auto LCD
ON / OFF
Auto Power On / Off
Off / 1minute / 3minutes
Frequency
50Hz
USB Interface
USB2.0
Battery capacity
120 mA
System Requirements
Windows XP2 / Vista / Windows 7 / Windows 8
IMPORTANT
It is your responsibility to make sure that you use the RAC CarCam in a safe and
responsible manner. Do not access functions or change settings whilst you are driving,
and the location and positioning of your RAC CarCam should not interfere with the
driver’s field of vision.
Please make sure that you drive in an appropriate way and in compliance with all the
laws and regulations. The RAC CarCam is not a driving aid and is designed solely to
provide a video record of your journey.
ProofCam accept no responsibility whatsoever for any failure of the equipment to work
correctly.
RAC 04 IB UK 20150828