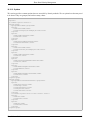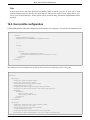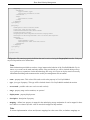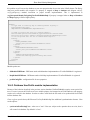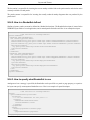
1
JBoss Portal 2.6.5
Reference Guide
Release 2.6.5
Table of Contents
JBoss Portal - Overview ..........................................................................................................................x
Feature List ......................................................................................................................................... xii
Target Audience ...................................................................................................................................xv
Acknowledgements .............................................................................................................................xvi
1. System Requirements ..........................................................................................................................1
1.1. Minimum System Requirements ...............................................................................................1
1.2. Supported Operating Systems ...................................................................................................1
1.3. JBoss Application Server ..........................................................................................................1
1.4. Databases ................................................................................................................................2
1.5. Source building ........................................................................................................................2
2. Installation .........................................................................................................................................3
2.1. The JBoss Portal and JBoss AS Bundle ......................................................................................3
2.2. Installing the Binary Download .................................................................................................4
2.2.1. Setting up your Environment ..........................................................................................4
2.2.1.1. Getting the Binary ..............................................................................................4
2.2.1.2. JBoss EAP and JBoss AS Setup ...........................................................................4
2.2.1.3. Database Setup ...................................................................................................5
2.2.1.4. Datasource Descriptors .......................................................................................5
2.2.2. Deploying JBoss Portal ..................................................................................................6
2.3. Installing from the Sources .......................................................................................................7
2.3.1. Getting the Sources .......................................................................................................7
2.3.2. JBoss EAP and JBoss AS Setup ...................................................................................10
2.3.2.1. JBoss Application Server Setup .........................................................................10
2.3.2.2. Operating System Environment Settings ............................................................10
2.3.3. Building and Deploying from the Sources .....................................................................12
2.3.4. Database Setup ............................................................................................................13
2.3.5. Datasource Configuration ............................................................................................13
2.4. Deploying JBoss Portal ...........................................................................................................14
3. Customizing your Installation ............................................................................................................16
3.1. Changing the Port ..................................................................................................................16
3.2. Changing the Context Path ......................................................................................................17
3.3. Forcing the Database Dialect ...................................................................................................18
3.3.1. Database Dialect Settings for JBoss Portal ....................................................................18
3.3.2. DB Dialect Settings for the CMS Component ................................................................18
3.4. Setting up the Email Service ...................................................................................................19
3.5. Configuring proxy settings ......................................................................................................20
3.6. Disabling Dynamic Proxy Un-wrapping ..................................................................................20
4. Upgrading JBoss Portal 2.4 to 2.6 ......................................................................................................22
4.1. Manual Upgrade ....................................................................................................................22
4.1.1. Themes .......................................................................................................................22
4.1.2. Updating the Database .................................................................................................23
4.1.3. Portlet Names ..............................................................................................................25
4.1.4. CMS ...........................................................................................................................27
5. Portlet Primer ...................................................................................................................................29
JBoss Release 2.6.5
ii
JBoss Portal 2.6.5
5.1. JSR-168 Overview .................................................................................................................29
5.1.1. Portal Pages ................................................................................................................29
5.1.2. Rendering Modes ........................................................................................................30
5.1.3. Window States ............................................................................................................30
5.1.4. Section Status ..............................................................................................................31
5.2. Tutorials ................................................................................................................................31
5.2.1. Deploying your first Portlet ..........................................................................................31
5.2.1.1. Introduction ......................................................................................................31
5.2.1.2. Package Structure .............................................................................................31
5.2.1.3. Portlet Classes ..................................................................................................31
5.2.1.4. Application Descriptors .....................................................................................33
5.2.1.5. Building your Portlet ........................................................................................37
5.2.1.6. Deploying your Portlet ......................................................................................38
5.2.2. An example JSP Portlet ...............................................................................................40
5.2.2.1. Introduction ......................................................................................................40
5.2.2.2. Package Structure .............................................................................................40
5.2.2.3. Portlet Classes ..................................................................................................41
5.2.2.4. JSP Files and the Portlet Tag Library .................................................................42
5.2.2.5. Building your JSP Portlet ..................................................................................44
5.2.2.6. Deploying your JSP Portlet ...............................................................................45
5.2.3. An example Sun JSF Reference Implementation (RI) Portlet ..........................................47
5.2.3.1. Introduction ......................................................................................................47
5.2.3.2. Package Structure .............................................................................................47
5.2.3.3. Application Descriptors .....................................................................................48
5.2.3.4. Building your JSF Portlet ..................................................................................50
5.2.3.5. Deploying your JSF Portlet ...............................................................................51
5.2.4. An example Apache MyFaces JSF Portlet .....................................................................53
5.2.4.1. Introduction ......................................................................................................53
5.2.4.2. Package Structure .............................................................................................53
5.2.4.3. Application Descriptors .....................................................................................54
5.2.4.4. Building your Apache MyFaces JSF Portlet ........................................................56
5.2.4.5. Deploying your Apache MyFaces JSF Portlet .....................................................57
6. XML Descriptors ..............................................................................................................................60
6.1. Changes from previous releases ..............................................................................................60
6.1.1. The JBoss Portlet DTD ................................................................................................61
6.1.2. The JBoss Portlet Instance DTD ...................................................................................64
6.1.3. The JBoss Portal Object DTD ......................................................................................67
6.1.4. The JBoss Portal App DTD ..........................................................................................73
6.2. Portlet Descriptors ..................................................................................................................73
6.2.1. *-object.xml Descriptors ..............................................................................................73
6.2.2. The portlet-instances.xml Descriptor .............................................................................76
6.2.3. The jboss-portlet.xml Descriptor ..................................................................................79
6.2.3.1. Injecting Header Content ...................................................................................79
6.2.3.2. Injecting Services in the Portlet Context .............................................................79
6.2.3.3. Defining Extra Portlet Information .....................................................................80
6.2.3.4. Portlet Session Replication in a Clustered Environment .......................................80
6.2.4. The portlet.xml Descriptor ...........................................................................................80
6.3. JBoss Portal Descriptors .........................................................................................................82
6.3.1. Datasource Descriptors (portal-*-ds.xml) ......................................................................82
JBoss Release 2.6.5
iii
JBoss Portal 2.6.5
6.3.1.1. Datasource Descriptors included in Binary releases .............................................83
6.3.1.2. Building Datasource Descriptors from Source ....................................................83
6.3.2. Portlet Debugging (jboss-portal.sar/conf/config.xml) .....................................................86
6.3.3. Log in to Dashboard ....................................................................................................86
6.4. Descriptor Examples ..............................................................................................................86
6.4.1. Defining a new Portal Page ..........................................................................................86
6.4.2. Defining a new Portal Instance .....................................................................................90
7. Portal urls .........................................................................................................................................93
7.1. Introduction ...........................................................................................................................93
7.2. Accessing a portal ..................................................................................................................93
7.3. Accessing a page ....................................................................................................................93
7.4. Accessing CMS Content .........................................................................................................94
8. Error handling configuration ..............................................................................................................95
8.1. Error types .............................................................................................................................95
8.2. Control policies ......................................................................................................................95
8.2.1. Policy delegation and cascading ...................................................................................95
8.2.2. Default policy .............................................................................................................96
8.2.3. Portal policy ................................................................................................................96
8.2.4. Page policy .................................................................................................................96
8.3. Configuration using the XML descriptors ................................................................................96
8.3.1. Portal policy properties ................................................................................................96
8.3.2. Page policy properties ..................................................................................................97
8.4. Handling errors with JSP ........................................................................................................99
8.5. Configuration using the Portal Management Application ..........................................................99
9. Content Integration ......................................................................................................................... 101
9.1. Window content ................................................................................................................... 102
9.2. Content customization .......................................................................................................... 102
9.3. Content Driven Portlet .......................................................................................................... 103
9.3.1. Displaying content ..................................................................................................... 103
9.3.2. Configuring content ................................................................................................... 103
9.3.3. Step by step example of a content driven portlet .......................................................... 104
9.3.3.1. The Portlet skeleton ........................................................................................ 104
9.3.3.2. Overriding the dispatch method ....................................................................... 104
9.3.3.3. Utilities methods ............................................................................................. 105
9.3.3.4. The editor ...................................................................................................... 106
9.3.3.5. Viewing content at runtime ............................................................................. 107
9.3.3.6. Hooking the portlet into the portal ................................................................... 108
9.4. Configuring window content in deployment descriptor ........................................................... 109
10. Widget Integration ........................................................................................................................ 111
10.1. Introduction ....................................................................................................................... 111
10.2. Widget portlet configuration ............................................................................................... 111
11. Portlet Modes ............................................................................................................................... 113
11.1. Admin Portlet Mode ........................................................................................................... 113
11.1.1. Portlet configuration ................................................................................................ 113
11.1.2. Declarative instance security configuration ................................................................ 113
11.1.3. Instance security configuration with the administration portlet .................................... 114
12. Portal API ..................................................................................................................................... 115
12.1. Introduction ....................................................................................................................... 115
12.2. Portal URL ........................................................................................................................ 116
JBoss Release 2.6.5
iv
JBoss Portal 2.6.5
12.3. Portal session ..................................................................................................................... 116
12.4. Portal runtime context ......................................................................................................... 117
12.5. Portal nodes ....................................................................................................................... 117
12.6. Portal navigational state ...................................................................................................... 119
12.7. Portal events ...................................................................................................................... 119
12.7.1. Portal node events ................................................................................................... 120
12.7.1.1. Portal node event propagation model .............................................................. 122
12.7.1.2. Portal node event listener .............................................................................. 122
12.7.1.3. Portal node event context .............................................................................. 123
12.7.2. Portal session events ................................................................................................ 123
12.7.3. Portal user events ..................................................................................................... 124
12.8. Examples ........................................................................................................................... 124
12.8.1. UserAuthenticationEvent example ............................................................................ 125
12.8.2. Achieving Inter Portlet Communication with the events mechanism ........................... 126
12.8.3. Link to other pages .................................................................................................. 129
13. Clustering Configuration ............................................................................................................... 130
13.1. Introduction ....................................................................................................................... 130
13.2. Considerations ................................................................................................................... 131
13.3. JBoss Portal Clustered Services ........................................................................................... 131
13.3.1. Portal Session Replication ........................................................................................ 131
13.3.2. Hibernate clustering ................................................................................................. 132
13.3.3. Identity clustering .................................................................................................... 133
13.3.4. CMS clustering ....................................................................................................... 133
13.4. Setup ................................................................................................................................. 134
13.5. Portlet Session Replication .................................................................................................. 136
13.5.1. JBoss Portal configuration ........................................................................................ 137
13.5.2. Portlet configuration ................................................................................................ 137
13.5.3. Limitations .............................................................................................................. 137
14. Web Services for Remote Portlets (WSRP) ..................................................................................... 139
14.1. Introduction ....................................................................................................................... 139
14.2. Level of support in JBoss Portal .......................................................................................... 139
14.3. Deploying JBoss Portal's WSRP services ............................................................................. 140
14.3.1. Considerations to use WSRP when running Portal on a non-default port or hostname ... 140
14.3.2. Considerations to use WSRP with SSL ..................................................................... 140
14.4. Making a portlet remotable ................................................................................................. 141
14.5. Consuming JBoss Portal's WSRP portlets from a remote Consumer ....................................... 142
14.6. Consuming remote WSRP portlets in JBoss Portal ................................................................ 142
14.6.1. Overview ................................................................................................................ 142
14.6.2. Configuring a remote producer walk-through ............................................................ 143
14.6.2.1. Using the configuration portlet ....................................................................... 143
14.6.2.2. Using a WSRP Producer XML descriptor ....................................................... 145
14.6.2.3. Configuring access to a remote portlet ............................................................ 146
14.6.3. WSRP Producer descriptors ..................................................................................... 147
14.6.3.1. Required configuration information ............................................................... 147
14.6.3.2. Optional configuration .................................................................................. 148
14.6.4. Examples ................................................................................................................ 148
14.7. Consumers maintenance ..................................................................................................... 150
14.7.1. Modifying a currently held registration ..................................................................... 150
14.7.1.1. Registration modification for service upgrade ................................................. 150
JBoss Release 2.6.5
v
JBoss Portal 2.6.5
14.7.1.2. Registration modification on producer error .................................................... 152
14.7.2. Consumer operations ............................................................................................... 154
14.7.3. Erasing local registration data ................................................................................... 154
14.8. Configuring JBoss Portal's WSRP Producer ......................................................................... 155
14.8.1. Overview ................................................................................................................ 155
14.8.2. Default configuration ............................................................................................... 155
14.8.3. Registration configuration ........................................................................................ 156
14.8.3.1. Customization of Registration handling behavior ............................................ 157
15. Security ........................................................................................................................................ 159
15.1. Securing Portal Objects ....................................................................................................... 159
15.2. Securing the Content Management System ........................................................................... 160
15.2.1. CMS Security Configuration .................................................................................... 161
15.2.1.1. CMS Super User ........................................................................................... 162
15.2.1.2. CMS Security Console .................................................................................. 163
15.3. Authentication with JBoss Portal ......................................................................................... 163
15.3.1. Authentication configuration .................................................................................... 163
15.3.2. The portal servlet ..................................................................................................... 163
15.4. Authorization with JBoss Portal .......................................................................................... 164
15.4.1. The portal permission .............................................................................................. 164
15.4.2. The authorization provider ....................................................................................... 164
15.4.3. Making a programmatic security check ..................................................................... 165
15.4.4. Configuring an authorization domain ........................................................................ 166
16. JBoss Portal Identity Management ................................................................................................. 167
16.1. Identity management API ................................................................................................... 167
16.1.1. How to obtain identity modules services ? ................................................................. 170
16.1.2. API changes since 2.4 .............................................................................................. 171
16.2. Identity configuration ......................................................................................................... 172
16.2.1. Main configuration file architecture (identity-config.xml) .......................................... 173
16.2.1.1. Datasources .................................................................................................. 174
16.2.1.2. Modules ....................................................................................................... 174
16.2.1.3. Options ........................................................................................................ 176
16.3. User profile configuration ................................................................................................... 177
16.4. Identity modules implementations ....................................................................................... 179
16.4.1. Database modules .................................................................................................... 179
16.4.2. Delegating UserProfile module ................................................................................. 179
16.4.3. Database UserProfile module implementation ........................................................... 180
17. JBoss Portal Identity Portlets ......................................................................................................... 182
17.1. Introduction ....................................................................................................................... 182
17.1.1. Features .................................................................................................................. 182
17.2. Configuration ..................................................................................................................... 182
17.2.1. Captcha support ....................................................................................................... 183
17.2.2. Lost password ......................................................................................................... 184
17.2.3. Reset password ........................................................................................................ 185
17.2.4. jBPM based user registration .................................................................................... 185
17.2.5. The configuration file .............................................................................................. 186
17.2.6. Customize e-mail templates ...................................................................................... 187
17.3. User interface customization ............................................................................................... 187
17.3.1. Example 1: required fields ........................................................................................ 188
17.3.2. Example 2: dynamic values (dropdown menu with predefined values) ........................ 188
JBoss Release 2.6.5
vi
JBoss Portal 2.6.5
17.3.3. Example 3: adding new properties ............................................................................ 189
17.3.4. Illustration .............................................................................................................. 190
17.3.5. Customizing the View Profile page ........................................................................... 192
17.4. Customizing the workflow .................................................................................................. 192
17.4.1. Duration of process validity ...................................................................................... 193
17.5. Disabling the Identity Portlets ............................................................................................. 193
17.5.1. Enabling the Identity Portlets .................................................................................... 194
18. Authentication and Authorization ................................................................................................... 195
18.1. Authentication in JBoss Portal ............................................................................................. 195
18.1.1. Configuration .......................................................................................................... 195
18.2. JAAS Login Modules ......................................................................................................... 195
18.2.1. org.jboss.portal.identity.auth.IdentityLoginModule .................................................... 195
18.2.2. org.jboss.portal.identity.auth.DBIdentityLoginModule ............................................... 196
18.2.3. org.jboss.portal.identity.auth.SynchronizingLdapLoginModule .................................. 197
18.2.4. org.jboss.portal.identity.auth.SynchronizingLdapExtLoginModule ............................. 198
18.2.5. org.jboss.portal.identity.auth.SynchronizingLoginModule .......................................... 198
19. LDAP ........................................................................................................................................... 200
19.1. How to enable LDAP usage in JBoss Portal ......................................................................... 200
19.2. Configuration of LDAP connection ..................................................................................... 201
19.2.1. Connection Pooling ................................................................................................. 201
19.2.2. SSL ........................................................................................................................ 202
19.2.3. ExternalContext ....................................................................................................... 203
19.3. LDAP Identity Modules ...................................................................................................... 203
19.3.1. Common settings ..................................................................................................... 203
19.3.2. UserModule ............................................................................................................ 204
19.3.2.1. LDAPUserModuleImpl ................................................................................. 204
19.3.2.2. LDAPExtUserModuleImpl ............................................................................ 205
19.3.3. RoleModule ............................................................................................................ 206
19.3.3.1. LDAPRoleModuleImpl ................................................................................. 206
19.3.3.2. LDAPExtRoleModuleImpl ............................................................................ 207
19.3.4. MembershipModule ................................................................................................. 208
19.3.4.1. LDAPStaticGroupMembershipModuleImpl .................................................... 208
19.3.4.2. LDAPStaticRoleMembershipModuleImpl ...................................................... 209
19.3.5. UserProfileModule .................................................................................................. 209
19.3.5.1. LDAPUserProfileModuleImpl ....................................................................... 209
19.4. LDAP server tree shapes ..................................................................................................... 210
19.4.1. Keeping users membership in role entries .................................................................. 210
19.4.1.1. Example LDIF .............................................................................................. 211
19.4.1.2. Example identity configuration ...................................................................... 212
19.4.2. Keeping users membership in user entries ................................................................. 214
19.4.2.1. Example LDIF .............................................................................................. 215
19.4.2.2. Example identity configuration ...................................................................... 216
19.5. Synchronizing LDAP configuration ..................................................................................... 217
19.6. Supported LDAP servers .................................................................................................... 219
20. Single Sign ON ............................................................................................................................. 220
20.1. Overview of SSO in portal .................................................................................................. 220
20.2. Using Tomcat Valve ........................................................................................................... 220
20.2.1. Enabling Tomcat SSO Valve .................................................................................... 220
20.2.2. Example of usage .................................................................................................... 220
JBoss Release 2.6.5
vii
JBoss Portal 2.6.5
20.3. CAS - Central Authentication Service .................................................................................. 222
20.3.1. Integration steps ...................................................................................................... 222
20.4. JOSSO - Java Open Single SignOn ...................................................................................... 224
20.4.1. Integration steps ...................................................................................................... 225
21. CMS Portlet .................................................................................................................................. 229
21.1. Introduction ....................................................................................................................... 229
21.2. Features ............................................................................................................................. 230
21.3. CMS content ...................................................................................................................... 230
21.3.1. Configuring a window to display CMS content .......................................................... 230
21.4. CMS Configuration ............................................................................................................ 230
21.4.1. Display CMS content ............................................................................................... 230
21.4.2. Service Configuration .............................................................................................. 231
21.4.2.1. Tuning Jackrabbit ......................................................................................... 231
21.4.2.2. Changing the url under which the content should be accessible ........................ 231
21.4.3. Configuring the Content Store Location .................................................................... 232
21.4.3.1. 100% Filesystem Storage .............................................................................. 232
21.4.3.2. 100% Database Storage ................................................................................. 233
21.4.3.3. Mixed Storage .............................................................................................. 233
21.5. Localization Support .......................................................................................................... 234
21.6. CMS Service ...................................................................................................................... 234
21.6.1. CMS Interceptors .................................................................................................... 234
22. Portal Workflow ........................................................................................................................... 238
22.1. JBPM Workflow Engine Integration .................................................................................... 238
22.2. CMS Publish/Approve Workflow Service ............................................................................ 239
23. Navigation Tabs ............................................................................................................................ 241
23.1. Explicit ordering of tabs ...................................................................................................... 241
23.2. Translating tab labels .......................................................................................................... 242
23.2.1. Method one: Multiple display-name .......................................................................... 242
23.2.2. Defining a resource bundle and supported locales ...................................................... 242
24. Layouts and Themes ...................................................................................................................... 244
24.1. Overview ........................................................................................................................... 244
24.2. Header ............................................................................................................................... 245
24.2.1. Overview ................................................................................................................ 245
24.2.1.1. Writing his own JSPs .................................................................................... 246
24.3. Layouts .............................................................................................................................. 248
24.3.1. How to define a Layout ............................................................................................ 248
24.3.2. How to use a Layout ................................................................................................ 248
24.3.2.1. Declarative use ............................................................................................. 248
24.3.2.2. Programmatic use ......................................................................................... 249
24.3.3. Where to place the Descriptor files ........................................................................... 249
24.3.4. Layout JSP-tags ....................................................................................................... 249
24.4. RenderSets ......................................................................................................................... 251
24.4.1. What is a RenderSet ................................................................................................. 251
24.4.2. How is a RenderSet defined ..................................................................................... 252
24.4.3. How to specify what RenderSet to use ...................................................................... 252
24.5. Themes .............................................................................................................................. 254
24.5.1. What is a Theme ...................................................................................................... 254
24.5.2. How to define a Theme ............................................................................................ 254
24.5.3. How to use a Theme ................................................................................................ 255
JBoss Release 2.6.5
viii
JBoss Portal 2.6.5
24.5.4. How to write your own Theme ................................................................................. 257
24.6. Other Theme Functionalities and Features ............................................................................ 257
24.6.1. Content Rewriting and Header Content Injection ....................................................... 257
24.6.2. Declarative CSS Style injection ................................................................................ 258
24.6.3. Disabling Portlet Decoration .................................................................................... 258
24.7. Theme Style Guide (based on the Industrial theme) .............................................................. 258
24.7.1. Overview ................................................................................................................ 259
24.7.2. Main Screen Shot .................................................................................................... 259
24.7.3. List of CSS Selectors ............................................................................................... 260
24.8. Additional Ajax selectors .................................................................................................... 282
25. Ajax ............................................................................................................................................. 284
25.1. Introduction ....................................................................................................................... 284
25.2. Ajaxified markup ............................................................................................................... 284
25.2.1. Ajaxified layouts ..................................................................................................... 284
25.2.2. Ajaxified renderers .................................................................................................. 285
25.3. Ajaxified pages .................................................................................................................. 286
25.3.1. Drag and Drop ......................................................................................................... 286
25.3.2. Partial refresh .......................................................................................................... 286
25.3.2.1. Portal objects configuration ........................................................................... 287
25.3.2.2. Portlet configuration ..................................................................................... 288
25.3.2.3. Limitations ................................................................................................... 288
26. Troubleshooting and FAQ ............................................................................................................. 290
26.1. Troubleshooting and FAQ ................................................................................................... 290
A. *-object.xml DTD .......................................................................................................................... 293
B. portlet-instances.xml DTD .............................................................................................................. 299
C. jboss-portlet.xml DTD .................................................................................................................... 302
JBoss Release 2.6.5
ix
JBoss Portal - Overview
Many IT organizations look to achieve a competitive advantage for the enterprise by improving business productivity and reducing costs. Today's top enterprises are realizing this goal by deploying enterprise portals within their IT
infrastructure. Enterprise portals simplify access to information by providing a single source of interaction with
corporate information. Although today's packaged portal frameworks help enterprises launch portals more quickly,
only JBoss Portal can deliver the benefits of a zero-cost open source license combined with a flexible and scalable
underlying platform.
JBoss Portal provides an open source and standards-based environment for hosting and serving a portal's Web interface, publishing and managing its content, and customizing its experience. It is entirely standards-based and supports the JSR-168 portlet specification, which allows you to easily plug-in standards-compliant portlets to meet
your specific portal needs. JBoss Portal is available through the business-friendly LGPL [1] open source license and
is supported by Red Hat Middleware, LLC Professional Support and Consulting [2] . JBoss support services are
available to assist you in designing, developing, deploying, and ultimately managing your portal environment.
JBoss Portal is currently developed by Red Hat Middleware, LLC developers and community contributors.
[1] http://jboss.com/opensource/lgpl/faq
[2] http://www.jboss.com/services/index
JBoss Release 2.6.5
x
JBoss Portal - Overview
The JBoss Portal framework and architecture includes the portal container and supports a wide range of features including standard portlets, single sign-on, clustering and internationalization. Portal themes and layouts are configurable. Fine-grained security administration down to portlet permissions rounds out the security model.
JBoss Portal Resources:
1.
JBoss Portal Home Page [3]
2.
Forums: User [4] | Design [5] | WSRP [6]
3.
Wiki [7]
4.
PortletSwap.com portlet exchange [8]
5.
Our Roadmap [9]
The JBoss Portal team encourages you to use this guide to install and configure JBoss Portal. If you encounter any
configuration issues or simply want to take part in our community, we would love to hear from you in our forums.
[3] http://labs.jboss.com/jbossportal
[4] http://www.jboss.org/index.html?module=bb&op=viewforum&f=215
[5] http://www.jboss.org/index.html?module=bb&op=viewforum&f=205
[6] http://jboss.org/index.html?module=bb&op=viewforum&f=232
[7] http://www.jboss.com/wiki/Wiki.jsp?page=JBossPortal
[8] http://www.portletswap.com
[9] http://jira.jboss.com/jira/browse/JBPORTAL?report=com.atlassian.jira.plugin.system.project:roadmap-panel
JBoss Release 2.6.5
xi
Feature List
The following list details features found in this document's related release. For a technical view of our features,
view the Project Roadmap and Task List [1] .
Technology and Architecture
•
JEMS: Leverages the power of JBoss Enterprise Middleware Services : JBoss Application Server, JBoss
Cache, JGroups, and Hibernate.
•
DB Agnostic: Will work with any RDBMS supported by Hibernate
•
JAAS Authentication: Custom authentication via JAAS login modules.
•
Cacheing: Utilizes render-view caching for improved performance.
•
Clusterable: Cluster support allows for portal state to be clustered for all portal instances.
•
Hot-Deployment: Leverages JBoss dynamic auto deployment features.
•
SAR Installer: Browser-based installer makes installation and initial configuration a breeze.
Single Sign On
•
Leverages Tomcat and JBoss single sign on (SSO) solutions.
•
Integrates with JOSSO and CAS out of the box. (Experimental support for Open SSO)
LDAP
•
Connect to virtually any LDAP server
•
Integrates with Sun Active Directory and OpenLDAP out of the box. (Experimental support for Active
Directory)
Supported Standards
•
Portlet Specification and API 1.0 (JSR-168)
•
Content Repository for Java Technology API (JSR-170)
•
Java Server Faces 1.2 (JSR-252)
•
Java Management Extension (JMX) 1.2
•
Web Services for Remote Portlets (WSRP) 1.0 See WSRP support in Portal [2] for more details.
•
Full J2EE 1.4 compliance when used with JBoss AS
[1] http://jira.jboss.com/jira/browse/JBPORTAL
[2] http://docs.jboss.com/jbportal/v2.6/reference-guide/en/html/wsrp.html#wsrp_support
JBoss Release 2.6.5
xii
Feature List
Portal and Portal Container
•
Multiple Portal Instances: Ability to have multiple Portal instances running inside of one Portal container.
•
IPC Inter-Portlet Communication API enables portlets to create links to other objects such as a page, portal or
window .
•
Dynamicity The ability for administrators and users to create and destroy objects such as portlets, pages,
portals, themes, and layouts at runtime.
•
Internationalization: Ability to use internationalization resource files for every portlet.
•
Pluggable services: Authentication performed by the servlet container and JAAS make it possible to swap the
authentication scheme.
•
Page-based Architecture: Allows for the grouping/division of portlets on a per-page basis.
•
Existing Framework support: Portlets utilizing Struts, Spring MVC, Sun JSF-RI, AJAX, or MyFaces are supported.
Themes and Layouts
•
Easily swappable themes/layouts: New themes and layouts containing images can be deployed in WAR
archives.
•
Flexible API: Theme and Layout API are designed to separate the business layer from the presentation layer.
•
Per-page layout strategy: Different layouts can be assigned to different pages.
User and Group Functionality
•
User registration/validation: Configurable registration parameters allow for user email validation before activation.
•
Workflow: Ability to define your own jBPM workflow on user registration.
•
User login: Makes use of servlet container authentication.
•
Create/Edit Users: Ability for administrators to create/edit user profiles.
•
Create/Edit Roles: Ability for administrators create/edit roles.
•
Role Assignment: Ability for administrators to assign users to roles.
•
Captcha support: To distinct humans from machines when registering.
Permissions Management
•
Extendable permissions API: Allows custom portlets permissions based on role definition.
JBoss Release 2.6.5
xiii
Feature List
•
Administrative interface: Allows for permissions assignments to roles at any time for any deployed portlet,
page, or portal instance.
Content Management System
•
JCR-compliant: The CMS is powered by Apache Jackrabbit, an open source implementation of the Java Content Repository API.
•
DB or Filesystem store support: Configurable content store to either a filesystem or RDBMS.
•
External Blob Support: Configurable content store allowing large blobs to reside on filesystem and content
node references/properties to reside in RDBMS.
•
Versioning support: All content edited/created is autoversioned with a history of edits that can be viewed at
any time.
•
Content Serving Search-engine-friendly URLS: http://yourdomain/portal/content/index.html (Does not apply
to portlet actions.)
•
No long portal URLS: Serve binaries with simple urls. (http://domain/files/products.pdf)
•
Multiple HTML Portlet instance support: Allows for extra instances of static content from the CMS to be
served under separate windows.
•
Directory Support: create, move, delete, copy, and upload entire directory trees.
•
File Functions: create, move, copy, upload, and delete files.
•
Embedded directory-browser: When copying, moving, deleting, or creating files, administrators can simply
navigate the directory tree to find the collection they want to perform the action on.
•
Ease-of-use architecture: All actions to be performed on files and folder are one mouse-click away.
•
Full-featured HTML editor: HTML Editor contains WYSIWYG mode, preview functionality, and HTML
source editting mode. HTML commands support tables, fonts, zooming, image and url linking, flash movie
support, bulleted and numbered list, and dozens more.
•
Editor style-sheet support: WYSIWYG editor displays current Portal style-sheet, for easy choosing of classes.
•
Internationalization Support: Content can be attributed to a specific locale and then served to the user based
on his/her browser settings.
•
Workflow Support: Basic submit for review and approval process.
JBoss Release 2.6.5
xiv
Target Audience
This guide is aimed towards Portlet developers, Portal administrators, and those wishing to implement and extend
the JBoss Portal framework. For end-user documentation, please refer to the JBoss Portal User Manual from the
JBoss Portal Documentation Library [1] .
[1] http://labs.jboss.com/portal/jbossportal/docs/index.html
JBoss Release 2.6.5
xv
Acknowledgements
We would like to thank the developers that participate in the JBoss Portal project effort.
Specifically,
•
Luca Stancapiano and Luc Boudreau for their localization contributions.
•
Antoine Herzog for his feedback, for writing Wikis and helping in the forums.
•
Mark Fernandes and Paul Tamaro from Novell, for their hard work in supplying the portal project with usable
and attractive themes and layouts in the 2.4 version of JBoss Portal.
•
Martin Holzner from Novell, for his work on themes in the 2.4 version of JBoss Portal.
•
Kev "kevs3d" Roast for supplying us with two working portlets that integrate existing frameworks in to the
portal: Sun JSF-RI and Spring MVC Portlet.
•
Swarn "sdhaliwal" Dhaliwal for supplying us with the Struts-Bridge, that will allow for existing struts applications to work with the Portal.
•
A few Red Hat employees, Remy Maucherat for Tomcat configuration, Magesh Kumar Bojan and Martin Putz
always there to help our customers, Prabhat Jha for making sure that JBoss Portal runs great everywhere. Noel
Rocher for his early feedback on JBoss Portal 2.6 and contributions. James Cobb for the Renaissance theme.
•
The JBoss Labs (http://www.JBoss.org) team for building a great infrastructure on top of JBoss Portal 2.6,
providing very useful feedback and giving us the initial Drag and Drop implementation.
•
Everyone participating in the forums and Wiki in general.
Contributions of any kind are always welcome, you can contribute by providing ideas, filling bug reports, producing some code, designing a theme, writing some documentation, etc... If you think your name is missing from this
page, please let us know.
JBoss Release 2.6.5
xvi
1
System Requirements
Thomas Heute <[email protected]>
Roy Russo <[email protected]>
The following section details tested, or reported as working by users, hardware and software versions that are compatible with JBoss Portal. Before reporting a problem, make sure you are using compatible hardware and software.
If you successfully installed JBoss Portal on versions not listed here, please let us know so it can be added to this
section.
1.1. Minimum System Requirements
•
JDK 5 (JDK 6 is not part of the test platform)
•
512 MB RAM
•
100 MB hard disk space
•
400 MHz CPU
1.2. Supported Operating Systems
JBoss Portal is 100% pure Java, and therefore it is interoperable with most Operating Systems capable of running a
Java Virtual Machine (JVM). These Operating Systems include but are not limited to: Linux, Microsoft Windows,
UNIX, and Mac OS X.
1.3. JBoss Application Server
JBoss Portal 2.6.5 is tested with JBoss Application Server (AS) 4.2.1, JBoss AS 4.2.2, JBoss Enterprise Application Platform (EAP) 4.2 and JBoss EAP 4.3. It is highly recommended that customers who have access to the JBoss
Customer Support Portal (CSP) [1] use JBoss EAP 4.3 (It is mandatory to get access to professional support). Customers who do not have access to the JBoss CSP should use JBoss AS [2].
[1] https://support.redhat.com/portal/login.html
[2] http://labs.jboss.com/jbossas/
JBoss Release 2.6.5
1
System Requirements
Warning
JBoss AS versions 4.0.x are not supported.
1.4. Databases
JBoss Portal is database-agnostic. The following list outlines known-to-be-working database vendor and version
combinations:
•
MySQL 4.x.x (use Connector/J 3.1 [3])
•
MySQL 5 (known issue [4])
•
PostgreSQL 8.x
•
Hypersonic SQL
•
Derby
•
Oracle 9 and 10g (use the latest driver from the Oracle 10 branch [5] even if you are running Oracle 9)
•
Microsoft SQL Server
•
MaxDB
Note
JBoss Portal employs Hibernate as an interface to a relational database management system (RDBMS).
Most relational database management systems supported by Hibernate will work with JBoss Portal.
1.5. Source building
The source building mechanism works on Linux, Microsoft Windows, Mac OS X, and any UNIX-like Operating
System.
[3] http://dev.mysql.com/downloads/connector/j/3.1.html
[4] http://wiki.jboss.org/wiki/Wiki.jsp?page=AvoidMySQL5DataTruncationErrors
[5] http://www.oracle.com/technology/software/tech/java/sqlj_jdbc/index.html
JBoss Release 2.6.5
2
2
Installation
Depending on your needs, there are several different methods to install JBoss Portal. Pre-configured clustered versions (JBoss Portal Binary (Clustered)) are available from the JBoss Portal Downloads [1] page. Clustered
versions of JBoss Portal must be deployed in the JBOSS_INSTALLATION_DIRECTORY/server/all/deploy/ directory. All JBoss AS instances must reference the same datasource. Refer to Section 2.3.2.2 for details on how to configure JBoss Portal for clustering.
An environment variable, JBOSS_HOME, is configured in Section 2.3.2.2. References to $JBOSS_HOME assume this to
be your JBOSS_INSTALLATION_DIRECTORY.
2.1. The JBoss Portal and JBoss AS Bundle
This is the easiest and fastest way to get JBoss Portal installed and running. The JBoss Portal and JBoss AS bundle
contains JBoss AS, JBoss Portal, and the embedded Hypersonic SQL database. To install the JBoss Portal and
JBoss AS bundle:
1.
Get the bundle: the bundle is available from the JBoss Portal Downloads [2] page. Bundles use the JBoss
Portal + JBoss AS naming convention.
2.
Extract the bundle: extract the ZIP archive. It does not matter which directory is used. On Microsoft Windows, the recommended directory is C:\jboss-version-number.
3.
Start the server: change into the JBOSS_PORTAL_INSTALLATION_DIRECTORY/bin/ directory. On Microsoft
Windows, execute run.bat. On Linux, run the sh run.sh command. To specify a configuration to use, for example, the default configuration, append the -c default option to the run.bat or sh run.sh commands.
4.
Log in to JBoss Portal: using a Web browser, navigate to http://localhost:8080/portal to open the JBoss
Portal homepage. Log in using one of the two default accounts: username user, password user, or username
admin, password admin.
SQL Errors
Tables are automatically created the first time JBoss Portal starts. When deployed for the first time, JBoss
Portal checks for the existence of the initial tables, which have not been created yet. This causes errors
such as the following, which can safely be ignored:
WARN
[JDBCExceptionReporter] SQL Error: -22, SQLState: S0002
[1] http://labs.jboss.com/portal/jbossportal/download/index.html
[2] http://labs.jboss.com/portal/jbossportal/download/index.html
JBoss Release 2.6.5
3
Installation
ERROR
WARN
ERROR
WARN
ERROR
[JDBCExceptionReporter]
[JDBCExceptionReporter]
[JDBCExceptionReporter]
[JDBCExceptionReporter]
[JDBCExceptionReporter]
Table not found in statement ...
SQL Error: 1146, SQLState: 42S02
Table 'jbossportal.jbp_cms_repositoryentry' doesn't exist
SQL Error: 1146, SQLState: 42S02
Table 'jbossportal.jbp_cms_version_refs' doesn't exist
2.2. Installing the Binary Download
The binary package typically consists of the jboss-portal.sar/ directory, documentation such as the JBoss Portal
User Guide and the JBoss Portal Reference Guide, and a set of pre-configured Datasource descriptors that allow
JBoss Portal to communicate with an external database. This installation method is recommended for users who
already have JBoss EAP or JBoss AS installed, or those who need to install JBoss Portal in a clustered environment.
2.2.1. Setting up your Environment
2.2.1.1. Getting the Binary
The binary download is available from the JBoss Portal Downloads [4] page. Look for the JBoss Portal Binary
package. Once the binary ZIP file has been downloaded and extracted, the folder hierarchy will look similar to the
following:
Files contained in this download are used in later sections. Download and extract the JBoss Portal binary ZIP file
before proceeding.
2.2.1.2. JBoss EAP and JBoss AS Setup
Before deploying JBoss Portal, make sure you have JBoss EAP or JBoss AS installed. Customers who have access
to the JBoss Customer Support Portal (CSP) [5] are advised to download and install JBoss EAP 4.3. Customers
who do not have access to the JBoss CSP are advised to use JBoss AS [6]. For JBoss AS installation instructions,
please refer to the JBoss AS Installation Guide [7].
Use the JBoss EAP and JBoss AS ZIP file
[4] http://labs.jboss.com/portal/jbossportal/download/index.html
[5] https://support.redhat.com/portal/login.html
[6] http://labs.jboss.com/jbossas/downloads/
[7] http://labs.jboss.com/jbossas/docs/index.html
JBoss Release 2.6.5
4
Installation
Only use the JBoss EAP and JBoss AS ZIP file versions. DO NOT ATTEMPT to deploy JBoss Portal
on the installer version of JBoss EAP or JBoss AS.
2.2.1.3. Database Setup
A database is required for JBoss Portal to run. JBoss EAP and JBoss AS include an embedded Hypersonic SQL
database that JBoss Portal can use; however, this is only recommended for developer use. The following databases
are recommended for production use, and have had test suites run against them: MySQL 4, MySQL 5, Microsoft
SQL Server, PostgreSQL 8, Oracle 9, and Oracle 10. JBoss Portal can use any database that is supported by Hibernate.
To configure a database to use with JBoss Portal:
1.
Create a new database: this guide assumes that the new database is called jbossportal.
2.
Grant access rights for a user to the jbossportal database: JBoss Portal needs to create tables and modify
table data. Grant access rights to a desired user to the jbossportal database. Configure the same username and
password in the Datasource descriptor.
3.
Deploy a RDBMS JDBC connector: a RDBMS JDBC connector is required for JBoss Portal to communicate with a database. Copy the connector into the $JBOSS_HOME/server/default/lib/ directory. For example,
a RDBMS JDBC connector for MySQL can be download from http://www.mysql.com/products/connector/j/.
For the correct RDMBS JDBC connector, please refer to the database documentation.
2.2.1.4. Datasource Descriptors
The JBoss Portal binary download that was extracted in Section 2.2.1.1, contains pre-configured Datasource
descriptors for the more popular databases. Datasource descriptors are provided for the MySQL 4, MySQL 5, PostgreSQL, Microsoft SQL Server, and Oracle databases, and can be found in the setup subdirectory where the JBoss
Portal binary was extracted to:
Copy the Datasource descriptor that matches your database into the $JBOSS_HOME/server/configuration/deploy/
directory, where configuration is either all, default, minimal or production. The production configuration only exists on JBoss EAP, and not JBoss AS. For example, if you are using the all configuration, copy the Datasource
descriptor into the $JBOSS_HOME/server/all/deploy/ directory.
After the Datasource descriptor has been copied into the deploy directory, make sure the user-name, password,
connection-url, and driver-class, are correct for your chosen database. Datasource descriptor files can be de-
JBoss Release 2.6.5
5
Installation
ployed to test before being used in production. The following is an example Datasource descriptor for a PostgreSQL database:
<?xml version="1.0" encoding="UTF-8"?>
<datasources>
<local-tx-datasource>
<jndi-name>PortalDS</jndi-name>
<connection-url>jdbc:postgresql:jbossportal</connection-url>
<driver-class>org.postgresql.Driver</driver-class>
<user-name>portal</user-name>
<password>portalpassword</password>
</local-tx-datasource>
</datasources>
For further details about Datasource descriptors, please refer to the JBoss JDBC Datasource Wiki page [9].
2.2.2. Deploying JBoss Portal
To start JBoss EAP or JBoss AS and deploy JBoss Portal:
1.
Datasource descriptor: if you have not done so already, change into the setup subdirectory where the JBoss
Portal binary was extracted to. Copy the correct Datasource descriptor file (*-ds.xml) you modified in the
previous steps into the $JBOSS_HOME/server/configuration/deploy/ directory.
2.
Start the server: change into the $JBOSS_HOME/bin/ directory. On Microsoft Windows, execute run.bat. On
Linux, run the sh run.sh command. To specify a configuration to use, for example, the default configuration,
append the -c default option to the run.bat or sh run.sh commands.
3.
Log in to JBoss Portal: using a Web browser, navigate to http://localhost:8080/portal to open the JBoss
Portal homepage. Log in using one of the two default accounts: username user, password user, or username
admin, password admin:
[9] http://wiki.jboss.org/wiki/Wiki.jsp?page=CreateAJDBCDataSource
JBoss Release 2.6.5
6
Installation
SQL Errors
Tables are automatically created the first time JBoss Portal starts. When deployed for the first time, JBoss
Portal checks for the existence of the initial tables, which have not been created yet. This causes errors
such as the following, which can safely be ignored:
WARN
ERROR
WARN
ERROR
WARN
ERROR
[JDBCExceptionReporter]
[JDBCExceptionReporter]
[JDBCExceptionReporter]
[JDBCExceptionReporter]
[JDBCExceptionReporter]
[JDBCExceptionReporter]
SQL Error: -22, SQLState: S0002
Table not found in statement ...
SQL Error: 1146, SQLState: 42S02
Table 'jbossportal.jbp_cms_repositoryentry' doesn't exist
SQL Error: 1146, SQLState: 42S02
Table 'jbossportal.jbp_cms_version_refs' doesn't exist
2.3. Installing from the Sources
2.3.1. Getting the Sources
The JBoss Portal source files can be obtained from the JBoss Portal Downloads [11] page. The source files down[11] http://labs.jboss.com/portal/jbossportal/download/index.html
JBoss Release 2.6.5
7
Installation
load uses a JBoss Portal Source Code naming convention. As well, the sources can be obtained from SVN. The
latest
sources
for
the
2.6.x
versions
are
located
at
http://anonsvn.jboss.org/repos/portal/branches/JBoss_Portal_Branch_2_6.
Several modules have been extracted from the JBoss Portal SVN repository. These modules have a different lifecycle and a different version scheme. The following is a list of modules used in JBoss Portal 2.6.5, and the locations of their source code:
•
JBoss
Portal
Common
1.1.1:
tp://anonsvn.jboss.org/repos/portal/modules/common/tags/JBP_COMMON_1_1_1
ht-
•
JBoss Portal Web 1.1.0: http://anonsvn.jboss.org/repos/portal/modules/web/tags/JBP_WEB_1_1_0
•
JBoss Portal Test 1.0.1: http://anonsvn.jboss.org/repos/portal/modules/test/tags/JBP_TEST_1_0_1
•
JBoss Portal Portlet 1.0.3: http://anonsvn.jboss.org/repos/portal/modules/portlet/tags/JBP_PORTLET_1_0_3
•
JBoss Portal Identity 1.0.3: http://anonsvn.jboss.org/repos/portal/modules/identity/tags/JBP_IDENTITY_1_0_3
After checking out the source from SVN, or after extracting the JBoss Portal Source Code ZIP file, a directory
structure similar to the following will be created:
JBoss Release 2.6.5
8
Installation
If the source files were obtained from SVN, change into the trunk/src/ directory to see the directories from the
above image. As well, there is an empty thirdparty directory. This directory contains files after building the JBoss
Portal source code (refer to Section 2.3.3). For more information about the JBoss Portal SVN repository, and accessing different versions of the JBoss Portal codebase, refer to the JBoss Portal SVN Repo [13] page on the JBoss
Wiki.
[13] http://wiki.jboss.org/wiki/Wiki.jsp?page=PortalSVNRepo
JBoss Release 2.6.5
9
Installation
2.3.2. JBoss EAP and JBoss AS Setup
2.3.2.1. JBoss Application Server Setup
Before deploying JBoss Portal, make sure you have JBoss EAP or JBoss AS installed. Customers who have access
to the JBoss Customer Support Portal (CSP) [14] are advised to download and install JBoss EAP 4.3. Customers
who do not have access to the JBoss CSP are advised to use JBoss AS [15]. For JBoss AS installation instructions,
please refer to the JBoss AS Installation Guide [16].
Use the JBoss EAP and JBoss AS ZIP file
Only use the JBoss EAP and JBoss AS ZIP file versions. DO NOT ATTEMPT to deploy JBoss Portal
on the installer version of JBoss EAP or JBoss AS. We are currently working on aligning the Application installer with JBoss Portal.
2.3.2.2. Operating System Environment Settings
For build targets to work, you must configure a JBOSS_HOME environment variable. This environment variable must
point to the root directory of the JBoss EAP or JBoss AS installation directory, which is the directory where the
JBoss EAP or JBoss AS files were extracted to.
When using Microsoft Windows, this is accomplished by going to Start > Settings > Control Panel > System >
Advanced > Environment Variables. Under the System Variables section, click New. Set the JBOSS_HOME environment variable to the location of your JBoss EAP or JBoss AS installation directory:
[14] https://support.redhat.com/portal/login.html
[15] http://labs.jboss.com/jbossas/downloads/
[16] http://labs.jboss.com/jbossas/docs/index.html
JBoss Release 2.6.5
10
Installation
To configure the JBOSS_HOME environment variable on Linux:
1.
Add the following line to the ~/.bashrc file. Note: this must be configured while logged in as the user who
runs JBoss EAP or JBoss AS:
export JBOSS_HOME=/path/to/jboss/installation/
2.
Run the following command to enable the JBOSS_HOME environment variable:
source ~/.bashrc
JBoss Release 2.6.5
11
Installation
JBoss EAP JBOSS_HOME Environment Variable
If you are running JBoss EAP, configure the JBOSS_HOME environment variable to point to the /
path/to/jboss-eap-version/jboss-as/ directory.
2.3.3. Building and Deploying from the Sources
During the first build, third-party libraries are obtained from an online repository, so you must be connected to the
Internet, and if you are behind a proxy server, you need to define your proxy server address and proxy server port
number. To define a proxy server, add the following line to the $JBOSS_HOME/bin/run.conf file:
JAVA_OPTS=-Dhttp.proxyHost=<proxy-hostname>
-Dhttp.proxyPort=<proxy-port>
Replace proxy-hostname with the proxy server's hostname, and proxy-port with the correct proxy server port
number.
To build and deploy JBoss Portal from the sources, change into the JBOSS_PORTAL_SOURCE_DIRECTORY/build/ directory, where JBOSS_PORTAL_SOURCE_DIRECTORY is the directory where the JBoss Portal source code was downloaded to. Then, Microsoft Windows users need to run the build.bat deploy command, and Linux users need to run
the sh build.sh deploy command.
At
the
end
of
the
build
$JBOSS_HOME/server/default/deploy/
process, the
directory:
jboss-portal.sar
file
is
copied
into
the
Portal Modules
The previous steps install a bare version of JBoss Portal. In previous versions, several additional modules
were deployed as well, but this has since been modularized to provide greater flexibility. To deploy additional modules, refer to the Portal's module list [17] for more information. To deploy all modules at once,
[17] http://wiki.jboss.org/wiki/Wiki.jsp?page=PortalModules
JBoss Release 2.6.5
12
Installation
change into the build directory. If you are running Linux, run the sh build.sh deploy-all command. If you
are running Microsoft Windows, run the build.bat deploy-all command.
To build the clustered version on Linux Operating Systems:
1.
Change into the JBOSS_PORTAL_SOURCE_DIRECTORY/build/ directory, and run the following command:
sh build.sh main
2.
Change into the JBOSS_PORTAL_SOURCE_DIRECTORY/core/ directory, and run the following command:
sh build.sh deploy-ha
After the sh build.sh deploy-ha command completes, the jboss-portal-ha.sar file is copied into the
$JBOSS_HOME/server/all/deploy/ directory.
To build the clustered version on Microsoft Windows, repeat the previous steps, replacing sh build.sh with
build.bat.
2.3.4. Database Setup
A database is required for JBoss Portal to run. JBoss EAP and JBoss AS include an embedded Hypersonic SQL
database that JBoss Portal can use; however, this is only recommended for developer use. The following databases
are recommended for production use, and have had test suites run against them: MySQL 4, MySQL 5, Microsoft
SQL Server, PostgreSQL 8, Oracle 9, and Oracle 10. JBoss Portal can use any database that is supported by Hibernate.
To configure a database to use with JBoss Portal:
1.
Create a new database: this guide assumes that the new database is called jbossportal.
2.
Grant access rights for a user to the jbossportal database: JBoss Portal needs to create tables and modify
table data. Grant access rights to a desired user to the jbossportal database. Configure the same username and
password in the Datasource descriptor.
3.
Deploy a RDBMS JDBC connector: a RDBMS JDBC connector is required for JBoss Portal to communicate with a database. Copy the connector into the $JBOSS_HOME/server/default/lib/ directory. For example,
a RDBMS JDBC connector for MySQL can be download from http://www.mysql.com/products/connector/j/.
For the correct RDMBS JDBC connector, please refer to the database documentation.
2.3.5. Datasource Configuration
The JBoss Portal binary download that was extracted in Section 2.2.1.1, contains pre-configured Datasource
descriptors for the more popular databases. Datasource descriptors are provided for the MySQL 4, MySQL 5, PostJBoss Release 2.6.5
13
Installation
greSQL, Microsoft SQL Server, and Oracle databases, and can be found in the setup subdirectory where the JBoss
Portal binary was extracted to:
Copy the Datasource descriptor that matches your database into the $JBOSS_HOME/server/configuration/deploy/
directory, where configuration is either all, default, minimal, or production. For example, if you are using the
production configuration, copy the Datasource descriptor into the $JBOSS_HOME/server/production/deploy/ directory. The production configuration only exists on JBoss EAP installations, and not JBoss AS.
After the Datasource descriptor has been copied into the deploy directory, make sure the user-name, password,
connection-url, and driver-class, are correct for your chosen database. Datasource descriptor files can be deployed to test before being used in production. The following is an example Datasource descriptor for a PostgreSQL database:
<?xml version="1.0" encoding="UTF-8"?>
<datasources>
<local-tx-datasource>
<jndi-name>PortalDS</jndi-name>
<connection-url>jdbc:postgresql:jbossportal</connection-url>
<driver-class>org.postgresql.Driver</driver-class>
<user-name>portal</user-name>
<password>portalpassword</password>
</local-tx-datasource>
</datasources>
For further details about Datasource descriptors, please refer to the JBoss JDBC Datasource Wiki page [19].
2.4. Deploying JBoss Portal
To start JBoss EAP or JBoss AS and deploy JBoss Portal:
1.
Datasource descriptor: if you have not done so already, change into the setup subdirectory where the JBoss
Portal binary was extracted to. Copy the correct Datasource descriptor file (*-ds.xml) you modified in the
previous steps into the $JBOSS_HOME/server/configuration/deploy/ directory.
2.
Start the server: change into the $JBOSS_HOME/bin/ directory. On Microsoft Windows, execute run.bat. On
Linux, run the sh run.sh command. To specify a configuration to use, for example, the default configuration,
append the -c default option to the run.bat or sh run.sh commands.
[19] http://wiki.jboss.org/wiki/Wiki.jsp?page=CreateAJDBCDataSource
JBoss Release 2.6.5
14
Installation
3.
Log in to JBoss Portal: using a Web browser, navigate to http://localhost:8080/portal to open the JBoss
Portal homepage. Log in using one of the two default accounts: username user, password user, or username
admin, password admin:
SQL Errors
Tables are automatically created the first time JBoss Portal starts. When deployed for the first time, JBoss
Portal checks for the existence of the initial tables, which have not been created yet. This causes errors
such as the following, which can safely be ignored:
WARN
ERROR
WARN
ERROR
WARN
ERROR
[JDBCExceptionReporter]
[JDBCExceptionReporter]
[JDBCExceptionReporter]
[JDBCExceptionReporter]
[JDBCExceptionReporter]
[JDBCExceptionReporter]
JBoss Release 2.6.5
SQL Error: -22, SQLState: S0002
Table not found in statement ...
SQL Error: 1146, SQLState: 42S02
Table 'jbossportal.jbp_cms_repositoryentry' doesn't exist
SQL Error: 1146, SQLState: 42S02
Table 'jbossportal.jbp_cms_version_refs' doesn't exist
15
3
Customizing your Installation
Thomas Heute <[email protected]>
Roy Russo <roy
at jboss dot org>
This chapter describes how to customize the default installation. This includes the JBoss EAP or JBoss AS listening port, email and proxy settings, and database dialect settings. For further configuration details, refer to Section 6.3 and Chapter 26.
3.1. Changing the Port
It is common for web services to run on port 80. By default, JBoss EAP and JBoss AS use port 8080. If you can not
use port forwarding [1], it is recommended to change the port JBoss EAP or JBoss AS listens on. To change the default port, open the $JBOSS_HOME/server/default/deploy/jboss-web.deployer/server.xml file, and edit the
Connector port value for the jboss.web service; however, this configuration only applies to Tomcat:
<Service name="jboss.web">
<Connector port="8088" address="${jboss.bind.address}"
This example changes the default port to port 8088. The JBoss EAP or JBoss AS server must be restarted before
the new port settings take affect.
The default SSL port is 8843. To enable HTTPS support, refer to the JBoss AS Guide [2]. For further information,
refer to Tomcat's SSL configuration how-to [3].
Please refer to Section 14.3.1 to update the WSRP service after having changed the port.
Root User Privileges
Linux systems require root user privileges to run a service on a port less than 1024. Starting JBoss EAP or
JBoss AS on port 80 as a non-privileged user will not work. Running JBoss EAP or JBoss AS as the root
user could lead to security breaches.
[1] http://wiki.jboss.org/wiki/Wiki.jsp?page=UsingPortForwardingWithJBoss
[2] http://docs.jboss.org/jbossas/jboss4guide/r4/html/ch9.chapt.html#d0e21962
[3] http://tomcat.apache.org/tomcat-6.0-doc/ssl-howto.html
JBoss Release 2.6.5
16
Customizing your Installation
3.2. Changing the Context Path
By default, the main JBoss Portal page is accessible by navigating to http://localhost:8080/portal/index.html. This
can be changed to a different path, for example, http://localhost:8080/index.html. The context path can be changed
when using the deployed jboss-portal.sar/, or before building from source. To change the context path when
using the JBoss Portal binary package:
1.
Open the $JBOSS_HOME/server/default/deploy/jboss-portal.sar/portal-server.war/WEB-INF/jboss-web.xml
file. If this file does not exist, copy and save the following example:
<?xml version="1.0"?>
<jboss-web>
<security-domain>java:jaas/portal</security-domain>
<context-root>/portal</context-root>
<replication-config>
<replication-trigger>SET</replication-trigger>
</replication-config>
<resource-ref>
<res-ref-name>jdbc/PortalDS</res-ref-name>
<jndi-name>java:PortalDS</jndi-name>
</resource-ref>
</jboss-web>
2.
Edit the <context-root> element with the desired context path:
<context-root>/testing</context-root>
Using this example, the main JBoss Portal page would be reached by navigating to http://localhost:8080/testing.
To change the context path when building from source:
1.
Change into the directory where the JBoss Portal Source Code ZIP file was extracted to, or where the
source from SVN was checked out to. Copy the build/etc/local.properties-example file and save it as
build/local.properties.
2.
Open the build/local.properties file and edit the portal.web.context-root option with the desired context path:
# Context root for the portal main servlet
portal.web.context-root=/testing
Using this example, the main JBoss Portal page would be reached by navigating to http://localhost:8080/testing.
3.
To clean the project, make sure you are connected to the Internet, and change into the build/ directory. Run
JBoss Release 2.6.5
17
Customizing your Installation
the ant clean command.
4.
Rebuild and redeploy JBoss Portal. Refer to Section 2.3 for build instructions.
Changing the context-root
By
default,
Tomcat
holds
on
to
the
root
context,
/.
You
may need to remove the
$JBOSS_HOME/server/default/deploy/jboss-web.deployer/ROOT.war/ directory, or add a jbossweb.xml
file,
which
declares
another
context-root
other
than
/,
under
the
$JBOSS_HOME/server/default/deploy/jboss-web.deployer/ROOT.war/WEB-INF/ directory, for the
above changes to take affect. The following is an example jboss-web.xml file, which changes the Tomcat
context path to /tomcat-root:
<?xml version="1.0"?>
<jboss-web>
<context-root>/tomcat-root</context-root>
</jboss-web>
3.3. Forcing the Database Dialect
This sections describes how to override the Database (DB) dialect settings. Under most circumstances, the autodetect feature works. If the Hibernate dialect is not working correctly, override the default behavior by following
the instructions in this section.
3.3.1. Database Dialect Settings for JBoss Portal
All hibernate.cfg.xml files in all JBoss Portal modules you intend to use need to be modified. The hibernate.cfg.xml files are found in the jboss-portal.sar/module/conf/hibernate/directory/ directory, where module
is the module name, and directory is a directory that, depending on the module, may or may not exist.
To modify these files to force the DB dialect, un-comment the following line from each hibernate.cfg.xml file in
each JBoss Portal module you intend to use, so that it looks like the following:
<!-- Force the dialect instead of using autodetection -->
<property name="dialect">org.hibernate.dialect.PostgreSQLDialect</property>
Note: this example is for a PostgreSQL database. If you use another database, you need to modify
org.hibernate.dialect.PostgreSQLDialect to reflect the correct database. For a list of supported dialects, refer
to the dialects list on the Hibernate website [4].
3.3.2. DB Dialect Settings for the CMS Component
To modify the DB dialect setting for the JBoss Portal CMS component:
[4] http://www.hibernate.org/hib_docs/v3/reference/en/html/session-configuration.html#configuration-optional-dialects
JBoss Release 2.6.5
18
Customizing your Installation
1.
Open the jboss-portal.sar/portal-cms.sar/conf/hibernate/cms/hibernate.cfg.xml file.
2.
Un-comment the following line, so that it looks like the following:
<!-- Force the dialect instead of using autodetection -->
<property name="dialect">org.hibernate.dialect.PostgreSQLDialect</property>
Note: this example is for a PostgreSQL database. If you use another database, you need to modify
org.hibernate.dialect.PostgreSQLDialect to reflect the correct database. For a list of supported dialects, refer
to the dialects list on the Hibernate website [5].
3.4. Setting up the Email Service
If you have a standard setup and a mail server installed, the email service should work without any extra configuration. Most Linux distributions have a mail server installed by default. The email service, for example, can be used
to verify a user's email address when a user subscribes, or for CMS workflow notifications.
The
email
service
is
configured
using
the
$JBOSS_HOME/server/default/deploy/jboss-portal.sar/META-INF/jboss-service.xml file. The following is
an example of the section which is used to configure the email service:
<mbean
code="org.jboss.portal.core.impl.mail.MailModuleImpl"
name="portal:service=Module,type=Mail"
xmbean-dd=""
xmbean-code="org.jboss.portal.jems.as.system.JBossServiceModelMBean">
<xmbean/>
<depends>jboss:service=Mail</depends>
<depends>portal:service=Module,type=IdentityServiceController</depends>
<attribute name="QueueCapacity">-1</attribute>
<attribute name="Gateway">localhost</attribute>
<attribute name="SmtpUser"></attribute>
<attribute name="SmtpPassword"></attribute>
<attribute name="JavaMailDebugEnabled">false</attribute>
<attribute name="SMTPConnectionTimeout">100000</attribute>
<attribute name="SMTPTimeout">10000</attribute>
<attribute name="JNDIName">java:portal/MailModule</attribute>
</mbean>
A different SMTP server (other than localhost) can be configured, along with a SMTP username and an SMTP
password. The following is an example configuration that uses the Gmail SMTP server:
<mbean
code="org.jboss.portal.core.impl.mail.MailModuleImpl"
name="portal:service=Module,type=Mail"
xmbean-dd=""
xmbean-code="org.jboss.portal.jems.as.system.JBossServiceModelMBean">
[5] http://www.hibernate.org/hib_docs/v3/reference/en/html/session-configuration.html#configuration-optional-dialects
JBoss Release 2.6.5
19
Customizing your Installation
<xmbean/>
<depends>jboss:service=Mail</depends>
<depends>portal:service=Module,type=IdentityServiceController</depends>
<attribute name="QueueCapacity">-1</attribute>
<attribute name="Gateway">smtp.gmail.com</attribute>
<attribute name="SmtpUser">[email protected]</attribute>
<attribute name="SmtpPassword">myPassword</attribute>
<attribute name="JavaMailDebugEnabled">false</attribute>
<attribute name="SMTPConnectionTimeout">100000</attribute>
<attribute name="SMTPTimeout">10000</attribute>
<attribute name="JNDIName">java:portal/MailModule</attribute>
</mbean>
Using this example, replace [email protected] and myPassword with your correct Gmail username and password.
3.5. Configuring proxy settings
There are a couple of scenarios where you need your proxy to be correctly defined at the JVM level so that you can
access documents from Internet. It could be to get the thirdparty libraries if you decided to build JBoss Portal from
the sources, to access RSS feeds or weather information in the samples portlet we provide or for your own needs.
To configure the proxy settings, you need to know the proxy host and the port to use. Then, add them when starting
Java.
Usually setting up JAVA_OPTS environment variable to -Dhttp.proxyHost=YOUR_PROXY_HOST
tp.proxyPort=YOUR_PROXY_PORT is enough.
-Dht-
3.6. Disabling Dynamic Proxy Un-wrapping
JBoss Portal uses the JBoss Microkernel for the service infrastructure. The JBoss Microkernel provides injection of
services into other services, otherwise known as wiring. Due to the Microkernel being JMX based, it is only possible to inject dynamic proxies that talk to the MBeanServer. The overhead at runtime is minimal since the Microkernel implementation is highly optimized; however, when it is used with Java 5, a noticeable bottleneck occurs
due to the fact that the implementation of the JMX API classes, javax.management.*, provided by the Java Platform, perform synchronization. This does not occur under JDK 1.4, since those classes are implemented by JBoss
MX.
JBoss Portal services use a special kind of Model MBean called JBossServiceModelMBean, which allows the unwrapping of injected dynamic proxies, and replaces them with plain old java object (POJO) services. This removes
the bottleneck when using Java 5, and also provides a performance boost on JDK 1.4. By default this feature is enabled, but it is possible to disable. To do this on Linux systems, change into the $JBOSS_HOME/bin/ directory and
run the following command:
sh run.sh -Dportal.kernel.no_proxies=false
On Microsoft Windows systems, run the following command:
JBoss Release 2.6.5
20
Customizing your Installation
run.bat -Dportal.kernel.no_proxies=false
JBoss Release 2.6.5
21
4
Upgrading JBoss Portal 2.4 to 2.6
Roy Russo <roy
Boleslaw Dawidowicz <boleslaw
at jboss dot org>
dot dawidowicz at redhat dot com>
Warning
Before performing any instructions or operations in this chapter, back up your database and the entire
JBoss EAP or JBoss AS directory!
4.1. Manual Upgrade
The database schema has not changed since JBoss Portal 2.4; however, there are several differences when using a
database created by JBoss Portal 2.4, that prevent simply deploying the latest version of JBoss Portal. For example,
some portlets are no longer present in JBoss Portal 2.6, and certain existing portlets are now packaged differently.
This chapter describes updating a MySQL database created by JBoss Portal 2.4, for use with JBoss Portal 2.6.
Users, roles, and pages created in JBoss Portal 2.4 should be accessible in JBoss Portal 2.6 deployments.
The upgrade procedure can be straightforward:
1.
If
you
are
using
the
JBoss
Portal
binary,
remove
the
directory. If JBoss Portal was built from source,
remove the $JBOSS_HOME/server/default/deploy/jboss-portal.sar file.
$JBOSS_HOME/server/default/deploy/jboss-portal.sar/
2.
Update the data in the JBoss Portal database, as described in Section 4.1.2.
3.
Deploy JBoss Portal 2.6.
4.1.1. Themes
In JBoss Portal 2.6, portal pages contain additional areas, such as the Login, Admin, and Dashboard links, on the
top right-hand corner of portal pages:
JBoss Release 2.6.5
22
Upgrading JBoss Portal 2.4 to 2.6
Since portal pages now contain additional areas, certain themes have changed. If a default theme that exists in
JBoss Portal 2.6 is used, such as renaissance, no configuration should be necessary. Using old themes from JBoss
Portal 2.4 may make JBoss Portal 2.6 unusable, for example, not being able to log in. To update custom themes,
refer to the bundled JBoss Portal 2.6 themes as an example.
4.1.2. Updating the Database
The following tables contain all references to portlets:
•
JBP_INSTANCE
•
JBP_WINDOW
•
JBP_OBJECT_NODE
All procedures described in the following sections can performed using the JBoss Portal 2.4 Admin portlet. Treat
these directions as guidelines when migrating a large JBoss Portal deployment. Database data can be updated
manually using the correct tools for your RDBMS. For example, if you are using a MySQL database, you can use
the MySQL Query Browser [1].
During the upgrade process, legacy references have to be cleaned up, to either remove them, or to allow JBoss
Portal 2.6 to recreate them correctly. Remove all references (instances and windows) to the portlets listed below, as
they are not present in JBoss Portal 2.6. This can be done using the JBoss Portal 2.4 Admin portlet:
•
HeaderContentPortlet
•
URLPortlet
[1] http://www.mysql.com/products/tools/query-browser/
JBoss Release 2.6.5
23
Upgrading JBoss Portal 2.4 to 2.6
•
TestPortlet
•
PortletA
•
PortletB
•
SecuredTestPortlet
•
CharsetPortlet
•
CounterPortlet
•
CachedCounterPortlet
•
ExceptionPortlet
•
PortletSessionPortlet
•
EncodingPortlet
The following instructions refer to a standard JBoss Portal 2.4 deployment. If core portlets, portlet instances, or
portlet windows were renamed, make the appropriate modifications. The following is an example of the MySQL
Query Browser:
Requested Resource Error
JBoss Release 2.6.5
24
Upgrading JBoss Portal 2.4 to 2.6
When running JBoss Portal 2.6 with a database created by JBoss Portal 2.4, a non-existing portlet will try
to be displayed, resulting in a 404, The requested resource() is not available error.
4.1.3. Portlet Names
Names of certain core bundled-portlets have changed. Destroy the following instances and use the Admin portlet to
recreate them, or edit the JBP_INSTANCE table as follows:
•
Change local.samples.JSPPortlet in the PORTLET_REF column to local./portal-jsp-samples.JSPPortlet.
•
Change local.portal.CMSPortlet in the PORTLET_REF column to local./portal-cms.CMSPortlet.
•
Change local.portal.CMSAdminPortlet in the PORTLET_REF column to local./portal-cms.CMSAdminPortlet.
•
Change local.portal.ManagementPortlet in the PORTLET_REF column to local./portal-admin.AdminPortlet.
Some portlets are no longer present in JBoss Portal 2.6, and certain existing portlets are now packaged differently.
Remove the following entries in the JBP_INSTANCE table, so that JBoss Portal 2.6 can recreate them:
•
rows containing NewsPortletInstance2 in the ID column.
•
rows containing local.portal.NavigationPortlet in the PORTLET_REF column.
•
rows containing local.samples.HeaderContentPortlet in the PORTLET_REF column.
•
rows containing local.samples.WeatherPortlet in the PORTLET_REF column.
•
rows containing local.samples.NewsPortlet in the PORTLET_REF column.
•
rows containing local.samples.URLPortlet in the PORTLET_REF column.
•
rows containing local.samples.TestPortlet in the PORTLET_REF column.
•
rows containing local.samples.PortletA in the PORTLET_REF column.
•
rows containing local.samples.PortletB in the PORTLET_REF column.
•
rows containing local.samples.SecuredTestPortlet in the PORTLET_REF column.
•
rows containing local.samples.CharsetPortlet in the PORTLET_REF column.
•
rows containing local.samples.CounterPortlet in the PORTLET_REF column.
•
rows containing local.samples.CachedCounterPortlet in the PORTLET_REF column.
•
rows containing local.samples.ExceptionPortlet in the PORTLET_REF column.
•
rows containing local.samples.PortletSessionPortlet in the PORTLET_REF column.
•
rows containing local.samples.EncodingPortlet in the PORTLET_REF column.
JBoss Release 2.6.5
25
Upgrading JBoss Portal 2.4 to 2.6
Remove the following entries in the JBP_WINDOW table, so that JBoss Portal 2.6 can recreate them:
•
rows containing NavigationPortletInstance in the INSTANCE_REF column.
•
rows containing URLPortletInstance in the INSTANCE_REF column.
•
rows containing PortletAInstance in the INSTANCE_REF column.
•
rows containing PortletBInstance in the INSTANCE_REF column.
•
rows containing EncodingPortletInstance in the INSTANCE_REF column.
•
rows containing PortletSessionPortletInstance in the INSTANCE_REF column.
•
rows containing CachedCounterPortletInstance in the INSTANCE_REF column.
•
rows containing CounterPortletInstance in the INSTANCE_REF column.
•
rows containing CharsetPortletInstance in the INSTANCE_REF column.
•
rows containing SecuredTestPortletInstance in the INSTANCE_REF column.
•
rows containing SecuredTestPortletInstance in the INSTANCE_REF column.
•
rows containing ExceptionPortletInstance in the INSTANCE_REF column.
•
rows containing HeaderContentPortletInstance in the INSTANCE_REF column.
•
rows containing TestPortletInstance in the INSTANCE_REF column.
•
rows containing MissingPortletInstance in the INSTANCE_REF column.
Remove the following entries in the JBP_OBJECT_NODE table, so that JBoss Portal 2.6 can recreate them:
•
rows containing NavigationPortletWindow in the NAME column.
•
rows containing URLPortletWindow in the NAME column.
•
rows containing PortletAWindow in the NAME column.
•
rows containing PortletBWindow in the NAME column.
•
rows containing MissingInstanceWindow in the NAME column.
•
rows containing EncodingPortletWindow in the NAME column.
•
rows containing PortletSessionPortletWindow in the NAME column.
•
rows containing CachedCounterPortletWindow in the NAME column.
•
rows containing CounterPortletWindow in the NAME column.
JBoss Release 2.6.5
26
Upgrading JBoss Portal 2.4 to 2.6
•
rows containing CharsetPortletWindow in the NAME column.
•
rows containing SecuredTestPortletWindow in the NAME column.
•
rows containing ExceptionPortletWindow in the NAME column.
•
rows containing MissingPortletWindow in the NAME column.
•
rows containing HeaderContentPortletWindow in the NAME column.
•
rows containing TestPortletWindow in the NAME column.
4.1.4. CMS
In JBoss Portal 2.6 versions, the way the CMS content is displayed changed significantly. For further information,
refer to Chapter 9 and Chapter 21. Currently there is no need to have more than one instance of the CMSPortlet.
The portlet window displays CMS content, not by referring to that portlet instance, but by having the proper content-type defined. The following configuration is in the jboss-portal.sar/conf/data/default-object.xml file:
<window>
<window-name>CMSWindow</window-name>
<content>
<content-type>cms</content-type>
<content-uri>/default/index.html</content-uri>
</content>
<region>center</region>
<height>1</height>
</window>
The following example uses the MySQL Query Browser. Open the JBP_OBJECT_NODE table in your database
schema. Look at the PATH column to identify any occurrences of CMS in your JBoss Portal deployment. Identify
any row referring to CMSPortletWindow, and remember the number in the PK column. The PK number is needed
in the following steps:
Go to the JBP_WINDOW table and find a row with the same PK value from the JBP_OBJECT_NODE table. In
JBoss Release 2.6.5
27
Upgrading JBoss Portal 2.4 to 2.6
such a row, replace CMSPortletInstance with a path to your CMS resource. For example, by default, JBoss Portal
displays /default/index.html.
Add a row containing the following to the JBP_PORTAL_OBJECT_PROPS table:
•
The PK number remembered from the OBJECT_KEY column.
•
portal.windowContentType in the NAME column.
•
cms in the jbp_VALUE column.
As well, the CMS can be migrated by backing up the jbp_cms_* tables, and recreating them in a JBoss Portal 2.6
database. There were no schema changes for the CMS between JBoss Portal 2.4 and JBoss Portal 2.6.
Portlet Content-type and the path to the CMS Resource
The Admin portlet can be used to change the portlet window content-type, and configure the path to the
CMS resource.
JBoss Release 2.6.5
28
5
Portlet Primer
Roy Russo <[email protected]>
Chris Laprun <[email protected]>
Thomas Heute <[email protected]>
5.1. JSR-168 Overview
The JSR-168 Portlet Specification aims at defining portlets that can be used by any JSR-168 portlet container, also
known as a portal. There are different portals with commercial and non-commercial licenses. This chapter gives a
brief overview of the JSR-168 Portlet Specification [1]. Portlet developers are strongly encouraged to read the JSR168 Portlet Specification [2].
JBoss Portal is fully JSR-168 compliant, which means any JSR-168 portlet behaves as it should inside the portal.
5.1.1. Portal Pages
A portal can be seen as pages with different areas, and inside areas, different windows, and each window having
one portlet:
[1] http://www.jcp.org/en/jsr/detail?id=168
[2] http://www.jcp.org/en/jsr/detail?id=168
JBoss Release 2.6.5
29
Portlet Primer
5.1.2. Rendering Modes
A portlet can have different view modes. Three modes are defined by the JSR-168 specification, but a portal can
extend those modes. The three modes are:
•
view
- generates markup reflecting the current state of the portlet.
•
edit
- allows a user to customize the behavior of the portlet.
•
help
- provides information to the user as to how to use the portlet.
5.1.3. Window States
Window states are an indicator of how much page real-estate a portlet consumes on any given page. The three
states defined by the JSR-168 specification are:
•
normal
- a portlet shares this page with other portlets.
JBoss Release 2.6.5
30
Portlet Primer
•
minimized
-a portlet may show very little information, or none at all.
•
maximized
- a portlet may be the only portlet displayed on this page.
5.1.4. Section Status
This overview of the JSR-168 Portlet Specification is a work in progress. Check back for more in-depth analsis of
the specification. The sections following here after contain real-world cases for how to leverage the specification.
5.2. Tutorials
The tutorials contained in this chapter are targetted toward portlet developers. Although they are a good starting
and reference point, it is highly recommend that portlet developers read and understand the JSR-168 Portlet Specification [3]. Use the JBoss Portal User Forums [4] for user-to-user help.
5.2.1. Deploying your first Portlet
5.2.1.1. Introduction
This section describes how to deploy a portlet in JBoss Portal. Before proceeding, download the
HelloWorldPortlet [5] from JBoss PortletSwap [6].
5.2.1.2. Package Structure
Like other Java EE applications, portlets are packaged in WAR files. A typical portlet WAR file can include servlets, resource bundles, images, HTML, JSPs, and other static or dynamic files. The following is an example of the
directory structure of the HelloWorldPortlet portlet:
5.2.1.3. Portlet Classes
[3] http://www.jcp.org/en/jsr/detail?id=168
[4] http://jboss.org/index.html?module=bb&op=viewforum&f=215
[5] http://anonsvn.jboss.org/repos/portletswap/portlets/2_6/bundles/HelloWorldPortlet.zip
[6] http://labs.jboss.com/portletswap/
JBoss Release 2.6.5
31
Portlet Primer
The following is the HelloWorldPortlet/src/main/org/jboss/portlet/hello/HelloWorldPortlet.java java
source file, which comes bundled with the HelloWorldPortlet [7]:
package org.jboss.portlet.hello;
import
import
import
import
import
import
import
javax.portlet.GenericPortlet;
javax.portlet.PortletException;
javax.portlet.RenderRequest;
javax.portlet.RenderResponse;
javax.portlet.UnavailableException;
java.io.IOException;
java.io.PrintWriter;
public class HelloWorldPortlet extends GenericPortlet
{
protected void doView(RenderRequest rRequest, RenderResponse rResponse)
throws PortletException, IOException, UnavailableException
{
rResponse.setContentType("text/html");
PrintWriter writer = rResponse.getWriter();
writer.write("Hello World!");
writer.close();
}
}
public class HelloWorldPortlet extends GenericPortlet
All portlets must implement the javax.portlet.Portlet interface. The portlet API provides a convenient implementation of this interface, in the form of the javax.portlet.GenericPortlet class, which among other
things, implements the Portlet render method to dispatch to abstract mode-specific methods to make it easier
to support the standard portlet modes. As well, it provides a default implementation for the processAction,
init and destroy methods. It is recommended to extend GenericPortlet for most cases.
protected void doView(RenderRequest rRequest, RenderResponse rResponse)
throws PortletException, IOException, UnavailableException
As we extend from GenericPortlet, and are only interested in supporting the view mode, only the doView
method needs to be implemented, and the GenericPortlet render implemention calls our implementation
when the view mode is requested.
rResponse.setContentType("text/html");
As in the servlet world, you must declare what content-type the portlet will be responding in. Do this before
starting to write content, or the portlet will throw an exception.
[7] http://anonsvn.jboss.org/repos/portletswap/portlets/2_6/bundles/HelloWorldPortlet.zip
JBoss Release 2.6.5
32
Portlet Primer
PrintWriter writer = rResponse.getWriter();
writer.write("Hello World!");
writer.close();
This produces the Hello World! text in our portlet window.
Note
Portlets are responsible for generating markup fragments, as they are included on a page and are surrounded by other portlets. In particular, this means that a portlet outputting HTML must not output any markup
that cannot be found in a <body> element.
5.2.1.4. Application Descriptors
JBoss Portal requires certain descriptors to be included in a portlet WAR file. Some of these descriptors are defined
by the JSR-168 Portlet Specification, and others are specific to JBoss Portal. The following is an example of the
directory structure of the HelloWorldPortlet portlet:
To create the WEB-INF/ and META-INF/ directories, extract the helloworldportlet.war file.
The following is an example of the HelloWorldPortlet/WEB-INF/portlet.xml file. This file must adhere to its
definition in the JSR-168 Portlet Specification. You may define more than one portlet application in this file:
<?xml version="1.0" encoding="UTF-8"?>
<portlet-app xmlns="http://java.sun.com/xml/ns/portlet/portlet-app_1_0.xsd"
xmlns:xsi="http://www.w3.org/2001/XMLSchema-instance"
xsi:schemaLocation="http://java.sun.com/xml/ns/portlet/portlet-app_1_0.xsd
http://java.sun.com/xml/ns/portlet/portlet-app_1_0.xsd"
version="1.0">
<portlet>
<portlet-name>HelloWorldPortlet</portlet-name>
<portlet-class>org.jboss.portlet.hello.HelloWorldPortlet</portlet-class>
<supports>
<mime-type>text/html</mime-type>
<portlet-mode>view</portlet-mode>
</supports>
<portlet-info>
JBoss Release 2.6.5
33
Portlet Primer
<title>HelloWorld Portlet</title>
</portlet-info>
</portlet>
</portlet-app>
<portlet-name>HelloWorldPortlet</portlet-name>
Define the portlet name. It does not have to be the class name.
<portlet-class>org.jboss.portlet.hello.HelloWorldPortlet</portlet-class>
The Fully Qualified Name (FQN) of your portlet class must be declared here.
<supports>
<mime-type>text/html</mime-type>
<portlet-mode>view</portlet-mode>
</supports>
The <supports> element declares all of the markup types that a portlet supports in the render method. This is
accomplished via the <mime-type> element, which is required for every portlet. The declared MIME types
must match the capability of the portlet. As well, it allows you to pair which modes and window states are supported for each markup type. All portlets must support the view portlet mode, so this does not have to be declared. Use the <mime-type> element to define which markup type your portlet supports, which in this example, is text/html. This section tells the portal that it only outputs text and HTML, and that it only supports
the view mode.
<portlet-info>
<title>HelloWorld Portlet</title>
</portlet-info>
When rendered, the portlet's title is displayed as the header in the portlet window, unless it is overridden programmatically. In this example, the title would be HelloWorld Portlet.
The HelloWorldPortlet/WEB-INF/portlet-instances.xml file is a JBoss Portal specific descriptor, that allows
you to create instances of portlets. The <portlet-ref> value must match the <portlet-name> value given in the
HelloWorldPortlet/WEB-INF/portlet.xml file. The <instance-id> value can be named anything, but it must
match the <instance-ref> value given in the *-object.xml file, which in this example, would be the HelloWorldPortlet/WEB-INF/helloworld-object.xml file.
The following is an example of the HelloWorldPortlet/WEB-INF/portlet-instances.xml file:
<?xml version="1.0" standalone="yes"?>
<!DOCTYPE deployments PUBLIC
"-//JBoss Portal//DTD Portlet Instances 2.6//EN"
"http://www.jboss.org/portal/dtd/portlet-instances_2_6.dtd">
<deployments>
<deployment>
<instance>
JBoss Release 2.6.5
34
Portlet Primer
<instance-id>HelloWorldPortletInstance</instance-id>
<portlet-ref>HelloWorldPortlet</portlet-ref>
</instance>
</deployment>
</deployments>
The *-object.xml file is a JBoss Portal specific descriptor that allow users to define the structure of their portal instances, and create and configure their windows and pages. In the following example:
•
a portlet window is created.
•
specifies that the window displays the markup generated by the HelloWorldPortletInstance portlet instance.
•
the window is assigned to the default.default page.
•
the <region> element specifies where the window appears on the page.
The following is an example HelloWorldPortlet/WEB-INF/helloworld-object.xml file:
<?xml version="1.0" encoding="UTF-8"?>
<!DOCTYPE deployments PUBLIC
"-//JBoss Portal//DTD Portal Object 2.6//EN"
"http://www.jboss.org/portal/dtd/portal-object_2_6.dtd">
<deployments>
<deployment>
<parent-ref>default.default</parent-ref>
<if-exists>overwrite</if-exists>
<window>
<window-name>HelloWorldPortletWindow</window-name>
<instance-ref>HelloWorldPortletInstance</instance-ref>
<region>center</region>
<height>1</height>
</window>
</deployment>
</deployments>
<parent-ref>default.default</parent-ref>
Tells the portal where this portlet appears. In this case, default.default specifies that the portlet appears in
the portal instance named default, and on the page named default.
<if-exists>overwrite</if-exists>
Instructs the portal to overwrite or keep this object if it already exists. Accepted values are overwrite and
keep. The overwrite option destroys the existing object, and creates a new one based on the content of the deployment. The keep option maintains the existing object deployment, or creates a new one if it does not exist.
<window-name>HelloWorldPortletWindow</window-name>
JBoss Release 2.6.5
35
Portlet Primer
A unique name given to the portlet window. This can be named anything.
<instance-ref>HelloWorldPortletInstance</instance-ref>
The value of <instance-ref> must match the value of one of the <instance-id> elements found in the HelloWorldPortlet/WEB-INF/portlet-instances.xml file.
<region>center</region>
<height>1</height>
Specifies where the window appears within the page layout.
The following diagram illustrates the relationship between the portlet.xml, portlet-instances.xml, and helloworld-object.xml descriptors:
JBoss Portal 2.6 introduces the notion of content-type, which is a generic mechanism to specify what content displayed by a given portlet window. The window section of the previous example, HelloWorldPortlet/
WEB-INF/helloworld-object.xml, can be re-written to take advantage of the new content framework. The following is an example deployment descriptor that uses the new content framework:
<?xml version="1.0" encoding="UTF-8"?>
<!DOCTYPE deployments PUBLIC
"-//JBoss Portal//DTD Portal Object 2.6//EN"
"http://www.jboss.org/portal/dtd/portal-object_2_6.dtd">
<deployments>
<deployment>
<parent-ref>default.default</parent-ref>
<if-exists>overwrite</if-exists>
<window>
<window-name>HelloWorldPortletWindow</window-name>
<content>
<content-type>portlet</content-type>
<content-uri>HelloWorldPortletInstance</content-uri>
</content>
<region>center</region>
<height>1</height>
</window>
</deployment>
</deployments>
JBoss Release 2.6.5
36
Portlet Primer
This declaration is equivalent to the previous HelloWorldPortlet/WEB-INF/helloworld-object.xml example.
Use <content-type> to specify the content to display. In this example, the content being displayed by the HelloWorldPortletWindow is a portlet. The <content-uri> element specifies which content to display, which in this
example, is the HelloWorldPortletInstance:
<content>
<content-type>portlet</content-type>
<content-uri>HelloWorldPortletInstance</content-uri>
</content>
To display certain content or a file, use the cms content-type, with the <content-uri> element being the path to the
file in the CMS. This behavior is pluggable: you can plug in almost any type of content.
5.2.1.5. Building your Portlet
The HelloWorldPortlet.zip file contains a pre-compiled helloworldportlet.war file; however, to manually
build the helloworldportlet.war file:
1.
Change into the HelloWorldPortlet/ directory, and remove the existing helloworldportlet.war file.
2.
If required, edit the HelloWorldPortlet/src/main/org/jboss/portlet/hello/HelloWorldPortlet.java
file,
and
the
application
descriptors
in
the
HelloWorldPortlet/
src/resources/helloworldportlet-war/WEB-INF/ directory.
3.
Change into HelloWorldPortlet/ directory, and run the ant deploy command. On Microsoft Windows, the
output will be similar to the following:
Note: the directory names will be different for your system.
Expanding the helloworldportlet.war file allows you to deploy the portlet as an expanded directory, which
makes development easier. As well, it gives you access to the application descriptors, resource files, JSF, and JSP
pages. To expand the helloworldportlet.war file:
JBoss Release 2.6.5
37
Portlet Primer
1.
If you do not have the HelloWorldPortlet/helloworldportlet.war file, change into the HelloWorldPortlet/ directory, and run the ant deploy command. This creates the helloworldportlet.war file.
2.
To expand the WAR file, change into the HelloWorldPortlet/ directory, and run the ant explode command.
On Microsoft Windows, the output will be similar to the following:
Note: the directory names will be different for your system.
The ant explode command creates a directory structure such as the following:
The expanded WAR file and the application descriptors are located in the HelloWorldPortlet/output/lib/exploded/helloworldportlet.war/WEB-INF/ directory.
5.2.1.6. Deploying your Portlet
JBoss Release 2.6.5
38
Portlet Primer
If you did not expand the helloworldportlet.war file, copy the HelloWorldPortlet/helloworldportlet.war
file into the correct JBoss AS or JBoss EAP deploy/ directory. If you expanded the helloworldportlet.war file,
copy the HelloWorldPortlet/output/lib/exploded/helloworldportlet.war/ directory into the correct JBoss
AS or JBoss EAP deploy/ directory. For example, if you are using the default JBoss AS profile, copy the WAR
file or the expanded directory into the $JBOSS_HOME/server/default/deploy/ directory.
Performing this step on a running instance of JBoss AS or JBoss EAP, and JBoss Portal, triggers a hot-deploy of
the portlet:
INFO [TomcatDeployer] deploy, ctxPath=/helloworldportlet,
warUrl=.../tmp/deploy/tmp35219helloworldportlet-exp.war/
To see the HelloWorldPortlet, navigate to http://localhost:8080/portal/, or, if the default JBoss Portal page is
already open, refresh the page. The HelloWorldPortlet is added to the bottom of the default JBoss Portal page:
To re-deploy the portlet, for example, if you have made changes to any of the application descriptors, touch the
$JBOSS_HOME/server/configuration/deploy/helloworldportlet.war/WEB-INF/web.xml file. This only works if
you copied the HelloWorldPortlet/output/lib/exploded/helloworldportlet.war/ directory into the JBoss AS
or JBoss EAP deploy/ directory. On Linux, run the following command to re-deploy the HelloWorldPortlet:
JBoss Release 2.6.5
39
Portlet Primer
touch $JBOSS_HOME/server/configuration/deploy/helloworldportlet.war/WEB-INF/web.xml
Re-deploying the HelloWorldPortlet produces output to the JBoss AS or JBoss EAP console, similar to the following:
INFO [TomcatDeployer] undeploy, ctxPath=/helloworldportlet,
warUrl=.../deploy/helloworldportlet.war/
INFO [TomcatDeployer] deploy, ctxPath=/helloworldportlet,
warUrl=.../deploy/helloworldportlet.war/
5.2.2. An example JSP Portlet
5.2.2.1. Introduction
This section describes how to deploy a JSP portlet in JBoss Portal. Before proceeding, download the HelloWorldJSPPortlet [9] from JBoss PortletSwap [10]. The HelloWorldJSPPortlet demonstrates how to use JSPs for
view rendering, and the portlet tag library (taglib) for generating links.
5.2.2.2. Package Structure
The application descriptors for the HelloWorldJSPPortlet portlet are similar to those from the HelloWorldPortlet
(Section 5.2.1.4). Refer to Section 6.2 for further information about application descriptors.
The HelloWorldJSPPortlet portlet contains the traditional portlet and JBoss Portal specific application descriptors.
The following is an example of the directory structure of the HelloWorldJSPPortlet portlet:
[9] http://anonsvn.jboss.org/repos/portletswap/portlets/2_4/bundles/HelloWorldJSPPortlet.zip
[10] http://labs.jboss.com/portletswap/
JBoss Release 2.6.5
40
Portlet Primer
To create the WEB-INF/ and META-INF/ directories, extract the helloworldjspportlet.war file.
5.2.2.3. Portlet Classes
The
HelloWorldJSPPortlet
[11]
contains
src/main/org/jboss/portlet/hello/HelloWorldJSPPortlet.java
the
HelloWorldJSPPortlet/
file:
package org.jboss.portlet.hello;
import
import
import
import
import
import
import
import
import
javax.portlet.ActionRequest;
javax.portlet.ActionResponse;
javax.portlet.GenericPortlet;
javax.portlet.PortletException;
javax.portlet.PortletRequestDispatcher;
javax.portlet.RenderRequest;
javax.portlet.RenderResponse;
javax.portlet.UnavailableException;
java.io.IOException;
public class HelloWorldJSPPortlet extends GenericPortlet
{
protected void doView(RenderRequest rRequest, RenderResponse rResponse)
throws PortletException, IOException, UnavailableException
{
rResponse.setContentType("text/html");
String sYourName = (String) rRequest.getParameter("yourname");
if(sYourName != null)
{
rRequest.setAttribute("yourname", sYourName);
PortletRequestDispatcher prd = getPortletContext()
.getRequestDispatcher("/WEB-INF/jsp/view2.jsp");
prd.include(rRequest, rResponse);
}
else
{
PortletRequestDispatcher prd = getPortletContext()
.getRequestDispatcher("/WEB-INF/jsp/view.jsp");
prd.include(rRequest, rResponse);
}
}
public void processAction(ActionRequest aRequest, ActionResponse aResponse)
throws PortletException, IOException, UnavailableException
{
String sYourname = (String) aRequest.getParameter("yourname");
// do something
aResponse.setRenderParameter("yourname", sYourname);
}
protected void doHelp(RenderRequest rRequest, RenderResponse rResponse)
throws PortletException, IOException, UnavailableException
{
rResponse.setContentType("text/html");
PortletRequestDispatcher prd = getPortletContext()
.getRequestDispatcher("/WEB-INF/jsp/help.jsp");
prd.include(rRequest, rResponse);
}
[11] http://anonsvn.jboss.org/repos/portletswap/portlets/2_4/bundles/HelloWorldJSPPortlet.zip
JBoss Release 2.6.5
41
Portlet Primer
protected void doEdit(RenderRequest rRequest, RenderResponse rResponse)
throws PortletException, IOException, UnavailableException
{
rResponse.setContentType("text/html");
PortletRequestDispatcher prd = getPortletContext()
.getRequestDispatcher("/WEB-INF/jsp/edit.jsp");
prd.include(rRequest, rResponse);
}
}
protected void doHelp(RenderRequest rRequest, RenderResponse rResponse)
throws PortletException, IOException, UnavailableException
protected void doEdit(RenderRequest rRequest, RenderResponse rResponse)
throws PortletException, IOException, UnavailableException
Support for these modes must be declared in the HelloWorldJSPPortlet/WEB-INF/portlet.xml file. They are
triggered when a user clicks on the respective icons in the portlet window titlebar, or through generated links
within the portlet.
public void processAction(ActionRequest aRequest, ActionResponse aResponse)
throws PortletException, IOException, UnavailableException
{
String sYourname = (String) aRequest.getParameter("yourname");
// do something
aResponse.setRenderParameter("yourname", sYourname);
}
This method is triggered when a user clicks on an actionURL, which is defined in the HelloWorldJSPPortlet/
WEB-INF/jsp/view.jsp file. This retrieves yourname from the HTML form, and passes it as a aResponse.setRenderParameter to the doView() method.
rResponse.setContentType("text/html");
As in the servlet world, you must declare what content-type the portlet will be responding in. Do this before
starting to write content, or the portlet throws an exception.
protected void doView(RenderRequest rRequest, RenderResponse rResponse)
throws PortletException, IOException, UnavailableException
The doView implementation is responsible for dispatching to the appropriate JSP, HelloWorldJSPPortlet/
WEB-INF/jsp/view.jsp or HelloWorldJSPPortlet/WEB-INF/jsp/view2.jsp, depending on the existence of
the yourname parameter passed in from processAction.
5.2.2.4. JSP Files and the Portlet Tag Library
JBoss Release 2.6.5
42
Portlet Primer
The HelloWorldJSPPortlet/WEB-INF/jsp/view.jsp and HelloWorldJSPPortlet/WEB-INF/jsp/view2.jsp JSP
files are included in the HelloWorldJSPPortlet portlet. The view.jsp file allows a user to input their name. This is
then posted to the processAction method in the portlet class, which is set as a aResponse.setRenderParameter.
The doView render method is invoked, which dispatches to the view2.jsp JSP:
The following is an example of the HelloWorldJSPPortlet/WEB-INF/jsp/view.jsp file:
<%@ taglib uri="http://java.sun.com/portlet" prefix="portlet" %>
<portlet:defineObjects/>
<div align="center">
This is a simple HelloWorld JSP Portlet. Type in a name and it will dispatch
to the view2.jsp to print out your name.
<br/>
<form action="<portlet:actionURL><portlet:param name="page" value="mainview"/>
</portlet:actionURL>" method="POST">
Name:<br/>
<input type="text" name="yourname"/>
</form>
<br/>
You can also link to other pages, using a renderURL, like <a
href="<portlet:renderURL><portlet:param name="yourname" value="Roy Russo">
</portlet:param></portlet:renderURL>">this</a>.
</div>
<%@ taglib uri="http://java.sun.com/portlet" prefix="portlet" %>
Define the portlet taglib. You do not need to bundle the portlet taglib - JBoss Portal handles this for you.
<portlet:defineObjects/>
Calling defineObjects makes available implicit objects in the JSP, such as renderRequest, actionRequest,
and portletConfig.
<form action="<portlet:actionURL><portlet:param name="page" value="mainview"/>
</portlet:actionURL>" method="POST">
A HTML form is created. This form posts to the URL defined by the portlet taglib. In this example, an actionURL is created, that activates the processAction method, which passes the input parameters from the form.
JBoss Release 2.6.5
43
Portlet Primer
<a href="<portlet:renderURL><portlet:param name="yourname" value="Roy Russo">
</portlet:param></portlet:renderURL>">
You can create a link to the doView method by creating a renderURL, which passes the yourname parameter.
5.2.2.5. Building your JSP Portlet
The HelloWorldJSPPortlet.zip file contains a pre-compiled helloworldjspportlet.war file; however, to manually build the helloworldjspportlet.war file:
1.
Change into the HelloWorldJSPPortlet/ directory, and remove the existing helloworldjspportlet.war file.
2.
If
required,
edit
the
HelloWorldJSPPortlet/
file, and the application descriptors in
the HelloWorldJSPPortlet/src/resources/helloworldjspportlet-war/WEB-INF/ directory.
src/main/org/jboss/portlet/hello/HelloWorldJSPPortlet.java
3.
Change into HelloWorldJSPPortlet/ directory, and run the ant deploy command. On Linux, the output will
be similar to the following:
Note: the directory names will be different for your system.
Expanding the helloworldjspportlet.war file allows you to deploy the portlet as an expanded directory, which
makes development easier. As well, it gives you access to the application descriptors, resource files, JSF, and JSP
pages. To expand the helloworldjspportlet.war file:
1.
If you do not have the HelloWorldJSPPortlet/helloworldjspportlet.war file, change into the HelloWorldJSPPortlet/ directory, and run the ant deploy command. This creates the helloworldjspportlet.war
file.
2.
To expand the WAR file, change into the HelloWorldJSPPortlet/ directory, and run the ant explode command. On Linux, the output will be similar to the following:
JBoss Release 2.6.5
44
Portlet Primer
Note: the directory names will be different for your system.
The ant explode command creates a directory structure such as the following:
The expanded WAR file and the application descriptors are located in the HelloWorldJSPPortlet/output/lib/exploded/helloworldjspportlet.war/WEB-INF/ directory.
5.2.2.6. Deploying your JSP Portlet
If you did not expand the helloworldjspportlet.war file, copy the HelloWorldJSPPortlet/helloworldjspportlet.war file into the correct JBoss AS or JBoss EAP deploy/ directory. If you expanded the helloworldjspportlet.war file, copy the HelloWorldJSPPortlet/output/lib/exploded/helloworldjspportlet.war/ directory into the correct JBoss AS or JBoss EAP deploy/ directory. For example, if you are using the default JBoss AS profile, copy the WAR file or the expanded directory into the $JBOSS_HOME/server/default/deploy/ directory.
Performing this step on a running instance of JBoss AS or JBoss EAP, and JBoss Portal, triggers a hot-deploy of
the portlet:
JBoss Release 2.6.5
45
Portlet Primer
INFO [TomcatDeployer] deploy, ctxPath=/helloworldjspportlet,
warUrl=.../deploy/helloworldjspportlet.war/
To see the HelloWorldJSPPortlet, navigate to http://localhost:8080/portal/, or, if the default JBoss Portal page is
already open, refresh the page. The HelloWorldJSPPortlet is added to the bottom of the default JBoss Portal page:
To re-deploy the portlet, for example, if you have made changes to any of the application descriptors, touch the
$JBOSS_HOME/server/configuration/deploy/helloworldjspportlet.war/WEB-INF/web.xml file. This only works
if you copied the HelloWorldJSPPortlet/output/lib/exploded/helloworldjspportlet.war/ directory into the
JBoss AS or JBoss EAP deploy/ directory. On Linux, run the following command to re-deploy the HelloWorldJSPPortlet:
touch $JBOSS_HOME/server/configuration/deploy/helloworldjspportlet.war/WEB-INF/web.xml
Re-deploying the HelloWorldJSPPortlet produces output to the JBoss AS or JBoss EAP console, similar to the following:
JBoss Release 2.6.5
46
Portlet Primer
INFO [TomcatDeployer] undeploy, ctxPath=/helloworldjspportlet,
warUrl=.../deploy/helloworldjspportlet.war/
INFO [TomcatDeployer] deploy, ctxPath=/helloworldjspportlet,
warUrl=.../deploy/helloworldjspportlet.war/
5.2.3. An example Sun JSF Reference Implementation (RI) Portlet
5.2.3.1. Introduction
This section describes how to deploy a JSF portlet in JBoss Portal, using the Apache MyFaces JSF implementation
in JBoss AS and JBoss EAP. Before proceeding, download the HelloWorldJSFSunRIPortlet [13] from JBoss PortletSwap [14].
5.2.3.2. Package Structure
JBoss Portal requires certain descriptors to be included in a portlet WAR file. Some of these descriptors are defined
by the JSR-168 Portlet Specification, and others are specific to JBoss Portal. Like a typical JSF application, the
HelloWorldJSFSunRIPortlet package contains a faces-config.xml file that defines managed-beans, converters,
validators, navigation rules, and so on. The following is an example of the directory structure of the HelloWorldJSFSunRIPortlet portlet:
To create the WEB-INF/ and META-INF/ directories, extract the helloworldjsfsunriportlet.war file.
Bundled Sun JSF RI
[13] http://anonsvn.jboss.org/repos/portletswap/portlets/2_6/bundles/HelloWorldJSFSunRIPortlet.zip
[14] http://labs.jboss.com/portletswap/
JBoss Release 2.6.5
47
Portlet Primer
JBoss
AS
version
4.2.x
and
JBoss
EAP
bundle
Sun's
JSF RI libraries in the
$JBOSS_HOME/server/default/deploy/jboss-web.deployer/jsf-libs/ directory. Therefore, you do not
need to package the Sun JSF RI libraries with your portlet application.
5.2.3.3. Application Descriptors
Only the portlet.xml, faces-config.xml, and web.xml descriptors are described here. For more information
about application descriptors, refer to Section 5.2.1.4 and Section 6.2.
The following is an example of the HelloWorldJSFSunRIPortlet/WEB-INF/portlet.xml file. This file must adhere to its definition in the JSR-168 Portlet Specification. You may define more than one portlet application in this
file:
<?xml version="1.0" encoding="UTF-8"?>
<portlet-app xmlns="http://java.sun.com/xml/ns/portlet/portlet-app_1_0.xsd"
xmlns:xsi="http://www.w3.org/2001/XMLSchema-instance"
xsi:schemaLocation="http://java.sun.com/xml/ns/portlet/portlet-app_1_0.xsd
http://java.sun.com/xml/ns/portlet/portlet-app_1_0.xsd"
version="1.0">
<portlet>
<portlet-name>HelloWorldJSFPortlet</portlet-name>
<portlet-class>com.sun.faces.portlet.FacesPortlet</portlet-class>
<init-param>
<name>com.sun.faces.portlet.INIT_VIEW</name>
<value>/WEB-INF/jsp/index.jsp</value>
</init-param>
<supports>
<mime-type>text/html</mime-type>
<portlet-mode>view</portlet-mode>
</supports>
<portlet-info>
<title>HelloWorld JSF Portlet</title>
</portlet-info>
</portlet>
</portlet-app>
<portlet-class>com.sun.faces.portlet.FacesPortlet</portlet-class>
This specifies that the com.sun.faces.portlet.FacesPortlet handles all requests and responses from the
users. This class is part of the HelloWorldJSFSunRIPortlet/WEB-INF/lib/jsf-portlet.jar file.
<init-param>
<name>com.sun.faces.portlet.INIT_VIEW</name>
<value>/WEB-INF/jsp/index.jsp</value>
</init-param>
You must initialize the portlet with a default page to render, similar to a welcome page.
<supports>
<mime-type>text/html</mime-type>
<portlet-mode>view</portlet-mode>
JBoss Release 2.6.5
48
Portlet Primer
</supports>
The <supports> element allows you to declare all of the markup types that a portlet supports in the render
method. This is accomplished via the <mime-type> element, which is required for every portlet. The declared
MIME types must match the capability of the portlet. As well, it allows you to pair which modes and window
states are supported for each markup type. All portlets must support the view portlet mode, so this does not
have to be declared. Use the <mime-type> element to define which markup type your portlet supports, which in
this example, is text/html. This section tells the portal that it only outputs text and HTML, and that it only
supports the view mode.
The following is an example HelloWorldJSFSunRIPortlet/WEB-INF/faces-config.xml file:
<?xml version="1.0"?>
<!DOCTYPE faces-config PUBLIC
"-//Sun Microsystems, Inc.//DTD JavaServer Faces Config 1.0//EN"
"http://java.sun.com/dtd/web-facesconfig_1_0.dtd">
<faces-config>
<managed-bean>
<description>Basic UserBean</description>
<managed-bean-name>user</managed-bean-name>
<managed-bean-class>org.jboss.portlet.hello.bean.User</managed-bean-class>
<managed-bean-scope>session</managed-bean-scope>
</managed-bean>
<navigation-rule>
<navigation-case>
<from-outcome>done</from-outcome>
<to-view-id>/WEB-INF/jsp/result.jsp</to-view-id>
</navigation-case>
</navigation-rule>
</faces-config>
Without the faces-config.xml file, the application would work the same outside of the portlet as it would inside a
portlet container. In this example, a basic user bean, <managed-bean-name>user</managed-bean-name>, and a navigation rule are defined, which handle the submission of the original form in the HelloWorldJSFSunRIPortlet/
WEB-INF/jsp/index.jsp file.
The following is an example of the Faces Servlet and Faces Servlet Mapping sections from the HelloWorldJSFSunRIPortlet/WEB-INF/web.xml file:
<?xml version="1.0"?>
<!DOCTYPE web-app PUBLIC
"-//Sun Microsystems, Inc.//DTD Web Application 2.3//EN"
"http://java.sun.com/dtd/web-app_2_3.dtd">
<web-app>
<!-- Faces Servlet -->
<servlet>
<servlet-name>Faces Servlet</servlet-name>
<servlet-class>javax.faces.webapp.FacesServlet</servlet-class>
<load-on-startup>1</load-on-startup>
</servlet>
<!-- Faces Servlet Mapping -->
JBoss Release 2.6.5
49
Portlet Primer
<servlet-mapping>
<servlet-name>Faces Servlet</servlet-name>
<url-pattern>*.jsf</url-pattern>
</servlet-mapping>
</web-app>
For Sun JSF RI portlets, the Faces Servlet and Faces Servlet Mapping sections are required to associate files
with the .jsf extension to the Apache MyFaces servlet.
Classes for the JSF-Portlet bridge are not included
Unlike Apache MyFaces, the classes for the JSF-Portlet bridge are not included in the JSF implementation,
JBoss AS, or JBoss EAP. This library must be available in your application package. Navigate to the JSFPortlet bridge webpage [15] to download the JSF-Portlet bridge library.
5.2.3.4. Building your JSF Portlet
The HelloWorldJSFSunRIPortlet.zip file contains a pre-compiled helloworldjsfsunriportlet.war file;
however, to manually build the helloworldjsfsunriportlet.war file:
1.
Change into the HelloWorldJSFSunRIPortlet/ directory, and remove the existing helloworldjsfsunriportlet.war file.
2.
If required, edit the HelloWorldJSFSunRIPortlet/src/main/org/jboss/portlet/hello/bean/User.java
file,
and
the
application
descriptors
in
the
HelloWorldJSFSunRIPortlet/
src/resources/helloworldjsfsunriportlet-war/WEB-INF/ directory.
3.
Change into HelloWorldJSFSunRIPortlet/ directory, and run the ant deploy command. On Linux, the output
will be similar to the following:
Note: the directory names will be different for your system.
Expanding the helloworldjsfsunriportlet.war file allows you to deploy the portlet as an expanded directory,
which makes development easier. As well, it gives you access to the application descriptors, resource files, JSF,
and JSP pages. To expand the helloworldjsfsunriportlet.war file:
[15] https://jsfportletbridge.dev.java.net/servlets/ProjectDocumentList
JBoss Release 2.6.5
50
Portlet Primer
1.
If you do not have the HelloWorldJSFSunRIPortlet/helloworldjsfsunriportlet.war file, change into the
HelloWorldJSFSunRIPortlet/ directory, and run the ant deploy command. This creates the helloworldjsfsunriportlet.war file.
2.
To expand the WAR file, change into the HelloWorldJSFSunRIPortlet/ directory, and run the ant explode
command. On Linux, the output will be similar to the following:
Note: the directory names will be different for your system.
The expanded WAR file and the application descriptors are located in the HelloWorldJSFSunRIPortlet/output/lib/exploded/helloworldjsfsunriportlet.war/WEB-INF/ directory.
5.2.3.5. Deploying your JSF Portlet
If you did not expand the helloworldjsfsunriportlet.war file, copy the HelloWorldJSFSunRIPortlet/helloworldjsfsunriportlet.war file into the correct JBoss AS or JBoss EAP deploy/ directory. If you expanded the
helloworldjsfsunriportlet.war
file,
copy
the
HelloWorldJSFSunRIPortlet/output/lib/exploded/helloworldjsfsunriportlet.war/ directory into the correct JBoss AS or JBoss EAP deploy/
directory. For example, if you are using default JBoss AS profile, copy the WAR file or the expanded directory
into the $JBOSS_HOME/server/default/deploy/ directory.
Performing this step on a running instance of JBoss AS or JBoss EAP, and JBoss Portal, triggers a hot-deploy of
the portlet:
INFO [TomcatDeployer] deploy, ctxPath=/helloworldjsfsunriportlet,
warUrl=.../tmp/deploy/tmp9138helloworldjsfsunriportlet-exp.war/
To see the HelloWorldJSFSunRIPortlet, navigate to http://localhost:8080/portal/, or, if the default JBoss Portal
page is already open, refresh the page. The HelloWorldJSFSunRIPortlet is added to the bottom of the default JBoss
Portal page:
JBoss Release 2.6.5
51
Portlet Primer
To re-deploy the portlet, for example, if you have made changes to any of the application descriptors, touch the
$JBOSS_HOME/server/configuration/deploy/helloworldjsfsunriportlet.war/WEB-INF/web.xml file. This only
works if you copied the HelloWorldJSFSunRIPortlet/output/lib/exploded/helloworldjsfsunriportlet.war/
directory into the JBoss AS or JBoss EAP deploy/ directory. On Linux, run the following command to re-deploy
the HelloWorldJSFSunRIPortlet:
touch $JBOSS_HOME/server/configuration/deploy/helloworldjsfsunriportlet.war/WEB-INF/web.xml
Re-deploying the HelloWorldJSFSunRIPortlet produces output to the JBoss AS or JBoss EAP console, similar to
the following:
INFO [TomcatDeployer] undeploy, ctxPath=/helloworldjsfsunriportlet,
warUrl=.../deploy/helloworldjsfsunriportlet.war/
INFO [TomcatDeployer] deploy, ctxPath=/helloworldjsfsunriportlet,
warUrl=.../deploy/helloworldjsfsunriportlet.war/
JBoss Release 2.6.5
52
Portlet Primer
5.2.4. An example Apache MyFaces JSF Portlet
5.2.4.1. Introduction
This section describes how to deploy a JSF portlet in JBoss Portal, using the Apache MyFaces JSF implementation
in JBoss AS and JBoss EAP. Before proceeding, download the HelloWorldJSFMyFaces42Portlet [17] from JBoss
PortletSwap [18].
Apache MyFaces can be used globally for the entire server, replacing the Sun JSF RI libraries, but the HelloWorldJSFMyFaces42Portlet uses its own libraries, but does not affect the application server.
5.2.4.2. Package Structure
JBoss Portal requires certain descriptors to be included in a portlet WAR file. Some of these descriptors are defined
by the JSR-168 Portlet Specification, and others are specific to JBoss Portal. Like a typical JSF application, the
HelloWorldJSFMyFaces42Portlet package contains a faces-config.xml file that defines managed-beans, converters, validators, navigation rules, and so on. The following is an example of the directory structure of the HelloWorldJSFMyFaces42Portlet portlet:
[17] http://anonsvn.jboss.org/repos/portletswap/portlets/2_6/bundles/HelloWorldJSFMyFaces42Portlet.zip
[18] http://labs.jboss.com/portletswap/
JBoss Release 2.6.5
53
Portlet Primer
To create the WEB-INF/ and META-INF/ directories, extract the helloworldjsfmyfacesportlet.war file. The WEBINF/lib/ directory must contain the Apache MyFaces libraries, along with the dependent libraries.
5.2.4.3. Application Descriptors
Only the portlet.xml, faces-config.xml, and web.xml descriptors are described here. For more information
about application descriptors, refer to Section 5.2.1.4 and Section 6.2.
The following is an example of the HelloWorldJSFMyFaces42Portlet/WEB-INF/portlet.xml file. This file must
adhere to its definition in the JSR-168 Portlet Specification. You may define more than one portlet application in
this file:
JBoss Release 2.6.5
54
Portlet Primer
<?xml version="1.0" encoding="UTF-8"?>
<portlet-app xmlns="http://java.sun.com/xml/ns/portlet/portlet-app_1_0.xsd"
xmlns:xsi="http://www.w3.org/2001/XMLSchema-instance"
xsi:schemaLocation="http://java.sun.com/xml/ns/portlet/portlet-app_1_0.xsd
http://java.sun.com/xml/ns/portlet/portlet-app_1_0.xsd"
version="1.0">
<portlet>
<portlet-name>HelloWorldJSFPortlet</portlet-name>
<portlet-class>org.apache.myfaces.portlet.MyFacesGenericPortlet</portlet-class>
<init-param>
<name>default-view</name>
<value>/WEB-INF/jsp/index.jsp</value>
</init-param>
<supports>
<mime-type>text/html</mime-type>
<portlet-mode>view</portlet-mode>
</supports>
<portlet-info>
<title>HelloWorld JSF Portlet</title>
</portlet-info>
</portlet>
</portlet-app>
<portlet-class>org.apache.myfaces.portlet.MyFacesGenericPortlet</portlet-class>
This specifies that the org.apache.myfaces.portlet.MyFacesGenericPortlet handles all requests and responses from the users. Therefore, there is no need to develop a specific portlet class, as Apache MyFaces
provides a generic implementation which bridges the JSF and portlet worlds.
<init-param>
<name>default-view</name>
<value>/WEB-INF/jsp/index.jsp</value>
</init-param>
You must initialize the portlet with a default page to render, similar to a welcome page.
<supports>
<mime-type>text/html</mime-type>
<portlet-mode>view</portlet-mode>
</supports>
The <supports> element allows you to declare all of the markup types that a portlet supports in the render
method. This is accomplished via the <mime-type> element, which is required for every portlet. The declared
MIME types must match the capability of the portlet. As well, it allows you to pair which modes and window
states are supported for each markup type. All portlets must support the view portlet mode, so this does not
have to be declared. Use the <mime-type> element to define which markup type your portlet supports, which in
this example, is text/html. This section tells the portal that it only outputs text and HTML, and that it only
supports the view mode.
Adding Functionality to an Apache MyFaces JSF Portlet
JBoss Release 2.6.5
55
Portlet Primer
To add functionality to an Apache MyFaces JSF portlet, sub-class it and create your own class.
The following is an example HelloWorldJSFMyFaces42Portlet/WEB-INF/faces-config.xml file:
<?xml version="1.0"?>
<!DOCTYPE faces-config PUBLIC
"-//Sun Microsystems, Inc.//DTD JavaServer Faces Config 1.0//EN"
"http://java.sun.com/dtd/web-facesconfig_1_0.dtd">
<faces-config>
<managed-bean>
<description>Basic UserBean</description>
<managed-bean-name>user</managed-bean-name>
<managed-bean-class>org.jboss.portlet.hello.bean.User</managed-bean-class>
<managed-bean-scope>session</managed-bean-scope>
</managed-bean>
<navigation-rule>
<navigation-case>
<from-outcome>done</from-outcome>
<to-view-id>/WEB-INF/jsp/result.jsp</to-view-id>
</navigation-case>
</navigation-rule>
</faces-config>
Without the faces-config.xml file, the application would work the same outside of the portlet as it would inside a
portlet container. In this example, a basic user bean, <managed-bean-name>user</managed-bean-name>, and a navigation rule are defined, which handle the submission of the original form in the HelloWorldJSFMyFaces42Portlet/WEB-INF/jsp/index.jsp file.
The
following
is
an
example of
file:
the
<context-parm>
element
from
the
HelloWorldJSFMy-
Faces42Portlet/WEB-INF/web.xml
<context-param>
<param-name>org.jboss.jbossfaces.WAR_BUNDLES_JSF_IMPL</param-name>
<param-value>true</param-value>
</context-param>
These extra parameters let the application server know that the portlet embeds its own libraries. This avoids collision with the Sun JSF RI libraries bundled with JBoss AS and JBoss EAP. For more information, refer to the
JBossFaces page on the JBoss Wiki [19].
5.2.4.4. Building your Apache MyFaces JSF Portlet
The HelloWorldJSFMyFaces42Portlet.zip file contains a pre-compiled helloworldjsfmyfacesportlet.war file;
however, to manually build the helloworldjsfmyfacesportlet.war file:
1.
Change into the HelloWorldJSFMyFaces42Portlet/ directory, and remove the existing helloworldjsfmyfacesportlet.war file.
2.
If
required,
edit
the
HelloWorldJSFMy-
[19] http://wiki.jboss.org/wiki/Wiki.jsp?page=JBossFaces
JBoss Release 2.6.5
56
Portlet Primer
Faces42Portlet/src/main/org/jboss/portlet/hello/bean/User.java
file, and the application descriptors
in the HelloWorldJSFMyFaces42Portlet/src/resources/helloworldjsfmyfacesportlet-war/WEB-INF/
directory.
3.
Change into HelloWorldJSFMyFaces42Portlet/ directory, and run the ant deploy command. On Linux, the
output will be similar to the following:
Note: the directory names will be different for your system.
Expanding the helloworldjsfmyfacesportlet.war file allows you to deploy the portlet as an expanded directory,
which makes development easier. As well, it gives you access to the application descriptors, resource files, JSF,
and JSP pages. To expand the helloworldjsfmyfacesportlet.war file:
1.
If you do not have the HelloWorldJSFMyFaces42Portlet/helloworldjsfmyfacesportlet.war file, change
into the HelloWorldJSFMyFaces42Portlet/ directory, and run the ant deploy command. This creates the
helloworldjsfmyfacesportlet.war file.
2.
To expand the WAR file, change into the HelloWorldJSFMyFaces42Portlet/ directory, and run the ant explode command. On Linux, the output will be similar to the following:
Note: the directory names will be different for your system.
The
expanded
WAR
file
and
the
application
descriptors
are
located
in
the HelloWorldJSFMyFaces42Portlet/output/lib/exploded/helloworldjsfmyfacesportlet.war/WEB-INF/ directory.
5.2.4.5. Deploying your Apache MyFaces JSF Portlet
If
you
did
not
expand
the
JBoss Release 2.6.5
file, copy the HelloWorldJSFMyfile into the correct JBoss AS or JBoss EAP deploy/ direct-
helloworldjsfmyfacesportlet.war
Faces42Portlet/helloworldjsfmyfacesportlet.war
57
Portlet Primer
ory.
If
you
expanded
the
copy the HelloWorldJSFMydirectory into the correct JBoss
AS or JBoss EAP deploy/ directory. For example, if you are using the default JBoss AS profile, copy the WAR
file or the expanded directory into the $JBOSS_HOME/server/default/deploy/ directory.
helloworldjsfmyfacesportlet.war
file,
Faces42Portlet/output/lib/exploded/helloworldjsfmyfacesportlet.war/
Performing this step on a running instance of JBoss AS or JBoss EAP, and JBoss Portal, triggers a hot-deploy of
the portlet.
To see the HelloWorldJSFMyFaces42Portlet, navigate to http://localhost:8080/portal/, or, if the default JBoss
Portal page is already open, refresh the page. The HelloWorldJSFMyFaces42Portlet is added to the bottom of the
default JBoss Portal page:
To re-deploy the portlet, for example, if you have made changes to any of the application descriptors, touch the
$JBOSS_HOME/server/configuration/deploy/helloworldjsfmyfacesportlet.war/WEB-INF/web.xml
file. This
only
works
if
you
copied
the
HelloWorldJSFMyFaces42Portlet/output/lib/exploded/helloworldjsfmyfacesportlet.war/ directory into the JBoss AS or
JBoss EAP deploy/ directory. On Linux, run the following command to re-deploy the HelloWorldJSFMyFaces42Portlet:
JBoss Release 2.6.5
58
Portlet Primer
touch $JBOSS_HOME/server/configuration/deploy/helloworldjsfmyfacesportlet.war/WEB-INF/web.xml
JBoss Release 2.6.5
59
6
XML Descriptors
Roy Russo <[email protected]>
6.1. Changes from previous releases
The previous releases of JBoss Portal did not have an external schema to validate XML descriptors; however, they
were internally validated by the portal. Since JBoss Portal 2.6, a Document Type Definition (DTD) has been
provided to validate descriptors.
To use the DTD, add the following declaration to the start of the desired descriptors:
<?xml version="1.0" encoding="UTF-8"?>
<!DOCTYPE deployments PUBLIC
"-//JBoss Portal//DTD Portal Object 2.6//EN"
"http://www.jboss.org/portal/dtd/portal-object_2_6.dtd">
If you do not use the DTD declaration, the previous mechanism for XML validation is used. The DTD is more
strict, specifically with the order of XML elements. The following is an example from a *-object.xml descriptor,
which is valid if you are not using the DTD, but is rejected if you are:
<if-exists>overwrite</if-exists>
<parent-ref>default.default</parent-ref>
The correct element order, and one which is valid against the DTD, is as follows:
<parent-ref>default.default</parent-ref>
<if-exists>overwrite</if-exists>
The following DTDs are available:
•
for -object.xml descriptors: "-//JBoss Portal//DTD Portal Object 2.6//EN"
•
for jboss-app.xml descriptors: "-//JBoss Portal//DTD JBoss Web Application 2.6//EN"
•
for jboss-portlet.xml descriptors: "-//JBoss Portal//DTD JBoss Portlet 2.6//EN"
JBoss Release 2.6.5
60
XML Descriptors
•
for portlet-instances.xml descriptors: "-//JBoss Portal//DTD Portlet Instances 2.6//EN"
The DTDs are located in the $JBOSS_HOME/server/configuration/deploy/jboss-portal.sar/dtd/ directory.
6.1.1. The JBoss Portlet DTD
The following items refer to elements found in the JBoss Portlet DTD, $JBOSS_HOME/server/configuration/
deploy/jboss-portal.sar/dtd/jboss-portlet_version_number.dtd:
<!ELEMENT portlet-app (remotable?,portlet*,service*)>
Use the <remotable> element to configure the default behavior of portlets with respect to WSRP exposure: if
no value is given, the value is either the value globally defined at the portlet application level, or false. Accepted values are true and false.
You can configure specific settings of the portlet container for each portlet defined in the WEBINF/portlet.xml file. Use the <service> element to inject services into the portlet context of applications.
<!ELEMENT portlet (portlet-name,remotable?,ajax?,session-config?,transaction?,
header-content?,portlet-info?)>
Additional configuration of the portlet. The <portlet-name> element defines the portlet name. It must match a
portlet defined in the WEB-INF/portlet.xml file for that application.
Use the <remotable> element to configure the default behavior of portlets with respect to WSRP exposure: if
no value is given, the value is either the value globally defined at the portlet application level, or false.
The <trans-attribute> element specifies the behavior of the portlet when it is invoked at runtime with respect to the transactional context. Depending on how the portlet is invoked, a transaction may or may not exist
before the portlet is invoked. The portal transaction is usually present in the local context. The default value is
NotSupported, which means that the portal transaction is suspended for the duration of the portlet's invocation.
Accepted values are Required, Mandatory, Never, Supports, NotSupported, and RequiresNew.
The following is an example section from a WEB-INF/portlet.xml file, which uses the <portlet-name>,
<remotable>, and <trans-attribute> elements:
<portlet>
<portlet-name>MyPortlet</portlet-name>
<remotable>true</remotable>
<trans-attribute>Required</trans-attribute>
</portlet>
<!ELEMENT portlet-name (#PCDATA)>
The portlet name.
JBoss Release 2.6.5
61
XML Descriptors
<!ELEMENT remotable (#PCDATA)>
Accepted values are true and false.
<!ELEMENT ajax (partial-refresh)>
Use the ajax element to configure the Asynchronous JavaScript and XML (AJAX) capabilities of the portlet.
<!ELEMENT partial-refresh (#PCDATA)>
If a portlet uses the true value for the <partial-refresh> element, the portal uses partial-page refreshing and
only renders that portlet. If the <partial-refresh> element uses a false value, the portal uses a full-page refresh when the portlet is refreshed.
<!ELEMENT session-config (distributed)>
The <session-config> element configures the portlet session for the portlet. The <distributed> element instructs the container to distribute the session attributes using portal session replication. This only applies to local portlets, not remote portlets.
The following is an example of the <session-config> and <distributed> elements:
<session-config>
<distributed>true</distributed>
</session-config>
<!ELEMENT distributed (#PCDATA)>
Accepted values are true and false. The default value is false.
<!ELEMENT transaction (trans-attribute)>
The <transaction> element defines how the portlet behaves with regards to the transactional context. The
<trans-attribute> element specifies the behavior of the portlet when it is invoked at runtime, with respect to
the transactional context. Depending on how the portlet is invoked, a transaction may or may not exist before
the portlet is invoked. The portal transaction is usually present in the local context.
The following is an example of the <transaction> and <trans-attribute> elements:
<transaction>
<trans-attribute>Required</transaction>
JBoss Release 2.6.5
62
XML Descriptors
<transaction>
<!ELEMENT trans-attribute (#PCDATA)>
The default value is NotSupported, which means that the portal transaction is suspended for the duration of the
portlet's invocation. Accepted values are Required, Mandatory, Never, Supports, NotSupported, and RequiresNew.
<!ELEMENT header-content (link|script|meta)*>
Specify the content to be included in the portal aggregated page when the portlet is present on that page. This
setting only applies when the portlet is used in the local mode.
<!ELEMENT link EMPTY>
No content is allowed inside a link element.
<!ELEMENT script (#PCDATA)>
Use the <script> element for inline script definitions.
<!ELEMENT meta EMPTY>
No content is allowed for the <meta> element.
<!ELEMENT service (service-name,service-class,service-ref)>
Declare a service that will be injected by the portlet container as an attribute of the portlet context.
The following is an example of the <service> element:
<service>
<service-name>UserModule</service-name>
<service-class>org.jboss.portal.identity.UserModule</service-class>
<service-ref>:service=Module,type=User</service-ref>
</service>
To use an injected service in a portlet, perform a lookup of the <service-name>, for example, using the init()
lifecycle method:
public void init()
JBoss Release 2.6.5
63
XML Descriptors
{
UserModule userModule = (UserModule)getPortletContext().getAttribute("UserModule");
}
<!ELEMENT service-name (#PCDATA)>
The <service-name> element defines the name that binds the service as a portlet context attribute.
<!ELEMENT service-class (#PCDATA)>
The <service-class> element defines the fully qualified name of the interface that the service implements.
<!ELEMENT service-ref (#PCDATA)>
The <service-ref> element defines the reference to the service. In the JMX Microkernel environment, this
consist of the JMX name of the service MBean. For an MBean reference, if the domain is left out, the current
domain of the portal is used.
6.1.2. The JBoss Portlet Instance DTD
The
following
items
refer
to
elements
found
in
the
JBoss
Portlet
Instance
DTD,
$JBOSS_HOME/server/configuration/deploy/jboss-portal.sar/dtd/portlet-instances_version_number.dtd:
<!ELEMENT deployments (deployment*)>
The <deployments> element is a container for <deployment> elements.
<!ELEMENT deployment (if-exists?,instance)>
The <deployment> element is a container for the <instance> element.
<!ELEMENT if-exists (#PCDATA)>
The <if-exists> element defines the action to take if an instance with the same name already exists. Accepted
values are overwrite and keep. The overwrite option destroys the existing object, and creates a new one
based on the content of the deployment. The keep option maintains the existing object deployment, or creates a
new one if it does not exist.
JBoss Release 2.6.5
64
XML Descriptors
<!ELEMENT instance (instance-id,portlet-ref,display-name*,preferences?,
security-constraint?, (display-name* | (resource-bundle, supported-locale+)))>
The <instance> element is used in the WEB-INF/portlet-instances.xml file, which creates instances of portlets. The portlet will only be created and configured if the portlet is present, and if an instance with the same
name does not already exist.
The following is an example of the <instance> element, which also contains the <security-constraint> element. Descriptions of each element follow afterwards:
<instance>
<instance-id>MyPortletInstance</instance-id>
<portlet-ref>MyPortlet</portlet-ref>
<preferences>
<preference>
<name>abc</name>
<value>def</value>
</preference>
</preferences>
<security-constraint>
<policy-permission>
<role-name>User</role-name>
<action-name>view</action-name>
</policy-permission>
</security-constraint>
</instance>
<!ELEMENT instance-id (#PCDATA)>
The instance identifier. The <instance-id> value can be named anything, but it must match the
<instance-ref>value given in the *-object.xml file.
<!ELEMENT portlet-ref (#PCDATA)>
The <portlet-ref> element defines the portlet that an instance represents. The <portlet-ref> value must
match the <portlet-name> given in the WEB-INF/portlet.xml file.
<!ELEMENT preferences (preference+)>
The <preferences> element configures an instance with a set of preferences.
<!ELEMENT preference (name,value)>
The <preference> element configures one preference, which is part of a set of preferences. Use the
<preferences> element to define a set of preferences.
JBoss Release 2.6.5
65
XML Descriptors
<!ELEMENT name (#PCDATA)>
A name.
<!ELEMENT value (#PCDATA)>
A string value.
<!ELEMENT security-constraint (policy-permission*)>
The <security-constraint> element is a container for <policy-permission> elements. The following is an
example of the <security-constraint> and <policy-permission> elements:
<security-constraint>
<policy-permission>
<role-name>User</role-name>
<action-name>view</action-name>
</policy-permission>
</security-constraint>
<security-constraint>
<policy-permission>
<unchecked/>
<action-name>view</action-name>
</policy-permission>
</security-constraint>
<!ELEMENT policy-permission (action-name*,unchecked?,role-name*)>
The <policy-permission> element secures a specific portlet instance based on a user's role.
<!ELEMENT action-name (#PCDATA)>
The <action-name> element defines the access rights given to the role defined. Accepted values are:
•
view:
users can view the page.
•
viewrecursive:
•
personalize:
•
personalizerecursive:
users can view the page and child pages.
users are able personalize the page's theme.
users are able personalize the page and child pages themes.
<!ELEMENT unchecked EMPTY>
JBoss Release 2.6.5
66
XML Descriptors
If present, the <unchecked> element defines anyone can view the instance.
<!ELEMENT role-name (#PCDATA)>
The <role-name> element defines a role that the security constraint will apply to. The following example only
allows users that are part of the EXAMPLEROLE role to access the instance:
<role-name>EXAMPLEROLE</role-name>
6.1.3. The JBoss Portal Object DTD
The following items refer to elements found in the JBoss Portal Object DTD, $JBOSS_HOME/server/configuration/
deploy/jboss-portal.sar/dtd/portal-object_version_number.dtd:
<!ELEMENT deployments (deployment*)>
The <deployments> element is a container for <deployment> elements.
<!ELEMENT deployment (parent-ref?,if-exists?,(context|portal|page|window))>
The <deployment> element is a generic container for portal object elements. The <parent-ref> child element
gives the name of the parent object that the current object will use as parent. The optional <if-exists> element defines the action to take if an instance with the same name already exists. The default behavior of the
<if-exists> element is to keep the existing object, and not to create a new object.
The following is an example of the <deployment> and <parent-ref> elements:
<deployment>
<parent-ref>default</parent-ref>
<page>
...
</page>
</deployment>
All portal objects have a common configuration which can include:
•
a listener: specifies the ID of a listener in the listener registry. A listener object is able to listen to portal
events, which apply to the portal node hierarchy.
•
properties: a set of generic properties owned by the portal object. Certain properties drive the behavior of
JBoss Release 2.6.5
67
XML Descriptors
the portal object.
•
security-constraint: defines the security configuration for the portal object.
<!ELEMENT parent-ref (#PCDATA)>
The <parent-ref> element contains a reference to the parent object. The naming convention for naming objects is to concatenate the names of the path to the object, and separate the names using a period. If the path is
empty, the empty string must be used. The <parent-ref> element tells the portal where the portlet appears.
The syntax for the <parent-ref> element is portal-instance.portal-page.
The following is an example of the root having an empty path:
<parent-ref/>
The following specifies that the portlet appears in the portal instance named default:
<parent-ref>default</parent-ref>
The following specifies that the portlet appear in the portal instance named default, and on the page named
default:
<parent-ref>default.default</parent-ref>
<!ELEMENT if-exists (#PCDATA)>
The <if-exists> element defines the action to take if an instance with the same name already exists. Accepted
values are overwrite and keep. The overwrite option destroys the existing object, and creates a new one
based on the content of the deployment. The keep option matains the existing object deployment, or creates a
new one if it does not exist.
<!ELEMENT context (context-name,properties?,listener?,security-constraint?,portal*,
(display-name* | (resource-bundle, supported-locale+)))>
The context type of the portal object. A context type represent a node in a tree, which does not have a visual
representation, and only exists under the root. A context can only have children that use the portal type.
<!ELEMENT context-name (#PCDATA)>
The context name.
JBoss Release 2.6.5
68
XML Descriptors
<!ELEMENT portal (portal-name,supported-modes,supported-window-states?,properties?,listener?,
security-constraint?,page*, (display-name* | (resource-bundle, supported-locale+)))>
A portal object that uses the portal type. A portal type represents a virtual portal, and can only have children
that use the page type. In addition to the common portal object elements, it also allows you to declare modes
and window states that are supported.
<!ELEMENT portal-name (#PCDATA)>
The portal name.
<!ELEMENT supported-modes (mode*)>
The <supported-modes> elements defines the supported modes of the portal. Accepted values are view, edit,
and help.
The following is an example of the <supported-mode> and <mode> elements:
<supported-mode>
<mode>view</mode>
<mode>edit</mode>
<mode>help</mode>
</supported-mode>
<!ELEMENT mode (#PCDATA)>
The portlet mode value. If there are no declarations of modes or window states, the default values are view,
edit, help, and normal, minimized, maximized, respectively.
<!ELEMENT supported-window-states (window-state*)>
Use the <supported-window-states> element to define the supported window states of the portal. The following is an example of the <supported-window-states> and <window-state> elements:
<supported-window-states>
<window-state>normal</window-state>
<window-state>minimized</window-state>
<window-state>maximized</window-state>
</supported-window-states>
<!ELEMENT window-state (#PCDATA)>
JBoss Release 2.6.5
69
XML Descriptors
Use the <window-state> element to define a window states. Accepted values are normal, minimized, and maximized.
<!ELEMENT page (page-name,properties?,listener?,security-constraint?,(page | window)*,
(display-name* | (resource-bundle, supported-locale+)))>
A portal object that uses the page type. A page type represents a page, and can only have children that use the
page and window types. The children windows are the windows of the page, and the children pages are the subpages of the page.
<!ELEMENT page-name (#PCDATA)>
The page name.
<!ELEMENT window (window-name,(instance-ref|content),region,height,initial-window-state?,
initial-mode?,properties?,listener?, (display-name* | (resource-bundle, supported-locale+)))>
A portal object that uses the window type. A window type represents a window. Besides the common properties, a window has content, and belongs to a region on the page.
The <instance-ref> and <content> elements, configured in the WEB-INF/*-object.xml files, define the content of a window. The <content> element is generic, and describes any kind of content. The <instance-ref>
element is a shortcut to define the content-type of the portlet, which points to a portlet instance. The value of
<instance-ref> must match the value of one of the <instance-id> elements in the WEBINF/portlet-instances.xml file.
<!ELEMENT window-name (#PCDATA)>
The window name value.
<!ELEMENT instance-ref (#PCDATA)>
Define the content of the window as a reference to a portlet instance. This value is the ID of a portlet instance,
and must much the value of one of the <instance-id> elements in the WEB-INF/portlet-instances.xml file.
The following is an example of the <instance-ref> element:
<instance-ref>MyPortletInstance</instance-ref>
<!ELEMENT region (#PCDATA)>
The region the window belongs to. The <region> element specifies where the window appears on the page.
JBoss Release 2.6.5
70
XML Descriptors
<!ELEMENT height (#PCDATA)>
The height of the window in a particular region.
<!ELEMENT listener (#PCDATA)>
Define a listener for a portal object. This value is the ID of the listener.
<!ELEMENT content (content-type,content-uri)>
Define the content of a window in a generic manner. The content is defined by the type of content, and a URI,
which acts as an identifier for the content. The following is an example of the <content> element, which is
configured in the WEB-INF/*-object.xml files:
<content>
<content-type>portlet</content-type>
<content-uri>MyPortletInstance</content-uri>
</content>
<content>
<content-type>cms</content-type>
<content-uri>/default/index.html</content-uri>
</content>
<!ELEMENT content-type (#PCDATA)>
The content type of the window. The <content-type> element specifies the content to display, for example, a
portlet.
<!ELEMENT content-uri (#PCDATA)>
The content URI of the window. The <content-uri> element specifies which content to display, for example,
a portlet instance. To display a file from the CMS, use the <content-uri> element to define the full path to
that file in the CMS.
<!ELEMENT properties (property*)>
A set of generic properties for the portal object. The <properties> elements contains definitions specific to a
page. This is commonly used to define the specific theme and layout to use. If not defined, the default portal
theme and layout are used.
JBoss Release 2.6.5
71
XML Descriptors
<!ELEMENT property (name,value)>
A generic string property.
<!ELEMENT name (#PCDATA)>
A name value.
<!ELEMENT value (#PCDATA)>
A value.
<!ELEMENT security-constraint (policy-permission*)>
The <security-constraint> element is a container for <policy-permission> elements. The following is an
example of the <security-constraint> and <policy-permission> elements:
<security-constraint>
<policy-permission>
<role-name>User</role-name>
<action-name>view</action-name>
</policy-permission>
</security-constraint>
<security-constraint>
<policy-permission>
<unchecked/>
<action-name>view</action-name>
</policy-permission>
</security-constraint>
<!ELEMENT policy-permission (action-name*,unchecked?,role-name*)>
The <policy-permission> element is secures a specific portlet instance based on a user's role.
<!ELEMENT action-name (#PCDATA)>
The <action-name> element defines the access rights given to the role defined. Accepted values are:
•
view:
users can view the page.
•
viewrecursive:
•
personalize:
•
personalizerecursive:
JBoss Release 2.6.5
users can view the page and child pages.
users are able personalize the page's theme.
users are able personalize the page and child pages themes.
72
XML Descriptors
<!ELEMENT unchecked EMPTY>
If present, the <unchecked> element defines that anyone can view the instance.
<!ELEMENT role-name (#PCDATA)>
The <role-name> element defines a role that the security constraint applies to. The following example only allows users that are part of the EXAMPLEROLE role to access the instance:
<role-name>EXAMPLEROLE</role-name>
6.1.4. The JBoss Portal App DTD
The following items refer to elements found in the JBoss Portal App DTD, $JBOSS_HOME/server/configuration/
jboss-portal.sar/dtd/jboss-app_version_number.dtd:
<Element <![CDATA[<!ELEMENT jboss-app (app-name?)>
<!DOCTYPE jboss-app PUBLIC
"-//JBoss Portal//DTD JBoss Web Application 2.6//EN"
"http://www.jboss.org/portal/dtd/jboss-app_2_6.dtd">
<!ELEMENT app-name (#PCDATA)>
When a web application is deployed, the context path under which it is deployed is taken as the application
name. The application name value in the <app-name> element overrides it. When a component references a
portlet, it needs to reference the application too, and if the portlet application WAR file is renamed, the reference is no longer valid; therefore, the <app-name> element is used to have an application name that does not
depend upon the context path, under which the application is deployed.
6.2. Portlet Descriptors
The following sections describe the descriptors that define portal objects, such as portals, pages, portlet instances,
windows, and portlets. Refer to Section 5.2 and Section 6.4 for examples on using these descriptors within a portlet
application.
6.2.1. *-object.xml Descriptors
JBoss Release 2.6.5
73
XML Descriptors
The *-object.xml descriptors define portal instances, pages, windows, and the window layout. As well, themes
and layouts for specific portal instances, pages, and windows, can be defined. The following example defines a
portlet window being added to the default page, in the default portal. For advanced functionality using these
descriptors, refer to Section 6.4:
<?xml version="1.0" encoding="UTF-8"?>
<!DOCTYPE deployments PUBLIC
"-//JBoss Portal//DTD Portal Object 2.6//EN"
"http://www.jboss.org/portal/dtd/portal-object_2_6.dtd">
<deployments>
<deployment>
<parent-ref>default.default</parent-ref>
<if-exists>overwrite</if-exists>
<window>
<window-name>HelloWorldJSPPortletWindow</window-name>
<instance-ref>HelloWorldJSPPortletInstance</instance-ref>
<region>center</region>
<height>1</height>
</window>
</deployment>
</deployments>
•
<deployments>...</deployments>
The <deployments> element encapsulates the entire document, and is a container for <deployment> elements.
Multiple deployments can be specified within the <deployments> element.
•
<deployment>...</deployment>
The <deployment> element specifies object deployments, such as portals, pages, windows, and so on.
•
<if-exists>...</if-exists>
The <if-exists> element defines the action to take if an instance with the same name already exists. Accepted
values are overwrite and keep. The overwrite option destroys the existing object, and creates a new one based
on the content of the deployment. The keep option maintains the existing object deployment, or creates a new
one if it does not exist.
•
<parent-ref>...</parent-ref>
The <parent-ref> element contains a reference to the parent object. The naming convention for naming objects is to concatenate the names of the path to the object, and separate the names using a period. If the path is
empty, the empty string must be used. The <parent-ref> element tells the portal where the portlet appears. The
syntax for the <parent-ref> element is portal-instance.portal-page.
In the example above, a window is defined, and assigned to default.default. This means the window appears
on the default page, in the default portal.
JBoss Release 2.6.5
74
XML Descriptors
•
<window>...</window>
The <window> element defines a portlet window. The <window> element requires an <instance-ref> element,
which assigns a portal instance to a window.
•
<window-name>...</window-name>
The <window-name> element defines the unique name given to a portlet window. This can be named anything.
•
<instance-ref>...</instance-ref>
The <instance-ref> elements define the portlet instances that windows represent. This value is the ID of a
portlet instance, and must match the value of one of the <instance-id> elements in the WEBINF/portlet-instances.xml file.
•
<region>...</region>
<height>...</height>
The <region> and <height> elements define where the window appears within the page layout. The <region>
element specifies where the window appears on the page. The <region> element often depends on other regions
defined in the portal layout. The <height> element can be assigned a value between one and X.
The previous *-object.xml example makes reference to items found in other descriptor files. The following diagram illustrates the relationship between the portlet.xml, portlet-instances.xml, and *-object.xml
descriptors:
Are *-object.xml descriptors required?
Technically, they are not. The portal object hierarchy, such as creating portals, pages, instances, and organizing them on the page, can be defined using the management portlet, which is accessible to JBoss Portal
administrators.
JBoss Release 2.6.5
75
XML Descriptors
6.2.2. The portlet-instances.xml Descriptor
The portlet-instances.xml descriptor is JBoss Portal specific, and allows developers to instantiate one-or-many
instances of one-or-many portlets. The benefit of this allows one portlet to be instantiated several times, with different preference parameters. The following example instantiates two separate instances of the NewsPortlet, both using different parameters. One instance draws feeds from Red Hat announcements, and the other from McDonalds
announcements:
<?xml version="1.0" standalone="yes"?>
<!DOCTYPE deployments PUBLIC
"-//JBoss Portal//DTD Portlet Instances 2.6//EN"
"http://www.jboss.org/portal/dtd/portlet-instances_2_6.dtd">
<deployments>
<deployment>
<instance>
<instance-id>NewsPortletInstance1</instance-id>
<portlet-ref>NewsPortlet</portlet-ref>
<preferences>
<preference>
<name>expires</name>
<value>180</value>
</preference>
<preference>
<name>RssXml</name>
<value>http://finance.yahoo.com/rss/headline?s=rhat</value>
</preference>
</preferences>
<security-constraint>
<policy-permission>
<action-name>view</action-name>
<unchecked/>
</policy-permission>
</security-constraint>
</instance>
</deployment>
<deployment>
<instance>
<instance-id>NewsPortletInstance2</instance-id>
<portlet-ref>NewsPortlet</portlet-ref>
<preferences>
<preference>
<name>expires</name>
<value>180</value>
</preference>
<preference>
<name>RssXml</name>
<value>http://finance.yahoo.com/rss/headline?s=mcd</value>
</preference>
</preferences>
<security-constraint>
<policy-permission>
<action-name>view</action-name>
<unchecked/>
</policy-permission>
</security-constraint>
</instance>
</deployment>
</deployments>
JBoss Release 2.6.5
76
XML Descriptors
•
<deployments>...</deployments>
The <deployments> element encapsulates the entire document, and is a container for <deployment> elements.
Multiple deployments can be specified within the <deployments> element.
•
<deployment>
<instance>...</instance>
</deployment>
The <deployment> element, and the embedded <instance> element, specify a portlet instance. The
<deployment> element specifies object deployments, such as portals, pages, windows, and so on. The
<instance> element creates instances of portlets. The portlet will only be created and configured if the portlet
is present, and if an instance with the same name does not already exist.
•
<instance-id>...</instance-id>
The <instance-id> elements defines a unique name given to an instance of a portlet. The <instance-id>
value can be named anything, but it must match the value of one of the <instance-ref> elements in the WEBINF/*-object.xml file.
•
<portlet-ref>...</portlet-ref>
The <portlet-ref> element defines the portlet that an instance represents. The <portlet-ref> value must
match the <portlet-name> given in the WEB-INF/portlet.xml file.
•
<preferences>
<preference>...</preference>
</preferences>
The <preference> element configures a preference as a key-value pair. This value can be composed of a single
string value, for example, the preference fruit can have the apple value. As well, this value can be composed of
multiple strings, for example, the preference fruits can have values of apple, orange, and kiwi:
<preferences>
<preference>
<name>fruits</name>
<value>apple</value>
<value>orange</value>
<value>kiwi</value>
</preference>
</preferences>
The <preference> element configures one preference, which is part of a set of preferences. Use the
<preferences> element to define a set of preferences.
JBoss Release 2.6.5
77
XML Descriptors
•
<security-constraint>
<policy-permission>
<action-name>viewrecursive</action-name>
<unchecked/>
</policy-permission>
</security-constraint>
The <security-constraint> element is a container for <policy-permission> elements. This example demonstrates the <security-constraint> and <policy-permission> elements.
The <action-name> element defines the access rights given to the role defined. Accepted values are:
•
view:
users can view the page.
•
viewrecursive:
•
personalize:
•
personalizerecursive:
users can view the page and child pages.
users are able personalize the page's theme.
users are able personalize the page and child pages themes.
You must define a role that the security constraint will apply to:
•
unchecked:
anyone can view the page.
•
<role-name>EXAMPLEROLE</role-name>:
only allow users that are part of the EXAMPLEROLE role to access
the instance.
The previous portlet-instances.xml example makes reference to items found in other descriptor files. The following diagram illustrates the relationship between the portlet.xml, portlet-instances.xml, and *-object.xml
descriptors:
Is the portlet-instances.xml descriptor required?
Technically, it is not. The portal object hierarchy, such as creating portals, pages, instances, and organizing
them on the page, can be defined using the management portlet, which is accessible to JBoss Portal adminJBoss Release 2.6.5
78
XML Descriptors
istrators.
6.2.3. The jboss-portlet.xml Descriptor
The jboss-portlet.xml descriptor allows you to use JBoss-specific functionality within your portlet application.
This descriptor is covered by the JSR-168 Portlet Specification [1], and is normally packaged inside your portlet
WAR file, alongside the other descriptors in these sections.
6.2.3.1. Injecting Header Content
The following example injects a specific style sheet, /images/management/management.css, allowing the portlet
to leverage a specific style:
<?xml version="1.0" standalone="yes"?>
<!DOCTYPE portlet-app PUBLIC
"-//JBoss Portal//DTD JBoss Portlet 2.6//EN"
"http://www.jboss.org/portal/dtd/jboss-portlet_2_6.dtd">
<portlet-app>
<portlet>
<portlet-name>ManagementPortlet</portlet-name>
<header-content>
<link rel="stylesheet" type="text/css" href="/images/management/management.css"
media="screen"/>
</header-content>
</portlet>
</portlet-app>
Use the <header-content> and <link> elements to specify a style sheet.
6.2.3.2. Injecting Services in the Portlet Context
The following example injects the UserModule service as an attribute to the portlet context:
<?xml version="1.0" standalone="yes"?>
<!DOCTYPE portlet-app PUBLIC
"-//JBoss Portal//DTD JBoss Portlet 2.6//EN"
"http://www.jboss.org/portal/dtd/jboss-portlet_2_6.dtd">
<portlet-app>
<service>
<service-name>UserModule</service-name>
<service-class>org.jboss.portal.identity.UserModule</service-class>
<service-ref>:service=Module,type=User</service-ref>
</service>
</portlet-app>
This allows the portlet to leverage the service, for example:
UserModule userModule = (UserModule) getPortletContext().getAttribute("UserModule");
String userId = request.getParameters().getParameter("userid");
User user = userModule.findUserById(userId);
[1] http://www.jcp.org/en/jsr/detail?id=168
JBoss Release 2.6.5
79
XML Descriptors
6.2.3.3. Defining Extra Portlet Information
As of JBoss Portal 2.6.3, icons can be defined for a portlet by using the <icon>, <small-icon>, and <large-icon>
elements:
<?xml version="1.0" standalone="yes"?>
<!DOCTYPE portlet-app PUBLIC
"-//JBoss Portal//DTD JBoss Portlet 2.6//EN"
"http://www.jboss.org/portal/dtd/jboss-portlet_2_6.dtd">
<portlet-app>
<portlet>
<portlet-name>ManagementPortlet</portlet-name>
<portlet-info>
<icon>
<small-icon>/images/smallIcon.png</small-icon>
<large-icon>/images/largeIcon.png</small-icon>
</icon>
</portlet-info>
</portlet>
</portlet-app>
References to icons can be absolute, for example, http://www.example.com/images/smallIcon.png, or relative to the
web application context, for example, /images/smallIcon.png. Icons can be used by different parts of the portlet
user interface.
6.2.3.4. Portlet Session Replication in a Clustered Environment
For information about portlet session replication in clustered environments, refer to Section 13.5.
Is the jboss-portlet.xml descriptor required?
Technically, it is not; however, it may be required to access JBoss-specific functionality that is not covered
by the Portlet specification.
6.2.4. The portlet.xml Descriptor
The portlet.xml descriptor is the standard portlet descriptor covered by the JSR-168 Portlet Specification [2]. Developers are strongly encouraged to read the JSR-168 Portlet Specification [3] items covering the correct use of this
descriptor, as it is only covered briefly in these sections. Normally the portlet.xml descriptor is packaged inside
your portlet WAR file, alongside the other descriptors in these sections. The following example is a modified version of the JBoss Portal UserPortlet definition:
<?xml version="1.0" encoding="UTF-8"?>
<portlet-app
xmlns="http://java.sun.com/xml/ns/portlet/portlet-app_1_0.xsd"
xmlns:xsi="http://www.w3.org/2001/XMLSchema-instance"
xsi:schemaLocation="http://java.sun.com/xml/ns/portlet/portlet-app_1_0.xsd
[2] http://www.jcp.org/en/jsr/detail?id=168
[3] http://www.jcp.org/en/jsr/detail?id=168
JBoss Release 2.6.5
80
XML Descriptors
http://java.sun.com/xml/ns/portlet/portlet-app_1_0.xsd"
version="1.0">
<portlet>
<description>Portlet providing user login/logout and profile management</description>
<portlet-name>UserPortlet</portlet-name>
<display-name>User Portlet</display-name>
<portlet-class>org.jboss.portal.core.portlet.user.UserPortlet</portlet-class>
<init-param>
<description>Initialize the portlet with a default page to render</description>
<name>>default-view</name>
<value>/WEB-INF/jsf/objects.xhtml</value>
</init-param>
<supports>
<mime-type>text/html</mime-type>
<portlet-mode>VIEW</portlet-mode>
</supports>
<supported-locale>en</supported-locale>
<supported-locale>fr</supported-locale>
<supported-locale>es</supported-locale>
<resource-bundle>Resource</resource-bundle>
<portlet-info>
<title>User portlet</title>
</portlet-info>
</portlet>
</portlet-app>
•
<portlet-app>...</portlet-app>
The <portlet-app> element encapsulates the entire document. Multiple portlets can be specified using the
<portlet-app> element.
•
<portlet>...</portlet>
The <portlet> element defines one portlet that is deployed within this archive.
•
<description>...</description>
The <description> element is a verbal description of the portlet's function.
•
<portlet-name>...</portlet-name>
The <portlet-name> element defines the portlet name. It does not have to be the class name.
•
<portlet-class>...</portlet-class>
The <portlet-class> element defines the Fully Qualified Name (FQN) of the portlet class.
•
<init-param>
<name>...</name>
<value>...</value>
JBoss Release 2.6.5
81
XML Descriptors
</init-param>
The <init-param> element specifies initialization parameters to create an initial state inside your portlet class.
This is usually used in the portlet's init() method, but not necessarily. Unlike a preference, an init-parameter is
data that does not change at runtime and does not go into a database. If the value is changed in the descriptor,
the change takes immediate effect after re-deploying the portlet. Multiple <init-param> elements can be used.
•
<supports>...</supports>
The <supports> element declares all of the markup types that a portlet supports. Use the <mime-type> element
to declare supported capabilities, for example, if the only outputs are text and HTML, use
<mime-type>text/html</mime-type>. Use the <portlet-mode> element to define the supported portlet modes
for the portlet. For example, all portlets must support the view portlet mode, which is defined using
<portlet-mode>view</portlet-mode>.
•
<supported-locale>...</supported-locale>
The <supported-locale> elements advertise the supported locales for the portlet. Use multiple
<supported-locale> elements to specify multiple locales.
•
<resource-bundle>...</resource-bundle>
The <resource-bundle> element specifies the resource bundle that contains the localized information for the
specified locales.
•
<portlet-info>
<title>...</title>
</portlet-info>
The <title> element defines the portlet's title, which is displayed in the portlet window's title bar.
The portlet.xml Example
This portlet.xml example is not a replacement for what is covered in the JSR-168 Portlet
Specification [4].
6.3. JBoss Portal Descriptors
This section describes Datasource descriptors, which are required for JBoss Portal to communicate with a database,
and briefly covers the jboss-portal.sar/conf/config.xml descriptor, which can be used for configuring logging,
and configuring which page a user goes to when they log in.
[4] http://www.jcp.org/en/jsr/detail?id=168
JBoss Release 2.6.5
82
XML Descriptors
6.3.1. Datasource Descriptors (portal-*-ds.xml)
JBoss Portal requires a Datasource descriptor to be deployed alongside the jboss-portal.sar, in order to communicate with a database. This section explains where to obtain template Datasource descriptors, how to compile them
from source, and how to configure them for your installation. For an in-depth introduction to datasources, refer to
the JBoss AS documentation online on the JBoss Datasource Wiki page [5].
6.3.1.1. Datasource Descriptors included in Binary releases
Several template Datasource descriptors are included in the binary and bundled distributions of JBoss Portal. They
are commonly located in the jboss-portal-version/setup/ directory:
The jboss-portal-version/setup/ directory contains sample Datasource descriptors for the MySQL, Microsoft
SQL Server, PostgreSQL, and Oracale databases, which can be customized for your own database:
6.3.1.2. Building Datasource Descriptors from Source
To build the Datasource descriptors from source:
1.
Obtain the JBoss Portal source code: Section 2.3.
2.
Configure the JBOSS_HOME environment variable: Section 2.3.2.2.
3.
Change into the JBOSS_PORTAL_SOURCE_DIRECTORY/build/ directory. To build the JBoss Portal source code
on Linux, run the sh build.sh deploy command, or, if you are running Microsoft Windows, run the build.bat
deploy command. If this is the first build, third-party libraries are obtained from an online repository, so you
must be connected to the Internet. After building, if the JBOSS_PORTAL_SOURCE_DIRECTORY/thirdparty/ dir-
[5] http://wiki.jboss.org/wiki/Wiki.jsp?page=ConfigDataSources
JBoss Release 2.6.5
83
XML Descriptors
ectory does not exist, it is created, and populated with the files required for later steps. For further details, refer
to Section 2.3.3.
4.
Change into the JBOSS_PORTAL_SOURCE_DIRECTORY/core/ directory, and run the sh build.sh datasource command, or, if you are running Microsoft Windows, run the build.bat datasource command:
Note: if the JBoss Portal source was not built as per step 3, the sh build.sh datasource and build.bat datasource
commands fail with an error, such as the following:
BUILD FAILED
java.io.FileNotFoundException: /jboss-portal-2.6.3.GA-src/core/../thirdparty/libraries.ent
(No such file or directory)
The datasource build process produces the following directory and file structure, with the Datasource descriptors in
the JBOSS_PORTAL_SOURCE_DIRECTORY/core/output/resources/setup directory:
JBoss Release 2.6.5
84
XML Descriptors
The following is an example Datasource descriptor for a PostgreSQL database:
<?xml version="1.0" encoding="UTF-8"?>
<datasources>
<local-tx-datasource>
<jndi-name>PortalDS</jndi-name>
<connection-url>jdbc:postgresql:jbossportal</connection-url>
<driver-class>org.postgresql.Driver</driver-class>
<user-name>portal</user-name>
<password>portalpassword</password>
</local-tx-datasource>
</datasources>
JBoss Release 2.6.5
85
XML Descriptors
Make sure the user-name, password, connection-url, and driver-class, are correct for your chosen database.
6.3.2. Portlet Debugging (jboss-portal.sar/conf/config.xml)
By default, JBoss Portal is configured to display all errors. This behavior can be configured by modifying the
jboss-portal.sar/conf/config.xml file:
<!-- When a window has restrictedaccess : show or hide values are permitted -->
<entry key="core.render.window_access_denied">show</entry>
<!-- When a window is unavailable : show or hide values are permitted -->
<entry key="core.render.window_unavailable">show</entry>
<!-- When a window produces an error : show, hide or message_only values are permitted -->
<entry key="core.render.window_error">message_only</entry>
<!-- When a window produces an internal error : show, hide are permitted -->
<entry key="core.render.window_internal_error">show</entry>
<!-- When a window is not found : show or hide values are permitted -->
<entry key="core.render.window_not_found">show</entry>
For these parameters, accepted values are show and hide. Depending on the setting, and the actual error, either an
error message is displayed, or a full stack trace within the portlet window occurs. Additionally, the
core.render.window_error property supports the message_only value. The message_only value will only display
an error message, whereas the show value will, if available, display the full stack trace.
6.3.3. Log in to Dashboard
By default, when a user logs in, they are forwarded to the default page of the default portal. In order to forward a
user to their Dashboard, set the core.login.namespace value to dashboard in the jbossportal.sar/conf/config.xml file:
<!-- Namespace to use when logging-in, use "dashboard" to directly
log-in the dashboard otherwise use "default" -->
<entry key="core.login.namespace">dashboard</entry>
6.4. Descriptor Examples
6.4.1. Defining a new Portal Page
The sample application descriptor in this section creates a new page, MyPage, in a portal. To illustrate this example,
download the HelloWorldPortalPage [6] portlet. To use the HelloWorldPortalPage portlet:
1.
Download the HelloWorldPortalPage [7] portlet.
[6] http://anonsvn.jboss.org/repos/portletswap/portlets/2_4/bundles/HelloWorldPortalPage.zip
[7] http://anonsvn.jboss.org/repos/portletswap/portlets/2_4/bundles/HelloWorldPortalPage.zip
JBoss Release 2.6.5
86
XML Descriptors
2.
Unzip the HelloWorldPortalPage ZIP file.
3.
To expand the WAR file, which will give you access to the XML descriptors, change into the HelloWorldPortalPage/ directory, and run the ant explode command.
4.
If you did not expand the helloworldportalpage.war file, copy the helloworldportalpage.war file into the
correct JBoss AS or JBoss EAP deploy/ directory. If you expanded the helloworldportalpage.war file,
copy the HelloWorldPortalPage/output/lib/exploded/helloworldportalpage.war/ directory into the correct JBoss AS or JBoss EAP deploy/ directory. For example, if you are using the default JBoss AS profile,
copy the WAR file or the expanded directory into the $JBOSS_HOME/server/default/deploy/ directory.
The HelloWorldPortalPage portlet is hot-deployable, so the JBoss EAP or JBoss AS server does not have to be restarted after deploying the HelloWorldPortalPage portlet. The following is an example of the helloworldportalpage.war/WEB-INF/helloworld-object.xml descriptor:
<?xml version="1.0" encoding="UTF-8"?>
<!DOCTYPE deployments PUBLIC
"-//JBoss Portal//DTD Portal Object 2.6//EN"
"http://www.jboss.org/portal/dtd/portal-object_2_6.dtd">
<deployments>
<deployment>
<if-exists>overwrite</if-exists>
<parent-ref>default</parent-ref>
<properties/>
<page>
<page-name>MyPage</page-name>
<window>
<window-name>HelloWorldPortletPageWindow</window-name>
<instance-ref>HelloWorldPortletPageInstance</instance-ref>
<region>center</region>
<height>0</height>
</window>
<security-constraint>
<policy-permission>
<unchecked/>
<action-name>viewrecursive</action-name>
</policy-permission>
</security-constraint>
</page>
</deployment>
</deployments>
A depoloyment is composed of a <deployments> element, which is a container for <deployment> elements. In the
previous example, a page is defined, the portlet is placed as a window on a page, and an instance of the portlet is
created. The Mangement portlet (bundled with JBoss Portal) can modify portal instances, page position, and so on.
The following list describes elements in a *-object.xml file:
•
<if-exists>
The <if-exists> element defines the action to take if an instance with the same name already exists. Accepted
values are overwrite and keep. The overwrite option destroys the existing object, and creates a new one based
JBoss Release 2.6.5
87
XML Descriptors
on the content of the deployment. The keep option matains the existing object deployment, or creates a new one
if it does not exist.
•
<parent-ref>
The <parent-ref> element contains a reference to the parent object. The naming convention for naming objects is to concatenate the names of the path to the object, and separate the names using a period. If the path is
empty, the empty string must be used. The <parent-ref> element tells the portal where the portlet appears. The
syntax for the <parent-ref> element is portal-instance.portal-page.
•
<properties>
A set of generic properties for the portal object. The <properties> elements contains definitions specific to a
page. This is commonly used to define the specific theme and layout to use. If not defined, the default portal
theme and layout are used.
•
<page>
The start of a page definition. Among others, the <page> element is a container for the <page-name>, <window>,
and <security-constraint> elements.
•
<page-name>
The page name.
•
<window>
The <window> element defines a portlet window. The <window> element requires an <instance-ref> element,
which assigns a portal instance to a window.
•
<window-name>
The <window-name> element defines the unique name given to a portlet window. This can be named anything.
•
<instance-ref>
The <instance-ref> elements define the portlet instances that windows represent. This value is the ID of a
portlet instance, and must match the value of one of the <instance-id> elements in the WEBINF/portlet-instances.xml file.
JBoss Release 2.6.5
88
XML Descriptors
•
<region>...</region>
<height>...</height>
The <region> and <height> elements define where the window appears within the page layout. The <region>
element specifies where the window appears on the page. The <region> element often depends on other regions
defined in the portal layout. The <height> element can be assigned a value between one and X.
•
<instance>
The <instance> element creates instances of portlets. The portlet will only be created and configured if the
portlet is present, and if an instance with the same name does not already exist.
•
<instance-name>
The <instance-name> maps to the <instance-ref> element.
•
<component-ref>
The <component-ref> element takes the name of the application, followed by the name of the portlet, as
defined in the WEB-INF/portlet.xml file.
The <security-constraint> element is a container for <policy-permission> elements. The following is an example of the <security-constraint> and <policy-permission> elements:
<security-constraint>
<policy-permission>
<role-name>User</role-name>
<action-name>view</action-name>
</policy-permission>
</security-constraint>
<security-constraint>
<policy-permission>
<unchecked/>
<action-name>view</action-name>
</policy-permission>
</security-constraint>
<action-name>
The <action-name> element defines the access rights given to the role defined. Accepted values are:
JBoss Release 2.6.5
89
XML Descriptors
•
view:
users can view the page.
•
viewrecursive:
•
personalize:
•
personalizerecursive:
users can view the page and child pages.
users are able personalize the page's theme.
users are able personalize the page and child pages themes.
<unchecked/>
If present, the <unchecked> element defines that anyone can view the instance.
<role-name>
The <role-name> element defines a role that the security constraint will apply to. The following example only allows users that are part of the EXAMPLEROLE role to access the instance:
<role-name>EXAMPLEROLE</role-name>
6.4.2. Defining a new Portal Instance
To illustrate our example, we have made available a portlet that you can download here: HelloPortal [8] .
For our example we make available helloworld-object.xml located under helloworldportal.war/WEB-INF/ , and it
looks like this:
<?xml version="1.0" encoding="UTF-8"?>
<!DOCTYPE deployments PUBLIC
"-//JBoss Portal//DTD Portal Object 2.6//EN"
"http://www.jboss.org/portal/dtd/portal-object_2_6.dtd">
<deployments>
<deployment>
<parent-ref/>
<if-exists>overwrite</if-exists>
<portal>
<portal-name>HelloPortal</portal-name>
<supported-modes>
<mode>view</mode>
<mode>edit</mode>
<mode>help</mode>
</supported-modes>
<supported-window-states>
<window-state>normal</window-state>
<window-state>minimized</window-state>
<window-state>maximized</window-state>
</supported-window-states>
<properties>
<!-- Set the layout for the default portal -->
<!-- see also portal-layouts.xml -->
<property>
[8] http://anonsvn.jboss.org/repos/portletswap/portlets/2_4/bundles/HelloWorldPortal.zip
JBoss Release 2.6.5
90
XML Descriptors
<name>layout.id</name>
<value>generic</value>
</property>
<!-- Set the theme for the default portal -->
<!-- see also portal-themes.xml -->
<property>
<name>theme.id</name>
<value>renaissance</value>
</property>
<!-- set the default render set name (used by the render tag in layouts) -->
<!-- see also portal-renderSet.xml -->
<property>
<name>theme.renderSetId</name>
<value>divRenderer</value>
</property>
</properties>
<security-constraint>
<policy-permission>
<action-name>personalizerecursive</action-name>
<unchecked/>
</policy-permission>
</security-constraint>
<page>
<page-name>default</page-name>
<security-constraint>
<policy-permission>
<action-name>viewrecursive</action-name>
<unchecked/>
</policy-permission>
</security-constraint>
<window>
<window-name>MyPortletWindow</window-name>
<instance-ref>MyPortletInstance</instance-ref>
<region>center</region>
<height>0</height>
</window>
</page>
</portal>
</deployment>
<deployment>
<parent-ref>HelloPortal</parent-ref>
<if-exists>overwrite</if-exists>
<page>
<page-name>foobar</page-name>
<security-constraint>
<policy-permission>
<action-name>viewrecursive</action-name>
<unchecked/>
</policy-permission>
</security-constraint>
<window>
<window-name>MyPortletWindow</window-name>
<instance-ref>MyPortletInstance</instance-ref>
<region>center</region>
<height>0</height>
</window>
</page>
</deployment>
</deployments>
This example, when deployed, will register a new portal instance named HelloPortal with two pages in it. The
portal instance can be accessed by navigating to: http://localhost:8080/portal/portal/HelloPortal for the default
page, and http://localhost:8080/portal/portal/HelloPortal/foobar , for the second page created.
JBoss Release 2.6.5
91
XML Descriptors
Note
You must define a page named default for any new portal instance to be accessible via a web browser.
JBoss Release 2.6.5
92
7
Portal urls
Julien Viet <[email protected]>
Thomas Heute <[email protected]>
Roy Russo <[email protected]>
7.1. Introduction
Most of the time portals use very complicated urls, however it is possible to setup entry points in the portal that follow simple patterns.
Each portal container can contain multiple portals and within a given portal, windows are organized in pages, a
page simply being a collection of windows associated to a name.
Before reading this chapter you must know how to define a page and a portal, you can refer to the chapter about
XML descriptors to have a better understanding of those notions.
7.2. Accessing a portal
Each portal container can contains multiple portals, also there is one special portal which is the default portal, i.e
the one used when no portal is specified in particular.
•
"/portal", will point to the default page of the default portal.
•
"/portal/portalname/" will point to the default page of the portal portalname
7.3. Accessing a page
It is possible to have multiple pages per portal. As for portal there is a default page for a given portal. Once the
portal has been selected, then a page must be used and all the windows present in that page will be rendered. The
page selection mechanism is the following.
•
"/portal/default/pageName" will render the pageName page.
JBoss Release 2.6.5
93
Portal urls
7.4. Accessing CMS Content
The CMSPortlet delivers content transparently, without modifying the url displayed. However, if you wish to deliver binary content (gif, jpeg, pdf, zip, etc...), it is desirable to display this content outside of the confines of the
portal.
•
will display the jboss_logo.gif outside of the portal. This is
accomplished as the portal interprets any path beginning with /content as a request for CMS content. As long
as the mime-type is not text/html or text/text, it will be rendered independently of the portal.
"/content/default/images/jboss_logo.gif"
JBoss Release 2.6.5
94
8
Error handling configuration
Julien Viet <[email protected]>
JBoss Portal's request pipeline allows for fine-grained, dynamic configuration of how Portal will behave when an
error occurs at runtime.
8.1. Error types
There are several kind of errors that can happen during a request:
•
Access denied: the user does not have the security rights to access a resource
•
Error: an anticipated error as when a portlet throws an exception
•
Internal error: an unexpected error
•
Resource not found: a resource is not found
•
Resource not available: a resource is found but is not serviceable
8.2. Control policies
When an error occurs, the request control flow changes according to the configuration. The configuration is also
called control policy.
8.2.1. Policy delegation and cascading
Whenever a control policy is invoked it is possible to change the response sent by the control flow. If the control
policy ignores the error then the next policy will handle the error at this turn. However if the control policy decides
to provide a new response then the next policy will not be invoked since the new response will not be of type error.
For instance, if a portlet part of a page produces an exception, the following reactions are possible:
•
The error is displayed in the window
•
The window is removed from the aggregation
•
An portal error page is displayed
JBoss Release 2.6.5
95
Error handling configuration
•
An HTTP 500 error response is sent to the browser
8.2.2. Default policy
The default policy applies when errors are not handled at other level. By default errors are translated into the most
appropriate HTTP response:
•
Access denied: HTTP 403 Forbidden response
•
Error: HTTP 500 Internal Server Error response
•
Internal error: HTTP 500 Internal Server Error response
•
Resource not found: HTTP 404 Not Found response
•
Resource not available: HTTP 404 Not Found response
8.2.3. Portal policy
The portal error policy controls the response that will be sent to the browser when an error occurs. There is a default configuration and it is reconfigurable per portal. Whenever an error occurs, the policy can either handle a redirect to a JSP page or ignore the error. If the error is ignored it will be handled by the default policy, otherwise a
JSP page will be invoked with appropriate request attributes to allow page customization.
8.2.4. Page policy
The window error policy controls how the page reacts to aggregation errors. Indeed the page is most of the time an
aggregation of several portlet windows and the action to take when an error occurs is different than the other
policies. Whenever an error occurs, the policy can either handle it or ignore it. If the error is ignored then it will be
treated by the portal policy. The different actions that are possible upon an error are:
•
Remove the window from the aggregation
•
Replace the markup of the window by a redirection to a JSP page
8.3. Configuration using the XML descriptors
Since the different policies are configured using portal object properties it is possible to configure the error handling policy in the XML descriptors of those objects (the *-object.xml files for your Portal deployment).
8.3.1. Portal policy properties
A set of properties configure the the behavior of the portal policy. Those properties will only be taken in account
for objects of type portal.
JBoss Release 2.6.5
96
Error handling configuration
Table 8.1. Portal policy properties
Property name
Description
Possible values
control.portal.access_denied
On access denied
ignore and jsp
control.portal.unavailable
On resource not available
ignore and jsp
control.portal.error
On an expected error
ignore and jsp
control.portal.internal_error
On an unexpected error
ignore and jsp
control.portal.not_found
On resource not found
ignore and jsp
control.portal.resource_uri
The path of the JSP used for redirections
A valid path to a JSP located in the
portal-core.war file
An example of portal configuration:
<portal>
<portal-name>MyPortal</portal-name>
...
<properties>
<property>
<name>control.portal.access_denied</name>
<value>ignore</value>
</property>
<property>
<name>control.portal.unavailable</name>
<value>ignore</value>
</property>
<property>
<name>control.portal.not_found</name>
<value>ignore</value>
</property>
<property>
<name>control.portal.internal_error</name>
<value>jsp</value>
</property>
<property>
<name>control.portal.error</name>
<value>jsp</value>
</property>
<property>
<name>control.portal.resource_uri</name>
<value>/WEB-INF/jsp/error/portal.jsp</value>
</property>
...
</properties>
...
</portal>
8.3.2. Page policy properties
A set of properties configure the the behavior of the page policy. Those properties will only be taken in account for
objects of type portal and page.
JBoss Release 2.6.5
97
Error handling configuration
Table 8.2. Page policy properties
Property name
Description
Possible values
control.page.access_denied
On access denied
ignore, jsp and hide
control.page.unavailable
On resource not available
ignore, jsp and hide
control.page.error
On an expected error
ignore, jsp and hide
control.page.internal_error
On an unexpected error
ignore, jsp and hide
control.page.not_found
On resource not found
ignore, jsp and hide
control.page.resource_uri
The path of the JSP used for redirections
ignore, jsp and hide
An example of page configuration:
<page>
<page-name>MyPortal</page-name>
...
<properties>
<property>
<name>control.page.access_denied</name>
<value>hide</value>
</property>
<property>
<name>control.page.unavailable</name>
<value>hide</value>
</property>
<property>
<name>control.page.not_found</name>
<value>hide</value>
</property>
<property>
<name>control.page.internal_error</name>
<value>jsp</value>
</property>
<property>
<name>control.page.error</name>
<value>jsp</value>
</property>
<property>
<name>control.page.resource_uri</name>
<value>/WEB-INF/jsp/error/page.jsp</value>
</property>
...
</properties>
...
</page>
Note
You can configure the page properties also on objects of type portal, in that case they will be inherited by
the pages which are located in the portal.
JBoss Release 2.6.5
98
Error handling configuration
8.4. Handling errors with JSP
As described above it is possible to redirect error handling to a JavaServer Page. Two pages can be created to
handle errors at portal and page level. Portal level error handling requires a page that will produce a full page and
the page level error handling requires a page that will produce markup for a window only. When the page is invoked a set of request attributes will be passed.
Table 8.3. Request attributes
Attribute name
Attribute Description
Attribute value
The error type
The possible values are ACCESS_DENIED, UNAVAILABLE,
ERROR, INTERNAL_ERROR,
NOT_FOUND
org.jboss.portal.control.CAUSE
The throwable cause that can be
null
The object is a subclass of
java.lang.Throwable
org.jboss.portal.control.MESSAG
E
An error message that can be null
Text
org.jboss.portal.control.ERROR_T
YPE
Note
The JavaServer Pages have to be located in the jboss-portal.sar/portal-core.war Web Application.
8.5. Configuration using the Portal Management Application
The Error handling policy can also be configured via the portal management application. The functionality is available as part of the properties for each configuration level where it makes sense: you can specify the default error
handling policy (at the root of the portal object hierachy), for each portal or each page by clicking on the Properties
link on each of these pages. You can also specify how dashboards should behave with respect to error handling by
clicking on the Dashboards tab of the Portal management application.
JBoss Release 2.6.5
99
Error handling configuration
JBoss Release 2.6.5
100
9
Content Integration
Julien Viet <julien
@ jboss dot com>
Since JBoss Portal 2.6 it is possible to provide an easy integration of content within the portal. Up to the 2.4 version content integration had to be done by configuring a portlet to show some content from an URI and then place
that portlet on a page. The new content integration capabilities allows to directly configure a page window with the
content URI by removing the need to configure a portlet for that purpose.
Note
We do not advocate to avoid the usage portlet preferences, we rather advocate that content configuration
managed at the portal level simplifies the configuration: it helps to make content a first class citizen of the
portal instead of having an intermediary portlet that holds the content for the portal. The portlet preferences
can still be used to configure how content is displayed to the user.
The portal uses portlets to configure content
JBoss Release 2.6.5
101
Content Integration
The portal references directly the content and use portlet to interact with content
9.1. Window content
The content of a window is defined by
•
The content URI which is the resource that the window is pointing to. It is an arbitrary string that the portal
cannot interpret and is left up to the content provider to interpret.
•
The window content type which defines how the portal interpret the window content
•
•
The default content type is for portlets and has the value portlet. In this case the content URI is the portlet
instance id.
•
The CMS content type allows to integrate content from the CMS at the page and it has the value cms. For
that content type, the content URI is the CMS file path.
The content parameters which are a set of additional key/value string pairs holding state that is interpreted by
the content provider.
At runtime when the portal needs to render a window it delegates the production of markup to a content provider.
The portal comes with a preconfigured set of providers which handles the portlet and the cms content types. The
most natural way to plug a content provider in the portal is to use a JSR 168 Portlet. Based on a few carefully
chosen conventions it is possible to provide an efficient content integration with the benefit of using standards and
without requiring the usage of a proprietary API.
9.2. Content customization
JBoss Release 2.6.5
102
Content Integration
Content providers must be able to allow the user or administrator to chose content from the external resource it integrates in the portal in order to properly configure a portal window. A few interactions between the portal, the content provider and the portal user are necessary to achieve that goal. Here again it is possible to provide content customization using a JSR 168 Portlet. For that purpose two special portlet modes called edit_content and select_content has been introduced. It signals to the portlet that it is selecting or editing the content portion of the
state of a portlet. select_content is used to select a new content to put in a window while edit_content is used to
modify the previously defined content, often the two modes will display the same thing. The traditional edit mode
is not used because the edit mode is more targeted to configure how the portlet shows content to the end user rather
than what content it shows.
Example of content customization - CMS Portlet
9.3. Content Driven Portlet
Portlet components are used to integrate content into the portal. It relies on a few conventions which allow the
portal and the portlet to communicate.
9.3.1. Displaying content
At runtime the portal will call the portlet with the view mode when it displays content. It will send information
about the content to display using the render parameters to the portlet. Therefore the portlet has just to read the
render parameters and use them to properly display the content in the portlet. The render parameters values are the
key/value pairs that form the content properties and the resource URI is available under the uri parameter name.
9.3.2. Configuring content
As explained before, the portal will call the portlet using the edit_content mode. In that mode the portlet and the
portal will communicate using either action or render parameters. We have two use cases which are:
•
The portal needs to configure a new content item for a new window. In that use case the portal will not send
special render parameters to the portlet and the initial set of render parameters will be empty. The portlet can
then use render parameters in order to provide navigation in the content repository. For example the portlet can
navigate the CMS tree and store the current CMS path in the render parameters. Whenever the portlet has decided to tell the portal that content has been selected by the user it needs to use an action URL with a special set
JBoss Release 2.6.5
103
Content Integration
of parameters:
•
•
content.action.select equals to any value
•
content.uri equals to the content URI
•
content.param. used as prefix to configure content parameters
The second use case happens when the portal needs to edit existing content. In such situation everything works
as explained before except that the initial set of render parameters of the portlet will be prepopulated with the
content uri URI and parameters.
9.3.3. Step by step example of a content driven portlet
9.3.3.1. The Portlet skeleton
Here is the base skeleton of the content portlet. The FSContentDrivenPortlet shows the files which are in the war
file in which the portlet is deployed. The arbitrary name filesystem will be the content type interpreted by the portlet.
public class FSContentDrivenPortlet extends GenericPortlet
{
/** The edit_content mode. */
public static final PortletMode EDIT_CONTENT_MODE = new PortletMode("edit_content");
/** The select_content mode. */
public static final PortletMode SELECT_CONTENT_MODE = new PortletMode("select_content");
...
}
9.3.3.2. Overriding the dispatch method
First the doDispatch(RenderRequest req, RenderResponse resp) is overridden in order to branch the request flow to
a method that will take care of displaying the editor.
protected void doDispatch(RenderRequest req, RenderResponse resp)
throws PortletException, PortletSecurityException, IOException
{
if (EDIT_CONTENT_MODE.equals(req.getPortletMode()) ||
SELECT_CONTENT_MODE.equals(req.getPortletMode()))
{
doEditContent(req, resp);
}
else
{
super.doDispatch(req, resp);
}
}
JBoss Release 2.6.5
104
Content Integration
9.3.3.3. Utilities methods
The portlet also needs a few utilities methods which take care of converting content URI to a file back and forth.
There is also an implementation of a file filter that keep only text files and avoid the WEB-INF directory of the war
file for security reasons.
protected File getFile(String contentURI) throws IOException
{
String realPath = getPortletContext().getRealPath(contentURI);
if (realPath == null)
{
throw new IOException("Cannot access war file content");
}
File file = new File(realPath);
if (!file.exists())
{
throw new IOException("File " + contentURI + " does not exist");
}
return file;
}
protected String getContentURI(File file) throws IOException
{
String rootPath = getPortletContext().getRealPath("/");
if (rootPath == null)
{
throw new IOException("Cannot access war file content");
}
// Make it canonical
rootPath = new File(rootPath).getCanonicalPath();
// Get the portion of the path that is significant for us
String filePath = file.getCanonicalPath();
return filePath.length() >=
rootPath.length() ? filePath.substring(rootPath.length()) : null;
}
private final FileFilter filter = new FileFilter()
{
public boolean accept(File file)
{
String name = file.getName();
if (file.isDirectory())
{
return !"WEB-INF".equals(name);
}
else if (file.isFile())
{
return name.endsWith(".txt");
}
else
{
return false;
}
}
};
JBoss Release 2.6.5
105
Content Integration
9.3.3.4. The editor
The editor is probably the longest part of the portlet. It tries to stay simple though and goes directly to the point.
Content editor of FSContentDrivenPortlet in action
protected void doEditContent(RenderRequest req, RenderResponse resp)
throws PortletException, PortletSecurityException, IOException
{
// Get the uri value optionally provided by the portal
String uri = req.getParameter("content.uri");
// Get the working directory directory
File workingDir;
if (uri != null)
{
workingDir = getFile(uri).getParentFile();
}
else
{
// Otherwise try to get the current directory we are browsing,
// if no current dir exist we use the root
String currentDir = req.getParameter("current_dir");
if (currentDir == null)
{
currentDir = "/";
}
workingDir = getFile(currentDir);
}
// Get the parent path
String parentPath = getContentURI(workingDir.getParentFile());
// Get the children of the selected file, we use a filter
// to retain only text files and avoid WEB-INF dir
File[] children = workingDir.listFiles(filter);
// Configure the response
resp.setContentType("text/html");
PrintWriter writer = resp.getWriter();
//
writer.print("Directories:<br/>");
writer.print("<ul>");
PortletURL choseDirURL = resp.createRenderURL();
if (parentPath != null)
{
choseDirURL.setParameter("current_dir", parentPath);
writer.print("<li><a href=\"" + choseDirURL + "\">..</a></li>");
}
for (int i = 0;i < children.length;i++)
JBoss Release 2.6.5
106
Content Integration
{
File child = children[i];
if (child.isDirectory())
{
choseDirURL.setParameter("current_dir", getContentURI(child));
writer.print("<li><a href=\"" + choseDirURL + "\">" + child.getName() +
"</a></li>");
}
}
writer.print("</ul><br/>");
//
writer.print("Files:<br/>");
writer.print("<ul>");
PortletURL selectFileURL = resp.createActionURL();
selectFileURL.setParameter("content.action.select", "select");
for (int i = 0;i < children.length;i++)
{
File child = children[i];
if (child.isFile())
{
selectFileURL.setParameter("content.uri", getContentURI(child));
writer.print("<li><a href=\"" + selectFileURL + "\">" + child.getName() +
"</a></li>");
}
}
writer.print("</ul><br/>");
//
writer.close();
}
9.3.3.5. Viewing content at runtime
Last but not least the portlet needs to implement the doView(RenderRequest req, RenderResponse resp) method in
order to display the file that the portal window wants to show.
protected void doView(RenderRequest req, RenderResponse resp)
throws PortletException, PortletSecurityException, IOException
{
// Get the URI provided by the portal
String uri = req.getParameter("uri");
// Configure the response
resp.setContentType("text/html");
PrintWriter writer = resp.getWriter();
//
if (uri == null)
{
writer.print("No selected file");
}
else
{
File file = getFile(uri);
FileInputStream in = null;
try
{
in = new FileInputStream(file);
FileChannel channel = in.getChannel();
byte[] bytes = new byte[(int)channel.size()];
ByteBuffer buffer = ByteBuffer.wrap(bytes);
channel.read(buffer);
JBoss Release 2.6.5
107
Content Integration
writer.write(new String(bytes, 0, bytes.length, "UTF8"));
}
catch (FileNotFoundException e)
{
writer.print("No such file " + uri);
getPortletContext().log("Cannot find file " + uri, e);
}
finally
{
if (in != null)
{
in.close();
}
}
}
//
writer.close();
}
9.3.3.6. Hooking the portlet into the portal
Management portlet with filesystem content type enabled
Finally we need to make the portal aware of the fact that the portlet can edit and interpret content. For that we need
a few descriptors. The portlet.xml descriptor will define our portlet, the portlet-instances.xml will create a single instance of our portlet. The web.xml descriptor will contain a servlet context listener that will hook the content type in
the portal content type registry.
<?xml version="1.0" encoding="UTF-8"?>
<portlet-app
xmlns="http://java.sun.com/xml/ns/portlet/portlet-app_1_0.xsd"
xmlns:xsi="http://www.w3.org/2001/XMLSchema-instance"
xsi:schemaLocation="http://java.sun.com/xml/ns/portlet/portlet-app_1_0.xsd
http://java.sun.com/xml/ns/portlet/portlet-app_1_0.xsd"
version="1.0">
JBoss Release 2.6.5
108
Content Integration
...
<portlet>
<description>File System Content Driven Portlet</description>
<portlet-name>FSContentDrivenPortlet</portlet-name>
<display-name>File System Content Driven Portlet</display-name>
<portlet-class>org.jboss.portal.core.portlet.test.FSContentDrivenPortlet</portlet-class>
<supports>
<mime-type>text/html</mime-type>
</supports>
<portlet-info>
<title>File Portlet</title>
<keywords>sample,test</keywords>
</portlet-info>
</portlet>
...
</portlet-app>
The portlet.xml descriptor
<deployments>
...
<deployment>
<instance>
<instance-id>FSContentDrivenPortletInstance</instance-id>
<portlet-ref>FSContentDrivenPortlet</portlet-ref>
</instance>
</deployment>
...
</deployments
The portlet-instances.xml descriptor
<web-app>
...
<context-param>
<param-name>org.jboss.portal.content_type</param-name>
<param-value>filesystem</param-value>
</context-param>
<context-param>
<param-name>org.jboss.portal.portlet_instance</param-name>
<param-value>FSContentDrivenPortletInstance</param-value>
</context-param>
<listener>
<listener-class>org.jboss.content.ContentTypeRegistration</listener-class>
</listener>
...
</web-app>
The web.xml descriptor
Warning
You don't need to add the listener class into your war file. As it is provided by the portal it will always be
available.
9.4. Configuring window content in deployment descriptor
JBoss Release 2.6.5
109
Content Integration
How to create a portlet that will enable configuration of content at runtime has been covered above, however it is
also possible to configure content in deployment descriptors. With our previous example it would give the following snippet placed in a *-portal.xml file:
<window>
<window-name>MyWindow</window-name>
<content>
<content-type>filesystem</content-type>
<content-uri>/dir1/foo.txt</content-uri>
</content>
<region>center</region>
<height>1</height>
</window>
Final effect - portal window with FSContentDrivenPortlet
Note
How to configure CMS file this way is covered in the CMS chapter: Section 21.3
JBoss Release 2.6.5
110
10
Widget Integration
Emanuel Muckenhuber <[email protected]>
10.1. Introduction
JBoss Portal supports the integration of Google gadgets and Netvibes (UWA [1] compatible) widgets out of the
box. This integration allows you to display the content of the widget within a portlet. Both types can be added in
the administration interface by editing the 'Page Layout' of a page or in the configuration of the users dashboard
when selecting the appropriate 'Content type'.
10.2. Widget portlet configuration
It is possible to modify certain behavior of caching and fetching widgets by changing the init-param values of the
portlet.
•
connectionTimeout
Connection timeout used for the directory lookup in milliseconds.
•
widgetExpiration
Time in minutes for which a widget should be cached. After this time the cached widget information will be deleted and fetched again when the information are needed.
•
queryExpiration
Times in minutes for which a directory query should be cached. After this time the cached query information
will be deleted.
•
fetchWidgetsOnDirectoryLookup
This parameter defines if all widgets from a directory lookup should be fetched at the time of the query or not.
The default values is false. This means that widgets are only fetched on demand - when the information is
really needed.
The parameter for both widget types can be changed identically in either:
[1] http://dev.netvibes.com/doc/uwa_specification
JBoss Release 2.6.5
111
Widget Integration
•
jboss-portal.sar/portal-widget.war/WEB-INF/portlet.xml (for google gadgets)
•
or jboss-portal.sar/portal-widget-netvibes.war/WEB-INF/portlet.xml (for netvibes widgets).
...
<portlet>
...
<init-param>
<name>connectionTimeout</name>
<value>5000</value>
</init-param>
<init-param>
<name>widgetExpiration</name>
<value>360</value>
</init-param>
<init-param>
<name>queryExpiration</name>
<value>60</value>
</init-param>
<init-param>
<name>fetchWidgetsOnDirectoryLookup</name>
<value>false</value>
</init-param>
...
</portlet>
...
For Netvibes widgets it is also possible to define a init-param called defaultHeight to set a specific default height
if no height attribute is defined by the widget itself. The default value is 250.
JBoss Release 2.6.5
112
11
Portlet Modes
Julien Viet <[email protected]>
JBoss Portal supports the standard portlet modes defined by the JSR-168 specification which are view, edit and
help. In addition of that it also supports the admin portlet mode.
11.1. Admin Portlet Mode
The admin mode defines a mode for the portlet which allows the administration of the portlet. Access to this mode
is only granted to users having an appropriate role. In order to grant admin access to a portlet, the user must have a
role which grants him the admin action permission on the portlet instance. This can be done in the instance deployment descriptor or using the administation portlet of the portal.
11.1.1. Portlet configuration
In order to be able to use the admin mode, the portlet must declare it in the portlet deployment descriptor.
<portlet-app>
...
<portlet>
...
<supports>
<mime-type>text/html</mime-type>
<portlet-mode>admin</portlet-mode>
</supports>
...
</portlet>
...
<custom-portlet-mode>
<name>admin</name>
</custom-portlet-mode>
...
</portlet-app>
11.1.2. Declarative instance security configuration
The following example shows the configuration of a portlet instance that grants the admin action permission to the
Admin security role. It also grants the view action permission to all users.
...
<instance>
<instance-id>ModePortletInstance</instance-id>
JBoss Release 2.6.5
113
Portlet Modes
<portlet-ref>ModePortlet</portlet-ref>
<security-constraint>
<policy-permission>
<action-name>admin</action-name>
<role-name>Admin</role-name>
</policy-permission>
<policy-permission>
<action-name>view</action-name>
<unchecked/>
</policy-permission>
</security-constraint>
</instance>
...
11.1.3. Instance security configuration with the administration portlet
At runtime the security configuration section of the administration portlet can be used to grant or revoke the admin
access. It can be done by clicking the security action of the portlet instance and then use the security editor.
Edit the security instance configuration
JBoss Release 2.6.5
114
12
Portal API
Julien Viet <[email protected]>
Thomas Heute <[email protected]>
12.1. Introduction
JBoss Portal provides an Application Programming Interface (API) which allows to write code that interacts with
the portal. The life time and validity of the API is tied to the major version which means that no changes should be
required when code is written against the API provided by the JBoss Portal 2.x versions and used in a later version
of JBoss Portal 2.x.
The Portal API package prefix is org.jboss.portal.api. All of the classes that are part of this API are prefixed with
this package name except for the org.jboss.portal.Mode and org.jboss.portal.WindowState classes. These two
classes were defined before the official Portal API framework was created and so the names have been maintained
for backward compatibility.
The Portlet API defines two classes that represent a portion of the visual state of a Portlet which are
javax.portlet.PortletMode and javax.portlet.WindowState. Likewise the Portal API defines similar classes named
org.jboss.portal.Mode and org.jboss.portal.WindowState which offer comparable characteristics, the main differences are:
•
Usage of factory methods to obtain instances.
•
Classes implements the java.io.Serializable interface.
The Mode class
JBoss Release 2.6.5
115
Portal API
The WindowState class
Note
In the Portal API, the Mode interface is named like this because it does represent the mode of some visual
object. The Portlet API names it PortletMode because it makes the assumption that the underlying object is
of type Portlet.
12.2. Portal URL
The Portal API defines the org.jboss.portal.api.PortalURL interface to represent URL managed by the portal.
The PortalURL interface
•
The setAuthenticated(Boolean wantAuthenticated) methods defines if the URL requires the authentication of
the user. If the argument value is true then the user must be authenticated to access the URL, if the argument
value is false then the user should not be authenticated. Finally if the argument value is null then it means that
the URL authenticated mode should reuse the current mode.
•
The setSecure(Boolean wantSecure) methods defines the same as above but for the transport guarantee offered
by the underlying protocol which means most of the time the secure HTTP protocol (HTTPS).
•
The setRelative(boolean relative) defines the output format of the URL and whether the created URL will be an
URL relative to the same web server or will be the full URL.
•
The toString() method will create the URL as a string.
12.3. Portal session
JBoss Release 2.6.5
116
Portal API
The PortalSession interface
It is possible to have access to a portion of the portal session to store objects. The
org.jboss.portal.api.session.PortalSession
interface
defines
its
API
and
is
similar
to
the
javax.servlet.http.HttpSession except that it does not offer methods to invalidate the session as the session is managed by the portal.
12.4. Portal runtime context
The PortalRuntimeContext interface
The org.jboss.portal.api.PortalRuntimeContext gives access to state or operations associated at runtime with the
current user of the portal. The String getUserId() retrieve the user id and can return null if no user is associated
with the context. It also gives access to the PortalSession instance associated with the current user. Finally it gives
access to the NavigationalStateContext associated with the current user.
12.5. Portal nodes
The portal structure is a tree formed by nodes. It is possible to programmatically access the portal tree in order to
•
discover the tree structure of the portal
•
create URL that will render the different portal nodes
•
access the properties of a specific node
JBoss Release 2.6.5
117
Portal API
The PortalNode interface
As usual with tree structures, the main interface to study is the org.jboss.portal.api.node.PortalNode. That interface
is intentionally intended for obtaining useful information from the tree. It is not possible to use it to modify the tree
shape because it is not intended to be a management interface.
public interface PortalNode
{
int getType();
String getName();
String getDisplayName(Locale locale);
Map getProperties();
PortalNodeURL createURL(PortalRuntimeContext portalRuntimeContext);
...
}
The interface offers methods to retrieve informations for a given node such as the node type, the node name or the
properties of the node. The noticeable node types are:
•
PortalNode.TYPE_PORTAL : the node represents a portal
•
PortalNode.TYPE_PAGE : the node represents a portal page
•
PortalNode.TYPE_WINDOW : the node represents a page window
The org.jboss.portal.api.node.PortalNodeURL is an extension of the PortalURL interface which adds additional
methods useful for setting parameters on the URL. There are no guarantees that the portal node will use the parameters. So far portal node URL parameters are only useful for nodes of type PortalNode.TYPE_WINDOW and they
should be treated as portlet render parameters in the case of the portlet is a local portlet and is not a remote portlet.
The method that creates portal node URL requires as parameter an instance of PortalRuntimeContext.
The interface also offers methods to navigate the node hierarchy:
public interface PortalNode
{
JBoss Release 2.6.5
118
Portal API
...
PortalNode
Collection
PortalNode
PortalNode
...
getChild(String name);
getChildren();
getRoot();
getParent();
}
12.6. Portal navigational state
The navigational state is a state managed by the portal that associates to each user the state triggered by its navigation. A well known part of the navigational state are the render parameters provided at runtime during the call of
the method void render(RenderRequest req, RenderResponse resp). The portal API offers an interface to query and
update the navigational state of the portal. For now the API only exposes mode and window states of portal nodes
of type window.
The NavigationalStateContext interface
12.7. Portal events
Portal events are a powerful mechanism to be aware of what is happening in the portal at runtime. The base package for event is org.jboss.portal.api.event and it contains the common event classes and interfaces.
The PortalEvent class
The org.jboss.portal.api.event.PortalEvent abstract class is the base class for all kind of portal events.
The PortalEventContext interface
JBoss Release 2.6.5
119
Portal API
The org.jboss.portal.api.event.PortalEventContext interface defines the context in which an event is created and
propagated. It allows retrieval of the PortalRuntimeContext which can in turn be used to obtain the portal context.
The PortalEventListener interface
The org.jboss.portal.api.event.PortalEventListener interface defines the contract that class can implement in order
to receive portal event notifications. It contains the method void onEvent(PortalEvent event) called by the portal
framework.
Listeners declaration requires a service to be deployed in JBoss that will instantiate the service implementation and
register it with the service registry. We will see how to achieve that in the example section of this chapter.
Note
The event propagation model uses one instance of a listener class to receive all portal events that may be
routed to that class when appropriate. Therefore implementors needs to be aware of that model and must
provide thread safe implementations.
12.7.1. Portal node events
Portal node events extend the abstract portal event framework in order to provide notifications about user interface
events happening at runtime. For instance when the portal renders a page or a window, a corresponding event will
be fired.
JBoss Release 2.6.5
120
Portal API
The portal node event class hierarchy
The org.jboss.portal.api.node.event.PortalNodeEvent class extends the org.jboss.portal.api.node.PortalEvent class
and is the base class for all events of portal nodes. It defines a single method PortalNode getNode() which can be
used to retrieve the node targetted by the event.
The org.jboss.portal.api.node.event.WindowEvent is an extension for portal nodes of type window. It provides access to the mode and window state of the window. It has 3 subclasses which represent different kind of event that
can target windows.
The org.jboss.portal.api.node.event.WindowNavigationEvent is fired when the window navigational state changes.
For a portlet it means that the window is targetted by an URL of type render.
The org.jboss.portal.api.node.event.WindowActionEvent is fired when the window is targetted by an action. For a
JBoss Release 2.6.5
121
Portal API
portlet it means that the window is targetted by an URL of type action.
The org.jboss.portal.api.node.event.WindowRenderEvent is fired when the window is going to be rendered by the
portal.
The org.jboss.portal.api.node.event.PageEvent is an extension for portal nodes of type page.
The org.jboss.portal.api.node.event.PageRenderEvent is fired when the page is going to be rendered by the portal.
12.7.1.1. Portal node event propagation model
A portal node event is fired when an event of interest happens to a portal node of the portal tree. The notification
model is comparable to the bubbling propagation model [1] defined by the DOM specification. When an event is
fired, the event is propagated in the hierarchy from the most inner node where the event happens to the root node of
the tree.
The portal node event propagation model
12.7.1.2. Portal node event listener
The org.jboss.portal.api.node.event.PortalNodeEventListener interface should be used instead of the too generic
org.jboss.portal.api.event.PortalEventListener when it comes down of listening portal node events. Actually it does
not replace it, the PortalEventListener interface semantic allows only traditional event delivering. The PortalNodeEventListener interface is designed to match the bubbling effect during an event delivery.
The PortalNodeEvent onEvent(PortalNodeEventContext context, PortalNodeEvent event) method declares a
PortalNodeEvent as return type. Commonly the method returns null; however, a returned PortalNodeEvent replaces
the event in the listeners subsequently called during the event bubbling process.
[1] http://en.wikipedia.org/wiki/DOM_Events#Event_flow
JBoss Release 2.6.5
122
Portal API
12.7.1.3. Portal node event context
The PortalNodeEventContext interface
The org.jboss.portal.api.node.event.PortalNodeEventContext interface extends the PortalEventContext interface
and plays an important role in the event delivery model explained in the previous section. That interface gives full
control over the delivery of the event to ascendant nodes in the hierarchy, even more it gives the possibility to replace the current event being delivered by a new event that will be transformed into the corresponding portal behavior. However there are no guarantees that the portal will turn the returned event into a portal behavior, here the
portal provides a best effort policy, indeed sometime it is not possible to achieve the substitution of one event by
another.
Here the simplest implementation of a listener that does nothing except than correctly passing the control to a parent event listener if there is one.
public PortalNodeEvent onEvent(PortalNodeEventContext context, PortalNodeEvent event)
{
return context.dispatch();
}
The method PortalNode getNode() returns the current node being selected during the event bubbler dispatching
mechanism.
12.7.2. Portal session events
The life cycle of the session of the portal associated with the user can also raise events. This kind of event is not
bound to a portal node since it is triggered whenever a portal session is created or destroyed
The PortalSessionEvent class
There are two different types of events:
JBoss Release 2.6.5
123
Portal API
•
org.jboss.portal.api.session.event.PortalSessionEvent.SESSION_CREATED, fired when a new portal session is
created
•
org.jboss.portal.api.session.event.PortalSessionEvent.SESSION_DESTROYED, fired when a new portal session is destroyed
12.7.3. Portal user events
The life cycle of the portal user can also raise events such as its authentication. A subclass of the wider scope
UserEvent class is provided and triggers events whenever a user signs in or out. The UserEvent object gives access
to the user name of the logged-in user through the method String getId().
The UserEvent class and UserAuthenticationEvent sub-classes
The UserAuthenticationEvent triggers two events that can be catched:
•
org.jboss.portal.api.session.event.UserAuthenticationEvent.SIGN_IN, fired when a portal user signs in
•
org.jboss.portal.api.session.event.UserAuthenticationEvent.SIGN_OUT, fired when a portal user signs out
Based on the UserEvent class other custom user related events could be added like one that would trigger when a
new user is being registered
12.8. Examples
The events mechanism is quite powerful, in this section of the chapter we will see few simple examples to explain
how it works.
JBoss Release 2.6.5
124
Portal API
12.8.1. UserAuthenticationEvent example
In this example, we will create a simple counter of the number of logged-in registered users. In order to do that we
just need to keep track of Sign-in and Sign-out events.
First, let's write our listener. It just a class that will implement org.jboss.portal.api.event.PortalEventListener and
its unique method void onEvent(PortalEventContext eventContext, PortalEvent event). Here is such an example:
package org.jboss.portal.core.portlet.test.event;
import[...]
public class UserCounterListener implements PortalEventListener
{
/** Thread-safe long */
private final SynchronizedLong counter = new SynchronizedLong(0);
/** Thread-safe long */
private final SynchronizedLong counterEver = new SynchronizedLong(0);
public void onEvent(PortalEventContext eventContext, PortalEvent event)
{
if (event instanceof UserAuthenticationEvent)
{
UserAuthenticationEvent userEvent = (UserAuthenticationEvent)event;
if (userEvent.getType() == UserAuthenticationEvent.SIGN_IN)
{
counter.increment();
counterEver.increment();
}
else if (userEvent.getType() == UserAuthenticationEvent.SIGN_OUT)
{
counter.decrement();
}
System.out.println("Counter
: " + counter.get());
System.out.println("Counter ever: " + counterEver.get());
}
}
}
On this method we simply filter down to UserAuthenticationEvent then depending on the type of authentication
event we update the counters. counter keeps track of the registered and logged-in users, while counterEver only
counts the number of times people logged-in the portal.
Now that the Java class has been written we need to register it so that it can be called when the events are triggered.
To do so we need to register it as an MBean. It can be done by editing the sar descriptor file: YourService.sar/META-INF/jboss-service.xml so that it looks like the following:
<?xml version="1.0" encoding="UTF-8"?>
<server>
<mbean
code="org.jboss.portal.core.event.PortalEventListenerServiceImpl"
name="portal:service=ListenerService,type=counter_listener"
xmbean-dd=""
xmbean-code="org.jboss.portal.jems.as.system.JBossServiceModelMBean">
<xmbean/>
<depends
optional-attribute-name="Registry"
JBoss Release 2.6.5
125
Portal API
proxy-type="attribute">portal:service=ListenerRegistry</depends>
<attribute name="RegistryId">counter_listener</attribute>
<attribute name="ListenerClassName">
org.jboss.portal.core.portlet.test.event.UserCounterListener
</attribute>
</mbean>
</server>
This snippet can be kept as it is, providing you change the values:
•
name: Must follow the pattern: portal:service=ListenerService,type={{UNIQUENAME}}
•
RegistryId: Must match the type (here: counter_listener)
•
ListenerClassName:
Full
path
to
org.jboss.portal.core.portlet.test.event.UserCounterListener).
the
listener
(here:
That's it - we now have a user counter that will display it states each time a user logs-in our logs-out.
12.8.2. Achieving Inter Portlet Communication with the events mechanism
The first version of the Portlet Specification (JSR 168), regretfully, did not cover interaction between portlets. The
side-effect of diverting the issue to the subsequent release of the specification, has forced portal vendors to each
craft their own proprietary API to achieve inter portlet communication. Here we will see how we can use the event
mechanism to pass parameters from one portlet to the other (and only to the other portlet).
The overall scenario will be that Portlet B will need to be updated based on some parameter set on Portlet A. To
achieve that we will use a portal node event.
Portlet A is a simple Generic portlet that has a form that sends a color name:
public class PortletA extends GenericPortlet
{
protected void doView(RenderRequest request, RenderResponse response)
throws PortletException, PortletSecurityException, IOException
{
response.setContentType("text/html");
PrintWriter writer = response.getWriter();
writer.println("<form action=\"" + response.createActionURL() + "\" method=\"post\">");
writer.println("<select name=\"color\">");
writer.println("<option>blue</option>");
writer.println("<option>red</option>");
writer.println("<option>black</option>");
writer.println("</select>");
writer.println("<input type=\"submit\"/>");
writer.println("</form>");
writer.close();
}
}
The other portlet (Portlet B) that will receive parameters from Portlet A is also a simple Generic portlet:
public class PortletB extends GenericPortlet
JBoss Release 2.6.5
126
Portal API
{
public void processAction(ActionRequest request, ActionResponse response)
throws PortletException, PortletSecurityException, IOException
{
String color = request.getParameter("color");
if (color != null)
{
response.setRenderParameter("color", color);
}
}
protected void doView(RenderRequest request, RenderResponse response)
throws PortletException, PortletSecurityException, IOException
{
String color = request.getParameter("color");
response.setContentType("text/html");
PrintWriter writer = response.getWriter();
writer.println("<div" +
(color == null ? "" : " style=\"color:" + color + ";\"") +
">some text in color</div>");
writer.close();
}
// Inner listener explained after
}
With those two portlets in hands, we just want to pass parameters from Portlet A to Portlet B (the color in as a request parameter in our case). In order to achieve this goal, we will write an inner Listener in Portlet B that will be
triggered on any WindowActionEvent of Portlet A. This listener will create a new WindowActionEvent on the window of Portlet B.
public static class Listener implements PortalNodeEventListener
{
public PortalNodeEvent onEvent(PortalNodeEventContext context, PortalNodeEvent event)
{
PortalNode node = event.getNode();
// Get node name
String nodeName = node.getName();
// See if we need to create a new event or not
WindowActionEvent newEvent = null;
if (nodeName.equals("PortletAWindow") && event instanceof WindowActionEvent)
{
// Find window B
WindowActionEvent wae = (WindowActionEvent)event;
PortalNode windowB = node.resolve("../PortletBWindow");
if (windowB != null)
{
// We can redirect
newEvent = new WindowActionEvent(windowB);
newEvent.setParameters(wae.getParameters());
newEvent.setMode(wae.getMode());
newEvent.setWindowState(WindowState.MAXIMIZED);
// Redirect to the new event
return newEvent;
}
}
// Otherwise bubble up
return context.dispatch();
}
JBoss Release 2.6.5
127
Portal API
}
It is important to note here some of the important items in this listener class. Logic used to determine if the requesting node was Portlet A.:
nodeName.equals("PortletAWindow")
Get the current window object so we can dispatch the event to it:
PortalNode windowB = node.resolve("../PortletBWindow");
Set the original parameter from Portlet A, so Portlet B can access them in its processAction():
newEvent.setParameters(wae.getParameters());
We still need to register our listener as an mbean:
<mbean
code="org.jboss.portal.core.event.PortalEventListenerServiceImpl"
name="portal:service=ListenerService,type=test_listener"
xmbean-dd=""
xmbean-code="org.jboss.portal.jems.as.system.JBossServiceModelMBean">
<xmbean/>
<depends
optional-attribute-name="Registry"
proxy-type="attribute">portal:service=ListenerRegistry</depends>
<attribute name="RegistryId">test_listener</attribute>
<attribute name="ListenerClassName">
org.jboss.portal.core.samples.basic.event.PortletB$Listener
</attribute>
</mbean>
For node events, we also need to declare on which node we want to listen, this is done by modifying the
*-object.xml that defines your portal nodes. In this example we want to trigger the listener each time the window
containing the portlet A is actioned. We can add the listener tag to specify that out listener with
RegistryId=test_listener should be triggered on events on the embedding object.
...
<window>
<window-name>PortletAWindow</window-name>
<instance-ref>PortletAInstance</instance-ref>
<region>center</region>
<height>0</height>
<listener>test_listener</listener>
</window>
...
Of course we could have added it at the page level instead of the window level. Note that a unique listener can be
specified, the event mechanism is primarily done to let the developer change the navigation state of the portal, this
example being a nice side-effect of this feature.
Note
The portlet 2.0 specification (JSR 286) will cover Inter Portlet Communication so that portlets using it can
JBoss Release 2.6.5
128
Portal API
work with different portal vendors.
12.8.3. Link to other pages
Linking to some other pages or portals is also out of the scope of the portlet specification. As seen previously JBoss
Portal offers an API in order to create links to other portal nodes. The JBoss request gives access to the current
window node from which we can navigate from.
// Get the ParentNode. Since we are inside a Window, the Parent is the Page
PortalNode thisNode = req.getPortalNode().getParent();
// Get the Node in the Portal hierarchy tree known as "../default"
PortalNode linkToNode = thisNode.resolve("../default");
// Create a RenderURL to the "../default" Page Node
PortalNodeURL pageURL = resp.createRenderURL(linkToNode);
// Output the Node's name and URL for users
html.append("Page: " + linkToNode.getName() + " -> ");
html.append("<a href=\"" + pageURL.toString() + "\">" + linkToNode.getName() + "</a>");
From this, it is easy to create a menu or sitemap, the List getChildren() method will return all the child nodes on
which the user has the view right access.
Samples
Those examples are available in the core-samples package in the sources of JBoss Portal. There are more
examples of events usage in the samples delivered with JBoss Portal. One of them shows the usage of a
portal node event to only have one window in normal mode at a time in a region. Anytime another window
is being put in normal mode, all the other windows of the same regions are automatically minimized.
JBoss Release 2.6.5
129
13
Clustering Configuration
Julien Viet <[email protected]>
Roy Russo <[email protected]>
This section covers configuring JBoss Portal for a clustered environment.
13.1. Introduction
JBoss Portal leverages various clustered services that are found in JBoss Application Server. This section briefly
details how each is leveraged:
•
JBoss Cache: Used to replicate data among the different hibernate session factories that are deployed in each
node of the cluster.
•
JBoss HA Singleton:
1.
Used to make the deployer a singleton on the cluster, in order to avoid concurrency issues when deploying
the various *-object.xml files. Without that, each node would try to create the same objects in the database
when it deploys an archive containing such descriptors.
2.
Used with JCR. The Jackrabbit server is not able to run in a cluster by itself, therefore we make a singleton
on the cluster. This provides HA-CMS, which is similar to the current HA JBossMQ provided in JBoss
AS.
•
HA-JNDI: Used to replicate a proxy that will talk to the HA CMS on the cluster.
•
Http Session Replication: Used to replicate the portal and the portlet sessions.
•
JBoss SSO: Used to replicate the user identity, an authenticated user does not have to login again when failover
occurs.
Note
JBoss Clustering details can be found in the Wiki [1] or the clustering documentation [2].
[1] http://wiki.jboss.org/wiki/Wiki.jsp?page=JBossHA
[2] http://labs.jboss.com/jbossas/docs/
JBoss Release 2.6.5
130
Clustering Configuration
13.2. Considerations
When you want to run JBoss Portal on a cluster there are a few things to keep in mind:
•
Deploy the portal under the all application server configuration as it contains the clustering services that is
leveraged by JBoss Portal.
•
All the portal instances have to use the same datasource : the database is used to store the portal persistent state
like pages. If you don't use a shared database then you will have consistency problems.
13.3. JBoss Portal Clustered Services
13.3.1. Portal Session Replication
The portal associates with each user a http session in order to keep specific objects such as:
•
Navigational state : this is mainly the state of different portlet windows that the user will manipulate during its
interactions with the portal. For instance a maximized portlet window with specific render parameters.
•
WSRP objects : the WSRP protocol can require to provide specific cookies during interactions with a remote
JBoss Release 2.6.5
131
Clustering Configuration
portlet.
Replicating the portal session ensures that this state will be kept in sync on the cluster, e.g The user will see exactly
the same portlet window on every node of the cluster. The activation of the portal session replication is made
through the configuration of the web application that is the main entry point of the portal. This setting is available
in the file jboss-portal.sar/portal-server.war/WEB-INF/web.xml
<web-app>
<description>JBoss Portal</description>
<!-- Comment/Uncomment to enable portal session replication -->
<distributable/>
...
</web-app>
13.3.2. Hibernate clustering
JBoss Portal leverages hibernate for its database access. In order to improve performances it uses the caching features provided by hibernate. On a cluster the cache needs to be replicated in order to avoid state inconsistencies. Hibernate is configured with JBoss Cache which performs that synchronization transparently. Therefore the different
hibernate services must be configured to use JBoss Cache. The following hibernate configurations needs to use a
replicated JBoss Cache :
•
jboss-portal.sar/conf/hibernate/user/hibernate.cfg.xml
•
jboss-portal.sar/conf/hibernate/instances/hibernate.cfg.xml
•
jboss-portal.sar/conf/hibernate/portal/hibernate.cfg.xml
• jboss-portal.sar/conf/hibernate/portlet/hibernate.cfg.xml
The cache configuration should look like :
<!-| Uncomment in clustered mode : use transactional replicated cache
-->
<property name="cache.provider_class">org.jboss.portal.core.hibernate.JMXTreeCacheProvider
</property>
<property name="cache.object_name">portal:service=TreeCacheProvider,type=hibernate
</property>
<!-| Comment in clustered mode
<property name="cache.provider_configuration_file_resource_path">
conf/hibernate/instance/ehcache.xml</property>
<property name="cache.provider_class">org.hibernate.cache.EhCacheProvider</property>
-->
Also we need to ensure that the cache is deployed by
portal.sar/META-INF/jboss-service.xml the cache service uncommented :
having
in
the
file
jboss-
<!-| Uncomment in clustered mode : replicated cache for hibernate
-->
<mbean
JBoss Release 2.6.5
132
Clustering Configuration
code="org.jboss.cache.TreeCache"
name="portal:service=TreeCache,type=hibernate">
<depends>jboss:service=Naming</depends>
<depends>jboss:service=TransactionManager</depends>
<attribute name="TransactionManagerLookupClass">
org.jboss.cache.JBossTransactionManagerLookup</attribute>
<attribute name="IsolationLevel">REPEATABLE_READ</attribute>
<attribute name="CacheMode">REPL_SYNC</attribute>
<attribute name="ClusterName">portal.hibernate</attribute>
</mbean>
<mbean
code="org.jboss.portal.core.hibernate.JBossTreeCacheProvider"
name="portal:service=TreeCacheProvider,type=hibernate">
<depends optional-attribute-name="CacheName">portal:service=TreeCache,type=hibernate
</depends>
</mbean>
More information can be found here [3].
13.3.3. Identity clustering
JBoss Portal leverages the servlet container authentication for its own authentication mechanism. When the user is
authenticated on one particular node he will have to reauthenticate again if a different node of the cluster (during a
failover for instance) is used. This is valid only for the FORM based authentication which is the default form of authentication that JBoss Portal uses. Fortunately JBoss provides transparent reauthentication of the user called JBoss
clustered
SSO.
Its
configuration
can
be
found
in
$JBOSS_HOME/server/all/deploy/jboss-web.deployer/server.xml and you will need to uncomment the following valve:
<Valve className="org.jboss.web.tomcat.service.sso.ClusteredSingleSignOn" />
More information can be found here [4].
13.3.4. CMS clustering
The CMS backend storage relies on the Apache Jackrabbit project. Jackrabbit does not support clustering out of the
box. So the portal run the Jackrabbit servicey on one node of the cluster using the HA-Singleton [5] technology.
The file jboss-portal.sar/portal-cms.sar/META-INF/jboss-service.xml contains the configuration. We will not reproduce it in this documentation as the changes are quite complex and numerous. Access from all nodes of the
cluster is provided by a proxy bound in HA-JNDI. In order to avoid any bottleneck JBoss Cache is leveraged to
cache CMS content cluster wide.
[3] http://wiki.jboss.org/wiki/Wiki.jsp?page=JBossCacheHibernate
[4] http://www.jboss.org/wiki/Wiki.jsp?page=SingleSignOn
[5] http://www.onjava.com/pub/a/onjava/2003/08/20/jboss_clustering.html
JBoss Release 2.6.5
133
Clustering Configuration
13.4. Setup
We are going to outline how to setup a two node cluster on the same machine in order to test JBoss Portal HA. The
only missing part from the full fledged setup is the addition of a load balancer in front of Tomcat. However a lot of
documentation exist on the subject. A detailed step by step setup of Apache and mod_jk is available from the JBoss
Wiki [6].
As we need two application servers running at the same time, we must avoid any conflict. For instance we will
need Tomcat to bind its socket on two different ports otherwise a network conflict will occur. We will leverage the
service binding manager this chapter [7] of the JBoss AS documentation.
The first step is to copy the all configuration of JBoss into two separate configurations that we name ports-01 and
ports-02 :
>cd $JBOSS_HOME/server
>cp -r all ports-01
>cp -r all ports-02
[6] http://wiki.jboss.org/wiki/Wiki.jsp?page=UsingMod_jk1.2WithJBoss
[7] http://docs.jboss.org/jbossas/jboss4guide/r3/html/ch10.html
JBoss Release 2.6.5
134
Clustering Configuration
Edit the file $JBOSS_HOME/server/ports-01/conf/jboss-service.xml and uncomment the service binding manager :
<mbean code="org.jboss.services.binding.ServiceBindingManager"
name="jboss.system:service=ServiceBindingManager">
<attribute name="ServerName">ports-01</attribute>
<attribute name="StoreURL">
${jboss.home.url}/docs/examples/binding-manager/sample-bindings.xml</attribute>
<attribute name="StoreFactoryClassName">org.jboss.services.binding.XMLServicesStoreFactory</attribute>
</mbean>
Edit the file $JBOSS_HOME/server/ports-02/conf/jboss-service.xml, uncomment the service binding manager and
change the value ports-01 into ports-02:
<mbean code="org.jboss.services.binding.ServiceBindingManager"
name="jboss.system:service=ServiceBindingManager">
<attribute name="ServerName">ports-02</attribute>
<attribute name="StoreURL">
${jboss.home.url}/docs/examples/binding-manager/sample-bindings.xml</attribute>
<attribute name="StoreFactoryClassName">
org.jboss.services.binding.XMLServicesStoreFactory</attribute>
</mbean>
Setup a database that will be shared by the two nodes and obviously we cannot use an embedded database. For instance using postgresql we would need to copy the file portal-postgresql-ds.xml into
$JBOSS_HOME/server/ports-01/deploy and $JBOSS_HOME/server/ports-02/deploy.
Copy JBoss Portal HA to the deploy directory of the two configurations.
Note
To improve CMS performance JBoss Cache is leveraged to cache the content cluster wide. We recommend
that you use the following version of JBoss Cache for best performance:
•
JBoss Cache 1.4.0.SP1 and above
• JGroups 2.2.7 or 2.2.8
When building from source the following command: {core}/build.xml deploy-ha automatically upgrades your JBoss Cache version.
Alternative: If upgrading your JBoss Cache version is not an option, the following configuration change is
needed in the jboss-portal-ha.sar/portal-cms.sar/META-INF/jboss-service.xml. Replace the following configuration in the cms.pm.cache:service=TreeCache Mbean:
<!-Configuring the PortalCMSCacheLoader
CacheLoader configuration for 1.4.0
-->
<attribute name="CacheLoaderConfiguration">
<config>
<passivation>false</passivation>
<preload></preload>
<shared>false</shared>
JBoss Release 2.6.5
135
Clustering Configuration
<cacheloader>
<class>org.jboss.portal.cms.hibernate.state.PortalCMSCacheLoader</class>
<properties></properties>
<async>false</async>
<fetchPersistentState>false</fetchPersistentState>
<ignoreModifications>false</ignoreModifications>
</cacheloader>
</config>
</attribute>
with the following configuration:
<!-Configuring the PortalCMSCacheLoader
CacheLoader configuratoon for 1.2.4SP2
-->
<attribute name="CacheLoaderClass">org.jboss.portal.cms.hibernate.state.PortalCMSCacheLoader
</attribute>
<attribute name="CacheLoaderConfig" replace="false"></attribute>
<attribute name="CacheLoaderPassivation">false</attribute>
<attribute name="CacheLoaderPreload"></attribute>
<attribute name="CacheLoaderShared">false</attribute>
<attribute name="CacheLoaderFetchTransientState">false</attribute>
<attribute name="CacheLoaderFetchPersistentState">false</attribute>
<attribute name="CacheLoaderAsynchronous">false</attribute>
Finally we can start both servers, open two shells and execute :
>cd $JBOSS_HOME/bin
>sh run.sh -c ports-01
>cd $JBOSS_HOME/bin
>sh run.sh -c ports-02
13.5. Portlet Session Replication
Web containers offer the capability to replicate sessions of web applications. In the context of a portal using portlets the use case is different. The portal itself is a web application that benefits of web application session replication. We have to make the distinction between local or remote portlets :
•
Local portlets are web applications deployed in the same virtual machine as the portal web application. At
runtime the access to a portlet is done using the mechanism of request dispatching. The portlet session is actually a mere wrapper of the underlying http session of the web application in which the portlet is deployed.
•
Remote portlets are accessed using a web service, we will not cover the replication in this chapter.
The servlet specification is very loose on the subject of replication and does not state anything about the replication
of sessions during a dispatched request. JBoss Portal offers a portlet session replication mechanism that leverages
the usage of the portal session instead which has several advantages
JBoss Release 2.6.5
136
Clustering Configuration
•
Replicate only the portlet that requires it.
•
Portal session replication is just web application replication and is very standard.
There are, however, some limitations. For example, you can only replicate portlet-scoped attributes of a portlet session. This means that any application-scoped attribute are not replicated.
13.5.1. JBoss Portal configuration
The mandatory step to make JBoss Portal able to replicate portlet sessions is to configure the portal web application
to be distributed as explained in Section 13.3.1
13.5.2. Portlet configuration
In order to activate portlet session replication you need to:
•
Add a Portal-specific listener class to the /WEB-INF/web.xml file of your portlet web application
•
Configure your portlet to be distributed in the /WEB-INF/jboss-portlet.xml file
<web-app>
...
<listener>
<listener-class> org.jboss.portal.portlet.session.SessionListener </listener-class>
</listener>
...
</web-app>
Example web.xml
<portlet-app>
...
<portlet>
<portlet-name>YourPortlet</portlet-name>
...
<session-config>
<distributed>true</distributed>
</session-config>
...
</portlet>
...
</portlet-app>
Configure YourPortlet to be replicated in jboss-portlet.xml
13.5.3. Limitations
As we noted above there are advantages as well as limitations to the clustering configuration
JBoss Release 2.6.5
137
Clustering Configuration
•
You can only replicate portlet scoped attributes of a portlet. The main reason of this is to keep consistency with
the session state. If accessing a portlet would trigger replication of application scoped attribute during the rendering of a page then another portlet on the same page could use this attribute for generating its markup. Then
the state seen by this second portlet would not necessarily be the same depending on the order in which the
portlets on this page are rendered.
•
Mutable objects need an explicit call to setAttribute(String name, Object value) on the portlet session object in
order to trigger replication by the container.
public void processAction(ActionRequest req, ActionResponse resp)
throws PortletException, IOException
{
...
if ("addItem".equals(action))
{
PortletSession session = req.getPortletSession();
ShoppingCart cart = (PortletSession)session.getAttribute("cart");
cart.addItem(item);
// Perform an explicit set in order to signal to the container that the object
// state has changed
session.setAttribute("cart", cart);
}
...
}
JBoss Release 2.6.5
138
14
Web Services for Remote Portlets (WSRP)
Julien Viet <[email protected]>
Chris Laprun <[email protected]>
14.1. Introduction
The Web Services for Remote Portlets specification defines a web service interface for accessing and interacting
with interactive presentation-oriented web services. It has been produced through the efforts of the Web Services
for Remote Portlets (WSRP) OASIS Technical Committee. It is based on the requirements gathered and on the
concrete proposals made to the committee.
Scenarios that motivate WSRP functionality include:
•
Content hosts, such as portal servers, providing Portlets as presentation-oriented web services that can be used
by aggregation engines.
•
Aggregating frameworks, including portal servers, consuming presentation-oriented web services offered by
content providers and integrating them into the framework.
More information on WSRP can be found on the official website for WSRP [1]. We suggest reading the primer [2]
for a good, albeit technical, overview of WSRP.
14.2. Level of support in JBoss Portal
The WSRP Technical Committee defined WSRP Use Profiles [3] to help with WSRP interoperability. We will refer
to terms defined in that document in this section.
JBoss Portal provides a Simple level of support for our WSRP Producer except that out-of-band registration is not
currently handled. We support in-band registration and persistent local state (which are defined at the Complex
level).
On the Consumer side, JBoss Portal provides a Medium level of support for WSRP, except that we only handle
HTML markup (as Portal itself doesn't handle other markup types). We do support explicit portlet cloning and we
[1] http://www.oasis-open.org/committees/tc_home.php?wg_abbrev=wsrp
[2] http://www.oasis-open.org/committees/tc_home.php?wg_abbrev=wsrp
[3] http://www.oasis-open.org/committees/download.php/3073
JBoss Release 2.6.5
139
Web Services for Remote Portlets (WSRP)
fully support the PortletManagement interface.
As far as caching goes, we have Level 1 Producer and Consumer. We support Cookie handling properly on the
Consumer and our Producer requires initialization of cookies (as we have found that it improved interoperabilty
with some consumers). We don't support custom window states or modes, as Portal doesn't either. We do, however,
support CSS on both the Producer (though it's more a function of the portlets than inherent Producer capability) and
Consumer.
While we provide a complete implementation of WSRP 1.0, we do need to go through the Conformance
statements [4] and perform more interoperability testing (an area that needs to be better supported by the WSRP
Technical Committee and Community at large).
14.3. Deploying JBoss Portal's WSRP services
JBoss Portal provides a complete support of WSRP 1.0 standard interfaces and offers both consumer and producer
services. WSRP support is provided by the portal-wsrp.sar service archive, included in the main jbossportal.sar service archive, if you've obtained JBoss Portal from a binary distribution. If you don't intend on using
WSRP, we recommend that you remove portal-wspr.sar from the main jboss-portal.sar service archive.
If you've obtained the source distribution of JBoss Portal, you need to build and deploy the WSRP service separately. Please follow the instructions on how to install JBoss Portal from the sources [5]. Once this is done, navigate
to JBOSS_PORTAL_HOME_DIRECTORY/wsrp and type: build deploy At the end of the build process, portal-wsrp.sar
is copied to JBOSS_HOME/server/default/deploy.
14.3.1. Considerations to use WSRP when running Portal on a non-default
port or hostname
If you have modified the port number on which Portal runs or bound your Application Server to a specific host
name, you will also need update the port and/or hostname information for WSRP [6] as found on JBoss Portal's
wiki [7].
14.3.2. Considerations to use WSRP with SSL
It is possible to use WSRP over SSL for secure exchange of data. Please refer to the instructions [8] on how to do
so from JBoss Portal's wiki [9].
[4] http://www.oasis-open.org/committees/download.php/6018
[5] http://docs.jboss.com/jbportal/v2.6/reference-guide/en/html/installation.html#install_source
[6] http://wiki.jboss.org/wiki/Wiki.jsp?page=WSRPChangePorts
[7] http://wiki.jboss.org/wiki/Wiki.jsp?page=JBossPortal
[8] http://wiki.jboss.org/wiki/Wiki.jsp?page=WSRPUseSSL
[9] http://wiki.jboss.org/wiki/Wiki.jsp?page=JBossPortal
JBoss Release 2.6.5
140
Web Services for Remote Portlets (WSRP)
14.4. Making a portlet remotable
JBoss Portal does NOT, by default, expose local portlets for consumption by remote WSRP consumers. In order to
make a portlet remotely available, it must be made "remotable" by adding a remotable element to the jbossportlet.xml deployment descriptor for that portlet. If a jboss-portlet.xml file does not exist, one must be added
to the WEB-INF folder of the web application containing the portlet.
In the following example, the "BasicPortlet" portlet is specified as being remotable. The remotable element is optional.
Example 14.1.
<?xml version="1.0" standalone="yes"?>
<!DOCTYPE portlet-app PUBLIC "-//JBoss Portal//DTD JBoss Portlet 2.6//EN"
"http://www.jboss.org/portal/dtd/jboss-portlet_2_6.dtd">
<portlet-app>
<portlet>
<portlet-name>BasicPortlet</portlet-name>
<remotable>true</remotable>
</portlet>
</portlet-app>
It is also possible to specify that all the portlets declared within a given jboss-portlet.xml file have a specific "remotable" status by default. This is done by adding a single remotable element to the root portlet-app element.
Usually, this feature will be used to remotely expose several portlets without having to specify the status for all the
declared portlets. Let's look at an example:
Example 14.2.
<?xml version="1.0" standalone="yes"?>
<!DOCTYPE portlet-app PUBLIC
"-//JBoss Portal//DTD JBoss Portlet 2.6//EN"
"http://www.jboss.org/portal/dtd/jboss-portlet_2_6.dtd">
<portlet-app>
<remotable>true</remotable>
<portlet>
<portlet-name>RemotelyExposedPortlet</portlet-name>
...
</portlet>
<portlet>
<portlet-name>NotRemotelyExposedPortlet</portlet-name>
<remotable>false</remotable>
...
</portlet>
</portlet-app>
In the example above, we defined two portlets with a default "remotable" status set to true. This means that all portlets defined in this descriptor are, by default, exposed remotely by JBoss Portal's WSRP producer. Note, however,
that it is possible to override the default behavior by adding a remotable element to a portlet description. In that
JBoss Release 2.6.5
141
Web Services for Remote Portlets (WSRP)
case, the "remotable" status defined by the portlet takes precedence over the default. In the example above, the RemotelyExposedPortlet inherits the "remotable" status defined by default since it does not specify a remotable element in its description. The NotRemotelyExposedPortlet, however, overrides the default behavior and is not remotely exposed. Note that in the absence of a top-level remotable element, portlets are NOT remotely exposed.
14.5. Consuming JBoss Portal's WSRP portlets from a remote
Consumer
WSRP Consumers vary a lot as far as how they are configured. Most of them require that you either specify the
URL for the Producer's WSDL definition or the URLs for the individual endpoints. Please refer to your Consumer's
documentation for specific instructions. For instructions on how to do so in JBoss Portal, please refer to Section 14.6.
JBoss Portal's Producer is automatically set up when you deploy a portal instance with the WSRP service. You can
access the WSDL file at http://{hostname}:{port}/portal-wsrp/MarkupService?wsdl. You can access the endpoint URLs at:
•
http://{hostname}:{port}/portal-wsrp/ServiceDescriptionService
•
http://{hostname}:{port}/portal-wsrp/MarkupService
•
http://{hostname}:{port}/portal-wsrp/RegistrationService
• http://{hostname}:{port}/portal-wsrp/PortletManagementService
The default hostname is localhost and the default port is 8080.
14.6. Consuming remote WSRP portlets in JBoss Portal
14.6.1. Overview
To be able to consume WSRP portlets exposed by a remote producer, JBoss Portal's WSRP consumer needs to
know how to access that remote producer. One can configure access to a remote producer using WSRP Producer
descriptors. Alternatively, a portlet is provided to configure remote producers.
Once a remote producer has been configured, it can be made available in the list of portlet providers in the Management portlet on the Admin page of JBoss Portal. You can then examine the list of portlets that are exposed by this
producer and configure the portlets just like you would for local portlets.
JBoss Portal's default configuration exposes some of the sample portlets for remote consumption. As a way to test
the WSRP service, a default consumer has been configured to consume these portlets. To make sure that the service
indeed works, check that there is a portlet provider with the self identifier in the portlet providers list in the Management portlet of the Admin page. All local portlets marked as remotable are exposed as remote portlets via the
self portlet provider so that you can check that they work as expected with WSRP. The portal-wsrp.sar file contains a WSRP Producer descriptor (default-wsrp.xml) that configures this default producer. This file can be edited or removed if needed.
JBoss Release 2.6.5
142
Web Services for Remote Portlets (WSRP)
14.6.2. Configuring a remote producer walk-through
Let's work through the steps of defining access to a remote producer so that its portlets can be consumed within
JBoss Portal. We will configure access to BEA's public WSRP producer. We will first examine how to do so using
the configuration portlet. We will then show how the same result can be accomplish with a producer descriptor.
14.6.2.1. Using the configuration portlet
As of Portal 2.6, a configuration portlet is provided to configure access to remote WSRP Producers grahically. You
can access it at http://{hostname}:{port}/portal/auth/portal/admin/WSRP or by logging in as a Portal administrator and clicking on the WSRP tab in the Admin portal. If all went well, you should see something similar to
this:
This screen presents all the configured producers associated with their status and possible actions on them. A Consumer can be active or inactive. Activating a Consumer means that it is ready to act as a portlet provider. Deactivating it will remove it from the list of available portlet providers. Note also that a Consumer can be marked as requiring refresh meaning that the information held about it might not be up to date and refreshing it from the remote
Producer might be a good idea. This can happen for several reasons: the service description for that remote Producer has not been fetched yet, the cached version has expired or modifications have been made to the configuration
that could potentially invalidate it, thus requiring re-validation of the information.
Next, we create a new Consumer which we will callbea. Type "bea" in the "Create a consumer named:" field then
click on "Create consumer":
You should now see a form allowing you to enter/modify the information about the Consumer. Set the cache expiration value to 300 seconds and enter the WSDL URL for the producer in the text field and press the "Refresh &
Save" button:
This will retrieve the service description associated with the Producer which WSRP is described by the WSDL file
JBoss Release 2.6.5
143
Web Services for Remote Portlets (WSRP)
found at the URL you just entered. In our case, querying the service description will allow us to learn that the Producer requires registration and that it expects a value for the registration property named registration/consumerRole:
Note
At this point, there is no automated way to learn about which possible values (if any) are expected by the
remote Producer. In the case of BEA's public producer, the possible values are indicated in the registration
property description. This is not always the case... Please refer to the specific Producer's documentation.
Enter "public" as the value for the registration property and press "Save & Refresh" once more. You should now
see something similar to:
The Consumer for the bea Producer should now be available as a portlet provider and is ready to be used.
A producer is configured, by default, by retrieving the producer's information via a WSDL URL. There are rare
cases, however, where URLs need to be provided for each of the producer's end points. You can do exactly that by
JBoss Release 2.6.5
144
Web Services for Remote Portlets (WSRP)
unchecking the "Use WSDL?" checkbox, as is the case for the self producer:
14.6.2.2. Using a WSRP Producer XML descriptor
We will create a public-bea-wsrp.xml descriptor. Note that the actual name does not matter as long as it ends
with -wsrp.xml:
Example 14.3.
<?xml version='1.0' encoding='UTF-8' ?>
<!DOCTYPE deployments PUBLIC "-//JBoss Portal//DTD WSRP Remote Producer Configuration 2.6//EN"
"http://www.jboss.org/portal/dtd/jboss-wsrp-consumer_2_6.dtd">
<deployments>
<deployment>
<wsrp-producer id="bea" expiration-cache="300">
<endpoint-wsdl-url>http://wsrp.bea.com:7001/producer/producer?WSDL</endpoint-wsdl-url>
<registration-data>
<property>
<name>registration/consumerRole</name>
<lang>en</lang>
<value>public</value>
</property>
</registration-data>
</wsrp-producer>
</deployment>
</deployments>
This producer descriptor gives access to BEA's public WSRP producer. We will look at the details of the different
elements later. Note for now the producer-id element with a "bea" value. Put this file in the deploy directory and
start the server (with JBoss Portal and its WSRP service deployed).
Note
A DTD and an XML Schema for WSRP Producer XML descriptors are available in jbossportal.sar/portal-wsrp.sar/dtd/jboss-wsrp-consumer_2_6.dtd
and
jboss-
JBoss Release 2.6.5
145
Web Services for Remote Portlets (WSRP)
portal.sar/portal-wsrp.sar/xsd/jboss-wsrp-consumer_2_6.xsd
14.6.2.3. Configuring access to a remote portlet
Let's now look at the Admin page and the Management portlet. Click on the "Portlet definitions" tab at the top.
Once this is done, look at the list of available portlet providers. If all went well, you should see something similar
to this:
We have 3 available portlet providers: local, self andbea. The local portlet provider exposes all the portlets deployed in this particular instance of Portal. As explained above, the self provider refers to the default WSRP consumer bundled with Portal that consumes the portlets exposed by the default WSRP producer. The bea provider
corresponds to BEA's public producer we just configured. Select it and click on "View portlets". You should now
see something similar to:
From there on out, you should be able to configure WSRP portlets just as any other. In particular, you can create an
instance of one of the remote portlets offered by BEA's public producer just like you would create an instance of a
local portlet and then assign it to a window in a page. If you go to that page, you should see something similar to
below for this portlet:
JBoss Release 2.6.5
146
Web Services for Remote Portlets (WSRP)
14.6.3. WSRP Producer descriptors
A WSRP Producer descriptor is an XML file which name ends in -wsrp.xml and which can be dropped in the deploy directory of the JBoss application server or nested in .sar files. It is possible to configure access to several different producers within a single descriptor or use one file per producer, depending on your needs. An XML Schema
for
the
WSRP
Producer
descriptor
format
can
be
found
at
jbossportal.sar/portal-wsrp.sar/xsd/jboss-wsrp-consumer_2_6.xsd, while a (legacy) DTD can be found at
jboss-portal.sar/portal-wsrp.sar/dtd/jboss-wsrp-consumer_2_6.dtd.
Note
It is important to note how WSRP Producer descriptors are processed. They are read the first time the WSRP service starts and the associated information is then put in the Portal database. Subsequent launch of the
WSRP service will use the database-stored information for all producers which identifier is already known
to Portal. More specifically, all the descriptors are scanned for producer identifiers. Any identifier that is
already known will be bypassed and the configuration associated with this remote producer in the database
will be used. If a producer identifier is found that wasn't already in the database, that producer information
will be processed and recorded in the database. Therefore, if you wish to delete a producer configuration,
you need to delete the associated information in the database (this can be accomplished using the configuration portlet as we saw in Section 14.6.2.1) AND remove the associated information in any WSRP Producer descriptor (if such information exists) as the producer will be re-created the next time the WSRP is
launched if that information is not removed.
14.6.3.1. Required configuration information
Let's now look at which information needs to be provided to configure access to a remote producer.
First, we need to provide an identifier for the producer we are configuring so that we can refer to it afterwards. This
is accomplished via the mandatory id attribute of the <wsrp-producer> element.
JBoss Portal also needs to learn about the remote producer's endpoints to be able to connect to the remote web services and perform WSRP invocations. Two options are currently supported to provide this information:
•
You can provide the URLs for each of the different WSRP interfaces offered by the remote producer via the
<endpoint-config> element and its <service-description-url>, <markup-url>, <registration-url> and
<portlet-management-url> children. These URLs are producer-specific so you will need to refer to your producer documentation or WSDL file to determine the appropriate values.
•
Alternatively, and this is the easiest way to configure your producer, you can provide a URL pointing to the
JBoss Release 2.6.5
147
Web Services for Remote Portlets (WSRP)
WSDL description of the producer's WSRP services. This is accomplished via the <endpoint-wsdl-url> element. JBoss Portal will then heuristically determine, from the information contained in the WSDL file, how to
connect appropriately to the remote WSRP services.
Note
It is important to note that, when using this method, JBoss Portal will try to match a port name to an interface based solely on the provided name. There are no standard names for these ports so it is possible
(though rare) that this matching process fails. In this case, you should look at the WSDL file and provide
the endpoint URLs manually, as per the previous method.
Both the id attribute and either <endpoint-config> or <endpoint-wsdl-url> elements are required for a functional remote producer configuration.
14.6.3.2. Optional configuration
It is also possible to provide addtional configuration, which, in some cases, might be important to establish a proper
connection to the remote producer.
One such optional configuration concerns caching. To prevent useless roundtrips between the local consumer and
the remote producer, it is possible to cache some of the information sent by the producer (such as the list of offered
portlets) for a given duration. The rate at which the information is refreshed is defined by the expiration-cache
attribute of the <wsrp-producer> element which specifies the refreshing period in seconds. For example, providing
a value of 120 for expiration-cache means that the producer information will not be refreshed for 2 minutes after it
has been somehow accessed. If no value is provided, JBoss Portal will always access the remote producer regardless of whether the remote information has changed or not. Since, in most instances, the information provided by
the producer does not change often, we recommend that you use this caching facility to minimize bandwidth usage.
Additionally, some producers require consumers to register with them before authorizing them to access their
offered portlets. If you know that information beforehand, you can provide the required registration information in
the producer configuration so that the Portal consumer can register with the remote producer when required.
Note
At this time, though, only simple String properties are supported and it is not possible to configure complex
registration data. This should however be sufficient for most cases.
Registration configuration is done via the <registration-data> element. Since JBoss Portal can generate the
mandatory information for you, if the remote producer does not require any registration properties, you only need
to provide an empty <registration-data> element. Values for the registration properties required by the remote
producer can be provided via <property> elements. See the example below for more details. Additionally, you can
override the default consumer name automatically provided by JBoss Portal via the <consumer-name> element. If
you choose to provide a consumer name, please remember that this should uniquely identify your consumer.
14.6.4. Examples
Here is the configuration of the self producer as found in default-wsrp.xml with a cache expiring every five
minutes:
Example 14.4.
JBoss Release 2.6.5
148
Web Services for Remote Portlets (WSRP)
<?xml version="1.0" encoding="UTF-8"?>
<!DOCTYPE deployments PUBLIC "-//JBoss Portal//DTD WSRP Remote Producer Configuration 2.6//EN"
"http://www.jboss.org/portal/dtd/jboss-wsrp-consumer_2_6.dtd">
<deployments>
<deployment>
<wsrp-producer id="self" expiration-cache="300">
<!-we need to use the individual endpoint configuration because the configuration via
wsdl forces an immediate attempt to access the web service description which is not
available yet at this point of deployment
-->
<endpoint-config>
<service-description-url>
http://localhost:8080/portal-wsrp/ServiceDescriptionService
</service-description-url>
<markup-url>http://localhost:8080/portal-wsrp/MarkupService</markup-url>
<registration-url>
http://localhost:8080/portal-wsrp/RegistrationService
</registration-url>
<portlet-management-url>
http://localhost:8080/portal-wsrp/PortletManagementService
</portlet-management-url>
</endpoint-config>
<registration-data/>
</wsrp-producer>
</deployment>
</deployments>
Here is an example of a WSRP descriptor with a 2 minute caching time and manual definition of the endpoint
URLs:
Example 14.5.
<?xml version="1.0" encoding="UTF-8"?>
<!DOCTYPE deployments PUBLIC "-//JBoss Portal//DTD WSRP Remote Producer Configuration 2.6//EN"
"http://www.jboss.org/portal/dtd/jboss-wsrp-consumer_2_6.dtd">
<deployments>
<deployment>
<wsrp-producer id="MyProducer" expiration-cache="120">
<endpoint-config>
<service-description-url>
http://www.someproducer.com/portal-wsrp/ServiceDescriptionService
</service-description-url>
<markup-url>
http://www.someproducer.com/portal-wsrp/MarkupService
</markup-url>
<registration-url>
http://www.someproducer.com/portal-wsrp/RegistrationService
</registration-url>
<portlet-management-url>
http://www.someproducer.com/portal-wsrp/PortletManagementService
</portlet-management-url>
</endpoint-config>
</wsrp-producer>
</deployment>
</deployments>
JBoss Release 2.6.5
149
Web Services for Remote Portlets (WSRP)
Here is an example of a WSRP descriptor with endpoint definition via remote WSDL file, registration data and
cache expiring every minute:
Example 14.6.
<?xml version="1.0" encoding="UTF-8"?>
<!DOCTYPE deployments PUBLIC "-//JBoss Portal//DTD WSRP Remote Producer Configuration 2.6//EN"
"http://www.jboss.org/portal/dtd/jboss-wsrp-consumer_2_6.dtd">
<deployments>
<deployment>
<wsrp-producer id="AnotherProducer" expiration-cache="60">
<endpoint-wsdl-url>http://example.com/producer/producer?WSDL</endpoint-wsdl-url>
<registration-data>
<property>
<name>property name</name>
<lang>en</lang>
<value>property value</value>
</property>
</registration-data>
</wsrp-producer>
</deployment>
</deployments>
14.7. Consumers maintenance
14.7.1. Modifying a currently held registration
14.7.1.1. Registration modification for service upgrade
Producers often offer several levels of service depending on consumers' subscription levels (for example). This is
implemented at the WSRP level with the registration concept: producers assert which level of service to provide to
consumers based on the values of given registration properties.
It is therefore sometimes necessary to modify the registration that concretizes the service agreement between a consumer and a producer. An example of easily available producer offering different level of services is BEA's public
producer. We configured access to that producer in Section 14.6.2.1. If you recall, the producer was requiring registration and required a value to be provided for the registration/consumerRole property. The description of that
property indicated that three values were possible: public, partner or insider each corresponding to a different
service level. We registered using the public service level. This gave us access to three portlets as shown here:
JBoss Release 2.6.5
150
Web Services for Remote Portlets (WSRP)
Suppose now that we would like to upgrade our service level to the "insider" level. We will need to tell BEA's producer that our registration data has been modified. Let's see how to do this. Assuming you have configured access
to the producer as previously described, please go to the configuration screen for the bea producer and modify the
value of the registration/consumerRole to insider instead of public:
Now click on "Update properties" to save the change. A "Modify registration" button should now appear to let you
send this new data to the remote producer:
Click on this new button and, if everything went well and your updated registration has been accepted by the remote producer, you should see something similar to:
You can now check the list of available portlets from the bea provider and verify that new portlets are now available:
JBoss Release 2.6.5
151
Web Services for Remote Portlets (WSRP)
14.7.1.2. Registration modification on producer error
It can also happen that a producer administrator decided to require more information from registered consumers. In
this case, invoking operations on the producer will fail with an OperationFailedFault. JBoss Portal will attempt
to help you in this situation. Let's walk through an example using the self producer. Let's assume that registration
is required without any registration properties (as is the case by default). If you go to the configuration screen for
this producer, you should see:
Now suppose that the administrator of the producer now requires a value to be provided for an email registration
property. We will actually see how to do perform this operation in JBoss Portal when we examine how to configure
Portal's producer in Section 14.8. Operations with this producer will now fail. If you suspect that a registration
modification is required, you should go to the configuration screen for this remote producer and refresh the information held by the consumer by pressing "Refresh & Save":
JBoss Release 2.6.5
152
Web Services for Remote Portlets (WSRP)
As you can see, the configuration screen now shows the currently held registration information and the expected information from the producer. Enter a value for the email property and then click on "Modify registration". If all
went well and the producer accepted your new registration data, you should see something similar to:
JBoss Release 2.6.5
153
Web Services for Remote Portlets (WSRP)
Note
As of WSRP 1, it is rather difficult to ascertain for sure what caused an OperationFailedFault as it is the
generic exception returned by producers if something didn't quite happen as expected during a method invocation. This means that OperationFailedFault can be caused by several different reasons, one of them
being a request to modify the registration data. Please take a look at the log files to see if you can gather
more information as to what happened. WSRP 2 introduces an exception that is specific to a request to
modify registrations thus reducing the ambiguity that currently exists.
14.7.2. Consumer operations
Several operations are available from the consumer list view of the WSRP configuration portlet:
The available operations are:
•
Configure: displays the consumer details and allows user to edit them
•
Refresh: forces the consumer to retrieve the service description from the remote producer to refresh the local information (offered portlets, registration information, etc.)
•
Activate/Deactivate: activates/deactivates a consumer, governing whether it will be available to provide portlets
and receive portlet invocations
•
Register/Deregister: registers/deregisters a consumer based on whether registration is required and/or acquired
•
Delete: destroys the consumer, after deregisterting it if it was registered
14.7.3. Erasing local registration data
There are rare cases where it might be required to erase the local information without being able to deregister first.
This is the case when a consumer is registered with a producer that has been modified by its administrator to not require registration anymore. If that ever was to happen (most likely, it won't), you can erase the local registration information from the consumer so that it can resume interacting with the remote producer. To do so, click on "Erase
local registration" button next to the registration context information on the consumer configuration screen:
JBoss Release 2.6.5
154
Web Services for Remote Portlets (WSRP)
Note
This operation is dangerous as it can result in inability to interact with the remote producer if invoked when
not required. A warning screen will be displayed to give you a chance to change your mind!
14.8. Configuring JBoss Portal's WSRP Producer
14.8.1. Overview
You can configure the behavior of Portal's WSRP Producer by using the WSRP administration interface, which is
the preferred way, or by editing the conf/config.xml file found in portal-wsrp.sar. Several aspects can be modified with respects to whether registration is required for consumers to access the Producer's services. An XML
Schema
for
the
configuration
format
is
available
at
jbossportal.sar/portal-wsrp.sar/xsd/jboss-wsrp-producer_2_6.xsd, while a (legacy) DTD is available at jbossportal.sar/portal-wsrp.sar/dtd/jboss-wsrp-producer_2_6.dtd
14.8.2. Default configuration
The default producer configuration is to require that consumers register with it before providing access its services
but does not require any specific registration properties (apart from what is mandated by the WSRP standard). It
does, however, require consumers to be registered before sending them a full service description. This means that
our WSRP producer will not provide the list of offered portlets and other capabilities to unregistered consumers.
The producer also uses the default RegistrationPolicy paired with the default RegistrationPropertyValidator.
We will look into property validators in greater detail later in Section 14.8.3. Suffice to say for now that this allows
users to customize how Portal's WSRP Producer decides whether a given registration property is valid or not.
JBoss Portal 2.6.3 introduces a web interface to configure the producer's behavior. You can access it by clicking on
JBoss Release 2.6.5
155
Web Services for Remote Portlets (WSRP)
the "Producer Configuration" tab of the "WSRP" page of the "admin" portal. Here's what you should see with the
default configuration:
As would be expected, you can specify whether or not the producer will send the full service description to unregistered consumers, and, if it requires registration, which RegistrationPolicy to use (and, if needed, which RegistrationPropertyValidator), along with required registration property description for which consumers must
provide acceptable values to successfully register.
14.8.3. Registration configuration
In order to require consumers to register with Portal's producer before interacting with it, you need to configure
Portal's behavior with respect to registration. Registration is optional, as are registration properties. The producer
can require registration without requiring consumers to pass any registration properties as is the case in the default
configuration. Let's configure our producer starting with a blank state:
We will allow unregistered consumers to see the list of offered portlets so we leave the first checkbox ("Access to
full service description requires consumers to be registered.") unchecked. We will, however, specify that consumers will need to be registered to be able to interact with our producer. Check the second checkbox ("Requires
registration. Modifying this information will trigger invalidation of consumer registrations."). The screen should
now refresh and display:
JBoss Release 2.6.5
156
Web Services for Remote Portlets (WSRP)
You can specify the fully-qualified name for your RegistrationPolicy and RegistrationPropertyValidator
there. We will keep the default value. See Section 14.8.3.1 for more details. Let's add, however, a registration property called email. Click "Add property" and enter the appropriate information in the fields, providing a description
for the registration property that can be used by consumers to figure out its purpose:
Press "Save" to record your modifications.
Note
At this time, only String (xsd:string) properties are supported. If your application requires more complex
properties, please let us know.
Note
If consumers are already registered with the producer, modifying the configuration of required registration
information will trigger the invalidation of held registrations, requiring consumers to modify their registration before being able to access the producer again. We saw the consumer side of that process in Section 14.7.1.2.
14.8.3.1. Customization of Registration handling behavior
Registration handling behavior can be customized by users to suit their Producer needs. This is accomplished by
providing an implementation of the RegistrationPolicy interface. This interface defines methods that are called
by Portal's Registration service so that decisions can be made appropriately. A default registration policy that
provides basic behavior is provided and should be enough for most user needs.
While the default registration policy provides default behavior for most registration-related aspects, there is still
one aspect that requires configuration: whether a given value for a registration property is acceptable by the WSRP
Producer. This is accomplished by plugging a RegistrationPropertyValidator in the default registration policy.
This allows users to define their own validation mechanism.
Please
refer
to
JBoss Release 2.6.5
the
Javadoc
for
org.jboss.portal.registration.RegistrationPolicy
and
157
Web Services for Remote Portlets (WSRP)
org.jboss.portal.Registration.policies.RegistrationPropertyValidator
for more details on what is ex-
pected of each method.
Defining a registration policy is required for the producer to be correctly configured. This is accomplished by specifying the qualified class name of the registration policy. Since we anticipate that most users will use the default
registration policy, it is possible to provide the class name of your custom property validator instead to customize
the default registration policy behavior. Note that property validators are only used by the default policy.
Note
Since the policy or the validator are defined via their class name and dynamically loaded, it is important
that you make sure that the identified class is available to the application server. One way to accomplish
that is to deploy your policy implementation as JAR file in your AS instance deploy directory. Note also
that, since both policies and validators are dynamically instantiated, they must provide a default, noargument constructor.
JBoss Release 2.6.5
158
15
Security
Roy Russo <[email protected]>
Julien Viet <[email protected]>
15.1. Securing Portal Objects
This section describes how to secure portal objects (portal instances, pages, and portlet instances), using the JBoss
Portal *-object.xml descriptor OR portlet-instances.xml descriptor. View the User Guide for information on how to
secure objects using the Management Portlet.
Securing portal objects declaratively, is done through the *-object.xml ( Section 6.2.1 ), for Portal Instances and
Pages, or the portlet-instances.xml ( Section 6.2.2 ) for Portlet Instances. The portion you will be adding to each
object is denoted by the <security-constraint> tag:
<?xml version="1.0" encoding="UTF-8"?>
<!DOCTYPE deployments PUBLIC
"-//JBoss Portal//DTD Portal Object 2.6//EN"
"http://www.jboss.org/portal/dtd/portal-object_2_6.dtd">
<deployments>
<deployment>
<parent-ref>default</parent-ref>
<if-exists>overwrite</if-exists>
<properties/>
<page>
<page-name>MyPage</page-name>
<window>
<window-name>HelloWorldPortletPageWindow</window-name>
<instance-ref>HelloWorldPortletPageInstance</instance-ref>
<region>center</region>
<height>0</height>
</window>
<security-constraint>
<policy-permission>
<action-name>viewrecursive</action-name>
<unchecked/>
</policy-permission>
</security-constraint>
</page>
</deployment>
</deployments>
The basic principle of the security mechanism is that everything is restricted unless you grant privileges. You grant
privilege on a portal node by adding a security constraint as explained here:
<security-constraint>
JBoss Release 2.6.5
159
Security
<policy-permission>
<unchecked/>
<action-name>viewrecursive</action-name>
</policy-permission>
</security-constraint>
The example above will grant the view privilege to anyone (unchecked role) to the current object and any child object recursively.
The security contraint portion is worth taking a look at, in an isolated fashion. It allows you to secure a specific
window/page/portal-instance based on a user's role.
Role definition: You must define a role that this security constraint will apply to. Possible values are:
•
<unchecked/> Anyone can view this page.
• <role-name>SOMEROLE</role-name> Access to this page is limited to the defined role.
Access Rights: You must define the access rights given to the role defined. Possible values are:
•
view Users can view the page.
•
viewrecursive Users can view the page and child pages.
•
personalize Users are able to personalize the page's theme.
•
personalizerecursive Users are able to personalize the page AND its children's pages themes.
Restricting access
Out of the box the default portal as a viewrecursive right for all the users, it means that whenever a page is
added, this page will be seen by any user. To restrict access to this page, the default portal security constraint must be changed from viewrecursive to view, and viewrecursive security constraints must be added
to its children so that they can be viewed except the one you want to restrict access to.
We provide three live samples of this descriptor, here Section 6.2.2 , Section 6.4.1 ,and Section 6.4.2
15.2. Securing the Content Management System
The JBoss Portal CMS system consists of a directory structure of Files organized unto their respective Folders.
Both Files and Folders are considered to be CMS resources that can be secured based on portal Roles and/or Users.
The following features are supported by the fine grained security system of Portal CMS:
•
You can associate "Read", "Write", and "Manage" Permissions at the CMS node level. (Both Files and Folders
are treated as CMS nodes)
•
The Permissions are propagated recursively down a folder hierarchy
•
Any Permissions specified explicitly on the CMS Node overrides the policy inherited via recursive propagation
•
You can manage the Permissions using the CMS Admin GUI tool via the newly added "Secure Node" feature
JBoss Release 2.6.5
160
Security
Table 15.1. Portal CMS Permission Matrix:
Permissions
Allowed Actions
Implies
Read
Read Contents of Folder, File and
its versions
N/A
Write
Create and Update new Folder and
File
Read Access
Manage
Delete/Copy/Move/Rename
Folders and Files
Read and Write Access
15.2.1. CMS Security Configuration
The
configuration
for
the
CMS
Security
service
is
specified
in
the
jbossportal.sar/portal-cms.sar/META-INF/jboss-service.xml file. The portion of the configuration relevant for securing the CMS service is listed as follows:
<!-- CMS Authorization Security Service -->
<mbean
code="org.jboss.portal.cms.security.AuthorizationManagerImpl"
name="portal:service=AuthorizationManager,type=cms"
xmbean-dd=""
xmbean-code="org.jboss.portal.jems.as.system.JBossServiceModelMBean">
<xmbean/>
<attribute name="JNDIName">java:portal/cms/AuthorizationManager</attribute>
<depends optional-attribute-name="Provider" proxy-type="attribute">
portal:service=AuthorizationProvider,type=cms
</depends>
</mbean>
<mbean
code="org.jboss.portal.cms.security.AuthorizationProviderImpl"
name="portal:service=AuthorizationProvider,type=cms"
xmbean-dd=""
xmbean-code="org.jboss.portal.jems.as.system.JBossServiceModelMBean">
<xmbean/>
<!-NOTE: cmsRootUserName denotes a single Portal user that has access
carefully and should be synonymous to the 'root' user in a Unix sys
'admin' user account. This can be changed to any other user account
-->
<attribute name="CmsRootUserName">admin</attribute>
<depends optional-attribute-name="IdentityServiceController" proxy-type="at
</mbean>
<!-- ACL Security Interceptor -->
<mbean
code="org.jboss.portal.cms.impl.interceptors.ACLInterceptor"
name="portal:service=Interceptor,type=Cms,name=ACL"
xmbean-dd=""
xmbean-code="org.jboss.portal.jems.as.system.JBossServiceModelMBean">
<xmbean/>
<attribute name="JNDIName">java:/portal/cms/ACLInterceptor</attribute>
<attribute name="CmsSessionFactory">java:/portal/cms/CMSSessionFactory</att
<attribute name="IdentitySessionFactory">java:/portal/IdentitySessionFactor
JBoss Release 2.6.5
161
Security
<attribute name="DefaultPolicy">
<policy>
<!-- permissions on the root cms node -->
<criteria name="path" value="/">
<permission name="cms" action="read">
<role name="Anonymous"/>
</permission>
<permission name="cms" action="write">
<role name="User"/>
</permission>
<permission name="cms" action="manage">
<role name="Admin"/>
</permission>
</criteria>
<!-- permissions on the default cms node -->
<criteria name="path" value="/default">
<permission name="cms" action="read">
<role name="Anonymous"/>
</permission>
<permission name="cms" action="write">
<role name="User"/>
</permission>
<permission name="cms" action="manage">
<role name="Admin"/>
</permission>
</criteria>
<!-- permissions on the private/protected node -->
<criteria name="path" value="/default/private">
<permission name="cms" action="manage">
<role name="Admin"/>
</permission>
</criteria>
</policy>
</attribute>
<depends optional-attribute-name="AuthorizationManager" proxy-type="attribu
portal:service=AuthorizationManager,type=cms
</depends>
<depends>portal:service=Hibernate,type=CMS</depends>
<depends>portal:service=Module,type=IdentityServiceController</depends>
</mbean>
15.2.1.1. CMS Super User
A CMS Super User is a designated Portal User Account that has access to all resources/functions in the CMS. It is
a concept similar to the super user concept in a Linux/Unix security system. This account should be carefully used
and properly protected. By default, JBoss Portal designates the built-in 'admin' user account as a CMS Super User.
This
can
be
changed
by
modifying
the
cmsRootUserName
value
in
the
jbossportal.sar/portal-cms.sar/META-INF/jboss-service.xml configuration.
<mbean
code="org.jboss.portal.cms.security.AuthorizationProviderImpl"
name="portal:service=AuthorizationProvider,type=cms"
xmbean-dd=""
xmbean-code="org.jboss.portal.jems.as.system.JBossServiceModelMBean">
<xmbean/>
<!-NOTE: cmsRootUserName denotes a single Portal user that has access
carefully and should be synonymous to the 'root' user in a Unix sys
'admin' user account. This can be changed to any other user account
-->
JBoss Release 2.6.5
162
Security
<attribute name="CmsRootUserName">admin</attribute>
<depends optional-attribute-name="IdentityServiceController" proxy-type="at
</mbean>
15.2.1.2. CMS Security Console
The CMS Security Console is used to assign proper permissions to all the nodes/content in the CMS. Besides protection on CMS content, this console itself needs to be secured against unauthorized acceess. Currently, the console
can be accessed only by Portal users that are members of the specified Role. By default, JBoss Portal uses the builtin Admin role to allow access to this security console. This can be customized by modifying the value of defaultAdminRole option specified in jboss-portal.sar/conf/identity/standardidentity-config.xml
15.3. Authentication with JBoss Portal
JBoss Portal relies on Java EE for the authentication of users. The Java EE authentication has its advantages and
drawbacks. The main motivation for using Java EE security is the integration with the application server and the
operational environment in which the portal is deployed. The servlet layer provides already the authentication functionality and obviously it is not a responsibility of the portal. Whenever a user is authenticated by the servlet layer
its security identity is propagated throughout the call stack in the different layers of the Java EE stack. The weaknesses are the lack of an explicit logout mechanism and the lack of dynamicity in the mapping of URL as security
resources. However JBoss Portal improves that behavior when it is possible to do so.
15.3.1. Authentication configuration
JBoss Portal can be seen before all as a web application and therefore inherits all the configuration mechanisms related to web applications. The main entry point of the whole portal is the jboss-portal.sar/portal-server.war deployment which is the web application that defines and maps the portal servlet. Here you can configure various
things
•
In the WEB-INF/web.xml you can change the authentication mode. The default authentication mechanism uses
the form based authentication, however you can change it to any of the mechanism provided by the servlet specification.
•
In the WEB-INF/jboss-web.xml you can change the security domain used by the portal. The default security domain used by the portal is java:/jaas/portal. That setting is specific to the JBoss Application Server and how it
binds the Java EE security to the operational environment. A security domain is a scope defined at the Application Server Level and defines usually a JAAS authentication stack. The portal security domain authentication
stack is defined in the jboss-portal.sar/conf/login-config.xml and is dynamically deployed with the portal. The
JBoss Application Server documentation is certainly the best reference for that topic.
•
The files login.jsp and error.jsp represent the pages used the form based authentication process. More information can be found in any good servlet documentation.
15.3.2. The portal servlet
JBoss Release 2.6.5
163
Security
The portal defines a single servlet to take care of all portal requests. The class name of that servlet is
org.jboss.portal.server.servlet.PortalServlet. That servlet needs to be declared two times with different configurations otherwise the portal would not be able to know about some request details which are importants.
•
PortalServletWithPathMapping is used for path mapping mappings.
• PortalServletWithDefaultServletMapping is used for the default servlet mapping.
The portal servlet is mapped four times with different semantics, the differences between the semantics are related
to the transport layer. Each one of those for mappings will have the same request meaning for the portal beside the
transport aspect. By default those mappings are
•
/* : the default access, does not define any security constraint. This is the default access that everybody uses.
•
/sec/* : the secured access, requires https usage. It is triggered when a portlet is defined as secure or when a secure portlet link is created. It requires the configuration of the https connector in JBoss Web. The JBoss Application Server documentation provides more information about it.
•
/auth/* : the authenticated access, requires the user to be authenticated to be used.
• /authsec/* : combine the two previous options into a single one.
Usually ones should not care much about those mappings as the portal will by itself switch to the most appropriate
mapping.
15.4. Authorization with JBoss Portal
JBoss Portal defines a framework for authorization. The default implementation of that framework is based on the
Java Authorization Contract for Containers (JACC) which is implemented by J2EE 1.4 Application Servers. This
section of the documentation focuses on defining the framework and its usage and is not an attempt to define what
authorization is or is not because it is out of scope of this context. Instead we will try to straightforwardly describe
the framework and how it is used. No specific knowledge is expected about JACC although it is a recommended
read.
15.4.1. The portal permission
The org.jboss.portal.security.PortalPermission object is used to describe a permission for the portal. It extends the
java.security.Permission class and any permission checked in the portal should extend the PortalPermission as
well. That permission adds two fields to the Permission class
•
uri : is a string which represents an URI of the resource described by the permission.
•
collection : an object of class org.jboss.portal.security.PortalPermissionCollection which is used when the permission act as a container for other permissions. If that object exists then the uri field should be null as a portal
permission represents an uri or acts as a container in an exclusive manner.
15.4.2. The authorization provider
JBoss Release 2.6.5
164
Security
The org.jboss.portal.security.spi.provider.AuthorizationDomain is an interface which provides access to several
services.
public interface AuthorizationDomain
{
String getType();
DomainConfigurator getConfigurator();
PermissionRepository getPermissionRepository();
PermissionFactory getPermissionFactory();
}
•
org.jboss.portal.security.spi.provider.DomainConfigurator provides configuration access to an authorization
domain. The authorization schema is very simple as it consists of bindings between URI, roles and permissions.
•
org.jboss.portal.security.spi.provider.PermissionRepository provides runtime access to the authorization domain. Usually it is used to retrieve the permissions for a specific role and URI. It is used at runtime by the
framework to take security decisions.
•
org.jboss.portal.security.spi.provider.PermissionFactory is a factory to instantiate permissions for the specific
domain. It is used at runtime to create permissions objects of the appropriate type by the security framework.
15.4.3. Making a programmatic security check
Making a security check is an easy thing as it consists in creating a permission of the appropriate type and make a
check against the org.jboss.portal.spi.auth.PortalAuthorizationManager service. That service is used by the portal
to make security checks. It is connected to the different authorization providers in order to take decisions at runtime
based on the type of the permission. Access to that service is done through the
org.jboss.portal.spi.auth.PortalAuthorizationManagerFactory. The factory is a portal service which is usually injected in other services like that
<?xml version="1.0" encoding="UTF-8"?>
<server>
...
<mbean
code='MyService"
name="portal:service=MyService">
<depends
optional-attribute-name="PortalAuthorizationManagerFactory"
proxy-type="attribute">portal:service=PortalAuthorizationManagerFactory</depends>
...
</mbean>
...
</server>
It can be injected in the servlet context of a war file in the file WEB-INF/jboss-portlet.xml
<?xml version="1.0" encoding="UTF-8"?>
<!DOCTYPE portlet-app PUBLIC
"-//JBoss Portal//DTD JBoss Portlet 2.6//EN"
"http://www.jboss.org/portal/dtd/jboss-portlet_2_6.dtd">
<portlet-app>
...
<service>
<service-name>PortalAuthorizationManagerFactory</service-name>
JBoss Release 2.6.5
165
Security
<service-class>
org.jboss.portal.security.spi.auth.PortalAuthorizationManagerFactory
</service-class>
<service-ref>:service=PortalAuthorizationManagerFactory</service-ref>
</service>
...
</portlet-app>
Here is an example of how a security check is made for a specific page
PortalAuthorizationManager pam = factory.getManager();
PortalObjectId id = page.getId();
PortalObjectPermission perm = new PortalObjectPermission(id, PortalObjectPermission.VIEW_MASK);
if (pam.checkPermission(perm) == false)
{
System.out.println("Current user is not authorized to view page " + id);
}
15.4.4. Configuring an authorization domain
Configuring a domain can be done through the DomainConfigurator interface
public interface DomainConfigurator
{
Set getSecurityBindings(String uri);
void setSecurityBindings(String uri, Set securityBindings)
throws SecurityConfigurationException;
void removeSecurityBindings(String uri) throws SecurityConfigurationException;
}
The various methods of that interface allows to configure security bindings for a given resource where a resource is
naturally identified by an URI. The org.jboss.portal.security.RoleSecurityBinding object is an object which encapsulate a role name and a set of actions bound to this role.
RoleSecurityBinding binding1 = new RoleSecurityBinding(Collections.singleton("view"), "Admin");
RoleSecurityBinding binding2 = new RoleSecurityBinding(Collections.singleton("view"), "User");
Set bindings = new HashSet();
bindings.add(binding1);
bindings.add(binding2);
configurator.setSecurityBinding(pageURI, bindings);
JBoss Release 2.6.5
166
16
JBoss Portal Identity Management
Boleslaw Dawidowicz <boleslaw
dot dawidowicz at redhat dot com>
This chapter addresses identity management in JBoss Portal 2.6
16.1. Identity management API
Since JBoss Portal 2.6 there are 4 identity services and 2 identity related interfaces. The goal of having such a fine
grained API is to enable flexible implementations based on different identity storage like relational databases or
LDAP servers. The Membership service takes care of managing the relationship between user objects and role objects. The User Profile service is responsible for managing the profile of a user, it has database and LDAP implementations as well as a mode that combines data from both.
•
The org.jboss.portal.identity.User interface represents a user and exposes the following operations:
/** The user identifier. */
public Object getId();
/** The user name. */
public String getUserName();
/** Set the password using proper encoding. */
public void updatePassword(String password);
/** Return true if the password is valid. */
public boolean validatePassword(String password);
Warning
Important Note! The proper usage of getId() method is:
// Always use it like this:
user.getId().toString();
// Do not use it like this:
// We would get a Long object if we are using the database implementation
(Long)user.getId();
// We would get a String with an LDAP server
(String)user.getId();
This is because the ID value depends on the User implementation. It'll probably be String object with the
LDAP implementation and a Long object with the database implementation but it could be something else
JBoss Release 2.6.5
167
JBoss Portal Identity Management
if one has chosen to make its own implementation.
•
The org.jboss.portal.identity.Role interface represents a Role and exposes the following operations:
/** The role identifier. */
public Object getId();
/** The role name used in security rules. This name can not be modified */
public String getName();
/** The role display name used on screens. This name can be modified */
public String getDisplayName();
/** */
public void setDisplayName(String name);
•
The org.jboss.portal.identity.UserModule interface exposes operations for users management:
/**Retrieve a user by its name.*/
User findUserByUserName(String userName)
throws IdentityException, IllegalArgumentException, NoSuchUserException;
/**Retrieve a user by its id.*/
User findUserById(Object id)
throws IdentityException, IllegalArgumentException, NoSuchUserException;
/**Retrieve a user by its id.*/
User findUserById(String id)
throws IdentityException, IllegalArgumentException, NoSuchUserException;
/** Creates a new user with the specified name.*/
User createUser(String userName, String password)
throws IdentityException, IllegalArgumentException;
/** Remove a user.*/
void removeUser(Object id)
throws IdentityException, IllegalArgumentException;
/** Get a range of users.*/
Set findUsers(int offset, int limit)
throws IdentityException, IllegalArgumentException;
/** Get a range of users.*/
Set findUsersFilteredByUserName(String filter, int offset, int limit)
throws IdentityException, IllegalArgumentException;
/**Returns the number of users.*/
int getUserCount() throws IdentityException, IllegalArgumentException;
•
The org.jboss.portal.identity.RoleModule interface exposes operations for roles management:
/** Retrieves a role by its name*/
Role findRoleByName(String name)
throws IdentityException, IllegalArgumentException;
/**Retrieve a collection of role from the role names.*/
Set findRolesByNames(String[] names)
throws IdentityException, IllegalArgumentException;
/** Retrieves a role by its id.*/
JBoss Release 2.6.5
168
JBoss Portal Identity Management
Role findRoleById(Object id)
throws IdentityException, IllegalArgumentException;
/** Retrieves a role by its id.*/
Role findRoleById(String id)
throws IdentityException, IllegalArgumentException;
/** Create a new role with the specified name.*/
Role createRole(String name, String displayName)
throws IdentityException, IllegalArgumentException;
/** Remove a role.*/
void removeRole(Object id)
throws IdentityException, IllegalArgumentException;
/** Returns the number of roles. */
int getRolesCount()
throws IdentityException;
/** Get all the roles */
Set findRoles() throws IdentityException;
•
The MembershipModule interface exposes operations for obtaining or managing relationships beetween users
and roles. The role of this service is to decouple relationship information from user and roles. Indeed while user
role relationship is pretty straightforward with a relational database (using a many to many relationship with an
intermediary table), with an LDAP server there a different ways to define relationships between users and roles.
/** Return the set of role objects that a given user has.*/
Set getRoles(User user) throws IdentityException, IllegalArgumentException;
Set getUsers(Role role) throws IdentityException, IllegalArgumentException;
/** Creates a relationship beetween a role and set of users. Other roles that have
assotiontions with those users remain unaffected.*/
void assignUsers(Role role, Set users) throws IdentityException, IllegalArgumentException;
/** Creates a relationship beetween a user and set of roles. This operation will erase any
other assotientions beetween the user and roles not specified in the provided set.*/
void assignRoles(User user, Set roles) throws IdentityException, IllegalArgumentException;
/** Returns role members based on rolename - depreciated method ethod here only
for compatibility with old RoleModule interface */
Set findRoleMembers(String roleName, int offset, int limit, String userNameFilter)
throws IdentityException, IllegalArgumentException;
•
The UserProfileModule interface exposes operations to access and manage informations stored in User profile:
public Object getProperty(User user, String propertyName)
throws IdentityException, IllegalArgumentException;
public void setProperty(User user, String name, Object property)
throws IdentityException, IllegalArgumentException;
public Map getProperties(User user)
throws IdentityException, IllegalArgumentException;
public ProfileInfo getProfileInfo()
throws IdentityException;
JBoss Release 2.6.5
169
JBoss Portal Identity Management
Warning
UserProfileModule.getProperty() method returns an Object. In most cases with DB backend it will always
be String object. But normally you should check what object will be retrieved using getProfileInfo() method.
•
The ProfileInfo interface can be obtained using the UserProfileModule and exposes meta information of a
profile:
/** Returns a Map o PropertyInfo objects describing profile properties */
public Map getPropertiesInfo();
public PropertyInfo getPropertyInfo(String name);
•
PropertyInfo interface expose methods to obtain information about accessible property in User profile
public
public
public
public
public
public
static
static
static
static
static
static
final
final
final
final
final
final
String
String
String
String
String
String
ACCESS_MODE_READ_ONLY = "read-only";
ACCESS_MODE_READ_WRITE = "read-write";
USAGE_MANDATORY = "mandatory";
USAGE_OPTIONAL = "optional";
MAPPING_DB_TYPE_COLUMN = "column";
MAPPING_DB_TYPE_DYNAMIC = "dynamic";
public String getName();
public String getType();
public String getAccessMode();
public String getUsage();
public LocalizedString getDisplayName();
public LocalizedString getDescription();
public String getMappingDBType();
public String getMappingLDAPValue();
public String getMappingDBValue();
public boolean isMappedDB();
public boolean isMappedLDAP();
16.1.1. How to obtain identity modules services ?
The advocated way to get a reference to the identity modules is by using JNDI:
import
import
import
import
org.jboss.portal.identity.UserModule;
org.jboss.portal.identity.RoleModule;
org.jboss.portal.identity.MembershipModule;
org.jboss.portal.identity.UserProfileModule;
[...]
JBoss Release 2.6.5
170
JBoss Portal Identity Management
(UserModule)new InitialContext().lookup("java:portal/UserModule");
(RoleModule)new InitialContext().lookup("java:portal/RoleModule");
(MembershipModule)new InitialContext().lookup("java:portal/MembershipModule");
(UserProfileModule)new InitialContext().lookup("java:portal/UserProfileModule");
Another way to do this is, if you are fimiliar with JBoss Microkernel architecture is to get the IdentityServiceController mbean. You may want to inject it into your services like this:
<depends optional-attribute-name="IdentityServiceController" proxy-type="attribute">
portal:service=Module,type=IdentityServiceController
</depends>
or
simply
obtain
in
your
code
by
doing
a
lookup
using
the
portal:service=Module,type=IdentityServiceController name. Please refer to the JBoss Application Server documentation if you want to learn more about service MBeans. Once you obtained the object you can use it:
(UserModule)identityServiceController.getIdentityContext()
.getObject(IdentityContext.TYPE_USER_MODULE);
(RoleModule)identityServiceController.getIdentityContext()
.getObject(IdentityContext.TYPE_ROLE_MODULE);
(MembershipModule)identityServiceController.getIdentityContext()
.getObject(IdentityContext.TYPE_MEMBERSHIP_MODULE);
(UserProfileModule)identityServiceController.getIdentityContext()
.getObject(IdentityContext.TYPE_USER_PROFILE_MODULE);
16.1.2. API changes since 2.4
Because in JBoss Portal 2.4 there were only UserModule , RoleModule , User and Role interfaces some API usages changed. Here are the most important changes you will need to aply to your code while migrating your aplication to 2.6:
•
For the User interface:
// Instead of: user.getEnabled()
userProfileModule.getProperty(user, User.INFO_USER_ENABLED);
// Instead of: user.setEnabled(value)
userProfileModule.setProperty(user, User.INFO_USER_ENABLED, value);
// In a similar way you should change rest of methods that are missing in User interface
// in 2.6 by the call to the UserProfileModule
// Instead of: user.getProperties()
userProfileModule.getProperties(user);
// Instead of: user.getGivenName()
userProfileModule.getProperty(user, User.INFO_USER_NAME_GIVEN);
// Instead of: user.getFamilyName()
userProfileModule.getProperty(user, User.INFO_USER_NAME_FAMILY);
JBoss Release 2.6.5
171
JBoss Portal Identity Management
// Instead of: user.getRealEmail()
userProfileModule.getProperty(user, User.INFO_USER_EMAIL_REAL);
// Instead of: user.getFakeEmail()
userProfileModule.getProperty(user, User.INFO_USER_EMAIL_FAKE);
// Instead of: user.getRegistrationDate()
userProfileModule.getProperty(user, User.INFO_USER_REGISTRATION_DATE);
// Instead of: user.getViewRealEmail()
userProfileModule.getProperty(user, User.INFO_USER_VIEW_EMAIL_VIEW_REAL);
// Instead of: user.getPreferredLocale()
userProfileModule.getProperty(user, User.INFO_USER_LOCALE);
// Instead of: user.getSignature()
userProfileModule.getProperty(user, User.INFO_USER_SIGNATURE);
// Instead of: user.getLastVisitDate()
userProfileModule.getProperty(user, User.INFO_USER_LAST_LOGIN_DATE);
•
The RoleModule interface:
// Instead of
// RoleModule.findRoleMembers(String roleName, int offset, int limit, String userNameFilter)
//
throws IdentityException;
membershipModule.findRoleMembers(String roleName, int offset, int limit,
String userNameFilter)
// Instead of
// RoleModule.setRoles(User user, Set roles) throws IdentityException;
membershipModule.assignRoles(User user, Set roles)
// Instead of
// RoleModule.getRoles(User user) throws IdentityException;
membershipModule.getRoles(User user)
16.2. Identity configuration
In order to understand identity configuration you need to understand its architecture. Different identity services like
UserModule, RoleModule and etc are just plain java classes that are instantiated and exposed by the portal. So an
*example* of UserModule service could be a plain java bean object that would be:
•
Instantiated using reflection
•
Initialized/Started by invoking some methods
•
Registered/Exposed using JNDI and/or mbeans (JBoss Microkernel) services, so other services of the portal
can use it
• Managed in the matter of lifecycle - so it'll be stopped and unregistered during portal shutdown
As you see from this point of view, configuration just specifies what java class will be used and how it should be
used by portal as a service.
JBoss Release 2.6.5
172
JBoss Portal Identity Management
Note
We use JBoss Microcontainer internally to manage the sub system made of those components so if you are
interested in implementing custom services - look on the methods that are used by this framework.
In JBoss Portal we provide a very flexible configuration. It is very easy to rearrange and customize services,
provide alternative implementations, extend the existing ones or provide a custom identity model.
To grasp the full picture of the configuration of identity services let's start from its root component. Whole configuration and setup of identity components is done by the IdentityServiceController service. It brings to life and registers all other services such as UserModule, RoleModule, MembershipModule and UserProfileModule. IdentityServiceController is defined in jboss-portal.sar/META-INF/jboss-service.xml
<mbean
code="org.jboss.portal.identity.IdentityServiceControllerImpl"
name="portal:service=Module,type=IdentityServiceController"
xmbean-dd=""
xmbean-code="org.jboss.portal.jems.as.system.JBossServiceModelMBean">
<xmbean/>
<depends>portal:service=Hibernate</depends>
<attribute name="JndiName">java:/portal/IdentityServiceController</attribute>
<attribute name="RegisterMBeans">true</attribute>
<attribute name="ConfigFile">conf/identity/identity-config.xml</attribute>
<attribute name="DefaultConfigFile">conf/identity/standardidentity-config.xml</attribute>
</mbean>
We can specify a few options here:
•
RegisterMBeans - defines if IdentityServiceController should register components which are instantiated as
mbeans
•
ConfigFile - defines the location of the main identity services configuration file. It describes and configures all
the components like UserModule, RoleModule... that need to be instantiated
•
DefaultConfigFile - defines the location of the configuration file containing the default values. For each component defined in ConfigFile, the IdentityServiceController will obtain a set of default options from this file.
That helps to keep the main main configuration file simple, short and easy to read. Potentially it provides more
powerful customizations.
16.2.1. Main configuration file architecture (identity-config.xml)
The file describing portal identity services contains three sections:
<identity-configuration>
<datasources>
<!-- Datasources section -->
<datasource> ... </datasource>
<datasource> ... </datasource>
...
</datasources>
<modules>
<!-- Modules section -->
<module> ... </module>
<module> ... </module>
JBoss Release 2.6.5
173
JBoss Portal Identity Management
...
</modules>
<options>
<!-- Options section -->
<option-group> ... </option-group>
<option-group> ... </option-group>
...
</options>
</identity-configuration>
By default you can find it in jboss-portal.sar/conf/identity/identity-config.xml
16.2.1.1. Datasources
This section defines datasource components. They will be processed and instantiated before components in Module
section, so they will be ready to serve them.
Note
This section isn't used with Database configuration as in JBoss Portal services exposing Hibernate are
defined separately. It is used by LDAP configuration and we will use it as an example
<datasource>
<name>LDAP</name>
<service-name>portal:service=Module,type=LDAPConnectionContext</service-name>
<class>org.jboss.portal.identity.ldap.LDAPConnectionContext</class>
<config>
<option>
<name>host</name>
<value>jboss.com</value>
</option>
<option>
<name>port</name>
<value>10389</value>
</option>
<option>
<name>adminDN</name>
<value>cn=Directory Manager</value>
</option>
<option>
<name>adminPassword</name>
<value>xxxxx</value>
</option>
<!-- Other options here.... -->
</config>
</datasource>
Note
If you look into JBoss Portal configuration files you will find that <service-name/> and <class/> are specified in DefaultConfigFile and not in ConfigFile. So here is how it works: those two will be picked up
from default configuration. The same rule is effective for the options - additional options will be picked up
from default configuration. What is linking configuration in those two files is the <name> tag.
16.2.1.2. Modules
JBoss Release 2.6.5
174
JBoss Portal Identity Management
Modules are core service components like UserModule, RoleModule and etc.
<module>
<!--type used to correctly map in IdentityContext registry-->
<type>User</type>
<implementation>DB</implementation>
<!--name of service and class for creating mbean-->
<service-name>portal:service=Module,type=User</service-name>
<class>org.jboss.portal.identity.db.HibernateUserModuleImpl</class>
<!--set of options that are in the instantiated object-->
<config>
<option>
<name>sessionFactoryJNDIName</name>
<value>java:/portal/IdentitySessionFactory</value>
</option>
<option>
<name>jNDIName</name>
<value>java:/portal/UserModule</value>
</option>
</config>
</module>
•
implementation - defines the scope under which the configuration for different implementations of modules
types resides. It enables to define the default options of the configuration of the different implementations of
same module types in one configuration file.
•
type - must be unique name across all modules defined in the main configuration file. This is important as module will be stored with such name within IdentityContext registry at runtime. Standard names are used (User,
Role, Membership, UserProfile). Together with implementation will create unique pair within file with default
configuration values.
•
service-name - will be used for the name when registered as an MBean.
•
class - java class that will be use to instantiate the module.
•
config - contains options related to this module
Note
Here you can easily see the whole idea about having two config files - main one and the one with default
values. The above code snippet with User module comes from standardidentity-config.xml, so the file
that defines default configuration values. Because of this in the main configuration file the definition of
User module will be as short as:
<module>
<!--type used to correctly map in IdentityContext registry-->
<type>User</type>
<implementation>DB</implementation>
<config/>
</module>
As you can see we specify only the type and the implementation - all the other values (service-name, class
and set of options) are read from default configuration. But remember that you can still overwrite any of
those values in the main config simply by overriding them.
JBoss Release 2.6.5
175
JBoss Portal Identity Management
16.2.1.3. Options
This section provides common options that are accessible by identity modules. We set options here that may need
to be shared. They are grouped, and can have many values:
<options>
<!--Common options section-->
<option-group>
<group-name>common</group-name>
<option>
<name>userCtxDN</name>
<value>ou=People,dc=example,dc=com</value>
</option>
<option>
<name>uidAttributeID</name>
<value>uid</value>
</option>
<option>
<name>passwordAttributeID</name>
<value>userPassword</value>
</option>
<option>
<name>roleCtxDN</name>
<value>ou=Roles,dc=example,dc=com</value>
</option>
<option>
<name>ridAttributeId</name>
<value>cn</value>
</option>
<option>
<name>roleDisplayNameAttributeID</name>
<value>cn</value>
</option>
<option>
<name>membershipAttributeID</name>
<value>member</value>
</option>
<option>
<name>membershipAttributeIsDN</name>
<value>true</value>
</option>
</option-group>
<option-group>
<group-name>userCreateAttibutes</group-name>
<option>
<name>objectClass</name>
<value>top</value>
<value>uidObject</value>
<value>person</value>
<value>inetUser</value>
</option>
<!--Schema requires those to have initial value-->
<option>
<name>cn</name>
<value>none</value>
</option>
<option>
<name>sn</name>
<value>none</value>
</option>
</option-group>
JBoss Release 2.6.5
176
JBoss Portal Identity Management
Note
In this section we use the same inheritance mechanism. When an option is not set, its value will be read
from the default config file. But this also means that you may need to overwrite some values that are specific to your LDAP architecture. All the options will be described along with module implementations that
use them.
16.3. User profile configuration
UserProfileModule has additional configuration file that defines user properties. It is specified in configuration in:
<module>
<type>UserProfile</type>
<implementation>DELEGATING</implementation>
(...)
<config>
(...)
<option>
<name>profileConfigFile</name>
<value>conf/identity/profile-config.xml</value>
</option>
</config>
</module>
This means that you can configure user profile in jboss-portal.sar/conf/identity/profile-config.xml
<profile>
<property>
<name>user.name.nickName</name>
<type>java.lang.String</type>
<access-mode>read-only</access-mode>
<usage>mandatory</usage>
<display-name xml:lang="en">Name</display-name>
<description xml:lang="en">The user name</description>
<mapping>
<database>
<type>column</type>
<value>jbp_uname</value>
</database>
</mapping>
</property>
<property>
<name>user.business-info.online.email</name>
<type>java.lang.String</type>
<access-mode>read-write</access-mode>
<usage>mandatory</usage>
<display-name xml:lang="en">Email</display-name>
<description xml:lang="en">The user real email</description>
JBoss Release 2.6.5
177
JBoss Portal Identity Management
<mapping>
<database>
<type>column</type>
<value>jbp_realemail</value>
</database>
<ldap>
<value>mail</value>
</ldap>
</mapping>
</property>
<property>
<name>portal.user.location</name>
<type>java.lang.String</type>
<access-mode>read-write</access-mode>
<usage>optional</usage>
<display-name xml:lang="en">Location</display-name>
<description xml:lang="en">The user location</description>
<mapping>
<database>
<type>dynamic</type>
<value>portal.user.location</value>
</database>
</mapping>
</property>
(...)
</properties>
Configuration file contains properties definition that can be retrieved using the PropertyInfo interface. Each property used in portal has to be defined here.
Note
Some information provided here can have a large impact on the behavior of the UserProfileModule. For instance access-mode can be made read-only and the value provided in type will be checked during setProperty()/getProperty() operations. On the other hand tags like usage, description or display-name have mostly
informational meaning at the moment and are used by the management tools at runtime.
•
name - property name. This value will be used to refer to the property in UserProfileModule
•
type - java type of property. This type will be checked when in UserProfileModule methods invocation.
•
access-mode - possible values are read-write and read-only
•
usage - property usage can be mandatory or optional.
•
display-name - property display name.
•
description - description of property.
•
mapping - defines how property is mapped in the underlaying storage mechanism. It can be mapped in database either as a column or dynamic value. It can also be mapped as ldap attribute.
Note
In current implementation column and dynamic mappings have the same effect, as database mappings are
JBoss Release 2.6.5
178
JBoss Portal Identity Management
defined in hibernate configuration.
Note
Property can have both ldap and database mappings. In such situation when LDAP support is enabled ldap
mapping will take precedense. Also even when using LDAP some properties will be mapped to LDAP and
some to database. Its because LDAP schema doesn't support all attributes proper to for portal properties.
To solve this we have DelegatingUserProfileModuleImpl that will delegate method invocation to ldap or
database related UserProfile module. When LDAP support is enabled and property need to be stored in
database user will be synchronized into database when needed. This behavior can be configured.
16.4. Identity modules implementations
Note
Identity modules implementations related to LDAP are described in LDAP chapter
16.4.1. Database modules
JBoss portal comes with a set of database related identity modules implementations done using Hibernate - those
are configured by default. Those are not very configurable in identity-config.xml file. The reason is that to keep
backwards compatibility of database schema with previous portal version, we reused most of hibernate implementation. If you want to tweak the hibernate mappings you should look into files in jboss-portal.sar/conf/hibernate.
Also those modules rely on hibernate SessionFactory components that are created in SessionFactoryBinder mbeans
defined in jboss-portal.sar/META-INF/jboss-service.xml
Classes implementing identity modules:
•
org.jboss.portal.identity.db.HibernateUserModuleImpl - implementaing UserModule interface
•
org.jboss.portal.identity.db.HibernateRoleModuleImpl - implementaing RoleModule interface
•
org.jboss.portal.identity.db.HibernateMembershipModuleImpl - implementaing MembershipModule interface
•
org.jboss.portal.identity.db.HibernateUserProfileModuleImpl - implementaing UserProfileModule interface
For each of those modules you can alter two config options:
•
sessionFactoryJNDIName - JNDI name under which hibernate SessionFactory object is registered
•
jNDIName - JNDI name under which this module should be registered
16.4.2. Delegating UserProfile module
Delegating UserProfileModule implementation has very specific role. When we use a storage mechanism like
LDAP we may not be able to map all user properties into LDAP attributes because of schema limitations. To solve
JBoss Release 2.6.5
179
JBoss Portal Identity Management
this problem we still can use the database to store user properties that do not exist in the LDAP schema. The Delegating user profile module will recognize if a property is mapped as ldap or database and delegate setProperty()/getProperty() method invocation to proper module implementation. This is implemented in
org.jboss.portal.identity.DelegatingUserProfileModuleImpl. If property is mapped either as ldap and database
the ldap mapping will have higher priority.
<module>
<!--type used to correctly map in IdentityContext registry-->
<type>UserProfile</type>
<implementation>DELEGATING</implementation>
<!--name of service and class for creating mbean-->
<service-name>portal:service=Module,type=UserProfile</service-name>
<class>org.jboss.portal.identity.DelegatingUserProfileModuleImpl</class>
<!--set of options that are set in instantiated object-->
<config>
<option>
<name>jNDIName</name>
<value>java:/portal/UserProfileModule</value>
</option>
<option>
<name>dbModuleJNDIName</name>
<value>java:/portal/DBUserProfileModule</value>
</option>
<option>
<name>profileConfigFile</name>
<value>conf/identity/profile-config.xml</value>
</option>
</config>
</module>
Module options are:
•
dbModuleJNDIName - JNDI name under which database implementation of UserProfileModule is registered.
•
ldapModuleJNDIName - JNDI name under which ldap implementation of UserProfileModule is registered.
•
profileConfigFile - configuration file for user properties.
16.4.3. Database UserProfile module implementation
Because of the behavior described in the previous section, database UserProfileModule requires some special features. If a user is present in LDAP server but a writable property isn't mapped as an LDAP attribute, such property
requires to be stored in the database. In order to achieve such result the user need to be synchronized from LDAP
into the database first.
Class org.jboss.portal.identity.db.HibernateUserProfileModuleImpl has additional synchronization features. Here
are the options:
•
synchronizeNonExistingUsers - when set to "true" if the user subject to the operation does not exist, then it
will created it in database. By default it is "true".
JBoss Release 2.6.5
180
JBoss Portal Identity Management
•
acceptOtherImplementations - if set to "true" module will accept user objects other than
org.jboss.portal.identity.db.HibernateUserImpl. This is needed to enable cooperation with UserModule implementations other than org.jboss.portal.identity.db.HibernateUserModuleImpl. The default value is set "true".
•
defaultSynchronizePassword - if this option is set, the value will be used as a password for synchronized user.
•
randomSynchronizePassword - if this option is set to "true" synchronized user will have random generated
password. This is mostly used for the security reasons. Default value is "false".
•
sessionFactoryJNDIName - JNDI name under which this user will be registered.
•
profileConfigFile - file with user profile configuration. If this option is not set, and we use delegating UserProfileModule, profile configuration will be obtained from it.
JBoss Release 2.6.5
181
17
JBoss Portal Identity Portlets
Emanuel Muckenhuber <[email protected]>
17.1. Introduction
Since JBoss Portal 2.6.2 two new Identity Portlets are shipped by default:
•
The User Portlet
• The Identity Management Portlet
As the names indicate - the User Portlet is responsible for actions related to the end user. Whereas the Identity
Management Portlet contains all the functionality for managing users and roles.
Warning
The Identity portlets will evolve over time, therefore usage and configuration might change.
17.1.1. Features
The identity portlets provide the following features:
•
Email verification: The users can receive an email with a link on which they must click to confirm the creation
of the new account. (Disabled by default,see Section 17.2.4)
•
Captcha support: The users are prompted to copy letters from a deformed image. (Disabled by default, see Section 17.2.1)
•
Lost password: The users can receive a new password by email, any user with access to the admin portlet can
also reset another user's password and send the new one by email in one click. (Disabled by default, see Section 17.2.2)
•
jBPM based user registration: Several business processes are available out of the box (this includes administration approval), this can be extended to custom ones. See Section 17.2.4.
•
User and role management: Ability for the administrator to add and edit users as well as adding,
17.2. Configuration
This section covers the configuration of the Identity Portlets.
JBoss Release 2.6.5
182
JBoss Portal Identity Portlets
17.2.1. Captcha support
CAPTCHA is an acronym for Completely Automated Public Turing test to tell Computers and Humans
Apart. This is providing a mechanism to prevent automated programs from using different services. The User Portlet uses JCaptcha to provide a challenge-response.
Note
By default the captcha service needs a XServer to generate the images. For using the captcha service
without a XServer make sure you run the jvm with the following option:
-Djava.awt.headless=true
The registration page with captcha.
The captcha support can be enabled by changing the portlet preference 'captcha' to 'true'. If enabled, captcha will be
JBoss Release 2.6.5
183
JBoss Portal Identity Portlets
used for the registration and lost password action.
...
<portlet>
...
<display-name>User portlet</display-name>
...
<portlet-preferences>
<preference>
<name>captcha</name>
<value>true</value>
</preference>
</portlet-preferences>
</portlet>
...
17.2.2. Lost password
The lost password feature enables the end user to reset his password by entering his username.
Note
This feature requires a properly configured MailModule. See Section 3.4.
The lost password page with captcha enabled.
JBoss Release 2.6.5
184
JBoss Portal Identity Portlets
The lost password feature can be enabled by changing the portlet preference 'lostPassword' to 'true'. If captcha is
enabled it will be also used for verifying the lost password action.
...
<portlet>
...
<display-name>User portlet</display-name>
...
<portlet-preferences>
<preference>
<name>lostPassword</name>
<value>true</value>
</preference>
</portlet-preferences>
</portlet>
...
17.2.3. Reset password
The reset password feature is similar to the lost password feature, but it is used in the User Management Portlet to
reset the password of a user. That means changing the password of a user is slightly simplified, because a random
password will be generated and sent to the users e-mail address.
...
<portlet>
...
<display-name>User management portlet</display-name>
...
<portlet-preferences>
<preference>
<name>resetPassword</name>
<value>true</value>
</preference>
</portlet-preferences>
</portlet>
...
17.2.4. jBPM based user registration
JBoss Portal supports three different subscription modes by default:
•
Automatic subscription (no jBPM required), the users can register and directly login.
•
E-Mail validation, the users need to click on a link sent by email before being able to login.
•
E-Mail validation and admin approval, the users need to validate their email, then an admin needs to approve
the newly created account.
Note
The subscription mode has to be defined in the configuration file as explained here: Section 17.2.5.
Warning
Make sure that the application server is restarted after re-deploying the Identity Portlets. This is required to
JBoss Release 2.6.5
185
JBoss Portal Identity Portlets
make sure that the registration and approval process works properly!
Approve or reject pending registrations (jbp_identity_validation_approval_workflow).
17.2.5. The configuration file
The Identity Portlets use some metadata which can be easily changed in the main configuration file, which is located at jboss-portal.sar/portal-identity.sar/conf/identity-ui-configuration.xml as shown here:
<identity-ui-configuration>
<subscription-mode>automatic</subscription-mode>
<admin-subscription-mode>automatic</admin-subscription-mode>
<overwrite-workflow>false</overwrite-workflow>
<email-domain>jboss.org</email-domain>
<email-from>[email protected]</email-from>
<password-generation-characters>a...Z</password-generation-characters>
<default-roles>
<role>User</role>
</default-roles>
<!-- user interface components -->
<ui-components>
<ui-component name="givenname">
<property-ref>user.name.given</property-ref>
</ui-component>
<ui-component name="familyname">
<property-ref>user.name.family</property-ref>
</ui-component>
...
</identity-ui-configuration>
•
subscription-mode: defines the User Portlet registration process
•
automatic: no validation nor approval (default)
•
jbp_identity_validation_workflow: e-mail validation, no approval
•
jbp_identity_validation_approval_workflow: e-mail validation and approval
•
custom: Take a look at Customizing the workflow
JBoss Release 2.6.5
186
JBoss Portal Identity Portlets
•
admin-subscription-mode: jBPM process used in the User Management Portlet for creating users
•
automatic: no validation nor approval (default)
•
jbp_identity_validation_workflow: e-mail validation, no approval
•
jbp_identity_validation_approval_workflow: e-mail validation and approval
•
custom: Take a look at Customizing the workflow
•
overwrite-workflow: if set to 'true' the workflow will be overwritten during the next startup (default: false)
•
email-domain: e-mail domain used in the validation e-mail by the template (can be anything)
•
email-from: e-mail fro field used by the validation e-mail
•
password-generation-characters: characters to use to generate a random password
•
default-roles: one or more default roles
•
available element: role
•
ui-components: Defines the available user interface components. Take a look at the next section for further details.
Due to the differentiation between subscription-mode and admin-subscription-mode it is possible to require e-mail
validation and approval for new registrations and e-mail validation only when a user is created in the user management portlet.
17.2.6. Customize e-mail templates
The email templates can be found in the folder: portal-identity.sar/conf/templates/
New languages can be added by creating a new file like: emailTemplate_fr.tpl
17.3. User interface customization
The following three examples describe common use cases for customizing the User Portlet.
•
Example 1: Describes how to tag a input field as required and add it to the registration page.
•
Example 2: Shows how to create a simple dropdown menu.
•
Example 3: Describes how to add new properties.
Note
This is not a JavaServer Faces tutorial. Basic knowledge of this technology is a precondition for customizing the User Portlet Interface.
JBoss Release 2.6.5
187
JBoss Portal Identity Portlets
17.3.1. Example 1: required fields
This example explains how to change optional properties to required properties, of course once this is done, we will
also need to add the corresponding fields in the registration page.
Here are the modifications in portal-identity.sar/conf/identity-ui-configuration.xml, we simply changed the required
element to true on our two fields corresponding to the given and family names.
<identity-ui-configuration>
...
<!-- user interface components -->
...
<ui-component name="givenname">
<property-ref>user.name.given</property-ref>
<required>true</required>
</ui-component>
<ui-component name="familyname">
<property-ref>user.name.family</property-ref>
<required>true</required>
</ui-component>
...
</identity-ui-configuration>
Now that we changed those values to "required" we need to give a chance to the user to enter those values, here are
the changes done in portal-identity.sar/portal-identity.war/WEB-INF/jsf/common/register.xhtml
...
<h:outputText value="#{bundle.IDENTITY_GIVENNAME}"/>
<h:inputText id="givenname" value="#{manager.uiUser.attribute.givenname}"
required="#{metadataservice.givenname.required}"/>
<h:panelGroup />
<h:message for="givenname" />
<h:outputText value="#{bundle.IDENTITY_FAMILYNAME}"/>
<h:inputText id="lastname" value="#{manager.uiUser.attribute.familyname}"
required="#{metadataservice.familyname.required}"/>
<h:panelGroup />
<h:message for="lastname"/>
...
That's it - from now on the given name and family name will be required on registration. We dynamically obtain
the values from the descriptor. Now if i just wanted to make them back to optional, i would change the values only
in the descriptor, letting the user enter or not those values.
17.3.2. Example 2: dynamic values (dropdown menu with predefined values)
If the data to enter is a choice instead of a free-text value, you can also define those in the descriptor like shown
here:
<identity-ui-configuration>
...
<!-- user interface components -->
...
<ui-component name="interests">
<property-ref>portal.user.interests</property-ref>
<values>
<value key="board">snowboarding</value>
<value key="ski">skiing</value>
JBoss Release 2.6.5
188
JBoss Portal Identity Portlets
<value key="sledge">sledging</value>
</values>
</ui-component>
...
</identity-ui-configuration>
In portal-identity.sar/portal-identity.war/WEB-INF/jsf/common/profile.xhtml - change inputText to a selectOneMenu:
...
<h:outputText value="#{bundle.IDENTITY_INTERESTS}"/>
<h:selectOneMenu id="interests" value="#{manager.uiUser.attribute.interests}"
required="#{metadataservice.interests.required}">
<f:selectItems value="#{metadataservice.interests.values}" />
</h.selectOneMenu>
<h:panelGroup />
<h:message for="interests"/>
...
For localizing dynamic values it is also possible to use the resource bundle. This can be done by adding the key
with a prefix (to i.e. Identity.properties) like in the following listing. The key will be stored in the users property
and is used to identify the element. The value of the configuration file will only be used if no localization information is found.
...
IDENTITY_DYNAMIC_VALUE_BOARD=localized snowboarding
IDENTITY_DYNAMIC_VALUE_SKI=localized skiing
IDENTITY_DYNAMIC_VALUE_SLEDGE=localized sledging
...
Note
If the value is not required a blank element will be added at the top.
17.3.3. Example 3: adding new properties
Note
Please make sure you read at least the section about user profile configuration: Section 16.3, to add a new
value on the interface it also has to be defined in your model, as shown on Step 1.
step 1: add a new property to profile-config.xml e.g. a dynamic property called gender:
...
<property>
<name>user.gender</name>
<type>java.lang.String</type>
<access-mode>read-write</access-mode>
<usage>optional</usage>
<display-name xml:lang="en">Gender</display-name>
<description xml:lang="en">The gender</description>
<mapping>
<database>
<type>dynamic</type>
<value>user.gender</value>
JBoss Release 2.6.5
189
JBoss Portal Identity Portlets
</database>
</mapping>
</property>
...
Note
It is recommended to use the 'User Information Attribute Names' from the Portlet Specification [1] for defining properties.
step 2: add the property to the identity-ui-configuration: (portal-identity.sar/conf/identity-ui-configuration.xml)
...
<ui-component name="gender">
<property-ref>user.gender</property-ref>
<required>true</required>
<values>
<value key="male">Male</value>
<value key="female">Female</value>
</values>
</ui-component>
...
Note
The property-ref must match a property from the profile-config.xml.
step
3:
add
your
custom
ui-component
tity.sar/portal-identity.war/WEB-INF/jsf/profile.xhtml)
to
the
profile
page:
(portal-iden-
...
<h:outputText value="#{bundle.IDENTITY_GENDER}"/>
<h:selectOneMenu id="gender" value="#{manager.uiUser.attribute.gender}"
required="#{metadataservice.gender.required}">
<f:selectItems value="#{metadataservice.gender.values}" />
</h.selectOneMenu>
<h:panelGroup />
<h:message for="gender"/>
...
Note
Don't forget to add the localization elements.
17.3.4. Illustration
[1] http://jcp.org/en/jsr/detail?id=168
JBoss Release 2.6.5
190
JBoss Portal Identity Portlets
Illustration of the relationship between the configuration files.
The JSF-View in more detail:
•
manager.uiUser.attribute: manages and stores the dynamic properties
•
examples: manager.uiUser.attribute.gender, manager.uiUser.attribute.interests
<h:inputText id="gender" value="#{manager.uiUser.attribute.gender}" />
•
metadataservice
•
required - references the required attribute from the ui-component
example: metadataservice.gender.required
<h:inputText id="gender" value="#{manager.uiUser.attribute.gender}" required="#{metadataservice.gender.re
•
values - references the values list from the ui-component
example: metadataservice.gender.values
<h:selectOneMenu id="interests" value="#{manager.uiUser.attribute.interests}">
<f:selectItems value="#{metadataservice.interests.values}" />
</h:selectOneMenu>
JBoss Release 2.6.5
191
JBoss Portal Identity Portlets
•
validator - references the name of a registered JSF validator
example:metadataservice.gender.validator - the first validator of the validator list
example: metadataservice.gender.validators[0] - the validator list with an index
<f:validator validatorId="#{metadataservice.gender.validator}"/>
•
converter - references the name of a registered JSF converter
example: metadataservice.gender.converter
<f:converter converterId="#{metadataservice.gender.converter}"/>
•
readOnly - references the access-mode of profile-config.xml
possible usage i.e. in /WEB-INF/jsf/common/profile.xhtml
<h:inputText value="#{manager.uiUser.attribute.nickname}" disabled="#{metadataservice.nickname.readOnly}"
Warning
The values of the profile-config.xml have a higher priority than the values in the user portlet configuration.
That means if the 'usage' is 'mandatory' in profile-config.xml and 'required' is 'false' it will be overwritten
by the value from the profile config!
17.3.5. Customizing the View Profile page
By default not all values of the user profile will be displayed on the View profile page. For customization it is possible
to
add
further
properties
to
the
page
by
editing
the
file:
portal-identity.sar/portal-identity.war/WEB-INF/jsf/profile/viewProfile.xhtml
17.4. Customizing the workflow
Note
For more details about jBPM please read the jBPM documentation [2]
The process definitions are located in: portal-identity.sar/conf/processes. To create a custom workflow, you can extend the existing process description file: custom.xml.
Available variables in the business process:
•
name: portalURL
type: java.lang.String
description: represents the full url of the portal e.g. http://localhost:8080/portal
•
name: locale
type: java.util.Locale
[2] http://docs.jboss.com/jbpm/v3/userguide/index.html
JBoss Release 2.6.5
192
JBoss Portal Identity Portlets
description: the requested locale at registration
•
name: email
type: java.lang.String
description: the e-mail address of the user in case of registration.
In case of changing the e-mail the new e-mail address.
•
name: user
type: org.jboss.portal.core.identity.services.workflow.UserContainer
description: Seralizable Object containing user information through the jBPM process
•
name: validationHash
type: java.lang.String
description: hash used for the validation part. Only available after executing SendValidationEmailAction
Note
Make sure that the filename and the process name match! e.g. conf/processes/custom.xml and processdefinition name="custom".
When using a custom workflow it is possible to customize the status message after registering in the locale bundle:
( e.g. portal-identity.sar/conf/bundles/Identity.properties)
...
IDENTITY_VERIFICATION_STATUS_REGISTER_CUSTOM=Customized message here
...
17.4.1. Duration of process validity
By default requests (e.g. e-mail validation and registrations) expire after some time in the validation state. Therefore it is not required to add additional maintenance mechanism to invalidate a request. The default expiration time
is 2 days, but is quite easy to change the timing by editing the duedate attribute in the process definition. changes
in: portal-identity.sar/conf/processes/*.xml
<process-definition>
...
<state name="validate_email">
<timer name="time_to_expire" duedate="2 days" transition="timedOut" />
</state>
...
</process-definition>
For further information take a look at the jBPM documentation [3] on Duration.
17.5. Disabling the Identity Portlets
Due to the fact that the former user portlets are still included in JBoss Portal 2.6.2 it is possible to activate it in the
Portal Admin interface, by using the PortletInstances:
[3] http://docs.jboss.com/jbpm/v3/userguide/index.html
JBoss Release 2.6.5
193
JBoss Portal Identity Portlets
•
UserPortletInstance: The former user portlet
•
RolePortletInstance: The former role managment portlet
17.5.1. Enabling the Identity Portlets
When migrating from former versions of JBoss Portal the Identity User Portlets won't be displayed by default, but
Windows can be created on basis of the existing Portlet Instances which are deployed by default. (The instances
names being IdentityUserPortletInstance and IdentityAdminPortletInstance.)
JBoss Release 2.6.5
194
18
Authentication and Authorization
Boleslaw Dawidowicz <boleslaw
dot dawidowicz at redhat dot com>
This chapter describes the authentication mechanisms in JBoss Portal
18.1. Authentication in JBoss Portal
JBoss Portal is heavily standard based so it leverages Java Authentication and Authorization Service (JAAS) in
JBoss Application Server. Because of this it can be configured in a very flexible manner and other authentication
solutions can be plugged in easily. To better understand authentication mechanisms in JBoss Portal please refer to
Security chapter. To learn more about JAAS look for proper documentation on Java security [1] website. To learn
more about security in JBoss Application Server please read JBossSX [2] documentation.
18.1.1. Configuration
You can configure the JAAS authentication stack in jboss-portal.sar/conf/login-config.xml. It is important to remember that authorization in portal starts at the JAAS level - configured LoginModules apply proper Principal objects
representing
the
roles
of
authenticated
user.
As
you
can
see
in
jbossportal.sar/portal-server.war/WEB-INF/web.xml portal servlet is secured with specified role ("Authenticated"). In
the default portal configuration this role is dynamically added by IdentityLoginModule. If you reconfigure the default JAAS authentication chain with other LoginModule implementations, you should remember that you must
deal with that security constraints in order to be able to access portal. For example if you place only one LoginModule that will authenticate users against LDAP server you may consider adding all users in your LDAP tree to such
role.
18.2. JAAS Login Modules
JBoss Portal comes with a few implementations of JAAS LoginModule interface
18.2.1. org.jboss.portal.identity.auth.IdentityLoginModule
This is the standard portal LoginModule implementation that uses portal identity modules in order to search users
and roles. By default it is the only configured LoginModule in the portal authentication stack. Its behavior can be
altered with the following options:
[1] http://java.sun.com/javase/6/docs/technotes/guides/security/
[2] http://wiki.jboss.org/wiki/Wiki.jsp?page=JBossSX
JBoss Release 2.6.5
195
Authentication and Authorization
•
userModuleJNDIName - JNDI name of portal UserModule.
•
roleModuleJNDIName - JNDI name of portal RoleModule.
•
membershipModuleJNDIName - JNDI name of portal MembershipModule.
•
additionalRole - additional user Principal that will be added to user Subject. This is important as in default
portal configuration it is the role that portal servlet is secured with.
•
havingRole - only users belonging to role specified with this option will be authenticated.
•
unauthenticatedIdentity - the principal to use when a null username and password are seen.
Note
IdentityLoginModule extends org.jboss.security.auth.spi.UsernamePasswordLoginModule so if you are familiar with JBossSX you can apply few other options like "password-stacking". Please refer to JBossSX
documentation.
18.2.2. org.jboss.portal.identity.auth.DBIdentityLoginModule
This LoginModule implementation extends JBossSX org.jboss.security.auth.spi.DatabaseServerLoginModule and
can be used to authenticate against Database. The main purpose of this module is to be configured directly against
portal database (instead of using portal identity modules like in IdentityLoginModule). So if you are using custom
LoginModule implementation you can place this module with "sufficient" flag. This can be extremely useful. For
example if you authenticate against LDAP server using JBossSX LdapLoginModule you can fallback to users
present in portal database and not present in LDAP like "admin" user. Please look into this [3] wiki page to learn
more about DatabaseServerLoginModule configuration
Options are:
•
dsJndiName - The name of the DataSource of the database containing the Principals and Roles tables
•
principalsQuery - The prepared statement query, equivalent to: "select Password from Principals where PrincipalID=?"
•
rolesQuery - The prepared statement query, equivalent to: "select Role, RoleGroup from Roles where PrincipalID=?"
•
hashAlgorithm - The name of the java.security.MessageDigest algorithm to use to hash the password. There is
no default so this option must be specified to enable hashing. When hashAlgorithm is specified, the clear text
password obtained from the CallbackHandler is hashed before it is passed to UsernamePasswordLoginModule.validatePassword as the inputPassword argument. The expectedPassword as stored in the users.properties
file must be comparably hashed.
•
hashEncoding - The string format for the hashed pass and st be either "base64" or "hex". Base64 is the default.
•
additionalRole - additional user Principal that will be added to user Subject.
Configuration using portal database will look like this:
[3] http://wiki.jboss.org/wiki/Wiki.jsp?page=DatabaseServerLoginModule
JBoss Release 2.6.5
196
Authentication and Authorization
<login-module code = "org.jboss.portal.identity.auth.DBIdentityLoginModule"
flag="sufficient">
<module-option name="dsJndiName">java:/PortalDS</module-option>
<module-option name="principalsQuery">
SELECT jbp_password FROM jbp_users WHERE jbp_uname=?
</module-option/>
<module-option name="rolesQuery">
SELECT jbp_roles.jbp_name, 'Roles' FROM jbp_role_membership INNER JOIN
jbp_roles ON jbp_role_membership.jbp_rid = jbp_roles.jbp_rid INNER JOIN jbp_users ON
jbp_role_membership.jbp_uid = jbp_users.jbp_uid WHERE jbp_users.jbp_uname=?
</module-option>
<module-option name="hashAlgorithm">MD5</module-option>
<module-option name="hashEncoding">HEX</module-option>
<module-option name="additionalRole">Authenticated</module-option>
</login-module>
Note
SQL query should be in single line. This code snipped was formatted like this only to fit documentation
page.
18.2.3. org.jboss.portal.identity.auth.SynchronizingLdapLoginModule
This module can be used instead of the IdentityLoginModule to bind to LDAP.
org.jboss.portal.identity.auth.SynchronizingLDAPLoginModule class is a wrapper around LdapLoginModule [4]
from JBossSX. It extends it so all configuration that can be applied to LdapExtLoginModule remains valid here.
For a user that was authenticated successfully it will try to call the identity modules from portal, then check if such
user exists or not, and if does not exist it will try to create it. Then for all roles assigned to this authenticated principal it will try to check and create them using identity modules. This behavior can be altered using following options:
•
userModuleJNDIName - JNDI name of portal UserModule. This option is obligatory if synchronizeIdentity
option is set to true
•
roleModuleJNDIName - JNDI name of portal RoleModule. This option is obligatory if synchronizeIdentity
and synchronizeRoles options are set to true
•
membershipModuleJNDIName - JNDI name of portal MembershipModule. This option is obligatory if synchronizeIdentity and synchronizeRoles options are set to true
•
userProfileModuleJNDIName - JNDI name of portal UserProfileModule. This option is obligatory if synchronizeIdentity option is set to true
•
synchronizeIdentity - if set to true module will check if successfully authenticated user exist in portal and if
not it will try to create it. If user exists module will update its password to the one that was just validated.
•
synchronizeRoles - if set to true module will iterate over all roles assigned to authenticated user and for each it
will try to check if such role exists in portal and if not it will try to create it. This option is checked only if synchronizeIdentity is set to true;
[4] http://wiki.jboss.org/wiki/Wiki.jsp?page=LdapLoginModule
JBoss Release 2.6.5
197
Authentication and Authorization
•
additionalRole - module will add this role name to the group of principals assigned to the authenticated user.
•
defaultAssignedRole - if synchronizeIdentity is set to true, module will try to assign portal role with such name
to the authenticated user. If such role doesn't exist in portal, module will try to create it.
For obvious reasons this is designed to use with portal identity modules configured with DB and not LDAP
18.2.4. org.jboss.portal.identity.auth.SynchronizingLdapExtLoginModule
All options that apply for SynchronizingLdapLoginModule also apply here. It's the same kind of wrapper made
around LdapExtLoginModule [5] from JBossSX. Sample configuration can look like this:
<login-module code="org.jboss.portal.identity.auth.SynchronizingLDAPExtLoginModule"
flag="required">
<module-option name="synchronizeIdentity">true</module-option>
<module-option name="synchronizeRoles">true</module-option>
<module-option name="additionalRole">Authenticated</module-option>
<module-option name="defaultAssignedRole">User</module-option>
<module-option name="userModuleJNDIName">java:/portal/UserModule</module-option>
<module-option name="roleModuleJNDIName">java:/portal/RoleModule</module-option>
<module-option name="membershipModuleJNDIName">java:/portal/MembershipModule
</module-option>
<module-option name="userProfileModuleJNDIName">java:/portal/UserProfileModule
</module-option>
<module-option name="java.naming.factory.initial">com.sun.jndi.ldap.LdapCtxFactory
</module-option>
<module-option name="java.naming.provider.url">ldap://example.com:10389/
</module-option>
<module-option name="java.naming.security.authentication">simple</module-option>
<module-option name="bindDN">cn=Directory Manager</module-option>
<module-option name="bindCredential">secret</module-option>
<module-option name="baseCtxDN">ou=People,dc=example,dc=com</module-option>
<module-option name="baseFilter">(uid={0})</module-option>
<module-option name="rolesCtxDN">ou=Roles,dc=example,dc=com</module-option>
<module-option name="roleFilter">(member={1})</module-option>
<module-option name="roleAttributeID">cn</module-option>
<module-option name="roleRecursion">-1</module-option>
<module-option name="searchTimeLimit">10000</module-option>
<module-option name="searchScope">SUBTREE_SCOPE</module-option>
<module-option name="allowEmptyPasswords">false</module-option>
</login-module>
18.2.5. org.jboss.portal.identity.auth.SynchronizingLoginModule
This module is designed to provide synchronization support for any other LoginModule placed in the authentication stack. It leverages the fact that in JAAS authentication process occurs in two phases. In first phase when login() method is invoked it always returns "true". Because of this behavior SynchronizingLoginModule should be always used with "optional" flag. More over it should be placed after the module we want to leverage as a source for
synchronization and that module should have "required" flag set. During the second phase when commit() method
is invoked it gets user Subject and its Principals and tries to synchronize them into storage configured for portal
identity modules. For this purposes such options are supported:
•
userModuleJNDIName - JNDI name of portal UserModule. This option is obligatory if synchronizeIdentity
[5] http://wiki.jboss.org/wiki/Wiki.jsp?page=LdapExtLoginModule
JBoss Release 2.6.5
198
Authentication and Authorization
option is set to true
•
roleModuleJNDIName - JNDI name of portal RoleModule. This option is obligatory if synchronizeIdentity
and synchronizeRoles options are set to true
•
membershipModuleJNDIName - JNDI name of portal MembershipModule. This option is obligatory if synchronizeIdentity and synchronizeRoles options are set to true
•
userProfileModuleJNDIName - JNDI name of portal UserProfileModule. This option is obligatory if synchronizeIdentity option is set to true
•
synchronizeIdentity - if set to true module will check if successfully authenticated user exist in portal and if
not it will try to create it. If user exists module will update its password to the one that was just validated.
•
synchronizeRoles - if set to true module will iterate over all roles assigned to authenticated user and for each it
will try to check if such role exists in portal and if not it will try to create it. This option is checked only if synchronizeIdentity is set to true;
•
additionalRole - module will add this role name to the group of principals assigned to the authenticated user.
•
defaultAssignedRole - if synchronizeIdentity is set to true, module will try to assign portal role with such name
to the authenticated user. If such role doesn't exist in portal, module will try to create it.
Note
Example of usage in LDAP authentication can be found in next chapter.
JBoss Release 2.6.5
199
19
LDAP
Boleslaw Dawidowicz <boleslaw
dot dawidowicz at redhat dot com>
This chapter describes how to setup LDAP support in JBoss Portal
Note
To be able to fully understand this chapter you should also read JBoss Portal Identity management and Authentication chapters before
19.1. How to enable LDAP usage in JBoss Portal
We'll describe here the simple steps that you will need to perform to enable LDAP support in JBoss Portal. For additional information you need to read more about configuration of identity and specific implementations of identity
modules
There are two ways to achieve this:
•
jboss-portal.sar/META-INF/jboss-service.xml in section:
<mbean
code="org.jboss.portal.identity.IdentityServiceControllerImpl"
name="portal:service=Module,type=IdentityServiceController"
xmbean-dd=""
xmbean-code="org.jboss.portal.jems.as.system.JBossServiceModelMBean">
<xmbean/>
<depends>portal:service=Hibernate</depends>
<attribute name="JndiName">java:/portal/IdentityServiceController</attribute>
<attribute name="RegisterMBeans">true</attribute>
<attribute name="ConfigFile">conf/identity/identity-config.xml</attribute>
<attribute name="DefaultConfigFile">conf/identity/standardidentity-config.xml</attribute>
</mbean>
change identity-config.xml to ldap_identity-config.xml
•
Swap the names or content of files in jboss-portal.sar/conf/identity/identity-config.xml and jbossportal.sar/conf/identity/ldap_identity-config.xml
After doing one of the above changes you need to edit configuration file that you choose to use (identity-config.xml
or ldap_identity-config.xml) and configure LDAP connection options in section:
<datasource>
<name>LDAP</name>
JBoss Release 2.6.5
200
LDAP
<config>
<option>
<name>host</name>
<value>jboss.com</value>
</option>
<option>
<name>port</name>
<value>10389</value>
</option>
<option>
<name>adminDN</name>
<value>cn=Directory Manager</value>
</option>
<option>
<name>adminPassword</name>
<value>qpq123qpq</value>
</option>
</config>
</datasource>
You also need to specify options for your LDAP tree (described in configuration documentation) like those:
<option-group>
<group-name>common</group-name>
<option>
<name>userCtxDN</name>
<value>ou=People,dc=portal26,dc=jboss,dc=com</value>
</option>
<option>
<name>roleCtxDN</name>
<value>ou=Roles,dc=portal26,dc=jboss,dc=com</value>
</option>
</option-group>
Note
Under PORTAL_SOURCES/identity/src/resources/example/ you can find a sample ldif that you can use
to populate LDAP server and quickly start playing with it.
19.2. Configuration of LDAP connection
19.2.1. Connection Pooling
JBoss Portal uses connection pooling [1] provided by JNDI [2], and is enabled by default. Use the following options
to configure connection pooling settings:
<datasource>
<name>LDAP</name>
<config>
...
<!-- com.sun.jndi.ldap.connect.pool -->
<option>
<name>pooling</name>
<value>true</value>
[1] http://java.sun.com/products/jndi/tutorial/ldap/connect/pool.html
[2] http://java.sun.com/products/jndi/
JBoss Release 2.6.5
201
LDAP
</option>
<!-- com.sun.jndi.ldap.connect.pool.protocol -->
<option>
<name>poolingProtocol</name>
<value>plain ssl</value>
</option>
<!-- com.sun.jndi.ldap.connect.pool.timeout -->
<option>
<name>poolingTimeout</name>
<value>300000</value>
</option>
<!-- com.sun.jndi.ldap.connect.pool.debug -->
<option>
<name>pooling</name>
<value> ... </value>
</option>
<!-- com.sun.jndi.ldap.connect.pool.initsize -->
<option>
<name>poolingInitsize</name>
<value> ... </value>
</option>
<!-- com.sun.jndi.ldap.connect.pool.maxsize -->
<option>
<name>poolingMaxsize</name>
<value> ... </value>
</option>
<!-- com.sun.jndi.ldap.connect.pool.prefsize -->
<option>
<name>poolingPrefsize</name>
<value> ... </value>
</option>
...
</config>
</datasource>
Remember, as it is described in the JNDI documentation [3], these options are system properties, not environment
properties, and as such, they affect all connection pooling requests in the Java runtime.
19.2.2. SSL
The setup is very similar to the one described in LdapLoginModule wiki page [4]
You need to modify your identity configuration file and add "protocol"
<datasource>
<name>LDAP</name>
<config>
...
<option>
<name>protocol</name>
<value>ssl</value>
</option>
[3] http://java.sun.com/products/jndi/tutorial/ldap/connect/config.html
[4] http://www.jboss.org/wiki/Wiki.jsp?page=LdapLoginModule
JBoss Release 2.6.5
202
LDAP
...
</config>
</datasource>
Then you need to have LDAP server certificate imported into your keystore. You can use following command:
keytool -import -file ldapcert.der -keystore ldap.truststore
Now you need to change the settings to use the alternative truststore. That can be done in the properties-service.xml
in deploy directory:
<attribute name="Properties">
javax.net.ssl.trustStore=../some/path/to/ldap.truststore
javax.net.ssl.trustStorePassword=somepw
</attribute>
19.2.3. ExternalContext
Instead of configuring your own connection you can use JNDI context federation mechanism in JBoss Application
Server. Configuration of ExternalContext is described in JBoss Application Server documentation [5]
When you have ExternalContext configured you can use it in JBoss Portal by providing proper JNDI name in the
configuration:
<datasource>
<name>LDAP</name>
<config>
<option>
<name>externalContextJndiName</name>
<value>external/ldap/jboss</value>
</option>
</config>
</datasource>
Note
When using "externalContextJndiName" you don't need to specify any other option for this datasource
19.3. LDAP Identity Modules
JBoss Portal comes with base LDAP implementation of all identity modules.
19.3.1. Common settings
For all modules you can set two config options:
•
jNDIName - JNDI name under which this module will be registered
[5] http://docs.jboss.com/jbossas/guides/j2eeguide/r2/en/html_single/#d0e6877
JBoss Release 2.6.5
203
LDAP
•
connectionJNDIName - JNDI name under which LDAP datasource is registered
Note
Most configuration of LDAP identity modules is done in options section by adding module specific options
in "common" option-group or in other module specific groups.
19.3.2. UserModule
Table 19.1. Comparision of UserModule implementations
Features
UserModule
LDAPUserModuleImpl
LDAPExtUserModuleImpl
User creation
X
-
User removal
X
-
Flat - one level scope
Flexible filter - sub tree scope
User search
19.3.2.1. LDAPUserModuleImpl
This is the base implementation of LDAP UserModule. It supports user creation, but will retrieve users and create
them in strictly specified place in LDAP tree.
To enable it in your configuration you should have:
<module>
<!--type used to correctly map in IdentityContext registry-->
<type>User</type>
<implementation>LDAP</implementation>
<config/>
</module>
org.jboss.portal.identity.ldap.LDAPUserModuleImpl configuration option-groups options:
•
common:
•
userCtxDN - DN that will be used as context for user searches
•
uidAttributeID - attribute name under which user name is specified. Default value is "uid"
•
passwordAttributeID - attribute name under which user password is specified. Default value is "userPassword"
•
principalDNPrefix and principalDNSuffix
•
searchTimeLimit - The timeout in milliseconds for the user searches. Defaults to 10000 (10 seconds).
JBoss Release 2.6.5
204
LDAP
•
userCreateAttibutes: This option-group defines a set of ldap attributes that will be set on user entry creation.
Option name will be used as attribute name, and option values as attribute values. This enables to fulfill LDAP
schema requirements.
Example configuration:
<option-group>
<group-name>common</group-name>
<option>
<name>userCtxDN</name>
<value>ou=People,o=portal,dc=my-domain,dc=com</value>
</option>
<option>
<name>uidAttributeID</name>
<value>uid</value>
</option>
<option>
<name>passwordAttributeID</name>
<value>userPassword</value>
</option>
</option-group>
<option-group>
<group-name>userCreateAttibutes</group-name>
<option>
<name>objectClass</name>
<!--This objectclasses should work with Red Hat Directory-->
<value>top</value>
<value>person</value>
<value>inetOrgPerson</value>
</option>
<!--Schema requires those to have initial value-->
<option>
<name>cn</name>
<value>none</value>
</option>
<option>
<name>sn</name>
<value>none</value>
</option>
</option-group>
19.3.2.2. LDAPExtUserModuleImpl
Aim of this implementation is to give more flexibility for users retrieval. You can specify LDAP filter that will be
used for searches. This module doesn't support user creation and removal
To enable it in your configuration you should have:
<module>
<!--type used to correctly map in IdentityContext registry-->
<type>User</type>
<implementation>LDAP</implementation>
<class>org.jboss.portal.identity.ldap.LDAPExtUserModuleImpl</class>
<config/>
</module
org.jboss.portal.identity.ldap.LDAPExtUserModuleImpl configuration option-groups options:
JBoss Release 2.6.5
205
LDAP
•
common:
•
userCtxDN - DN that will be used as context for user searches. More than one value can be specified.
•
userSearchFilter - ldap filter to search users with. {0} will be substitute with user name. Example filter
can look like this: "(uid={0})". This substituion behavior comes from the standard DirContext.search(Name, String, Object, SearchControls cons) method
•
uidAttributeID - attribute name under which user name is specified. Default value is "uid"
•
searchTimeLimit - The timeout in milliseconds for the user searches. Defaults to 10000 (10 seconds).
19.3.3. RoleModule
Table 19.2. Comparision of RoleModule implementations
Features
RoleModule
LDAPRoleModuleImpl
LDAPExtRoleModuleImpl
Role creation
X
-
Role removal
X
-
Flat - one level scope
Flexible filter - sub tree scope
Role search
19.3.3.1. LDAPRoleModuleImpl
This is the base implementation of LDAP RoleModule. It supports user creation, but will retrieve roles and create
them in strictly specified place in LDAP tree.
To enable it in your configuration you should have:
<module>
<!--type used to correctly map in IdentityContext registry-->
<type>Role</type>
<implementation>LDAP</implementation>
<config/>
</module>
org.jboss.portal.identity.ldap.LDAPRoleModuleImpl configuration option-groups options:
•
common:
•
roleCtxDN - DN that will be used as context for role searches.
•
ridAttributeID - attribute name under which role name is specified. Default value is "cn".
JBoss Release 2.6.5
206
LDAP
•
roleDisplayNameAttributeID - attribute name under which role display name is specified. Default value is
"cn".
•
searchTimeLimit - The timeout in milliseconds for the roles searches. Defaults to 10000 (10 seconds).
19.3.3.2. LDAPExtRoleModuleImpl
Aim of this implementation is to give more flexibility for roless retrieval. You can specify LDAP filter that will be
used for searches. This module doesn't support role creation and removal
This module doesn't support role creation and removal
To enable it in your configuration you should have:
<module>
<!--type used to correctly map in IdentityContext registry-->
<type>Role</type>
<implementation>LDAP</implementation>
<class>org.jboss.portal.identity.ldap.LDAPExtRoleModuleImpl</class>
<config/>
</module>
org.jboss.portal.identity.ldap.LDAPExtRoleModuleImpl configuration option-groups options:
•
common:
•
roleCtxDN - DN that will be used as context for role searches. More than one value can be specified.
•
roleSearchFilter - ldap filter to search roles with. {0} will be substitute with role name. Example filter can
look like this: "(cn={0})". This substituion behavior comes from the standard DirContext.search(Name,
String, Object, SearchControls cons) method.
•
ridAttributeID - attribute name under which role name is specified. Default value is "cn".
•
roleDisplayNameAttributeID - attribute name under which role display name is specified. Default value is
"cn".
•
searchTimeLimit - The timeout in milliseconds for the roles searches. Defaults to 10000 (10 seconds).
•
searchScope - Sets the search scope to one of the strings. The default is SUBTREE_SCOPE.
•
OBJECT_SCOPE - only search the named roles context.
•
ONELEVEL_SCOPE - search directly under the named roles context.
•
SUBTREE_SCOPE - If the roles context is not a DirContext, search only the object. If the roles context is a DirContext, search the subtree rooted at the named object, including the named object itself.
JBoss Release 2.6.5
207
LDAP
Note
In UserModule there are two methods that handle offset/limit (pagination) behavior.
/** Get a range of users.*/
Set findUsers(int offset, int limit) throws IdentityException, IllegalArgumentException;
/** Get a range of users.*/
Set findUsersFilteredByUserName(String filter, int offset, int limit)
throws IdentityException, IllegalArgumentException;
Pagination support is not widely implemented in LDAP servers. Because UserModule implementations
rely on JNDI and are targetted to be LDAP server agnostic those methods aren't very effecient. As long as
you don't rely on portal user management and use dedicated tools for user provisioning it shouldn't bother
you. Otherwise you should consider extending the implementation and providing solution dedicated to
your LDAP server.
19.3.4. MembershipModule
Table 19.3. Comparision of MembershipModule implementations
Features
MembershipModule
LDAPStaticGroupMembershipModuleImpl
LDAPStaticRoleMembershipModuleImpl
Role assignment stored in LDAP
role entry
X
-
Role assignment stored in LDAP
user entry
-
X
User/Role relationship creation
X
X
19.3.4.1. LDAPStaticGroupMembershipModuleImpl
This module support tree shape where role entries keep information about users that are their members.
To enable it in your configuration you should have:
<module>
<!--type used to correctly map in IdentityContext registry-->
<type>Membership</type>
<implementation>LDAP</implementation>
<config/>
</module>
org.jboss.portal.identity.ldap.LDAPStaticGroupMembershipModuleImpl configuration option-groups options:
JBoss Release 2.6.5
208
LDAP
•
common:
•
membershipAttributeID - LDAP attribute that defines member users ids. This will be used to retrieved
users from role entry.
•
membershipAttributeIsDN - defines if values of attribute defined in membershipAttributeID are fully
qualified LDAP DNs.
19.3.4.2. LDAPStaticRoleMembershipModuleImpl
This module support tree shape where user entries keep information about roles that they belong to.
To enable it in your configuration you should have:
<module>
<!--type used to correctly map in IdentityContext registry-->
<type>Membership</type>
<implementation>LDAP</implementation>
<class>org.jboss.portal.identity.ldap.LDAPStaticRoleMembershipModuleImpl</class>
<config/>
</module>
org.jboss.portal.identity.ldap.LDAPStaticRoleMembershipModuleImpl configuration option-groups options:
•
common:
•
membershipAttributeID - LDAP attribute that defines role ids that user belongs to. This will be used to
retrieved roles from user entry.
•
membershipAttributeIsDN - defines if values of attribute defined in membershipAttributeID are fully
qualified LDAP DNs.
19.3.5. UserProfileModule
19.3.5.1. LDAPUserProfileModuleImpl
This is standard implementation that enables to retrieve user properties from atributes in LDAP entries.
To enable it in your configuration you should have:
<module>
<type>UserProfile</type>
<implementation>DELEGATING</implementation>
<config>
<option>
<name>ldapModuleJNDIName</name>
<value>java:/portal/LDAPUserProfileModule</value>
</option>
</config>
</module>
JBoss Release 2.6.5
209
LDAP
<module>
<type>DBDelegateUserProfile</type>
<implementation>DB</implementation>
<config>
<option>
<name>randomSynchronizePassword</name>
<value>true</value>
</option>
</config>
</module>
<module>
<type>LDAPDelegateUserProfile</type>
<implementation>LDAP</implementation>
<config/>
</module>
Note
Using such configuration you will have LDAP MembershipModule along with DB MembershipModule
and Delegating MembershipModule. Please read Identity chapter to see why this is important.
org.jboss.portal.identity.ldap.LDAPUserModuleImpl configuration option-groups options:
•
common:
•
profileConfigFile - file with user profile configuration. If this option is not set, and we use delegating UserProfileModule, profile configuration will be obtained from it.
19.4. LDAP server tree shapes
JBoss Portal supports full user/role management for simple LDAP tree shapes. Some more flexible trees can be
supported by LdapExtUserModuleImpl and LdapExtRoleModuleImpl - but without user/role creation and removal
capabilities. However if you have complex LDAP tree you should consider using SynchronizingLoginModule described in Authentication chapter along with dedicated tools for user provisioning provided with LDAP server.
In following subsections we will describe two base LDAP tree shapes along with example LDIFs and portal identity modules configurations. Those two examples differ only by using different MembershipModule implementations and describe only tree shapes with supported user/role creation and removal capabilities.
19.4.1. Keeping users membership in role entries
In this example, information about users/roles assignment is stored in roles entries using LDAP "member". Of
course any other attribute that comes with schema can be used for this.
Example tree shape in LDAP browser
JBoss Release 2.6.5
210
LDAP
19.4.1.1. Example LDIF
dn: dc=example,dc=com
JBoss Release 2.6.5
211
LDAP
objectclass: top
objectclass: dcObject
objectclass: organization
dc: example
o: example
dn: ou=People,dc=example,dc=com
objectclass: top
objectclass: organizationalUnit
ou: People
dn: uid=user,ou=People,dc=example,dc=com
objectclass: top
objectclass: inetOrgPerson
objectclass: person
uid: user
cn: JBoss Portal user
sn: user
userPassword: user
mail: [email protected]
dn: uid=admin,ou=People,dc=example,dc=com
objectclass: top
objectclass: inetOrgPerson
objectclass: person
uid: admin
cn: JBoss Portal admin
sn: admin
userPassword: admin
mail: [email protected]
dn: ou=Roles,dc=example,dc=com
objectclass: top
objectclass: organizationalUnit
ou: Roles
dn: cn=User,ou=Roles,dc=example,dc=com
objectClass: top
objectClass: groupOfNames
cn: User
description: the JBoss Portal user group
member: uid=user,ou=People,dc=example,dc=com
dn: cn=Admin,ou=Roles,dc=example,dc=com
objectClass: top
objectClass: groupOfNames
cn: Echo
description: the JBoss Portal admin group
member: uid=admin,ou=People,dc=example,dc=com
19.4.1.2. Example identity configuration
<modules>
<module>
<!--type used to correctly map in IdentityContext registry-->
<type>User</type>
<implementation>LDAP</implementation>
<config/>
</module>
<module>
<type>Role</type>
<implementation>LDAP</implementation>
JBoss Release 2.6.5
212
LDAP
<config/>
</module>
<module>
<type>Membership</type>
<implementation>LDAP</implementation>
<config/>
</module>
<module>
<type>UserProfile</type>
<implementation>DELEGATING</implementation>
<config>
<option>
<name>ldapModuleJNDIName</name>
<value>java:/portal/LDAPUserProfileModule</value>
</option>
</config>
</module>
<module>
<type>DBDelegateUserProfile</type>
<implementation>DB</implementation>
<config>
<option>
<name>randomSynchronizePassword</name>
<value>true</value>
</option>
</config>
</module>
<module>
<type>LDAPDelegateUserProfile</type>
<implementation>LDAP</implementation>
<config/>
</module>
</modules>
<options>
<option-group>
<group-name>common</group-name>
<option>
<name>userCtxDN</name>
<value>ou=People,dc=example,dc=com</value>
</option>
<option>
<name>roleCtxDN</name>
<value>ou=Roles,dc=example,dc=com</value>
</option>
</option-group>
<option-group>
<group-name>userCreateAttibutes</group-name>
<option>
<name>objectClass</name>
<!--This objectclasses should work with Red Hat Directory-->
<value>top</value>
<value>person</value>
<value>inetOrgPerson</value>
</option>
<!--Schema requires those to have initial value-->
<option>
<name>cn</name>
<value>none</value>
</option>
<option>
<name>sn</name>
<value>none</value>
</option>
</option-group>
<option-group>
JBoss Release 2.6.5
213
LDAP
<group-name>roleCreateAttibutes</group-name>
<!--Schema requires those to have initial value-->
<option>
<name>cn</name>
<value>none</value>
</option>
<!--Some directory servers require this attribute to be valid DN-->
<!--For safety reasons point to the admin user here-->
<option>
<name>member</name>
<value>uid=admin,ou=People,dc=example,dc=com</value>
</option>
</option-group>
</options>
19.4.2. Keeping users membership in user entries
In this example, information about users/roles assignment is stored in user entries using LDAP "memberOf". Of
course any other attribute that comes with schema can be used for this.
Example tree shape in LDAP browser
JBoss Release 2.6.5
214
LDAP
19.4.2.1. Example LDIF
dn: dc=example,dc=com
objectclass: top
objectclass: dcObject
objectclass: organization
dc: example
o: example
dn: o=example2,dc=example,dc=com
objectclass: top
objectclass: organization
o: example2
dn: ou=People,o=example2,dc=example,dc=com
objectclass: top
objectclass: organizationalUnit
ou: People
dn: uid=admin,ou=People,o=example2,dc=example,dc=com
objectclass: top
objectclass: inetOrgPerson
objectclass: inetUser
uid: admin
cn: JBoss Portal admin
sn: admin
userPassword: admin
mail: [email protected]
memberOf: cn=Admin,ou=Roles,o=example2,dc=example,dc=com
dn: uid=user,ou=People,o=example2,dc=example,dc=com
objectclass: top
objectclass: inetOrgPerson
objectclass: inetUser
JBoss Release 2.6.5
215
LDAP
uid: user
cn: JBoss Portal user
sn: user
userPassword: user
mail: [email protected]
memberOf: cn=User,ou=Roles,o=example2,dc=example,dc=com
dn: ou=Roles,o=example2,dc=example,dc=com
objectclass: top
objectclass: organizationalUnit
ou: Roles
dn: cn=User,ou=Roles,o=example2,dc=example,dc=com
objectClass: top
objectClass: organizationalRole
cn: User
description: the JBoss Portal user group
dn: cn=Admin,ou=Roles,o=example2,dc=example,dc=com
objectClass: top
objectClass: organizationalRole
cn: Echo
description: the JBoss Portal admin group
19.4.2.2. Example identity configuration
<modules>
<module>
<!--type used to correctly map in IdentityContext registry-->
<type>User</type>
<implementation>LDAP</implementation>
<config/>
</module>
<module>
<type>Role</type>
<implementation>LDAP</implementation>
<config/>
</module>
<module>
<type>Membership</type>
<implementation>LDAP</implementation>
<class>org.jboss.portal.identity.ldap.LDAPStaticRoleMembershipModuleImpl</class>
<config/>
</module>
<module>
<type>UserProfile</type>
<implementation>DELEGATING</implementation>
<config>
<option>
<name>ldapModuleJNDIName</name>
<value>java:/portal/LDAPUserProfileModule</value>
</option>
</config>
</module>
<module>
<type>DBDelegateUserProfile</type>
<implementation>DB</implementation>
<config>
<option>
<name>randomSynchronizePassword</name>
<value>true</value>
</option>
JBoss Release 2.6.5
216
LDAP
</config>
</module>
<module>
<type>LDAPDelegateUserProfile</type>
<implementation>LDAP</implementation>
<config/>
</module>
</modules>
<options>
<option-group>
<group-name>common</group-name>
<option>
<name>userCtxDN</name>
<value>ou=People,dc=example,dc=com</value>
</option>
<option>
<name>roleCtxDN</name>
<value>ou=Roles,dc=example,dc=com</value>
</option>
<option>
<name>membershipAttributeID</name>
<value>memberOf</value>
</option>
</option-group>
<option-group>
<group-name>userCreateAttibutes</group-name>
<option>
<name>objectClass</name>
<!--This objectclasses should work with Red Hat Directory-->
<value>top</value>
<value>person</value>
<value>inetOrgPerson</value>
</option>
<!--Schema requires those to have initial value-->
<option>
<name>cn</name>
<value>none</value>
</option>
<option>
<name>sn</name>
<value>none</value>
</option>
</option-group>
<option-group>
<group-name>roleCreateAttibutes</group-name>
<!--Schema requires those to have initial value-->
<option>
<name>cn</name>
<value>none</value>
</option>
<!--Some directory servers require this attribute to be valid DN-->
<!--For safety reasons point to the admin user here-->
<option>
<name>member</name>
<value>uid=admin,ou=People,dc=example,dc=com</value>
</option>
</option-group>
</options>
19.5. Synchronizing LDAP configuration
JBoss Release 2.6.5
217
LDAP
Like it was described in previous section, you can meet some limitations in identity modules support for more complex LDAP tree shapes. To workaround this you can use identity synchronization on JAAS level. JBoss Portal
comes with SynchronizingLoginModule that can be easily configured with other authentication solutions that support JAAS framework. Here we want to provide a simple example on how it can be integrated with LdapExtLoginModule [6] from JBossSX framework.
First of all portal identity modules should be configured to work with portal database - default configuration. This
is important as we will leverage them, and we want to synchronize users identity into default portal storage mechanism. So lets look at simple configuration that should take place in jboss-portal.sar/conf/login-config.xml
<policy>
<!-- For the JCR CMS -->
<application-policy name="cms">
<authentication>
<login-module code="org.apache.jackrabbit.core.security.SimpleLoginModule"
flag="required"/>
</authentication>
</application-policy>
<application-policy name="portal">
<authentication>
<login-module code="org.jboss.security.auth.spi.LdapExtLoginModule" flag="required">
<module-option name="java.naming.factory.initial">com.sun.jndi.ldap.LdapCtxFactory
</module-option>
<module-option name="java.naming.provider.url">ldap://example.com:10389/
</module-option>
<module-option name="java.naming.security.authentication">simple</module-option>
<module-option name="bindDN">cn=Directory Manager</module-option>
<module-option name="bindCredential">lolo</module-option>
<module-option name="baseCtxDN">ou=People,dc=example,dc=com</module-option>
<module-option name="baseFilter">(uid={0})</module-option>
<module-option name="rolesCtxDN">ou=Roles,dc=example,dc=com</module-option>
<module-option name="roleFilter">(member={1})</module-option>
<module-option name="roleAttributeID">cn</module-option>
<module-option name="roleRecursion">-1</module-option>
<module-option name="searchTimeLimit">10000</module-option>
<module-option name="searchScope">SUBTREE_SCOPE</module-option>
<module-option name="allowEmptyPasswords">false</module-option>
</login-module>
<login-module code="org.jboss.portal.identity.auth.SynchronizingLoginModule"
flag="optional">
<module-option name="synchronizeIdentity">true</module-option>
<module-option name="synchronizeRoles">true</module-option>
<module-option name="additionalRole">Authenticated</module-option>
<module-option name="defaultAssignedRole">User</module-option>
<module-option name="userModuleJNDIName">java:/portal/UserModule</module-option>
<module-option name="roleModuleJNDIName">java:/portal/RoleModule</module-option>
<module-option name="membershipModuleJNDIName">java:/portal/MembershipModule
</module-option>
<module-option name="userProfileModuleJNDIName">java:/portal/UserProfileModule
</module-option>
</login-module>
</authentication>
</application-policy>
</policy>
Few things are important in this configuration:
[6] http://wiki.jboss.org/wiki/Wiki.jsp?page=LdapExtLoginModule
JBoss Release 2.6.5
218
LDAP
•
LdapExtLoginModule has flag="required" set which means that if this single LoginModule return fail from authentication request whole process will fail. SynchronizingLoginModule has flag="optional". Such combination
is critical as SynchronizingLoginModule always authenticates user sucessfully no matter what credentials were
provided. You always must have at least one LoginModule that you will rely on.
•
SynchronizingLoginModule is always the last one in whole authentication chain. This is because in commit
phase it will take users Subject and its Principals (roles) assigned by previous LoginModules and try to synchronize them. Roles assigned to authenticated user by LoginModules after it won't be handled.
19.6. Supported LDAP servers
LDAP servers support depends on few conditions. In most cases they differ in schema support - various objectClass objects are not present by default in server schema. Sometimes it can be workarounded by manually extending schema.
Servers can be
•
Supported
•
Not Supported
•
Experimental - implementation can work with such server but it's not well tested so shouldn't be considered for
production.
Table 19.4. Support of identity modules with different LDAP servers
LDAP
Server
UserModule
RoleModule
LDLDAPEx- LDAPRoAPUsertUserMod- leModuleI
ModuleIm- uleImpl
mpl
pl
MembershipModule
UserProfileModule
LDAPEx- LDAPStat- LDAPLDtRoleModu icGroupStaticRole- APUserleImpl
MemberMemberProshipMod- shipMod- fileModule
uleImpl
uleImpl
Impl
Red Hat
Directory
Server
Supported
Supported
Supported
Supported
Supported
Supported
Supported
OpenDS
Supported
Supported
Supported
Supported
Supported
Not Supported
Supported
OpenLDAP
Supported
Supported
Supported
Supported
Supported
Not Supported
Supported
JBoss Release 2.6.5
219
20
Single Sign ON
Boleslaw Dawidowicz <boleslaw
dot dawidowicz at redhat dot com>
Sohil Shah <[email protected]>
This chapter describes how to setup SSO in JBoss Portal
20.1. Overview of SSO in portal
Portal as an integration and aggregation platform provides some form of SSO by itself. When you log into the
portal you gain access to many systems through portlets using a single identity. Still in many cases you need to integrate the portal infrastructure with other SSO enabled systems. There are many different Identity Management
solutions on the market. In most cases each SSO framework provides its own way to plug into Java EE application.
For custom configurations you need to have a good understanding of JBoss Portal Identity management and authentication mechanisms.
20.2. Using Tomcat Valve
JBoss Application Server embeds Apache Tomcat as the default servlet container. Tomcat provides a builtin SSO
support using a valve. The Single Sign On Valve caches credentials on the server side, and then invisibly authenticate users when they reach different web applications. Credentials are stored in a host-wide session which means
that SSO will be effective throughout the session.
20.2.1. Enabling Tomcat SSO Valve
To enable SSO valve in Tomcat you should uncomment the following line
<Valve className=’org.apache.catalina.authenticator.SingleSignOn’/>
in the $JBOSS_HOME/server/default/deploy/jboss-web.deployer/server.xml file. More information can be
found here [1].
20.2.2. Example of usage
Lets look a little bit closer and configure SSO between portal and other web application. As an example we'll use
jmx-console web-app that comes with every JBoss Application Server installation. You can find more information
on how to secure jmx-console in JBoss AS wiki [2].
[1] http://www.jboss.org/wiki/Wiki.jsp?page=SingleSignOn
JBoss Release 2.6.5
220
Single Sign ON
1.
Take a clean install of JBoss Application Server
2.
Edit $JBOSS_HOME/server/default/deploy/jmx-console.war/WEB-INF/web.xml file and make sure it contains
following content:
<security-constraint>
<web-resource-collection>
<web-resource-name>HtmlAdaptor</web-resource-name>
<description>An example security config that only allows users with the
role JBossAdmin to access the HTML JMX console web application
</description>
<url-pattern>/*</url-pattern>
<http-method>GET</http-method>
<http-method>POST</http-method>
</web-resource-collection>
<auth-constraint>
<role-name>Admin</role-name>
</auth-constraint>
</security-constraint>
<security-constraint>
<web-resource-collection>
<web-resource-name>Public</web-resource-name>
<url-pattern>/public/*</url-pattern>
<http-method>GET</http-method>
<http-method>POST</http-method>
</web-resource-collection>
</security-constraint>
<login-config>
<auth-method>BASIC</auth-method>
<realm-name>jmx-console</realm-name>
</login-config>
<security-role>
<role-name>Admin</role-name>
</security-role>
This will secure jmx-console web application using BASIC browser authentication and restrict access for users
with Admin role only.
3.
Edit $JBOSS_HOME/server/default/conf/props/jmx-console-roles.properties file and make it contain:
admin=JBossAdmin,HttpInvoker,Admin
This file is a simple identity store for this web application authentication. It will make user admin belongs to
Admin role.
4.
Deploy JBoss Portal
5.
Run JBoss Application Server
6.
Now you can check that when you go to
[2] http://wiki.jboss.org/wiki/Wiki.jsp?page=SecureTheJmxConsole
JBoss Release 2.6.5
221
Single Sign ON
•
http://localhost:8080/portal
• http://localhost:8080/jmx-console
you need to authenticate separately into each of those web applications.
7.
Shutdown Application Server
8.
Uncomment the following line
<Valve className=’org.apache.catalina.authenticator.SingleSignOn’/>
in the $JBOSS_HOME/server/default/deploy/jboss-web.deployer/server.xml file. More information can
be found here [3].
Run JBoss Application Server.
Now if you log into portal as user admin with password admin, you won't be asked for credentials when accessing
jmx-console. This should work in both directions.
Note
Please note that in this example jmx-console uses BASIC authentication method. This means that user credentials are cached on the client side by browser and passed on each request. Once authenticated to clear
authentication cache you may need to restart browser.
20.3. CAS - Central Authentication Service
This Single Sign On plugin enables seamless integration between JBoss Portal and the CAS Single Sign On Framework. Details about CAS can be found here [4]
20.3.1. Integration steps
Note
The steps below assume that CAS server and JBoss Portal will be deployed on the same JBoss Application
Server instance. CAS will be configured to leverage identity services exposed by JBoss Portal to perform
authentication. Procedure may be slightly different for other deployment scenarios. Both JBoss Portal and
CAS will need to be configured to authenticate against same database or LDAP server. Please see CAS
documentation to learn how to setup it up against proper identity store.
Note
Configuration below assumes that JBoss Application Server is HTTPS enabled and operates on standard
ports: 80 (for HTTP) and 443 (for HTTPS).
1.
Install CAS server (v 3.0.7). This should be as simple as deploying single cas.war file.
2.
Copy
portal-identity-lib.jar
and
portal-identity-sso-lib.jar
$JBOSS_HOME/server/default/deploy/jboss-portal.sar/lib
files
from
to
[3] http://www.jboss.org/wiki/Wiki.jsp?page=SingleSignOn
[4] http://www.ja-sig.org/products/cas/
JBoss Release 2.6.5
222
Single Sign ON
$JBOSS_HOME/server/default/deploy/cas.war/WEB-INF/lib.
3.
Edit $JBOSS_HOME/server/default/deploy/jboss-portal.sar/portal-server.war/WEB-INF/context.xml file and
enable proper tomcat valve by uncommenting following lines:
<Valve className="org.jboss.portal.identity.sso.cas.CASAuthenticationValve"
casLogin="https://localhost/cas/login"
casValidate="https://localhost/cas/serviceValidate"
casServerName="localhost"
authType="FORM"
/>
Update valve options as follow:
•
casLogin: URL of your CAS Authentication Server
•
casValidate: URL of your CAS Authentication Server validation service
•
casServerName: the hostname:port combination of your CAS Authentication Server
Note
CAS client requires to use SSL connection. To learn how to setup JBoss Application Server to use HTTPS
see here
4.
Copy casclient.jar into $JBOSS_HOME/server/default/deploy/jboss-portal.sar/lib. You can download this file
from CAS homepage or from JBoss repository under http://repository.jboss.com/cas/3.0.7/lib/
Note
The CAS engine does not accept self-signed SSL certificates. This requirement is fine for production use
where a production level SSL certificate is available. However, for testing purposes, this can get a little annoying. Hence, if you are having this issue, you can use casclient-lenient.jar instead.
5.
Edit $JBOSS_HOME/server/default/deploy/jboss-portal.sar/META-INF/jboss-service.xml file and uncomment
following lines:
<mbean
code="org.jboss.portal.identity.sso.cas.CASAuthenticationService"
name="portal:service=Module,type=CASAuthenticationService"
xmbean-dd=""
xmbean-code="org.jboss.portal.jems.as.system.JBossServiceModelMBean">
<xmbean/>
<depends>portal:service=Module,type=IdentityServiceController</depends>
<attribute name="HavingRole"></attribute>
</mbean>
This will expose special service in JBoss Portal that can be leveraged by CAS AuthenticationHandler if the
server is deployed on the same application server instance. This AuthenticationHandler will be enabled in next
2 steps.
JBoss Release 2.6.5
223
Single Sign ON
6.
Edit $JBOSS_HOME/server/default/deploy/cas.war/WEB-INF/deployerConfigContext.xml and add following
line in the authenticationHandlers section:
<bean class="org.jboss.portal.identity.sso.cas.CASAuthenticationHandler" />
This can replace default SimpleTestUsernamePasswordAuthenticationHandler so whole part of this config file
can look as follows:
<property name="authenticationHandlers">
<list>
<!-| This is the authentication handler that authenticates services by means of callback via SSL, there
| a server side SSL certificate.
+-->
<bean
class="org.jasig.cas.authentication.handler.support.HttpBasedServiceCredentialsAuthenticationHandle
<property
name="httpClient"
ref="httpClient" />
</bean>
<!-| This is the authentication handler declaration that every CAS deployer will need to change before
| into production. The default SimpleTestUsernamePasswordAuthenticationHandler authenticates Userna
| where the username equals the password. You will need to replace this with an AuthenticationHandl
| local authentication strategy. You might accomplish this by coding a new such handler and declari
| edu.someschool.its.cas.MySpecialHandler here, or you might use one of the handlers provided in the
+-->
<bean class="org.jboss.portal.identity.sso.cas.CASAuthenticationHandler" />
</list>
</property>
To test the integration:
•
Go to your portal. Typically, http://localhost:8080/portal
•
Click on the "Login" link on the main portal page
•
This should bring up the CAS Authentication Server's login screen instead of the default JBoss Portal login
screen
•
Input your portal username and password. For built-in portal login try user:user or admin:admin
•
If login is successful, you should be redirected back to the portal with the appropriate user logged in
20.4. JOSSO - Java Open Single SignOn
JBoss Portal enables seamless integration with JOSSO server. More details on JOSSO can be found here [5]
[5] http://www.josso.org/
JBoss Release 2.6.5
224
Single Sign ON
Note
The steps below assume that JOSS server and JBoss Portal will be deployed on the same JBoss Application
Server instance. JOSSO will be configured to leverage identity services exposed by JBoss Portal to perform authentication. Procedure may be slightly different for other deployment scenarios. Both JBoss Portal
and JOSSO will need to be configured to authenticate against same database or LDAP server. Please see
JOSSO documentation to learn how to setup it up against proper identity store.
Note
Configuration below assumes that JOSSO is already installed and deployed in the JBoss Application Server. This involves adding proper jar files into the classpath and altering several configuration files (adding
tomcat valves, security realm and specific JOSSO configuration files). For JBoss setup please refer to
JOSSO documentation [6]
20.4.1. Integration steps
1.
Copy
portal-identity-lib.jar
and
portal-identity-sso-lib.jar
$JBOSS_HOME/server/default/deploy/jboss-portal.sar/lib
$JBOSS_HOME/server/default/deploy/josso.ear/josso.war/WEB-INF/lib.
files
from
to
2.
Edit $JBOSS_HOME/server/default/deploy/jboss-portal.sar/portal-server.war/WEB-INF/context.xml file and
enable proper tomcat valve by uncommenting following lines:
<Valve className="org.jboss.portal.identity.sso.josso.JOSSOLogoutValve"/>
3.
Edit $JBOSS_HOME/server/default/config/josso-agent-config.xml and mapping for portal web application:
<partner-apps>
...
<partner-app>
<context>/portal</context>
</partner-app>
...
</partner-apps>
Complete config file can look as follows:
<?xml version="1.0" encoding="ISO-8859-1" ?>
<agent>
<class>org.josso.jb4.agent.JBossCatalinaSSOAgent</class>
[6] http://www.josso.org/jboss4-howto.html
JBoss Release 2.6.5
225
Single Sign ON
<gatewayLoginUrl>http://localhost:8080/josso/signon/login.do</gatewayLoginUrl>
<gatewayLogoutUrl>http://localhost:8080/josso/signon/logout.do</gatewayLogoutUrl>
<service-locator>
<class>org.josso.gateway.WebserviceGatewayServiceLocator</class>
<endpoint>localhost:8080</endpoint>
</service-locator>
<partner-apps>
<partner-app>
<context>/partnerapp</context>
</partner-app>
<partner-app>
<context>/portal</context>
</partner-app>
</partner-apps>
</agent>
4.
Edit
$JBOSS_HOME/server/default/deploy/jboss-portal.sar/portal-server.war/login.jsp
and
$JBOSS_HOME/server/default/deploy/jboss-portal.sar/portal-server.war/erros.jsp and uncomment following
line:
<%
response.sendRedirect(request.getContextPath() + "/josso_login/");
%>
(make sure to remove java style comment '/* */' - not the xml one).
5.
Edit $JBOSS_HOME/server/default/deploy/jboss-portal.sar/META-INF/jboss-service.xml file and uncomment
following lines:
<mbean
code="org.jboss.portal.identity.sso.josso.JOSSOIdentityServiceImpl"
name="portal:service=Module,type=JOSSOIdentityService"
xmbean-dd=""
xmbean-code="org.jboss.portal.jems.as.system.JBossServiceModelMBean">
<xmbean/>
<depends>portal:service=Module,type=IdentityServiceController</depends>
</mbean>
This will expose a special service in JBoss Portal that can be leveraged by JOSSO Credential and Identity
Stores if the server is deployed on the same application server instance.
6.
Edit $JBOSS_HOME/server/default/deploy/josso.ear/josso.war/WEB-INF/classes/josso-gateway-config.xml
and configure following elements:
•
Credential Store:
<!-- Basic Authentication Scheme -->
<authentication-scheme>
JBoss Release 2.6.5
226
Single Sign ON
<name>basic-authentication</name>
<class>org.josso.auth.scheme.BindUsernamePasswordAuthScheme</class>
<!-- ================================================= -->
<!-- JBoss Portal Credential Store
-->
<!-- ================================================= -->
<credential-store>
<class>org.jboss.portal.identity.sso.josso.JOSSOIdentityStore</class>
</credential-store>
<!-- ================================================= -->
<!-- Credential Store Key adapter
-->
<!-- ================================================= -->
<credential-store-key-adapter>
<class>org.josso.gateway.identity.service.store.SimpleIdentityStoreKeyAdapter</class>
</credential-store-key-adapter>
</authentication-scheme>
•
SSO Identity Store:
<sso-identity-manager>
<class>org.josso.gateway.identity.service.SSOIdentityManagerImpl</class>
<!-- ================================================= -->
<!-- JBoss Portal Credential Store
-->
<!-- ================================================= -->
<sso-identity-store>
<class>org.jboss.portal.identity.sso.josso.JOSSOIdentityStore</class>
</sso-identity-store>
<!-- ================================================= -->
<!-- Identity Store Key adapter
-->
<!-- ================================================= -->
<sso-identity-store-key-adapter>
<class>org.josso.gateway.identity.service.store.SimpleIdentityStoreKeyAdapter</class>
</sso-identity-store-key-adapter>
</sso-identity-manager>
To test the integration:
•
Go to your portal. Typically, http://localhost:8080/portal
•
Click on the "Login" link on the main portal page
•
This should bring up the JOSSO login screen instead of the default JBoss Portal login screen
•
Input your portal username and password. For built-in portal login try user:user or admin:admin
JBoss Release 2.6.5
227
Single Sign ON
•
If login is successful, you should be redirected back to the portal with the appropriate user logged in
JBoss Release 2.6.5
228
21
CMS Portlet
Roy Russo <roy
@ jboss dot org>
Thomas Heute <[email protected]>
JBoss Portal packages a Web Content Management System capable of serving and allowing administration of web
content. This chapter describes the CMS Portlet which is responsible for serving resources requested, the following
chapter describes the CMSAdmin Portlet and all administration functionality.
21.1. Introduction
The CMS Portlet displays content from the file store inside a portlet window, or, in the case of binary content, out-
JBoss Release 2.6.5
229
CMS Portlet
side of the portlet window altogether.
21.2. Features
The CMSPortlet handles all requests for all content types.
The methodology of serving content within the CMSPortlet, allows for some beneficial features, like:
1.
Search-engine friendly URLs: http://domain/[portal]/content/company.html
2.
Serve binaries with simple urls independent of the portal: http://domain/content/products.pdf
3.
Deploy several instances of the CMSPortlet on any page and configure them to display different start pages.
4.
Localization support: CMSPortlet will display content based on the user request locale, or display content using the default locale setting.
21.3. CMS content
Since 2.6 displaying CMS content in the portal is done using the new content integration feature. Each window of
the portal can be configured to display CMS content directly instead of having to configure the CMS portlet as it
used to be.
21.3.1. Configuring a window to display CMS content
Showing CMS content in a portal window can be done in the deployment descriptor quite easily
<window>
<window-name>MyCMSWindow</window-name>
<content>
<content-type>cms</content-type>
<content-uri>/default/index.html</content-uri>
</content>
<region>center</region>
<height>1</height>
</window>
At the first display of the window, the content is initialized with the content uri value. When the user clicks on a
link that navigates to another CMS file, the CMS file will be shown in the same window.
21.4. CMS Configuration
21.4.1. Display CMS content
Since 2.6 displaying CMS content in the portal is done using the new content integration feature. The portal is also
able to map urls content to the CMS through a specific window. The CMS portlet default page is defined as a preference and can be overridden like any other preference up to the user's preference level. The default CMS portlet
JBoss Release 2.6.5
230
CMS Portlet
displayed when you install JBoss Portal for the first time is describe in the following file: jbossportal.sar/portal-core.war/WEB-INF/portlet.xml .
<portlet-preferences>
<preference>
<name>indexpage</name>
<value>/default/index.html</value>
</preference>
</portlet-preferences>
The preference key is "indexpage". To change the default page, just make sure to create an HTML document using
the CMS Admin portlet then change the value of "indexpage" to the corresponding path.
21.4.2. Service Configuration
21.4.2.1. Tuning Jackrabbit
JBoss Portal uses Apache Jackrabbit as its Java Content Repository implementation. Configuration of the service
descriptor, allows for changing many of the variables associated with the service.
Here
is
the
default
configuration
for
the
CMS
repository
found
under
portal-
cms.sar/META-INF-INF/jboss-service.xml
...
<attribute
<attribute
<attribute
<attribute
<attribute
...
name="DoChecking">true</attribute>
name="DefaultContentLocation">portal/cms/conf/default-content/default/</attribute>
name="DefaultLocale">en</attribute>
name="RepositoryName">PortalRepository</attribute>
name="HomeDir">${jboss.server.data.dir}${/}portal${/}cms${/}conf</attribute>
Below is a list of items found in the service descriptor and their definitions. Only items commonly changed are
covered here and it is recommended you do not change any others unless you are very brave.
•
DoChecking: Should the portal attempt to check for the existence of the repository configuration files and default content on startup?
•
DefaultContentLocation: Location of the default content used to pre-populate the repository.
•
DefaultLocale: Two-letter abbreviation of the default locale the portal should use when fetching content for
users. A complete ISO-639 list can be found here [1] .
•
HomeDir: Location of configuration information for the repository when in 100% FileSystem store mode. Otherwise, its in the database.
21.4.2.2. Changing the url under which the content should be accessible
By default, the content will be accessible to a url like this: http://www.example.com/content/[...], if you need or
prefer to change "content" to something else you will need to edit the following file: portalcms.sar/META-INF-INF/jboss-service.xml and change the value of Prefix to something else. Please note that
you[1]
cannot
change it to "nothing", you need to provide a value.
http://ftp.ics.uci.edu/pub/ietf/http/related/iso639.txt
JBoss Release 2.6.5
231
CMS Portlet
...
<mbean
code="org.jboss.portal.core.cms.CMSObjectCommandFactory"
name="portal:commandFactory=CMSObject"
xmbean-dd=""
xmbean-code="org.jboss.portal.common.system.JBossServiceModelMBean">
<xmbean/>
<attribute name="Prefix">content</attribute>
<attribute name="TargetWindowRef">default.default.CMSPortletWindow</attribute>
<depends optional-attribute-name="Factory" proxy-type="attribute">
portal:commandFactory=Delegating
</depends>
<depends optional-attribute-name="CMSService" proxy-type="attribute">
portal:service=CMS
</depends>
</mbean>
...
•
Prefix: This is the context path prefix that will trigger the portal to render content. By default, navigating to a
URL such as http://localhost:8080/[portal_context]/content/Test.PDF will trigger the portal to display the PDF
isolated from the portal pages. The path following the Prefix has to be absolute when fetching content.
21.4.3. Configuring the Content Store Location
By default, the JBoss Portal CMS stores all node properties, references, and binary content in the database, using
the portal datasource. The location of some of these items is configurable, and there are 3 options:
•
Section 21.4.3.1
•
Section 21.4.3.2
•
Section 21.4.3.3
21.4.3.1. 100% Filesystem Storage
To
enable
100%
Filesystem
storage,
you
must
edit
the
file:
jbossportal.sar/portal-cms.sar/META-INF/jboss-service.xml . You will note that the file is set to use the HibernateStore
and HibernatePersistenceManager classes, by default. To have the CMS use 100% file system storage, simply comment these blocks. Then, you should uncomment to use the LocalFileSystem and XMLPersistenceManager classes.
Follow these steps to activate 100% FS storage:
1.
Comment out the following blocks (there are 3 in total):
<!-- HibernateStore: uses RDBMS + Hibernate for storage -->
<FileSystem class="org.jboss.portal.cms.hibernate.HibernateStore">
...
</FileSystem>
And uncomment the blocks under them (there are 3 in total):
JBoss Release 2.6.5
232
CMS Portlet
<!-- LocalFileSystem: uses FileSystem for storage. -->
<FileSystem class="org.apache.jackrabbit.core.fs.local.LocalFileSystem">
...
</FileSystem>
2.
Now comment out the following blocks (there are 2 in total):
<!-- HibernatePersistentManager: uses RDBMS + Hibernate for storage -->
<PersistenceManager class="org.jboss.portal.cms.hibernate.state.HibernatePersistenceManager">
...
</PersistenceManager>
And uncomment the blocks under them (there are 2 in total):
<!-- XMLPersistenceManager: uses FileSystem for storage -->
<PersistenceManager class="org.apache.jackrabbit.core.state.xml.XMLPersistenceManager"/>
Warning
If you do any change at the workspaces configuration you will need to delete the file
$JBOSS_HOME/server/xxx/data/portal/cms/conf/workspaces/default/workspace.xml before restarting
JBoss or redeploying JBoss Portal. If you forget to do that, the changes won't affect the CMS. For the same
reason, you also need to delete that file if you recompile JBoss Portal after changing the name of the datasource. Note that on a cluster environment, you need to remove that file (if it exists) on all the nodes.
21.4.3.2. 100% Database Storage
This is the default configuration for the CMS store. Please view
portal.sar/portal-cms.sar/META-INF/jboss-service.xml , for guidance on how to reset it.
the
original
jboss-
21.4.3.3. Mixed Storage
Mixed storage consists of meta-data being stored in the DB and blobs being stored on the Filesystem. This is the recommended setting for those of you that serve large files or stream media content.
Setting the repository this way is simple. Change
portal.sar/portal-cms.sar/META-INF/jboss-service.xml , from:
every
instance
in
the
file
jboss-
<param name="externalBLOBs" value="false"/>
to:
<param name="externalBLOBs" value="true"/>
Warning
If you do any change at the workspaces configuration you will need to delete the file
$JBOSS_HOME/server/xxx/data/portal/cms/conf/workspaces/default/workspace.xml before restarting
JBoss or redeploying JBoss Portal. If you forget to do that, the changes won't affect the CMS. For the same
reason, you also need to delete that file if you recompile JBoss Portal after changing the name of the data-
JBoss Release 2.6.5
233
CMS Portlet
source. Note that on a cluster environment, you need to remove that file (if it exists) on all the nodes.
21.5. Localization Support
The CMS Portlet now serves content based on the user's locale setting. For example: if a user's locale is set to
Spanish in his browser, and he requests URL: default/index.html , the CMSPortlet will first try and retrieve the
Spanish version of that file. If a Spanish version is not found, it will then try and retrieve the default language version set for the CMSPortlet.
21.6. CMS Service
The CMS portlet calls a CMS service that can be reused in your own portlets.
21.6.1. CMS Interceptors
Since JBoss Portal 2.4 you can add your own interceptor stack to the CMS service. The interceptors are called
around each command (Get a file, write a file, create a folder...), this is a very easy way to customize some actions
based on your needs.
To create your own interceptor you just need to extend the org.jboss.portal.cms.CMSInterceptor class and
provide the content of the invoke(JCRCommand) method. Do not forget to make a call to JCRCommand.invokeNext() or the command will never be executed.
JBoss Portal relies on the interceptor mechanism to integrate its Fine Grained Security Service and the Publish/
Approve Workflow Service
To
add
or
remove
an
interceptor, you just need to edit the following file: portalIt works the same way as the server interceptor, for each interceptor you
need to define an MBean then add it to the cms interceptor stack. For example, if you have the 2 default interceptors, you should have the following lines in the jboss-service.xml file:
cms-sar/META-INF/jboss-service.xml.
<!-- ACL Security Interceptor -->
<mbean code="org.jboss.portal.cms.impl.interceptors.ACLInterceptor"
name="portal:service=Interceptor,type=Cms,name=ACL" xmbean-dd=""
xmbean-code="org.jboss.portal.jems.as.system.JBossServiceModelMBean">
<xmbean />
<attribute name="JNDIName">
java:/portal/cms/ACLInterceptor
</attribute>
<attribute name="CmsSessionFactory">
java:/portal/cms/CMSSessionFactory
</attribute>
<attribute name="IdentitySessionFactory">
java:/portal/IdentitySessionFactory
</attribute>
<attribute name="DefaultPolicy">
<policy>
<!-- permissions on the root cms node -->
<criteria name="path" value="/">
<permission name="cms" action="read">
<role name="Anonymous" />
</permission>
<permission name="cms" action="write">
JBoss Release 2.6.5
234
CMS Portlet
<role name="User" />
</permission>
<permission name="cms" action="manage">
<role name="Admin" />
</permission>
</criteria>
<!-- permissions on the default cms node -->
<criteria name="path" value="/default">
<permission name="cms" action="read">
<role name="Anonymous" />
</permission>
<permission name="cms" action="write">
<role name="User" />
</permission>
<permission name="cms" action="manage">
<role name="Admin" />
</permission>
</criteria>
<!-- permissions on the private/protected node -->
<criteria name="path" value="/default/private">
<permission name="cms" action="manage">
<role name="Admin" />
</permission>
</criteria>
</policy>
</attribute>
<depends optional-attribute-name="AuthorizationManager"
proxy-type="attribute">
portal:service=AuthorizationManager,type=cms
</depends>
<depends>portal:service=Hibernate,type=CMS</depends>
<depends>
portal:service=Module,type=IdentityServiceController
</depends>
</mbean>
<!-- Approval Workflow Interceptor -->
<mbean
code="org.jboss.portal.cms.impl.interceptors.ApprovalWorkflowInterceptor"
name="portal:service=Interceptor,type=Cms,name=ApprovalWorkflow"
xmbean-dd=""
xmbean-code="org.jboss.portal.jems.as.system.JBossServiceModelMBean">
<xmbean />
<attribute name="JNDIName">
java:/portal/cms/ApprovalWorkflowInterceptor
</attribute>
<depends>portal:service=Hibernate,type=CMS</depends>
</mbean>
<!-- CMS Interceptor Registration -->
<mbean
code="org.jboss.portal.server.impl.invocation.JBossInterceptorStackFactory"
name="portal:service=InterceptorStackFactory,type=Cms" xmbean-dd=""
xmbean-code="org.jboss.portal.jems.as.system.JBossServiceModelMBean">
<xmbean />
<depends-list optional-attribute-name="InterceptorNames">
<depends-list-element>
portal:service=Interceptor,type=Cms,name=ACL
</depends-list-element>
<depends-list-element>
portal:service=Interceptor,type=Cms,name=ApprovalWorkflow
</depends-list-element>
</depends-list>
</mbean>
JBoss Release 2.6.5
235
CMS Portlet
The first two MBeans define the interceptors and the third MBean, define which interceptors to add to the CMS
service.
If you create your own interceptor org.example.myCMSInterceptor, the service descriptor file will look like:
<mbean code="org.example.myCMSInterceptor"
name="portal:service=Interceptor,type=Cms,name=MyName" xmbean-dd=""
xmbean-code="org.jboss.portal.common.system.JBossServiceModelMBean">
<xmbean />
</mbean>
<!-- ACL Security Interceptor -->
<mbean code="org.jboss.portal.cms.impl.interceptors.ACLInterceptor"
name="portal:service=Interceptor,type=Cms,name=ACL" xmbean-dd=""
xmbean-code="org.jboss.portal.jems.as.system.JBossServiceModelMBean">
<xmbean />
<attribute name="JNDIName">
java:/portal/cms/ACLInterceptor
</attribute>
<attribute name="CmsSessionFactory">
java:/portal/cms/CMSSessionFactory
</attribute>
<attribute name="IdentitySessionFactory">
java:/portal/IdentitySessionFactory
</attribute>
<attribute name="DefaultPolicy">
<policy>
<!-- permissions on the root cms node -->
<criteria name="path" value="/">
<permission name="cms" action="read">
<role name="Anonymous" />
</permission>
<permission name="cms" action="write">
<role name="User" />
</permission>
<permission name="cms" action="manage">
<role name="Admin" />
</permission>
</criteria>
<!-- permissions on the default cms node -->
<criteria name="path" value="/default">
<permission name="cms" action="read">
<role name="Anonymous" />
</permission>
<permission name="cms" action="write">
<role name="User" />
</permission>
<permission name="cms" action="manage">
<role name="Admin" />
</permission>
</criteria>
<!-- permissions on the private/protected node -->
<criteria name="path" value="/default/private">
<permission name="cms" action="manage">
<role name="Admin" />
</permission>
</criteria>
</policy>
</attribute>
<depends optional-attribute-name="AuthorizationManager"
proxy-type="attribute">
portal:service=AuthorizationManager,type=cms
</depends>
<depends>portal:service=Hibernate,type=CMS</depends>
<depends>
portal:service=Module,type=IdentityServiceController
JBoss Release 2.6.5
236
CMS Portlet
</depends>
</mbean>
<!-- Approval Workflow Interceptor -->
<mbean
code="org.jboss.portal.cms.impl.interceptors.ApprovalWorkflowInterceptor"
name="portal:service=Interceptor,type=Cms,name=ApprovalWorkflow"
xmbean-dd=""
xmbean-code="org.jboss.portal.jems.as.system.JBossServiceModelMBean">
<xmbean />
<attribute name="JNDIName">
java:/portal/cms/ApprovalWorkflowInterceptor
</attribute>
<depends>portal:service=Hibernate,type=CMS</depends>
</mbean>
<mbean
code="org.jboss.portal.server.impl.invocation.JBossInterceptorStackFactory"
name="portal:service=InterceptorStackFactory,type=Cms" xmbean-dd=""
xmbean-code="org.jboss.portal.jems.as.system.JBossServiceModelMBean">
<xmbean />
<depends-list optional-attribute-name="InterceptorNames">
<depends-list-element>
portal:service=Interceptor,type=Cms,name=ACL
</depends-list-element>
<depends-list-element>
portal:service=Interceptor,type=Cms,name=ApprovalWorkflow
</depends-list-element>
</depends-list>
</mbean>
<!-- CMS Interceptor Registration -->
<mbean
code="org.jboss.portal.server.impl.invocation.JBossInterceptorStack"
name="portal:service=InterceptorStack,type=Cms" xmbean-dd=""
xmbean-code="org.jboss.portal.common.system.JBossServiceModelMBean">
<xmbean />
<depends-list optional-attribute-name="InterceptorNames">
<depends-list-element>
portal:service=Interceptor,type=Cms,name=ACL
</depends-list-element>
<depends-list-element>
portal:service=Interceptor,type=Cms,name=ApprovalWorkflow
</depends-list-element>
<depends-list-element>
portal:service=Interceptor,type=Cms,name=MyName
</depends-list-element>
</depends-list>
</mbean>
Note
The interceptor order is important !
To check that the interceptors have been correctly added, you can check the JMX console, by going to: http://localhost.localdomain:8080/jmx-console/HtmlAdaptor?action=inspectMBean&name=portal%3Aservic
e%3DInterceptorStack%2Ctype%3DCms
JBoss Release 2.6.5
You should notice all the interceptors in the attribute "interceptors".
237
22
Portal Workflow
Sohil Shah <sshah
@ redhat dot com>
JBoss Portal packages a Workflow Service based on JBPM. This service provides you with the JBPM services that
your portal can use to build out the end-user/application workflows that should meet your portal's requirements.
22.1. JBPM Workflow Engine Integration
The JBPM Workflow service is packaged as an mbean and takes care of all the low-level JBPM related functions.
The configuration is found in jboss-portal.sar/portal-cms.sar/portal-workflow.sar/META-INF/jboss-service.xml.
The mbean service configuration is as follows:
<!-- Hibernate service -->
<mbean
code="org.jboss.portal.jems.hibernate.SessionFactoryBinder"
name="portal:service=Hibernate,type=Workflow"
xmbean-dd=""
xmbean-code="org.jboss.portal.jems.as.system.JBossServiceModelMBean">
<xmbean/>
<depends>jboss.jca:service=DataSourceBinding,[email protected]@</depends>
<attribute name="DoChecking">true</attribute>
<attribute name="ConfigLocation">conf/hibernate/workflow/hibernate.cfg.xml</attribute>
<attribute name="JNDIName">java:/portal/workflow/WorkFlowSessionFactory</attribute>
</mbean>
<!-- Workflow service -->
<mbean
code="org.jboss.portal.workflow.service.WorkflowServiceImpl"
name="portal:service=Workflow,type=WorkflowService"
xmbean-dd=""
xmbean-code="org.jboss.portal.jems.as.system.JBossServiceModelMBean">
<xmbean/>
<depends>portal:service=Hibernate,type=Workflow</depends>
<attribute name="JbpmConfigurationXml">
<jbpm-configuration>
<jbpm-context>
<service name="persistence"
factory="org.jbpm.persistence.db.DbPersistenceServiceFactory"/>
</jbpm-context>
<string name="resource.hibernate.cfg.xml"
value="conf/hibernate/workflow/hibernate.cfg.xml"/>
<string name="resource.business.calendar"
value="org/jbpm/calendar/jbpm.business.calendar.properties"/>
<string name="resource.default.modules"
value="org/jbpm/graph/def/jbpm.default.modules.properties"/>
<string name="resource.converter"
value="org/jbpm/db/hibernate/jbpm.converter.properties"/>
<string name="resource.action.types" value="org/jbpm/graph/action/action.types.xml"/>
<string name="resource.node.types" value="org/jbpm/graph/node/node.types.xml"/>
<string name="resource.varmapping" value="org/jbpm/context/exe/jbpm.varmapping.xml"/>
JBoss Release 2.6.5
238
Portal Workflow
</jbpm-configuration>
</attribute>
</mbean>
22.2. CMS Publish/Approve Workflow Service
The CMS Publish/Approval Workflow feature can be optionally turned on so that, every file that is created or updated needs to go through an Approval process before it can be published to go Live. The current implementation,
creates a pending queue for managers. The managers can then either approve or reject the publishing of the document in question.
1. How activate this feature?
In the following file, jboss-portal.sar/portal-cms.sar/META-INF/jboss-service.xml, activate this feature on the
org.jboss.portal.cms.impl.jcr.JCRCMS MBean
<mbean
code="org.jboss.portal.cms.impl.jcr.JCRCMS"
name="portal:service=CMS"
xmbean-dd=""
xmbean-code="org.jboss.portal.jems.as.system.JBossServiceModelMBean">
<xmbean/>
<!-- The datasource hibernate depends on,
it can be commented when the file store is used -->
<depends>jboss.jca:service=DataSourceBinding,name=PortalDS</depends>
<depends>portal:service=JAASLoginModule</depends>
<depends>portal:service=Hibernate,type=CMS</depends>
<depends>portal:service=Module,type=IdentityServiceController</depends>
<!-- Uncomment this to activate publish/approval workflow integration -->
<depends optional-attribute-name="ApprovePublishWorkflow"
proxy-type="attribute">portal:service=ApprovePublish,type=Workflow</depends>
<depends optional-attribute-name="StackFactory" proxy-type="attribute">
portal:service=InterceptorStackFactory,type=Cms
</depends>
<attribute name="DoChecking">true</attribute>
<attribute name="DefaultContentLocation">
portal/cms/conf/default-content/default/</attribute>
<attribute name="DefaultLocale">en</attribute>
<attribute name="RepositoryName">PortalRepository</attribute>
<attribute name="HomeDir">${jboss.server.data.dir}${/}portal${/}cms${/}conf</attribute>
<attribute name="Config">
2. How to configure this feature?
The
configuration
for
this
workflow
service
is
found
portal.sar/portal-cms.sar/portal-workflow.sar/META-INF/jboss-service.xml file
JBoss Release 2.6.5
in
the
jboss-
239
Portal Workflow
<!-- ApprovePublish workflow service -->
<mbean
code="org.jboss.portal.workflow.cms.ApprovePublishImpl"
name="portal:service=ApprovePublish,type=Workflow"
xmbean-dd=""
xmbean-code="org.jboss.portal.jems.as.system.JBossServiceModelMBean">
<xmbean/>
<depends optional-attribute-name="WorkflowService" proxy-type="attribute">
portal:service=Workflow,type=WorkflowService
</depends>
<depends optional-attribute-name="IdentityServiceController" proxy-type="attribute">
portal:service=Module,type=IdentityServiceController
</depends>
<!-- JBPM process definition -->
<attribute name="Process">
<!-- cms approval workflow -->
<process-definition name="approval_workflow">
<start-state>
<transition to="request_approval"/>
</start-state>
<task-node name="request_approval" signal="first">
<task name="approve_publish">
<assignment class="org.jboss.portal.cms.workflow.PublishAssignmentHandler"/>
<event type="task-start">
<action class="org.jboss.portal.cms.workflow.FinalizePublish"/>
</event>
<exception-handler>
<action class="org.jboss.portal.workflow.cms.TaskExceptionHandler"/>
</exception-handler>
</task>
<transition name="approval" to="end"/>
<transition name="rejection" to="end"/>
</task-node>
<end-state name="end"/>
</process-definition>
</attribute>
<!-overwrite = false creates the process first time if does not exist, for
subsequent server restarts, this process definition remains in tact
overwrite = true creates the process first time if does not exist,
for subsequent server restarts, it creates a new version of the process definition
which will be used for processes created from then onwards. Old processes created
for an older version of the definition remain in tact and use their corresponding
process definition.
Typically use overwrite=false and overwrite=true only when a new process definition
elated to this workflow needs to be deployed
-->
<attribute name="Overwrite">false</attribute>
<!-a comma separated list of portal roles that are designated
to act as workflow managers. They are allowed to
approve/reject content publish requests
-->
<attribute name="ManagerRoles">Admin</attribute>
<attribute name="JNDIName">java:portal/ApprovePublishWorkflow</attribute>
</mbean>
JBoss Release 2.6.5
240
23
Navigation Tabs
Roy Russo
Thomas Heute <[email protected]>
The navigation tabs allow users to navigate the portal pages. This section describes some of the functionality available in configuring them.
23.1. Explicit ordering of tabs
Explicit ordering of the tab display, is accomplished via page properties that are defined in your *-object.xml ( Section 6.2.1 ). Ordering is accomplished using the order tag at the page level as a page property.
<page>
JBoss Release 2.6.5
241
Navigation Tabs
<page-name>default</page-name>
<properties>
<property>
<name>order</name>
<value>1</value>
</property>
</properties>
...
</page>
23.2. Translating tab labels
Labels on tabs can be defined in multiple languages. Two different ways can be used, the first one consist at defining several display name for page objects, the second one consists of defining a resource bundle where to find the
localized display-name. Both methods have advantages and drawbacks.
23.2.1. Method one: Multiple display-name
In the *-object.xml descriptor under the page element, it is possible to define a display-name per locale. Here is
an example:
<page>
<page-name>News</page-name>
<display-name xml:lang="en">News</display-name>
<display-name xml:lang="it">Novita'</display-name>
<display-name xml:lang="es">Noticias</display-name>
<display-name xml:lang="fr">Actualités</display-name>
...
</page>
Here we defined a display name for four different languages. The advantage of this method is that it is simple and
the display name is kept along the metadata. The drawback of this method is that if you may end up with different
places to keep your localized data. If you are using resource bundles for other elements, the second method might
be simpler when you add new supported languages.
23.2.2. Defining a resource bundle and supported locales
If you are already using resource bundles for localization you may prefer to point to those files. To do so you can
define the name of your ressource bundle. The files should be in the classloader of the war containing the
*-object.xml where you define them, meaning in the same war file.
Here is an example:
<page>
<page-name>Weather</page-name>
<supported-locale>fr</supported-locale>
<supported-locale>en</supported-locale>
...
</page>
JBoss Release 2.6.5
242
Navigation Tabs
With one or the other method, accessing the portal will now display the tab names with the preferred locale if a localized value exists.
Warning
If you change the values in the descriptor (method 1) or in the resource bundles (method 2) you need to use
the <if-exists>overwrite</if-exists> so that the values are updated
JBoss Release 2.6.5
243
24
Layouts and Themes
Martin Holzner <[email protected]>
Mark Fernandes <[email protected]>
Thomas Heute <[email protected]>
24.1. Overview
Portals usually render the markup fragments of several portlets, and aggregate these fragments into one page that
ultimately gets sent back as response. Each portlet on that page will be decorated by the portal to limit the real estate the portlet has on the page, but also to allow the portal to inject extra functionality on a per portlet basis. Classic examples of this injection are the maximize, minimize and mode change links that will appear in the portlet
window , together with the title.
Layouts and themes allow to manipulate the look and feel of the portal. Layouts are responsible to render markup
that will wrap the markup fragments produced by the individual portlets. Themes, on the other hand, are responsible to style and enhance this markup.
In JBoss Portal, layouts are implemented as a JSP or a Servlet. Themes are implemented using CSS Style sheets,
javascript and images. The binding element between layouts and themes are the class and id attributes of the
rendered markup.
JBoss Portal has the concept of regions on a page. When a page is defined, and portlet windows are assigned to the
page, the region, and order inside the region, has to be specified as well. For portal layouts this has significant
meaning. It defines the top most markup container that can wrap portlet content (other then the static markup in the
JSP itself). In other words: from a layout perspective all portlets of a page are assigned to one or more regions.
Each region can contain one or more portlets. To render the page content to return from a portal request, the portal
has to render the layout JSP, and for each region, all the portlets in the region.
Since the markup around each region, and around each portlet inside that region, is effectively the same for all the
pages of a portal, it makes sense to encapsulate it in its own entity.
To implement this encapsulation there are several ways:
•
JSPs that get included from the layout JSP for each region/portlet
•
a taglib that allows to place region, window, and decoration tags into the layout JSP
JBoss Release 2.6.5
244
Layouts and Themes
• a taglib that uses a pluggable API to delegate the markup generation to a set of classes
In JBoss Portal you can currently see two out of these approaches, namely the first and the last. Examples for the
first can be found in the portal-core.war, implemented by the nodesk and phalanx layouts. Examples for the third
approach can be found in the same war, implemented by the industrial and Nphalanx layout. What encapsulates the
markup generation for each region, window, and portlet decoration in this last approach is what's called the
RenderSet.
The RenderSet consist of four interfaces that correspond with the four markup containers that wrap the markup
fragments of one of more portlets:
•
Region
•
Window
•
Decoration
•
Portlet Content
While we want to leave it open to you to decide which way to implement your layouts and themes, we strongly believe that the last approach is superior, and allows for far more flexibility, and clearer separation of duties between
portal developers and web designers.
The last topic to introduce in this overview is the one of portal themes. A theme is a collection of web design artifacts. It defines a set of CSS, javascript and image files that together decide about the look and feel of the portal
page. The theme can take a wide spectrum of control over the look and feel. It can limit itself to decide fonts and
colors, or it can take over a lot more and decide the placement (location) of portlets and much more.
24.2. Header
24.2.1. Overview
The default header is divided into two parts, links to pages displayed as tabs and links to navigate between portals
and dahsboards as well as loggin in and out. Those two parts are included into the template thanks to the layout as
defined in Section 24.3. In fact, the region named, dashboardnav will include the navigation links, while the region
named navigation will include the navigation tabs. It is then easy to hide one and/or the other by removing the
corresponding inclusion in the layout.
Screenshot of the header with the 'renaissance' theme
Note
Here, we use split content from rendering by using a CSS style sheet, it allow us to change the display by
switching the CSS without affecting the content. THe Maple theme will display the links on the left side
with a different font for example. THis is up to you to choose or not this approach
JBoss Release 2.6.5
245
Layouts and Themes
To customize the header there are several options detailed after.
•
The first option would simply require to modify the theme CSS, by doing this you could change the fonts, the
way tabs are rendered, colors and many other things but not change the content.
•
The second option is to modify the provided JSPs, header.jsp and tabs.jsp. It gives you more flexibility than
the previous solution on modifying the content. Links to legacy application could easily be added, URLs could
be arranged differently, the CSS approach could be replaced by good old HTML, CSS style names could be
changed... The drawback of this method compare to the next one is the limitation in what is accessible from the
JSP.
24.2.1.1. Writing his own JSPs
The content of those two parts are displayed thanks to two different JSP pages. By default you would find those
pages in the directory portal-core.war/WEB-INF/jsp/header/. The file header.jsp is used to display the links
that are displayed on the upper right of the default theme. The file tabs.jsp is used to display the pages tabs appearing on the left.
Again, you have several choices, either to edit the included JSPs directly or create your own, store them in a web
application then edit the following file: jboss-portal.sar/META-INF/jboss-service.xml. The interesting part in
that file is the following:
<mbean
code="org.jboss.portal.core.aspects.controller.PageCustomizerInterceptor"
name="portal:service=Interceptor,type=Command,name=PageCustomizer"
xmbean-dd=""
xmbean-code="org.jboss.portal.jems.as.system.JBossServiceModelMBean">
<xmbean/>
<attribute name="TargetContextPath">/portal-core</attribute>
<attribute name="HeaderPath">/WEB-INF/jsp/header/header.jsp</attribute>
<attribute name="TabsPath">/WEB-INF/jsp/header/tabs.jsp</attribute>
<depends
optional-attribute-name="PortalAuthorizationManagerFactory"
proxy-type="attribute">portal:service=PortalAuthorizationManagerFactory</depends>
</mbean>
The three attributes are:
•
TargetContextPath: Defines the web application context where the JSPs are located
•
HeaderPath: Defines the location (in the web application previously defined) of the JSP in charge of writing the
header links
•
TabsPath: Defines the location (in the web application previously defined) of the JSP in charge of writing the
pages links (note that it doesn't have to be renderer as tabs)
Writing the header JSP
A couple of request attributes are set so that they can be used by the JSP, here is the list of attributes and their
meaning:
•
org.jboss.portal.header.USER:
JBoss Release 2.6.5
A org.jboss.portal.identity.User object of the logged-in user, null if
246
Layouts and Themes
the user is not logged-in.
•
org.jboss.portal.header.LOGIN_URL:
URL to logging-in.
•
org.jboss.portal.header.DASHBOARD_URL:
•
org.jboss.portal.header.DEFAULT_PORTAL_URL:
URL to the dashboard, null if the user is already on the dashboard, null if the user is on the default portal already.
URL to the default page of the portal named 'default', null if
the user is on the default portal already.
•
org.jboss.portal.header.ADMIN_PORTAL_URL:
URL to the default page of the admin portal (named 'admin'),
null if the user is on the admin portal already.
•
org.jboss.portal.header.EDIT_DASHBOARD_URL:
URL to the page content editor of the dashboard, set only if
the user is on the dashboard, null otherwise.
•
org.jboss.portal.header.COPY_TO_DASHBOARD_URL:
URL to copy a page from a portal to the personal dash-
board, null if the user is on the dashboard.
• org.jboss.portal.header.SIGN_OUT_URL: URL to log out the portal.
Every attribute that is an URL attribute is an object implementing the org.jboss.portal.api.PortalURL interface.
Therefore it is possible to generate the URL using the toString() method and change various things related to the
URL. With that in hand, if someone just wanted to display the logged-in username and a link to log out, he could
write:
<%@ page import="org.jboss.portal.identity.User" %>
<%
User user = (User) request.getAttribute("org.jboss.portal.header.USER");
PortalURL signOutURL = (PortalURL)request.getAttribute("org.jboss.portal.header.SIGN_OUT_URL");
PortalURL loginURL = (PortalURL)request.getAttribute("org.jboss.portal.header.LOGIN_URL");
if (user == null)
{
%>
<a href="<%= loginURL %>">Login</a>
<%
}
else
{
%>
Logged in as: <%= user.getUserName() %>
<br/>
<a href="<%= signOutURL %>">Logout</a>
<%
}
%>
Writing the tabs JSP
A couple of request attributes are set so that they can be used by the JSP, here is the list of attributes and their
meaning:
•
org.jboss.portal.api.PORTAL_NODE:
A org.jboss.portal.api.node.PortalNode object of the root Portal
node. Authorized children and siblings of this object are accessible.
JBoss Release 2.6.5
247
Layouts and Themes
•
org.jboss.portal.api.PORTAL_RUNTIME_CONTEXT:
A org.jboss.portal.api.PortalRuntimeContext object
that can be used to render URLs.
The default file in charge of displaying the tabs can be found in: portal-core.war/WEB-INF/jsp/header/
24.3. Layouts
24.3.1. How to define a Layout
Layouts are used by the portal to produce the actual markup of a portal response. After all the portlets on a page
have been rendered and have produced their markup fragments, the layout is responsible for aggregating all these
pieces, mix them with some ingredients from the portal itself, and at the end write the response back to the requesting client.
Layouts can be either a JSP or a Servlet. The portal determines the layout to use via the configured properties of the
portal, or the requested page. Both, portal and pages, can define the layout to use in order to render their content. In
case both define a layout, the layout defined for the page will overwrite the one defined for the portal.
A Layout is defined in the layout descriptor named portal-layouts.xml. This descriptor must be part of the portal
application, and is picked up by the layout deployer. If the layout deployer detects such a descriptor in a web application, it will parse the content and register the layouts with the layout service of the portal. Here is an example
of such a descriptor file:
<layouts>
<layout>
<name>phalanx</name>
<uri>/phalanx/index.jsp</uri>
</layout>
<layout>
<name>industrial</name>
<uri>/industrial/index.jsp</uri>
<uri state="maximized">/industrial/maximized.jsp</uri>
</layout>
</layouts>
24.3.2. How to use a Layout
24.3.2.1. Declarative use
Portals and pages can be configured to use a particular layout. The connection to the desired layout is made in the
portal descriptor (YourNameHere-object.xml). Here is an example of such a portal descriptor:
<portal>
<portal-name>default</portal-name>
<properties>
<!-- Set the layout for the default portal -->
<!-- see also portal-layouts.xml -->
<property>
<name>layout.id</name>
<value>phalanx</value>
</property>
</properties>
JBoss Release 2.6.5
248
Layouts and Themes
<pages>
<page>
<page-name>theme test</page-name>
<properties>
<!-- set a difference layout for this page -->
<property>
<name>layout.id</name>
<value>industrial</value>
</property>
</properties>
</page>
</pages>
</portal>
The name specified for the layout to use has to match one of the names defined in the portal-layouts.xml descriptor
of one of the deployed applications.
As you can see, the portal or page property points to the layout to use via the name of the layout. The name has
been given to the layout in the layout descriptor. It is in that layout descriptor where the name gets linked to the
physical resource (the JSP or Servlet) that will actually render the layout.
24.3.2.2. Programmatic use
To access a layout from code, you need to get a reference to the LayoutService interface. The layout service is an
mbean that allows access to the PortalLayout interface for each layout that was defined in a portal layout
descriptor. As a layout developer you should never have to deal with the layout service directly. Your layout hooks
are the portal and page properties to configure the layout, and the layout strategy, where you can change the layout
to use for the current request, before the actual render process begins.
24.3.3. Where to place the Descriptor files
Both descriptors, the portal and the theme descriptor, are located in the WEB-INF/ folder of the deployed portal application. Note that this is not limited to the portal-core.war, but can be added to any WAR that you deploy to the
same server. The Portal runtime will detect the deployed application and introspect the WEB-INF folder for known
descriptors like the two mentioned here. If present, the appropriate meta data is formed and added to the portal
runtime. From that time on the resources in that application are available to be used by the portal. This is an elegant
way to dynamically add new layouts or themes to the portal without having to bring down , or even rebuild the core
portal itself.
24.3.4. Layout JSP-tags
The portal comes with a set of JSP tags that allow the layout developer faster development.
There are currently two taglibs, containing tags for different approaches to layouts:
•
portal-layout.tld
•
theme-basic-lib.tld
The theme-basic-lib.tld contains a list of tags that allow a JSP writer to access the state of the rendered page content. It is built on the assumption that regions, portlet windows and portlet decoration is managed inside the JSP.
JBoss Release 2.6.5
249
Layouts and Themes
The portal-layout.tld contains tags that work under the assumption that the RenderSet will take care of how regions,
portlet windows and the portlet decoration will be rendered. The advantage of this approach is that the resulting
JSP is much simpler and easier to read and maintain.
Here is an example layout JSP that uses tags from the latter:
<%@ taglib uri="/WEB-INF/theme/portal-layout.tld" prefix="p" %>
<!DOCTYPE html PUBLIC "-//W3C//DTD XHTML 1.0 Transitional//EN"
"http://www.w3.org/TR/xhtml1/DTD/xhtml1-transitional.dtd">
<html xmlns="http://www.w3.org/1999/xhtml">
<head>
<title>JBoss Portal</title>
<meta http-equiv="Content-Type" content="text/html;" />
<p:theme themeName='renaissance' />
<p:headerContent />
</head>
<body id="body">
<div id="portal-container">
<div id="sizer">
<div id="expander">
<div id="logoName"></div>
<table border="0" cellpadding="0" cellspacing="0" id="header-container">
<tr>
<td align="center" valign="top" id="header">
<div id="spacer"></div>
</td>
</tr>
</table>
<div id="content-container">
<p:region regionName='This-Is-The-Page-Region-To-Query-The-Page'
regionID='This-Is-The-Tag-ID-Attribute-To-Match-The-CSS-Selector'/>
<p:region regionName='left' regionID='regionA'/>
<p:region regionName='center' regionID='regionB'/>
<hr class="cleaner" />
<div id="footer-container" class="portal-copyright">Powered by
<a class="portal-copyright"
href="http://www.jboss.com/products/jbossportal">
JBoss Portal
</a>
</div>
</div>
</div>
</div>
</div>
</body>
</html>
1. The theme tag
The theme tag looks for the determined theme of the current request (see Portal Themes for more details). If no
theme was determined, this tag allows an optional attribute 'themeName' that can be used to specify a default theme
to use as a last resort. Based on the determined theme name, the ThemeService is called to lookup the theme with
this name and to get the resources associated with this theme. The resulting style and link elements are injected,
making sure that war context URLS are resolved appropriately.
2. The headerContent tag
JBoss Release 2.6.5
250
Layouts and Themes
This tags allows portlets to inject content into the header. More details about this function are mentioned in the 'other Theme Functions' section of this document.
3. The region tag
The region tag renders all the portlets in the specified region of the current page, using the determined RenderSet to
produce the markup that surrounds the individual portlet markup fragments. The regionName attribute functions as
a query param into the current page. It determines from what page region the portlets will be rendered in this tag.
The regionID attribute is what the RenderSet can use to generate a CSS selector for this particular region. In case of
the divRenderer, a DIV tag with an id attribute corresponding to the provided value will be rendered for this region.
This id in turn can be picked up by the CSS to style the region.
24.4. RenderSets
24.4.1. What is a RenderSet
A RenderSet can be used to produce the markup containers around portlets and portlet regions. The markup for
each region, and each portlet window in a region is identical. Further more, it is most likely identical across several
layouts. The way portlets are arranged and decorated will most likely not change across layouts. What will change
is the look and feel of the decoration, the images, fonts, and colors used to render each portlet window on the page.
This is clearly a task for the web designer, and hence should be realized via the portal theme. The layout only needs
to provide enough information to the theme so that it can do its job. The RenderSet is exactly that link between the
layout and the theme that takes the information available in the portal and renders markup containing the current
state of the page and each portlet on it. It makes sure that the markup around each region and portlet contains the
selectors that the theme CSS needs to style the page content appropriately.
A RenderSet consists of the implementations of four interfaces. Each of those interfaces corresponds to a markup
container on the page.
Here are the four markup containers and their interface representation:
•
Region - RegionRenderer
•
Window - WindowRenderer
•
Decoration - DecorationRenderer
• Portlet Content - PortletRenderer
All the renderer interfaces are specified in the org.jboss.portal.theme.render package.
The four markup containers are hierarchical. The region contains one or more windows. A window contains the
portlet decoration and the portlet content.
The region is responsible for arranging the positioning and order of each portlet window. Should they be arranged
in a row or a column? If there are more then one portlet window in a region, in what order should they appear?
The window is responsible for placing the window decoration, including the portlet title, over the portlet content, or
under, or next to it.
JBoss Release 2.6.5
251
Layouts and Themes
The decoration is responsible for inserting the correct markup with the links to the portlet modes and window states
currently available for each portlet.
The portlet content is responsible for inserting the actually rendered markup fragment that was produced by the
portlet itself.
24.4.2. How is a RenderSet defined
Similar to layouts, render sets must be defined in a RenderSet descriptor. The RenderSet descriptor is located in the
WEB-INF/layout folder of a web application, and is named portal-renderSet.xml. Here is an example descriptor:
<?xml version="1.0" encoding="UTF-8"?>
<portal-renderSet>
<renderSet name="divRenderer">
<set content-type="text/html">
<region-renderer>org.jboss.portal.theme.impl.render.DivRegionRenderer</region-renderer>
<window-renderer>org.jboss.portal.theme.impl.render.DivWindowRenderer</window-renderer>
<portlet-renderer>org.jboss.portal.theme.impl.render.DivPortletRenderer</portlet-renderer>
<decoration-renderer>
org.jboss.portal.theme.impl.render.DivDecorationRenderer
</decoration-renderer>
</set>
</renderSet>
<renderSet name="emptyRenderer">
<set content-type="text/html">
<region-renderer>org.jboss.portal.theme.impl.render.EmptyRegionRenderer</region-renderer>
<window-renderer>org.jboss.portal.theme.impl.render.EmptyWindowRenderer</window-renderer>
<portlet-renderer>
org.jboss.portal.theme.impl.render.EmptyPortletRenderer
</portlet-renderer>
<decoration-renderer>
org.jboss.portal.theme.impl.render.EmptyDecorationRenderer
</decoration-renderer>
</set>
</renderSet>
</portal-renderSet>
24.4.3. How to specify what RenderSet to use
Analogous to how a strategy is specified, the RenderSet can be specified as a portal or page property, or a particular layout can specify an anonymous RenderSet to use. Here is an example of a portal descriptor:
<?xml version="1.0" encoding="UTF-8"?>
<portal>
<portal-name>default</portal-name>
<properties>
<!-- use the divRenderer for this portal -->
<property>
<name>theme.renderSetId</name>
<value>divRenderer</value>
</property>
</properties>
<pages>
<default-page>default</default-page>
<page>
<page-name>default</page-name>
JBoss Release 2.6.5
252
Layouts and Themes
<properties>
<!-- overwrite the portal's renderset for this page -->
<property>
<name>theme.renderSetId</name>
<value>emptyRenderer</value>
</property>
</properties>
<window>
<window-name>TestPortletWindow</window-name>
<instance-ref>TestPortletInstance</instance-ref>
<region>center</region>
<height>0</height>
</window>
</page>
</pages>
</portal>
Here is an example of a layout descriptor with an anonymous RenderSet:
<?xml version="1.0" encoding="UTF-8"?>
<layouts>
<renderSet>
<set content-type="text/html">
<region-renderer>org.foo.theme.render.MyRegionRenderer</region-renderer>
<window-renderer>org.foo.theme.render.MyWindowRenderer</window-renderer>
<portlet-renderer>org.foo.theme.render.MyPortletRenderer</portlet-renderer>
<decoration-renderer>org.foo.theme.render.MyDecorationRenderer</decoration-renderer>
</set>
</renderSet>
<layout>
<name>generic</name>
<uri>/generic/index.jsp</uri>
<uri state="maximized">/generic/maximized.jsp</uri>
</layout>
</layouts>
Again, analogous to layout strategies, the anonymous RenderSet overwrites the one specified for the page, and that
overwrites the one specified for the portal. In other words: all pages that use the layout that defines an anonymous
RenderSet will use that RenderSet, and ignore what is defined as RenderSet for the portal or the page.
In addition to specifying the renderSet for a portal or a page, each individual portlet window can define what
renderSet to use for the one of the three aspects of a window, the window renderer, the decoration renderer, and the
portlet renderer. This feature allow you to use the the window renderer implementation from one renderSet, and the
decoration renderer from another. Here is an example for a window that uses the implementations of the
emptyRenderer renderSet for all three aspects:
<window>
<window-name>NavigationPortletWindow</window-name>
<instance-ref>NavigationPortletInstance</instance-ref>
<region>navigation</region>
<height>0</height>
<!-- overwrite portal and page properties set for the renderSet for this window -->
<properties>
<!-- use the window renderer from the emptyRenderer renderSet -->
<property>
<name>theme.windowRendererId</name>
<value>emptyRenderer</value>
</property>
<!-- use the decoration renderer from the emptyRenderer renderSet -->
<property>
<name>theme.decorationRendererId</name>
JBoss Release 2.6.5
253
Layouts and Themes
<value>emptyRenderer</value>
</property>
<!-- use the portlet renderer from the emptyRenderer renderSet -->
<property>
<name>theme.portletRendererId</name>
<value>emptyRenderer</value>
</property>
</properties>
</window>
24.5. Themes
24.5.1. What is a Theme
A portal theme is a collection of CSS styles, JavaScript files, and images, that all work together to style and enhance the rendered markup of the portal page. The theme works together with the layout and the RenderSet in producing the content and final look and feel of the portal response. Through clean separation of markup and styles a
much more flexible and powerful approach to theming portals is possible. While this approach is not enforced, it is
strongly encouraged. If you follow the definitions of the Theme Style Guide (see later), it is not necessary to
change the layout or the strategy, or the RenderSet to achieve very different look and feels for the portal. All you
need to change is the theme. Since the theme has no binary dependencies, it is very simple to swap, or change individual items of it. No compile or redeploy is necessary. Themes can be added or removed while the portal is active.
Themes can be deployed in separate web applications furthering even more the flexibility of this approach. Web
developers don't have to work with JSPs. They can stay in their favorite design tool and simple work against the
exploded war content that is deployed into the portal. The results can be validated life in the portal.
24.5.2. How to define a Theme
Themes can be added as part of any web application that is deployed to the portal server. All what is needed is a
theme descriptor file that is part of the deployed archive. This descriptor indicates to the portal what themes and
theme resources are becoming available to the portal. The theme deployer scans the descriptor and adds the
theme(s) to the ThemeService, which in turn makes the themes available for consumption by the portal. Here is an
example of a theme descriptor:
<themes>
<theme>
<name>nodesk</name>
<link href="/nodesk/css/portal_style.css" rel="stylesheet" type="text/css" />
<link rel="shortcut icon" href="/images/favicon.ico" />
</theme>
<theme>
<name>phalanx</name>
<link href="/phalanx/css/portal_style.css" rel="stylesheet" type="text/css" />
<link rel="shortcut icon" href="/images/favicon.ico" />
</theme>
<theme>
<name>industrial-CSSSelect</name>
<link rel="stylesheet" id="main_css" href="/industrial/portal_style.css" type="text/css" />
<link rel="shortcut icon" href="/industrial/images/favicon.ico" />
<script language="JavaScript" type="text/javascript">
JBoss Release 2.6.5
254
Layouts and Themes
// MAF - script to switch current tab and css in layout...
function switchCss(currentTab,colNum) {
var obj = currentTab;
var objParent = obj.parentNode;
if (document.getElementById("current") != null) {
var o = document.getElementById("current");
o.setAttribute("id","");
o.className = 'hoverOff';
objParent.setAttribute("id","current");
}
var css = document.getElementById("main_css");
source = css.href;
if (colNum == "3Col") {
if (source.indexOf("portal_style.css" != -1)) {
source = source.replace("portal_style.css","portal_style_3Col.css");
}
if (source.indexOf("portal_style_1Col.css" != -1)) {
source = source.replace("portal_style_1Col.css","portal_style_3Col.css");
}
}
if (colNum == "2Col") {
if (source.indexOf("portal_style_3Col.css" != -1)) {
source = source.replace("portal_style_3Col.css","portal_style.css");
}
if (source.indexOf("portal_style_1Col.css" != -1)) {
source = source.replace("portal_style_1Col.css","portal_style.css");
}
}
if (colNum == "1Col") {
if (source.indexOf("portal_style_3Col.css" != -1)) {
source = source.replace("portal_style_3Col.css","portal_style_1Col.css");
}
if (source.indexOf("portal_style.css" != -1)) {
source = source.replace("portal_style.css","portal_style_1Col.css");
}
}
css.href = source;
}
</script>
</theme>
</themes>
Themes are defined in the portal-themes.xml theme descriptor, which is located in the WEB-INF/ folder of the web
application.
24.5.3. How to use a Theme
Again, analogous to the way it is done for layouts, themes are specified in the portal descriptor as a portal or page
property. The page property overwrites the portal property. In addition to these two options, themes can also be
specified as part of the theme JSP tag , that is placed on the layout JSP. Here is an example portal descriptor that
specifies the phalanx theme as the theme for the entire portal, and the industrial theme for the theme test page:
<portal>
<portal-name>default</portal-name>
<properties>
<!-- Set the theme for the default portal -->
<property>
JBoss Release 2.6.5
255
Layouts and Themes
<name>layout.id</name>
<value>phalanx</value>
</property>
</properties>
<pages>
<page>
<page-name>theme test</page-name>
<properties>
<!-- set a difference layout for this page -->
<property>
<name>layout.id</name>
<value>industrial</value>
</property>
</properties>
<window>
<window-name>CatalogPortletWindow</window-name>
<instance-ref>CatalogPortletInstance</instance-ref>
<region>left</region>
<height>0</height>
</window>
</page>
</pages>
</portal>
And here is an example of a layout JSP that defines a default theme to use if no other theme was defined for the
portal or page:
<%@ taglib uri="/WEB-INF/theme/portal-layout.tld" prefix="p" %>
<!DOCTYPE html PUBLIC "-//W3C//DTD XHTML 1.0 Transitional//EN"
"http://www.w3.org/TR/xhtml1/DTD/xhtml1-transitional.dtd">
<html xmlns="http://www.w3.org/1999/xhtml">
<head>
<title><%= "JBoss Portal :: 2.2 early (Industrial)" %></title>
<meta http-equiv="Content-Type" content="text/html;" />
<p:theme themeName='industrial' />
<p:headerContent />
</head>
<body id="body">
<div id="portal-container">
<div id="sizer">
<div id="expander">
<div id="logoName"></div>
<table border="0" cellpadding="0" cellspacing="0"
id="header-container">
<tr>
<td align="center" valign="top" id="header">
<div id="spacer"></div>
</td>
</tr>
</table>
<div id="content-container">
<p:region
regionName='This-Is-The-Page-Region-To-Query-The-Page'
regionID='This-Is-The-Tag-ID-Attribute-To-Match-The-CSS-Selector' />
<p:region regionName='left' regionID='regionA' />
<p:region regionName='center' regionID='regionB' />
<hr class="cleaner" />
<div id="footer-container" class="portal-copyright">
Powered by
<a class="portal-copyright"
href="http://www.jboss.com/products/jbossportal">
JBoss Portal
</a>
<br />
Theme by
JBoss Release 2.6.5
256
Layouts and Themes
<a class="portal-copyright"
href="http://www.novell.com">
Novell
</a>
</div>
</div>
</div>
</div>
</div>
</body>
</html>
For the function of the individual tags in this example, please refer to the layout section of this document.
24.5.4. How to write your own Theme
Ask your favorite web designer and/or consult the Theme Style Guide in this document.
24.6. Other Theme Functionalities and Features
This section contains all the functionalities that don't fit with any of the other topics. Bits and pieces of useful functions that are related to the theme and layout functionality.
24.6.1. Content Rewriting and Header Content Injection
Portlets can have their content rewritten by the portal. This is useful if you want to uniquely namespace markup
(JavaScript functions for example) in the scope of a page. The rewrite functionality can be applied to the portlet
content (the markup fragment) and to content a portlet wants to inject into the header. The rewrite is implemented
as specified in the WSRP (OASIS: Web Services for Remote Portlets; producer write). As a result of this, the token
to use for rewrite is the WSRP specified "wsrp_rewrite_". If the portlet sets the following response property
res.setProperty("WSRP_REWRITE","true");
all occurrences of the wsrp_rewrite_ token in the portlet fragment will be replaced with a unique token (the window id). If the portlet also specifies content to be injected into the header of the page, that content is also subject to
this rewrite.
res.setProperty("HEADER_CONTENT", "
<script>function wsrp_rewrite_OnFocus(){alert('hello button');}</script>
");
Note that in order for the header content injection to work, the layout needs to make use of the headerContent JSP
tag, like:
<%@ taglib uri="/WEB-INF/theme/portal-layout.tld" prefix="p" %>
<!DOCTYPE html PUBLIC "-//W3C//DTD XHTML 1.0 Transitional//EN"
"http://www.w3.org/TR/xhtml1/DTD/xhtml1-transitional.dtd">
<html xmlns="http://www.w3.org/1999/xhtml">
<head>
<title><JBoss Portal 2.2 early</title>
<meta http-equiv="Content-Type" content="text/html;" />
<p:headerContent />
JBoss Release 2.6.5
257
Layouts and Themes
</head>
<body id="body">
<p>...</p>
</body>
</html>
24.6.2. Declarative CSS Style injection
If a portlet needs a CSS style sheet to be injected via a link tag in the page header, it can do so by providing the
context relative URI to the file in the jboss-portlet.xml descriptor, like:
<portlet-app>
<portlet>
<portlet-name>HeaderContentPortlet</portlet-name>
<header-content>
<link rel="stylesheet" type="text/css" href="/portlet-styles/HeaderContent.css"
title="" media="screen" />
</header-content>
</portlet>
</portlet-app>
This functionality, just like the previously described header content injection, requires the layout JSP to add the
"headerContent" JSP tag (see example above). One thing to note here is the order of the tags. If the headerContent
tag is placed after the theme tag, it will allow portlet injected CSS files to overwrite the theme's behavior, making
this feature even more powerful!
24.6.3. Disabling Portlet Decoration
One possible use of window properties is demonstrated in the divRenderer RenderSet implementation. If a window
definition (in the portal descriptor) contains a property like:
<window>
<window-name>HintPortletWindow</window-name>
<instance-ref>HintPortletInstance</instance-ref>
<region>center</region>
<height>0</height>
<properties>
<!-- turn the decoration off for this portlet (i.e. no title and mode/state links) -->
<property>
<name>theme.decorationRendererId</name>
<value>emptyRenderer</value>
</property>
</properties>
</window>
the DivWindowRenderer will use the decoration renderer from the emptyRenderer RenderSet to render the decoration for this window (not delegate to the DivDecorationRenderer). As a result, the portlet window will be part of
the rendered page, but it will not have a title, nor will it have any links to change the portlet mode or window state.
24.7. Theme Style Guide (based on the Industrial theme)
JBoss Release 2.6.5
258
Layouts and Themes
24.7.1. Overview
Note
This section to be updated soon with new CSS selectors found in JBoss Portal 2.6. The current definitions
remain, but the newer additions with regards to dashboards/drag-n-drop have not been documented as of
yet.
This document outlines the different selectors used to handle the layout and look/feel of the Industrial theme included in the JBoss portal.
A couple of things to know about the theming approach discussed below:
•
Main premise behind this approach was to provide a clean separation between the business and presentation
layer of the portal. As we go through each selector and explain the relation to the visual presentation on the
page, this will become more apparent.
•
The flexibility of the selectors used in the theme stylesheet allow a designer to very easily customize the visual
aspects of the portal, thereby taking the responsibility off of the developers hands through allowing the designer
to quickly achieve the desired effect w/out the need to dive down into code and/or having to deploy changes to
the portal. This saves time and allows both developers and designers to focus on what they do best.
•
This theme incorporates a liquid layout approach which allows elements on a page to expand/contract based on
screen resolution and provides a consistent look across varying display settings. However, the stylesheet is adaptable to facilitate a fixed layout and/or combination approach where elements are pixel based and completely
independent of viewport.
•
The pieces that make up the portal theme consist of at least one stylesheet and any associated images. Having a
consolidated set of files to control the portal look and feel allows administrators to effortlessly swap themes on
the fly. In addition, this clean separation of the pieces that make up a specific theme will enable sharing and
collaboration of different themes by those looking to get involved or contribute to the open source initiative.
24.7.2. Main Screen Shot
Screen shot using color outline of main ID selectors used to control presentation and layout:
JBoss Release 2.6.5
259
Layouts and Themes
•
Red Border - portal-container
•
Yellow Border - header-container
•
Orange Border - content-container
•
Blue Border - regionA/regionB
•
Green Border - portlet-container
24.7.3. List of CSS Selectors
The following is a list of the selectors used in the theme stylesheet, including a brief explanation of how each selector is used in the portal:
•
Portal Body Selector
#body {
JBoss Release 2.6.5
260
Layouts and Themes
background-color: #FFFFFF;
background-image: url( images/header_bg.gif );
background-repeat: repeat-x;
margin: 0px;
padding: 0px;
font-family: Verdana, Arial, Helvetica, sans-serif;
background-repeat: repeat-x;
font-size: 11px;
color: #656565;
}
Usage: This selector controls the background of the page, and can be modified to set a base font-family, layout
margin, etc. that will be inherited by all child elements that do not have their own individual style applied. By
default, the selector pulls an image background for the page.
•
Portal Header Selectors
#spacer {
width: 770px;
line-height: 0px;
font-size: 0px;
height: 0px;
}
Usage: Spacer div used to keep header at certain width regardless of display size. This is done to avoid overlapping of tab navigation in header. To account for different display sizes, this selector can be modified to force a
horizontal scroll in the browser which eliminates any issue with overlapping elements in the header.
#header-container {
background-repeat: repeat-y;
height: 100%;
min-width: 1000px;
width: 100%;
position: absolute;
bottom: 5px;*/
}
Usage: Wrapper selector used to control the position of the header on the page. This selector is applied as an ID
on the table used to structure the header. You can adjust the attributes to reposition the header location on the
page and/or create margin space on the top, right, bottom and left sides of the header.
Screenshot:
#header {
height: 65px;
width: 100%;
padding: 0px;
margin: 0px;
z-index: 1;
}
Usage: This selector applies the header background image in the portal. It can be adjusted to accommodate a
header background of a certain width/height or, as it currently does, repeat the header graphic so that it tiles
across the header portion of the page.
JBoss Release 2.6.5
261
Layouts and Themes
#logoName {
background-image: url( images/logo.gif );
background-repeat: no-repeat;
float: left;
width: 250px;
height: 25px;
z-index: 2;
position: absolute;
left: 20px;
top: 10px;
}
Usage: Logo selector which is used to brand the header with a specific, customized logo. The style is applied as
an ID on an absolutely positioned DIV element which enables it to be moved to any location on the page, and
allows it to be adjusted to accommodate a logo of any set width/height.
•
Portal Layout Region Selectors
#portal-container {
/* part of below IE hack to preserve min-width for portlet regions */
/*width: 100%;*/
margin: 4px 2% 0px 2%;
padding: 0 350px 0 350px;
}
Usage: Wrapper for entire portal which starts/ends after/before the BODY tag (see red border in screen shot).
The padding attribute for this selector is used to preserve a minimum width setting for the portlet regions
(discussed below). Similar to body selector, this style can modified to create margin or padding space on the
top, right, bottom and left sections of the page. It provides the design capability to accommodate most layouts
(e.g. a centered look such as the phalanx theme where there is some spacing around the content of the portal, or
a full width look as illustrated in the Industrial theme).
Screenshot:
JBoss Release 2.6.5
262
Layouts and Themes
/* min width for IE */
#expander {
position: relative;
padding: 0 0 0 0;
margin: 0 -350px 0 -350px;
min-width: 770px;
padding: 0 0 0 0;
}
/* min width hack for IE */
#sizer {
width: 100%;
}
/* IE Hack \*/
* html #portal-container,
* html #sizer,
* html #expander {
height: 0;
}
Usage: These selectors are used in conjunction with the above, portal-container, selector to preserve a minimum
width setting for the portlet regions. This was implemented to maintain a consistent look across different
browsers.
JBoss Release 2.6.5
263
Layouts and Themes
#content-container {
height: 100%;
text-align: left;
width: 100%;
min-width: 770px;
/*
position: absolute;
top: 70px;
left: 0px; / * z-index: 1; * /
/ * part of below IE hack
padding: 0 350px 0 350px; * /
padding: 0px 100px 0px 0px;
*/
}
Usage: Wrapper that contains all regions in portal with the exception of the header (see orange border in screen
shot). Its attributes can be adjusted to create margin space on page, as well as control positioning of the area of
the page below the header.
/* portlet regions within content-container. this includes footer-container. */
#regionA {
width: 30%;
float: left;
margin: 0px;
padding: 0px;
min-width: 250px; /*height: 300px;*/
}
Usage: First portlet region located within the content-container (see blue border in screen shot). This selector
controls the width of the region as well as its location on the page. Designers can very easily reposition this region in the portal (e.g. swap left regionA with right regionB, etc.) by adjusting the attributes of this selector.
#regionB {
/* test to swap columns..
margin: 0 30% 0 0; */
/*two column layout
margin: 0 0 0 30%;*/
padding: 0px; /* test to add 3rd region in layout...*/
width: 67%;
float: left; /*height: 300px;*/
}
Usage: Second portlet region located within the content-container (see blue border in screen shot). Similar to
regionA, this selector controls the width of the region as well as its location on the page.
#regionC {
/* inclusion of 3rd region - comment out for 2 region testing */
padding: 0px;
margin: 0px;
width: 28%;
float: left; /*hide 3rd region*/
display: none;
}
Usage: Third portlet region located within the content-container (please refer to blue border in screen shot representing regionA and regionB for an example). Used for 3 column layout. Similar to regionA and regionB, this
selector controls the width of the region as well as its location on the page.
Screenshot:
JBoss Release 2.6.5
264
Layouts and Themes
hr.cleaner {
clear:both;
height:1px;
margin: -1px 0 0 0;
padding:0;
border:none;
visibility: hidden;
}
Usage: Used to clear floats in regionA, regionB and regionC DIVs so that footer spans bottom of page.
#footer-container {
padding: 10px;
text-align: center;
clear: both;
}
Usage: Footer region located towards the bottom of the content-container (see above screen shot). This region
spans the entire width of the page, but can be adjusted (just like regionA, regionB and regionC) to take on a certain position and width/height in the layout.
•
Portlet Container Window Selectors
JBoss Release 2.6.5
265
Layouts and Themes
.portlet-container {
padding: 10px;
}
Usage: Wrapper that surrounds the portlet windows (see green border in screen shot). Currently, this selector is
used to create space (padding) between the portlets displayed in each particular region.
.portlet-titlebar-title {
color: #656565;
font-family: Verdana, Arial, Helvetica, sans-serif;
font-size: 12px;
font-weight: bold;
white-space: nowrap;
line-height: 100%;
float: left;
text-indent: 5px;
padding-top: 5px;
padding-bottom: 6px;
}
Usage: Class used to style the title of each portlet window. Attributes of this selector set font properties, indentation and position of title.
.portlet-mode-container {
float: right;
padding-top: 4px;
white-space: nowrap;
}
Usage: Wrapper that contains the portlet window modes that display in the top right section of the portlet windows.
.portlet-titlebar-left {
background-image: url( images/portlet-top-left.gif );
background-repeat: no-repeat;
width: 9px;
height: 29px;
min-width: 9px;
background-position: bottom;
}
Usage: Used to style the top left corner of the portlet window. Each portlet window consists of one table that
has 3 columns and 3 rows. This selector styles the first column (TD) in the first row (TR).
Screenshot:
.portlet-titlebar-center {
background-image: url( images/portlet-top-middle.gif );
background-repeat: repeat-x;
height: 29px;
background-position: bottom;
}
Usage: Used to style the center section of the portlet title bar. Each portlet window consists of one table that has
JBoss Release 2.6.5
266
Layouts and Themes
3 columns and 3 rows. This selector styles the second column (TD) in the first row (TR).
Screenshot:
.portlet-titlebar-right {
background-image: url( images/portlet-top-right.gif );
background-repeat: no-repeat;
width: 10px;
height: 30px;
min-width: 10px;
background-position: bottom left;
}
Usage: Used to style the top right corner of the portlet window. Each portlet window consists of one table that
has 3 columns and 3 rows. This selector styles the third column (TD) in the first row (TR).
Screenshot:
.portlet-content-left {
background-image: url( images/portlet-left-vertical.gif );
background-repeat: repeat-y;
width: 9px;
min-width: 9px;
/*
width:20px;
background-color:#FFFFFF;
border-left: 1px solid #dfe8ed;
*/
}
Usage: Used to style the left hand vertical lines that make up the portlet window. Each portlet window consists
of one table that has 3 columns and 3 rows. This selector styles the first column (TD) in the second row (TR).
Screenshot:
JBoss Release 2.6.5
267
Layouts and Themes
.portlet-content-center {
vertical-align: top;
padding: 0;
margin: 0;
}
Usage: Used to style the center, content area where the portlet content is injected into the portlet window (see
below screen). Attributes for this selector control the positioning of the portlet content as well as the background and font properties. Each portlet window consists of one table that has 3 columns and 3 rows. This selector styles the second column (TD) in the second row (TR).
Screenshot:
JBoss Release 2.6.5
268
Layouts and Themes
.portlet-body {
background-color: #FFFFFF;
padding: 0;
margin: 0;
}
Usage: An extra selector for controlling the content section of the portlet windows (see below screen). This was
added to better deal with structuring the content that gets inserted/rendered in the portlet windows, specifically
if the content is causing display problems in a portlet.
Screenshot:
JBoss Release 2.6.5
269
Layouts and Themes
.portlet-content-right {
background-image: url( images/portlet-right-vertical.gif );
height: 100%;
background-repeat: repeat-y;
background-position: left;
width: 5px;
min-width: 5px;
padding: 0;
margin: 0;
/*
width:5px;
background-color:#FFFFFF;
border-right: 1px solid #dfe8ed;
*/
}
Usage: Used to style the right hand vertical lines that make up the portlet window. Each portlet window consists of one table that has 3 columns and 3 rows. This selector styles the third column (TD) in the second row
(TR).
Screenshot:
JBoss Release 2.6.5
270
Layouts and Themes
.portlet-footer-left {
background-image: url( images/portlet-bottom-left.gif );
width: 9px;
height: 4px;
background-repeat: no-repeat;
background-position: top right;
min-width: 9px;
padding: 0;
margin: 0;
/*
background-color:#FFFFFF;
border-bottom: 1px solid #98b7c6;
border-left: 1px solid #dfe8ed;
height:5px;
*/
}
Usage: Used to style the bottom left corner of the portlet window. Each portlet window consists of one table
that has 3 columns and 3 rows. This selector styles the first column (TD) in the third row (TR).
Screenshot:
JBoss Release 2.6.5
271
Layouts and Themes
.portlet-footer-center {
background-image: url( images/portlet-bottom-middle.gif );
height: 4px;
background-repeat: repeat-x;
/* background-color:#FFFFFF;
border-bottom: 1px solid #98b7c6;
height:5px;
*/
}
Usage: Used to style the bottom, center of the portlet window (i.e. the bottom horizontal line in the Industrial
theme). Each portlet window consists of one table that has 3 columns and 3 rows. This selector styles the
second column (TD) in the third row (TR).
Screenshot:
JBoss Release 2.6.5
272
Layouts and Themes
.portlet-footer-right {
background-image: url( images/portlet-bottom-right.gif );
width: 5px;
height: 4px;
background-repeat: no-repeat;
min-width: 5px;
/*
background-color:#FFFFFF;
border-bottom: 1px solid #98b7c6;
border-right: 1px solid #dfe8ed;
height:5px;
*/
}
Usage: Used to style the bottom right corner of the portlet window. Each portlet window consists of one table
that has 3 columns and 3 rows. This selector styles the third column (TD) in the third row (TR).
Screenshot:
JBoss Release 2.6.5
273
Layouts and Themes
•
Portlet Window Mode Selectors
.portlet-mode-maximized {
background-image: url( images/ico_16_maximize.gif );
background-repeat: no-repeat;
width: 16px;
height: 16px;
float: left;
display: inline;
cursor: pointer;
padding-left: 3px;
}
Usage: Selector used to display the portlet maximize mode. Attributes for this selector control the display and
dimensions of the maximize icon, including the behavior of the mouse pointer when hovering the mode.
.portlet-mode-minimized {
background-image: url( images/ico_16_minimize.gif );
background-repeat: no-repeat;
width: 16px;
height: 16px;
float: left;
display: inline;
cursor: pointer;
padding-left: 3px;
}
Usage: Selector used to display the portlet minimize mode. Attributes for this selector control the display and
JBoss Release 2.6.5
274
Layouts and Themes
dimensions of the minimize icon, including the behavior of the mouse pointer when hovering the mode.
.portlet-mode-normal {
background-image: url( images/ico_16_normal.gif );
width: 16px;
height: 16px;
background-repeat: no-repeat;
float: left;
display: inline;
cursor: pointer;
padding-left: 3px;
}
Usage: Selector used to display the portlet normal mode (i.e. the icon that when clicked, restores the portlet to
the original, default view). Attributes for this selector control the display and dimensions of the normal icon, including the behavior of the mouse pointer when hovering the mode.
.portlet-mode-help {
background-image: url( images/ico_16_help.gif );
width: 16px;
height: 16px;
background-repeat: no-repeat;
float: left;
display: inline;
cursor: pointer;
padding-left: 3px;
}
Usage: Selector used to display the portlet help mode. Attributes for this selector control the display and dimensions of the help icon, including the behavior of the mouse pointer when hovering the mode.
.portlet-mode-edit {
background-image: url( images/ico_edit.gif );
background-repeat: no-repeat;
width: 28px;
height: 16px;
float: left;
display: inline;
cursor: pointer;
padding-left: 3px;
}
Usage: Selector used to display the portlet edit mode. Attributes for this selector control the display and dimensions of the edit icon, including the behavior of the mouse pointer when hovering the mode.
.portlet-mode-remove {
background-image: url( images/ico_16_remove.gif );
background-repeat: no-repeat;
width: 16px;
height: 16px;
float: left;
display: inline;
cursor: pointer;
padding-left: 3px;
}
Usage: Currently not available. But here is the intended use: Selector used to display the portlet remove mode.
Attributes for this selector control the display and dimensions of the remove icon, including the behavior of the
mouse pointer when hovering the mode.
.portlet-mode-view {
background-image: url( images/ico_cancel.gif );
background-repeat: no-repeat;
JBoss Release 2.6.5
275
Layouts and Themes
width: 28px;
height: 16px;
float: left;
display: inline;
cursor: pointer;
padding-left: 3px;
padding-right: 20px;
}
Usage: Selector used to display the portlet view mode. Attributes for this selector control the display and dimensions of the view icon, including the behavior of the mouse pointer when hovering the mode.
.portlet-mode-reload {
background-image: url( images/ico_16_reload.gif );
background-repeat: no-repeat;
width: 16px;
height: 16px;
float: left;
display: inline;
cursor: pointer;
padding-left: 3px;
}
Usage: Currently not available. But here is the intended use: Selector used to display the portlet reload mode.
Attributes for this selector control the display and dimensions of the reload icon, including the behavior of the
mouse pointer when hovering the mode.
•
Copyright Selectors
.portal-copyright {
font-family: Verdana, Arial, Helvetica, sans-serif;
font-size: 10px;
color: #5E6D7A;
}
a.portal-copyright {
color: #768591;
text-decoration: none;
}
a.portal-copyright:hover {
color: #bcbcbc;
text-decoration: underline;
}
Usage: The above three selectors are used to style copyright content in the portal. The portal-copyright selector
sets the font properties (color, etc.), and the a.portal-copyright/a.portal-copyright:hover selectors style any links
that are part of the copyright information.
•
Table Selectors
.portlet-table-header {
background-color: #eef;
padding: 0 5px 5px 5px;
font-weight: bold;
color: #656565;
font-size: 12px;
border-bottom: 1px solid #d5d5d5;
}
Usage: Intended for styling tables (specifically, the TH or table header elements) that get rendered within a
JBoss Release 2.6.5
276
Layouts and Themes
portlet window.
.portlet-table-body {
}
Usage: Intended for styling the table body element used to group rows in a table.
.portlet-table-alternate {
background-color: #E6E8E5;
border-bottom: 1px solid #d5d5d5;
}
Usage: Used to style the background color (and possibly other attributes) for every other row within a table.
.portlet-table-selected {
color: #000;
font-size: 12px;
background-color: #CBD4E6;
}
Usage: Used to style text, color, etc. in a selected cell range.
.portlet-table-subheader {
font-weight: bold;
color: #000;
font-size: 12px;
}
Usage: Used to style a subheading within a table that gets rendered in a portlet.
.portlet-table-footer {
padding: 5px 5px 0 5px;
font-weight: bold;
color: #656565;
font-size: 12px;
border: none;
border-top: 1px solid #d5d5d5;
}
Usage: Similar to portlet-table-header and portlet-table-body, this selector is used to style the table footer element which is used to group the footer row in a table.
.portlet-table-text {
padding: 3px 5px;
border-bottom: 1px solid #d5d5d5;
}
Usage: Text that belongs to the table but does not fall in one of the other categories (e.g. explanatory or help
text that is associated with the table). This selector can also be modified to provide styled text that can be used
in all tables that are rendered within a portlet.
•
FONT Selectors
.portlet-font {
color: #000000;
font-family: Verdana, Arial, Helvetica, sans-serif;
font-size: 11px;
}
Usage: Used to style the font properties on text used in a portlet. Typically this class is used for the display of
non-accentuated information.
JBoss Release 2.6.5
277
Layouts and Themes
.portlet-font-dim {
color: #777777;
font-family: Verdana, Arial, Helvetica, sans-serif;
font-size: 11px;
}
Usage: A lighter version (color-wise) of the portlet-font selector.
•
FORM Selectors
.portlet-form-label {
font-size: 10px;
color: #656565;
}
Usage: Text used for the descriptive label of an entire form (not the label for each actual form field).
.portlet-form-button {
font-size: 10px;
font-weight: bold;
color: #FFFFFF;
background-color: #5078aa;
border-top: 1px solid #97B7C6;
border-left: 1px solid #97B7C6;
border-bottom: 1px solid #254869;
border-right: 1px solid #254869;
}
Usage: Used to style portlet form buttons (e.g. Submit).
.portlet-icon-label {
}
Usage: Text that appears beside a context dependent action icon.
.portlet-dlg-icon-label {
}
Usage: Text that appears beside a "standard" icon (e.g Ok, or Cancel).
.portlet-form-field-label {
font-family: Verdana, Arial, Helvetica, Sans-Serif, sans-serif;
font-size: 10px;
color: #000;
vertical-align: bottom;
white-space: nowrap
}
Usage: Selector used to style portlet form field labels.
.portlet-form-field {
font-family: Verdana, Arial, Helvetica, Sans-Serif, sans-serif;
font-size: 10px;
color: #000; /*margin-top: 10px;*/
}
Usage: Selector used to style portlet form fields (i.e. INPUT controls, SELECT elements, etc.).
•
LINK Selectors
.portal-links:link {
JBoss Release 2.6.5
278
Layouts and Themes
font-family: Verdana, Arial, Helvetica, Sans-Serif, sans-serif;
font-size: 11px;
font-weight: bold;
color: #242424;
text-decoration: none;
}
.portal-links:hover {
font-family: Verdana, Arial, Helvetica, Sans-Serif, sans-serif;
font-size: 11px;
font-weight: bold;
color: #5699B7;
text-decoration: none;
}
.portal-links:active {
font-family: Verdana, Arial, Helvetica, Sans-Serif, sans-serif;
font-size: 11px;
font-weight: bold;
color: #242424;
text-decoration: none;
}
.portal-links:visited {
font-family: Verdana, Arial, Helvetica, Sans-Serif, sans-serif;
font-size: 11px;
font-weight: bold;
color: #242424;
text-decoration: none;
}
Usage: The above four selectors are used to style links in the portal. Each pseudo class (i.e. hover, active, etc.)
provides a different link style.
•
MESSAGE Selectors
.portlet-msg-status {
font-family: Verdana, Arial, Helvetica, Sans-Serif, sans-serif;
font-size: 12px;
font-style: normal;
color: #336699;
}
Usage: Selector used to signify the status of a current operation that takes place in the portlet (e.g. "saving results", "step 1 of 4").
.portlet-msg-info {
font-family: Verdana, Arial, Helvetica, Sans-Serif, sans-serif;
font-size: 12px;
font-style: italic;
color: #000;
}
Usage: Selector used to signify general information in a portlet (e.g. help messages).
.portlet-msg-error {
color: red;
font-family: Verdana, Arial, Helvetica, Sans-Serif, sans-serif;
font-size: 12px;
font-weight: bold;
}
Usage: Selector used to signify an error message in the portlet (e.g. form validation error).
JBoss Release 2.6.5
279
Layouts and Themes
.portlet-msg-alert {
font-family: Verdana, Arial, Helvetica, Sans-Serif, sans-serif;
font-size: 12px;
font-weight: bold;
color: #821717;
}
Usage: Selector used to style an alert that is displayed to the user.
.portlet-msg-success {
font-family: Verdana, Arial, Helvetica, Sans-Serif, sans-serif;
font-size: 12px;
font-weight: bold;
color: #359630;
}
Usage: Selector used to indicate successful completion of an action in a portlet (e.g. "save successful").
•
SECTION Selectors
.portlet-section-header {
font-weight: bold;
color: #656565;
font-size: 12px;
}
Usage: Table or section header.
.portlet-section-body {
color: #656565;
}
Usage: Normal text in a table cell.
.portlet-section-alternate {
background-color: #F2F2F2;
}
Usage: Used to style background color and text in every other table row.
.portlet-section-selected {
background-color: #CBD4E6;
}
Usage: Used to style background and font properties in a selected cell range.
.portlet-section-subheader {
font-weight: bold;
font-size: 10px;
}
Usage: Used to style a subheading within a table/section that gets rendered in a portlet.
.portlet-section-footer {
font-size: 11px;
}
Usage: Used to style footer area of a section/table that gets rendered in a portlet.
.portlet-section-text {
font-size: 12px;
font-style: italic;
}
JBoss Release 2.6.5
280
Layouts and Themes
Usage: Text that belongs to a section but does not fall in one of the other categories. This selector can also be
modified to provide styled text that can be used in all sections that are rendered within a portlet.
•
MENU Selectors
.portlet-menu {}
Usage: General menu settings such as background color, margins, etc.
.portlet-menu-item {
color: #242424;
text-decoration: none;
font-family: Verdana, Arial, Helvetica, sans-serif;
font-size: 12px;
}
Usage: Normal, unselected menu item.
.portlet-menu-item:hover {
color: #5699B7;
text-decoration: none;
font-family: Verdana, Arial, Helvetica, sans-serif;
font-size: 12px;
}
Usage: Used to style hover effect on a normal, unselected menu item.
.portlet-menu-item-selected {}
Usage: Applies to selected menu items.
.portlet-menu-item-selected:hover {}
Usage: Selector styles the hover effect on a selected menu item.
.portlet-menu-cascade-item {}
Usage: Normal, unselected menu item that has sub-menus.
.portlet-menu-cascade-item-selected {}
Usage: Selected sub-menu item.
.portlet-menu-description {}
Usage: Descriptive text for the menu (e.g. in a help context below the menu).
.portlet-menu-caption {}
JBoss Release 2.6.5
281
Layouts and Themes
Usage: Selector used to style menu captions.
•
WSRP Selectors
.portlet-horizontal-separator {}
Usage: A separator bar similar to a horizontal rule, but with styling matching the page.
.portlet-nestedTitle-bar {}
Usage: Allows portlets to mimic the title bar when nesting something.
.portlet-nestedTitle {}
Usage: Allows portlets to match the textual character of the title on the title bar.
.portlet-tab {}
Usage: Support portlets having tabs in the same style as the page or other portlets.
.portlet-tab-active {}
Usage: Highlight the tab currently being shown.
.portlet-tab-selected {}
Usage: Highlight the selected tab (not yet active).
.portlet-tab-disabled {}
Usage: A tab which can not be currently activated.
.portlet-tab-area {}
Usage: Top level style for the content of a tab.
24.8. Additional Ajax selectors
Since 2.6 JBoss Portal has ajax features. Those features introduce a couple of CSS selectors that enables further
customization of the visual look and feel. Indeed by default those CSS styles are provided by ajaxified layouts but
it may not fit with some themes. It is possible to redefine them in the stylesheet of the themes.
•
JBoss Release 2.6.5
282
Layouts and Themes
.dyna-region {}
Usage: Denotes a dynamic region which can be subject to ajax capabilities.
•
.dyna-window {}
Usage: Denotes a dynamic window which can be subject to ajax capabilities.
•
.dyna-decoration {}
Usage: Denotes a dynamic decorator which can be subject to ajax capabilities.
•
.dyna-portlet {}
Usage: Denotes a dynamic content which can be subject to ajax capabilities.
•
.dnd-handle {
cursor: move;
}
Usage: Denotes the handle offered by draggable windows. By default it changes the mouse shape to indicate to
the user that his mouse is hovering a draggable window.
•
.dnd-droppable {
border: red 1px dashed;
background-color: Transparent;
}
Usage: Denotes a zone where a user can drop a window during drag and drop operations. This selector is added
and removed dynamically at runtime by the ajax framework and is not present in the generated markup.
JBoss Release 2.6.5
283
25
Ajax
Julien Viet <[email protected]>
This section covers the ajax features provided by the portal.
25.1. Introduction
Todo
25.2. Ajaxified markup
25.2.1. Ajaxified layouts
Part of the Ajax capabilities are implemented in the layout framework which provide the structure for generating
portal pages. The good news is that the existing layout only requires a few modifications in order to be ajaxified.
We will use as example an simplified version of the layout JSP provided in JBoss Portal 2.6 and outline what are
the required changes that makes it an ajaxified layout:
<%@ taglib uri="/WEB-INF/theme/portal-layout.tld" prefix="p" %>
<!DOCTYPE html PUBLIC "-//W3C//DTD XHTML 1.0 Transitional//EN"
"http://www.w3.org/TR/xhtml1/DTD/xhtml1-transitional.dtd">
<html xmlns="http://www.w3.org/1999/xhtml">
<head>
<meta http-equiv="Content-Type" content="text/html;"/>
<!-- inject the theme, default to the Renaissance theme if
nothing is selected for the portal or the page -->
<p:theme themeName="renaissance"/>
<!-- insert header content that was possibly set by portlets on the page -->
<p:headerContent/>
</head>
<body id="body">
<p:region regionName='AJAXScripts' regionID='AJAXScripts'/>
<div id="portal-container">
<div id="sizer">
<div id="expander">
<div id="logoName"></div>
<table border="0" cellpadding="0" cellspacing="0" id="header-container">
<tr>
<td align="center" valign="top" id="header">
<!-- Utility controls -->
<p:region regionName='dashboardnav' regionID='dashboardnav'/>
JBoss Release 2.6.5
284
Ajax
<!-- navigation tabs and such -->
<p:region regionName='navigation' regionID='navigation'/>
<div id="spacer"></div>
</td>
</tr>
</table>
<div id="content-container">
<!-- insert the content of the 'left' region of the page,
and assign the css selector id 'regionA' -->
<p:region regionName='left' regionID='regionA'/>
<!-- insert the content of the 'center' region of the page,
and assign the css selector id 'regionB' -->
<p:region regionName='center' regionID='regionB'/>
<hr class="cleaner"/>
</div>
</div>
</div>
</div>
<p:region regionName='AJAXFooter' regionID='AJAXFooter'/>
</body>
</html>
•
<p:theme themeName="renaissance"/> should be already present as it exists since 2.4 but is even more necessary as it will inject in the page the reference to the ajax stylesheet.
•
<p:region regionName='AJAXScripts' regionID='AJAXScripts'/> should be added before any other region in
the markup of the layout.
•
<p:region regionName='AJAXFooter' regionID='AJAXFooter'/> should be added after any other region in the
markup of the layout.
25.2.2. Ajaxified renderers
At runtime the portal combines the layout and the renderers in order create the markup returned to the web
browser. The most used render set is the divRenderer. Renderers only need a modification in the deployment
descriptor to indicate that they support ajax. Here is the declaration of the default divRenderer now in 2.6:
<renderSet name="divRenderer">
<set content-type="text/html">
<ajax-enabled>true</ajax-enabled>
<region-renderer>org.jboss.portal.theme.impl.render.div.DivRegionRenderer
</region-renderer>
<window-renderer>org.jboss.portal.theme.impl.render.div.DivWindowRenderer
</window-renderer>
<portlet-renderer>org.jboss.portal.theme.impl.render.div.DivPortletRenderer
</portlet-renderer>
<decoration-renderer>org.jboss.portal.theme.impl.render.div.DivDecorationRenderer
</decoration-renderer>
</set>
</renderSet>
You should notice the <ajax-enabled>true</ajax-enabled> which indicates that the render set supports ajaxification.
JBoss Release 2.6.5
285
Ajax
25.3. Ajaxified pages
The ajaxification of the portal pages can be configured in a fine grained manner. Thanks to the portal object properties it is possible to control which pages support ajax and which page do not support ajax. The administrator must
pay attention to the fact that property values are inherited in the object hierarchy.
25.3.1. Drag and Drop
That feature is only effective in dashboards as it requires the offer personalization of the page layout per user. By
default the feature is enabled thanks to a property set on the dashboard object. It is possible to turn off that property
if the administrator does not want to expose that feature to its user.
In the file jboss-portal.sar/conf/data/default-object.xml is declared and configured the creation of the dashboard
portal:
<deployment>
<parent-ref/>
<if-exists>keep</if-exists>
<context>
<context-name>dashboard</context-name>
<properties>
...
<property>
<name>theme.dyna.dnd_enabled</name>
<value>true</value>
</property>
...
</properties>
...
</context>
</deployment>
The property theme.dyna.dnd_enabled is set to the value true which means that the dashboard object will provide
the drag and drop feature.
25.3.2. Partial refresh
Partial refresh is a very powerful feature which allows the portal to optimize the refreshing of portlets on a page.
When one portlet is invoked, instead of redrawing the full page, the portal is able to detect which portlets needs to
be refreshed and will update only these portlets.
JBoss Release 2.6.5
286
Ajax
The portal providing partial refresh
25.3.2.1. Portal objects configuration
Like with the drag and drop feature, partial page refresh is controlled via properties on portal objects. The name of
the property is theme.dyna.partial_refresh_enabled and its values can be true or false. When this property is set on
an object it is automatically inherited by the sub hierarchy located under that object. By default the drag and drop
feature is positioned on the dashboard object and not on the rest of the portal objects.
<deployment>
<parent-ref/>
<if-exists>keep</if-exists>
<context>
<context-name>dashboard</context-name>
<properties>
...
<property>
<name>theme.dyna.partial_refresh_enabled</name>
<value>true</value>
</property>
...
</properties>
...
</context>
</deployment>
Note
The partial page refresh feature is compatible with the Portal API. The Portal API allows programmatic update of the state of portlets at runtime. For instance it is possible to modify the window state or the mode of
several portlets on a given page. When such event occurs, the portal detects the changes which occurred
and will update the portlet fragments in the page.
It is possible to change that behavior at runtime using the property editor of the management portlet. If you want to
enable partial refreshing on the default portal you should set the property to true directly on the portal and all the
pages in that portal will automatically inherit those properties.
JBoss Release 2.6.5
287
Ajax
The default portal configured for partial page refresh
25.3.2.2. Portlet configuration
By default any portlet will support partial refreshing. When does the portal performs partial page refreshing ? By
default it is enabled for action and render links with the following exceptions. In those situations, the portal will
prefer to perform a full page refresh:
•
Form GET are not handled, however it should not be an issue as this situation is discouraged by the Portlet specification. It however taken in account, just in case of. Here is an example of a Java Server Page that would do
one:
<form action="<%= renderResponse.createActionURL() %>" method="get">
...
</form>
•
Form uploads are not handled.
•
Having an interaction that deals with the MAXIMIZED window state. When a window is entering a maximized
state or leaving a maximized window state, the portal will perform a full page refresh.
It can happen that a portlet does not want to support partial refreshing, in those situations the jboss-portlet.xml can
be used to control that behavior. Since 2.6 an ajax section has been added in order to configure ajax features related
to the portlet.
<portlet>
<portlet-name>MyPortletNoAjax</portlet-name>
<ajax>
<partial-refresh>false</partial-refresh>
</ajax>
</portlet>
The usage of the partial-refresh set to the value false means that the portlet will not be subject of a partial page refresh when it is invoked. However the portlet markup can still be subject to a partial rendering.
25.3.2.3. Limitations
JBoss Release 2.6.5
288
Ajax
Partial refreshing of portlets has limitations both on the server side (portal) and on the client side (browser).
25.3.2.3.1. Application scoped session attributes
When partial refresh is activated, the state of a page can potentially become inconsistent. for example, if some objects are shared in the application scope of the session between portlets. When one portlet update a session object,
the other portlet won't be refreshed and will still display content based on the previous value of the object in the
session. To avoid that, partial refresh can be deactivated for certain portlets by adding
<portlet-refresh>false<portlet-refresh> in the jboss-portlet.xml file.
25.3.2.3.2. Non ajax interactions
The solution developed by JBoss Portal on the client side is built on top of DOM events emitted by the web
browser when the user interacts with the page. If an interaction is done without an emission of an event then JBoss
Portal will not be able to transform it into a partial refresh and it will result instead of a full refresh. This can happen with programmatic submission of forms.
<form id="<%= formId %>" action="<%= renderResponse.createActionURL() %>" method="post">
...
<select onclick="document.getElementById('<%= formId %>').submit()">
...
</select>
...
</form>
JBoss Release 2.6.5
289
26
Troubleshooting and FAQ
Roy Russo <[email protected]>
26.1. Troubleshooting and FAQ
Installation / Configuration
•
I am seeing "ERROR [JDBCExceptionReporter] Table not found in statement" in the logfile on first boot. What
is this?
•
I want to do a clean install/upgrade over my existing one. What are the steps?
•
Is my database vendor/version combination supported?
•
How do I force the Hibernate Dialect used for my database?
•
How do I change the context-root of the portal to http://localhost:8080/?
CMS
•
How do I change the CMS repository configuration?
•
On reboot, the CMS is complaining about a locked repository.
•
I created a file in the CMSAdmin. How do I view it?
Errors
•
When I access a specific portal-instance or page, I keep seeing "401 - not authorized" error in my browser.
•
How do I disable development-mode errors on the presentation layer?
Miscellaneous
•
Is there a sample portlet I can look at to learn about portlet development and JBoss Portal deployments?
I am seeing "ERROR [JDBCExceptionReporter] Table not found in statement" in the logfile on first boot.
What is this?
JBoss Release 2.6.5
290
Troubleshooting and FAQ
Ignore this error. It is used by the portal to create the initial database tables. On second boot, you should not see
them at all.
I want to do a clean install/upgrade over my existing one. What are the steps?
•
Shut down JBoss AS
•
Delete JBOSS_HOME/server/default/data/portal
•
Delete all JBoss Portal tables from your database
•
Start JBoss AS.
Is my database vendor/version combination supported?
See Section 1.4
How do I force the Hibernate Dialect used for my database?
See Section 3.3
How do I change the context-root of the portal to http://localhost:8080/?
See Section 3.2
How do I change the CMS repository configuration?
There are 3 supported modes: 100% DB (default), 100% Filsystem, and Mixed (Blobs on the Filesystem and
metadata in the DB). You can see configuration options here: Section 21.4.3
On reboot, the CMS is complaining about a locked repository.
This occurs when JBoss AS is improperly shutdown or the CMS Service errors on startup. To remove the lock,
shutdown JBoss, and then remove the file under JBOSS_HOME/server/default/data/portal/cms/conf/.lock.
I created a file in the CMSAdmin. How do I view it?
Using the default configuration, the path to the file in the browser would be: http://localhost:8080/portal/content/path/to/file.ext. Note that all requests for cms content must be prepended with /
content and then followed by the path/to/the/file.gif as it is in your directory structure.
When I access a specific portal-instance or page, I keep seeing "401 - not authorized" error in my browser.
You are likely not authorized to view the page or portal instance. You can either modify the security using the
Management Portlet under the Admin Tab, or secure your portlets via the object descriptor, Section 15.1
How do I disable development-mode errors on the presentation layer?
See: Section 6.3.2
Is there a sample portlet I can look at to learn about portlet development and JBoss Portal deployments?
JBoss Release 2.6.5
291
Troubleshooting and FAQ
•
Sample portlets with tutorials can be found here, Section 5.2
•
Additional Portlets can be found at PortletSwap.com [1] .
[1] http://www.portletswap.com
JBoss Release 2.6.5
292
A
*-object.xml DTD
<?xml version="1.0" encoding="UTF-8" ?>
<!--~~~~~~~~~~~~~~~~~~~~~~~~~~~~~~~~~~~~~~~~~~~~~~~~~~~~~~~~~~~~~~~~~~~~~~~~~~~
~ JBoss, a division of Red Hat
~
~ Copyright 2006, Red Hat Middleware, LLC, and individual
~
~ contributors as indicated by the @authors tag. See the
~
~ copyright.txt in the distribution for a full listing of
~
~ individual contributors.
~
~
~
~ This is free software; you can redistribute it and/or modify it
~
~ under the terms of the GNU Lesser General Public License as
~
~ published by the Free Software Foundation; either version 2.1 of
~
~ the License, or (at your option) any later version.
~
~
~
~ This software is distributed in the hope that it will be useful,
~
~ but WITHOUT ANY WARRANTY; without even the implied warranty of
~
~ MERCHANTABILITY or FITNESS FOR A PARTICULAR PURPOSE. See the GNU
~
~ Lesser General Public License for more details.
~
~
~
~ You should have received a copy of the GNU Lesser General Public
~
~ License along with this software; if not, write to the Free
~
~ Software Foundation, Inc., 51 Franklin St, Fifth Floor, Boston, MA
~
~ 02110-1301 USA, or see the FSF site: http://www.fsf.org.
~
~~~~~~~~~~~~~~~~~~~~~~~~~~~~~~~~~~~~~~~~~~~~~~~~~~~~~~~~~~~~~~~~~~~~~~~~~~~-->
<!-<!DOCTYPE deployments PUBLIC
"-//JBoss Portal//DTD Portal Object 2.6//EN"
"http://www.jboss.org/portal/dtd/portal-object_2_6.dtd">
-->
<!-The deployements element is a generic container for deployment elements.
-->
<!ELEMENT deployments (deployment*)>
<!-The deployment is a generic container for portal object elements. The parent-ref
child gives the name of the parent object that the current object will use as parent.
The optional if-exists element define the behavior when a portal object which
an identical name is already child of the parent element. The default behavior of
the if-exist tag is to keep the existing object and not create a new object. The
last element is the portal object itself.
Example:
<deployment>
<parent-ref>default</parent-ref>
<page>
...
</page>
</deployment>
JBoss Release 2.6.5
293
*-object.xml DTD
All portal objects have a common configuration which can be :
1/ a listener : specifies the id of a listener is the listener registry. A listener
object is able to listen portal events which apply to the portal node hierarchy.
2/ properties : a set of generic properties owned by the portal object. Some
properties can drive the behavior of the object.
3/ security-constraint : defines security configuration of the portal object.
-->
<!ELEMENT deployment (parent-ref?,if-exists?,(context|portal|page|window))>
<!-Contains a reference to the parent object. The naming convention for naming object
is to concatenate the names of the path to the object and separate the names by a dot.
If the path is empty then the empty string must be used.
Example:
<parent-ref/> the root having an empty path
<parent-ref>default</parent-ref> the object with the name default under the root
having the path (default)
<parent-ref>default.default</parent-ref> the object with the path (default,default)
-->
<!ELEMENT parent-ref (#PCDATA)>
<!-The authorized values are overwrite and keep. Overwrite means that the existing
object will be destroyed and the current declaration will be used. Keep means that
the existing object will not be destroyed and no creation hence will be done.
-->
<!ELEMENT if-exists (#PCDATA)>
<!-A portal object of type context. A context type represent a node in the tree which
does not have a visual representation. It can exist only under the root. A context can
only have children with the portal type.
-->
<!ELEMENT context (context-name,properties?,listener?,security-constraint?,portal*,
(display-name* | (resource-bundle, supported-locale+)))>
<!-The context name value.
-->
<!ELEMENT context-name (#PCDATA)>
<!-A portal object of type portal. A portal type represents a virtual portal and can
have children of type page. In addition of the common portal object elements it support
also the declaration of the modes and the window states it supports. If no declaration
of modes or window states is done then the default value will be respectively
(view,edit,help) and (normal,minimized,maximized).
-->
<!ELEMENT portal (portal-name,supported-modes,supported-window-states?,properties?,
listener?,security-constraint?,page*,
(display-name* | (resource-bundle, supported-locale+)))>
<!-The portal name value.
-->
<!ELEMENT portal-name (#PCDATA)>
JBoss Release 2.6.5
294
*-object.xml DTD
<!-The supported modes of a portal.
Example:
<supported-mode>
<mode>view</mode>
<mode>edit</mode>
<mode>help</mode>
</supported-mode>
-->
<!ELEMENT supported-modes (mode*)>
<!-A portlet mode value.
-->
<!ELEMENT mode (#PCDATA)>
<!-The supported window states of a portal.
Example:
<supported-window-states>
<window-state>normal</window-state>
<window-state>minimized</window-state>
<window-state>maximized</window-state>
</supported-window-states>
-->
<!ELEMENT supported-window-states (window-state*)>
<!-A window state value.
-->
<!ELEMENT window-state (#PCDATA)>
<!-A portal object of type page. A page type represents a page which can have children of
type page and window. The children windows are the windows of the page and the children
pages are the subpages of this page.
-->
<!ELEMENT page (page-name,properties?,listener?,security-constraint?,(page|window)*,
(display-name* | (resource-bundle, supported-locale+)))>
<!ELEMENT display-name (#PCDATA)>
<!ATTLIST display-name
xml:lang
NMTOKEN
#IMPLIED
>
<!ELEMENT resource-bundle (#PCDATA)>
<!ELEMENT supported-locale (#PCDATA)>
<!-The page name value.
-->
<!ELEMENT page-name (#PCDATA)>
<!-A portal object of type window. A window type represents a window. Beside the common
properties a window has a content and belong to a region on the page.
The instance-ref or content tags are used to define the content of the window. The
JBoss Release 2.6.5
295
*-object.xml DTD
usage of the content tag is generic and can be used to describe any kind of content.
The instance-ref is a shortcut to define a content type of portlet which points to a
portlet instance.
The region and height defines how the window is placed in the page.
-->
<!ELEMENT window (window-name,(instance-ref|content),region,height,
initial-window-state?,initial-mode?,properties?,listener?,
(display-name* | (resource-bundle, supported-locale+)))>
<!-The window name value.
-->
<!ELEMENT window-name (#PCDATA)>
<!-Define the content of the window as a reference to a portlet instance. The value
is the id of the instance.
Example:
<instance-ref>MyPortletInstance</instance-ref>
-->
<!ELEMENT instance-ref (#PCDATA)>
<!-Define the content of the window in a generic manner. The content is define by
the type of the content and an URI which acts as an identificator for the content.
Example:
<content>
<content-type>portlet</content-type>
<content-uri>MyPortletInstance</content-uri>
</content>
<content>
<content-type>cms</content-type>
<content-uri>/default/index.html</content-uri>
</content>
-->
<!ELEMENT content (content-type,content-uri)>
<!-The content type of the window.
-->
<!ELEMENT content-type (#PCDATA)>
<!-The content URI of the window.
-->
<!ELEMENT content-uri (#PCDATA)>
<!-The region the window belongs to.
-->
<!ELEMENT region (#PCDATA)>
<!-The window state to use when the window is first accessed
-->
<!ELEMENT initial-window-state (#PCDATA)>
<!--
JBoss Release 2.6.5
296
*-object.xml DTD
The mode to use when the window is first accessed
-->
<!ELEMENT initial-mode (#PCDATA)>
<!-The height of the window in the particular region.
-->
<!ELEMENT height (#PCDATA)>
<!-Define a listener for a portal object. The value is the id of the listener.
-->
<!ELEMENT listener (#PCDATA)>
<!-A set of generic properties for the portal object.
-->
<!ELEMENT properties (property*)>
<!-A generic string property.
-->
<!ELEMENT property (name,value)>
<!-A name value.
-->
<!ELEMENT name (#PCDATA)>
<!-A value.
-->
<!ELEMENT value (#PCDATA)>
<!-The security-constraint element is a container for policy-permission elements
Examples:
<security-constraint>
<policy-permission>
<role-name>User</role-name>
<action-name>view</action-name>
</policy-permission>
</security-constraint>
<security-constraint>
<policy-permission>
<unchecked/>
<action-name>view</action-name>
</policy-permission>
</security-constraint>
-->
<!ELEMENT security-constraint (policy-permission*)>
<!-The policy-permission element is used to secure a specific portal page based on a
user's role.
-->
<!ELEMENT policy-permission (action-name*,unchecked?,role-name*)>
<!-The role-name element is used to define a role that this security constraint will apply to
* <role-name>SOMEROLE</role-name> Access to this portal page is limited to the defined role.
-->
JBoss Release 2.6.5
297
*-object.xml DTD
<!ELEMENT action-name (#PCDATA)>
<!-The unchecked element is used to define (if present) that anyone can view this portal page
-->
<!ELEMENT unchecked EMPTY>
<!-The action-name element is used to define the access rights given to the role defined.
Possible values are:
* view - Users can view the page.
-->
<!ELEMENT role-name (#PCDATA)>
JBoss Release 2.6.5
298
B
portlet-instances.xml DTD
<?xml version="1.0" encoding="UTF-8" ?>
<!--~~~~~~~~~~~~~~~~~~~~~~~~~~~~~~~~~~~~~~~~~~~~~~~~~~~~~~~~~~~~~~~~~~~~~~~~~~~
~ JBoss, a division of Red Hat
~
~ Copyright 2006, Red Hat Middleware, LLC, and individual
~
~ contributors as indicated by the @authors tag. See the
~
~ copyright.txt in the distribution for a full listing of
~
~ individual contributors.
~
~
~
~ This is free software; you can redistribute it and/or modify it
~
~ under the terms of the GNU Lesser General Public License as
~
~ published by the Free Software Foundation; either version 2.1 of
~
~ the License, or (at your option) any later version.
~
~
~
~ This software is distributed in the hope that it will be useful,
~
~ but WITHOUT ANY WARRANTY; without even the implied warranty of
~
~ MERCHANTABILITY or FITNESS FOR A PARTICULAR PURPOSE. See the GNU
~
~ Lesser General Public License for more details.
~
~
~
~ You should have received a copy of the GNU Lesser General Public
~
~ License along with this software; if not, write to the Free
~
~ Software Foundation, Inc., 51 Franklin St, Fifth Floor, Boston, MA
~
~ 02110-1301 USA, or see the FSF site: http://www.fsf.org.
~
~~~~~~~~~~~~~~~~~~~~~~~~~~~~~~~~~~~~~~~~~~~~~~~~~~~~~~~~~~~~~~~~~~~~~~~~~~~-->
<!-<!DOCTYPE deployments PUBLIC
"-//JBoss Portal//DTD Portlet Instances 2.6//EN"
"http://www.jboss.org/portal/dtd/portlet-instances_2_6.dtd">
-->
<!-The deployements element is a container for deployment elements.
-->
<!ELEMENT deployments (deployment*)>
<!-The deployment is a container for an instance element.
-->
<!ELEMENT deployment (if-exists?,instance)>
<!-The if-exists element is used to define action to take if instance with such name is
already present. Possible values are overwrite or keep . Overwrite will destroy the
existing object in the database and create a new one, based on the content of the
deployment. Keep will maintain the existing object deployment or create a new one if
it does not yet exist.
-->
<!ELEMENT if-exists (#PCDATA)>
<!-The instance element is used to create an instance of a portlet from the portlet
JBoss Release 2.6.5
299
portlet-instances.xml DTD
application of the same war file containing the portlet-instances.xml file. The portlet
will be created and configured only if the portlet is present and an instance with
such a name does not already exist.
Example :
<instance>
<instance-id>MyPortletInstance</instance-id>
<portlet-ref>MyPortlet</portlet-ref>
<preferences>
<preference>
<name>abc</name>
<value>def</value>
</preference>
</preferences>
<security-constraint>
<policy-permission>
<role-name>User</role-name>
<action-name>view</action-name>
</policy-permission>
</security-constraint>
</instance>
-->
<!ELEMENT instance (instance-id,portlet-ref,display-name*,preferences?,
security-constraint?, (display-name* | (resource-bundle, supported-locale+)))>
<!ELEMENT display-name (#PCDATA)>
<!ATTLIST display-name
xml:lang
NMTOKEN
#IMPLIED
>
<!ELEMENT resource-bundle (#PCDATA)>
<!ELEMENT supported-locale (#PCDATA)>
<!-The identifier of the instance.
-->
<!ELEMENT instance-id (#PCDATA)>
<!-The reference to the portlet which is its portlet name.
-->
<!ELEMENT portlet-ref (#PCDATA)>
<!-Display name is the string used to represent this instance
-->
<!ELEMENT display-name (#PCDATA)>
<!ATTLIST display-name
xml:lang
NMTOKEN
#IMPLIED
>
<!-The preferences element configures the instance with a specific set of preferences.
-->
<!ELEMENT preferences (preference+)>
<!-The preference configure one preference of a set of preferences.
-->
<!ELEMENT preference (name,value)>
<!--
JBoss Release 2.6.5
300
portlet-instances.xml DTD
A name.
-->
<!ELEMENT name (#PCDATA)>
<!-A string value.
-->
<!ELEMENT value (#PCDATA)>
<!-The security-constraint element is a container for policy-permission elements
Examples:
<security-constraint>
<policy-permission>
<role-name>User</role-name>
<action-name>view</action-name>
</policy-permission>
</security-constraint>
<security-constraint>
<policy-permission>
<unchecked/>
<action-name>view</action-name>
</policy-permission>
</security-constraint>
-->
<!ELEMENT security-constraint (policy-permission*)>
<!-The policy-permission element is used to secure a specific portlet instance based on a
user's role.
-->
<!ELEMENT policy-permission (action-name*,unchecked?,role-name*)>
<!-The action-name element is used to define the access rights given to the role defined.
Possible values are:
*
*
*
*
view - Users can view the page.
viewrecursive - Users can view the page and child pages.
personalize - Users are able to view AND personalize the page.
personalizerecursive - Users are able to view AND personalize the page AND its child
pages.
-->
<!ELEMENT action-name (#PCDATA)>
<!-The unchecked element is used to define (if present) that anyone can view this instance
-->
<!ELEMENT unchecked EMPTY>
<!-The role-name element is used to define a role that this security constraint will apply to
* <role-name>SOMEROLE</role-name> Access to this instance is limited to the defined role.
-->
<!ELEMENT role-name (#PCDATA)>
JBoss Release 2.6.5
301
C
jboss-portlet.xml DTD
<?xml version="1.0" encoding="UTF-8" ?>
<!--~~~~~~~~~~~~~~~~~~~~~~~~~~~~~~~~~~~~~~~~~~~~~~~~~~~~~~~~~~~~~~~~~~~~~~~~~~~
~ JBoss, a division of Red Hat
~
~ Copyright 2006, Red Hat Middleware, LLC, and individual
~
~ contributors as indicated by the @authors tag. See the
~
~ copyright.txt in the distribution for a full listing of
~
~ individual contributors.
~
~
~
~ This is free software; you can redistribute it and/or modify it
~
~ under the terms of the GNU Lesser General Public License as
~
~ published by the Free Software Foundation; either version 2.1 of
~
~ the License, or (at your option) any later version.
~
~
~
~ This software is distributed in the hope that it will be useful,
~
~ but WITHOUT ANY WARRANTY; without even the implied warranty of
~
~ MERCHANTABILITY or FITNESS FOR A PARTICULAR PURPOSE. See the GNU
~
~ Lesser General Public License for more details.
~
~
~
~ You should have received a copy of the GNU Lesser General Public
~
~ License along with this software; if not, write to the Free
~
~ Software Foundation, Inc., 51 Franklin St, Fifth Floor, Boston, MA
~
~ 02110-1301 USA, or see the FSF site: http://www.fsf.org.
~
~~~~~~~~~~~~~~~~~~~~~~~~~~~~~~~~~~~~~~~~~~~~~~~~~~~~~~~~~~~~~~~~~~~~~~~~~~~-->
<!-- The additional configuration elements of the JBoss portlet container.
<!DOCTYPE portlet-app PUBLIC
"-//JBoss Portal//DTD JBoss Portlet 2.6//EN"
"http://www.jboss.org/portal/dtd/jboss-portlet_2_6.dtd">
-->
<!-The remotable element is used to configure the default behavior of the portlets with
respect to WSRP exposure.
For each portlet defined in portlet.xml, it is possible to configure specific
settings of the portlet container.
It is also possible to inject services in the portlet context of the application
using the service elements.
-->
<!ELEMENT portlet-app (remotable?,portlet*,service*)>
<!-Additional configuration for a portlet.
The portlet-name defines the name of the portlet. It must match a portlet defined already
in portlet.xml of the same web application.
The remotable element configures the portlet exposure to WSRP. If no value is present
then the value considered is either the value defined globally at the portlet
JBoss Release 2.6.5
302
jboss-portlet.xml DTD
application level or false.
The trans-attribute value specifies the behavior of the portlet when it is invoked at
runtime with respect to the transactionnal context. According to how the portlet is
invoked a transaction may exist or not before the portlet is invoked. Usually in the
local context the portal transaction could be present. By default the value considered is
NotSupported which means that the portal transaction will be suspended for the duration
of the portlet invocation.
Example:
<portlet>
<portlet-name>MyPortlet</portlet-name>
<remotable>true</remotable>
<trans-attribute>Required</trans-attribute>
</portlet>
-->
<!ELEMENT portlet (portlet-name,remotable?,ajax?,session-config?,transaction?,
header-content?,portlet-info?)>
<!-The portlet name.
-->
<!ELEMENT portlet-name (#PCDATA)>
<!-The remotable value is used for WSRP exposure. The accepted values are the
litterals true of false.
-->
<!ELEMENT remotable (#PCDATA)>
<!-The ajax tag allows to configure the ajax capabilities of the portlet. If
the portlet is tagged as partial-refresh then the portal may use partial page
refreshing and render only that portlet. If the portlet partial-refresh value
is false, then the portal will perform a full page refresh when the portlet is refreshed.
-->
<!ELEMENT ajax (partial-refresh)>
<!-The authorized values for the partial-refresh element are true or false.
-->
<!ELEMENT partial-refresh (#PCDATA)>
<!-Additional portlet information
-->
<!ELEMENT portlet-info (icon?)>
<!-Defines icons for the portlet, they can be used by the administration portlet
to represent a particular portlet.
-->
<!ELEMENT icon (small-icon?, large-icon?)>
<!-A small icon image, usually 16x16, gif, jpg and png are usually supported.
An absolute URL or a URL starting with a '/' in the context of the webapp are accepted:
eg. http://www.example.com/images/smallIcon.png
eg. /images/smallIcon.png
-->
<!ELEMENT small-icon (#PCDATA)>
<!-A large icon image, usually 32x32, gif, jpg and png are usually supported.
JBoss Release 2.6.5
303
jboss-portlet.xml DTD
An absolute URL or a URL starting with a '/' in the context of the webapp are accepted:
eg. http://www.example.com/images/smallIcon.png
eg. /images/smallIcon.png
-->
<!ELEMENT large-icon (#PCDATA)>
<!-This element configure the portlet session of the portlet.
The distributed element instructs the container to distribute the session attributes
using the portal session replication. It applies only to local portlets are not to
remote portlets. The default value is false.
Example:
<session-config>
<distributed>true</distributed>
</session-config>
-->
<!ELEMENT session-config (distributed)>
<!-The authorized values for the distributed element are true or false.
-->
<!ELEMENT distributed (#PCDATA)>
<!-Defines how the portlet behaves with the transactionnal context. The default value
is Never.
Example:
<transaction>
<trans-attribute>Required</transaction>
<transaction>
-->
<!ELEMENT transaction (trans-attribute)>
<!-The trans-attribute value defines the transactionnal behavior. The accepted values
are Required, Mandatory, Never, Supports, NotSupported and RequiresNew.
-->
<!ELEMENT trans-attribute (#PCDATA)>
<!-Specify content which should be included in the portal aggregated page when the portlet
is present on that page. This setting only applies when the portlet is used in the local mode.
-->
<!ELEMENT header-content (link|script|meta)*>
<!-Creates a header markup element for linked resources,
see http://www.w3.org/TR/html401/struct/links.html#h-12.3
At runtime the href attribute value will be prefixed with the context path
of the web application.
Example:
<link rel="stylesheet" type="text/css" href="/style.css" media="screen"/>
will produce at runtime the following markup
<link rel="stylesheet" type="text/css" href="/my-web-application/style.css" media="screen"/>
-->
JBoss Release 2.6.5
304
jboss-portlet.xml DTD
<!ATTLIST link
href CDATA #IMPLIED
rel CDATA #IMPLIED
type CDATA #IMPLIED
media CDATA #IMPLIED
title CDATA #IMPLIED>
<!-No content is allowed inside an link element.
-->
<!ELEMENT link EMPTY>
<!-Creates a header markup for scripting,
see http://www.w3.org/TR/html401/interact/scripts.html
At runtime the src attribute value will be prefixed with the context path
of the web application.
Example 1:
<script type="text/javascript" src="/myscript.js"></script>
will produce at runtime the following markup
<script type="text/javascript" src="/my-web-application/myscript.js"></script>
Example 2:
<script type="text/javascript">
function hello() {
alert('Hello');
}
</script>
-->
<!ATTLIST script
src CDATA #IMPLIED
type CDATA #IMPLIED
language CDATA #IMPLIED>
<!-The script header element can contain inline script definitions.
-->
<!ELEMENT script (#PCDATA)>
<!-Creates a header markup for adding meta data to a page,
see http://www.w3.org/TR/html401/struct/global.html#h-7.4.4
Example:
<meta name="keywords" content="jboss, portal, redhat"/>
-->
<!ATTLIST meta
name CDATA #REQUIRED
content CDATA #REQUIRED>
<!-No content is allowed for meta element.
-->
<!ELEMENT meta EMPTY>
<!-Declare a service that will be injected by the portlet container as an
attribute of the portlet context.
JBoss Release 2.6.5
305
jboss-portlet.xml DTD
Example:
<service>
<service-name>UserModule</service-name>
<service-class>org.jboss.portal.identity.UserModule</service-class>
<service-ref>:service=Module,type=User</service-ref>
</service>
In the portlet it is then possible to use it by doing a lookup on the service
name, for example in the init() lifecycle method :
public void init()
{
UserModule userModule = (UserModule)getPortletContext().getAttribute("UserModule");
}
-->
<!ELEMENT service (service-name,service-class,service-ref)>
<!-The service name that will be used to bind the service as a portlet context attribute.
-->
<!ELEMENT service-name (#PCDATA)>
<!-The full qualified name of the interface that the service implements.
-->
<!ELEMENT service-class (#PCDATA)>
<!-The reference to the service. In the JMX Microkernel environment it consist of the JMX
name of the service MBean. For an MBean reference if the domain is left out, then the
current domain of the portal will be used.
-->
<!ELEMENT service-ref (#PCDATA)>
JBoss Release 2.6.5
306