1
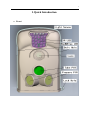
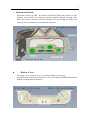
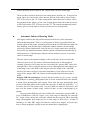
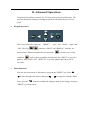
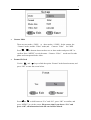
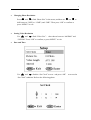
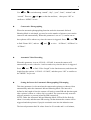
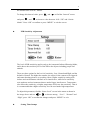
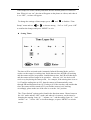
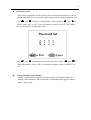
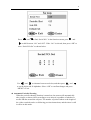
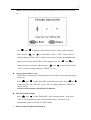
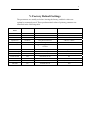
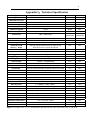
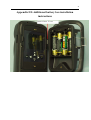
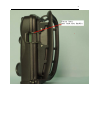
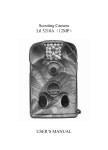
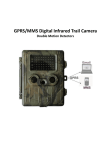
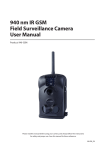
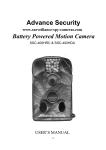
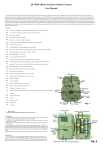
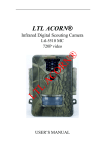
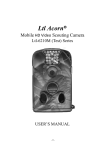
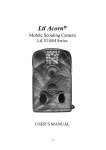
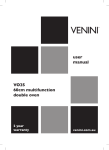
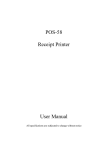
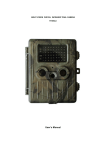
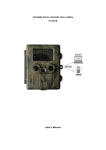
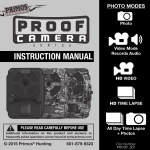
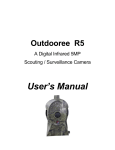
 Infrared Scouting Camera Ltl 5210(5MP) & Ltl 5210A(12MP)
USER’S MANUAL
2
Contents
I. Quick Introduction
•
•
•
•
•
•
Front
Bottom Part and Switch
Battery Cover
Function Switch
Preview Testing Mode
Automatic Infrared Shooting Mode
II. Advanced Operations
1. Keypad Operations
2. Menu Functions
•
•
•
•
•
•
•
•
•
•
•
•
•
•
Camera Mode
Format SD card
Changing Photo Resolution
Setting Video Resolution
Date and Time
Consecutive Photographing
Automatic Video Recording
Setting the Interval of Automatic Photographing/Videotaping
PIR Sensitivity Adjustment
Setting Time Stamps
Setting Timer
System Password
Setting Machine Serial Number
Automatic Periodic Shooting
•
•
•
•
•
Seting prepare PIR On or Off
Restoring Default Settings
Photos/Videos Playback and Deletion
File System
File Format
III. Driver Installation for SD Card
IV. Post-sales Service
V. Factory Default Settings
Appendix I: Technical Specifications
Appendix II: Parts list
Appendix III: Additional battery box installation instructions
3
I. Quick Introduction
• Front
4
•
Bottom and Switch
When the switch is at “OFF”, the camera is turned off. When the switch is at “ON”
position in the middle, the camera is on the automatic infrared shooting mode.
When the switch is moved to the TEST position, the previewing test mode is on,
and you can set parameters or test different functions.
z
Battery Cover
To supply power for the device, it is recommended to use four new
high-performance alkaline AA batteries or low self-leakage NI-MH (Nickel-Metal
hydride) rechargeable AA batteries.
5
z
Function Switch
After putting in the batteries and a SD card (4M~16G), the device can be started.
There are three positions for the switch: OFF, ON and TEST. They each
correspond to three different modes of the camera. When batteries need to be
changed or when the device is not in used, it should be at the OFF mode.
z
Preview Testing Mode
Moving the switch to the TEST position would set camera to the preview testing
mode. When the device is in this mode, you can manually take pictures, videotape,
view existing photos and videos, and adjust the parameters just like using an
ordinary camera. You can also test the PIR (Pyroelectric Infrared) function by the
following operations: first, make sure the camera is in preview test mode by
looking at the position of the switch, and then, in the range of 3 to 20 meters (10 to
65 feet), walk slowly back and forth along the direction that is exactly vertical to
the camera lens. If the red LED indicator light flashes, it shows that the position
can be sensed by “take PIR”, and if the blue LED indicator light flashes, it shows
6
that the position can be sensed by the “prepare PIR” on the left and right.
There are three scenarios in the preview testing mode, and they are: 1) the preview
mode, where you can see the scenes directly in front of the camera lens from the
TFT LCD screen or the TV, 2) the setting mode, where the menu is shown, and 3)
the playback mode, where you can view existing photos and videos that are stored
in SD card from the TFT LCD screen or the TV. The camera automatically enters
into the preview mode when it is first set in the preview testing mode.
z
Automatic Infrared Shooting Mode
Moving the switch to the ON position would set the device in the Automatic
Infrared Shooting Mode. There is a waiting time of about 10 seconds before the
system adjusts to this mode, and during this period the red LED indicator light will
keep flashing. After that the light extinguishes and the camera can start taking
pictures by infrared inducement. Once the device is in this mode, there would be
no need for any manual operations, and the camera will function automatically by
taking pictures or videotaping the subjects such as animals, persons, or cars that
enters a certain range.
The time interval, the number of photo or the record time can be set before the
camera is put to work. The camera will automatically turn on when subjects
(anmials, persons or cars) enters the area covered by the “prepare PIR” on the left
and right sides. Then it will take pictures or start videotaping once the subjects are
in the range of the “take PIR”. If the subjects enter the range of the “take PIR”
directly, the camera will be in operation immediately. If the subjects leave the
range of the “prepare PIR”, the camera would automatically shut down after a
while.
Prepare PIR the advantages: General infrared camera to save power, usually
only PIR part is working, photographic part is closed, when PIR detect the animals,
it begin opens photographic parts supply, Then from the start photographic parts
power to start take photo needs certain time (this time is different, generally 1 ~ 5
seconds), Our Ltl-5210 camera need 1 second. When an animal is fast across, will
pass over the camera’s shoot range, which will have to take a photograph of no
animal.
Our preparation PIR can solve the problem.Our camera have prepared PIR, its
scope of induction is 100-120° Angle, a very wide range of induction, far outweigh
50 ° Angle of the camera lens, when the animals into the prepared PIR is detecting
range, photographic parts began power on and ready to shoot after 1 second, if
animals go in “take PIR” range (less than the camera lens Angle), will soon, this
time is almost negligible, rapidly across the animal able to photograph.
7
II. Advanced Operations
Compared with ordinary cameras, Ltl 5210 has more professional functions. The
user can change the settings according to specific needs under the preview test
mode.
•
Keypad Operation
The 6 keys from left to right are:
“OK”. The keys
“MENU” ,
“left”, “Up”, “Down”, “right” and
symbolize “SHOT” and “REPLAY”, and they are
shortcut keys. When used under the preview mode,
condition,
leads to photo condition, and when the key “SHOT” is pressed, a
photo or video is take, and
reviewed.
•
will lead you to video
“REPLAY” is pressed, photos and videos can be
Menu Functions
You can access the menu of functions by pressing the “MENU” key. Press
to move through each option, and press
done, press the
、
、
to change the settings. When
button to confirm the changes made to the settings. and press
“MENU” to exit the menu.
8
•
Camera Mode
There are two modes(5MP) or three modes(12MP)for the camera, the
“Camera” mode, and the “Video” mode,and “Camera+ Video” for 12MP .
Press
、
to alternate between these two or three modes and press“OK” to
confirm. Press “MENU” to exit the menu. “Camera+ Video”
photo and consequential take video.
•
mode can first take
Format SD Card
and
Use the
keys to find the option “Format” in the function menu, and
press “OK” to enter the screen below.
Press
and
to shift between “Yes” and “No”, press “OK” to confirm, and
press “MENU” to exit the screen. Please note that if you choose “Yes” and
press “OK”, all information in the SD card will be deleted.
9
•
Changing Photo Resolution
Press
and
to find “Photo Size” in the menu, and then use
and
to
shift between “3MP”(or “12MP”) and “5MP”. Then press “OK” to confirm or
press “MENU” to exit.
•
Setting Video Resolution
Use
•
and
to find “Video Size”, then choose between “640X480” and
“320X240”. Press “OK” to confirm, or press“MENU” to exit.
Date and Time
Use
and
to find the “Set Clock” screen,and press “OK” to access the
“Set Clock” submenu. Refer to the following photo:
10
Use
and
to switch among “month”, “day”, “year”, “hour”, “minute” and
“second”. Then use
and
to set the date and time,
then press “OK” to
confirm or “MENU” to exit.
z
Consecutive Photographing
When the automatic photographing function under the Automatic Infrared
Shooting Mode is activitated, you need to set the number of pictures you want the
camera to take automatically. When this parameter is set at1~3, it means one to
three photos will be taken every time the camera is triggered. Press
to find “Picture NO.”, and use
and
and
to view “01 Photo”, “02 Photo” or
“03 Photo”.
z
Automatic Video Recording
When this parameter is set at AVI 01S~ AVI 60S, it means the camera will
automatically record a video for 1 to60 seconds every time the device is triggered.
Press
and
to find “Video Length” in the function menu, and choose the
length from the options “AVI 01S~ AVI 60S”, and then press “OK” to confirm or
the “MENU” key to exit.
z
Setting the Interval of Automatic Photographing/Videotaping
This time parameter is relevant when the camera takes pictures or shoots videos
automatically under the Automatic Infrared Shooting Mode. The interval is
defined as the length of time the camera will wait to restart PIR and function again
after a picture is taken or a video clip is recorded. The system can only sense the
subjects (animals, or persons) when the PIR is turned on.
NOTE: Under the Automatic Infrared Shooting Mode, LED will first flash for
about 10 seconds, and then start PIR sensing. At that moment the camera will be
triggered and takes pictures if people or animals come into the induction area.
The interval parameter has120 values from 0 to 59 seconds and 1 to 60 minute ,
11
the default value is set at 1 minute.
To change this interval value, press
and press
and
and
to find the “Interval” menu,
to choose a value between “01S~ 59S” and “01min~
60min”. Press “OK” to confirm or press “MENU” to exit the screen.
z
PIR Sensitivity Adjustment
The level of PIR sensitivity applies only to the Automatic Infrared Shooting Mode,
and it shows the sensitivity level of the PIR to the objects including people and
animals.
There are three options for the level of sensitivity: Low, Normal and High, and the
default is Normal. The higher the number, the easier for the camera to be triggered
and starts shooting pictures or recording videos. Higher sensitivity setting suits
indoors and environments with little or no interference, while lower sensitivity
suits outdoors and environments that are under bigger interferences. Temperature
also affects the sensitivity, as higher temperature will lower the sensitivity. Thus it
is recommended that a higher sensitivity level be used under high temperature.
To adjust this parameter, find the “Sense Level” screen in the menu as shown in
the image above and use
and
to choose among
“Low”、“Normal” and
“High”, press “OK” to confirm the changes and press “MENU” to exit.
z
Setting Time Stamps
12
Time stamps are used to identify and show the time that the photos or videos are
shot. When it is set “on”, the time will appear on the photos or videos, and when it
is set “OFF” , no time will appear.
To change the settings of time stamps, press
Stamp” menu and use
and
and
to choose among
to find the “Time
“On” or “Off”, press “OK”
to confirm the changes and press “MENU” to exit.
z
Setting Timer
The timer will be activated under Automatic Infrared Shooting Mode, and it is
used to set the camera’s working time. Inside that set time, the PIR will working
and the camera will be in operation. Outside that set time, the PIR will shut down
and the camera will no longer be in operation. After set “On”, the device will
work every day during the same period, for example, if the starting time is set at
18:35 and the ending time at 8:25, then the camera will automatically sense
through PIR and functions from 18:35 today to 8:25 the next day, and outside that
time, the camera will be turned off. If you find the camera is not working
accordingly, please make sure if the time is set at the “On” position.
The “Timer Switch” option can be found in the functions menu. Choose between
the “On” mode and the “OFF” mode, and when it is in turn on, set the timer be
changing the starting “hour(h)”, “minute(m)” and the ending “hour(h)” and
“minute(m)”. Select “OK” to confirm changes, or press “MENU” to exit the
screen.
13
z
System Password
If the system password is set, the device can be protected from non-users, since it
cannot enter the Preview Test mode without the password and thus cannot be used.
Use
and
to find the “Password Set” option and press
and
to
choose either “On” or “Off”. Once the function is turned on, press “OK” and set
the password. Refer to the image below.
Use
and
to alternate between each data slot, and use
and
change the number. Select “OK” to confirm the changes, and press “MENU” to
exit.
z
Setting Machine Serial Number
Setting a serial number can print to the photo ,point out the photo where is it
filming. When turned on, the serial number will automatically appear with the
photo’s time stamp.
to
14
Press
and
to find “Serial NO.” in the functions menu, press
and
to shift between “On” and “Off”. If the “On” is selected, then press “OK” to
enter “Serial NO Set” as shown below.
Use
and
to alternate between each slot, and then press
and
to set the digits and 26 alphabets. Select “OK” to confirm changes and press
“MENU” to exit.
z Automatic Periodic Shooting
When the periodic shooting function is turned on, the camera will automatically
take pictures or shoot videos according to a set interval, regardless of whether or
not the PIR has sensed the subjects. The number of pictures taken or the length of
the video recorded can be set following previous instructions, and the timer is still
in effect in this mode.
15
NOTE: When the Automatic Periodic Shooting Mode is on, the PIR will be turned
off.
Use
and
menu, and use
to find the “Periodic Interval Set” option in the functions
and
to select either “ON” or “OFF”. Select “OK” to
confirm changes. When “ON” is chosen, the system will enter the submenu that
allows you to set the interval. Refer to the graph below, use
alternate between each slot, and then press
and
and
to
to set the time. Select
“OK” to confirm changes and press “MENU” to exit.
z
Seting prepare PIR On or Off
Unless there is interference, Usually should set ON, This can accelerate the speed
of start-up.
Press
and
to find “Side PIR” in the functions menu,Press
and
to shift between “On” and “Off”, press “OK” to confirm, and press “MENU” to
exit the screen.
Note:Set Off the prepare PIR will loss of function.
z
Restore Default Settings
Press
and
to find “Default Set” in the functions menu,then select
“OK” to set all parameters back to their default factory. The device will
automatically return to the Preview TEST mode.
•
Photos/Videos Playback and Deletion
16
Under the Preview TEST mode, pressing “OK” will display the last photos or
videos. Use
and
clip, you can press
to playback the photos or video clips. If it is a video
(SHOT)to play, then press
(SHOT)to stop playing.
When in 12MP camera, Photos can 16 times zoom playback,press
and press
photo;press
zoom out,press
view right photo and press
long time view up and press
zoom in
view left
long time view down.
In this playback mode, pressing “MENU” will enter into the deletion menu, in
which you have the options to delete the current picture/video or to delete all.
Select “OK” and then “Yes” to confirm deleting the file, or select “No” to keep it.
•
File System
When a SD card that is smaller than 1 GB is used, the device supports the file
system format of FAT12 and FAT16 .it supports FAT32 with a SD card larger
than 2 G. The maximum capacity of SD card the camera supports is 16G.
•
File Format
The camera uses a SD card to store all photos and videos under the folder
\DCIM\100IMAGE. Photos and videos will be named according to the sequence
of shooting. Examples include IMAG0001.JPG or IMAG0001.AVI. The suffixes
distinguish between a photo (with suffix jpg) and a video (with suffix avi).
Note: When connected to the TV under the switch “On” mode (Automatic
Infrared Shooting Mode), the trigger time will be slowed.
III. Driver Installation for USB
The camera uses USB2.0 High Speed data transmission. If your computer doesn’t
recognize mass storage, for example, the operation system is Windows 98 please
download and install the appropriate driver that supports USB2.0 High Speed.
IV. Post-sales Service
We provide two year of free maintenance. If your product is out of our service
period and is manually damaged through wrong operations, we can still provide
paid services including parts replacements and repair.
Note: The factory reserves the right to update products.
17
V. Factory Default Settings
The parameters are usually set before leaving the factory, and their values are
optimal or commonly used. These predetermined values of primary parameter are
identified in the following table.
Parameter
name
Default data
Remark
others
Mode
Camera
Photo
Video(Photo+ Video when 12MP)
Photo Size
5MP
5MP
3M Pixel(12MP)
Video Size
640×480
VGA mode
320x240
Capture No.
01 Photo
One photo each time
2 Photo, 3 Photo
Video length
AVI 10s
Video length is 10s
1-60 seconds
Interval
1 min
Trigger to trigger interval is
1minute
0-59 seconds, 1-60 minutes
Sense Level
Normal
Sensitivity
High, Low
Time Stamp
On
Time stamp on
Off
Timer Switch
Off
Time switch off
Password Set
Off
Password set off
On
Serial NO.
Off
Serial No. off
On
Periodic Shot
Off
Periodic Interval Shot off
On(00:00 – 23:59:59)
Side PIR
On
Side PIR Set On
Off
On
(00:00 – 23:59)
18
Appendix I:Technical Specification
Type
Parameters
Ltl-5210
Ltl-5210A
Image Sensor
5 Mega Pixels Color CMOS
Yes
Yes
Maximum Pixel Size
2560x1920
Yes
Yes
Lens
F=3.1; FOV=52°; Auto IR-Cut
Yes
Yes
IR-Flashlight
65 Feet/20 Meters
Yes
Yes
Option
Yes
TFT Display Screen
48x35.69mm (2.36");480(RGB)*234DOT; 16.7M color
Operation Keypad
6 keys
Option
Yes
Memory
SD Card (8MB ~16GB)
Yes
Yes
Picture Size
5MP = 2560x1920;
And 3MP =
And 12MP
2048x1536
=4000x3000
Video Size
640x480: 20fps; 320x240: 20fps
Yes
Yes
PIR Sensitivity
PIR with 3 sensitivity levels: High/Normal/Low
Yes
Yes
PIR Sensing Distance
65ft/20m(Below +25°C/+77°F at the Normal Level)
Yes
Yes
Preparation PIR
Left and right light beams form an angle of 100°
Yes
Yes
Sensing Angle
Each lens covers 10°(Can be set Off)
Shot PIR Sensing Angle
35°
Yes
Yes
Operation Mode
Day/Night
Yes
Yes
Trigger Time
1 Second (When using the 2G SD card)
Yes
Yes
Triggering Interval
0sec. - 60min. Programmable
Yes
Yes
Shooting Numbers
1~3
Yes
Yes
Video Length
1-60sec. Programmable
Yes
Yes
Camera+Video
First take Picture and then take Video
No
Yes
Playback Zoom In
1~16 times
No
Yes
On /Off, include serial No./ tempreture and moon phase
Yes
Yes
Timer
On /Off Time Lapse Programmable
Yes
Yes
Password
4 Protection Numbers
Option
Yes
Device Serial No.
4 Digits and 26 alphabet Set by Yourself
Yes
Yes
Periodic Shot
1 Second~24Hours
Yes
Yes
Power Supply
4xAA,Can add to 8XAA(Need the additional battery box)
Yes
Yes
Stand-by Current
0.4mA
Yes
Yes
Stand-by Time
3~6 Months(4xAA~8XAA)
Yes
Yes
Auto Power Off
Auto power off in 2 minutes while no keypad controlling
Yes
Yes
Power Consumption
150mA (+500mA when IR LED lights up)
Yes
Yes
Low Battery Alarm
4.2~4.3V
Yes
Yes
Interface
TV out (NTSC); USB; SD Card Holder; 6V DC External
Yes
Yes
Fix Method
Belt, Tripod Nail
Yes
Yes
Waterproof
IP54
Yes
Yes
Operation Temperature
-30 ~+70°C/-22~+158°F
Yes
Yes
Operation Humidity
5% ~ 95%
Yes
Yes
Certificate
FCC & CE & RoHS
Yes
Yes
Time Stamp
Option: In normal is "Yes". If “No” the parameters will set by the PC. Can only choose "Yes" or "No" in all.
19
Appendix II:Parts list
Part name
Quantity
Digital camera
1
Addition battery box
1
TV AV IN cable
1
USB cable
1
Belt
1
External DC cable(optional)
1
Manual
1
Guarantee card
1
20
Appendix III: Additional battery box installation
instructions
21