1
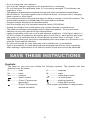
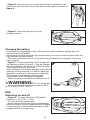
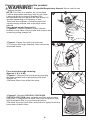
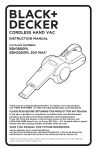
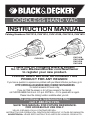
Cordless Hand Vac INSTRUCTION MANUAL Catalog Numbers CHV1210, CHV1410, CHV1410B, CHV1510, CHV1610 CHV1210 CHV1410 CHV1410B CHV1510 CHV1610 Thank you for choosing Black & Decker! Go to www.BlackandDecker.com/NewOwner to register your new product. PLEASE READ Before returning this product for any reason: If you have a question or experience a problem with your Black & Decker purchase, go to http://www.blackanddecker.com/instantanswers for instant answers 24 hours a day. If you can’t find the answer or do not have access to the internet, call 1-800-544-6986 from 8 a.m. to 5 p.m. EST Mon. -- Fri. to speak with an agent. Please have the catalog number available when you call. To purchase a replacement filter call 1-888-678-7278. Save this manual for Future reference. FOR HOUSEHOLD USE ONLY. VEA EL ESPANOL EN LA CONTRAPORTADA. INSTRUCTIVO DE OPERACIÓN, CENTROS DE SERVICIO Y PÓLIZA DE GARANTÍA. ADVERTENCIA: LÉASE ESTE INSTRUCTIVO ANTES DE USAR EL PRODUCTO. SAFETY GUIDELINES - DEFINITIONS It is important for you to read and understand this manual. The information it contains relates to protecting YOUR SAFETY and PREVENTING PROBLEMS. The symbols below are used to help you recognize this information. DANGER: Indicates an imminently hazardous situation which, if not avoided, will result in death or serious injury. WARNING: CAUTION: Indicates a potentially hazardous situation which, if not avoided, may result in minor or moderate injury. NOTICE: Used without the safety alert symbol indicates potentially hazardous situation which, if not avoided, may result in property damage. Indicates a potentially hazardous situation which, if not avoided, could result in death or serious injury. IMPORTANT SAFETY INSTRUCTIONS When using an electrical appliances, basic precautions should always be followed, including the following: READ ALL INSTRUCTIONS BEFORE USING THIS APPLIANCE. WARNING: Read all safety warnings and all instructions. Failure to follow the warnings and instructions listed below may result in electric shock, fire and/or serious injury. WARNING: Some household dust contains chemicals known to the State of California to cause cancer, birth defects or other reproductive harm such as asbestos and lead in lead based paint. WARNING: To reduce the risk of fire, electrical shock or injury: • WARNING: To reduce the risk of electric shock – Do not use outdoors or on wet surfaces. • Do not allow to be used as a toy. Close attention is necessary when used by or near children. • Use only as described in this manual. Use only manufacturer’s recommended attachments. • Do not use with damaged cord or plug. If appliance is not working as it should, has been dropped, damaged, left outdoors, or dropped into water, return it to a service center. • Do not pull or carry by cord, use cord as a handle, close a door on cord, or pull cord around sharp edges or corners. Do not run appliance over cord. Keep cord away from heated surfaces. • Do not unplug by pulling on cord. To unplug, grasp the plug, not the cord. • Do not handle charger, including charger plug, and charger terminals with wet hands. • Do not put any object into openings. Do not use with any opening blocked; keep free of dust,lint, hair, and anything that may reduce air flow. • Keep hair, loose clothing, fingers, and all parts of body away from openings and moving parts. • Use extra care when cleaning on stairs. • Do not use to pick up flammable or combustible liquids, such as gasoline, or use in areas where they may be present. • Do not pick up anything that is burning or smoking, such as cigarettes, matches, or hot ashes. • Do not use without dust bag and/or filters in place. • Do not use outdoors or on wet surfaces 2 • Do not charge the unit outdoors. • Use only the charger supplied by the manufacturer to recharge. • Do not incinerate the appliance even if it is severely damaged. The batteries can explode in a fire. • This appliance is intended for household use only and not for commercial or industrial use. • Shock Hazard. To protect against risk of electrical shock, do not put unit or charging base in water or other liquid. • Do not allow the cord to hang over the edge of a table or counter or touch hot surfaces. The unit should be placed or mounted away from sinks and hot surfaces. • Plug the charger directly into an electrical outlet. • Use the charger only in a standard electrical outlet (120V/60Hz). • Unplug the charger from outlet before any routine cleaning or maintenance. • This product includes rechargeable nickel cadmium batteries. Do not incinerate batteries as they will explode at high temperatures. • Leaks from battery cells can occur under extreme conditions. If the liquid, which is a 20-35% solution of potassium hydroxide, gets on the skin (1) wash quickly with soap and water or (2) neutralize with a mild acid such as lemon juice or vinegar. If the liquid gets into the eyes, flush them immediately with clean water for a minimum of 10 minutes. Seek medical attention. • Do not look into the air vents when the unit is switched on, as sometimes there is a possibility of small debris being discharged from the air vents, especially after cleaning / replacement of the filters as debris inside the unit can be disturbed. SAVE THESE INSTRUCTIONS Symbols • The label on your tool may include the following symbols. The symbols and their definitions are as follows: V...................voltsA....................amperes Hz.................hertzW...................watts min...............minutes .................alternating current no..................no load speed .............direct current .................Class I Construction ..................earthing terminal .................safety alert symbol (grounded) .................Class II Construction .../min or rpm..revolutions or reciprocation (double insulated) per minute 3 Product Features CHV1410, CHV1410B, CHV1510, CHV1610 A 1. On/off switch 2. Bowl release button 3. Charging indicator 4. Charging socket 5. Dust bowl 6. Nozzle 7. Nozzle release button 8. Nozzle rotating button 9. Extendable crevice tool 10. Flip-up Brush 11. Cloth filter 12. Plastic pre-filter 13. Wall mount bracket 14. Charger 15. Jack plug CHV1210 A1 1. On/off switch 2. Bowl release button 3. Charging indicator 4. Charging socket 5. Dust bowl 6. Nozzle 7. Nozzle release button 11. Cloth filter 12. Wall mount bracket 13. Charger 14. Jack plug Assembly Wall Mounting The product can be wall mounted, if desired, using the wall mount bracket, screws and anchors supplied. To wall mount the vac, refer to figures B, C, D and E. • Figure B - Mark the location of the screw B C holes (within reach of an electrical outlet for chargeing the vac while it is on the wall bracket). • Figure C - Insert the charger cord into the curved slot in the wall mount bracket leaving approximately 8-9 inches (203mm - 227mm) excess as shown. 4 • Figure D - Hang the vac on the wall by placing the opening on the base of the vac over the hooks in the wall mount bracket as shown in figure D. • Figure E - Insert the jack plug into the charging socket. D E Charging the battery From new, the rechargeable cells of the product need a minimum charge time of 9 hours to ensure full power. We suggest you fully discharge the product when it is used for the first time as this will help the cells recharge faster. • The switch must be in the off (“O”) position, the product will not charge if it is in any other position. • Figure F - Plug the jack plug of the charger into F the charging socket of the tool. Plug the charger into any standard 120 Volt 60 Hz electrical outlet. The charging indicator will be lit. While charging, the charger may get warm, this is perfectly normal and safe. It is safe to leave the appliance connected to the charger indefinitely. The charger automatically reduces power consumption when charging is complete. • When charging is complete, the LED will turn off. WARNING: Do not charge the battery at ambient temperatures below 39°F (4°C) or above 104°F (40°C). Use Switching on and off • Figure G - To start, slide the On/Off switch forward (i.e. “O”= Off, “I” = On). • To stop, slide the switch back. • Return the product to the charger immediately after use so that it will be ready and fully charged for the next use. Ensure that the product is fully engaged with the charger plug. 5 G Cleaning and emptying the product WARNING: Projectile/Respiratory Hazard: Never use the vac without its filter. NOTE: The filter is re-usable, do not confuse H it with a disposable dust bag, and do not throw it away when the product is emptied. We recommend that you replace the filter every 6-9 months depending on frequency of use. There are two methods of cleaning the bowl, a quick empty method and a thorough clean method. For a quick empty (figures H,I) • Figure H - Press in on both nozzle release buttons on the sides of the nozzle and remove the nozzle by pulling straight off. • Figure I - Empty the dust from the bowl. • For a more thorough cleaning, remove bowl as described below. For a more thorough cleaning (figures J, K, L & M) • Figure J - Remove the dust bowl by pressing the bowl release button and pulling the bowl straight off. • Remove filters from within the bowl. I J • Figure K - Models CHV1410, CHV1410B, CHV1510, CHV1610 have a plastic pre-filter and an inner cloth filter. To separate the cloth filter from the plastic filter, twist the plastic filter in a clockwise direction. • Remove the inner cloth filter and shake or lightly brush any loose dust off both filters. 6 K • Figure L - The dust bowls and filters can be washed in warm soapy water. Allow to dry before placing back into the vac. L • Figure M - (CHV1410, CHV1410B, CHV1510, CHV1610) To replace the filters, slide the outer plastic filter over the cloth M filter. • Align the wings of the plastic filter with the slots in the cloth filter and twist in a counterclockwise direction. • Place filters back into the bowl pressing firmly to ensure a secure fit. • To replace dust bowl, place it back onto the handle until it “clicks” firmly into position. IMPORTANT: Maximum dust collection will only be obtained with a clean filter and an empty dust bowl. If dust begins to fall back out of the product after it is switched off, this indicates that the bowl is full and requires emptying. • Wash the filters regularly using warm, soapy water and ensure that they are completely dry before using again. The cleaner the filter is, the better the product will perform. • It is very important that the filter is correctly in position before use. Nozzle / Accessories (CHV1410, CHV1410B, CHV1510, CHV1610) • Figure N - A crevice tool is built into the nozzle and can be extended as shown in figure N by pulling the extension piece until it locks into position. • Figure O - A brush accessory is built into the nozzle and can be flipped upwards for use. 7 N O • Figure P - The nozzle can be rotated for better P access in tight spots. To rotate the nozzle press the button shown in figure P and rotate the nozzle to the left or right until it clicks into place. Replacing the filters The filters should be replaced every 6 to 9 months and whenever worn or damaged. Replacement filters are available from your Black & Decker dealer. Visit www.blackanddecker.com to locate dealers. • Remove the old filters as described above. • Fit the new filters as described above. Maintenance Bowls and filters can be washed thoroughly; however, use only mild soap and a damp cloth to clean the main part of the vacuum. IMPORTANT: To assure product SAFETY and RELIABILITY, repairs, maintenance and adjustment (other than those listed in this manual) should be performed by authorized service centers or other qualified service personnel, always using identical replacement parts. Troubleshooting If the product does not work, check the following: • The charge indicator light is on when unit is connected to charger. • The charger was correctly plugged in for recharge. (It feels slightly warm to the touch.) • The charger cord is not damaged and is correctly attached. • The charger is plugged into a working electrical outlet. • The switch is in the “OFF” position when charging. For assistance with your product, visit our website www.blackanddecker.com for the location of the service center nearest you or call the BLACK & DECKER help line at 1-800-544-6986. Accessories Recommended accessories for use with your product are available from your local dealer or authorized service center. If you need assistance regarding accessories, please call: 1-800-544-6986. WARNING: The use of any accessory not recommended for use with this product could be hazardous. Battery Removal and Disposal This product uses nickel-cadmium (Ni-Cd) rechargeable and recyclable batteries. When the batteries no longer hold a charge, they should be removed from the Vac and recycled. They must not be incinerated or composted. The batteries can be taken for disposal to a Black & Decker, Company-Owned or Authorized Service Center. Some local retailers are also participating in a national TM recycling program (see “RBRC Seal”). Call your local retailer for details. If you bring the batteries to a Black & Decker Company-Owned or Authorized Service Center, the Center will arrange to recycle old batteries. Or, contact your local municipality for proper disposal instructions in your city/town. To remove the battery pack for disposal: 1.) First, before attempting to disassemble the product, turn it on and leave it on until the motor completely stops insuring a complete discharge of the batteries. 2.) Using a phillips screwdriver, remove the seven screws securing the two housing halves. 3.) Lift the housing cover away from the assembly. 4.) Detach all lead connections from battery pack. 8 5.) Remove battery pack and dispose of as per recommended guidelines. The RBRC™ Seal The RBRC™ (Rechargeable Battery Recycling Corporation) Seal on the nickel-cadmium battery (or battery pack) indicates that the costs to recycle the battery (or battery pack) at the end of its useful life have already been paid by Black & Decker. In some areas, it is illegal to place spent nickelcadmium batteries in the trash or municipal solid waste stream and the RBRC program provides an environmentally conscious alternative. RBRC in cooperation with Black & Decker and other battery users, has established programs in the United States and Canada to facilitate the collection of spent nickelcadmium batteries. Help protect our environment and conserve natural resources by returning the spent nickel-cadmium battery to an authorized Black & Decker service center or to your local retailer for recycling. You may also contact your local recycling center for information on where to drop off the spent battery, or call 1-800-8-BATTERY. Service Information All Black & Decker Service Centers are staffed with trained personnel to provide customers with efficient and reliable power tool service. Whether you need technical advice, repair, or genuine factory replacement parts, contact the Black & Decker location nearest you. To find your local service location, call: 1-800-544-6986 or visit www.blackanddecker.com TWO-YEAR LIMITED Warranty Black & Decker (U.S.) Inc. warranties this product to be free from defects in material or workmanship for a period of two (2) years following the date of purchase, provided that the product is used in a home environment. This limited warranty does not cover failures due to abuse, accidental damage or when repairs have been made or attempted by anyone other than Black & Decker and its Authorized Service Centers. A defective product meeting the warranty conditions set forth herein will be replaced or repaired at no charge in either of two ways: The first, which will result in exchanges only, is to return the product to the retailer from whom it was purchased (provided that the store is a participating retailer).Returns should be made within the time period of the retailer’s policy for exchanges. Proof of purchase may be required. Please check with the retailer for its specific return policy regarding time limits for returns or exchanges. The second option is to take or send the product (prepaid) to a Black & Decker owned or authorized Service Center for repair or replacement at Black & Decker’s option. Proof of purchase may be required. Black & Decker owned and authorized service centers are listed under “Tools–Electric” in the yellow pages of the phone directory or online at www.blackanddecker.com. This warranty does not apply to accessories. This warranty gives you specific legal rights and you may have other rights which vary from state to state. Should you have any questions, contact the manager of your nearest Black & Decker Service Center. This product is not intended for commercial use, and accordingly, such commercial use of this product will void this warranty. All other guarentees, express or implied, are hereby disclaimed. LATIN AMERICA: This warranty does not apply to products sold in Latin America. For products sold in Latin America, check country specific warranty information contained in the packaging, call the local company or see the website for such information. Imported by Black & Decker (U.S.) Inc., 701 E. Joppa Rd. Towson, MD 21286 U.S.A. 9