1
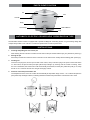
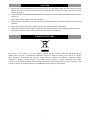
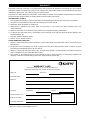
User's MANUAL
DEAR CUSTOMER
Congratulations! Thank you for buying this KORYO appliance. Your new Electric Cooker has been designed for your convenience. We are
sure you will get many years of trouble free service from this appliance.
Before commissioning this device please read this user manual carefully. Please retain this user manual, warranty certificate, sales receipt
and if possible carton with the inner packaging.
2
CONTENTS
Parts Identification............................................................................4
Automatic electric cooker heat preservation type...............................4
Instructions.......................................................................................4
Caution. . ...........................................................................................5
E-Waste Disposal . . ............................................................................5
Recipes............................................................................................6
Warranty ........................................................................................ 10
3
PARTS IDENTIFICATION
Lid
Pan
Handle
Body
Switch Button
Pilot Lamp
Leg
AUTOMATIC ELECTRIC COOKER HEAT PRESERVATION TYPE
The Automatic Electric Cooker is equipped with a permanent Magnetic Controlling System. Its good looking design with
compact body makes it one of its kind - in looks and performance. Its also a power saver.
INSTRUCTIONS
1. Cleaning and putting the rice into the pot
After cleaning the rice in another container. Put the rice into the pot and add water as per your preference. (See Fig.1)
2. Placing the pot
Place the pot inside the cooker and move it around so as to make it touch closely with the heating plate. (See Fig.2)
3. Cooking rice
Insert the wire plug first, into the input socket of the cooker, then put another plug in the power socket and switch
on. At this time, the pilot red lamp and pilot yellow lamp will light up, showing, that the cooker is working, when
the rice is well boiled, the switch button will automatically be released, and the pilot yellow lamp will go out, keep
the lid on for 10 minutes and the rice will get thoroughly cooked.
4. Function of the Heat preservation unit
The temperature of the rice in the cooker will automatically be kept within range of 60°C - 70°C. Below this point the
pilot yellow lamp will begin to flicker, indicating that the Automatic heat preservation unit has been set to work.
Fig.2
Fig.1
Fig.4
Fig.3
Fig.5
4
CAUTION
1. Keep the pan and heating plate clean. No rice grain, dust or any other foreign matter should be allowed to remain
between the bottom of the pot and the surface of the heating plate; otherwise the cooker’s performance will be
affected. (See Fig 3.)
2.
Prevent the bottom from being bumped otherwise the pot may be deformed which will affect the performance of the cooker.
(See Fig. 4)
3. Always place the rice evenly in to the pot. (See Fig.5)
4. Clean the body of the electric cooker with a piece of soft and damp cloth when soiled and the pot can be washed
with water.
5. Don’t use the cooker to boil acid or alkaline food stuff. Don’t keep the cooker in damp place.
6. Place the pot well, then insert the plug of cooker into the power socket; draw out the plug before taking the pot out.
7. Never place the electric cooker near the gas burner or stove when it is operational.
E-WASTE DISPOSAL
This symbol on the product or on the container indicates that this product cannot be eliminated with the
general waste. The user is responsible for eliminating this kind of waste by throwing them away at a “recycling
point” specifically for electrical and electronic waste. Selective collection and electrical equipment recycling
contribute to preserve natural resources and warrant waste recycling to protect environment and health.
In order to receive further information about electrical and electronic waste collecting and recycling, contact your Local
Council, the service of household waste or the establishment where the product was acquired.
5
RECIPES
VEGETABLE BIRYANI
Ingredients
Basmati Rice
2 cups
Water
4 cups
Mixed vegetables
(cauliflower, carrots, beans, potatoes)
1/2 kg
Onions
3 nos (sliced)
Bay leaf
1 no
Shahjeera
1/2 tsp
Ghee
5 tbsp
Mint, coriander leaves
2 tbsp each (chopped)
Salt to taste
To be ground to a paste
Ginger
3 cms
Garlic
8 cloves
Green chillies
3 nos
Poppy seeds
2 tsp
Fennel
2 tsp
Coriander powder
2 tsp
Chilli powder
1/2 tsp
Cloves
4 nos
Cardamom
4 nos
Cinnamon
5 cms
Method
Add water to the cooker pan. Pour in the cleaned rice. Place the pan in the cooker. Close the lid and allow rice to soak for 15 minutes.
Add salt and diced vegetables. Heat ghee in a kadai. Add shahjeera and bay leaf. Add sliced onion and fry till brown. Add the ground
masala, fry for 2 minutes. Add mint and coriander leaves. Remove from fire and add contents to the cooker pan. Stir gently and replace
the lid. Switch on the cooker to ‘Cooking’. Stirring the biryani gently once, half way through the cooking helps to distribute the flavours
and seasoning uniformly. When the biryani is cooked, the switch will automatically move to the ‘Keep Warm’ position. Let the biryani
steam for 10-15 minutes before switching off the cooker and serving. Alternatively, leave the biryani in the cooker in ‘Keep Warm’
position, till time to serve (up to 4 hrs.)
Variation for Minced Meat Biryani
Leave out the vegetables, soak 350 gms of cleaned mince meat in half a cup of curd for one hour. When the masala is fried, add meat
with the curds and cook till dry. Then simply follow the method described for Vegetable Biryani.
SOOJI HALWA
Ingredients
Roasted semolina (rava) 2 cups
Sugar
2 cups
Water
4 cups
Ghee
1 cup
Tinned pineapple pieces
1 cup (chopped)
Pineapple essence
1 tsp
Yellow food colour
Little
Method
Gather all the ingredients, place in the cooker pan, mix well. Place in cooker, cover with the lid and press the switch to ‘Cooking’. The
switch will move to ‘Keep Warm’ in 15 - 20 minutes. In case there is excess liquid, mix well and press the switch once again to ‘Cooking’.
When the halwa is ready, the switch will automatically move to ‘Keep Warm’. Switch off the cooker, transfer the halwa to a serving dish
and decorate with extra pineapple slices. If using fresh pineapple cook it with 1/2 cup sugar and 1/2 cup water for 5 minutes. Drain from
syrup and use.
Variation for Plain Kesari
Leave out the pineapple, essence and yellow food colour. Use roasted cashewnuts, cardamom powder and orange red colour.
CHICKEN BIRYANI
Ingredients
Basmati rice
2 cups
Water
4 cups
Chicken
1 (about 800 gms)
Curds
1/2 cup
Chilli powder
1/2 tsp
Ginger 2 cms
6
Garlic 4 cloves (grind with ginger)
Salt To taste
Green chillies 4 - 6 nos (chopped)
Onions 5 nos sliced
Mint leaves 2 tbsp
Ghee 6 tbsp
Coriander leaves 2 tbsp
Cardamom 5 nos
Cloves 5 nos
Cinnamon 3 nos
Poppy seeds
2 tsp
(Powder the Cardamom, Cloves, Cinnamon, Poppy seeds together.)
Method
Remove the skin from the chicken, then join it. Clean well and squeeze till dry. Mix with curds, one teaspoon salt, chilli powder and
ginger-garlic paste. Soak for two hours. Clean the rice. Place in the pan of the cooker. Add water, and the remaining salt. Heat ghee
in a kadai and fry onions till brown and crisp. Add the chicken and curds to the kadai. Fry till the liquid is absorbed. Add the powdered
ingredients, mint and the coriander leaves. Remove from fire. Add to the rice in the cooker. Mix well, place in cooker and put on the lid.
Switch on to ‘Cooking’. When the rice is done, the switch will automatically move to ‘Keep Warm’. Switch off the cooker after 15 minutes.
Mix gently and serve hot or allow to keep warm till time to serve (up to 4 hours). Garnish if desired, with boiled eggs and fried nuts.
For Non-Stick Models
The cooking plate is not required. First fry the masala directly in the Non-Stick Pan. Then add rice and water. Gently stir a couple of
times during ‘Cooking’ and do not ‘Keep Warm’ for more than one hour.
CORN AND CHICKEN CHOWDER
Ingredients
Broiler chicken joints 500 gms
Water or chicken stock 1 litre
Onions 1/2 cup (chopped)
Capsicum 1/2 cup (discard seeds and chop)
Celery
2 stalks (minced)
Parsley 4-5 springs (minced)
Garlic
2 cloves (minced)
Sweet corn (cream style) 1 tin
Noodles (broken into pieces) 1/2 cup
Eggs 2 nos
Tinned mushrooms 3 tbsp (drained and sliced)
Salt and pepper To taste
Method
Chicken pieces to be placed in the cooker pan, along with water and 1 tsp salt. Close the lid. Switch on to ‘Cooking’. Once the water
in the cooker begins to boil add onions, capsicum, celery, parsley and garlic. When the chicken is cooked, use tongs to remove the
chicken on to a plate. Drop the noodles into the cooking pan. While the noodles cook, debone the chicken, flake the meat and add it
to the simmering chowder. Once the noodles are cooked, add sweet corn and mushrooms. Beat the eggs lightly. When the chowder
begins to boil, pour the eggs in a thin stream, stirring the chowder with a fork, so the eggs set as thin strands. Add pepper and more salt
if necessary. Switch off and serve hot.
Note: Open lid only to add ingredients and cover immediately.
VEGETABLE SOUP
Cooking time 35 minutes
Ingredients
Potato 1 no. medium size
Onion 1 no. medium size
Carrot 1 no. medium size
Turnip 1 no. medium size
Tender beans 5 nos
Cabbage 1 piece (500 gms)
Garlic 4 cloves
Celery 1 stalk
Tomato 1 large (hybrid quality)
Water or Vegetable stock 4 cups
Milk 1/2 cup
Salt and pepper To taste
Garnish: croutons and grated cheese
7
Method
First peel, de-seed and chop up the tomato. Shred the cabbage into small bits. Mince all the other vegetables and garlic. Place in the
pan of the cooker . Pour water in and cover with the lid. Switch on to ‘Cooking’ and cook till all the vegetables are very soft. Using a
laddle, strain out 2 cups of cooked vegetables and blend in a mixer with the milk. Return the puree to the pan. Season with salt and
pepper (to taste). Replace the lid. When the soup begins to boil again, switch off the cooker and serve the soup hot, garnished with
croutons and grated cheese. Alternatively, push the switch manually to ‘Keep Warm’ and allow to remain hot till time to serve (up to 4
hours).
SPICY ROAST POTATOES
Ingredients
Small potatoes 1/2 kg
Oil 4 tbsp
Chilli powder 1 tsp
Green chillies 2 nos (chopped)
Garam masala powder 1 tsp
Asafoetida powder a pinch
Cumin powder 1 tsp
Coriander powder 2 tsp
Turmeric powder 1/2 tsp
Salt To taste
Water 1/2 cup
Method
Boil the potatoes, then peel, slice into small size pieces, and prick all pieces with toothpicks. Mix with rest of the ingredients except
water. Place potatoes in the cooker and pour water. Cover pan with the lid and switch on to ‘Cooking’. When the potatoes are ready, the
switch will move to ‘Keep Warm’ position. Switch off and serve hot with rice or chapattis,
or ‘Keep Warm’ till required.
CHICKEN POT ROAST
Ingredients
Chicken 500 gms
Salt To taste
Wine (optional) 1 tbsp
Chilli powder 1/2 tsp
Oil 1 tbsp
Vinegar 1 tbsp
Ginger garlic paste
1 tsp
Chilli sauce 1/2 cup
Method
Skin and joint the chicken. Wash and squeeze dry. Mix with the rest of the ingredients. Keep covered in the refrigerator for 4 to 6 hours.
Place a piece of aluminium foil at the base of the pan of the cooker and place the chicken mixture over it. Cover closely with another
piece of aluminium foil. Switch on ‘Cooking’. When the dish is ready the switch will automatically move to ‘Keep Warm’. Switch off and
serve hot, or allow to remain hot till time to serve (up to 4 hours).
TOMATO RICE
Ingredients
Rice 1 cups
Tomatoes 200 gms
Oil or ghee 4 tbsp
Mustard 1 tsp
Black gram dal 2 tsp
Peanuts 2 tbsp
Curry leaves Few
Onion 1 cup, chopped
Kasuri methi 2 tsp
Chilli powder 1 tsp
Coriander powder 1 tsp
Turmeric powder 1/2 tsp
Salt To taste
Method
First blanch the tomatoes then peel them. Extract seeds and blend pulp in the mixer. Add enough water to make 4 cups. Wash the rice,
drain and place over the cooking plate in the cooking pan. Add the tomato puree and salt. Press the switch to ‘Cooking’. Heat oil in a
kadai and season with mustard, dal, peanuts and curry leaves. Add onions and fry till light brown. Add kasuri methi, chilli, turmeric and
coriander powder. Add to the rice and stir gently. When the rice is done, the switch will automatically move to ‘Keep Warm’. Switch off
the cooker after 15 minutes, stir the rice gently before serving. Or allow to keep warm till time to serve (up to 4 hours).
8
MALAI CHICKEN
Ingredients
Chicken pieces 800 gms
Curds 1/2 cup
Lime 1
Green chillies 6-8
Ginger 3 cm
Coriander leaves 1/2 cup
Mint leaves 1/2 cup
Cloves 6
Cardamom 4
Cinnamon 2-3 pieces
Pepper 1/2 tsp
Turmeric powder 1/2 tsp
Cashewnuts (powdered) 3 tbsp
Malai 3 tbsp
Salt To taste
Method
Crush together the cloves, cinnamon, cardamom and pepper. Grind into a paste the chillies, ginger, coriander, and mint leaves using
little water. Mix these with curds, lime juice, turmeric powder and salt. Pour this masala over the chicken pieces and marinate for 2-4
hours. Place the chicken with the marinade in the cooker pan. Press the switch to ‘Cooking’. When the chicken is cooked (about 20
minutes), add the cashew powder and malai. Switch off the cooker after 5 minutes.
PANEER VEGETABLE MEDLEY
A tasty and nutritious dish, pleasing to the eye, totally free of oil and easy to prepare.
Ingredients
Paneer 250 gms approx.
Carrots 250 gms
Mushrooms 200 gms
Capsicum 200 gms
(Use a combination of yellow red, and green if available)
Tomatoes 200 gms
Spring onions 1 cup, finely chopped
Green chillies 1 tbsp, finely chopped
Ginger 2 tsp, finely chopped
Coriander leaves 1/2 cup, chopped
Mint leaves 1/2 cup, chopped
Salt and lime juice to taste
Dry roast and powder the following
Red chillies 2-3
Pepper corns 1/2 tsp
Coriander seeds 1 tsp
Cumin seeds 1 tsp
Method
Slice paneer into thin rectangular slices. Chop carrots and mushrooms. Cut the capsicums into halves, remove the seeds and cut each
half into 4 wedges. Thinly slice the tomatoes. Blend the chopped ingredients with salt and the masala powder. Pour 2 cups of water in
the cooker pan of the cooker and press the switch to ‘Cooking / Steaming’. Line the base of the steamer with a piece of aluminium foil.
Arrange the paneer slices on it. Sprinkle with 1/5th of the masala mixture on top. Arrange carrots, capsicum, mushroom and a layer of
tomato, one over the other, sprinkle each layer with the masala mixture. Place the steamer in position and cover with the lid. Steam for
15-20 minutes. Mix lightly and sprinkle lime juice on top. Serve with rotis, chapattis, bread, ghee rice or pulao.
Important Note
These recipes are indicative of the versatility of thiis appliance. As you continue to use your cooker, we are sure you will gain a lot of
enjoyment from discovering new recipes that you can prepare. All the cooking times given in this recipe book are approximate and are
intended as a guide. Always check food regularly during preparation and adjust the cooking time to suit your personal taste.
9
WARRANTY
This product comes with a warranty of 12 months from the date of purchase as specified on the warranty card. This is against
all defective material or workmanship. In the event of a defect, Future Value Retail Limited or Koryo Authorized Service Centre
undertakes to repair the set, free of charge, during the warranty period.
In the event of a defect developing in the product, contact KORYO Customer Care or KORYO Authorized Service Centre and
provide information about the defect, the model number and serial number of the product.
THIS WARRANTY IS VOID IF
1. The completely filled warranty card is not presented to the authorised personnel at the time of servicing of the product.
2. The product is not operated according to the instructions given in the user manual.
3. Defects are caused by improper or reckless use.
4. Modifications or alterations have been made to the product or if the product has been tampered with,in any
manner whatsoever.
5. Repairs to the product are carried out by anyone other than an authorised company representative.
6. For defects other than faulty parts or workmanship such as damage due to lightning, abnormal voltage, spillages, dust,
accidental damage, etc.
7. The serial number is deleted or altered.
8. Used for any non–domestic purpose.
OTHER TERMS AND CONDITIONS
1. Repairs or replacement will be carried out either by a Future Value Retail Limited authorised customer care centre or by a
representative.
2. All expenses incurred in collecting the unit(s) or part(s) thereof from the Customer Service Centre, as well as any other
expenses and incidentals will be borne by the customer.
3. Whilst the company will make every effort to carry out repairs at the earliest, it is made expressly clear that the company is
under no obligation to do so in a specified period of time.
4. The company or its authorised customer centre reserves the right to retain any part(s) or component(s) replaced at its
discretion, in the event of a defect being noticed in the equipment during the warranty
WARRANTY CARD
THIS CARD IS VALID ONLY IF IT IS FILLED IN COMPLETELY,
SIGNED AND STAMPED BY THE DEALER ON DATE OF PURCHASE
MODEL NO
: CUSTOMER NAME
:
SERIAL NO
:
ADDRESS:
PHONE NO
: RESIDENCE
INVOICE/CASH BILL NO
:
DATE OF PURCHASE
:
CUSTOMER SIGNATURE
:
:
OFFICE
:
DEALER’S STAMP
* For service request kindly contact Customer Care Centre at : 1800-425-7722, 080-26577722
* Please mail in queries to [email protected]
10
11
Also Available
Chopper
Food Steamer
Juicer Mixer Grinder
Slow Juicer
Dry Iron
Geyser
Microwave Oven
Split Air Conditioners
Electric Cooker
Hair Dryer
Mixer Grinder
Stabilizer
Electric Kettle
Hand Blender
Oven Toaster Griller
Steam Iron
Electric Pressure Cooker
Immersion Heater
Pop-Up Toaster
Vacuum Cleaner
Emergency Light
Induction Cook-Top
Room Heater
Washing Machine
Fan
Juice Extractor
Sandwich Maker
Window Air Conditioners
Imported by:
Future Value Retail Limited
Tower C, 9th Floor, 247 Park, L.B.S. Marg, Vikhroli (West),
Mumbai - 400 083, Maharashtra, India.