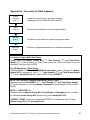
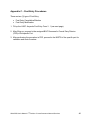
1
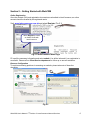
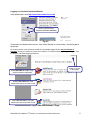
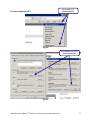
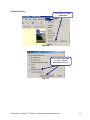
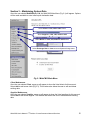
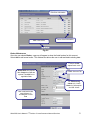
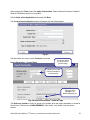
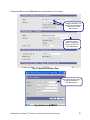
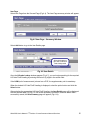
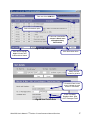
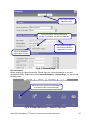
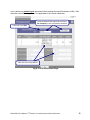
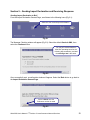
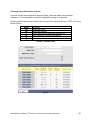
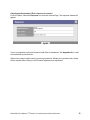
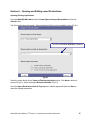
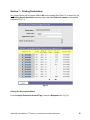
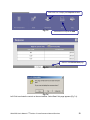
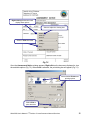
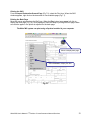
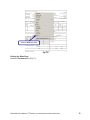
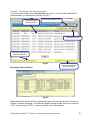
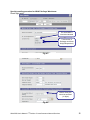
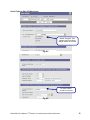
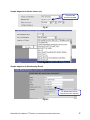
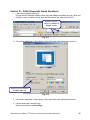
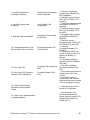
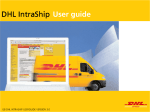
WEB CWS
©
Custom’s Work Station
User’s Manual
V1.04
Table of Contents
Section 1 - Introduction ............................................................................................. 3
The Web CWS application allows you to:........................................................... 3
System Requirement .......................................................................................... 3
Section 2 – Getting Started with WebCWS............................................................... 4
Online Registration ............................................................................................. 4
Browser Configuration ........................................................................................ 4
For Internet Explorer (Microsoft default browser) ..................................... 5
For Mozilla Firefox..................................................................................... 5
Logging in to the InterCommerce Website ......................................................... 6
Resetting Passwords .......................................................................................... 7
Password Security .............................................................................................. 7
For Internet Explorer (IE 6 sp1) ................................................................ 7
For Internet Explorer (IE 7) ....................................................................... 8
For Mozilla Firefox..................................................................................... 9
Section 3 – Maintaining System Data ..................................................................... 10
Client Maintenance ........................................................................................... 10
Supplier Maintenance ....................................................................................... 10
Broker Maintenance.......................................................................................... 11
Section 4 – Preparing Import Declarations ............................................................. 13
Import Declaration – General Page .................................................................. 14
Item Page................................................................................................ 16
Entering Multiple Items ..................................................................................... 20
Financial Page ........................................................................................ 20
Pre assessment ................................................................................................ 21
Section 5 – Sending Import Declaration and Receiving Response ........................ 23
Sending Import Declaration to BoC .................................................................. 23
Receiving Import Declaration response............................................................ 24
Checking the Declaration if Error response is received.................................... 25
Section 6 – Opening and Editing saved Declarations............................................. 26
Opening Existing Applications .......................................................................... 26
Creating from an Existing Application............................................................... 27
Section 7 – Printing Declarations ............................................................................ 28
Printing the Assessment Notice........................................................................ 28
Printing the SAD ............................................................................................... 31
Printing the Back Page ........................................................................... 31
Printing the Rider Page........................................................................... 32
Exporting to Microsoft Excel ............................................................................. 33
Section 9 – Simulated Import Declarations (examples ONLY) ............................... 34
Sample lodgment procedure for NAIA .............................................................. 34
Special encoding procedure for NAIA PairCargo Warehouse................ 35
Direct Flight for PAL-PSI Warehouse ..................................................... 36
Sample lodgment for Harbor Center only ......................................................... 37
Sample lodgment for Warehousing Entries ...................................................... 37
Section 10 – FAQs (Frequently Asked Questions) ................................................. 40
Appendix A – Usual Errors ...................................................................................... 41
Appendix B – Procedure for NAIA lodgment........................................................... 43
Appendix C – Post Entry Procedures...................................................................... 44
© InterCommerce Network Services
All Rights Reserved
Unit 2203, 88 Corporate Center
141 Valero cor Sedeño Streets, Salcedo Village
1227 Makati City, Philippines
+63 (2) 845 0509; Fax +63 (2) 843 8160
[email protected]
www.intercommerce.com.ph
2
Section 1 - Introduction
The Web Customs Workstation System (WebCWS) is a web based application that enables the
electronic transfer of documents between the Bureau of Customs (BoC), importers, brokers,
forwarders, bonded warehouse operators, and other Customs trading parties using the network
and technology developed and maintained by InterCommerce Network Services, Inc.
The Web CWS application allows you to:
• Prepare and submit import entry declarations Online;
•
Print import entry declarations and assessment notices in the Customs-prescribed form;
•
Look up tables for Customs product codes, tariff rates, and currency exchange rates used
by Customs in computing dutiable values;
•
Manage system information; and
•
Allow online visibility on your Import Entries by Clients and Importers.
System Requirement
• Computer with stable internet access (1024 X 768 recommended screen
resolution)
• Internet Explorer 5.5 or higher; Mozilla Firefox 2.0 or higher
• Flash Player (browser plug-in)
• Microsoft Excel (optional - for reports)
• Microsoft compatible Printer (preferably Laser printer for Assessment Notice/SAD;
Dot-matrix for IEIRD)
For concerns, please email:
[email protected]
Chat Support:
Yahoo! Messenger and MSN Messenger ID:
manilacs
WebCWS User’s Manual. 2nd Revision. © InterCommerce Network Services
3
Section 2 – Getting Started with WebCWS
Online Registration
Once the contract (SLA) and registration documents are submitted to InterCommerce, an online
account should be created by the registered user/s.
Visit www.intercommerce.com.ph and select Register (Fig 2.1)
Select Register to create
an Online Profile with
InterCommerce
Fig 2.1 InterCommerce Main Page
Fill up all the necessary information and select submit. You will be informed if your registration is
successful. Please call our Client Service department for follow-up on account activation.
Browser Configuration
To avoid encountering problems in accessing our website, please take note of these few
checklists:
Fig 2.2
WebCWS User’s Manual. 2nd Revision. © InterCommerce Network Services
4
For Internet Explorer (Microsoft default browser)
To add InterCommerce to your trusted sites, select Tools – Internet Options – Security –
Trusted Sites – Sites (Fig 2.2).
Add https://www.intercommerce.com.ph
Select OK to go back to Internet Options
Configuring Pop-up settings:
Should allow
www.intercommerce.com.ph
For your security, always block
pop-ups
Fig 2.3
For Mozilla Firefox
To enable pop-ups from InterCommerce, select Tools – Options – Content – Block pop-up
windows - Exceptions (Fig 2.4).
Should allow
www.intercommerce.com.ph
Fig 2.4
WebCWS User’s Manual. 2nd Revision. © InterCommerce Network Services
5
Logging in to the InterCommerce Website
In the address bar, enter http://www.intercommerce.com.ph
Enter Login Name and
Password (not case sensitive)
Fig 2.5
If Username and password are correct, user will be directed to a secured site. Just select yes at
the prompt.
For security reason, InterCommerce site will be automatically logged-off after ten (10) minutes of
inactivity. Saving your work from time to time is advised. To continue working once logged-out, just close
the browser and repeat logging procedures.
Select WebCWS ver 1.04 to begin
Import Declaration lodgments
Select to Log-out
of the system
Select Cash Advance to View
transactions and current Cash Credit
Select Account Info to view past
transactions and current Cash Credit
Fig 2.6 WebCWS Member’s Page
WebCWS User’s Manual. 2nd Revision. © InterCommerce Network Services
6
The Account Info link lets you update user’s data and password (Fig 2.6). Since all usernames
and passwords are not case sensitive, it will be the user’s responsibility to regularly update and
secure their password. If you think somebody is using or accessing your account, please contact
InterCommerce (by email or fax) immediately to freeze your account.
Resetting Passwords
To reset your password, the authorized user or broker needs to fax a formal letter (fax# 843 6180)
requesting for a password change. The letter should include the username, Broker’s name, TIN,
CAS #, company name (if applicable), contact details and signature. The new password will be
sent to the registered email address of the user’s account.
Password Security
In order to protect the account owner from unauthorized use, proper precautions should be
followed when accessing your account specially from publicly used computers (e.g.. internet
cafes, offices and shared computers). Unauthorized use of your account might put your license at
risk!
• Memorize your Password. Do not write it anywhere.
• If you need to share your account with another person, update password immediately
afterwards.
• Always select NO when being asked by Windows about saving password options.
• Follow these steps to clear the windows password cache in your browser:
For Internet Explorer (IE 6 sp1)
Select Clear Passwords
Select Tools, Content
then AutoComplete
Fig 2.7
WebCWS User’s Manual. 2nd Revision. © InterCommerce Network Services
7
Select Tools, then
Internet Options
For Internet Explorer (IE 7)
Fig 2.8
Select Delete, then press
Delete passwords
Fig 2.9
WebCWS User’s Manual. 2nd Revision. © InterCommerce Network Services
8
For Mozilla Firefox
Select Tools then Clear
Private Data
Fig 2.10
Select Clear Private Data,
making sure Saved
Passwords is checked
Fig 2.11
WebCWS User’s Manual. 2nd Revision. © InterCommerce Network Services
9
Section 3 – Maintaining System Data
Once the user selects WebCWS ver 1.04, the WebCWS Main Menu (Fig 3.1) will appear. Options
will be made available to enter initial import declaration data.
Select Client to view, edit or add Clients
Select Supplier to view, edit, delete or add
S
li
Select Broker to view, edit, delete or add Brokers
Select Exchange Rate to view current and past exchange rates
Fig 3.1 WebCWS Main Menu
Client Maintenance
Once the user selects Client, a pop-up will appear to show the listed clients for this account.
Select Add to add a new client (Fig 3.3). This window also allows the user to edit and delete
existing data.
Supplier Maintenance
Once the user selects Supplier, a pop-up will appear to show the listed suppliers for this account.
Select Add to add a new supplier. This window also allows the user to edit and delete existing
data.
WebCWS User’s Manual. 2nd Revision. © InterCommerce Network Services
10
Edit Client Information
Adds a new Client
Delete Client Information
Fig 3.2
Broker Maintenance
Once the user selects Broker, a pop-up will appear to show the listed brokers for this account.
Select Add to add a new broker. This window also allows the user to edit and delete existing data.
A Unique 3 char
alphanumeric code
White fields are required
data. Grayed out fields are
optional. Use N/A for not
applicable fields
DUNS. Same as TIN
For warehousing
clients only. Leave
blank for Consumption
and SGL clients
User is advised to take
extra diligence in
encoding the correct
data
WebCWS User’s Manual. 2nd Revision. © InterCommerce Network Services
11
Fig 3.3 Add Client Window
WebCWS User’s Manual. 2nd Revision. © InterCommerce Network Services
12
Section 4 – Preparing Import Declarations
In the WebCWS Main Menu, select Create/Open Import Declaration button then Click the
Submit box (Fig 4.1).
Fig 4.1 WebCWS Main Menu
In the next window, select a Client from the drop down menu.
Drop down button.
Select Client
Select appropriate
mode of declaration
Select Next>> when done
Fig 4.2
WebCWS User’s Manual. 2nd Revision. © InterCommerce Network Services
13
After selecting the Client, select the mode of declaration. Check with InterCommerce if desired
Mode of Declaration option is not available.
Select Create a New Application button and click Next.
The Create a New Application window will appear with the following data:
Fig 4.3
If all the details are correct, select Continue to proceed.
Import Declaration – General Page
This button allows
you to go back to
previous page
A Reference number
will be generated for
this transaction
Take note of the
format for the
Manifest/Registry No.
Fig 4.4 Import Declaration - General Page
The Reference number will only be stored in the system when the Import declaration is saved for
the first time. The format is (AAAYYMMDDXX) Client Code, Year, Month, Day and series
number.
WebCWS User’s Manual. 2nd Revision. © InterCommerce Network Services
14
All required fields must be filled out before the declaration can be saved.
Supplier information can
be directly encoded here
if not stored in Code
Maintenance
Select the look-up
button to display the
Brokers stored in the
Code Maintenance
Fig 4.5 Import Declaration Data
Select the drop down menu
to display data store in
Code Maintenance
Fig 4.4 Broker look-up box
WebCWS User’s Manual. 2nd Revision. © InterCommerce Network Services
15
Item Page
Select Item Page from the General Page (Fig 4.4). The Item Page summary window will appear.
Fig 4.5 Item Page - Summary Window
Select Add button to go to the Item Details page
Select this button to
go to HS Code/Tariff
Code lookup table
Fig 4.6 Item Details
Once the HS code Lookup window appears (Fig 4.7), you can begin searching for the required
HS Code/Tariff Heading by entering the first six (6) digits in the search field.
If the UOM (unit of measurement) column has a PCE, the supplementary unit is mandatory.
When the desired HS Code/Tariff Heading is displayed, select the option button and click the
Select button.
After selecting the appropriate HS Code/Tariff Heading, the Item Details page will be displayed
with the selected data (Fig 4.8). Fill out all the necessary information, and then save. When
successfully saved, the Item Summary page will appear (Fig 4.14).
WebCWS User’s Manual. 2nd Revision. © InterCommerce Network Services
16
Take note of the UOM field
Select the desired option
Take note of the PCE. If
column is blank, leave
all Supplementary
Values blank
Fig 4.7 HS Code Lookup
Click Select when done
Enter the first six (6)
digit HS Code/Tariff
Code and click Search
Always use this
button to go back
If Container Data is more
than 4, indicate the total
number of Containers
Fig 4.8 Item Details Data
WebCWS User’s Manual. 2nd Revision. © InterCommerce Network Services
Enter Container
Numbers here. Max
of 17 Chars per Field
17
The Invoice Number field and other Flags.
Enter the Invoice Data
Should be checked if
other charges is in
Transaction value
Fig 4.9 Invoice Number, other Flags
Leave unChecked if Insurance is being paid
The Supplementary Value is dependent on the HS code/Tariff Heading selected.
Supplementary unit is
mandatory for those with
UOM, otherwise leave blank
Fig 4.10 Supplementary Value
Select the Country Code as well as the applicable Preference.
Fig 4.11 Preference
WebCWS User’s Manual. 2nd Revision. © InterCommerce Network Services
18
Select the Procedure and applicable Extended Code.
This button will display
Procedure and Extension Lookup
pop-up. Values can also be
entered directly in the field.
Fig 4.12 Procedure, Extended Code
Select appropriate
Procedure and Extension
Fig 4.13 Procedure, Extended Code Options
Usually with a value of 1
WebCWS User’s Manual. 2nd Revision. © InterCommerce Network Services
19
Entering Multiple Items
To enter additional items, select the Add button. Select Open to review previous item and Delete
to remove current selected item. When adding multiple items, double-check the data per item.
Select Add to add
additional Item
Fig 4.14 Item Page – 1 Item
Enter all the necessary values on the succeeding items. Select Save when done.
Take note of the Total
Transaction Value
Selected Item can be
viewed or deleted
Fig 4.15 Item Page – Multiple Items
Financial Page
The Financial page can only be accessed if there is an existing saved item.
WebCWS User’s Manual. 2nd Revision. © InterCommerce Network Services
20
Don’t forget to always
Save your work!
For regular entries, use the IEIRD serial
number. For EDI/SGL, INS will issue Bank Ref
Click to select the Bank
Name. Select “Bank Not
Registered” if not in list
Should be Checked if
without Bank Charges
Fig 4.16 Financial Page
Pre assessment
Before sending an Import Declaration, Please view your current transaction in your preassessment facility. At the bottom of the Import Declaration – General Page, you can see the
following icons:
Select this icon to view the Pre-assessment
computation of the current transaction
Fig 4.18 Import Declaration – General Page Icons
WebCWS User’s Manual. 2nd Revision. © InterCommerce Network Services
21
User is advised to double-check the values before sending the Import Declaration to BoC. Also
check the current Exchange Rate if it is applicable to the current transaction.
Enter the desired Exchange Rate and select
Re-Compute for other computation scenarios
Take note of the Date
Take note of the computations
Fig 4.19 Pre-assessment Page
WebCWS User’s Manual. 2nd Revision. © InterCommerce Network Services
22
Section 5 – Sending Import Declaration and Receiving Response
Sending Import Declaration to BoC
From the Import Declaration General Page, scroll down to the following icons (Fig 5.1):
Select this icon to send Import Declaration
Fig 5.1
The Message Checking window will appear (Fig 5.2). Select the default Send via XML, then
select the Continue button.
You may still send declarations
after BoC operating hours for the
following day transaction, provided
the exchange rate is the same.
Fig 5.2
Once successfully sent, a confirmation window will appear. Select the Back button to go back to
the Import Declaration General Page.
Select <<Back once the
Reference number is noted
Fig 5.3
WebCWS User’s Manual. 2nd Revision. © InterCommerce Network Services
23
Receiving Import Declaration response
From the Existing Import Application Summary Page, Check the status of the particular
transaction. It is recommended to refresh the page while waiting for a response.
Click the refresh button in your browser icon or press F5 for Internet Explorer or CTRL + R if using
Mozilla Firefox.
Status
AG
AS
S
ER
C
I
Remarks
Approved Green
Approved Selected
The system has not received a response yet
Error Response. Check the Declaration
Created
Incomplete
Table 6.1 Status Table
Fig 5.4
WebCWS User’s Manual. 2nd Revision. © InterCommerce Network Services
24
Checking the Declaration if Error response is received
For Error Status, Select the Response icon from the General Page. The response window will
appear.
Fig 5.5
If error is unspecified, call InterCommerce Help Desk for assistance. See Appendix A for usual
errors and how to prevent them.
System errors may be discounted in your account balance. Should you encounter such, please
write a request within 30 days to INS Finance Department for adjustment.
WebCWS User’s Manual. 2nd Revision. © InterCommerce Network Services
25
Section 6 – Opening and Editing saved Declarations
Opening Existing Applications
From the WebCWS Main Menu, Select Create/Open and Import Declaration and click the
Submit button.
The Client select page will appear. Select the desired Client from the available option (Fig 6.1).
The menu for mode of declaration is disabled
Fig 6.1
Select the option button for the Open an Existing Application action. Click Next>> button to
proceed (Fig 6.1). Select the desired Reference Number (Fig 6.2)
Once the Import Declaration General Page appears, edit the appropriate data and Save to
make the changes permanent.
WebCWS User’s Manual. 2nd Revision. © InterCommerce Network Services
26
Fig 6.2
Creating from an Existing Application
To create a Declaration based from the data of an existing Import Entry, Select the option Create
from an Existing Application button and click the Next>> button (Fig 6.1).
The next window will display the previously created declarations (Fig 6.2). Select from the
available list, the desired reference number.
A new Reference Number will then be generated for the new Declaration (Fig 6.3). The
declaration will only be stored in the system once Saved.
The status is Incomplete. Enter the Bank
Ref in the financial section
Fig 6.3
WebCWS User’s Manual. 2nd Revision. © InterCommerce Network Services
27
Section 7 – Printing Declarations
Only Import Entries with the status of AS or AG can be printed (See Table 6.1 for status list). On
the Existing Import Application summary page, select the Reference number of the desired
transaction (Fig 7.1).
Fig 7.1
Printing the Assessment Notice
From the Import Declaration General Page, Select the Response icon (Fig 7.2).
WebCWS User’s Manual. 2nd Revision. © InterCommerce Network Services
28
Select this icon to display the Response window
Fig 7.2
Select this icon to print the SAD
Select to view Assessment page
Fig 7.3
Fig 7.4
Left Click to activate the control on the next window. Select Yes if this page appears (Fig 7.4).
WebCWS User’s Manual. 2nd Revision. © InterCommerce Network Services
29
Right clicking the document will
display these options
Select to adjust the viewing size
Select to Print document
Fig 7.5
Once the Assessment Notice window appears, Right click on the document displayed to view
the available options (Fig 7.5). When Print is selected, the print dialog box will appear (Fig 7.6).
Select desired Printer and
printing options
Select Print to
print document
Fig 7.6
WebCWS User’s Manual. 2nd Revision. © InterCommerce Network Services
30
Printing the SAD
From the Import Declaration General Page (Fig 7.2), select the Print icon. When the SAD
window appears, right click on the document to view available page (Fig 7.7).
Printing the Back Page
Move the mouse pointer above the BoC logo. When the Play button turns green, left click to
display the back page (Fig 7.8). Once displayed, follow the steps in printing the front page. Make
sure that the paper in the printer is adjusted for the back page.
The WebCWS system can print using all printer installed in your computer.
Select to display back page
Select Forward to display the rider
Fig 7.7
WebCWS User’s Manual. 2nd Revision. © InterCommerce Network Services
31
Select to Print document
Fig 7.8
Printing the Rider Page
Select the Forward option (Fig 7.7)
WebCWS User’s Manual. 2nd Revision. © InterCommerce Network Services
32
Section 8 – Cash Advance and Transaction reports
From the Member’s Page, select Cash Advance (see Fig 2.6). Once the CASH ADVANCES
window appears, you should see the following (Fig 8.1):
Latest transactions
will be listed first
Click to export data to excel
Remaining balance
Total amount deposited
with InterCommerce
Fig 8.1
Total amount deducted
from cash deposit
Exporting to Microsoft Excel
Fig 8.2
When using Mozilla Firefox, MS Excel automatically opens with the exported data. For Internet
Explorer, a window will appear. To transfer all the data including formats, select a cell, select all
(CTRL + A) and copy all (CTRL + C) then open Excel, select all and paste.
WebCWS User’s Manual. 2nd Revision. © InterCommerce Network Services
33
Section 9 – Simulated Import Declarations (examples ONLY)
Sample lodgment procedure for NAIA
See Appendix B for specific procedures
Enter the flight number
of the aircraft
Fig 9.1
Should be based on
the attached invoice
or Airway bill
Should be based on
the attached invoice
or bill of lading.
Maximum of 17
characters per field
Fig 9.2
WebCWS User’s Manual. 2nd Revision. © InterCommerce Network Services
34
Special encoding procedure for NAIA PairCargo Warehouse
Direct flight entry
The word DIRECT
should be indicated
Total number of
Packages and Gross
Weight Respectively
Fig 9.3
Master Airway Bill
should be encoded
(11 digits)
Fig 9.4
WebCWS User’s Manual. 2nd Revision. © InterCommerce Network Services
35
Direct Flight for PAL-PSI Warehouse
Master Airwaybill, Total
Quantity and Total Gross
Weight should be encoded
Fig 9.5
The word DIRECT
should be encoded
Fig 9.6
WebCWS User’s Manual. 2nd Revision. © InterCommerce Network Services
36
Sample lodgment for Harbor Center only
The letters HC
should be included
Fig 9.7
Fig 9.8
Sample lodgment for Warehousing Entries
For Warehousing entries,
Prepaid Account is required
Fig 9.9
WebCWS User’s Manual. 2nd Revision. © InterCommerce Network Services
37
Select the appropriate mode of declaration (Fig 9.10)
Fig 9.10
Fig 9.11
In the Financial section,
the consignee TIN should
match with the specific
warehouse code
Fig 9.12
Standard delay is 270 for all
warehousing entries
(7 7, 7E 7, 7T 7 and 7W 7)
WebCWS User’s Manual. 2nd Revision. © InterCommerce Network Services
38
Procedure for Underbond (5A 5) Entries only
Fig 9.13
Standard delay is 180 for
Underbond entries
(5A 5)
WebCWS User’s Manual. 2nd Revision. © InterCommerce Network Services
39
Section 10 – FAQs (Frequently Asked Questions)
1. I can’t see my options (pop-ups)
Pop-up blockers might be enabled. When we install additional toolbars such as Yahoo and
Google, be sure to enable pop-ups from InterCommerce Site (also check Fig 2.3).
See pop-up blocker
options for Yahoo and
Google Toolbars
Fig 10.1
2. Can see the Add button in the supplier, client and broker code maintenance window.
Minimum screen resolution
is 1024 X 768 pixels
Fig 10.2
3. Can see the Add button in the supplier, client and broker code maintenance window.
4. Cannot access the Financial Page.
Need to input data on the Item Page.
WebCWS User’s Manual. 2nd Revision. © InterCommerce Network Services
40
Appendix A – Usual Errors
ERROR DESC
PROBABLE CAUSE
1. Manifest/BL does not exist
No Manifest/BL in BoC's
Database
2. BL is not IMPORT
Wrong BL format sent in
BOC
3. BL written Off
BL has been tagged in BOC
4. BL has been reserved by a
previous declaration (for dummy
BL)
Dummy BL was already
used
POSSIBLE SOLUTION/S
1. Check with the Shipping
lines/Forwaders/Consolidators
if Manifest and BL's was
already submitted
2. If in case the Manifest and
BLs are already submitted,
check the correct Manifest or
BL in BOC (eg. 1 or I, 0 or O
etc)
1. Check with the BOCMISTG (c/o Ms. Noemi
Gonzales)
2. Ask the shipping
lines/consolidator to check the
format of the BL submitted in
BOC
1. Check with the BOCMISTG (c/o Ms. Noemi
Gonzales) if BL was tagged
and if assessment was done
(Entry No. Generated)
1. Check the dummy BL
assigned (to the Client)
2. Check/Look for other
available dummy BL
assigned.
5. Supplementary unit must be
empty
Supplementary Unit Field
for the HS Code used
6. Supplementary Unit is
mandatory
Supplementary Unit Field
for the HS Code used
1. Check the HS Code used
then check the supplementary
unit field (Note: field should be
empty if there’s no code
opposite the supplementary
unit box 1)
1. Check the HS Code used,
then check the supplementary
unit field. Supplementary Unit
field must contain a value.
(Note: Supplementary Unit is
mandatory if you can see a
code (e.g. PCE, LTR, KGM
etc) in the box opposite the
supplementary unit box 1)
WebCWS User’s Manual. 2nd Revision. © InterCommerce Network Services
41
7. Insufficient Number of
Packages remaining
Total Number of Packages
Field incompatible
8. Insufficient gross mass
remaining
Gross Weight Field
incompatible
9. Package Type incompatible
Packaging Code encoded
by the client
10. Consignee/Declarant Code
does not exist in the control file
Consignee/Declarant TIN
Field is invalid
12. Error Code 194
Consignee TIN is expired in
BOC
13. Error Code 134 (Container
Number Field is Mandatory)
Container Number Field
Error
1. Total No. of Packages
encoded was different in the
BoC's database
2. Check the correct value in
BOC (ATI for POM & ICTSI
for MICP)
1. Total gross weight encoded
was different in the BoC's
database
2. Check the correct value in
BOC (ATI for POM & ICTSI
for MICP)
1. Packaging Code encoded
was different in the BoC's
database
2. Check the correct
packaging code in BOC (ATI
for POM & ICTSI for MICP)
1. Check the
Consignee/Declarant TIN
encoded
2. TIN Number should only
contain 9 digits (numeric), no
spaces, no dashes, no
periods.
3. TIN Number should be
updated in BOC's Database
(Asycuda)
1. Check the respective
Consignee/Importer TIN in
BOC
1. This usually encountered in
multiple items (HS Code)
CusDec.
2. If the Said Cusdec is
containerized, the container
detail should be also encoded
in the succeeding item page.
14. Cannot see the Import
Declaration Listing/created
entries.
1. Check the Client Code. It
should be 3 Characters.
15. Cannot log-in when password
is updated/changed
1. Your browser’s (IE or
Firefox) saved password
feature might be enabled. Pls
see password security for
details (sec. 2)
WebCWS User’s Manual. 2nd Revision. © InterCommerce Network Services
42
Appendix B – Procedure for NAIA lodgment
Brokers
Premises
(Step 1)
Bank
(Step 2)
Cash Div.
(Step 4)
Warehouse
(Step 5)
Lodge the Import Entry. If approved, print the
Assessment Notice. (SAD for SGL and EDI)
Pay the duties and taxes on the designated Bank.
Proceed to cash division to match the payment made.
Proceed to designated warehouse to release the shipment.
NOTE:
For Indirect Flight (PSI & PairCargo)
Please encode the Master Airway Bill (1st), Total Quantity (2nd) and Total Gross
Weight (3rd ) in the container no. Field. And encode the House AirWaybill in box for
Airwaybill Field (box 40a in IEIRD)
For PSI Warehouse: Direct Flight
If Direct Flight in PSI and CARGOHAUS warehouse, please encode the Master
Airway Bill in container no. field (1st) , Total Quantity (2nd) and Total Gross Weight
(3rd ) and in Airwaybill Field (box 40a in IEIRD) the word DIRECT.
NOTE: For PairCargo & Miascor Warehouse (Direct Flight)
Please encode the word DIRECT (1st) , Total Quantity (2nd) and Total Gross Weight
(3rd) in the container no. field and Master Airway Bill in the Airwaybill Field (box 40a in
IEIRD)
NOTE: For MIASCOR only
Please encode the Master Airway Bill, Gross Weight and Packaging in the container
no. field and House Airway Bill (numeric only) in the Airwaybill Field.
If DIRECT FLIGHT, please encode the word DIRECT in container no. field (1st) and
Master Airway Bill in the Airwaybill Field.
WebCWS User’s Manual. 2nd Revision. © InterCommerce Network Services
43
Appendix C – Post Entry Procedures
There are two (2) type of Post-Entry
•
•
Post Entry Cancellation/Deletion
Post Entry Modification
1. Fill up the VASP- Asycuda Post Entry Form V. 1 (see next page).
2. After filling up, proceed to the assigned BOC Personnel in Formal Entry Division
(FED) of the specific Port.
3. After performing the procedure in FED, proceed to the MISTG of the specific port for
validation and control number.
WebCWS User’s Manual. 2nd Revision. © InterCommerce Network Services
44
ASYCUDA POST- ENTRY REVISION FORM
Date:
Control No.:
VASP User Name: _______________________________________________________
ASYCUDA Registration No. and Date : _______________________________________
Port : ___________________________ VASP : _______________________________
Declaration Status:
Registered
Assessed
Registered/Deleted
Assessed/Delete
Reason for Post-Entry : ___________________________________________________
_______________________________________________________________________
_______________________________________________________________________
_______________________________________________________________________
_______________________________________________________________________
____________________________________
Requested by:
Noted by:
_____________________________
Name and Signature, Date and Time
(VASP User)
Name and Signature, Date and Time
(Importer/Officer-in-Charge)
BOC Use Only (Division/Section Concerned)
Approved and Performed by:
Name and Signature, Date and Time
Division/Section
Position/Designation
Action:
MISTG Use Only:
Checked by:
Name and Signature, Date and Time
Remarks:
VASP Post-entry Request Form 2007.1
One (1) copy shall be submitted to MISTG, Site Manager