1
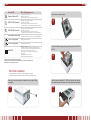
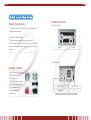
.1
English
English
System Requirements
Hardware Overview
N2100 Front Panel
To configure the Thecus YES Box N2100, you must have a PC
equipped with the following:
A CD-ROM or DVD-ROM drive.
An Ethernet port connected to a network hub or switch.
Microsoft Windows XP, 2000, ME, Linux OS or Apple Mac OS X.
Microsoft Internet Explorer 6.0, Firefox 1.0.4, or Safari 1.3 web
browser.
Power
USB
N2100 Back Panel
Package Contents
One (1) Thecus YES Box N2100
One (1) Accessory Pack:
One (1) power cord
Two (2) RJ-45 Ethernet cables
Twelve (12) hard disk screws
One (1) installation CD
USB 1 USB 2
Lan 1 Lan 2
Quick installation guide
Power Cord
Fan
Warranty card
LAN 1/LAN 2: High speed connections to your network hub/switch.
Power Socket: Connect power cord, ideally from a surge protector.
2.
.3
English
English
Power LED
Blue: System power on
System Status LED
Blinking orange: System startup
Blinking red: System error
Off: System startup complete; system operating normally
HDD 1 LED (blue/red)
Blue: HDD 1 detected
Blinking blue: Active HDD 1 data transfer
Red : HDD 1 error detected
Blinking red: HDD 1 capacity is nearly full (90% or more)
* If RAID is configured, capacity is based on the entire RAID system.
HDD 2 LED (blue/red)
Blue: HDD 2 installed
Blinking blue: Active HDD 2 data transfer
Red : HDD 2 error detected
Blinking red: HDD 2 capacity is nearly full (90% or more)
* If RAID is configured, capacity is based on the entire RAID system.
One-Button USB Copy
Push the button to copy entire USB volume to theN2100. Files are
stored in a folder named by current time stamp: (YearMonthDayHHMM)
LAN 1 LED (green)
Green: Network connected
Blinking green: Network activity
LAN 2 LED (green)
Green: Network connected
Blinking green: Network activity
USB LED
USB Device Connection:
Blinking blue (5 seconds) : USB device connected successfully.
*For universal USB memory card reader, USB LED will blink blue
when one or more card is mounted successfully.
Blinking red (5 seconds) : USB device connection failure
Data Transfer:
Blinking blue: Active data transfer
Blinking red: USB device read/write error
USB Port: USB 2.0 port for USB storage expansion.
USB Copy Button: Automatically copy entire USB storage content to the YES Box N2100.
Power Button: Turn on/off YES Box N2100.
Unscrew four mounting screws.
STEP
2
Lift up the hard disk tray by pulling up the top panel of the YES Box
N2100.
STEP
3
Hard Disk Installation
The YES Box N2100 supports up to two Serial ATA (SATA) hard disks.
To install hard disks into the YES Box N2100, please follow the diagrams below:
Remove two screws located on the back of the unit using a Philips
screwdriver.
Carefully insert a standard 3.5” SATA hard disk into the tray, and
secure the hard disk with screws from the included accessory pack.
STEP
1
STEP
4
4.
.5
English
English
Connect & Setup the YES Box N2100
If you are installing two hard disks, please insert the second hard
disk at the bottom of the tray and secure it with screws from the
included accessory pack.
STEP
5
Connect the first Ethernet port ( LAN) to your network hub/router.
STEP
1
Plug in the power cord and turn on the system.
STEP
2
Carefully lower the hard disk tray back into the YES Box N2100.
After making sure the tray is in place and the connectors are aligned,
ecure the hard disk tray with screws.
STEP
6
Make sure system is running properly by checking all front panel
LEDs for any error indications.
STEP
3
6.
.7
English
English
YES Box N2100 Setup Wizard
1.Insert the Iinstallation CD into your CD-ROM drive (host PC must
have connection to the above network).
2.The Setup Wizard should launch automatically. If not, please
browse your CD-ROM drive and double click on Setup.exe.
3.The Setup Wizard will start and automatically detect all YES Box
N2100s on your network. If none are found, please check your
connection and refer to the Troubleshooting Guide at the back of the
YES Box N2100 User’s Manual.
Name your YES Box N2100 system and configure the network IP
address. If your router in configured as a DHCP Server, configuring
the YES Box N2100 to automatically obtain an IP address is
recommended. You may also use a static IP address and enter the
DNS Server address manually
STEP
4
STEP
1
Enable the services you wish to make publicly accessible. The YES
Box N2100 offers FTP Server and iTunes® Server. Check “Local
System Time” to synchronize the system time with your local computer.
Select the YES Box N2100 that you like to configure.
STEP
5
STEP
2
Refer to the following chart and select the hard disk configuration
that best suits your usage model.
STEP
6
Login with the default administrator account and password.The
default account and password are both : “ admin”.
STEP
3
Setup Options
1 Disk JBOD
2 Disk RAID 0
2 Disk RAID 1
2 Disk JBOD
High Performance
Increased Reliability
No
Yes
Yes
No
No
No
Yes
No
RAID 0 Spanning: Combine 2 physical hard disks into one or more logical drives. Data
is separated into threads and stored across both physical drives.
RAID 1 Mirroring: Use the 2nd hard disk as a mirror image of the 1st hard disk for
ncreased reliability.
JBOD Expansion: Similar to RAID 0, but files are stored in whole on any available
hard disks.
8.
.9
Chinese (Traditional) 10.
English
Change the default administrator password.
STEP
7
快速安裝指南
系統規格
要設定Thecus YES Box N2100,您的電腦必須具有以下配備:
CD-ROM 或 DVD-ROM 光碟機
連接至網路集線器或交換器的乙太網路接埠
Microsoft Windows XP、2000、ME、Linux 或 Apple Mac X 作業
Finished! Access the current YES Box N2100 administrator webpage
by pressing the “Web Management” button.You can also configure
another YES Box N2100 at this point.
系統。
Microsoft Internet Explorer 6.0、Firefox 1.0.4 或 Safari
1.3 網頁瀏覽器。
STEP
8
包裝內容
Thecus YES Box N2100 ×1
配件包 ×1:
Advanced Service Setup
電源線 ×1
Photo Web Server
RJ-45 乙太網路線 ×2
The YES Box N2100 has a built-in Photo Web Server that enables the sharing of
硬碟螺絲 ×12
personal photos anywhere on the network. Users can share photos with anyone or
安裝光碟片 ×1
specific users using an access control list.
快速安裝指南
FTP
保證卡
The YES Box can act as an FTP Server, enabling users to share files with their favorite
FTP programs.
iTunes
The YES Box N2100 has a built-in iTunes® service that allows users to share and
play digital music. PCs installed with iTunes® can playback music stored on the
YES Box.