1
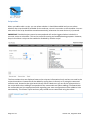
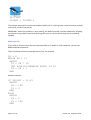
xxter scripts manual The basics 2 Script management 3 Script editor 4 Commands Controlling components Controlling (other) scripts Using delays Scenarios, alerts and schedulers Commands 5 5 6 7 8 8 Values 9 Variables and calculation Variables Calculation 9 9 10 Functions Mathematical Time functions 11 11 12 Control structures IF and WHILE BEGIN and END 13 13 14 Other 15 Page 1 of 15 Version 3.0, Augustus 2015 xxter scripts With xxter scripts you can create your own small programs within xxter. These scripts are very flexible and can be used to add a wide variety of features to a home automation installation. You can create logic functions, delay actions, extend your scenarios with RGB sequences and much more. Scripts can be activated using a scenario, a schedule, an action (trigger) or another script. In addition to this manual, several examples are also available for download on our website to create specific features with xxter scripts. These examples might be very useful not only for these specific features, but also for learning how xxter scripts work. The basics xxter scripts are written programs that consist of one or more lines. Each line should contain only one specific command. You cannot put multiple commands on one line. You can add comments to a script by writing a “#” character. This can be done on a separate line or at the end of a command. An example of an xxter script: Scripts can be started and stopped by many means, for example by a scenario or a schedule. Scripts can be "unending" scripts that perform certain actions in repeating intervals or can be defined as a sequence of commands that are executed only once, whenever the script is started. Page 2 of 15 Version 3.0, Augustus 2015 Script management xxter scripts can be created and updated using the xxter editor. This editor can be found in the project configuration of “My xxter”. Select the project for which you want to manage the scripts and select “Scripts” in the menu bar. All existing scripts will be shown here and can be edited and deleted. Important: When you add or edit a script, this has to be loaded onto the xxter device before it can be used. Whenever a change has been made, you can see the text “Project has changed” at the top right hand corner. When you click on this and subsequently on “Push configuration to xxter device”, the device will download the new configuration. This feature can only be used when xxter is configured for use outside (see chapter 13 of the installation manual). Alternatively you can reload the profile using the app (see chapter 11 of the user manual). Of course you can also reload the profile from the xxter device itself, by logging onto the device and clicking the button “Load configuration” at the top left hand corner in the menu. When you are logged in on the device, you can see the loaded scripts by clicking the “Scripts” option in the menu. Here a script can also be manually started, restarted or stopped for testing purposes. Page 3 of 15 Version 3.0, Augustus 2015 Script editor When you add or edit a script, you can select whether it should be enabled and you can select whether the script should be available for the end user, to use in scenarios or the scheduler. You can also select if the script should be started automatically, whenever the xxter device is (re) started. IMPORTANT: Disabled scripts cannot be executed and will not be triggered when included in a scenario, action or scheduler. This can be useful for testing and troubleshooting proposes. However, keep in mind that a script can be enabled or disabled by another script! The line numbers that are displayed next to the script are informational only and are not used in the scripts themselves. Commands can be added by typing them in directly or by using the command selection tool, located at the right hand side top corner. Make sure you are at the right position in the script editor when adding a command with the commands tool. When adding a command with the commands tool, the appropriate fields regarding your xxter configuration will be added as links automatically. This allows a quick and easy way to add correct commands using the editor. Page 4 of 15 Version 3.0, Augustus 2015 After you have added one or more commands in the editor, you can verify if they are valid by clicking the "Save and check" button. Your current script will be checked and redisplayed in the editor. All lines that are correct will be displayed in black. All lines in red indicate it contains an error somewhere on that line. Comment will always be displayed in green. After correcting or adding lines, you can easily verify the script again by using the "Save and check" button. When everything is correct you can use the "Save and close" button to close the editor. Note: scripts that contain errors can be saved and started. However the lines that contain errors (and are displayed in red) will not be executed during the execution of the script. xxter will skip them and continue with the next line. Scripts will automatically stop running after the last command of the script has been executed. When using the command selection tool, parts of the command will be displayed between [] brackets. These parts need to be replaced by valid input. The default text shown in between these brackets will give you an indication of the required value. Scripts are written using commands and values. Additionally scripts can be extended using variables, calculations, functions and certain control structures like IF statements and WHILE loops. Commands The commands section is divided in the different main types of commands that are available. Controlling components SET [component] TO [value] With this command you can set bit, byte and float (2byte) components to a specified value. Use the “.” character as separator for floating point values. You can also use other components as the value part of this command. This allows you to set one component to the value of another. Page 5 of 15 Version 3.0, Augustus 2015 SET [RGB component] TO [red],[green],[blue] This command lets you set a RGB component to a specified colour. The colour must be described with the red, green and blue values, all using a range of 0-‐255. Instead of using static values, you can replace any of the three primary colour parts with a BYTE component. You can also replace all the component parts together with a single other RGB component. This allows you to set a RGB component to another RGB components colour. FADE [component] TO [value] IN [time] This command is quite similar to the two commands above; you can use it on bytes, floats and RGB values. Instead of setting the value directly, this command changes the values in steps from the current value to the value specified. You can specify the time as a static value or use the value of a component. Possible time units are MSEC/SEC/MIN/HOUR/DAY. If no units are specified for the time value, milliseconds are assumed. This command changes the value of the component every second. Similar to the SET command, you can also use this command in combination with RGB components. FADE [component] TO [value] in [time] STEP [time] This command is similar to the command above; it just adds the specification of the step time. When the step time is not specified, the FADE command changes the value every second. By specifying the step time, you can change this to for example every 30 minutes, or 100 milliseconds. The minimum value is 100 milliseconds. Similar to the SET command, you can also use this command in combination with RGB components. READ [component] With this command you can request the current status of the component on the bus. You can also use the command for scenarios. This will perform a READ for every component that is included in the scenario. Controlling (other) scripts STOP This command simply stops the current script. RESTART This command restarts the current script. In other words it starts running again from the beginning. IMPORTANT: restarting a script without using a WAIT command (see next section) will bring the script in a direct infinite loop, which should be avoided. Page 6 of 15 Version 3.0, Augustus 2015 START [script] This will start another script if it is not running at the moment. Replace [script] with the actual script you wish to start. START AT BEGIN [script] This will start another script if it is not running. If it is running it will tell the script to start over again from the beginning (restart). Replace [script] with the actual script you wish to (re)start. STOP [script] This will stop another script if it is running. Replace [script] with the actual script you wish to stop. SET [script] TO [on/off] This command allows you to enable or disable a script. Replace [script] which the actual script you wish to enable/disable. All values greater than 0 are interpreted as ON, all values of 0 or below are interpreted as OFF. This can be helpful when using a certain component to activate/deactivate scripts. Disabling a script that is currently running will also directly stop the script. Using delays WAIT [time] or WAIT [time] MSEC/SEC/MIN/HOUR/DAY This command will put the script on hold for the given period of time. If no time units are supplied, milliseconds are assumed. The maximum waiting time is approximately 20 days. Instead of entering a static value, you can use a value from a component as well. (BYTE or 2BYTE) WAIT [time] RANDOM [time] This command is similar to the previous command, however, this command waits for the given time with an addition of a random generated time in the interval given as the second time range. For example: WAIT 1 HOUR RANDOM 30 MIN will wait somewhere between 1 hour and 1,5 hours. Every time the command is executed, this will be recalculated with a different result. Page 7 of 15 Version 3.0, Augustus 2015 Scenarios, alerts and schedulers Existing scenarios, alerts and schedulers can be used in scripts, with the following commands: CALL [scenario] This will call the specified scenario. Replace [scenario] with the actual scenario you wish to call. LEARN [scenario] This will modify the scenario. All components in the scenario will be set to their current state in the home automation installation. CALL [alert] or CALL [alert] WITH [value] This allows you to use the alert service from within scripts. If no value is specified, 0 is used. Replace [alert] with the actual alert you wish to call. SET [scheduler] TO [on/off] This command allows you to enable of disable a scheduler. Replace [scheduler] with the actual scheduler you wish to activate or deactivate. All values greater than 0 are interpreted as ON, all values of 0 or below are interpreted as OFF. Keep in mind this will only work on schedulers that can be manually enabled or disabled. Schedulers that are automatically enabled or disabled based on a component cannot be enabled or disabled by a script. Commands EXECUTE [network command] This allows you to use a network command from within scripts. Replace [network command] with the actual command you wish to use. EXECUTE [ir command] This allows you to use an infrared command from within scripts. Replace [ir command] with the actual command you wish to use. Page 8 of 15 Version 3.0, Augustus 2015 EXECUTE ON [upnp device] [upnp command] This allows you to use a command on a uPnP device from within scripts. Replace [upnp device] with the desired uPnP device and [upnp command] with the actual command you wish to use. EXECUTE ON [diva] [diva macro] This allows you to use a command on a diva device from within scripts. Replace [diva] with the desired diva server and [diva macro] with the diva macro you wish to use. Values When you insert a command through the script command list, values and components are displayed in [ ] brackets. These are displayed to indicate what you should enter at the appropriate location. When possible the editor will make a link to the right listing of components, scripts, alerts, schedules or scenarios. The right value can then be selected. Valid components are written for example as SCENARIO(123/name). In this example a scenario is intended with the identifier “123”. The name is displayed for readability only. You do not have to enter the correct name, because the correct name will be automatically inserted after the script is validated. For many commands you will normally use a static value, for example WAIT 20 SEC. However, in some circumstances it might by useful to use the value of a component instead. With all commands you can replace the static value with a component. Time values are assumed in milliseconds if no time unit is specified. Valid units are: MSEC, SEC, MIN, HOUR and DAY. Variables and calculation The basic commands and values can be extended further with the use of variables and calculations. Variables You can define your own variables in scripts, which are defined as global variables, useable across all different scripts on the xxter device. A variable starts with a dollar sign “$”, for example: $AVERAGE The name of the variable can consist of alphanumeric characters (A-‐Z and 0-‐9). You can use variables to store any value, for example: $LIGHTPERCENTAGE = 0 SET BYTE(21/Spots) TO $LIGHTPERCENTAGE Page 9 of 15 Version 3.0, Augustus 2015 Or $LIGHTSPOTS = BYTE(21/Spots) SET BYTE(24/Spots Kitchen) TO $LIGHTSPOTS Calculation You can use variables to calculate values using arithmetic operators. Calculations are written in the following manner: $MAXLIGHT = ( 2 * 10 ) + 10 Of course you can use values of components as well, for example: $MAXLIGHT = ( 2 * BYTE(21/Spots) ) + 10 IMPORTANT: when using calculations you should always make use of brackets. When no brackets are used, the calculation is processed in the order it is written! For instance 2 * 10 + 10 will result in 30, but 10 + 2 * 10 will have a result of 24. You can prevent this by writing: 10 + (2*10). Always keep this in mind when using calculations. Floating-‐point values can be used by using the “.” as a separator, for instance 2.42 Note that all variables are xxter wide. So if you set a specific variable in one script another script can use that value as well. If you want to use a specific variable only in one script, make sure other scripts do not use the same variable name. The following operators can be used: + -‐ * / % ^ & | = < > <> plus minus multiply divide modulo (division remainder) power and (result = 1 if both values greater than 0, 0 if not) or (result = 1 if one of the values is greater then 0, 0 if not) is equal to (result = 1 if true, 0 if not) is smaller than (result = 1 if true, 0 if not) is greater than (result = 1 if true, 0 if not) is not equal to (result = 1 if true, 0 if not) A square root can be made with the power operator: ^ (1/2) = to the power of ½ = the square root of the value. Page 10 of 15 Version 3.0, Augustus 2015 Functions There are several functions available in scripts to calculate values. These functions can be used in combination with commands or with variables. Mathematical ROUND (value) or ROUND (value, precision) Returns the rounded value of the given value. When no precision is specified, a precision of 0 is used. For example ROUND(4.3) = 4 and ROUND(4.321, 1) = 4.3 FLOOR (value) or FLOOR (value, precision) Returns the floored (rounded down) value of the given value. When no precision is specified, a precision of 0 is used. For example FLOOR(4.7) = 4 and FLOOR(4.987, 1) = 4.9 CEIL (value) or CEIL (value, precision) Return the ceiled (rounded up) value of the given value. When no precision is specified, a precision of 0 is used. For example CEIL(4.3) = 5 and CEIL(4.321, 1) = 4.4 ABS (value) Returns the absolute value of the given value, so ABS(-‐4) = 4 and ABS(6.13) = 6.13. MIN (value, value, value, ..) Returns the minimum value of all the parameters given. Requires a minimum of one parameter. MAX (value, value, value, ..) Returns the maximum value of all the parameters given. Requires a minimum of one parameter. AVG (value, value, value, ..) Returns the average value of all the parameters given. Requires a minimum of one parameter. RANDOM (max value) Returns a random value between 0 and the given maximum value. Page 11 of 15 Version 3.0, Augustus 2015 Time functions NOW() Returns the current time as a timestamp in seconds since january 1st 1970 (unix date). This timestamp can be compared to an earlier value to determine how much time has passed. DAYTIME() of DAYTIME(timestamp) Returns a 1 if the sun is up and a 0 if the sun is down. When a timestamp is given, this time is used, otherwise the current time is used. SECOND() of SECOND(timestamp) Returns the amount of seconds (0-‐59). When a timestamp is given, this time is used, otherwise the current time is used. MINUTE() of MINUTE(timestamp) Returns the amount of minutes (0-‐59). When a timestamp is given, this time is used, otherwise the current time is used. HOUR() of HOUR(timestamp) Returns the amount of hours (0-‐23). When a timestamp is given, this time is used, otherwise the current time is used. DAYOFWEEK() of DAYOFWEEK(timestamp) Returns the day of the week (1-‐7). When a timestamp is given, this time is used, otherwise the current time is used. 1 = Sunday, 2 = Monday, .. 7 = Saturday. DAYOFMONTH() of DAYOFMONTH(timestamp) Returns the day of the month (1-‐31). When a timestamp is given, this time is used, otherwise the current time is used. DAYOFYEAR() of DAYOFYEAR(timestamp) Returns the day of the year (1-‐366). When a timestamp is given, this time is used, otherwise the current time is used. Page 12 of 15 Version 3.0, Augustus 2015 MONTH() of MONTH(timestamp) Returns the month (1-‐12). When a timestamp is given, this time is used, otherwise the current time is used. YEAR() of YEAR(timestamp) Returns the year, for example “2015”. When a timestamp is given, this time is used, otherwise the current time is used. Control structures IF and WHILE You can use IF statements and WHILE loops to execute specific actions only if a condition is met. The condition can be defined using all arithmetic operators as explained above. For example: IF $LIGHT > 33.33 $LIGHT = 33.33 The action that is written on the second line is only executed when the calculation behind the IF statement is TRUE (greater than 0). The action will be skipped if the result is FALSE (0 or below). If you use an IF statement, you can also add an ELSE statement, like this: IF $LIGHT > 33.33 $X = 100 ELSE $X = 0 The ELSE statement should always be on a separate line, directly below the command to execute when the condition of the IF statement is met. Apart from the IF statement, a WHILE statement can also be used. The difference between an IF statement and a WHILE statement is that an IF statement is performed once and a WHILE statement will be repeated until the condition is no longer met, for example: $COUNT = 0 WHILE $COUNT < 10 Page 13 of 15 Version 3.0, Augustus 2015 $COUNT = $COUNT+1 The example above will increase the variable COUNT until it is 10 or greater. How to execute multiple commands, see the next section. IMPORTANT: when the condition is never ending, the WHILE loop will continue indefinitely. Allowing this without using a WAIT command will bring the script in a direct infinite loop, which should be avoided. BEGIN and END If you need to execute more than one command after a IF, WHILE or ELSE statement, you can use BEGIN and END statements. These should be written on separate lines as well, for example: $X = 0 WHILE $X < 11 BEGIN $Y = $X * 10 SET BYTE(22/EXAMPLE BYTE) TO $Y $X = $X + 1 END Another example: IF $LIGHT > 33.33 BEGIN $X = 100 $Y = 0 END ELSE BEGIN $X = 0 $Y = 100 END Page 14 of 15 Version 3.0, Augustus 2015 Other SEND WAKEONLAN TO [ma:c :ad:re:ss] With this command you can send a wake on lan command to a network device. Replace [ma:c :ad:re:ss] with the mac-‐address of the intended device. OPEN KNXTUNNEL With this command you can enable the knx tunnel access on the xxter device for programming with ETS for a period of 8 hours. CLOSE KNXTUNNEL With this command you can disable the knx tunnel access on the xxter device for programming with ETS Using all described commands, values, functions and control structures will allow you to create almost any functionality required. Page 15 of 15 Version 3.0, Augustus 2015