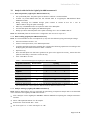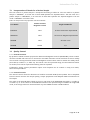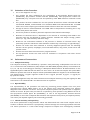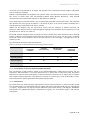
1
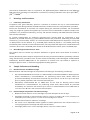
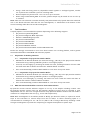
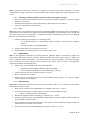
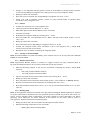
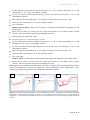
Epi proColon 2.0 CE
Epi proColon Plasma Quick Kit (M5-02-001)
(M5
Epi proColon Sensitive PCR Kit (M5-02-002)
(M5
Epi proColon Control Kit (M5-02
02-003)
The instructions for use must be read carefully prior to use and followed precisely to
achieve reliable results.
IFU 0009GB, rev 5,, copyright©,
copyright September 2014,, Epigenomics AG
M5-02-001, M5-02-002,
002, M5-02-003
M5
Epigenomics AG,
10829 Berlin, Germany
Instructions For Use
Contents
1.
Name and Intended Use ................................................................................................................................3
2.
Summary and Explanation .............................................................................................................................3
3.
Principles of the Procedure ............................................................................................................................3
4.
Materials Provided..........................................................................................................................................4
4.1. Contents ................................................................................................................................................... 4
4.2. Safety Information ..................................................................................................................................... 4
5.
Storage and Stability ......................................................................................................................................5
5.1. Epi proColon Plasma Quick Kit (M5-02-001) .............................................................................................. 5
5.2. Epi proColon Sensitive PCR Kit (M5-02-002) .............................................................................................. 5
5.3. Epi proColon Control Kit (M5-02-003) ....................................................................................................... 6
6.
Materials Required, but not Provided ...........................................................................................................6
6.1. General Laboratory Equipment .................................................................................................................. 6
6.2. General Laboratory Consumables and Reagents ......................................................................................... 6
6.3. Required Special Equipment and Consumables........................................................................................... 7
6.4. Installation Requirements........................................................................................................................... 7
7.
Warnings and Precautions .............................................................................................................................8
7.1. Laboratory Precautions .............................................................................................................................. 8
7.2. Microbiological and Infectious State........................................................................................................... 8
8.
Sample Collection and Handling ...................................................................................................................8
8.1. Blood Collection and Blood Storage ........................................................................................................... 8
8.2. Plasma Sample Preparation and Plasma Storage ......................................................................................... 8
9.
Test Procedure ................................................................................................................................................9
9.1. Preparation of Working Solutions ............................................................................................................... 9
9.2. DNA Extraction and Bisulfite Conversion from Patient Plasma ..................................................................... 9
9.3. PCR Setup ............................................................................................................................................... 13
10.
Analysis with the Applied Biosystems 7500 Fast and 7500 Fast Dx PCR Instruments..............................14
10.1. Software Requirement ............................................................................................................................. 14
10.2. PCR Plate Preparation (Applied Biosystems 7500 Fast and 7500 Fast Dx)................................................... 14
10.3. Plate Loading (Applied Biosystems 7500 Fast and 7500 Fast Dx) ............................................................... 15
10.4. Analysis Settings (Applied Biosystems 7500 and 7500 Fast Dx) ................................................................. 18
10.5. Run Validity by the Epi proColon Controls ................................................................................................ 19
10.6. Interpretation of Results for a Single PCR ................................................................................................. 19
11.
Analysis with Roche LightCycler 480 Instrument I .....................................................................................20
11.1. Plate Preparation (LightCycler 480 Instrument I)....................................................................................... 20
11.2. Plate Loading (LightCycler 480 Instrument I)............................................................................................ 20
11.3. Analysis Settings (LightCycler 480 Instrument I) ....................................................................................... 20
11.4. Run Validity by the Epi proColon Controls (LightCycler 480 Instrument I) ................................................. 21
11.5. Interpretation of Results for a Single PCR (LightCycler 480 Instrument I) ................................................... 22
12.
Analysis with the Roche LightCycler 480 Instrument II .............................................................................23
12.1. Plate Preparation (LightCycler 480 Instrument II)...................................................................................... 23
12.2. Plate Loading (LightCycler 480 Instrument II) ........................................................................................... 23
12.3. Analysis Settings (LightCycler 480 Instrument II) ...................................................................................... 23
12.4. Run Validity of the Epi proColon Test Result (LightCycler 480 Instrument II) .............................................. 25
12.5. Interpretation of Results for a Single PCR (LightCycler 480 Instrument II) .................................................. 25
13.
Interpretation of Results for a Patient Sample ...........................................................................................26
14.
Quality Control .............................................................................................................................................26
14.1. External Controls ..................................................................................................................................... 26
14.2. Internal Controls ..................................................................................................................................... 26
15.
Limitations of the Procedure .......................................................................................................................27
16.
Performance Characteristics ........................................................................................................................27
16.1. Analytical Sensitivity ................................................................................................................................ 27
16.2. Reproducibility ........................................................................................................................................ 27
16.3. Clinical Sensitivity and Specificity ............................................................................................................. 27
16.4. Concordance of the Two Real-Time PCR instruments ................................................................................ 28
16.5. Interference ............................................................................................................................................. 28
17.
Meaning of Symbols .....................................................................................................................................29
18.
References .....................................................................................................................................................29
19.
Contact Information .....................................................................................................................................30
Page 2 of 30
Instructions For Use
1.
Name and Intended Use
Epi proColon 2.0 CE is a qualitative assay for the real-time PCR detection of methylated Septin9 DNA in
bisulfite converted DNA from human plasma samples. Presence of methylated Septin9 is associated
with, and may aid in, the detection of colorectal cancer.
Epi proColon 2.0 CE is comprised of the Epi proColon Plasma Quick Kit (M5-02-001), the Epi proColon
Sensitive PCR Kit (M5-02-002) and the Epi proColon Control Kit (M5-02-003).
2.
Summary and Explanation
Epi proColon 2.0 CE is an in vitro polymerase chain reaction (PCR) assay for the qualitative detection of
Septin9 gene methylation in DNA isolated from 3.5 ml of patient plasma. Cytosine residues in the v2
region of the Septin9 gene become methylated in colorectal cancer (CRC) tissue but not in normal
colon mucosa. This aberrant methylation can be detected by specific amplification of DNA present in
the blood stream. Detection of CRC DNA in plasma using the Septin9 methylation biomarker has been
demonstrated in multiple case control studies of CRC patients and colonoscopy-verified negative
controls1-3. The blood-based Epi proColon 2.0 CE offers patients, who currently refuse screening
colonoscopy, a reasonable alternative to non-invasive CRC screening options.
3.
Principles of the Procedure
Epi proColon 2.0 CE involves two steps. In the first step DNA is extracted from plasma followed by
bisulfite conversion of the purified DNA using the Epi proColon Plasma Quick Kit (M5-02-001). In the
second step bisulfite converted DNA (bisDNA) is assayed in a duplex PCR using the Epi proColon
Sensitive PCR Kit (M5-02-002) which detects both the target methylated Septin9 DNA and an internal
control, ACTB (ß-actin) DNA, to assess adequacy of input DNA. Controls provided with the
Epi proColon Control Kit (M5-02-003) are required as positive and negative controls for each run.
The extraction of DNA contained in patient plasma is based on the binding of free-circulating DNA to
magnetic particles, which are then magnetically separated from the plasma. Remaining impurities are
removed from the magnetic particles during the washing steps. In the elution step purified DNA is
removed from the magnetic particles by dissolving in elution buffer. The eluate containing DNA is then
subjected to a chemical reaction that specifically alters unmethylated cytosine residues within the DNA.
Bisulfite treatment is utilized as the method of choice for analyzing DNA methylation. The conversion is
based on the nucleophilic addition of a bisulfite ion to a cytosine nucleotide and a subsequent
deamination reaction to yield uracil sulfonate, while 5-methylcytosine (methylated cytosine) does not
undergo the deamination reaction and remains unchanged.
The blockers and probes used in the subsequent PCR reaction discriminate between methylated and
unmethylated sequences. Epi proColon 2.0 CE detects a bisDNA sequence containing methylated CpG
sites within the v2 region of the Septin9 gene and total bisDNA of a region of the ACTB gene. The
Septin9 portion of the duplex assay consists of primers that are placed in regions lacking CpG
dinucleotides. A blocker specific for bisulfite converted unmethylated sequences within the region is
added so that methylated sequences are preferentially amplified. A methylated Septin9-specific
fluorescent detection probe is used in the reaction in order to exclusively identify methylated sequences
amplified during the PCR reaction4.
Page 3 of 30
Instructions For Use
4.
Materials Provided
4.1.
Contents
Colon Plasma Quick Kit.
Kit
Table 1: Contents of the Epi proColon
Containers
Volume
Storage Temperature
Epi proColon
Colon Lysis Binding Buffer
1 bottle
125 ml
15° C to 30° C
Epi proColon
Colon Wash A Concentrate
1 bottle
60 ml
15° C to 30° C
Epi proColon Magnetic Beads
1 bottle
4 ml
15° C to 30° C
Epi proColon
Colon Wash B Concentrate
1 bottle
7 ml
15° C to 30° C
Epi proColon Elution Buffer
1 tube
6 ml
15° C to 30° C
Epi proColon Bisulfite Solution
4 tubes
1.9 ml each
15° C to 30° C
Epi proColon Protection Buffer
1 tube
1 ml
15° C to 30° C
Containers
Volume
Storage Temperature
Epi proColon PCR Mix
2 tubes
810 µl each
--25° C to -15° C
Epi proColon Polymerase
1 tube
85 µl
--25° C to -15° C
Containers
Volume
Storage Temperature
Epi proColon Negative Control
6 tubes
3.65 ml each
--25° C to -15° C
Epi proColon Positive Control
6 tubes
3.65 ml each
--25° C to -15° C
Reagent
Colon Sensitive PCR Kit.
Kit
Table 2: Contents of the Epi proColon
Reagent
Colon Control Kit.
Kit
Table 3: Contents of the Epi proColon
Reagent
4.2.
Safety Information
When working with chemicals, always wear a laboratory coat and disposable gloves. Clean
contaminated surfaces with water.
water. For more information, please consult the respective material safety
data sheets (MSDS) available on our webpage (http://www.epiprocolon.com/en/laboratories/septin9
http://www.epiprocolon.com/en/laboratories/septin9test/safety-data-sheets.html).
Colon Lysis Binding Buffer and Epi proColon Wash A
Epi proColon
Concentrate: contain TRITON X-100
X
and Guanidinium
thiocyanate
Hazard statements: EUH032: Contact with acids liberates very
toxic gas; H302: Harmful if swallowed; H312: Harmful in contact
with skin; H318: Causes serious eye damage; H332: Harmful if
inhaled; H412: Harmful to aquatic life with long lasting effects.
Precautionary statements: P261: Avoid breathing aerosols; P273:
Avoid release to the environment; P301 + P312: IF SWALLOWED:
Call a POISON CENTER or doctor/physician if you feel unwell; P302
+ P352: IF ON SKIN: Wash with plenty of soap and water; P305 +
P351 + P338: IF IN EYES: Rinse cautiously with water for several
minutes. Remove contact lenses, if present and easy to do.
Continue rinsing.
DANGER
ANGER
Page 4 of 30
Instructions For Use
Epi proColon
Colon Bisulfite Solution: contains aqueous solution of
Ammonium bisulfite (Ammonium
Ammonium hydrogen sulfite)
Hazard statements: EUH031: Contact with acids liberates toxic
gas; H314: Causes severe skin burns and eye damage.
Precautionary statements: P264: Wash hands thoroughly after
handling; P271: Use only outdoors or in well-ventilated
well
areas;
P280: Wear protective gloves/protective clothing; P305+351+338:
IF IN EYES: Rinse cautiously with water for several minutes. Remove
contact lenses, if present and easy
ea to do. Continue rinsing; P312:
Call a POISON CENTER or doctor/physician if you feel unwell.
DANGER
Epi proColon
Colon Protection Buffer: contains 6-hydroxy-2,5,7,8tetramethylchromane-2-carboxylic
carboxylic acid,
acid Tetrahydrofurfurylalcohol
Hazard statements: H319: Causes serious eye irritation.
Precautionary statements: P305 + P351 + P338: IF IN EYES: Rinse
cautiously with water for several minutes. Remove contact lenses, if
present and easy to do. Continue rinsing.
rinsing
WARNING
Epi proColon
Colon Wash B Concentrate, Epi proColon Elution Buffer, Epi proColon
Colon Magnetic Beads,
Epi proColon PCR Mix, Epi proColon
pro
Polymerase, Epi proColon Positive Control, and Epi proColon
Negative Control are not harmful.
harmfu
5.
Storage and Stability
pro
Plasma Quick Kit (M5-02-001), Epi proColon
Colon Sensitive PCR Kit
Reagents provided with the Epi proColon
(M5-02-002) and Epi proColon
Colon Control Kit (M5-02-003)
(M5
003) are stable until the expiration date when
stored and handled as directed. Do not use material past expiration date. Do not mix component
components from
different kit lots.
5.1.
Epi proColon
Colon Plasma Quick Kit (M5-02-001)
(M5
Store all reagents of the Epi proColon
Colon Plasma Quick Kit at
15 to 30 °C.
Epi proColon
Colon Bisulfite Solution is sensitive to oxygen contact. Use
only unopened tubes of Epi proColon
Colon Bisulfite Solution. Discard
used tubes!
Store reconstituted Epi proColon Wash A Buffer and reconstituted
Epi proColon Wash B Buffer at 15 to 30 °C for up to 6 weeks.
After first use store all reagents at 15 to 30 °C for up to 6 weeks.
5.2.
Epi proColon
Colon Sensitive PCR Kit (M5-02-002)
Colon Polymerase at
Store Epi proColon PCR Mix and Epi proColon
-25 to -15 °C.
Each Epi proColon PCR Mix tube may be thawed and refrozen one
time. After first use store all reagents at -25
25 to -15 °C for up to
6 weeks.
Page 5 of 30
Instructions For Use
5.3.
Epi proColon Control Kit (M5-02-003)
Store Epi proColon Control Kit at -25 to -15 °C.
6.
Materials required, but not Provided
6.1.
General Laboratory Equipment
The following general laboratory equipment is required to perform the Epi proColon 2.0 CE test. All
laboratory equipment must be installed, calibrated, operated, and maintained according to the
manufacturer’s recommendations.
Required Equipment
Suggested Equipment
Tube rack for 15 ml tubes and 2 ml tubes
VWR International, catalog no. 211-0200, or equivalent
Rotator
VWR International, catalog no. 445-2102; Carl Roth GmbH + Co. KG,
catalog no. Y549.1, or equivalent
Vortex
VWR International, catalog no 444-1372, or equivalent
Thermoshaker for 2 ml tubes
ThermoMixer® C, Eppendorf, catalog no. 5382 000.015, with dry heating
block 2 ml, Eppendorf, catalog no. 5362 000.035, or equivalent
Pipettes with adjustable volumes of the following
ranges 10 - 100 µl, 100 - 1000 µl
Eppendorf Reference®, adjustable volume pipette, Eppendorf, catalog no.
4910 000.042 and 4910 000.069, or equivalent
Repeat pipettor capable of repetitively dispensing
volumes in an adjustable range
Eppendorf Multipette® M4, Eppendorf, catalog no. 4982 000.012, or
HandyStep® electronic, Brand, catalog no. 705000/705001, or equivalent
Bench top centrifuge with rotor for 1.5/2.0 ml
tubes
Centrifuge 5418, Eppendorf, catalog no. 5418 000.017with rotor F-4530-11, Eppendorf, catalog no. 5490 015.002, or equivalent
Multichannel pipette
Eppendorf Research® plus 8-Channel, 10 - 100 µl, Eppendorf, catalog no.
3122 000.035, or equivalent
Plate centrifuge capable for PCR plates
Centrifuge 5804 R, Eppendorf, catalog no. 5804 000.013, with rotor A-2DWP, Eppendorf, catalog no. 5804 740.009, or equivalent
100 ml graduated cylinder or 50 ml serological
pipette
Carl Roth, catalog no. C177.2, or equivalent, or Fisher Scientific, catalog
no. 11889181, or equivalent
6.2.
General Laboratory Consumables and Reagents
Consumables and Reagents
Suggested Consumables and Reagents
Ethanol absolute (for molecular biology, ≥99.5 %)
Merck KGaA, catalog no. 1.08543.0250, or equivalent
15 ml polypropylene centrifuge tubes with conical
bottom, PP/sterile
Sarstedt, catalog no. 62.554.502, or equivalent
2.0 ml microtubes with round bottom and with
attached PP cap with lid seal mechanism
Sarstedt SafeSeal, catalog no. 72.695.400 or Eppendorf Safe-LockTM,
catalog no. 0030 120.094, or equivalent
Pipette tips with aerosol barrier
ep Dualfilter T.I.P.S.®, Eppendorf:
§
2 – 100 µl, catalog no. 0030 077.547, or equivalent
§
50 – 1000 µl, catalog no. 0030 077.571, or equivalent
Tips for repetitive pipettes for volumes of 0.5 ml,
1 ml, 10 ml, 25 ml
Combitips advanced®, Eppendorf:
§
0.5 ml, catalog no. 0030 089.421, or equivalent
§
1 ml, catalog no. 0030 089.430, or equivalent
§
10 ml, catalog no. 0030 089.464, or equivalent
§
25 ml, catalog no. 0030 089.472, or equivalent
Disposable transfer pipettes, non-sterile bulk
packaged, length 15 cm (about 6 inches), stem
diameter 5 mm, capacity about 5 ml
VWR Disposable Transfer Pipettes with Reference Lines Non-sterile, catalog
no. 612-4520, or equivalent
Disposable transfer pipettes, non-sterile bulk
packaged, length 22.5 cm (about 9 inches), stem
diameter 5 mm, capacity about 5 m
Disposable transfer pipette, graduated, Carl Roth, catalog no. EA61.1, or
equivalent
Page 6 of 30
Instructions For Use
Consumables and Reagents
Suggested Consumables and Reagents
96 well plates for DNA storage
MicroAmp® Fast 96-Well Reaction Plate, 0.1 ml , Applied Biosystems (Life
Technologies Co.), catalog no. 4346906, or equivalent
Adhesive film or foil for DNA storage plate
VWR Thermalseal PCR Sealing Film, catalog no. 391-1254 or Eppendorf
Storage Foil (self-adhesive), catalog no. 0030 127.889, or equivalent
Applicator to form a tight seal between a
microplate and an adhesive film
MicroAmp® Adhesive Film Applicator, Applied Biosystems, catalog no.
4333183
Re-closable plastic bags, 10 x 15 cm for disposing
of used PCR plates.
Carl Roth, catalog no. P279.2, or equivalent
Cryovial, 5 ml, self standing
VWR, catalog no. 479-1218, or equivalent
Blood collection tubes
§
§
§
BD Vacutainer® K2EDTA 10 ml Blood Collection Tubes (Becton
Dickinson, catalog no. 367525) or
S-Monovette® 9 ml K3E (Sarstedt catalog no. 02.1066.001) or
S-Monovette® 8.5 ml CPDA (Sarstedt catalog no. 01.1610.001)
Required Special Equipment and Consumables
6.3.
The following special equipment and consumables are required to perform the Epi proColon 2.0 CE test
and cannot be replaced by other equipment.
When performing the Epi proColon 2.0 CE test on the Applied Biosystems 7500 Fast or 7500 Fast Dx
PCR instruments:
·
Applied Biosystems 7500 Fast Dx Real-Time PCR Instrument with Sequence Detection Software
v1.4 21 CFR Part 11 Module (Life Technologies Co., catalog no. 4406984 or 4406985) or
Applied Biosystems 7500 Fast Real-Time PCR Instrument (Life Technologies Co., catalog no.
4351106 or 4351107) with Sequence Detection Software v1.4 21 CFR Part 11 Module (Life
Technologies Co., catalog no. 4377355)
·
MicroAmp® Fast Optical 96-Well Reaction Plate with Barcode, 0.1 ml (Applied Biosystems (Life
Technologies Co.), 20 plates, catalog no. 4346906; 200 plates, catalog no. 4366932)
MicroAmp® 96- & 384-Well Optical Adhesive Film (Applied Biosystems (Life Technologies Co.),
25 sheets, catalog no. 4360954 or 100 sheets, catalog no. 4311971)
When performing the Epi proColon 2.0 CE test on the Roche LightCycler 480 instruments I and II:
·
LightCycler 480 Instrument I with 96-well heat block (Roche, catalog no. 05015278001) and
with Software version 1.5.x or
LightCycler 480 Instrument II with 96-well heat block (Roche, catalog no. 05015278001) and
with Software version 1.5.x
·
LightCycler 480 Multiwell Plate 96 (white plate) with sealing foils (Roche, catalog no.
04729692001)
·
LightCycler 480 Sealing Foil (Roche, catalog no. 04729757001)
Additional equipment required, compatible with all Real-Time PCR instrument configurations:
6.4.
·
Magnetic Separator: DynaMag™-15 magnet (Invitrogen, catalog no. 123.01D)
·
Magnetic Separator: DynaMag™-2 magnet (Invitrogen, catalog no. 123.21D)
Installation Requirements
The installation, calibration, performance verification and maintenance of the Applied Biosystems 7500
Fast Dx PCR Instrument, Applied Biosystems 7500 Fast PCR Instrument or the Roche LightCycler 480
Instrument I or II needs to be performed according to the manufacturer’s instructions.
Note: Monthly background calibration as described in the manufacturer’s maintenance procedure is
mandatory for the Applied Biosystems 7500 Fast Dx PCR Instrument and Applied Biosystems 7500 Fast
PCR Instrument.
Page 7 of 30
Instructions For Use
Semi-annual maintenance tasks are required for the Applied Biosystems 7500 Fast Dx and 7500 Fast
PCR Instrument according to manufacturer’s instructions, including calibration of the pure dyes FAMTM,
JOETM, TAMRATM.
7.
Warnings and Precautions
7.1.
Laboratory Precautions
Compliance with good laboratory practices is essential to minimize the risk of cross-contamination
between samples during and after the DNA extraction, bisulfite conversion, and purification procedure.
Prevent the introduction of nucleases into samples during the extraction procedure. We recommend
using only single-use pipettes and pipette tips to prevent cross-contamination of patient samples. This
procedure is for professional laboratory use only and assumes familiarity with DNA extraction methods
and real-time PCR assays.
To prevent contamination by amplicons generated from previous PCR we recommend a strict
separation of pre-PCR activities (e.g. plasma DNA extraction and purification, PCR setup) and post-PCR
activities (e.g. real-time PCR). Further, we recommend that used PCR plates are disposed in a way that
no PCR product can be released. E. g. used PCR plates should be placed in a re-closable plastic bag
immediately after removal from the PCR instrument; the bag closed and disposed of in dedicated waste
container. Never store a used PCR plate outside of the PCR instrument. Never open a used PCR plate.
Microbiological and Infectious State
7.2.
The product does not contain any infectious substances or agents which cause disease in humans or
animals.
Human blood and plasma samples analyzed with this assay should be handled as potentially infectious
using safe laboratory procedures such as those outlined in Biosafety in Microbiological and Biomedical
Laboratories, Directive 2000/54/EC on the protection of workers from risks related to exposure to
biological agents at work, or with other appropriate biosafety practices.
8.
Sample Collection and Handling
8.1.
Blood Collection and Blood Storage
Blood collection and blood storage can be performed according to the following condition(s):
·
Use Vacutainer® K2EDTA 10 ml tube or S-Monovette® 9 ml Potassium-EDTA for drawing blood.
Follow manufacturer’s recommendations for performing blood draw. Blood should be
processed immediately. At maximum the blood may be stored at 2 to 8 °C for up to 24 hours
prior to plasma preparation. Do not freeze blood samples.
·
Alternatively S-Monovette® 8.5 ml CPDA tube can be used for drawing blood. Follow
manufacturer’s recommendations for performing blood draw. Blood should be processed
immediately. At maximum the blood may be stored in S-Monovette® 8.5 ml CPDA tube at
15 to 25 °C for 48 hours. Do not freeze blood samples.
Plasma Sample Preparation and Plasma Storage
8.2.
·
Disable the brake function in the centrifuge to prevent disruption of the cell layer.
·
Centrifuge the blood in blood collection tube for 12 min at 1350 ± 150 rcf. For conversion of
revolutions per minute (rpm) to rcf, refer to the centrifuge user manual.
·
Remove blood collection tube from centrifuge.
·
Use a fresh 15 cm disposable transfer pipette to transfer plasma from the collection tube to a
15 ml polypropylene centrifuge tube with conical bottom.
·
Centrifuge plasma in the 15 ml centrifuge tube for 12 min at 1350 ± 150 rcf.
Page 8 of 30
Instructions For Use
·
Using a fresh extra-long (22.5 cm) disposable transfer pipette or serological pipette, transfer
3.5 ml plasma into a labeled cryovial or centrifuge tube.
·
Plasma samples may be stored at -15 to -25 °C for up to 4 weeks.
·
When using Vacutainer® K2EDTA 10 ml tube, plasma sample may be stored at 2 to 8 °C for up
to 18 hours.
Note: Take care not to disturb or transfer the buffy coat (white blood cells) layered above the red blood
cells in the blood collection tube after the first centrifugation, or sedimented at the bottom of the
conical centrifuge tube after the second centrifugation.
9.
Test Procedure
A repeat pipettor is recommended for repetitive dispensing of the following reagents:
§
§
§
§
§
§
§
§
Epi proColon Lysis Binding Buffer
Epi proColon Magnetic Bead Suspension
Ethanol in DNA Binding Step 9.2.3.
Epi proColon Wash A Buffer
Epi proColon Wash B Buffer
Epi proColon Elution Buffer
Epi proColon Bisulfite Solution
Epi proColon Protection Buffer and the PCR Master Mix.
Further we strongly recommend to use a ferris wheel rotator not a rocking platform, and to pipette
extracted and bisulfite treated DNA with reference pipettes.
Preparation of Working Solutions
9.1.
9.1.1. Preparation of Epi proColon Wash A Buffer
·
Add 60.0 ml of Absolute Ethanol (for molecular biology, ≥99.5 %) to the Epi proColon Wash A
Concentrate using a sterile graduated cylinder or a serological pipette.
·
Close lid, mix thoroughly by inverting the bottle five times, avoiding formation of foam. Label
the bottle with date of dilution and mark the “Ethanol added” checkbox.
·
Store reconstituted Epi proColon Wash A Buffer at 15 to 30 °C for up to 6 weeks.
9.1.2. Preparation of Epi proColon Wash B Buffer
9.2.
·
Add 40.0 ml of Absolute Ethanol (for molecular biology, ≥99.5 %) to the Epi proColon Wash B
Concentrate using a sterile graduated cylinder or a serological pipette.
·
Close lid, mix thoroughly by inverting the bottle five times. Label the bottle with date of
dilution and mark the “Ethanol added” checkbox.
·
Store reconstituted Epi proColon Wash B Buffer at 15 to 30 °C for up to 6 weeks.
DNA Extraction and Bisulfite Conversion from Patient Plasma
Epi proColon 2.0 CE contains sufficient reagents to run up to 32 samples including controls. One
Epi proColon Positive Control and one Epi proColon Negative Control must be included in each
independent test run. There are 4 single-use tubes of Epi proColon Bisulfite Solution that will enable a
maximum of 4 independent test runs (e.g., 4 runs of 8 samples each).
Note: Brief centrifugation of microtubes (stated as ‘Briefly spin down the tubes‘) is required in several
steps of this instruction to remove drops from the lid and/or to collect remaining liquid. It is
recommended to centrifuge for 10 - 20 sec at 1,000 ± 150 rcf using a Bench-Top centrifuge. Avoid
stronger centrifugation to prevent the compacting of magnetic bead pellets in specific steps.
Page 9 of 30
Instructions For Use
Note: Vortexing of tubes and containers is required in several steps of this instruction to ensure
homogeneous mixing of liquid. It is recommended to use a vortexer adjusted to medium speed for 5 to
10 sec.
9.2.1. Thawing of Plasma and Epi proColon Positive and Negative Control
·
Thaw one Epi proColon Positive Control and one Epi proColon Negative Control for about
30 min at 15 to 30 °C.
·
If frozen plasma sample is used, thaw sample for about 30 min at 15 to 30 °C.
·
Start lysis within 60 min after thawing.
9.2.2. Lysis
Note: Prior to use, briefly shake the Epi proColon Lysis Binding Buffer and visually check for precipitates.
If precipitates are present heat the Epi proColon Lysis Binding Buffer in a water bath at 37 °C for 60 min
and shake gently until the precipitate is completely dissolved. Equilibrate Epi proColon Lysis Binding
Buffer to room temperature before use.
·
Add the following to a labeled 15 ml centrifuge tube:
o
3.5 ml plasma sample, or Epi proColon Positive Control, or Epi proColon Negative
Control
o
3.5 ml Epi proColon Lysis Binding Buffer
·
Cap the tube and mix by vortexing for 5-10 sec.
·
Incubate tube on the bench top at 15 to 30 °C for 10 ± 1 min.
9.2.3. DNA Binding
Note: A homogeneous suspension of the Epi proColon Magnetic Beads is essential for proper test
performance. Deviations from the specified amount of beads may lead to false results. To ensure the
correct magnetic bead concentration, the bottle should be mixed thoroughly just before pipetting.
There should be no visible sediment at the bottom of the bottle. Mix to ensure a homogeneous
suspension between the pipetting steps.
·
Add to the 15 ml centrifuge tube in the following order:
o
90 µl Epi proColon Magnetic Beads (freshly suspended)
o
2.5 ml of Absolute Ethanol (for molecular biology, ≥99.5 %)
·
Cap the tube and mix by inverting the tube 5 - 6 times.
·
Place 15 ml tube into a rotator.
·
Rotate at room temperature for 45 ± 5 min at medium speed (approx. 10 - 20 rpm); adjust
rotator angle to 35 - 45 degrees.
9.2.4. DNA Washing
Note: Before starting the wash procedure set the thermoshaker to 80 ± 2 °C for later use in the elution
and bisulfite conversion steps.
·
Place the 15 ml tube into the DynaMag™-15 magnetic racks for 5 - 10 min.
·
Pour off the supernatant carefully, taking care not to remove magnetic beads.
o
Add 1.5 ml Epi proColon Wash A Buffer
·
Resuspend magnetic beads completely by vortexing for 5 – 10 sec.
·
Using an extra-long (22.5 cm) disposable transfer pipette, transfer magnetic beads suspension
into a labeled 2.0 ml microtube.
·
Place disposable transfer pipette back into 15 ml tube to collect remaining magnetic beads and
transfer them into the 2.0 ml microtube.
·
Place the microtube into the DynaMag™-2 magnetic racks for 2 - 6 min.
Page 10 of 30
Instructions For Use
·
Using a 15 cm disposable transfer pipette, remove as much buffer as possible while microtube
is still in the DynaMag™-2 magnetic rack, taking care not to remove magnetic beads.
·
Briefly spin down the microtube.
·
Place the 2.0 ml microtube into the DynaMag™-2 magnetic rack for 2 - 6 min.
·
Using a 10 - 100 µl reference pipette, remove as much residual buffer as possible while
microtube is still in magnetic rack.
9.2.5. Elution
·
Transfer the microtube into a non-magnetic rack.
·
Vortex Epi proColon Elution Buffer for 5 – 10 sec.
·
Add 100 µl Epi proColon Elution Buffer to each microtube.
·
Close the microtube.
·
Resuspend the magnetic beads by vortexing for 5 – 10 sec.
·
Place microtube into a thermoshaker set to 1,000 ± 100 rpm and incubate at 80 ± 2 °C for
10 ± 1 min.
·
Briefly spin down the microtube.
·
Place microtube into the DynaMag™-2 magnetic rack for 2 - 6 min.
·
Transfer the complete eluate, while microtube is still in the magnetic rack, (~100 µl DNA
solution) into fresh 2.0 ml microtube.
·
Discard the 2 ml microtube containing the magnetic beads.
9.2.6. Storage of Extracted DNA
Note: If extracted DNA is not used immediately, store material at 2 to 8 °C for up to 24 hours. Do not
freeze the extracted DNA.
9.2.7. Bisulfite Conversion
Note: Epi proColon Bisulfite Solution is sensitive to oxygen contact. Use only unopened tubes of
Epi proColon Bisulfite Solution. Do not store but discard any left-over solution.
·
Add the following reagents to the 2.0 ml microtubes containing the eluate (~100 µl DNA
solution):
o
150 µl Epi proColon Bisulfite Solution
o
25 µl Epi proColon Protection Buffer
·
Cap the microtube and mix the bisulfite reaction by vortexing for 5 – 10 sec.
·
Briefly spin down the microtube.
·
Place microtube into thermoshaker and incubate for 45 ± 5 min at 80 ± 2 °C without shaking.
·
Remove microtube from the thermoshaker immediately after 45 ± 5 min.
·
Reset thermoshaker temperature to 23 ± 2 °C, or set up a second thermoshaker to 23 ± 2 °C for
later use.
9.2.8. Binding Step
Note: A homogeneous suspension of beads in the Epi proColon Magnetic Beads suspension is essential
for proper performance. Deviations from the specified amount of beads may lead to false results. To
ensure correct magnetic bead concentration, the bottle should be mixed thoroughly just before
pipetting. There should be no visible sediment at the bottom of the bottle. Mix to ensure a
homogeneous suspension between the pipetting steps.
·
Briefly spin down the 2.0 ml microtube containing the bisulfite reaction.
·
Add the following components to the microtube:
o
1000 µl Epi proColon Wash A Buffer
Page 11 of 30
Instructions For Use
o
20 µl Epi proColon Magnetic Beads (freshly suspended).
·
Mix by vortexing for 5 – 10 sec.
·
Wait until thermoshaker reaches 23 ± 2 °C.
·
Place the microtube in the thermoshaker at 1000 ± 100 rpm and incubate for 45 ± 5 min at
23 ± 2 °C.
·
Briefly spin down the microtube.
·
Place microtube on the DynaMag™-2 magnetic racks for 2 – 6 min.
·
Using a fresh 15 cm disposable transfer pipette, remove as much liquid as possible while tube is
still in the magnetic rack, taking care not to remove magnetic beads.
9.2.9. First Wash
·
Remove the sample rack from the magnet for washing and vortexing:
o
Add 800 µl Epi proColon Wash A Buffer.
·
Resuspend by vortexing for 5 – 10 sec.
·
Briefly spin down the microtube.
·
Place microtube on the DynaMag™-2 magnetic racks for 2 - 6 min.
·
Using a fresh 15 cm disposable transfer pipette, remove as much liquid as possible while tube is
still in the magnetic rack, taking care not to remove magnetic beads.
9.2.10. Second Wash
·
Remove the sample rack from the magnet for washing and vortexing:
o
Add 800 µl Epi proColon Wash B Buffer.
·
Resuspend by vortexing for 5 – 10 sec.
·
Briefly spin down the microtube.
·
Place microtube on the DynaMag™-2 magnetic racks for 2 - 6 min.
·
Using a fresh 15 cm disposable transfer pipette, remove as much liquid as possible while tube is
still in the magnetic rack, taking care not to remove magnetic beads.
9.2.11. Third Wash
·
Remove the sample rack from the DynaMag™-2 magnet for washing and vortexing:
o
Add 400 µl Epi proColon Wash B Buffer.
·
Resuspend by vortexing for 5 – 10 sec.
·
Briefly spin down the microtube.
·
Place microtube on the DynaMag™-2 magnetic racks for 2 - 6 min.
·
Using a fresh 15 cm disposable transfer pipette, remove as much liquid as possible while tube is
still in the magnetic rack, taking care not to remove magnetic beads.
·
Briefly spin down the microtube.
·
Place microtube on the DynaMag™-2 magnetic racks for 2 - 6 min.
·
Using a 10 - 100 µl reference pipette, remove as much remaining liquid as possible while tube
are still in the magnetic rack, taking care not to remove magnetic beads.
9.2.12. Drying
Note: Do not increase drying time or temperature as over-drying might reduce bisDNA recovery.
·
Open microtube lid.
·
Place open microtube into thermoshaker.
·
Allow the pellet to dry for 10 ± 1 min at 23 ± 2 °C without shaking.
Page 12 of 30
Instructions For Use
9.2.13. Elution
·
Transfer microtube into a non-magnetic rack:
o
Add 60 µl Epi proColon Elution Buffer.
·
Close the microtube.
·
Resuspend the magnetic beads by vortexing for 5 – 10 sec.
·
Incubate for 10 ± 1 min at 23 ± 2 °C in a thermoshaker at 1000 ± 100 rpm.
·
Briefly spin down the microtube.
·
Place microtube on the DynaMag™-2 magnetic racks for 2 - 6 min.
·
Using a 10 - 100 µl reference pipette, transfer the complete eluate (~ 60 µl DNA solution) into a
96-well plate and seal the plate with adhesive film using an adhesive film applicator.
·
Set up the bisDNA storage plate according to the recommended plate layout in Table 4.
Table 4: Recommended Layout for a bisDNA Storage Plate.
#
1
2
A
PC#
S7
B
NC$
S8
C
S1
S9
D
S2
S10
E
S3
S11
F
S4
S12
G
S5
S13
H
S6
S14
3
4
5
6
7
8
9
10
11
12
Epi proColon Positive Control, $Epi proColon Negative Control
9.2.14. Storage of Bisulfite Converted DNA
If extracted bisulfite converted DNA (bisDNA) is not used immediately, store material at 2 to 8 °C for up
to 24 hours or at -25 to -15 °C for up to 72 hours.
PCR Setup
9.3.
Note: Each bisDNA (patient sample, Epi proColon Positive Control, or Epi proColon Negative Control)
must be tested in triplicate.
Note: Prior to use spin Epi proColon Polymerase for 10 - 20 sec at 1,000 ± 150 rcf using a Bench-Top
centrifuge to remove drops from the lid.
9.3.1. Preparation of PCR Master Mix
·
Thaw 1 or 2 Epi proColon PCR Mix tubes depending on the desired number of patient and
control sample determinations (see Table 5).
·
Vortex the Epi proColon PCR Mix tube(s) for –5 - 10 sec, briefly spin down the tube(s).
·
Transfer the corresponding volumes of Epi proColon PCR Mix and Epi proColon Polymerase as
indicated in Table 5 into a 2.0 ml microtube.
·
Mix the PCR Master Mix by vortexing for 5 – 10 sec.
·
Briefly spin the PCR Master Mix to remove drops from the lid.
Note: Use PCR Master Mix , immediately. Do not store. Refreeze unused Epi proColon PCR Mix and
Epi proColon Polymerase, directly after usage.
Page 13 of 30
Instructions For Use
Note: For a single PCR 16 μl Epi proColon PCR Mix and 0.8 μl Epi proColon Polymerase are required.
Indicated volumes already contain pipetting margin. There is no need to prepare an additional reaction
for Master Mix preparation.
Table 5: Preparation of PCR Master Mix with pipetting margin.
Volume for
8
Determinations
(24 PCRs)
Volume for
16
Determinations
(48 PCRs)
Volume for
24
Determinations
(72 PCRs)
Volume for
32
Determinations
(96 PCRs)
Epi proColon
PCR Mix
384 µl
768 µl
1152 µl
1536 µl
Epi proColon
Polymerase
19.2 µl
38.4 µl
57.6 µl
76.8 µl
Component
Table 6: Recommended PCR Plate Layout.
#
1
2
3
4
5
6
A
PC#
PC#
PC#
S7
S7
S7
B
NC$
NC$
NC$
S8
S8
S8
C
S1
S1
S1
S9
S9
S9
D
S2
S2
S2
S10
S10
S10
E
S3
S3
S3
S11
S11
S11
F
S4
S4
S4
S12
S12
S12
G
S5
S5
S5
S13
S13
S13
H
S6
S6
S6
S14
S14
S14
7
8
9
10
11
12
$
Epi proColon Positive Control, Epi proColon Negative Control
Note: If the PCR will be performed with the Applied Biosystems 7500 Fast PCR Instrument or 7500 Fast
Dx PCR Instruments with SDS v1.4 follow the instructions in section 10 and section 13.
If the PCR will be performed with the Roche LightCycler 480 Instrument I follow the instructions in
section 11 and section 13.
If the PCR will be performed with the Roche LightCycler 480 Instrument II follow the instructions in
section 12 and section 13.
10.
Analysis with the Applied Biosystems 7500 Fast and 7500 Fast Dx PCR Instruments
10.1. Software Requirement
This product has been validated using the SDS v1.4 software with 21 CFR Part 11 Module.
10.2. PCR Plate Preparation (Applied Biosystems 7500 Fast / Fast Dx)
·
Set up the PCR plate. The plate layout as shown in Table 6 is recommended.
·
Transfer 15 µl PCR Master Mix into the selected wells of the MicroAmp® Fast Optical 96-Well
Reaction Plate.
·
Briefly centrifuge the bisDNA storage plate created in section 9.2.13 if required for 1 min at
1000 ± 100 rcf using the plate centrifuge.
·
Add 15 µl of bisDNA solution to respective wells of the PCR plate.
Page 14 of 30
Instructions For Use
·
Seal the plate with MicroAmp® Optical Adhesive Film.
·
Briefly spin down the plate with a plate centrifuge for 1 min at 1000 ± 100 rcf.
Note: The filled PCR plate can be stored in a refrigerator at 2 to 8 °C for up to 4 hours.
10.3. Plate Loading (Applied Biosystems 7500 Fast / Fast Dx)
Note: The PCR Master Mix does not contain ROX or any other reference dye. Accordingly, the passive
reference setting must be set to “none”.
Note: It is recommended to save a template file (*.sdt) with the defined cycling and analysis settings.
·
Start the Software version SDS v1.4.
·
Load the specified experiment template file or create a new plate document.
·
Click “Create New Document”.
·
Define the following plate document:
o
Assay:
Standard Curve (Absolute Quantification)
o
Container:
96-Well Clear
o
Template:
Blank Document (or select respective Epi proColon 2.0 CE Template file)
o
Run Mode:
Standard 7500.
·
Click “Next”.
·
Click “New Detector…”.
·
Create a new detector using following properties:
·
o
Name:
Septin9
o
Description:
Epi proColon 2.0 CE
o
Reporter dye:
FAM
o
Quencher dye:
(none)
o
Color:
Red.
Click “Create Another” and define following properties:
o
Name:
ACTB
o
Description:
Epi proColon 2.0 CE
o
Reporter dye:
JOE
o
Quencher dye:
(none)
o
Color:
Green.
·
Click “ok”.
·
Select both detectors and click “Add >>” to assign the detectors to the plate document.
·
Select “(none)” in the drop down menu of “Passive Reference”.
·
Click “Done”.
·
Go to the tab “Setup” and “Plate”.
·
Select all 96 wells of the plate.
·
Go to the menu point “View” and open the “Well Inspector”.
·
Select detector “Septin9” and “ACTB”.
·
Check the Passive Reference setting to be “(none)” (see Figure 1).
·
Click “Close”.
·
Go to tab “Instrument” to program the cycling conditions as described in Table 7
·
Change the following settings:
o
Sample Volume:
30 µl,
o
Run Mode:
Standard 7500,
Page 15 of 30
Instructions For Use
o
Data Collection:
Stage 2, Step 2.
·
Create a “Thermal Profile” with 3 stages.
·
Create a “Stage 2” having 3 steps, and a “Stage 1” and “Stage 3” having 1 step.
·
Enter repetitions, target temperature, and hold time according to Table 7.
·
Change the “Ramp Rate” according to Table 7.
·
Set “Data Collection” for “Stage 2, Step 2 (55.5 @ 0:35)”.
·
Confirm the Thermal Cycler Protocol settings according to Table 7 (see Figure 2).
·
Save the run plate document under an appropriate file name.Open the tray.
·
Place the PCR plate into the frame (position A1 goes to the upper left corner), ensure that the
plate fits accurately in the frame. Close the tray.
·
Start the run by pressing the “Start” button.
Table 7: Thermal Cycler Program for Applied Biosystems 7500 Fast / Fast Dx.
Denaturation
Cycling
Holding
”Stage 1”
”Stage 2”
”Stage 3”
Repetitions
1
45
1
Step
1
1
2
3
1
Target [°C]
94
62
55.5
93
40
20:00
00:05
00:35
00:30
00:05
0
0
0
80
80
40
Program
Parameter
Stage
Hold [mm:ss]
Auto Increment
Ramp Rate [%]
Data Collection
40
80
Stage 2, Step 2 (55.5 @ 0:35)
Page 16 of 30
Instructions For Use
Figure 1: Screenshot from SDS v1.4 software after confirming settings in the 'Well Inspector' window.
Figure 2: Screenshot from SDS v1.4 software after setting cycler program and detection mode.
Page 17 of 30
Instructions For Use
10.4. Analysis Settings (Applied Biosystems 7500 Fast / Fast Dx)
Note: Analyze PCR runs with software version SDS v1.4 only.
·
Note: Incomplete runs or runs where an error message occurs must not be analyzed. The run
document must contain fluorescence data for 45 cycles.After completion of the PCR cycling
program click “ok”.
·
Select the tab “Results”, then select the tab “Amplification Plot“.
·
Set “Analysis Setting” for Septin9 detector to be the following:
·
o
Data:
“Delta Rn vs Cycle”
o
Detector:
“Septin9”
o
Line color:
“Detector Color”
o
Manual Ct, Threshold:
“50000” (appears as “5.0e+004”)
o
Manual baseline, Start (cycle): “10”
o
Manual baseline, End (cycle):
“22”
Set “Analysis Setting” for ACTB detector to be the following:
o
Data:
“Delta Rn vs Cycle”
o
Detector:
“ACTB”
o
Line color:
“Detector Color”
o
Manual Ct, Threshold:
“25000” (appears as “2.5e+004”)
o
Manual baseline, Start (cycle): “10”
o
Manual baseline, End (cycle):
“22”
·
Click “Analyze”.
·
Click “Save”.
·
Septin9 Ct values and ACTB Ct values are calculated automatically.
·
Select the wells to be analyzed.
·
Amplification curves are displayed in the tab “Amplification Plot”.
·
Ct values are displayed in the tab “Report”.
Note: Each amplification curve should be visually inspected. Amplification curves crossing the threshold
due to inconsistent data points (noise peaks) or linear curve shape should be evaluated as negative.
Examples are provided in Figure 3.
A
B
1
2
Figure 3: Screenshots of Septin9 amplification curves using the Applied Biosystems 7500 Fast.
A: Examples of valid positive curves. B: Examples of negative curves due to inconsistent data points (1) or linear
curve shape (2).
Page 18 of 30
Instructions For Use
10.5. Run Validity by the Epi proColon Controls (Applied Biosystems 7500 Fast / Fast Dx)
Any run of one or more patient sample(s) processed together with Epi proColon Positive Control and
Epi proColon Negative Control is considered valid, when criteria set forth in Table 8 are met for ALL
THREE (3) PCR replicates per control.
If either the Epi proColon Positive Control or Epi proColon Negative Control, or both is/are invalid, the
data for patient samples processed together with the controls cannot be interpreted. Testing must be
repeated for all patient samples included in this test run.
Table 8: Validity limits of Epi proColon Controls analyzed with the Applied Biosystems 7500 Fast / 7500 Fast Dx.
Result of Control
Determination
Septin9 Result
ACTB Result
Positive Control valid
PCR1
PCR2
PCR3
Ct* ≤ 41.1
Ct* ≤ 41.1
Ct* ≤ 41.1
Ct* ≤ 29.8
Ct* ≤ 29.8
Ct* ≤ 29.8
Negative Control valid
PCR1
PCR2
PCR3
no Ct* provided
(“Undetermined”)
Ct* ≤ 37.2
Ct* ≤ 37.2
Ct* ≤ 37.2
*Cycle threshold
10.6. Interpretation of Results for a Single PCR (Applied Biosystems 7500 Fast / Fast Dx)
The interpretation of a single PCR is performed according to Table 9. Provided that the result of the
internal control assay ACTB indicates sufficient input of bisDNA into the single PCR (ACTB cycle
threshold specified in Table 9), the result of the Septin9 PCR defines the result for this single PCR (see
section 13). An ACTB value above the cycle threshold specified in Table 9 determines the single PCR
result to “Invalid PCR”.
Table 9: Interpretation of Results for Single PCR (Applied Biosystems 7500 Fast / Fast Dx).
Single PCR Result
Septin9 Positive
Septin9 Negative
Invalid
Septin9 Result
ACTB Result
Ct* < 45
Ct* ≤ 32.1
no Ct* provided
(“Undetermined”)
Ct* ≤ 32.1
any result
Ct* > 32.1
Or “Undetermined”
*Cycle threshold
Page 19 of 30
Instructions For Use
11.
Analysis with Roche LightCycler 480 Instrument I
11.1. Plate Preparation (LightCycler 480 Instrument I)
·
Set up the PCR plate. The plate layout as shown in Table 6 is recommended.
·
Transfer 15 µl PCR Master Mix into the selected wells of LightCycler 480 Multiwell Plate
96 Reaction Plate.
·
Briefly centrifuge the bisDNA storage plate created in section 9.2.13 for 1 min at
1000 ± 100 rcf using the plate centrifuge.
·
Add 15 µl of bisDNA solution to respective wells of the PCR plate.
·
Seal the PCR plate with LightCycler 480 Sealing Foil.
·
Briefly spin down the PCR plate with a plate centrifuge for 1 min at 1000 ± 100 rcf.
Note: The filled PCR plate can be stored at 2 to 8 °C for up to 4 h.
11.2. Plate Loading (LightCycler 480 Instrument I)
Note: It is recommended to save a template file (*.ixo) with the defined cycling and analysis settings.
·
Start the software version 1.5.x.
·
Create a new experiment, click “New Experiment”
·
Load the specified experiment template file or define the following experiment according to the
PCR program parameters detailed in Table 10 below.
·
Open the tray.
·
Place the PCR plate into the frame (position A1 goes to the upper left corner), ensure that the
plate fits accurately in the frame. Close the tray.
·
Click “Start Run” to start.
Table 10: Standard PCR Program for LightCycler 480 Instrument I.
Program Parameter
Denaturation
Cycling
Cooling
None
Quantification mode
None
Cycles
1
50
1
Segment
1
1
2
3
1
Target [°C]
94
62
56
93
40
Hold [hh:mm:ss]
00:20:00
00:00:05
00:00:35
00:00:30
00:00:30
Ramp Rate [°C/s]*
1.0
1.3
1.3
1.3
1.3
Acquisition Mode
None
None
Single
None
None
Analysis Mode
* LightCycler 480 Instrument I: select the “Dual Color Hydrolysis Probe/UPL Probe” as detection format; activate the filter
combination 483 – 533 nm and 523 – 568 nm and set the “Reaction Volume” to “30”.
11.3. Analysis Settings (LightCycler 480 Instrument I)
Note: Users of the LightCycler 480 Instrument I need to select Color Compensation “ON” and load the
respective “Epi proColon Color Compensation” file for the filter combinations “Filter Comb 483 - 533”
and “Filter Comb 523 - 568”.
Note: Perform data analysis only on used wells by generating a respective sample sub set as described
in the manual of the LightCycler 480 Instrument I.
·
Click “Analysis” on the LightCycler 480 Basic Software Module bar opening the “Analysis Overview”
window.
·
Select “Abs Quant/Fit Points” for all samples.
Page 20 of 30
Instructions For Use
·
Activate “Epi proColon Color Compensation”.
·
Activate the “Filter Comb 483 - 533”.
·
Set “First Cycle” to “1” and “Last Cycle” to “50”.
·
Set the background (click blue background button) to “5 - 22” by setting “Min Offset” to “4” and
“Max Offset” to “21” in the “Cycle Range” window.
·
Set the noise band to ”Noise Band (Fluoresc)” and set the noise band manually to “1.6” in the
“Noise Band” window.
·
After selecting “Threshold (Manual)” in the “Analysis” window set the threshold to “1.6”.
·
Set the number of Fit Points to “2” in the “Analysis” window.
·
Click “Calculate”.
Septin9 Crossing Point (“CP”) for each sample is calculated automatically and displayed in the
Sample Table.
·
Export the CP values by clicking with the right mouse button on the Sample Table. Choose
“Export”. Save the file with a unique and meaningful file name.
·
Activate the “Filter Comb 523 - 568”.
·
Set “First Cycle” to “1” and “Last Cycle” to “50”.
·
Set the background (click blue background button) to “5 - 22” by setting Min Offset to “4” and
Max Offset to “21” in the “Cycle Range” window.
·
Set the noise band to ”Noise Band (Fluoresc)” and set the noise band manually to “0.8” in the
“Noise Band” window.
·
After selecting “Threshold (Manual)” in the “Analysis” window set the threshold to “0.8”.
·
Set the number of Fit Points to “2” in the “Analysis” window.
·
Click “Calculate”.
ACTB CP values for each sample is calculated automatically and displayed in the Sample Table.
·
Export the CP values by clicking with the right mouse button on the Sample Table. Choose
“Export”. Save the file with a unique and meaningful file name.
Note: Adjust the “Noise Band” and “Threshold” such that it is slightly above the background and that it
crosses the amplification curves at the beginning of the exponential increase. Amplification curves
without a significant exponential increase should be evaluated as negative.
11.4. Run Validity by the Epi proColon Controls (LightCycler 480 Instrument I)
Any run (patient samples processed together with Epi proColon Positive Control and Epi proColon
Negative Control) is considered valid if criteria set forth in Table 11 are met for ALL THREE (3) PCR
replicates per control.
Page 21 of 30
Instructions For Use
A
B
C
Adjusted Threshold
Adjusted Threshold
Figure 4: Screenshots of Septin9 amplification curves using LightCycler 480. A: Amplification curve without a significant
exponential increase should be evaluated as negative. B: Threshold should be adjusted that it is slightly above the
background. C: Threshold should be adjusted that it crosses the amplification curves at the beginning of the exponential
increase.
If either the Epi proColon Positive Control or Epi proColon Negative Control (or both) is invalid, the
data for patient samples processed together with the controls cannot be interpreted. Testing must be
repeated for all patient samples included in this run.
Table 11: Validity Limits of Epi proColon Controls (LightCycler 480 Instrument I).
Result of Control
Determination
Septin9 Result
ACTB Result
Positive Control valid
PCR1
PCR2
PCR3
CP* ≤ 40.6
CP* ≤ 40.6
CP* ≤ 40.6
CP* ≤ 29.5
CP* ≤ 29.5
CP* ≤ 29.5
Negative Control valid
PCR1
PCR2
PCR3
No CP* provided
CP* ≤ 36.5
CP* ≤ 36.5
CP* ≤ 36.5
*Crossing Point
11.5. Interpretation of Results for a Single PCR (LightCycler 480 Instrument I)
If the result of the internal control ACTB indicates sufficient input of DNA into the single PCR (ACTB
cycle threshold specified in Table 12), the result of the Septin9 PCR defines the result for this single PCR
(see section 13). An ACTB value above the crossing point specified in Table 12 determines the single
PCR result to be “Invalid”.
Table 12: Interpretation of Results for Single PCR (LightCycler 480 Instrument I).
Single PCR Result
Septin9 Positive
Septin9 Negative
Invalid
Septin9 Result
ACTB Result
CP* < 50
CP* ≤ 33.1
no CP* provided
CP* ≤ 33.1
any result
CP* > 33.1
*Crossing Point
Page 22 of 30
Instructions For Use
12.
Analysis with the Roche LightCycler 480 Instrument II
12.1. Plate Preparation (LightCycler 480 Instrument II)
·
Set up the PCR plate. The plate layout as shown in Table 6 is recommended.
·
Transfer 15 µl PCR Master Mix into the selected wells of a LightCycler 480 Multiwell Plate
96 Reaction Plate.
·
Briefly centrifuge the bisDNA storage plate created in section 9.2.13 for 1 min at
1000 ± 100 rcf using the plate centrifuge.
·
·
Add 15 µl of bisDNA solution to respective wells of the PCR plate.
Seal the PCR plate with LightCycler 480 Sealing Foil.
·
Briefly spin down the PCR plate with a plate centrifuge for 1 min at 1000 ± 100 rcf.
Note: The filled PCR plate can be stored in a refrigerator at 2 to 8 °C for up to 4 h.
12.2. Plate Loading (LightCycler 480 Instrument II)
Note: It is recommended to save a template file (*.ixo) with the defined cycling and analysis settings.
·
Start the software version 1.5.x.
·
Create a new experiment, click “New Experiment”
·
Load the specified experiment template file or define the following experiment according to the
PCR program parameters detailed in Table 13 below.
·
Open the tray.
·
Place the PCR plate into the frame (position A1 goes to the upper left corner), ensure that the
plate fits accurately in the frame. Close the tray.
·
Click “Start Run” to start.
Table 13: Standard PCR Program for LightCycler 480 Instrument II.
Program Parameter
Denaturation
Cycling
Cooling
None
Quantification mode
None
Cycles
1
50
1
Segment
1
1
2
3
1
Target [°C]
94
62
56
93
40
Hold [hh:mm:ss]
00:20:00
00:00:05
00:00:35
00:00:30
00:00:30
Ramp Rate [°C/s]*
1.0
1.3
1.3
1.3
1.3
Acquisition Mode
None
None
Single
None
None
Analysis Mode
* LightCycler 480 Instrument II: select the “Dual Color Hydrolysis Probe/UPL Probe” as detection format; activate the
filter combination 465 – 510 nm and 533 – 580 nm and set the “Reaction Volume” to “30”.
12.3. Analysis Settings (LightCycler 480 Instrument II)
Note: Perform data analysis only on used wells by generating a respective sample sub set as described
in the manual of the LightCycler 480 Instrument II.
·
Click “Analysis” on the LightCycler 480 Basic Software Module bar opening the “Analysis Overview”
window.
·
Select “Abs Quant/Fit Points” for all samples.
·
Activate the “Filter Comb 465 – 510”.
·
Set “First Cycle” to “1” and “Last Cycle” to “50”.
Page 23 of 30
Instructions For Use
·
Set the background (click blue background button) to “5 - 22” by setting “Min Offset” to “4” and
“Max Offset” to “21” in the “Cycle Range” window.
·
Set the noise band to ”Noise Band (Fluoresc)” and set the noise band manually to “2.0” in the
“Noise Band” window.
·
After selecting “Threshold (Manual)” in the “Analysis” window set the threshold to “2.0”.
·
Set the number of Fit Points to “2” in the “Analysis” window.
·
Click “Calculate”.
Septin9 Crossing Point (“CP”) for each sample is calculated automatically and displayed in the
Sample Table.
·
Export the CP values by clicking with the right mouse button on the Sample Table. Choose
“Export”. Save the file with a unique and meaningful file name.
·
Activate the “Filter Comb 533 - 580”.
·
Set “First Cycle” to “1” and “Last Cycle” to “50”.
·
Set the background (click blue background button) to “5 - 22” by setting Min Offset to “4” and
Max Offset to “21” in the “Cycle Range” window.
·
Set the noise band to ”Noise Band (Fluoresc)” and set the noise band manually to “2.0” in the
“Noise Band” window.
·
After selecting “Threshold (Manual)” in the “Analysis” window set the threshold to “2.0”.
·
Set the number of Fit Points to “2” in the “Analysis” window.
·
Click “Calculate”.
ACTB CP values for each sample are calculated automatically and displayed in the Sample Table.
·
Export the CP values by clicking with the right mouse button on the Sample Table. Choose
“Export”. Save the file with a unique and meaningful file name.
Note: Adjust the “Noise Band” and “Threshold” such that it is slightly above the background and that it
crosses the amplification curves at the beginning of the exponential increase. Amplification curves
without a significant exponential increase should be evaluated as negative.
A
B
C
Adjusted Threshold
Adjusted Threshold
Figure 5: Screenshots of Septin9 amplification curves using LightCycler 480. A: Amplification curve without a significant
exponential increase should be evaluated as negative. B: Threshold should be adjusted that it is slightly above the
background. C: Threshold should be adjusted that it crosses the amplification curves at the beginning of the exponential
increase.
Page 24 of 30
Instructions For Use
12.4. Run Validity of the Epi proColon Test Result (LightCycler 480 Instrument II)
Any run (patient samples processed together with Epi proColon Positive Control and Epi proColon
Negative Control is considered valid, if criteria set forth in Table 14 are met for ALL THREE (3) PCR
replicates per control.
If either the Epi proColon Positive Control or Epi proColon Negative Control (or both) is invalid, the
data for patient samples processed together with the controls cannot be interpreted. Testing must be
repeated for all patient samples included in this run.
Table 14: Validity Limits of Epi proColon Controls (LightCycler 480 Instrument II).
Result of Control
Determination
Septin9 Result
ACTB Result
Positive Control valid
PCR1
PCR2
PCR3
CP* ≤ 40.5
CP* ≤ 40.5
CP* ≤ 40.5
CP* ≤ 30.3
CP* ≤ 30.3
CP* ≤ 30.3
Negative Control valid
PCR1
PCR2
PCR3
No CP* provided
CP* ≤ 37.1
CP* ≤ 37.1
CP* ≤ 37.1
*Crossing Point
12.5. Interpretation of Results for a Single PCR (LightCycler 480 Instrument II)
If the result of the internal control ACTB indicates sufficient input of DNA into the single PCR (ACTB
cycle threshold specified in Table 15), the result of the Septin9 PCR defines the result for this single PCR
(see section 13). An ACTB value above the crossing point specified in Table 15 determines the single
PCR result to “Invalid PCR”.
Table 15: Interpretation of Results for Single PCR (LightCycler 480 Instrument II).
Single PCR Result
Septin9 Positive
Septin9 Negative
Invalid
Septin9 Result
ACTB Result
CP* < 50
CP* ≤ 33.7
no CP* provided
CP* ≤ 33.7
any result
CP* > 33.7
* Crossing Point
Page 25 of 30
Instructions For Use
13.
Interpretation of Results for a Patient Sample
The test result for a patient sample is interpreted according to Table 16. The test result for a patient
sample is “POSITIVE”, if at least two of three PCR replicates are Septin9 Positive. The test result for a
patient sample is “NEGATIVE”, if at least two of three PCR replicates are Septin9 Negative. The test
result is “INVALID” in all other cases.
Table 16: Interpretation of Epi proColon 2.0 CE Test Results
Test Result
Positive Control
Negative Control
Single PCR Results
POSITIVE
Valid
At least two Positive Septin9 PCR
NEGATIVE
Valid
At least two Negative Septin9 PCR
INVALID
Valid
All other cases
INVALID
Invalid
n/a
14.
Quality Control
14.1. External Controls
Epi proColon 2.0 CE contains Epi proColon Positive and Negative Controls (M5-02-003). These controls
must be included with each run to monitor the successful execution of the work flow to ensure validity
of test results. The Epi proColon Positive and Negative Control values must be within the validity limits
(see Table 8, or Table 11, or Table 14). If a control is out of its specified range, the associated test results
are invalid, must not be reported and testing must be repeated.
If laboratory quality control procedures require more frequent use of controls to verify test results,
follow those procedures.
14.2. Internal Controls
The internal control allows the detection of bisulfite converted ACTB (ß-actin) DNA. This co-amplified
internal control monitors the sample quality, sample preparation and adequate DNA concentration of
the sample.
The result of the Septin9 PCR is linked to the Ct or CP value of the ACTB PCR (see Table 9, or Table 12
or Table 15). Ct or CP values of the ACTB PCR outside of the specified range invalidate the single PCR
result; as such high values are associated with very low bisDNA content or PCR inhibition.
Page 26 of 30
Instructions For Use
15.
16.
Limitations of the Procedure
·
For in vitro diagnostic use only.
·
This product has been validated for the combination of Epi proColon Plasma Quick Kit
(M5-02-001), Epi proColon Sensitive PCR Kit (M5-02-002), and Epi proColon Control Kit
(M5-02-003) only. The parts must not be replaced by other DNA extraction methods or PCR
kits.
·
This product has been validated for use with plasma derived from blood collected with BD
Vacutainer® K2EDTA, S-Monovette® 9 ml Potassium-EDTA and S-Monovette® 8.5 ml CPDA
tubes. Use of other sample types and other blood collection tubes have not been validated.
·
Storage of blood in S-Monovette® 8.5 ml CPDA tubes at temperatures exceeding 25 °C may
lead to false positive test results.
·
Use of this product is limited to personnel experienced and trained in PCR assays.
·
Detection of colorectal cancer is dependent on the amount of circulating tumor DNA in the
specimen and may be affected by sample collection methods and sample storage, patient
factors (i.e. age, other diseases) and tumor stage.
·
Results are not confirmative evidence of the presence or absence of colorectal cancer. Any
positive Epi proColon 2.0 CE test result should be confirmed by colonoscopy or sigmoidoscopy.
·
Positive test results have been observed in clinically diagnosed patients with the following
diseases: chronic gastritis, esophagitis, non rheumatoid arthritis, lung cancer, breast cancer and
prostate cancer.
·
Positive test results have been observed in pregnant women.
·
The Epi proColon 2.0 CE test result must be evaluated in conjunction with other clinical
parameters.
Performance Characteristics
16.1. Analytical Sensitivity
The analytical sensitivity was evaluated by 3 operators each performing 4 independent runs with a set
of 2 x 7 technical Limit of Detection (LoD) samples with HeLa DNA (Septin9 positive) concentrations of
0, 6, 12, 18, 25, 35 and 50 pg/ml resulting in 168 Septin9 determinations. All determinations on the
Applied Biosystems 7500 Fast Dx with SDS v1.4 were valid. 133 of 144 LoD samples with spiked HeLa
DNA were positive and 24 of 24 samples without spiked HeLa DNA were negative. The estimated LoD95
was determined by a logistic regression model to be 14 pg/ml (CI 95%: 9 pg/ml - 19 pg/ml) for
Epi proColon 2.0 CE.
A similar investigational setup was used to determine the analytical sensitivity using the LightCycler 480
Instrument I. The estimated LoD95 was determined to be equivalent.
16.2. Reproducibility
The reproducibility of the procedure was tested by processing plasma aliquots from nine pools
generated from human EDTA plasma. Six of the plasma pools comprised plasma from patients
diagnosed with colorectal carcinoma. Three pools comprised plasma from patients with no apparent
disease as controls. All pools were processed in 6 replicates by three operators using different kit lots of
the Epi proColon Plasma Quick Kit (M5-02-001), as well as the Epi proColon Sensitive PCR Kit
(M5-02-002). In 54 of the 54 Septin9 determinations the expected result (cancer pool Septin9 positive;
non-cancer pool Septin9 negative) was consistently generated.
16.3. Clinical Sensitivity and Specificity
The clinical performance of Epi proColon 2.0 CE was determined with 149 clinical samples with no
evidence of disease selected from a prospectively collected average risk screening population and with
197 clinical specimens in a case–control design comprised of samples from histologically confirmed
Page 27 of 30
Instructions For Use
colorectal carcinoma patients of all stages and samples from colonoscopy-verified negative individuals
with no evidence of disease.
Bisulfite converted DNA was prepared from plasma which was derived from blood processed within
four hours of blood draw with Vacutainer® K2EDTA Tubes (Becton Dickinson). Valid Septin9
measurements were obtained for 346 out of 346 specimens (100 %).
In the prospectively collected cohort 1 out of 149 samples provided a positive test result. The estimated
false positive rate in this group of patients is 1 % (CI 95 %: 0 % - 4 %). These numbers translate into a
clinical specificity of 99 % (CI 95 %: 96 % - 100 %).
Within the 99 subjects from the case-control cohort with no evidence of disease (controls), 96
specimens were determined to be Septin9 negative resulting in an estimated clinical specificity of 97 %
(CI 95 %: 91 % - 99 %), see Table 17.
Of the 98 subjects diagnosed with colorectal carcinoma 79 specimens were determined to be Septin9
positive resulting in an estimated clinical sensitivity of 81 % (CI 95 %: 72 % - 87 %). In early, localized
colorectal cancer the Epi proColon 2.0 CE test was positive in 43 (18 stage I, 25 stage II) of the 56
patients (77 %).
The table below summarizes the data obtained.
Table 17. Summary of clinical performance data of Epi proColon 2.0 CE
Controls
(screening
cohort)
Controls
(case-control)
All colorectal
carcinoma
Localized
colorectal
carcinoma
Valid results
149
99
98
56
Septin9 positive
1
3
79
43
Septin9 negative
148
96
19
13
Positivity
1%
3%
81%
77%
16.4. Concordance of the Two Real-Time PCR instruments
The concordance of Epi proColon 2.0 CE on the Applied Biosystems 7500 Fast Dx System and the
LightCycler 480 Instrument I has been determined in a side-by-side measurement with 48 plasma
samples from patients with histologically confirmed colorectal carcinoma of all stages and 52 samples
from subjects without apparent colon disease as verified by colonoscopy. In 93 % (93/100) of cases,
both measurement systems generated concordant Septin9 results.
16.5. Interference
No interference was observed within experimental controls and nonreactive or reactive samples tested
with elevated levels of unmethylated genomic DNA (100 ng/ml), Bilirubin (0.20 mg/ml), Hemoglobin
(1 mg/ml), Triglycerides (12 mg/ml), Protein (Albumin from human serum) (120 mg/ml), Red Blood
Cells (0.4% v/v), K2EDTA (20 mg/ml), Cholesterol (5 mg/ml), Uric acid (0.235 mg/ml), and Glucose
(10 mg/ml).
Page 28 of 30
Instructions For Use
17.
Meaning of Symbols
Consult Instructions for Use
Order Number
In Vitro Diagnostic Medical Device
Lot Number
Expiration Date
Manufacturer
Store at indicated Temperature
Number of Tests
Do not Re-use
18.
References
1 deVos, T et al. Circulating methylated SEPT9 DNA in plasma is a biomarker for colorectal
cancer. Clinical Chemistry 55:7, 1337-46
1337
(2009)
2 Lofton-Day,
Day, C. et al. DNA methylation biomarkers for blood-based
blood based colorectal cancer
screening. Clinical Chemistry 54:2, 414-423
414
(2008)
3 Model, F. et al. Identification and validation of colorectal neoplasia
neoplasia-specific methylation
markers for accurate classification of disease. Mol Cancer Res 5, 153-163
153 163 (2007)
4 Eads, C.A. et al. MethyLight: a high-throughput
high throughput assay to measure DNA methylation. N
Nucleic
Acids Research, Volume 28, Issue 8, e32 (2000)
Page 29 of 30
Instructions For Use
19.
Contact Information
Epi proColon 2.0 CE is manufactured by:
Epigenomics AG
Geneststr. 5
10829 Berlin, Germany
For further information and support send an e-mail to or call:
[email protected]
Phone: +49 30 24345 222
Fax:
+49 30 24345 555
Notice to Purchaser
Epi proColon (Epi proColon®) is a registered trademark of Epigenomics AG. All other trademarks,
brands, and names contained herein are the property of their respective owners.The LightCycler® 480
System is a registered trademark of F. Hoffmann-La Roche Ltd.
The Applied Biosystems®, MicroAmp® are registered trademarks of Life Technologies Corporation;
DynaMag™ is a trademark of Life Technologies Corporation.
BD Vacutainer® is a registered trademark of Becton Dickinson Inc./Corporation.
S-Monovette® is a registered trademark of of Sarstedt AG & Co.
ThermoMixer®, Research®, Reference®, Multipette®, ep Dualfilter T.I.P.S.®, Combitips advanced® are
registered trademarks of Eppendorf AG; Safe LockTM is a trademark of Eppendorf AG.
HandyStep® is a registered trademark of Brand GmbH + Co KG.
The purchase of this product grants the purchaser rights under certain Roche patents to use it solely for
providing human in vitro diagnostic services. No general patent or other license of any kind other than
this specific right of use from purchase is granted hereby.
Page 30 of 30