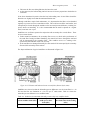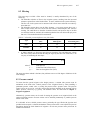
1
CONTENTS Micro-irrigation systems 1 Introduction ............................................................................................................................................................................................................................................... 8.1 2 Emitters .......................................................................................................................................................................................................................................................... 8.1 2.1 Drippers .......................................................................................................................................................................................................................................... 8.4 2.1.1 Mounting ....................................................................................................................................................................................................................... 8.4 2.1.2 Composition............................................................................................................................................................................................................... 8.5 2.1.3 Components ............................................................................................................................................................................................................... 8.6 2.1.3.1 Inlet .................................................................................................................................................................................................................... 8.6 2.1.3.2 The body....................................................................................................................................................................................................... 8.7 2.1.3.3 The casing................................................................................................................................................................................................... 8.7 2.1.3.4 Outlets ............................................................................................................................................................................................................. 8.7 2.1.4 Pressure compensating mechanisms .............................................................................................................................................. 8.7 2.2 Micro sprayers ........................................................................................................................................................................................................................ 8.7 2.2.1 Mounting ....................................................................................................................................................................................................................... 8.8 2.2.2 Composition............................................................................................................................................................................................................... 8.8 2.2.3 Components ............................................................................................................................................................................................................... 8.8 2.2.3.1 Inlet coupling .......................................................................................................................................................................................... 8.8 2.2.3.2 Body .................................................................................................................................................................................................................. 8.8 2.2.3.3 Emitters ......................................................................................................................................................................................................... 8.8 2.2.3.4 Bridge .............................................................................................................................................................................................................. 8.9 2.2.3.5 Spreaders...................................................................................................................................................................................................... 8.9 2.2.3.6 Pressure compensators ............................................................................................................................................................. 8.10 2.2.3.7 Filter or screen................................................................................................................................................................................... 8.10 2.3 Choice .......................................................................................................................................................................................................................................... 8.11 2.3.1 Drip or micro ........................................................................................................................................................................................................ 8.12 2.3.2 Pressure sensitive or pressure compensating ................................................................................................................... 8.13 2.3.3 Different drip system concepts ........................................................................................................................................................ 8.14 2.3.3.1 Conventional concept................................................................................................................................................................ 8.14 2.3.3.2 The Martinez approach............................................................................................................................................................ 8.15 2.3.4 Different micros ................................................................................................................................................................................................ 8.16 2.3.4.1 Micros with fixed or static spreaders ...................................................................................................................... 8.17 2.3.4.2 Micros with rotating spreaders rotators ................................................................................................................ 8.18 3 Laterals ....................................................................................................................................................................................................................................................... 8.18 3.1 On-line mounted emitters ...................................................................................................................................................................................... 8.18 3.2 In-line and internally mounted emitters ................................................................................................................................................ 8.18 4 Filtration.................................................................................................................................................................................................................................................... 8.19 4.1 Pre-filtering and treatment.................................................................................................................................................................................... 8.24 4.1.1 Settling and aeration..................................................................................................................................................................................... 8.25 4.1.2 Sand separators................................................................................................................................................................................................... 8.26 4.2 Filter types............................................................................................................................................................................................................................... 8.20 4.2.1 Mesh filters ............................................................................................................................................................................................................. 8.20 4.2.2 Disc filters ................................................................................................................................................................................................................ 8.21 4.2.3 Sand filters ............................................................................................................................................................................................................... 8.21 4.3 Selection of filter type ............................................................................................................................................................................................... 8.22 4.3.1 Drip systems .......................................................................................................................................................................................................... 8.22 4.3.2 Micro systems ...................................................................................................................................................................................................... 8.23 4.4 Selection of filter size or filter capacity ................................................................................................................................................ 8.23 4.4.1 Maximum flow rate....................................................................................................................................................................................... 8.23 4.4.2 Dirtiness of the water .................................................................................................................................................................................. 8.23 4.4.3 Cleaning cycle ..................................................................................................................................................................................................... 8.24 5 Automation ............................................................................................................................................................................................................................................ 8.24 5.1 Mechanical/hydraulic ................................................................................................................................................................................................. 8.24 5.2 Electric/hydraulic ............................................................................................................................................................................................................ 8.26 5.3 Computerised systems ............................................................................................................................................................................................... 8.27 5.3.1 Requirements ........................................................................................................................................................................................................ 8.28 5.3.2 Design approach ............................................................................................................................................................................................... 8.29 6 Installation ...............................................................................................................................................................................................................................................8.31 6.1 Installation of laterals .................................................................................................................................................................................................8.31 6.2 Flushing of irrigation systems ..........................................................................................................................................................................8.31 6.3 Filterstation.............................................................................................................................................................................................................................8.31 6.4 Irrigation material ...........................................................................................................................................................................................................8.31 7 Evaluation after irrigation......................................................................................................................................................................................................8.32 8 Management ..........................................................................................................................................................................................................................................8.34 8.1 Water application ............................................................................................................................................................................................................8.34 8.2 Filtration.....................................................................................................................................................................................................................................8.37 8.3 Pressure control .................................................................................................................................................................................................................8.37 9 Maintenance...........................................................................................................................................................................................................................................8.38 9.1 Water quality ........................................................................................................................................................................................................................8.38 9.2 Water purification methods .................................................................................................................................................................................8.41 9.2.1 Solution for preventing bloskages resulting from physical factors ...................................................... 8.41 9.2.1.1 Filtering.........................................................................................................................................................................................8.43 9.2.1.2 Sedimentation dams........................................................................................................................................................8.43 9.2.1.3 Sand separators ....................................................................................................................................................................8.44 9.2.2 Chemical water treatment ....................................................................................................................................................................8.44 9.2.2.1 Chlorine application .......................................................................................................................................................8.46 9.2.2.2 Acid application ..................................................................................................................................................................8.48 9.2.2.3 Other methods .......................................................................................................................................................................8.48 9.2.2.4 Specific blockage problems with solutions .........................................................................................8.48 9.2.3 Biological blockage control ...............................................................................................................................................................8.49 9.3 Prevention of root penetration ........................................................................................................................................................................8.49 9.4 Maintenance schedules of micro irrigation systems .............................................................................................................8.50 10 Troubleshooting tables...........................................................................................................................................................................................................8.52 11 References ............................................................................................................................................................................................................................................8.54 Micro-irrigation systems 8.1 1 Introduction The concept of micro-irrigation originated during the initial “discovery” and development of drippers and drip irrigation in Israel. However, its inevitable evolutionary process (as well as opposition) consequently led to the invention of microsprayers. The original term "micro spray irrigation" was soon abbreviated to "micro-irrigation.” This created some confusion, which prompted the current generation of irrigation experts to stop referring to the concept, but rather to refer in the vernacular to the two main components which are used to apply the concept as: • drippers (drip irrigation systems or drip systems); and • microsprayers, also called micros (micro spray irrigation systems, better known under the abbreviated term, micro systems). Micro-irrigation, which is discussed as a comprehensive concept in this chapter, therefore includes all irrigation systems which share the following characteristics: • Full or partial area wetting is applied • A short cycle approach is followed • A low emitter delivery is maintained (usually between about two and 250 l/h) • Low operating pressures are required (ideally between 50 and 150 kPa). Although care has been taken in this chapter to avoid any kind of confusion between the concept and the system, future references to the system will be drip systems and micro systems, and the emitters will be called drippers and micros. This chapter contains basic information on micro systems (Section 1-5) as contained in the Irrigation Design Manual of the ARC-Institute for Agricultural Engineering, as well as practical information on the installation, evaluation and operation of micro systems. The most important physical characteristics which distinguish between drip and micro systems are given in Table 8.1. 2 Emitters The mechanisms by means of which water is let out from the laterals into the atmosphere are known as emitters. Emitters are found in a large variety of characteristics and shapes, covering the whole spectrum from small button-shaped drippers to sprinklers. This chapter concentrates on the two emitters usually associated with the concept of micro irrigation, namely drippers and micros.There is a substantial difference between drippers and micros, mainly due to the disparity in discharge rates, as well as the difference in the methods of applying the water. These characteristics are clearly highlighted in Table 8.1. Table 8.1: Some directives with regard to characteristics of drip and micro systems Characteristic Drip systems Micro systems Application Row crops (both permanent and annual crops), also underground on pastures, sugar, cotton, for instance Row crops (both permanent and annual crops), also single plants or large trees (e.g. nuts) Method of application of water Point application by means of drip action, lateral distribution by soil Surface distribution by means of spray action (1 - 10 m diameter) Potential system efficiency Mounting of emitter in relation to lateral 95% + On wall inside lateral, or in-line as integral part of tubing, or directly/ indirectly on outer wall of tubing 85 to 90% + On outer wall of lateral (either directly on pipe, or mostly on micro tubing with plastic stand) 8.2 Irrigation User’s Manual Table 8.1 (continued): Some directives with regard to characteristics of drip and micro systems Characteristic Emitter interval Drip systems Externally mounted: At random. All other: At fixed intervals varying between 0,3 m and 1,25 m Micro systems Random placing; for row crops approximately 1,5 m to 3,5 m Emitter discharge 1,05 to 12 l/h 20 - 250 l/h Operating pressure 5 to 20 m (also pressure compensating) 10 to 30 m (also pressure compensating) Most emitters are available in both pressure sensitive and pressure compensating models: • The discharge of pressure sensitive emitters (also known as conventional emitters) is a function of the operating pressure inside the lateral. It is therefore essential to ensure during the designing process that system pressure inside the sidelines and laterals are maintained within the required tolerances in order to maintain uniformity of emitter discharge within specified ranges. Advantages of pressure sensitive emitters: ° Relative low cost compared to pressure compensating drippers ° The simplicity in composition enhances uniform discharge between emitters (low CV-values) ° Less and uncomplicated components decrease vulnerability to mechanical damage Disadvantages of pressure sensitive emitters: ° Lateral length is influenced because topography directly influences the operating pressure, therefore also the discharge ° Larger pipe diameters are normally used along flatter gradients to limit friction losses ° Because it is often necessary to maintain downhill flow directions in both laterals and sidelines, costs will escalate in case a more extensive supply system is required ° Relatively complicated design processes, which normally require the use of advanced equations, graphic aids, and even computer programmes, are inevitable and complicate the design process • Pressure compensating emitters, on the other hand, are fitted with pressure reducing mechanisms with the result that the emitter discharge is limited to a specific rate, despite any fluctuations in system pressure inside the laterals. Usually, the only limitation is that a minimum required pressure should be maintained to perform the compensating function. The mechanisms used for this function usually differ (there are exceptions) between drippers and micros. Micros normally make use of a separate pressure lowering mechanism between the adaptor and the nozzle, while the mechanism of drippers is usually integrated with the body of the unit. Advantages of pressure compensating emitters: ° Longer laterals of the same diameter pipe can be used because emitter discharge remains constant and is not influenced by pressure variations due to friction or topography. ° For the same reason, pipes with smaller diameters can generally be used in sidelines and laterals, and in some cases even in the distribution network. ° In most cases it is advantageous to maintain a flow direction opposite to that of the soil gradient in the sidelines and emitter lines, thus eliminating supply lines by supplying water to the sideline at the point closest to the source. Micro-irrigation systems ° ° The CV of the emitters constitutes the total discharge variation of a system. Low CV-values of well-designed and well-manufactured emitters therefore ensure even distribution of water and plant nutrients, often safely within the normal allowable tolerances. No advanced design techniques with complicated equations and graphic aids, or even computer programmes, are required for the designing process. Sensible application of basic pipe hydraulics is all that is required for this purpose. Disadvantages usually associated with pressure compensating emitters: ° ° ° 8.3 Complicated composition involves more components, resulting in increased vulnerability The composition of the emitter components makes it difficult to maintain low CV-values The only other disadvantage is higher emitter costs The differences in function between the two concepts are shown in Figures 8.1 and 8.2. Figure 8.1: Pressure compensating drippers: Typical discharge graphs 8 3,5 l/h Discharge [liter/hour] 7 6 2,3 l/h 5 4 1,6 l/h 3 1,2 l/h 2 1 0 0 5 10 15 20 25 30 Pressure [m] Figure 8.2: Pressure sensitive micro sprayers: Typical discharge graphs 35 8.4 Irrigation User’s Manual 2.1 Drippers The first drippers for irrigation purposes were developed in Israel during the early sixties, and launched in South Africa in 1969. An Israeli engineer, Simca Blass, noticed that a leaking pipe connection in a fruit orchard had an unusually positive effect on the single tree where the “fault” was located. He immediately recognised the concept, accepting the challenge of causing artificial leakages to pipes which can function at controlled, ultra-low discharge rates without squirting or blocking. Since then, the development of the concept has lead to the availability of a large variety of drippers which can satisfy every imaginable need. 2.1.1 Mounting Drippers can be mounted onto dripper lines in various ways (refer to Figure 8.3): Figure 8.3: Mounting of drippers to dripper line • Externally on the wall of the pipe With this approach the diameter of the pipe is irrelevant. Standard, low density polyethylene pipes with small diameters can be used. Likewise, the dripper spacing can be done at random according to the requirements. The only limitation on the size of the emitter is the manufacturing cost. A measure of robustness is also required because of vulnerability to factors such as the movement of people and implements, especially in rare cases where the dripper is linked to the dripper line by means of extension tubing. These drippers are fitted with a barbed connection which is pressed either into a pre-punched hole in the dripper line, or into the end of the extension tubing. • In-line with dripper line In this case, the dripper is cylindrical with a barbed adaptor at each end. These are fitted to the dripper line (after the pipe has been manufactured) in such a way that the hollow cylindrical core forms part of the dripper line. The pipe is usually cut into pre-determined lengths and the ends of the pipe are mechanically pressed over the barbed ends of the dripper. One limitation is that only specially fabricated dripper pipes, available only in specified diameters, which fit tightly over the ends of the barbed ends of the dripper, can be used. Micro-irrigation systems 8.5 • Inside the dripper line In this variation the dripper is mounted inside the pipe during the manufacturing process of a unique dripper pipe and fixed to the inner wall of the pipe by means of thermal fusing. Standard polyethylene pipes are therefore out of the question. Two kinds of drippers are mainly used: ° Cylindrical drippers are inserted into the pipe, where the wall of the pipe forms the casing of the dripper. ° Elongated drippers, which are so small that they cause little friction, are fixed to the inner wall of the pipe during the pipe manufacturing process. • Integral with the wall of the dripper line In this case the special and unique thin-walled dripper line is manufactured in such a way that the characteristics of the components of a dripper (pressure sensitive or pressure compensating) are formed inside the pipe wall by means of a thermal extrusion process. 2.1.2 Composition Because it is impossible to consider all the different types of drippers and their composition individually, attention will be focused on representative examples of drippers found in everyday use, as illustrated in Figure 8.4. Figure 8.4: Composition of some commonly known drippers 8.6 Irrigation User’s Manual 2.1.3 Components As Figure 8.4 clearly illustrates, the drippers vary to such an extent that it is difficult to identify common components. Initially, however, a positive distinction can be made between the two approaches regarding the composition of the flow path: • Long flow path type drippers mainly use friction and turbulence in the flow path to decrease the lateral pressure until the design discharge is reached. The cross section area of the flow path is usually about 1 mm². Depending on the design approach, the flow path can vary considerably in length, up to 1 m and more. Although flow velocities are relatively low, the flow is regarded as turbulent because of the continuous changes in direction it experiences along the labyrinth. • Short flow path type drippers usually are physically small and discharge is regulated by means of a built-in mechanism. All the drippers shown in Figure 8.4 are of the long flow path type, except the small button type which is mounted to the outside of the pipe. Common components include the following, among others: 2.1.3.1 Inlet of water from the lateral takes place via the barbed coupling of the type which is mounted on the outside of the lateral. All the other types are provided with openings between the outside of the body and the pressure reducing mechanism, which often is part of the body. This opening is almost always fitted with some kind of grid or screen to prevent dirt that can block the flow path from ending up inside the mechanism. 2.1.3.2 The body houses the pressure reducing mechanism in all cases except the integral type, where the core is situated inside the wall. 2.1.3.3 The casing encloses the body or the active pressure reducing mechanism, and is available in various shapes: • It can be a shell which fits onto the core like the larger button type outside the dripper line • The body and casing can form a homogeneous unit, as with the small button type • It can also be a cylindrical casing which encloses the core like the in-line type • The dripper line itself can form the casing of the dripper which is mounted inside, as well as the type which is formed inside the wall of the dripper line 2.1.3.4 Outlets are provided to all drippers which are exposed to the atmosphere. With all other types, discharge holes are punched into the wall of the dripper line during the manufacturing process. 2.1.4 Pressure compensating mechanisms These mechanisms are optionally available as components to most tried and tested pressure sensitive emitters. The only known exceptions are the in-line type drippers. In pressure sensitive types, the pressure reducing characteristics of the labyrinth are usually combined with a free-moving diaphragm of which the active part is situated over and on the downstream side of the labyrinth. This diaphragm is manufactured of a high quality synthetic elastic material which is chemically stable in respect of all known chemicals. The water inside the lateral exercises the necessary pressure which causes the diaphragm to distort, thereby reducing the flow opening and keeping the discharge constant. A flushing action usually takes place during the stage that the dripper line is filled with water and before enough pressure is built up to activate the diaphragm. Micro-irrigation systems 8.7 Typical examples of both types of pressure compensating drippers are illustrated in Figure 8.5. Figure 8.5: A diagram of typical pressure compensating drippers 2.2 Microsprayers Drippers were soon followed by micros, which initially were in competition with drippers, but later became a welcome supplement to the concept of micro-irrigation, filling the many gaps that could not be handled effectively by drippers. 2.2.1 Mounting Due to the nature of their function, these emitters are mounted to the outside of the lateral. Standard low density small diameter polyethylene pipes are therefore used in practice. Spacing may be done completely at will according to requirements. There is therefore no real limitation on the physical size of the emitter, except as far as manufacturing cost is concerned. As in the case of drippers mounted on the outside, a measure of robustness is required due to vulnerability as a result of exposure to environmental factors, such as movement of people and implements. 2.2.2 Composition Most of the micros used in the RSA conform to the general shape and composition as depicted in Figure 8.6. 2.2.3 Components The following components and variations thereof are shown in Figure 8.6: 2.2.3.1 Inlet coupling The inlet coupling joins the rest of the emitter with the water in the lateral or the extension tube. Two types are generally used: • Screwed fitting: This type is screwed into a pre-punched hole in the lateral, or, alternatively, screwed into the end of a high-density polyethylene riser pipe. • Barbed fitting: It can be pressed into the lateral through a pre-punched hole, or into the end of a low density polyethylene or plasticised uPVC extension tube. Couplings are available as integral parts of the body or as separate components with friction or bayonet type couplings to the body. 8.8 Irrigation User’s Manual 2.2.3.2 Body The body or basis structure of a micro is that part which supports or joins together almost all the other components. The body is available as a separate part or it may be an integral part of one or more other components such as a nozzle, and/or the bridge and/or the inlet coupling. 2.2.3.3 Emitters The nozzle is the component which is designed to regulate the discharge. The shape, length and diameter of the opening determine the discharge at specific pressures. Other characteristics are: • The nozzle may be an integral part of the body or it may be available as a separate, interchangeable component. • Interchangeable nozzles are usually colour-coded to easily distinguish between the various diameters (and therefore discharges). Static Static Rotating Figure 8.6: General composition of micro sprayers 2.2.3.4 Bridge This component has the important function of forming, at the top, either the attachment point for static spreaders, or the bearing in (or on) which the rotating spreader revolves. It is therefore extremely important that the bridge is highly stable to ensure long-term even distribution of water. Other characteristics include: • Usually available as an integral part of the body, but can in exceptional cases also be obtained as a separate component. • Normally available in the so-called “A” or “G” type shape, depending on the type of construction of the micro. Removable bridge structures have three supports (for the sake of stability), compared to the single support of the “G” type and the double support of the “A” type. Micro-irrigation systems 8.9 2.2.3.5 Spreaders Two types of spreaders are normally used. • Rotating type spreaders are water-driven by the stream from the nozzle. The stream of water is lead along a curved channel in the rotator which changes the stream’s direction of motion to bring about rotation. The shaft is usually supported by the nozzle at the bottom end, and at the top by a bush or pin on the bridge. The only current exception to this composition is the Eintal concept: The spreader in this case is a small shaft which goes through the nozzle and is kept in position by thickened plastic ends (incidentally, this concept has narrow strip wetting and insect proof characteristics). A large variety of rotating spreaders are available from different manufacturers, each with unique characteristics intended for specific functions. For instance, wide strip, narrow strip and even insect proof type rotating spreaders are available. At no-flow conditions, the latter stops in a position which makes it impossible for insects to penetrate. • Static spreaders (diffusers) are normally mounted to the bridge, perpendicularly above the stream of water coming from the nozzle, and in such a way that the stream hits the spreader in the centre. The only known exception to this layout concept is the ‘Microjet’ approach according to which the spreader is mounted directly onto the body in the form of a cap. Distribution takes place through the openings at the top of the vertical walls of the cap. A wide range of distribution patterns, angles and diameters are available for almost any application, and every manufacturer has unique basic designs for every purpose. Most make use of circular spreaders with flat, convex, concave or ribbed surfaces to spread the water in a specific pattern and to ensure a specific drop size. Examples of some of the more popular distribution patterns and angles are shown in Figure 8.7. 2.2.3.6 Pressure compensators Some manufacturers also provide pressure compensators which are mounted between the micro adaptor and the body and which ensure that any excess pressure in the system is reduced to the design pressure of the emitter. The purpose of this is to ensure that each emitter is subject to identical pressure conditions (resulting in more or less identical discharge rates), as long as the inlet pressures conform to the minimum requirements. 2.2.3.7 Filter or screen Some manufacturers also supply, as optional equipment, a small mesh filter or screen fitted in a position between the inlet and the body. Its purpose is to trap any dirt that may end up in the lateral before it clogs the nozzle. The screen is easily removable for cleaning purposes. Once again, its utilisation should be physically justifiable and economically beneficial. 8.10 Irrigation User’s Manual Figure 8.7: Examples of distribution patterns and angles of some micros 2.3 Choice The choice between drip and micro, or between one emitter and another, or even between the concepts of pressure sensitive and pressure compensating emitters, are often done subjectively, or according to preconceived directives, or even based on historical or circumstantial misconceptions. Beware of those commercial designers who are forced to propagate only the agency products of their companies. A situation like this can cause an excellent design to fail dismally. Here are some guidelines according to which this problem can be approached more scientifically: 2.3.1 Drip or micro • Drip irrigation has a higher system efficiency than micro-irrigation. • Micros are mechanically more vulnerable than most drip systems. Most drippers are mounted inside the laterals and under some conditions whole systems can be suspended above ground level. • Drip systems have limitations because they feature point application, while micros distribute water above-ground. The lateral water spreading capacity of the soil can therefore be a determining factor in the decision-making process. Micro-irrigation systems 8.11 The shape and size of the wetted profile in the soil are therefore very important for obvious reasons. It should be able to store at least enough water in an area accessible to the feeding roots (or an acceptable part thereof) of the crop. The method of placing irrigation water on top of the soil, as well as the distribution of water in the soil (especially lateral distribution), should correlate well with the nature, shape and extent of the root system, and any limitations affecting these. These aspects are particularly important in cases where no clearcut decision about drip irrigation can be made. Because characteristics of the crop are normally common knowledge, and limitations from a soil science point of view would have become evident during the soil survey, the only remaining unknown factor is the ability of the soil to distribute irrigation water laterally. Although aspects regarding these characteristics are discussed in more detail in Chapter 3: Soil, attention is once again drawn to the fact that three basic, interactive factors are responsible for this very important characteristic. They are ° the clay percentage in the soil; and/or ° the percentage fine fraction in the sand; and/or ° the presence of organic material in the soil. The distribution of the water in the soil occurs along the hydraulic gradient between the wet and the dry soil, laterally by means of capillary action and vertically due to gravitation. With point application, this wetting and distribution pattern more or less takes the shape of an onion, as shown in Figure 8.8. Micros, on the other hand, distribute the water abovesoil. While a much larger wetted area is obtained, it may result in the use of a larger volume of water and shallower wetted depth in the soil. However, it will form the basis for decision-making on the type of system that will eventually be recommended in terms of technical as well as economical considerations. Although these factors are individually quantifiable, their combined effect on the lateral water distribution capacity of the soil as medium, can in no way be calculated theoretically. The only reliable method of establishing this characteristic, is by doing experimental observations and calculations according to specific guidelines: ° Lay-out dripper lines, preferably 20 m to 30 m long, on the soil that is to be irrigated, with different inter-dripper spacings. ° Connect these to a water source which will render a continuous and stable supply. ° Switch on the system at the required operating pressure and irrigate for about 12 hours on the heavier soils and about six hours on sandy soils. ° Allow the water to penetrate the soil for a further 24 and 12 hours respectively, without any interference, in order that the wet zone can reach its maximum dimensions. ° Then dig longitudinal and cross profile furrows and do the necessary observations and measurements to establish whether the proposed system will satisfy all requirements according to established norms. 8.12 Irrigation User’s Manual Figure 8.8: Typical water distribution pattern with point application • Due to the lower emitter discharge of drippers, the standing time is usually longer than that of micros, and the farmer’s operating system should be able to accommodate the choice. • Cost aspects play a key role and require a careful and objective approach: ° A drip system on citrus, equipped with double dripper lines, can be more expensive than a micro system. On the contrary, a drip system on a vineyard can be cheaper than a micro system. ° Pressure compensating emitters are generally more expensive than pressure sensitive emitters, but cost savings on the distribution system may completely reverse the picture. ° The role of filtration also cannot be ignored. Cleaner or dirtier water can overturn the cost implications completely in favour of a different type of system. ° Operating pressure also plays an important role from the operational cost point of view, and should be considered in the total cost structure. 2.3.2 Pressure sensitive or pressure compensating Besides the cost aspect discussed in Section 2.3.1, specific technical aspects may necessitate the use of pressure compensating emitters under certain conditions: • • • • The use of pressure sensitive emitters on very steep inclines may require an impractical number of branch lines to maintain specified discharge limits. Pressure compensating emitters may possibly provide the only practical solution. Long emitter lines (especially dripper lines with limited diameters), with little or no topographical slope, may have excessive friction losses, and will therefore also not conform to the specified limited discharge tolerances. Additional distribution and/or branch lines, or pressure compensating emitters are the only alternatives. Uneven terrain, where topographic features are the only cause for unacceptable emitter discharge deviations, will naturally require pressure compensating emitters. Even systems which can easily and economically make use of pressure sensitive emitters, may have sections which will unavoidably endure excess pressure. Pressure compensating emitters will effectively and economically solve the problem. Micro-irrigation systems 8.13 2.3.3 Different drip system concepts There are mainly two vastly different drip system concepts in use, one of which has not yet been implemented either on large scale or over the long term in South Africa. 2.3.3.1 Conventional concept All systems that make use of the strip wetting principle, both pressure sensitive and pressure compensating modes, fall under this category. Although laterals are traditionally placed above-ground, in some cases it is more beneficial to place them underground. This approach has been implemented with success in for instance the USA and Israel, but it is a specialised application with many specific pros and (especially) cons which requires special care and operational practices. These features and requirements are discussed in more detail below. The purpose of the general conventional approach is to create a continuous wet zone in the soil within which sufficient feeding roots of row crops will develop and function satisfactorily. It is therefore important to make maximum use of the lateral water distribution capacity of the soil by means of adequate emitter overlapping. Emitter spacing should therefore be selected sensibly and practically, as shown in Section 2.3.1. A pre-assembled dripper line is normally manufactured according to standard manufacturing processes with a wide range of dripper spacing options, ranging from about 0,3 to 1,25 m. This allows the designer to satisfy the minimum requirements, that is the economic application of the experimental results of tests done on the potential lateral water distribution capacity of the specific soil. When underground application of this concept is considered, some features, guidelines and limitations should be considered. • Circumstances under which the concept can be implemented beneficially are: ° Where regular burning of sugar cane fields occurs ° If the crop and soil combination requires short cycle irrigation ° Where harvesting practices can be simplified, for example mechanical harvesting of tomatoes or cotton ° With the use of sewage water this method will prevent pathogens from reaching the soil surface • Crops which are already successfully irrigated with this method include strawberries, sugar cane, chillies, broccoli, lettuce, onions, tomatoes, cotton and water-melon. • The application of chemicals is important for plant nutrition, insect control and the prevention of dripper blockages. The necessary equipment for this purpose should therefore be provided at a suitable place in the system. • Potential root penetration is a serious problem and requires special preventive practices: ° Decreasing the pH of the water regularly can be beneficial, but the soil should be monitored periodically to prevent toxicity in the root zone. ° Drippers that close automatically under low pressure conditions are more resistant to root penetration. ° Shock dosages of chlorine can be applied after harvesting for a period just long enough to fill all the dripper lines. ° Scheduling should be effected in such a way that plants never experience any water stress. ° Plants such as lettuce, asparagus and sweet potato create more problems with root penetration. ° Shallow positioning of dripper lines (5 to 7 cm) can also cause more problems. 8.14 Irrigation User’s Manual ° Trefluralin combinations are applied relatively regularly on a four to six months basis to prevent root penetration. • Potential soil penetration, due to vacuum conditions, especially when the system is switched off, is a common problem. The design should therefore make provision for the following preventative measures: ° Anti-vacuum valves should be supplied downstream of all shut-off valves ° Likewise, anti-vacuum valves should be installed at all high points • The installation depth (usually between 0,1 m en 0,3 m) depends on the plant root system and the lateral water distribution capacity of the soil. Water distribution can be improved by implementing the following practices: ° Use drippers with a low discharge (2 l/h). ° Plant nutrients containing calcium and nitrates instead of sodium and ammonia can improve water distribution. ° Apply pulse irrigation. • In the USA it has been found that the discharge of pressure sensitive drippers decreases with 10% to 20%. Sufficient provision should be made for this in the design of system capacity. 2.3.3.2 The Martinez approach This concept, which is radically different from conventional drip irrigation practices, was developed quite recently in Spain for the irrigation of citrus orchards. The basic consideration was derived from the philosophy that ideal conditions for the absorption of water and plant nutrients on a daily cycle need to be provided to a volume of as little as 120 l to the feeding roots of the tree. This means that the full crop water requirement is applied during the active transpiration period every day. Remarkable success has been achieved thus far, especially regarding marketable quality. The concept has been implemented in a number of countries. Research is currently under way locally, and it is therefore appropriate to take note of design techniques which are unique to this concept: • Trees are planted with initially only one emitter each. As demand increases, the original emitter is either replaced with a larger one, or a second one is added. Dripper positions in relation to the tree are also adjusted during the early developmental stages. This means that the hydraulic design, especially for soils with steep slopes, cannot be finalised from the outset with pressure sensitive emitters because of tolerance limitations. Pressure compensating drippers are therefore strongly recommended. • Due to the above-mentioned conditions, it is also basically impossible to make use of a system with emitters that are integral with the laterals, and the use of on-line mounted drippers is also almost unavoidable. • If the use of in-line or internally mounted drippers is considered at all, it should be taken into account that the spacing is absolutely plant-bound. The manufacturing specifications should make thorough provision for this, especially regarding the thermal characteristics of the specific dripper line material. The installation of this type of system can also be very complicated as far as layout is concerned, where one or two emitters have to be provided (maybe moved) and maintained for each tree. • Although the cost of the emitter itself is relatively high in systems with on-line drippers compared to other types, it is partially compensated for by the use of standard polyethylene pipes instead of special dripper lines (refer to Section 3). • The philosophy also requires that plant nutrients are provided with the water on a daily basis. Providing suitable equipment at both the control centre and individual blocks is therefore also a prerequisite. • Automation of the operating and management system will also be virtually unavoidable. Micro-irrigation systems 8.15 2.3.4 Different micros Micros apply the water to the soil through the air. This feature requires that some new factors are to be considered: • There now is a larger wetted soil area, which means that a higher evaporation effect has to be taken into consideration. • Although the discharge rate of micros is significantly higher than those of drippers, the water is distributed over such a large area that it could reduce the application rate to critical levels in terms of the norms for surface evaporation. • The principle of a continuous wetted strip as with drip irrigation is no longer an absolute requirement, but it is mostly maintained with micros due to soil characteristics such as poor lateral water distribution capacity, or potential dangers of alkalinity. • Micros are usually placed on-line to laterals and are therefore extremely vulnerable to damage as a result of normal movement of implements and people. Sensible strategic positioning can therefore in some cases enjoy higher priority than technically correct, theoretical emitter intervals. • Evaporation losses between the emitter and the soil are higher than with drip, and can reach excessive levels if a poor selection in the type of spreader was made, or at excessive operating pressures. It is important to select the micro within its specified operating pressure range. At excessive pressure levels, misting will generally occur, resulting in high evaporation and increased losses due to wind action. At low pressure levels micros with rotating spreaders are inclined to distribute most of the water in a circular shape on the periphery of the wetted area. Relatively even water distribution is important where nutrients are applied through the system. Where wetting pattern graphs are not available to simplify the selection, test lines will have to be laid out for this purpose. To further simplify the installation of and calculations for orchards, it may be good practice to keep the emitter and plant spacings identical, while keeping the norm in mind. Distinctions can be made between various emitter types, as discussed below. 2.3.4.1 Micros with fixed or static spreaders As indicated by the name, these emitters have no moving components (refer to Section 2.2.3.5). The water jet from the nozzle is distributed according to the type of spreader and may vary considerably in pattern and stream break-up features. In case of poor selection, stream break-up can also be a function of operating pressure. Typical micros in this category have the following characteristics and limitations: • Effective wetted radius at 10 m to 15 m operating pressure: 1,5 m to about 2,5 m • Maximum spacing for strip wetting about 3 m • No mechanical wear - low maintenance cost • Relatively high break-up features - fairly sensitive to wind • Stream type spreaders are less sensitive to wind, but more dependant on the lateral water distribution properties of the soil • Available with spreaders which cover angles smaller than 360°, therefore more versatile 8.16 Irrigation User’s Manual 2.3.4.2 Micros with rotating spreaders (rotators) With this concept the water is deflected by rotating spreaders in a wide variety of shapes and patterns (refer to Section 2.2.3.5), each designed for specific results. Characteristics and limitations of typical rotators can be summarised as follows: • With this concept the stream break-up takes place in such a way that droplet sizes are generally larger and less wind sensitive. However, excessive pressure should be avoided. • The effective wetted radius can basically be divided into two categories. ° Wide-strip rotators distribute the water at lower application rates (take applicable norms into account when selecting), with a wetted radius of about 4,0 m. Moderate wind sensitivity may still occur. Maximum spacing for strip wetting can therefore be as much as 4,5 m or more, depending on soil characteristics. ° On the other hand, narrow-strip rotators distribute the water at a higher application rate, with droplet sizes which are less sensitive to wind. With a maximum wetted radius of about 1,5 m to 2,0 m, the maximum spacing for strip wetting will be about 2,5 m. These micros are ideal for orchards which have been established on ridges, as well as crops with narrower rows, such as vineyards. • Rotating spreaders are subject to mechanical wear and therefore generally require higher maintenance costs. • Due to the nature of its construction, the rotating spreader can only cover full circles. • Many manufacturers fit their products with insect proof features. Under no-pressure conditions the spreader blocks the outlet of the nozzle in such a way that insects cannot intrude from the outside. 3 Laterals The approach to laterals differs basically according to the positioning of the emitters. 3.1 On-line mounted emitters All micro sprayers, as well as all drippers that are not mounted in-line or internally, fall under this group. The big advantage of this concept is that standard polyethylene pipes can be used for the laterals. The higher costs of on-line emitters are therefore subsidised to a certain extent by the lower cost of the pipe. A further advantage is that the designer has a large variety of diameters at his disposal, which allows for more versatility, enabling him to easily conform to tolerance requirements. 3.2 In-line and internally mounted emitters This group includes all types of dripper lines with drippers mounted during the manufacturing process as an integral part of the product. The method of manufacturing, the physical characteristics of the different raw materials involved, as well as the size norms of the countries where most of these emitters were originally developed, contribute to the fact that dripper lines generally do not comply with any recognised local standards, dimensions or norms. Some general guidelines can be summarised as follows: Micro-irrigation systems 8.17 • Diameter and wall thickness The extremely high cost involved in the manufacturing of injection moulds which would render products of the required quality and standard, limits diameters to only a few standard sizes. This means that a limited range of lateral diameters are available to the designer, with resulting limitations on versatility. Most dripper lines have a diameter of 12 mm or 16 mm, with varying wall thicknesses (which naturally have a big influence on the cost structure), which depend on operational variables (longterm, no handling; portable or removable) ease of handling (portable or capable of being coiled) and expected or required lifespan (‘permanent’ in the case of permanent crops, or destructible on a seasonal basis, as with certain types of vegetables where recovery is difficult, especially with underground location). Some larger diameters (17 mm and 20 mm) are available for extreme conditions, but the cost aspect restricts their popularity. Dripper lines with drippers mounted integrally with the wall of the pipe are usually available with various wall thicknesses for different applications. • Material composition Most manufacturers of dripper lines use linear low density polyethylene (LLDPE) as basis (varying in composition) to give the pipe more elasticity, to allow drippers to be fitted without the danger of breaking down the molecular structure of the pipe material, which usually goes hand-inhand with stress cracking of the pipe. Some also use other polymeres for this purpose. These raw materials are inevitably more expensive than standard LDPE, and likewise the process which incorporates the drippers as part of the dripper line. On the contrary, the drippers themselves are mostly less expensive than the on-line equivalent, and the labour (usually manual labour) involved in the mounting process is also eliminated in this process. The cost involved in the laterals is therefore inseparably tied to emitter and labour costs. 4 Filtration Irrigation water is filtered to make it suitable for application by means of drippers and micros. The physical quality of the water is therefore improved by removing harmful components, such as sand, silt, clay and organic matter, where these occur in extent and concentration which could result in immediate or gradual blocking of emitters. The degree and type of filtering is determined by the type of irrigation system and emitter involved, as well as the physical quality of the water. Filtration cannot improve the chemical or biological quality of irrigation water, because that is only possible by means of chemical treatment as recommended by experts (Section 9.1). 4.1 Pre-filtering and treatment In some cases it may be necessary to pre-treat the chemical, biological or physical condition of irrigation water and to employ pre-filtering before the water is finally filtered to the required degree by the system filters. 4.1.1 Settling and aeration In cases where irrigation water has more solids than 100 ppm in suspension, it is advisable to settle the solids in a dam before it is filtered through the system. If the specific density of these materials is very low, it may even be necessary to flocculate it chemically before settling will be practically possible. Settling can prevent the filters from being overloaded and from unduly being backwashed. Important considerations for a settling dam include the following: 8.18 Irrigation User’s Manual • • • • • Water should be extracted as far away as possible from the inlet Back-wash water should be dumped as far away as possible from the extraction point It should be possible to clean the dam with little effort Water should be extracted from the supernatant for filtering A long narrow dam is more effective for settling than a square one Table 8.2: Settling velocity of soil particles of different sizes Soil texture Granule size [ mm ] Settling velocity [ m/min ] Course sand > 0,5 38 Medium sand 0,25 - 0,5 22 Fine sand 0,1 - 0,25 5 Very fine sand 0,05 - 0,1 0,9 Silt 0,002 - 0,05 0,015 Clay < 0,00 2 0,000 6 When free iron occurs in the water, it is essential to aerate the water to allow oxidation of the iron. For best results, it is also advisable to flocculate iron oxide during the settling process. 4.1.2 Sand separators Sand separators are installed for removing the sand from irrigation water by means of centrifugal action. It is important to note that sand separators cannot merely be purchased, as the flow velocity through the separator must be adapted to the particle size of the sediment. Coarse sand is removed effectively at a lower flow velocity than in the case of silt. Where sand is a problem and the impeller and sump of the pump wears excessively as a result thereof, sand separators can be installed on the suction side of the pump to remove sand before it enters the pump. Although there are benefits to the installation of the sand separator on the suction side of the pump, careful attention must be given to some features of such an installation: • The sand separator can protect the pump removing sand that causes wear from the water. • Any equipment installed on the suction side of the pump increases the possibility of air intrusion and the resulting cavitation, which can eventually cause more damage to the pump than the sand. • To be really effective, some sand separators absorb as much as 7,6 m pressure. If the pressure loss is smaller than 3,4 m, the centrifugal power will be insufficient to remove the impurities. • For effective function of the sand separator, the flow rate through the system must be kept almost constant, which is seldom the case. Micro-irrigation systems 8.19 Figure 8.9: Two types of sand separators (Burt & Styles, 1994). 4.2 Filter types The need to filter irrigation water originated with the development of the micro-irrigation concept in Israel. Initially, mesh filters were used, but the need to filter very dirty water, especially outside Israel, led to the development of more efficient filters which could also handle much higher flow rates. The different types of filters which are currently used in South Africa consist of the following. 4.2.1 Mesh filters Mesh filters consist of a permeable membrane which is usually located inside a supporting, cylindrical core. The mesh is usually manufactured of stainless steel or a nylon compound. The filtering qualities are determined by the size of the mesh openings, the total mesh area and the facility for cleaning the mesh during regular maintenance operations. A typical construction is illustrated in Figure 8.10. Mesh filters are suitable for filtering water of good quality in which sand and silt occurs. Algae can however block the openings of a mesh filter. Standard filter ratings Micron 300 mm 0,3 Mesh 50 250 0,25 60 200 0,2 75 130 0,13 120 100 0,1 155 80 0,08 200 Figure 8.10: Mesh filters and mesh identification 8.20 Irrigation User’s Manual 4.2.2 Disc filters Disc filters offer a three-dimensional filter action, and therefore have a much higher capacity compared to mesh filters of the same basic dimensions. The filter medium consists of a number of grooved circular plastic discs which are stacked in cylindrical form, tightly positioned together. Water flows from the outside of the cylinder through the discs to the inside. All foreign matter larger than the permeable openings of the specific grooves is retained by the discs. The dirt is then removed from the discs by flushing with filtered water in the opposite direction through the discs. In some filters the discs can also be loosened from one another, even rotated, during the backwashing action. This results in cleaner discs after backwashing. Figure 8.11 illustrates the flow pattern of a typical disc filter. Figure 8.11: Filtration and backwash action in disc filters Disc- and mesh filters are selected so that the allowable pressure difference over the clean disc/mesh filters is ≤ 10 kPa. Table 8.3 shows the allowable pressure difference over disc/mesh filter banks. Table 8.3: Guidelines for maximum allowable pressure drop over disc- / mesh filter banks Allowable pressure Allowable pressure drop over Clean disc / mesh filter build up over filter filter bank before backwashing bank (kPa) bank (kPa) (kPa) ≤ 30 ≤ 40 ≤ 70 4.2.3 Sand filters Sand filters also offer a three-dimensional filtering action. Its particularly large medium area means that the total capacity of the sand filter is much higher than that of other types. It also has a finer filter action, which makes it very popular in drip systems. Most manufacturers specify a sand with a wide spectrum of granular sizes capable of removing particles down to 80 microns from the water. The medium area is the determining factor for calculating the filter capacity. The theoretical maximum filter capacity of a "0,8" mm sand is 50 m3/h per square metre sand surface. However, there are two major reasons why it is not advisable to use sand filters maximally : Micro-irrigation systems 8.21 • The lower the flow rate during filtration, the better the result • At the same time, the backwashing intervals increase in inverse proportion to the decline in utilisation It has been determined in practice that the best backwashing rates of sand filters should be identical to or slightly lower than the maximum filtration rate. Although sand filters require little maintenance, it is important that the filters are backwashed regularly to prevent excessive accumulation of dirt. This could screen off the sand surface, and consequently be forced through the sand due to the increased pressure difference, resulting in a process known as funnelling. It is also recommended that the sand is replaced on a regular basis, but at least once a year. Sand filters are at all times operated in conjunction with secondary disc or mesh filters. There are two reasons for this: • Under normal circumstances, the secondary filter serves as a check on the performance of the sand filter. During incidental funnelling, the material will move through the sand and will be intercepted by the secondary filter. This condition serves as a warning to the operator that the sand filter needs to be serviced. • If the sand filter was damaged internally, the filter sand will be intercepted by the secondary filter and will not land up in the emitters. The shape and function of typical sand filters are illustrated in Figure 8.12. Figure 8.12: Filtration and backwash action in sand filters (Burt & Styles,1994) Sandfilters are selected so that the allowable pressure difference over the clean filters is ≤ 10 kPa and the flow rate limitation of ≤ 50 m3/h per m2 sand surface. Table 8.4 shows the allowable pressure difference over sandfilter banks. Table 8.4: Guidelines for maximum allowable pressure drop over sandfilter banks Allowable pressure Allowable pressure drop over Clean sandfilter bank (kPa) build up over filter filter bank before backwashing bank (kPa) (kPa) ≤ 40 ≤ 20 ≤ 60 8.22 Irrigation User’s Manual 4.3 Selection of filter type The type of filter to be used, and the level of filtration which is to be handled by the filter medium, are closely related to both the type of system which is to be served and the degree of dirt in the water. Because dripper blockages are difficult to see, and can only be repaired by replacement, drip irrigation in general requires a higher degree of filtration. 4.3.1 Drip systems Sand filters, fitted with secondary filters, are recommended for drip irrigation with ‘normal’ stored or running water. Because mesh filters are basically not back-washable, disc filters are recommended for this purpose. In cases where clean water, such as most water found in boreholes, is used for irrigation, the use of disc filters is usually adequate. The filtration level will be fine enough and the only limitation will be the length of the back-wash cycle. 4.3.2 Micro systems The use of disc filters is usually adequate for micro systems. The fineness of disc filtration should be smaller than 1/5 of the discharge orifice of the micros in the system. Water with abnormally high concentrations of algae usually blocks disc filters at such a high rate that the use of sand filters is unavoidable in such cases. 4.4 Selection of filter size or filter capacity The size and/or the number of filters required for a system depend on the following factors: • The number of filters of specific size required is a function of the total flow in the system and the maximum recommended flow through each filter • The maximum recommended flow is restricted by the amount of dirt present in the water • The minimum back-wash or cleaning cycle will also restrict the flow rate 4.4.1 Maximum flow rate The higher the flow rate through a filter, the higher pressure loss over the filter. Pressure losses should be limited because of physical and economical reasons. The total pressure loss over a clean filter at the maximum allowable flow rate should not exceed 10 kPa. This guideline, however, is not rigid, but can be adapted according to relevant system factors. Excessive pressure losses may adversely affect the filtration efficiency and may even damage the medium. 4.4.2 Dirtiness of the water An adaptation in the recommended flow rate of filter is necessary if the silt load of the irrigation water is abnormally high, e.g. the recommended directive for the maximum flow rate of sand filters of < 50 m³/h per m² sand surface can be reduced for the Orange river with its heavy silt load to 30 – 35 m³/h per m² sand surface. The dirtiness of irrigation water is measured, for filtration purposes, with a special but simple apparatus, called the dirt index meter. The dirt index (DI) is measured and expressed as a percentage. For more information on the relevant apparatus, the ARC-Institute for Agricultural Engineering in Silverton may be contacted. The interpretation of DI can be illustrated as follows: Micro-irrigation systems 8.23 Table 8.5 : Classification of the dirt index figures for irrigation water Dirt index (DI) [% ] Classification <1 Clean >1 Dirty Approximately 5 Fairly dirty: blockage of most filters within a few days Approximately 30 Very dirty: blockage of most filters within a few hours Approximately 60 Extremely dirty: blockage of most filters within a few minutes 4.3.3 Cleaning cycle During the filtration process there is an increase in the total pressure loss over the filter due to blockage. The pressure loss over a typical filter is illustrated in Figure 8.13 . Figure 8.13: Typical blockage graph of filter From this, it is clear that an increase in the allowable pressure loss over a filter will result in an increase in the capacity: • An increase of about 1,5 to 2,0 m in sand filters may cause funnelling, with resulting penetration of dirt. • With disc and mesh filters, excessive pressure losses may cause the dirt to be forced through the medium, and decrease efficiency in that way. • In some filters, especially mesh filters which filtrate from the outside of the core to the inside, the entire element may collapse if the pressure loss is excessive. In this case a large concentration of dirt (which accumulated on the element) may be released into the system, which may cause serious blockages to the emitters. • Elements, and even sand, which lose their function due to excessive pressure losses, are more difficult to clean, while the efficiency of backwash actions will also decrease. The backwash cycle therefore depends exclusively on the quality of the water. Dirtier water requires shorter backwash cycles, and more and/or larger filters. 8.24 Irrigation User’s Manual 5 Automation Various factors gradually contributed to the increasing demand for automation. • Manual control of systems which resort under the micro-irrigation concept, is hampered by the long working hours and the complicated grouping systems generally encountered in the systems. Management expertise and abilities are therefore under pressure. • Reliable labour is also getting scarcer and more expensive. This leads to inconsistencies which often result in over or under irrigation with the consequential unavoidable damage. • More accurate control over the scheduling of irrigation can bring about moderate and even dramatic increases in both the quantity and quality of the yields, and can therefore contribute to higher profits. • A reliable and accurate control system inevitably creates peace of mind and security with the farmer. • Systems that were designed from the outset with automation as basis, may save enough on capital layout to completely cover the costs of automation. Automation is normally operated according to one of three basic principles, and/or combinations thereof. 5.1 Mechanical/hydraulic Hydraulic valves, combined with water meters, and known as automatic metering valves, are used at the blocks. These valves are each fitted with a mechanical pilot valve. The pilot valves are joined by means of hydraulic sensing tubing filled with water for conveying the signal. The system is usually operated as follows: • At the beginning of the irrigation cycle each valve is set manually, individually and in a specific sequence to the volume of water which should be let out to that block during the relevant cycle. • The system is switched on after all the valves have been set. • Valve Number 1 will pass the pre-determined volume of water, and the pilot valve will automatically close that valve and open the following valve in the cycle. • This process repeats itself up to the last valve. The pilot valve will also close this valve, and the flow-switch will automatically cut off the power to the pump. • The process is repeated in each successive cycle. Micro-irrigation systems Figure 8.14: Peak design data 8.25 8.26 Irrigation User’s Manual Advantages • • • • The control system is totally independent of electric power. Capital investment is relatively low. Control is volumetric and therefore independent of time. No form of interruption will therefore have an effect on the programmed irrigation. The operator (usually the farmer himself) is obliged to reset the hydrometers at blocks, forcing him to inspect the system and the crops themselves. Disadvantages • • • • • The system has to be physically set for each irrigation cycle. Calculation of requirements, as well as resetting of the valves, requires schooled labour. Long lengths of pilot tubing are mechanically vulnerable. Sensing tubing must be located along smooth gradients and be free of air, something which is practically very difficult to achieve. Air in the tubes delays (and often stops) operation. Pilot valves require clean water for effective operation. Any sediment which can harm the mechanical operation of the components will put the whole system out of action. Figure 8.15: Typical mechanical/hydraulic follow-through system 5.2 Electric/hydraulic With this system, operation is generated by means of a time-switch. Time-switches vary between simple single cycle units to types which can repeat fixed inputs several times. The system can be used for any fixed cycle function, such as, for instance, to control irrigation valves or filter backwash valves. The time switch activates an electric relay which can perform one of two functions: • It can activate a hydraulic relay, situated next to the time switch, which in turn relays the instruction to the hydraulic valve at the block by means of hydraulic sensing tubes. The valve can therefore either be opened or closed in this manner. Micro-irrigation systems 8.27 • Alternatively, it can convey an electric signal (usually an impulse) to a remotely situated electric/hydraulic solenoid valve, mounted on a hydraulic valve at the block, by means of an electric conductor. The hydraulic valve is therefore activated by means of electric remote control. Advantages • Hydraulic activation can be eliminated to a large extent by using electric remote control. It reduces problems with installing the hydraulic components. • Control is effected by the operator from a central point. • Capital layout is relatively low. Disadvantages • Electric power is a prerequisite. • Electric conduction from the unit to the blocks is mechanically even more vulnerable than the hydraulic sensing tube. • The system operates on a time and not a volumetric basis. Any disruption in the water supply is therefore ignored by the time-switch of the scheduling system. Even a reduction in the water supply due to (partially) blocked filters will not be noticed by the time-switch. • As with the hydraulic system, a schooled operator is required. • Theft of electrical wire is a threat. • Sensitivity for lightning requires special protection mechanisms. • Record keeping is not possible. Figure 8.16: Keyboard of a typical time-switch 5.3 Computerised systems Computerised irrigation systems can be of great help to the farmer, despite the high capital layout. Modern, high technology equipment can even handle a large part of the decision-making process. 8.28 Irrigation User’s Manual Figure 8.17: Central computer, integrated with field units Inputs of a wide variety of sources are mostly accommodated. • • • Hard, permanently programmed data and characteristics can be pre-installed in the system. Varying system characteristics and irrigation requirements can be keyed in on a continuous basis. Feed-back from monitoring equipment can be interpreted by the computer continuously in an intelligent way, and can be processed to new or amended instructions, which will then be implemented automatically. The entire computer function is currently still mostly conveyed to equipment by means of electric cables. The equipment is activated either electrically or hydraulically. The same cables also convey feed-back from the monitoring equipment. However, cables are vulnerable and also expensive. The more modern technology of radio communication is therefore increasingly employed and developed further for this purpose. Although it is also expensive, it compares well to other methods, especially due to the higher reliability of the concept. 5.3.1 Requirements Some requirements usually expected of computerised equipment, include: • • The technology and operation should not be beyond the farmer’s management skills. It is important that the farmer is evaluated at the outset regarding this aspect. The system should be user-friendly. Except for the initial training given by the suppliers, the farmer has to rely on himself for the continuous operation of the system. Micro-irrigation systems 8.29 Figure 8.18: Typical computerised system: Diagram of outputs and feed-back • • • • • Hardware should be of high quality and able to operate reliably without failure. Locally developed and purpose manufactured equipment (for South African purposes and requirements) should preferably be used. It is important that the computer should be able to receive all relevant inputs from both directions (from the operator as well as the monitoring equipment), and generate and implement the correct outputs accordingly. Control should be effected on a volumetric basis, with a time-based control system. Continuous feed-back of current actions and conditions is especially important. Fault-detection, reporting back, warning and applying emergency measures, are essential characteristics of an effective system. When, for instance, feed-back of ultrahigh flow conditions outside the set parameters is received, the computer should be able to interpret it as a possible pipe burst. The least that can be expected of the system is: ° A warning should immediately be sounded to the operator by means of an audio and/or visual alarm (for instance a siren and/or flashing red light). ° Comprehensive feed-back on all aspects of the problem (location, extent, etc.) should be recorded and shown on the screen. ° The relevant region should automatically be isolated by closing off the necessary valves. ° Irrigation of the following group should automatically commence after identifying the priority situation and reacting on that information. As much decision-making as possible should take place totally automatically from scheduling inputs, both from instrumental feed-back (e.g. climatic data) and manually keyed-in inputs. 8.30 Irrigation Design Manual 5.3.2 Design approach When computer-based irrigation control is considered, a number of important design aspects should be taken into account: • The computer should firstly, and most importantly, suit the farmer. Many sophisticated computers in the field only operate as very expensive time switches because the farmer or operator does not have the required level of expertise and/or management skills. The guilty party almost always is the designer, who neglected to do a need assessment before the design of the system • Similarly, the computer should suit the system design if possible, and not the other way around. This action can be divided into two categories: ° An existing irrigation unit, with an already established infrastructure, limits the designer's options and opportunities for innovative thinking. In such cases, he is usually forced to adapt the computer to the system. Moderate, low-cost modifications to the system should, however, be a consideration at all times, especially where operating costs can be reduced in the long term. ° New systems and/or extensions offer the biggest opportunity to integrate both the system and control unit around the system requirements. It also offers the opportunity to sub-divide the system into smaller units for better control. Subdivision can be done on logistical, geographical or system pressure zone basis, or any other consideration which may benefit from group formation. General: y y y y The irrigation system must be designed hydraulically correct and must operate with the necessary protection. It is unfair to expect from the computer to control a hydraulic irrigation system that was incorrectly designed. Power supply must be constant and “clean”. The use of a UPS (Uninterrupted Power Supply) is of great help. Installation must be neat and orderly, wires must be marked for future reference. Inspection must be done at joints. The computer must be installed in a clean, dry place and not be subjected to fertilizer and water. Advantages: • • • • • • More accurate scheduling management increases earnings. Central control simplifies management functions. Management is continuously informed about all activities. Fault detection features result in automatic and prompt action. Volumetric control to a large extent eliminates scheduling mistakes. Reliable execution of instructions reduces instances of damage and creates peace of mind. Disadvantages: • • • • Relatively high capital layout. Requires high level management and operational expertise. Specialist maintenance services are required periodically. Sensitivity to lightning necessitates special protection mechanisms. Micro-irrigation systems 8.31 6 Installation For effective functioning of any irrigation system, the correct method of installation and flushing of the system is essential, before any irrigation can be started. 6.1 Installation of laterals Install laterals as indicated on the plan, because the system is designed on the plan. Especially where systems are designed before the exact rows have been pegged out, deviations of the plan can easily occur. The laterals and supply lines must be installed in correct lengths of each selected diameter according to the plan in the correct positions. Black polyethylene pipes can be left in the sun for a few days until all the bends are straightened out before placing them in position. Place the micro sprayer lateral on the side of the tree row from where the wind direction is. The micro sprinkler lateral can be buried subsurface or tied to a wire held into a position by stakes 300 mm above ground. If the laterals are buried (±50 mm deep), a standing pipe must be used. This pipe must be held in position with a block or stand. If mechanical tilling is used, it is preferable that the laterals must be suspended on a wire. Prevent as far as possible that any soil or material particles are let into the pipes during installation. When sawing and drilling is done to uPVC pipes, prevent borings from falling in, because it can cause blockage at adopters in the laterals. 6.2 Flushing of irrigation system After the installation has been done, all the components must be flushed before they are connected. First flush the main line for 15 to 20 minutes while all valves to the supply line are closed. Manifolds are then flushed one by one for 5 to 10 minutes before being connected o the laterals. Flush the laterals one by one at high pressure until the water at the ends of the laterals are completely clean. Manifolds must preferably be fitted with flush valves at the ends. Alternatively, the end of every lateral can be bent over, so that it is easy to flush each lateral. 6.3 Filter station Check the pressure before and after the filter station after the system has been flushed. Ensure that the flush water of the filter and fertilizer pump is drained away from the irrigation block. The setting of pressure control valves, adjustment of the backwashing frequency and backwashing duration of the filters are of cardinal importance during installation. Check the filter bank for any leakages at the line connection. 8.32 Irrigation Design Manual Figure 8.19: Installed pressure measuring points at a filter bank 6.4 Irrigation material Treat all screw thread against rust. Use bitumen treated and galvanised pipe where possible. Where corrosion is a problem, use uPVC pipes and accessories. Any surface uPVC pipe must be protected by a coat of water-based paint. Valves, filters and control equipment must preferable be protected with roofing. This will prevent plastic and rubber parts from wear. 7 Evaluation after installation The purpose of the evaluation is to ensure that the system functions as described in the design report and whether the system was installed according to the plan. This type of evaluation procedure must be relatively simple, so that the producer can execute it himself and interpret the results. This evaluation can also be conducted by the producer on an annual basis to identify possible problems in time. The following table described some of the measurements that should be executed if a deviation from the design specifications is noticed. Micro-irrigation systems 8.33 Table 8.6: Proposed basic evaluation procedure to determine whether an irrigation system is correctly installed and functions according to design specifications Action if measurements / Subject / Item Measurement/Evaluation evaluation does not conform to the design specifications Determine the inlet pressure of Contact designer and adjust setInlet pressure of block the blocks with a pressure gauge up schedule if necessary and compare with the required pressured as specified on the peak design form Measure pressure with a pressure If a pressure variation of more Emitter pressure and delivery gauge and measure the delivery than 20% of the design pressure in a container for at least five or a delivery variation of more minutes at the four emitters on than 10% occurs, as specified in the technical report, contact fours corners of the field. the designer. Examine system layout by Re-install according to plan System lay-out measuring the distances between emitters/ laterals, as well as the position of valves with a tape measure. Compare installed pipe diameters with those on the plan. Also take note of the direction of the laterals/emitter lines. If lateral is installed in the wrong direction, then the slope of that lateral is not as per design. designer for Equipment: model and Compare the model/ Contact of faulty manufacturer of the installed replacement manufacturer pump, electric motor, filter and equipment emitters with the specifications as per design report. Schedule of blocks/ movable Compare the blocks / sprinklers Change the blocks / sprinklers sprinklers in simultaneous that are in simultaneous that are in simultaneous operation, with the specification operation, by either opening the operation correct taps or reprogramming as suggested in design report. the irrigation computer. Examine if any leakages occur in Repair leaks General installation the system Examine operation of filters Contact designer for fault Operation of equipment (e.g., pressure loss and detection backwashing action), air and pressure control valves Determine system flow rate by If a flow rate deviation of more System capacity taking the reading from the flow than 10% from the average occurs, as specified in the peak meter/ measuring notch design form, contact the designer. *See Example 8.2 for determining delivery variation. If a complete system evaluation is required, an irrigation professional can be consulted to perform the evaluation as described in the Irrigation Evaluation Manual of the ARC-Institute for Agricultural Engineering. 8.34 Irrigation Design Manual 8 Management Practical recommendations on water application, filtering and pressure control in micro systems are made in this Section. Scheduling of irrigation water is discussed separately in Chapter 12: Irrigation scheduling. 8.1 Water application The correct decision on water application is very important to ensure optimum production and efficient water use. There are a number of recognized techniques that can be used to schedule irrigation effectively. The smaller the effective root depth and readily available water in the soil, the more critical is accurate scheduling to either prevent saturation or leaching. There is no perfect irrigation-scheduling program and it is therefore recommended that a second method of soil water measuring be used for control purposes. Aids in this continuous decisionmaking process must be reliable. Chapter 12: Irrigation scheduling gives a complete description of the available scheduling methods and aids. To determine how many mm of water should be applied with an irrigation system, one of the following methods can be used: • Flow measurement It is advisable to have a flow meter on the main supply pipeline to the irrigation system, so that the water use can be measured over the season. The flow measurement can thus be calculated on a monthly basis to mm/month. Example 8.1: Area under irrigation = Flow measurement per month = Gross application per month = • 5 ha 7 500 m³ 7 500 = 150mm/month 5 × 10 Measuring of emitter delivery The emitter delivery can be measured in the block by collecting the delivery in a measuring cylinder for 5 minutes. Five laterals, distributed in the block are selected and the delivery of five emitters per lateral, distributed on the lateral is measured. The delivery variation can thus be determined by dividing the difference between the maximum and minimum delivery in the block, by the average delivery. By multiplying this by 100, the percentage deviation in delivery can be obtained. A norm of a maximum of 10% variation in delivery between emitters in the block is acceptable. If the delivery variation is >10%, the emitters must be replaced or the system pipe network must be repaired. Micro-irrigation systems 8.35 Figure 8.20: Delivery test of surface drippers Example 8.2: Dripper delivery as collected in a measuring cylinder for 5 minutes (in ml) is as follows: Delivery at specific distances on the laterals (ml/5min) Distance Lateral 1 2 3 4 5 0 L/4 L/2 3L/4 L 200 180 190 200 190 180 190 195 170 190 210 180 170 180 190 190 190 200 195 180 180 200 190 180 195 Convert above delivery in ml/5 min to l/h Delivery at specific distances on the laterals (l/h) Distance Lateral 1 2 3 4 5 0 L/4 L/2 3L/4 L 2,4 2,16 2,28 2,4 2,28 2,16 2,28 2,34 2,04 2,28 2,52 2,16 2,04 2,16 2,28 2,28 2,28 2,4 2,34 2,16 2,16 2,4 2,28 2,16 2,34 Calculate the total measured deliveries = 56,58 l/h Average delivery = 56,58 l/h 25 Maximum measured delivery = 2,52 l/h Minimum measured delivery = 2,04 l/h Percentage delivery variation = 2,52 − 2,04 × 100 = 2,25 = 2,25 l/h 21,3%, which is greater than the 10% norm. To calculate the average gross application per month, the number of emitters per block must be multiplied by the average delivery per emitter to obtain the flow rate per block. This value can then be converted to flow per month by multiplying the above value with the number of hours irrigated per month. The gross application per month can then be determined as explained under Example 8.1. 8.36 Irrigation Design Manual The question sometimes arises of how much water (mm) must theoretically be applied per irrigation. The method of calculation can be described by the following example: Example 8.3: Soil water capacity (10 –100 kPa) Emitter spacing Effective root depth Application efficiency Emitter delivery Lateral spacing Wetted emitter radius = = = = = = = 90 mm/m 2,6 m 0,6 m 85% 52 l/h 5,5 m 1,4 m Suppose the plant requires 5mm/day. Solution: Determine the standing time for a practical cycle length. Available soil reservoir (mm) = Wetted surface (decimal) × effective root depth (m) × soil water capacity (mm/m) = 1,4 × 2 × 0,6 × 90 mm 5,5 = 27,5 mm Maximum gross application Available water reservoir = Application efficiency 27,5 = mm 0,85 = 32 mm = 320 m3 /ha Standing time required for the gross application Maximum gross application (mm) = gross application rate of the system (mm/h) 52 = 32/ h 5,5 × 2,6 = 8,8 hours Theoretical cycle length: Available water reservoir = nett irrigation requirements (mm/day) 27,5 day 5 = 5,5 days = Suppose a practical cycle length of 2× per week is chosen: Standing time for a cycle length of 3,5 days: 3,5 × 8,8 h 5,5 = 5,6 hours = Micro-irrigation systems 8.37 8.2 Filtering The exact stage at which a filter must be cleaned, is usually determined by one of the following: • The allowable reduction of flow in the irrigation system, resulting from the increased resistance against flow in the blocked filter: It causes reduction in the system efficiency. The flow rate in the system can be measured with a flow meter and must not reduce by more than 10%. • The allowable pressure drop over the filter elements: A too great pressure drop over a filter element causes dirt to be forced into the element, which hampers later effective cleaning. The sand filters are therefore cleaned when the total pressure drop of 60 kPa over the filter banks are reached, still considering that the flow rate must not drop by more than 10%. This method lends itself to automation. Table 8.7: Allowable pressure difference over filter banks: • Type Clean filter bank (kPa) Maximum pressure build-up (kPa Pressure difference before backwashing (kPa) Disc / mesh filter 30 40 70 Sand filter 40 20 60 A further method is to limit time lapse between cleanings. First calculating the volume that can be safely filtered and then dividing the figure by the flow rate of the filter, is an easy way of calculating the time lapse. T where T = V = Q = = V Q (8.1) Time lapse (h) Volume that can be filtered (m³) Flow rate through the filter (m³/h) The most convenient method is the latter, but problems can occur if the degree of dirtiness of the water changes. 8.3 Pressure control To ensure that the system irrigates at the design pressure, a constant inlet pressure must be maintained at the block inlet. Control pressure at the irrigation block by either installing a permanent pressure control valve, or setting the pressure with a pressure meter. The pressure control valves can be set for a specific pressure and are then installed on the upstream side to reduce pressure, caused by e.g. gravity. The different valves are dealt with in Chapter 7: Irrigation equipment. Alternatively, pressure meters can be used for setting the pressure at an irrigation block at the required operating pressure. Pressure meters can be installed permanently or portable pressure meters can be used. It is advisable to have reliable pressure meters, preferably the type filled with glycerine and provided with a stopcock, so that the mechanism of the pressure meter is not subjected to pressure fluctuations during the entire duration of irrigation. At least one pressure meter point must be installed at each block. 8.38 Irrigation Design Manual 9 Maintenance Drippers and micro sprinklers are inclined to be extremely sensitive to particles that can cause blockages because the flow path openings of the emitters are very small. Although signs of blockage can be observed during visual inspections, it is virtually impossible to identify the causes of blockage on the inside of the dripper without a water analysis. 9.1 Water quality The quality of the irrigation water determines the measure of blockage. Partial blockage is as much a problem as complete blockage, since it influences the water distribution of the system negatively. It is therefore essential that the water should be analysed to identify possible dangers of blockage. This analysis must be done at the stage that the water quality is at it worst and must be compared to historical figures to monitor any variations in water quality. Table 8.8 indicates the physical, chemical and biological factors that can cause blockage. Table 8.8: Physical, chemical and biological factors that can cause blockages (Bucks et al, 1979) Physical - Inorganic materials Sand (50 - 250µm) Silt (2 - 50µm) Clay (<2µm) - Organic materials Water plants Phytoplankton Algae Water animals Zooplankton Snails Bacteria (0,4-2µm) Plastic pipe cuttings Oil • Chemical - Alkaline heavy metals Cation Calcium Magnesium Iron Manganese Anion Carbonates Hydroxides Silicates Sulphides - Fertilizers Ammonia Iron Copper Zinc Manganese Phosphate Biological - Algae - Bacteria Filament Slime - Microbiological activities Iron Manganese Sulphate Physical A certain amount of the particles in irrigation water can get through the filter and can cause blockage problems in emitters. Very fine particles will mostly remain in suspension and may possibly flocculate out at places where the flow rate is low or when the water turbulence reduces. The most likely place where sedimentation will occur is at the end of laterals. It will result in these emitters to get blocked first. Although a single particle will not necessarily cause blockage, a quantity of particles can form a clump and block emitters. The clump occurs where microbe slime bind suspended solids including algae. Micro-irrigation systems 8.39 Surface level water sources usually contain suspended solids. Organic material such as algae can occur, especially if the water source is rich in nitrate (>10 mg/l). Subsurface water sources usually contain a lot of sand and silt that cause blockages. • Chemical Blockage of emitters caused by the chemical composition of the water is normally the result of a deposit formed resultant from a chemical reaction. The deposits that can give rise to blockages are the following: Calcium and magnesium carbonate: These deposits can occur outside emitter openings as well as inside laterals and can also lead to sedimentation of the upper sand layer of a sand filter. Calcium and magnesium carbonate deposits are usually formed at dripper openings when the water evaporates; at a pH of greater than 8; by the addition of fertilizers such as ammonia that increases the pH of the water; laterals subjected to extreme heat; and in filters where a pressure loss occurs in water that contains carbon dioxide (Rainbird, 1999). The possibility of the forming of deposits can be identified by either a water analysis, or by treating the water sample with household ammonia and examining it after 12 hours for deposits that could have formed or when an acid that has formed on the deposit is dripped and makes a “fizzy” sound. The most general method for treating these deposits is by applying acid (Section 9.2.2.2). Iron and magnesium sulphides: The occurrence of sulphides (>0,5 mg/l) combined with iron or manganese in the irrigation water, can cause blockage problems. This type of blockage occurs especially in borehole water if oxygen is absent. When the sulphides in the irrigation water are high, sulphides can precipitate out on the stainless steel mesh filters. Hydrogen sulphides have a characteristic rotten-egg odour and are found in nature where sulphates are transformed into sulphides. If chlorine is added to water that contains hydrogen sulphide, a sulphur deposit will be formed and cause blockage (Rainbird, 1990). Iron and manganese oxides: Fe2+ appears in solutions and converts to Fe3+ during oxidation and forms a deposit. It occurs mostly in borehole water that is rich in iron / manganese, as well as the addition of phosphoric acid. The flask test as described below can also be done by the addition of chlorine to the water. Depending on the blockage threat, blockages caused by iron and manganese oxides can be solved by the following: aeration, sedimentation, chlorination and filtering (Table 8.13). The oxidation process of manganese takes place much slower than iron and is therefore difficult to remove effectively. Aeration and sedimentation is therefore necessary in most cases. Before any fertilizer is administered, it must be mixed with the irrigation water in a translucent flask (flask test). If the mixture becomes milky within 24 hours or forms a deposit, it is good indication that dripper blockage may occur. This type of fertilizer must then be avoided. It is important to buffer the pH of the water at approximately 6,5 to make effective fertilizer application possible. • Biological Algae growth usually occurs in storage dams rich in nitrites. The identification of the type and the amount of algae that occurs is of little value, because it varies a lot during the irrigation season. Ornamental algae and fibrous algae usually cause blockage of filters (Harding, 2000). A high occurrence of algae can result in a larger filter capacity to be required and cause the backwashing frequency of the filters to increase. Algae can be controlled by the application of chemicals such as copper sulphate (~2 mg/l) or chlorine (Section 9.2.2). Algae needs light to grow, it therefore does not grow in black polyethylene pipes. The algae residue that seep through filters together with clay particles, serves as a food source for bacterial slime. Iron deposits, i.e. the oxidation of Fe2+ to Fe 3+ is also possible if certain bacteria occur in the irrigation water with Fe2+ concentration of greater than 0,2 mg/l.Where fertilizer is applied 8.40 Irrigation Design Manual through the system and where laterals are exposed to the sun, an increase in bacterial slime forming is possible. This slime can block emitters or they can act as bonding agent that binds fine silt and clay particles, which leads to blockage. If a vacuum is created in an irrigation system, bacteria can be sucked in that will lead to slime forming and eventually emitter blockages. The installation of air inlet valves can prevent this. Slime can also be formed if hydrogen sulphide occurring in the irrigation water is oxidised to sulphur by aerobic bacteria (Ford, 1985). Bacterial slime forming can be prevented by chlorination (Section 9.2.2). Blockage material is identified by the colour of the various deposits in the blocked dripper. A carbonate deposit appears white, iron oxides appear rust-coloured and microbiological activities are black. Each type of blockage has a unique solution. A water analysis that indicates the exact nature of the blockage is therefore essential. Chapter 5: Water contains information on sampling and handling requirements for taking samples. The results of the water analysis can be used to quantify the blockage threat for especially dripper systems (Table 8.9). Table 8.9: Water quality norms for quantifying the blockages risk for emitters (Koegelenberg et al, 2002) Blockage risk Cause Low Physical: Suspended solids, e.g. silt, clay and <50 organic material (mg/l) Chemical: pH <7,0 <100 Bicarbonate (mg/l) Calsium <10 <0,1 Manganese (mg/l) <0,2 Iron (mg/l) <500 Total dissolved solids (mg/l) Biological: <10 000 Bacteria (per ml) Conversions: 1dS/m = 100 mS/m = 100 mmhos/m = 1 mmhos/cm = 1 000 µmhos/cm 1 mg/l = 1 ppm equivalent mass = atom mass /loading of ion me/l = mg/l / equivalent mass mmol/l = me/l / loading of ion Sum of cations/anions: me/l = EC (dS/m)×10 High >100 8,0 >200 >50 >1,5 >1,5 >2 000 >50 000 Some suppliers of irrigation systems consider water with an iron-content of >0,8 mg/l in storage dams and borehole water with an iron-content of >0,3 mg/l as a high blockage risk for emitters. Water with a manganese-content of >0,3 mg/l is also considered a blockage risk. These causes are interactive with each other, e.g. the removal of organic material will reduce biological activities. Table 8.10 suggests solutions for the different blockage problems that can be experienced. Micro-irrigation systems 8.41 Table 8.10: Solutions for different types of blockage problems (Koegelenberg, 2002) Solution for different types of blockages Blockage risk Physical Chemical Biological Follow the maintenance schedules of systems (Tables 8.16) and Low filters (Table 8.11). Extraction point of water from storage dams must be lifted with a float. Use sand filters for Chlorinating and acid Chlorinating Between low and high filtering application (Section 9.2.2) (Section 9.2.2) Bicarbonate and calcium: Acid application (Section 9.2.2) iron and manganese: Store water in Combination of aeration sedimentation dam Chlorination and sedimentation dams High before pumping the and/or continuous chlorine (Section 9.2.2) water to the application for at least 2 – 3 irrigation system minutes before water reaches sand filter (Section 9.2.2) 9.2 Water purification methods The water purification methods depend on the type of blockage problem experienced. 9.2.1 Solutions for preventing blockages resulting from physical factors Depending on the degree of the blockage risk, filtering, sedimentation dams or sand separators or a combination of the above is recommended. 9.2.1.1 Filtering Filtering of irrigation water is of cardinal importance for the effective and efficient functioning of all micro irrigation systems. The system’s pressure and flow rate must be controlled so that it complies with the filter manufacturers recommended working area of the specific filter. Exceeding the recommended flow rate can lead to an increase in blockages. The use of a filter at higher than recommended pressures, can lead to the damage of the filter element. Insufficient flushing cycle duration, incorrectly setting of flushing control valves and the use of filters outside their recommended flow range, are the greatest causes of filter blockage. If mesh filters are used, the mesh must be regularly inspected for holes. Regular inspection is the key to success. Table 8.11 shows a maintenance schedule for filters. 8.42 Irrigation Design Manual Table 8.11: Maintenance schedule for filter with manual control* Monitor With each cycle Monthly Annually Inspect for leakages at filters X Monitor pressure difference over X filters Inspect sand level depth (± 350 X mm) and add sand if necessary Service disc filters X Monitor duration of flushing X cycle and reset if necessary Inspect sand particles and filter X elements and replace if necessary Service backwashing and air X valves on filter bank. Check hydraulic and electric X connections *If filter station is automated, the maintenance schedule can be adapted, e.g. the pressure difference over the filters can be verified over a longer period, e.g. weekly. Where aggressive water occurs, metal parts of the filters must receive epoxy treatment. Lubricants extend the lifespan of synthetic rings in filters where metal and rubber parts are in contact. High viscosity silicon products have proved to be the most suitable product for general usage. Lithium grease, but definitely not oil, is very suitable for valve axles and other moving parts. Backwashing can be done on a time or volume or pressure difference basis. The backwashing on a pressure difference basis is recommended, because it takes water quality changes into consideration. • Backwashing cycle of sand filters The theoretical backwashing cycle is the time it takes the filter bank to build up a pressure difference of 4 m under normal conditions (at the beginning). A third of this duration is used as the practical backwashing cycle. The duration can change during the season as the water quality changes. If the water is very clean, backwashing should be done once daily to prevent sedimentation of the sand-bed. Stirring the sand with the hand can elevate sedimentation. It may sometimes be necessary to replace the sand. Bacteria growth on the sand sometimes leads to sedimentation of the sand, resulting in tunnel forming. The bacteria growth can be prevented by means of chemical treatment of the water. A backwashing duration of at least 60 seconds is mostly recommended. It is however good practice to physically backwash the filter and monitoring the time it will take until all the discolouring and alien material disappears from the water. It is also very important to take a sample of the backwashing water with a clean container before the flushing process is completed and to inspect it to ensure that it is clean. Backwashing usually takes place while irrigation continues. It is however beneficial to backwash the system from time to time (bi-weekly), with all blocks closed, so that a greater volume of water can flow through the filters to accomplish a more effective backwashing action. A pressure of ±5 m higher than the normal functioning pressure before the filters during this action is sufficient. The use of air under pressure with a backwashing will aid in the disintegrating of clotted sand. Discolouration of water during the backwashing cycle is normal and indicates the effective functioning of the filters. Micro-irrigation systems 8.43 The backwashing flow rate is very important and must be set to ensure effective backwashing. A too-high flow rate will cause the sand to wash out, while a too low flow rate will prevent impurities from being washed out. • Replacing sand and discs in filters Replace the sand when the measured time to build up a pressure difference of 2 m over the filter bank has reduced with a sixth of the original time. The rule of thumb to replace the sand annually does not have to be followed to the point. It may be necessary to replace the sand more or less regularly. When sand is rubbed between the fingers it must not feel smooth, because this will mean that the sand has been worn down and no longer filters effectively. When replacing sand, sand particles must be angular and not round. Particle sizes that vary from 0,71 mm to 1,85 mm are recommended. When replacing the sand in the filter, it is essential to half-fill the filter with water before filling it with sand to prevent damage to the roses or fingers in the filter. The water forms a cushion and protects the internal parts. Sand filters normally have a sand depth of ±350 mm. A layer is sometimes formed on the sand that becomes dirty or blocked and even causes sedimentation. It is not necessary to remove all the sand from the filter. The layer can be scraped off and removed and the correct amount of sand can be replaced. It is usually as a result of a low backwashing flow rate or a too long backwashing cycle. Any disc/discs that show signs of mechanical damage should be replaced. Discs with chemically blocked channels must be removed and clean chemically. If the discs cannot be cleaned effectively, they must be replaced. Always replace discs with the same colour and from the same manufacturer to ensure that the degree of filtedisc remains the same. It is strongly recommended that the disc filters should be removed from time to time and be cleaned manually. 9.2.1.2 Sedimentation dam Ensure that algae growth is prevented in sedimentation dams by chlorination. If water seepage through the dam wall is a problem, the necessary maintenance work must be done immediately. Leaves collecting on the water surface or at extraction points must be removed daily. Sedimentation dams are cleaned when the dam no longer functions effectively as sedimentation dam. This can be done as follows: Pump or drain the remaining water from the dam and remove the sediment collected on the bottom. Signs of water that has become excessively dirty and filters of which the backwashing frequency increases are signs that the dam should be cleaned. 9.2.1.3 Sand separators Sand separators require a specific flow rate. Changes in the flow rate can influence the effectiveness of the sand separators negatively and the flow rate must be checked regularly. The dirt collecting in the sand separator’s collection chamber must be removed regularly so that the sand separator does not get blocked. 8.44 Irrigation Design Manual 9.2.2 Chemical water treatment Chemical water treatment is the addition of chemicals to prevent or dissolve deposits or for cleaning of the system. 9.2.2.1 Chlorine application Chlorine is a strong oxidising agent. Chlorine can therefore be used for the oxidation of iron and manganese and for preventing and removing sedimentation from organic materials in an irrigation system. Chlorine is also used for the destruction of bacteria and bacterial slimes (Table 8.12). The recommended chlorine concentration is applied through the irrigation system and the same injection pumps used for the application of fertilizers. The application point must be as close as possible to the system, as residual concentrations are destroyed with time and distance from the application point. If chlorine is however applied to precipitate iron and manganese, it is preferable to administer the chlorine before the filter so that the iron/manganese in the filter can precipitate to prevent blockage in the emitters. Before chlorinating, the laterals must be flushed clean to remove dirt. Chlorine can be added continuously or periodically. Recommended concentrations are given in Table 8.12. The effectiveness of chlorinating depends on the contact time and the pH of the water. Periodic application of chlorine usually takes place during the last 30 to 60 minutes of irrigation. Avoid chlorine concentration of more than 100 mg/l since this can possibly damage dripper diaphragms. After irrigation, the free residual chlorine in the water that remains in the pipes will suppress undesirable microbiological activities. The laterals must then be flushed thoroughly before the next irrigation cycle. The free residual chlorine at the end of the system is an indication that the oxidation process is completed and should be 1-3 mg/l (Table 8.12). Chlorine is also the most effective at a pH of approximately 6,5 and the irrigation water must be acidified if necessary. The acid is applied to reduce the pH of the water to 2-4 for 1020 minutes and then applying the chlorine. Table 8.12: recommended chlorine concentrations (Netafim, 1998) Recommended concentration Purpose of Chlorination method (mg/l) at: chlorination Injection point End point Prevention of sedimentation Continuous 3-5 >1 Periodically 10 >3 Cleansing of system of bacterial slimes Continuous 5-10 >3 Periodically 15 >5 When the purpose of chlorination is to improve the filtering ability of the sand, chlorine must be applied before the filter bank. For continuous chlorination, the chlorine concentrations downstream of the filter bank must not be less than 1 to 2 mg/l and for periodic chlorination, the figure is 3 to 6 mg/l. Free chlorine is easy to measure with a DPD chlorine test apparatus. Total chlorine is the sum of the free chlorine and other chlorine compounds, but is of no value for water treatment of dripper systems. The type of chlorine used, depends on the amount required, cost and availability of chlorine and equipment. Chlorine is available in the following forms: Micro-irrigation systems • 8.45 Chlorine gas Chlorine gas is supplied in 50 kg gas bottles. An adjustable regulator controls the flow of the gas from the bottle. The device for the application of chlorine gas is relatively expensive, although chlorine gas is the cheapest source of chlorine. Special safety precautions must be taken during the administering of the gas because chlorine gas is very dangerous. The following equations are used to calculate the amount of chlorine gas to be applied: (Most gas flow meters read in kg/day) IT = 0,024 QK where IT Q K = = = (8.2) injection rate of chlorine solution (kg/day) flow rate of the system (m³/h) required concentration (mg/l) Example 8.4: The producer wants to apply chlorine gas daily at a concentrate of 3 mg/l. The flow rate of the system is 295 m³/h. Solution: From Equation 8.2: 0,024 × 295 × 3 kg/day 21,24 kg/day IT = = • Liquid sodium hypochloride This product is supplied in 20 litre plastic canisters and is expensive. The effective concentration chlorine is approximately 12%. Do not store the liquid hypochloride in sunlight, because the 10% concentration solution can lose 20 to 50% of the useable chloride. Tanks used for fertilizer application must be cleaned thoroughly and preferable painted before it is used for storage of sodium hypochloride. This will prevent the build-up of heat. The following equation is used for calculating the amount of sodium hypochloride: IT = where IT Q K P = = = = 0,1 QK P (8.3) injection rate of chlorine solution (l/h) flow rate of the system (m³/h) required concentration (mg/l) percentage active chlorine in solution (%) 8.46 Irrigation Design Manual Example 8.5: The flow rate of a block is 50 m³/h and the required concentration of the application is 6 mg/l. Sodium hypochlorite that contains 12% chlorine, will be applied.. Solution: From Equation 8.3 IT = = • 0,1 × 50 × 6 l/h 12 2,5 liter/hour Calcium hypochloride (e.g. HTH chlorine) The HTH chlorine is supplied in granular form and the effective concentration is 75%. Maximum active concentration HTH of 4% is recommended to prevent sedimentation. Equation 8.3 is also used to determine the injection rate of the chlorine solution. Example 8.6: HTH chlorine is used with an effective chlorine concentration of 75%. Percentage active chlorine solution required is 1%. To obtain a concentration of 1% chlorine solution, dissolve 400 gram HTH in 30 litres of water. The flow rate of the block is 50 m³/h and an application of 6 mg/l is required. Determine the injection rate. Answer: From Equation 8.3 0,1 × 50 × 6 = IT l/h 1 = 30 liter/hour Table 8.13: Comparison of different chlorine forms (Rainbird, 1990) Chlorine source Amount required for Amount required per 1 000 m³ application of 500 g Cl2 water to apply 1 mg/l Calcium hypochloride 65% chlorine 769 g 1 538 g 70% chlorine 714 g 1 429 g Sodium hypochloride 20 l 10 l 5% chloor 10% chloor 10 l 5l 15% chloor 6,67 l 3,3 l Chlorine gas 500 g 1 kg 9.2.2.2 Acid application The presence of high concentrations of calcium, magnesium and bicarbonate in irrigation water, is usually an indication that carbonate deposits in irrigation water can form (Table 8.9). Acid application is necessary for dissolving these deposits. By maintaining a pH value of < 5,5, the oxidation of iron, i.e. the iron deposits can be prevented. Corrosion of the irrigation material can however accelerate. Find out from the manufacturers whether the material in the apparatus is suitable for acid application. Acid solutions (low pH) can also corrode irrigation system fittings if it is manufactured from steel and aluminium. uPVC and polyethylene fittings are recommended in these cases. Do not use phosphoric acid for a high pH, calcium or bicarbonate water (Netafim, 2000). The injection points must be designed for applying the acid solution in the centre of the Micro-irrigation systems 8.47 pipeline in order to blend the water and acid sufficiently, preferably after the filter. The recommended acid solution is usually applied for an hour, after which the system is flushed with clean water. In most cases, hydrochloric acid is used, as it is less dangerous. The following acid concentrations are recommended: Table 8.14: Recommended acid concentration (Netafim, 1998) Maximum percentage Type of acid Concentration of product acid in water (%) available on market (%) 0,6 Hydrochloric acid (HCL) 33 - 35 0,6 Sulphuric acid (H2SO4) 70 0,6 Nitric acid (HNO3) 60 0,6 Phosphoric acid (H3PO4) 85 If the percentage of the acid differs from the above values, the maximum acid percentage must be adjusted. If the available sulphuric acid concentrations are e.g. 98%, the maximum percentage acid in the water must be adapted to 0,4% ( 70 × 0,6). Specialists 80 recommend that a laboratory test should be done on the irrigation water to determine the amount of water necessary to reduce the pH of the water to a specific level. A titration curve is unique for each water source and type of acid applied. A titration curve also changes during the year as the water quality changes. A simple way of determining the amount of acid needed is to fill a 200-litre drum with the irrigation water and adding small amounts of the acid solution until the required pH is reached. Netafim (2000) recommends the following practical directives for acid treatment: • Connect the fertilizer injection pump at the block that must be treated and get the system to operating pressure. • Switch on the injection pump at full capacity with clean water and determine the volume of water that is applied within 10 minutes (application volume). Test again by placing the same volume of water in a container to ensure that it is the correct volume in the 10 minutes. • Apply the acid • After applying the acid, flush clean water through the injection pump to rinse out the acid. • Irrigate for a further hour after the acid is applied. This will ensure that the pH of the root zone will return to the value before treatment. • Flush the system. (Only one or two dripper laterals at a time must be flushed, or the flow velocity will reduce to <0,4 m/s and the rinsing process becomes ineffective). NB! • Do not store chlorine and acid in the same place • Do not add water to chlorine or acid • Do not mix chlorine and insecticides/herbicides – chlorine weakens the organic compound of the other chemicals • The presence of ammonia and urea in the irrigation water will reduce the effectiveness of the chorine • Do not mix chlorine and fertilizer. This will lead to an explosion – clean the mixing tank before chorine is used • Avoid contact with eyes and skin; wear protective clothing and eyeglasses to protect the eyes when using chlorine • Do not inhale gasses (chlorine or acid) 8.48 Irrigation Design Manual Example 8.7 The system’s flow rate is 10 l/s. It has been established with a 200 l drum that 20 ml of acid is required to reduce the pH to 4,0. An injector pump with delivery of 100 l/h is used to apply the concentration acid solution within 10 minutes into the system. Determine the injection rate of applying the concentrated acid and the amount of acid required: Solution: Required acid concentration: 20 = 0,01% 200 The injection rate of the concentrated acid in the system is: 10 × 3 600 × 0,01 = 3,6 l/h 100 ∴The amount of acid required for application over a ten-minute period = 3,6 × 10 = 0,6 l 60 Volume of container required: 100 × 10 =16,7 l 60 9.2.2.3 Other methods Various other treatment are available in South Africa but must be used with discretion. It is important to find out beforehand what the exact function of these treatments are before they are used. 9.2.2.4 Specific blockage problems with solutions Specialists in the field of water treatment for micro systems recommend different solutions for blockage problems. Table 8.15 is a typical example of possible solutions for blockages. It is recommended that the producer Table 8.15: Specific blockage problems with solutions (Hanson et al, 1992) Problem Solution Carbonate deposit (whitish colour) • Continuous acid application – maintain pH of 5 – 7 HCO3 > 2 me/l • Shock acid application at end of pH > 7,5 irrigation cycle – maintain pH of 4 for 30 – 60 minutes. Iron deposits (reddish colour) • Aeration to oxidize iron (especially Iron concentration > 0,1 ppm suited to high iron concentration of 10 ppm of more. • Acid application to promote iron deposits - injection rate of 1 ppm chlorine per 0,7 ppm iron. - Application before filter so that deposits are retained. • Lower pH to # 4 by daily acid applications for 30 – 60 minutes to dissolve iron deposits. Manganese deposit (black colour) • Application of 1 ppm chlorine per 1,3 Mananese concentration > 0,1 ppm ppm manganese, before filter. Iron bacteria (reddish slime) • Application of 1 ppm chlorine (free Iron concentration > 0,1 ppm clorine available) continuously or 10 – 20 ppm for 0 – 60 minutes as required. Sulphur bacteria (white cotton-like • Continuous application of chlorine at 1 slime) ppm per 4 – 8 ppm sulphur hydroxide. Micro-irrigation systems 8.49 Problem Sulphide concentration > 0,1 ppm Solution • Application of chlorine as required until 1 ppm free chlorine is available for 30 – 60 minutes. Algae, slime • Application of chlorine at a continuous rate of 0,5 – 1 ppm or 20 ppm for 20 minutes at the end of each irrigation cycle. Iron sulphide (black, sandy material) • Dissolving of iron by continuous acid Iron and sulphide concentration > 0,1 application to reduce pH to between 5 ppm and 7. *The mg/l iron concentration must be multiplied by 0,7 to calculate the kg chlorine required per 1 000 m³ irrigation water. 9.2.3 Biological blockage control Blockage as a result of algae growth in storage dams, bacteria in irrigation water and microbiological activities can be solved by the application of chlorine as described in Section 9.2.2.1. Copper sulphate can be used to control algae in dams at a concentration of 2 mg/l. 9.3 Prevention of root penetration Prevention of root penetration in subsurface drip systems is important. Plant roots tend to grow towards the area with the highest water content, which is near the drippers in a subsurface drip system and the danger of root penetration is therefore evident. To prevent root penetration, the following is recommended: • • • • • Roots are inclined to follow seams in the dripper lines and cause dripper blockages. Fewer problems are encountered with root penetration in drippers that close their outlet openings after irrigation. Drippers installed shallower than 150 mm (especially with cash crops), experience more root penetration problems. Super-chlorinating at 100 to 400 mg/l is also done in the USA, but this must be done after the harvest, for a period just long enough to fill all the dripper lines. Specialists believe that, if scheduling is done correctly and the plants are not under soil water tension, root penetration can be prevented. Plants such as lettuce, asparagus, tomatoes and sweet potatoes give more problems with root penetration than other crops. A herbicide such as e.g. Trifluralin is used in Israel at 0,2 ml/dripper every 3 to 4 months to prevent root penetration. For sandy soils, more regular, but smaller doses are recommended, e.g. 0,1 ml/dripper, six to seven times per year. Ensure that all drippers (especially the furthest drippers) are filled with Trifluralin before the system is switched off. Rinse the application equipment with clean water after application of Trifluralin. (The same equipment used for the application of fertilizer). Trifluralin has not yet been registered in the RSA for this purpose, but is however used with great success. Wait for at least 4 to 8 hours after Trifluralin application before continuing irrigation. Profile holes must be dug regularly to monitor root penetration. It is currently not known how long the effective release of Trifluralin will take through drippers impregnated with Trifluralin. 8.50 Irrigation Design Manual 9.4 Maintenance schedules of micro-irrigation systems The continuous monitoring of the emitter functioning in an irrigation block is very important. It is recommended that a walk should be taken through an irrigation block after each irrigation cycle to clean blocked emitters and mend leakages. Replace emitters with the same make and type if necessary. Ensure that the system irrigates at the design pressure, because a too low pressure will lead to a lower flow velocity in laterals that improves the possibility of the sedimentation of suspended solids. The effectiveness of the flushing of the laterals is also influenced adversely by lower flow velocity. Practices such as cleaning of storage dams and especially the flushing of laterals must be done regularly (Table 8.16). These measures will not necessarily prevent blockage, but will delay it. Flush the laterals one by one, until the water at the end of the lateral is completely clean. If biological and chemical blockage problems are being experienced, the water must be chemically treated (Section 9.2.2). Air pressure is not recommended, because it can influence the emitter delivery rate by a too high pressure through the irrigation pipes. Flush the system with filtered water at the end of the irrigation system. Flush the filters with clean water and drain all the water from the filters. Filter elements and fertilizer equipment that can be removed can be stored during the winter. Roll up the dripper laterals where cash crops were irrigated. This must preferably be done during the coolest time of the day. First disconnect the laterals before starting the rolling process. Roll up one line at a time. Follow the manufacturer’s manual regarding the rolling process. Store the dripper lines on a shelf, out of reach of rodents. Table 8.16 shows a typical maintenance schedule for micro irrigation systems. Table 8.16: Maintenance schedule for micro-irrigation systems (manual control)* With each Monitor Monthly Annually cycle Inspect system for leakages X Check system pressure and flow X rate Flush laterals (depending on the X water quality Service air valves and pressure X control valves Check hydraulic and electrical X connections Check functioning of hydraulic valves on filter bank and inspect X moving parts Chlorine treatment (depending on the water quality and method of X application) Take water sample at end of system and evaluate water quality X changes *The recommended maintenance schedule can be adapted for automatic systems, e.g. system pressure can be monitored monthly. Micro-irrigation systems 8.51 Figure 8.21: Flushing of laterals is important 10 Troubleshooting tables Table 8.17: Troubleshooting table for sand filters Problem Poor filtering Continuous high pressure drop over filters Sand appears downstream in system Backwashing valves leak Increasing frequency of backwashing action Possible causes Too high a flow through the filters causes that sand flushes out or forces dirt through filters to outlet Wrong sand in filters Too high a pressure difference forces dirt through filters and outlet Insufficient sand depth lets dirt through Sand has formed a layer by sedimentation or blockages Insufficient backwashing flow Too little sand, causes poor backwashing Wrong choice of filters Sand is too fine Solution Reduce flow through filter or create additional filter capacity Replace sand Adjust backwashing time Supplement sand Remove affected layer of sand and replace with clean sand Adjust backwashing valve Supplement sand Replace filters Replace with correct type of sand Mechanical damage to discs/rosettes Repair or replace Dirt in valve seat Diaphragm of valve leaks “O-rings” on shaft damaged Backwashing flow or duration is not long enough to clean filter Insufficient sand depth Diminished water quality at source Clean Replace Replace and lubricate Adjust backwashing flow Supplement Create additional filter capacity or reduce flow or pre-filter 8.52 Irrigation Design Manual Problem Automatic backwashing does not take place Sand filter blocked Possible causes Tunnel forming Solution Loosen sand manually or use air for backwashing Electrical supply to control-box is off, fuse melts, contact breaker tripped out. Switch on, check fuse, and repair. Faulty adjustment of pressure difference switch Solenoids faulty System pressure insufficient to activate valves Flow rate through filters too high Adjust Poor chemical treatment Wrong setting of the backwashing valves Wrong choice of filters Test, clean, replace if necessary Check system, especially inlet sieve Reduce flow or enlarge filter bank Treat with chlorine/acid Adjust backwashing time and cycle Replace filters Table 8.19: Trouble shooting table for disc and mesh filters Problem Poor filtering Continuous high pressure drop over filters Backwashing valves leak Increasing frequency of backwashing action Automatic backwashing does not take place Possible causes Wrong filtering fineness of disc/mesh Too few discs Too high pressure difference over filter Holes in mesh O-ring damaged Wrong choice of filters Insufficient backwashing time Dirt in valve seat Diaphragm of valve leaks O-ring on shaft damaged Backwashing flow or duration is not long enough to clean filter Diminished water quality at source Backwashing action of filters insufficient Electricity off in control-box, fuse melted, contact breaker tripped Wrong setting of pressure difference switch Solenoids faulty System pressure insufficient to activate valves Solution Replace discs/ mesh Add discs Adjust backwashing cycle or time Replace mesh Replace O-ring Replace filters Adjust backwashing time Clean Replace Replace and lubricate Adjust backwashing flow Create additional filter capacity or reduce flow or pre-filter Clean by hand Switch on, check fuse and repair Adjust setting Test, clean, replace if necessary Check system, especially inlet sieve Micro-irrigation systems 8.53 11 References 1. Bucks, D.A. and Nakayama, F.S., 1979. Trickle irrigation: Chemical treatment of Colorado River water. ASAE, 2950 Niles Rd, St Joseph. MI, USA. 2. Burt, C. M. and S. W. Styles. 1994. Drip and micro-irrigation for trees, vines and row crops. Irrigation Training and Research Center, California, USA. 3. Ford, H. W. 1985. The problem of Dripper Clogging and Methods for Control. SA Irrigation Journal. October/November. University of Florida. USA. 4. Franson, M. H. 1995. 19th edition. Standard Methods for the examination of water and waste water. Prepared and published jointly by the American Public Health Association, American Water Work Association and Water Environment Federation. 5. Gilbert, R.G. and H.W. Ford. 1986. Operational principles: Emitter clogging in Trickle Irrigation for crop production, eds. F.S Nakayama and D. A. Bucks. Amsterdam: Elsevier. 6. Hanson, B., S. Grattan, T. Prichard and L. Schwankl 1992. Drip irrigation for row crops. University of California, Davis, California, USA. 7. Harding, W. R. 2000. Personal Communication. Aquatic Ecosystem Services. Helderberg. RSA. 8. Heyns, P. J., Burger, J. H., Kleynhans, E. P. J., Koegelenberg, F. H., Lategan, M. T., Mulder, D. J. Smal, H. S., Stimie, C. M., Uys, W. J. and Van der Merwe, F. P. J., Viljoen, P. D 1996. Irrigation Design Manual. ARC-Institute for Agricultural Engineering. RSA. 9. Koegelenberg, F. H, Reinders F.B., van Niekerk, A.S., van Niekerk R. and Uys W.J. 2002. Performance of drip irrigation under field conditions. ARC-Institute for Agricultural Engineering. RSA. 10. Netafim. 1998. Thin-Walled Irrigation Dripperline Installation and Maintenance Manual. Israel. 11. Netafim, 2000. Onderhoud van drupbesproeiingstelsels pamflet. RSA 12. Rain Bird, 1990. Low volume irrigation system maintenance manual. Rain Bird International, Inc. USA.