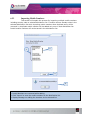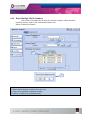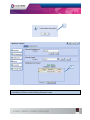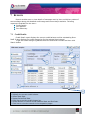
1
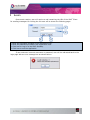
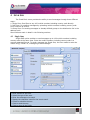
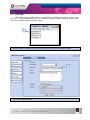
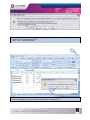
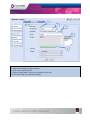
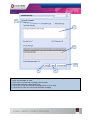
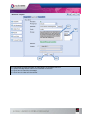
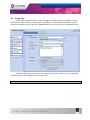
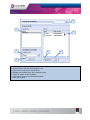
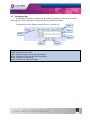
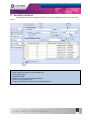
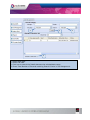
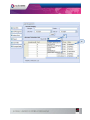
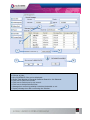
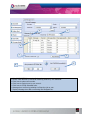
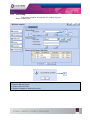
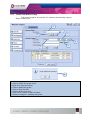
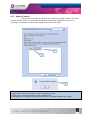
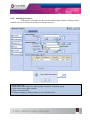
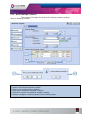
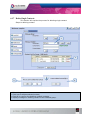
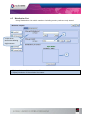
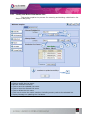
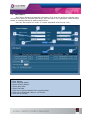
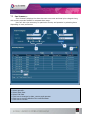
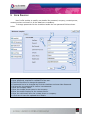
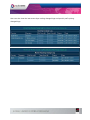
User Manual IndiaPlus Desktop Version 1.0 Contents 1 INTRODUCTION ...................................................................................................................................... 3 2 LOGIN ......................................................................................................................................................... 4 3 WELCOME PAGE ..................................................................................................................................... 5 4 SEND SMS .................................................................................................................................................. 6 4.1 SINGLE SMS: .................................................................................................................................................6 4.2 BULK SMS:....................................................................................................................................................7 4.3 PERSONALIZED BULK SMS: .........................................................................................................................11 4.3.1 Sending Text Message ............................................................................................................................11 4.3.2 Sending Unicode Message .....................................................................................................................13 4.4 GROUP SMS: ...............................................................................................................................................19 4.5 SCHEDULING SMS: ......................................................................................................................................21 5 JOB MANAGEMENT .............................................................................................................................. 22 6 ADDRESS BOOK ..................................................................................................................................... 27 6.1 GROUP MANAGEMENT: ...............................................................................................................................27 6.1.1 Add Group: ............................................................................................................................................28 6.1.2 Modify and Delete Group. .....................................................................................................................29 6.1.3 Import Contacts: ....................................................................................................................................30 6.1.4 Add Single Contact: ...............................................................................................................................31 6.1.5 Edit Contact: ..........................................................................................................................................32 6.1.6 Delete Multiple Contacts: ......................................................................................................................33 6.1.7 Delete Single Contacts: .........................................................................................................................34 6.2 DISTRIBUTION LIST: ....................................................................................................................................35 6.2.1 Add Distribution List: ............................................................................................................................36 6.2.2 Modify and Delete Distribution List: .....................................................................................................37 6.2.3 Importing Mobile Numbers: ..................................................................................................................38 6.2.4 Delete Multiple Mobile Numbers: .........................................................................................................39 6.2.5 Delete Single Mobile Number:...............................................................................................................41 7 REPORTS ................................................................................................................................................. 42 7.1 7.2 7.3 CREDIT DETAILS: ........................................................................................................................................42 SMS REPORT: ..............................................................................................................................................43 SMS SUMMARY: ..........................................................................................................................................44 8 USER PROFILE ....................................................................................................................................... 45 9 COVERAGE DETAILS ........................................................................................................................... 46 1 INTRODUCTION The SMS+ Client is an easy way to send sms to multiple mobile numbers including country code. With just a few clicks user can send sms using the Send Sms option, user can send text or flash or Unicode messages to customers, friends, office employees or relatives from anywhere in the world. User doesn’t require any prior knowledge or special training for using the features provided in SMS+ client. In Send SMS, there are three ways for sending sms as follows: The Single Sms option provides the facility to send sms for up to 100 mobile numbers including country code, Bulk SMS option provides the facility to send sms by uploading text file containing mobile numbers including country code and Group SMS option provides the facility to send sms by adding contacts from groups or distribution list created in Address Book. User is allowed to schedule sending of sms on a particular date and time. The entire scheduled and executing jobs are displayed in Job Management option. SMS+ Client lets the user to create groups and distribution list and manage the contacts using the Address Book option. In Reports, user gets the detailed credit history in Credit Details option. User can view sent sms log in SMS Report option as well as export in comma-separated format (.csv). User can also view sent sms summary in SMS Summary option. Also provides facility to manage User’s details in User Profile and displays detailed coverage information of the user which can be exported in pdf format. Features: World-wide price based routing system. Send text, Unicode and flash messages from PC to mobile numbers. Facility to send sms using multi-language characters (using Unicode messages) Fast Delivery. Reports for viewing detailed information of sent sms. Unlimited storage of contact numbers in Groups and Distribution lists. Accurate DLR Report. User friendly, does not require any prior knowledge to use. 2 LOGIN On account creation, user will receive a mail containing the URL of the SMS+ Client for sending messages. On visiting the link user will be shown the following page:- 1 2 3 1. 2. 3. 4. 4 Enter the username provided in the registration mail. Enter the password provided in the registration mail. Click here to Log–in to the SMS+ Desktop Click here to exit the Application If user enters an incorrect username or password, user will be redirected back to the login page with an error message box as shown below:- 3 WELCOME PAGE 10 1 4 5 6 7 8 9 1. Username who logged into the system. 2. It will redirect user into Login form. 3. It will close the Application. 4. Click to send Single, Bulk and Group Sms. 5. Click here to view the Scheduled sms. 6. Click here to manage the Groups and Distribution lists. 7. Click here to view the Credit Details, Sms Reports and sms Summary. 8. Click here to update the user details. 9. Click here to view Coverage Details. 10. Click here to view User Manual of IndiaPlus Desktop. 2 3 4 SEND SMS The 'Send Sms' menu provides the ability to send messages through three different ways:1. Single Sms. Send Sms to any 100 mobile numbers including country code directly. 2. Bulk Sms. For sending messages by uploading mobile numbers including country code from a text file at a time. 3. Group Sms. For sending messages to already defined groups or the distribution list in the address book. We will discuss each in detail in the following sections. 4.1 Single Sms: Single SMS option enables to send messages up to 100 mobile numbers including country code at the same time. Enter the mobile numbers including country code in a comma separated format. To send a message via Single Sms, the user needs to enter the mobile no(s), sender no, message type and message. 1 2 3 4 5 6 7 1. 2. 3. 4. 5. 6. 7. 8. 8 Mobile numbers including country code should be in comma separated format. Enter sender for the sms. Select the type of the sms. Enter the message to be send. Display the character count for the sms to send. Check to schedule the sms. Click to send the sms. Click to clear all the fields. 4.2 Bulk Sms: Bulk SMS option provides facility to send SMS to multiple users just by selecting text file (.txt) or comma-separated file (.csv) containing mobile numbers including country code in a line separated format as shown below. 1 1. Mobile numbers including country code should be in new line separated format. 1 1. Click here to select the file. 2 3 5 4 2. After selecting a file , a file Filtering window appears. In this Process the File is Filtered according to the valid mobile numbers in the File. 3. Shows Message box after completing filtering of the File. 4. User can cancel the Process of File Filtering in the Middle by clicking cancel button. 5. After canceling the Process a Message box appears showing File Filtering Canceled. 4.3 Personalized Bulk Sms: 4.3.1 Sending Text Message Bulk SMS also provides facility to send personalized SMS by selecting commaseparated (.csv) file in which the mobile numbers including country code must always be the first column followed by the rest of the column, as shown below: 1 1. First column should always be mobile numbers including country code on which sms has to be send. For sending Personalized Bulk SMS check the Personalize checkbox and enter sender, select message type and select the tags to compose the personalized message. Using personalized bulk sms user can send sms to maximum 10000 mobile numbers. 1 2 1. Check here to send personalized bulk sms. 2. Select the tags which have to be inserted in the sms. 4.3.2 Sending Unicode Message Bulk SMS also provides facility to send personalized SMS by selecting Tab-separated (.csv) file in which the mobile numbers including country code must always be the first column followed by the rest of the column, as shown below: Note: Tab-Separated file can be created in any language. Follow the below steps to create a tab-separated file in excel. 1 1. Create a Arabic Tab File to upload which is tab separated. 2 3 4 2. Select “Unicode Text” as type for saving tab separated file & also specify the extension. 3. Click “OK” to continue saving file. 4. Click “Yes” to save the details. 5 6 5. Click here to close the excel file. 6. In the confirmation box click “NO” to save file in correct format. 1 2 3 4 5 1. 2. 3. 4. 5. Check here to send personalized bulk sms. Select the Message Type as Unicode. Click here to select the file. Select the tags which have to be inserted in the sms. Click here to set the Unicode message 6 7 9 10 8 11 6. Check here to send the Message type. 7. Enter the Message to send. 8. Click here to convert the message into Unicode. 9. Converted message is displayed here. 10. Click here to set the Unicode message which is to be sent. 11. Click here to clear the converted Unicode message. 12 13 14 12. 13. 14. 15. 15 Converted Unicode message is appended in a Message text box. Select the tags which have to be inserted in the sms. Click here to send the message. Click here to clear all the values. 4.4 Group Sms: Group SMS provides facility to send message to the specific set of contacts. Group SMS works in same manner as Bulk SMS, only difference is that Group SMS takes mobile numbers including country code from Address Book in the form of Group or Distribution list. 1 Contact numbers can be selected by clicking the Import Contact Link or by selecting a distribution list and clicking the Import List Link. 1. Click here to open the available groups and distribution list of the user 7 1 4 2 3 1. 2. 3. 4. 5. 6. 7. All groups will be listed here. All distribution lists will be displayed here. Click here to import the selected list. Displays all contacts from the selected group. Check to select all the contacts. Click here to import the selected contacts. close the window 5 6 4.5 Scheduling Sms: Scheduling SMS facility provides user to schedule message to send on a particular date and time. All the Send Sms modes provide sms scheduling facility. To Schedule Sms the following step have to be carried out: Step 2 Step 3 Step 1 Step 4 Step 5 Step Step Step Step Step Step 1. 2. 3. 4. 5. 6. Check the Schedule checkbox. Select the Time zone. Select the Date on the pop-up calendar. Select the Time with the Up Down button. Click here to send sms. Click here to clear the values. Step 6 5 JOB MANAGEMENT Job Management option displays details of the jobs uploaded by the user from Send Sms. 1 3 2 5 4 6 7 1. 2. 3. 4. 5. 6. 7. Enter message details to search for a particular job. Enter sender to search for a particular job. Select Start Date. Select End Date. Click here to search the specified Details. Select to view selected Job. Shows Total Number of Records in Job Management. 1 3 4 1. Select Start Date. 2. Select End Date. 3. Click here to search the Details between the selected date range . 4. Shows Total Number of Records matching Search Criteria in Job Management. 2 1 1a 4 2 5 3 6 7 1. Select the Particular Job you want to view. 1a. Shows all jobs. 2. Only SCHEDULED Jobs can be displayed. 3. Shows Total Number of Records matching Search by Job Selected. 4. Click here to select all records. 5. Click here to Select one by one record. 6. Click here to delete Selected Jobs. 7. Message box confirming whether to delete the details or not. 8. Display Message box after confirming the Deletion. 8 3 1 4 2 6 1. 2. 3. 4. 5. 6. 7. Only IN PROCESS Job can be displayed Shows Total Number of Records matching Search by Job Selected. Click here to select all records. Click here to Select one by one record. Click here to STOP Selected Jobs. Message box confirming whether to Stop the job or not. Display Message box after confirming the Stopped Job. 5 7 6 ADDRESS BOOK Address Book provides facility to save mobile numbers including country code. User can add, edit or delete mobile numbers saved in 'Groups'. User can add or delete mobile numbers saved in 'Distribution List'. 6.1 Group Management: Using Groups, user can store mobile number including country code along with name. Duplicate mobile numbers including country code within a group are not allowed. 1 2 1. Display all the available Groups of the user. 2. Display contact numbers of the selected Group. 6.1.1 Add Group: This section explains the process for creating a group. Steps to add group: 1 3 2 4 1. 2. 3. 4. Enter the name of the group which is to be created e.g. Office, Customers etc. Click to add the group. Click to clear the field. Display message on adding the group. 6.1.2 Modify and Delete Group. This section explains the process for renaming and deleting a group. Steps to add group: 3 5 2 4 6 7 1 8 1. 2. 3. 4. 5. 6. 7. 8. Select the group to rename. Click to modify the group name. Enter the new group name. Click to update the group. Click to clear the field. Click to delete the group. Click here to import multiple contacts. Display message on updating the group. 6.1.3 Import Contacts: This section will explain the process for importing multiple contacts. If mobile number already exists in a group while importing contacts then duplicate entry will be removed i.e. duplicate contact will be added only once in that group. 1 2 3 4 1. 2. 3. 4. Enter contacts in new line separated format. Name and number should be in comma separated format Click here to save the contacts to the selected group Message Box will display Specifying the number of contacts added to the group. 6.1.4 Add Single Contact: This section will explain the process for adding single contact. Existing mobile number will not be allowed to be saved in the same group. 1 2 3 4 5 1. 2. 3. 4. 5. Select the group. Enter name and number for adding single contact to a selected group. Click here to save single contact. Click to clear the field. Display message on adding contact to the selected group. 6.1.5 Edit Contact: This section will explain the process for editing contact of the selected group. Steps to editing contacts: 1 3 5 4 6 2 7 1. 2. 3. 4. 5. 6. 7. Select the group. Click here to edit the selected contact. Edit the contact name. Edit the contact number. Click here to update the modified contact. Click to clear the field. Display message on updating contact of the selected group. 6.1.6 Delete Multiple Contacts: This section will explain the process for deleting multiple contacts. Steps to deleting contacts: 1 2 3 5 1. 2. 3. 4. 5. 6. Select the group. Select here to delete selected contact. Select here to select all the contacts. Click here to delete the selected Contacts. Click OK to confirm the deleting multiple contacts. Display message on deleting contact of the selected group. 4 6 6.1.7 Delete Single Contacts: This section will explain the process for deleting single contact. Steps to deleting contact: 1 2 3 1. 2. 3. 4. Select the group. Click here to delete selected contact. Click OK to confirm the deleting multiple contacts. Display message on deleting contact of the selected group. 4 6.2 Distribution List: Using Distribution List mobile numbers including country code are only stored. 1 3. Click OK to confirm the deleting single contacts 2 1. Display all the available List name of the user. 2. Display Numbers of the selected List name. 6.2.1 Add Distribution List: This section explains the process for creating a distribution list. 1 2 3 4 1. 2. 3. 4. Enter List name. E.g. Office Click to Save the Distribution List Click to clear the entered List name Display Message on adding the List Name. 6.2.2 Modify and Delete Distribution List: This section explains the process for renaming and deleting a distribution list. Steps to add group: 3 4 5 1 7 2 8 1. 2. 3. 4. 5. 6. 7. 8. Click to select the Distribution List name Click to modify the List name. Edit the selected List name. Click to save the updated List name. Click to clear the entered List name Click to delete the List name. Click here to enter the mobile numbers including country code to the selected list. Display Message on updating the List Name. 6 6.2.3 Importing Mobile Numbers: This section will explain the process for importing multiple mobile numbers including country code to selected distribution list. If mobile number already exists in the selected distribution list while importing mobile numbers then duplicate entry will be removed i.e. duplicate mobile number will be added only once in that distribution list. Invalid mobile numbers will not be saved in the distribution list. 1 2 3 4 1. 2. 3. 4. Enter numbers in new line format i.e. one below the other. Invalid Numbers are removed while adding. Click ‘Import’ to save the mobile numbers to the distribution list. Display Message on adding the numbers to the selected list. 6.2.4 Delete Multiple Mobile Numbers: This section will explain the process for deleting multiple mobile numbers including country code in the selected distribution list. Steps to deleting contacts: 1 2 3 4 1. 2. 3. 4. Select the distribution list name Select Mobile Number to delete from the List. Click here to delete the selected number. Confirm to delete the selected number. 1 2 1. Display Message on deleting the numbers to the selected list. 2. Distribution Contact List after deleting Selected Contact. 6.2.5 Delete Single Mobile Number: This section will explain the process for deleting single mobile number. 1 2 3 4 1. 2. 3. 4. 5. Select the distribution list name Select Mobile Number to delete from the List. Click here to delete the selected number. Confirm to delete the selected number. Display Message on deleting the numbers to the selected list 5 7 REPORTS Reports enables user to view details of messages sent by User and delivery status of sent messages along with detailed credit usage and current day’s statistics. Following reports are available for the users: Credit Details. Sms Reports. Sms Summary. 7.1 Credit Details: Credit Detail report displays the current credit balance and the outstanding OverDraft. It also displays the credit change log for the selected time interval. To get the credit change log details select the Start and End Date and then click Search button 3 1 4 2 5 6 1. 2. 3. 4. 5. 6. 7. Displays the current Over-Draft credit. Displays the current credit balance. Select Start Date. Display Select End Date. Click here to get the credit change log. Shows Number of records found between Start and End Date. Click here to view the records in the respective pages. 7 7.2 Sms Report: Sms Report displays the detailed information of all sent sms and price charged along with delivery status for selected date range. User can search for a particular mobile number, sender or message details by adding search filters. User can also export sms report in comma-separated value format (.csv). 1 2 3 3 4 6 7 5 8 9 1. 2. 3. 4. 5. 6. 7. 8. 9. Enter Mobile Number. Enter Sender. Enter Message details. Select Delivery Status. Select Start Date. Select End Date Click here to get the details of the specified data. Click here to download report in .csv format Click here to refresh 7.3 Sms Summary: Sms Summary displays the date-wise sent sms count and total price charged along with country-operator details for selected date range. User can also view summary for particular country and operator by selecting them depending on user preference. 1 3 4 2 6 5 1. 2. 3. 4. 5. 6. 7. Select country. Select operator. Select Start Date. Select End Date Click here to arrange by date, country and operator Click here to get the details of the specified data. Click here to refresh 7 8 USER PROFILE User Profile enables to modify user details like password, company, contact person, contact number and email id. All the details are mandatory. To change password click the checkbox beside the new password field as shown below. 1 2 3 4 5 6 7 8 9 10 1. This displays the username for the logged in user. 2. Enter password, required for validation of the user. 3. Click the Check box to change the password. 4. If password has to be changed the click the checkbox and enter New Password. 5. Re-type the new password to confirm new password. 6. Enter the company name. 7. Enter the contact person name in the company. 8. Enter the mobile number for the contact person. 9. Enter the valid email-id for the contact person or company. 10. Click here to save the updated User Details. 9 COVERAGE DETAILS Coverage Details provides the coverage information of the user. User can view the default price, the assigned pricing and the special prefix pricing. 1 3 1. 2. 3. 4. 4 Displays the default price assigned to the user Click here to download Coverage Detail report in pdf format Click here to view the recent assigned routing changed logs Click here to view the recent special prefix routing changed logs 2 User can also view the last seven days routing changed logs and special prefix pricing changed logs.