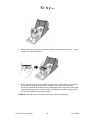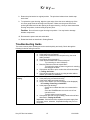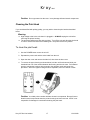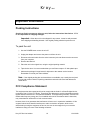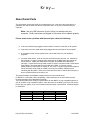
1
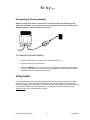
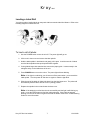
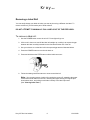
KROY
K227 On Line Labeler
User Manual
Revision Date - 11/16/1999
Kroy
LLC
Getting Started
This chapter explains how to unpack and set up the printer and quickly print a label.
Unpacking
Carefully remove the printer and its components from the box and place them on a flat, sturdy
surface.
Note: Save the box and packing materials for future use in transporting or shipping the unit.
Examine the drawing below to familiarize yourself with the components and to make sure
that none are damaged or missing.
Power
Adaptor
Power Cord
Printer
Printer Software
Kroy 227 On Line Labeler
2
11/16/1999
Kroy
LLC
System Requirements
Before setting up the printer, verify that your personal computer meets the minimum
requirements as follows.
Windows Version
!" IBM PC or 100% compatible computer with an 80486 or higher processor (for most
effective use of the printer, an 80586 or higher processor is highly recommended)
!" RS-232C serial port
!" 16 Megabytes of Random Access Memory (RAM)
!" Hard Disk with 700K of available space
!" Microsoft Windows ’95, ’98, or NT 4.0 in either standard or enhanced mode
!" EGA/VGA display
!" Mouse or other pointing device
Important: If your computer does not meet the above requirements, the printer may not
operate as expected. Check your computer specifications carefully before installing the
printer software.
Kroy 227 On Line Labeler
3
11/16/1999
Kroy
LLC
Setting Up Your Printer
Component Diagram
Use the following diagram to familiarize yourself with the unit’s features and components.
1. Dust Cover
2. Power Light
3.
4.
5.
6.
7.
8.
9.
FEED Button
POWER Button
Label Cutting Bar
Label Spindle
Serial Connection Jack
Power Jack
Print Head Release Lever
10. Paper Guide
Kroy 227 On Line Labeler
Protects internal components of the unit.
Indicates whether the power is on or off.
Lights steadily when the power is on.
Flashes to indicate an error condition.
Manually feeds labels or adjusts label position.
Switches the unit power on and off.
Used to cut off printed labels.
Holds the label roll.
Connects the serial cable to the unit.
Connects the power cord to the unit.
Located inside the unit. When the top housing is
removed, lifts up to release label jams or when
cleaning the print head.
Positions the labels when standard size labels are
used.
4
11/16/1999
Kroy
LLC
Connecting the Unit to Your Computer
The printer is easily connected to your computer using the serial cable provided. Refer to
the following diagram to make the serial cable connection.
To connect the unit to your computer:
1. Turn off the power to your computer and the printer.
2. Insert the telephone-style connector end of the serial cable into the serial connection jack
at the back of the printer.
3. There are two connectors (9-pin and 25-pin) on the serial cable. Choose the one that
matches the serial port on your computer. Plug the correct connector into a serial port
(COM1, COM2, COM3, or COM4) on your computer.
Note: If you are unfamiliar with serial ports, refer to the manual that came with your computer.
Kroy 227 On Line Labeler
5
11/16/1999
Kroy
LLC
Connecting the Power Adapter
Before connecting the unit to a power source, check the voltage and frequency of the
outlet. Non-standard power sources may cause irreparable harm to the unit. Refer to the
following diagram to make the adapter connection.
To connect the power adapter:
1. Plug the power cord into the power jack at the back of the unit.
2. Plug the adapter into a power outlet.
3. Press the POWER button to turn the unit on. If everything has been connected correctly,
the green power light on the front of the printer will light up. The power light will flash to
indicate that there are no labels in the printer.
Using Labels
Your unit employs the latest direct thermal printing technology to provide crisp, high-resolution
printing every time. Since the labels themselves are specially formulated for thermal printing,
ribbons or cartridges are unnecessary. To guarantee best printing quality, we recommend that you
use only KROY labels. Purchase labels from Kroy (888) 888-5769, at the KROY Web Site,
www.kroy.com or your authorized KROY reseller.
Kroy 227 On Line Labeler
6
11/16/1999
Kroy
LLC
Loading a Label Roll
Your printer makes loading labels an easy task with its automatic label feed feature. Refer to the
following diagram to load a label roll.
To load a roll of labels:
1. Use the POWER button to turn the unit off. The power light will go out.
2. Lift the unit’s dust cover and remove the label spindle.
3. Hold the label spindle in both hands and gently pull it apart. Load the new roll of labels
onto the label spindle and snap the spindle back together.
4. If using labels larger than standard size remove the paper guide. It stores neatly in the
triangular cavity on the inside base of the unit.
5. Press POWER button to turn the unit on. The power light will start blinking.
Note: If the light is not blinking, you did not turn off the power when you removed the
label spindle. Turn the power off and then on again to make the light blink.
6. Slide the end of the label roll (label side down) into the label input area. The printer will
automatically feed the labels into the correct printing position.
7. Replace the spindle in the unit and lower the dust cover.
Note: If the labels do not feed into the unit successfully and the light is still blinking, try
again, or use the FEED button to feed the labels manually. If the light has stopped
blinking, turn the unit off then on again and reload the labels. Refer to the Troubleshooting
Guide for more information.
Kroy 227 On Line Labeler
7
11/16/1999
Kroy
LLC
Removing a Label Roll
You can easily change your label roll when you want to print using a different size label. To
remove a label roll, you will need a pair of desk scissors.
DO NOT ATTEMPT TO MANUALLY PULL LABELS OUT OF THE FEED AREA.
To remove a label roll:
1. Use the POWER button to turn the unit off. Power light will go out.
2. Lift the unit’s dust cover, and lift the label roll straight up, unrolling it to expose the gap
between the label currently inserted into the feed area and the rest of the roll.
3. Use your scissors to cut the label roll in the exposed gap area as illustrated below.
4. Press the POWER button to turn the unit back on.
5. Press and hold down the FEED button until the label comes out.
6. Follow the loading instructions above to insert a new label roll.
Note: You can also remove a label roll by turning the power off, separating the power
cord and the serial cable from the unit, removing the upper housing, moving the print
head release lever, and pulling out the label currently in the label input area.
(See "Clearing Label Jams.")
Kroy 227 On Line Labeler
8
11/16/1999
Kroy
LLC
Installing Device Drivers
The K227 On line Labeler is a Plug and Play device (PNP) which is supported on Win95/98.
After connecting the printer as described above, reboot the your computer and the labeler will
be detected and installed.
After installing the drivers make sure that you check the Serial port for the optimal settings as
follows:
1. Speed:
38400 to 115200 bps
2. Data:
8
3. Parity:
N
4. Stop Bits:
1
5. Flow Control:
Xon/Xoff
Since Windows NT 4.0 is not a PNP system use the following steps:
1. Click#Start#Settings#Printers#, then double click “Add Printers
2. Select the appropriate port# click “Configure Port”
Kroy 227 On Line Labeler
9
11/16/1999
Kroy
LLC
3. Select# Settings and set up as indicated below and then click#OK#Cancel
4. Click# Have Disk
5. Browse to the location of the driver files
Kroy 227 On Line Labeler
10
11/16/1999
Kroy
LLC
6. Select the printer you are installing and Click#Next
7. Enter Printer name or use default, and select if this printer is to be your windows default.
8. Select whether this is to be a shared or not shared printer#Click Next
Kroy 227 On Line Labeler
11
11/16/1999
Kroy
LLC
9. At this point you can elect to test the printer or not click#”Finished”
Testing the Printer
The printer includes a self-test feature to check for proper printer operation. To use the
self-test feature:
1. Press the POWER button to turn the unit off. The power light will go out.
2. Press and hold down the FEED button, then press the POWER button to turn the unit
back on.
3. The unit will print a test label as shown below.
Note: Self-test dimensions will vary depending on the label size being used.
4. Examine the test label. The printing should be dark and uniform with no distortion. If the
self-test results differ markedly from those expected, refer to the
Troubleshooting section in this manual.
Kroy 227 On Line Labeler
12
11/16/1999
Kroy
LLC
Troubleshooting and Maintenance
This chapter explains how to respond to situations that may arise while using the printer,
and also describes basic maintenance procedures.
Clearing Label Jams
If labels become lodged in the printer unit, printer operation will stop and the power light will flash.
Warning:
$"
High voltage exists in the unit when it is plugged in. ALWAYS unplug the unit before
removing the printer housing.
$" The print head will become hot during printing. Turn off the unit and allow the print
head to cool for several minutes before reaching into the printer area for any reason.
To dislodge a label jam:
1. Use the POWER button to turn the unit off.
2. Separate the power cord and the serial cable from the unit.
3. Open the dust cover and remove the label roll by tearing off the labels, then close the
dust cover. DO NOT PULL LABELS BACK OUT OF THE FEEDER OR DAMAGE MAY
RESULT TO THE PRINT HEAD.
4. To remove the upper housing as shown below, hold the unit face down and slide your
thumbnail into one of the notches between the housing and the unit case. Pull outward
gently to release the housing, then proceed to the opposite notch and repeat the
procedure. When the upper housing has been separated, remove it and set it aside.
Caution: Your printer contains delicate electronic components. Be careful not to
disturb internal components when the printer housing has been removed. KROY is not
responsible for damages incurred when clearing label jams.
5. Move the print head release lever to the upright position as shown below.
Kroy 227 On Line Labeler
13
11/16/1999
Kroy
LLC
6. Push the head in the direction of the arrow as shown below and then pull down. You will
be able to see the head surface.
7. Remove any labels stuck to the print head, rubber roller or label entrance. If necessary,
gently rotate the gears to remove labels. Carefully remove all traces of adhesive
remaining on the head and rubber roller by rubbing lightly with a soft cloth or cotton swab
soaked in isopropyl alcohol. Failure to remove all adhesives may affect printing quality,
and may cause labels to become stuck again.
Caution: Be careful not to scratch the surface when wiping the print head.
Kroy 227 On Line Labeler
14
11/16/1999
Kroy
LLC
8. Return the print head to its original position. The print head release lever should snap
back down.
9. To replace the upper housing, align the upper edge of the dust cover with the top of the
unit, then gently lower the housing back into place. Make sure the green LED for the
power light slides back into the opening in the upper housing. Once you have lowered the
housing into position, it should easily snap into place.
Caution: Do not force the upper housing into position. You may bend or damage
delicate components.
10. Reconnect the power cord and serial cable.
11. Reload the labels as described in Getting Started.
Troubleshooting Guide
The most common printer challenges can be resolved quickly and easily. Check through the
following list before calling for service.
Symptom
Possible Cause/Solution
$" Is the unit power on? (An error message will be displayed.)
Printer Does Not Print
$" Is the power plug connected?
$" Is the printer connected to the computer using the serial
cable provided?
$" Are all plugs firmly plugged in?
$" Is the unit connected to the correct serial port?
Try connecting to other COM ports.
$" Does the label size match the actual label?
Try turning the power off then on again and matching
the setting to the label.
$" If the printer still fails to print, conduct the self-test described
in Testing the Printer.
$" If the self-test operates correctly, try using another cable or
contact your dealer for assistance.
$" Is the unit power on? (An error message will be displayed.)
Printer Stops While
$" Is the power plug connected securely?
Printing
$" Is the serial cable connected properly?
$" Are you out of labels? (An error message will be displayed.)
See Loading / Removing a Label Roll.
$" Is the power light blinking?
Printer has lost label data due to a communication
failure.
Press the POWER button to turn the unit off and
cancel the error.
Turn the printer on and try again.
$" If the printer stills fails to begin printing, conduct the self-test
described in Testing the Printer.
Important: If the self-test fails, separate the power supply from
the power source, otherwise, irreparable damage may occur in
the printer.
Kroy 227 On Line Labeler
15
11/16/1999
Kroy
Symptom
All Text Printed on One
Line
LLC
Possible Cause/Solution
$" Is the dust cover in place or is it affecting the Label feed?
$" Is something jammed between the rubber roller and the gear?
Remove the upper housing as instructed in
Clearing Label Jams, then gently rotate the Gear parts to
remove the jammed material.
$" Is there a label stuck to the rubber roller?
See Clearing Label Jams.
$" If the problem is not due to the above reasons:
Unplug the power cord, then reconnect. Conduct the self-test
described in Testing the Printer.
Unbalanced Printing
$"
Abnormal Self-Test
Results
$"
Most unbalanced printing is caused by a misaligned label
guide when using standard size labels, or because of an
incorrectly fed first label. Try reloading the labels using the
instructions in Loading a Label Roll.
Is printing quality unacceptable for part of the label?
The print head may need cleaning. Refer to Cleaning the
Print Head.
$" Is the image stretched or compressed?
There may be a label jam. See Removing a Label Roll.
$" Are dotted lines or blocks not being printed?
The print head may be damaged. Contact your dealer for
assistance.
Printer Maintenance
Please keep your printer in a clean, safe place. Avoid:
1. Dust, oil, or humidity
2. Heaters or direct sunlight
3. Large electrical equipment
Cleaning the Printer
Clean the printer about once every three months. Unplug the power cord and remove the label
roll. Use a small vacuum cleaner with a pointed end to clean the printer. Remove all label
residue and dust thoroughly. If you have just printed a label, make sure the print head has cooled
before cleaning.
Be careful not to damage the internal components of the printer while cleaning. If the outer case
of the printer is dirty, wipe with a soft cloth dampened with a solution of detergent and water.
Close the dust cover to prevent water from getting into the printer. Do not use a rough brush or
cloth. Do not use alcohol or thinners, which damage the printer case.
Kroy 227 On Line Labeler
16
11/16/1999
Kroy
LLC
Caution: Do not get water into the case. It may damage delicate internal components.
Cleaning the Print Head
If you are dissatisfied with printing quality, you may wish to clean the print head as described
below.
Warning:
$"
High voltage exists in the unit when it is plugged in. ALWAYS unplug the unit before
removing the printer housing.
$" The print head will become hot during printing. Turn off the unit and allow the print head
to cool for several minutes before reaching into the printer area for any reason.
To clean the print head:
1. Use the POWER button to turn the unit off.
2. Separate the power cord and the serial cable from the unit.
3. Open the dust cover and remove the label roll, then close the dust cover.
4. To remove the upper housing as shown below, hold the unit face down and slide your
thumbnail into one of the notches between the housing and the unit case. Pull outward
gently to release the housing, then proceed to the opposite notch and repeat the
procedure. When the upper housing has been separated, remove it and set it aside.
Caution: Your label printer contains delicate electronic components. Be careful not to
disturb internal components when the printer housing has been removed. KROY is not
responsible for damages incurred when cleaning the print head.
Kroy 227 On Line Labeler
17
11/16/1999
Kroy
LLC
5. Move the print head release lever to the upright position as shown below.
6. Push the head in the direction of the arrow as shown below and then pull down. You will
be able to see the head surface.
7. Wipe the print head with a soft cloth or cotton swab soaked in isopropyl alcohol.
Caution: Be careful not to scratch the surface when wiping the print head. If the head
surface is damaged, printing quality will be permanently affected.
8. Return the print head to its original position. The print head release lever should snap
back down.
9. To replace the upper housing, align the upper edge of the dust cover with the top of the
unit, then gently lower the housing back into place. Make sure the green LED for the
power light slides back into the opening in the housing. Once you have lowered the
housing into position, it should easily snap into place.
Caution: Do not force the upper housing into position. You may bend or damage
delicate components.
10. Reconnect the power cord and serial cable.
11. Reload the labels as described in Loading a Label Roll. If using the above procedure
does not result in an increase in printing quality, or if printing quality worsens, discontinue
use and contact your dealer.
Kroy 227 On Line Labeler
18
11/16/1999
Kroy
LLC
Important Information
Packing Instructions
Should you find it necessary to ship your unit, follow the instructions listed below. KROY
is not responsible for shipping damages.
Important: When the unit is to be shipped for any reason, it must be well protected
from shipping and handling hazards. Use original packing material to pack the unit.
To pack the unit:
1. Use the POWER button to turn the unit off.
2. Unplug the adapter and remove the power cord from the unit.
3. Disconnect the serial cable from the serial connector jack and disconnect the connector
from your computer.
4. Remove the label roll.
5. Place the unit in the original box, using the original packing material.
6. Tape the box shut. It is recommended that you use filament tape or 2" wide plastic tape.
7. Address the package in large letters for shipment to the nearest service location.
Remember to include your return address.
Note: If the original packing box and material are not available, use a sturdy box and pack
the unit with at least 2 inches of packing material around each side. Seal and address as
noted above.
FCC Compliance Statement
This equipment has been tested and found to comply with the limits for a Class B digital device,
pursuant to Part 15 of the FCC Rules. These limits are designed to provide reasonable protection
against harmful interference in a residential installation. This equipment generates, uses and can
radiate radio frequency energy and, if not installed and used in accordance with the instruction,
may cause harmful interference to radio communication.
However, there is no guarantee that interference will not occur in a particular installation. If this
equipment does cause harmful interference to radio or television reception, which can be
determined by turning the equipment off and on, the user is encouraged to try to correct the
interference using one more of the following measures:
Kroy 227 On Line Labeler
19
11/16/1999
Kroy
LLC
$"
Move or replace the receiving antenna.
$"
Increase the separation between the equipment and the receiver.
$"
Connect the equipment to an outlet on a circuit different from where the receiver is
connected.
$"
Consult the dealer or experienced radio/TV technician for help.
Warning: Change or modifications to this unit not expressly approved by the party
responsible for compliance could void the user’s authority to operate the equipment. Finally,
any changes or modification to the equipment by the user not expressly approved by the
grantee or manufacturer could void the user’s authority to operate such equipment.
Safe Operating Recommendations
To avoid unnecessary injury or damage to the unit, please review the following
recommendations.
Warning: To reduce risk of fire or electrical shock, DO NOT expose unit to water or
moisture.
$"
USE THE CORRECT ELECTRICAL VOLTAGE - Avoid electrical short circuit, overheating or
shocks. Check the electric rating label affixed to the unit. The wrong voltage could cause
damage to the unit, possible overheating or shocks.
$"
AVOID ELECTRICAL SHOCK - Never insert metal objects such as screwdrivers, paper
clips or nail files inside the unit.
$"
BEFORE REACHING INTO THE LABEL FEEDER AREA, always turn the power off.
$"
DO NOT COVER OR PLACE ANY OBJECTS on the unit when the power is on.
$"
IF THE UNIT IS DROPPED, the insulation system may be disturbed. Unplug the power cord
before picking up the unit. Have the unit checked by a qualified service technician before
using it again.
$"
TEMPERATURE AND HUMIDITY - Avoid placing the unit near an excessively warm or
humid location.
$"
BEFORE CLEANING, make sure the unit is turned off and unplugged.
$"
IF LIQUIDS ARE SPILLED OR SPLASHED on the unit, immediately unplug it. Have unit
checked by a qualified service technician.
$"
PLUG the power cord into an outlet which is nearby and easily accessible.
$"
KEEP FINGERS, HAIR, AND JEWELRY away from the label feeder area.
Kroy 227 On Line Labeler
20
11/16/1999
Kroy
LLC
$"
THE PRINT HEAD WILL BECOME HOT DURING PRINTING - Turn off the unit and allow the
print head to cool for several minutes before reaching into the printer area for any reason.
$"
YOUR PRINTER CONTAINS DELICATE ELECTRONIC COMPONENTS - Be careful not to
disturb these components when removing the upper housing to clean the print head or to
clear label jams.
Product Consumer Warranty
Limited Warranty/30 Day Warranty
KROY warrants this software against defects in material or workmanship for a period of 30 days
from the date of original purchase for use, and agrees to, at KROY’s option, replace any defective
software without charge for either parts or labor. Proof of Purchase will be required.
2 Year Parts Warranty
Following the first 90 days from the date of purchase and thereafter, until two years from the date
of purchase, KROY will replaced any defective part at no charge. There will be a standard charge
for labor and the cost of transportation.
$"
Important: This warranty does not cover damage resulting from accident, misuse or
abuse, any modification or alteration including attaching the unit to other than the
recommended receptacle or voltage.
THIS WARRANTY IS VOID WHEN SERVICE OR REPAIR IS PREFORMED BY A NONAUTHORIZED SERVICE LOCATION.
This warranty does not cover shipping expenses to and from a service location.
NO RESPONSIBILITY ASSUMED FOR ANY SPECIAL, OR INCIDENTAL DAMAGES.
You may obtain warranty service through one of our service locations. To obtain the location of
the nearest Service Center, call toll-free.
1 (800) 347-5769
The toll-free number operates Monday through Friday, from 7:30 am to 4:30 pm Mountain
Standard Time.
Simply take or ship the unit prepaid to the nearest service location.
Damage occurred during transit is not covered by this warranty.
Kroy 227 On Line Labeler
21
11/16/1999
Kroy
LLC
Note: No other warranty, written or verbal, is authorized by KROY. This warranty gives
you specific legal rights, and you may also have other rights which vary from state to
state. Some states do not allow the exclusion or limitation of incidental damages or
limitations on how long an implied warranty lasts; the above exclusion and limitations may
not apply to your printer.
Obtaining Service
If the unit needs service, call the reseller where you purchased the unit, or contact KROY
Technical Support Center, call toll-free (800) 347 – 5769 or (216) 426-5600
When calling the 800 number, please have the model number and User’s Manual with you.
For the most efficient service, record the information requested below:
$"
Model No. of your printer.
$"
Model No. and processor type (i.e., 486, etc.) of your personal computer.
$"
Type of problem.
Note: To qualify for warranty, proof of purchase must accompany the unit. Your sales
receipt is your proof of purchase.
Ordering Labels
KROY offers the following label supplies for your printer. To order, contact KROY directly at (888)
888-5769, on the KROY Web site, or your KROY authorized reseller.
Item
Stock No.
2479300
*Universal Address Label (White)
(2ea) 260 label rolls
1.125” x 3.5” (28.58mm x 88.9mm)
2479600
*Universal Address Label (Clear)
(1ea) 260 label rolls
1.125” x 3.5” (28.58mm x 88.9mm)
Kroy 227 On Line Labeler
22
11/16/1999
Kroy
Item
LLC
Stock No.
2479400
*Universal Shipping Label (White)
(1ea) 220 label roll
2.125” x 4” (53.98mm x 101.6mm)
2479500
*Universal Diskette Label (White)
(1ea) 320 label roll
2.125” x 2.75” (53.98mm x 69.85mm)
2555000
Large Address Label (White)
(1ea) 260 label roll
1.50” x 3.50” (38.1mm x 88.9mm)
2555200
VHS Spine Label (White)
(1ea) 150 label roll
0.75” x 5.813” (19.05mm x 147.64mm)
2555300
VHS Face Label (White)
(1ea) 150 label roll
1.813” x 3.06” (46.04mm x 77.79mm)
2554800
Long Label 1 (White)
(1ea) 125 label roll
1.5” x 7.5” (38.1mm x 190.5mm)
Long Label 2 (White)
(1ea) 125 label roll
2.0” x 7.50” (50.8mm x 190.5mm)
2554900
Zip Disk (White)
2554500
(1ea) 380 label roll
2.0” x 2.375” (50.8mm x 60.33mm)
2554600
File Folder Label 1 (White)
(1ea) 150 label rolls
0.563” x 2.75” (14.29mm x 69.85mm)
2554700
File Folder Label 2 (White)
(2ea) 130 label roll
0.563” x 3.5” (14.29mm x 88.9mm)
2555100
Multi Purpose Label (White)
(2ea) 220 label roll
1.125” x 2.0” (28.58mm x 50.8mm)
2555500
Return Address Label (White)
(2ea) 220 label roll
0.75” x 2.0” (19.05mm x 50.8mm)
2557700
VHS Face-Spine Combo (White)
(1ea) 150 label roll 0.75 x 5.813
(1ea) 150 label roll1.813 x 3.06
Total 300 Labels
*Universal Labels will operate in most Personal PC Printers.
Kroy 227 On Line Labeler
23
11/16/1999
Kroy
LLC
About Serial Ports
The serial cable used by the printer is included with the unit. One end of the serial cable is a
telephone jack and the other end has two connectors with 9 or 25 pins to interface with your
computer.
Note: Use only ONE connector (9-pin or 25-pin) to interface with your
computer. If both connectors are plugged in, the printer will not operate properly.
If there seems to be a problem with the serial port, check the following:
$"
Is the serial cable firmly plugged into the interface connector at the back of the printer?
$"
Is the other end of the serial cable firmly plugged into the serial port of the computer?
$"
Is it plugged into the correct serial port set in the Label Printer for your Windows
program?
$"
Is another serial device, such as a mouse, fax/modem board, scanner, etc. installed on
the computer? It may be using the same interrupts as the label printer port, which will
cause problem. COM1 and COM3 share interrupts, and COM2 and COM4 share
interrupts. A serial device using COM1 cannot be used in conjunction with a serial device
using COM3. The same holds true for COM2 and COM4. If a mouse is using
COM1,install the Label Printer on COM2, or vice versa. If another serial device besides a
mouse is already using COM1 or COM2, try moving it to COM3 or COM4 to avoid
interfering with the printer. Refer to the serial device manual to redefine the interrupts, or
have a qualified technician do this for you.
The printer hardware and software supplies with this unit are manufactured
for IBM PC’s or those with 100% compatibility. Other systems may not work with the printer
because hardware control addresses may differ.
The following table shows serial port specifications for the IBM PC or fully compatible systems. If
you do not have a fully compatible system, check the values in the table to see if you can use the
Printer with your system. If you are not familiar with serial ports, consult KROY Technical Support
for assistance.
Port
COM1
COM2
COM3
COM4
Kroy 227 On Line Labeler
Address
3F8H
2F8H
3E8H
2E8H
IRQ
4
3
4
3
24
Vector
0CH
0BH
0CH
0BH
11/16/1999
Kroy
LLC
Connector Pin Assignments
Serial Cable Connection Schematic
Pin No.
RTS 8
CTS 7
DSR 6
GND 5
RxD 3
TxD 2
DB 9S
J-11 JACK
6 543 2 1
VIEWED FROM REAR OF PRINTER
Blue
Yellow
Green
Red
Black
White
Pin No.
TxD 3
RxD 2
GND 7
DSR 6
CTS 5
RTS 4
DB 25S
1
2
3
4
5
6
TxD
RxD
RTS
GND
CTS
DTR
RJ-11 CONNECTOR
RS-232C Signal Levels
The signal levels used in the serial interface follow RS-232C standards.
Signal Level
MARK (1)
SPACE (0)
Kroy 227 On Line Labeler
RS-232C Signal Labels
Input
-27V to -5V
+5V to +27V
25
Output
-12V
+12V
11/16/1999
Kroy
LLC
Specifications
Printer
Model
K227 Printer
Dimensions
Weight
Height : 5.1”
Width : 3.9”
Depth : 8.0”
1.45 lbs.
Paper Handling:
Straight. Entire path is accessible.
Power Adapter:
Input: 100 to 250VAC, 50 to 60Hz Output: 24VDC, 2.3A
Interface
Type:
Protocol:
Bi-directional, serial RS-232C using transmit, receive and
ground
XON/XOFF control, 9600 to 115,200 baud, 8 data bits, no
parity, 1 stop
Print Head
Model
Fixed 2.2" wide linear thermal head.
Head Life:
Approximately 18.6 miles of paper Print head is replaceable.
Printing
Method:
Direct thermal
Graphics Resolution:
203 x 203 dots per inch
Label
Label Width:
Maximum width of 2.25"
Label Length:
Maximum length of 12.0”
Label Sizes:
See the Supplies section for ordering information
End
Kroy 227 On Line Labeler
26
11/16/1999