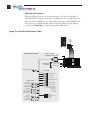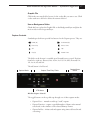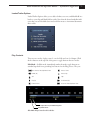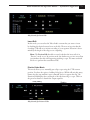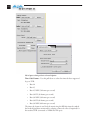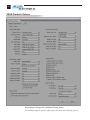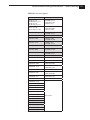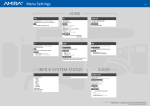
1
XENA 2K, LH, & LS Installation and Operation Guide JULY 11, 2007 P/N101658-2 ii Trademarks AJA, XENA, KONA, and Io are trademarks of AJA Video, Inc. QuickTime and the QuickTime Logo are trademarks of Apple Computer, Inc. After Effects and Photoshop are registered trademarks of Adobe Systems, Inc. Combustion is a registered trademark of Autodesk, Inc. Fusion is a registered trademark of eyeon Software, Inc. Liquid Chrome is a trademark of Avid Technology, Inc. Vegas is a registered trademark of Sony Creative Software, Inc. CineVision is a registered trademark of Sonic Solutions. Machina Copyright (c) 2006 Gregory Booth and AJA Video Systems, Inc. All rights reserved. Xena Windows Plugins Copyright (c) 2006 Gregory Booth and AJA Video Systems, Inc. All rights reserved. Machina contains the following source code: FreeType v. 2.1.10 Copyright (c) 1996-2002 David Turner, Robert Wilhelm, and Werner Lemberg. www.freetype. org Machina, the AJA Premiere Pro Plugin , and the AJA After Effects Plugin contain the following source code: TIFF Library Copyright (c) 1988-1997 Sam Leffler Copyright (c) 1991-1997 Silicon Graphics, Inc. Permission to use, copy, modify, distribute, and sell this software and its documentation for any purpose is hereby granted without fee, provided that (i) the above copyright notices and this permission notice appear in all copies of the software and related documentation, and (ii) the names of Sam Leffler and Silicon Graphics may not be used in any advertising or publicity relating to the software without the specific, prior written permission of Sam Leffler and Silicon Graphics. All other trademarks are the property of their respective holders. Notice Copyright © 2007 AJA Video, Inc. All rights reserved. All information in this manual is subject to change without notice. No part of the document may be reproduced or transmitted in any form, or by any means, electronic or mechanical, including photocopying or recording, without the express written permission of AJA Inc. FCC Emission Information This equipment has been tested and found to comply with the limits for a Class A digital device, pursuant to Part 15 of the FCC Rules. These limits are designed to provide reasonable protection against harmful interference when the equipment is operated in a commercial environment. This equipment generates, uses and can radiate radio frequency energy and, if not installed and used in accordance with the instruction manual, may cause harmful interference to radio communications. Operation of this equipment in a residential area is likely to cause harmful interference in which case the user will be required to correct the interference at his own expense. Changes or modifications not expressly approved by AJA Video can effect emission compliance and could void the user’s authority to operate this equipment. XENA Installation and Operation Manual iii Contacting Support To contact AJA Video for sales or support, use any of the following methods: 443 Crown Point Circle, Grass Valley, CA. 95945 USA Telephone: 800.251.4224 or 530.274.2048 Fax: 530.274.9442 Web: http://www.aja.com Support Email: [email protected] Sales Email: [email protected] When calling for support, first read the Chapter on Troubleshooting at the back of this manual. You can often save time and effort by looking there first for simple remedies and support information for AJA and Apple Computer Inc. Limited Warranty AJA Video warrants that this product will be free from defects in materials and workmanship for a period of three years from the date of purchase. If a product proves to be defective during this warranty period, AJA Video, at its option, will either repair the defective product without charge for parts and labor, or will provide a replacement in exchange for the defective product. In order to obtain service under this warranty, you the Customer, must notify AJA Video of the defect before the expiration of the warranty period and make suitable arrangements for the performance of service. The Customer shall be responsible for packaging and shipping the defective product to a designated service center nominated by AJA Video, with shipping charges prepaid. AJA Video shall pay for the return of the product to the Customer if the shipment is to a location within the country in which the AJA Video service center is located. Customer shall be responsible for paying all shipping charges, insurance, duties, taxes, and any other charges for products returned to any other locations. This warranty shall not apply to any defect, failure or damage caused by improper use or improper or inadequate maintenance and care. AJA Video shall not be obligated to furnish service under this warranty a) to repair damage resulting from attempts by personnel other than AJA Video representatives to install, repair or service the product, b) to repair damage resulting from improper use or connection to incompatible equipment, c) to repair any damage or malfunction caused by the use of non-AJA Video parts or supplies, or d) to service a product that has been modified or integrated with other products when the effect of such a modification or integration increases the time or difficulty of servicing the product. THIS WARRANTY IS GIVEN BY AJA VIDEO IN LIEU OF ANY OTHER WARRANTIES, EXPRESS OR IMPLIED. AJA VIDEO AND ITS VENDORS DISCLAIM ANY IMPLIED WARRANTIES OF MERCHANTABILITY OR FITNESS FOR A PARTICULAR PURPOSE. AJA VIDEO’S RESPONSIBILITY TO REPAIR OR REPLACE DEFECTIVE PRODUCTS IS THE WHOLE AND EXCLUSIVE REMEDY PROVIDED TO THE CUSTOMER FOR ANY INDIRECT, SPECIAL, INCIDENTAL OR CONSEQUENTIAL DAMAGES IRRESPECTIVE OF WHETHER AJA VIDEO OR THE VENDOR HAS ADVANCE NOTICE OF THE POSSIBILITY OF SUCH DAMAGES. iv XENA Installation and Operation Manual — Table of Contents Table of Contents Trademarks ..................................................................................................................................... ii Notice ............................................................................................................................................. ii FCC Emission Information . ........................................................................................................... ii Contacting Support ....................................................................................................................... iii Limited Warranty .......................................................................................................................... iii Chapter 1 Introduction Overview . ....................................................................................................................................... 1 XENA 2Ke/2K Features . ................................................................................................................ 2 Dual Link................................................................................................................................... 3 2K Workflow.............................................................................................................................. 3 Broadcast-quality Conversion...................................................................................................... 3 Video + Key SDI output ............................................................................................................ 4 XENA 2K Audio......................................................................................................................... 4 XENA 2K I/O............................................................................................................................ 4 XENA LHe/LH Features ................................................................................................................ 5 XENA LH I/O............................................................................................................................ 6 Down-conversion........................................................................................................................ 6 Two XENA LH Models.............................................................................................................. 6 XENA LSe/LS Features ................................................................................................................... 6 XENA Software .............................................................................................................................. 7 What’s In The Box? ........................................................................................................................ 8 Minimum System Requirements . ................................................................................................... 9 Understanding Disk Storage Methods......................................................................................... 9 Cable Connections . ...................................................................................................................... 10 Using the Breakout Cable and Card Endplate Connectors........................................................ 10 XENA LHe/LH and LSe Connectors............................................................................ 10 XENA LS Connectors................................................................................................... 10 XENA 2K Connectors.................................................................................................. 11 Using Breakout Boxes............................................................................................................... 12 XENA KL-Box for LS and LH Cards............................................................................ 13 K3-Box for XENA 2K................................................................................................... 13 About BNC Connectors............................................................................................................ 14 About Mini-Connectors............................................................................................................ 14 1 2 Connector Descriptions—LS/LH Cables and KL-Box.............................................................. 15 SDI Input and Outputs................................................................................................. 15 2-Channel Digital AES/EBU Audio Inputs And Outputs............................................. 15 Analog 2-Channel Balanced Audio................................................................................ 16 Analog 2-Channel Unbalanced Audio (KL-Box only)................................................... 16 RS-422 Machine Control . ........................................................................................... 16 Connector Descriptions—2K Cables and K3-Box..................................................................... 16 8-Channel Digital AES/EBU Audio Inputs and Outputs.............................................. 16 Analog 2-Channel Unbalanced Audio (breakout box only)........................................... 16 RS-422 Machine Control.............................................................................................. 17 SDI Inputs and Outputs............................................................................................... 17 Analog Monitor Out (Component/Composite HD/SD).............................................. 17 Reference Video............................................................................................................ 18 In This Manual ............................................................................................................................. 19 Chapter 2 Installation & Hardware Configuration Installation Overview .................................................................................................................... 21 Unpacking .................................................................................................................................... 22 Shipping Box Contents............................................................................................................. 22 Computer Requirements for XENA Cards . .................................................................................. 23 AJA Data Rate Calculator Application for Windows (Version 1).............................................. 23 AJA XENA System Test (Version 1)......................................................................................... 24 Installing the XENA Card . ........................................................................................................... 25 Cabling XENA . ............................................................................................................................ 27 Using The 2Ke/2K Breakout Cable . ........................................................................................ 27 Dual-link Connections.................................................................................................. 28 Using The LHe/LH/LSe Breakout Cable ................................................................................. 28 Using The LS Breakout Cable . ............................................................................................... 29 A Typical System...................................................................................................................... 29 Genlock and Your System ............................................................................................................. 31 Installing XENA Software ............................................................................................................ 31 Software Installation Procedure................................................................................................. 31 XENA Installation and Operation Manual — Table of Contents Chapter 3 XENA Setup and Configuration Setup Overview . ........................................................................................................................... 37 Selection of Primary & Secondary Formats in Various Applications . ............................................. 37 Overview................................................................................................................................... 37 Convert Mode............................................................................................................... 39 Video Input................................................................................................................. 40 Audio Input.................................................................................................................. 41 SDI Outputs 1 & 2....................................................................................................... 41 Analog Output.............................................................................................................. 41 Audio Level................................................................................................................... 41 Timecode Input............................................................................................................ 42 Desktop Display Options.............................................................................................. 42 File Options ................................................................................................................. 43 Capture, Preview, and Playback—Differences and Similarities . .................................................... 43 Capture Overview..................................................................................................................... 43 Preview Overview...................................................................................................................... 44 Playback Overview.................................................................................................................... 44 Support for Capture, Preview and Playback.............................................................................. 44 Codex Utility ................................................................................................................................ 45 Chapter 4 AJA Machina Application Machina Capture/Playback Application ......................................................................................... 47 XENA Realtime Performance.................................................................................................... 47 Machina Overview.................................................................................................................... 48 Shortcuts and Display Features................................................................................................. 49 Keyboard Shortcuts....................................................................................................... 49 Full-screen Desktop Display .................................................................................................... 49 Setup Window ............................................................................................................................... 50 Activation Options.................................................................................................................... 50 Board............................................................................................................................ 50 Activation Mode........................................................................................................... 50 XENA Information....................................................................................................... 51 Capture Options....................................................................................................................... 51 Convert Mode............................................................................................................... 53 3 4 YUV<->RGB Range...................................................................................................... 56 Video Input.................................................................................................................. 56 Audio Input.................................................................................................................. 57 SDI Outputs 1 & 2....................................................................................................... 57 Analog Output.............................................................................................................. 58 Timecode Input............................................................................................................ 58 Play Options............................................................................................................................. 59 Audio Sync.................................................................................................................... 59 Audio Sample Rate........................................................................................................ 59 Timebase....................................................................................................................... 59 Reference...................................................................................................................... 59 Device Control Options............................................................................................................ 60 Timecode Format.......................................................................................................... 60 Timecode Source.......................................................................................................... 60 General Options........................................................................................................................ 61 Video/Audio Directory Setup........................................................................................ 61 Enforce Memory Alignment.......................................................................................... 61 Audio Files Setup.......................................................................................................... 61 Audio Monitor Levels................................................................................................... 61 Capture Window ........................................................................................................................... 62 File Options.............................................................................................................................. 63 Type ............................................................................................................................ 63 Video/Audio ................................................................................................................ 63 Video Subtype ............................................................................................................. 64 Audio Subtype ............................................................................................................. 64 Audio Track.................................................................................................................. 64 Clip Options............................................................................................................................. 64 Clip Name.................................................................................................................... 64 Reel Name ................................................................................................................... 64 Sequence Offset............................................................................................................ 64 Create New Folder Per Sequence ................................................................................. 65 Abort on Dropped Frames............................................................................................ 65 Display Options........................................................................................................................ 65 Display Type................................................................................................................. 65 Display To Desktop...................................................................................................... 65 Display Sizes................................................................................................................. 66 XENA Installation and Operation Manual — Table of Contents Overlay Options........................................................................................................................ 66 Enable Overlay.............................................................................................................. 66 Mixer Coefficient.......................................................................................................... 66 Foreground Video ........................................................................................................ 66 Background Video........................................................................................................ 66 Graphic File ................................................................................................................. 67 Use as Background Video.............................................................................................. 67 Capture Controls...................................................................................................................... 67 Capture In/Out Mode.................................................................................................. 68 VTR TC....................................................................................................................... 68 Capture/XENA Status................................................................................................... 68 Play Window ................................................................................................................................. 69 File Options ............................................................................................................................. 69 Display Options........................................................................................................................ 70 Display Type . .............................................................................................................. 70 Display To Desktop...................................................................................................... 70 Display Sizes................................................................................................................. 70 Leader/Trailer Options.............................................................................................................. 71 Play Controls............................................................................................................................ 71 Play Modes................................................................................................................... 72 Output Modes.......................................................................................................................... 72 Insert Edit..................................................................................................................... 73 Print-to-Video Mode.................................................................................................... 73 Play/XENA Status......................................................................................................... 74 Chapter 5 Adobe Premiere Pro CS3 Overview . ...................................................................................................................................... 75 XENA Realtime Performance . ....................................................................................................... 76 XENA/Adobe Premiere Pro CS3 Setup . ........................................................................................ 77 Beginning a Project with XENA Presets ......................................................................................... 78 Custom Settings Panel.............................................................................................................. 79 Audio and Device Control ....................................................................................................... 81 Audio Mapping............................................................................................................. 82 Device Control.............................................................................................................. 83 AJA Capture Options Menu .......................................................................................................... 85 5 6 Capture Options....................................................................................................................... 85 Primary and Secondary Format Options Supported by XENA . ................................... 86 Convert Mode ............................................................................................................. 87 YUV<->RGB Range...................................................................................................... 90 Video Input.................................................................................................................. 90 Audio Input.................................................................................................................. 91 SDI Outputs 1 & 2....................................................................................................... 91 Analog Output.............................................................................................................. 92 Audio Level................................................................................................................... 92 Timecode Input ........................................................................................................... 92 Desktop Display Options.......................................................................................................... 92 Display To Desktop...................................................................................................... 92 Display Capture Speed.................................................................................................. 93 Desktop Capture Width and Height............................................................................. 93 File Options.............................................................................................................................. 93 Audio Formats.............................................................................................................. 95 Audio Tracks ............................................................................................................... 95 XENA Playback Options ............................................................................................................... 96 XENA Playback Options.......................................................................................................... 97 Audio Sync.................................................................................................................... 97 Audio Level................................................................................................................... 97 Reference...................................................................................................................... 97 Desktop Display Options.......................................................................................................... 97 Display Type . .............................................................................................................. 97 Display To Desktop...................................................................................................... 97 Desktop Speed.............................................................................................................. 98 Desktop Capture Width and Height............................................................................. 98 Preview Render Options........................................................................................................... 98 Timeline Options...................................................................................................................... 98 XENA Output Modes . ............................................................................................................ 99 Insert Edit..................................................................................................................... 99 Print-to-Video Mode.................................................................................................. 100 XENA Installation and Operation Manual — Table of Contents Chapter 6 Adobe After Effects CS3 Overview . .................................................................................................................................... 101 XENA After Effects CS3 Plugin Overview ................................................................................... 101 Basic Plugin Operations and Configuration............................................................................ 103 Activation Mode......................................................................................................... 103 After Effects CS3 and Preview Note............................................................................ 103 Shortcuts and Display Features............................................................................................... 104 Keyboard Shortcuts..................................................................................................... 104 Using the AJA Capture Plugin ..................................................................................................... 104 Activation Options.................................................................................................................. 105 Capture Options..................................................................................................................... 105 Convert Mode............................................................................................................. 108 YUV<->RGB Range.................................................................................................... 111 Video Input................................................................................................................ 111 Audio Input................................................................................................................ 112 SDI Outputs 1 & 2..................................................................................................... 112 Analog Output............................................................................................................ 112 Audio Level................................................................................................................. 112 Display to Desktop..................................................................................................... 113 Timecode Input ......................................................................................................... 113 File Options Menu.................................................................................................................. 114 Type........................................................................................................................... 114 Capture....................................................................................................................... 115 Video Format . ........................................................................................................... 115 Audio Format ............................................................................................................ 115 Audio Tracks............................................................................................................... 115 Clip Options........................................................................................................................... 116 Clip Name.................................................................................................................. 116 Reel Name ................................................................................................................. 116 Sequence Offset.......................................................................................................... 116 Create New Folder Per Sequence................................................................................ 116 Import Clip After Capture.......................................................................................... 116 Location Options........................................................................................................ 116 General Menu – Device Control Options............................................................................... 117 Timecode Format........................................................................................................ 117 7 8 Timecode Source........................................................................................................ 117 Status Display......................................................................................................................... 118 Play/Record Controls.............................................................................................................. 118 Capture In/Out........................................................................................................... 119 VTR TC..................................................................................................................... 119 Abort on Dropped Frame............................................................................................ 120 Using the AJA Preview Plugin . .................................................................................................... 120 Using the AJA Playback Plugin .................................................................................................... 121 Playback File Options............................................................................................................. 122 File Options................................................................................................................ 122 Playback General Options....................................................................................................... 124 Device Control Options.............................................................................................. 124 Leader/Trailer Options................................................................................................ 125 Memory Options........................................................................................................ 125 Playback XENA Options........................................................................................................ 126 Activation Options...................................................................................................... 126 Playback Options........................................................................................................ 126 Play Controls.......................................................................................................................... 127 Edit Mode . ................................................................................................................ 127 Status Display......................................................................................................................... 130 Chapter 7 Adobe Photoshop CS3 Overview....................................................................................................................................... 131 XENA Photoshop Plugin Overview.............................................................................................. 132 Basic Plugin Operations and Configuration............................................................................ 134 Activation Mode......................................................................................................... 134 Using the AJA Capture Plugin................................................................................................ 135 Activation Options...................................................................................................... 135 Capture Options......................................................................................................... 136 All conversions use AJA 10-bit hardware on the card. ................................................ 140 To do a down-conversion on an HD input (2K and LH models):............................... 140 Image Options Menu.................................................................................................. 144 General Options Menu............................................................................................... 145 Status Display............................................................................................................. 146 Play/Record Controls.............................................................................................................. 147 XENA Installation and Operation Manual — Table of Contents Using the AJA Preview Plugin................................................................................................. 148 Chapter 8 Autodesk Combustion Using XENA with Combustion 4................................................................................................. 151 Preview Options...................................................................................................................... 152 Activation.................................................................................................................... 153 Primary & Secondary Formats................................................................................................ 153 Primary and Secondary Format Options Supported ................................................... 154 XENA LH Conversion Options.................................................................................. 155 XENA 2K Conversion Options................................................................................... 156 SDI Outputs 1 & 2 . .............................................................................................................. 158 Analog Output . ..................................................................................................................... 158 Chapter 9 Eyeon Fusion Using XENA with Fusion 5.......................................................................................................... 159 Preview Options...................................................................................................................... 161 Activation.................................................................................................................... 161 Primary & Secondary Formats................................................................................................ 161 Analog Output . ..................................................................................................................... 164 Fusion “View On”.................................................................................................................. 165 Chapter 10 3rd-Party Applications 3rd-Party Applications Providing Native Support for XENA Products.......................................... 167 Using XENA with Avid Liquid Chrome™ XE....................................................................... 168 Sony Vegas + DVD................................................................................................................. 168 Drastic Technologies QuickClip Pro....................................................................................... 168 Sonic CineVision.................................................................................................................... 168 CineForm Prospect HD.......................................................................................................... 168 Chapter 11 Troubleshooting If You Run Into Problems............................................................................................................. 169 Updating Software........................................................................................................................ 169 Support......................................................................................................................................... 169 9 10 Frequently Asked Questions.......................................................................................................... 170 Appendix A Specifications XENA 2Ke & 2K Specifications.................................................................................................... 175 XENA LHe/LH Specifications...................................................................................................... 177 XENA LSe/LS Specifications......................................................................................................... 179 Machine Control Connector Pinou............................................................................................... 180 X NA Models: 2K, LH, and LS Chapter 1 Introduction XENA 2Ke – SD, HD, Dual Link, HSDL XENA LHe – SD, HD, Analog XENA LSe – SD, Analog Overview The AJA XENA series brings the highest quality 2K, HD, and SD video and audio to a Windows workstation. With XENA’s professional features, you can run Windows platform applications: • Adobe Premiere Pro CS3 • Adobe After Effects CS3 • Adobe Photoshop CS3 • Autodesk Combustion 4 • Eyeon Fusion 5 (Application software not included.). For Windows, XENA also offers AJA’s own Machina software for incredible standalone file capture, preview and playout with full machine control. Third-party native support for XENA cards is also available in applications such as Avid Liquid Chrome, Sony Vegas, and Sonic CineVision (see Chapter 10, 3rd Party Applications). All card models are available in both PCI-X compatible and PCI-e bus versions. XENA cards offer high-quality digital and analog interfaces for use in broadcast, editing and graphics/animation work. The XENA 2Ke/2K card can capture SDI, HD-SDI, and Dual Link 4:4:4 HD-SDI. XENA LHe/LH models capture analog and digital HD/SD data. XENA LS is for analog and digital SD data only. 1 2 When capturing, you can record data in the following file formats: • • • • • • • • DPX (LHe/LH & 2Ke/2K only) Cineon (LHe/LH & 2Ke/2K only) TGA TIFF BMP YUV AVI QuickTime This manual covers the installation and operation of XENA LSe/LS, LHe/LH, and 2Ke/2K models and discusses using them with supported applications. Instructions for installing the optional breakout boxes are shipped with the option. Note: Except where noted in this manual, references to XENA LS, LH, and 2K also include the LSe, LHe, and 2Ke models. XENA 2Ke/2K Features The XENA 2K card supports the popular uncompressed SD or HD formats including the 2K and Dual Link 4:4:4 HD-SDI formats. It captures uncompressed 10-bit and 8-bit digital video and 24-bit 48 kHz digital audio in Standard definition (SMPTE 259M), High definition (SMPTE 292M), and Dual Link High Definition (SMPTE 372M). XENA 2K features include: • SDI, HD-SDI, Dual Link SD and HD-SDI, and HSDL • XENA software plugins and support for third-party applications • AJA’s standalone Machina capture/playback software • Native support for uncompressed DPX, Cineon, TGA, TIFF, BMP, YUV, and AVI and QuickTime files • Support for 2K frame formats • Look Up Table support (LUT) • 4-lane PCI-express bus interface (XENA 2Ke) or PCI-X 133 interface (XENA 2K) • Broadcast-quality hardware 10-bit up-convert, down-convert and crossconvert. • 12-bit HD component and SD component/composite analog output • 16-channel SDI embedded audio and 8-channel 48/96 kHz AES audio • RS-422 machine control XENA Installation and Operation Manual — Introduction 3 • Cables standard, K3-Box breakout optional Dual Link XENA 2K supports Dual Link 4:4:4 HD-SDI. XENA 2K Dual Link supports full-bandwidth 4:4:4 RGB at 10-bits (12-bit capable) for 1080i, 1080p, and 720p formats. XENA 2K can also convert between 4:4:4 and 4:2:2 formats for Single Link HD-SDI output. 2K Workflow The XENA 2K path allows you to go straight from telecine to disk with 2K media eliminating the steps of using tape stock and then digitizing those tapes for the nonlinear editor. XENA 2K capture from 2K telecine directly creates 2K DPX, QuickTime, Cineon, AVI, TGA, TIFF, or BMP files. Material can be played out at 2K via HSDL (High Speed Data Link) at 15 fps. XENA 2K allows 2K files to be viewed on HD 1080 24P-supported video monitors. This 1080 HD playout can also be down-converted to SD in realtime, giving the 2K DI pipeline a solution for multi-format video playout of 2K material. By generating 2K files directly from a Telecine in a multitude of file formats and bit-depths, you have files available for use on any system and at any stage in production. A colorist, effects artist, and editor can immediately use the files. XENA 2K supports any popular uncompressed SD or HD format, including Dual Link and 2K and captures and plays back uncompressed 10-bit and 8-bit digital video. XENA 2K also includes a variety of 10-bit broadcast-quality features—hardware-based up-, down-, and cross-conversion to and from HD. XENA 2K is available in two models. XENA 2K uses the PCI-X 133 interface while XENA 2Ke is a 4-lane PCI-express bus card. The two cards are identical in features and video and audio connections and use the same optional K3-Box breakout box. Broadcast-quality Conversion XENA 2K features full 10-bit, broadcast-quality, SD-to-HD up-conversion, HD- to-SD down-conversion, SD and HD cross-conversion, and automatic HD/SD 12-bit component analog output. The quality is identical to AJA’s standalone products and all functionality is hardware-based making it available all the time on digitize or playback. XENA 2K offers hardware-based 1080-to-720 or 720-to-1080 cross-conversion further streamlining dailies and deliverables creation at true broadcast picture quality in realtime. For maximum flexibility, hardware-based aspect ratio conversion can be applied to standard definition capture and output. 4 Video + Key SDI output This feature is available on the output settings in Machina, After Effects, and Premiere Pro. To use Video + Key, set the SDI-1 Output to ‘Video + Key (V)’ or ‘Video + Key (K)’. The SDI-2 then output automatically changes to the complimentary setting. Note: Video + Key is limited to 8-bit RGBA files. XENA 2K Audio XENA 2K’s extensive audio support makes installation simple, working with 8-channel 24-bit 48 and 96 kHz AES audio via XLR (balanced) connections, and 16-channel embedded 24-bit SDI/HD-SDI audio (capture and playback). XENA 2K also features high-quality input sample-rate conversion on AES inputs, which eliminates the need for audio source synchronization. XENA 2K I/O XENA 2K offers two HD/SD SDI inputs and outputs and a component analog output, each independently switchable between HD and SD (SD analog can be configured as composite). For example, if you are working in HD, you can have simultaneous HD-SDI, SD-SDI, and HD or SD component analog output. Using XENA 2K’s always-available format conversion features, monitoring can be as simple as a single composite monitor for both SD and HD projects. Dual Link can be monitored via Dual Link HD-SDI outputs, Single Link HD-SDI, or HD component analog. When you plug in XENA 2K’s breakout cables they automatically configure. For SDI video, the card features two HD/SD inputs and two outputs for Single or Dual Link, one connection for Genlock input, and three for HD/SD component analog video out. Also included is a 9-pin D connector for RS-422 machine control. The SDI inputs and outputs use a separate cable with special mini-BNC connectors on one end and full-size BNCs on the other for ease of connection and superior reliability. The K3-Box for XENA 2K simplifies interfacing by offering a 19-inch, 1RU rack-mountable breakout box that attaches to the XENA 2K with just two cables. This option offers all the same inputs and outputs as the standard breakout cable, and can be easily rackmounted or placed on top of a broadcast monitor or editing desk. Additional functionality includes simultaneous XLR and BNC AES output, 2-channel RCA analog audio monitoring, and looping BNC Genlock reference connectors. Proper connections are provided for a Betacam deck, HDCAM, DVCPRO HD, D5, D9, or even HDCAM SR. XENA Installation and Operation Manual — Introduction 5 XENA LHe/LH Features The XENA LH card provides both HD and SD analog and digital I/O for the Windows workstation. It bridges the analog and digital worlds by offering I/O for both. XENA LH Features include: • 10-bit Uncompressed SD/HD Capture Card • 12-bit HD Analog Component I/O • 12-bit SD Analog Component or Composite/YC I/O • 10-bit Hardware HD to SD Down conversion • Native support for DPX, Cineon, TGA, TIFF, BMP, AVI and QuickTime files • SDI or HD-SDI input • 2 Independent SDI/HD-SDI outputs • 2-channel balanced XLR AES and 2-channel balanced XLR Analog Audio I/O • 8-channel SDI Embedded Audio I/O • HD/SD Genlock • RS-422 Machine Control • Cables standard, KL-Box breakout box optional • AJA XENA software, including application plugins and AJA Machina capture/playout software • PCI-express bus interface (XENA LHe) • PCI-X 133 bus interface (XENA LH) 6 XENA LH I/O The XENA LH comes standard with a breakout cable and also works with the optional KL-Box for rackmounted I/O convenience. Also, XENA LH offers multi-channel audio and 16/24/32-bit AES/EBU digital audio at 48 kHz for digital production. XENA LH by including hardware sample-rate conversion on AES inputs, eliminates source synchronizing requirements. Supporting Digital SD/HD and Analog SD/HD I/O, XENA LH fits many diverse workflows including analog component connections from HDV cameras providing direct ingest of HDV-acquired material into uncompressed or any other supported file format. These 12-bit analog inputs and outputs, and 10-bit digital I/Os, ensure that XENA LH can interface to almost any SDI or analog device. Down-conversion XENA LH also provides 10-bit hardware HD-to-SD down-conversion that can be applied to any or all inputs or outputs. Digitize HD into space-efficient SD for off-line work. Monitor HD files on an SD monitor. Make analog or digital SD tape masters from an HD project. Two XENA LH Models XENA LH is available in two models. XENA LH uses the PCI-X 133 interface while XENA LHe is a 4-lane PCI-express bus card. The two cards are identical in features and video and audio connections and use the same optional KL-Box breakout box. XENA LSe/LS Features The XENA LS card offers the best solution for affordable SD capture and playback. It offers a cost-effective solution for capture, playback, and printing video for non-linear editing and visual effects/motion graphics. XENA LS features include: • 12-bit Component/Composite/S-video analog I/O • SDI input and 2 independent SDI outputs • AES I/O; sample rate conversion on input (2-channel XLR) • Balanced analog audio I/O (2-channel XLR) • 8-channel SDI embedded audio support • Broadcast-quality Time Base Correction (TBC) with VHS support • Genlock and RS-422 Machine Control • AJA Support for TGA, TIFF, BMP, AVI, and QuickTime files XENA Installation and Operation Manual — Introduction 7 • Supports all popular standard definition formats in NTSC and PAL • Cables standard and KL-Box breakout box optional • AJA XENA software, including application plugins and AJA Machina capture/playout software • PCI-express bus interface (XENA LSe) • PCI-X compatible bus interface (XENA LS) The XENA LS supports TGA, TIFF, BMP, YUV, AVI, or QuickTime. XENA LS I/O XENA LS can operate with either the standard breakout cable (included) or optional KL-Box for rackmounted I/O convenience. XENA LS provides high quality analog and digital 10-bit resolution SMPTE SDI SDI standard definition video connections. XENA LS also has great audio I/O support—2-channel balanced XLR analog, 2-channel XLR AES, and multi-channel embedded SDI audio. XENA LS includes hardware sample-rate conversion on AES inputs eliminating source synchronizing requirements. XENA Software XENA software consists of XENA application software (Machina™), XENA driver software, and XENA plug-in software for 3rd-party applications. This suite of software allows XENA to work in a variety of workflows. The plug-ins provide tightly integrated XENA source selection and control within 3rd-party applications. XENA software provides direct support for Adobe Premiere Pro CS3, Adobe After Effects CS3, Adobe Photoshop CS3, Autodesk Combustion 4, and Eyeon Fusion 5 (application software not included). With a Windows workstation, and XENA, you have a high-quality cost-effective system for standard definition, high definition, digital and analog video production workflows (features vary with each model). Software is supplied on CD, including: • AJA’s Machina Capture/Playback application • Drivers for the card itself • All files necessary for interfacing with third-party software applications 8 What’s In The Box? When you unpack your AJA XENA LS, LH or 2K, you’ll find the following components: • AJA XENA Software and Documentation CD-ROM – this CD contains the software installer to place XENA drivers, plugins, and the AJA Machina capture/playback application on a Windows workstation. The CD also contains a wide variety of useful information. • The XENA model you ordered • Cable assembly – the appropriate XENA Standard Breakout cable for your XENA card • Read Me First Notice – late-breaking news and/or errata related to XENA and the documentation • Registration Sheet – register your card by mail or online (details provided) AJA XENA LS, LH or 2K Card (XENA LH shown) Installation Software CD Installation and Operation Manual in electronic form on the CD (PDF) Standard Cable XENA Breakout Cable (LH/LHe/LSe version shown) XENA Shipping Box Contents XENA Installation and Operation Manual — Introduction 9 Minimum System Requirements AJA Video recommends that your system meet minimum hardware and software requirements to achieve a satisfactory level of performance when operating it. System requirements are subject to change as new versions of operating systems, QuickTime, and workstations become available. For the most up-to-date Minimum System Requirements see the AJA website at: http://www.aja.com/html/support_xena_rec_sys.htm Understanding Disk Storage Methods To ensure performance and quality, the disk storage system used with the Windows workstation must be able to meet the demands of storing realtime uncompressed media. At the very minimum, the disk storage system must be able to provide and maintain a consistent 50 MB/s transfer rate from the workstation to disk (read/write). There are a variety of system configurations and peripherals that can provide this level of performance. Refer to Chapter 2, Computer Requirements for some approved and tested system configurations and information on testing data rates and storage performance. 10 Cable Connections XENA offers unsurpassed cable connectivity for a video/audio capture card. Connections are made via the supplied breakout cable and connectors mounted on the XENA Card endplate. Using the Breakout Cable and Card Endplate Connectors The breakout cables for the three XENA models are shown on the following page. XENA LHe/LH and LSe Connectors The XENA LHe/LH and LSe models use a breakout cable that supports: • Reference Input (BNC connector) • Component/Composite/S Video Input (3x BNC) • Component/Composite/S Video Output (3x BNC) • AES In (2x XLR) • AES Out (2x XLR) • Balanced Audio In (2x XLR) • Balanced Audio Out (2x XLR) • RS-422 Machine Control (9 pin D) The three BNCs on the XENA LH card endplate additionally provide: • A Standard-definition and High-definition SDI input (BNC) • Two SDI outputs (2x BNC, independent outputs) XENA LS Connectors The XENA LS model has no endplate BNC’s and uses a breakout cable to provide the same audio/video and reference I/O as the LHe/LH and LSe models (supporting standard definition only). A 9-pin D connector on the LS endplate provides RS-422 Machine Control connection. XENA Installation and Operation Manual — Introduction LH/LHe and LSe Breakout Cable LS Breakout Cable 60-pin connector To XENA LH/LHe SD-SDI/HD-SDI Video/Audio (no HD in LSe) Reference Input BNC blue red Balanced Audio Analog Audio Channel 1 Input Analog Audio Channel 2 Input Analog Audio Channel 1 Output Analog Audio Channel 2 Output AES Input Channels 1 & 2 AES Output Channels 1 & 2 green blue red To 44-pin XENA LS Connector SDI Input BNC SDI Output 1 BNC SDI Output 2 BNC Analog Video green 11 Y/CVBS In BNC Labelled BNCs: Reference Input BNC SDI In BNC Pb/Y In BNC SDI Out 1 BNC Pr/C In BNC SDI Out 2 BNC Y/G/CVBS Out BNC Analog Video Input: Y/CVBS, Pb/Y, Pr/C Analog Video Output: Y/CVBS, Pb/Y, Pr/C Pb/B/Y Out BNC Pr/R/C Out BNC 6 BNCs (Analog Connections): Can be Configured for Component, Composite, or Y/C RS422 Machine Control to VTR (9-pin) Labelled XLRs (audio): Channel 1 Analog In Channel 1 Analog Out Channel 2 Analog In Channel 2 Analog Out Channels 1&2 AES In Channels 1&2 AES Out XENA Breakout Cables XENA 2K Connectors XENA 2K provides complete I/O connectivity choices in two breakout cables. One cable provides AES/EBU digital XLR connections and analog video monitoring connections. The other cable has 4 mini-connectors on one end and 4 BNCs on the other providing SDI connections for both Single Link and Dual Link SD/HD SDI connections. Cable connections are marked on both the XENA card endplate and on the cable connectors for easy identification. 12 XENA 2K D Connector 3 BNCs (Analog Connections): In SD Can be Configured for Component, Composite, or S-Video In HD Can Only Be Component XENA 2K Mini-BNCs Reference Input BNC Audio Output XLRs Channels 1-8 (2 channels/connector) Audio Input XLRs Channels 1-8 (2 channels/connector) RS422 Machine Control to VTR (9-pin) SDI Out1/Link A BNC SDI Out2/Link B BNC SDI In1/Link A BNC SDI cable SDI In2/Link B BNC SDI Video with Embedded Audio In/Out XENA 2K Breakout Cable Using Breakout Boxes The XENA product line offers two optional 19” 1RU rack-mountable breakout boxes that attach to the XENA card via cables that connect to the back of the Box. These cables are supplied with the Box. The breakout boxes offer the same inputs and outputs as the standard breakout cables and more. Breakout boxes can be easily rackmounted or placed on top of a broadcast monitor or editing desk. XENA Installation and Operation Manual — Introduction 13 XENA KL-Box for LS and LH Cards The XENA KL-Box is connected via one 60-pin to 60-pin, and one 3-BNC to 3-BNC cable. When you purchase the KL-Box, you get two-channel unbalanced audio output (2 RCA Jacks) not available with the standard cable. Balanced Audio In Channels 1 & 2 AES/EBU Audio In and Out Balanced Audio Out Channels 1 & 2 Serial Digital In Serial Digital Out Composite/ Component Video In RS422 Machine Control External Reference (loop) Composite/ Component Video Out Analog Audio Output AJA KL-Box Panel Connectors K3-Box for XENA 2K The K3-Box for XENA 2K offers convenient connector access and additional functionality including simultaneous XLR and BNC AES output, 2-channel RCA analog audio monitoring, and looping BNC Genlock reference connectors. If you’re using a digital Betacam deck, HDCAM, DVCPRO HD, D5, D9 or even an HDCAM SR, you’ll have the proper connections. AES/EBU Audio In Channels 1 through 8 AES/EBU Audio Out Channels 1 through 8 AES/EBU Audio In Channels 1 through 8 AES/EBU Audio Out Channels 1 through 8 All AES/EBU audio connectors have two channels per connector AJA K3-Box Panel Connectors RS422 Machine Control Serial Digital In Serial Digital Out External Reference (loop) Component/ Composite Video Output Analog Audio Output 14 About BNC Connectors Although most video professionals are used to BNC connectors, you may not have seen them if you’ve been using primarily desktop video equipment. BNC connectors ensure a positive connection by the act of locking the connectors together via pins in one connector that fit into slots in the corresponding connector. To make a BNC connection, slide the cable connector over the panel connector and then when seated, rotate the barrel of the cable connector 90˚ clockwise until the connectors are locked together. When properly locked, the cable cannot accidentally be pulled out. Pins (2) on BNC Connector (connector on KL-box) Align slots in cable connector barrel with the connector pins, then slide it over the pins and rotate the barrel to lock the connectors together BNC Connectors About Mini-Connectors The four mini-connectors found on the XENA 2K endplate are not common on video equipment but offer small size, ease-of-use, and high reliability. (These connectors are also sometimes referred to as “mini-BNC’s” and “1.0/2.3 Connectors.”) To make a connection with these connectors, simply slide the cable connector onto the endplate connector. It will lock in place when fully seated. To remove a mini-connector, just grasp the knurled barrel on the connector and slide it backward to release the lock. Note: Do not try to remove the mini-connector by pulling on the cable itself. This action will not remove the connector but will stress the cable. XENA Installation and Operation Manual — Introduction Knurled Barrel 15 4 Mini-connectors on XENA 2K PC board endplate Slides back to release connector. Mini BNC Connectors Connector Descriptions—LS/LH Cables and KL-Box Connectors on the standard cable set are labelled as to their function for easy installation and maintenance. Connectors on the optional KL-Box are similarly labelled. SDI Input and Outputs BNC connectors are provided on the XENA LHe/LH card endplates for one SDSDI or HD-SDI input and two SDI outputs (format independent of the input). The SDI input and outputs support video and embedded 24-bit digital audio. Use SDI wherever possible for the best quality 10-bit uncompressed video input, capture and output. If peripheral equipment has a variety of inputs/outputs, look to see if it has SDI I/O, and use it where possible. Most high-end professional broadcast equipment supports SDI (VTRs, cameras, media storage servers, etc.). 2-Channel Digital AES/EBU Audio Inputs And Outputs One female XLR connector is provided for the channel 1 and 2 inputs, while a male XLR connector carries channel 1 and 2 outputs. AES/EBU signals are handled internally as 24-bit digital.The optional KL-Box also provides XLR audio connections on the front panel. Note: AES XLR connections are digital and cannot be used with analog equipment having XLR connectors. 16 Analog 2-Channel Balanced Audio Two sets of analog XLR connectors, one for each channel, support balanced audio connections. Male XLRs are provided for outputs and female XLRs are provided for inputs. Balanced audio (differential) connections provide better analog audio quality over longer cable runs. Most professional quality VTRs and audio equipment have XLR style connectors for analog audio. Analog audio signals are converted internally to 24-bit digital. Analog 2-Channel Unbalanced Audio (KL-Box only) On the KL-Box are two analog output connectors, one for each channel. These connectors are RCA-style phono jacks. RS-422 Machine Control A female DB9 connector on the LHe/LH/LSe breakout cable provides connection for VTRs, camcorders, disk media servers, and other devices using RS-422 SMPTE (Sony) protocol. The XENA LS card has a direct RS-422 connection on the rear end connector plate for a user-supplied cable. This RS-422 connector is also present on the optional KL-Box (connector pinout is listed in Appendix A: Specifications). Connector Descriptions—2K Cables and K3-Box Connectors on the standard cable set are labelled for their function for easy installation and maintenance. Connectors on the optional K3-Box (breakout box) are similarly labelled. 8-Channel Digital AES/EBU Audio Inputs and Outputs When using the standard cables, XLR connections are provided for AES/EBU audio input/output. Four female XLR connectors are provided for audio input and four for audio output. Each XLR carries two channels. XLR connectors are labeled for input/output and channels. The optional K3-Box provides both BNC and XLR audio connections on the front panel. Note: XLR connections are digital and cannot be used with analog equipment having XLR connectors. Analog 2-Channel Unbalanced Audio (breakout box only) On the breakout box are two analog output connectors, one for each channel. These connectors are RCA-style phono jacks. XENA Installation and Operation Manual — Introduction 17 RS-422 Machine Control A female DB9 connector provides connection for VTRs, camcorders, disk media servers, and other devices using RS-422 SMPTE (Sony) protocol. This connector is present on both the general I/O cables and the optional K3-Box. (Connector pinout is listed in Appendix A: Specifications.) SDI Inputs and Outputs On the XENA 2Ke/2K card, mini-connectors are provided for two SDI inputs and two SDI outputs for Single or Dual Link. A cable with four Mini-connectors on one end and four BNCs on the other end is provided for connecting equipment to the SDI inputs and outputs. XENA 2K has three video outputs altogether—two SDI outputs that are used for both High- and Standard-definition (SD/HD-SDI), and one component analog output (discussed later). Each of the three outputs is independently switchable between HD and SD. For example, if you are working in HD, you can have simultaneous HD-SDI, SD-SDI, and HD-component analog output. SDI inputs and outputs support video and 8-channel embedded 24-bit digital audio. Use SDI wherever possible for the best quality 10-bit uncompressed video input, capture, and output. If peripheral equipment has a variety of inputs/outputs, look to see if it has SDI I/O, and use it wherever possible. Most high-end professional broadcast equipment supports SDI (VTRs, cameras, media storage servers, etc.). Analog Monitor Out (Component/Composite HD/SD) Both the standard I/O cable and the optional KL-Box feature two groups of three BNC connectors each, for input and output of component, composite and Y/C functions. The signals are labelled on both the cable and KL-Box connectors. The analog component output can be switched between SD and HD. XENA 2K features 12-bit component video output for both HD and SD. SD can be switched to composite and Y/C. (The same three BNC connectors share component and Y/C functions.) This allows use of an inexpensive analog monitor for both HD and SD work. You can even use a composite video monitor. For Dual Link HD-SDI output, HD or SD can be monitored through the component output. Dual Link HD can be output as 4:4:4 RGB. Component video signals are generally higher quality than composite, but not as high-quality as serial digital (SDI). A Note About RGB: Although RGB is used less in today’s video systems, XENA 2K supports it for A/V Monitor output. However, because the XENA 2K (and SMPTE SDI’s) native format is YPbPr, AJA recommends using YPbPr when the monitor supports it. The YPbPr format provides “headroom” for “superwhite” and superblack”—and these video levels will be 18 clipped when transcoding to RGB. Also, the RGB/YPbPr transcoding involves a level translation that results in mathematical round-off error. RGB can be configured in the Playout setup panel of the specific application you are using with XENA 2K. A Note About YPbPr: XENA 2K supports three different types of YPbPr: • SMPTE/EBU N10 • Betacam (NTSC) • Betacam (NTSC-J [Japan]). These three formats differ in level only and can be configured in the Playout setup panel of the specific application you are using with XENA 2K. Reference Video A single BNC on the standard XENA cable—or two BNC connectors on the K3Box (it loops through)—allow you to synchronize XENA outputs to your house analog reference video signal (or black burst). If you have a sync generator or central piece of video equipment to use for synchronizing other video equipment in your studio, connect its analog composite output here. When XENA outputs video it locks to this reference signal. When connecting a reference video source, the locking signal should be the same format as the Primary format selected in XENA software. It is possible in some circumstances to use an alternate format video signal if the basic frame rate is compatible. XENA Installation and Operation Manual — Introduction 19 In This Manual Chapter 1 is the introduction you’re reading, listing features, box contents, system requirements, and connection hardware. Chapter 2 provides complete instructions for installing the AJA XENA card. The user is guided through unpacking, installing the card into a Windows workstation, installing XENA Software From CD, cabling the system and getting it up and running. Important configuration information is also provided on video settings and use of genlock/external reference. Chapter 3 discusses XENA features that are common across all its plug-ins and the XENA Machina application. Here you’ll find a basic overview of how XENA operates and is configured, from making source and format selections to capturing, previewing, and playing back video and audio. Chapter 4 discusses operational aspects of XENA when used with AJA’s Machina capture/playback application. Chapter 5 discusses operational aspects of XENA when used with Adobe Premiere Pro CS3 editing and motion graphics software. Chapter 6 discusses operational aspects of XENA when used with Adobe After Effects CS3 compositing software. Chapter 7 discusses operational aspects of XENA when used with Adobe Adobe Photoshop CS3 photo/graphics editing application. Chapter 8 discusses operational aspects of XENA when used with Autodesk Combustion software. Chapter 9 discusses operational aspects of XENA when used with Eyeon Fusion software. Chapter 10 discusses other third-party applications that provide native support for XENA cards. Chapter 11 discusses troubleshooting problems with your system and what to do when there’s a problem you can’t solve. It also provides a list of Frequently Asked Questions (FAQs). Appendix A contains the technical specifications for the product. 20 X NA Models: 2K, LH, and LS Chapter 2 Installation & Hardware Configuration Installation Overview The installation and set up of a XENA is very simple. All of the steps of installation and hardware configuration are described in this chapter and are summarized as follows: 1. Unpack the shipping box 2. If not previously installed on your PC, ensure that your editing or capture/ playback applications are installed as detailed in their user documentation. These applications must be installed and have been run at least once prior to installing AJA XENA software to allow proper interface setup. 3. Configure your Workstation as appropriate for your workflow requirements. A URL to AJA Support is provided for getting the latest tested and approved XENA and RAID storage configurations. 4. Install AJA XENA software on your Workstation from the supplied AJA CD-ROM. 5. Cable the system audio and video sources, VTR, audio monitor, and video monitor. If you purchased the optional KL-Box or K3-Box, install it in an equipment rack or place it on a desk and connect its two cables to the XENA card. If you are using the standard cable set instead, connect those directly to the equipment. These steps are explained in greater detail in the following pages. 2 22 Unpacking Shipping Box Contents Your XENA card is shipped with a CD containing system software and an Installation and Operation manual (a PDF on the CD), and a cable assembly. If you purchased the optional KL-Box or K3-Box breakout box, it ships with its own set of cables and instructions for connection to the XENA card. AJA XENA LS, LH or 2K Card (XENA LH shown) Installation Software CD Installation and Operation Manual in electronic form on the CD (PDF) Standard Cable XENA Breakout Cable (LH/LHe/LSe version shown) Contents, XENA Shipping Box As you unpack the shipping box(es), carefully examine the contents. Ensure you received everything and nothing was damaged in shipment. If you find any damage, immediately notify the shipping service and supply them with a complete description of the damage then contact your AJA dealer or distributor for details on how to have your XENA repaired or replaced. AJA will repair or replace damaged items. Save packing materials and the shipping box. If you ever require service or move your system—use the packaging materials and box for safe shipment. XENA Installation and Operation Manual — Installation & Hardware Configuration 23 Computer Requirements for XENA Cards The currently suggested systems for use with XENA are shown in the table below. Item Minimum Workstation with 2K, LH, or LS cards for 2K, HD, and SD workflows HP XW8400 (Windows XP or Vista – 32-bit) with: • 2 physical processors in 2 processor sockets Note: A single Dual-core processor is not acceptible for operation of these XENA models. HP XW9400 (Windows XP or Vista – 32-bit) with: • 2 physical processors in 2 processor sockets Boxx 8200 (Windows XP or Vista – 32-bit) with: • 2 physical processors in 2 processor sockets Boxx 7400 (Windows XP or Vista – 32-bit) with: • 2 physical processors in 2 processor sockets All systems should have: • Minimum 2 GB DDR2 RAM • Two PCI-X buses • A 16-lane PCIe NVidia Quadro FX graphics card Workstation with LS cards on a HP XW4300 Dual Core, XW6200Dual Processor (Windows XP or Vista – 32-bit) PCI-X bus only. with: • 74 GB Raptor or SCSI Boot drive • 2 GB RAM • DVD-Drive • 3-4 Drive, single-channel, SATA or SCSI boot drive • A 16-lane PCIe NVidia Quadro FX graphics card Storage [SATA storage has yet to be certified by AJA for HD or 2K workflows] The Faster the better. 2K/HD RGB (Requires sustained 400-450 MB/s throughput) • 8 – 10 Drive, 2 to 4-channel U320 Adaptec 39320 SCSI card (Using multiple HBAs is a common solution in high-bandwidth workflows.) • 2-channel - 4GB Fiber-channel array HD YUV/RGB (Requires sustained 250-300 MB/s throughput) • 4 – 6 Drive, 2-channel U320 Adaptec 39320 SCSI card • 2-channel - 2GB Fiber-channel array SD YUV/RGB • 3 – 4 Drive single-channel SATA or SCSI raid AJA Data Rate Calculator Application for Windows (Version 1) AJA offers a Data Rate Calculator utility for XENA users as a resource for configuring systems and determining storage requirements. This application calculates data rates and storage requirements for a given video size, format, and frame rate and is available for download at: http://www.aja.com/html/support_xena2k_swd.html Note: It is the storage vendor’s responsibility to maintain sustained playback. Many benchmark utilities show a speed test in an ideal setting but will not sustain that data rate for sequential data reads/writes as required in a true video editing environment. Use the calculator to determine the data rate required and then proceed to the system test described below. 24 AJA XENA System Test (Version 1) XENA System Test is available on the AJA website at: http://www.aja.com/html/support_xena2k_swd.html XENA System Test is a Windows utility for measuring system performance with AJA XENA Video Capture cards. The application includes disk drive speed tests and video data copy (DMA) speeds. The disk speed tests differ from standard disk I/O performance applications in that they specifically test the system under conditions typically encountered with video capture, playback, and editing. Note: Most of the disk performance tests are generic and don’t require an AJA XENA Video Capture card. The DMA performance tests do require a XENA card and AJA XENA Driver software to operate. We suggest the best test is to fill your storage disk to 80% and then test capture at the highest data rate you will use. Use Machina Capture Status display to monitor lost frames (see page 64). XENA Installation and Operation Manual — Installation & Hardware Configuration 25 Installing the XENA Card 1. Place the PC in a well-lit convenient area, where you will have easy access to the chassis access door. 2. Touch the outside of the PC to discharge any static electricity in your body. Remove the power cable from the back of the PC. 3. Open the PC to gain access to the card slots as described in your Workstation User Manual. 4. Remove the XENA card from its protective anti-static bag; place the card on top of the bag. 5. To install the XENA card and RAID controller card (SCSI or Fibre Channel), refer to the AJA website for the latest installation updates at: http://www.aja.com/html/support_xena_rec_sys.htm Because of hardware and software changes, AJA engineers are constantly testing and grading workstation performance. The AJA website is your best source of upto-date approved workstation configurations. Note: Always put the RAID controller and XENA on separate PCI busses. This improves performance by reducing bus contention. CPU 0 1 XENA LSe, LHe, or 2Ke XENA LS, LH, or 2K 2 PCI 32/33 PCI-E 16X 3 PCI 32/33 4 PCI-E 4X 5 PCI-X 64/133 6 PCI-X 64/100 7 PCI-X 64/100 CPU 1 SCSI 2 SCSI 1 XENA Card Slots in HP XW8200 Motherboard (LH card shown) 6. Open the card retainer bar on the left side of the chassis cardcage. Remove the card edge access cover from the desired slot where you will be inserting the XENA card. 26 7. Holding the XENA card by the card edge plate and an outside edge, carefully insert the XENA card by rocking it slowly into the slot. Ensure the card edge aligns properly with the PC’s opening (where the card edge cover was just removed) and that it is fully seated in the slot. 8. Secure the card in the slot replacing the card retainer bar. 9. Replace the PC’s panel/door removed in step 3. Card edge covers Locate the PCI Slots Inside Your PC and Insert the XENA Card XENA Installation and Operation Manual — Installation & Hardware Configuration 27 Cabling XENA Make video and audio input/output connections according to your workflow requirements. Each connector is described in detail in Chapter 1. In this section, XENA cable connections are shown and described for XENA 2Ke/2K, LHe/LH/ LSe and XENA LS breakout cables. Using The 2Ke/2K Breakout Cable XENA Installs in PCI Slot in PC Video Monitor Component Video AJA XENA 2K Card (installed in the Workstation) AES/EBU Audio Out to Monitor System RS422 Machine Control (9-pin) 4-mini BNCs to 4 standard BNCs Audio Input XLRs Channels 1-8 (2 channels/connector) SDI Out1/Link A BNC SDI Out2/Link B BNC SDI In1/Link A BNC Digital VTR with SDI Inputs SDI In2/Link B BNC SDI Video with Embedded Audio In/Out SDI cable B t2 t1A Ou In Audio Output XLRs Channels 1-8 (2 channels/connector) Ou 1A 2B Reference Input BNC In Optional Genlock Reference 3 BNCs (Analog Connections): In SD Can be Configured for Component, Composite, or S-Video In HD Can Only Be Component 28 Dual-link Connections Using the XENA 2K card, you can take advantage of the speed and quality of Dual-link SDI I/O. When connecting for dual-link, use the normally separate inputs and outputs numbered 1 & 2 as A and B components of the dual-link (thus the connectors are labeled 1A/2B). When configuring XENA Capture plugins, you will select Dual-link for your SDI input and output modes. Using The LHe/LH/LSe Breakout Cable XENA Installs in PCI Slot in PC Standard Breakout Cable 60-pin connector To XENA LH/LHe or LSe SD-SDI/HD-SDI Video/Audio Reference Input BNC Analog Video green blue red green Balanced Audio Analog Audio Channel 1 Input Analog Audio Channel 2 Input Analog Audio Channel 1 Output Analog Audio Channel 2 Output AES Input Channels 1 & 2 AES Output Channels 1 & 2 SDI Input BNC SDI Output 1 BNC SDI Output 2 BNC blue red Y/CVBS In BNC Pb/Y In BNC Pr/C In BNC Y/G/CVBS Out BNC Pb/B/Y Out BNC Pr/R/C Out BNC 6 BNCs (Analog Connections): Can be Configured for Component, Composite, or Y/C RS422 Machine Control to VTR (9-pin) XENA Installation and Operation Manual — Installation & Hardware Configuration 29 Using The LS Breakout Cable XENA LS Installs in PCI Slot in PC Standard Breakout Cable 44-pin connector To XENA LS RS422 Machine Control to VTR (user-supplied 9-pin cable) Reference Input BNC SDI Input BNC green SDI Output 1 BNC blue SDI Output 2 BNC red green Balanced Audio Analog Audio Channel 1 Input Analog Audio Channel 2 Input Analog Audio Channel 1 Output Analog Audio Channel 2 Output blue red Y/CVBS In BNC Pb/Y In BNC Pr/C In BNC Y/G/CVBS Out BNC Pb/B/Y Out BNC Pr/R/C Out BNC 6 BNCs (Analog Connections): Can be Configured for Component, Composite, or Y/C AES Input Channels 1 & 2 AES Output Channels 1 & 2 A Typical System A figure on the following page shows typical system interconnections for a system with digital A/V sources using the KL-Box for XENA LS or LH cards. Your system may differ depending on VTRs, audio monitoring, and video monitoring. 1. If desired, connect your house reference sync to the XENA Ref Loop connector (BNC). The second XENA Ref Loop connector on the KL-Box (if used) can be connected to the VTR or terminated with a 75-ohm terminator. 2. Connect a Video Monitor to the XENA Component Analog Video Out BNC connectors (preferred), or connect to a composite monitor. 3. Connect a 9-pin DB9 machine control cable between your VTR’s RS422 control port and the XENA breakout cable RS-422 machine control connector. 30 4. Connect two SDI cables between XENA (BNCs are on the card endplate) and your digital VTR (Digital Betacam etc.): one from XENA SDI In to the VTR SDI Out, and one from XENA SDI Out (1 or 2) to the VTR SDI In. The XENA SDI connections have embedded audio so the VTR must be configured accordingly. 5. If you have an AES/EBU-ready audio monitoring system, connect the two channels of AES/EBU output from XENA’s XLR connectors (channels 1 and 2) to the monitoring system AES/EBU inputs. If instead you have an analog audio monitoring system, you can use either the XLR balanced audio connectors or the two RCA-style unbalanced stereo output jacks on the Optional KL-Box for output. Digital VTR with SDI Inputs Analog Audio Inputs/Outputs (Balanced) Audio Monitor Reference Monitors AES/EBU Audio In/Out to Monitor System External Reference Connect to KL-Box Using Cables and Instructions Supplied With it SDI Video with Embedded Audio In/Out Optional Genlock Reference RS422 Machine Control Video Monitor Component Video Computer Monitor Installed Inside PC AJA XENA Card Raid driver card Installed in the PC Typical System Connections—Shown with Optional KL-Box l Externa RAID XENA Installation and Operation Manual — Installation & Hardware Configuration 31 Genlock and Your System For video stability and proper system operation, it’s always best to genlock all equipment to house sync. Although genlock is not absolutely required for XENA or your system, you will have better quality and repeatable operation using it. Usually, this means using a black burst generator output looped through the system. On the XENA cables and optional KL-Box and K3-Box breakout boxes, house sync is connected to “Ref Loop”. Installing XENA Software If your PC has previously had another video capture or multimedia card installed, remove the card and uninstall any related software before installing XENA. This will prevent hardware or software conflicts. Note: Before proceeding, ensure that your capture application software is installed as detailed in its user documentation. These applications should be installed and run at least once prior to installing AJA XENA software. Use the CD-ROM supplied with the XENA system to install necessary software drivers and AJA’s Machina Capture/Playback application (if desired). The procedure is described below. You cannot use XENA with third-party applications until the AJA XENA software has been installed on the host workstation. If you add XENA supported applications at a later date, you must run the install program again selecting the appropriate application support software to be installed. System software updates may occasionally become available to AJA XENA owners on our website (www.aja.com). We recommend checking occasionally for both software updates and additional product information. Software Installation Procedure Locate the AJA XENA Software CD packaged with your system and follow the procedure below to install the required software on the host system. Note: Before installing XENA software, turn off any virus protection and security software that you have installed on your computer. 32 Insert the XENA CD in the PC. Install Wizard The XENA installation program will launch and extract the necessary XENA drivers and XENA Control Panel software for installation on the desired hard drive. Install Wizard Welcome When you see the Welcome page click “Next” to view the XENA license agreement. XENA Installation and Operation Manual — Installation & Hardware Configuration 33 License Agreement Read the XENA license agreement and click “Yes” to accept. You will be asked to choose the type of installation you would like to perform. Installation Type 34 If you don’t have all the XENA supported Adobe Production Studio products installed on your workstation, you may choose to perform a Custom installation (default) and select only the software necessary for your applications. If you use the entire collection, use the “Typical” installation. The following screens depict the more elaborate Custom installation. Installation Destination You will be prompted to choose the drivers and plugins you would like installed on your system. XENA Installation and Operation Manual — Installation & Hardware Configuration 35 Driver and Plugin Selection Click “Next” to review your settings before copying files to your system. Note that you can run the installation again if you decide to add other XENA compatible applications. When the installer has completed copying the XENA software to disk, you will see a standard Windows Logo test warning. Click on the “Continue Anyway” button to finish the installation. Windows Logo Test Warning When the installation is completed, a final screen will be displayed announcing that “Setup has finished installing AJA XENA on your computer.” Click on the Finish button after the installation is complete. Restart the computer after installation to activate the XENA card. 36 X NA Models: 2K, LH, and LS Chapter 3 XENA Setup and Configuration Setup Overview This Chapter discusses the XENA features that are common across all its plug-ins and the Machina application. Here you’ll find a basic overview of how XENA operates and is configured, from making source and format selections to capturing, previewing, and playing back video and audio. Selection of Primary & Secondary Formats in Various Applications In XENA’s operation, the Primary Format is that which is written to disk. The Secondary Format is set to match the format of the input device (if the Primary Format is a conversion) or to match the format that is set for an output monitor if you’re monitoring a conversion and the Primary Format is the format on the input device. Note: The XENA Secondary Format nomenclature places (O) or (I) at the end of the signal format: (O) indicates the selected secondary format is for output only. (I) indicates the format selection is that of an input only. The Secondary Format isn’t used if there are no conversions. In all of the applications supported by XENA, you can set these formats. In the Adobe applications (Premiere Pro, After Effects, and Photoshop), the XENA plug-ins provide similar ways of making these choices. In each application, though their interfaces may differ, these choices are virtually the same. For your convenience this manual redundantly describes these choices in the chapters specific to each application. As a primer, they are also described in this chapter. Overview The Primary Format menu allows you to select the video format to be used in the current project. Analog output is always available and performs a conversion, if necessary, based on the Primary or Secondary Format. Note: No frame rate interpolation is applied for conversions from one frame rate to another. 3 38 Primary and Secondary Format Options Supported by XENA cards Video Signal Formats LS LH 2K 720x576 @ 25.00i Yes Yes Yes 720x576 (Wide) @ 25.00i Yes Yes Yes 720x486 @ 29.97i Yes Yes Yes 720x486 (Wide) @ 29.97i Yes Yes Yes 720x480 @ 29.97i Yes Yes Yes 720x480 (Wide) @ 29.97i Yes 1280x720 @ 23.976p Yes Yes Yes Yes 1280x720 @24.00p Yes Yes 1280x720 @ 25.00p Yes Yes 1280x720 @ 29.97p Yes Yes 1280x720 @ 30.00p Yes Yes 1280x720 @ 50.00p Yes Yes 1280x720 @ 59.94p Yes Yes 1280x720 @ 60.00p Yes Yes 1920x1080 @ 23.976sF Yes Yes 1920x1080 @ 24.00sF Yes Yes 1920x1080 @ 25.00sF Yes Yes 1920x1080 @ 29.97sF Yes Yes 1920x1080 @ 30.00sF Yes Yes 1920x1080 @ 25.00i Yes Yes 1920x1080 @ 29.97i Yes Yes 1920x1080 @ 30.00i Yes Yes 1920x1080 @ 23.976p Yes Yes 1920x1080 @ 24.00p Yes Yes 1920x1080 @ 25.00p Yes Yes 1920x1080 @ 29.97p Yes Yes 1920x1080 @ 30.00p Yes Yes 1920x1080 @ 50.00p Yes 1920x1080 @ 59.94p Yes 1920x1080 @ 60.00p Yes [email protected] Yes Yes [email protected] Yes Yes [email protected] Yes Yes [email protected] Yes Yes [email protected] Yes [email protected] Yes Primary to Secondary conversion allows you to set up down-, up-, and crosscoversion depending on the XENA model and formats supported. XENA Installation and Operation Manual — XENA Setup and Configuration 39 Convert Mode Allows selection of a conversion mode for up-, down-, or cross-conversion between High-definition and Standard-definition, or High-definition to High-definition formats. The choices offered depend on the XENA model present and the Primary and Secondary format chosen. XENA 2K models support up-, down-, and cross-conversion plus SD-to-SD aspect ration conversions. LH models only have a down converter, and the LS model (SD only) has no conversion. All conversions use AJA 10-bit hardware on the card. To do a down-conversion on an HD input (2K and LH models): • Set the Primary Format as an SD format • Select the correct HD format with an (I) input designation for the Secondary Format, then • Choose a “– Secondary” Video Input type To do an up-conversion on an SD project for HD output (2K models): • Set the Primary Format as an SD format • Select the correct HD format with an (O) output designation for the Secondary Format, then • Choose a “– Secondary” SDI1/2 Output type and an HD Analog Output Down-conversion display mode choices that may be available include (LH and 2K): • Anamorphic: full-screen • Letterbox: image is reduced with black top and bottom added to image area with the aspect ratio preserved • Crop: image is cropped horizontally to fit new screen size Up-conversion display mode choices that may be available include (2K models): • Anamorphic: full-screen • Pillarbox 4x3 • Zoom 14x9 • Zoom Letterbox • Zoom Wide 40 For Cross-conversion (2K models): • Set the Primary Format as an HD format (what you want the input converted to) • Select the correct input HD format with an (I) input designation for the Secondary Format XENA 2K cross-conversion allows you to convert from one format of HD to another, such as 1080i @ 29.97 to 720p @ 59.94. XENA 2K does not perform 2K to HD cross-convert, but can display a cropped cut of the 2K on an HD monitor. In addition to HD-to-HD cross-conversion, XENA 2K also can perform SD to SD hardware based aspect-ratio conversion for capture and output. This is controlled the same as all other up/down/cross-conversions. Use it by selecting a ‘Secondary Video Format’ that matches the ‘Primary Video Format’ and then specifying the conversion using the ‘Convert Mode’ control. Video Input Each XENA plug-in, and the stand-alone Machina application, offer a Video Input pull-down menu to select an appropriate signal type for your input. (The current selection is reported in the display of the pull-down menu.) Video Input always shows all the available input options based on your Primary and Secondary format configuration. XENA software looks at 1) what model you have, 2) Primary Format, and 3) Secondary Format (in that order) to determine the appropriate input options. Video Input Options Supported by XENA cards include: • Single Link SDI • Component Betacam NTSC-J • Composite NTSC • Component SMPTE NTSC-J • S-Video NTSC • Composite PAL • Component Betacam NTSC • S-Video PAL • Component SMPTE NTSC • Component Betacam PAL • Composite NTSC-J • Component SMPTE PAL • S-Video NTSC-J • Component XVGA (HD only) • Dual Link HD (2K only) • HSDL (2K only) XENA Installation and Operation Manual — XENA Setup and Configuration 41 Audio Input Use the Audio Input pull-down menu to select the appropriate signal type for your input. (The current selection is reported in the Status Display.) Audio Input Options Supported by XENA cards include: • Embedded SDI • Digital AES/EBU - XLR • Digital AES/EBU - BNC (only applies if you are using a KL- or K3-Box) SDI Outputs 1 & 2 When using XENA LS and LH cards, the SDI outputs will be Single Link only, if there is no Secondary Video Output Format selected. If you have a Secondary format selected, you can choose between Single Link SDI – Primary and Single Link SDI – Secondary as your output. XENA 2K also offers Dual Link output which uses both output connectors for a single A/B channeled output (SDI Output 2 automatically becomes Dual Link). Analog Output Analog format choices in the Analog Output pull-down menu vary depending upon file format. • Composite + S-Video NTSC • Composite PAL • Composite + S-Video NTSC-J • S-Video PAL • Component Betacam NTSC • Component Betacam PAL • Component Betacam NTSC-J • Component SMPTE PAL • Component SMPTE • Component RGB • Component XVGA (HD only) Note: When SD and HD formats are available as Primary and Secondary formats, you can choose between SD and HD raster for the Analog Output. Audio Level Choose between +6 dB (US) monitor level and +0 dB (EBU). 42 Timecode Input Select the type of timecode used by the source video machine—RS422 or Embedded SDI (RP188). Note: SMPTE RP 188 defines a standard for the transmission of time code and control code in the ancillary data space of a digital television data stream. Time code information is transmitted in the ancillary data space as defined in ANSI/SMPTE 291M. Multiple codes can be transmitted within a single digital video data stream. Other time information, such as realtime clock, DTTR tape timer information, and other user-defined information, may also be carried in the ancillary time code packet instead of time code. The actual information transmitted through the interface is identified by the coding of a distributed binary bit. Equipment manufacturers can use the meta data for different purposes. Desktop Display Options Select one of four modes of desktop display: • Off • Display while idle only (this mode is suggested) • Display during capture only • Display Always Display to Desktop uses system resources and could affect performance. Choose Capture Speed, Width, and Height as appropriate for your system capabilities. Desktop Speed: • Full Speed – Every frame is displayed to desktop during playback • Half Speed – Every other frame is displayed to desktop during playback • Quarter Speed – one out of every four frames is displayed to the desktop Half Speed and Quarter Speed will reduce the system load that the Display-ToDesktop is using to draw video to your computer. Desktop Capture Width and Height: These selections allow you to reduce the resolution of the desktop capture display. The captured file will be full-resolution. Only the displayed image is reduced to save processing resources during capture. The choices available are: • Full Resolution • Eighth Resolution • Half Resolution • Sixteenth Resolution • Quarter Resolution XENA Installation and Operation Manual — XENA Setup and Configuration 43 File Options XENA supports the following Video and Audio Formats: Video Formats: • 8-bit YUV 4:2:2 – ‘2vuy’ • 8-bit RGBA 4:4:4:4 – ‘rgba’ • 8-bit YUV 4:2:2 – ‘2Vuy’ • 8-bit RGBA 4:4:4:4 – ‘bgra’ • 10-bit YUV 4:2:2 – ‘v210’ • 10-bit Log RGB 4:4:4 – ‘R10g’ • 8-bit RGB 4:4:4 – ‘rgb’ • 10-bit RGB 4:4:4 – ‘R10k’ • 8-bit RGB 4:4:4 – ‘bgr’ • 10-bit RGB 4:4:4 – ‘r10k’ • 8-bit RGBA 4:4:4:4 – ‘argb’ Audio Formats (96 kHz available on XENA 2K only): • 48 kHz 16-bit PCM Mono • 48 kHz 16-bit PCM Stereo • 48 kHz 24-bit PCM Mono • 48 kHz 24-bit PCM Stereo • 48 kHz 32-bit PCM Mono • 48 kHz 32-bit PCM Stereo • 96 kHz 16-bit PCM Mono • 96 kHz 16-bit PCM Stereo • 96 kHz 24-bit PCM Mono • 96 kHz 24-bit PCM Stereo • 96 kHz 32-bit PCM Mono • 96 kHz 32-bit PCM Stereo XENA 2K supports up to 16 channels of audio (eight stereo pairs), while the other XENA cards support up to eight (four stereo pairs). Adobe Premiere Pro CS3 supports six channels. Capture, Preview, and Playback—Differences and Similarities The services that XENA provides differs based on the plug-ins. Some applications, like Adobe Premiere when used with its XENA plug-in, offer full support for media capture, previewing from RAM, and playback to monitors and to an attached VTR with full machine control. Other applications and their XENA plug-ins offer different levels of support. This section describes the support provided by each XENA plug-in and the Machina standalone application and discusses what each of these capabilities mean. Capture Overview Capture records the source signal to your storage system from the chosen input connector(s), digitizing and encoding the media (audio and video) to disk as you’ve directed in your XENA configuration settings. Media may be recorded directly as configured as the Primary Format (framebuffer) or with some type of conversion performed—a Secondary Format at the input (set up in XENA con- 44 figuration) is converted to the Primary Format (as allowed by the XENA model you have). For those applications that do not directly support capture via XENA, you can always use Machina to perform the capture and then load the media into the desired application as a QuickTime, AVI, or still image file. Preview Overview Preview is the viewing of captured media from RAM memory in the computer. It is not necessarily realtime since it’s affected by CPU performance and other real world factors such as other activities that might be occuring on the host computer. RAM preview occurs on the computer monitor. The purpose of preview operations is to review the captured material and perform editing/trimming operations. Playback Overview Playback differs from Preview in that the media is read directly from disk storage and output, as configured, to XENA outputs. Playback also outputs machine control signals to the RS422 connector directing VTR operations. Playback is frame-accurate and suitable for broadcast and print-to-tape. Support for Capture, Preview and Playback The following table shows for each of the XENA plug-ins and the Machina application, which Capture, Preview, and Playback services are provided. Application or Plug-in Capture Y/N Preview Y/N Playback Notes Y/N Machina Y Y Y Use tabbed windows to configure Adobe Premiere Plug-in Y Y Y Capture & Preview: file-> capture Playback: project->”project settings” ->General->”playback settings” button Adobe After Effects CS3 Plug-in Y Y Y AJA plug-in screen available under Windows menu Adobe Photoshop CS3 Plug-in Y (1 frame) Y N Capture 1 frame: file->Import-> “AJA image capture” Combustion Plug-in N Y N Preview: file->preferences->host-> framebuffer->framebuffer type-> AJA Preview->click “Options” Eyeon Fusion Plug-in N Y N Preview: file->preferences-> “global and new comp defaults”-> preview->options-> ”display file sequences on” -> AJA Preview To Edit AJA Settings: file->preferences-> “global and new comp defaults”-> I/O -> AJA Preview XENA Installation and Operation Manual — XENA Setup and Configuration 45 Codex Utility When XENA software is installed, a utility application named Codex is put in the AJA directory (Programs -> AJA -> Codex). This utility allows you to make global adjustments to the YUV/RGB Matrix in both the QuickTime and AVI Codecs used by third-party applications. (Does NOT apply to Premiere Pro CS3 and After Effects CS3.) The Codex utility allows you to adjust the matrices used when YUV–RGB conversions are performed by applications such as Fusion, and Combustion. These conversions occur during YUV–RGB encoding/decoding when creating or opening QuickTime and AVI files using the AJA AVI/QuickTime codecs. Codex Application Screen The pulldown menus in this screen are organized by the function being performed. Pulldowns on the left are for AVI file decompression and compression and those on the right are for QuickTime decompression and compression. 46 In each pulldown, the current setting is displayed. When you click on any of the pulldowns, the choices available for each are all the same: • 601 SMPTE • 601 CGR • 709 SMPTE • 709 CGR The 601 matrices govern Standard-definition component digital color scaling matrices and the 709 apply to High-definition color scaling matrices. If you make a change to the existing setting it will only be saved and used when the Apply button at the bottom of the Codex screen is clicked. Clicking the Reset button, located next to the Apply button, restores the factory default settings. Note: Similar controls can be found in the XENA plugins for Adobe Premiere Pro CS3 and Adobe After Effects CS3 rather than in the Codex application. X NA Models: 2K, LH, and LS Chapter 4 AJA Machina Application Machina Capture/Playback Application Machina (pronounced: mock´-en-uh) is AJA’s powerful standalone capture/ playback application that includes full VTR machine control. It is an easy-to-use interface that provides access to any and all XENA supported file formats, video standards, and video conversions. Captured files can be imported into virtually any software package that supports these file formats—such as 3D animation programs, audio editing programs, and more. With Machina, you can also accurately output files exported from these same programs to tape. The Machina application is part of the software package that came with your XENA card. If you haven’t already done so, launch the XENA Install CD, follow the prompts, and click on the Machina short-cut placed on the desktop to launch Machina. This chapter addresses configuration and setup unique to use of XENA LSe/LS, LHe/LH, and 2Ke/2K models with Machina. XENA Realtime Performance With XENA LS running Machina, in realtime you can: 1. Capture uncompressed analog or digital SD, component/composite, or SVideo to: Tiff, Targa, Bitmap, Quicktime, AVI, or YUV 2. Playback to two displays simultaneously, SD-SDI and analog 3. Import or Export: Tiff, Targa, Bitmap, Quicktime, AVI, or YUV With XENA LH running Machina, in realtime you can: 1. Capture uncompressed analog or digital SD and HD, component/composite, or S-Video to: DPX, Cineon, Tiff, Targa, Bitmap, Quicktime, AVI, or YUV 2. Down-convert from HD to SD during capture or playback 3. Playback to two displays simultaneously, SD-SDI and analog 4 48 With XENA 2K running Machina, in realtime you can: 1. Capture Uncompressed digital SD or HD via SDI or Dual Link to: DPX, Cineon, Tiff, Targa, Bitmap, Quicktime, AVI, or YUV 2. Up-convert SD to HD, Cross-convert 1080i <-> 720p, and Down-convert SD to HD during capture or playback 3. Display to three monitors with various conversions Machina Overview AJA’s Machina provides three tabbed windows that perform the following: • Setup – set Activation, Capture, Playback, Device Control, and General options • Capture – set Capture file and Clip options and Control the capture • Play – set Playback file options and Control the playback Window Selection Tabs Machina Application Interface – Setup Menu XENA Installation and Operation Manual — AJA Machina Application 49 This section of the manual will discuss each of these windows in detail and discuss how various Pull-down menu options, hot text entry fields, and play/record controls function and interact. Note: The specific options available to you are determined by the currently active XENA model installed in your workstation. This section will describe all possible options for Machina and note any options exclusive to a particular XENA model. Shortcuts and Display Features Keyboard Shortcuts Space Bar – Use it to start and stop playback of media. Pressing the Space Bar starts playback from the location of the Edit Line. I key – press to set an In-point when trimming a clip. J key – press to shuttle backward through the clip. Press repeatedly to move at a faster rate (2x, 4x, etc.). K key – press to stop playback at the current position. L key – press to shuttle forward through the clip. Press repeatedly to move at a faster rate (2x, 4x, etc.). O key – press to set an Out-point when trimming a clip in Machina. Left Arrow key (<-) – press to move one frame backward. Right Arrow key (->) – press to move one frame forward. Up Arrow key – press to start playback (forward). Down Arrow key – press to start playback backward. Full-screen Desktop Display To use Machina for full-screen preview during capture or playback, first maximize the Machina window, then hit the Escape key. This can be especially useful for monitoring capture or playback in the absence of a full-resolution monitor. In full-screen mode you can use the mouse to control picture position and zoom for detail monitoring of graphic elements or frame-cut results (see Display Sizes, later in this section). 50 Setup Window To configure the Machina operation, click on the Setup tab at the top of the window. In the left-most column are the Activation Options. The next column will toggle between Capture and Playback options when you click on the arrow tabs to the left and right of the header text. Next, Device Options address machine control settings. Finally, General Options establish paths to file storage directories for Video and Audio files and enable other options. Activation Options Board The Board window/menu reports the current Type of XENA card selected and acts as a pull-down menu if you have multiple XENAs installed in your workstation. Note: Using multiple XENA cards in the same workstation is possible but not always practical due to motherboard and disk system bandwidth limitations. Activation Mode Machina and XENA plugins in Adobe applications can be set for Automatic or Manual activation using the Activation Mode pull-down menu. Automatic is the default setting and is recommended for normal operation. Current activation status is reported below the pull-down menu. The XENA card can be accessed by multiple application client windows but only one can have control at a time (for example, Adobe Premiere Pro and Adobe Photoshop). In automatic mode, the application or plugin can take active control when the card is not being used. When the controlling application is done (and any processing initiated is complete), control is released, making the XENA card available to others. Note: If the application window you click on does not access the card (reporting XENA Status: Active), either another application window is still processing operations or it is set in Manual activation mode. (Remember: only one client window can have control of the XENA card at a time.) If the card is controlled by an application in Manual mode, you must either un-check the enable check-box or select Auto in the Activation Mode pull-down menu to relinquish control. In Manual mode, you must click on the enable check-box to activate boardcontrol. XENA Installation and Operation Manual — AJA Machina Application 51 XENA Information At the bottom of the Machina Setup screen, in the left hand column, you’ll find vital information about your specific XENA board—license type, serial number, and version. This information will be helpful if you ever need technical support. Capture Options To the right of “Activation Options” there is a column that can toggle to either “Capture Options” or “Play Options.” The arrow buttons on either side of the Capture Options/Play Options button determine which of the two is displayed. Under Capture Options, you can select the appropriate formats and settings for your project. During XENA operation, the Primary Format is the format written to disk. The Secondary Format is set to match the format of the input device (if the Primary Format is a conversion) or the format set for an output monitor if you’re monitoring a conversion and the Primary Format is the format on the input device. The Secondary Format isn’t used if there are no conversions. The Primary Format menu allows you to select the video format for the current project. Analog output is always available and any necessary conversions you’ve selected are based upon the Primary or Secondary Format. Note: No frame rate interpolation is applied for conversions from one frame rate to another. Throughout Machina, choices are always presented based on which XENA card you are using and what it can do with the signals available and the inputs/outputs selected. For example, The LH card offers downconversion of HD-to-SD format, while the 2K card offers up-, down-, and cross-conversion. (For more see Convert Mode following.) Note: When converting an Input to the Primary Format, select the Secondary Format option that has (I), for input only, appended to it. Conversely, when converting an Output from the Primary Format, you must select an output signal with (O) for output only. 52 Primary and Secondary Format Options Supported Video Signal Formats LS LH 2K 720x576 @ 25.00i Yes Yes Yes 720x576 (Wide) @ 25.00i Yes Yes Yes 720x486 @ 29.97i Yes Yes Yes 720x486 (Wide) @ 29.97i Yes Yes Yes 720x480 @ 29.97i Yes Yes Yes 720x480 (Wide) @ 29.97i Yes Yes Yes 1280x720 @ 23.976p Yes Yes 1280x720 @24.00p Yes Yes 1280x720 @ 25.00p Yes Yes 1280x720 @ 29.97p Yes Yes 1280x720 @ 30.00p Yes Yes 1280x720 @ 50.00p Yes Yes 1280x720 @ 59.94p Yes Yes 1280x720 @ 60.00p Yes Yes 1920x1080 @ 23.976sF Yes Yes 1920x1080 @ 24.00sF Yes Yes 1920x1080 @ 25.00sF Yes Yes 1920x1080 @ 29.97sF Yes Yes 1920x1080 @ 30.00sF Yes Yes 1920x1080 @ 25.00i Yes Yes 1920x1080 @ 29.97i Yes Yes 1920x1080 @ 30.00i Yes Yes 1920x1080 @ 23.976p Yes Yes 1920x1080 @ 24.00p Yes Yes 1920x1080 @ 25.00p Yes Yes 1920x1080 @ 29.97p Yes Yes 1920x1080 @ 30.00p Yes Yes 1920x1080 @ 50.00p Yes 1920x1080 @ 59.94p Yes 1920x1080 @ 60.00p Yes [email protected] Yes Yes [email protected] Yes Yes [email protected] Yes Yes [email protected] Yes Yes [email protected] Yes [email protected] Yes XENA Installation and Operation Manual — AJA Machina Application 53 Convert Mode Convert Mode allows selection of a conversion mode for up-, down-, or crossconversion between High-definition and Standard-definition, or High-definition to High-definition formats. The choices offered depend on the XENA model present and the Primary and Secondary format chosen. XENA 2K models support up-, down-, and cross-conversion plus SD-to-SD aspect ration conversions. LH models only have a down converter, and the LS model (SD only) has no conversion. See the following tables for LH and 2K conversion options. XENA LH Conversion Options: LH Primary Video Format Secondary Format Options 720x480 @ 29.97i 720x480 (Wide) @ 29.97i 720x486 @ 29.97i 720x486 (Wide) @ 29.97i 720x576 @ 25.00i 720x576 (Wide) @ 25.00i None Available 1280x720 @ 23.976p 720x486 @ 29.97i 1280x720 @24.00p None Available 1280x720 @ 25.00p 720x576 @ 25.00i 1280x720 @ 29.97p 720x486 @ 29.97i 1280x720 @ 30.00i None Available 1280x720 @ 50.00p 720x576 @ 25.00i 1280x720 @ 59.94p 720x486 @ 29.97i 1280x720 @ 60.00p 1920x1080 @ 23.976sF None Available 1920x1080 @ 24.00sF 1920x1080 @ 25.00sF 720x576 @ 25.00i 1920x1080 @ 29.97sF 720x486 @ 29.97i 1920x1080 @ 30.00sF None Available 1920x1080 @ 25.00i 720x576 @ 25.00i 1920x1080 @ 29.97i 720x486 @ 29.97i 1920x1080 @ 30.00i 1920x1080 @ 23.976p 1920x1080 @ 24.00p 1920x1080 @ 25.00p 1920x1080 @ 29.97p 1920x1080 @ 30.00p [email protected] [email protected] [email protected] [email protected] None Available 54 XENA 2K Conversion Options: 2K Primary Video Format Secondary Format Options 720x480 @ 29.97i 720x480 (Wide) @ 29.97i 720x486 @ 29.97i 720x486 (Wide) @ 29.97i 1920x1080 @ 29.97i 1280x720 @ 59.94p 720x486 @ 29.97i 720x576 @ 25.00i 720x576 (Wide) @ 25.00i 1920x1080 @ 25.00i 1280x720 @ 50.00p 720x576 @ 25.00i 1280x720 @ 23.976p 720x486 @ 29.97i 1920x1080 @ 29.97i 1280x720 @24.00p 1920x1080 @ 30.00i 1280x720 @ 25.00p 720x576 @ 25.00i 1920x1080 @ 25.00i 1280x720 @ 29.97p 720x486 @ 29.97i 1920x1080 @ 29.97i 1280x720 @ 30.00i 1920x1080 @ 30.00i 1280x720 @ 50.00p 720x576 @ 25.00i 1920x1080 @ 25.00i 1280x720 @ 59.94p 720x486 @ 29.97i 1920x1080 @ 29.97i 1280x720 @ 60.00p 1920x1080 @ 30.00i 1920x1080 @ 23.976sF 720x486 @ 29.97i 1920x1080 @ 24.00sF None Available 1920x1080 @ 25.00sF 720x576 @ 25.00i 1280x720 @ 50.00p 1920x1080 @ 29.97sF 720x486 @ 29.97i 1280x720 @ 59.94p 1920x1080 @ 30.00sF 1280x720 @ 60.00p 1920x1080 @ 25.00i 720x576 @ 25.00i 1280x720 @ 50.00p 1920x1080 @ 29.97i 720x486 @ 29.97i 1280x720 @ 59.94p 1920x1080 @ 30.00i 1280x720 @ 60.00p 1920x1080 @ 23.976p 1920x1080 @ 24.00p 1920x1080 @ 25.00p 1920x1080 @ 29.97p 1920x1080 @ 30.00p 1920x1080 @ 50.00p 1920x1080 @ 59.94p 1920x1080 @ 60.00p [email protected] [email protected] [email protected] [email protected] [email protected] [email protected] None Available XENA Installation and Operation Manual — AJA Machina Application 55 All conversions use AJA 10-bit hardware on the card. To do a down-conversion on an HD input (2K and LH models): • Set the Primary Format as an SD format • Select the correct HD format with an (I) input designation for the Secondary Format, then • Choose a “– Secondary” Video Input type To do an up-conversion on an SD project for HD output (2K models): • Set the Primary Format as an SD format • Select the correct HD format with an (O) output designation for the Secondary Format, then • Choose a “– Secondary” SDI1/2 Output type and an HD Analog Output Down-conversion display mode choices that may be available include (LH and 2K): • Anamorphic: full-screen • Letterbox: image is reduced with black top and bottom added to image area with the aspect ratio preserved • Crop: image is cropped horizontally to fit new screen size Up-conversion display mode choices that may be available include (2K models): • Anamorphic: full-screen • Pillarbox 4x3 • Zoom 14x9 • Zoom Letterbox • Zoom Wide 56 For Cross-conversion (2K models): • Set the Primary Format as an HD format (what you want the input converted into) • Select the correct input HD format with an (I) input designation for the Secondary Format XENA cross-conversion converts one format of HD to another, such as 1080i @ 29.97 to 720p @ 59.94. XENA 2K does not perform 2K-to-HD cross-convert, but can display a cropped cut of the 2K on an HD monitor. In addition to HDto-HD cross-conversion, XENA 2K can also perform SD-to-SD hardware-based aspect ratio conversion for capture and output. This is controlled the same as all other up/down/cross-conversions. Use it by selecting a ‘Secondary Video Format’ that matches the ‘Primary Video Format’ and then specify the conversion using the ‘Convert Mode’ control. YUV<->RGB Range This control mode should almost never be changed from its CGR default. This setting is only for highly-knowledgeable users that must define how color values will be mapped when doing the color space conversion—far less than 1% of all users should ever need to use it. Use this feature only for capturing YUV source into an RGB file, or to play an RGB file out to YUV. The CGR setting maps the typical YUV values to typical RGB values. For example, 8bit YUV 16 is mapped to 8 bit RGB 0, and YUV 235 to RGB 255. The ‘SMPTE’ setting for this control maps YUV into RGB using the exact YUV values. Therefore, 8 bit YUV 16 will map to RGB 16, and so forth. Only change this setting from its default if you are absolutely sure you know the benefits/consequences. This feature is not the same as a broadcast safe limiter. Video Input Use the Video Input pull-down menu to select the appropriate signal type of your input. (The current selection is reported in the display of the pull-down menu.) Video Input always shows all the available input options based on your Primary and Secondary format configuration. XENA software looks at 1) what model you have, 2) Primary Format, and 3) Secondary Format (in that order) to determine what input options are appropriate. XENA Installation and Operation Manual — AJA Machina Application 57 Video Input Options supported by XENA cards include: • Single Link SDI • Component Betacam NTSC-J • Composite NTSC • Component SMPTE NTSC-J • S-Video NTSC • Composite PAL • Component Betacam NTSC • S-Video PAL • Component SMPTE NTSC • Component Betacam PAL • Composite NTSC-J • Component SMPTE PAL • S-Video NTSC-J • Component XVGA (HD only) • Dual Link 4:4:4 HD-SDI (2K only) • HSDL (2K only) Audio Input Use the Audio Input pull-down menu to select the appropriate signal type for your input. (The current selection is reported in the Status Display.) Audio Input Options Supported by XENA cards include: • Embedded SDI • Digital AES/EBU - XLR (using either breakout cable or breakout box) • Digital AES/EBU - BNC (only applies if you are using a breakout box with BNC connectors for AES/EBU) • Analog (except for XENA 2K) Note: On the XENA 2K, you can choose between 48 kHz AES/EBU (for standard audio) and 96 kHz AES/EBU (for extra-high quality audio). SDI Outputs 1 & 2 The SDI outputs will be Single Link, Dual Link (available with 2K card only), or Video+Key (also only available with 2K card). If you have assigned a Secondary Video Format, you can select either the Primary or Secondary format for the SDI Output: • Single Link SDI – Primary • Single Link SDI – Secondary • Dual Link SDI – Primary (2K model only) • Dual Link SDI – Secondary (2K model only) On XENA 2K, the two SDI outputs can also be configured to output a Video signal on one SDI output and a Key video signal on the second SDI output for 58 use with external devices that support separate video and key (switchers, DVEs, etc.). This feature is also available on the output settings in After Effects CS3, and Photoshop CS3. To configure separate video and key, set the SDI-1 Output to ‘Video + Key (V)’ or ‘Video + Key (K)’. The SDI-2 output will then automatically change to the complimentary setting. Video + Key is limited to 8 bit RGBA files. Analog Output Analog format choices in the Analog Output pull-down menu vary with selected file format. Analog Output Options Supported by XENA cards include: • Composite + S-Video NTSC • Composite PAL • Composite + S-Video NTSC-J • S-Video PAL • Component Betacam NTSC • Component Betacam PAL • Component Betacam NTSC-J • Component SMPTE PAL • Component SMPTE • Component RGB • Component XVGA (HD only) Timecode Input Select the type of timecode used by the source video machine—RS-422 or Embedded SDI (RP188). Note: SMPTE RP 188 defines a standard for the transmission of timecode and control code in the ancillary data space of a digital television data stream. Timecode information is transmitted in the ancillary data space as defined in ANSI/SMPTE 291M. Multiple codes can be transmitted within a single digital video data stream. Other time information, such as real time clock, DTTR tape timer information, and other user-defined information, may also be carried in the ancillary timecode packet instead of timecode. The actual information transmitted through the interface is identified by the coding of a distributed binary bit. Equipment manufacturers can use the meta data for different purposes. After configuring Machina Capture Options, select the Play options by clicking on the toggle arrows on either side of the Capture Options title header. XENA Installation and Operation Manual — AJA Machina Application 59 Play Options Primary Format, Secondary Format, Convert Mode, and Output Type settings are all the same for playback mode as those described previously. Refer to the Capture Options section. Audio Sync Choose to sync audio output to either the Primary Format or the Secondary Format if it’s available. When a Primary/Secondary conversion is done, there may be a 0, .5, or 1 frame delay introduced. Audio Sync will ensure that either the Primary or Secondary format is kept in synch. Audio Sample Rate Choose 48 kHz or 96 kHz (XENA 2K only). Timebase Use the Timebase pull-down menu to choose between: • Frames • Timecode (NDF) • Timecode (DF) Reference Using the Reference pull-down menu, select timing Reference source—Free Run, from External (genlock), or from the video Input signal. 60 Device Control Options Device Control Options set options for the RS-422 machine control interface on the XENA card. These functions support Print-to-Tape machine control. Timecode Format Use this pull-down to select the timecode base supported by your VTR. • Base 24 • Base 25 • Base 25 (50 frames per second) • Base 30 DF (drop-frame, 30 frames per second) • Base 30 NDF (non-drop-frame, 30 frames per second) • Base 30 DF (drop-frame, 60 frames per second) • Base 30 NDF (non-drop-frame, 60 frames per second) Timecode Source Choose between a separate-channel Longitudinal Timecode (LTC) or Vertical Interval Timecode (VITC) transported in the video signal’s vertical interval or include both (LTC + VITC). Click on the Hot Text items to enter a value for: • Preroll – 0 to 15; the number of frames required to start the source machine before capture • Handles – 0 to 60; the number of frames added to the front and back of a sequence for editing flexibility • Timecode Offset – -30 to +30; timecode adjustment (in frames) forward or back to compensate for discrepancies between the source’s burned-in timecode and that of the captured sequence. XENA Installation and Operation Manual — AJA Machina Application 61 General Options Video/Audio Directory Setup Use these hot text fields to enter the path of the default capture/playback directories. Enforce Memory Alignment For almost all cases this checkbox should remain unchecked. However on certain types of RAID Controllers (usually RAID5 SATA), when reading/writing to disc to/ from system memory, memory alignment must be done on a 512 byte address alignment. Enabling this option insures that reading/writing is done to a 512 byte address in system memory. But there is a performance cost. Due to re-alignment, reading/writing is not guaranteed to be in realtime. This is why you should always use AJA approved RAID controllers and harddrives. Audio Files Setup Three audio enable check boxes, when checked, allow you to: • Enable Audio Scrubbing – Audio will play while you move through frames using the scrub bar (see Play Controls). • Enable Audio Variable Speed – Audio will play at the same speed the video is played (rather than 1x only). • Enable Audio Auto-Search – XENA software will automatically load the Audio Track list with audio files that have been generated with the same name as the selected video file. Note: When Audio Auto-Search is active, existing file names in the list will be removed or over-written when the Video File is loaded. (Does not affect the actual audio files.) Audio Monitor Levels Choose between +6 dB (US) monitor level and +0 dB (EBU). 62 Capture Window Click on the Capture tab to bring up the Capture window. The figure below shows the Clip Options panel. Also available by clicking on the hot toggle buttons left and right of the title header are File Options and Display Options and Overlay Options. Machina Capture Window XENA Installation and Operation Manual — AJA Machina Application 63 File Options In the File Options menu you will configure the capture file you will be creating by setting the following. Type The Type pull-down menu provides a choice of video/audio file formats: • QuickTime Movie • TGA Sequence • AVI Movie • BMP Sequence • DPX Sequence (2K & LHe/LH only) • TIF Sequence • Cineon (2K & LHe/LH only) • YUV Sequence Video/Audio Use this pull-down menu to select the video/audio input combination you will capture: • Video Only • Audio Only • Video - (minus) Audio – video and audio are recorded in separate files • Video + (plus) Audio (QuickTime only) – video and audio are recorded in the same file The options shown are determined by the selected file format. QuickTime captured audio is either embedded with the video file or captured to separate .mov files. All other formats capture audio to Wave Files. 64 Video Subtype Video Capture Formats supported by XENA cards (varying according to file type) include: • 8-bit YUV 4:2:2 – ‘2vuy’ • 8-bit RGBA 4:4:4:4 – ‘rgba’ • 8-bit YUV 4:2:2 – ‘2Vuy’ • 8-bit RGBA 4:4:4:4 – ‘bgra’ • 10-bit YUV 4:2:2 – ‘v210’ • 10-bit Log RGB 4:4:4 – ‘R10g’ • 8-bit RGB 4:4:4 – ‘rgb’ • 10-bit RGB 4:4:4 – ‘R10k’ • 8-bit RGB 4:4:4 – ‘bgr’ • 10-bit RGB 4:4:4 – ‘r10k’ • 8-bit RGBA 4:4:4:4 – ‘argb’ Audio Subtype Audio Capture Formats supported by XENA cards include:. • 48 kHz 16-bit PCM Mono • 48 kHz 16-bit PCM Stereo • 48 kHz 24-bit PCM Mono • 48 kHz 24-bit PCM Stereo • 48 kHz 32-bit PCM Mono • 48 kHz 32-bit PCM Stereo • XENA 2K also supports 96 kHz 16 through 32-bit PCM Mono and Stereo selections Audio Track Select the number of audio tracks for this project. XENA models support up to 16 tracks, depending on the XENA model. Clip Options Clip Name In the Clip Options menu, click on the Clip Name to name the file you will be creating. Subsequent file numbers will increment from this one. Reel Name Click on the hot text field to enter a source tape name—the name of the tape on the VTR. Only QuickTime and DPX files store this information. Sequence Offset When capturing file-per-frame sequences, after naming a file, you can set a Sequence Offset number that will determine the beginning number of the file sequence. XENA Installation and Operation Manual — AJA Machina Application 65 Create New Folder Per Sequence A check-box is provided to enable this automatic function. When you check this selection, Machina will gather each frame capture sequence in a new folder, based on clip names, on your disk. (Not applicable to QuickTime or AVI movie files.) Abort on Dropped Frames Checking this box causes a capture to automatically stop any time that XENA detects frames are being dropped for some reason. This ensures you don’t waste storage space and time capturing when there may be a problem with the capture. Display Options Display Options configure how the desktop display operates for capture. Display Type The Display Type pull-down menu provides a choice of display rendering formats: OpenGL Texture or OpenGL DrawPixels. This setting changes the way the PC’s GPU handles video overlay on your desktop monitor. OpenGL Texture should always be used whenever possible. Note, however that this setting is not guaranteed to work on all boards—it has been tested primarily with high-end nVidia workstation graphics cards. Using OpenGL Texture mode will allow any applied LUTs to be displayed on the desktop display as well as on the video output. Open GL DrawPixels should only be used when you are experiencing display problems. Typically, this will be for graphics cards that are not AJA approved, and that have less OpenGL support. This mode does not allow applied LUTs to be displayed on the desktop. This mode also has many limitations when working with YUV files. When using this setting, files may appear pixelated on the desktop display—this does not affect the quality or resolution of the video being captured or output from the XENA card. Display To Desktop This setting determines when the desktop monitor overlay is present. Choice include: • OFF – always off (no display) • While Idle Only – displays whatever is present at the selected input while idle; when capturing, there is no display (saving system resources) 66 • While Capture Only – only display while capturing • Always – display during capture and when idle Display Sizes The desktop monitor display will be sized according to this setting. You can choose from select sizes (25% to 800%), enter a custom size (Custom), or have XENA fit the display size according to your Machina screen (Fit). If you use Custom, use the hot text fields underneath Display Sizes to enter a specific percentage and X and Y origin points. You can also zoom picture size by clicking on the Size hot text field and dragging to the left or right. Zoom can also be done using the scroll-wheel of your mouse (especially helpful when viewing the display in Full-screen mode, see Shortcuts and Display Features). To move the picture within the display, just click in the display area and drag the picture. Overlay Options The final options selection in the Capture window is Overlay Options. These overlay controls allow you to insert a graphic file supporting alpha channel transparency to apply an effect or insert a bug (logo) over the video content. Enable Overlay Enable/disable the overlay using this checkbox. Mixer Coefficient Adjust the overlay file transparency (range: 0 to 1000). Doubleclick on the field to select and enter a value or click-drag left or right to increment or decrement (respectively). Foreground Video Select the blending mode for the foreground layer: • Full Image • Pre-Mult Alpha • UnShaped Background Video Select the blending mode of the background layer: XENA Installation and Operation Manual — AJA Machina Application 67 Graphic File Click in the text entry field to browse for the overlay file you want to use. Click on the trash can to the left to delete the current selection. Use as Background Video Check this box to place the Graphic File on the Background layer and place the motion video in the foreground layer. Capture Controls Standard tape deck icons provide hot buttons for the Capture process. They are: Rewind (8x) Fast Forward (8x) Reverse Play Reverse 1 frame Still Stop Play (1x) Forward 1 frame The slider on the bottom is a variable speed forward/reverse control. Positions from left to right are: (Reverse) 16x, 8x, 4x, 2x, 1/2, 1/4, Still, (Forward) 1/4, 1/2, 2x, 4x, 8x, and 16x. The red button is for Record. Capture Mode Capture Time Entry Fields Capture/Xena Status VTR Status Machina Capture Controls The toggle buttons on the top-left step through one of three capture modes: • Capture Now – manual record/stop (“crash”) capture • Capture Duration – capture a specified number of frames after manual start, based on the timebase of the selected Primary Format • Capture In/Out – initiate and end capture using timecode-based in and out settings 68 The selected mode will activate the appropriate hot text for that mode (to the right of the Capture Mode selection). Click the hot text to enter a timecode value (hours:minutes:seconds:frames). The bottom display indicates the current machine status and timecode from the VTR. Capture In/Out Mode The capture in-point is entered by clicking on the left field of eight digits. The out-point can be set by clicking on the right field of eight digits. Alternatively, you can specify a duration in the Duration field and the in- or out-point (whichever you have not entered) will be entered automatically according to duration. Note: The in-point/out-point field values are inclusive. If both are set to the same value, the capture duration will be 1 frame. To load the current VTR timecode setting in either field (in-point or out-point) click on the hot text field and enter from your keyboard. Note: When a hot text field has a dotted underline, you can left-click and hold on the field and drag your curser to increment or decrement the value. VTR TC The current VTR timecode is displayed on the bottom of the control pane and you can click on it and enter a timecode to perform a seek to that timecode on the VTR. The VTR must be online and in remote rather than local control mode (as reported to the left of the current timecode). Capture/XENA Status Click on the hot toggle buttons of the Status header to switch between Capture Status and XENA Status. Capture Status reports current state of activity, capture duration and number of frames captured in ( ), and the number of frames that may have been dropped. XENA Status reports Active/Inactive status, Primary Format setting, Video Input type, and Audio Input type. XENA Installation and Operation Manual — AJA Machina Application 69 Play Window Machina Play Screen File Options On the right side of the desktop display you can use the hot buttons at the top to toggle between File Options, Display Options, and Leader/Trailer Options. In File Options, the current file name and path is loaded into the Video field. Alternatively, you can click on the path hot text to select a file, delete it using the trash icon at the left, or turn it on/off using the check-box at the right. Format, Colorspace, and total number of frames in the file is reported below the path text. You can preview the effects of a color Look Up Table by clicking on the LUT hot text or delete the selected LUT file by clicking on the trash icon. 70 You can edit the Audio Track list that is automatically loaded with audio files that have been generated with the same name as the selected video file. QuickTime embedded audio files are automatically appended with a number and will be loaded numerically into the track list. Click on the trash icon to delete a track. Click on the check-box on the right to enable/disable a track. To manually enter audio files, simply double-click on a track in the list. Display Options In the Display Options menu you will configure how the desktop display operates during playback operations. Display Type The Display Type pull-down menu provides a choice of display rendering formats: OpenGL Texture or OpenGL DrawPixels. This setting changes the way the PC’s GPU handles video overlay on your desktop monitor. OpenGL Texture should be used whenever possible. These options were described in detail earlier under the Capture screen options. Display To Desktop This setting determines when the desktop monitor overlay is present. Choice include: • OFF – always off (no display during scrubbing or playback) • While Scrubbing Only – displays media as you scrub through it via the playhead; during playback there is no display (saving system resources) • While Playing Only – displays media only during playback • Always – display during playback and when idle Display Sizes The desktop monitor display will be sized according to this setting. You can choose from select sizes (25% to 800%), enter a custom size (“Custom”), or have XENA fit the display size according to your Machina screen (“Fit”). If “Custom” is chosen, use the hot text fields underneath Display Sizes to enter a specific percentage and/or X and Y origin. XENA Installation and Operation Manual — AJA Machina Application 71 Leader/Trailer Options Leader/Trailer Options allow you to add colorbars, test tone, and black field in a leader to your clip and black field as trailer. Note that the dotted underline indicates that you can left-click down and scroll the mouse to increment/decrement these values. Play Controls There are two modes of play control—one for Edit and one for Output. Click the hot buttons at the top-left of the pane to toggle between the two modes. Edit Mode – In Edit mode, immediately under the mode toggle buttons are standard tape deck icons providing hot buttons for the Play process. They are: Go-to-Previous “Most Significant” frame Reverse 1 frame Rewind (8x) Reverse Play Still Stop Play (1x) Fast Forward (8x) Forward 1 frame Go-to-next “Most Significant” frame Play Entire Clip or Marked Segment Play Mode Arrow Edit Mode Play Controls and Scrub Bar 72 Below the Play buttons is a Scrub Bar that allows you to click and drag along the loaded sequence to view individual frames and mark In/Out- points for playback of frame subsets. To set an in-point, click on the left bracket. To set an out-point, click on the right bracket. To set an in-point, click on the left-most hot text numeral below the bar and enter the desired frame number. Similarly, enter the out-point by clicking on the right side hot text numeral. Note: The “first” or “last” frame may be for the entire sequence or for frames in an in/out-marked subset. In this case, first, last, in, and out frames become “Most Significant Frames.” For example, clicking on the Go-to-1st button will move you to the first Most Significant Frame to the left. Clicking on the Go-to-Next button will move you to the first Most Significant Frame to the right. The slider on the bottom is a variable speed forward/reverse control. Positions from left to right are: (Reverse) 16x, 8x, 4x, 2x, 1/2, 1/4, Still, (Forward) 1/4, 1/2, 2x, 4x, 8x, and 16x. Play Modes Select a Play type by clicking the Play hot toggle buttons above the controls. Choose between: Play All or Play Range. You can select one of three Play Modes by clicking on the Play Mode arrow to the left of the slider control. You will step through the following modes: • Once (single arrow) – play once through in forward or reverse • Bounce (double-ended arrow) – play continuously, alternating between forward and reverse play • Loop (double right-pointing arrow) – play repeatedly, looping in one direction If you have designated an In/Out sub-segment you can use the hot text brackets (to the right of the Play Mode arrow) to play either the entire clip [ ] or the marked segment only { }. Output Modes Toggle the Play Mode to Output and standard VTR controls and machine control timecode hot text will appear. Beneath the Output mode header are hotbuttons that allow you to choose between two modes of output— Insert Edit or Print-To-Video. Print-To-Video and Insert Edit will output the loaded clip from its in/out- points (if any exist) or from the first to last frame (if no in/out-points have been set). XENA Installation and Operation Manual — AJA Machina Application 73 Play Controls for Insert Edit Insert Edit In this mode, you can select the Video/Audio content that you want to insert by checking the desired content boxes at the left. Then set an in-point that the recording VTR will use to initiate recording of your segment. Duration is determined by the length of the clip you are outputting. Note: The Preview Edit check-box controls whether the insert edit is in “Preview” mode or not. In preview mode, the deck never goes into record but just simulates the edit without putting anything to tape. You must un-check this box to perform the actual Insert Edit. Print-to-Video Mode This mode allows you to manually put a clip to tape using the VTR’s current position. You have the option of adding Delay frames. XENA will wait this many frames after the tape machine’s start command, before it outputs the clip. The Duration Field displays the total length of the clip that will go to tape. Click on the green hot button to launch the output sequence. Delay Setting Play Controls for Print-to-Video Duration 74 Play/XENA Status Click on the hot toggle buttons of the Status header to switch between Play Status and XENA Board Status. Play Status reports current state of activity, play duration selected for the current playback, total number of frames in ( ), and lastly, the number of frames that may have been dropped. XENA Status reports Active/Inactive status, Primary Format setting, Video Input type, and Audio Input type. X NA Models: 2K, LH, and LS Chapter 5 Adobe Premiere Pro CS3 Overview XENA is fully integrated with Adobe Premiere Pro CS3 (not included with XENA). XENA allows a user to bring in supported Premiere Pro CS3 compressed formats and provides plug-ins and drivers that add functionality to the Premiere Pro application. Note: You should have Adobe Premiere Pro CS3 installed on your workstation before installing XENA software. The XENA installation adds required files to your Adobe application directories. After you install the XENA software on your Windows workstation, all you need to do to begin using it is to become familiar with the XENA plugins and how Adobe Premiere Pro CS3 accesses XENA options. The manual you are reading does not provide operational information for Adobe Premiere Pro CS3 except as related to XENA operations. Please read the Adobe Premiere Pro CS3 user documentation provided with the application for information on configuration and operation. The chapter you are reading addresses configuration and setup unique to use of XENA LS, LH, and 2K models with Adobe Premiere Pro CS3. Topics covered include: • XENA Realtime Performance • XENA/Adobe Premiere Pro CS3 Setup • Beginning a Project with XENA Presets • XENA Capture Options • XENA Playback Options 5 76 XENA Realtime Performance With XENA, Adobe Premiere Pro CS3 can perform the following functions in Realtime: • XENA LS can capture uncompressed analog or digital SD, component, composite, or S-Video to the supported file formats. • XENA LH can capture uncompressed analog or digital SD and HD, component or composite, or S-Video to the supported file formats. • XENA 2K can capture uncompressed digital SD or HD via SDI or Dual Link and uncompressed digital 2K via HSDL at 15 fps to the supported file formats. • Playback of DPX, Cineon, Tiff, Targa, BMP, Quicktime, AVI, YUV, and HDV MPEG. Note: This happens automatically. Files of these types that match the resolution and frame rates of the projects will play in realtime as long as they are uncompressed and in one of the supported colorspaces. The exception is HDV, which of course is compressed. For HDV to playback RT it must be in a 1080 project and the frame rate or the file must match that of the project. • Crop – happens automatically when an imported file is too large for the project size. Using Premiere Pro’s Motion Effects positioning, this realtime crop is keyframable (Timeline Option “Render RT files of different resolution” box must be unchecked). This also occurs when you use the Adobe Crop effects which can be found in the effects folders under Transform. • Up/Down/Cross Convert the playback from the timeline. (Cross- and upconvert are supported by the 2K card only.) XENA accelerates the following Adobe Premiere Pro CS3 effects making them realtime: Note: Color effects are accelerated to realtime on LH and 2K modules only, not on the LS. • Brightness Contrast • RGB color balance • Arithmetic (except for Slice and Screen Operators) see Premiere Pro Documentation • Invert (some Operators are not in realtime) • Gamma • Clip • Crop XENA Installation and Operation Manual — Adobe Premiere Pro 2.0 77 Real-time XENA accelerated AJA Effects (found in the Effects window in Premiere Pro under AJA Effects) include: • Gamma/Gain/Offset • Brightness/Contrast/Pivot • Log to Linear Conversion XENA/Adobe Premiere Pro CS3 Setup When installing XENA, the Premiere Pro XENA plugins and Project Presets are installed automatically. The Project Presets are listed in the New Project dialogue box. AJA Effects are listed in the Effects panel and Playback Settings are displayed in the Playback Settings panel. After a Project is created, you can edit XENA parameters in the Playback Settings and Capture Settings panels. 1. New Project Setup Start Premiere>New Project window Load Presets tab Custom Settings tab General Capture Options Playback Settings 2. Preferences Setup – global settings Edit>Preferences Audio Hardware XENA ASIO>ASIO settings Audio Mapping Device Control AJA Device Control Options AJA ASIO Options 3. Changing Project Settings Project>Project Settings or File>Capture>Settings tab Capture Settings>Edit General Playback Settings XENA Premiere Pro Setup Capture Options 78 Beginning a Project with XENA Presets Opening Adobe Premiere Pro CS3, you will select New Project from the Quick Start Screen and choose a preset from the AJA presets folder and start a new project. The XENA Presets offer typical project settings for the specific XENA cards. XENA Adobe Premiere Pro CS3 Presets The Description field summarizes the parameters for each preset including: • Frame raster size • Timebase • Frame rate • Pixel Aspect Ratio • Field order • Audio sample rate • Capture file format • Video Rendering format • Sequence settings XENA Installation and Operation Manual — Adobe Premiere Pro 2.0 79 Custom Settings Panel Using the Custom Setting panel you can change or adjust details for the selected Preset. The following settings can be accessed: • General – change Editing Mode and Timebase for the Adobe Premiere Pro CS3 project and access Playback settings for XENA output. Adobe Premiere Pro CS3 Desktop Display, Preview Rendering, and Timeline options are also available. New Project>Custom Settings>Playback Settings 80 Note: The specific options available to you are determined by the XENA model that is installed in your workstation. This section will describe all possible options for Adobe Premiere Pro CS3 and note the options that are exclusive to a particular XENA model. • Capture – select the AJA file format for your captured clip and access the AJA Capture Options window by clicking on the Setup button to the right to set Capture, Desktop Display, and File options. New Project>Custom Settings>Capture>AJA Capture Options • Video Rendering – see Adobe Premiere Pro CS3 documentation • Default Sequence – see Adobe Premiere Pro CS3 documentation XENA Installation and Operation Manual — Adobe Premiere Pro 2.0 81 Audio and Device Control In Adobe Premiere Pro CS3 Preferences (under Edit>Preferences) you can set up global (default) settings for: • Audio Hardware – select XENA ASIO to use XENA as the default audio device • Audio Output mapping • Device Control Edit>Preferences>Audio Hardware 82 Edit>Preferences>Audio Output Mapping Audio Mapping XENA LS/LH supports 8 audio channels and XENA 2K supports 16 embedded, however Adobe Premiere Pro CS3 only uses a maximum of six. Refer to Adobe Premiere Pro CS3 documentation for setting up audio channels and Dolby 5.1 surround sound. Note: Premiere Pro defaults to using the internal sound device for audio playback. To change this setting, go to Edit>Preferences>Audio Hardware and select XENA ASIO from the pull down. XENA Installation and Operation Manual — Adobe Premiere Pro 2.0 83 Edit>Preferences>Device Control>Options Device Control Device Control Options are settings for the RS-422 machine control interface on the XENA card. Note: Always use AJA Serial Control and the XENA RS-422 port for XENA capture. Enter the desired value for: • Preroll – 0 to 15; the number of frames required to start the source machine before capture. • Timecode Offset – -30 to +30; timecode adjustment (in frames) forward or back to compensate for discrepancies between the source’s burned-in timecode and that of the captured sequence. Click on the Options button to pull up the AJA Device Control window. Note: Device Control setup windows can also be accessed through File>Capture>Settings tab. 84 File>Capture>Settings>Device Control>Options Time Code Format – Use this pull-down to select the timecode base supported by your VTR. • Base 24 • Base 25 • Base 25 NDF (50 frames per second) • Base 30 DF (30 frames per second) • Base 30 NDF (30 frames per second) • Base 30 DF (60 frames per second) • Base 30 NDF (60 frames per second) The timecode format is used for both monitoring the RP-188 timecode embedded in the digital data stream and for selecting a timecode offset (if required) for the attached VTR (connected to XENA’s RS-422 port). XENA Installation and Operation Manual — Adobe Premiere Pro 2.0 85 AJA Capture Options Menu File>Capture>Settings tab>Edit button>AJA QuickTime Setup button Capture Options Under Capture Options, select the appropriate formats and settings for your project. In XENA’s operation, the Primary Format is the media format written to disk. The Secondary format is that which may be input for capture or output from XENA to VTRs or other devices. Conversion may be applied on input or on output. The Primary Format menu allows you to select the video format used in your current project. Analog output is always available and, where supported by your model of XENA card, can also have an up/down conversion performed (based on the Primary or Secondary Format settings). Note: No frame rate interpolation is applied for conversions from one frame rate to another. 86 Primary and Secondary Format Options Supported by XENA Note: When converting an Input to the Primary Format, select the Secondary Format option that has (I), for input only, appended to it. Conversely, when converting an Output from the Primary Format, you must select an output signal with (O) for output only. Video Signal Formats LS LH 2K 720x576 @ 25.00i Yes Yes Yes 720x576 (Wide) @ 25.00i Yes Yes Yes 720x486 @ 29.97i Yes Yes Yes 720x486 (Wide) @ 29.97i Yes Yes Yes 720x480 @ 29.97i Yes Yes Yes 720x480 (Wide) @ 29.97i Yes Yes Yes 1280x720 @ 23.976p Yes Yes 1280x720 @24.00p Yes Yes 1280x720 @ 25.00p Yes Yes 1280x720 @ 29.97p Yes Yes 1280x720 @ 30.00p Yes Yes 1280x720 @ 50.00p Yes Yes 1280x720 @ 59.94p Yes Yes 1280x720 @ 60.00p Yes Yes 1920x1080 @ 23.976sF Yes Yes 1920x1080 @ 24.00sF Yes Yes 1920x1080 @ 25.00sF Yes Yes 1920x1080 @ 29.97sF Yes Yes 1920x1080 @ 30.00sF Yes Yes 1920x1080 @ 25.00i Yes Yes 1920x1080 @ 29.97i Yes Yes 1920x1080 @ 30.00i Yes Yes 1920x1080 @ 23.976p Yes Yes 1920x1080 @ 24.00p Yes Yes 1920x1080 @ 25.00p Yes Yes 1920x1080 @ 29.97p Yes Yes 1920x1080 @ 30.00p Yes Yes 1920x1080 @ 50.00p Yes 1920x1080 @ 59.94p Yes 1920x1080 @ 60.00p [email protected] Yes Yes Yes [email protected] Yes Yes [email protected] Yes Yes [email protected] Yes Yes [email protected] Yes [email protected] Yes XENA Installation and Operation Manual — Adobe Premiere Pro 2.0 87 Convert Mode Convert Mode allows selection of a conversion mode for up-, down-, or crossconversion between High-definition and Standard-definition, or High-definition to High-definition formats. The choices offered depend on the XENA model present and the Primary and Secondary format chosen. XENA 2K models support up-, down-, and cross-conversion plus SD-to-SD aspect ration conversions. LH models only have a down converter, and the LS model (SD only) has no conversion. See the following tables for 2K and LH conversion options. XENA LH Conversion Options: LH Primary Video Format Secondary Format Options 720x480 @ 29.97i 720x480 (Wide) @ 29.97i 720x486 @ 29.97i 720x486 (Wide) @ 29.97i 720x576 @ 25.00i 720x576 (Wide) @ 25.00i None Available 1280x720 @ 23.976p 720x486 @ 29.97i 1280x720 @24.00p None Available 1280x720 @ 25.00p 720x576 @ 25.00i 1280x720 @ 29.97p 720x486 @ 29.97i 1280x720 @ 30.00i None Available 1280x720 @ 50.00p 720x576 @ 25.00i 1280x720 @ 59.94p 720x486 @ 29.97i 1280x720 @ 60.00p 1920x1080 @ 23.976sF None Available 1920x1080 @ 24.00sF 1920x1080 @ 25.00sF 720x576 @ 25.00i 1920x1080 @ 29.97sF 720x486 @ 29.97i 1920x1080 @ 30.00sF None Available 1920x1080 @ 25.00i 720x576 @ 25.00i 1920x1080 @ 29.97i 720x486 @ 29.97i 1920x1080 @ 30.00i 1920x1080 @ 23.976p 1920x1080 @ 24.00p 1920x1080 @ 25.00p 1920x1080 @ 29.97p 1920x1080 @ 30.00p [email protected] [email protected] [email protected] [email protected] None Available 88 XENA 2K Conversion Options: 2K Primary Video Format Secondary Format Options 720x480 @ 29.97i 720x480 (Wide) @ 29.97i 720x486 @ 29.97i 720x486 (Wide) @ 29.97i 1920x1080 @ 29.97i 1280x720 @ 59.94p 720x486 @ 29.97i 720x576 @ 25.00i 720x576 (Wide) @ 25.00i 1920x1080 @ 25.00i 1280x720 @ 50.00p 720x576 @ 25.00i 1280x720 @ 23.976p 720x486 @ 29.97i 1920x1080 @ 29.97i 1280x720 @24.00p 1920x1080 @ 30.00i 1280x720 @ 25.00p 720x576 @ 25.00i 1920x1080 @ 25.00i 1280x720 @ 29.97p 720x486 @ 29.97i 1920x1080 @ 29.97i 1280x720 @ 30.00i 1920x1080 @ 30.00i 1280x720 @ 50.00p 720x576 @ 25.00i 1920x1080 @ 25.00i 1280x720 @ 59.94p 720x486 @ 29.97i 1920x1080 @ 29.97i 1280x720 @ 60.00p 1920x1080 @ 30.00i 1920x1080 @ 23.976sF 720x486 @ 29.97i 1920x1080 @ 24.00sF None Available 1920x1080 @ 25.00sF 720x576 @ 25.00i 1280x720 @ 50.00p 1920x1080 @ 29.97sF 720x486 @ 29.97i 1280x720 @ 59.94p 1920x1080 @ 30.00sF 1280x720 @ 60.00p 1920x1080 @ 25.00i 720x576 @ 25.00i 1280x720 @ 50.00p 1920x1080 @ 29.97i 720x486 @ 29.97i 1280x720 @ 59.94p 1920x1080 @ 30.00i 1280x720 @ 60.00p 1920x1080 @ 23.976p 1920x1080 @ 24.00p 1920x1080 @ 25.00p 1920x1080 @ 29.97p 1920x1080 @ 30.00p 1920x1080 @ 50.00p 1920x1080 @ 59.94p 1920x1080 @ 60.00p [email protected] [email protected] [email protected] [email protected] [email protected] [email protected] None Available XENA Installation and Operation Manual — Adobe Premiere Pro 2.0 89 All conversions use AJA 10-bit hardware on the card. To do a down-conversion on an HD input (2K and LH models): • Set the Primary Format as an SD format • Select the correct HD format with an (I) input designation for the Secondary Format, then • Choose a “– Secondary” Video Input type To do an up-conversion on an SD project for HD output (2K models): • Set the Primary Format as an SD format • Select the correct HD format with an (O) output designation for the Secondary Format, then • Choose a “– Secondary” SDI1/2 Output type and an HD Analog Output Down-conversion display mode choices that may be available include (LH and 2K): • Anamorphic: full-screen • Letterbox: image is reduced with black top and bottom added to image area with the aspect ratio preserved • Crop: image is cropped horizontally to fit new screen size Up-conversion display mode choices that may be available include (2K models): • Anamorphic: full-screen • Pillarbox 4x3 • Zoom 14x9 • Zoom Letterbox • Zoom Wide For Cross-conversion (2K models): • Set the Primary Format as an HD format (what you want the input converted into) • Select the correct input HD format with an (I) input designation for the Secondary Format HD Cross-conversion and 2K/HD Cropping: XENA cross-conversion converts one format of HD to another, such as 1080i @ 29.97 to 720p @ 59.94. XENA 2K can also perform SD-to-SD hardware based aspect-ratio conversion for capture and output. This is controlled the same as all other up/down/cross-conver- 90 sions. Use it by selecting a ‘Secondary Video Format’ that matches the ‘Primary Video Format’ and then specify the conversion using the ‘Convert Mode’ control. XENA 2K does not perform 2K to HD cross-convert. On an Adobe Premiere Pro CS3 timeline, 2K can be cropped to fit an HD raster, but you are not doing a true 2K up/down/cross-conversion. For more information on 2K/HD cropping and keyframing using the Adobe Premiere Pro CS3 Motion Effect within the crop, see Preview Render Options later in this chapter. YUV<->RGB Range This control mode should almost never be changed from its CGR default. This setting is only for highly-knowledgeable users that must define how color values will be mapped when doing the color space conversion—far less than 1% of all users should ever need to use it. Use this feature only for capturing YUV source into an RGB file, or to play an RGB file out to YUV. The CGR setting maps the typical YUV values to typical RGB values. For example, 8bit YUV 16 is mapped to 8 bit RGB 0, and YUV 235 to RGB 255. The ‘SMPTE’ setting for this control maps YUV into RGB using the exact YUV values. Therefore, 8 bit YUV 16 will map to RGB 16, and so forth. Only change this setting from its default if you are absolutely sure you know the benefits/consequences. This feature is not the same as a broadcast safe limiter. Video Input Use the Video Input pull-down menu to select the appropriate signal type of your input. (The current selection is reported in the display of the pull-down menu.) Video Input always shows all the available input options based on your Primary and Secondary format configuration. XENA software looks at 1) what model you have, 2) Primary Format, and 3) Secondary Format (in that order) to determine what input options are appropriate. XENA Installation and Operation Manual — Adobe Premiere Pro 2.0 91 Video Input Options Supported by XENA cards include: • Single Link SDI • Component Betacam NTSC-J • Composite NTSC • Component SMPTE NTSC-J • S-Video NTSC • Composite PAL • Component Betacam NTSC • S-Video PAL • Component SMPTE NTSC • Component Betacam PAL • Composite NTSC-J • Component SMPTE PAL • S-Video NTSC-J • Component XVGA (HD only) • Dual Link HD (2K only) • HSDL (2K only) Audio Input Use the Audio Input pull-down menu to select the appropriate signal type for your input. (The current selection is reported in the Status Display.) Audio Input Options Supported by XENA cards include: • Embedded SDI • Digital AES/EBU - XLR (using either breakout cable or breakout box) • Digital AES/EBU - BNC (only applies if you are using a breakout box with BNC connectors for AES/EBU) • Analog (except for XENA 2K) Note: On the XENA 2K, you can choose between 48 kHz AES/EBU (for standard audio) and 96 kHz AES/EBU (for extra-high quality audio). SDI Outputs 1 & 2 When using XENA LS and LH cards, the SDI outputs will be Single Link only, if there is no Secondary Video Output Format selected. If you have a Secondary format selected, you can choose between Single Link SDI – Primary and Single Link SDI – Secondary as your output. XENA 2K also offers Dual Link output which uses both output connectors for a single A/B channeled output (SDI Output 2 automatically becomes Dual Link). 92 Analog Output Analog format choices in the Analog Output pull-down menu vary depending upon file format. • Composite + S-Video NTSC • Composite PAL • Composite + S-Video NTSC-J • S-Video PAL • Component Betacam NTSC • Component Betacam PAL • Component Betacam NTSC-J • Component SMPTE PAL • Component SMPTE • Component RGB • Component XVGA (HD only) Note: When SD and HD formats are available as Primary and Secondary formats, you can choose between SD and HD raster for the Analog Output. Audio Level Choose between +6 dB (US) monitor level and +0 dB (EBU). Timecode Input Select the type of timecode used by the source video machine—RS422 or Embedded SDI (RP188). Note: SMPTE RP 188 defines a standard for the transmission of time code and control code in the ancillary data space of a digital television data stream. Time code information is transmitted in the ancillary data space as defined in ANSI/SMPTE 291M. Multiple codes can be transmitted within a single digital video data stream. Other time information, such as real time clock, DTTR tape timer information, and other user-defined information, may also be carried in the ancillary time code packet instead of time code. The actual information transmitted through the interface is identified by the coding of a distributed binary bit. Equipment manufacturers can use the meta data for different purposes. Desktop Display Options Display To Desktop Select one of four modes of desktop display: • Off • Display while idle only (this mode is suggested) • Display during capture only XENA Installation and Operation Manual — Adobe Premiere Pro 2.0 93 • Display Always Display to Desktop uses system resources and could affect performance. Choose Capture Speed, Width, and Height as appropriate for your system’s capabilities. Display Capture Speed • Full Speed – Every frame is displayed to desktop during playback • Half Speed – Every other frame is displayed to desktop during playback • Quarter Speed – One out of every four frames is displayed to the desktop Half Speed and Quarter Speed will reduce the system load that the Display-ToDesktop is using to draw video to your computer. Desktop Capture Width and Height These selections allow you to reduce the resolution of the desktop capture display. The captured file will be full-resolution. Only the displayed image is reduced to save processing resources during capture. The choices available are: • Full Resolution • Eighth Resolution • Half Resolution • Sixteenth Resolution • Quarter Resolution File Options The Premiere Pro Project Setting>Capture menu allows you to select one of the following AJA file formats from the Capture Format pulldown menu: • AJA AVI Capture • AJA QuickTime Capture • AJA Sequence Capture Within the AVI and QuickTime formats, you can select one of the following subtypes by clicking on the Setup button to the right to bring up the AJA Capture Options menu. Note: Capture file format options vary by XENA card model. The tables provided reflect a comprehensive list of supported formats (for XENA 2K). 94 Under the File Options panel, select a video format subtype: AVI files in the following Subtypes QuickTime files in the following Subtypes 8-Bit YUV 4:2:2 – ‘2vuy’ 8-Bit YUV 4:2:2 – ‘2Vuy’ 8-Bit YUV 4:2:2 – ‘uyvy’ 10-Bit YUV 4:2:2 – ‘v210’ 8-Bit RGB 4:4:4 – ‘bgr’ 8-Bit RGB 4:4:4:4 – ‘bgra’ 8-Bit RGB 4:4:4 – ‘bgr’ T2B 8-Bit RGB 4:4:4:4 – ‘bgra’ T2B 10-Bit Log RGB 4:4:4 – ‘R10g’ 10-Bit RGB 4:4:4 – ‘R10k’ 10-Bit RGB 4:4:4 – ‘r10k’ 8-Bit YUV 4:2:2 – ‘2vuy’ 8-Bit YUV 4:2:2 – ‘2Vuy’ 10-Bit YUV 4:2:2 – ‘v210’ 10-Bit YUV 4:2:2 – ‘V210’ 8-Bit RGB 4:4:4 – ‘rgb’ 8-Bit RGB 4:4:4 – ‘bgr’ 8-Bit RGBA 4:4:4:4 – ‘argb’ 8-Bit RGBA 4:4:4:4 – ‘rgba’ 8-Bit RGBA 4:4:4:4 – ‘bgra’ 10-Bit Log RGB 4:4:4 – ‘R10g’ 10-Bit RGB 4:4:4 – ‘R10k’ 10-Bit RGB 4:4:4 – ‘r10k’ 16-Bit RGB 4:4:4 – ‘b48r’ When you select AJA Sequence Capture, the File Options panel allows you to choose a Sequence Type: • TGA Sequence • BMP Sequence • DPX Sequence (LH and 2K only) • TIF Sequence • Cineon (LH and 2K only) • YUV Within these sequence types, XENA (model dependent) supports the following video formats: DPX Sequences in the following Subtypes Cineon Sequences in the following Subtypes 10-Bit Log RGB 4:4:4 (BE) T2B 10-Bit RGB 4:4:4 (BE) T2B 10-Bit Log RGB 4:4:4 (BE) B2T 10-Bit RGB 4:4:4 (BE) B2T 10-Bit Log RGB 4:4:4 (LE) T2B 10-Bit RGB 4:4:4 (LE) T2B 10-Bit Log RGB 4:4:4 (LE) B2T 10-Bit RGB 4:4:4 (LE) B2T 10-Bit Log RGB 4:4:4 (BE) TGA Sequences in the following Subtypes BMP Sequences in the following Subtypes 8-Bit RGB 4:4:4 B2T 8-Bit RGBA 4:4:4:4 B2T 8-Bit RGB 4:4:4 T2B 8-Bit RGBA 4:4:4:4 T2B 8-Bit RGB 4:4:4 B2T 8-Bit RGBA 4:4:4:4 B2T 8-Bit RGB 4:4:4 T2B 8-Bit RGBA 4:4:4:4 T2B TIF Sequences in the following Subtypes YUV Sequences in the following Subtypes 8-Bit RGB 4:4:4(LE) B2T 8-Bit RGBA 4:4:4:4(LE) B2T 8-Bit RGB 4:4:4(LE) T2B 8-Bit RGBA 4:4:4:4(LE) T2B 8-Bit RGB 4:4:4(BE) B2T 8-Bit RGBA 4:4:4:4(BE) B2T 8-Bit RGB 4:4:4(BE) T2B 8-Bit RGBA 4:4:4:4(BE) T2B 16-Bit RGB 4:4:4(LE) B2T 16-Bit RGB 4:4:4(LE) T2B 8-Bit YUV 4:2:2 XENA Installation and Operation Manual — Adobe Premiere Pro 2.0 95 Audio Formats • 48 kHz 16-bit PCM Mono • 48 kHz 16-bit PCM Stereo • 48 kHz 24-bit PCM Mono • 48 kHz 24-bit PCM Stereo • 48 kHz 32-bit PCM Mono • 48 kHz 32-bit PCM Stereo • XENA 2K also supports 96 kHz 16 through 32-bit PCM Mono and Stereo selections Audio Tracks Select the number of audio tracks for this project, XENA supports up to eight (four stereo pairs) for XENA LH/LS or 16 for XENA 2K. Adobe Premiere Pro CS3 supports six channels. 96 XENA Playback Options Project>Project Settings>General>Playback Setting button Use the Player Options panel to adjust playout formats and rendering options. XENA Installation and Operation Manual — Adobe Premiere Pro 2.0 97 XENA Playback Options The XENA Options for Playback are much the same as those for Capture but are output settings. Player Options – Primary Format, Secondary Format, Convert Mode, and Output type setting are all the same as those described for the Capture panel. (Refer to XENA Capture Options Menu.) Audio Sync Choose to sync audio output to either the Primary Format or the Secondary Format if it’s available. When a Primary/Secondary conversion is done, there may be a 0, .5, or 1 frame delay introduced. Audio Sync will ensure that either the Primary or Secondary format is kept in synch. Audio Level Choose between +6 dB (US) monitor level and +0 dB (EBU). Reference Using the Reference pull-down menu, select timing Reference source—Free Run, from External (genlock), or from the video Input signal. Desktop Display Options Display Type Select the display draw type according to the capability of your workstation’s graphics card. OpenGL DrawPixels is preferred, GDI is the default due to its compatibility with more graphics cards. • GDI (Safe Mode) • OpenGL DrawPixels Display To Desktop Select one of four modes of desktop display: • Off • Display While Scrubbing Only • Display While Playing Only • Display Always Display to the desktop uses system resources and can affect system performance. 98 To reduce workload on the CPU, you can choose slower desktop display speeds during playback or reduce the width and height of the desktop display. Rendered files are not affected. Desktop Speed Desktop Speed for Display and Scope are: • Full Speed – Every frame is displayed to desktop during playback • Half Speed – Every other frame is displayed to desktop during playback • Quarter Speed – One out of every four frames is displayed to the desktop Desktop Capture Width and Height These selections allow you to reduce the resolution of the desktop playback display and scrub display. The rendered file will be full-resolution. Only the displayed image is reduced to save processing resources during capture. The choices available are: • Full Resolution • Eighth Resolution • Half Resolution • Sixteenth Resolution • Quarter Resolution Preview Render Options These selections affect how non-realtime segments in the timeline are rendered. The Default settings are most often used. Timeline Options These selections allow you to override the red-bar non-realtime indicator in the Adobe Premiere Pro CS3 timeline. Depending on the speed of your system, some of these functions, although not truly realtime, will playout through XENA as realtime. If this is the case, you can remove the red marker by un-checking the appropriate check box. Note: If you are importing a format larger than your project format for the purpose of cropping in the timeline (or doing a keyframable crop with Motion Effects), you must un-check the last box “Render RT Files of different resolution. XENA Installation and Operation Manual — Adobe Premiere Pro 2.0 99 XENA Output Modes You can use XENA’s AJA Export to perform Insert Edits and Print-to-Tape outputs. With your timeline active, go to File>Export>Export To Tape to access the following panel: File>Export>Export to Tape>Insert Edit menu selection Insert Edit In this mode, you can select the Video/Audio content that you want to insert by checking the desired content boxes at the left. Then set an in-point that the recording VTR will use to initiate recording of your segment. Duration is determined by the length of the clip you are outputting. Note: The Preview Edit check-box controls whether the insert edit is in “Preview” mode or not. In preview mode, the deck never goes into record but just simulates the edit without putting anything to tape. You must uncheck this box to perform the actual Insert Edit. 100 Print-to-Video Mode This mode allows you to manually put a clip to tape using the VTR’s current position. You have the option of adding Delay frames. After the tape machine’s start command, XENA waits this many frames before outputting the clip. The Duration Field displays the total length of the clip that will go to tape. Click on the green hot button to launch the output sequence. File>Export>Export to Tape> Print-to-Video menu selection X NA Models: 2K, LH, and LS Chapter 6 Adobe After Effects CS3 Overview Adobe After Effects CS3 (not included with XENA) accepts XENA plugins and drivers to closely integrate XENA functions into the application. Note: You should have After Effects CS3 installed on your workstation before installation of the XENA software. After you install the XENA software on your workstation, perform the following steps to become familiar with the XENA After Effects CS3 plugins and how After Effects CS3 works with XENA. With After Effects CS3 open, go to the Window pull-down menu and select the AJA Capture plugin to set up your recording work flow, file storage, and other Xena options. Then access the AJA Preview to set options for viewing timeline effects on a monitor. Finally, set up the Playback plugin configuration for output type, timebase, and other options for both video and audio playback. When are familiar with the XENA plugin screen functional design, you will be comfortable with the similar XENA plugin features in Adobe PhotoShop, Autodesk Combustion, and other compositing applications. This manual does not provide operational information for Adobe After Effects CS3. Please read the After Effects CS3 user documentation provided with the application for information on configuration and operation. This chapter addresses configuration and setup unique to use of XENA LSe/LS, LHe/LH, and 2Ke/2K models with Adobe After Effects CS3. XENA After Effects CS3 Plugin Overview The XENA After Effects CS3 plugins add XENA functions to the After Effects CS3 application. Three XENA plugin screens are accessed under the Window pulldown menu. The Capture and Playback plugin screens allow you to see and edit how the XENA card workflow is currently configured for recording, storage, and playback of your video and audio data. They provide you with standard tapedeck style play/record functions, status display, and configuration options. The Preview plugin allows you to view the current frame of your working timeline in various formats on a monitor connected to a XENA output. 6 102 In this section, you will read about the various pull-down options, hot-text entry fields, and play/record controls and how they interact. Note: The specific options available to you are determined by the currently active XENA model installed in your workstation. This section will describe all possible options for After Effects CS3 and note the options exclusive to particular XENA models. There are three functional areas in both the Capture and the Playback screen as indicated in the following illustration (AJA Capture plugin screen is shown): Status Display, Play/Record Controls, and Configuration Options. Status Display Play/Record Controls Configuration Options XENA After Effects CS3 Plugin Layout The Status Display area is read-only information about configuration, current status, and performance. The Play/Record Controls offer standard tapedeck controls and more. Hot-text fields are at the top for writing and reading timing data (Capture plugin only). Capture mode will determine which fields are operational. XENA Installation and Operation Manual — Adobe After Effects 103 Note: Capture Play controls are RS422 machine controls for running a VTR tape deck. Playback controls are for XENA playout functions. The Configurations Options section contains tabbed menu selections that provide: • XENA Options – XENA workflow configuration options • File Options – File path and formatting information, and • General – General options (for machine control interface). If you don’t see the Configuration Options section, click on the Options triangle switch above the Status Display. In normal operation, you may decide to hide this section when it is not needed. Basic Plugin Operations and Configuration This section discusses settings common across plugin windows and how they interact. Activation Mode A XENA plugin can be set for Automatic or Manual activation using the Activation Mode pull-down menu. Automatic is the default setting and is recommended for normal operation. In this mode, you merely click between the open plugins to make one active. Note: Only one plugin window can have control of the XENA card at a time. If the window you click on does not access the card (reporting Board: Active), either another window is still processing operations or it is set in Manual activation mode and must be disabled (check box blanked). In Manual mode, you must check the Enable XENA box to activate board control and un-check it to release control. Upon startup of the After Effects CS3 application, if the launched plugin window is in Manual mode, the window will NOT activate until the enable box is clicked again. The Preview plugin does not need activation since it grabs only one frame (the current working frame) at a time for output to the monitor. It grabs the data on a priority basis when it can or else it is turned off. After Effects CS3 and Preview Note Double clicking on a captured Project File in the project bin will sometimes open the file in an After Effects CS3 player which can be previewed. Some formats will result in the file opening in a third-party viewer (QuickTime for example)—but the file cannot be previewed in that viewer. 104 Shortcuts and Display Features Keyboard Shortcuts Space Bar – Use it to start and stop playback of media. Pressing the Space Bar starts playback from the location of the Edit Line. I key – press to set an In-point when trimming a clip. J key – press to shuttle backward through the clip. Press repeatedly to move at a faster rate (2x, 4x, etc.). K key – press to stop playback at the current position. L key – press to shuttle forward through the clip. Press repeatedly to move at a faster rate (2x, 4x, etc.). O key – press to set an Out-point when trimming a clip in After Effects. Left Arrow key (<-) – press to move one frame backward. Right Arrow key (->) – press to move one frame forward. Up Arrow key – press to start playback (forward). Down Arrow key – press to start playback backward. Using the AJA Capture Plugin To begin using the XENA card in After Effects CS3, go to the Capture window (Window->AJA Capture), ensure the card is activated (look under the Xena Options tab), and then set up your workflow by defining Input and Output formats and timing options. XENA remembers the workflow setting changes you make (until changed again). Next, access the File Options tab to name the capture file, set file options, and set up the path to your file storage directory. Under the General options tab you can set Device Control timecode options. XENA Installation and Operation Manual — Adobe After Effects 105 XENA Options Menu Activation Options For Activation Options details, see Basic Plugin Operations and Configuration. Capture Options Under Capture Options you select the appropriate formats and settings for your After Effects CS3 workflow. Before configuring your workflow, you must understand the concept of Primary and Secondary formats. In XENA’s operation, the Primary Format is the media format written to disk. The Secondary format is that which may be input for capture or output from XENA to VTRs or other devices. Primary & Secondary Formats: The Primary Format menu allows you to select the video format used by the current project in XENA’s framebuffer and written to disk. (The current selection is reported in the Primary Format pull-down menu.) 106 Choices are always presented based on which XENA card you are using and what it can do with the signals available and the inputs/outputs selected. For example, The LHe/LH card offers down-conversion of HD to SD format, while the 2K card offers up, down, and cross-conversion. (For more see Convert Mode following.) Note: When converting an Input to the Primary Format, select the Secondary Format option that has (I), for input only, appended to it. Conversely, when converting an Output from the Primary Format, you must select an output signal with (O) for output only. XENA Installation and Operation Manual — Adobe After Effects 107 Primary and Secondary Format Options Supported by XENA cards Video Signal Formats LS LH 2K 720x576 @ 25.00i Yes Yes Yes 720x576 (Wide) @ 25.00i Yes Yes Yes 720x486 @ 29.97i Yes Yes Yes 720x486 (Wide) @ 29.97i Yes Yes Yes 720x480 @ 29.97i Yes Yes Yes 720x480 (Wide) @ 29.97i Yes Yes Yes 1280x720 @ 23.976p Yes Yes 1280x720 @24.00p Yes Yes 1280x720 @ 25.00p Yes Yes 1280x720 @ 29.97p Yes Yes 1280x720 @ 30.00p Yes Yes 1280x720 @ 50.00p Yes Yes 1280x720 @ 59.94p Yes Yes 1280x720 @ 60.00p Yes Yes 1920x1080 @ 23.976sF Yes Yes 1920x1080 @ 24.00sF Yes Yes 1920x1080 @ 25.00sF Yes Yes 1920x1080 @ 29.97sF Yes Yes 1920x1080 @ 30.00sF Yes Yes 1920x1080 @ 25.00i Yes Yes 1920x1080 @ 29.97i Yes Yes 1920x1080 @ 30.00i Yes Yes 1920x1080 @ 23.976p Yes Yes 1920x1080 @ 24.00p Yes Yes 1920x1080 @ 25.00p Yes Yes 1920x1080 @ 29.97p Yes Yes 1920x1080 @ 30.00p Yes Yes 1920x1080 @ 50.00p Yes 1920x1080 @ 59.94p Yes 1920x1080 @ 60.00p Yes [email protected] Yes Yes [email protected] Yes Yes [email protected] Yes Yes [email protected] Yes Yes [email protected] Yes [email protected] Yes 108 Convert Mode Convert Mode allows selection of a conversion mode for up-, down-, or crossconversion between High-definition and Standard-definition, or High-definition to High-definition formats. The choices offered depend on the XENA model present and the Primary and Secondary format chosen. XENA 2K models support up-, down-, and cross-conversion plus SD-to-SD aspect ration conversions. LH models only have a down converter, and the LS model (SD only) has no conversion. See the following tables for 2K and LH conversion options. XENA LH Conversion Options: LH Primary Video Format Secondary Format Options 720x480 @ 29.97i 720x480 (Wide) @ 29.97i 720x486 @ 29.97i 720x486 (Wide) @ 29.97i 720x576 @ 25.00i 720x576 (Wide) @ 25.00i None Available 1280x720 @ 23.976p 720x486 @ 29.97i 1280x720 @24.00p None Available 1280x720 @ 25.00p 720x576 @ 25.00i 1280x720 @ 29.97p 720x486 @ 29.97i 1280x720 @ 30.00i None Available 1280x720 @ 50.00p 720x576 @ 25.00i 1280x720 @ 59.94p 720x486 @ 29.97i 1280x720 @ 60.00p 1920x1080 @ 23.976sF None Available 1920x1080 @ 24.00sF 1920x1080 @ 25.00sF 720x576 @ 25.00i 1920x1080 @ 29.97sF 720x486 @ 29.97i 1920x1080 @ 30.00sF None Available 1920x1080 @ 25.00i 720x576 @ 25.00i 1920x1080 @ 29.97i 720x486 @ 29.97i 1920x1080 @ 30.00i 1920x1080 @ 23.976p 1920x1080 @ 24.00p 1920x1080 @ 25.00p 1920x1080 @ 29.97p 1920x1080 @ 30.00p [email protected] [email protected] [email protected] [email protected] None Available XENA Installation and Operation Manual — Adobe After Effects 109 XENA 2K Conversion Options: 2K Primary Video Format Secondary Format Options 720x480 @ 29.97i 720x480 (Wide) @ 29.97i 720x486 @ 29.97i 720x486 (Wide) @ 29.97i 1920x1080 @ 29.97i 1280x720 @ 59.94p 720x486 @ 29.97i 720x576 @ 25.00i 720x576 (Wide) @ 25.00i 1920x1080 @ 25.00i 1280x720 @ 50.00p 720x576 @ 25.00i 1280x720 @ 23.976p 720x486 @ 29.97i 1920x1080 @ 29.97i 1280x720 @24.00p 1920x1080 @ 30.00i 1280x720 @ 25.00p 720x576 @ 25.00i 1920x1080 @ 25.00i 1280x720 @ 29.97p 720x486 @ 29.97i 1920x1080 @ 29.97i 1280x720 @ 30.00i 1920x1080 @ 30.00i 1280x720 @ 50.00p 720x576 @ 25.00i 1920x1080 @ 25.00i 1280x720 @ 59.94p 720x486 @ 29.97i 1920x1080 @ 29.97i 1280x720 @ 60.00p 1920x1080 @ 30.00i 1920x1080 @ 23.976sF 720x486 @ 29.97i 1920x1080 @ 24.00sF None Available 1920x1080 @ 25.00sF 720x576 @ 25.00i 1280x720 @ 50.00p 1920x1080 @ 29.97sF 720x486 @ 29.97i 1280x720 @ 59.94p 1920x1080 @ 30.00sF 1280x720 @ 60.00p 1920x1080 @ 25.00i 720x576 @ 25.00i 1280x720 @ 50.00p 1920x1080 @ 29.97i 720x486 @ 29.97i 1280x720 @ 59.94p 1920x1080 @ 30.00i 1280x720 @ 60.00p 1920x1080 @ 23.976p 1920x1080 @ 24.00p 1920x1080 @ 25.00p 1920x1080 @ 29.97p 1920x1080 @ 30.00p 1920x1080 @ 50.00p 1920x1080 @ 59.94p 1920x1080 @ 60.00p [email protected] [email protected] [email protected] [email protected] [email protected] [email protected] None Available 110 All conversions use AJA 10-bit hardware on the card. To do a down-conversion on an HD input (2K and LH models): • Set the Primary Format as an SD format • Select the correct HD format with an (I) input designation for the Secondary Format, then • Choose a “– Secondary” Video Input type To do an up-conversion on an SD project for HD output (2K models): • Set the Primary Format as an SD format • Select the correct HD format with an (O) output designation for the Secondary Format, then • Choose a “– Secondary” SDI1/2 Output type and an HD Analog Output Down-conversion display mode choices that may be available include (LH and 2K): • Anamorphic: full-screen • Letterbox: image is reduced with black top and bottom added to image area with the aspect ratio preserved • Crop: image is cropped horizontally to fit new screen size Up-conversion display mode choices that may be available include (2K models): • Anamorphic: full-screen • Pillarbox 4x3 • Zoom 14x9 • Zoom Letterbox • Zoom Wide For Cross-conversion (2K models): • Set the Primary Format as an HD format (what you want the input converted into) • Select the correct input HD format with an (I) input designation for the Secondary Format XENA Installation and Operation Manual — Adobe After Effects 111 HD Cross-conversion: XENA cross-conversion converts one format of HD to another, such as 1080i @ 29.97 to 720p @ 59.94. XENA 2K does not perform 2K-to-HD cross-convert, but can display a cropped cut of the 2K on an HD monitor. In addition to HD-to-HD cross-conversion, XENA 2K can also perform SD-to-SD hardware based aspect ratio conversion for capture and output. This is controlled the same as all other up/down/cross-conversions. Use it by selecting a ‘Secondary Video Format’ that matches the ‘Primary Video Format’ then specify the conversion using the ‘Convert Mode’ control. YUV<->RGB Range This control mode should almost never be changed from its CGR default. This setting is only for highly-knowledgeable users that must define how color values will be mapped when doing the color space conversion—far less than 1% of all users should ever need to use it. Use this feature only for capturing YUV source into an RGB file, or to play an RGB file out to YUV. The CGR setting maps the typical YUV values to typical RGB values. For example, 8bit YUV 16 is mapped to 8 bit RGB 0, and YUV 235 to RGB 255. The ‘SMPTE’ setting for this control maps YUV into RGB using the exact YUV values. Therefore, 8 bit YUV 16 will map to RGB 16, and so forth. Only change this setting from its default if you are absolutely sure you know the benefits/consequences. This feature is not the same as a broadcast safe limiter. Video Input Use the Video Input pull-down menu to select a signal type that matches your source input. (The current selection is reported in the display of the pull-down menu.) Video Input always shows all the available input options based on your Primary and Secondary format configuration. XENA software looks at 1) what model you have, 2) Primary Format, and 3) Secondary Format (in that order) to determine what input options are appropriate. • Single Link SDI • Component Betacam NTSC-J • Composite NTSC • Component SMPTE NTSC-J • S-Video NTSC • Composite PAL • Component Betacam NTSC • S-Video PAL • Component SMPTE NTSC • Component Betacam PAL • Composite NTSC-J • Component SMPTE PAL • S-Video NTSC-J • Component XVGA (HD only) • Dual Link HD (2K only) • HSDL (2K only) 112 Audio Input Use the Audio Input pull-down menu to select the appropriate signal type for your input. (The current selection is reported in the Status Display.) Audio Input Options Supported by XENA cards include: • Embedded SDI • Digital AES/EBU - XLR (using either breakout cable or breakout box) • Digital AES/EBU - BNC (only applies if you are using a breakout box with BNC connectors for AES/EBU) • Analog (except for XENA 2K) Note: On the XENA 2K, you can choose between 48 kHz AES/EBU (for standard audio) and 96 kHz AES/EBU (for extra-high quality audio). SDI Outputs 1 & 2 The SDI outputs will be Single Link or Dual Link (available with 2K card only). If you have assigned a Secondary Video Format, you can select either the Primary or Secondary format for the SDI Output: • Single Link SDI – Primary • Single Link SDI – Secondary • Dual Link SDI – Primary (2K model only) • Dual Link SDI – Secondary (2K model only) Analog Output Analog format choices in the Analog Output pull-down menu support both HD and SD and vary depending upon file format. • Composite + S-Video NTSC • Composite PAL • Composite + S-Video NTSC-J • S-Video PAL • Component Betacam NTSC • Component Betacam PAL • Component Betacam NTSC-J • Component SMPTE PAL • Component SMPTE • Component RGB • Component XVGA (High Definition only) Audio Level Choose between +6 dB (US) monitor level and +0 dB (EBU). XENA Installation and Operation Manual — Adobe After Effects 113 Display to Desktop Select one of four modes of desktop display: • Off • Display while idle only (this mode is suggested) • Display during capture only • Display Always Display to Desktop uses system resources and could affect performance. Timecode Input Select the type of timecode used by the source video machine—RS-422 or Embedded SDI (RP188). Note: SMPTE RP 188 defines a standard for the transmission of time code and control code in the ancillary data space of a digital television data stream. Time code information is transmitted in the ancillary data space as defined in ANSI/SMPTE 291M. Multiple codes can be transmitted within a single digital video data stream. Other time information, such as real time clock, DTTR tape timer information, and other user-defined information, may also be carried in the ancillary time code packet instead of time code. The actual information transmitted through the interface is identified by the coding of a distributed binary bit. Equipment manufacturers can use the meta data for different purposes. 114 File Options Menu After configuring XENA Options, select the File Options tab. In the File Options tabbed menu there are three operation panes below: File Options, Clip Options and Location Options. In the File Options pane you will select the capture file type, capture content (video/audio), video format, audio format and the number of audio tracks included. Type The Type pull-down menu provides a choice of video/audio file formats: • QuickTime Movie • TGA Sequence • AVI Movie • BMP Sequence • DPX Sequence (LHe/LH & 2K) • TIF Sequence • Cineon (LHe/LH & 2K) • YUV Sequence (8-bit only) XENA Installation and Operation Manual — Adobe After Effects 115 Capture Use the Capture pull-down menu to select the video/audio input combination you will capture: • Video Only • Audio Only • Video - (minus) Audio – video and audio are recorded in separate files • Video + (plus) Audio (QuickTime only) – video and audio are recorded in the same file Note: The options shown are determined by the file format selected. QuickTime captured audio is either embedded with the video file or captured to separate .mov files. All other formats capture audio to Wave Files. Video Format Video Capture Formats supported by XENA cards (varying according to file type) include: • 8-bit YUV 4:2:2 – ‘2vuy’ • 8-bit RGBA 4:4:4:4 – ‘rgba’ • 8-bit YUV 4:2:2 – ‘2Vuy’ • 8-bit RGBA 4:4:4:4 – ‘bgra’ • 10-bit YUV 4:2:2 – ‘v210’ • 10-bit Log RGB 4:4:4 – ‘R10g’ • 8-bit RGB 4:4:4 – ‘rgb’ • 10-bit RGB 4:4:4 – ‘R10k’ • 8-bit RGB 4:4:4 – ‘bgr’ • 10-bit RGB 4:4:4 – ‘r10k’ • 8-bit RGBA 4:4:4:4 – ‘argb’ Audio Format Audio Capture Formats supported by XENA cards include:. • 48 kHz 16-bit PCM Mono • 48 kHz 16-bit PCM Stereo • 48 kHz 24-bit PCM Mono • 48 kHz 24-bit PCM Stereo • 48 kHz 32-bit PCM Mono • 48 kHz 32-bit PCM Stereo • XENA 2K also supports 96 kHz 16 through 32-bit PCM Mono and Stereo selections Audio Tracks Select the number of audio tracks for this project. XENA 2K supports up to 16 (eight stereo pairs), while the other XENA cards support up to eight (four stereo pairs). Adobe Premiere Pro CS3 supports six channels. 116 Clip Options Clip Name In the Clip Options menu, click on the Clip Name hot-text to name the file you will be creating. Subsequent capture file numbers will increment from this one. Reel Name Click on the hot-text field to enter a source tape name (the name of the tape on the VTR). Only QuickTime and DPX files store this information. Sequence Offset When capturing file-per-frame sequences, after naming a file, you can set a Sequence Offset number that will determine the beginning number of the file sequence. Create New Folder Per Sequence A check-box is provided to enable this automatic function. When you check this selection, After Effects CS3 will gather each frame capture sequence in a new folder, based on clip names, on your disk. (Not applicable to QuickTime or AVI movie files.) Import Clip After Capture This function imports the completed capture file into After Effects CS3 Project window. Location Options In the Location Options pane, enter the path to the RAID location you have dedicated for Video and Audio captures. After XENA and File Options are configured, you are ready to perform your video/motion graphics capture. XENA Installation and Operation Manual — Adobe After Effects 117 General Menu – Device Control Options Under the General menu you will find settings for Device Control Options. Device Control (RS-422) Settings Device Control Options are settings for the RS-422 machine control interface on the XENA card. The timecode format is used for both monitoring the RP-188 timecode embedded in the digital data stream and for selecting a timecode offset (if required) for the attached VTR (connected to XENA’s RS-422 port). Timecode Format Use this pull-down to select the timecode base supported by your VTR. • Base 24 • Base 25 • Base 25 (50 frames per second) • Base 30 DF (drop-frame, 30 frames per second) • Base 30 NDF (non-drop-frame, 30 frames per second) • Base 30 DF (drop-frame, 60 frames per second) • Base 30 NDF (non-drop-frame, 60 frames per second) Timecode Source Choose between a separate-channel Longitudinal Timecode (LTC) or Vertical Interval Timecode (VITC) transported in the video signal’s vertical interval or include both (LTC + VITC). Click on the Hot-text items to enter a value for: • Preroll – 0 to 15; the number of frames required to start the source machine before capture • Handles – 0 to 60; the number of frames added to the front and back of a sequence for editing flexibility • Timecode Offset – -30 to +30; timecode adjustment (in frames) forward or back to compensate for discrepancies between the source’s burned-in timecode and the captured sequence. 118 Status Display The Status Display section of the AJA Capture plugin, in the left column, reports the settings that you have selected for the XENA board to use when you have control of it: • Primary Format • Video Input type • Audio Input type Capture Plugin Status Display In the right column you will see current information for: • Capture Status • Number of frames successfully captured • Number of frames dropped from the capture sequence Capture Status reports the detected signal status of the XENA input: • Off Line – the capture plugin does not control the XENA card • Idle – Ready, the plugin has control and the proper input signal is present • Video Input Not Detected – no input present • [format of input detected] – if the input is not a match with the chosen input format, the mismatched signal format will be displayed here Play/Record Controls Standard tape deck icons provide hot buttons for the Play/Record process. They are: Rewind (8x) Fast Forward (8x) Reverse Play Reverse 1 frame Still Stop Play (1x) Forward 1 frame XENA Installation and Operation Manual — Adobe After Effects 119 The slider on the bottom is a variable speed forward/reverse control. Positions from left to right are: (Reverse) 16x, 8x, 4x, 2x, 1/2, 1/4, Still, (Forward) 1/4, 1/2, 2x, 4x, 8x, and 16x. The red button is for Record. Capture Play/Record Controls The pull-down menu on the right enables one of three capture modes: • Capture Now – manual record/stop (crash) capture • Capture Duration – capture a specified number of frames after manual start, based on the timebase of the selected Primary Format • Capture In/Out – initiate and end capture using timecode-based in and out settings The selected mode will activate the appropriate hot-text for that mode. Clicking the hot-text brings up and entry field (hours:minutes:seconds:frames). The upper left display indicates the current timecode from the VTR. Capture In/Out The capture in-point is entered by clicking on the left field of eight digits in the bracketed fields above the In/Out Duration field. The out-point can be set by clicking on the right field of eight digits. Or you can specify a duration in the In/ Out Duration field and the in- or out-point (whichever you have not entered) will be entered automatically according to duration. Note: The in-point/out-point field values are inclusive. If both are set to the same value, the capture duration will be 1 frame. To load the current VTR timecode setting in either field (in-point or out-point) click on the bracket ( { or } ) next to the field. VTR TC The VTR timecode field displays the current machine timecode. You can click on it and enter a timecode to perform a seek to that timecode on the VTR. The VTR must be online and in remote rather than local control mode (as reported in the VTR Status field). 120 Abort on Dropped Frame Found in both Machina and the After Effects CS3 Capture window, this checkbox causes XENA to watch for dropped frames during a capture—if one is found it automatically halts the capture and discards any media captured to that point. Using the AJA Preview Plugin The Preview Plugin allows you to view on a monitor the current frame you are working on in the timeline as it will appear at the XENA output. A summary area at the top of the Preview window shows how the XENA card is currently configured. If you wish to change it, you can use the Preview Options below. (For more on After Effects CS3 and Preview performance, see the FAQ in Section 11, Troubleshooting.) In Preview Options, you can vary the Primary and Secondary signal formats, Convert mode, YUV to RGB range (see earlier discussion under the AJA Capture Plugin), SDI and Analog output type (as applicable), and select timing Reference mode—Free Run, External (genlock), or from the video Input signal. In Color Options, you can change color standards and view the resulting output on monitor. You can select a 10-bit Look Up Table (LUT) file and turn it on and off using the check-box at the right. XENA Installation and Operation Manual — Adobe After Effects 121 You can output a Test Pattern selection using the pull-down menu under Test Options. Using the AJA Playback Plugin Use the Playback Plugin to view rendered files that are produced from the After Effects CS3 effects timeline. You’ve previewed your composition, made final adjustments, and rendered it to a movie or sequence. Now you want to view it in real-time. The Playback Plugin offers the same functional layout as the Capture Plugin— Status Display, Configuration Options, Play Controls but with variations suitable for playback. 122 Playback File Options You can load a file (one file only) into your Playback window by simply dragging it from disk or the After Effects CS3 bin to the active Playback window. File Options Select the File Options tab to see the file name and path currently pointing to the Video File used for playback. Alternatively, you can click on the path hot-text to select a file, delete it using the trash icon at the left, or turn it on/off using the check-box at the right. Format, Colorspace, and total number of frames in the file is reported below the path text. You can select a color Look Up Table by clicking on the LUT hot-text, delete the existing LUT file by clicking on the trash icon, or turn the file on/off in the check-box. XENA Installation and Operation Manual — Adobe After Effects 123 Audio Files Setup – three audio enable check boxes, when checked, allow you to: • Enable Audio Scrubbing – Audio will play while you move through frames using the scrub bar (see Playback Controls). • Enable Audio Variable Speed – Audio will play at the same speed the video is played (rather than 1x only). • Enable Audio Auto-Search – XENA software will automatically load the Audio Track list with audio files that have been generated with the same name as the selected video file. Note: When Audio Auto-Search is active, existing file names in the list will be removed or over-written when the Video File is loaded. (Does not affect the actual audio files.) You can edit the Audio Track list that is automatically loaded with audio files that have been generated with the same name as the selected video file. XENA 2K allows up to 16 (eight stereo pairs), while the other XENA cards support up to eight (four stereo pairs). In the 2K menu, you have a pull-down window that allows you to select either tracks 1–8 or tracks 9–16. QuickTime embedded audio files are automatically appended with a number and will be loaded numerically into the track list. Click on the trash icon to delete a track. Click on the speaker icon check-box on the right to enable/disable a track. To manually enter audio files, simply double-click on a track in the list. Format, Channel, and number of frames in the sequence are reported below the list. Location Options – You can use the Video and Audio path hot-text fields to create a new Playback directory (separate from your capture directory). 124 Playback General Options Under the General Options tab, you will find Device Control Options, Leader/ Trailer Options, and Memory Options. Device Control Options Device Control Options define the RS422 machine control interface on the XENA card. These functions support Print-to-Tape machine control. Timecode Format – Use this pull-down to select the timecode base supported by your VTR. • Base 24 • Base 25 • Base 25 (50 frames per second) • Base 30 DF (drop-frame, 30 frames per second) • Base 30 NDF (non-drop-frame, 30 frames per second) • Base 30 DF (drop-frame, 60 frames per second) • Base 30 NDF (non-drop-frame, 60 frames per second) XENA Installation and Operation Manual — Adobe After Effects 125 Timecode Source – Choose between a separate-channel Longitudinal Timecode (LTC) or Vertical Interval Timecode (VITC) transported in the video signal’s vertical interval or include both (LTC + VITC). Click on the Hot-text items to enter a value for: • Preroll – 0 to 15; the number of frames required to start the source machine before capture • Timecode Offset – -30 to +30; timecode adjustment (in frames) forward or back to compensate for discrepancies between the source’s burned-in timecode and that of the captured sequence. Leader/Trailer Options These options allow you to add colorbars, test tone, and black field in a leader to your clip and black field as trailer. Memory Options Under Memory Options, always leave Enforce Memory Alignment unchecked. It is for SATA controller use only. 126 Playback XENA Options The XENA Options for Playback are much the same as those for Capture. Playback options, however, are for output. Playback Screen with XENA Options menu Activation Options Same as Capture Plugin Playback Options Primary Format, Secondary Format, Convert Mode, YUV-RGB Range, and Output type setting are all the same as those described for the Capture window. Use the Timebase pull-down menu to choose between: • Frames • Timecode (NDF), non-drop-frame • Timecode (DF), drop-frame Audio Level – Choose between +6 dB (US) monitor level and +0 dB (EBU). XENA Installation and Operation Manual — Adobe After Effects 127 Display to Desktop – Select one of four modes of desktop display: • Off • While Scrubbing Only (this mode is suggested) • While Playing Only • Always Note: Display to Desktop uses system resources and could affect performance during capture. Play To Desktop Speed – Use this pull-down menu to set a desktop play speed: • Full Speed – Every frame is displayed to desktop during playback • Half Speed – Every other frame is displayed to desktop during playback • Quarter Speed – one out of every four frames is displayed to the desktop Half Speed and Quarter Speed will reduce the system load that the Display-ToDesktop is using to draw video to your computer. Using the Reference pull-down menu, select timing Reference source—Free Run, from External (genlock), or from the video Input signal. The Mode option menu offers types of Playback—Edit or Output. This selection changes the functionality of the Play Controls as described in the next section. Play Controls The Mode selection made in XENA Options provides either editing or output functionality in the Play Controls pane and in Output mode you can choose between Print-to-Video or Insert Edit functionality. Edit Mode The Edit mode display is shown below: Edit Mode Play Controls and Scrub Bar 128 Below the video display is a Scrub Bar that allows you to click and drag along the loaded sequence to view individual frames and mark In and Out frames for playback of frame subsets. To set an in-point, click on the left bracket. To set an out-point, click on the right bracket. Alternatively, you can set an in-point by clicking on the left most hot-text numeral below the bar and enter the desired frame number for an in-point. Similarly, enter the out-point frame by clicking on the right side hot-text numeral. Note: The “first” or “last” frame may be for the entire sequence or for frames in a in/out-marked subset. In this case, first, last, in, and out frames become “Most Significant Frames.” For example, clicking on the Go-to-1st button will move you to the first Most Significant Frame to the left. Clicking on the Go-to-Next button will move you to the first Most Significant Frame to the right. Immediately under the scrub bar are standard tape deck icons providing hot buttons for the Play process. They are: Go-to-Previous “Most Significant” frame Reverse 1 frame Rewind (8x) Reverse Play Still Stop Play (1x) Fast Forward (8x) Forward 1 frame Go-to-next “Most Significant” frame The slider on the bottom is a variable speed forward/reverse control. Positions from left to right are: (Reverse) 16x, 8x, 4x, 2x, 1/2, 1/4, Still, (Forward) 1/4, 1/2, 2x, 4x, 8x, and 16x. Output Mode Use the Mode pull-down at the bottom of the Xena Options tabbed menu to select Output mode. Note: The Playback Options pane is disabled in this mode to prevent format changes during output. Standard VTR controls and machine control timecode hot-text are provided for outputing your segment. A pull-down menu beneath VTR Status allows you to choose between two modes of output— Insert Edit or Print-To-Video. Print-ToVideo and Insert Edit will output the loaded clip from its in/out- points (if any exist) or from the first to last frame (if no in/out-points have been set). XENA Installation and Operation Manual — Adobe After Effects 129 Insert Edit Mode Insert Edit Mode In this mode, you can select the Video/Audio content that you want to insert by checking the desired content boxes at the left. Then set an in-point that the recording VTR will use to initiate recording of your segment. Duration is determined by the length of the clip you are outputting. Note: The Preview Edit check-box controls whether the insert edit is in “Preview” mode or not. In preview mode, the deck never goes into record but just simulates the edit without putting anything to tape. You must uncheck this box to perform the actual Insert Edit. 130 Print-to-Video Mode This mode allows you to manually put a clip to tape using the VTR’s current position. You have the option of adding Delay frames. XENA will wait this many frames after the tape machine start command before outputting the clip. The Duration Field displays the total length of the clip that will go to tape. Click on the green hot button to launch the output sequence. Play Controls for Print-To-Video Status Display The Status Display section of the AJA Playback plugin reports the settings that you have selected for the XENA board you are controlling: • Primary Format • SDI1 Output type • SDI2 Output type • Analog Output type In the right column you will also see current information for: • Playback Status: Stop, Still, Playing • Frames Dropped: a live frame count display followed by a total count of any frames dropped from the sequence in parens ( ) X NA Models: 2K, LH, and LS Chapter 7 Adobe Photoshop CS3 Overview Adobe Photoshop CS3 (not included with XENA) accepts XENA plugins and drivers to closely integrate XENA functions into the application. After you install the XENA software on your Windows XP workstation, all you need to do to begin using it is to become familiar with the XENA Plugins and how Photoshop works with XENA. With Photoshop open, you’ll go to the File pull-down menu and select Import>AJA Capture to set up your workflow, source device control, and other XENA options. Then access Export>AJA Preview Setup to configure the preview output to your monitor. Quick capture and simple send-to-preview functions are also available in these menus. The manual you are reading does not provide operational information for Adobe Photoshop CS3. Please read the Photoshop user documentation provided with the application for information on configuration and operation. The chapter you are reading addresses configuration and setup unique to use of XENA LS, LH, and 2K models with Adobe Photoshop CS3. 7 AJA Image Capture in Photoshop File>Import Menus 132 XENA Photoshop Plugin Overview The XENA Photoshop plugin is a software application that is integrated into the Photoshop CS3 application and is accessed under the File menu. The Capture plugin provides you with standard tapedeck style play/record functions, status display, and configuration options. The Preview plugin allows you to adjust output formats and view your current project frame on a monitor connected to a XENA output before rendering to file. In this section, you will read about the various pull-down options, hot-text entry fields, and play/record controls and how they interact. Note: The specific options available to you are determined by the XENA model that is installed in your workstation and you are currently controlling. This section will describe all possible options for the Photoshop plugin and note the options that are exclusive to a particular XENA model. There are three functional areas in the Capture screen as indicated in the following illustration—Status Display, Play/Record Controls, and Configuration Options. Status Display Play/Record Controls XENA Photoshop Capture Plugin Layout Configuration Options XENA Installation and Operation Manual — Adobe Photoshop 133 The Status Display area is read-only information about configuration, current status, and performance. The Play/Record Controls offer standard tapedeck controls and more. The hot-text fields beneath the video display are for writing and reading timing data. Capture mode will determine which fields are operational. Note: Capture Play controls are RS422 machine controls for running a VTR tape deck with timecode data. The Configuration Options section contains tabbed menu selections that provide: • XENA Options – XENA workflow configuration options • Image Options – Image formatting colorspace, frame, and crop information If you don’t see the Configuration Options section, click on the Options triangle switch above the Status Display. In normal operation, you may decide to hide this section when it is not needed. File>Import>AJA Image Capture 134 Basic Plugin Operations and Configuration This sections discusses settings that are common across plugin windows and how they interact. Activation Mode A XENA plugin can be set for Automatic or Manual activation using the Activation Mode pull-down menu. Automatic is the default setting and is recommended for normal operation. In this mode, you merely click between the open plugins to make one active. Note: Only one plugin window can have control of the XENA card at a time. If the window you click on does not access the card (reporting Board: Active), either another window is still processing operations or it is set in Manual activation mode and must be disabled (check-box empty). In Manual mode, you must check the Enable XENA box to activate the board control and un-check it to release control. Upon startup of the Photoshop CS3 application, if the launched plugin window is in Manual mode, the window will NOT activate until the enable box is clicked again. The Preview plugin does not need activation since it grabs only one frame (the current working frame) at a time for output to the monitor. It grabs the data on a priority basis when it can or it is off. XENA Installation and Operation Manual — Adobe Photoshop 135 Using the AJA Capture Plugin First, activate the XENA card from the Capture window and set up your workflow by defining Input and Output formats and timing options. To do this, click on the XENA Options tab. (XENA stores the workflow settings you make until they are next changed.) Next, access the Image Options tab to set colorspace and framing options and make Alpha Channel (for RGBA scanned-in images) and image crop settings if required. Finally, use the General Options menu to set timecode and other machine control options. XENA Options Menu Activation Options For Activation Options details, see Basic Plugin Operations and Configuration. 136 Capture Options Before configuring your workflow, it is necessary to understand the concept of Primary and Secondary formats. In XENA operation, the Primary format is that which is written to disk and is the format of the content in the working framebuffer. Secondary format is that which is input for capture or output from XENA to storage or downstream devices. Primary & Secondary Formats: The Primary Format menu allows you to select the video format to be used in the current project in XENA’s framebuffer. (The current selection is reported in the Status Display.) Throughout the plugin, choices are always presented based on which XENA card you are using and what it can do with the signals available and the inputs/outputs selected. For example, The LHe/LH card offers down-conversion of HD to SD format, while the 2K card offers up, down, and cross-conversion. (For more see Convert Mode following.) Note: When converting an Input to the Primary Format, select the Secondary Format option that has (I), for input only, appended to it. Conversely, when converting an Output from the Primary Format, you must select an output signal with (O) for output only. XENA Installation and Operation Manual — Adobe Photoshop 137 Primary and Secondary Format Options Supported Video Signal Formats LS LH 2K 720x576 @ 25.00i Yes Yes Yes 720x576 (Wide) @ 25.00i Yes Yes Yes 720x486 @ 29.97i Yes Yes Yes 720x486 (Wide) @ 29.97i Yes Yes Yes 720x480 @ 29.97i Yes Yes Yes 720x480 (Wide) @ 29.97i Yes Yes Yes 1280x720 @ 23.976p Yes Yes 1280x720 @24.00p Yes Yes 1280x720 @ 25.00p Yes Yes 1280x720 @ 29.97p Yes Yes 1280x720 @ 30.00p Yes Yes 1280x720 @ 50.00p Yes Yes 1280x720 @ 59.94p Yes Yes 1280x720 @ 60.00p Yes Yes 1920x1080 @ 23.976sF Yes Yes 1920x1080 @ 24.00sF Yes Yes 1920x1080 @ 25.00sF Yes Yes 1920x1080 @ 29.97sF Yes Yes 1920x1080 @ 30.00sF Yes Yes 1920x1080 @ 25.00i Yes Yes 1920x1080 @ 29.97i Yes Yes 1920x1080 @ 30.00i Yes Yes 1920x1080 @ 23.976p Yes Yes 1920x1080 @ 24.00p Yes Yes 1920x1080 @ 25.00p Yes Yes 1920x1080 @ 29.97p Yes Yes 1920x1080 @ 30.00p Yes Yes 1920x1080 @ 50.00p Yes 1920x1080 @ 59.94p Yes 1920x1080 @ 60.00p Yes [email protected] Yes Yes [email protected] Yes Yes [email protected] Yes Yes [email protected] Yes Yes [email protected] Yes [email protected] Yes 138 Convert Mode Facilitates selection of a conversion mode for up, down, or cross-conversion between High Definition and Standard Definition, or High Definition to High Definition formats. The choices offered will depend upon the XENA model present and the Primary and Secondary format chosen. XENA 2K models support up, down, and cross-conversion plus SD-to-SD aspect ratio conversions, while LH models only have a down converter, and the LS model has no conversion since it’s SD-only. See the following tables for 2K and LH conversion options for each signal type. XENA LH Conversion Options: LH Primary Video Format Secondary Format Options 720x480 @ 29.97i 720x480 (Wide) @ 29.97i 720x486 @ 29.97i 720x486 (Wide) @ 29.97i 720x576 @ 25.00i 720x576 (Wide) @ 25.00i None Available 1280x720 @ 23.976p 720x486 @ 29.97i 1280x720 @24.00p None Available 1280x720 @ 25.00p 720x576 @ 25.00i 1280x720 @ 29.97p 720x486 @ 29.97i 1280x720 @ 30.00i None Available 1280x720 @ 50.00p 720x576 @ 25.00i 1280x720 @ 59.94p 720x486 @ 29.97i 1280x720 @ 60.00p 1920x1080 @ 23.976sF None Available 1920x1080 @ 24.00sF 1920x1080 @ 25.00sF 720x576 @ 25.00i 1920x1080 @ 29.97sF 720x486 @ 29.97i 1920x1080 @ 30.00sF None Available 1920x1080 @ 25.00i 720x576 @ 25.00i 1920x1080 @ 29.97i 720x486 @ 29.97i 1920x1080 @ 30.00i 1920x1080 @ 23.976p 1920x1080 @ 24.00p 1920x1080 @ 25.00p 1920x1080 @ 29.97p 1920x1080 @ 30.00p [email protected] [email protected] [email protected] [email protected] None Available XENA Installation and Operation Manual — Adobe Photoshop 139 XENA 2K Conversion Options: 2K Primary Video Format Secondary Format Options 720x480 @ 29.97i 720x480 (Wide) @ 29.97i 720x486 @ 29.97i 720x486 (Wide) @ 29.97i 1920x1080 @ 29.97i 1280x720 @ 59.94p 720x486 @ 29.97i 720x576 @ 25.00i 720x576 (Wide) @ 25.00i 1920x1080 @ 25.00i 1280x720 @ 50.00p 720x576 @ 25.00i 1280x720 @ 23.976p 720x486 @ 29.97i 1920x1080 @ 29.97i 1280x720 @24.00p 1920x1080 @ 30.00i 1280x720 @ 25.00p 720x576 @ 25.00i 1920x1080 @ 25.00i 1280x720 @ 29.97p 720x486 @ 29.97i 1920x1080 @ 29.97i 1280x720 @ 30.00i 1920x1080 @ 30.00i 1280x720 @ 50.00p 720x576 @ 25.00i 1920x1080 @ 25.00i 1280x720 @ 59.94p 720x486 @ 29.97i 1920x1080 @ 29.97i 1280x720 @ 60.00p 1920x1080 @ 30.00i 1920x1080 @ 23.976sF 720x486 @ 29.97i 1920x1080 @ 24.00sF None Available 1920x1080 @ 25.00sF 720x576 @ 25.00i 1280x720 @ 50.00p 1920x1080 @ 29.97sF 720x486 @ 29.97i 1280x720 @ 59.94p 1920x1080 @ 30.00sF 1280x720 @ 60.00p 1920x1080 @ 25.00i 720x576 @ 25.00i 1280x720 @ 50.00p 1920x1080 @ 29.97i 720x486 @ 29.97i 1280x720 @ 59.94p 1920x1080 @ 30.00i 1280x720 @ 60.00p 1920x1080 @ 23.976p 1920x1080 @ 24.00p 1920x1080 @ 25.00p 1920x1080 @ 29.97p 1920x1080 @ 30.00p 1920x1080 @ 50.00p 1920x1080 @ 59.94p 1920x1080 @ 60.00p [email protected] [email protected] [email protected] [email protected] [email protected] [email protected] None Available 140 All conversions use AJA 10-bit hardware on the card. To do a down-conversion on an HD input (2K and LH models): • Set the Primary Format as an SD format • Select the correct HD format with an (I) input designation for the Secondary Format, then • Choose a “– Secondary” Video Input type To do an up-conversion on an SD project for HD output (2K models): • Set the Primary Format as an SD format • Select the correct HD format with an (O) output designation for the Secondary Format, then • Choose a “– Secondary” SDI1/2 Output type and an HD Analog Output Down-conversion display mode choices that may be available include (LH and 2K): • Anamorphic: full-screen • Letterbox: image is reduced with black top and bottom added to image area with the aspect ratio preserved • Crop: image is cropped horizontally to fit new screen size Up-conversion display mode choices that may be available include (2K models): • Anamorphic: full-screen • Pillarbox 4x3 • Zoom 14x9 • Zoom Letterbox • Zoom Wide For Cross-conversion (2K models): • Set the Primary Format as an HD format (what you want the input converted into) • Select the correct input HD format with an (I) input designation for the Secondary Format XENA Installation and Operation Manual — Adobe Photoshop 141 XENA cross-conversion converts from one format of HD to another, such as 1080i @ 29.97 to 720p @ 59.94. XENA 2K does not perform 2K-to-HD crossconvert, but can display a cropped cut of the 2K on an HD monitor. In addition to HD-to-HD cross-conversion, XENA 2K can also perform SD-to-SD hardware-based aspect ratio conversion for capture and output. This is controlled the same as all other up/down/cross-conversions. Use it by selecting a ‘Secondary Video Format’ that matches the ‘Primary Video Format’ and then specify the conversion using the ‘Convert Mode’ control. XENA 2K does not perform 2Kto-HD cross-convert. YUV<->RGB Range This control mode should almost never be changed from its CGR default. This setting is only for highly-knowledgeable users that must define how color values will be mapped when doing the color space conversion—far less than 1% of all users should ever need to use it. Use this feature only for capturing YUV source into an RGB file, or to play an RGB file out to YUV. The CGR setting maps the typical YUV values to typical RGB values. For example, 8bit YUV 16 is mapped to 8 bit RGB 0, and YUV 235 to RGB 255. The ‘SMPTE’ setting for this control maps YUV into RGB using the exact YUV values. Therefore, 8 bit YUV 16 will map to RGB 16, and so forth. Only change this setting from its default if you are absolutely sure you know the benefits/consequences. This feature is not the same as a broadcast safe limiter. Video Input Use the Video Input pull-down menu to select the appropriate signal type of your input. (The current selection is reported in the display of the pull-down menu.) Video Input always shows all the available input options based on your Primary and Secondary format configuration. XENA software looks at 1) what model you have, 2) Primary Format, and 3) Secondary Format (in that order) to determine what input options are appropriate. Video Input Options supported by XENA cards include: • Single Link SDI • Component Betacam NTSC-J • Composite NTSC • Component SMPTE NTSC-J • S-Video NTSC • Composite PAL • Component Betacam NTSC • S-Video PAL • Component SMPTE NTSC • Component Betacam PAL • Composite NTSC-J • Component SMPTE PAL • S-Video NTSC-J • Component XVGA (HD only) • Dual Link HD (2K only) • HSDL (2K only) 142 Audio Input Use the Audio Input pull-down menu to select the appropriate signal type for your input. (The current selection is reported in the Status Display.) Audio Input Options Supported by XENA cards include: • Embedded SDI • Digital AES/EBU - XLR • Digital AES/EBU - BNC (only applies if you are using a KL-box) • Analog SDI Outputs 1 & 2 The SDI outputs will be Single Link only if there is no Secondary Video Output Format selected. If you have a Secondary format selected, you can choose between Single Link SDI – Primary and Single Link SDI – Secondary as your output. XENA 2K also supports Dual Link output. Analog Output Analog format choices in the Analog Output pull-down menu vary depending upon file format. • Composite + S-Video NTSC • Composite PAL • Composite + S-Video NTSC-J • S-Video PAL • Component Betacam NTSC • Component Betacam PAL • Component Betacam NTSC-J • Component SMPTE PAL • Component SMPTE • Component RGB • Component XVGA (HD only) Display to Desktop Select the mode of desktop display: • Off • Display while idle only (this mode is suggested) XENA Installation and Operation Manual — Adobe Photoshop 143 Timecode Input Select the type of timecode used by the source video machine—RS-422 or Embedded. Note: SMPTE RP 188 defines a standard for the transmission of time code and control code in the ancillary data space of a digital television data stream. Time code information is transmitted in the ancillary data space as defined in ANSI/SMPTE 291M. Multiple codes can be transmitted within a single digital video data stream. Other time information, such as real time clock, DTTR tape timer information, and other user-defined information, may also be carried in the ancillary time code packet instead of time code. The actual information transmitted through the interface is identified by the coding of a distributed binary bit. Equipment manufacturers can use the meta data for different purposes. 144 Image Options Menu After configuring XENA Options, select the Image Options tab. In the Image Options menu there are four configuration settings—Colorspace, Frame Scan, Set Alpha Channel, and Crop Image. XENA LS options shown Photoshop Plugin Image Options Tab Note: You can enlarge the thumbnail capture image to full-screen by doubleclicking on the image. To return, double-click again. Colorspace – Choose between 8- and 16-bit color in either RGB 4:4:4, or RGBA 4:4:4:4 mode. Frame Scan – Work with a Full Frame or capture Even or Odd fields only in single or double modes. Set Alpha Channel – The Alpha channel image applies only to RGBA scannedin images and then you can set it to 255 (default) which is zero transparency or 0 which is 100 percent transparency when the image is imported into Photoshop. Crop Image – Use the hot text fields to enter value for pixels cropped from Top, Left, Right, and Bottom of the captured image. When you import (Accept) the image into Photoshop, it will be cropped to these specifications. XENA Installation and Operation Manual — Adobe Photoshop 145 General Options Menu Under the General tab, you will find Device Control Options. These functions are for the RS-422 machine control interface on the XENA card. They support Print-to-Tape machine control. Timecode Format – Use this pull-down to select the timecode base supported by your VTR. • Base 24 • Base 25 • Base 25 (50 frames per second) • Base 30 DF (drop-frame, 30 frames per second) • Base 30 NDF (non-drop-frame, 30 frames per second) • Base 30 DF (drop-frame, 60 frames per second) • Base 30 NDF (non-drop-frame, 60 frames per second) Timecode Source – Choose between a separate-channel Longitudinal Timecode (LTC) or Vertical Interval Timecode (VITC) transported in the video signal’s vertical interval or include both (LTC + VITC). Click on the Hot Text items to enter a value for: • Preroll – 0 to 15; the number of frames required to start the source machine before capture • Timecode Offset – -30 to +30; timecode adjustment (in frames) forward or back to compensate for discrepancies between the source’s burned-in timecode and that of the captured sequence. 146 Status Display The Status Display section of the Photoshop Capture plugin, in the left column, reports the settings that you have selected for the XENA board to use when you have control of it: • Primary Format • Video Input type • Selected Colorspace Photoshop Capture Window Status Display If you have more than one XENA card installed in your workstation, you can select another card to work with by using the Board pull-down menu at the top. If your XENA cards are set for Auto Activation and are idle (not processing), you will immediately take control of the new Board (see Basic Plugin Operations and Configuration). In the right column Capture Status reports the detected signal status of the XENA input: • Off Line – the capture plugin does not control the XENA card • Idle – Ready, the plugin has control and the proper input signal is present • Video Input Not Detected – no input present XENA Installation and Operation Manual — Adobe Photoshop 147 Play/Record Controls Standard tape deck icons provide hot buttons for the Play/Record RS-422 machine control of a source VTR. They are: Rewind (8x) Fast Forward (8x) Reverse Play Reverse 1 frame Still Stop Play (1x) Forward 1 frame The slider on the bottom is a variable speed forward/reverse control. Positions from left to right are: (Reverse) 16x, 8x, 4x, 2x, 1/2, 1/4, Still, (Forward) 1/4, 1/2, 2x, 4x, 8x, and 16x. The red Record button is used to initiate a capture. Photoshop Capture Window Play/Record Controls The pull-down menu on the right enables one of two capture modes: • Caputure Now – manual record/stop (“crash”) capture • Capture In/Out – initiate a capture using timecode-based in or out settings The selected mode will activate the appropriate hot text for that mode. Clicking the hot text brings up and entry field (hours:minutes:seconds:frames). The upper left display indicates the current timecode from the VTR. Capture In/Out – Enter a timecode Capture point by clicking on either the left field or right field of eight digits in the backeted fields above the In/Out Duration field. Since Photoshop capture is a single-frame function, the In and Out settings will always be the same and the frame duration will always be one frame. Note: The in-point/out-point field values are inclusive. When both are set to the same value, the capture duration will be 1 frame. To load the current VTR timecode setting in either field (in-point or out-point) click on the bracket ( { or } ) next to the field. 148 VTR TC – The VTR timecode field displays the current machine timecode and you can click on it to roll the VTR to another frame setting. The VTR must be online and in remote rather than local control mode (as reported in the VTR Status field.) Accept – When you have successfully captured the frame you wish to use in Photoshop, Click on Accept in the bottom right corner of the Play/Record pane. The XEN capture plugin will close and your frame will be opened in Photoshop for editing. Using the AJA Preview Plugin The Preview Plugin allows you to view on a monitor the current frame you are working on in Photoshop CS3. Go to File>Export>AJA Preview Setup to configure previews. When you have Preview Setup the way you want it, subsequent Previews are output by selecting AJA Preview (below AJA Preview Setup). AJA Export Plugins for Photoshop XENA Installation and Operation Manual — Adobe Photoshop 149 The pull-down menu at the top allows you to select any XENA board you have installed in your workstation (subject to Activation rules). A check box is provided to enable/disable the Preview function.. AJA Preview Setup Menu for Photoshop The Summary section reports current configuration settings. In Preview Options, you can change the Primary and Secondary signal formats, Convert mode, SDI and Analog output type (as applicable), and select timing Reference mode—Free Run, External (genlock), or from the video Input signal. In Color Options, you can change color standards and view the resulting output on your monitor. You can select a 10-bit Look Up Table (LUT) file and turn it on and off using the check-box at the right. Finally, for picture quality adjustment, you can output a Test Pattern selection using the pull-down menu under Test Options. Click OK to output your Preview. 150 X NA Models: 2K, LH, and LS Chapter 8 Autodesk Combustion Using XENA with Combustion 4 AJA’s XENA Plugins for Autodesk Combustion 4 are used for Preview functions only. Select AJ A Preview Click on Options LH Combustion Preferences>Framebuffer Menu The Preview Plugin allows you to view on a monitor the current project you are working on in Combustion, at the XENA output. With a Combustion project open, go to File>Preferences and select Host>Framebuffer. In the pulldown window, select AJA Preview and click on Options to configure previews. 8 152 If you use XENA Machina for capture and your Video Input format is 8-bit YUV 4:2:2, then select the 2Vuy mode (uppercase V). Select Update Dynamically to output every frame as you play a segment. Alternatively, you can output only the frame you have stopped on and are currently viewing by deselecting Update Dynamically. This mode can speed up processing by minimizing use of system resources. Preview Options If you have more than one XENA card, the Board pull-down menu at the top allows you to select the XENA board you want to control (subject to Activation). AJA Preview Setup Menu XENA Installation and Operation Manual — Autodesk Combustion 153 The Summary section reports current configuration settings. In Preview Options, you can change the Primary and Secondary signal formats, Convert mode, YUV to RGB range, SDI and Analog output type (as applicable), and select timing Reference mode—Free Run, External (genlock), or from the video Input signal. In Color Options, you can change color standards and view the resulting output on your monitor. You can select a 10-bit Look Up Table (LUT) file and turn it on and off using the check-box at the right. Finally, for picture quality adjustment, you can output a Test Pattern selection using the pull-down menu under Test Options. Click OK to output your Preview. Activation Note: Only one plugin window can have control of the XENA card at a time. If the application window you click on does not access the card (panel fields are inactive), either another window is still processing operations or it may be in Manual activation mode and requires manual disabling (check box blanked) to release control of the XENA card. Activation mode is available in these applications: Machina, Adobe After Effects CS3, and Adobe Photoshop CS3. Primary & Secondary Formats The Primary Format menu allows you to select the video format to be used in the current project in XENA’s framebuffer. (The current selection is reported in the display of the pull-down menu.) Choices are always presented based on which XENA card you are using and what it can do with the signals available and the inputs/outputs selected. For example, if the outputs or inputs are a different format than the primary, the Secondary Format pull-down menu will allow you to view and edit the available secondary format selection if it differs from the Primary format. Note: When converting an Input to the Primary Format, select the Secondary Format option that has (I), for input only, appended to it. Conversely, when converting an Output from the Primary Format, you must select an output signal with (O) for output only. 154 Primary and Secondary Format Options Supported Video Signal Formats LS LH 2K 720x576 @ 25.00i Yes Yes Yes 720x576 (Wide) @ 25.00i Yes Yes Yes 720x486 @ 29.97i Yes Yes Yes 720x486 (Wide) @ 29.97i Yes Yes Yes 720x480 @ 29.97i Yes Yes Yes 720x480 (Wide) @ 29.97i Yes Yes Yes 1280x720 @ 23.976p Yes Yes 1280x720 @24.00p Yes Yes 1280x720 @ 25.00p Yes Yes 1280x720 @ 29.97p Yes Yes 1280x720 @ 30.00p Yes Yes 1280x720 @ 50.00p Yes Yes 1280x720 @ 59.94p Yes Yes 1280x720 @ 60.00p Yes Yes 1920x1080 @ 23.976sF Yes Yes 1920x1080 @ 24.00sF Yes Yes 1920x1080 @ 25.00sF Yes Yes 1920x1080 @ 29.97sF Yes Yes 1920x1080 @ 30.00sF Yes Yes 1920x1080 @ 25.00i Yes Yes 1920x1080 @ 29.97i Yes Yes 1920x1080 @ 30.00i Yes Yes 1920x1080 @ 23.976p Yes Yes 1920x1080 @ 24.00p Yes Yes 1920x1080 @ 25.00p Yes Yes 1920x1080 @ 29.97p Yes Yes 1920x1080 @ 30.00p Yes Yes 1920x1080 @ 50.00p Yes 1920x1080 @ 59.94p Yes 1920x1080 @ 60.00p Yes [email protected] Yes Yes [email protected] Yes Yes [email protected] Yes Yes [email protected] Yes Yes [email protected] Yes [email protected] Yes XENA Installation and Operation Manual — Autodesk Combustion 155 Convert Mode: Allows selection of a conversion mode for up-, down-, or crossconversion between High-definition and Standard-definition, or High-definition to High-definition formats. The choices offered depend on the XENA model present and the Primary and Secondary format chosen. XENA 2K models support up-, down-, and cross-conversion plus SD-to-SD aspect ration conversions. LH models only have a down converter, and the LS model (SD only) has no conversion. See the following tables for LH and 2K conversion options. XENA LH Conversion Options LH Primary Video Format Secondary Format Options 720x480 @ 29.97i 720x480 (Wide) @ 29.97i 720x486 @ 29.97i 720x486 (Wide) @ 29.97i 720x576 @ 25.00i 720x576 (Wide) @ 25.00i None Available 1280x720 @ 23.976p 720x486 @ 29.97i 1280x720 @24.00p None Available 1280x720 @ 25.00p 720x576 @ 25.00i 1280x720 @ 29.97p 720x486 @ 29.97i 1280x720 @ 30.00i None Available 1280x720 @ 50.00p 720x576 @ 25.00i 1280x720 @ 59.94p 720x486 @ 29.97i 1280x720 @ 60.00p 1920x1080 @ 23.976sF None Available 1920x1080 @ 24.00sF 1920x1080 @ 25.00sF 720x576 @ 25.00i 1920x1080 @ 29.97sF 720x486 @ 29.97i 1920x1080 @ 30.00sF None Available 1920x1080 @ 25.00i 720x576 @ 25.00i 1920x1080 @ 29.97i 720x486 @ 29.97i 1920x1080 @ 30.00i 1920x1080 @ 23.976p 1920x1080 @ 24.00p 1920x1080 @ 25.00p 1920x1080 @ 29.97p 1920x1080 @ 30.00p [email protected] [email protected] [email protected] [email protected] None Available 156 XENA 2K Conversion Options 2K Primary Video Format Secondary Format Options 720x480 @ 29.97i 720x480 (Wide) @ 29.97i 720x486 @ 29.97i 720x486 (Wide) @ 29.97i 1920x1080 @ 29.97i 1280x720 @ 59.94p 720x486 @ 29.97i 720x576 @ 25.00i 720x576 (Wide) @ 25.00i 1920x1080 @ 25.00i 1280x720 @ 50.00p 720x576 @ 25.00i 1280x720 @ 23.976p 720x486 @ 29.97i 1920x1080 @ 29.97i 1280x720 @24.00p 1920x1080 @ 30.00i 1280x720 @ 25.00p 720x576 @ 25.00i 1920x1080 @ 25.00i 1280x720 @ 29.97p 720x486 @ 29.97i 1920x1080 @ 29.97i 1280x720 @ 30.00i 1920x1080 @ 30.00i 1280x720 @ 50.00p 720x576 @ 25.00i 1920x1080 @ 25.00i 1280x720 @ 59.94p 720x486 @ 29.97i 1920x1080 @ 29.97i 1280x720 @ 60.00p 1920x1080 @ 30.00i 1920x1080 @ 23.976sF 720x486 @ 29.97i 1920x1080 @ 24.00sF None Available 1920x1080 @ 25.00sF 720x576 @ 25.00i 1280x720 @ 50.00p 1920x1080 @ 29.97sF 720x486 @ 29.97i 1280x720 @ 59.94p 1920x1080 @ 30.00sF 1280x720 @ 60.00p 1920x1080 @ 25.00i 720x576 @ 25.00i 1280x720 @ 50.00p 1920x1080 @ 29.97i 720x486 @ 29.97i 1280x720 @ 59.94p 1920x1080 @ 30.00i 1280x720 @ 60.00p 1920x1080 @ 23.976p 1920x1080 @ 24.00p 1920x1080 @ 25.00p 1920x1080 @ 29.97p 1920x1080 @ 30.00p 1920x1080 @ 50.00p 1920x1080 @ 59.94p 1920x1080 @ 60.00p [email protected] [email protected] [email protected] [email protected] [email protected] [email protected] None Available XENA Installation and Operation Manual — Autodesk Combustion 157 All conversions use AJA 10-bit hardware on the card. To do a down-conversion on an HD input (2K and LH models): • Set the Primary Format as an SD format • Select the correct HD format with an (I) input designation for the Secondary Format, then • Choose a “– Secondary” Video Input type To do an up-conversion on an SD project for HD output (2K models): • Set the Primary Format as an SD format • Select the correct HD format with an (O) output designation for the Secondary Format, then • Choose a “– Secondary” SDI1/2 Output type and an HD Analog Output Down-conversion display mode choices that may be available include (LH and 2K): • Anamorphic: full-screen • Letterbox: image is reduced with black top and bottom added to image area with the aspect ratio preserved • Crop: image is cropped horizontally to fit new screen size Up-conversion display mode choices that may be available include (2K models): • Anamorphic: full-screen • Pillarbox 4x3 • Zoom 14x9 • Zoom Letterbox • Zoom Wide For Cross-conversion (2K models): • Set the Primary Format as an HD format (what you want the input converted into) • Select the correct input HD format with an (I) input designation for the Secondary Format 158 XENA cross-conversion converts one format of HD to another, such as 1080i @ 29.97 to 720p @ 59.94. XENA 2K does not perform 2K-to-HD cross-convert, but can display a cropped cut of the 2K on an HD monitor. In addition to HDto-HD cross-conversion, XENA 2K can also perform SD-to-SD hardware based aspect ratio conversion for capture and output. This is controlled the same as all other up/down/cross-conversions. Use it by selecting a ‘Secondary Video Format’ that matches the ‘Primary Video Format’ and then specify the conversion using the ‘Convert Mode’ control. SDI Outputs 1 & 2 The SDI outputs will be Single Link only if there is no Secondary Video Output Format selected. If you have a Secondary format selected, you can choose between Single Link SDI – Primary and Single Link SDI – Secondary as your output. XENA 2K also supports Dual Link output. Analog Output Analog format choices in the Analog Output pull-down menu vary depending upon file format. Choices that may be available include: • Composite + S-Video NTSC • Composite PAL • Composite + S-Video NTSC-J • S-Video PAL • Component Betacam NTSC • Component Betacam PAL • Component Betacam NTSC-J • Component SMPTE PAL • Component SMPTE • Component RGB • Component XVGA (High Definition only) X NA Models: 2K, LH, and LS Chapter 9 Eyeon Fusion Using XENA with Fusion 5 The XENA Fusion 5 plugin is a software application integrated into Fusion that allows you to preview your current Fusion project through the XENA card output. Go to File>Preferences to setup AJA Preview. Selecting AJA Preview for Fusion 9 160 Under Globals and new comp defaults->Preview select AJA Preview from the “Display file sequences on:” pull-down menu. To set up AJA Preview formatting, continue down to the I/O selections under Globals and new comp defaults and then choose AJA Preview. AJA Preview Setup Menu for Fusion XENA Installation and Operation Manual — Eyeon Fusion 161 Preview Options If there is more than one XENA card installed in your system, a pull-down menu at the top allows you to select which XENA board to control (subject to Activation rules). In Preview Options, you can change the Primary and Secondary signal formats, Convert mode, SDI and Analog output type (as applicable), and select timing Reference mode—Free Run, External (genlock), or from the video Input signal. In Color Options, you can change color standards and view the resulting output on your monitor. You can select a 10-bit Look Up Table (LUT) file and turn it on and off using the check-box at the right. Finally, for picture quality adjustment, you can output a Test Pattern selection using the pull-down menu under Test Options. Click OK to output your Preview. Note: Fusion AJA Preview, in most cases, will not be in realtime for any RAM Preview. Also, it only receives 8-bit RGBA image data from Fusion. Activation Note: Only one plugin window can have control of the XENA card at a time. If the application window you click on does not access the card (panel fields are inactive), either another application is still processing operations or it may have a Manual activation mode and must be disabled (check box blanked) to release control of the XENA card. Activation Mode is available in Machina, Adobe After Effects CS3, and Adobe Photoshop CS3. Primary & Secondary Formats The Primary Format menu allows you to select the video format to be used in the current project in XENA’s framebuffer. (The current selection is reported in the display of the pull-down menu.) Choices are always presented based on which XENA card you are using and what it can do with the signals available and the inputs/outputs selected. For example, The LHe/LH card offers down-conversion of HD to SD format, while the 2K card offers up, down, and cross-conversion. (For more see Convert Mode following.) Note: The Secondary Format is assigned to either an input or an output so XENA nomenclature places (O) = Output only or (I) = Input only, at the end of the signal format. 162 Primary and Secondary Format Options Supported by XENA cards: Video Signal Formats LS LH 2K 720x576 @ 25.00i Yes Yes Yes 720x576 (Wide) @ 25.00i Yes Yes Yes 720x486 @ 29.97i Yes Yes Yes 720x486 (Wide) @ 29.97i Yes Yes Yes 720x480 @ 29.97i Yes Yes Yes 720x480 (Wide) @ 29.97i Yes Yes Yes Yes Yes 1280x720 @ 23.976p 1280x720 @24.00p Yes Yes 1280x720 @ 25.00p Yes Yes 1280x720 @ 29.97p Yes Yes 1280x720 @ 30.00p Yes Yes 1280x720 @ 50.00p Yes Yes 1280x720 @ 59.94p Yes Yes 1280x720 @ 60.00p Yes Yes 1920x1080 @ 23.976sF Yes Yes 1920x1080 @ 24.00sF Yes Yes 1920x1080 @ 25.00sF Yes Yes 1920x1080 @ 29.97sF Yes Yes 1920x1080 @ 30.00sF Yes Yes 1920x1080 @ 25.00i Yes Yes 1920x1080 @ 29.97i Yes Yes 1920x1080 @ 30.00i Yes Yes 1920x1080 @ 23.976p Yes Yes 1920x1080 @ 24.00p Yes Yes 1920x1080 @ 25.00p Yes Yes 1920x1080 @ 29.97p Yes Yes 1920x1080 @ 30.00p Yes Yes 1920x1080 @ 50.00p Yes 1920x1080 @ 59.94p Yes 1920x1080 @ 60.00p Yes [email protected] Yes Yes [email protected] Yes Yes [email protected] Yes Yes [email protected] Yes Yes [email protected] Yes [email protected] Yes Convert Mode: Facilitates selection of a conversion mode for up, down, or cross-conversion between High Definition and Standard Definition, or High Definition to High Definition formats. The choices presented will depend on the XENA model present and the Primary and Secondary format also chosen. XENA 2K models have up, down, and cross-conversion plus SD-to-SD aspect ration conversions, while LH models only have a down converter, and the LS model has no conversion since it’s SD-only. XENA Installation and Operation Manual — Eyeon Fusion 163 All conversions use AJA 10-bit hardware on the card. To do a down-conversion on an HD input (2K and LH models): • Set the Primary Format as an SD format • Select the correct HD format with an (I) input designation for the Secondary Format, then • Choose a “– Secondary” Video Input type To do an up-conversion on an SD project for HD output (2K models): • Set the Primary Format as an SD format • Select the correct HD format with an (O) output designation for the Secondary Format, then • Choose a “– Secondary” SDI1/2 Output type and an HD Analog Output Down-conversion display mode choices that may be available include (LH and 2K): • Anamorphic: full-screen • Letterbox: image is reduced with black top and bottom added to image area with the aspect ratio preserved • Crop: image is cropped horizontally to fit new screen size Up-conversion display mode choices that may be available include (2K models): • Anamorphic: full-screen • Pillarbox 4x3 • Zoom 14x9 • Zoom Letterbox • Zoom Wide For Cross-conversion (2K models): • Set the Primary Format as an HD format (what you want the input converted into) • Select the correct input HD format with an (I) input designation for the Secondary Format 164 XENA cross-conversion converts from one format of HD to another, such as 1080i @ 29.97 to 720p @ 59.94. XENA 2K does not perform 2K to HD crossconvert, but can display a cropped cut of the 2K on an HD monitor. In addition to HD to HD cross-conversion, XENA 2K also can perform SD to SD hardware based aspect-ratio conversion for capture and output. This is controlled in the same manner as all other up/down/cross-conversions. Use it by selecting a ‘Secondary Video Format’ which matches the ‘Primary Video Format’ and then specifying the conversion using the ‘Convert Mode’ control. SDI Outputs 1 & 2 The SDI outputs will be Single Link only if there is no Secondary Video Output Format selected. If you have a Secondary format selected, you can choose between Single Link SDI – Primary and Single Link SDI – Secondary as your output. Analog Output Analog format choices in the Analog Output pull-down menu vary depending upon file format. Choices that may be available include: • Composite + S-Video NTSC • Composite PAL • Composite + S-Video NTSC-J • S-Video PAL • Component Betacam NTSC • Component Betacam PAL • Component Betacam NTSC-J • Component SMPTE PAL • Component SMPTE • Component RGB • Component XVGA (High Definition only) XENA Installation and Operation Manual — Eyeon Fusion 165 Fusion “View On” When working on a timeline in Fusion, you can choose to preview a specific node by right-clicking on the segment and going to View on>AJA Preview. Right-click Selection of “View on” AJA Preview 166 X NA Models: 2K, LH, and LS Chapter 10 3rd-Party Applications 3rd-Party Applications Providing Native Support for XENA Products The following third-party applications provide native support for specified AJA XENA capture cards. This list is not all-inclusive. Other applications not listed may also support XENA cards. If you have problems related to hardware functions while using these applications, contact AJA Support and we will do our best to promptly verify and resolve them. If your problems are software related please contact the application manufacturer. Contact phone numbers and URLs are provided below. Note: Some vendors may have a fee structure for customer support services. Application XENA Card Supported Support Contacts Avid Liquid Chrome LHe Note: Contact your Liquid Chrome dealer before contacting Avid support. Avid support: 1-800-800-2843 http://www.avid.com/onlinesupport/supportcenter.asp?productID=176 Sony Vegas LHe/LH, LSe/LS 1.800.577.6642 http://www.sonycreativesoftware.com/support/technicalsupport.asp Drastic Technologies LHe/LH LSe/LS 1-416-255-5636 email: [email protected] Sonic CineVision LHe/LH 1-866-279-7694 (toll free) or 1-905-482-5200 outside of North America (Note: This is a call to the Toronto area and you are responsible for any toll fees that may apply.) CineForm Prospect HD HS, LHe/LH http://www.sonic.com/about/contactus.aspx http://supportcenteronline.com/ics/support/default.asp?deptID=614 10 168 Using XENA with Avid Liquid Chrome™ XE The Avid Liquid Chrome XE product comes bundled with a XENA LHe card for media capture and playback. No AJA plug-ins are necessary for Liquid Chrome operation—however, for you to use other applications (including Machina)with XENA, you will need to install the necessary XENA pluggins and drivers using the supplied AJA software CD. Sony Vegas + DVD Sony Vegas + DVD Production Suite support for Xena LHe/LH and LSe/LS boards allows you to capture, edit, monitor, and print-to-tape using SDI (serial digital interface) professional SD and HD decks. Multichannel audio, mixed timecode handling, 1080 24p capture and export, and component monitoring are also supported. Drastic Technologies QuickClip Pro The QuickClip Pro software-based digital disk recorder application supports XENA LHe/LH and LSe/LS cards for uncompressed capture and playback. QuickClip Pro supports a wide range of hardware platforms including Uncompressed 8/10-Bit Y’CrCb and video standards ranging from NTSC/PAL to 1080x1920 HDTV. Sonic CineVision Sonic CineVision is a comprehensive encoding solution for the Blu-ray Disc and HD DVD optical disc formats. It supports a wide range of file and image sequence input files. CineVision offers complete support for all three next-generation video codecs—H.264/AVC, VC-1 and MPEG-2. AJA’s XENA LHe/LH card is a CineVision recommended periferal for uncompressed capture/playback. CineForm Prospect HD Note: For users who want to use both the CineForm Premiere Pro plugins for compressed workflow and the XENA Premiere Pro plugins for uncompressed workflow: Because the CineForm Prospect HD plugins are dependent on older versions of the AJA Hardware drivers, it is necessary to have a dual-boot configuration if both Prospect HD and XENA plugins will be used. The XENA plugins must be installed on one bootable partition, and the CineForm plugins installed on the other. X NA Models: 2K, LH, and LS Chapter 11 Troubleshooting If You Run Into Problems One useful way to find the source of problems is to isolate your system to the smallest size where the problem still occurs and then note all the symptoms. This serves to eliminate areas not involved in the problem and makes finding the problem easier. Once you’ve noted problem symptoms, look through the following table and see if any of the symptoms are listed. If so, check the items listed. If you later need to call for customer service, let them know all of the things you’ve tried and when and how the symptoms appeared. Updating Software Check on the AJA Video website (http://www.aja.com/html/support.html) for software updates. If any are available, download the file and read any associated instructions prior to installing the software. Support When calling for support, first check over your system configuration and ensure everything is connected properly and that current Presets and Setups match what you are trying to do. Even if you cannot find the cause of the problem, having this information at hand will help when you call AJA Customer Support for help. If the problem is unknown or you need general help, first contact the dealer where you purchased the product. AJA dealers offer product support for many service requirements. 11 170 If the problem is an AJA Video XENA issue, then contact AJA Video Customer Support using one of the methods listed below: Contacting by Mail Address: 443 Crown Point Circle, Grass Valley, CA. 95945 USA Telephone: 1.800.251.4224 or 1.530.274.2048 Fax: 1.530.274.9442 Web: http://www.aja.com Support Email: [email protected] Frequently Asked Questions Can I use SATA Drives for RAID storage with the XENA product line? AJA always recommends the use of SCSI or Fibre Channel storage solutions for use with XENA products. I updated the XENA software and my XENA hardware is now missing, Why? A function of the uninstaller is removing the current driver for the XENA card. In doing this the XENA hardware is removed completely. A “plug and play” request must be made to install a new driver for the hardware. This can be done be either restarting the system or going into device manager and searching for new hardware. On startup the computer automatically looks for new or uninstalled hardware. Can the XENA handle HDV? If so how? XENA can capture or output to/from uncompressed files using HDV devices that have SDI or analog inputs or outputs. Also, HDV mpeg files will play realtime in Premiere Pro when using AJA supplied project presets. HDV mpeg files should be captured using Adobe’s built in capture support for DV and HDV cameras. Does XENA Offer Support for compressed codecs? XENA cards capture uncompressed files exclusively. Compressed files can be used in most of the applications for which XENA has plug-ins, but in most cases they will not be playable in real-time. The exception is using HDV or DV files in Adobe Premiere Pro. When using AJA XENA project presets in Premeire Pro, compressed HDV or DV files can be played in real-time from the timeline. Other compressed formats such as DVCProHD and JPEG-2000 are currently not supported. Some unsupported formats can be imported into projects, but they will XENA Installation and Operation Manual — Troubleshooting 171 not be playable in real-time. I am using After Effects for compositing and sometimes my preview is not in real time—why is this? RAM Preview should be very close to real-time for HD in After Effects 7. Please ensure you have the following settings for proper RT RAM preview. 1. Make sure that the “Primary Format” of the AJA Preview Panel in AE7 matches the resolution and frame rate of your After Effects Composition. 2. Also, RT RAM Preview is only possible with 8-bit AE Projects and with the “8-bit RGBA 4:4:4:4” setting for the “Output 8-bit As:” found in the AJA Preview Panel Color Options. Other color spaces and AE Project depths require a software transformation of the video data before being displayed—thus slowing down preview. 3. Next, please ensure that the “Resolution” setting for “Time Controls” is set to “Full”. If not set to “Full”,the image that the AJA Preview Panel receives and sends to the XENA board during RAM Preview will not be sent at “Full Resolution” and thus will either be software resized to Full Resolution before sending to the XENA Board for display, or will be center cropped before sending. The latter choice is controlled by the checkbox in the AJA Preview Panel labeled “Auto Resize Image” under the “Primary Format” Setting. 4. If RAM Preview is still not real-time, you can try some of the following – setting your Zoom to “100%” in your AE Composition, making sure the “Frame Rate” of the AE Time Controls” matches the frame rate of the “Primary Format” in the AJA Preview Panel, and muting audio in the AE Time Controls. Note: in some cases the available bandwidth of the motherboard limits the cards ability to output full frame rate 1080i 29.97 RGBA. How does XENA hardware Up-convert, Cross-convert or Downconvert? The XENA 2k can perform many different conversions of a video source. The XENA 2K can convert only when video is passing across the board. So in capture or playback you have the ability to convert video in hardware in real-time with no CPU/Memory cost. The XENA LH also does hardware down conversion in the same way. Can I work with 720p variable frame rates? XENA will automatically remove duplicate frames from varicam footage as long as the RP-188 flags are set correctly. However, this footage will have 29.97 fps timecode. XENA does not attempt time code conversion, so the timecode in captured files will not be reliable. 172 What file formats are supported by XENA? We support the following formats: AVI files in the following Subtypes QuickTime files in the following Subtypes 8-Bit YUV 4:2:2 – ‘2vuy’ 8-Bit YUV 4:2:2 – ‘2Vuy’ 8-Bit YUV 4:2:2 – ‘uyvy’ 8-Bit YUV 4:2:2 – ‘v210’ 8-Bit RGB 4:4:4 – ‘bgr’ 8-Bit RGB 4:4:4:4 – ‘bgra’ 8-Bit RGB 4:4:4 – ‘bgr’ T2B 8-Bit RGB 4:4:4:4 – ‘bgra’ T2B 10-Bit Log RGB 4:4:4 – ‘R10g’ 10-Bit RGB 4:4:4 – ‘R10k’ 10-Bit RGB 4:4:4 – ‘r10k’ 8-Bit YUV 4:2:2 – ‘2vuy’ 8-Bit YUV 4:2:2 – ‘2Vuy’ 8-Bit YUV 4:2:2 – ‘v210’ 8-Bit RGB 4:4:4 – ‘rgb’ 8-Bit RGB 4:4:4 – ‘bgr’ 8-Bit RGB 4:4:4:4 – ‘argb’ 8-Bit RGB 4:4:4:4 – ‘bgra’ 8-Bit RGB 4:4:4:4 – ‘rgba’ 10-Bit Log RGB 4:4:4 – ‘R10g’ 10-Bit RGB 4:4:4 – ‘R10k’ 10-Bit RGB 4:4:4 – ‘r10k’ DPX Sequences in the following Subtypes Cineon Sequences in the following Subtypes 10-Bit Log RGB 4:4:4 (BE) T2B 10-Bit RGB 4:4:4 (BE) T2B 10-Bit Log RGB 4:4:4 (BE) B2T 10-Bit RGB 4:4:4 (BE) B2T 10-Bit Log RGB 4:4:4 (LE) T2B 10-Bit RGB 4:4:4 (LE) T2B 10-Bit Log RGB 4:4:4 (LE) B2T 10-Bit RGB 4:4:4 (LE) B2T 10-Bit Log RGB 4:4:4 (BE) TGA Sequences in the following Subtypes BMP Sequences in the following Subtypes 8-Bit RGB 4:4:4 B2T 8-Bit RGB 4:4:4:4 B2T 8-Bit RGB 4:4:4 T2B 8-Bit RGB 4:4:4:4 T2B 8-Bit RGB 4:4:4 B2T 8-Bit RGB 4:4:4:4 B2T 8-Bit RGB 4:4:4 T2B 8-Bit RGB 4:4:4:4 T2B TIF Sequences in the following Subtypes YUV Sequences in the following Subtypes 8-Bit RGB 4:4:4(LE) B2T 8-Bit RGB 4:4:4:4(LE) B2T 8-Bit RGB 4:4:4(LE) T2B 8-Bit RGB 4:4:4:4(LE) T2B 8-Bit RGB 4:4:4(BE) B2T 8-Bit RGB 4:4:4:4(BE) B2T 8-Bit RGB 4:4:4(BE) T2B 8-Bit RGB 4:4:4:4(BE) T2B 8-Bit YUV 4:2:2 Why does it take longer to open a new project in Premiere after the XENA plugins have been installed? When XENA plug-ins are installed there is a great deal of additional preset information that must also be loaded for using our card. This data takes longer to load than the standard Adobe presets that come with Premiere. Are there any important things to be aware of when setting up a RAID for Video capture? Many SCSI and Fiber raids that use SATA or IDE with a backplane and controller often offer user settings for configurations. Be sure to format the Physical disk in a 512 Block size and never exceed a single volume size of 2TB. Multiple 2TB (or below) can be striped together by the OS for larger capacity storage. XENA Installation and Operation Manual — Troubleshooting 173 I captured a QuickTime file and then renamed it when the system prompted me to save it—why did it take so long to save? When XENA is capturing, it creates separate audio & video files based on the name the clip is logged with and then multiplexes the audio & video together at the end of the capture. If the user renames this clip after the capture, a duplicate clip has to be regenerated and re-multiplexed. I selected a XENA preset in Premiere Pro 2.0 but when I played the clip, the audio came through the internal speakers, and not through the XENA card. Premiere Pro 2.0 defaults to using the internal sound device for audio playback. To change this setting, go to Edit; Preferences; Audio Hardware and select XENA ASIO from the pull down. I have XENA software version 2.5 or later installed, and now my desktop display is very blocky—why is this? In version 2.5 we added support for OpenGL Texture desktop display. For OpenGL Texture support, an NVidia Quadro FX card with version 91.36 software or later is required. How do I ensure I’ve done a full uninstall of the XENA software? 1. In “Add / Remove Programs” uninstall the XENA Retail. 2. Uninstall the AJA Video for Windows Codec and the AJA XENA Drivers. 3. Restart and go to program files, and then verify there are no AJA folders or files named XENA in the following directories: • C:\Program Files\Adobe\Adobe After Effects 7.0\Support Files\Plug-ins • C:\Program Files\Adobe\Adobe Premiere Pro 2.0\Plug-ins\en_US • C:\Program Files\Adobe\Adobe Premiere Pro 2.0\Settings\en_US • C:\Program Files\Adobe\Adobe Premiere Pro 2.0\Plug-ins\en_US\Editing Modes • C:\Program Files\Adobe\Adobe Photoshop CS2\Plug-Ins\Import-Export • C:\Program Files\Autodesk\Combustion 4\Plugins\Discreet\Modules • C:\Program Files\fusion\plugins 174 X NA Models: 2K, LH, and LS Appendix A Specifications XENA 2Ke & 2K Specifications XENA 2Ke PCIe 4-lane compatible XENA 2K PCIe and PCI-X compatible Video Formats SD: 525i 29.97 525i 29.97 (WIDE) 625i 25 625i 25 (WIDE) 480i 29.97 480i 29.97 (WIDE) HD: 720p 23.976 720p 24 720p 29.97 720p 30 720p 50 720p 59.94 720p 60 1080i 25 1080i 29.97 1080i 30 1080p 23.98 1080psf 23.98 1080p 24 1080psf 24 1080p 25 1080psf 25 1080p 29.97 1080psf 29.97 1080p 30 1080psf 30 1080p 50 1080p 59.94 1080p 60 A A–176 2K: 2048 x 1080p 23.976 2048 x 1080psf 23.976 2048 x 1080p 24 2048 x 1080psf 24 2048 x 1556p 14.98 2048 x 1556p 15 Video Input HD-SDI/SDI, SMPTE-259/292/296 Dual-link HD 4:4:4 2K HSDL Video Output Digital: HD-SDI/SDI, SMPTE-259/292/296 Dual-link HD 4:4:4 2K HSDL Analog: SD and HD Output, 12 bits, BNC HD: YPbPr, RGB SD: YPbPr, RGB (component mode) Composite/YC (composite mode) 12-bit D/A Audio 16/24/32-bit 48 kHz synchronous 16-channel SDI/HD-SDI embedded audio sample rate conversion on AES inputs (no source synchronization required) Up-Conversion Hardware 10-bit Aspect conversion modes: Anamorphic – full-screen Pillar box 4:3 – results in a 4:3 image in center of screen with black sidebars Zoom 14:9 – results in a 4:3 image zoomed slightly to fill a 14:9 image with black sidebars Zoom Letterbox – zooms a 16:9 Letterbox source to full-screen Zoom Wide – results in a combination of zoom and horizontal stretch to fill a 16:9 screen; this setting can introduce a small aspect ratio change Down-Conversion Hardware 10-bit Anamorphic – full-screen Letterbox – 16:9 image with black top and bottom Crop – image is cropped for full-screen image Cross-Conversion Hardware 10-bit 1080i to 720p 720p to 1080i XENA Installation and Operation Manual — XENA Specifications A–177 SD to SD Aspect Ratio Conversion 16:9 to 4:3 Letterbox 16:9 to 4:3 Horizontal Crop 4:3 to 16:9 Pillarbox 4:3 to 16:9 Vertical Crop Reference Input Analog Color or HD Tri-level 1 BNC on standard breakout cable (75 Ohm terminating) Machine Control RS-422, Sony 9-pin protocol XENA LHe/LH Specifications XENA LHe PCIe 4-lane compatible XENA LH PCIe and PCI-X compatible Look Up Tables Real-time primary LUT Import/export text-based LUT files File Import/Export Import (capture) and export (playback) standard file formats: DPX, Cineon, TGA, TIFF, BMP, and AVI,QuickTime. Video Formats SD: 525i 29.97 625i 25 HD: 720p 23.976 720p 24 720p 25 720p 29.97 720p 30 720p 50 720p 59.94 720p 60 1080i 25 1080i 29.97 1080i 30 1080p 23.976 1080psf 23.976 1080p 24 1080psf 24 1080p 25 1080psf 25 1080p 29.97 1080psf 29.97 1080p 30 1080psf 30 A–178 Video Input Digital: HD-SDI/SDI, SMPTE-259/292/296 Analog: SD and HD Input, BNC HD: YPbPr, RGB SD: YPbPr, RGB (component mode) Composite/YC (composite mode) 12-bit A/D Video Output SD and HD Output, BNC HD: YPbPr, RGB SD: YPbPr, RGB (component mode) Composite/YC (composite mode) 12-bit D/A Audio Input Digital: 2-channel 16/24/32-bit AES/EBU, 48 kHz sample rate Synchronous or Non-synchronous (Internal sample rate conversion) 16/24/32-bit SMPTE-259 SDI embedded audio, 8-Ch, 48 kHz synchronous Analog: 2-channel balanced output +24dbu Full-scale Digital (0dbFS) 16/24/32-bit D/A, 48 kHz sample rate +/- 0.2db 20 to 20 kHz Frequency Response Audio Output Digital: 2-channel 16/24/32-bit AES/EBU, 48 kHz sample rate 16/24/32-bit AES/EBU, 48 kHz sample rate 16/24/32-bit SMPTE-259 SDI embedded audio, 8-Ch, 48 kHz synchronous Analog: 2-channel balanced output +24dbu Full-scale Digital (0dbFS) 16/24/32-bit D/A, 48 kHz sample rate +/- 0.2db 20 to 20 kHz Frequency Response Down-Conversion Hardware 10-bit output, 16/24/32-bit internal processing Anamorphic: full-screen Letterbox: image is reduced with black top and bottom added to image area with the aspect ratio preserved Crop: image is cropped horizontally Reference Input Analog Color or HD Tri-level 1 BNC on standard breakout cable (75 Ohm terminating) KL-Box (optional): 2 BNCs, passive loop Machine Control RS-422, Sony 9-pin protocol Connector provided on XENA LH/LHe breakout cable and on optional KL-Box. XENA Installation and Operation Manual — XENA Specifications A–179 XENA LSe/LS Specifications XENA LSe PCIe compatible XENA LS PCI and PCI-X compatible File Import/Export Import (capture) and export (playback) standard file formats:TGA, TIFF, BMP, and AVI, QuickTime,WAV. Video Formats SD: 525i 29.97 625i 25 Video Input Digital: 8 or 10-bit SDI, SMPTE-259 Analog: SD: YPbPr, RGB (component mode) Composite/YC (composite mode) 12-bit A/D Video Output Digital: 8 or 10-bit SDI x2 BNC, SMPTE-259 Analog: SD: YPbPr, RGB (component mode) Composite/YC (composite mode) 12-bit A/D Audio Input Digital: 2-channel 16/24/32-bit AES/EBU, 48 kHz sample rate Synchronous or Aynchronous (Internal sample rate conversion) 16/24/32-bit SMPTE-259 SDI embedded audio, 6-Ch, 48 kHz synchronous Analog: 2-channel balanced input +24dbu Full-scale Digital (0dbFS) 16/24/32-bit A/D, 48 kHz sample rate +/- 0.2db 20 to 20 kHz Frequency Response Audio Output Digital: 2-channel 16/24/32-bit AES/EBU, 48 kHz sample rate 16/24/32-bit SMPTE-259 SDI embedded audio, 6-Ch, 48 kHz synchronous Analog: 2-channel balanced output (XLR) +24dbu Full-scale Digital (0dbFS) 16/24/32-bit D/A, 48 kHz sample rate +/- 0.2db 20 to 20 kHz Frequency Response 2-channel unbalanced output (RCA-jack): requires KL-Box option A–180 Reference Input Analog Color Black 1 BNC on standard breakout cable (75 Ohm terminating) KL-Box (optional): 2 BNCs, passive loop Machine Control RS-422, Sony 9-pin protocol Connector provided on XENA LS breakout cable and on optional KL-Box. Machine Control Connector Pinout RS-422, Sony 9-pin protocol. 9-pin D-connector pinout is as follows: 1................. GND 2................. RX3................. TX+ 4................. GND 5................. No Connection 6................. GND 7................. RX+ 8................. TX9................. GND Shell............ GND XENA Installation and Operation Manual — Index I-1 Index Symbols 9-pin connector A–180 720p variable frame rates 171 A abort on dropped frame 120 accelerated effects 77 accept Photoshop image 148 activation mode After Effects 103 Combustion 153 Fusion 161 Machina 134 Photoshop 68 adding delay frames Machina 73 AJA website 170 alpha channel 144 analog output 55 Fusion 164 Machina 58 audio files setup After Effects 123 audio format After Effects 115 audio input 41 audio level 91 After Effects 126 Avid Liquid Chrome 167 B breakout box 12 K3-Box 13 KL-Box 13 C cabling 27 capture controls Machina 62, 67 capture file options Machina 63 capture in/out After Effects 119 Machina 68 Photoshop 147 capture options 43 After Effects 105, 115 Photoshop 136 Premiere Pro 80 capture status After Effects 118 capture window After Effects 104 Photoshop 135, 146 CineForm Prospect 167 clip options After Effects 116 Machina 64 codex utility 10 color space Photoshop 144 color standards 120 computer requirements 115 configuration options After Effects 39 connectors 103 BNC & mini BNC 54 DB9 53 contact us 170 convert mode 154 Combustion 155 Fusion Machina 56 crop image After Effects 111 customer support email 170 D damaged shipment 22 DB9 connector 16 DB9 pinout A–180 desktop display options 42 Machina 49 device control options After Effects 117 Machina 60 Premiere Pro 65 display to desktop After Effects 113 Machina 65 Photoshop 142 Premiere Pro 92 dual-link configuration 28 E edit mode After Effects 127 Machina 71 F FAQs (frequently asked questions) 170 features, XENA 1 2K 2 XENA LH/LHe 5 XENA LS/LSe 6 file formats 172 file options 43 After Effects 114 Premiere Pro 93 G general options Machina 61 I image options Photoshop 144 import clip 116 insert edit mode After Effects 129 Machina 73 installing the XENA card 23 In This Manual 19 K keyboard shortcuts Machina 49, 104 L leader/trailer options After Effects 125 Machina 71 Liquid Chrome 167 M machine control 17 mailing address 170 mapping audio 82 memory options After Effects 125 mixer coefficient 18 O OpenGL 70 output mode After Effects 128 Machina 72 overlay 66 I-2 P playback file options After Effects 122 Machina 69 playback, general options After Effects 124 playback, XENA options After Effects 121, 126 Premiere Pro 96 play controls After Effects 127 Machina 71 play/record controls After Effects 102, 118 Photoshop 147 plugins After Effects 101 preferences Premiere Pro 37 presets Premiere Pro 78 preview options After Effects 120 Combustion 151, 153 Fusion 161 Photoshop 149 preview settings After Effects 103 realtime 171 Primary/Secondary conversion LH 53, 87 XENA 2K 53 primary/secondary formats 86 After Effects 136 Combustion 161 Fusion Machina 124 R raid location 116 realtime performance 171 reference video 18 reference video loop 29 RS-422 57, 113, 117 RS-422 connector A–180 S scrub bar Machina 72 SDI outputs 1 & 2 After Effects 112 Combustion 158 Fusion 164 Machina 57 Photoshop 142 Premiere Pro 91 set alpha channel 144 signal conversion 2K 53, 54, 88, 108 LH 53 single link After Effects 112 Combustion 158 Premiere Pro 91 slider 118 Sonic CineVision 167 Sony Vegas 167 specifications 2K & 2Ke A-175 LH & LHe A–177 LS & LSe A–177 machine control pinout A–180 T test pattern 121, 149, 153 third-party applications 167 timecode format After Effects 117 Machina 60 Premiere Pro 56 timecode input 109 After Effects 113 Machina 58 Photoshop 143 Premiere Pro 92 timecode source After Effects 125 U unpacking 8, 22 update dynamically Combustion 152 updating software 169 V Vegas (Sony) 167 video format 43 After Effects 115 Combustion 154 video input Machina 56 Photoshop 141 Premiere Pro 90 video input options 90 Premiere Pro 91 view on (right-click) Fusion 165 W website 170 workflow XENA 2K 3 X XENA 2K I/O 4 XENA board information 51 XENA features 2K 5 LH/LHe 6 LS/LSe 6 XENA options menu Photoshop 135 XENA presets 78 XENA software 16