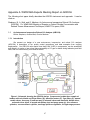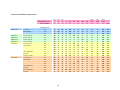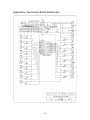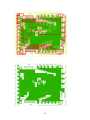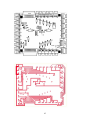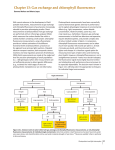
1
User’s Manual
Compiled by: Britton Stephens and Andrew Watt
National Center for Atmospheric Research, Boulder, Colorado, USA
Please email feedback or questions to both [email protected]
and [email protected] to ensure a timely response.
V. 0.1 November 16, 2006
Table of Contents
1. Introduction ................................................................................................................... 2
2. Getting Started ............................................................................................................. 7
A. Unpack the instrument............................................................................................ 7
B. Power up the instrument ........................................................................................ 7
C. Connect to the instrument computer.................................................................... 7
D. Run the relay control program .............................................................................. 8
E. Connect the calibration gases ............................................................................. 11
F. Connect the inlet lines .......................................................................................... 12
3. Diagnostic and Tuning Procedures......................................................................... 13
A. Standard procedures and checksheets ............................................................. 13
B. AWM3300 mass-flow meter lookup chart.......................................................... 21
C. Li-820 calibration ................................................................................................... 21
D. Drying system ........................................................................................................ 22
4. Instrument Computer Configuration........................................................................ 26
A. Basic setup ............................................................................................................. 26
B. Ethernet setup........................................................................................................ 27
C. USB drive ............................................................................................................... 28
D. Network time synchronization ............................................................................. 28
E. Instrument control program.................................................................................. 29
5. Transferring Data ....................................................................................................... 35
A. Storage and manual transfer ............................................................................... 35
B. Automated data transfer....................................................................................... 35
6. Processing Data......................................................................................................... 37
A. Daily diagnostics and 1-Hz to 2.5-min averaging............................................. 37
B. Monthly diagnostics and calibrated data ........................................................... 38
C. Comparisons between sites and units ............................................................... 39
D. Generation of organizing html pages ................................................................. 40
E. Example input files ................................................................................................ 41
F. Example batch files and scripts........................................................................... 43
7. Accessing Operation and Processing Code.......................................................... 44
Appendix A. WMO/IAEA Experts Meeting Report on AIRCOA .............................. 47
Appendix B. Valve Switching Sequence .................................................................... 52
Appendix C. AIRCOA Parts Lists ................................................................................ 57
Appendix D. Recommended Field Equipment .......................................................... 60
Appendix E. Interconnect Board Schematics ............................................................ 61
Appendix F. List of Additional Technical Documents ............................................... 64
1
1. Introduction
This manual describes the operation of the autonomous, inexpensive, robust
CO2 analyzer (AIRCOA). Making accurate CO2 measurements requires careful
attention to gas handling, numerous automated quality control diagnostics, and a
suite of reference cylinders closely linked to the WMO CO2 calibration scale.
AIRCOA is based on a single-cell infrared gas analyzer (IRGA), which has
moderate short-term noise and instrument drift rate. The short-term noise is
overcome with signal averaging and instrument drift with frequent calibrations.
Additional potential sources of CO2 measurement bias that are addressed with
automated diagnostics include: incomplete flushing of the sample cell and dead
volumes, incomplete drying of the sample air, IRGA sensitivity to pressure
broadening, IRGA sensitivity to temperature, leaks to ambient air, leaks of
calibration gas through solenoid valves, and modification of CO2 concentrations
by the drying system or plastic components. The last 2 pages in this section
show schematics of the 5 inlet and 3 inlet AIRCOA designs, which are further
described here.
The inlets consist of rain shields, and quartz wool and 30 μm polypropylene filters
(30). The instrument box is generally indoors in an environment with moderate
temperature variability, but it can also be outdoors. Each inlet stream passes
through a mass-flow meter (F), and a 5 μm metal filter (5) and needle valve
before reaching a manifold of three-way (3) and 2-way (2) solenoid valves. A
brushless DC diaphragm pump (p) flushes the sample lines at 500 to 1000 sccm
when they are not being analyzed. The one gas selected by these valves exits
through both ends of the manifold and then passes through the first of two 2.44
m by 2.8 mm ID Nafion driers. A smaller brushless DC diaphragm pump (mp)
then compresses this gas to approximately 55 kPa above ambient at which point
it passes through a second 5 μm metal filter and enters a second manifold of
two-way and three-way solenoid valves.
This second manifold selects either a sample gas or a calibration gas to be
analyzed. When the sample gas is not being analyzed it exits the valve manifold
through a needle valve set to maintain constant pressure in the upstream Nafion
drier. The four calibration gases (LS2, LS1, HS1, HS2) typically span the range
350 to 480 ppm and are stored in high-pressure aluminum cylinders with
Ceodeux valves fitted with two-stage brass regulators. These regulators are set
to match the pressure in the sample line. A 10 L high-pressure cylinder will last
12 months at the default flows and calibration frequency. A fifth calibrated highpressure cylinder (LT) stores a long-term surveillance gas which is run through
the entire inlet system and treated as an unknown during analysis. The regulator
on this cylinder is set to approximately 20 kPa above ambient and a needle valve
is used to match sample pressures in the first Nafion drier.
The sample or calibration gas selected for analysis next passes through another
5 μm filter and a miniature pressure regulator (R) with an output of approximately
2
30 kPa above ambient. The gas is then dried by a second Nafion drier and
reduced in pressure by a needle-valve before reaching a single-cell IRGA. This
needle valve is normally adjusted to set the sample flow to 100 sccm. After
leaving the IRGA, the gas passes through a 40 μm metal filter (40), a normallyopen needle valve used for leak checking purposes, and a humidity and
temperature sensor (RH/T) used to verify drier performance. The gas is then
completely dried once with 13X molecular sieve to be used as the purge gas on
the second Nafion drier, and then dried a second time to be used as the purge
gas on the first Nafion drier. Most of the moisture in the ambient air exits the first
Nafion without ever reaching the mole sieve driers. The instrument uses three
200 ml molecular sieve driers, the quickest filling of which lasts 5 to 10 months
depending on outside humidity. The gas passes through a final mass-flow meter
before exhausting to the room. There is little flow impedance between the Li820
cell and this exhaust such that sample and calibration measurements are both
closely matched to ambient pressure.
The IRGA measures the pressure, temperature, and CO2 concentration of the
gas. It actively and precisely controls the optical bench to 50 ˚C and has
excellent stability with respect to ambient temperature of around 0.05 ppm/C. By
default, the IRGA is configured to use a 2 second digital filter and the instrument
logs values at 1 Hz. These filtered values have a 1-sigma rms noise of 0.6 ppm
which averages to 0.1 ppm over 100 seconds. The instrument switches the gas
being analyzed every 150 seconds and the processing software ignores the first
50 seconds after each switch to allow for flushing of gases through the system.
The instrument cycles between the three or five inlet lines on a 7.5 or 12.5
minute schedule, respectively. The processing software makes a calculation
based on measured flows of how long the measured gas takes to get from the
inlet to the sample cell and adjusts the times of reported measurements
accordingly. Every 30 minutes the instrument analyzes one of the 4 calibration
gases to allow the estimation of drift in the IRGA zero offset, while every 4 hours
it measures all four calibration gases to allow estimation of linear and 2nd-order
calibration coefficients for the IRGA. The instrument alternates the sequence of
these 4 gases to allow detection of problems associated with incomplete flushing
of the sample cell and any dead volumes. Every 8 hours the instrument analyzes
the long-term surveillance gas.
Every 4 to 8 hours the instrument also performs automated system checks to
determine the IRGA pressure sensitivity and to measure system leak rates to
ambient at positive pressure and from the solenoid valves at ambient pressure.
Because of silicone seals in the IRGA; plastic fittings on the Nafion driers; Viton
seals in the solenoid valves, Nafion driers, and manifolds; and plastic and Viton
seals in the micropump the instrument is designed to support efforts to minimize
and monitor system leaks.
A PC104-based computer running Linux performs automated data acquisition
and valve control. This system can be accessed through an internet connection
3
and data and system diagnostics can be retrieved, processed, and displayed in
near real time. If any of the automated diagnostics suggest a problem, the
instrument allows more detailed troubleshooting to be performed interactively.
This direct connectivity and rapid processing is critical for maintaining the system
and producing high-quality CO2 measurements.
The following sections describe all steps necessary to test, deploy, and maintain
the instrument and to store, transfer, and process the data to obtain accurate
CO2 measurements.
4
5
6
2. Getting Started
A. Unpack the instrument
Check for any obvious damage or loose fittings that may have resulted from
shipping. Place the instrument on a lab bench with the door open.
B. Power up the instrument
The internal power supply can take 88-264 VAC at 47-63 Hz. For operation in
Europe, a plug adapter is required. After plugging the instrument in, the tower
pump should start immediately and several LEDs on the computer stack will light
green. If a terminal is connected to COM port 2 (see below) it will display
standard boot-up and any error messages from the computer. After several
minutes, the computer will finish booting and it will start the measurement
program which will activate one or more relays and turn on the sample pump. At
this point the instrument begins automatically switching valves and logging data
according to its prescribed schedule (see Appendix B).
C. Connect to the instrument computer
There are 3 different means of making a data connection to the instrument
computer.
Serial output stream:
In the default configuration, the program sends ascii data to COM port 3 at
9600 baud (N, 8, 1). If you connect a serial terminal to COM port 3 using a
null modem cable, you should see the following values streaming:
Time (HH:MM:SS.S), Li820 CO2 (ppm), Li820 Pressure (kPa), Li820
Temperature (C), Valve Setting (hexadecimal), Box Temperature Signal
(V), RH Signal (V), Sample Flow Signal (V), Line 1 Flow Signal (V),
Line 2 Flow Signal (V), Line 3 Flow Signal (V), Line 4 Flow Signal
(V), Line 5 Flow Signal (V), LT Flow Signal (V)
For a 3 inlet unit the Line 4 and Line 5 flow values will be missing.
Serial control interface:
COM port 2 is available as a direct interface to the Linux computer, using a
setting of 115200 baud (N, 8, 1). If you connect a serial terminal with these
settings to COM port 2 using a null modem cable and hit ‘enter’ you should
see the command prompt:
7
/ #
indicating that your are in the root directory (/). If this terminal is connected
when the instrument is powered up you will see all of the standard Linux boot
messages.
Ethernet connection:
An ethernet connection is available on the outside of the instrument box via a
bulkhead fitting and a supplied adapter cable, and also inside the box if
necessary by disconnecting the cable from the bulkhead fitting to the
computer. By default, the instrument is set up to find an IP address using
DHCP. If it is connected to a DHCP enabled network on boot-up, you will
simply need to use the serial control interface (above) and enter the
command:
/ # ifconfig
to learn what its IP address is. Alternatively, you can use the serial control
interface to edit the file /etc/rc.sysinit to specify an IP address (see Section 3
below). Once you know the IP address, you can connect to the instrument
using ssh as root with a command like:
> ssh [email protected]
the default root password for the CarboEurope AIRCOA units is:
hlkbbp!
Please feel free to change this using the command:
/ # passwd
Once you are successfully logged in you should see the command prompt:
~ #
indicating that you are in the home directory for user root (/root).
D. Run the relay control program
The instrument computer has a program for manually controlling the relays and
viewing data which is called ‘rrelay’ and resides in the /usr/local/bin directory.
This program can be started with the command:
~ # /usr/local/bin/rrelay localhost
8
or by using the shortcut jobfile:
~ # /rr.job
which resides in the root directory and contains this same command. After
starting, this program displays the following menu:
Commands:
h: stop output, show this help. Enter g to restart output
?: same as h
p: pause output
g: go, restart output
s: show state of relays in binary form (0=open,1=closed).
Enter g to restart output
o: open all relays
number <space or return>: toggle a relay open->closed or closed->open.
You must enter a space or carriage return after the number.
There are 15 relays, so enter a number
between 0 and 14.
r: resume relay program control of relays
q: quit rrelay (relay program will resume control)
Q: terminate entire data acquisition program
This menu can be called up at any time by hitting ‘h’ or ‘?’. After typing ‘g’ the
screen will display measured data in the same format as for the COM port 3
output stream:
Time (HH:MM:SS.S), Li820 CO2 (ppm), Li820 Pressure (kPa), Li820
Temperature (C), Valve Setting (hexadecimal), Box Temperature Signal
(V), RH Signal (V), Sample Flow Signal (V), Line 1 Flow Signal (V),
Line 2 Flow Signal (V), Line 3 Flow Signal (V), Line 4 Flow Signal (V),
Line 5 Flow Signal (V), LT Flow Signal (V)
where the Line 4 and Line 5 flow values are missing on a 3 inlet unit. Typing ‘s’
stops the data output and displays the relay status in binary form, e.g.:
relays :
19 18 17 16 15 14 13 12 11 10
0 0 0 0 0 0 1 0 0 0
9
0
8
0
7
0
6
1
5
0
4
0
3
0
2
0
1
1
0
0
indicates that relays 13 (micropump), 6 (sample air), and 1 (line 2) are on,
corresponding to a hexadecimal value of 2042. Typing any number between 0
and 19 followed by <space> or <enter> will toggle that relay number, although
only relays 0 through 13 are currently used [note: the statement in the program
menu that relay 14 is used is out of date].
9
The relays correspond to:
Relay
0
1
2
3
4
5
Inlet Line
Line
Line
Line
Line
Line
LT
1
2
3
4
5
Relay
Selected
Relay
Other
6
7
8
9
10
11
Air
LS2
LS1
HS1
HS2
Guest Cal.
12
13
Leak Check Valve
Micro Pump Power
Note: the leak check valve/manifold connected to relay 12 is configured to be
normally open, so activating it closes the valve. Note also: the computer has 20
relays (0-19) and in case they are needed later relays 14-17 are routed to switch
12 V to connectors on the interconnect board (see Appendix E).
Typing ‘o’ will turn off all relays. Once you have asserted manual control over the
valves by turning a relay on or off, the program continues logging data but stops
its automated switching of relays. To indicate that the program is under manual
control, bit 20 of the binary relay code is set to 1, which adds 100000 to the
hexadecimal value displayed on screen and recorded to the data file. To resume
automated switching of valves according to the prescribed schedule, type ‘r’ or
‘q’. If the rrelay program is left under manual control with either the menu or
valve status showing (but no data outputting to screen), it will revert back to
automated valve switching after 5 minutes.
IMPORTANT: If the rrelay program is left under manual control with data
outputting to the screen, it will not revert to automated valve switching. This is a
useful feature for leak checking and other interactive procedures, but requires
that care be taken to exit this program or at least stop the output to the screen if
resumption of normal operations is desired.
Typing ‘Q’ stops both the manual relay control and the automated instrument
control program (‘aircoa’). The manual relay control program will not run unless
the aircoa program is running. To tell if the aircoa program is running, use the
command:
~ # ps
which will show approximately 9 aircoa processes if the program is running. To
restart the aircoa program, use the command:
~ # /home/isff/aircoa.sh
or alternatively, use the same command that is called in /etc/rc.sysinit on start up:
~ # /home/isff/aircoa.sh 2>&1 | /usr/bin/logger -p local4.info &
10
which also sets up error logging to the file /var/tmp/log/messages.
While running, the aircoa program logs data in the directory /data/aircoa which
corresponds to the mounted USB drive. You can confirm data recording by
listing the contents of this directory. The file naming structure is:
af_%y%m%d_%H%M%S.dat
where the letter following the first two letters indicate the specific aircoa unit (k-o
for the CarboEurope units). The letter code of your unit can be determined with
the command:
~ # hostname
The year, month, and day in the filename are the current day, and the hour,
minute, and second correspond to the start of the file. The default configuration
is for the program to write three files a day, ending in *000000.dat, *080000.dat,
and *160000.dat, but any time the program is stopped and restarted it will begin
a new output file with the corresponding time in the filename.
The format of these data files is currently a binary time/sensor/checksum stamp
followed by ascii data on each line [Note: a software upgrade is planned so that
they will be all ascii]. The ascii portion can be viewed, but a separate program
(see Section 6) is required to convert the binary portion to ascii.
E. Connect the calibration gases
Follow NOAA GMD guidelines for the handling of calibration gas cylinders,
including venting regulators 4 times after installation, checking for leaks with
snoop, and not over tightening CGA fittings (use Teflon tape on CGA nipples if
necessary). In addition, we recommend orienting the cylinders on their sides in a
stable temperature environment as this has been shown to minimize drift in
cylinder CO2 concentration. Four calibration gases are required for AIRCOA
operation: low-span 2 (LS2), low-span 1 (LS1), high-span 1 (HS1), and highspan 2 (HS2), with nominal concentrations of 350, 380, 410, and 480 ppm,
respectively. If sampling at low heights at night in a forest is planned, the HS2
value should be increased to span the highest anticipated measured value. The
AIRCOA system also requires a long-term (LT) surveillance gas which should be
near ambient (380 ppm) CO2 concentration. After connecting, venting, and leak
checking regulators for the 4 calibration cylinders and the surveillance gas,
connect the regulator outputs to the instrument at the appropriate 1/8” bulkhead
fittings, using cleaned 1/8” stainless steel tubing (Valco Part number TSS285 or
equivalent).
11
At this point several additional leak checks should be performed. With either the
system powered down or at least all solenoid valves closed, increase the
regulator output pressures to around 8 psi and then back out (turn counterclockwise) the regulator adjustment knob all the way. Also, close the cylinder
valves and note all 5 upstream and all 5 downstream regulator pressures. If the
system is going to be left unattended for more than a few days we recommend
performing the high-side pressure test over at least 1 hour to protect against an
undetected leak depleting a cylinder. Record these 10 pressures every 15
minutes until you are confident there are no leaks upstream or downstream of the
regulators - pressures should be constant after allowing for any room
temperature swings and imprecision in reading the gauges. Note: the Model-14
regulator pressure-gauge needles can stick against the clear covers and these
gauges should be lightly tapped before any reading to ensure reproducible
results. Finally, be sure to remove any plug on the guest-cal bulkhead fitting as
this line is used to vent air during the automated leak checks.
F. Connect the inlet lines
Note: we recommend running the instrument in lab for several weeks to become
familiar with its operation and to ensure proper operation before field deployment.
Inlet lines should be 1/4" Synflex 1300 (formerly Dekoron Type 1300 Dekabon)
composite tubing. Connect these lines to the appropriate 1/4” bulkhead fittings
on the instrument box. The provided inlets consist of a 47 mm filter holder and a
funnel rain shield. We recommend stuffing a small amount of glass wool in the
inlet to the filter holder to discourage entry by large insects and using 30 μm
polypropylene filter papers in the filter holders to exclude smaller particles.
12
3. Diagnostic and Tuning Procedures
A. Standard procedures and checksheets
The AIRCOA system has been designed to run autonomously for months at a
time, but requires occasional manual diagnostics and tuning procedures to
ensure that the automated operation is working correctly. The two two-page
check sheets included in the following pages describe these procedures for the 3
inlet and 5 inlet units separately. We recommend that a full tune be carried out
before deployment, after any major system changes, and every several months
as allowed by normal field visits. Once the system flows and pressures have
been initially tuned, these procedures run much more quickly. Here and in
Appendix A we outline some of the rationale for the steps and settings in these
check sheets.
Leak checking:
The system performs automated high-pressure (to detect leaks to ambient)
and ambient-pressure (to detect leaks of calibration gases through solenoid
valves) several times a day. To diagnose detected leaks these often must be
done manually. Note: the inline Beswick regulator and the LT regulator must
be set (~ bottom of first page) before the high-pressure leak detection
procedure will work. The LT regulator is purposefully set to a lower pressure
than the inline Beswick regulator so that when using the LT gas to do a highpressure leak check the inline Beswick regulator will allow free gas flow in
both directions. Using a pressure lower than the inline Beswick regulator set
point would allow the potential for flow through the regulator to mask any
downstream leaks. The high-pressure leak check will detect leaks in the area
between the inlet line selection manifold and the leak check valve. To further
localize a detected leak, this check can alternately be run with the sample air
valve closed (relay 6 off) to only detect leaks between the gas selection
manifold and the leak check valve.
It is difficult to estimate the influence of leaks on measurement accuracy. For
leaks through the calibration gas solenoid, we can estimate the effect
assuming a standard sample flow rate of 100 sccm and a calibration gas
concentration 100 ppm different than ambient. In this case, a leak rate of 0.1
sccm would lead to a bias of 0.1 ppm. Assuming an interior volume and
pressure during the leak check procedure of 30 cc at 101.3 kPa, this leak rate
would cause a pressure increase of 0.3 kPa/min. For a positive pressure leak
to ambient, the effect would depend on the leak location and the outside CO2
concentration, but it is clear that leak rates corresponding to pressure
decreases of several tenths of a kPa/min can have an adverse effect.
Operationally, we find that in both cases leak rates of 0.05 kPa/min or better
can be obtained with a reasonable level of effort and that as good as 0.02
13
kPa/min is also possible. Therefore, we use 0.05 kPa/min as our predeployment target and a trigger for field maintenance. Cut-off levels for when
to include or exclude data must be determined by the user, but should not be
much higher than 0.05 kPa/min and certainly lower than 0.3 kPa/min. Note: if
both positive-pressure leaks to ambient and leaks of a calibration gas through
a solenoid valve are present, they can offset and cause falsely favorable
readings during these leak checks. If necessary, this can be ruled out by
performing a high pressure leak check with the calibration gas cylinder
regulators turned off and the lines vented.
Two common places for leaks to develop are at the internal o-ring seal
between the plastic tee and the Nafion inner tube and also at the hose-barb
fittings to the sample micropump. Leaks at the pump fittings can sometimes
be detected using snoop. To further isolate where a leak is, the Nafion tubes
can be bypassed with a short length of 1/4" tubing with Ultratorr fittings on
either end, and the pump can be bypassed with a short length of 1/4" tubing
with Swagelok fittings on either end. A leak at a Nafion o-ring can sometimes
be addressed by tightening the o-ring compression fitting, but caution should
exercised as over tightening can easily lead to crossed threads on this fitting.
Alternatively, the fitting can be disassembled and the o-ring replaced,
cleaned, and/or lightly greased. To address a leak at the micropump, remove
pull the Bev-a-line tubing and retaining clip and off the hose barbs, cut the
tubing back or replace it, replace the retaining clip, and remake the fitting.
Leak checks on the calibration and sample inlet lines, upstream of the valve
manifolds should also be performed occasionally and anytime flow or cylinder
pressure readings indicate a possible leak. For the sample lines, this can be
done by plugging the bulkhead fittings on the outside of the box and then
opening the line selection valves during a standard leak check procedure.
For the calibration gases, this can be done by backing off the regulator
pressures and then opening the gas selection valves during a standard leak
check procedure.
Inlet needle valve adjustment:
This procedure assumes you want the maximum flush-flow through each line.
These flows should be the same for all lines so that the combined needle-valve
and tubing impedance to flow is the approximately the same for each line and
consequently the pressure on the inlet Nafion drier will be similar for each line.
The flush flows can be set lower if necessary. The processing software accounts
for these flow rates and the tubing lengths in calculating the actual time a sample
entered the inlet.
Calibration gas regulator adjustment:
14
Only the HS2, HS1, LS1, and LS2 calibration gas regulators should be set to 9
psi. IMPORTANT: If the LT surveillance gas regulator pressure is set higher
than 4 psi the sample pump can be damaged.
Inline Beswick regulator adjustment:
These regulators are adjusted by turning the small thumb screw clockwise to
increase pressure and counter-clockwise to decrease pressure. The larger knob
is a lock nut that must be loosened before adjustment and tightened after.
LT regulator adjustment:
Normally this results in a regulator gauge reading of around 3 psig.
Flow control needle valve adjustment:
This Swagelok valve is the primary point of flow adjustment for the instrument.
Calibration pressure and flow check:
If all calibration pressures differ significantly from the previously recorded sample
gas pressures it is likely that the sample pump is having problems. If any of the
calibration pressures are significantly different than the others it is possible that
the cylinder regulator is set incorrectly or that there is a leak or obstruction in that
calibration line.
Line purge needle valve adjustment:
The gas selection manifold has 2-way valves for the calibration gases so that
they will not flow when not selected, but a 3-way valve for the sample gas so that
when it is not selected it continues to flow out a bypass line and the upstream
Nafion drier experiences constant pressure. This step adjusts the impedence on
this bypass line to match that through the Beswick regulator and flow control
needle valve. Because the bypass line does not have a mass-flow meter the
sample line mass-flow meter is borrowed for this step.
LT needle valve fine tune:
The LT needle valve is set through the purge line while the sample line massflow meter is still attached to the purge line. This allows the delivery impedance
of air from the regulator through this needle valve to be matched to the delivery
impedance of air from one of the sample lines, which would not be possible if the
through the analysis line which includes the inline regulator. IMPORTANT: Fine
tuning this needle valve requires REVERSE control. The sample pump does not
operate well with high upstream pressure, such that opening this needle valve
actually decreases the flow through the pump. Conversely closing this needle
15
valve will increase the flow (of course closing it all the way will eventually reduce
the flow).
Sample pressure and flow check:
Ensure that pressures and flows are similar between lines and between sample
and the previously recorded calibration values. If the LT pressure or flow is
significantly different than the sample line pressure or flow, redo the LT needle
valve fine tune and check again.
High side pressure recording:
Cylinder pressures should be recorded whenever possible to establish a history
of depletion to evaluate whether any small leaks exist on the calibration gas
fittings, regulators, or lines, and to anticipate when cylinders will need to be
changed. In accordance with NOAA GMD guidelines, do not use any calibration
cylinders below 300 psig (20 atm) and return them to laboratory for postcalibration at this point.
16
AIRCOA Set-up/Tune-up Procedures for 5 Inlet Line Unit
Unit ____________
Date _______________ Location: _____________
OPTIONAL: If Diagnostics suggests a leak, here’s how to track it down:
Do a high pressure leak check
“o” to open all relays
Power up leak check valve (R12 on)
Open LT, Sample solenoid (R5, R6 on) for 30 sec (Pressure should go to ~ 20 kPa over ambient)
Close LT, leave sample solenoid open (R5 off)
When pressure stabilizes, note time and pressure ____________ @ ____:____:____
Wait 2 minutes and again note time and pressure _______ @ ____:____:_____
If pressures differ by more than 0.05 kPa/min, check fittings for potential leaks
Repeat if necessary. Repeat with Sample solenoid (R6) off to localize below or above gas selection manifold.
Low Pressure Leak Check
“o” to open all relays
Power up line 1 (R0), Guest Cal (R11) and Micropump (R13) to vent above regulator for 30 sec
Close Guest Cal (R11), power up leak check (R12) and note time and pressure
____________ @ ____:____:_____
After two minutes , note time and pressure ____________ @ ____:____:_____
Change should be less than 0.05 kPa/min or a cal solenoid needs repair/replacement
STANDARD:
Adjust inlet needle valves
“o” to open all relays. For first time tune, open all needle valves all the way
Power up Lines 2, 3, 4 and 5 (R1, R2, R3, R4 on) so all flush flow goes through Line 1
Line 1 Flow ________________V
Repeat for Lines 2, 3, 4 and 5
R0, R2, R3, R4 on. Line 2 Flow _________________V
R0, R1, R3, R4 on. Line 3 Flow _________________V
R0, R1, R2, R4 on. Line 4 Flow _________________V
R0, R1, R2, R3 on. Line 5 Flow _________________V
Adjust each inlet needle valve so that MFM reads the same as the lowest one (or 4.9, whichever is less) +/- 0.1.
Line 1 Flow ____________Line 2 Flow ____________V Line 3 Flow ______________V
Line 4 Flow ____________Line 5 Flow ____________V
Adjust all calibration cylinder regulators (not LT!) to 9 psig (initial set-up only)
Set Beswick regulator
“o” to open all relays
Watch Licor pressure till stable. Licor ambient pressure _______________kPa
Close leak check solenoid (R12 on), ensure pump is off (R13 off)
Open LS2 (R7 on)
Adjust regulator/check that Licor pressure is 30 +/- 2 kPa above ambient (Note: may need to open V12 if
pressure goes above setpoint to allow pressure to vent back down).
Beswick regulator setting: _______________kPa @ 30 seconds after V7 on
Close LS2 (R7 off)
Set LT cylinder regulator
“o” to open all relays
17
Close Leak check solenoid (R12 on)
Open Sample solenoid (R6 on), open LT inlet solenoid (R5 on)
Adjust LT cylinder regulator to get Licor pressure 20 +/- 2 kPa over ambient after 30 sec
LT regulator setting: _______________kPa, regulator gauge ____________psi
Adjust Licor flow needle valve
“o” to open all relays
Open Line 1, Sample solenoid (R0, R6 on)
Turn on pump (R13 on)
Use Licor needle valve to set flow on Sample MFM to 100 sccm (~ 2.35 V).
Flow: ______________V, Licor Pressure: ____________kPa
Check calibration sampling pressures and flows
“o” to open all relays
LS2 solenoid open (R7 on)
LS2 Pressure: ____________kPa, Sample Flow V: _________________
Repeat for LS1 (R8), HS1 (R9) and HS2 (R10)
LS1 Pressure: ____________kPa, Sample Flow V: _________________
HS1 Pressure: ____________kPa, Sample Flow V: _________________
HS2 Pressure: ____________kPa, Sample Flow V: _________________
Adjust line purge needle valve
“o” to open all relays
Connect Sample MFM to outlet of line purge needle valve
Open Line 1 solenoid (R0)
Turn on pump (R13 on) to send Line 1 flow out purge valve
Adjust needle valve to 100 sccm (2.2-2.5 V)
Line purge flow: _______________
Fine tune LT needle valve
“o” to open all relays
Open LT solenoid (R3 on)
Turn on pump (R13 on) to send LT flow out purge valve
Adjust needle valve to get flow equal to 100 sccm (2.2-2.5 V)
LT purge flow: ________________V
Return Sample MFM on outlet Nafion
Cylinder High Side Pressures
HS2
HS1
LS1
LS2
LT
Then check Line sampling pressures and flows
“o” to open all relays
Open Line 1, Sample solenoid (R0, R6 on)
Turn on pump (R13 on)
Line 1 pressure: ______________kPa, Line Flow V: __________ Sample Flow V: _____________
R0 off, R1 on
Line 2 pres: ________________kPa, Line Flow V: ___________ Sample Flow V: ____________
R1 off, R2 on
Line 3 pres: ________________kPa, Line Flow V: ___________ Sample Flow V: ____________
R2 off, R3 on
Line 4 pres: ________________kPa, Line Flow V: ___________ Sample Flow V: ____________
R3 off, R4 on
Line 5 pres: ________________kPa, Line Flow V: ___________ Sample Flow V: ____________
R4 off, R5 on
LT pres: ________________kPa, Line Flow V: ______________ Sample Flow V: ____________
18
AIRCOA Set-up/Tune-up Procedures for 3 Inlet Line Unit
Unit ____________
Date _______________ Location: _____________
OPTIONAL: If Diagnostics suggests a leak, here’s how to track it down:
Do a high pressure leak check
“o” to open all relays
Power up leak check valve (R12 on)
Open LT, Sample solenoid (R3, R6 on) for 30 sec (Pressure should go to ~ 20 kPa over ambient)
Close LT, leave sample solenoid open (R3 off)
When pressure stabilizes, note time and pressure ____________ @ ____:____:____
Wait 2 minutes and again note time and pressure _______ @ ____:____:_____
If pressures differ by more than 0.05 kPa/min, check fittings for potential leaks
Repeat if necessary. Repeat with Sample solenoid (R6) off to localize below or above gas selection manifold.
Low Pressure Leak Check
“o” to open all relays
Power up line 1 (R0), Guest Cal (R11) and Micropump (R13) to vent above regulator for 30 sec
Close Guest Cal (R11), power up leak check (R12) and note time and pressure
____________ @ ____:____:_____
After two minutes , note time and pressure ____________ @ ____:____:_____
Change should be less than 0.05 kPa/min or a cal solenoid needs repair/replacement
STANDARD:
Adjust inlet needle valves
“o” to open all relays. For first time tune, open all needle valves all the way
Open Lines 2 and 3 (R1, R2 on) so all flush flow goes through Line 1
Line 1 Flow ________________V
Repeat for Lines 2 and 3
R0, R2 on. Line 2 Flow _________________V
R0, R1 on. Line 3 Flow _________________V
Adjust each inlet needle valve so that MFM reads the same as the lowest one (or 4.9, whichever is less) +/- 0.1.
Line 1 Flow ____________Line 2 Flow ____________V Line 3 Flow ______________V
Adjust all calibration cylinder regulators (not LT!) to 9 psig (initial set-up only)
Set Beswick regulator
“o” to open all relays
Watch Licor pressure till stable. Licor ambient pressure _______________kPa
Close leak check solenoid (R12 on), ensure pump is off (R13 off)
Open LS2 (R7 on)
Adjust regulator/check that Licor pressure is 30 +/- 2 kPa above ambient (Note: may need to open V12 if
pressure goes above setpoint to allow pressure to vent back down).
Beswick regulator setting: _______________kPa @ 30 seconds after V7 on
Close LS2 (R7 off)
19
Set LT cylinder regulator
“o” to open all relays
Close Leak check solenoid (R12 on)
Open Sample solenoid (R6 on), open LT inlet solenoid (R3 on)
Adjust LT cylinder regulator to get Licor pressure 20 +/- 2 kPa over ambient after 30 sec
LT regulator setting: _______________kPa, regulator gauge ____________psi
Adjust Licor flow needle valve
“o” to open all relays
Open Line 1, Sample solenoid (R0, R6 on)
Turn on pump (R13 on)
Use Licor needle valve to set flow on Sample MFM to 100 sccm (~ 2.35 V).
Flow: ______________V, Licor Pressure: ____________kPa
Check calibration sampling pressures and flows
“o” to open all relays
LS2 solenoid open (R7 on)
LS2 Pressure: ____________kPa, Sample Flow V: _________________
Repeat for LS1 (R8), HS1 (R9) and HS2 (R10)
LS1 Pressure: ____________kPa, Sample Flow V: _________________
HS1 Pressure: ____________kPa, Sample Flow V: _________________
HS2 Pressure: ____________kPa, Sample Flow V: _________________
Adjust line purge needle valve
“o” to open all relays
Connect Sample MFM to outlet of line purge needle valve
Open Line 1 solenoid (R0)
Turn on pump (R13 on) to send Line 1 flow out purge valve
Adjust needle valve to 100 sccm (2.2-2.5 V)
Line purge flow: _______________
Fine tune LT needle valve
“o” to open all relays
Open LT solenoid (R3 on)
Turn on pump (R13 on) to send LT flow out purge valve
Adjust needle valve to get flow equal to 100 sccm (2.2-2.5 V)
LT purge flow: ________________V
Return Sample MFM on outlet Nafion
Cylinder High Side Pressures
HS2
HS1
LS1
LS2
LT
Then check Line sampling pressures and flows
“o” to open all relays
Open Line 1, Sample solenoid (R0, R6 on)
Turn on pump (R13 on)
Line 1 pressure: ______________kPa, Line Flow V: __________ Sample Flow V: _____________
R0 off, R1 on
Line 2 pres: ________________kPa, Line Flow V: ___________ Sample Flow V: ____________
R1 off, R2 on
Line 3 pres: ________________kPa, Line Flow V: ___________ Sample Flow V: ____________
R2 off, R3 on
LT pres: ________________kPa, Line Flow V: ______________ Sample Flow V: ____________
20
B. AWM3300 mass-flow meter lookup chart
sccm
volts
sccm
volts
0
25
50
75
100
125
150
175
200
225
250
275
300
325
350
375
400
425
450
475
500
1.00
1.39
1.72
2.01
2.26
2.47
2.66
2.82
2.97
3.10
3.22
3.33
3.43
3.52
3.62
3.71
3.79
3.88
3.96
4.04
4.13
500
525
550
575
600
625
650
675
700
725
750
775
800
825
850
875
900
925
950
975
1000
4.13
4.20
4.28
4.35
4.42
4.49
4.55
4.60
4.65
4.70
4.73
4.77
4.80
4.82
4.84
4.86
4.87
4.89
4.92
4.95
5.00
C. Li-820 calibration
The AIRCOA does not rely on the Li-820 CO2 sensor calibration but does
perform better if the Li-820 is reasonably well calibrated because its internal
pressure correction functions are more accurate then. We recommend
recalibrating the Li-820 whenever its internal calibration has drifted by more than
20 ppm as determined by comparing to one of the known calibration gas
concentrations. The Li-820 PC interface software that is required to do this can
be downloaded from:
ftp://ftp.licor.com/perm/env/LI-820/Software/LI820_win-1.0.0.exe
The Li-820 manual is provided as a supporting document to this manual (see
Appendix F) and can also be downloaded from:
http://ftp.licor.com/env/LI-820/Manual/LI-820_Manual.pdf
21
Most of the Li-820 drift is in the zero or constant offset component, but
unfortunately the Li-820 software does not allow adjustment of the zero to match
an ambient concentration reference gas. Therefore, you will need a source of
zero CO2 gas to perform this calibration. We recommend using N2 as opposed to
air that has been scrubbed of CO2 to avoid getting any of the scrubbing agent
inside the instrument and we recommend using 99.999 % N2 or better to reduce
the amount of CO2 in the gas. Note: the CO2 readings from the instrument will be
biased for up to several hours after running N2 through the instrument as the
Nafions and other plastic surfaces come back into equilibrium with ambient CO2
levels. To introduce the N2 to the instrument, you can connect to the guest-cal
bulkhead fitting on the outside of the instrument and use the manual relay control
program to select this line. The Li-820 span also drifts and after zeroing the
instrument you should introduce HS2 calibration gas to the sensor and use its
value to set the span.
D. Drying system
The AIRCOA drying system consists of a combination of Nafion drying tubes
(www.permapure.com) and mole sieve moisture traps. Water in the sample air is
transported by the Nafion from the inner sample tube to the outer purge tube as a
result of the humidity difference. The air entering the outer purge tube has been
dried by the mole sieve traps so enters with no water and carries away most of
the water that entered in the inner sample tube. The first Nafion tube dries the
sample gas to 1000-3000 ppm H2O and the second Nafion tube further dries the
sample gas and humidifies the calibration gases to 300-700 ppm H2O. A
difference in humidity between the sample and calibration gases of 300 ppm
would result in a dilution bias in the CO2 measurement of 0.1 ppm. The
response time of the Nafion tubes to changes in input humidity is many hours.
Therefore, they are very good at matching humidity between the calibration and
sample gases to within a few ppm. Note: their response time to a change in
ambient temperature is very rapid, with a 1 C change in ambient temperature
resulting in a 1 C change in output dew point. The AIRCOA mole sieve driers
contain 200 ml of mole sieve (13X with 4A indicating). For systems intended for
high-altitude operations, only one 200 ml drier is used in the second position, but
for systems intended for sea-level operations, two 200 ml driers in series are
used in this position to increase the time between required replacement.
The last two pages in this section show the results of laboratory tests of the
drying system during which the humidity at multiple points in the system was
measured. The two tests correspond to sampling air with a dew point of 10 C
and a dew point of 26 C. These tests indicate that the driers in the second
position will last between 5.5 and 14.5 months depending on ambient humidity
conditions. The drier in the first position should last between 10 and 18 months
but we recommend replacing it at the same time as the other driers. When a
drier becomes saturated, the RH measurement in the instrument will begin a
22
steady climb, indicating that servicing is required. Saturated mole sieve can be
regenerated by heating at 250 C for several hours in a shallow pan.
It is also possible that during extreme precipitation events the instrument may
ingest liquid water. If liquid water comes in contact with the Nafion tubes they will
no longer work. The following note is from the Permapure FAQ web page:
Introduction of liquid water into the dryer causes failure by an unexpected
mechanism. Ordinarily Nafion dryers remove water vapor from the sample and
perevaporate it into the surrounding medium. There is no net phase change, and no
energy is consumed. If liquid water enters the dryer, it is still absorbed then
perevaporated as water vapor. Since energy is thereby consumed, the dryer begins to
cool. As it cools, it condenses more water, causing more cooling. There is a cascade
failure in which the dryer becomes progressively colder and wetter until it is
completely soaked and nonfunctional.
In most instances, when the dryer becomes physically wet, the process can be
reversed by simply discontinuing sample flow and permitting the purge gas to dry out
the device. The dryer then recovers its normal performance. Unfortunately, in some
instances the sample may contain ionic compounds in the gas phase. If present, these
ionic compounds will dissolve in the liquid water accumulating within the dryer.
Once present in solution, the ions can participate in ion exchange with the Nafion
tubing, converting the tubing to another form that is much less water absorptive.
Should this occur, it will be necessary to regenerate the Nafion tubing by treatment
with acid before it fully recovers its normal performance.
Note that in the AIRCOA system it is not possible to stop the sample flow while
keeping the purge flow going, as the two are linked. If water does enter one of
the Nafion tubes, we recommend removing both tubes from the instrument as
soon as possible and purging them with dry air or nitrogen for several days.
Also, if the inner Nafion tube still appears kinked or collapsed, soaking all but the
end fittings in methanol can restore its shape. It is also possible in this case that
liquid water will have entered the Li-820. We recommend also purging the Li-820
with dry air or nitrogen. If the Li-820 calibration seems significantly affected,
follow the Li-Cor procedures for cleaning the optical bench and then perform a
recalibration.
23
24
25
4. Instrument Computer Configuration
A. Basic setup
The instrument computer is contained in a PC104 stack that includes, from
bottom to top, a custom interconnect board (Appendix E) that supplies power and
receives signals from all of the diagnostic sensors, a relay board with 20 relays, a
power supply board, and a Prometheus 486 computer board. Also, the
Prometheus board has a 32 MB flash module mounted to it which contains the
BusyBox Linux operating system (http://www.busybox.net) and custom C
programs for controlling and interacting with the instrument. These C programs
control relays for the valves and micropump, record serial data from the CO2
sensor, and log analog signals from the mass flow, temperature, and humidity
sensors.
Connect to the instrument using either the COM 2 or ethernet interfaces as
described in Section 2. The computer can be rebooted either by powering the
instrument down and up, or by using the command:
~ # reboot
The initialization file /etc/rc.sysinit configures much of the system at startup and
by default it contains:
#!/bin/sh
# Required to allow spawning of persistant processes from this script.
trap "" SIGHUP
PATH=/bin:/sbin:/usr/bin:/usr/sbin:/usr/local/bin:/usr/local/sbin:.
export PATH
export TERM=vt100
/sbin/fsck.ext3 /dev/hda1
/bin/hostname aircoan # or other aircoa unit name
/bin/mount -t proc /proc /proc
/bin/mount -n -o remount,rw,noatime /
# read hardware clock
/sbin/insmod rtc && /sbin/hwclock --hctosys
# ramfs
mount /var/tmp
mkdir /var/tmp/run
mkdir /var/tmp/log
touch /var/tmp/log/messages
touch /var/tmp/log/isff.log
touch /var/tmp/log/lastlog
# used by sshd (doesn't grow)
26
/sbin/ifconfig lo 127.0.0.1 netmask 255.0.0.0
# fixed ip address (use this for field operation)
#/sbin/ifconfig eth0 198.11.18.44 netmask 255.255.255.0 # edit
addresses and uncomment
# gateway (if needed)
#/sbin/route add default gw 198.11.18.1
# dhcp (use this if needed for lab testing)
mkdir /var/tmp/dhcpcd
/sbin/dhcpcd -L /var/tmp/dhcpcd -d -n -h `hostname` -R eth0
# set up network time sync
cp /etc/ntp/drift /var/run/ntp.drift
/sbin/portmap
/sbin/syslogd -m 0
/usr/sbin/ntpdate 192.43.244.18 && /sbin/hwclock --systohc # NCARs NIST
ntp server
/usr/sbin/ntpd -P 50
/usr/bin/setupsshkeys.sh && /usr/sbin/sshd &
/sbin/insmod /lib/modules/misc/dscudkp.o
# set up serial ports
/bin/setserial /dev/ttyS0
/bin/setserial /dev/ttyS1
/bin/setserial /dev/ttyS2
/bin/setserial /dev/ttyS3
port
port
port
port
0x3f8
0x2f8
0x3e8
0x2e8
irq
irq
irq
irq
4 uart 16550A
3 uart 16550A
5 uart 16850
15 uart 16850
# mount USB pen drive
mount /data && ([ -d /data/aircoa ] || mkdir /data/aircoa)
# start aircoa program
/home/isff/aircoa.sh 2>&1 | /usr/bin/logger -p local4.info &
# start daily data zipping program
#/home/isff/dailyzip.sh &
This file also automatically starts the aircoa instrument control program ‘aircoa’
by calling the shell script /home/isff/aircoa.sh.
B. Ethernet setup
By default the Prometheus attempts to obtain an IP address on start-up using
DHCP. You will need to convert to using a specified IP address in the field and
may need to do so in laboratory as well. To do this, use the vi terminal editor to
edit rc.sysinit and comment out the 2 DHCP lines:
#mkdir /var/tmp/dhcpcd
#/sbin/dhcpcd -L /var/tmp/dhcpcd -d -n -h `hostname` -R eth0
27
Next comment in the line:
/sbin/ifconfig eth0 198.11.18.44 netmask 255.255.255.0
and edit the eth0 address and netmask to correspond to your network
environment. If you need to specify a gateway, do so by uncommenting the line:
/sbin/route add default gw 198.11.18.1
and editing the gateway address to correspond to your gateway.
C. USB drive
The data are stored on a 512 MB USB drive attached to the Prometheus via one
of the USB connectors. This drive is configured in the file /etc/fstab with the line:
/dev/sda1
/data vfat
defaults,noatime,noauto 0 0
and mounted as /data during start up by the line in /etc/rc.sysinit:
mount /data && ([ -d /data/aircoa ] || mkdir /data/aircoa)
This command also creates the directory /data/aircoa. IMPORTANT: This USB
drive can not be ‘hot-swapped’ as it could on a Windows or Mac system and
disconnecting it before unmounting it could result in corrupted data or damage to
the drive. In normal operation using remote data transfer (see Section 5) you
should not have to disconnect this drive. If you do need to disconnect this drive,
first stop the aircoa program by starting the manual relay control program (see
Section 2D above) and typing ‘Q’ then unmount the drive using the command:
~ # umount /data
after reconnecting it, you must mount it using the command:
~ # mount /data
and ensure that the directory /data/aircoa exists before restarting the aircoa
program with the command:
~ # /home/isff/aircoa.sh 2>&1 | /usr/bin/logger -p local4.info &
D. Network time synchronization
28
The Prometheus is configured to synchronize its clock with GMT time using the
NCAR NIST ntp server. To do this, it must be connected to the internet. If it is
not connected or the ntp program is not configured properly, the Prometheus
time will drift by around 30 seconds per week and will require manual resetting.
The ntp program is configured in two places. First, in rc.sysinit with the lines:
cp /etc/ntp/drift /var/run/ntp.drift
/usr/sbin/ntpdate 192.43.244.18 && /sbin/hwclock –systohc
/usr/sbin/ntpd -P 50
and second, in the file /etc/ntp.conf with the line:
server 192.43.244.18
If you wish to use a different ntp server, you must set its IP address in BOTH of
these files.
E. Instrument control program
The instrument control program ‘aircoa’ and the manual relay control program
reside in the directory /usr/local/bin. The aircoa program is started from the script
/home/isff/aircoa.sh, which is called by /etc/rc.sysinit on system start up. The
script aircoa.sh is set to attempt to start the aircoa program every 30 seconds
until successful. It contains:
#!/bin/sh
cd /home/isff/aircoa
PATH=/usr/local/bin:$PATH
# aircoa arguments:
# -r relay_program_file relay_program_name: file and program to run
# -x xml_init_file
:
file of XML to send to LI820 on startup
# -t serial output port:
# -R samples per second:
# -a archive file_directory name_format interval_in_seconds:
args="-r relays5.txt relays5 -x li820.xml -t /dev/ttyS2 -R 1 -a
/data/aircoa af_%y%m%d_%H%M%S.dat 28800"
while true; do
# exit loop if successful exit from aircoa
aircoa $args && break
sleep 30
done
echo "$0 exiting"
29
where the first 2 letters of the output file correspond to the specific AIRCOA unit.
Also, a 3 inlet line unit will call the file relays3.txt and the program relays3 instead
of relays5.txt and relays5 as shown. The output file interval (third input to
argument -a) is currently set to 28800 seconds (3 files per day) but can be
adjusted. The output rate (input to argument -R) is currently set to 1 Hz but can
be adjusted to minimize data file size as long as the Li-820 filter is adjusted
accordingly (see below). The file /home/isff/aircoa/li820.xml configures the Li820 sensor and contains:
<LI820>
<CFG>
<OUTRATE>0</OUTRATE>
<HEATER>TRUE</HEATER>
<PCOMP>TRUE</PCOMP>
<BENCH>14</BENCH>
<SPAN>1000</SPAN>
<FILTER>2</FILTER>
</CFG>
<RS232>
<CO2ABS>FALSE</CO2ABS>
<IVOLT>FALSE</IVOLT>
<RAW>FALSE</RAW>
</RS232>
</LI820>
Refer to the Li-820 manual (Appendix F or
http://ftp.licor.com/env/LI-820/Manual/LI-820_Manual.pdf) for details on these
commands. The raw data rate of the Li-820 is 2 Hz. Setting the filter to 2 causes
the sensor to apply a 2 second digital smoother to the measurements which
ensures that our 1 Hz sampling rate does not undersample the measurements. If
the sampling rate is reduced to 0.5 Hz, this filter should be increased to 4
seconds.
The program file /home/isff/aircoa/relays5.txt specifies the schedule of relay
switches for the 5 inlet line units and contains:
include sequences5.txt
program relays5
#
name
repeat
sequence baseloop 3
sequence zerocal1 1
sequence baseloop 2
sequence zerocal2 1
sequence baseloop 2
sequence zerocal3 1
sequence baseloop 2
sequence bloopno1 1
sequence zerocal4 1
30
sequence baseloop 2
sequence zerocal1 1
sequence baseloop 2
sequence zerocal2 1
sequence baseloop 3
sequence fullcal1 1
sequence baseloop 3
sequence zerocal3 1
sequence baseloop 2
sequence zerocal4 1
sequence baseloop 2
sequence zerocal1 1
sequence baseloop 2
sequence bloopno1 1
sequence zerocal2 1
sequence baseloop 2
sequence zerocal3 1
sequence baseloop 2
sequence zerocal4 1
sequence baseloop 3
sequence fullcal2 1
end program
which defines the program ‘relays5’ and includes the file
/home/isff/aircoa/sequences5.txt. This file defines the sequences named in the
program relays5 as:
include settings5.txt
sequence baseloop
# setting
seconds
line5
150
line4
150
line3
150
line2
150
line1
150
end sequence
sequence bloopno1
# setting
seconds
line5
150
line4
150
line3
150
31
line2
end sequence
150
sequence zerocal1
# setting
seconds
cal1
150
end sequence
sequence zerocal2
# setting
seconds
cal2
150
end sequence
sequence zerocal3
# setting
seconds
cal3
150
end sequence
sequence zerocal4
# setting
seconds
cal4
150
end sequence
sequence fullcal1
# setting
seconds
cal1
150
cal2
150
cal3
150
cal4
150
ventall
30
loleakcheck
120
lt
150
end sequence
sequence fullcal2
# setting
seconds
cal4
150
cal3
150
cal2
150
cal1
150
ventall
30
loleakcheck
120
pressurize
30
hileakcheck
120
end sequence
and further includes the file /home/isff/aircoa/settings5.txt which specifies what
relays to turn on in each of the named settings:
# spare pump lkchk guest HS2 HS1 LS1
#
14
13
12
11
10
9
8
#
settings
#
14 13 12 11 10 9 8 7
line1
0 1 0 0 0
0 0 0
line2
0 1 0 0 0
0 0 0
32
LS2 air lt
7
6
5
l5 l4 l3 l2 l1
4 3 2 1 0
6
1
1
2
0
0
5
0
0
4
0
0
3
0
0
1
0
1
0
1
0
line3
line4
line5
lt
0
0
0
0
1
1
1
1
0
0
0
0
0
0
0
0
0
0
0
0
0
0
0
0
0
0
0
0
0
0
0
0
1
1
1
1
0
0
0
1
0
0
1
0
0
1
0
0
1
0
0
0
0
0
0
0
0
0
0
0
cal1
cal2
cal3
cal4
0
0
0
0
1
1
1
1
0
0
0
0
0
0
0
0
0
0
0
1
0
0
1
0
0
1
0
0
1
0
0
0
0
0
0
0
0
0
0
0
0
0
0
0
0
0
0
0
0
0
0
0
0
0
0
0
1
1
1
1
0
0
0
0
1
0
1
0
0
1
1
1
1
0
0
0
0
0
0
0
0
0
0
0
0
0
0
0
0
0
0
0
0
1
0
1
0
1
0
0
0
0
0
0
0
0
0
0
0
0
0
0
0
0
0
0
1
0
1
0
ventall
pressurize
loleakcheck
hileakcheck
end settings
Collectively, these three files in /home/isff/aircoa (relays5.txt, sequences5.txt,
and settings5.txt) define the valves sequences shown in Appendix B. The three
files relays3.txt, sequences3.txt, and settings3.txt are somewhat simpler but
perform a similar function for the 3 inlet line units. If necessary, these files can
be edited to change the default relay sequences.
One more file in this directory, /home/isff/aircoa/aircoa_config.txt, is used to
configure the analogue input channels on the Prometheus. For the 5 inlet line
units this file contains:
T 108 -1.25 1.25
RH 100 -1.25 1.25
flow0 111 -5 5
flow1 104 -5 5
flow2 101 -5 5
flow3 103 -5 5
flow4 110 -5 5
flow5 102 -5 5
flow6 109 -5 5
The first column is the variable name, the second column specifies the analog
Prometheus channel (Vin0 to Vin11) to use, and the third and fourth columns
specify the voltage range. See the Prometheus manual (Appendix F) for details
on the allowable range settings. The row order in this file specifies the column
order in the output to COM port 3, the manual relay control program, and the
output data files. Note: because the Humitter RH signals are very small (~ 20
mV) at the operational dried humidity levels of a few percent, the nature of the
Prometheus multiplexing results in a sensitivity of around 0.05 mV to large
changes (~ 2 V) in the measured previously signal. Therefore, we sample RH on
channel 100 immediately after sampling flow0 (sample flow) on channel 111,
which is fairly constant at around 2.35 V, instead of after one of the other flow
signals which typically vary by over 3 V.
The aircoa program can be quit by starting the manual relay control program (see
Section 2D above) and typing ‘Q’. To trouble shoot problems in starting the
33
aircoa program, start it from the command line directly using the following
commands:
cd /home/isff/aircoa
PATH=/usr/local/bin:$PATH
aircoa -r relays5.txt relays5 -x li820.xml -t /dev/ttyS2 -R 1 -a
/data/aircoa af_%y%m%d_%H%M%S.dat 28800
where the first two letters of the output file format correspond to the specific
AIRCOA unit. Standard and error messages will then show up on screen.
34
5. Transferring Data
A. Storage and manual transfer
The files stored in /data/aircoa on the USB drive take up approximately 9 MB/day
for a 3 inlet unit running at 1 Hz and 10 MB/day for a 5 inlet unit. Without zipping,
a 512 MB USB drive will fill in approximately 50 days. Connect or log into the
system and delete old files every month to prevent the USB drive from filling. If it
does fill, the program will no longer log data. To fix this, connect or log in to the
computer and delete old files, then restart the aircoa program or reboot the
computer.
The script /home/isff/dailyzip.sh can be run to automatically zip previous days’
data and this script can be enabled by uncommenting the line in /etc/rc.sysinit:
/home/isff/dailyzip.sh &
These zipped files are approximately 5 times smaller than the unzipped versions.
Files can be transferred using the linux secure copy command ‘scp’ or using
‘rsync’ configured to use ssh. To do this, use the command:
> rsync -ae 'ssh' [email protected]:/data/aircoa/\* .
after substituting in the IP address of the specific AIRCOA unit, and enter the root
password when prompted.
B. Automated data transfer
To automate this process, it is necessary to set up password-less ssh to the
Prometheus computer. To do this, on your home machine enter the command:
> ssh-keygen -t dsa
You will be prompted for a destination for the key file. Put it in
.ssh/aircoa_id_dsa in your home directory. Then enter a carriage return for the
passphrase twice. This will create two files in your .ssh directory:
aircoa_id_dsa
and
aircoa_id_dsa.pub
Copy the *.pub file to the Prometheus into root's .ssh directory using the
35
command:
> scp .ssh/aircoa_id_dsa.pub [email protected]:/root/.ssh
after substituting in the IP address of the specific AIRCOA unit. Then, connect or
log in to the Prometheus and cd to the .ssh directory:
~ # cd .ssh
Next, append the *.pub file to a file called ‘authorized_keys’ using the command:
~/.ssh # cat aircoa_id_dsa.pub >> authorized_keys
which will create authorized_keys if it doesn't exist. The permissions on this file
must not allow read/write to anybody but root, so next enter the command:
~/.ssh # chmod 600 authorized_keys
Finally, back on your home system try to ssh into the Prometheus using the
command:
> ssh -i ~/.ssh/aircoa_id_dsa [email protected]
after substituting in the IP address of the specific AIRCOA unit and replacing the
~ with your explicit home directory path. If it connects without asking for a
password it is properly set up. Now, you can modify the rsync command to be:
> rsync -ae 'ssh –i ~/.ssh/aircoa_id_dsa'
[email protected]:/data/aircoa/\* .
all on one line and substituting in the IP address of the specific AIRCOA unit and
replacing the ~ with your explicit home directory path. This command can then
be put into a shell script that is called automatically by a cronjob.
36
6. Processing Data
The aircoa program stores files of normally 1-Hz data that can then be
transferred to a home computer via the internet. Automated Linux scripts and
functions written in R (http://www.r-project.org/) are available to process these
files to produce diagnostic plots and calibrated data. You will need to download
and install R on a Unix or Linux machine. There is also a Windows version of R
but the AIRCOA scripts would have to be modified to work in Windows. Once
installed the R scripts can be sourced from within the R environment or run using
automated batch files from the Unix/Linux environment.
This section contains a description of the R functions, scripts, and batch files.
See Section 7 for instructions on obtaining the source files themselves. This
code is not fully tested and comes with absolutely no warranties. We will strive to
keep anyone who downloads the files appraised of future revisions or
corrections, but please also check back often for new versions. The format used
to list these files below is:
R source code file name [executable function name] (options=defaults)
A. Daily diagnostics and 1-Hz to 2.5-min averaging
aircoa_raw_day.r [acrawday] (loc='NWR', unit='A', day='050901', outflag='',
njog=150, skip=50, ntrd=50, ico=0.0, eco=1.0, png=F)
This function calls the external data_dump procedure to convert AIRCOA output
files (*.dat) with binary time stamps into temporary ascii files. It then reads in
data from these ascii files, filters and averages to get 2.5 minute processed data,
outputs a processed data file (e.g. NWR_050901.out), a log file (e.g.
NWR_050901.log), and daily diagnostic plots.
Parameter Type
Description
loc
text3
Site code corresponding to data to be
processed
unit
text1
AIRCOA unit in use at that site
day
text6
Day of output to be processed
outflag
text1
Optional flag to attach to output files - use to
process different parts of one day separately
njog
integer Data values in measurement period
skip
integer Data values to skip at start of measurement
period
37
ntrd
integer Data values to use at start and end of
averaging period for slope calculations
ico
real
Fraction of day before which data will be cut
off
eco
real
Fraction of day after which data will be cut off
png
logic
Whether png graphs should be generated
directly, which is only possible from within
the R environment, or via the bitmap
command, which works using BATCH files
B. Monthly diagnostics and calibrated data
aircoa_conc_days.r [acconcdays] (loc=’NWR’,unit='A', startchr='050901',
endchr='050907' ,inflag='', outflag='', pcor=T, tcor=T, fcor=F, ltmpco=0.5,
sflco=70, ico=0.0, eco=1.0, png=F, daily=T)
This function reads in one or more output files (*.out) from acrawday. It also
reads in the aircoa_cylrec.txt file and calls a lookup routine (cflkup.r, not shown
here) to find assigned calibration gas values. It calculates pressure and
temperature smoothers and applies 4-hourly quadratic and 30-minute zero-offset
calibrations. It also reads in the aircoa_timeoff.txt file and makes any necessary
clock-drift corrections and reads in the aircoa_inlet.txt file and calculates and
applies time lags. It interpolates data to 15-minute intervals. It outputs a
concentration processing file (e.g. NWR_050901_050907.con), a calibrated
measurements file (e.g. NWR_050901_050907.mes), an interpolated
measurements file (e.g. NWR_050901_050907.int), a dump file (e.g.
NWR_050901_050907.dmp), a log file (e.g. NWR_050901_050907.log), and
daily timeseries and profile plots, weekly timeseries plots, a monthly timeseries
plot, a monthly diurnal cycle and variability plot, and monthly diagnostic plots.
Furthermore, it reads in concentration processing output files from previous
months and outputs a full concentration processing file (e.g.
NWR_050901_061106.lco), full calibrated measurements file (e.g.
NWR_050901_061106.lme), a full interpolated measurements file (e.g.
NWR_050901_061106.lin), and full timeseries plots. It also reads in the
aircoa_hiside.txt file and outputs a timeseries plot of cylinder pressures.
Parameter Type Description
loc
text3 Site code corresponding to data to be
processed
unit
text1 AIRCOA unit in use at that site
startchr
text6 First day of output to be processed
endchr
text6 Last day of output to be processed
38
inflag
text1 Optional flag used to read in flagged output
from acrawday
outflag
text1 Optional flag to attach to output files
pcor
logic Whether a pressure smoother should be
applied
tcor
logic Whether a temperature smoother should be
applied
fcor
logic Whether a flushing correction should be
applied
ltmpco
real LiCor 840 temperature (degC) anomaly above
which data will be cut off
sflco
real Sample flow (sccm) below which data will be
cut off
ico
real Fraction of day before which data will be cut off
on first day processed
eco
real Fraction of day after which data will be cut off
on last day processed
png
logic Whether png graphs should be generated
directly, which is only possible from within the
R environment, or via the bitmap command,
which works using BATCH files
daily
logic Whether daily calibrated timeseries and profile
plots should be produced
C. Comparisons between sites and units
aircoa_comp.r [accomp] (start='050902', end='050907',
locs=c('NWR','FEF','SPL'), outflag='', ico=0.0, eco=1.0, png=F)
This function reads in the full output files (*.lco) from acconcdays for two or more
units and compares their concentrations. It outputs a combined concentration file
(e.g. comp_050226_050304.out), a results file (e.g. comp_050226_050304.res),
a log file (e.g. comp_050226_050304.log), and comparison plots.
Parameter Type Description
start
text6 First day of output to be processed
end
text6 Last day of output to be processed
locs
vector Site codes corresponding to data to be
of
processed
39
text3
outflag
text1 Optional flag to attach to output files
ico
real
Fraction of day before which data will be cut
off on first day processed
eco
real
Fraction of day after which data will be cut off
on last day processed
png
logic
Whether png graphs should be generated
directly, which is only possible from within the
R environment, or via the bitmap command,
which works using BATCH files
D. Generation of organizing html pages
aircoa_make_html.r [acmkhtml] (loc=’NWR’,unit='A', start='050901',
end='050907', procday=T, procconc=F, proccomp=F, outflag='',
netdir='/net/www/docs/homes/stephens/RACCOON/', remold=T, remall=F)
This function makes daily diagnostic, multi-day (calibrated) diagnostic, and
comparison html pages to organize png and log files from acrawday,
acconcdays, and accomp. It removes old output in the network directory and
moves new output and html files into the network directory.
Parameter Type Description
loc
text3 Site code corresponding to data to be
processed (needed if procday or procconc = T)
unit
text1 AIRCOA unit in use at that site (needed if
procday or procconc = T)
start
text6 First day of acconcdays or accomp output to
be organized (needed if procconc or proccomp
= T)
end
text6 Day of acrawday output to be organized, or
last day of acconcdays or accomp output to be
organized
procday
logic Whether to organize output of an acrawday run
procconc
logic Whether to organize output of an acconcdays
run
proccomp logic Whether to organize output of an accomp run
outflag
text1 Optional flag used to organize flagged output
from acrawday, acconcday, or accomp
40
netdir
text
Directory to move output and html
remold
logic Whether to remove old output from netdir for
same loc and day of acrawday output or same
loc and starting day of acconcdays or accomp
output
remall
logic Whether to remove all old output from netdir
for same loc
E. Example input files
The above described functions require a number of input files. Note: these input
files are assumed to be 2 directories above the directory where the functions are
being run.
../../aircoa_cylrec.txt
This file contains information on the cylinder IDs and installation dates and times
(GMT) of all calibration cylinders.
LOC
NWR
FEF
SPL
LB5
SPL
NWR
HDP
FEF
FEF
CE1
SPL
CE2
LB6
CE3
CE4
CE5
LB6
CE4
CE5
UNIT DATE TIME HS2 HS1 LS1 LS2 LT
A 050825 0000 JJ21201 JJ8550 JJ13623
C 050825 0000 CC60235 CC42692 CC28157
D 050901 0000 JJ13615 JJ8174 JJ1348
H 060207 2400 JJ21174 JJ23191 JJ12502
D 060303 0247 JJ8852 JJ8578 JJ9020
A 060405 1600 JJ9008 JJ8906 JJ482
E 060419 0000 JJ651
JJ31255 JJ20269
C 060525 1730 FA02360 CC42692 CC28157
C 060720 1615 JJ21174 JJ23191 JJ12502
M 060621 0000 CC29040 CC56491 CC28553
D 060817 1800 JJ8852 JJ8578 JJ9020
N 060901 0000 CC29040 CC56491 CC28553
I 060919 0000 CC29040 CC56491 CC28553
O 060929 0000 CC29040 CC56491 CC28553
L 060929 0000 CC29040 CC56491 CC28553
K 061020 0000 CC29040 CC56491 CC28553
I 061024 0000 CC29040 CC56491 CC71620
L 061024 0000 CC29040 CC56491 CC71620
K 061024 0000 CC29040 CC56491 CC71620
JJ8588
CC12938
JJ1378
JJ22398
JJ8485
JJ635
JJ12491
CC12938
JJ22398
CC66785
JJ8485
CC66785
CC66785
CC66785
CC66785
CC66785
CC28553
CC28553
CC28553
JJ19017
CC29083
FA02340
CC71620
FA02340
JJ19017
JJ8510
CC29083
CC29083
CC71620
JJ18942
CC71620
CC71620
CC71620
CC71620
CC71620
FA02361
FA02361
FA02361
../../aircoa_inlets.txt
This file contains information on the installation dates and times (GMT) and
tubing inlet heights and lengths in meters. The total inlet lengths are calculated
by summing the inlet height and any extra tubing runs or inlet volumes. This file
also allows specifying that more than one unit is sampling from the same line
(e.g. during an intercomparison) to account for the faster flush flow. Note: this
41
version only allows 3 inlet lines, but modifications are planned to allow 5 inlet
lines.
LOC UNIT DATE SECONDS L1HEIGHT L2HEIGHT L3HEIGHT HZRUN1 HZRUN2 HZRUN3
UNITSPERLINE
SPL D 050901 00000.0 2.5 5.8 9.1 149 147.3 164.1 1
FEF C 050829 00000.0 2.6 9.5 17.8 91.5 91.5 91.5 1
NWR A 050825 00000.0 1.3 3.5 2.3 3.3 3.3 4.3 1
NWR A 050910 77400.0 1.3 2.3 3.5 3.3 4.3 3.3 1
NWR A 051012 69000.0 1.3 3.5 5.1 3.3 3.3 5.9 1
LB5 H 060131 00000.0 1 1 1 0 0 0 1
HDP E 060419 00000.0 -999.99 17.1 17.7 -999.99 21.9 17.1 1
CE1 M 060621 00000.0 1 1 1 0 0 0 1
CE2 N 060901 00000.0 1 1 1 0 0 0 1
LB6 I 060919 00000.0 1 1 1 0 0 0 1
CE3 O 060929 00000.0 1 1 1 0 0 0 1
CE4 L 060929 00000.0 1 1 1 0 0 0 1
CE5 K 061020 00000.0 1 1 1 0 0 0 1
../../aircoa_hiside.txt
This file contains manual readings of the high side regulator gauges on the
calibration cylinders. The times in this file must be consistent with the times in
aircoa_cylrec.txt. For example, a cylinder swap out must be recorded in
aircoa_cylrec.txt with a time after the old high side pressure and before the new
high side pressure is recorded here.
LOC
NWR
FEF
SPL
FEF
FEF
NWR
NWR
NWR
NWR
NWR
FEF
SPL
FEF
NWR
NWR
NWR
FEF
FEF
NWR
SPL
UNIT DATE GMT
A 050826 1400
C 050829 1653
D 050831 1646
C 050901 1800
C 050908 1400
A 050909 1600
A 050916 1730
A 050922 1800
A 050929 1620
A 051008 2100
C 051013 1800
D 051014 1000
C 051025 1200
A 051026 1200
A 051102 1200
A 051123 1200
C 051128 1200
C 051219 1200
A 060112 1200
D 060201 1200
HS2P
1370
780
1330
770
760
1280
1250
1200
1170
1110
690
1040
660
1010
950
850
600
570
630
440
HS1P
1390
1060
1510
1050
1040
1310
1270
1240
1190
1170
950
1200
940
1040
990
920
870
840
680
600
LS1P
1360
960
1560
960
930
1280
1240
1210
1160
1120
890
1580
860
1010
980
890
790
770
660
650
LS2P
1270
1110
910
1100
1090
1200
1160
1130
1060
1030
1000
920
1000
910
860
770
920
900
550
510
LTP
1290
1300
1120
1300
1300
1270
1260
1260
1250
1210
1300
970
1300
1190
1185
1140
1260
1270
1080
730
../../aircoa_timeoff.txt
This file contains information on any clock-drifts. Initially ntp on the Prometheus
computers was not configured properly and the computer clocks were drifting.
42
They no longer drift, but it would be important to maintain this file if the AIRCOA
were deployed without internet access.
LOC
NWR
NWR
NWR
NWR
NWR
NWR
NWR
NWR
NWR
NWR
NWR
NWR
FEF
FEF
FEF
FEF
FEF
FEF
FEF
FEF
FEF
FEF
FEF
FEF
FEF
UNIT DATE(YYMMDD)
A 050824 00:00:00
A 051026 18:55:45
A 051028 17:12:59
A 051028 17:13:00
A 051221 20:45:00
A 060120 01:05:00
A 060404 18:00:00
A 060426 16:36:29
A 060426 16:36:30
A 060620 15:32:54
A 060620 15:32:55
A 060719 23:19:30
C 050829 00:00:00
C 051026 19:00:00
C 051221 20:45:19
C 051221 20:45:20
C 060120 01:11:51
C 060120 01:11:52
C 060319 01:18:54
C 060319 01:21:00
C 060426 16:48:28
C 060426 16:48:29
C 060620 15:30:00
C 060711 22:56:39
C 060711 22:56:40
TIMEMEASURED(UNIT) OFFSET(UNIT-UTC in SEC)
0
-315
-316
-3 (rebooted)
-3
0
0
-53
0 (rebooted)
-173
0 (rebooted)
0 (fixed ntp.conf and rebooted)
0
0
199
0
248
0
212
0 (rebooted)
178
0
0
186
0 (fixed ntp.conf and rebooted)
netdir/CE1_notes.txt
The aircoa_make_html.r function also creates a link to a text file of notes that
resides in the specified netdir. Create this file, replacing ‘CE1’ with your location
code, and enter in records of field visits or other maintenance.
cflkup.out
The aircoa_conc_days.r function currently calls another R function to look up
CO2 concentrations measured in the NCAR O2 CO2 Calibration Facility for a
given cylinder. Note: this portion of the code needs to be rewritten to accept a
text file of manually entered concentrations. Note also: this code is being edited
to account for assumed linear drifts between pre- and post- deployment
calibration cylinder determinations.
F. Example batch files and scripts
To be edited.
43
7. Accessing Operation and Processing Code
Note: the C code for the instrument control programs and the R code described
above will be made available through a public web page. Accessing this web
page will require the acceptance of the following software license.
R CODE FOR PROCESSING, and C CODE FOR OPERATING, AIRCOA DATA
IMPORTANT!
PLEASE READ THIS SOFTWARE LICENSE AGREEMENT ("AGREEMENT")
CAREFULLY. INDICATE YOUR ACCEPTANCE OF THESE TERMS BY
SELECTING THE “I ACCEPT” BUTTON AT THE END OF THIS AGREEMENT. IF
YOU DO NOT AGREE TO ALL OF THE TERMS OF THIS AGREEMENT, SELECT
THE “I DON’T ACCEPT” BUTTON AND YOU WILL NOT BE PERMITTED TO
DOWNLOAD THE SOFTWARE.
1. License. The University Corporation for Atmospheric Research (UCAR) grants
you (the undersigned “Licensee”) a non-exclusive, nontransferable, world-wide,
royalty-free License to use certain R Code and C Code developed for, and
provided to, Licensee by UCAR (the “Software”) for non-commercial purposes.
2. Restrictions and Use.
a. No Sales. Licensee shall not sell, or license or transfer for a fee the
Software, or any work that in any manner contains the Software.
b. Modifications. All modifications or changes to the Software and
derivative works that incorporate or utilize the Software, shall carry
prominent notices stating that you changed the files and the date of the
change. Licensee may also transfer such modifications, changes, and/or
derivative works back to UCAR.
c. Notices. Each copy of the Software and any modifications shall include a
copy of this Agreement and all copyright information and notices as set
forth below:
NOTICE: The Software (insert title here) module is the sole and exclusive
property of the University Corporation for Atmospheric Research.
Copyright © 2006 University Corporation for Atmospheric Research. All
Rights Reserved.
Such notices shall be displayed on any documents, media, printouts, and
visualization or on any other electronic or tangible expressions associated with,
related to or derived from the Software or associated documentation.
44
3. Termination. Your rights under this Agreement will terminate automatically
without notice from UCAR if you fail to comply with any term(s) of this
Agreement. Licensee may terminate this Agreement at any time by destroying
the Software and any related documentation and any complete or partial copies
thereof. Upon termination, all rights granted under this Agreement shall
terminate. The following provisions shall survive termination: Sections 2, 5, 6,
and 10.
4. Proprietary Rights. Title, ownership rights, and intellectual property rights in
the Software shall remain in UCAR. You acknowledge such ownership and
intellectual property rights and will not take any action to jeopardize, limit or
interfere in any manner with UCAR’S ownership of or rights with respect to the
Software.
5. Disclaimer of Warranty on Software. You expressly acknowledge and agree
that use of the Software is at your sole risk. The Software is provided "AS IS" and
without warranty of any kind and UCAR EXPRESSLY DISCLAIMS ALL
WARRANTIES AND/OR CONDITIONS OF ANY KIND, EXPRESS OR
IMPLIED, INCLUDING, BUT NOT LIMITED TO, ANY WARRANTIES OR
CONDITIONS OF TITLE, NON-INFRINGEMENT OF A THIRD PARTY’S
INTELLECTUAL PROPERTY, MERCHANTABILITY OR SATISFACTORY
QUALITY AND FITNESS FOR A PARTICULAR PURPOSE. UCAR DOES
NOT WARRANT THAT THE FUNCTIONS CONTAINED IN THE
SOFTWARE WILL MEET YOUR REQUIREMENTS, OR THAT THE
OPERATION OF THE SOFTWARE WILL BE UNINTERRUPTED OR
ERROR-FREE, OR THAT DEFECTS IN THE SOFTWARE WILL BE
CORRECTED. FURTHERMORE, UCAR DOES NOT WARRANT OR MAKE
ANY REPRESENTATIONS AND YOU ASSUME ALL RISK REGARDING
THE USE OR THE RESULTS OF THE USE OF THE SOFTWARE OR
RELATED DOCUMENTATION IN TERMS OF THEIR CORRECTNESS,
ACCURACY, RELIABILITY, OR OTHERWISE. THE PARTIES EXPRESSLY
DISCLAIM THAT THE UNIFORM COMPUTER INFORMATION
TRANSACTIONS ACT (UCITA) APPLIES TO OR GOVERNS THIS
AGREEMENT. No oral or written information or advice given by UCAR or a
UCAR authorized representative shall create a warranty or in any way increase
the scope of this warranty. Should the Software prove defective, you (and not
UCAR or any UCAR representative) assume the cost of all necessary correction.
6. Limitation of Liability. UNDER NO CIRCUMSTANCES, INCLUDING
NEGLIGENCE, SHALL UCAR BE LIABLE FOR ANY DIRECT,
INCIDENTAL, SPECIAL, INDIRECT OR CONSEQUENTIAL DAMAGES
INCLUDING LOST REVENUE, PROFIT OR DATA, WHETHER IN AN
ACTION IN CONTRACT OR TORT ARISING OUT OF OR RELATING TO
THE USE OF OR INABILITY TO USE THE SOFTWARE, EVEN IF UCAR
HAS BEEN ADVISED OF THE POSSIBILITY OF SUCH DAMAGES.
45
7. Export Law Assurances. All Software and any technical data delivered under
this Agreement are subject to U.S. export control laws and may be subject to
export or import regulations in other countries. You agree to comply strictly with
all such laws and regulations and you acknowledge that you have responsibility to
obtain such license to export, re-export, or import as may be required after
delivery to you.
8. No Support/Modifications. The Software is provided without any support or
maintenance, and without any obligation to provide you with modifications,
improvements, enhancements, or updates of the Software.
9. Controlling Law and Severability. This Agreement shall be governed by the
laws of the United States and the State of Colorado. If for any reason a court of
competent jurisdiction finds any provision, or portion thereof, to be
unenforceable, the remainder of this Agreement shall continue in full force and
effect. This Agreement shall not be governed by the United Nations Convention
on Contracts for the International Sale of Goods, the application of which is
hereby expressly excluded.
10. The Software includes certain copyrighted, segregable components listed below
(the “Third Party Code”). For this reason, you must check the source identified
below for additional notice requirements and terms of use that may apply to your
use of this Software.
Code
Copyright
Source Link for additional Terms
Diamond
Systems
header file
dscud.h
Copyright © 2003
Diamond Systems
www.diamondsystems.com
Corporation. All
rights reserved.
libparsifal
library
Copyright ©
2002-2005 Toni
Uusitalo
released to the
public domain
2002-11-15
http://www.saunalahti.fi/~samiuus/toni/xmlproc/
11. Complete Agreement. This Agreement constitutes the entire agreement between
the parties with respect to the use of the Software and supersedes all prior or
contemporaneous understandings regarding such subject matter. No amendment
to or modification of this Agreement will be binding unless in a writing and
signed by UCAR.
46
Appendix A. WMO/IAEA Experts Meeting Report on AIRCOA
The following short paper briefly describes the AIRCOA instrument and approach. It can be
cited as:
Stephens, B., A. Watt, and G. Maclean, An Autonomous Inexpensive Robust CO2 Analyzer
(AIRCOA). 13th WMO/IAEA Meeting of Experts on Carbon Dioxide Concentration and
Related Tracers Measurement Techniques, WMO TD in press, 2006.
?.?
An Autonomous Inexpensive Robust CO2 Analyzer (AIRCOA)
Britton Stephens, Andrew Watt, Gordon Maclean
?.?.1 Introduction
We present our design of a new autonomous, inexpensive, and robust CO2 analyzer
(AIRCOA), a description of our quality control procedures, and data examples from ongoing
deployments. Our AIRCOA units require less than $10K (USD) in components, can be assembled
and tested in 4 weeks or less, show intercomparability of 0.1 ppm or better during laboratory and field
tests, and run autonomously for months at a time.
Figure 1: Schematic showing the AIRCOA design. Components include three sample air
intakes with rain shields and 30 µm filters (30), mass-flow meters (F), 5 µm filters (5), manual
needle valves, three-way (3) and two-way (2) solenoid valves and manifolds, Nafion driers,
molecular sieve driers, a sample micropump (mp) and purge pump (p), four reference
cylinders, one surveillance cylinder, two-stage pressure regulators, a single-stage pressure
47
regulator (R), a humidity and temperature sensor (RH/T), a PC104 computer running Linux,
PC104 relay and A/D boards, a power supply, and a LiCor 820 single-cell IRGA.
There is a strong motivation to improve atmospheric carbon flux constraints from continental
scales (~10,000 km) to regional scales (~1000 km) so that they can be better related to the underlying
ecosystem processes, land-use histories, and climate forcing. This requires a considerable increase
in the temporal and spatial density of accurate atmospheric CO2 observations, which would be
significantly aided by lowered costs and improved reliability of continuous CO2 analysis systems. As
part of the Carbon in the Mountains Experiment (CME), we developed AIRCOA for the purpose of
observing local scale CO2 gradients across a network of towers at the Niwot Ridge carbon flux site,
and have since begun deploying the same system in a regional CO2 observing network.
Making accurate CO2 measurements requires careful attention to gas handling, numerous
automated quality control diagnostics, and a suite of reference cylinders closely linked to the WMO
CO2 calibration scale. Our approach builds on those of Zhao et al. (1997) and Trivett and Köhler
(1999), but with considerable changes (see Figure 1). AIRCOA is based on a single-cell infrared gas
analyzer (IRGA), which dramatically lowers the cost but increases the short-term noise and instrument
drift rate. We overcome the short-term noise with signal averaging and instrument drift with frequent
calibrations. Additional potential sources of CO2 measurement bias that we address with automated
diagnostics include: incomplete flushing of the sample cell and dead volumes, incomplete drying of the
sample air, IRGA sensitivity to pressure broadening, IRGA sensitivity to temperature, leaks to ambient
air, leaks of calibration gas through solenoid valves, and modification of CO2 concentrations by the
drying system or plastic components (see Table 1).
?.?.2 Instrument Design
As shown in Figure 1, we sample air from three heights on a tower, using inlets consisting of
rain shields, and quartz wool and 30 μm polypropylene filters. The instrument box is generally indoors
in an environment with moderate temperature variability, but in principle it could also be outdoors.
Each inlet stream passes through a mass-flow meter (Honeywell, AWM3000V), and a 5 μm metal filter
and needle valve (Beswick Engineering, CF and MLS series) before reaching a manifold of solenoid
valves (Numatech, TM10 series). A brushless DC diaphragm pump (KNF Neuberger, N89) flushes
the sample lines at 500 to 1000 ml min-1 STP when they are not being analyzed. The one gas
selected by these valves exits through both ends of the manifold and then passes through the first of
two 2.44 m by 2.8 mm ID Nafion driers (Permapure, MD series). A smaller brushless DC diaphragm
pump (KNF Neuberger, NMP015B) then compresses this gas to approximately 55 kPa above ambient
at which point it passes through a second 5 μm metal filter and enters a second solenoid valve
manifold.
Table 1: Potential sources of measurement error and AIRCOA solutions.
Measurement Concern
Solution
Short-term IRGA noise
Incomplete drying of air
Incomplete flushing of cell
Drift in IRGA sensitivity
Inadequate IRGA pressure calibration
Leaks through fittings and valves
Temperature sensitivity of IRGA
Drying system affecting CO2
Other plastics affecting CO2
Average for 100 seconds to get 0.1 ppm precision
Slow flow; two 2.44 m Nafion driers; downstream humidity sensor to verify
Sufficient flow; alternate calibration sequence low-to-high / high-to-low
4-hourly 4-point calibrations and 30-minute 1-point calibrations
Automated 4-hourly pressure sensitivity measurements
Automated 8-hourly positive pressure and 4-hourly ambient pressure checks
Empirical temperature sensitivity smoother from 30-minute 1-point calibrations
Constant flows, pressures, and humidity in Nafions
Minimize changes in pressure drop at inlet
48
Different sensitivity with and without Ar
Fossil CO2 in calibration gases
Regulator temperature effects
System diagnostics and verification
Links to WMO scale
Development of problems in the field
Use calibration gases made with real air
Comparisons to laboratory Siemens Ultramat 6F limit 13C effect to 0.05 ppm
Laboratory tests show effect to be negligible; monitor for anomalous regulators
8-hourly analyses of surveillance gas run through entire inlet/drying system
Laboratory calibration transfer facility; comparison to GMD flasks at NWR
Near real-time data retrieval, processing, diagnostic checking, and display
This second manifold selects either a sample gas or a calibration gas to be analyzed. When
the sample gas is not being analyzed it exits the valve manifold through a needle valve set to maintain
constant pressure in the upstream Nafion drier. The four calibration gases typically span the range
340 to 480 ppm and are stored in high-pressure aluminum cylinders with Ceodeux valves (Scott
Marrin Inc.) and two-stage brass regulators (Scott Specialty, model 14). These regulators are set to
match the pressure in the sample line. We use 10 L high-pressure cylinders which last 12 months at
our flows and calibration frequency. A fifth calibrated high-pressure cylinder stores a long-term
surveillance gas which we run through the entire inlet system and treat as an unknown during
analysis. The regulator on this cylinder is set to approximately 20 kPa above ambient and a needle
valve is used to match sample pressures in the first Nafion drier.
The sample or calibration gas selected for analysis next passes through another 5 μm filter
and a miniature pressure regulator (Beswick Engineering, PRD series) with an output of approximately
30 kPa above ambient. The gas is then dried by a second Nafion drier and reduced in pressure by a
needle-valve (Swagelok, S series) before reaching a single-cell IRGA (LiCor, Li820). We adjust this
needle valve to set the sample flow to 100 ml min-1 STP. After leaving the IRGA, the gas passes
through a 40 μm metal filter, a normally-open needle valve used for leak checking purposes, and a
humidity and temperature sensor (Vaisala, HUMITTER 50Y) used to verify drier performance. We
then completely dry the gas once with 13X molecular sieve to use it as the purge gas on the second
Nafion drier, and dry it a second time to use it as the purge gas on the first Nafion drier. Most of the
moisture in the ambient air exits the first Nafion without ever reaching the mole sieve driers. We use
200 ml molecular sieve driers which last 6 to 12 months depending on outside humidity. The gas
passes through a final mass-flow meter before exhausting to the room. There is little flow impedance
between the Li820 cell and this exhaust such that sample and calibration measurements are both
closely matched to ambient pressure.
49
Figure 2: Measurements (top panels) made by 4 AIRCOA units on 3 days in Broomfield, CO
during July 2005. These units were all in a laboratory with their inlet lines connected to a
common manifold sampling outside air and common calibration cylinders. Comparison of
measurements made by each unit during this period (bottom panels) shown as differences
from the 4-unit median value at each sample time. The means (and 1-sigma standard
deviations) for the 6 pair-wise differences were 0.05 (0.13) ppm or better.
The Li820 measures the pressure, temperature, and CO2 concentration of the gas. It actively
and precisely controls the optical bench to 50 ˚C and has excellent stability with respect to ambient
temperature of around 0.05 ppm/C, which is a factor of 10 better than more expensive LiCor
analyzers. We set the Li820 to use a 0.5 Hz digital filter and report values at 1 Hz. These filtered
values have a 1-sigma rms noise of 0.6 ppm which averages to 0.1 ppm over 100 seconds. We
switch the gas being analyzed every 150 seconds and ignore the first 50 seconds after each switch to
allow for flushing of gases through the system. We then cycle between the three inlet lines on a 7.5
minute schedule. We make a calculation based on measured flows of how long the measured gas
takes to get from the inlet to the sample cell and adjust the times of our reported measurements
accordingly. Every 30 minutes we analyze one of the 4 calibration gases to estimate drift in the Li820
zero offset, while every 4 hours we measure all four calibration gases to estimate linear and 2nd-order
calibration coefficients for the Li820. We alternate the sequence of these 4 gases to look for problems
associated with incomplete flushing of the sample cell and any dead volumes. Every 8 hours we
analyze the long-term surveillance gas.
Every 4 hours we also perform automated system checks to determine the Li820 pressure
sensitivity and to measure system leak rates to ambient at positive pressure and from the solenoid
valves at ambient pressure. We make considerable efforts to minimize and monitor system leaks.
Because of silicone seals in the Li820, plastic fittings on the Nafion driers, viton seals in the solenoid
valves, Nafion driers, and manifolds, and plastic and viton seals in the micropump it is not practical to
completely eliminate them. A leak of calibration gas with a 100 ppm difference from sample air
through the solenoid valves at a rate of 0.1 ml min-1 would result in a 0.1 ppm bias in our
measurements. We set an operational target of 0.015 ml min-1 for the total of all solenoid valve leaks
and an absolute data-rejection cutoff of 0.03 ml min-1. It is more difficult to estimate the effect of
positive-pressure leaks to ambient, but because of the potential for diffusion against flow they are not
negligible. We test at 5 kPa overpressure and use similar target and cutoff rates as for the ambient
leak-up test.
50
Figure 3: Measurements (left) made by 3 AIRCOA units from October 16 through December 30,
2005 in the field in Colorado: at Niwot Ridge (NWR), at Fraser Experimental Forest (FEF), and at
Storm Peak Laboratory (SPL). Only values from the highest intake lines at these sites are
shown. Comparison of surveillance cylinder measurements (right) made by each unit during
this period, shown as differences from their laboratory assigned values. The means (and 1sigma standard deviations) of these differences were -0.08 (0.13), 0.10 (0.10), and -0.01 (0.10)
ppm respectively.
A PC104-based computer running Linux performs automated data acquisition and valve
control. We access this system through a dedicated internet connection and retrieve, process, and
display data and system diagnostics in near real time. If any of the automated diagnostics suggest a
problem, we are then able to perform more detailed troubleshooting interactively. We cannot
overstress the value of this direct connectivity and rapid processing for maintaining the systems and
producing high-quality CO2 measurements.
?.?.3 Results
In a week-long laboratory intercomparison between 4 AIRCOA units all sampling outside air
from a common mixing volume and using common reference cylinders, unit-to-unit differences on
coincident measurements showed 1-sigma variability of 0.13 ppm and systematic biases of 0.05 ppm
or less (see Figure 2). During isolated field operation comparability is more difficult to assess, but we
use 8-hourly analyses of surveillance tanks to estimate performance. We installed three AIRCOA
systems in the field at the start of September 2005. Despite the added complexity of different sets of
calibration gases and larger temperature variations in comparison to the laboratory tests, the units still
perform very well. While periods of systematic bias of up to 0.2 ppm are evident, averaged over a
period of 2.5 months the 1-sigma variability for these three units ranged from 0.10 to 0.13 ppm and the
systematic bias ranged from 0.01 to 0.10 ppm (see Figure 3). This figure also illustrates that the
systems have been operating with relatively few data gaps during their initial deployments. We are
working closely with other investigators developing and deploying similar single-cell IRGA based
systems, as well as investigators deploying longer-established but more expensive technologies, in an
effort to improve the intercomparability between independent observing networks.
References
Trivett, N., and A. Köhler (1999), Guide on sampling and analysis techniques for chemical constituents and
physical properties in air and precipitation as applied at stations of the Global Atmosphere Watch. Part
1: Carbon Dioxide, WMO TD No. 980.
Zhao, C.L., P.S. Bakwin, and P.P. Tans (1997), A design for unattended monitoring of carbon dioxide on a very
tall tower, J. Atm. Oc. Tech., 14, 1139-1145.
51
Appendix B. Valve Switching Sequence
The following pages contain information on the default 3 inlet and 5 inlet valve
switching schedules. These schedules are selected in the file
/home/isff/aircoa.sh by using one of these two lines:
args="-r relays3.txt relays3 -x li820.xml -t /dev/ttyS2 -R 1 -a
/data/aircoa ai_%y%m%d_%H%M%S.dat 28800"
args="-r relays5.txt relays5 -x li820.xml -t /dev/ttyS2 -R 1 -a
/data/aircoa ai_%y%m%d_%H%M%S.dat 28800"
The file /home/isff/aircoa/relays*.txt sets the broad schedule and calls the file
/home/isff/aircoa/sequences*.txt for details on the individual sequences. This file
in turn calls the file /home/isff/aircoa/settings*.txt for the relay configuration under
each setting (see Section 4 above). The last column of hexadecimal values in
the component tables correspond to those reported by the program and can be
converted into a binary number indicating which relays are turned on. For
example, hexadecimal 2044 equals binary 10000001000100 indicating that
relays 13, 6, and 2 are turned on.
52
3 inlet line schedule:
COMPONENT
BASE LOOP
ZERO CAL1
BASE LOOP
ZERO CAL2
BASE LOOP
ZERO CAL3
BASE LOOP
ZERO CAL4
BASE LOOP
ZERO CAL1
BASE LOOP
ZERO CAL2
BASE LOOP
FULL CAL1
BASE LOOP
ZERO CAL3
BASE LOOP
ZERO CAL4
BASE LOOP
ZERO CAL1
BASE LOOP
ZERO CAL2
BASE LOOP
ZERO CAL3
BASE LOOP
ZERO CAL4
BASE LOOP
FULL CAL2
ITERATIONS
DURATION
(min)
4
1
4
1
4
1
4
1
4
1
4
1
4
1
4
1
4
1
4
1
4
1
4
1
4
1
4
1
30
2.5
30
2.5
30
2.5
30
2.5
30
2.5
30
2.5
30
15
30
2.5
30
2.5
30
2.5
30
2.5
30
2.5
30
2.5
30
15
START TIME
0:00:00
0:30:00
0:32:30
1:02:30
1:05:00
1:35:00
1:37:30
2:07:30
2:10:00
2:40:00
2:42:30
3:12:30
3:15:00
3:45:00
4:00:00
4:30:00
4:32:30
5:02:30
5:05:00
5:35:00
5:37:30
6:07:30
6:10:00
6:40:00
6:42:30
7:12:30
7:15:00
7:45:00
53
8:00:00
8:30:00
8:32:30
9:02:30
9:05:00
9:35:00
9:37:30
10:07:30
10:10:00
10:40:00
10:42:30
11:12:30
11:15:00
11:45:00
12:00:00
12:30:00
12:32:30
13:02:30
13:05:00
13:35:00
13:37:30
14:07:30
14:10:00
14:40:00
14:42:30
15:12:30
15:15:00
15:45:00
16:00:00
16:30:00
16:32:30
17:02:30
17:05:00
17:35:00
17:37:30
18:07:30
18:10:00
18:40:00
18:42:30
19:12:30
19:15:00
19:45:00
20:00:00
20:30:00
20:32:30
21:02:30
21:05:00
21:35:00
21:37:30
22:07:30
22:10:00
22:40:00
22:42:30
23:12:30
23:15:00
23:45:00
3 inlet line schedule components:
LEVEL/TANK/VALVE
RELAY NUMBER
line
1
line
2
line
3
LT
Air
LS2
LS1
HS1
HS2
Guest
Cal
Leak
Check
Micro
Pump
0
1
2
3
6
7
8
9
10
11
12
13
HEX
off
off
ON
off
ON
off
off
off
off
off
off
ON
2044
DURATION (sec)
BASE LOOP
3 x 2.5-min.
150
measurements
150
off
ON
off
off
ON
off
off
off
off
off
off
ON
2042
150
ON
off
off
off
ON
off
off
off
off
off
off
ON
2041
ZERO CAL1
2.5-min. LS2 cal.
150
ON
off
off
off
off
ON
off
off
off
off
off
ON
2081
ZERO CAL2
2.5-min. LS1 cal.
150
ON
off
off
off
off
off
ON
off
off
off
off
ON
2101
ZERO CAL3
2.5-min. HS1 cal.
150
ON
off
off
off
off
off
off
ON
off
off
off
ON
2201
ZERO CAL4
2.5-min. HS2 cal.
150
ON
off
off
off
off
off
off
off
ON
off
off
ON
2401
FULL CAL1
4 x 2.5-min. cal.
150
ON
off
off
off
off
ON
off
off
off
off
off
ON
2081
(10 min. total)
150
ON
off
off
off
off
off
ON
off
off
off
off
ON
2101
150
ON
off
off
off
off
off
off
ON
off
off
off
ON
2201
150
ON
off
off
off
off
off
off
off
ON
off
off
ON
2401
Low P Leakcheck
30
ON
off
off
off
off
off
off
off
off
ON
off
ON
2801
(2.5 min)
120
ON
off
off
off
off
off
off
off
off
off
ON
ON
3001
2.5-min. LT meas.
150
off
off
off
ON
ON
off
off
off
off
off
off
ON
2048
4 x 2.5-min. cal.
150
ON
off
off
off
off
off
off
off
ON
off
off
ON
2401
(10 min. total)
150
ON
off
off
off
off
off
off
ON
off
off
off
ON
2201
150
ON
off
off
off
off
off
ON
off
off
off
off
ON
2101
150
ON
off
off
off
off
ON
off
off
off
off
off
ON
2081
Low P Leakcheck
30
ON
off
off
off
off
off
off
off
off
ON
off
ON
2801
(2.5 min)
120
ON
off
off
off
off
off
off
off
off
off
ON
ON
3001
High P Leakcheck
30
off
off
off
ON
ON
off
off
off
off
off
ON
off
1048
(2.5 min)
120
off
off
off
off
ON
off
off
off
off
off
ON
off
1040
FULL CAL2
54
5 inlet line schedule:
COMPONENT
ITERATIONS
DURATION
(min)
BASE LOOP
ZERO CAL1
BASE LOOP
ZERO CAL2
BASE LOOP
ZERO CAL3
BASE LOOP
B. LOOP NO 1
ZERO CAL4
BASE LOOP
ZERO CAL1
BASE LOOP
ZERO CAL2
BASE LOOP
FULL CAL1
BASE LOOP
ZERO CAL3
BASE LOOP
ZERO CAL4
BASE LOOP
ZERO CAL1
BASE LOOP
B. LOOP NO 1
ZERO CAL2
BASE LOOP
ZERO CAL3
BASE LOOP
ZERO CAL4
BASE LOOP
FULL CAL2
3
1
2
1
2
1
2
1
1
2
1
2
1
3
1
3
1
2
1
2
1
2
1
1
2
1
2
1
3
1
37.5
2.5
25
2.5
25
2.5
25
10
2.5
25
2.5
25
2.5
37.5
15
37.5
2.5
25
2.5
25
2.5
25
10
2.5
25
2.5
25
2.5
37.5
15
START TIME
0:00:00
0:37:30
0:40:00
1:05:00
1:07:30
1:32:30
1:35:00
2:00:00
2:10:00
2:12:30
2:37:30
2:40:00
3:05:00
3:07:30
3:45:00
4:00:00
4:37:30
4:40:00
5:05:00
5:07:30
5:32:30
5:35:00
6:00:00
6:10:00
6:12:30
6:37:30
6:40:00
7:05:00
7:07:30
7:45:00
55
8:00:00
8:37:30
8:40:00
9:05:00
9:07:30
9:32:30
9:35:00
10:00:00
10:10:00
10:12:30
10:37:30
10:40:00
11:05:00
11:07:30
11:45:00
12:00:00
12:37:30
12:40:00
13:05:00
13:07:30
13:32:30
13:35:00
14:00:00
14:10:00
14:12:30
14:37:30
14:40:00
15:05:00
15:07:30
15:45:00
16:00:00
16:37:30
16:40:00
17:05:00
17:07:30
17:32:30
17:35:00
18:00:00
18:10:00
18:12:30
18:37:30
18:40:00
19:05:00
19:07:30
19:45:00
20:00:00
20:37:30
20:40:00
21:05:00
21:07:30
21:32:30
21:35:00
22:00:00
22:10:00
22:12:30
22:37:30
22:40:00
23:05:00
23:07:30
23:45:00
5 inlet line schedule components:
LEVEL/TANK/VALVE
ln 1
ln 2
ln 3
ln 4
ln 5
LT
Air
LS2
LS1
HS1
HS2
Guest Cal
Leak Check
Micro Pump
RELAY NUMBER
0
1
2
3
4
5
6
7
8
9
10
11
12
13
HEX
DURATION (sec)
BASE LOOP
5 x 2.5-min.
150
off
off
off
off
ON
off
ON
off
off
off
off
off
off
ON
2050
measurements
150
off
off
off
ON
off
off
ON
off
off
off
off
off
off
ON
2048
150
off
off
ON
off
off
off
ON
off
off
off
off
off
off
ON
2044
150
off
ON
off
off
off
off
ON
off
off
off
off
off
off
ON
2042
150
ON
off
off
off
off
off
ON
off
off
off
off
off
off
ON
2041
off
off
off
off
ON
2081
ZERO CAL1
2.5-min. LS2 cal.
150
ON
off
off
off
off
off
off
ON
off
ZERO CAL2
2.5-min. LS1 cal.
150
ON
off
off
off
off
off
off
off
ON
off
off
off
off
ON
2101
ZERO CAL3
2.5-min. HS1 cal.
150
ON
off
off
off
off
off
off
off
off
ON
off
off
off
ON
2201
ZERO CAL4
2.5-min. HS2 cal.
150
ON
off
off
off
off
off
off
off
off
off
ON
off
off
ON
2401
FULL CAL1
4 x 2.5-min. cal.
150
ON
off
off
off
off
off
off
ON
off
off
off
off
off
ON
2081
(10 min. total)
150
ON
off
off
off
off
off
off
off
ON
off
off
off
off
ON
2101
150
ON
off
off
off
off
off
off
off
off
ON
off
off
off
ON
2201
150
ON
off
off
off
off
off
off
off
off
off
ON
off
off
ON
2401
Low P Leakcheck
30
ON
off
off
off
off
off
off
off
off
off
off
ON
off
ON
2801
(2.5 min)
120
ON
off
off
off
off
off
off
off
off
off
off
off
ON
ON
3001
2.5-min. LT meas.
150
off
off
off
off
off
ON
ON
off
off
off
off
off
off
ON
2060
4 x 2.5-min. cal.
150
ON
off
off
off
off
off
off
off
off
off
ON
off
off
ON
2401
(10 min. total)
150
ON
off
off
off
off
off
off
off
off
ON
off
off
off
ON
2201
150
ON
off
off
off
off
off
off
off
ON
off
off
off
off
ON
2101
150
ON
off
off
off
off
off
off
ON
off
off
off
off
off
ON
2081
Low P Leakcheck
30
ON
off
off
off
off
off
off
off
off
off
off
ON
off
ON
2801
(2.5 min)
120
ON
off
off
off
off
off
off
off
off
off
off
off
ON
ON
3001
High P Leakcheck
30
off
off
off
off
off
ON
ON
off
off
off
off
off
ON
off
1060
(2.5 min)
120
off
off
off
off
off
off
ON
off
off
off
off
off
ON
off
1040
4 x 2.5-min.
150
off
off
off
off
ON
off
ON
off
off
off
off
off
off
ON
2050
measurements
150
off
off
off
ON
off
off
ON
off
off
off
off
off
off
ON
2048
150
off
off
ON
off
off
off
ON
off
off
off
off
off
off
ON
2044
150
off
ON
off
off
off
off
ON
off
off
off
off
off
off
ON
2042
FULL CAL2
B. LOOP NO 1
56
Appendix C. AIRCOA Parts Lists
General:
Item
1
2
3
4
5
6
7
8
9
10
11
12
13
14
15
16
17
18
19
20
21
22
23
24
25
26
27
28
29
30
31
32
33
34
35
36
37
Total
Manufacturer/Vendor
Air Liquide
Part number
Cat # 1001
Scott Marrin, Inc.
Scott Marrin, Inc.
LiCor, Inc.
Advantec MFS, Inc.
Millipore
Hardware store
Valco
KNF
KNF
Numatics
Numatics
Numatics
Numatics
Beswick
Perma Pure
Honeywell
ExpressPCB
Vaisala
Jameco
Diamond Systems
Diamond Systems
Diamond Systems
Diamond Systems
Diamond Systems
Diamond Systems
Diamond Systems
Diamond Systems
e.g., Memorex
Scott Specialty
05-NIP-50B-56
05-NUT-590B
LI-820
Cat # A-06623-22
Cat # AN3H04700
Vynckier
Custom
McMaster-Carr
McMaster-Carr
McMaster-Carr
RVJ1614HWPL2
TSS285
N89 KNDC B
NMP015B
TM101V12C2
51030106
62030002
51030101
PRD-3N1-0-VIX
MD-110-96F-4
AWM3300V
Custom
HMP50 YAB1A1A
123334
PR-Z32-EA-ST
IR104
Jupiter-MM-LP
C-PRZ-01
C-PRZ-02
698012
FD-32-XT
SPC104
16053-44R-22
Description
Model 14 Regulator, 2 stage, 0-10 psi,
no CGA, qty. 25 volume discount
Brass CGA-590 nipple
Brass CGA 590 nut
CO2 Analyzer (qty. 3-5 3% discount)
In-line 47mm filter holder, polypro.
Polypro. prefilters, 30 um x 47 mm dia.
Funnel to fit Item 6, filter holder
1/8" o.d., 0.085" i.d. stainless tubing
Tower intake pump – brushless DC
Sample pump
Solonoid valves
Solonoid manifold, 6 station
24" leads for valves
Solonoid manifold, 1 station leak check
Miniature regulator
Nafion Driers
Mass flow meter, 0-1000 mL/min
Interconnect Board
Humidity/temperature sensor
12 V, 60 W power supply
Prometheus PC/104 CPU
IR104 relay, optoislated inputs
25 watt, +5 volt output
Cable Assy, PR-Z32 Breakout
Cable Assy, PR-Z32 Ethernet
Cable, USB Dual to 10-pin header
Flashdisk Module
PC104 spacers
USB memory stick, 512 Mb
Mol Sieve Moisture Trap, 13X w/ 4A
indicator, 200 mL, 1/8" fittings
Enclosure -- Fiberglass, w/ back panel
Mounting panels
Tower pump vibration isolators
Micropump vibration isolators
4-40 bolts and nuts
Fittings from other sheet
Electrical from other sheet
57
Qty
6
Price
$ 250.00
Total
$ 1,500
6
6
1
5
0.05
5
10
1
1
13
2
13
1
1
2
7
1
1
1
1
1
1
1
1
1
1
18
1
3
$
4.00
$
3.00
$3,014.94
$ 25.97
$ 53.05
$
0.89
$
2.75
$ 302.00
$ 234.00
$ 18.00
$ 43.67
$
2.05
$ 11.22
$ 68.05
$ 299.50
$ 87.94
$ 46.88
$ 290.00
$ 53.95
$ 700.00
$ 270.00
$ 100.00
$ 15.00
$ 15.00
$ 15.00
$ 65.00
$
0.40
$ 60.00
$ 129.00
$
$
$
$
$
$
$
$
$
$
$
$
$
$
$
$
$
$
$
$
$
$
$
$
$
$
$
$
$
24
18
3,015
130
3
4
28
302
234
234
87
27
11
68
599
616
47
290
54
700
270
100
15
15
15
65
7
60
387
1
3
4
2
100
$ 115.00
$
$
$
$
$
$
$
$
115
153
15
7
6
610
162
9,993
$
$
$
3.77
3.59
0.06
Web Page
http://www.airliquide.com/en/business/indu
stry/laboratories/equipment/equipment.asp
http://www.scottmarrin.com/
http://www.scottmarrin.com/
http://www.licor.com/env/Products
http://www.coleparmer.com/
http://www.millipore.com/
http://www.vici.com/tube/cust_met.htm
http://www.knf.com/pdfs/nmp010.pdf
http://www.knf.com/pdfs/n84_89.pdf
http://www.numatech.com
http://www.numatech.com
http://www.numatech.com
http://www.numatech.com
http://www/beswick.com
http://www.permapure.com
http://catalog.sensing.honeywell.com
http://www.expresspcb.com/
http://vaisala.com
http://www.jameco.com
http://www.diamondsystems.com/
http://www.diamondsystems.com/
http://www.diamondsystems.com/
http://www.diamondsystems.com/
http://www.diamondsystems.com/
http://www.diamondsystems.com/
http://www.diamondsystems.com/
http://www.diamondsystems.com/
http://www.scottgas.com/
http://www.enclosuresonline.com
Fittings:
description
1/8" x 1/4" reducer
1/4" female NPT x 1/4" sw. female elbow
1/4" bulkhead fittings, stainless
1/4" bulkhead retainer,ss
MFM o-rings
1/8" x 1/4" reducer
1/8" x 10-32 compression fitting
10-32 5 micron filter
1/8" needle valves
10-32 hex extension
10-32 plug
1/8" tubing to 10-32 thr. Elbow
1/8" male NPT x 1/8" sw. male elbow
1/8" male NPT x 1/4" tubing
union tee, 1/8"
reducer, 1/8" x 1/4"
insert for 1/4" plastic tubing
reducing union, 1/4" x 1/8"
1/8" male NPT x 1/8" sw. male connector, ss
1/8" bulkhead,ss
1/8" bulkhead retainer,ss
1/8" plug
1/8" tubing to 10-32 thr. Elbow
10-32 5 micron filter
10-32 plug
1/8" needle valve
1/8" x 10-32 compression fitting
union tee, 1/8"
1/8" tubing to 10-32 thr. Elbow
1/8" x 10-32 compression fitting
reducer, 1/8" x 1/4"
1/8" needle valves, S series
1/8" port connnector
insert for 1/4" plastic tubing
reducing union, 1/4" x 1/8"
1/8" tubing to 10-32 thr. Elbow
10-32 plug
reducer, 1/8" x 1/2"
1/2" union tee
arbor, 1/2" teflon ferrules
reducer, 1/8" x 1/4"
reducer, 1/8" x 1/4"
part number
SS-400-R-2
B-400-8-4
SS-400-61
S-402-61F
2-106 VITON-7
B-400-R-2
MCB-1018-V
CF-1010-05-V
MLS-MV-1010-K-V
MEB-1010-1-V
MSP-1000-V
MCBL-1018-TALL-V
B-200-2-2
B-4-TA-1-2
B-200-3
B-200-R-4
B-405-2
B-400-6-2
SS-200-1-2
SS-200-61
S-202-61F
NY-200-P
MCBL-1018-TALL-V
CF-1010-05-V
MSP-1000-V
MLS-MV-1010-K-V
MCB-1018-V
B-200-3
MCBL-1018-TALL-V
MCB-1018-V
B-200-R-4
B-SS2
B-201-PC
B-405-2
B-400-6-2
MCBL-1018-TALL-V
MSP-1000-V
B-200-R-8
B-810-3
TFE-810-Sets-10
B-200-R-4
B-200-R-4
qty
1
5
6
6
12
6
6
6
7
6
1
3
1
1
1
2
2
2
4
5
5
1
8
7
1
1
1
1
1
1
2
1
1
2
2
2
3
2
1
0.1
2
1
supplier
DV&F
DV&F
DV&F
DV&F
Rocket Seals
DV&F
Beswick
Beswick
Beswick
Beswick
Beswick
Beswick
DV&F
DV&F
DV&F
DV&F
DV&F
DV&F
DV&F
DV&F
DV&F
DV&F
Beswick
Beswick
Beswick
Beswick
Beswick
DV&F
Beswick
Beswick
DV&F
DV&F
DV&F
DV&F
DV&F
Beswick
Beswick
DV&F
DV&F
DV&F
DV&F
DV&F
58
$/each
$ 9.30
$ 5.30
$ 12.50
$ 0.70
$ 0.41
$ 2.40
$ 1.68
$ 2.63
$ 14.50
$ 1.08
$ 0.66
$ 5.38
$ 4.00
$ 1.60
$ 6.50
$ 2.30
$ 0.60
$ 2.80
$ 5.70
$ 17.20
$ 0.70
$ 2.40
$ 5.38
$ 2.63
$ 0.66
$ 14.50
$ 1.68
$ 6.50
$ 5.38
$ 1.68
$ 2.40
$ 46.30
$ 1.30
$ 0.60
$ 2.80
$ 5.38
$ 0.66
$ 7.20
$ 11.10
$ 3.05
$ 2.30
$ 2.30
TOTAL
Total
$
9.30
$
26.50
$
75.00
$
4.20
$
4.92
$
14.40
$
10.08
$
15.78
$ 101.50
$
6.48
$
0.66
$
16.14
$
4.00
$
1.60
$
6.50
$
4.60
$
1.20
$
5.60
$
22.80
$
86.00
$
3.50
$
2.40
$
43.04
$
18.41
$
0.66
$
14.50
$
1.68
$
6.50
$
5.38
$
1.68
$
4.80
$
46.30
$
1.30
$
1.20
$
5.60
$
10.76
$
1.98
$
14.40
$
11.10
$
0.31
$
4.60
$
2.30
$ 610.36
Location
From LT regulator into 1/4" bhf
Top of tower
into housing
For tower entry bulkheads
for MFMs
out of mfm
into needle valve
into needle valve
to adjust sample flow and purge flow
into sample manifold
to plug sample manifold
in and out of sample manifold
in to tower pump
out of tower pump
from either side of the manifold to 1st Nafion
into and out of 1st Nafion
in and out of micropump
in and out of micropump
Out of cal tank regulators
For cal tanks
For cal tanks
To plug guest cal bhf
into and out of cal valve manifold
into cal valve manifold and regulator
to plug cal manifold
to adjust sample bypass flow
out of needle valve
from either side of the manifold to regulator
into regulator
out of regulator
into and out of 2nd Nafion
Licor flow adjustment
into Licor
in and out of Licor
into Licor
in and out of leak check valve
plugs for leak check manifold
to increase and reduce for HUMITTER
for HUMITTER
for HUMITTER
into and out of 2nd Nafion purge
into and out of 1st Nafion purge
Electrical:
Item #
1
2
3
4
5
6
7
8
9
10
11
12
13
14
15
16
17
18
19
20
21
22
23
24
25
26
27
28
29
30
31
32
33
34
35
Vendor
Newark
Newark
Newark
Newark
Digi-Key
Newark
Newark
Newark
Newark
Newark
Newark
Newark
Newark
Newark
Newark
Newark
Newark
Newark
Newark
Newark
Newark
Newark
Newark
Newark
Newark
Newark
Newark
Newark
Newark
Newark
Newark
Digi-Key
Newark
Newark
Newark
Manufacturer
Molex
Molex
Molex
Molex
Molex
Molex
Molex
Molex
Molex
Molex
Molex
Molex
Molex
Amp
Amp
Amphenol
Amp
Amp
Amp
Amp
Amp
Amp
Amp
Amp
Amp
Amp
Alpha Wire
Alpha Wire
Alpha Wire
Part number
38C9955
38C9956
38C9957
50F2064
A26304-ND
50F2067
38C9863
38C9864
25C5453
35C5018
90F4757
90F4759
90F4760
90F4539
90F4138
27F592
27F882
07F7478
09F3574
33C4436
89F1466
48F1669
92F7919
44F8388
95F1798
96F7920
46F1142
92F4851
46F1144
50F516
90F7240
Q123-ND
92F9994
92F9983
92F9329
Description
Connection header, 2 position
Connection header, 3 position
Connection header, 4 position
Connection header, 10 position
Connection header, 16 position
Connection header, 20 position
Connection housing, 2 position
Connection housing, 3 position
Connection housing, 4 position
Pins for above
Connection housing, 10 position
Connection housing, 16 position
Connection housing, 20 position
Connection housing, 50 position
Pins for above
Fuse holder
5 A fuse for above
5 V voltage regulator, LM7805
Diode, 1N4001
Capacitor, CK05BX104K
D-sub 9 pin connector, socket contacts
9-pin CPC, square flanged
Pins for above
9-pin CPC, plug
Heat shrinkable boot for above
Sockets for above
3-pin CPC, square flanged
Pins for above
3-pin CPC, plug
Heat shrinkable boot for above
Sockets for above
Line cords
White hook up wire, 22 ga
Black hook up wire, 22 ga
Red hook up wire, 22 ga
59
Qty
22
7
1
1
1
1
18
14
1
75
1
1
1
1
56
1
1
2
20
2
1
2
4
1
1
4
1
3
1
1
3
1
20
20
20
Price
$ 0.55
$ 0.81
$ 0.90
$ 1.78
$ 2.33
$ 5.87
$ 0.58
$ 0.40
$ 0.56
$ 0.09
$ 1.71
$ 1.54
$ 1.76
$ 4.51
$ 0.27
$ 2.17
$ 0.44
$ 0.59
$ 0.03
$ 0.22
$ 1.58
$ 2.55
$ 0.44
$ 2.40
$ 7.10
$ 0.52
$ 2.35
$ 7.14
$ 2.99
$ 6.98
$ 7.77
$ 3.26
$ 0.02
$ 0.02
$ 0.02
TOTAL
Total
$
12.01
$
5.64
$
0.90
$
1.78
$
2.33
$
5.87
$
10.39
$
5.57
$
0.56
$
6.90
$
1.71
$
1.54
$
1.76
$
4.51
$
14.90
$
2.17
$
0.44
$
1.19
$
0.54
$
0.43
$
1.58
$
5.09
$
1.76
$
2.40
$
7.10
$
2.10
$
2.35
$
21.42
$
2.99
$
6.98
$
23.31
$
3.26
$
0.30
$
0.30
$
0.30
$ 162.36
Appendix D. Recommended Field Equipment
For initial deployment
For tool box
Spare parts
AIRCOA unit
stand
Cal and LT cylinders
Regulators
1/8" stainless tubing
Power cable and
Extension cord
Ethernet cable
Hub (if needed)
Laptop/palmtop and serial
cable
Tool box
Funnels
Filter holder, with fitting
Filter paper
Synflex
Cable ties
Hard soled shoes
Climbing rope and harness
1.5' 2 x 4's
Lag bolts
Drill and bit, lag pilot and
tubing penetration
Cylinder straps
I-bolts
Surge protector
Ethernet surge protector
Hose clamps for grounding
Sign for door
Box of wood screws
10' extension cord
Leatherman
Needlenose pliers
Wire strippers
Soldering Iron and solder
Wrenches, 1/4, 5/16, 3/8,
7/16 x 21, 1/2 x 2, 9/16,
5/8, 11/16
Adjustable wrenches x 2
Cylinder wrench
Cylinder valve wrench
Misc slotted screwdrivers
Misc Phillips screwdrivers
Set allen wrenches
Synflex tubing cutter
Stainless tubing cutter
Tubing reamers
Flashlight
Tape measure
Mirror
Scalpel
Awl
Socket set, 1/4"
Misc. small files
Chapman set
Voltmeter
7/16"nut driver
Shovel for burying tubing
Caulk and gun
Purge flow adjust jig
Tune-up worksheets
Snoop
Crimpers and extra crimp
pins
LI820 Cleaning Kit
Pens
Sharpies
Pump for leak checks
Teflon tape
Crimpers for RJ-45
Camera
Camera batteries
Serial cable
Colored tape
Gender benders DB9
1/4" Synflex (~2')
1/8" tubing x 2
Honeywell AWM3300 x 3
N89 KNDC brushless
sample pump
NMP015B micropump
Prometheus
Humitter
Numatech solenoid x 4
Numatech blank-off kit
Beswick filter and needle
valve
Beswick plugs
Selection of Swagelok
fittings and ferrules,
including tees
Selection of Beswick
fittings and ferrules
Brass insert for
compression fittings
Heat shrink tubing
Beswick regulator
MFM o-rings x 2
Labbook
5 A fuses x 4
Pins for Amphenol
connectors
Pins for Amp connnectors
Pins for Molex
connnectors
Humitter pin-outs
Interconnect board
schematic
Cal sheet for AWM's
RJ-45 plugs
Nafion x 2
Nafion caps x 8
Glass wool
Length of bev-a-line
Power supply
1/4" ultratorr fittings for
bypass
LI-840 for humidity
problems
Isolation mounts for both
pumps
Spare pen drive
Spare ultra torr o-rings
60
Appendix E. Interconnect Board Schematics
61
62
63
Appendix F. List of Additional Technical Documents
The following documents are provided separately as reference material on
individual components of the AIRCOA system:
1) HMP50 Manual - 2004 Dec.pdf (Honeywell documentation on RH/T sensor)
2) KNF N84_89.pdf (KNF documentation on N89 tower pump)
3) KNF NMP015.pdf (KNF documentation on sample pump)
4) KNF NMP850.pdf (KNF documentation on N850 low-power tower pump)
5) Meanwell Power Supply.PDF (documentation on 12 V DC power supply)
6) numatech TM.pdf (schematics of TM10 solenoid valves)
7) IR104Manual.pdf (manual for relay board)
8) Prometheus Manual, v1.44.pdf (Diamond Systems manual for instrument
computer)
9) LI820Manual.pdf (Li-Cor manual for CO2 sensor)
64