1
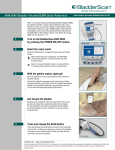
CLINICAL DIVISION Policy and Procedure To: Clinical Personnel From: Valerie Favata, RN, MSN, and Chief Nursing Officer Subject: Bladder Scanner (BladderScan BVI 9400) Purpose: Provide guidelines for the use of the BladderScan BVI 9400 Category C Statement of Policy: Ultrasound Bladder scanning is a non invasive procedure that measures urinary bladder volume. It uses ultrasonic reflections within the patient’s body to differentiate the urinary bladder from surrounding tissue and create a three dimensional ultrasound image of the bladder. Based on this image, the BladderScan automatically calculates and displays the bladder volume. This procedure may be performed by nursing staff trained in the use of the bladder scanner Indications for Use: The Bladder scanner may be used to assess for the following: Measurement of post-void residual bladder volume Evaluation and diagnosis of urinary retention Determination of need to catheterize following the discontinuation of a Foley catheter or during an intermittent catheterization schedule Verification that a Foley catheter is draining properly Verification of an empty bladder Checking for bladder over distention Monitoring a patients’ hydration status Instructions for Use: 1. Assemble the proper equipment: The BladderScan is kept in the Clinical Nursing Supervisors’ office and may be obtained by calling the Nursing Supervisor. Other supplies needed: ultrasound gel, tissues and alcohol preps. 2. Turn on the BladderScan by pressing the On/Off button. 3. Make sure the probe is plugged in and the battery is adequately charged. 4. Explain the procedure to the patient to their level of understanding. 5. If the patient is being scanned for post void residual have the patient void 10 to 15 minutes before the test is performed. 6. Have the patient lie flat and remain still with their head elevated on a pillow. 7. Position the BladderScan so that the screen is easily viewed. 8. Expose the patients’ lower abdomen. The bladder lies in the pelvis directly behind the symphysis pubis. 9. Before using the probe, clean the rounded end by wiping it with an alcohol prep. 10. Select the appropriate gender on the BladderScan. If the female patient has not had a hysterectomy, press the FEMALE button. For all other patients (male or female), press the FEMALE button again to clear the gender icon from the LCD screen. 11. Palpate the patient’s symphysis pubis. Place and ample quantity of gel (with as few air bubbles as possible) midline on the patient’s abdomen, approximately on inch above the symphysis pubis. 12. Standing at the patient’s right side, place the probe on the gel pad and aim toward the expected location of the bladder. For most patients, this means tilting the probe slightly toward the coccyx so the scan clears the pubic bone. Page | 1 Bladder Ultrasound – BladderScan policy and procedure 13. Press the SCAN button, located on the underside of the probe. As the scan progresses, sections of the bladder will appear on the console screen. When you hear the end-scan tone, the scan is complete. 14. If the scan is “on target” all 8 arrows will flash on the probe screen and the bladder will be shown in the center of the crosshairs on the console screen. Since no re-aiming is needed no arrows will appear on the console screen. 15. If the scan is “off target” the probe will show an arrow indicating the direction to move the probe to be “on target”. If the arrow is solid, it means you are slightly “off target”. If the arrow is flashing, it means you are significantly “off target” and must re-aim and rescan. On the console, the bladder will not be on the crosshairs and there will be an arrow pointing in the direction for re-aiming. 16. You may also see a screen that indicates the pubic bone is “inside” the ultrasound cone. If this occurs, you may want to re-aim and re-scan. Although the bladder may be shown as centered in the ultrasound cone, and your measurement could be complete, there is a possibility that the pubic bone is obscuring some of the bladder. 17. To save the exam, you must annotate it. Tao annotate, press and prelease the RECORD button on the console. When you see the RECORD button icon turn to a STOP button icon, record your patient information by speaking into the probe microphone. Press the STOP button on the console. When the hourglass icon disappears, press the LISTEN button to replay the annotation. To review the images of your scan, press the REVIEW button (you must save the exam before you can review it.). 18. To print exam results via the on-board printer, press the PRINT button. To perform another exam, press the HOME button. 19. Once the scan is completed wipe the ultrasound gel off the patient. Troubleshooting: 1. Device will not turn on: Usually due to a dead battery. This can be remedied by replacing the battery. Contact the Bio-Med department for assistance. 2. Printer will not function: Usually due to printer paper depletion. There will be an “out of paper” screen displayed when the printer is out of paper. Please see the user manual for directions on how to change paper. 3. Too Hot: The BladderScan may display a “too hot” message. In this case turn the BladderScan off. This may be a result of a paper jam. Contact the Bio-med department. Proper Care and Maintenance: 1. Use a soft cloth dampened with isopropyl alcohol (or an appropriate hospital cleaning agent) to wipe the probe until it is thoroughly cleaned. 2. Do not immerse the instrument in disinfectant solution, use CidexPlus, or subject any part of the instrument to steam sterilization. Patient/Family Teaching: 1. Educate the patient/family to the level of their understanding the procedure and reason for measuring bladder volume. Page | 2 Bladder Ultrasound – BladderScan policy and procedure Documentation: 1. Documentation should include reason for use and findings. 2. Documentation of patient/family education and their level of understanding. References: Urological Health in the Acute Care Setting, Verathon 2007, BladderScan In-Service Traning ________________ Date __________________________________________________ Valerie Favata RN, MSN, Chief Nursing Officer MAP Orig: 12/23/11 Page | 3