1
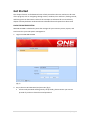
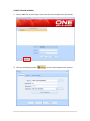
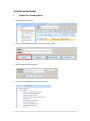
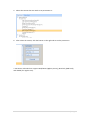
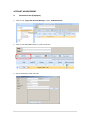
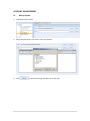
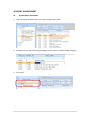
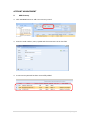
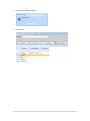
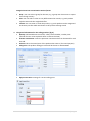
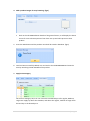
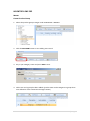
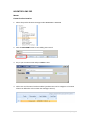
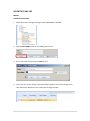
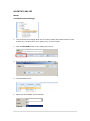
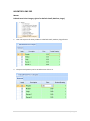
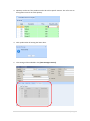
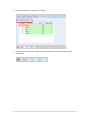
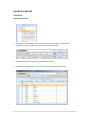
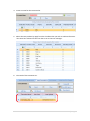
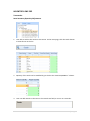
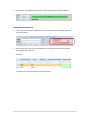
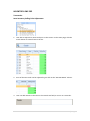
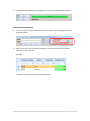
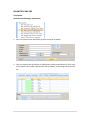
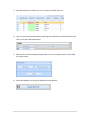
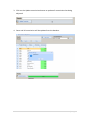
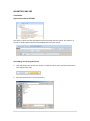
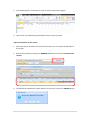
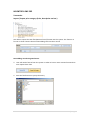
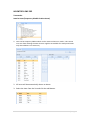
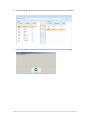
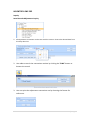
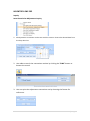
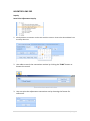
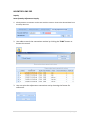
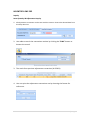
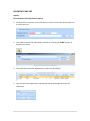
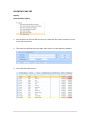
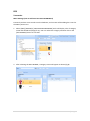
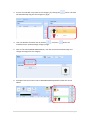
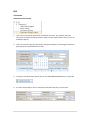
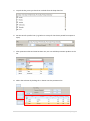
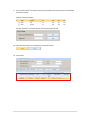
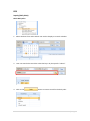
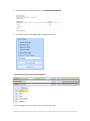
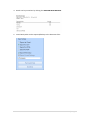
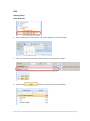
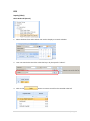
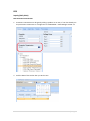
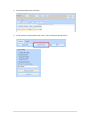
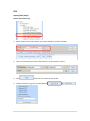
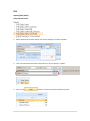
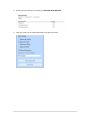
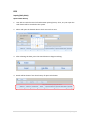
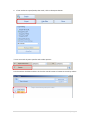
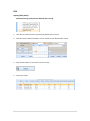
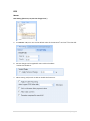
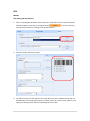
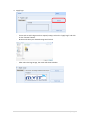
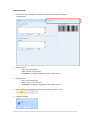
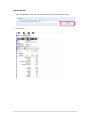
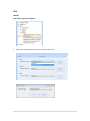
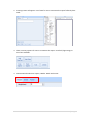
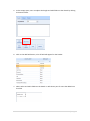
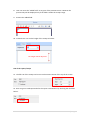
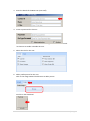
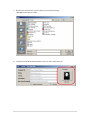
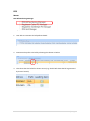
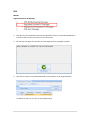
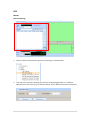
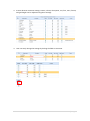
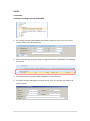
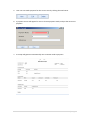
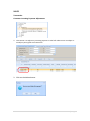
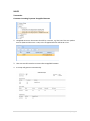
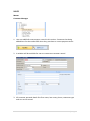
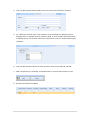
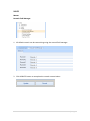
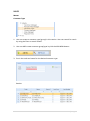
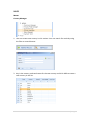
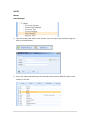
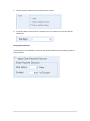
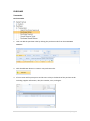
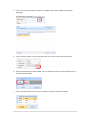
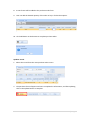
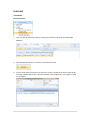
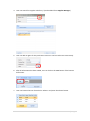
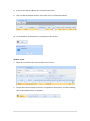
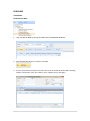
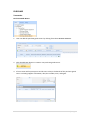
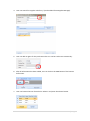
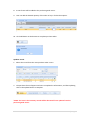
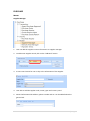
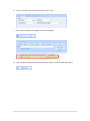
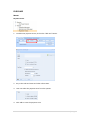
This user manual provides a brief introduction of the ONE ERP SYSTEM. ONE ERP SYSTEM USER MANUAL POS MY IT SOLUTION Latest update on: 20/11/12 TABLE OF CONTENTS CHAPTER 1 - GET STARTED Login Into Account ..............................................................................................................4 Update to New Version .......................................................................................................5 Account management i) Create User Group ...........................................................................................8 ii) Create employee ...........................................................................................10 iii) Backup System ...............................................................................................12 iv) System menu customizer employee .............................................................13 v) Add Currency .................................................................................................14 CHAPTER 2 - INVENTORY ONE POS Master Create Product Categories ................................................................................................15 Create New Product ITEM (Product) .................................................................................18 Product Group....................................................................................................................21 Product Location ................................................................................................................22 Product Color .....................................................................................................................23 Unit Measurement Manager .............................................................................................24 Default Item Price Category ...............................................................................................25 Transaction Item Favorite List ..............................................................................................................28 Item Inventory Quantity Adjustment ................................................................................30 Item Inventory Selling Price Adjustment ...........................................................................32 Item Barcode Printing/Adjustment....................................................................................34 Item Commission Adjustment ...........................................................................................36 Item Inventory Quantity in/Out Transaction .....................................................................38 Import from CSV to SYSTEM ..............................................................................................40 Import/Export Price Category ............................................................................................42 Inactive Items .....................................................................................................................44 1|Page Inquiry Item Barcode Adjustment Inquiry .....................................................................................46 Item Commission Adjustment Inquiry ..............................................................................47 Item Price Adjustment Inquiry ...........................................................................................48 Item Quantity Adjustment Inquiry .....................................................................................49 Item Quantity In Inquiry.....................................................................................................50 Item Quantity Out Inquiry..................................................................................................51 Item Quantity Inquiry.........................................................................................................52 Report Item Balance Report ..........................................................................................................53 Item Movement Report ....................................................................................................55 CHAPTER 3 - POS Transaction Menu Settings ...................................................................................................................57 Promotion Product Setup ..................................................................................................59 Inquiry (Daily Sales) Check Daily Sales ...............................................................................................................62 Daily Sales Cancel ..............................................................................................................64 Check Order Bill .................................................................................................................66 Order Bill Cancel ................................................................................................................68 Promoter’s Commission ....................................................................................................70 View Cashier Transaction ..................................................................................................72 Daily Sales Net Profit..........................................................................................................73 Open Drawer History ........................................................................................................75 Delete Item Log ..................................................................................................................77 Master POS Setting (Discount, tax, Service charge & etc.) ...........................................................78 POS Setting (Create Receipt) .............................................................................................80 POS Setting (Customize Report) ........................................................................................85 Create New User (Cashier/Promoter/Store Keeper) ........................................................89 POS Bill Numbering Manager ............................................................................................92 Registered Cashier PC Manager .........................................................................................93 POS Grid Manager..............................................................................................................94 2|Page CHAPTER 4 - SALES Transaction Customer Incoming Payment (Order Bill) ..........................................................................96 Customer Incoming Payment Adjustment .........................................................................98 Customer Incoming Payment Unapplied Amount .............................................................99 Inquiry Customer Sales Analysis ..................................................................................................100 Customer Incoming Payment History .............................................................................102 Customer Incoming Payment Adjustment History .........................................................103 Master Customer Manager .........................................................................................................104 Remark Field Manager ....................................................................................................106 Customer Type .................................................................................................................107 Country Manager .............................................................................................................108 State Manager..................................................................................................................109 Payment Term..................................................................................................................110 CHAPTER 5 - PURCHASE Transaction Purchase Order ................................................................................................................113 Purchase Invoice .............................................................................................................116 Goods Receive Note .........................................................................................................119 Purchase Goods Return ..................................................................................................122 Master Supplier Manager.............................................................................................................125 Payment Terms ...............................................................................................................127 3|Page CHAPTER 6 - BANK Transaction Purchase Import...............................................................................................................128 Purchase...........................................................................................................................129 Master Bank Account Maintenance .............................................................................................131 4|Page Get Started This chapter focuses on fundamental Point of Sale procedures that are used across all areas of the program, such as navigating through menus, windows, lists and forms, finding records, and listing items on documents. Some of the concepts are advanced for an introductory chapter and may be better understood once individual feature chapters have been read. LOGIN TO ONE ERP SYSTEM ONE ERP SYSTEM is a backend system that manages all your inventory items, reports, and total control to your POS System management. 1. Login into ONE ERP SYSTEM (fig.1) 2. Key in the user ID & Password and press OK. (fig.1) All user ID & password will be given by the provider, please contact your service provider if you do not have the ID and password. 5|Page UPDATE TO NEW VERSION 1. Launch ONE ERP, at main login screen look for the settings button (as below). 2. Click on the Settings button a screen will prompt out for options. 6|Page 3. There are 3 options available, Database setting, license setting and system update. Select the SYSTEM UPDATE tab. 4. The SYSTEM UPDATE setting screen will be shown as below. a b a) Automatically update when ONE ERP is launch. b) Check for update manually. 5. Select the “Check Update” button; the updater screen will appear for updates. 7|Page 6. The updater will automatically detect the system; if the application is latest the system will show “Up-To-Date” else the word “Update required” will be shown. 7. To update, just click on the “UPDATE” button. The update will run automatically. *note: internet connection required. 8. DONE: The updater will close once it finish updates. 8|Page ACCOUNT MANAGEMENT I. Create User Group (admin) 1. To Backup system, select 2. Click on the ADD NEW button to create a new user group. 3. Key in the details for the group. 4. Set Permission for Menu control for this group 9|Page 5. Select the section that user wish to set permission to: 6. After select the section, click the button on the right side to set the permission. 7. Permission is divided into 3 types: Read/Write (Highest priority), Read only (Mid-level), and disable (for regular user). 10 | P a g e ACCOUNT MANAGEMENT II. Create New User (Employee) 1. Click on the “Login User Account Manager” under “SYSTEM Section”. 2. Click on the ADD NEW button to create a new user. 3. Key in the details of the new user. 11 | P a g e 4. Click on the ADD button to save. 5. Successfully added a new user. (eg. Trainee added) 12 | P a g e ACCOUNT MANAGEMENT III. Backup System 1. To Backup system, select 2. Select the path (where you wish to save) and update. 3. Click to start performing a full back up on the path. 13 | P a g e ACCOUNT MANAGEMENT IV. System Menu Customizer 1. User can change the ERP system menu titles to follow their needs. 2. Example of menu title customizing the English System name to another foreign language. 3. The results: 14 | P a g e ACCOUNT MANAGEMENT V. Add Currency 4. Click ADD NEW button to add a new currency record. 3. Enter the code number, name, symbol and the conversion rate on the field. 4. A new Currency Record has been successfully added. 15 | P a g e INVENTORY ONE ERP Master Create Product Categories 1. Select the product category manager under INVENTORY > MASTER. 2. Click the ADD NEW button to start adding new record. 3. Key in your Category name and press ADD to save. 16 | P a g e 4. Successfully added a category. 5. Your Result: 17 | P a g e HOW TO DELETE PRODUCT CATEGORIES 1. Select the categories u wish to delete and click on the EDIT RECORD button. 2. Click on the delete button: 3. Click YES to confirm delete: 4. Categories is successfully been deleted: 18 | P a g e INVENTORY ONE ERP Master Create New Product ITEM (Product) This part gives you a briefs guide to start adding item to your database. Each of the item added will be display on the POS screen later on. 1. Select [INVENTORY]> [MASTER]> [ITEM MANAGER] and it will show a section for user to search, add, edit item. Press [ADD NEW] to start adds a new record. 2. Add New Product Record Item no: Product code will be insert here (product code can be added manually or automatically in future) Description: Product name can be inserted here. Model: Types of model Barcode: User can either manually key in / scan the barcode using a scanner Serial No: Serial numbers for the item. Warranty Months: If there is a warranty for this product, it can be noted here. Suspended: Item will be hidden for future use without deleting the item. Voucher: Add Voucher for product. Inventory: if this section is check, item that is sold will be deducted from the inventory. (e.g. for item like can drinks) 19 | P a g e Categorize item into customization sections/areas Group: user can select a group for the item, e.g. a group item that arrives or import from a foreign country. Color: user can select a color to easy differentiate the records, e.g. each product might be same and color might be differs. Location: user can easier to track the product, e.g. each product can be categorized into location part like which warehouse is this product is being stored. 3. The general information for the selling product. (fig.4) Quantity: add available stock on hand, safety stock reminder, reorder point (reminder for item to be replenish when it reaches the limit) Promoter commission: insert the promoter commission that can be earned for each item sold. Unit Cost: This is the actual price of the product that came in (for record purpose) Selling Price: The product selling price that will be shown on POS SYSTEM. Apply Current Price: settings for current selling price. 20 | P a g e 4. Add a product images for easy browsing. (fig.5) Click on the Tab IMAGE button beside of the general button, it will display the above screen for user to browse pictures from their own pc and add a picture to their product. 5. Press the ADD button and the product record will be saved in database. (fig.6) 6. Item has been successfully added; user can back to the ITEM MANAGER and view the item by searching or EDIT RECORD of the product. 7. Apply Price Category On the Price Category tab, user can create the item default price for regular, Medium, Large item. Apply by select the checkbox, and select the regular, medium or large check box and key in the desired price. 21 | P a g e INVENTORY ONE ERP Master Create Product Group 1. Select the product group manager under INVENTORY > MASTER. 2. Click the ADD NEW button to start adding new record. 3. Key in your Category name and press ADD to save. 4. Clicks save and a group has been added. (product item can be categorize in group when user defined it at the create item manager section) 22 | P a g e INVENTORY ONE ERP Master Create Product Location 1. Select the product location manager under INVENTORY > MASTER. 2. Click the ADD NEW button to start adding new record. 3. Key in your Location name and press ADD to save. 4. Clicks save and a location has been added. (product item can be categorize in location when user defined it at the create item manager section) 23 | P a g e INVENTORY ONE ERP Master Create Product Color 1. Select the product category manager under INVENTORY > MASTER. 2. Click the ADD NEW button to start adding new record. 3. Key in your Color name and press ADD to save. 4. Clicks save and a color category has been added. (product item can be categorize in color when user defined it at the create item manager section) 24 | P a g e INVENTORY ONE ERP Master Unit Measurement Manager 1. Unit measurement manager allow user to create or add a new measurement for their product. E.g. Product can be in Pcs (piece), Can, or even in boxes. 2. Click the ADD NEW button to start adding new record. 3. Key in your unit measurement name and press ADD to save. 4. The new added result. 5. Option will be available at item manager: 25 | P a g e INVENTORY ONE ERP Master Default Item Price Category (price for default Small, Medium, Large) 1. User can set price for their product at a default small, medium, large format. 2. The price and quantity can be set when user click on it. 26 | P a g e 3. Quantity can be set if the product need to be sell in specific amount. This is for user to have greater control on stock quantity. 4. Click update when all setting has been done. 5. This setting will be available in the [item manager section]. 27 | P a g e 6. Select the checkbox to apply price category. 7. Apply price that user wish to add in into the product item. Press the update button when done. 28 | P a g e INVENTORY ONE ERP Transaction Item Favourite List 1. Item favourite list enable user to easily track their item for more control when replenishes stock. E.g. item can be favourite as “HOT SELLING”. 2. Start ADD favourite list by clicking the Add New buttons. 3. A window will appear with a list of item in your database key in earlier on. 29 | P a g e 4. Create a name for the Favourite list. 5. Select the item product by apply from the checkbox that you wish to add into favourite. *The item here is based on the item that u set on the item manager. 6. The result of the Favourite List: 30 | P a g e INVENTORY ONE ERP Transaction Item Inventory Quantity Adjustment 1. User able to add in their stock in this section. At the main page, click the search button to view all item in the list. 2. Quantity of the stock can be modified by just click at the “ADJUST QUANTITY” column. 3. User can add remark on the item in the remark text field; it can act as a reminder. 31 | P a g e 4. To complete this adjustment of quantity, click on the update button as below: FROM ITEM FAVOURITE LIST 1. User can choose from the favourite list if they set their item accordingly from the previous chapter. 2. After choose from the list, click the GO button and all the item that listed at the favourite list will be shown. Example: *specific item is shown instead of all product items. 32 | P a g e INVENTORY ONE ERP Transaction Item Inventory Selling Price Adjustment 1. User able to adjust their item stock price in this section. At the main page, click the search button to view all item in the list. 2. Price of the Item stock can be adjusted by just click at the “SELLING PRICE” column. 3. User can add remark on the item in the remark text field; it can act as a reminder. 33 | P a g e 4. To complete this adjustment of selling price, click on the update button as below: FROM ITEM FAVOURITE LIST 1. User can choose from the favourite list if they set their item accordingly from the previous chapter. 2. After choose from the list, click the GO button and all the item that listed at the favourite list will be shown. Example: *specific item is shown instead of all product items. 34 | P a g e INVENTORY ONE ERP Transaction Item Barcode Printing / Adjustment 1. Item can search more specifically by filter function as below: 2. User can search item by display all (default by clicking search button), filter item (only specific item under requirement will be shown), or by using item favourite list. 35 | P a g e 3. Item barcode can be either key in or scan by a barcode scanner: 4. User can print out the barcode by selecting the checkbox of the desired item and click on the print barcode button: 5. When click on the barcode printing button, user can choose to print in A4 mode or receipt mode. 6. Save and update by clicking the Update barcode button: 36 | P a g e INVENTORY ONE ERP Transaction Item Commission Adjustment 1. User able to adjust their item commission in this section. At the main page, click the search button to view all item in the list. 2. Adjust commission for each product by clicking the commission column. 37 | P a g e 3. Click on the Update commission button to update all commission that being adjusted. 4. Done and all commission will be updated into the databse. 38 | P a g e INVENTORY ONE ERP Transaction Item Inventory Quantity In/Out Transaction 1. User able to adjust their item commission in this section. At the main page, click the search button to view all item in the list. 2. User can search their item by item no, barcode, or use the group item favourite list to do selections. 3. User will have to choose either to “IN” stock quantity, or “OUT” stock quantity from the radio button at transaction type section: 39 | P a g e 4. Click search button to show results: 5. Select the In/out column respectively to adjust the item stock volume. IN OUT 6. Click update to complete the adjustment. 40 | P a g e INVENTORY ONE ERP Transaction Import from CSV to SYSTEM User able to import the CSV files (Microsoft excel) format into the system. This function is for user to have a better solution when adding item into their record. Start adding record using CSV format. 1. User will need a format from this system in order to have a more accurate format when user imports their data. 2. Save the file format into your pc directory. 41 | P a g e 3. The sample CSV files can be open by excel or similar CSV format program. 4. Item can be start added using the default format as import just now. Import the CSV back to the system 1. After finish key in the data into the excel CSV format, user can import the files back to the system. 2. Browse the CSV files by clicking the “BROWSE CSV” button and click the Retrieve CSV content. 3. To complete and update the system with this current CSV, click on the IMPORT button. 42 | P a g e INVENTORY ONE ERP Transaction Import / Export price category (Price, description and etc.) User able to import the CSV files (Microsoft excel) format into the system. This function is for user to have a better solution when adding item into their record. Start adding record using CSV format. 1. User will need a format from this system in order to have a more accurate format when user imports their data. 2. Save the file format into your pc directory. 43 | P a g e 5. The sample CSV files can be open by excel or similar CSV format program. 6. Item can be start added using the default format as import just now. Import the CSV back to the system 4. After finish key in the data into the excel CSV format, user can import the files back to the system. 5. Browse the CSV files by clicking the “BROWSE CSV” button and click the Retrieve CSV content. 6. To complete and update the system with this current CSV, click on the IMPORT button. 44 | P a g e INVENTORY ONE ERP Transaction Inactive Item (Temporary disable Product Items) 1. Item can be temporary hidden which can be reactive when user need it. This section save user from deleting the item where it might be unavailable for small period times only where delete is not necessary. 2. All items will be automatically shown as above. 3. Select the item from the list and click the add button. 45 | P a g e 4. Item has being add into the inactive list (item will be inactive but not deleted) 5. Click close and all inactive items will be inactive in all POS and item manager. 46 | P a g e INVENTORY ONE ERP Inquiry Item Barcode Adjustment Inquiry 1. All adjustment transaction can be seen with this section. Choose the desired date from the drop down list. 2. User able to search the transaction number by clicking the “FIND” button to browse the record. 3. User can print the adjustment transaction out by choosing the format for references. 47 | P a g e INVENTORY ONE ERP Inquiry Item Commission Adjustment Inquiry 1. All adjustment transaction can be seen with this section. Choose the desired date from the drop down list. 2. User able to search the transaction number by clicking the “FIND” button to browse the record. 3. User can print the adjustment transaction out by choosing the format for references. 48 | P a g e INVENTORY ONE ERP Inquiry Item Price Adjustment Inquiry 1. All adjustment transaction can be seen with this section. Choose the desired date from the drop down list. 2. User able to search the transaction number by clicking the “FIND” button to browse the record. 3. User can print the adjustment transaction out by choosing the format for references. 49 | P a g e INVENTORY ONE ERP Inquiry Item Quantity Adjustment Inquiry 1. All adjustment transaction can be seen with this section. Choose the desired date from the drop down list. 2. User able to search the transaction number by clicking the “FIND” button to browse the record. 3. User can print the adjustment transaction out by choosing the format for references. 50 | P a g e INVENTORY ONE ERP Inquiry Item Quantity IN Adjustment Inquiry 1. All adjustment transaction can be seen with this section. Choose the desired date from the drop down list. 2. User able to search the transaction number by clicking the “FIND” button to browse the record. 3. The result from previous adjustment transaction (IN STOCK) 4. User can print the adjustment transaction out by choosing the format for references. 51 | P a g e INVENTORY ONE ERP Inquiry Item Quantity OUT Adjustment Inquiry 1. All adjustment transaction can be seen with this section. Choose the desired date from the drop down list. 2. User able to search the transaction number by clicking the “FIND” button to browse the record. 3. The result from previous adjustment transaction (IN STOCK) 4. User can print the adjustment transaction out by choosing the format for references. 52 | P a g e INVENTORY ONE ERP Inquiry Item Quantity Inquiry 1. All transaction can be seen with this section. Information like safety stock level, current stock, and sell quantity. 2. The result can be filter by Item code, Item name, or even quantity numbers. 3. The result from the search: 53 | P a g e INVENTORY ONE ERP Report Item Balanced Report 1. All item total balance report can be view in this section. 2. User able to filter in a very specific search as above. User can search by 1 types of condition, or even multiple conditions for more specific searching. 54 | P a g e 3. The result of searching: 55 | P a g e INVENTORY ONE ERP Report Item Movement Report 1. All item total movement report can be view in this section. (movement report consist of item that are being replenish or sold) 2. User able to filter in a very specific search as above. User can search by 1 types of condition, or even multiple conditions for more specific searching. 56 | P a g e 3. The result of searching: 4. The list of item is shown accordingly. 57 | P a g e POS Transaction Menu Settings (How to add item into POS SYSTEM Menu) Previously we have store records into the database, and now we will be adding the record to the POS system menu. 1. Select [POS]> [MASTER]> [POS CATEGORY MANAGER] and it will display a list of category name and thumbnail (image) if any. User can select the category and then click on the [EDIT RECORD] button to start edit. 2. After selecting the EDIT RECORD, a category screen will appear as above (fig.8). 58 | P a g e 3. As user can now add in a product to this category, by clicking the will automatically drag into the categories. (fig.9) 4. User can deselect the entire item by click the individual items. Update/change category image. , and press button. The item button for 5. Click on the Tab CATEGORY IMAGE button, user able to browse selected image and change the images for this category. 6. Example of the final screen result in ONE POS SYSTEM (F10 Menu) after the record added. 59 | P a g e POS Transaction Promotion Product Setup 1. User can set the specific promotion period date and time. (E.g. famous fast food restaurant normally have the promotion meal on lunch time or dinner hour or even on weekdays special). 2. User can search the previous promotion settings and adjust by selecting the date from posting date and click edit button to edit. 3. To setup a new promotion period, click on the ADD NEW RECORD button to start add. 4. A screen will prompt for user to setup the promotion date, day, time and etc. 60 | P a g e 5. To pick the day, users just checks or uncheck form the drop down list. 6. Set the time for specific hour (e.g. below is a setup for lunch time period from 12pm to 2pm). 7. After promotion date and time has been set, user can add the promotion product to the list. 8. Add in the selection by clicking the >> button into the promotion list. 61 | P a g e 9. Key in the discount % and the amount of the product item that need to be sold within promotion period. Choose the item product. Set the discount % and item amount for the promotion period. 10. Click the save button to complete this promotion setup. 11. The results. 62 | P a g e POS Inquiry (Daily Sales) Check Daily Sales 1. Select the date from and to which user wish to display as a result as below: 2. User can search also search the sales that key in by the specific “cashier”. 3. Click on the button to retrieve result for the daily sales. 63 | P a g e 4. Result can be printed out by clicking the PREVIEW PRINT BUTTON: 5. Daily Sales can be exported/backup to the document files: *search daily sales by using product categories: *Product Category only can apply on item and sales detail tab. 64 | P a g e POS Inquiry (Daily Sales) Check Canceled Daily Sales 1. Select the date from and to which user wish to display as a result as below: 2. User can search also search the sales that key in by the specific “cashier”. 3. Click on the button to retrieve result for the Canceled daily sales. 65 | P a g e 4. Result can be printed out by clicking the PREVIEW PRINT BUTTON: 5. Cancel Daily Sales can be exported/backup to the document files: 66 | P a g e POS Inquiry (Sales) Check Order Bill 1. Select the date from and to which user wish to display as a result as below: 2. User can search also search the sales that key in by the specific “cashier”. 3. Click on the button to retrieve result for the order bill. 67 | P a g e 4. Result can be printed out by clicking the PREVIEW PRINT BUTTON: 5. Order Bill can be exported/backup to the document files: 68 | P a g e POS Inquiry (Sales) Check Order Bill (Cancel) 1. Select the date from and to which user wish to display as a result as below: 2. User can search also search the sales that key in by the specific “cashier”. 3. Click on the button to retrieve result for the canceled order bill. 69 | P a g e 4. Result can be printed out by clicking the PREVIEW PRINT BUTTON: 5. Cancel Order Bill can be exported/backup to the document files: 70 | P a g e POS Inquiry (Daily Sales) POS Promoters Commission 1. Promoters commission can be gain by selling a product or an item, if user has already set the promoters commission on a single item at *INVENTORY > Item Manager. PAGE: 13 2. Pick the date of the results that you wish to see. 71 | P a g e 3. The result will be shown as below: 4. If user wishes to export/backup the result, click on the Export Result button. 72 | P a g e POS Inquiry (Daily Sales) Cashier Transaction Log 1. Select the date from and to which user wish to display as a result as below: 2. User can search also search the sales that key in by the specific “cashier”. 3. Click button to start search for the record. 4. Cashier transaction log can be export/backup. 73 | P a g e POS Inquiry (Daily Sales) Daily Sales Net Profit 1. Select the date from and to which user wish to display as a result as below: 2. User can search also search the sales that key in by the specific “cashier”. 3. Click on the button to retrieve result for the daily net profit. 74 | P a g e 4. Result can be printed out by clicking the PREVIEW PRINT BUTTON: 5. Daily net profit can be exported/backup to the document files: 75 | P a g e POS Inquiry (Daily Sales) Open Drawer History 1. User able to track the record of Cash Drawer opening history. Thus, any user open the cash drawer will be recorded in the system. 2. Select and open the desired date in which user wish to view. 3. After selecting the date, press the search button to begin searching. 4. Result will be shown if user have history of open cash drawer. 76 | P a g e 5. If user wishes to export/backup the result, click on the Export button. **user can search by more specific with cashier options: Tick the Cashier checkbox and then click on the search button to browse to search by cashier. 77 | P a g e POS Inquiry (Daily Sales) Deleted Item Log (view previous deleted item record) 1. User able to track the record of previously deleted item record. 2. Choose from the date and cashier to start search for the deleted item record. 3. Click search button to start search for the record. 4. The search result 78 | P a g e POS Master POS Setting (Discount, tax, Service charge & etc.) 5. At GENERAL TAB, user can set the default value of the Discount % and Tax % for their bill. 6. Service charges can be applied if users tick the checkbox. *uncheck to disable it. 7. Other setting: tick/un tick to able or disable the functions. 79 | P a g e 8. Margin Settings for Receipt size report (the printed section). 80 | P a g e POS Master POS Setting (Receipt Section) 1. Click on the RECEIPT tab button and it will show a drop down list from report template. Choose template 1 and click on configure button, report/receipt outlook by clicking on the preview button. or you can view the 2. Overview of the customize receipt: 3. For allow barcode, tick the option at the right side of the form. Additional item that can be added into the receipt apply station no, apply cashier ID, Cashier name, table no, and apply pax. Setting can be custom by following the user needs. 81 | P a g e 4. Apply logo: - If user wish to add a logo into their report/receipt, tick on the “apply logo” and click on the “browse” button. Browse and select your desired image and click ok. - After select the logo image, the result will show as below. 82 | P a g e 5. Apply Company Name: - Key in your company name FONT: choose your type font ALIGNMENT: change the company name alignment to left, right or center. 6. Apply Address: - Key in your address or information on the text field. FONT: choose your type font ALIGNMENT: change the company name alignment to left, right or center. 7. After complete customization, click on the “UPDATE” button to save. 8. Update complete: 83 | P a g e FOOTER SECTION 1. Click on the footer tab above it will show the Bottom part of the receipt for customization: 2. Apply Footer 1 - Key in your desired text. - FONT: choose your type font. - ALIGNMENT: change the alignment to left, right or center. 3. Apply Footer 2 - Key in your desired text. - FONT: choose your type font. - ALIGNMENT: change the alignment to left, right or center. 4. After complete customization, click on the “UPDATE” button to save. 5. Update complete: 84 | P a g e PREVIEW RECEIPT 1. After configuration done, User can click preview button to preview the receipt. 2. Print results: 85 | P a g e POS Master POS Setting (Customize Report) 1. Select the customization report from the drop down list. 86 | P a g e 2. A setting screen will appear. List of item for user to customize the report follow by their needs. 3. There are many options for user to customize their report. Text field, logo image, or even fonts available. 4. Customization divided into 3 parts, Header. Details and Footer. 87 | P a g e 5. At the empty space, user can adjust the height and add fields into the details by clicking the button below. 6. Click on the add field button, a list of field will appear for the header. 7. When select and add a field into the details. It will show a part for user that added into the field. 88 | P a g e 8. User can move the “added field” to any part of the preview section. However the preview only will be displayed only if the field is within the receipt range. 9. Preview the added field: 10. In details user can set the height of the receipt as below: The height will be adjusted. Size of the report/receipt 11. The full size of the receipt can be set via the master section of the top of the screen. 12. User can go on Landscape mode for the report customization by checking the checkbox below: 89 | P a g e POS Master Create New User (Cashier/Promoter/Store Keeper) 1. To start adding a new staff as user (cashier, promoter, store keeper & etc.), click on the Add New button. 2. After click on the add button, user will see a form as below: 90 | P a g e 3. Enter the details of the New User (new staff). 4. Create a password for this user. *Tick Administrator for this user to have more rights to view files & records. *Tick Active to enable or disable this user. 5. Select the role for this user: 6. Add a profile picture for this user. Click on the Image TAB and click browse to add a picture. Or Click on the thumbnail. 91 | P a g e 7. Browse your picture from your PC directory and click the image. *80 x 80 for best picture scales. 8. The picture thumbnail will be shown as soon as users select their pic. 92 | P a g e POS Master POS Bill Numbering Manager 1. User able to customize the bill prefixes details. 2. Customize the prefix in the bill by selecting the column as below: 3. This shows that the bill will be shown as KL1 (E.g. the bill will show that bill is generated by the KL1 branch) 93 | P a g e POS Master Registered Cashier PC Manager 1. User able to trace the details and view the registered cashier on the POS SYSTEM (this is to track record of which pc have access to the system) 2. For the first time login user will see the a message box that prompted as below: 3. User able to view the record like MAC Address, PC Number, & the registered date. *To delete record user can click on the Delete button. 94 | P a g e POS Master POS Grid Settings 1. Users are able to customize the grid size and settings in the POS menu. 2. User will see a screen for adjusting the font size and grid height above, it is a default adjustment for the screen (e.g. for enhance better view in different monitors resolutions) 95 | P a g e 3. A more advance customize setting is name, column, description, size, font, icons, format, and grid height can be adjusted using these settings. 4. User can easily change the settings by clicking the field to customize. 96 | P a g e SALES Transaction Customer Incoming Payment (Order Bill) 1. For existing customer (POS/F&B POS) that have payment in terms, user can use this section to keep track of the payment. 2. Search the item by using the date or using the function “DUE DATE” for filtering the search. 3. The result will show a button called “PAYMENT” in front of the list. 4. A payment window will appear for further action. User can view the user details and make payment. 97 | P a g e 5. User can start make payment for this current user by clicking the new button. 6. A payment screen will appear for user to choose payment mode, and put the amount to payment. 7. A receipt will generate automatically once customer made a payment. 98 | P a g e SALES Transaction Customer Incoming Payment Adjustment 1. This section is to adjust any incoming payment in order bills. Where user can adjust or modify any wrong bills and transaction. 2. Click on the delete button 99 | P a g e SALES Transaction Customer Incoming Payment Unapplied Amount 1. Unapplied amount is the amount that left by customer, e.g. like how if the user paid an item for $200 and the terms is 150, so the unapplied amount will be 50 on list. 2. User can use this section to contra the unapplied amount. 3. A receipt will generate automatically. 100 | P a g e SALES Inquiry Customer Sales Analysis 1. User can check the customer sales report in this section. 2. All result can be track by filtering or key in the customer details on the search bar. 3. User can track today record by just click the TODAY button. 4. There are a few tabs for different report. 101 | P a g e 5. The search results: 102 | P a g e SALES Inquiry Customer Incoming Payment History 1. User can check the customer payment history in this section. 2. Incoming Payment history result will be show based on your selection. 3. User can print the result by click the Print button in front of the record. 103 | P a g e SALES Inquiry Customer Incoming Adjustment History 1. User can check the customer payment history in this section. 2. Incoming Payment history result will be show based on your selection. 3. User can print the result by click the Print button in front of the record. 104 | P a g e SALES Master Customer Manager 1. User can add/edit new customer record in this section. Customer that being added here can be used at POS when they purchase or create payment terms. 2. A window will be available for user to create new customer record. 3. All customer personal details like First name, last name, phone, customer type and etc. can be stored. 105 | P a g e 4. User can add a special delivery address user can click on the tab button as below: 5. For a different customer type, each customer can be classified in a different price list. Example there is a member price for Platinum, Gold, or silver member with all purchase in different prices. This function allow user to have more control in multi-level pricing for customers. 6. User can add remarks and note for each customer at the remark tab and note tab. 7. When complete key in all details, click ADD button to create a new customer record. 8. Record successfully been added. 106 | P a g e SALES Master Remark Field Manager 1. All default remark can be customizing using the remark field manager. 2. Click UPDATE button to complete the remark customization. 107 | P a g e SALES Master Customer Type 1. User can create a customer type (group) in this section. User can search for result by using the filter or search button. 2. User can ADD a new customer group/type by click the ADD NEW button. 3. Put in the code and name for the desired customer type. Results: 108 | P a g e SALES Master Country Manager 1. User can create new country in this section. User can search for result by using the filter or search button. 2. Key in the country code and name for the new country and click ADD to create a new country in the list. 109 | P a g e SALES Master State Manager 1. User can create new state in this section. User can search for result by using the filter or search button. 2. Key in the state code and name for the new state and click ADD to create a new country in the list. 110 | P a g e SALES Master Payment Term 1. User is able to create a payment term for customer. 2. Click on the ADD NEW button it will prompt a screen for user to create record. 3. Details needed for payment term. 4. A unique code and name of the person. 111 | P a g e 5. Choose payment method from the radio button options: 6. A due days date can be insert for reminders (user can create a term for due date for customers). Early payment discount A special option are available for customer who will be benefited if they willing to make an early payments. 112 | P a g e PURCHASE Transaction Purchase Order 1. User can add the purchase order by clicking the purchase order from the PURCHASE MODULE. 2. Click the Add New button to create a new purchase order. 3. A form screen will be prompt out and let user to key in the details of the purchase order. Including supplier information, date, doc number, term, and agent. 113 | P a g e 4. User can search for supplier code if any *(supplier code can be added from Supplier Manager). 5. User can add an agent for this purchase order so it can be track more conveniently. 6. After all information has been added, user can add the stock item on the ADD button of the bottom half section. 7. User can browse the item from the list. Select it and press the Choose button. 114 | P a g e 8. A row of item will be added to the purchase order form. 9. User can add the desired quantity of the order or key in further description. 10. Click add button at the bottom to complete purchase order. Updates record 1. Select the record from the main purchase order screen. 2. The purchase form will appear and user can update the information, and after updating click on the update button to complete. 115 | P a g e PURCHASE Transaction Purchase Invoice 1. User can add the purchase order by clicking the purchase order from the PURCHASE MODULE. 2. Click the Add New button to create a new purchase Invoice. 3. A form screen will be prompt out and let user to key in the details of the purchase order. Including supplier information, date, doc number, term, Supplier d/o no, supplier invoice no, and agent. 116 | P a g e 4. User can search for supplier code if any *(can be added from Supplier Manager). 5. User can add an agent for this purchase Invoice so it can be track more conveniently. 6. After all information has been added, user can click on the ADD button of the bottom half section. 7. User can browse the item from the list. Select it and press the Choose button. 117 | P a g e 8. A row of item will be added to the purchase Invoice form. 9. User can add the desired quantity of the order or key in further description. 10. Click add button at the bottom to complete purchase Invoice. Updates record 1. Select the record from the main purchase Invoice screen. 2. The purchase form will appear and user can update the information, and after updating click on the update button to complete. 118 | P a g e PURCHASE Transaction Goods Receive Note 1. User can add the GRN by clicking the GRN from the PURCHASE MODULE. 2. Click the Add New button to create a new GRN. 3. A form screen will be prompt out and let user to key in the details of the GRN. Including supplier information, date, doc number, term, supplier d/o no and agent. 119 | P a g e 4. User can search for supplier code if any *(can be added from Supplier Manager). 5. User can add an agent for this purchase Invoice so it can be track more conveniently. 6. After all information has been added, user can click on the ADD button of the bottom half section. 7. User can browse the item from the list. Select it and press the Choose button. 120 | P a g e 8. A row of item will be added to the purchase Invoice form. 9. User can add the desired quantity of the order or key in further description. 10. Click add button at the bottom to complete purchase Invoice. Updates record 3. Select the record from the main purchase Invoice screen. 4. The purchase form will appear and user can update the information, and after updating click on the update button to complete. *NOTE: the item in the inventory record will be increased if user update from the GRN. 121 | P a g e PURCHASE Transaction Purchase Goods Return 1. User can add the purchase goods return by clicking from the PURCHASE MODULE. 2. Click the Add New button to create a new purchase goods return. 3. A form screen will be prompt out and let user to key in the details of the purchase goods return. Including supplier information, date, doc number, term, and agent. 122 | P a g e 4. User can search for supplier code if any *(can be added from Supplier Manager). 5. User can add an agent for this purchase order so it can be track more conveniently. 6. After all information has been added, user can click on the ADD button of the bottom half section. 7. User can browse the item from the list. Select it and press the Choose button. 123 | P a g e 8. A row of item will be added to the purchase goods return. 9. User can add the desired quantity of the order or key in further description. 10. Click add button at the bottom to complete purchase order. Updates record 1. Select the record from the main purchase order screen. 2. The purchase form will appear and user can update the information, and after updating click on the update button to complete. *NOTE: the item in the inventory record will be decreased if user updates from the purchase goods return. 124 | P a g e PURCHASE Master Supplier Manager 1. User can add the supplier contact information on supplier manager. 2. To add a new supplier record, click on the “Add New” button. 3. A new record screen for user to key in the information of the supplier. 4. User able to add the supplier code, name, types and currency used. 5. General information like address, phone number and etc. can be added below the general tab. 125 | P a g e 6. User can set the terms for discount at the “terms” tab. 7. Click “ADD” to add a new supplier record into database. 8. User can edit record by select the record shown below, and click on the edit record. 126 | P a g e PURCHASE Master Payment Terms 1. To add a new payment terms, click on the “add new” button. 2. Key in the code and name and other information. 3. User can select the payment term from the options. 4. Click adds to save the payment term. 127 | P a g e BANK Master Bank Account Maintenance 1. Create a bank account group at the master module of bank account maintenance. 2. Add a new bank account by clicking the add button. 3. Done: Click “save” to add a new bank record. 128 | P a g e BANK Transaction Payment Import 1. User can import the CSV format files by using this payment import module. 2. On the payment import screen, click the browse CSV to import the files. 3. After browse the csv files, click the “Retrieve CSV Content” to start the retrieve process. 129 | P a g e 4. After retrieve the CSV, the payment record will be listed. 5. Click the import button to import csv to system. 6. Done! Record saved. 130 | P a g e BANK Transaction Payment 1. This section allow user to view the payment transaction record and document number of the payment and sales creditor. 2. Select the date and click on the search, record will be listed out. 3. User can view the record by double click it. 131 | P a g e 4. Record can be deleted, or amended in this form view. After all modification user can click the save button to save the record. 132 | P a g e