1
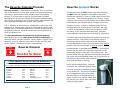
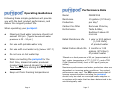
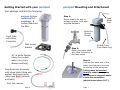
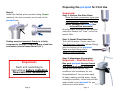
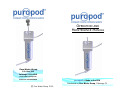
OPERATION
AND
MAINTENANCE MANUAL
Pure Water Group
P.O. Box 785
Calistoga, CA 94515
pure-water-group.com
Toll Free: 310.993.9929
puropod is Made in the USA
Distributed by Pure Water Group, Calistoga, CA
© Pure Water Group 2015
Congratulations on your purchase of a
Compact Reverse Osmosis
Drinking Water System
Your puropod is the original patented Compact
Reverse Osmosis Water Purification System that
you attach yourself. It is constructed with the finest
materials available, including a Dow FilmTec NSF and
FDA approved reverse osmosis membrane. Puropod is
made in the USA.
Pure Water Group believes everyone deserves clean,
purified water for drinking and cooking. We are dedicated
to the distribution of simple, effective, and affordable
water treatment solutions to fulfill that goal.
Your puropod has been designed for effortless connection, operation and maintenance. This manual tells
you everything you need to know to enjoy optimal performance and long life of your puropod device.
Please read through all the instructions carefully before
assembling and operating your puropod. We want you
to enjoy all the benefits of your new product.
Table of Contents
The Reverse Osmosis Process
Page 2
How the puropod works
Page 3
Operating guidelines
Page 4
Performance data
Page 5
Getting started - What’s in the box
Page 6
Puropod Mounting and Attachment Page 7
Preparing for first use
Page 9
Disassembly / Reassembly
Page 10
Replacement Parts
Page 12
Countertop /Faucet-mount Model
Page 13
Maintenance
Page 14
Warranty
Page 15
Purchase / Maintenance record
Page 16
Testing Record (TDS)
Page 17
Pure Water Group thanks you
for your purchase.
Page 1
The Reverse Osmosis Process
How the puropod Works
Reverse Osmosis - often referred to simply as “R.O.” is a process
that utilizes pressure to force water across a membrane containing
microscopic pores that prevent contaminants from passing
through. It is recognized by the EPA (Environmental Protection
Agency) as one of the finest filtration technologies available today,
and it is the technology most common used by water bottlers and
other beverage manufacturers to purify their products.
R.O. is effective at eliminating or substantially reducing a very
wide array of contaminants, and of all technologies used to treat
drinking water in residential applications, it has the greatest range of
contaminant removal. Reverse osmosis can remove particles as
small as individual ions.
The EPA (United States Environmental Protection Agency)
rates Reverse Osmosis as a BAT (Best Available Technology) for
removing arsenic, fluoride, microbes, nitrate, radium, uranium, lead,
aluminum, mercury, asbestos, other heavy metals, and TOC (total
organic carbon - a measure of organic contaminants).
Reverse Osmosis
is
First Aid for Water
TYPICAL REMOVAL RATES FOR THIN-FILM MEMBRANES
Partial list of Elements and the Percent R.O. Membranes will remove*
Source:“Water Processing:3rd Edition”, Wes McGowan, Water Quality Assoc. 2001
Arsenic
Asbestos
Cyanide
Barium
Cadmium
Copper
Fluoride
94%
99%
86%
99%
98%
99%
93%
Lead
Mercury
Nitrates
Nitrites
Radium
Selenium
Chromium (3 & 6)
* at 65 psi feed pressure, 77° temperature
Page 2
99%
91%
87%
87%
80%
96%
86%
The puropod uses an FDA (Food & Drug Administration)
and NSF (National Sanitation Foundation) approved
membrane material to remove a wide range of impurities
from water. The patented puropod is the only single
canister reverse osmosis (R.O.) system that includes carbon
and sediment pre-filtration as an integral part of the
filtration process. A carbon / sediment filter removes
sediment above 20 microns as well as chlorine, and many
"volatile" contaminants (VOCs) such as benzene, MTBE,
and radon. It also removes tastes and odors, and other
compounds that can shorten the life of the R.O. membrane.
The water entering the appliance first passes through the
carbon pre-filter, then flows to the reverse osmosis
membrane which performs a molecular separation
process dividing the water into two streams: the product
stream, and the concentrate or second stream. The
product stream is purified drinking water. The second
stream carries away the impurities rejected by the
membrane down to molecular (sub micron) size. The
purified water exits the appliance through the tube at the
top, while the second stream flows out of the bottom of
the puropod and can be used purposes
other than drinking or cooking.
Unlike simple carbon filters, removed
impurities are continually flushed away
from the puropod membrane, giving it
a long useful life. The puropod system
is unsurpassed by any home water
filtration device or bottled drinking
water found on the market today, and
will provide your family with the finest
quality drinking water.
Page 3
Operating Guidelines
Performance Data
Model
PSROFM15
Following these simple guidelines will provide
you with the best product performance, and
deliver the longest product life.
Membrane
Production
15 gallons (57 liters)
per day*
When operating your puropod:
Carbon Pre-Filter
Performance
Removes Chlorine,
Taste & Odor,
Sediment above 20
microns
Rated Membrane Life
1 year or 400 gallons
(1,512 liters)
of product water
Rated Carbon Block life
3 months or 125
gallons (475 liters)
of product water
Maximum feed water pressure should not
exceed 100 psi. (Typical household water
pressure is 35 - 50 psi )
For use with potable water only
For use with cool water only (below 100° F)
Do not use on hot water tap
When connecting the puropod for the
first time, discard all water produced
(product and second stream) for at least
four hours before storing drinking water
Keep unit from freezing temperatures
Page 4
*Based on a feed pressure of 60 psi (approximately 4
bar), water temperature of 77° F (25° C), and a TDS
(Total Dissolved Solids) level of 500 ppm (parts per
million).
Membrane performance and water production rates are
dependent on incoming water conditions. Your actual
performance may vary. The EPA recommends that all
reverse osmosis systems including the puropod
should only be used on municipal water supplies or
on systems with water that has been determined to be
microbiologically safe.
Page 5
Getting Started with your puropod
puropod Mounting and Attachment
Your package contains the following:
puropod System
containing R.O.
membrane &
Carbon/Sediment
Pre-filter
Step 1:
Mount bracket on wall in
suitable location, with usersupplied fasteners
Feed
Water
Inlet
Outlet for
Second
Stream
Feed Tube
with Hose
Connector
Wall mount
bracket
30” of white flexible
tubing for product
water (may have
Green markings)
Flow Restrictor Assembly
with elbow stem fitting and
bottom discharge tubing
(May have Red markings
and label)
Step 2:
Attach the water feed
with Hose Connector to
the hose outlet
Step 3:
Connect the loose end of the
water feed tubing to the inlet
on the top of the puropod.
Tubing must be inserted
firmly in order to compress
the internal o-ring and insure
a leak-free connection
(should insert about 5/8").
And, this manual.
Page 6
Product Tube
(Pure Water Out)
Page 7
Preparing the puropod for First Use
Step 4:
Install the flexible white product tubing (Green
markers) into the connector on the side of the
puropod cap.
Important:
Step 1: Carbon Pre-filter Flush
Once the feed connections have been
completed, and before installing the
Flow Restrictor Assembly, run cold
water through the puropod for
at least five seconds !
Running water through the unit without
restriction flushes the “fines” out of the
carbon filter.
Tubing must be inserted firmly in to fully
compress the internal o-ring and insure a leak-free
connection (should insert about 5/8").
Step 2: Install Flow Restrictor
Turn off the water. Firmly insert the
Flow Restrictor Assembly (elbow fitting)
into the bottom of the puropod.
Make sure the fitting is fully
seated in the connection.
Step 3: Membrane Preparation
Important:
Flush unit according to
instructions before installing
flow restrictor assembly!
Page 8
Important - First Use Only:
Run your puropod for four hours
and discard all water produced
during this initial period. This
conditions the membrane for use.
Congratulations! You are now ready
to begin making purified water. Using
a storage container, collect the purified
water made by the puropod for use
anytime you need water.
Page 9
puropod Disassembly and Reassembly
Step 3:
Step 1:
The lower section (sump) is
disengaged from the upper section
(head) by grasping both parts firmly
and rotating the sump as shown.
Remove the filter stack from the
sump by gently twisting and pulling
upward on the top of the membrane
assembly.
Step 4:
Remove the pre-filter from the
membrane stem by gently twisting it
and pulling it upward. To perform a
pre-filter change, simply discard the
old pre-filter and replace with a new
one.
Step 2:
Once the sump is disengaged from
the head, the two sections may be
separated by gently pulling them
apart.
Page 10
Step 5:
Assembly is the opposite of
disassembly. Thoroughly rinse
parts and wipe clean. Parts should
be slightly wet when reassembling.
Take care to have all “O” Rings
correctly positioned. Be careful to
not dislocate “O” Rings when fitting
parts back together.
Page 11
puropod Replacement Parts
Carbon / Sediment
Pre-Filter cartridge
Countertop Faucet - Mount
Model with Diverter Valve-
R.O. Membrane Assembly
A. Place unit in supplied bracket.
B. Remove aerator
from faucet.
Product Tubing
Flow Restrictor
with discharge tubing
C. Install diverter valve supplied
with unit to faucet.
Use adapters as required.
Hose Bibb Adapter*
(optional)
D. If not already installed at the factory, connect
other end of the feed water tube to the feed water inlet
on top of your unit.
Pre-Filter “O” Ring
(Same as Hose Connect model - Step 3 / Page 7)
Sump “O” Ring
Feed Inlet “O” Ring
Page 12
Page 13
puropod Maintenance
Your puropod Compact R.O. System was designed to
be virtually maintenance free. Simply follow these
recommendations and your puropod should last for
years.
Clean your puropod with a damp cloth and
mild dish soap. Do not use abrasive cleaners.
To protect the R.O. Membrane, the carbon block
pre-filter should be replaced every 3 months or
125 gallons of product water
(We have provided a page in this manual [Page 16]
for you to record your pre-filter changes.)
When not in use for extended periods, your
puropod should be disconnected, placed in a
plastic bag, and stored in the refrigerator.
puropod Warranty
This Limited Warranty covers parts and labor needed
to repair any supplied item that proves to be defective
in material, workmanship or factory assembly. This
Limited Warranty covers the puropod product for one
calendar year from date of purchase. The following
items are subject to exclusions: membrane, filter, “O”
rings, flow restrictor and all other parts or components
that require regular replacement. This Limited
Warranty applies only to the original purchaser.
Disclaimers
The Limited Warranty does not cover defects caused
by improper use, alteration, lack of regular maintenance or as a result of fouling due to iron, hydrogen
sulfide, silica, scaling from excessive hardness, or
membrane breakthrough due to excessive chlorine.
The manufacturer does not assume responsibility for
damage caused by accident, fire or acts of God.
Incidental and Consequential Damages
PWG does not assume responsibility for payment of
incidental and consequential damages as a result of
the failure of this unit to comply with express or
implied warranties.
Implied Warranties
The implied at-law warranties shall terminate one
calendar year from the date of purchase. Some states
do not allow limitations on implied warranties so the
above limitation may not apply.
For service during the warranty period, contact
Pure Water Group ([email protected]).
Page 14
Page 15
puropod Purchase/Maintenance Record
puropod Testing /handheld TDS Meter
Purchase Information:
Our hand-held TDS (Total Dissolved Solids) Meter
enables you to regularly monitor the performance of
Date of Purchase
___ / ___ / _____
your
puropod, and know when it’s time to change
your pre-filter. Buy one - it’s fun to know how well
your
Maintenance Performed:
Date
puropod is working.
Test Record (TDS):
Operation
Date
Pre-Treatment
Post Treatment
___ / ___ / _____
______________________
___ / ___ / _____
__________
__________
___ / ___ / _____
______________________
___ / ___ / _____
__________
__________
___ / ___ / _____
______________________
___ / ___ / _____
__________
__________
___ / ___ / _____
______________________
___ / ___ / _____
__________
__________
___ / ___ / _____
______________________
___ / ___ / _____
__________
__________
___ / ___ / _____
______________________
___ / ___ / _____
__________
__________
___ / ___ / _____
______________________
___ / ___ / _____
__________
__________
___ / ___ / _____
______________________
___ / ___ / _____
__________
__________
___ / ___ / _____
______________________
___ / ___ / _____
__________
__________
___ / ___ / _____
______________________
___ / ___ / _____
__________
__________
___ / ___ / _____
__________
___ / ___ / _____
__________
__________
Page 16
__________
Page 17