1
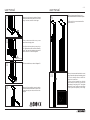
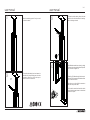
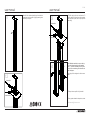
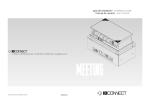
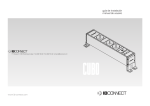
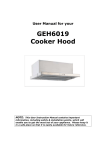
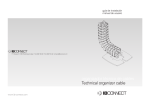
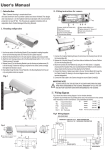
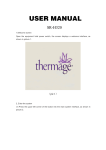
installation guide
user manual
DUPLO
COLUMNA
la conexión organizada
the organized connection
user manual
1-2
user manual
FIXING TO THE FLOOR
Remove the front cover by placing a flathead
screwdriver between the joints of the cover and
using it as a lever, as shown in the image.
01
Once you have removed the top cover,
remove the aluminium covers from the profile.
05
Pull the top of the cover outwards until the
profile comes out.
FIXING TO THE FLOOR
Once you have removed the cover, you can
access the anchoring system.
02
You will see the base where you are going to
fix it. Mark and use a drill to make the necessary
holes. Then, insert the rawlplugs and screw the
base to the floor, as shown in diagram 2.
Rawlplugs and screws
03
Put the cover back on, as shown in diagram 03.
FIXING TO THE CEILING
Once you have removed the aluminium covers,
you can access the telescopic anchoring system.
1) Turn the butterfly screws A and B anticlockwise to loosen them.
2) Once you have loosened them, slide the
system along the profile until you reach the
point where you are going to fix it. Then, tighten
the butterfly screws, making sure that the top
of the system rests perfectly on the ceiling.
06
04
REMOVE THE TOP COVER
Remove the front and back covers by placing
a flathead screwdriver between the joints of the
covers and using it as a lever, as shown in the
diagram.
A
B
user manual
07
08
3- 4
user manual
INSERTING AND CONNECTING THE
CABLES
Once the anchoring system is fixed, you need
to insert the cables.
09
ELECTRIC CABLES
To insert the electric cables, perform the same
operation as for the data cables, but inserting
them in the larger channel.
10
REMOVING THE VOICE AND
DATA LID
Use a flathead screwdriver as a lever by placing
it between the voice and data lid and the profile
joint, as shown in diagram 10.
DATA CABLES
To insert the data cables, there is a channel on
the inside left of the profile that goes to the data
connectors. Once there, follow the steps to
connect them to the connectors.
B
CONNECTING THE DATA AND ELECTRIC
CABLES
Thread the V/D cables through the bottom part.
Place the RJ45 connectors in the lid and connect
them as shown in detail A.
Place the cover on the rail with the connectors
and collect any excess cable.
A
For the electric connection, thread the cables
through the bottom and connect to the terminal
on the side of profile B.
user manual
11
5-6
user manual
Once all of the cables are installed, put the aluminium
covers back on the profile by lightly pressing them
until they fit into place.
To finish, simply put the top cover back on. To
do this, attach the front cover to the back and
once they are in place, slide it up the profile to
the ceiling.
13
data cables
electric cables
14
12
A
B
FITTING THE VERTEBRA
Use a flathead screwdriver to remove the top
lid on the right and replace it with insertable
piece A. Once the insertable piece is in place,
you can fit the vertebra to guide the cables, as
show in diagram B.
The right profile is designed to collect excess
cable.
data cables
The duplo column profile is fully installed.
electric cables
For any queries related to the product, contact:
[email protected]