1
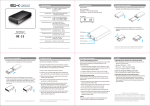
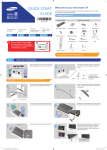
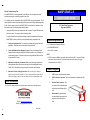
General Troubleshooting Tips:
WARP DRIVE 2.5
If the WARP DRIVE 2.5 is being powered by the USB port of the computer and not the
optional power supply, the following symptoms may occur:
QUICK START GUIDE
If a computer goes into suspended mode, the WARP DRIVE may not be accessible. This is
caused bysome notebook computers cutting off the power to the USB port during suspended
2.5” Hard Drive Enclosure
High speed USB 2.0
mode. Once the power is cut off to the WARP DRIVE, it is not able to be accessed. When
this situation occurs, the following steps should be taken:
Unplug the USB port from the computer and wait 5 seconds. Plug the USB cable back
into the computer. The computer will then detect the drive.
To avoid this situation, an optional power supply may be purchased that will power the
WARP DRIVE at all times and will not drop connection during suspended mode.
1.
Check your light status first. You should have a steady red light when the unit is
powered on. It will blink when the hard drive is being accessed.
System Requirements
♦ PC or Mac with an available USB port
♦ WIN 98SE/ME/2000/XP
2.
Check the Windows Device Manager for errors. Look in the Windows Device
♦ Mac OS 9.x or greater
Manager for any errors that pertain to the USB device drivers. Your USB ports may
not be working properly. A quick way to check is to plug a different USB device into
NOTE:
the port and see if it works.
♦ USB 2.0 supports 480Mbps (maximum) data transfer rate, USB 1.1 supports 12Mbps
(maximum) data transfer rate. To achieve the maximum performance, it is highly
3.
Make sure the hard drive is formatted. Windows will not assign a drive letter to
recommend ed to use USB 2.0.
unformatted hard drives. Please follow the steps in the Knowledge Base article
T4096- 1545 or this tutorial on how to format the hard drive under Windows.
Product Diagram
4.
Make sure the drive is being powered on. Make sure the power adapter is
properly plugged in to the Warp Drive. The use of the hard drive requires the use
of the power supply, otherwise the card reader will be the only thing that works.
Further Information
1.
LED: Power-on and data access indicator.
2.
USB 2.0 Interface Connector: This port is backwards compatible with USB
1.1
3.
External Power Connector: This
1
connection is for an optional power
The “Driver CD” contains a detailed user’s manual. Please read that before contacting support.
supply that is not included with the
unit.
4.
Release tabs: By pushing these
two tabs inward, the rear panel can
be removed to access the hard
drive.
Website: www.trittontechnologies.com
Support: [email protected]
4
QSG V001
3
2
4
Hardware Installation
Software Installation
Cable Connection
WIN ME/2000/XP and Macintosh:
1. Insert the plug of the interface cable
into the Interface Connector.
External Power Source
2. Usually, the external drive gets the
power from USB port of computer, and
will work properly.
1.
(If the power from the
computer is poor, use the
external power)
3. If the power from computer is not enough for the drive, you should use the external
power source. Please read the guide of external power source to learn the usage. Note,
you must plug out the external drive from computer before connect the external
power source.
4. You are now ready to install the device driver.
How to install the hard disk drive into the drive case
1
Push both latches
and then release.
2
Drivers are pre -installed in these operating systems and the unit will install
automatically.
Pull out the PCB
with panel from the
case.
2
3
Insert the hard disk
drive into the
socket on the PCB
WIN 98SE:
***Do not connect the WARP Drive to the computer until you are told to do
so!***
1. Turn on your Windows 98SE computer. Insert the “Driver CD” into the
CD-ROM drive. The CD will then begin to auto play and a welcome screen
will be displayed. If the CD does not auto play, click on “My Computer”,
double click the CD-ROM that contains “Driver CD”, and then double click
“index.htm” to open the welcome screen.
2. Click “Install Device Driver.”
3. Click “USB 2.0 Driver for Windows 98SE.”
4. Click “Install” on the next screen. When a “File Download” dialog prompts
“Would you like to open the file or save it to your computer,” click Open.
The setup program will start immediately.
To Remove the USB driver from WIN 98SE
1.
Make sure the WARP DRIVE is not connected to the computer. Access the
“Control Panel.”
2.
Select “Add/Remove Programs .”
3.
Select “Hi- Speed USB-to- IDE Win98 Driver .”
4.
Select “Remove” and then follow the instructions. The driver will be removed from
WIN 98SE system.
2
4
Secure the drive to
the PCB with screws.
5
Load the PCB with
drive into the case.
6
Push the drive into
case completely.
3