1
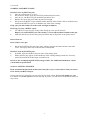
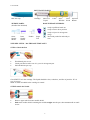
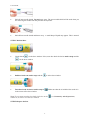
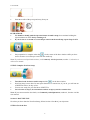
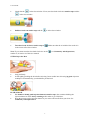
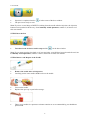
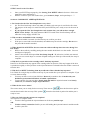
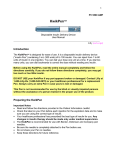
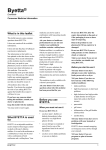
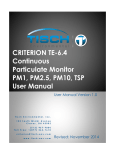
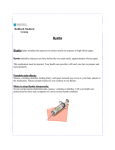
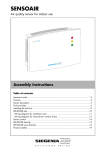
User manual
PEN USER MANUAL
Section 1. WHAT YOU NEED TO KNOW ABOUT YOUR BYETTA PEN
Read this section completely before you begin. Then, move on to section 2 – getting started.
BYETTA 10 micrograms solution for injection, pre-filled pen
(exenatide)
Read these instructions carefully BEFORE using your BYETTA pen. Also read the BYETTA Package
leaflet that comes with the BYETTA pen carton.
You need to use the pen correctly in order to get the most benefit from BYETTA. Failure to follow
these instructions completely may result in a wrong dose, a broken pen or an infection.
These instructions do not take the place of talking with your healthcare professional about
your medical condition or your treatment. If you are having problems using your BYETTA
pen, contact your healthcare professional.
IMPORTANT INFORMATION ABOUT YOUR BYETTA PEN
•
•
•
•
•
•
•
•
•
BYETTA is injected twice a day, the pen contains enough medicine for 30 days. You do not
have to measure any doses, the pen measures each dose for you.
DO NOT TRANSFER THE MEDICINE IN THE BYETTA PEN TO A SYRINGE.
If any part of your pen appears broken or damaged, do not use the pen.
Do not share your pen or needles as this may risk transmission of infectious agents.
This pen is not recommended for use by people who are blind or who cannot see well enough.
Help will be needed by a person trained to use the pen.
Healthcare professionals or other caregivers should follow local or institutional policies
regarding needle handling.
Follow the instructions for hygienic injection technique recommended by your healthcare
professional.
Follow Section 2 only to set up a new pen before first use.
Section 3 of this manual should be used for every injection.
ABOUT INJECTION NEEDLES
Your BYETTA pen is suitable for use with Becton, Dickinson and Company pen injection needles.
Do I use a new needle for each injection?
•
Yes. Do not reuse needles.
•
Remove the needle immediately after each injection. This will help prevent leakage of
BYETTA, keep out air bubbles, reduce needle clogs, and decrease the risk of infection.
•
Never push the injection button on the pen unless a needle is attached.
How do I throw away my needles?
•
Throw away used needles in a puncture-resistant container or as recommended by your
healthcare professional.
•
Do not throw away the pen with a needle attached.
1
User manual
STORING YOUR BYETTA PEN
How do I store my BYETTA pen?
•
Store in a refrigerator (2° to 8°C).
•
Do not freeze. Throw away any BYETTA pen that has been frozen.
•
Once in use, your BYETTA pen should be kept below 25°C.
•
Replace the cap on the pen in order to protect from light.
•
Do not store the BYETTA pen with the needle attached. If the needle is left on, medicine may
leak from the BYETTA pen or air bubbles may form in the cartridge.
Keep your pen and needles out of the reach and sight of children.
How long can I use a BYETTA pen?
•
Use a BYETTA pen for only 30 days after setting up a new pen for first use.
Dispose of a used BYETTA pen after 30 days, even if some medicine remains in the pen.
•
Mark the date when you first used your pen and the date 30 days later in the spaces below:
Date of first use
Date to throw away pen
•
Do not use BYETTA after the expiry date, which is stated on the label and the carton after
‘EXP’. The expiry date refers to the last date of that month.
How do I clean my BYETTA pen?
•
If needed, wipe the outside of the pen with a clean, damp cloth.
•
White particles may appear on the outside tip of the cartridge during normal use. You may
remove them with an alcohol wipe or alcohol swab.
Please see the accompanying BYETTA Package Leaflet. For additional information, contact
your healthcare professional.
Section 2. GETTING STARTED
Read and follow the directions in this section only after you’ve read section 1-what you need to
know about your BYETTA pen.
Set up your new pen just before you use it for the first time. Follow the New Pen Setup only once.
For routine use, do not repeat the New Pen Setup. If you do, you will run out of BYETTA before 30
days of use.
2
User manual
BYETTA PEN PARTS
Blue Pen Cap
Cartridge
NEEDLE PARTS
(Needles Not Included)
BYETTA
Liquid
Label
Dose
Window
Dose
Knob
Injection
Button
DOSE WINDOW SYMBOLS
ready to pull dose knob out
ready to turn to dose position
Outer
Needle
Shield
Inner
Needle
Shield
Needle
ready to inject 10 micrograms
(mcg)
dose knob pushed in and ready to
reset
Paper
Tab
NEW PEN SETUP – DO THIS ONE TIME ONLY
STEP A Check the Pen
•
•
•
Wash hands prior to use.
Check pen label to make sure it is your 10 micrograms pen.
Pull off the blue pen cap.
Check BYETTA in the cartridge. The liquid should be clear, colourless, and free of particles. If it is
not, do not use.
Note: A small air bubble in the cartridge is normal
STEP B Attach the Needle
•
•
Remove paper tab from outer needle shield.
Push outer needle shield containing the needle straight onto the pen, then screw needle on until
secure.
3
User manual
•
Pull off outer needle shield. Do not throw away. The outer needle shield will be used when you
are removing the needle from the pen after the injection.
•
Pull off inner needle shield and throw away. A small drop of liquid may appear. This is normal.
STEP C Dial the Dose
•
Check that the
is in the dose window. If not, turn dose knob clockwise until it stops and the
is in the dose window.
•
Pull dose knob out until it stops and the
•
Turn dose knob clockwise until it stops at
in the centre of the dose window.
is in the dose window.
. Make sure that the 10 with the line under it is
Note: If you cannot turn the dose knob clockwise to the
number 9, in Section 4 of this user manual.
STEP D Prepare the Pen
4
, see Commonly Asked Questions,
User manual
•
Point the needle of the pen up and away from you.
PUSH & HOLD
•
Use thumb to firmly push the injection button in until it stops, then continue holding the
injection button in while slowly counting to 5.
•
If you do not see a stream or several drops come from the needle tip, repeat Steps C & D.
•
Pen preparation is complete when the
is in the centre of the dose window AND you have
seen a stream or several drops come from the needle tip.
Note: If you do not see liquid after 4 times, see Commonly Asked Questions, number 3, in Section 4
of this user manual.
STEP E Complete New Pen Setup
•
•
•
•
Turn dose knob clockwise until it stops and the
is in the dose window.
New Pen Setup is now done. Do not repeat Section 2 for routine use, if you do, you will run out
of BYETTA before 30 days of use.
You are now ready for your first dose of BYETTA.
Go to Section 3, Step 3, for instructions on how to inject your first routine dose.
Note: If you cannot turn the dose knob, see Commonly Asked Questions, number 9, Section 4 of this
user manual.
Section 3. ROUTINE USE
Now that you have done the New Pen Setup, follow Section 3 for all of your injections.
STEP 1 Check the Pen
5
User manual
•
•
•
Wash hands prior to use.
Check pen label to make sure it is your 10 microgram pen.
Pull off the blue pen cap.
•
•
Check BYETTA in the cartridge.
The liquid should be clear, colourless, and free of particles. If it is not, do not use.
Note: A small air bubble will not harm you or affect your dose.
STEP 2 Attach the Needle
•
•
Remove paper tab from outer needle shield.
Push outer needle shield containing the needle straight onto the pen, then screw needle on until
secure.
•
Pull off outer needle shield. Do not throw away. The outer needle shield will be used when you
are removing the needle from the pen after the injection.
•
Pull off inner needle shield and throw away. A small drop of liquid may appear. This is normal.
STEP 3 Dial the Dose
6
User manual
•
Check that the
is in the dose window. If not, turn dose knob clockwise until it stops and the
is in the dose window.
•
Pull dose knob out until it stops and the
•
Turn dose knob clockwise until it stops at
in the centre of the dose window.
is in the dose window.
. Make sure that the 10 with the line under it is
Note: If you cannot turn the dose knob clockwise to the
number 9, in Section 4 of this user manual.
, see Commonly Asked Questions,
STEP 4 Inject the Dose
•
•
Grip pen firmly.
Avoid tightly pinching the skin before injecting. Insert needle into skin using hygienic injection
technique recommended by your healthcare professional.
PUSH & HOLD
•
Use thumb to firmly push injection button in until it stops, then continue holding the
injection button in while slowly counting to 5 in order to get a full dose.
•
Keep the pressure on the injection button as you remove the needle from your skin. See
Commonly Asked Question 4.
7
User manual
•
•
Injection is complete when the
The pen is now ready to reset.
is in the centre of the dose window.
Note: If you see several drops of BYETTA leaking from the needle after the injection, the injection
button was not pushed in all the way. See Commonly Asked Questions, number 5, in Section 4 of
this user manual.
STEP 5 Reset the Pen
•
Turn dose knob clockwise until it stops and the
is in the dose window.
Note: If you cannot turn the dose knob, or if your pen leaks, your full dose has not been delivered. See
Commonly Asked Questions, numbers 5 and 9, in Section 4 of this user manual.
STEP 6 Remove and Dispose of the Needle
•
•
Remove the needle after each injection.
Carefully put the outer needle shield back over the needle.
•
•
Unscrew the needle.
Replace blue pen cap on pen before storage.
•
Throw away needles in a puncture-resistant container or as recommended by your healthcare
professional.
8
User manual
STEP 7 Store Pen for Next Dose
•
•
Store your BYETTA pen properly. (See Storing Your BYETTA Pen in Section 1 of this user
manual for more information.)
When it is time for your next routine dose, go to Section 3, Step 1, and repeat Steps 1 - 7.
Section 4. COMMONLY ASKED QUESTIONS
1. Do I need to do the New Pen Setup before every dose?
•
No. The New Pen Setup is done only once, just before each new pen is used for the first time.
•
The purpose of the setup is to make sure that your BYETTA pen is ready to use for the next 30
days.
•
If you repeat the New Pen Setup before each routine dose, you will not have enough
BYETTA for 30 days. The small amount of BYETTA used in the New Pen Setup will not
affect the 30-day supply of BYETTA.
2. Why are there air bubbles in the cartridge?
•
A small air bubble is normal. It will not harm you or affect your dose.
•
If the pen is stored with a needle attached, air bubbles may form in the cartridge. Do not store
the pen with the needle attached.
3. What should I do if BYETTA does not come out of the needle tip after four tries during New
Pen Setup?
•
Remove the needle by carefully putting the outer needle shield back over the needle. Unscrew
and dispose of properly.
•
Attach a new needle and repeat New Pen Setup, Steps B – E, in Section 2 of this user manual.
Once you see several drops or a stream of liquid coming out of the tip of the needle, the setup is
complete.
4. Why do I see particles in the cartridge after I finish my injection?
Particles or discolouration may appear in the cartridge after an injection. This may happen if the skin
is pinched too tightly or if the pressure on the injection button is released before the needle is removed
from the skin.
5. Why do I see BYETTA leaking from my needle after I have finished my injection?
It is normal for a single drop to remain on the tip of your needle after your injection is complete. If you
see more than one drop:
•
You may not have received your full dose. Do not inject another dose. Consult with your
healthcare professional about how to handle a partial dose.
•
To prevent this, for your next dose, firmly push and hold the injection button in and slowly
count to 5 (see Section 3, Step 4: Inject the Dose).
6. What do the arrows mean?
The arrows mean you are ready for the next step. These arrows
turn the dose knob in the next step. This symbol
ready to reset.
show the direction to pull or
means the dose knob is pushed in and the pen is
7. How can I tell when the injection is complete?
The injection is complete when:
•
You have firmly pushed the injection button in all the way until it stops
and
•
You have slowly counted to 5 while you are still holding the injection button in and the needle
is still in your skin
and
9
User manual
•
The
is in the centre of the dose window.
8. Where should I inject BYETTA?
BYETTA should be injected into your abdomen, thigh, or upper arm using the injection technique
recommended by your healthcare professional.
Front
Back
9. What if I cannot pull, turn, or push the dose knob?
Check the symbol in the dose window. Follow the steps next to the matching symbol.
If
is in the dose window:
•
Pull the dose knob out until
If
•
is in the dose window and the dose knob will not turn:
The cartridge in your BYETTA pen may not have enough liquid to deliver a full dose. A small
amount of BYETTA will always remain in the cartridge. If the cartridge contains a small
amount or looks empty, obtain a new BYETTA pen.
If
and part of the
•
The dose knob was not turned all the way. Continue turning the dose knob clockwise until
is in the centre of the dose window.
appears.
are in the dose window and the dose knob cannot be pushed in:
If part of
and part of
are in the dose window and the dose knob cannot be pushed in:
•
The needle may be clogged, bent, or incorrectly attached.
•
Attach a new needle. Make sure needle is on straight and screwed on all the way.
•
Firmly push the injection button in all the way. BYETTA should come from needle tip.
If
•
•
•
is in the dose window and the dose knob will not turn:
The injection button was not pushed in all the way and a complete dose was not delivered.
Consult with your healthcare professional about how to handle a partial dose.
Follow these steps to reset your pen for your next injection:
- Firmly push the injection button in all the way until it stops. Keep holding the injection button
in and slowly count to 5. Then turn the dose knob clockwise until
appears in the dose
window.
- If you cannot turn the dose knob, the needle may be clogged. Replace the needle and repeat
the step above.
For your next dose, be sure to firmly push and hold the injection button in and slowly count to
5 before removing needle from skin.
Please see the accompanying Package Leaflet. For additional information contact your
healthcare professional.
10
User manual
Pen User Manual was last approved in
12/2013
11