1
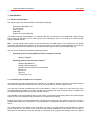
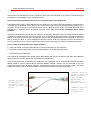
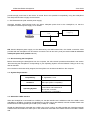
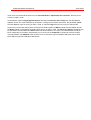
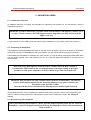
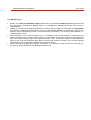
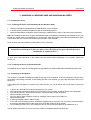
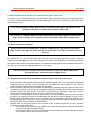
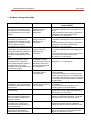
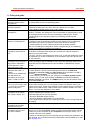
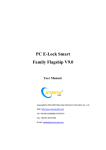
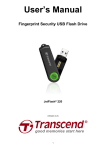
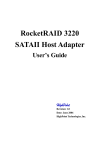
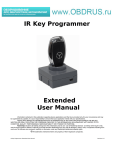
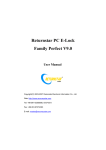
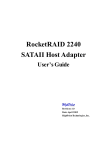
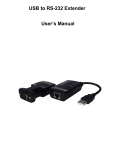
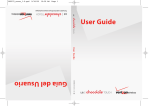
USB2 Data Edition HandyDrive
User Guide
USER'S MANUAL
USB-2 Data Edition HandyDrive
Index
1.- Introduction
1.1.- General unit description
1.2.- Connecting the HandyDrive to a computer
1.2.1.- Connecting the HandyDrive to a USB hub
1.3.- Disconnecting the HandyDrive
1.4.- System Requirements
1.5.- About the USB-2 interface
2.- Macintosh users
2.1.- Installing the extension
2.2.- Formatting the HandyDrive
2.3.- Disconnecting the HandyDrive
2.4.- MacOS issues
3.- Windows 98, Windows 98SE and Windows Me users
3.1.- Installing the driver
3.1.1.- Installing the driver under Windows 98 and Windows 98SE
3.1.2.- Installing the driver under Windows Me
3.2.- Formatting the HandyDrive
3.3.- Disconnecting the HandyDrive
3.4.- Windows 98, 98SE and Me issues
4.- Windows 2000 Professional and Windows XP Home Edition and Professional users
4.1.- Installing the driver
4.1.1.- Configuring the Windows XP write cache
4.2.- Formatting the HandyDrive
4.3.- Disconnecting the HandyDrive
4.4.- Windows 2000 Professional and Windows XP Home Edition and Professional issues
5.- Linux users
5.1.- Installing the driver
5.2.- Connecting the HandyDrive
5.3.- Formatting the HandyDrive
5.4.- Mounting and unmounting the HandyDrive
6. Features
7.- Problem solving quick guide
8.- FAQ quick guide
USB2 Data Edition HandyDrive
User Guide
1.- Introduction
1.1.- General unit description
The following items are delivered within the HandyDrive package:
HandyDrive Data Edition unitCD with driversUser´s manual
USB cableDouble connection USB cable
The USB-2 HandyDrive Data Edition is an external hard disk unit, powered via the USB cable. Should enough
power supply be delivered from the USB system to the HandyDrive, there is no need for an external power
supply to operate the unit.
NB 1 : Should enough power supply not be delivered from the USB system to the HandyDrive, the double
connection USB cable must be used to connect the HandyDrive to the system, as explained later in this manual.
Should the problem not be solved this way, an external power supply must be used to operate the unit.
The unit can be used under the following operating systems:
Operating systems needing additional drivers (included in the CD):
Windows 98/98SE
Operating systems including native support:
Windows Me (Millenium)
Windows 2000 Professional
Windows XP Home Edition and Professional
MacOS 8.6
MacOS 9.x
MacOS X
Linux.(kernel 2.4.x)
1.2.- Connecting the HandyDrive to a computer.The HandyDrive can be hot-plugged to the USB port in a portable or desktop computer. This means that the
connection can take place while the system is up and running, with no need for a system restart.
The hard disk is already formatted with one FAT-32 partition, so that it is ready to be used under any of the
supported Operating Systems. If you wish, the disk can be formatted to other file system types as supported by
your Operating System (see each Operating System section).
The HandyDrive can be operated in either of two modes, in the Bus-Powered mode (without an external power
supply) or in the Self-Powered mode (powered from an external power supply).
Enough power supply must be delivered from the USB system (either from the system´s root port or from the
USB hub where the unit is connected to) for the Handydrive to be operated in the Bus-Powered mode. See NB 1
above.
Two LED indicators are available in the HandyDrive: the green one lights whenever the HandyDrive is getting
power, while the red one lights on and off as the disk is being read/written by the system. Do not move or
disconnect the HandyDrive unless the red light is completely off, as physical disk damage can occur. Before
USB2 Data Edition HandyDrive
User Guide
disconnecting the HandyDrive from the computer, follow the rules described in the section “Disconnecting the
HandyDrive” corresponding to your Operating System.
How to know that the adequate power level is being delivered to the HandyDrive?
If adequate power supply is being delivered to the Handydrive, the green LED (light indication) will light and the
motor will spin up (the drive is very quiet, so you must be very close to the drive to hear the motor spinning up). If
the green LED does not light or the motor does not spin-up, adequate power supply is not being delivered to the
HandyDrive, so additional power is needed. See next section How to solve the inadequate power supply
problem?
Should the HandyDrive be connected to a USB port not supplying adequate current or voltage levels to operate
the disk drive, either the drive's motor will not spin-up and a somewhat rattle noise will be produced by the drive's
heads, or the drive's motor will spin up and down for ever, and the system either will not recognise or will not be
able to access the drive. It is also possible that the disk´s motor could spin-up and the system recognises the
drive, but random errors or system crashes occur during the normal usage. To solve this, see following section.
How to solve the inadequate power supply problem?
1.- Using the double connection USB cable to connect the HandyDrive to two USB ports
2.- Using the external power supply to operate the HandyDrive in the Self-Powered mode
1.- Double connection USB cable
The HandyDrive is delivered with a special USB-2 cable adapter, that can be connected on one side to two USB ports
(either system or hub ports), and on the other side to two USB devices.
Once the cable has been connected to two USB ports, the HandyDrive can be connected to the device connector
labeled “HANDY”, and the second device connector (labeled “RATÓN” –mouse-) can be connected to any Low
Power device (like mouse, keyboard, joystick or those devices powered from their own power supply). This cable
adapter can solve the low current level problem, but it does not solve the low voltage level problem.
System´s side
connectors, to
connect to two
system or hub
ports
“RATON” port to
connect any Low
Power device
like mouse,
keyboard, or
any SelfPowered device
“HANDY” port to
connect the
HandyDrive.
USB2 Data Edition HandyDrive
User Guide
The HandyDrive is
connected to the
“HANDY” port of the
double connection
cable.
Both system´s side
connectors are
connected to two USB
ports at the portable.
2.- Using the external power supply
You must ask your dealer to provide you the power supply cable for your Data Edition HandyDrive.
1.2.1.- Connecting the HandyDrive to a USB hub.The HandyDrive can be connected to the system´s root port, or to a hub port. There are two kinds of USB hubs:
Bus-Powered hubs (powered directly from the USB cable) and Self-Powered hubs (powered from their own
power supply).
1.- Using Bus-Powered hubs (with no external power supply)
Generally speaking, Bus Powered hubs are designed to supply power only to Low Power devices (those drawing
100 mA or less, like keyboards, mouse or joystick, or those powered from their own power supply).
As the HandyDrive draws more than 100 mA, the external power supply is needed when connecting to a BusPowered hub.
Bus-Powered
hub
HandyDrive
HandyDrive´s
power supply
NB: Depending on the hub´s particular design, it may be incompatible with Self-powered devices that are also
able to work in the Bus-powered mode (like the HandyDrive), so that the system cannot work with the device
even if the external power supply is being used. Under this situation, a message stating that “the hub does not
USB2 Data Edition HandyDrive
User Guide
provide enough power level to the device” is issued. Due to this possible incompatibility, using the HandyDrive
with Self-powered hubs is highly recommended.
2.- Self-Powered hubs (with external power supply)
Generally speaking, Self-Powered hubs can deliver adequate power level to the HandyDrive, so that the
HandyDrive´s external power supply is not needed
Self-Powered
hub
Hub´s power
supply
HandyDrive
NB: Should adequate power supply not be delivered by the Self-Powered hub, the double connection cable
provided with the HandyDrive can be used to connect the unit to two hub´s ports (see section How to solve the
inadequate power level problem? above).
1.3.- Disconnecting the HandyDrive
Before disconnecting the HandyDrive from the computer, the safe removal procedures described in the section
“Disconnecting the HandyDrive” corresponding to your Operating System must be followed. Failing to do so may
lead to data loss.
Once the device has been safely stopped, the HandyDrive can be disconnected from the computer.
1.4.- System Requirements:
Compatibility:
Hardware:
Operating System:
PC, Apple/MAC, Linux
USB-2 port (USB-1 compatible)
Windows 98/98SE/Me/2000 Professional/XP
Home Edition and Professional
Mac OS 8.6, 9.x and X
Linux (kernel 2.4.x and later)
1.5.- About the USB-2 interface
When the HandyDrive is connected into a USB-2 port, the data transfer rate is 40fold than that of the USB-1 mode
(480 Mbps or 60 MB/s). Connecting the HandyDrive to a USB-1 port is also allowed, however the data transfer rate
will slow down to that supported by the USB-1 port (12 Mbps or 1.5 MB/s).
Should the HandyDrive be connected into a USB-1 port or hub, it will run at USB-1 transfer rate. Should an external
USB-2 hub be connected into a USB-1 port or hub, all devices connected to the USB-2 hub will run at USB-1 transfer
rate.
USB2 Data Edition HandyDrive
User Guide
My system does not have USB-2 ports available. What can I do?
If the system does not have USB-2 ports available, a USB-2 host adapter card supporting your Operating System
can be installed.
Before acquiring a USB-2 host adapter card, read the manufacturer’s documentation to check whether your
Operating System is supported and whether it provides USB-2 support for your Operating System. Special
attention must be paid to this issue should your Operating System be Windows 98 (First Edition) or MacOS, as
some USB-2 boards support these Operating Systems only in the USB-1 mode.
Before acquiring a USB-2 host adapter card, you must read the manufacturer’s documentation to check whether
your system complies with the minimum requirements specified. For PC environments, a 266 or 333 MHz
Pentium processor with 64 MB of RAM is usually required; for Macintosh environments, a Beige G3 rev. B Power
Macintosh or later is normally required.
To be able to work with your USB-2 Data Edition HandyDrive in the UBS-2 mode, the
installed USB-2 ports must be first recognized by your Operating System.
How to know whether my USB ports are USB-1 or USB-2 ports?
How to know whether the USB port where I have attached my HandyDrive is running at USB-1 or USB-2
mode?
Under Windows, to have the USB-2 ports running into the USB-2 mode, the USB-2 driver must be installed.
Should the USB-2 driver not be installed, the USB-2 ports will run at USB-1 mode. You may run the Device
Manager to check this:
•
•
•
•
Click on My PC with the right hand mouse button
Select Properties on the options menu
Under Windows 98/SE and Me, select the Device Manager tab
Under Windows 2000 and XP, select the Hardware tab and then the Device Manager button
Get into the Universal Serial Bus controllers group and locate all the USB host controllers. Those controllers
named Universal/UHCI or Open/OHCI are USB-1 controllers. Those controllers named Enhanced/EHCI are
USB-2 controllers. Check for yellow or red marks on those controllers. Should one USB-2 card be installed on
the system, one Enhanced/EHCI USB host controller must be found under the Device Manager, unless the USB2 driver is not installed (in this case the controller may appear as an Unknown device). In this case follow the
card instructions to install the USB-2 driver.
Every USB-2 port is USB-1 compatible, so USB-2 ports will show in the Device Manager as one Enhanced/EHCI
USB host controller plus some Universal/UHCI or Open/OHCI USB host controllers, all of them corresponding to
the same USB ports.
To check whether the USB port you have attached your HandyDrive is running at USB-1 or USB-2 mode, the
Device Connection view must be selected:
•
•
Under Windows 98/SE and Me, select the Device connection view radio button
Under Windows 2000 and XP, open the View menu and select the Device by connection option
Open the device tree (by clicking with the primary mouse button on the + sign at the left of device entries) until
the PCI bus device is located. Depending on system configuration, the PCI bus device can be located at the
second or third device branch. Open the PCI bus branch and locate all the USB host controllers (on the PCI
bus branch there may be a PCI bridge device, whose branch must also be opened to locate possible additional
USB host controllers). Open all branches at all of the USB host controllers until the HandyDrive is located. If the
HandyDrive is located at the branch of one Enhanced/EHCI host controller, then the port is running in USB-2
USB2 Data Edition HandyDrive
User Guide
mode, but if it is located at the branch of one Universal/UHCI or Open/OHCI host controller, then the port is
running in USB-1 mode.
Under MacOS, open the Apple System Profiler and select the Devices and volumes tab. The HandyDrive
appears next to one of the USB ports in the system. Looking into the device information, the parameter speed
will show Full if the port is running in USB-1 mode, or will show High if the port is running in USB-2 mode.
Under Linux, to have the USB-2 ports running into the USB-2 mode, the EHCI module must be loaded. Should
the EHCI module not be loaded, the USB-2 ports will run in USB-1 mode. The lsmod and dmesg commands can
be executed to check whether the EHCI module has been loaded or not. Some Linux distributions include the
EHCI module but do not load it automatically, so you must run the modprobe command to have the module
manually loaded. The USBView utility can also be run to check the type of available USB ports and to check
what USB port type the HandyDrive attached to.
USB2 Data Edition HandyDrive
User Guide
2.- MACINTOSH USERS
2.1.- Installing the extension
No additional extension is required. The HandyDrive is supported under MacOS 8.6, 9.x and MacOS X with the
USB native extensions.
Should the system be MacOS 8.6, you must check that the native USB Support version is 1.3.5
or above. On the contrary, the USB Support must be upgraded (you may do that from the
Apple’s web site)
To get information on the USB-2 ports and USB-2 support availability on your system, please see section 1.5.
2.2.- Formatting the HandyDrive
The HandyDrive is already formatted and ready for use with a FAT-32 partition, so its icon will appear on the desktop
when being connected. If reformatting the disk is not required, you may skip this section and jump to section 2.3.
If reformatting the HandyDrive is required at any other moment, you may do that by selecting the Erase Disk option
from the Finder's Special menu under MacOS 8.6 or 9.x, or by the Disk Utility under MacOS X. HFS format is not
recommended.
Due to the large disk capacity, if MacOS native format is desired, HFS+ format is
recommended. HFS format is not recommended due to the high wasting of disk space
produced as disk space assigned to each file is much larger than the real file size.
Should the DOS format be the only available choice in the Erase Disk utility, File Sharing
Control Panel must be disabled in the Extension Manager to be able to reformat the
HandyDrive into the HFS+ format.
Once the disk has been reformatted, File Sharing may be enabled again if desired.
Should Windows and/or Linux compatibility be desired, DOS (FAT-32) format must be used. Reformatting the
disk to the DOS format by Disk Utility under MacOS X is NOT recommended (see section 2.4.- MacOS X
issues).
2.3.- Disconnecting the HandyDrive
Before disconnecting the HandyDrive, please Eject the disk by throwing it into the can. After the
HandyDrive´s icon has disappeared from the desktop, the HandyDrive can be safely disconnected.
Read section 2.4.
USB2 Data Edition HandyDrive
User Guide
2.4.- MacOS issues
•
•
•
•
MacOS 10.0.x does not adequately support DOS format. It is recommended NOT to use DOS volumes under
this environment. Upgrading the MacOS version or reformatting the HandyDrive into the HFS+ format is
recommended.
MacOS 10.1.x and later do support DOS format, but DOS volumes created by Disk Utility are incompatible
with Windows. Additionally, both MacOS 9 and X can take several minutes in mounting the volume on the
desktop. Should reformatting the disk to the DOS format be required, it can be done under MacOS 9 or
under Windows or Linux.
When attaching a FAT-32 disk to MacOS 10.1.x, a verification of the whole partition is conducted by the
system before the disk is mounted. When a large volume of data is contained in the disk, this verification can
take some minutes, taking longer when attached to a USB-1 port. The red LED indicator of the HandyDrive
lights on and off as this verification takes place. If avoiding this situation is desired, you can either upgrade
the MacOS version or reformat the HandyDrive to the HFS+ format.
When mounting or ejecting DOS volumes, sometimes it is necessary to move the mouse to have the icon
mounted on or unmounted from the desktop under MacOS X.
USB2 Data Edition HandyDrive
User Guide
3.- WINDOWS 98, WINDOWS 98SE AND WINDOWS Me USERS
3.1.- Installing the driver
3.1.1.- Installing the driver under Windows 98 and Windows 98SE
•
•
•
Insert the HandyDrive's CDROM into the CDROM drive of your computer.
A window showing several HandyDrive models is automatically opened.
Select the Data Edition HandyDrive and then select the “Install the driver” option. Follow the screen instructions.
NB: If the installing window does not open automatically when the CDROM is inserted into the CDROM drive, it may
be that your system does not automatically run Autorun files. Open the Explorer and locate the CDROM drive letter.
Then double-click on the Autorun file located in the root folder of the CDROM.
Once the driver has been installed, the HandyDrive can be connected.
Should the HandyDrive be connected before installing the driver, the Windows New Hardware
Found Wizard will open. In this case please close the Wizard and proceed with the driver
installation as explained above.
To know how to get information on the USB-2 ports and USB-2 support availability on your system, please see
section 1.5.
3.1.2.- Installing the driver under Windows Me
No additional driver is required. The HandyDrive is supported by the Windows Me native USB Mass Storage driver.
3.2.- Formatting the HandyDrive
The HandyDrive is already formatted and ready for use with a FAT-32 partition, so its icon will appear in My PC and in
the Explorer when being connected. If reformatting the disk is not required, you may skip this section and jump to
section 3.3.
If reformatting the HandyDrive is required at any other moment, you may do that by the Format option in the drive’s
menu:
•
•
•
•
•
•
•
•
•
In My PC or in the Explorer, locate the HandyDrive´s icon or letter.
Click with the right hand mouse button on the HandyDrive´s icon or letter, so that the device menu will appear.
From the device menu, select the Format option. The Format Disk window will appear.
Select Complete Format type.
You may wish to give the partition a name by entering a volume name in the LABEL box.
Select the Start button.
A warning message is shown. Select Accept.
At the end of the formatting process, Scandisk is suggested to be executed. You may wish to verify the partition
by executing Scandisk (this may take a long time, as the disk surface is being verified).
The formatting process is over. The HandyDrive can be now accessed and data can be read/written on it.
The file system being done is FAT-32, so that the volume is compatible with MacOS and Linux.
USB2 Data Edition HandyDrive
User Guide
3.3.- Disconnecting the HandyDrive
Before disconnecting the HandyDrive, the device must be stopped by the "Stop and Eject
Hardware" utility, located at the right side of the Task Bar (its icon is that of a PCMCIA card
with an arrow above it).
By selecting this icon, all removable drives along with their respective logical letters will be shown. Select the
HandyDrive and select Stop. Once the confirmation dialog box is shown, the HandyDrive can be safely disconnected.
Under Windows 98, the right hand mouse button must be used to select the Stop and Eject icon.
3.4.- Windows 98 and 98SE issues
This section includes VERY IMPORTANT information, applicable only when two or more
partitions are going to be created in the HandyDrive. This is only recommended to advanced
users.
The HandyDrive is already formatted and ready for use with a FAT-32 partition. Should you want to partition the
HandyDrive into two or more partitions you can do that by the FDISK utility, but following restrictions must be
observed:
•
Due to a limitation in the Windows 98 and Windows 98SE FORMAT utility, formatting a partition in a USB or
firewire hard disk drive starting above 8 GB is erroneously done. This is to say, the sum of the capacity of
the primary partition plus the capacities of any Logical Units except the last one cannot be greater than 8
GB. For example, if two partitions are being made, the primary partition cannot be greater than 8 GB. If three
partitions are desired, the sum of the primary partition plus the first logical unit cannot be greater than 8 GB.
A general rule to check that this requirement is met, is that the last Logical Unit created in the HandyDrive
must have a capacity greater than the total HandyDrive capacity minus 8 GB. This is to say:
•
•
•
•
On the 40 GB HandyDrive, the last Logical Unit must have a capacity greater than 32 GB.
On the 60 GB HandyDrive, the last Logical Unit must have a capacity greater than 52 GB.
On the 80 GB HandyDrive, the last Logical Unit must have a capacity greater than 72 GB.
On the 100 GB HandyDrive, the last Logical Unit must have a capacity greater than 92 GB.
Windows Me does not have this limitation, so that FDISK can be used to partition the disk into any number of
partitions of any size.
USB2 Data Edition HandyDrive
User Guide
4.- WINDOWS 2000 PROFESSIONAL AND WINDOWS XP HOME EDITION AND
PROFESSIONAL USERS
4.1.- Installing the driver
No additional driver is required. The HandyDrive is supported by the Windows 2000 and XP native USB Mass
Storage drivers.
To know how to get information on the USB-2 ports and USB-2 support availability on your system, please see
section 1.5.
4.1.1.- Configuring the Windows XP write cache
You may speed-up disk write operations by activating the Windows XP write cache. To do that:
•
•
•
•
•
•
Open My PC and click on the HandyDrive’s icon with the right hand mouse button
On the drive’s menu select the Properties option
Select the Hardware tab
A list of all available disk drives is shown. Double click on the HandyDrive and select the Properties button
Open the Directives tab
Check the Configure for performance box and deselect the Enable the disk write cache box (this option
has no utility and if disabled Windows XP will not ask for a system restart).
This procedure has to be done only once. Windows will remember this configuration for all subsequent
attachments of the HandyDrive.
4.2.- Formatting the HandyDrive
The HandyDrive is already formatted and ready for use with a FAT-32 partition, so its icon will appear in My PC and in
the Explorer when being connected. If reformatting or repartitioning the disk is not required, you may skip this section
and jump to section 4.3.
If reformatting the partition is required at any other moment, you may do that by the Format option in the drive’s menu,
but following restrictions must be observed:
•
Windows 2000 Professional and Windows XP Home Edition and Professional cannot format to the FAT32 file system partitions greater than 32 GB.
Partitions greater than 32 GB can be formatted to the FAT-32 file system under Windows 98 / SE / Me, Linux and
MacOS 9.
Optionally the HandyDrive can be partitioned into partitions smaller than 32 GB so they can be formatted to the FAT32 file system under Windows 2000 or XP.
If desired the HandyDrive can be formatted to the NTFS file system, but then the NTFS partitions will only be
accessible under Windows 2000 or XP.
Partitions must be created by the Disk Administrator. To do that you must log in the system with Administration rights.
To open the Disk Administrator you may click on My PC with the right hand mouse button and select the Administrate
option. The Disk Administration link is located on the list at the left of the window.
If Disk Administrator asks for permission to write a signature onto the disk, YES must be selected. Otherwise the
HandyDrive will be put in off-line status, so you will not be able to create the partitions.
USB2 Data Edition HandyDrive
User Guide
Locate the HandyDrive drive and right-click on the disk space to get the options menu
The partition may be formatted from within the Create Partition Wizard (one-step creating and formatting procedure),
or it can be formatted afterwards either from the Disk Administrator or from My PC or Explorer (by the Format option
within the drive's menu).
FAT-32 (for partitions smaller than 32 GB) or NTFS file systems can be selected, but NTFS
partitions will only be accessible under Windows 2000 or XP.
See section 4.4.- Windows 2000 Professional and Windows XP Home Edition and Professional
issues, about creating FAT-32 partitions and about Windows 2000´s Disk Administrator
4.3.- Disconnecting the HandyDrive
Before disconnecting the HandyDrive, it must be stopped by the "Stop and Eject Hardware"
utility, located at the right side of the Task Bar (its icon is that of a PCMCIA card with an arrow
above it).
By selecting this icon, all removable drives along with their respective logical letters will be shown. Select the
HandyDrive and select Stop. Once the confirmation dialog box is shown, the HandyDrive can be safely disconnected.
After data has been written onto the disk under XP, it is possible that stopping the device is not allowed at first time. In
this case you can just retry the stopping procedure for a second time.
See next section 4.4.- Windows 2000 Professional and Windows XP Home Edition and
Professional issues, about issues when stopping devices.
4.4.- Windows 2000 Professional and Windows XP Home Edition and Professional issues
•
•
•
•
Due to a limitation in the Windows 2000 Professional’s Disk Administrator, when a one-step partition creating and
formatting process is executed, it may be possible that a formatting error will be reported. In this case, the
partition (already created) must be selected and formatted again.
Due to a limitation in Windows XP Home Edition and Professional, USB disks cannot be ejected if a view of them
is opened in the Explorer or My PC (an error message is reported by the Stop and Eject utility, stating that some
program is making use of the device). To be able to Stop and Eject the HandyDrive, make sure to close or
change the view in the Explorer or My PC, then run the Stop and Eject utility again.
The execution of some programs (backup, antivirus and so on) may sometimes prevent the Stop and Eject
procedure from stopping the device (a message stating that the device cannot be stopped is shown), even if
those programs have already finished. This is not a problem with the HandyDrive but with those programs or the
Operating System itself. You can try to close all programs and/or close and open again the Windows session. If
this does not work, the only solution is to restart Windows.
Windows 2000 and XP cannot format to the FAT-32 file system a partition greater than 32 GB. If a partition
greater than 32 GB is created, then:
o Under Windows XP, NTFS is the only available choice when formatting either by the Disk Administrator
or by the Format option of the drive’s menu.
o Under Windows 2000, FAT-32 is an available choice when formatting by the Disk Administrator, but the
error message “Volume size is too large” is shown.
USB2 Data Edition HandyDrive
o
User Guide
Under Windows 2000, FAT and FAT-32 are available choices when formatting by the Format option of
the drive’s menu, but in both cases the error message “Windows could not finish formatting” is shown.
To be able to format a partition to the FAT-32 file system, the maximum size that can be specified in the
Wizard is 32.768 MB under Windows XP, and 32.769 MB under Windows 2000. Due to this limitation, should
you wish to format to the FAT-32 file system a partition greater than 32 GB, it must be formatted under
Windows 98/SE/Me, that have no such limitations.
USB2 Data Edition HandyDrive
User Guide
5.- LINUX USERS
5.1.- Installing the driver
No additional driver is required. Linux includes native USB-2 and USB Mass Storage support from kernel 2.4.18, and
there are also available patches for earlier 2.4.x versions
To know how to get information on the USB-2 ports and USB-2 support availability on your system, please see
section 1.5.
5.2.- Connecting the HandyDrive
The HandyDrive is assigned an SCSI device name (sdx). The dmesg command may be used to locate what device
name was assigned.
5.3.- Formatting the HandyDrive
The HandyDrive is already formatted and ready for use with a FAT-32 partition. If reformatting or repartitioning the
disk is not required, you may skip this section and jump to section 5.4.
If reformatting or repartitioning the HandyDrive is required at any other moment, you must be superuser .
Partitions are created by fdisk. Following is the command line to run fdisk on the sda device:
fdisk /dev/sda
Linux type partitions are created by default, so if another partition type is desired the partition type must be changed
before exiting fdisk. You may do that by selecting the t option. To create a FAT-32 partition, the “c” partition type must
be selected.
Once the partition has been created it can be formatted by mkfs. If you have created FAT-32 partitions, then the
mkfs.msdos command must be used instead:
mkfs.msdos –F 32 /dev/sda1
The Dosutils package must be installed for mkfs.msdos command to be used.
This process takes a while and no progress indication is shown. You can confirm the formatting is taking place by
looking at the red LED indication on the HandyDrive.
5.4.- Mounting and Unmounting the HandyDrive
The HandyDrive must be mounted to have the disk accessible. Likewise, the HandyDrive must be unmounted
before disconnecting it from the computer.
If you are running a graphic environment, disk partitions have a device menu available from where partitions can
be mounted and unmounted. If you are running a command line environment, the mount and umount
commands must be used. The following command mounts the first partition on the sda device onto the dir folder
(the folder where the disk is to be mounted must actually exist or be previously created):
mount /dev/sda1 /dir
USB2 Data Edition HandyDrive
User Guide
The following command unmounts the partition that is actually mounted on the dir folder:
umount /dir
USB2 Data Edition HandyDrive
6. Features
Size
135 mm x 75 mm x 15 mm
Weight
180 gr.
Optional AC Adapter
The unit is powered from the USB port. The optional
power supply output is DC 5V / 1,7 A
Interface
USB 2 (60 MB/s), compatible with USB 1
Hard disk
40 GB
60 GB
80 GB
100 GB
Accessories
USB cable
Double connection USB cable
CD with drivers
User’s Manual
User Guide
USB2 Data Edition HandyDrive
User Guide
7.- Problem solving quick guide
Problem
Root cause
.- The HandyDrive´s LEDs do not
light when connecting the drive to
the computer or to a self-powered
hub (powered from its own power
supply)
.- Adequate power
supply is not being
delivered to the
HandyDrive.
.- Rattle noise from the disk´s motor
and heads is produced when
connecting the HandyDrive to the
computer or to a self-powered hub,
and the LEDs do not light
permanently (they flash all the time)
.- The disk´s motor does spin-up
and the drive is recognized by the
system, but read/write operation is
not stable, and/or system hangs
during the normal operation of the
drive.
.- When connecting the HandyDrive
to a Bus-Powered hub, I get a
message that the hub cannot
deliver adequate power supply to
the USB device, even if the
HandyDrive is being powered from
its own power supply.
.- File transfer issues
.- Adequate power
supply is not being
delivered to the
Handydrive.
.- When disconnecting the
HandyDrive, I get a message that
an USB device has been unsafely
disconnected.
.- How do I format the HandyDrive
under MacOS?
.- Under MacOS 9, the Erase Disk
utility only shows the DOS option.
How to format the HandyDrive to
the HFS+ format?
.- When connecting/ejecting the
HandyDrive, the volume is not
mounted/unmounted on/from my
MacOS X desktop.
.- When formatting the drive to the
DOS format under MacOS X,
Windows does not recognize the
.- Adequate power
supply is not being
delivered to the
Handydrive.
Solution (see the User’s Manual for
more details)
.- Use the special double connection USB cable
to connect the HandyDrive to the computer or to
the hub.
.- Use the external power supply to operate the
HandyDrive in the Self-Powered mode.
See section 1.2 in the manual
.- Use the special double connection USB cable
to connect the HandyDrive to the computer or to
the hub.
.- Use the external power supply to operate the
HandyDrive in the Self-Powered mode.
See section 1.2 in the manual
.- Use the special double connection USB cable
to connect the HandyDrive to the computer or to
the hub.
.- Use the external power supply to operate the
HandyDrive in the Self-Powered mode.
See section 1.2 in the manual
.- Use a Self-Powered hub
.- The hub is not
compatible with Selfpowered devices that are See section 1.2.1 in the manual
also able to work in the
Bus-powered mode (like
the HandyDrive).
.- Driver issue or
connecting issue or
powering issue
.- Under Windows 98/SE make sure the driver is
correctly installed.
.- Check the HandyDrive is correctly powered
and the green LED indicator is on permanently.
.- Check the USB cable connections. Check that
the red LED indicator flashes while file transfers
are taking place.
.- The HandyDrive has
.- The device must be stopped before
not been stopped before disconnecting it.
disconnecting it.
See the Disconnecting procedure for your
operating system in the User Manual
.- By the Erase Disk utility in the Finder’s
Special menu or by the Disk Utility (MacOS X).
See section 2,2 in the manual
.- MacOS 9 configuration .- The File sharing control panel must be
disabled in the Extension Manager. The Erase
Disk utility will then show the HFS+ option.
.- MacOS X issue
.- Sometimes the FAT-32 volume is not
mounted/unmounted in/from the MacOS X
desktop until after the mouse has been moved.
.- MacOS X issue.
.- The DOS format made by Disk Utility is not
correct. The volume may be formatted under
MacOS 9 (or Windows or Linux).
USB2 Data Edition HandyDrive
partition and MacOS takes a long
time to have the disk mounted.
.- I have many problems under
MacOS X 10.0.x and I have even
lost data.
User Guide
.- MacOS 10.0.x issue
.- DOS format is not adequately supported by
MacOS 10.0.x. Upgrading the MacOS version
or reformatting the HandyDrive to the HFS+
format is recommended.
.- After having used the HandyDrive .- MacOS X management .- When files or folders are copied to a DOS
under MacOS X, I see many
of DOS volumes.
volume under MacOS X, depending upon the
duplicated files under MacOS 9,
MacOS version a control file for each one, with
Windows and Linux.
the same name but preceded by a dash, is also
created. These files are not seen under OS X
but are visible under other operating systems.
.- A yellow or red mark is shown
next to the HandyDrive in the
Device Manager (Win98/98SE)
.- The disk icon does not appear in
My PC when I connect the
HandyDrive.
.- The driver has not
been correctly installed.
.- Reinstall the driver.
.-. USB connection issue
or Operating System
issue
.- Check if yellow or red marks are shown in
Device Manager.
.- Check if the driver has been successfully
installed under Windows 98/SE.
.- Disconnect the HandyDrive from the USB port
and reconnect again after 10 seconds.
.- Restart Windows.
.- I cannot Stop the device under
Windows XP or 2000
.- Windows XP and 2000
issue
Stop the HandyDrive again after trying one or
some of the following actions:
.- Under XP close all open views of the
HandyDrive in My PC or Explorer, and then try
to stop it again.
.- Even if all views are closed, sometimes XP
cannot stop the device for the first time if data
has been written onto the disk. Retry for a
second time.
.- Close all programs making use of the disk
(backup, antivirus and so on).
.- Under Windows 2000, open and close the
Disk Administrator.
.- Close and open again the Windows session.
.- If nothing works, restart Windows
.- You may divide the disk space into several
partitions shorter than 32 GB.
.- You can create and format a FAT-32 partition
larger than 32 GB under Windows 98/98SE and
Me. It will be accessible under Windows 2000
and XP
See section 4.4 in the User Manual
.- Install the Dosutils package
.- Alternately, the disk may be formatted under
Windows or MacOS 9.
The FAT-32 file system has a file size limitation
on 4 GB.
.- You must divide your backup copies into
pieces shorter than 4 GB.
.- When trying to format the
.- The partition is larger
partition to the FAT-32 format under than 32 GB (Windows
Windows 2000 or XP, I always get 2000 and XP limitation)
the error that “the volume size is
too large” or “Windows could not
finish the format operation”.
.- I don’t find the mkfs.msdos
command to format the HandyDrive
under Linux
.- My HandyDrive has much free
space left but I cannot do a backup
(or write a file) larger than 4 GB.
.- The Dosutils package
is not installed
.- FAT-32 file system
limitation
USB2 Data Edition HandyDrive
User Guide
USB2 Data Edition HandyDrive
User Guide
8.- FAQ quick guide
Question
.- Can I install and boot the
Operating System off the
HandyDrive?
.- What are the supported
Operating Systems
.- How can I format the
HandyDrive?
.- How many partitions can I
create in my HandyDrive?
.- Can I access the
HandyDrive under DOS or
NT?,
.- Can I access the
HandyDrive by booting off a
floppy disk or CDROM or
booting Windows in the
System Symbol mode?
.- How to know whether my
USB ports are USB-1 or
USB-2?
.- How to know whether the
port attached to the
HandyDrive is running at
USB-1 or USB-2 mode?
.- I have not got a USB 2.0
port in my PC, but only USB
1.1. How can I access the
USB-2 HandyDrive?
.- Can I format the
HandyDrive to the NTFS /
HFS / HFS+ / EXT2, etc?
.- Can I share the
HandyDrive among Mac,
Windows and Linux?
.- How can I work with my
HandyDrive under Linux?
Any driver needed?
Answer
.- No. Booting off USB Mass Storage Devices would need to be supported both
by system BIOS and by the Operating System.
.- Windows 98 / 98SE / Me / 2000 Professional and XP Home Edition and
Professional, MacOS 8.6, 9.x and X and Linux (kernel 2.4.x or later).
.- Only Windows 98/SE need a driver to be installed.
The HandyDrive is delivered already partitioned and formatted with a FAT-32
partition. If needed, the HandyDrive can be reformatted or repartitioned by using
the Operating System tools. See the “Formatting the HandyDrive” section
corresponding to your Operating System for formatting procedures and
limitations.
.- Only one volume can be created by the Erase Disk utility under MacOS 8 and
9. Should the disk be previously partitioned, each partition can be individually
reformatted, but number of partitions or their sizes cannot be changed.
,.- Multiple partitions can be created under all other operating systems.
See the “Formatting the HandyDrive” section corresponding to your Operating
System for formatting procedures and limitations.
.- USB is not supported by either DOS or NT. The only way to have the
HandyDrive accessible under DOS or NT would be if it could be supported
directly by the system BIOS.
.- Anyway, FAT-32 is not supported by DOS or NT, so that the HandyDrive would
be partitioned into 2 GB FAT partitions or be formatted to the NTFS format (only
for use under NT).
.- As of today, the only system supporting USB Mass Storage Devices when
booting off a floppy disk or CDROM is Linux. Boot CDs and floppy disks can be
generated, and microdistributions are also available in CDROM from several
parties.
See the section 1.5 of the User Manual for more details:
.- Under Windows, open the Device Manager and look for the USB Host
Controllers. Universal (UHCI) and Open (OHCI) Host Controllers are USB-1,
whereas Enhanced (EHCI) Host Controllers are USB-2.
.- Under MacOS, you can check your USB ports in the Apple System Profiler.
.- Under Linux, you can check whether the EHCI driver has been loaded by
lsmod and dmesg commands. The USBView utility can also be used to check
the installed USB ports.
.- You may connect the USB-2 HandyDrive to a USB-1 port but it will run at the
slower USB-1 transfer rate. You can install a USB-2 host adapter card in your
system (in this case, please check whether the card does support your operating
system in the USB-2 mode). USB-2 transfer rate is 40fold the USB-1 rate. See
section 1.5 in the User Manual for more details.
Yes you can, but the HandyDrive will only be accessible under the Operating
Systems supporting the relevant format:
.- MacOS supports both FAT-32 and HFS+.
.- Windows 98/SE/Me support FAT-32
.- Windows 2000/XP support both FAT-32 and NTFS.
.- Linux supports FAT-32 and native types (EXT, EXT2). NTFS is supported only
for reading.
.- Yes as all them support the FAT-32 file system.
.- USB-2 is supported from kernel 2.4.18 and patches are available for earlier
versions 2.4.x. Should the EHCI module not being automatically loaded, manual
loading may be accomplished by the modprobe command (see section 1.5 of
the User manual for more details).
.- Details on formatting and device mounting and unmounting are explained in the
User Manual, and a comprehensive technical bulletin is also available at our web
site es.fujitsu.com
USB2 Data Edition HandyDrive
User Guide