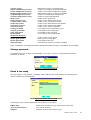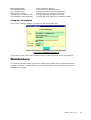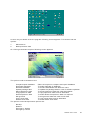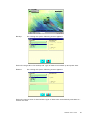
1
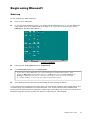
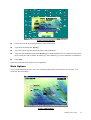
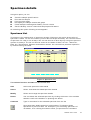
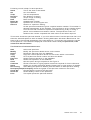
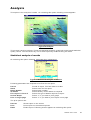
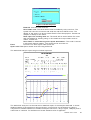
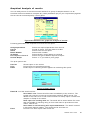
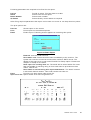
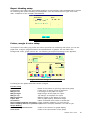
Rheosoft
R
Software for
Future Foundation
Rheometer
User’s Guide
Req u ires
Microsoft
Windo ws
XP/2000/Me/98Se
ffinstruments.com
November 2002
Busysoft Systems Private Limited
Future Foundation
Mercury House 16 Community Centre, Wazirpur Industrial Area Delhi 110052
Phone:(O)+91-011-27428044 Fax:+91-011-27373011, Mobile:+91-9810068112 email:[email protected]
Rheosoft
tm
User’s Guide
November 2002
Busysoft Systems Private Limited
Rheosoft User Manual
Copyright © 2001 Busysoft Systems Pvt. Ltd.. All rights reserved.
No part of this publication may be reproduced, in any form or by any means, without prior written
permission from Busysoft Systems Pvt. Ltd..
Rheosoft, Busysoft, ViscoSoft are registered trademarks, and is used by Busysoft Systems Pvt. Ltd.
Microsoft, W indows, W indows NT, W indows 2000 and their respective logos are registered
trademarks of Microsoft Corporation in the United States and other countries.
All other product names mentioned in this guide may be trademarks or registered trademarks of
their respective companies and are hereby acknowledged.
Disclaimer
Busysoft makes no representations or warranties with respect to the contents of this publication
and specifically disclaims any implied warranties of merchantability or f itness for any particular
purpose. Further, Busysoft reserves the right to revise this publication without notice.
Warranty
The software and related documentation are prov ided “AS IS” and without warranty of any kind.
Busysoft expressly disclaims all warranties, express or implied, including, but not limited to, the
implied warranties of merchantability and fitness for a particular purpose. Busysoft does not
warrant that the functions contained in the software will meet your requirements, or that the
operation of the software will be uninterrupted or error-free, or that defects in the software will be
corrected. Furthermore, Busysoft does not warrant or make any representations regarding the use
or the results of the use of the software or related documentation in terms of their correctness,
accuracy, reliability, or otherwise. No oral or written information or advice given by Busysoft or a
Busysoft authorized representative shall create a warranty or in any way increase the scope of this
warranty. Should the software prove defective, you (and not Busysoft or a Busysoft authorized
representative) assume the entire cost of all necessary servicing, repair, or correction.
Under no circumstances, including negligence, shall Busysoft be liable for any incidental, special,
or consequential damages that result from the use or inability to use the software or related
documentation, even if Busysoft or a Busysoft authorized representative has been advised of the
possibility of such damages. In no event shall Busysoft’s total liability to you for all damages,
losses, and causes of action (whether in contract, tort (including negligence) or otherwise) exceed
the amount paid by you for the Software.
Contents
Chapter 1
Introduction
What is Rheosoft?
How Rheosoft system works?
6
Main steps
New stock addition
Specimen addiion & testing
Analysis of results
Hardware and Software requirements
7
Rheosoft Installation
8
Hardware Requirements
Software Requirements
Other Requirements
Computer settings
Prepare for installation
Install Rheosoft
Chapter 2
Before you begin using Rheosoft
9
Begin using Rheosoft
10
Specimen Details
13
Startup
Main options
Specimen List
Specimen Parameter
Add a new specimen
Test specimen
Printing Run time report
Modify a Specimen details
Delete a Specimen Details
Check Quality control of specimen
Show Quality control status of specimen
Stock Details
Stock List
Stock Parameter
20
Add a new stock
Modify a Stock Details
Delete a Stock Details
Print Stock details
Stock & Control limits
Analysis
24
Setup
29
Statistical analysis of results
Graphical analysis of results
Statistical quality control
Introduction
Configuration
Calibration
Report Heading setup
Printer, margin & colour setup
Change Password
Email & Fax setup
User and permissions
Database maintenance plan
Machine maintenance info(Only for maintenance staff)
Machine statistics
Company information
Introduction
What is Rheosoft?
The Rheosoft software is for Future Foundation Rheometer. The software is connected with
the Rheometer and controls the specimen testing, calculates results and analyses the test
results. The complete details of specimens, specif ications, test results, quality control status
are kept in its base.
The main features of the program are:
l
l
l
l
l
l
Keeps the record of stock with control limits
Tests the specimens and calculates the results in real-time
Keeps the record of tested specimen which can be viewed any time
Prints the run time report
Performs powerful graphical analysis on results, view results of a period with statistical and
graphical presentation for quality control.
The specimen reports can be printed, emailed (requires fax/modem and and a internet
connection) or faxed (requires fax/modem).
The user can add, modify the required details in the system through a user-f riendly menu
driven operation.
How Rheosoft system works?
Main steps
Rheosoft is divided into three basic steps:
l
l
l
New Stock Addition
Specimen addition and testing
Analysis of results
New Stock Addition
This is the f irst step for testing the specimen. The compound details are to be f irst set in this
option. The user has to f ill the compound identification, testing temperature, torque arc and run
duration. The user can also set control parameters, quality control gates and pass fail criteria.
All the specimen thus tested are compared with these parameters to do parameter analysis of
the results.
Specimen Addition and testing
After adding the stock compound details the user can now test the specimen. The specimen
details are first added specifying the compound to be tested, batch number and operator
name. A run test on the compound is perf ormed and all the results are calculated
automatically. The specimen results can be seen using a show quality control option. The
specimen testing graph (Rheograph) and calculated parameters are shown on the screen.
Analysis of results
After testing the specimens ov er a time period the user can compare the results using
graphical and statistical analysis. The statistical analysis can also help in setting control
parameters of stocks.
Rheosoft User’s Guide
6
Hardware and Software requirements
Hardware Requirements
Rheosoft program is used with computers having the W indows based operating systems. For
maximum performance following configuration is required.
Configuration
Minimum Requirement
Best Performance
Processor
Memory
Floppy Drive
Hard Disk
Monitor
Key Board
OS
CD ROM
Pentium Class CPU
32 MB RAM
1.44
1.2 GB or more
Minimum Resolution 800x600
Standard
W indows 95/98/2000/NT
Any CD ROM
P III 650 Mhz or more
128 MB RAM
same
10 GB or more
same
same
same
same
Printer
DESKJET/INKJET /LASER
same
The computer hardware technology is a ever changing f ield and the computer configuration
keeps on changing with time. User must have a computer which is in accordance to above
configuration and runs following software. It does not matter if the computer has a speed of
600 MHz instead of 650 Mhz mentioned above. A higher conf iguration or a computer with more
speed is good for quick functioning of the software.
Software Requirements
This system should be installed with:
l
l
W indows operating system mainly windows-95/98/NT or 2000.
Internet explorer 5.0 or above
Other Requirements
This system should be installed with:
l
l
l
l
l
l
Modem for Internet and fax connection
Telephone line for modem
Microsoft MS-outlook or Internet email account such as Hotmail/Yahoo mail f or emailing.
Fax software f or faxing reports (Such as Bitware fax, W infax etc.)
Microsoft MS-Excel if you want to open and edit the reports under ms-excel
Internet connection from a service provider.
Rheosoft User’s Guide
7
Rheosoft installation
To install and operate Rheosoft, your computer and Rheosoft must meet the following
requirements.
Computer settings
l
l
l
l
l
l
l
Microsoft® W indows® 95, W indows 98, or W indows NT. 4.0 operating system
IBM-compatible computer with a PII or higher processor
64 MB RAM minimum (more recommended)
200 MB hard disk space av ailable
VGA monitor
CD-ROM drive
Mouse
Prepare for Installation
If you have not already set up your RHEOSOFT in the computer, take the f ollowing steps
before you install Rheosoft.
n
Turn the computer ON, and make sure that your mouse, CD-ROM, keyboard is working
properly with above mentioned computer requirements.
n
Install a printer driver for your use.
Install Rheosoft
Do the f ollowing to install Rheosoft on your computer:
n
Insert the Rheosoft CD in the computer ’s CD-ROM drive.
n
Click [Start] (the W indows Start button).
n
Click Run.
n
In the Run dialog box, click [Browse] and in the “Look in” box, click and select your CDROM drive. The files on the CD-ROM are listed.
n
Select setup.exe and click [Open]. The file is displayed in the Open text box in the Run
dialog box.
n
Click [OK]. The installation program starts. Click on the [Next] option in most of the
options.
n
This window identifies the software you are installing. Click [Next] to continue,
and the “license terms” are displayed.
n
Read the terms and click [Next] if you accept them.
n
Click [Next] to continue.
The installation program copies the RHEOSOFT software into your computer.
n
Accept the def ault f older shown, or click to select a different f older. Click [Next] to
continue.
After installation is complete, a message is shown to you confirming the same. Restart your
computer to update the system with the latest changes.
Rheosoft User’s Guide
8
Before you begin using Rheosoft
Bef ore you start Rheosoft software you must fine tune your computer with the following:
Regional date settings
Your computer regional setting date must be set as dd/mm/yyyy
n
Click [Start] (the W indows Start button).
n
Click [Settings] and then select Control Panel
Control Panel
Regional Date Setting
n
Double click [Regional Settings]. In the regional setting properties click on Date.
n
Look for short date style and type dd/mm/yyyy in the text. and click [Apply]
and then [OK].
Install a printer
n
Install a printer for using Rheosoft
Setup Display settings
n
Setup your display resolution to 800x600 mode.
Setup MS-Outlook
n
Install and setup MS-OUTLOOK if you want to use Rheosoft Email options
Setup MS-Excel
n
Install and setup MS-Excel if you want to use Rheosoft Excel file options
Setup Fax software
n
Install and setup fax-software that has come with your Modem if you want to use
Rheosoft faxing option.
Setup Internet Account
n
Install and setup internet account with you Internet service provider.
Rheosoft User’s Guide
9
Begin using Rheosoft
Start-up
Do the f ollowing to start Rheosoft:
n
Turn on your Computer
n
If you are at the desktop screen, you should see the Rheosoft icon. If you see Rheosoft
icon double click on the same and go to step no 5. If you do not see this icon, Click
[Start] (the W indows Start button).
Figure 1 Desktop
n
Point pointer at Program and then at Rheosoft.
n
In the Rheosoft option list, click Rheosoft
If you want to place Rheosoft icon on the desktop for the Rheosoft program , place
pointer at Rheosoft and then place pointer at send to and click on create shortcut at
desktop. A Rheosoft icon than is created at your desktop. You can run the program
by double clicking at this icon next time as explained in step 2.
n
Your desktop screen should look something like the illustration below.
This is first screen of Rheosoft. At this screen you must enter authentic user identif ication and
corresponding user password to access Rheosoft. This screen ensures that unauthorized
persons do not have access to Rheosoft. It also helps in blocking one or many functions of the
Rheosoft program to users. Kindly see section on Security f or more details.
Rheosoft User’s Guide
10
Figure 2 Login Screen
n
Place text cursor by clicking at Enter User ID text box.
n
Type User ID and press [Enter]
n
Your text cursor will be placed at Enter User Password
n
Type correct password and press [Enter] (The user password is not visible on the screen
at this moment and is shown as asterix(*). Each asterix(*) f or one character of password.
n
Click [Ok]
After few moments main option screen appears.
Main Options
This is main Rheosoft screen. You can access all Rheosoft functions f rom this screen. The
functions are as follows:
Figure 3 Main Menu
Rheosoft User’s Guide
11
Specimen Details : Choose this function for
l
l
l
l
l
l
New sample addition & testing
Searching & listing of tested samples on the basis of
- Date & Serial Number
- Stock
- Date
- Batch No.
- Arc
- Temperature
Re-display tested Samples
Check & Show quality control status
Print, fax, email run time report
Put special reminder comments f or each tested specimen
Stock Details: Choose this option for
l
New stock addition
l
Stock control limits
l
Stock gates and pass fail criteria
l
Print stock list
Analysis : Select this option for printing analysis reports:
l
Statistical analysis of results
l
Graphical analysis of results
l
Statistical quality control
Setup: Choose this option for setting details for
l
Software configuration (Do not change)
l
Calibration
l
Report heading setup
l
Printer margin and color setup
l
Change Passwords
l
Email & fax setup
l
User and permissions
l
Database maintenance plan
l
Machine maintenance info
l
Machine statistics
l
Machine setup calculations (Do not change)
l
Delete specimen data
Company info
l
Choose this option for showing company details.
Quit
l
Ends the program
Rheosoft User’s Guide
12
Specimen details
Using this option you can:
n
n
n
n
n
n
Store the sample specif ications
Run test the sample
Print run time report
Re-display the sample results and graph
Check sample results against Quality control criteria
See the Quality control criteria and sample pass fail status
On selecting this option following screen appears:
Specimen List
This option is for maintenance of specimen records. Clicking on this option shows a list of
specimens tested for the current date (current date set as per windows). You can see the list
of specimen for a day or for all days. You can see the list of other days by using next previous
options of the days. The list can also be sorted on the basis of Stock, Srl. No.., Batch No.,
Date, Arc, Temperature, Operator and session number. You can select a particular specimen
by double clicking the same.
Figure 4 Specimen list
The various function available on this screen are:
Add
Add a new specimen to be tested
Select
Select and show the tested specimen details
Modify
Select and change the specimen details
Delete
You can delete the selected specimen by clicking this button. You would be
asked to confirm the deletion on pressing this button.
Comment
Type in comments for the selected specimen f rom the list
Show specimen details tested on previous date. This button shows
specimens of previous date. For example if you are seeing specimens of
13/3/2001, then clicking this button shows you specimens of 12/3/2001.
Rheosoft User’s Guide
13
Show specimen details tested on next date. This button shows specimens of
next date. For example if you are seeing specimens of 13/3/2001, then
clicking this button shows you specimens of 14/3/2001.
Shows calender f or selecting a particular date. You can select a particular
date for which you want to see specimens. As soon as you click the date in
the calender the list shows the specimens of that date.
This button shows list of specimens of current date set as per your computer
date. To change the current date of your computer, double click time shown
at the right bottom corner of the desktop window. Choose the date and click
apply followed by ok.
Shows list of all the specimen in the system
Shows list of specimen for a period. You have to feed in the period for the list
of specimen.
This button places you on first specimen details of the list shown on the
screen.
This button places you on the last specimen details of the list shown on the
screen.
Close
Quit the specimen list option and go to main menu.
Searching
You can list and search the specimen on the basis of Sr.No., Stock, Arc,
Temperature, Run Duration, Date of testing, Batch number, Operator,
Session, and Pass/Fail. Click the particular column to first select the order of
searching. After clicking, type a detail to be searched in the Find column
provided at the top of the screen. You can also give your choice of searching
such as exact match, Like, Search string and the complete list.
Specimen Parameter
Every specimen record is kept in this specimen detail f orm with a unique serial number starting
with one. As soon as you select or add a specimen detail following screen appears:
Figure 5 Specimen details
Rheosoft User’s Guide
14
Following record is kept for each specimen.
Stock
Arc
Temp
Duration
Torque
Date
Batch No.
Operator
Session
This is the stock to be tested.
Arc of oscillation
The test temperature
Run duration of testing
Torque range of testing.
Date of testing
Allotted batch number
Operator who is running the test
Session of specimen testing.
All the specimens tested are giv en a special session number. This number is
allotted automatically by the software. The significance of this number arises
from the f act that a number of specimens tested during a day or during a
period can be allotted one session number. The specimens under one
sessions then can be compared with each other as and when required.
This screen shows the specimen details. If you click select button from the specimen list it will
show the selected specimen with its details. Clicking Add button will show a blank format. You
have to fill in the required parameters of the new specimen. This screen also shows the results
of the specimen. The results are displayed under three heads namely torque values, time
values and derived values.
The functions of various buttons are:
Add
Add a new specimen
Modify
Modify the specimen details shown on the screen
Delete
Delete the specimen from the database
Copy
Copy the current specimen shown on the screen with a new number
Jump
Go to a particular serial number and show its details
Previous
shows previous specimen in the database
Next
shows next specimen in the database
Close
Quit the option and go to specimen list Figure.4
Comment
Shows a text box for typing special comments required for future reference.
Stock
Allows you to work with stock details. Please refer to next section for details.
Run testing
After adding the specimen details, press this button to start specimen testing.
Re-display Graph Re-display results and graph of the specimen shown on the screen.
Check QC
Checks Quality control of the specimen.
Show QC
Shows Quality control of the specimen.
Print
This option prints the specimen details.
Rheosoft User’s Guide
15
Add a new specimen
n
n
n
n
n
At the above screen click on Add button
The specimen booking form becomes blank
The cursor moves to the top of screen at specimen srl no.
Next available serial number appears in this column. Type a different serial number if
required or press enter
The cursor move to Stock. The name of the stock should have been already entered in the
stock and control limits. A list of stocks available for selection appears as shown below.
You can select the stock by using up or down arrow or can select the stock by typing f ew
characters of the stock name. On pressing Enter, some parameters are automatically
taken f rom the stock and control limits and are displayed on the specimen form.
Figure 6 Stock Selection
n
n
n
n
n
Cursor mov es to date, type the date of sample testing and press enter
The cursor moves to Batch No. Type batch number and press enter.
Cursor mov es to operator details. Type operator and press enter.
As soon as you type last detail of the specimen, the specimen details are saved
A specimen details form remains at the screen.
Test specimen
n
n
n
n
Press Run testing button
Following screen appears
The system asks you to load the sample and press ok to start testing the specimen.
The specimen test graph now appears on the screen.
Figure 7 Run Time Screen
The graph is div ided into two portions. The top portion displays the temperature of upper and
lower dies. The lower portion displays time vs torque graph. At the bottom of the screen
elapsed time, torque, upper temperature, lower temperature is also shown. As soon as the
testing time period is over you will see a message along with a beep sound informing you of
Rheosoft User’s Guide
16
the completion. Following screen is shown:
Figure 8 Test screen of Specimen
The above screen shows following options:
Shows all samples of the session
Shows f irst sample of the session
Shows previous sample of the session
Shows next sample of the session
Shows last sample of the session
Shows report of the abov e graph
Query on time or torque
Print report of the above graph
Email report of the above graph
Save report in excel file format
Test more samples in the same session
Close this screen and go back one step
n
After completion of the test, the software calculates are test results and sav es against the
specimen.
n It now asks you to test more samples if required
Printing
Run time report
n Type the batch number and press enter and the process of testing starts all ov er again.
Rheosoft User’s Guide
17
On pressing print button following screen appears:
Figure 9 Print runtime report
The print options are
Preview
Print
Email
Shows run time report on the screen
Prints run time report on the selected printer
Emails the run time report. You should hav e a modem and internet access
bef ore using this option. Following screen appears on selecting this option:
Figure 10 Email report
Email ID: Id of the email receiver.
Send email now: The email will be sent immediately to the receiver. The
system will connect to internet and send the mail thru SMTP server. The
details of the same is to be set under Email & Fax Setup option. Please see
chapter on Setup for the same.
Save report for sending later on: The email will be saved with a name and
is available for sending using on-line email service providers such as Yahoo,
hotmail etc.
Save email in outlook along with report attachment : The email is saved
in Microsoft Outlook outbox. This email can be sent later on.
Excel
Prints the run time report under excel f ile.
Open excel file Opens saved excel f ile using MS-EXCEL. Please make sure that you have
MS-EXCEL installed in your system.
Modify a Specimen Details
Make sure that the details of the specimen required to be modif ied is shown on screen. In case
if it is not shown use Next, Previous, Jump options on specimen f orm. You can also search
and select a specimen f rom specimen list.
n
n
n
n
n
n
Check that the required specimen now appears on the screen.
Click on Modify button
Click on the detail to be modified.
Type in the changed details
Click Save button to apply changes
Click on Cancel button to quit changes
Delete a Specimen Details
Rheosoft User’s Guide
18
Make sure that the details of the specimen required to be deleted is shown on screen. In case
if it is not shown use Next, Previous, Jump options on specimen f orm. You can also search
and select a specimen f rom specimen list.
n
n
n
Check that the required specimen now appears on the screen.
Click on the Delete button
You are asked to confirm the deletion.
Check Quality Control of specimen
The Rheosoft software automatically checks for quality control of the specimen by comparing
the test results with control limits, QC gates and pass fail criteria. This process is done as
soon as specimen is tested. Please note that one has to enter these parameters and check as
criteria f or pass/fail in stock and control limit. You have to run this option in case you have
reset the control limits after testing the specimen. Follow the instructions given below to check
the status.
Make sure that the details of the specimen required to be tested for QC is shown on screen. In
case if it is not shown use Next, Previous, Jump options on specimen f orm. You can also
search and select a specimen from specimen list.
n
n
n
Check that the required specimen now appears on the screen.
Click on the Check QC button
You are asked to press Ok.
Show Quality control status of specimen
On pressing this button following screen appears. It shows the test result values against
control limits and QC gates set in stock and control limits. At times one might like to supercede
the computer decision of pass/fail. For this a special button is available. On pressing this
button you can change the decision of pass/fail as required.
Make sure that the details of the specimen required shown on screen. In case if it is not shown
use Next, Previous, Jump options on specimen form. You can also search and select a
specimen from specimen list.
n
n
n
Check that the required specimen now appears on the screen.
Click on the Show QC button
You are asked to press Ok.
Figure 11 Show QC details
Rheosoft User’s Guide
19
Stock details
This option stores the testing parameters for each type of stock (compound). It stores two
type of parameters namely:
n
n
Stock specifications: The parameter to be entered are arc, temperature, die type, run
duration, torque range
Quality control parameters: The Quality control criteria, QC gates and pass fail criteria
of stocks
On selecting this option following screen appears:
Stock List
This option is f or maintenance of stock records. Clicking on this option shows a list of stocks.
Figure 12 Stock list
The various function available on this screen are:
Add
Add a new stock to be tested
Select
Select and show the tested stock details
Modify
Select and change the stock details
Delete
You can delete the selected stock by clicking this button. You would be asked
to conf irm the deletion on pressing this button. You must delete the tested
specimen of the stock first to delete the stock.
Comment
Type in comments for the selected stock from the list
Close
Quit the stock list option and go to main menu.
Searching
You can list and search the stock on the basis of Sr.No., Stock, Arc,
Temperature, Run Duration. Click the particular column to first select the
order of searching. After clicking, type a detail to be searched in the Find
column provided at the top of the screen. You can also give your choice of
searching such as exact match, Like, Search string and the complete list.
Rheosoft User’s Guide
20
Stock Parameter
Every stock record is kept in this stock detail f orm with a unique serial number starting with
one. As soon as you select or add a stock detail following screen appears:
Figure 13 Stock details
Following record is kept f or each stock.
Stock
Remarks
Arc
Temperature
Run Duration
Torque range
Units
Last revision
Date
This is the stock name .
Type remarks regarding the stock
The arc of oscillation
Temperature of testing the sample
Run duration of testing
Torque range of testing
This is unit of measurements. Three units of measurements are allowed
namely lb in, KgCm, and dNM.
Date of last revision as record
This screen shows the stock details. If you click select button from the stock list it will show
the selected stock with its details. Clicking Add button will show a blank format. You have to fill
in the required parameters of the new stock. This screen also shows the control limits, QC
gates and pass/fail criteria of the stock.
The functions of various buttons are:
Add
Modify
Delete
Copy
Jump
Previous
Next
Close
Comment
Print
Add a new stock
Modif y the stock details shown on the screen
Delete the stock from the database
Copy the current stock shown on the screen with a new number
Go to a particular serial number and show its details
shows prev ious stock in the database
shows next stock in the database
Quit the option and go to stock list Figure.12
Shows a text box for typing special comments required for future reference.
This option prints the stock list.
Rheosoft User’s Guide
21
Add a new stock
n
n
n
n
n
n
n
n
At the above screen click on Add button
The stock booking form becomes blank
The cursor moves to the top of screen at stock srl no.
Next available serial number appears in this column. Type a different serial number if
required or press enter
Cursor moves to Stock. Type the name of the stock and press enter
Type all the required details.
As soon as you type last detail of the stock, the stock details are sav ed
A stock details f orm remains at the screen.
Modify a Stock Details
Make sure that the details of the stock required to be modif ied is shown on screen. In case if it
is not shown use Next, Previous, Jump options on stock f orm. You can also search and select
a stock f rom stock list.
n
n
n
n
n
n
Check that the required stock now appears on the screen.
Click on the Modify button
Click on the detail to be modified
Type in the changed details
Click Save button to apply changes
Click on Cancel button to quit changes
Delete a Stock Details
Make sure that the details of the stock required to be deleted is shown on screen. In case if it
is not shown use Next, Previous, Jump options on stock f orm. You can also search and select
a stock f rom stock list.
n
n
n
Check that the required stock now appears on the screen.
Click on the Delete button
You are asked to confirm the deletion.
Print Stock details
Make sure that the details of the stock required to be printed is shown on screen. In case if it
is not shown use Next, Previous, Jump options on stock f orm. You can also search and select
a stock f rom stock list.
n
n
Check that the required stock now appears on the screen.
Click on the Print button
On pressing print button following screen appears:
Figure 14 Print stock details
The print options are:
Previ ew
Print
Email
Shows stock details report on the screen
Prints stock details report on the selected printer
Emails the stock details report. Following screen appears on selecting this
option:
Rheosoft User’s Guide
22
Figure 15 Email Report
Email ID: Id of the email receiver.
Send email now: The email will be sent immediately to the receiver. The
system will connect to internet and send the mail thru SMTP server. The
details of the same is to be set under Email & Fax Setup option. Please see
chapter on Setup for the same.
Save report for sending later on: The email will be saved with a name and
is available for sending using on-line email service providers such as Yahoo,
hotmail etc.
Save email in outlook along with report attachment : The email is saved
in Microsoft Outlook outbox. This email can be sent later on.
Excel
Prints the stock details report under excel file.
Open excel file Opens saved excel files in MS-excel.
Stock & Control Limits
You can define the control limits such as Lower, Upper, Mean and Sigma (sd), with respect to
results like:
n
n
n
n
n
n
n
n
n
n
n
n
Initial Torque
Minimum torque
Maximum torque
TS2 Induct Time
TS5 Scroch Time
Tc’(50)
Tc’(90)
Thermoplasticity
Cure Rate (CR)
QC1 Torque
QC2 Time
QC3 Torque
You can specify pass fail criteria against each of the 12 parameters provided above. You can
also take a print out of the control limits chart f or filing purposes. By entering the control limits
of each stock we can use Rheosoft's powerful analytical system to compare one or a group of
stock samples tested. W ithout this option the graphical analysis is not operational. By entering
Qc gates you can visualize perf ormance of the sample being tested on-line. The QC gates are
marked as arrows on test graph of the sample. The Qc1 and Qc3 gates are torque v alues
where as Qc gate is time value. Kindly see the graph on prev ious pages showing gates as
arrows and explaining the significance of the same.
Rheosoft User’s Guide
23
Analysis
This option is for analysis of results. On choosing this option following screen appears.
Figure 16 Analysis
This screen has three options. These are statistical analysis, graphical analysis and statistical
quality control. You can select any one of these option by double clicking the same.
Statistical analysis of results
On selecting this option following parameter box is displayed:
Figure 17 Statistical Analysis of Results
Following parameters are required to be filled f or the report:
Period
Stock
Batch Number
Qc Status
Print report in form of
Include Graph
Print in single page
Period of report, Fill from-date to to-date
Select stock f or the report
Select batch number
Select Quality control status as required
Select the type of details required in report
Select “Y” if you want to print graph
Select “Y” if you want to print report in one page
The print options are:
Preview
Print
Email
Shows report on the screen
Prints report on the selected printer
Emails report. Following screen appears on selecting this option:
Rheosoft User’s Guide
24
Figure 17 Email Reports
Email ID: Id of the email receiver.
Send email now: The email will be sent immediately to the receiver. The
system will connect to internet and send the mail thru SMTP server. The
details of the same is to be set under Email & Fax Setup option. Please see
chapter on Setup for the same.
Save report for sending later on: The email will be saved with a file name
and is available for sending using on-line email service providers such as
Yahoo, hotmail etc.
Save email in outlook along with report attachment : The email is sav ed
in Microsof t Outlook outbox. This email can be sent later on.
Excel
Prints the run time report under excel file.
Open excel file Opens saved excel file using MS-excel.
The statistical analysis report as given below is printed.
The statistical analysis is a summarized or detailed report of the samples selected. It shows
detailed results of the specimens along with their control limits. At the bottom of report it
computes out statistics based on the above samples like mean, range, sigma, LSD(5%) and %
coefficient of variation. For definitions of these statistics refer to appendix.
Rheosoft User’s Guide
25
Graphical Analysis of results
You can analyze one of the v arious tests results for a group of samples tested. It is an
excellent method available to compare any result parameter (as per your requirement) against
the set control limits and quality control gates.
Figure 19 Parameters for graphical analysis of results
Following parameters are required to be filled f or the report:
Analyze parameter
Period
Stock
Batch Number
Qc Status
Print report in form of
Include Graph
Select the required parameter from the list.
Period of report, Fill from-date to to-date
Select stock f or the report
Select batch number
Select Quality control status as required
Select the type of details required in report
Select “Y” if you want to print graph
The print options are:
Preview
Print
Email
Shows report on the screen
Prints report on the selected printer
Emails report. Following screen appears on selecting this option:
Figure 20 Email Report
Email ID: Id of the email receiver.
Send email now: The email will be sent immediately to the receiver. The
system will connect to internet and send the mail thru SMTP server. The
details of the same is to be set under Email & Fax Setup option. Please see
chapter on Setup for the same.
Save report for sending later on: The email will be saved with a file name
and is available for sending using on-line email service providers such as
Yahoo, hotmail etc.
Save email in outlook along with report attachment : The email is saved
in Microsof t Outlook outbox. This email can be sent later on.
Excel
Prints the run time report under excel file.
Rheosoft User’s Guide
26
Open excel file Opens saved excel file using MS-excel.
Select this option and fill in the details as required. Graph shown below compares ts2 torque
for stock 7295, 3 degree Arc at 155 degree temperature with respect to upper and lower
control limits.
Statistical quality control
This report is again very important for analyzing the results of the chosen sample group. It
works out percentage of results which fall within 1,2 or 3 sigma. W ith the help of this statistics
you can at a glance appreciate statistical quality control of your samples tested. You can also
use this to enter or review your control limits. Select this option and fill the required parameter
as shown on the screen below.
Figure 21 Parameters for graphical analysis of results
Rheosoft User’s Guide
27
Following parameters are required to be filled f or the report:
Period
Stock
Batch Number
Qc Status
Period of report, Fill from-date to to-date
Select stock f or the report
Select batch number
Select Quality control status as required
After filling required parameters the report can be seen on screen or can be printed on printer.
The print options are:
Preview
Print
Email
Shows report on the screen
Prints report on the selected printer
Emails report. Following screen appears on selecting this option:
Figure 22 Email Report
Email ID: Id of the email receiver.
Send email now: The email will be sent immediately to the receiver. The
system will connect to internet and send the mail thru SMTP server. The
details of the same is to be set under Email & Fax Setup option. Please see
chapter on Setup for the same.
Save report for sending later on: The email will be saved with a file name
and is available for sending using on-line email service providers such as
Yahoo, hotmail etc.
Save email in outlook along with report attachment : The email is saved
in Microsoft Outlook outbox. This email can be sent later on.
Excel
Prints the run time report under excel f ile.
Open excel file Opens saved excel file using MS-excel.
Rheosoft User’s Guide
28
Setup
Introduction
This option helps in setting configuration of run time graphs, report presentations, calibration,
security etc. On clicking this option f ollowing screen appears.
Figure 23 Setup options
The function of various options are
Configuration
Calibration
Report heading setup
Printer, margin & color setup
Change password
Email & fax setup
User and permissions
Database maintenance plan
Machine maintenance info
Sets the configuration parameters of the graph
Run the calibration
Reports heading setup
Setup of printer and colour printouts
Changes the user password
Email and f ax heading and message setup
Security setup f or accessing information for users
Setup the backup days
Gives information on machine maintenance
Configuration
On selecting this option the system asks you to type password. This option is for maintenance
staff only. Do not change any setup parameter from this screen. This is master configuration
details of sample testing. This is for your information only.
Calibration
This option is f or calibration of the machine. Please refer to chapter in machine manual for the
details.
Figure 24 Calibration
Rheosoft User’s Guide
29
Report Heading setup
This option is for setting the top heading position of the company name and address in reports.
On selecting this option following screen appears. You can select the font type, size, bold,
italic, underline for the company and address.
Figure 25 Report heading setup
Printer, margin & color setup
This option is f or setting up printer and colour printouts. On selecting this option you can set
paper size, margins, page orientation and presentation of graphs. You can select the
background colour, graph colours etc. On selecting this option f ollowing screen appears:
Figure 26 Printer margin & colour setup
Following are the parameters that can be changed:
Printer setup
Printer Name
Name of the printer for printing report and graph
Printer Port
Printer port on which printer is attached
Margin Left
Left margin of the paper for report
Margin Right
Right margin of the paper for report
Margin Top
Top margin of the paper for report
Margin Bottom
Bottom margin of the paper for report
Paper Size
Size of paper specify width and height
Orientation
Paper orientation as Portrait or Landscape
Show company address in Analysis Prints company address if it is set as yes
Show company address in specimen report Prints company address if it is set as yes
Graph Setting
Window background colour
Colour of the screen for graph display
Text colour
Colour of the text shown on the graph
Rheosoft User’s Guide
30
Torque colour
Upper Temperature Colour
Lower Temperature Colour
Details background colour
Temp background colour
Torque background colour
Grid colour
Temp frame colour
Torque frame colour
Temp text colour
Torque text colour
Time text colour
Temp grid width
Torque grid width
Time grid width
Graph width
Graphical Analysis
Graph frame colour
Graph grid colour
Graph grid width
Stop message
Background colour of Torque graph
Colour of the upper temperature graph
Colour of the lower temperature graph
Background Colour of specimen details
Colour of temperature background
Colour of torque background
Colour of the grid lines
Colour of the Temp frame lines
Colour of the torque frame lines
Colour of the temperature text details
Colour of the torque text details
Colour of the time text details
Line width of the Temperature grid
Line width of the torque grid
Line width of the time grid
Line width of the torque graph
Frame colour of the graph
Grid colour of the graph
Line width of the grid
Chooses the source of output message
Note : Please do not change the above parameters before proper consultation & knowledge
Change password
This option lets you change your password. You have to type your old password and new
password to be set.
Figure 27 Change password
Email & fax setup
Use this option to set subject, message, email address and host details. On selecting this
option following screen appears.
Figure 28 Email & Fax setup
Following are the various parameters to be filled in this option.
SMTP Host
Your E-mail address
Subject
SMTP host number of your email service provider
Your email address
Subject of email to be sent by you
Rheosoft User’s Guide
31
Message
User and permissions
Message details of email to be sent by you
Use this option to set user accessibility and password option f or the package. On selecting this
option following screen appears:
Figure 29 User and permissions
You can add new users or delete users using this screen. By pressing Set security you can
set user security options. On pressing this button f ollowing screen appears.
Figure 30 Set user security
You can allow or disallow various options to the user. Check a option box to allow a user or
uncheck to disallow its working to a user.
Database maintenance plan
Use this option to setup automatic database backup and compacting option. On pressing this
option following screen appears.
Figure 31 Database maintenance plan
Following are the parameters for the database maintenance plan:
Rheosoft User’s Guide
32
Last backup taken on
Take backup after
Due on
Give Reminder
Date of last backup
Days af ter which next backup is to be taken
Next date of backup (calculated automatically)
Select “Y” in case if you require the reminder to be given
before taking the backup
Select backup option as “Optional” or “Always”. In case of
optional you will be asked to take backup or not. In case of
Always the backup will be automatically taken.
Forced backup
Machine maintenance Info (Only for maintenance staff)
This option gives you the details of machine maintenance. On pressing this option f ollowing
screen appears.
Figure 32 Machine maintenance info
The details in this screen are:
Machine start date
Last service done on
Next service due after
Machine used for
Balance no of Minutes
Display message
Date of machine starting
Date of last service
Period of running after which machine service is due
Period of running of machine
Period of minutes left before maintenance is due
Displays alarm if maintenance is due.
Machine statistics
This option is for machine statistics and usage. This is for information purposes only.
Figure 33 Machine statistics
Following are the information details that are available for you.
Rheosoft User’s Guide
33
Machine start date
No of Samples done
Avg. Samples /day
Machine run duration
Avg Machine run duration/day
Avg samples run duration/day
Date of machine starting
Total number of samples tested
Average number of samples tested day
Total machine run duration in minutes
Average machine run duration per day
Average machine samples run duration per day
Company information
This is your company details. It is also for your inf ormation only.
Figure 34 Company information
This screen shows name and address of the licensee authorized to use this package.
Maintenance
This option is another option provided to manage and restore the corrupted data due to
improper shutdown or power failure. On the main desktop screen double click on Rheo
Maintenance program.
Rheosoft User’s Guide
34
As soon as you double click this program following screen appears. This screen has two
options:
1.
2.
Maintenance
Backup/restore data
On clicking maintenance option following screen appears.
.
The options under maintenance are:
Compact/repair database
Select this option to compact and repair database
Duplicate data base
To make duplicate of database
Rename Database
To rename a database with different name
Update package data
To update the package data in case of software updation.
Merge Specimen data
To merge specimen data with other data bases
Copy specimen data
To copy specimen data to other data base
Delete specimen data
To mass delete the specimen data not required
Merge stock
To merge stock data with other stock data
Copy stock data
To copy stock data to other data base
Delete stock data
To mass delete stock data
The options under backup/restore options are:
Backup
Restore
Emergency backup
Emergency restore
Rheosoft User’s Guide
35
Backup
On clicking this option f ollowing screen appears.
Select the target drive for backup and type of data to be backed up and press start.
Restore
On clicking this option f ollowing screen appears.
Select the source drive for data and the type of data to be restored and press start to r
restore the data.
Rheosoft User’s Guide
36
Busysoft Systems Private Limited
Future Foundation
Mercury House 16 Community Centre, Wazirpur Industrial Area Delhi 110052
Phone:(O)+91-011-27428044 Fax:+91-011-27373011, Mobile:+91-9810068112 email:[email protected]