1
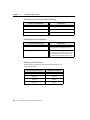
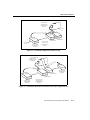
Fast and Ultra SCSI
Host Adapter
User Manual
3307-0042 Rev.1
Products:
Ultra:
ASB3940UA
ABP3980UA (4-CHL)
Fast:
ASB3902
ASB3905
ABP3922
ABP3925
Copyright
© 2000 ConnectCom Solutions, 1150 Ringwood Ct., San Jose, CA 95131
This manual, as well as the software described in it, is furnished under license and
may only be used or copied in accordance with the terms of such license. Except as
permitted by such license, no part of this publication may be reproduced, stored in a
retrieval system or transmitted, in any form or by any means, electronic, mechanical,
recording, or otherwise, without the prior written permission of ConnectCom
Solutions This manual is furnished for informational use only, and is subject to
change without notice. ConnectCom Solutions assumes no responsibility or liability
for any errors or inaccuracies that may appear in this book. The information in this
manual should not be construed as a commitment by ConnectCom Solutions.
Trademarks
AdvanSys and ConnectCom Solutions are trademarks of ConnectCom Solutions Inc.,
registered in the U.S., and other countries. Novell and NetWare are trademarks of
Novell Inc. Microsoft, MS-DOS, Windows, and Windows NT are trademarks of
Microsoft Corporation. OS/2 Warp is a trademark of IBM Corporation. Interactive
UNIX is a trademark of Sun Microsystems. SCO UNIX is a trademark of Santa Cruz
Operation, Inc. Acrobat Reader is a trademark of Adobe Systems Incorporated. All
other trademarks used belong to their respective owners.
Revision Control
Part Number 3307-0042, Revision 1, May 1, 2000
How to Reach Us
ConnectCom Solutions, Inc.
1150 Ringwood Court, San Jose, CA 95131 USA
408-383-9400
Tech Support:Phone: (408) 467-2930 Monday – Friday, 8:00 A.M -6:00 P.M (PST)
Fax: 408-383-9612
Email: [email protected]
Or visit our web site at http://www.connectcom.net
FCC Part 15 Class B Registration Warning
This equipment generates and uses radio frequency energy. If the equipment is not
installed and used properly, that is, in strict accordance with the manufacturer’s
instructions, may cause interference with radio and television reception. It has been
type-tested and found to comply with the limits for a Class B computing device in
accordance with the specification in Subpart B of Part 15 of FCC Rules &
Regulations, which is designed to provide reasonable protection against such
interference in a residential installation. If this equipment does cause interference to
radio or television reception, which can be determined by turning the equipment off
and on, the user is encouraged to try to correct the interference by one or more of the
following measures: (1) Reorient the receiving antenna (2) Relocate the computer
with respect to the receiver (3) Move the computer away from the receiver (4) Plug
the computer into a different outlet so that the computer and receiver are on different
branch circuits. If necessary, the user should consult the dealer or an experienced
radio/ television professional for additional suggestions. The Federal
Communications Commission produces a booklet: How to Identify and Resolve
Radio-TV Interference Problems, which the user may find helpful. This booklet is
available from the U.S. Government printing office, Washington, DC 20402.
Stock No. 004-000-00345-4
Shielded cables and certified Class B peripherals must be used with this product.
Using unshielded cables or uncertified peripherals may result in this unit being out of
compliance with FCC Rules Part 15.
Changes or modifications not expressly approved by the manufacturer can void the
user’s authority to operate this equipment.
This device complies with Part 15 of the FCC Rules & Regulations. Operation is
subject to the following two conditions: (1) this device may not cause harmful
interference, and (2) this device must accept any interference received, including
interference that may cause undesired operation.
Table of Contents
Overview and Quick Installation . . . . . . . . . . . . . . . .1-1
Quick Installation — Software . . . . . . . . . . . . . . . . . . . . . .1-2
Windows 95/98 and Windows 2000 . . . . . . . . . . . . . . . . . . . . . . . .1-2
DOS 6.x . . . . . . . . . . . . . . . . . . . . . . . . . . . . . . . . . . . . . . . . . . . . .1-2
Windows NT 4.0 . . . . . . . . . . . . . . . . . . . . . . . . . . . . . . . . . . . . . . .1-3
MAC OS 7.X, 8.X, 9.X . . . . . . . . . . . . . . . . . . . . . . . . . . . . . . . . . .1-3
Other Operating Systems . . . . . . . . . . . . . . . . . . . . . . . . . . . . . . . .1-4
Quick Installation — Hardware . . . . . . . . . . . . . . . . . . . . .1-5
AdvanSys SCSI Host Adapter . . . . . . . . . . . . . . . . . . . . . . . . . . . .1-5
Connecting Internal SCSI Devices . . . . . . . . . . . . . . . . . . . . . . . . .1-5
Connecting External SCSI Devices . . . . . . . . . . . . . . . . . . . . . . . .1-6
Host Adapter Specifications . . . . . . . . . . . . . . . . . . .2-1
Product Features . . . . . . . . . . . . . . . . . . . . . . . . . . . . . . . .2-1
Host Adapter PCI-Bus Interface . . . . . . . . . . . . . . . . . . . . . . . . . . .2-2
SCSI Controller Integrated Circuits . . . . . . . . . . . . . . . . . . . . . . . .2-2
Compatibility . . . . . . . . . . . . . . . . . . . . . . . . . . . . . . . . . . . . . . . . . .2-2
Reliability . . . . . . . . . . . . . . . . . . . . . . . . . . . . . . . . . . . . . . . . . . . .2-3
Common AdvanSys Fast/Ultra SCSI Technical Specifications . . .2-3
Data Transfer Rates . . . . . . . . . . . . . . . . . . . . . . . . . . . . . . . .2-3
Typical Operating System Support . . . . . . . . . . . . . . . . . . . . .2-3
Temperature and Humidity Specifications . . . . . . . . . . . . . . . .2-4
Replacing Part Numbers . . . . . . . . . . . . . . . . . . . . . . . . . . . . .2-4
ConnectCom Contact Information . . . . . . . . . . . . . . . . . . . . . .2-5
Tech Support . . . . . . . . . . . . . . . . . . . . . . . . . . . . . . . . . . . . . .2-5
ConnectCom Web Site . . . . . . . . . . . . . . . . . . . . . . . . . . . . . .2-5
Anonymous FTP . . . . . . . . . . . . . . . . . . . . . . . . . . . . . . . . . . .2-5
Fast and Ultra SCSI Host Adapter User Manual
v
Table of Contents
Hardware Installation . . . . . . . . . . . . . . . . . . . . . . . 3-1
Hardware Requirements . . . . . . . . . . . . . . . . . . . . . . . . . . 3-2
PC
. . . . . . . . . . . . . . . . . . . . . . . . . . . . . . . . . . . . . . . . . . . . . 3-2
Mac
. . . . . . . . . . . . . . . . . . . . . . . . . . . . . . . . . . . . . . . . . . . . . 3-2
Cable Considerations . . . . . . . . . . . . . . . . . . . . . . . . . . . . . . . . . . 3-2
Fast/Ultra SCSI Host Adapter Overview . . . . . . . . . . . . . . 3-3
SCSI Device Installation . . . . . . . . . . . . . . . . . . . . . . . . . . 3-4
SCSI ID Assignment . . . . . . . . . . . . . . . . . . . . . . . . . . . . . 3-6
SCSI Installer Software CD . . . . . . . . . . . . . . . . . . . 4-1
AdvanSys SCSI Installer Software CD . . . . . . . . . . . . . . . 4-2
SuperInstall Instructions . . . . . . . . . . . . . . . . . . . . . . . . . . . . . . . . 4-4
Auto Insert Notification . . . . . . . . . . . . . . . . . . . . . . . . . . . . . .
SuperInstall Installation . . . . . . . . . . . . . . . . . . . . . . . . . . . . .
Installation from Diskette . . . . . . . . . . . . . . . . . . . . . . . . . . . .
Diskette Creation . . . . . . . . . . . . . . . . . . . . . . . . . . . . . . . . . .
4-4
4-5
4-6
4-6
SuperView . . . . . . . . . . . . . . . . . . . . . . . . . . . . . . . . . . . . . . . . . . 4-7
Software Driver Installation . . . . . . . . . . . . . . . . . . . 5-1
Windows 95/98 and Windows 2000 Driver Installation . . . 5-2
Updating Flash BIOS . . . . . . . . . . . . . . . . . . . . . . . . . . . . . . . . . . 5-2
DOS 6.x, Driver Installation . . . . . . . . . . . . . . . . . . . . . . . 5-3
Installing From CD-ROM . . . . . . . . . . . . . . . . . . . . . . . . . . . . 5-3
Installing From Diskette . . . . . . . . . . . . . . . . . . . . . . . . . . . . . 5-3
Command Line Options . . . . . . . . . . . . . . . . . . . . . . . . . . . . . 5-5
Mac PowerPC OS 7.x, 8.x and 9.x Driver Installation . . . 5-6
Windows NT Driver Installation . . . . . . . . . . . . . . . . . . . . . 5-7
Installation Diskette Creation for Windows NT 4.0 . . . . . . . . . . . . 5-7
Installing to a New Windows NT system . . . . . . . . . . . . . . . . . . . . 5-7
Installing to an Existing Windows NT 4.0 System . . . . . . . . . . . . . 5-7
Novell NetWare Driver Software Installation . . . . . . . . . . . 5-8
vi
Fast and Ultra SCSI Host Adapter User Manual
Table of Contents
Naming Scheme . . . . . . . . . . . . . . . . . . . . . . . . . . . . . . . . . . . . . . .5-8
Installation . . . . . . . . . . . . . . . . . . . . . . . . . . . . . . . . . . . . . . . . . . .5-8
ADVHMXXX.DDI Installation Information File . . . . . . . . . . . . . . . .5-9
Installing ASPI . . . . . . . . . . . . . . . . . . . . . . . . . . . . . . . . . . . . . . . .5-9
SCO OpenServer Driver Installation . . . . . . . . . . . . . . . .5-10
During SCO OpenServer Installation . . . . . . . . . . . . . . . . . . . . . .5-10
After SCO OpenServer Installation . . . . . . . . . . . . . . . . . . . . . . .5-11
Installing the Solaris x86 Driver . . . . . . . . . . . . . . . . . . . .5-12
Instructions for Creating the ASC Driver Diskette in Solaris . . . .5-12
Instructions for Creating the ASC Driver Diskette in DOS . . . . . .5-12
Installing the ASC Driver During Solaris Installation . . . . . . . . . .5-13
Installing the ASC Driver After Installing Solaris . . . . . . . . . . . . .5-13
Installing SCSI Devices Under Solaris . . . . . . . . . . . . . . . . . . . . .5-14
SCO UnixWare Installation . . . . . . . . . . . . . . . . . . . . . . .5-15
Creating the ASC Universal Driver Diskette From DOS . . . . . . .5-15
Creating the ASC Universal Driver Diskette From UnixWare . . .5-16
Installing the ASC Driver During UnixWare Installation . . . . .5-16
Installing the ASC Driver After Installing UnixWare . . . . . . . .5-16
Converting ASC Driver to a Loadable Driver . . . . . . . . . . . . .5-17
Checking the Software and Hardware Configuration . . . . . . .5-17
Installing SCSI Devices Under UnixWare . . . . . . . . . . . . . . .5-17
BIOS Setup Values . . . . . . . . . . . . . . . . . . . . . . . . .6-1
Accessing the System BIOS Values . . . . . . . . . . . . . . . . . . . . . . .6-1
The Main Menu . . . . . . . . . . . . . . . . . . . . . . . . . . . . . . . . . . . . . . .6-2
Adapter Configuration . . . . . . . . . . . . . . . . . . . . . . . . . . . . . . . . . .6-3
Host SCSI ID . . . . . . . . . . . . . . . . . . . . . . . . . . . . . . . . . . . . . .6-4
Start-up Delay Time . . . . . . . . . . . . . . . . . . . . . . . . . . . . . . . . .6-4
SCSI Bus Termination (SE and LVD) . . . . . . . . . . . . . . . . . . .6-4
PCI Burst Mode . . . . . . . . . . . . . . . . . . . . . . . . . . . . . . . . . . . .6-4
Extended Translation . . . . . . . . . . . . . . . . . . . . . . . . . . . . . . . .6-4
Support Removable as Fixed Disk . . . . . . . . . . . . . . . . . . . . .6-4
CD Bootability . . . . . . . . . . . . . . . . . . . . . . . . . . . . . . . . . . . . .6-4
SCSI Parity . . . . . . . . . . . . . . . . . . . . . . . . . . . . . . . . . . . . . . .6-4
Ultra SCSI Feature . . . . . . . . . . . . . . . . . . . . . . . . . . . . . . . . .6-4
Fast and Ultra SCSI Host Adapter User Manual
vii
Table of Contents
Host Queue Size . . . . . . . . . . . . . . . . . . . . . . . . . . . . . . . . . .
Device Queue Size . . . . . . . . . . . . . . . . . . . . . . . . . . . . . . . .
Boot Device ID . . . . . . . . . . . . . . . . . . . . . . . . . . . . . . . . . . . .
SCSI Configuration . . . . . . . . . . . . . . . . . . . . . . . . . . . . . . . .
SCSI Device ID . . . . . . . . . . . . . . . . . . . . . . . . . . . . . . . . . . .
Start Unit Command . . . . . . . . . . . . . . . . . . . . . . . . . . . . . . . .
SCSI Disconnection . . . . . . . . . . . . . . . . . . . . . . . . . . . . . . . .
Command Queuing . . . . . . . . . . . . . . . . . . . . . . . . . . . . . . . .
Synchronous Transfer . . . . . . . . . . . . . . . . . . . . . . . . . . . . . .
BIOS Target Control . . . . . . . . . . . . . . . . . . . . . . . . . . . . . . . .
6-5
6-5
6-5
6-5
6-6
6-6
6-6
6-6
6-6
6-6
SCSI Bus Scan . . . . . . . . . . . . . . . . . . . . . . . . . . . . . . . . . . . . . . . 6-7
Low Level Disk Format . . . . . . . . . . . . . . . . . . . . . . . . . . . . . . . . . 6-7
Restore Factory Defaults . . . . . . . . . . . . . . . . . . . . . . . . . . . . . . . 6-7
Restore Previous Settings . . . . . . . . . . . . . . . . . . . . . . . . . . . . . . 6-7
Save Changes and Continue . . . . . . . . . . . . . . . . . . . . . . . . . . . . 6-8
Discard Changes and Continue . . . . . . . . . . . . . . . . . . . . . . . . . . 6-8
viii
Fast and Ultra SCSI Host Adapter User Manual
Fast and Ultra SCSI Host Adapter User Manual
Chapter 1
Overview and Quick
Installation
AdvanSys SCSI Host Adapters are high-performance PCI Bus Master Host Adapter
Cards that provide highly integrated solutions for attaching SCSI devices and
operating them with your PC or Mac.
This manual is for the AdvanSys Fast/Ultra SCSI products listed on the cover. All
AdvanSys SCSI Host Adapters and software are installed in the same basic way. Any
installation or setup differences between the host adapters, hardware or software are
indicated wherever they apply.
Installation of the AdvanSys SCSI Host Adapter is fully Plug-and-Play compatible.
Board configuration is automatically controlled by the system BIOS. If your
operating system is Windows 95/98, or Windows 2000, it is strongly recommended
that the driver software be installed first, and then the AdvanSys SCSI Host Adapter.
Complete instructions for installing the AdvanSys SCSI Host Adapter and drivers are
covered in Chapter 3, Hardware Installation, Chapter 4, SCSI Installer Software
CD, and Chapter 5, Software Driver Installation.
There are a small number of older PCI motherboards that do not correctly assign
interrupts for Plug-and-Play products. If you have difficulty during installation, check
the system BIOS settings for PCI configuration. The PCI slots should be enabled, and
interrupts should be available for each slot. For PCs, interrupt 10 is a good choice to
use on a PCI slot for an AdvanSys SCSI Host Adapter.
Fast and Ultra SCSI Host Adapter User Manual
1-1
Chapter
1
Overview and Quick Installation
Quick Installation — Software
Quick installation assumes that the system has a functional CD-ROM to read the
AdvanSys CD. See Chapter 5, Software Driver Installation for directions to install a
SCSI CD-ROM and/or to make installation diskettes from the AdvanSys CD.
Windows 95/98 and Windows 2000
•
Verify that your Windows 95/98 or Windows 2000 operating system is
running.
•
Insert the AdvanSys CD into your working CD-ROM drive and wait for the
Autorun program to come up. (If Auto insert notification is disabled for your
CD-ROM drive, you can manually start the Autorun program by opening the
My Computer icon - press F5 to refresh the My Computer window - and
double-clicking on the CD-ROM drive icon).
•
Click the SuperInstall button to install the Windows 95/98 SCSI drivers.
•
Your AdvanSys Windows 95/98 or Windows 2000 driver is now installed.
For more instructions, see Chapter 3, Hardware Installation.
•
Install your AdvanSys SCSI Host Adapter before loading drivers in DOS 6.x.
•
After you have installed your AdvanSys SCSI Host Adapter, power-on the
computer and let it boot up to DOS.
•
Insert the AdvanSys CD into your working CD-ROM drive.
•
Type the letter of your CD drive (such as ‘d:’) at the command prompt and
press Enter.
•
Type cd d:\advansys\drivers\narrow\dos\install at the command prompt and
press Enter.
•
Type install at the command prompt and press Enter. This starts the DOS
drivers installation program. Press Enter to go past the introduction screen.
DOS 6.x
1-2
Fast and Ultra SCSI Host Adapter User Manual
Quick Installation — Software
•
Use the arrow keys to highlight Automatic installation. Press Enter to
continue. (If you are installing SCSI removable disk drives, select Custom
Installation so that you have the option of installing an additional AdvanSys
removable disk driver.
•
Follow the instructions on the screen. Press Enter to proceed or press ESC to
cancel. You can use arrow keys to make selection, if necessary.
•
When the program ends (and you are back at the command prompt), remove
the AdvanSys CD from your CD-ROM drive and press Ctrl+Alt+Delete to
reboot the system, so that the newly installed drivers can take effect.
•
Your AdvanSys SCSI Host Adapter is now installed.
Windows NT 4.0
Install your AdvanSys SCSI Host Adapter before loading drivers in Windows NT 4.0.
From d:\advansys\drivers\narrow\winnt (assuming CD-ROM is in drive d:\), copy the
following files to the root directory of a newly formatted 3.5” diskette:
NT4ASC.TXT
TXTSETUP.OEM
NT4ASC.SYS
NT4ASC.INF
DISK1
This is your AdvanSys Fast/Ultra SCSI Windows NT Diskette. Read NT4ASC.TXT
for instructions on using this diskette.
MAC OS 7.X, 8.X, 9.X
No special drivers are required for the PowerMac, Power PC G3 and G4. Drivers for
the host adapter are built into the card. Included is the Anubis disk mounting and CD
ROM utilities from Charismac Engineering, Inc.
For the Mac Blue, White G3, and newer models, the AdvanSys SCSI Host Adapter
must be configured to support booting from a SCSI driver. The “AdvanSys SCSI
Utility”, is used to configure the card to boot these machines. Execute this utility and
follow the on screen instructions. The firmware is configured and/or updated with a
file like Advfb.BN Update.bin.
If possible, it is always a good idea to check the AdvanSys web site at
http://www.connectcom.net/macuw.html
for the latest firmware updates.
In general, for faster disk performance:
•
Disable virtual memory using the memory control panel, or
•
Avoid using virtual memory whenever possible.
Fast and Ultra SCSI Host Adapter User Manual
1-3
Chapter
1
Overview and Quick Installation
Other Operating Systems
Install your AdvanSys SCSI Host Adapter before loading drivers in Novell NetWare.
Drivers are located in various subdirectories of d:\advansys\drivers (assuming your
CD-ROM is in drive d:\). The instructions are located either in those subdirectories or
the d:\advansys\drivers\narrow\(operating system)\image directories, which also
contain driver diskette image files (you can create driver diskettes from the image
files by typing unixfer filename.144 a: from a DOS command prompt while in those
image directories). See Chapter 5, Software Driver Installation for more detail.
1-4
Fast and Ultra SCSI Host Adapter User Manual
Quick Installation — Hardware
Quick Installation — Hardware
AdvanSys SCSI Host Adapter
Use the following steps to install your AdvanSys SCSI Host Adapter in a PCI slot:
•
Shut down the computer.
•
Turn the computer power off.
•
Remove the PC chassis cover to access the expansion slot and
expansion slot covers.
•
Identify an unused PCI expansion slot. Remove the cover from the selected
expansion slot.
•
Align the PCI bus connector on the bottom of the AdvanSys SCSI Host
Adapter with the available slot.
•
Carefully insert the AdvanSys SCSI Host Adapter into the slot.
•
Attach the bracket to the PC chassis with the expansion slot cover screw.
Connecting Internal SCSI Devices
Follow the steps listed below to connect SCSI devices mounted inside your PC. Use
the internal SCSI cable included with the AdvanSys SCSI Host Adapter to connect
your SCSI devices, or use an internal cable that supports the number of devices you
wish to connect. The cable does not have a built-in terminator, so make sure you
terminate the last internal device on the cable. See Chapter 3, Hardware Installation,
for detailed SCSI device installation information.
•
Follow the instructions that came with your SCSI devices and disable
termination on all but the last internal SCSI device.
•
Plug the 50-pin connector on the end of your internal cable into the 50-pin
SCSI connector on the Host Adapter Card (make sure this end of the cable is
not terminated). When installing, match up pin 1 on the connector (indicated
by an arrow) with pin 1 on the ribbon cable connector
(also indicated by an arrow).
•
Plug the other end of the cable into the connector of the closest internal SCSI
device. Maintain Pin 1 orientation as in Step 2.
•
If you have another SCSI device to connect, repeat step 3 by plugging the
connector on the cable into the connector of the next SCSI device you wish
to attach.
•
After your device(s) are connected, make certain that the last device on the
cable is properly terminated. (See Chapter 3, Hardware Installation for
Fast and Ultra SCSI Host Adapter User Manual
1-5
Chapter
1
Overview and Quick Installation
detailed termination instructions, or consult the documentation that came
with your SCSI device.)
•
Replace the chassis cover before powering up the computer.
Connecting External SCSI Devices
Use the following steps when connecting external SCSI devices to your AdvanSys
SCSI Host Adapter:
•
Attach the external SCSI cable connector to the external SCSI connector of
the host adapter (pin 1 orientation is predetermined, since external cables can
only be attached one way.)
•
Plug the second end of the cable into one of the SCSI connectors at the back
of the external device you wish to connect.
•
Add more external devices by repeat step 2 for each subsequent device.
Insert an active standard or active pass through terminator plug into the SCSI
connector on the last external SCSI device. See instructions in your device
documentation, if necessary. You can now power up your system after all the devices
have been properly connected.
1-6
Fast and Ultra SCSI Host Adapter User Manual
Fast and Ultra SCSI Host Adapter User Manual
Chapter 2
Host Adapter
Specifications
This chapter lists the features of the AdvanSys Fast/Ultra SCSI Host Adapters.
Product Features
The following table lists the Fast SCSI and the Ultra SCSI features.
Model No
Ext.
Conn.
Inter.
Conn.
Active/Pass.
Termination
BIOS
Controller
Chip
No
ASC3030
Fast SCSI:
ASB3902-00
25 pin
Passive
ASB3902-01
Sub D
ASB3905-00
50 pin
ASB3905-01
HD
NA
Active
No
ASC3030
ABP3922-00
25 pin
50 pin Std.
Active
Flash
ASC3030
ABP3922-01
Sub D
ABP3925-00
50 pin
ABP3925-01
HD
NA
Active
Passive
No
50 pin Std.
Active
Flash
ASC3030
No
Ultra SCSI:
ASB3940UA
50 pin
HD
50 pin Std
Active
Flash
ASC3050
ASB3980UA
50 pin
HD
4-50 pin
Std.
Active
Flash
ASC3050
Fast and Ultra SCSI Host Adapter User Manual
2-1
Chapter
2
Host Adapter Specifications
Host Adapter PCI-Bus Interface
•
Fully compliant with the PCI Local Bus Specification Revision 2.1
•
32-bit Bus Master DMA allows for a data transfer rate of up to 133 MB/sec
across the PCI Bus
•
5 - Volt only PCI board
SCSI Controller Integrated Circuits
•
AdvanSy SCSI controller integrated circuits (I.C.s) offer industry leading
performance, features, integration, and reliability. Integrated application
specific RISC processors assure excellent performance while keeping
required CPU utilization to a minimum.
•
Host-accessible internal registers and single-step RISC instruction execution
provide for efficient diagnostic capability.
•
Flash ROM enables end-user field BIOS upgrades.
•
An EEPROM read-and-write configuration makes jumpers unnecessary.
•
Automatic Active Termination control means you never need to worry about
terminating the Host Adapter, if a cable is not attached to one of the host
adapter’s connectors. Note: SCSI bus ends must always be terminated.
•
The watchdog timer prevents system hangs caused by malfunctioning SCSI
peripheral devices.
•
Tagged queuing supported by SCSI.
•
Each adapter board supports up to 7 peripheral devices.
•
Each adapter board supports the complete range of SCSI devices, including
hard disk drives, CD-ROM drives, tape backup units, MOs, CD-ROMs,
printers, and scanners.
Compatibility
The AdvanSys SCSI Host Adapter is compatible with all types of host systems,
operating systems, and SCSI peripherals. Compatibility has been established through
extensive testing.
The AdvanSys SCSI Host Adapter includes support for many operating systems.
Refer to the I/O Operating System Support section (under Technical Specifications in
this chapter) for a complete list, and to Chapter 5, Software Driver Installation for
instructions on installing the drivers for various operating systems.
2-2
Fast and Ultra SCSI Host Adapter User Manual
Product Features
Reliability
AdvanSys builds SCSI Host Adapters to the highest quality standards in ISO-9002
certified facilities. High-level integration ensures superior reliability and makes it
possible for AdvanSys to offer the first limited lifetime guarantee in the industry. For
registered owners, if anything goes wrong with your AdvanSys SCSI Host Adapter
within 5 years of initial purchase, ConnectCom, will replace it.
Common AdvanSys Fast/Ultra SCSI Technical Specifications
•
Computer Bus: PCI Bus
•
Interface Protocol: Bus Master DMA
•
Device Protocol: SCSI
•
Bus Width: SCSI: 8-bit and PCI: 32-bit
•
Device Support: Up to 7 SCSI devices
Data Transfer Rates
•
3 to 6 MB/sec asynchronous on the SCSI bus
•
10 MB/sec synchronous burst on the Fast Narrow SCSI bus
•
20 MB/sec synchronous burst on Ultra SCSI bus
Typical Operating System Support
•
Windows 95/98 and Windows 2000
•
Windows NT (version 3.51 and 4.0)
•
MS-DOS (version 6.0 or higher)/Windows 3.1
•
Novell Netware (version 3.12, 4.1 and greater)
•
SCO OpenServer (version 5.0 and greater)
•
SCO Unixware (version 2.1 and greater)
•
Linux (version 1.2 and greater)
•
Sun x86 Solaris (version 2.0 and greater)
•
Mac OS (7.5.5 and greater)
Fast and Ultra SCSI Host Adapter User Manual
2-3
Chapter
2
Host Adapter Specifications
Temperature and Humidity Specifications
Temperature and Humidity
Specification
Operating Temperature:
0°C to 55°C
Storage Temperature:
-40°C to 75°C
Relative Humidity:
10% to 95% non-condensing
Certification and Compliance
Certification and Compliance
Specification
FCC Certification:
47 CFR Part 15, Subpart B, Class B Digital
Device Compliance to ANSI C63.4-1992
CE Compliance:
EN 50081-1:1992 Emissions, EN 500821:1992 Immunity Compliance in accordance
with CISPR 22B:1985, IEC 1000-4-2:1995,
IEC 1000-4-3:1995 and IEC 1000-4-4:1995
Replacing Part Numbers
The following list matches the new Fast SCSI part numbers to the
replaced part numbers:
2-4
New Fast SCSI Part Numbers
Replaced Part Numbers
ASB3902
ABP902
ASB3905
ABP915
ABP3922
ABP922
ABP3925
ABP925
Fast and Ultra SCSI Host Adapter User Manual
Product Features
The following list matches the new Ultra SCSI part numbers to the
replaced part numbers:
New Ultra SCSI Part Numbers
Replaced Part Numbers
ASB3940UA
ABP930UA, ABP940UA, ABP970UA,
ASB3980UA
ABP980UA
ConnectCom Contact Information
ConnectCom Solutions
1150 Ringwood Court,
San Jose, CA 95131
USA
Telephone: 408-383-9400
Tech Support
Telephone: 408-467-2930 Monday – Friday 8:00 A.M to 6:00 P.M (PST)
email: [email protected]
ConnectCom Web Site
http://www.connectcom.net
Anonymous FTP
ftp.connectcom.net (login: anonymous)
Fast and Ultra SCSI Host Adapter User Manual
2-5
Chapter
2-6
2
Host Adapter Specifications
Fast and Ultra SCSI Host Adapter User Manual
Fast and Ultra SCSI Host Adapter User Manual
Chapter 3
Hardware Installation
This chapter provides detailed instructions for installing your AdvanSys SCSI Host
Adapter. It also details SCSI device installation, termination, and ID assignment.
While installation of host adapters is generally the same, differences are described as
they apply.
Host Adapter Kit Contents
Before you install and configure your AdvanSys SCSI Host Adapter, make sure that
your system meets the minimum hardware requirements, and you have the following
items:
•
AdvanSys SCSI Host Adapter
•
SCSI Management Software Kit containing:
•
A single CD solution for PC and MAC
The CD contains the following: drivers, for the various operating
systems supported, the SuperInstall utility for installing Windows 95/
98, or Windows 2000, and the CharisMac utility for Mac installations.
•
•
Quick Install Guide for Windows 95/98, Windows NT,
and Windows 2000
•
Quick Install Guide for MAC
•
Warranty information and Software License Agreement
50-pin flat SCSI ribbon cable. See Chapter 3, Cable Considerations
Please be sure to fill out and return the Registration Card to ConnectCom.
Fast and Ultra SCSI Host Adapter User Manual
3-1
Chapter
3
Hardware Installation
Hardware Requirements
Before you install and configure your AdvanSys SCSI Host Adapter, make sure that
your system meets the minimum hardware requirements.
PC
To install your AdvanSys SCSI Host Adapter in a PC you will need the following:
•
An IBM PC (486 or higher) or compatible
•
At least 16MB of RAM
•
At least 2 MB of free disk space for a basic installation
•
One or more SCSI peripheral devices (up to a total of 7 per adapter card)
•
Available PCI slot
•
External SCSI cable for external devices
Mac
To install your AdvanSys SCSI Host Adapter in a Mac you will need the following:
•
Any Power Macintosh with at least one free PCI slot
•
8MB or more of RAM
•
1 MB of free disk space
•
MAC OS 7.5.2 or above
•
Available PCI slot
Cable Considerations
Please use an Ultra SCSI cable to attach Ultra SCSI peripherals to your AdvanSys
PCI to Ultra SCSI Host Adapter Card. An Ultra SCSI cable is required for the
following reasons:
3-2
•
If you are attaching fewer than five SCSI devices to the host adapter, the
maximum cumulative cable length for Ultra SCSI (20 MB/sec SCSI data
transfer) is 3.0 meters (versus 6.0 meters for FAST SCSI-2). If you plan to
attach from five to eight devices, the maximum cumulative length for cabling
is 1.5 meters.
•
Termination should be active on both sides because Ultra SCSI (2-3pF) has
a lower capacitance than FAST SCSI-2 (8-10pF).Impedance is lower for
Ultra SCSI (90W +/- 10W) than for FAST SCSI-2 (110W +/- 10W). The
REQ and ACK signals have even lower impedance at 90W+/- 6W.
•
Active negation for Ultra SCSI versus Open Drain for FAST SCSI.
Fast and Ultra SCSI Host Adapter User Manual
Fast/Ultra SCSI Host Adapter Overview
Fast/Ultra SCSI Host Adapter Overview
This chapter guides you through the process of installing your AdvanSys Fast/Ultra
SCSI Host Adapter. Please see Figure 3 - 1, the Fast/Ultra Host Adapter Layout
Connectors illustration.
Pin 1
J1
J1
J2
J2
J3
Pin 1 J3
JP1
Pin 1
Figure 3-1: Fast/Ultra Host Adapter Layout Connectors
Connector
Description
J1
25/50-pin external high-density SCSI connector
J2
50-pin internal SCSI connector
J3
SCSI Bus Busy LED connector pins 1 & 4:
POWER pins 2 & 3: SCSI Bus Busy Signal (active low)
Fast and Ultra SCSI Host Adapter User Manual
3-3
Chapter
3
Hardware Installation
SCSI Device Installation
Install any internal and external SCSI peripheral devices according to the
manufacturers’ installation instructions. You can install a maximum of seven SCSI
peripheral devices per AdvanSys host adapter.
The devices at both ends of the bus must be properly terminated, so signals can be
transmitted properly across the SCSI bus. The AdvanSys host adapter has automatic
termination control for the host adapter end of the bus cable; however, you must
ensure that the terminator at the other end (the last peripheral device only) of the bus
cable is enabled.
•
Figure 3 - 2 demonstrates proper termination when only internal SCSI
devices are attached to the host adapter card.
•
Figure 3 - 3 illustrates proper termination with only external peripheral
devices attached to the card.
•
Figure 3 - 4 illustrates proper termination for a combination of both external
and internal SCSI devices.
Most devices use resistor networks as terminators. To enable termination, leave the
resistor networks installed in their respective SIP (Single In-Line Package)
connectors. To disable termination, remove these resistor networks. Active
terminators generally have a jumper or switch that controls the enable/disable feature.
Refer to the SCSI device's installation manual for more details.
End of SCSI Bus
TERMINATION
AUTOMATICALLY
ENABLED
J2
ABP9X0U
Host Adapter
Card
J1
Device
#7
Device
#1
Device
#2
NO
Internal SCSI
Devices
TERMINATION
NO
TERMINATION
End of SCSI Bus
TERMINATION
ENABLED
Maximum 7 SCSI
Periperal Devices
Installable With One
ABP9X0U
Figure 3-2: Termination With Internal Devices Only
3-4
Fast and Ultra SCSI Host Adapter User Manual
SCSI Device Installation
End of SCSI Bus
TERMINATION
AUTOMATICALLY
ENABLED
J2
J1
ABP9X0U
Host Adapter
Card
Device
#2
Device
#7
External SCSI
Devices
PCI
Connector
Device
#1
NO
TERMINATION
NO
TERMINATION
Maximum 7 SCSI
Periperal Devices Expansion
Installable With One Slots
ABP9X0U
AdvanSys SCSI
Host Adapter
End of SCSI Bus
TERMINATION
ENABLED
Figure 3-3: Termination With External Power
Devices Only
Supply
ABP9X0U Host Adapter Card
TERMINATION
AUTOMATICALLY
3 1/2
DISABLED
Floppy
J2
J1
CD-ROM
Device
#1
NO
TERMINATION
Device
#7
End of SCSI Bus
TERMINATION
ENABLED
End of SCSI Bus
TERMINATION
ENABLED
NO
TERMINATION
Maximum 7 SCSI
Periperal Devices
Installable With One
ABP9X0U
Figure 3-4: Termination With Internal And External SCSI Peripheral Devices
Fast and Ultra SCSI Host Adapter User Manual
3-5
Chapter
3
Hardware Installation
SCSI ID Assignment
Each and every SCSI peripheral device connecting to the same AdvanSys host
adapter, including the host adapter itself, must be assigned its own unique SCSI ID.
SCSI IDs are numbered from 0 to 7. The default setting for the AdvanSys host
adapter is SCSI ID 7.
Figure 3 - 5 illustrates SCSI ID assignment to five internal and two external SCSI
peripheral devices attached to an AdvanSys host adapter. Each device on the SCSI
Bus has a unique SCSI ID number. You can assign the IDs randomly, as long as there
is no conflict!
ABP9X0U
Host Adapter
Card
J2
J1
SCSI ID:0
SCSI ID:2
SCSI ID:4
SCSI ID:3
SCSI ID:5
SCSI ID:6
Figure 3-5: Typical SCSI ID Assignment
3-6
Fast and Ultra SCSI Host Adapter User Manual
SCSI ID:1
SCSI ID Assignment
Figure 3 - 6 shows how to attach the internal SCSI cable to the host adapter card.
1.
Connect one end of the internal 50-pin flat SCSI ribbon cable to connector J2 of
the SCSI host adapter card, and the other end to any internal device.
2.
Be sure to connect the colored edge of the ribbon cable to the side of J2 marked
with an arrow (pin # 1).
3.
Make certain that the internal SCSI devices are connected with the colored edge
of the cable to pin 1 of the device.
Colored Side
50-Pin Flat SCSI
Ribbon Cable
J2 Internal
SCSI Connector
Pin 1
Figure 3-6: Connecting an Internal SCSI Cable to the Host Adapter Card
4.
Connect external SCSI peripheral devices to the SCSI connector J1.
5.
You can connect the hard disk LED cable of your PC to the “SCSI Bus Busy” LED
CONN (connector J3) so that the user will know when a SCSI device is active.
Fast and Ultra SCSI Host Adapter User Manual
3-7
Chapter
3
Hardware Installation
Hard Disk LED Cable
of Your PC
J2 Internal
SCSI Connector
Pin 1
LED Conn J3
Figure 3-7: Connecting the SCSI Bus Busy LED
NOTE: The J3 connector and SCSI Bus Busy LED are not available on all AdvanSys
host adapters.
3-8
Fast and Ultra SCSI Host Adapter User Manual
Fast and Ultra SCSI Host Adapter User Manual
Chapter 4
SCSI Installer
Software CD
This chapter guides you through the AdvanSys drivers installation using the
AdvanSys SCSI Installer Software CD. After completing installation of Windows 95/
98 or Windows 2000, refer to Chapter 3: Hardware Installation, for AdvanSys SCSI
Host Adapter installation instructions.
Fast and Ultra SCSI Host Adapter User Manual
4-1
Chapter
4
SCSI Installer Software CD
AdvanSys SCSI Installer Software CD
The SCSI Installer Software CD contains SCSI drivers for all major operating
systems and leading-edge utilities, incorporating the latest and most powerful
integration of SCSI software and hardware available in the market. The SCSI
Installer Software CD includes: SuperInstall for the Windows 95/98 and Windows
2000 environments, and CharisMac™ Anubis and AutoCache utilities for the Mac
environment.
SuperInstall is a software installation program for your Windows 95/98 and Windows
2000 environment. It loads your Windows 95/98 and Windows 2000 SCSI host
adapter drivers with one click of your mouse.
Included on the SCSI Installer Software CD is a complete User Manual in Adobe
Acrobat pdf file format. The Adobe Acrobat Reader is also included on the CD. To
print (or view) the manuals, install the Adobe Acrobat reader for your operating
system from the AdvanSys CD and then, from the Adobe Acrobat reader, open the
manual pdf file, of interest, from the AdvanSys CD. You can print the entire manual
or selected pages.
4-2
Fast and Ultra SCSI Host Adapter User Manual
AdvanSys SCSI Installer Software CD
Figure 4-1: Adobe Subdirectory for Readers to View Manuals in pdf Format shows a
directory listing of the SCSI Installer Software CD and the Adobe subdirectory where
the various versions of the readers can be found. Instructions can be found in the text
files in these subdirectories.
Figure 4-1: Adobe Subdirectory for Readers to View Manuals in.PDF Format
Note:
***** IMPORTANT NOTICE *****
Unlike the driver software for other operating systems, the AdvanSys drivers for Windows 95/
98 and Windows 2000 are installed before the Host Adapter Card, using the AdvanSys
SuperInstall utility on the SCSI Installer Software CD. Follow the instructions in this chapter to
install Windows 95/98 and Windows 2000 drivers first.
Fast and Ultra SCSI Host Adapter User Manual
4-3
Chapter
4
SCSI Installer Software CD
SuperInstall Instructions
Auto Insert Notification
Windows 95/98 and Windows 2000 comes with Auto insert notification activated. If
you have disabled it, make certain that it is activated before attempting installation by
performing the following steps:
4-4
•
Click on START.
•
Choose SETTINGS.
•
Click on CONTROL PANEL.
•
Double-click on the SYSTEM icon.
•
Click on DEVICE MANAGER.
•
Double-click on the CD-ROM icon.
•
Double-click on the listing for your CD-ROM drive.
•
In the Properties window, click on the Settings tab.
•
Click on the check-box next to Auto insert notification.
•
Reboot your system.
Fast and Ultra SCSI Host Adapter User Manual
AdvanSys SCSI Installer Software CD
SuperInstall Installation
Insert the AdvanSys SCSI Installer Software CD into your CD-ROM drive and wait
for the SuperInstall AutoRun window to appear (see Figure 4-2: AutoRun
SuperInstall Window from SCSI Installer Software CD).
Figure 4-2: AutoRun SuperInstall Window from SCSI Installer Software CD
If it does not appear after a few seconds, open My Computer by double clicking its
icon. Press F5 to refresh the My Computer window. Double click the AdvanSys
SuperInstall icon. From this SuperInstall window, clicking the left button in the
middle of the window installs Windows 95/98 and Windows 2000 SCSI drivers.
Follow the on-screen instructions.
An information dialogue box appears to announce that installation is complete; then,
refer to Chapter 3: Hardware Installation, for The AdvanSys SCSI Host Adapter
installation instructions. When the host adapter is in place and you reboot your
computer, Windows 95/98 and Windows 2000 will detect the new SCSI card and
assign it the AdvanSys drivers you’ve installed.
Fast and Ultra SCSI Host Adapter User Manual
4-5
Chapter
4
SCSI Installer Software CD
Installation from Diskette
The SCSI Management Software and SCSI Installer Software CDs have programs
that automate the installation of Windows 95/98 and Windows 2000 and Mac SCSI
drivers directly from the CD. Installation of Windows NT can also be done directly
from the CD. However, installation of SCSI drivers for other operating systems
involves making installation diskettes on a X86 PC.
Diskette Creation
In general, driver subdirectories for each supported operating system can be found
under the d:\Superscsi\Advansys\drivers\wide\ subdirectory, assuming the CD-ROM
drive is D. See Figure 4-3: Location of Drivers for Various Operating Systems for the
drivers subdirectory location on the SCSI Installer Software CD.
Figure 4-3 Location of Drivers for Various Operating Systems
4-6
Fast and Ultra SCSI Host Adapter User Manual
AdvanSys SCSI Installer Software CD
In each operating system subdirectory is a text file with instructions for the creation of
diskettes and installation of SCSI drivers for that operating system. In each operating
system subdirectory is a subdirectory titled “\image\”. This subdirectory usually
contains a driver diskette image file and an executable file to create the driver
installation diskette. Again read the instruction in the text file for the operating system
being installed. An alternate method of making installation diskettes is to use BIOS
Setup. See Chapter 6: SCO OpenServer Driver Installation.
Use the following procedure to create diskettes:
•
Boot system.
•
When AdvanSys Banner appears during boot up, press Ctrl+A.
•
On Adapter Configuration Menu, enable CD Bootability.
•
Exit SCSI BIOS setup.
•
Put AdvanSys CD in CD-ROM and reboot.
•
PC should boot from AdvanSys CD and offer a menu to make installation
diskettes for the various operating systems supported.
•
Make the desired Installation Diskettes, following the various menu
instructions.
•
When finished, reboot system, re-enter SCSI BIOS setup and disable CD
Bootability.
SuperView
SuperView is a tool designed for use within the Windows 95 environment. It can be
downloaded from a link on the ConnectCom support page at http://
www.connectcom.net/support/index.html. SuperView will help you solve any
problems you may encounter after installing the AdvanSys driver and your AdvanSys
SCSI Host Adapter.
Fast and Ultra SCSI Host Adapter User Manual
4-7
Chapter
4-8
4
SCSI Installer Software CD
Fast and Ultra SCSI Host Adapter User Manual
Fast and Ultra SCSI Host Adapter User Manual
Chapter 5
Software Driver
Installation
This chapter guides you through AdvanSys driver installation. Refer to Chapter 4,
SCSI Installer Software CD for instructions to create installation diskettes for your
operating system. For operating systems not covered in this chapter, create
installation diskettes and follow customary procedures for installing peripherals and
associated drivers on the PCI bus.
The DOS/Windows 3.11, and Novell AdvanSys driver software provide the industry
standard ASPI interface. We recommend that you check with your device
manufacturer for instructions on using the ASPI interface with your device.
The following list shows the sections in this chapter contains installation instructions
appropriate for your operating system.
•
Windows 95/98 and Windows 2000
•
DOS and CD-ROM Driver installation
•
Windows NT
•
Windows 2000
•
Mac OS 7.55 or greater
•
Novell NetWare
•
SCO OpenServer
•
Solaris 86
•
SCO UnixWare
•
Linux
Fast and Ultra SCSI Host Adapter User Manual
5-1
Chapter
5
Software Driver Installation
Windows 95/98 and Windows 2000
Driver Installation
Install the driver software BEFORE installing your AdvanSys SCSI Host Adapter
(see Chapter 3, Hardware Installation). Use SuperInstall Autorun from the
AdvanSys SCSI Installer Software CD to install drivers for the Windows 95/98 and
Windows 2000 as described in Chapter 4, SCSI Installer Software CD.
Updating Flash BIOS
Use the following procedure to update the flash BIOS:
5-2
1.
Turn on your system.
2.
Click the START button and continue until you open Windows Explorer.
3.
Go to the CD-ROM directory (D) and click on the plus signs (+) next to the
following: Advansys; Drivers; and Narrow.
4.
Click on the Win9x folder to open it.
5.
Double-click on the advwflsh.exe in the advscsi folder.
6.
When the Superflash box appears, follow the instructions to upgrade your BIOS.
Fast and Ultra SCSI Host Adapter User Manual
DOS 6.x, Driver Installation
DOS 6.x, Driver Installation
Install the driver software after installing your AdvanSys SCSI Host Adapter (see
Chapter 3, Hardware Installation). Windows 3.1 users follow the same instructions
as DOS users.
Installing From CD-ROM
1.
After installing the SCSI host adapter, let the computer boot up to DOS.
2.
Insert the AdvanSys CD into your CD-ROM drive.
3.
Enter the letter of your CD Drive (such as d:) at the command prompt.
4.
Type cd d:\advansys\drivers\Narrow\dos at the command prompt
and press Enter.
5.
Type install at the command prompt and press Enter. This starts the DOS
drivers installation program.
6.
Press Enter to go past the introduction screen.
7.
Use the arrow keys to highlight the Full installation (recommended choice). Press
Enter to continue. If you are installing SCSI removable disk drives, select the
Custom Installation choice so that you have the option of installing an additional
AdvanSys removable disk driver.
8.
Follow the instructions on the screen. Press Enter to proceed or press ESC to
cancel. You can use arrow keys to highlight selections, if necessary.
9.
When the program ends (and you are back at the command prompt), remove the
AdvanSys CD and press Ctrl+Alt+Delete to reboot the system, so that the newly
installed drivers can take effect.
10. Your AdvanSys SCSI Host Adapter is installed.
Installing From Diskette
1.
Turn your computer power on.
2.
Insert the Installation diskette into the floppy drive.
3.
At the C:\> prompt, type A:\ and press Enter.
4.
At the A:\> prompt, type Install and press Enter, a message appears.
This program will install the AdvanSys DOS Drivers.
Files will be copied to: C:\ADVSCSI, and default
settings for hardware and software will be used.
5.
Press Enter
Fast and Ultra SCSI Host Adapter User Manual
5-3
Chapter
5
Software Driver Installation
6.
Automatic Installation will use default setting and options. Custom Installation
will prompt you for changes
7.
If you select Automatic Installation, the driver files will be copied to
C:\ADVSCSI.
8.
Working....(shows the files being copied to the C:\ drive)
9.
If you select Custom Installation, you will be prompted for changes to
config.sys and autoexec.bat files.
10. Upon completion of either step 6 or step 7, the following screen message appears:
“AdvanSys DOS Drivers have been successfully installed. You
must REBOOT your computer for the changes to take effect.”
11. Press Enter to exit the installation program.
12. Before continuing, remove the disk from the floppy disk drive.
13. If you want the driver installation to take effect now, reboot by pressing
Ctrl+Alt+Delete. Otherwise, press any key to continue.
ADVASPI.SYS is the AdvanSCSI ASPI Manager for DOS. It is designed to support
the AdvanSys Fast/Ultra SCSI Host Adapters, using MS-DOSTM 6.0 or later version.
ADVASPI.SYS is loaded from the CONFIG.SYS file and automatically installed by
the DOS installation program. To install it manually, add the following line to the
CONFIG.SYS file:
DEVICE=ADVASPI.SYS
To minimize possible confusion, it is a good idea to create a \ADVSCSI directory to
hold all of the AdvanSys software files. In this case, the directory path would be:
DEVICE=C:\ADVSCSI\ADVASPI.SYS
The automatic install programs use this method.
You can also load ADVASPI.SYS into high memory if you install the appropriate
memory manager before loading.
5-4
Fast and Ultra SCSI Host Adapter User Manual
DOS 6.x, Driver Installation
Command Line Options
Command line options (separated by forward slashes and containing no spaces) can
be added on the same line as the command. For example:
DEVICE=ADVASPI.SYS /P/V
Several command line options can be used with ADVASPI.SYS. Most installations
will not require any of these, but there are circumstances for which one or more may
be necessary.
The command lines are as follows:
/L By default, logical units (LUNs) are not supported by ADVASPI.SYS. To
enable LUN support, specify the /L option at the command line.
/P When you use the /P option, ADVASPI.sys will pause until you press a
key before continuing when it’s loaded.
/V A verbose display will be printed during initialization, showing adapter
I/O ports, IRQs, and other miscellaneous information.
Fast and Ultra SCSI Host Adapter User Manual
5-5
Chapter
5
Software Driver Installation
Mac PowerPC OS 7.x, 8.x and 9.x
Driver Installation
Special drivers are not required for the extension manager. The drivers for the Mac
OS are built into the SCSI card. However, to provide boot capability from an attached
SCSI device with the new G3 or newer Macs, the AdvanSys Mac flash utility will be
required to configure the SCSI card to enable this capability. Anubis disk-mounting
and CD-ROM AutoCache utilities are included to mount the disk and CD-ROMs, or
use your favorite Mac-mounting utility, since most mounting utilities will work.
•
5-6
If you have difficulty locating your AdvanSys SCSI Host Adapter, make sure
that you have the latest version of the Mac mounting software or use the
included Anubis version. Anubis only supports devices mounted on
AdvanSys SCSI Host Adapters.
Fast and Ultra SCSI Host Adapter User Manual
Windows NT Driver Installation
Windows NT Driver Installation
Installation Diskette Creation for Windows NT 4.0
From d:\advansys\drivers\Narrow\winnt (assuming CD-ROM is drive
d:\), copy the following files to the root directory of a newly formatted 3.5” diskette:
•
WINNT.TXT
•
DISK1
•
TXTSETUP.OEM
•
OEMSETUP.INF
•
ASC.SYS
This will now be your Windows NT AdvanSys Driver diskette. Read WINNT.TXT
for instructions on using this diskette.
Installing to a New Windows NT system
•
At the end of the diskette phase of a new Windows NT installation, you will
be asked whether you want to: Specify Additional Drivers. Answer yes by
selecting S.
•
From the list of drivers displayed, select Other.
•
When prompted, insert the installation diskette.
•
When the AdvanSys driver you desire is found on the diskette, highlight its
name. Once the driver is loaded, it will search for the AdvanSys SCSI Host
Adapter installed in the system.
•
Windows NT displays a confirmation message when the successfully loaded
driver finds the AdvanSys SCSI Host Adapter. Press Enter to continue with
the installation.
Installing to an Existing Windows NT 4.0 System
•
Double-click My Computer and open the Control Panel.
•
From the Control Panel, open the SCSI Adapters icon.
•
Select the Drivers tab.
•
From the Install Driver window, press the button labeled Have Disk.
•
When prompted, insert the Windows NT AdvanSys Driver diskette.
•
Reboot the system for the driver installation to take effect.
Fast and Ultra SCSI Host Adapter User Manual
5-7
Chapter
5
Software Driver Installation
Novell NetWare Driver Software Installation
The AdvanSys NetWare HAM Driver, ADVHMXXX.HAM, is designed to work
with the AdvanSys Fast/Ultra SCSI Host Adapters, and Netware 4.0 or later.
Naming Scheme
The AdvanSys NetWare HAM Driver name reflects its version number. When you
are upgrading drivers, it is important that you modify the server STARTUP.NCF or
AUTOEXEC.NCF to contain the new driver name.
Installation
•
Boot your system with the AdvanSys ADVASPI.SYS and ADVANCD.SYS
drivers in the CONFIG.SYS file, in order to make the CD-ROM drive visible
to DOS.
•
After bootup, change to the CD-ROM drive, type install, and then follow
the NetWare installation procedures.
•
You will need to use the driver diskette to load the AdvanSys driver during
installation. NetWare will automatically detect AdvanSys SCSI Host
Adapters and assign a unique slot number. When the system prompts with a
slot number, press Enter to accept it and continue installation.
•
If you want to upgrade the driver after installation, copy the driver from the
diskette to the server boot directory and update the STARTUP.NCF file.
•
After installation, NetWare will create a STARTUP.NCF file, which will
contain the following AdvanSys driver loading statement:
LOAD ADVHMXXX.HAM INT=B
•
You may update the statement as follows for nonstop NetWare bootup:
LOAD ADVHMXXX.HAM SLOT=10001
5-8
Fast and Ultra SCSI Host Adapter User Manual
Novell NetWare Driver Software Installation
ADVHMXXX.DDI Installation Information File
The ADVHMXXX.DDI file that accompanies the HAM driver is used for automatic
hardware detection during installation of NetWare 4.11. This DDI file contains driver
descriptions that specify configurable driver parameters, the input required from the
user, and the format of the required output.
Installing ASPI
Novell 4.11 includes the ASPI layer:
LOAD NWASPI.NLM
For earlier versions of Novell, the NWPA patch is required. The NWPA patch is
available on the World Wide Web at
http://developer.novell.com/devres/sas/nwpa_up.exe.
Note:
The URL may change in the future since Novell provides the patch.
Fast and Ultra SCSI Host Adapter User Manual
5-9
Chapter
5
Software Driver Installation
SCO OpenServer Driver Installation
The SCO OpenServer Driver supports AdvanSys Ultra/Fast SCSI Host Adapters for
the OpenServer 5.0 or above.
In order to install the universal driver software on SCO OpenServer, you will first
need to create the installation diskettes from the AdvanSys SCSI Management
Software or SCSI Installer Software CD. If you haven’t already done this, see
Diskette Creation on page 4-6.
During SCO OpenServer Installation
Set up your devices with the following SCSI Target IDs:
Hard Disk: 0
CD-ROM: 5
Tape Drive: 2
5-10
1.
Use the installation boot disk you created from the SuperSCSI CD.
2.
Type link at the Boot: prompt. SCO dynamically links the AdvanSys driver to
the install kernel. The AdvanSys driver is a BTLD (Boot Time Loadable Driver).
3.
Type asc, which is the name of the AdvanSys BTLD driver package, when the
install program asks you what package to link.
4.
Place the AdvanSys SCO BTLD diskette into the floppy drive when the system
prompts you to do so. Do not insert the diskette until you are asked for it. (The
install program may ask for the disk more than once.)
Fast and Ultra SCSI Host Adapter User Manual
SCO OpenServer Driver Installation
After SCO OpenServer Installation
•
Create an AdvanSys driver diskette as described previously. Label the
diskette AdvanSys SCO BTLD. Be sure to include the version of the driver
on the label.
•
Type the command installpkg from the SCO UNIX command line.
•
Insert the AdvanSys SCO BTLD diskette into the floppy drive at the prompt.
•
After installation, type the following commands to rebuild a new kernel
containing the asc driver:
cd /etc/conf/cf.d./link_unix
For more information, refer to the SCO documentation on compiling the kernel.
Fast and Ultra SCSI Host Adapter User Manual
5-11
Chapter
5
Software Driver Installation
Installing the Solaris x86 Driver
The AdvanSys Solaris driver (ASC) supports the AdvanSys Ultra/Fast SCSI Host
Adapter for Solaris 2.6 and 2.7. Earlier versions of Solaris are not supported.
The Solaris directory includes the image files listed below. If the date listed in the
solaris.txt file indicates that it is more than a few months old, please check the
AdvanSys FTP site to download the latest version of the driver.
SOLARIS.TXT
Installation Instructions
SOLARIS.EXE
DOS Executable File to create
ASCITU.DAT and RAWRITE.EXE
Instructions for Creating the ASC Driver Diskette in Solaris
1.
Copy file ascitu_d.z as ascitu.dd.Z using
# cp ascitu.dd.z ascitu.dd.Z
2.
Uncompress the file using
# uncompress ascitu.dd.Z
3.
Stop Volume Management if it is running using
# /etc/init.d/volmgt stop
4.
Copy the image onto a 1.44 MB floppy.
Insert a floppy in the floppy drive and type
# dd if=ascitu.dd of=/dev/rfd0
bs=64k
Instructions for Creating the ASC Driver Diskette in DOS
The file SOLARIS.EXE is a self-extracting archive, which contains the image of
Solaris ASCITU diskette.
1.
Copy the file SOLARIS.EXE to a DOS system.
2.
Type the command SOLARIS.EXE. The following files will be created:
RAWRITE.EXE DOS Executable to transfer file images to a diskette
ASCITU.DAT
3.
5-12
Driver Update Image for AdvanSys hardware
Type RAWRITE ASCITU.DAT A: to create the ASCITU diskette
Fast and Ultra SCSI Host Adapter User Manual
Installing the Solaris x86 Driver
Installing the ASC Driver During Solaris Installation
Note: For other Driver Updates to be used during installation, use the Driver update diskettes
(if any) supplied with the Installation media or check out
http://access1.sun.com/drivers.
1.
Use Boot diskette to boot the Solaris operating environment.
2.
Insert the Solaris x86 Edition Installation CD into a CD-ROM drive and the Boot
diskette into the first floppy drive.
3.
The system should boot off the floppy. When the Solaris Device Configuration
Assistant screen is displayed, press F4_Driver Update.
4.
Remove Boot diskette and insert ASCTU Diskette. Press F2_Continue.
5.
Select Solaris OS and press F2_Continue.
6.
Remove the ASCITU diskette and reinsert Boot diskette. Press F4_Done.
7.
You will see ASC in the driver list and press F2_Continue.
8.
Then follow the Solaris instructions to finish the installation.
9.
At the end of the installation, you will be prompted to insert the ASCITU and other
Driver Update Diskette(s) again.
10. The installation procedure automatically adds the AdvanSys driver to the installed
system. There is no need to re-add the driver after completing the installation.
Installing the ASC Driver After Installing Solaris
You must already have installed Solaris x86 Edition software before you proceed with
this process.
1.
Boot the Solaris system and login as root.
2.
Type ps -ef | grep vold to audit the Volume Management software.
3.
If Volume Management is running, temporarily stop it with this command:
# /etc/init.d/volmgt stop
4.
Insert ASCITU Driver Update diskette into the floppy drive.
5.
Mount ASCITU Driver Update diskette at the /mnt mount point.
# mount -F pcfs /dev/diskette /mnt
6.
Execute the install script on the diskette by typing:
Fast and Ultra SCSI Host Adapter User Manual
5-13
Chapter
5
Software Driver Installation
For Solaris 2.6:
# /mnt/DU/sol_26/i86pc/Tools/install.sh -i
For Solaris 2.7:
# /mnt/DU/sol_27/i86pc/Tools/install.sh -i
7.
Unmount the diskette if the install.sh script exits.
# umount /mnt
8.
Reboot your Solaris system and use the boot command b -r at the boot prompt
to reconfigure the system. The -r option will cause the /devices and /dev
directories to be rebuilt.
Installing SCSI Devices Under Solaris
SCSI Disk and CD-ROM devices are controlled by the same target driver cmdk(7d).
Device files are of the form:
/dev/[r]dsk/c[0-9]t[0-7]d[0-7]s[0-15]
SCSI Tape drives are controlled by st(7d). Device files are of the form:
/dev/[n]rmt/[0-9]
If you add or remove a SCSI device reboot your Solaris system and use the boot
command b -r at the boot prompt to reconfigure the system. This will cause the /
devices and /dev directories to be rebuilt.
5-14
Fast and Ultra SCSI Host Adapter User Manual
SCO UnixWare Installation
SCO UnixWare Installation
The AdvanSys UnixWare ASC Driver supports all AdvanSys Ultra/Fast SCSI Host
Adapters for SCO UnixWare 7.X and 2.1 Releases.
The UNIXWARE directory includes the following files. The latest versions of these
files are contained on the AdvanSys web site. If the date listed in the
UNIXWARE.TXT file is more than a few months old, please check the web site for a
newer version of the driver.
UNIXWARE.TXT
Installation Instructions
UNIXBTLD.EXE
DOS Self-extracting Archive Containing Diskette Image
UNIXBTLD.Z
UNIX Compressed Floppy Diskette Image
To install the AdvanSys Universal Driver you will need to create a Boot Loadable
Diskette containing the driver. You may create the diskette using either DOS or
UnixWare. Decide which system to use and follow the directions below. After the
diskette is created it can be used to add the driver during the UnixWare installation or
used to add the driver to an existing UnixWare system. Directions for both of these
installation options are contained below.
Creating the ASC Universal Driver Diskette From DOS
The file unixbtld.exe is a self-extracting archive, which contains an image of a
UnixWare s5 file system. The image can be copied to a 3.5" diskette to make an ASC
Universal Driver HBA Diskette.
1.
Copy the file unixbtld.exe from the AdvanSys DOS diskette containing the
directory UNIXWARE to a DOS system.
copy a:\unixware\unixbtld.exe
2.
Type the command unixbtld.exe. The following two files will be created:
btld.dat
unixfer.exe
3.
Insert a blank formatted diskette in the 3.5" floppy disk drive and create the
diskette with the following command:
unixfer btld.dat a:
4.
To verify the contents of the diskette unixfer can also be run in reverse. The file
btld.dat should exactly match test.dat.
unixfer a: test.dat
fc btld.dat test.dat
Fast and Ultra SCSI Host Adapter User Manual
5-15
Chapter
5
Software Driver Installation
Creating the ASC Universal Driver Diskette From UnixWare
The file unixbtld.Z is a compressed image of an UnixWare s5 file system. To
make an ASC Universal Driver HBA Diskette, copy the image to a 3.5" diskette.
1.
Copy the file unixbtld.Z from the AdvanSys DOS diskette containing the
directory UNIXWARE to a UnixWare system.
$ doscp a:/unixware/unixbtld.Z unixbtld.Z
2.
Uncompress the file unixbtld.Z with the following command in the same
directory where the file is located.
$ uncompress unixbtld.Z
3.
Insert a blank diskette in the 3.5" floppy disk drive and use "dd" to create the
diskette with the following command.
$ dd if=unixbtld of=/dev/rdsk/f0t bs=64k
4.
To verify the contents of the diskette run dd in reverse. The file unixbtld
should exactly match test.dat.
$ dd if=/dev/rdsk/f0t of=test.dat bs=64k
$ cmp unixbtld test.dat
Installing the ASC Driver During UnixWare Installation
Insert the ASC HBA Driver Diskette when prompted to by the install procedure. The
driver will be loaded into the live system and the install will proceed.
Installing the ASC Driver After Installing UnixWare
•
Type the pkgadd command from the command line as the root user.
pkgadd -d diskette1
•
5-16
Install the AdvanSys HBA driver. The kernel will automatically be re-built
to include the driver the next time the system is shutdown.
Fast and Ultra SCSI Host Adapter User Manual
SCO UnixWare Installation
Converting ASC Driver to a Loadable Driver
The ASC UnixWare driver by default is installed as a static driver. If the driver is not
needed for booting the system (it does not control the system boot disk) it may be
changed to a loadable driver with the following commands:
•
Edit the file /etc/conf/sdevice.d/ASC and remove the line
containing the word "static".
•
Type /etc/conf/bin/idbuild -M ASC to build the driver as a
loadable module.
•
Install the loadable module with the command modadmin -l ASC.
Checking the Software and Hardware Configuration
The ASC driver software and hardware configuration may be queried using the
command dcu. This command will list all the installed AdvanSys adapters and their
hardware settings.
Installing SCSI Devices Under UnixWare
SCSI devices will automatically be detected at boot time and device files for the
devices will be created. This can also be done manually with the following
commands:
/etc/scsi/pdimkdev -if
/etc/scsi/pdimkdtab -if
The following commands can be used to set-up a SCSI disk. Do not run this
command on the root disk or a disk that is already set-up.
fdisk /dev/rdsk/cXbXtXdXs0
disksetup -I /dev/rdsk/cXbXtXdXs0
Here is a basic list of UnixWare device files:
Disk Device Files: /dev/[r]dsk/c[0-9]b0t[0-7][ps][0-f]
Tape Device Files: /dev/rmt/c[0-9]b0t[0-7]l[0-7]
CD-ROM Device Files: /dev/[r]cdrom/c[0-9]b0t[0-7]l[0-7]
Note: On UnixWare-7, the tape devices are locked by SCO ARCserve/Open utility. Because of
this the tape devices are unavailable for use by backup commands like tar, cpio. To unlock these
devices; the above utility could be stopped by running a stop as a root user. For more information
about this, refer to UnixWare-7 Runtime Release Notes.
Fast and Ultra SCSI Host Adapter User Manual
5-17
Chapter
5-18
5
Software Driver Installation
Fast and Ultra SCSI Host Adapter User Manual
Fast and Ultra SCSI Host Adapter User Manual
Chapter 6
BIOS Setup Values
Board configuration is automatically controlled by the system BIOS. However, once
the Plug-and-Play compatible AdvanSys SCSI Host Adapter is installed, experienced
PC users may access and adjust the default configuration values. (Macintosh users
don’t need the information in this chapter, since values are assigned automatically.)
Accessing the System BIOS Values
Restart your computer system. The system detects the SCSI host adapter, indicates
that the system is running, conducts a BIOS scan, and lists all peripherals on the SCSI
chain. The AdvanSys banner appears.
AdvanSys SCSI Fast/Ultra PCI Host Adapter BIOS V 2.9ZA
Copyright (c) 2000 ConnectCom Solutions, Inc.
Figure 6-1: AdvanSys Banner Example
Check the BIOS version shown in the banner to verify that it is the latest by
comparing version number to those offered on the AdvanSys web site support area.
Press Ctrl+A to interrupt the booting process and display the system values. The port
address, IRQ (interrupt request), SCSI ID of the host adapter, BIOS address, and
Serial number appear in the banner. The Main Menu also appears below the banner.
Fast and Ultra SCSI Host Adapter User Manual
6-1
Chapter
6
BIOS Setup Values
The Main Menu
The Main Menu allows you to configure the host adapter, detect which peripherals
are on the SCSI bus, reformat a hard drive, and implement or discard changes.
AdvanSys SCSI PCI Ultra Host Adapter Setup # Copyright (c) 1999
Port:D000 IRQ 10 SCSI ID:7 BIOS:C800 Rev: C
Main Menu
Adapter Configuration
SCSI Configuration
SCSI Bus Scan Low
Level Disk Format
Restore Factory Defaults
Restore Factory Settings
Save Changes & Continue Discard
Changes & Continue
Figure 6-2: Main Menu
Use the up/down Arrow keys to select an item in the Main Menu.
Press Enter to activate the item or access the values for that item.
6-2
Fast and Ultra SCSI Host Adapter User Manual
Adapter Configuration
When you select Adapter Configuration from the main menu, the Adapter
Configuration menu appears.
AdvanSys SCSI PCI Host Adapter Setup # Copyright (c) 1999
Port:D000 IRQ 12 SCSI ID:7 BIOS:C800 Rev: C
Adapter Configuration
Host SCSI ID
Start-up Delay Time
.............
[
7
1
SCSI Bus Termination
PCI Burst Mode
Extended Translation
Support Removable
as Fixed Drive
CD Bootability
SCSI Parity
Ultra SCSI Feature
Automatic
Enabled
Enabled
Disabled
Host Queue Size
Device Queue Size
Boot Device ID
16
8
0
] Cursor
[Spacebar] Select
Enabled
Enabled
Enabled
[Esc]
Figure 6-3: Configuration Menu
This menu allows you to configure the peripheral start-up speed, termination, data
rate capacity, bootability, error-scanning, and queue.
•
Press the Space bar to scroll through the menu list.
•
Use the up/down Arrow keys to toggle or scroll through the value.
•
Press Esc to return to the Main Menu.
Figure 6-5: SCSI Bus Scan Results
Fast and Ultra SCSI Host Adapter User Manual
6-3
Chapter
6
BIOS Setup Values
Host SCSI ID
The host SCSI ID should always be 7.
Start-up Delay Time
The 0–10 (1 second is default, 0 seconds means there is no SCSI reset) values
determines how much time is allotted for all peripherals to come up to speed at startup.
SCSI Bus Termination (SE and LVD)
The Automatic (default), Disable, or Enable value determines the ability of the
SCSI bus to terminate a peripheral. Automatic allows the SCSI bus to automatically
sense which internal or external peripherals need termination. Disable means
termination on the host adapter is turned off, and Enable means termination is on.
PCI Burst Mode
The Enabled (default) or Disabled value determines whether data will be sent to the
peripherals at high speeds on the PCI bus. Use Disabled only if a peripheral requires
a significantly lower burst rate.
Extended Translation
This function was used to work around older PC ROM BIOS drive size limitations.
Extended translation allowed partitioning of drives over 1 GB. Default is enabled.
However, if partitioning drives (<1GB), disable the extended option.
Support Removable as Fixed Disk
This function treats removable drives as a fixed drive and assigns it a drive letter.
CD Bootability
The Enabled (default) or Disabled value determines whether the computer system
can boot up from a CD-ROM drive.
SCSI Parity
The Enabled (default) or Disabled value determines whether the BIOS scans for any
errors on the SCSI chain. AdvanSys highly recommends that this setting always be
Enabled so that a warning will appear if an error is found.
Ultra SCSI Feature
The Enabled (20 MB/sec) or Disabled (10 MB/sec) value determines whether the
SCSI takes advantage of the Ultra SCSI board’s increased bandwidth. The default is
Enabled.
6-4
Fast and Ultra SCSI Host Adapter User Manual
Host Queue Size
The numbered (16 is normal) value determines how many commands a host adapter
may hold in its queue at a time.
Device Queue Size
The numbered (8 is normal) value determines how many commands a peripheral may
hold in its queue at a time.
Boot Device ID
By default, the BIOS uses the first bootable SCSI device found for boot. This
parameter will allow user to specify a target ID for boot.
SCSI Configuration
When you select SCSI Configuration from the Main Menu, a matrix of settings
appears.
AdvanSCSI PCI Ultra Adapter Setup # Copyright (c) 1998
Port:D000 IRQ 12 SCSI ID:7 BIOS:C800 Rev:C
SCSI Configuration
SCSI Device ID
Start Unit Command
SCSI Disconnection
Command Queuing
Synchronous Transfer
BIOS Target Control
[
–><–] Cursor
[y] Yes
#0
Yes
Yes
No
Yes
Yes
#1
Yes
Yes
No
Yes
Yes
[n] No
#2
Yes
Yes
No
Yes
Yes
#3
Yes
Yes
No
Yes
Yes
#4
Yes
Yes
No
Yes
Yes
#5
Yes
Yes
No
Yes
Yes
#6
Yes
Yes
No
Yes
Yes
[Spacebar] Toggle
#7
Yes
Yes
No
Yes
Yes
[Esc]
•
Press the Space bar to scroll through the list, then use the arrow keys to select
a number.
•
Type y for Yes and n for No or use the Space bar to toggle the Yes/No values.
•
Press Esc to return to the Main Menu.
Fast and Ultra SCSI Host Adapter User Manual
6-5
Chapter
6
BIOS Setup Values
SCSI Device ID
Displays the ID number (0–7) of the peripherals and host adapter(s) on the SCSI
chain. The host adapter ID should always be 7.
Start Unit Command
The Yes (default) or No value determines whether the host adapter will start each
peripheral in an automatic sequence. Allowing the host adapter to control the start
sequence protects the computer power supply from overload.
SCSI Disconnection
The Yes (default) or No value determines whether SCSI peripherals can connect to
and disconnect from the bus. Yes enables multi-threading and multi-tasking, with less
idle time and maximum efficiency.
Command Queuing
The Yes or No (default) value determines whether the host and peripherals can accept
multiple command queues. Most peripherals do not implement command queuing, so
AdvanSys recommends setting this option to No. If you assign Yes for Command
Queuing, you must specify the values for Host Queue Size and Device Queue Size
through the Adapter Configuration menu, discussed later in this chapter.
Synchronous Transfer
Sets maximum speed that SCSI host will accept data from peripheral. In marginal
configurations (configurations with marginal cable quality, older devices, or
approaching the maximum number of peripherals supported), setting the transfer rate
lower for a problem device can at times make that device functional.
BIOS Target Control
The Yes (default) or No value determines from which SCSI peripherals the BIOS can
boot. The host adapter must always be Yes. Assign No to any peripheral that should
manufacturer, type of peripheral, and the firmware version number of the peripheral.
Press any key to return to the Main Menu.
6-6
Fast and Ultra SCSI Host Adapter User Manual
SCSI Bus Scan
When you select SCSI Bus Scan from the Main Menu, the message “Searching for
drives...” appears. When the scan is complete, a list of all connected peripherals on
the SCSI bus appears, with associated information, including the ID number,
manufacturer, type of peripheral, and the firmware version number of the peripheral.
Press any key to return to the Main Menu.
SCSI Bus Scan Results
4:SeagateSTS1080N0943
5:ToshibaCD-ROMXM-620ITA1030
Figure 6-5: SCSI Bus Scan Results
Low Level Disk Format
Note: WARNING: This option will destroy your boot sector!
When you select Low Level Disk Format from the Main Menu, a list of all media
drives on the SCSI chain appears. If you are certain that you need to reformat your
media drive, use the arrow keys to select a drive, and press Enter. A warning message
appears: “Are you sure you want to format it?”
If you select Yes and press Enter, the selected media drive is reformatted, and the
Main Menu reappears. If you select No and press Enter, the Main Menu reappears.
Restore Factory Defaults
Selecting Restore Factory Defaults from the Main Menu immediately restores the
AdvanSys default setup configuration values for the host adapter and SCSI.
Restore Previous Settings
When you select Restore Previous Settings from the Main Menu, the previously saved
configuration values are immediately restored.
Fast and Ultra SCSI Host Adapter User Manual
6-7
Chapter
6
BIOS Setup Values
Save Changes and Continue
When you select Save Changes and Continue from the Main Menu, a question
appears: “Do you want to save changes and continue?”
If you select Yes and press Enter, all changes you made will be saved to EEPROM,
and the computer system resumes booting up.
If you select No and press Enter, the Main Menu reappears.
Discard Changes and Continue
When you select Discard Changes and Continue from the Main Menu, a question
appears: “Do you want to discard changes and continue?”
If you select Yes and press Enter, all changes you made will be discarded, and the
computer system will resume booting up.
If you select No and press Enter, the Main Menu reappears.
6-8
Fast and Ultra SCSI Host Adapter User Manual
Index
Numerics
32-bit Bus Master DMA
data transfer rate 2-2
A
ABP3922 2-4
ABP3925 2-4
ABP902 2-4
ABP915 2-4
ABP922 2-4
ABP925 2-4
Adapter Configuration 6-3
bootability 6-3
data rate capacity 6-3
error-scanning 6-3
peripheral startup speed 6-3
queue 6-3
termination 6-3
ADVANCD.SYS 5-8
AdvanSCSI ASPI Manager
DOS 5-4
AdvanSys Contact Information 2-5
AdvanSys DOS Driver 5-3
AdvanSys Fast/Ultra Host Adapters
features 2-1
AdvanSys Mac flash utility 5-6
AdvanSys NetWare HAM Driver 5-8
AdvanSys SCSI Host Adapter
compatibility 2-2
installation 3-1
AdvanSys SCSI Management Software 4-1
AdvanSys SCSI Utility 1-3
AdvanSys Solaris driver 5-12
AdvanSys SuperSCSI CD 5-3
AdvanSys Universal Driver 5-15
ADVASPI 5-4
ADVASPI.SYS 5-8
ADVITU.DAT 5-12
advwflsh.exe 5-2
Anonymous FTP 2-5
Anubis 4-2
disk mounting 1-3
Anubis disk-mounting 5-6
ASB3902 2-4
ASB3905 2-4
ASB3980UA 2-5
ASC HBA Driver Diskette 5-16
ASC Universal Driver HBA Diskette 5-15
ASC.SYS 5-7
ASP980UA 2-5
ASPI interface 5-1
ASPI layer 5-9
Auto insert notification 4-4
AutoCache 4-2
AUTOEXEC.NCF 5-8
Automatic Installation 1-3, 5-4
Autorun program 1-2
Autorun SuperSCSI 5-2
B
BIOS 5-2
Boot Device ID 6-5
Device Scan 6-4, 6-5
Target Control 6-6
version 6-1
BIOS address 6-1
BIOS scan 6-1
BIOS Setup 4-7
BIOS upgrades 2-2
Board configuration
BIOS 6-1
BTLD (Boot Time Loadable Driver) 5-10
btld.dat 5-15
C
cabling
for external devices attached to Ultra SCSI host
adapter 3-2
CE Compliance 2-4
CharisMac 4-2
Command line options 5-5
Command Queuing 6-6
command queuing 6-5
CONFIG.SYS file 5-8
connect SCSI devices
PC 1-5
connector table 3-3
connectors 3-3
Custom Installation 5-4
D
Discard Changes and Continue
command 6-8
disk performance 1-3
DISK1 5-7
DOS 6.x 1-2
-ix
L
driver
diskette image files 1-4
driver software 5-3
drivers
Mac OS 5-6
Drivers locations
subdirectories 1-4
loading drivers
Novell NetWare 1-4
Windows 3.1 1-4
Windows NT 1-3
Low Level Disk Format 6-7
LUN support 5-5
E
M
EEPROM 2-2, 6-8
Extended translation 6-4
external SCSI cable connector
attatching 1-6
F
Fast SCSI
features 2-1
FCC Certification 2-4
file
ADVHMXXX.HAM 5-8
advitu.dd.Z 5-12
advitu_d.z 5-12
files
ADVASPI.SYS 5-4
autoexec.bat 5-4
cmdk(7d) 5-14
CONFIG.SYS 5-4
firmware 1-3
Flash ROM 2-2
H
hardware requirements 3-1, 3-2
host adapter 6-2
I
ID assignment 3-1
installation boot disk 5-10
installation diskettes 4-6, 5-10
create 1-2
installation program
DOS 1-2
installing
AdvanSys SCSI Host Adapter 1-5
SCSI Host Adapters 1-1
software 1-1
installing peripherals 5-1
IRQ 6-1
-x
Mac Blue
SCSI driver 1-3
Main Menu 6-2
N
NetWare 5-8
NWASPI.NLM 5-9
NWPA patch 5-9
O
OEMSETUP.INF 5-7
OpenServer 5.0 5-10
Operating Temperature 2-4
P
P (pause) option 5-5
PCI
burst mode 6-4
PCI configuration
BIOS settings 1-1
PCI Local Bus Specification
Revision 2.1 2-2
Pin 1
orientation 1-5
Plug-and-Play 1-1
port address 6-1
PowerMac Power PC
Built-in Drivers 1-3
Q
Quick installation 1-2
R
RAWRITE.EXE 5-12
Relative Humidity Specification 2-4
Restore Factory Defaults
configuration values 6-7
Restore Previous Settings
configuration values 6-7
RISC processors 2-2
S
Save Changes and Continue
command 6-8
SCO OpenServer Driver 5-10
SCSI
error checking 6-4
removable disk drives 1-3, 5-3
SCSI Bus Scan 6-7
SCSI bus termination
Automatic 6-4
Disable 6-4
Enable 6-4
SCSI cable 1-5
SCSI Configuration 6-5
SCSI connector 1-5
SCSI device
G3 5-6
SCSI Device ID 6-6
SCSI device installation 3-1
SCSI devices
terminating 3-4
SCSI Disconnection 6-6
SCSI Host Adapters 1-1
SCSI ID 3-6, 6-1, 6-4
SCSI Installer Software 4-1
SCSI Management Software CD
SCSI drivers 4-2
SCSI Target IDs 5-10
Serial number 6-1
slot number 5-8
SOLARIS.EXE 5-12
SOLARIS.TXT 5-12
Specify Additional Drivers 5-7
Start Unit Command 6-6
STARTUP.NCF 5-8
Storage Temperature 2-4
Superflash box 5-2
SuperInstall 4-2, 5-2
SuperView 4-2, 4-7
with external and internal devices 3-5
with external devices only 3-5
with internal devices only 3-5
terminator plug 1-6
TXTSETUP.OEM 5-7
U
Ultra SCSI
features 2-1
ultra SCSI cabling 3-2
UNIXBTLD.EXE 5-15
unixbtld.exe 5-15
UNIXBTLD.Z 5-15
unixbtld.Z 5-16
unixfer.exe 5-15
UnixWare
installation 5-15
system 5-15
UnixWare device files
CD-ROM Device Files 5-17
Disk Device Files 5-17
Tape Device Files 5-17
UNIXWARE directory 5-15
UNIXWARE.TXT 5-15
UnixWare-7 5-17
V
verbose display 5-5
Volume Management software 5-13
W
watchdog timer 2-2
White G3
SCSI driver 1-3
Windows NT AdvanSys Driver
diskette 5-7
WINNT.TXT 5-7
T
Tagged queuing 2-2
Tech Support 2-5
termination 3-1
of SCSI devices 3-4
-xi