1
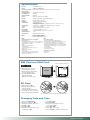
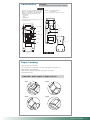
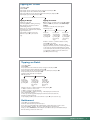
User Manual
PrimeTrex-S
(WiFi model shown)
0RINTER2ELEASE,EVER
4HERMAL0APER#OVER
&UNCTION+EYS
-AGNETIC#ARD2EADER
+EY0AD
3$#ARD2EADER
%-6#ARD2EADER
#HARGING"ASE3TATION
*3TANDARDWITH7I&IMODEL/PTIONALWITH'023MODEL
Contents Checklist:
Power cord
Power adapter
Paper roll (2)
Charging base station (Standard with WiFi model; Optional with GPRS model)
PrimeTrex-S User Manual
1
Specifications
P
sProcessor
BIT!2-0ROCESSOR
sMemory
-"&LASH-"3$2!-
sReal
0OWERBACKUPFORDATARETENTIONWHILETHEEXTERNALPOWERISTURNEDOFF
Time Clock (RTC)
sMagnetic
Stripe
Card Reader (MSR)
sSD
Card Reader
sSmart
Card Reader
)3/-32WILLREAD4RACK
!PPLICABLE
!PPLICABLE
sDisplay
'RAPHICAL,#$WITHRESOLUTIONX
sKeypad
3OFTWAREPROGRAMMABLE;)NTEGRATED,%$BACKLIGHT
sSpeaker
)NTEGRATEDSINGLETONESPEAKER
sFull
s.UMBEROFDOTSPERLINE$OTS
s0APERWIDTHINCH
s0APERDIAMETERINCH
s0RINTINGSPEEDLINESPERSECOND7IRELESSMODELLINESPERSECOND
sCommunication
s$ESKTOPMODEL23PORTS2*%THERNET0ORT$IAL0ORT
s7IRELESSMODEL($-)
sPower
!#$#POWERADAPTEREXTERNAL6
sEnvironmental
s/PERATING4EMPERATURE²#TO²#
s/PERATING(UMIDITYTONONCONDENSING
sHardware
YEAR
Graphic
Thermal Printer
Options
Specifications
sSize
Warranty
(L x W x H)
sWeight
MMXMMXMM
0RIME4REX3$ESKTOPG
0RIME4REX37IRELESS'023G
0RIME4REX37IRELESS7I&IG
GPRS:
Quad-band 850/900/1800/1900 MHZ
'3-'023&EATURES
s7ATTS%'3-'3-RADIOSECTIONRUNNINGUNDER6OLTS
s7ATTS'3-RADIOSECTIONRUNNINGUNDER6OLTS
s(ARDWARE'023CLASSCAPABLE
)NTERFACE
s$IGITALSECTIONRUNNINGUNDER6OLTS
s/PTIONAL3)-HOLDER
s#OMPLETEINTERFACINGTHROUGHAPINCONNECTOR
/PERATINGSYSTEM
s2EAL4IME#LOCKWITHCALENDAR
s"ATTERYCHARGER
s%CHO#ANCELLATIONANDNOISEREDUCTIONQUADRICCODEC
s&ULL'3-OR'3-'023/PERATING3YSTEMSTACKS
#ERTIFICATIONS&###%2O(3
WIFI:
802.11 Wireless LAN
s2ALINK247-!#""0WITH244RANSCEIVER
s3UPPORT)%%%BCOMPLIANT$"03+$103+##+MODULATION
)%%%B3TANDARD$ATA2ATESAND-BPS
s3UPPORT)%%%GCOMPLIANT$333##+/&$-MODULATION
)%%%G3TANDARD$ATA2ATES-BPS
s%MBEDDED7%0ORBITENGINEFORENCIPHERINGDECIPHERING
OFWIRELESSDATA
s3UPPORT4+)0AND!%3
s(OST)NTERFACESUPPORTS53"
C
Specification Compliance
s)%%%BG
s53"SPEC
SIM Card and SAM Card
3)-CARDISFOR'023COMMUNICATION
4URNOFFTHETERMINAL
/PENTHEBATTERYCOVERONTHE
BOTTOMPANELOFTHETERMINAL
0USHTHEBUTTONASDEMONSTRATED
TOREMOVETHEBATTERYCASE
0LACETHE3!-CARDAND3)-
CARDASDEMONSTRATED
Note3)-CARDFOR'023MODELONLY
SIM
BATTERY
SAM
Push the button
3!-CARDISFORSMARTCARDAPPLICATIONS
SD Card
-AKESUREPOWERISON.
,OCATETHE3$CARDSLOTATTHE
SIDEOFTHETERMINAL
)NSERTTHE3$CARDALLTHEWAYINTO
THESLOTWITHTHECONTACTOFTHECARD
FACINGDOWNANDTOWARDTHETERMINAL
3$ISNOTSTANDARD)TISUSEDFORVARIOUSAPPLICATIONSANDASADOWNLOADTOOL
Changing Date and Time
3COLLDOWNTOOther Setup
%NTERPASSWORDANDPRESSOK
3COLLDOWNTODATETIMEANDSELECTIT
0RESSF3TOhSlct”
0RESSF3TOhEdit”
%NTERDATEINTHEFORMATSHOWNONTHE
SCREENANDPRESSOK
0RESSF2FORhNext”
0RESSF3TOhEdit”
%NTERTIMEINTHEFORMATSHOWNONTHE
SCREENANDPRESSOK
0RESSF4TOhExit”
0RESSF2TOSAVECHANGES
0RESShCancelvTOGOBACKTOTHEMAINSCREEN
PrimeTrex-S User Manual
2
WARNING
Connections
Do not use PrimeTrex-S if it shows signs of damage
s0OWER0ORT#ONNECTINGTHE!#!DAPTERFORPOWERSUPPLY
s%THENET0ORT#ONNECTING%THERNETCABLEFOR)0TRANSACTIONS
s$IAL0ORT#ONNECTINGTELEPHONECORDFOR$IALTRANSACTIONS
s230ORTS#ONNECTINGPERIPHERALDEVICESUCHAS
"ARCODE2EADER
#HECK2EADER
)MAGER
%XTERNAL0).PAD
s($-)0ORT&OR)0AND$IALCOMMUNICATIONS
&ORPERIPHERALDEVICE
s0OWER0ORT#ONNECTINGTHE!#!DAPTERFORRECHARGING
s#ABLESTRAINRELIEF#ABLESAREHELDINPLACETOREDUCEWEARON
THECABLESANDTHEPORTS
Cable strain relief
Power Port
HDMI Port
Power Port
RJ45 Ethernet Port
3 RS232 Ports
Power Port
Dial Port
Paper Loading
0LACETHETERMINALONAFLATSURFACE
4OOPENTHEPRINTERCOVERPRESSTHELEVERLOCATEDONTHERIGHTSIDEOFTHEPRINTERCOVER
0LACETHEPAPERROLLASSHOWNBELOW
(AVEINCHESOFPAPEREXPOSEDOUTSIDEOFTHEPRINTERASSHOWNBELOW
#LOSETHE0RINTER#OVER
CAUTION - Sharp edges on paper tear bar.
Step 1
Step 2
Step 3
Step 4
PrimeTrex-S User Manual
3
Tipping on Credit
1. Press F1 for Sale
2. Select Credit
3. If prompted, enter the clerk ID of the clerk processing the sale, and press OK.
4. If prompted, enter the Record Number and press OK.
5. Key in the dollar amount of the transaction without the decimal point, and press OK.
6. If prompted, key the tax amount and press OK.
Tipping on Receipt
Tipping on Terminal
6. Swipe the credit card.
7. Connecting GPRS… Sending…Receiving…
will be displayed on terminal screen when
communicating with host.
8. Host response message will be displayed
on terminal screen. At this same time, merchant
copy will be printed out.
9. If prompted, press F1 to return to the
main menu or press F2 to print customer
copy.
Note: For tipping on terminal, make sure that Tip on Sale
parameter is ON. This parameter is under Other Setup/
Terminal
6. Swipe the credit card; a Tip screen appears:
7. On the tip screen:
If customer
Clicks F4 NO,
confirm amount
by clicking OK
If a customer
clicks F2 %age,
confirm amount
by clicking OK,
then enter tip
%age
If a customer
clicks F3 ($),
confirm amount
by clicking OK,
then enter tip
amount
8. Wait for customer to confirm the transaction total by
pressing OK on the terminal
9. Connecting GPRS… Sending…Receiving… will be
displayed on terminal screen when communicating with host.
10. Host response message will be displayed on terminal
screen. At this same time, merchant copy will be printed out.
11. If prompted, press F1 to return to the main menu or
press F2 to print customer copy.
Tipping on Debit
1. Press F1 for Sale
2. Select Debit
3. If prompted, enter the clerk ID of the clerk processing the sale, and press OK.
4. If prompted, enter the Record Number and press OK.
5. Key in the dollar amount of the transaction without the decimal point, and press OK.
6. If prompted, key the tax amount and press OK.
7. Swipe the debit card; a Tip screen appears:
8. On the tip screen:
If customer
Clicks F4 NO,
confirm amount
by clicking OK
If a customer
clicks F2 %age,
confirm amount
by clicking OK,
then enter tip
%age
If a customer
clicks F3 ($),
confirm amount
by clicking OK,
then enter tip
amount
9. Wait for customer to confirm the transaction total by pressing OK.
10. Wait for customer to select account.
11. Wait for customer to enter the password.
12. Connecting GPRS… Sending…Receiving… will be displayed on terminal screen
when communicating with host.
13. Host response message will be displayed on terminal screen. At this same time,
merchant copy will be printed out.
14. If prompted, press F1 to return to the main menu or press F2 to print customer copy.
Settlement
1. Press F4 to choose Batch Settlement
2. Print the settlement detail report and totals report.
3. You can choose either Debit, Credit or All depending on which transactions you wish to settle.
4. Connecting GPRS… Sending… Receiving… will be displayed on terminal screen.
5. After you choose F1/F2/F3, the terminal will print out the Batch totals report and Settlement Report
Then the terminal goes back to the main screen.
PrimeTrex-S User Manual
4
Sale
V
1. Press F1 for Sale
2. Select Credit or Debit
3. If prompted, enter the clerk ID of the clerk processing the sale, and press OK.
4. If prompted, enter the Record Number and press OK.
5. Key in the dollar amount of the transaction without the decimal point, and press OK.
6. If prompted, key the tax amount and press OK.
1.
2.
No
3.
se
4.
Pr
ac
5.
an
6.
vo
7.
wa
wh
Credit
Debit
7. Swipe the credit card.
8. Connecting GPRS… Sending…Receiving…
will be displayed on terminal screen when
communicating with host.
9. Host response message will be displayed
on terminal screen. At this same time, merchant
copy will be printed out.
10. If prompted, press F1 to return to the main
menu or press F2 to print customer copy.
7. Swipe the debit card.
Note: Debit card no. Cannot be entered manually.
8. Wait for customer to confirm the transaction
by pressing OK.
9. Wait for customer to select account.
10. Wait for customer to enter the password.
11. Connecting GPRS… Sending…Receiving…
will be displayed on terminal screen when
communicating with host.
12. Host response message will be displayed on
terminal screen. At this same time, merchant copy
will be printed out.
13. If prompted, press F1 to return to the main
menu or press F2 to print customer copy.
Note:
As transactions are processed, if the terminal is connecting over WiFi, the screen will show
“Connecting WiFi” instead of “Connecting GPRS”; and if the terminal is connecting over Dial, the screen
will show “Dial Primary” instead of “Connecting GPRS”; and if the terminal is connecting over IP, the screen
will show “Connecting TCP/IP” instead of “Connecting GPRS”
Cr
8.
ne
9.
wi
co
10
ter
wi
11
co
me
Void
1. Press F2 to select Void.
2. If prompted, key password and press OK.
Note: This prompt, if enabled, cannot be by passed.
3. Press F2 to select Yes if you want to void the last transaction entered. Press F1 to select No if you want to
select another transaction to void.
4. If you selected No, the terminal prompts you to determine how to retrieve the transaction you wish to void.
Press F1 to retrieve the transaction by record number. Press F2 to retrieve the transaction by the credit card
account number.
5. If you selected to retrieve by record Number, key the record number of the transaction to be voided
and press OK.
6. If you selected to retrieve Acct#, key the last four digits of the credit card number of the transaction to be
voided and press OK.
7. The selected transaction information displays. If you want to void this transaction, select Yes. If you do not
want to void the transaction at this time, select No to return to the main menu. To display the next transaction,
which meets the same criteria, select Next.
Credit
Debit
8. Swipe or manually enter the card number that
needs to be voided.
9. Connecting GPRS … Sending…Receiving…
will be displayed on terminal screen when
communicating with host.
10. Host response message will be displayed on
terminal screen. At this same time, merchant copy
will be printed out.
11. If prompted, press F2 to print the customer
copy of the receipt, or press F1 to return to Main
menu.
8. Swipe the Debit card.
9. Wait for customer to confirm the transaction by pressing
OK.
10. Wait for customer to select account.
11. Wait for customer to enter the password.
12. Connecting GPRS… Sending…Receiving…will be
displayed on terminal screen when communicating with host.
13. Host response message will be displayed on terminal
screen. At this same time, merchant copy will be printed
out.
14. If prompted, press F2 to print the customer copy of
the receipt, or press F1 to return to Main menu.
PrimeTrex-S User Manual
5
Refund
1. Press F3 to select Refund.
2. If prompted, key password and press OK.
Note: This prompt, if enabled, cannot be by passed.
3. Select Credit or Debit
4. If prompted, enter the clerk ID of the clerk processing the sale, and press OK.
5. If prompted, enter the Record Number and press OK.
6. Key the amount of the transaction and press OK.
Credit
Debit
7. Slide card through the card reader, or enter the
card number and press OK.
8. If prompted, key card expiration date in MMYY
format, and press OK.
Note: This screen displays only if the card
number has been entered manually.
9. If prompted, key the password and press OK.
Note: This prompt, if enabled, cannot be
bypassed.
10. Connecting GPRS… Sending…Receiving…
will be displayed on terminal screen when
communicating with host.
11. Host response message will be displayed on
terminal screen. At this same time, merchant copy
will be printed out.
12. If prompted, press F2 to print customer copy,
or press F1 to return to the main menu.
7. Swipe the debit card.
Note: Debit card no. Cannot be entered manually.
8. Wait for customer to confirm the transaction by
pressing OK.
9. Wait for customer to select account.
10. Wait for customer to enter the password.
11. Connecting GPRS... Sending... Receiving...
will be displayed on terminal screen when
communicating with host.
12. Host response message will be displayed on
terminal screen. At this same time, merchant copy
will be printed out.
13. If prompted, press F1 to return tothe main
menu or press F2 to print customer copy.
General safety Instructions when using
your PrimeTrex-S
To reduce the risk of fire, electric shock, or any personal injury, please read the following basic
safety precautions.
Follow all warnings and instructions on the device and in this manual.
Before cleaning the terminal, disconnect the terminal from the power supply and any peripherals.
Do not clean the terminal with liquid or aerosol cleaners. Clean the device with a damp cloth.
Do not use the terminal near water or any other liquid.
Avoid spilling liquid on the terminal.
Place the terminal on a stable and solid surface, to avoid the terminal from falling.
Place the terminal in a properly ventilated area.
WARNING- Use only the AC adapter that is supplied with the terminal.
Never insert any object into the terminal through slots, other than those specifically intended
for credit/debit or SD cards. This may damage the terminal or result in a fire or electric shock.
Never disassemble the terminal for any reason, as it may cause an electric shock or worse.
If the terminal requires repair, take it to a qualified service representative.
To order paper and other supplies please call:
Customer Service - 1 877 777 6603
Copyright Notice
Copyright © TechTrex Inc. All rights reserved. This Document may not be reproduced in any format or translated into
any language with out any written consent from TechTrex Inc. Print date: 2010
PrimeTrex-S User Manual
6