1
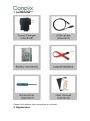
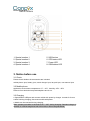
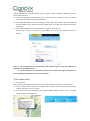
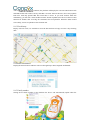
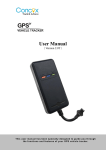
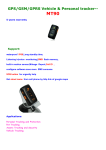
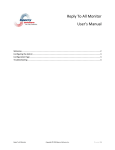
Baby Bear children mobile phone User manual Please read this manual carefully before attempting installation . Pictures are for indication and illustration purposes only. 1. Accessories Please check whether these accessories are included. 2. Appearance Button illustration 1. Special number 1 2. Special number 2 3. Special number 3 4. Special number 4 5. SOS button 6. GPS status LED 7. Power LED 8. GSM status LED 3. Notice before use 3.1 Check Please check whether the accessories are included: mobile phone 1pcs, battery 1pcs, travel charger 1pcs, lanyard 1pcs, user manual 1pcs 3.2 Mobile phone Application environment: temperature: 0℃~40℃, humidity: 45%~85% Remove from television/computer/telephone and so on. 3.3 Charging ● Open bottom USB port and connect mobile with power by charger. It needs 3-4 hours ● After finishing charging, disconnect mobile with power. ● Mobile can be used well during charging. Warn: please put mobile in the draft of 0℃~40℃ during charging. Standard charger is needed, or it will be dangerous and in this case, it will not be guaranteed. 3.4 User of battery When red LED is off or flash quickly, which means low battery, it should be charged in time. When charged, solid bright means charging and slow flash means already full charged. Warn: When abandon the mobile for a long time, its battery will be over-discharged. In this case, when charging the next time, red LED will only start flashing after 15 minutes, which is normal. 3.5 Install SIM card Upper push the back cover of mobile and remove it, insert SIM card in the slot and lock the cover. 4. Operation manual 4.1 Power on/off This mobile does not have power on/off key. Power on: Put SIM card and battery inside the mobile, then the mobile will be turned on automatically. At that time, special 1/2/3/4 keys and SOS key will light and turned off after 20s. GMS LED and power LED keep flash. Once the mobile is on, its GPS will begin to search. GPS LED will keep solid light for 20s after succeeding in locating, or it will be off if failed to locate in 5 minutes. Power off: Remove the battery. 4.2 Ring setting SMS: RING, ring parameter# Ring parameter range: 1-10 For example: RING, 2#. It means select the second ring as incoming ring tone. 4.3 Specific number setting There are three ways to set special numbers. 4.3.1 Set via SMS command The specific number can be set via SMS command sent from mobile phone Sending SMS command: SOS, A,number1,number2,number3,number4#(A means add number) For example: SOS, A,13510682360,13511685136,13612687248,13612683621# A is regarded as operation of adding phone number. It will reply “OK” if succeeded. If only set one specific number, it can be as follows: SOS, A,13527852360# means set the first specific number SOS, A,,13527852360# means set the second specific number SOS, A,,,13527852360# means set the third specific number SOS, A,,,,13527852360# means set the fourth specific number 4.3.2 Platform You can set special numbers in platform. 4.4 Delete specific number There are two methods to delete specific number, one is via sms command and the other is via platform. For the platform website, please contact your dealer. SMS: SOS, D,1,2,3,4# (D means delete one specific number) For example: SOS, D,1# means delete the first number SOS, D,3# means delete the third number If delete several numbers at one time, SMS command can be: SOS, D, 1, 2, 4# means delete the first/ second and fourth numbers. You can also delete number by SMS like this: SOS, D,number# For example: SOS, D, 13527852360# means delete this specific number directly. It will reply “OK” if succeeded to delete this number. 4.5 Dial specific number After setting specific number, press correspond button for more than 3s until twice vibration happened, then the button LED will be light and begin to dial correspond specific number. Press SOS button to conclude current call. If no specific number is set in correspond button, when press it, vibration will be happened twice also but no dialing. 4.6 Receive call from specific number When there is an incoming call from specific number, the button LED will light. Press any button (except SOS button) to receive the call. Press SOS button to conclude current call. It rejects other numbers incoming call except specific numbers. Notice: If the SIM card does not activate the function of caller ID, all calls will be rejected. 4.7 Low battery alarm When device battery is low, it will send low battery alarm sms to all preset specific numbers: “Attention!Battery too low,Please charge." 4.8 Ringtone setting Press combination key to change mode among ring mode, vibrate mode, silent mode in turn, when the device is in ring mode. Operation method: Press combination key (4+SOS) within 3sec when the device is in ring mode, the device will enter into vibrate mode automatically. Press combination key for one more time, the device will enter into silent mode. 4.9 Call volume adjustment Shortly press 1 button for one time to increase one level of call volume when it is calling. After volume reach the minimum, 5 key indicators will turn on together. 4.10 Restore factory setting Send SMS via any cellphone: FACTORY# to set all parameter to factory value. Once received “OK”, it succeeds. e.g.: FACTORY# 5 SOS emergency call Press SOS button for more than 3s to activate GPS automatically. Twice vibration will be happened, then the device will send a LBS locating sms to the specific number, e.g.:“Emergency call(LBS): nearby Bao’an Road Bao’an District, Shenzhen, Guangdong (22.571,113.876)”. Then it will dial the specific numbers by cycle, if there’s no response after all the number been dialed for three cycles, it will stop. After dialing the specific numbers, if GPS is located, the device will send an accurate address information, e.g.: “Emergency call(LBS): Bao’an Road, Bao’an District, Shenzhen, Guangdong (N22.57139,E113.87710)”. If GPS is not located in 5 minutes, the device will not send the accurate address information. Notice: To realize this function, please set special numbers first. 6 GPS locating function GPS will be activated automatically with flashing Blue LED after power on the device, If GPS is located within 5 minutes, GPS LED keeps in solid bright and the device will send accurate address information to the server, then the GPS will be off automatically. If GPS is not located after 5 minutes, GPS will be off and the blue LED will in dark state. GPS will turn off after 5 minutes if the device stays in the area without GPS signal cover. At this time, GPS timing locating function will be activated. The default time interval is 30 minutes. The GPS will start updating data every 30 minutes. 7. Check location 7.1 Checking via call When one of the 4 specific numbers call the device, hanging off the call when it rings 1-3 times (Ringing for 1-3 times then hang off, the corresponding specific number LED will not light and not ring), device will automatically activate GPS, If rings more than 3 times, it will not activate GPS, which will enter dialing proceed directly, indicate guardian want to normally talk to their wards. GPS searching time can be last for 5 min in maximum after booting device. If succeed to activate GPS, device will send accurate location SMS to specific number, which just called, e.g.: “Location (LBS): Bao’an Road, Bao’an District, Shenzhen, Guangdong (N22.57139,E113.87710)”. Then the GPS will be off again. If it is overtime and not able to be located in 5 minutes, the device will not send GPS accurate address information and will turn off the GPS automatically. When GPS is off, device will send LBS information to the server, if still needs to use GPS, call the device via specific number again. 7.2 Checking location via SMS command Only the 4 specific numbers have authority to check the location of device via SMS command. The rest of mobiles will receive a error SMS from device if they are trying to send checking command, for instance: ERROR:110. 7.2.1 Position check Specific numbers send SMS command to device: Position Apply device to reply its position SMS of location. If command is sent successfully, the specific numbers will receive LBS position SMS. If GPS functions of device active within 5mins, device will send an extra accurate position SMS. If not, device will not send extra SMS as well. Replying examples of LBS Chinese position SMS: “Current Location (LBS): nearby Bao’an Road Bao’an District, Shenzhen, Guangdong (22.571,113.876)” Replying examples of GPS Chinese position SMS: “Accurate location (GPS): Bao’an Road, Bao’an District, Shenzhen, Guangdong (N22.57139,E113.87710)” 7.2.2 GPS longitude and latitude location check Specific numbers send SMS command to device: WHERE# apply for longitude and latitude Replying examples of longitude and latitude SMS: Lat:N22.571285,Lon:E113.877115,Course:42.20,Speed:0.0740,DateTime:10-11-23 22:28:51 7.2.3 GPS location web link check Specific numbers send SMS command to device: URL# apply for google link Replying examples of google link SMS: <DateTime:10-11-23 23:42:51>http://maps.google.com/maps?q=N22.571490,E113.877103 Notice: GPS can only be located outdoor. It can not be located indoor, or the shade of tree, or tall building where has low GPS or even no GPS signal. While LBS can be located in anywhere has GSM signal. 8. Monitor Monitoring function is only available for 4 specific numbers. SMS command: MONITOR# The device will reply “OK” and dial the specific number which just sent the command. The owner of the specific number can answer the phone and then enter monitoring state. 9. Appendix 9.1 Safety for the battery ● Please use the original battery. The warranty will be invalid by using any other accessory. The manufacturer will not take any responsibility if the device gets damage. ● The new battery need 2-3 days for charging full power and finishing all power to get the best condition. ● The battery can get full charge and finish all power over and over hundreds times。When the battery using time becomes shorter obviously, please change a new one. ● Cut off power supply if not using the charger, don’t charge the battery more than one week, over charging will reduce the battery using time. ● Do not short-circuit the battery with metal stuff (like the key in your pocket) ● Do not bend or open the battery. ● Do not put the battery into water or fire. ● The battery should be charged at room temperature. ● The battery should never be charged at temperatures of below 0 degrees or above 45 degrees Celsius. 9.2 Use and maintain Babybear is a high technology product, please use with caution. The advices below can help you know how to use and maintain the device. ● Keep away the accessory of children’s reach. ● Keep the mobile dry, the water and moisture will corrosion circuit. ● Do not keep or use the mobile in a dusty place. ● Do not keep the mobile in heat, it will reduce the mobile using time, damage battery and plastic accessories. ● Do not keep the mobile in low temperatures. When the mobile transfers in high temperature, the moisture will damage circuit board. ● Do not disassemble mobile, non-professionals will damage the device with improper handing. ● Do not throw, tap, shake the mobile. It may damage the main board. ● Do not clean the mobile with detergents. Use rag to wipe it slowly with soap water. ● Do not paint any color for the mobile. It may affect the mobile working in normal. ● If the mobile get wet, please switch off immediately and take out the battery, keep it for 24 hours, then use after it gets dry. ● It is better turn down the volume and screen backlight for lasting phone standby time. ● Do not put metal parts (except specific charger interface and cable interface) with phone charger interface, avoid short circuit. 9.3 Troubleshooting If there is trouble during using the phone, please read the solution as follow or contact service providers. Common problems Causes Solution Radio waves can not communicate with device when it be used in a bad signal area, like basement or space beside tall building. Change to a place with good signal. Can not talk in Call-intensive period. Avoid call-intensive period Phone can not switch on No power Change a new battery Calls can not go through Have not setup the specific number for that key. Setup specific number for each key. SIM card installed wrong Check the SIM card The sheet mental of SIM card is dusty. Wipe with a clean wiper. Invalid SIM card Contact your internet service provider Out of GSM service area Move back to the GSM service covered area. weak signal Try again in a strong signal area Voltage is out of charging range of charger. Change to the proper voltage Use non-standard charger Use charger that come with the package Poor contact Check if the plug is in. Keep the phone indoor Locating in open space outdoor. Weak GPS signal Keep the upside of the phone face to sky There is metal stuff covered the phone. Move away the metal stuff. SIM card can not support GPRS functions Please contact SIM card sell service to active GPRS functions Reply “not receiving data, please try again” all the time Please contact with your distributors or selling services Can not check because not specific numbers Please tight your phone number to specific number Bad reception Phone can not connect to the network Phone can not charge GPS is not locating Can not check location information 10. Global location platform check 10.1 Login GK301 Kids phones will automatically register a login account according to IMEI no. after the device being activated. (1) After inserting SIM card and booting device, laying the device outside or near the window, waiting for the first time locating by GPS data. (2) If the GPS LED (Blue) turns into normally on status after GPS locating. The GPS LED will turn off if GPS can not finish the locating within 5mins or if GPS successfully located more than 20sec. (3) After GPS LED (Blue) turns into normally on, login in en.coomix.net Select Login to login in platform by using IMEI no. of device, the original password is 666666. Notice: 1. The accomplishment of this function need network support in your area, SIM card is required to active GPRS function. 2. For the first time to use this device, please wait for 2mins, then login the platform. Or else the platform may indicate “the account not exists”. 10.2 Location check 1. View location When entering into platform interface, users can check the device locations on View location. (1) Green symbols flicker means GPS location, Blue symbols means LBS location and Grey symbols means the device is off-line. (2) View location interface will display the location address details of device, type of locating, battery strength, track and so on. After login the location service platform, the platform will display the real time GPS location info and LBS location info. LBS is cursory and GPS is accurate. Most of the time, device only uploads LBS info. And only upload GPS info when GPS is active. If you want accurate GPS info immediately, you can click “starts satellite location” button in platform, the device will active GPS function for 20mins after receiving the command sent from platform. When the GPS located successfully, it starts to upload accurate location info. 10.3 View history Replay of device track, it is available to select the date and time of reply in recent 7 days locating data. 10.4 Alarm information Display the alarm location and time of device through map or data, longitude and latitude. 10.5 Family number Setting device family number on the platform, the device will automatically update when the platform finish the settings. ShenZhen Concox Information Technology CO.,Ltd Tel: +86 755 2912 1200 Fax: +86 755 2912 1290 Add: 4/F, Building B, Gaoxinqi Industrial Park, Liuxian 1st Road, No.67 Bao'an District, Shenzhen www.iconcox.com