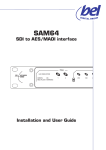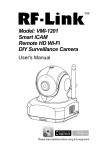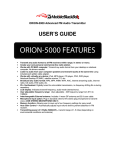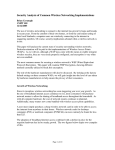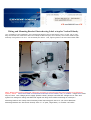
1
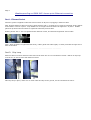
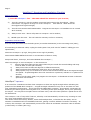
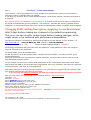
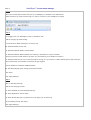
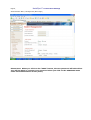
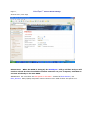
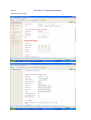
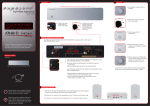
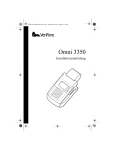
Wiring and Mounting Bracket Photo showing Label at top for Vertical Polarity
“UP” orientation of the HotelSpot™ has a waterproof Ethernet port at the bottom corner of case, left or right.
Plug non-booted end of Ethernet cable into waterproof Ethernet port, then carefully screw black weather tight
assembly with gland nut on end - into threaded port socket. Last, tighten gland nut around white Cat5e cable.
Note: White booted end of Ethernet cable with red mark is inserted into RED end of Power-over-Ethernet
injector, above. Short blue cable is connected to Internet source switch, hub, or modem. Longer blue cable
may be used. Low voltage power supply (bottom center) accepts universal AC voltage 90v to 250v and
injects low voltage DC along with Ethernet signal into long white cable connecting to HotelSpot™.
Mounting bracket can clamp around existing metal mounting pole size to 2-1/4 inches diameter.
Mounting Bracket can also screw directly onto 4” x 4” post, large beam, or wooden roof rafter.
Page 2
Weatherproofing an OMNI-WiFi Access point Ethernet connection
Part 1: Ethernet Socket
Dielectric grease is applied to Ethernet socket on back of AP prior to plugging in Ethernet cable.
After plugging Ethernet cable into socket, plastic bushing with 1” molded hex nut must be tightened snugly against
socket with 1” wrench or pliers. Only AFTER hex nut is tight should thumbnut be tightened - by hand. Rubber
gland will protrude when thumbnut is tightened sufficiently around cable.
Bushing shown with 1” hex nut tightened onto Ethernet socket, and thumbnut tightened around cable.
Note: When thumbnut is tightened sufficiently, rubber gland with cable tightly in center protrudes through hole in
back of thumbnut
--------------------------------
Part 2: Drip Loop
Ethernet cable must enter AP from below AP so that water will not run into Ethernet socket. Bottom of drip loop
must be six (6) inches lower than Ethernet socket.
With Drip loop in place, water will run down cable and drip to the ground, not into the Ethernet socket..
Page 3
HotelSpot™ Mounting and Installation Checklist
Before Mounting:
1) Test the HotelSpot™ first - The SSID should be written on your invoice;
2)
Test the HotelSpot™ with the modem connected and measure the throughput – follow
instructions on pages 2 through 13 of the HotelSpot™ User Manual. Write down the
throughput and signal strength;
3)
Test the environment with NetStumbler. Program the HotelSpot™ to broadcast on an unused
Wi-Fi channel;
4)
Always use a UPS - 350va will protect a HotelSpot™ and a modem;
5)
NEVER open the case. This will void the warranty and let in moisture;
Preparation and Mounting:
Run the white PoE cable from the PoE injector (at modem downstairs) to the mounting area (attic);
If terminating an Ethernet cable, unplug the PoE injector first, and use the “ANSI-b” cabling pin-out
specification;
Mount the HotelSpot™ up high, facing down at an angle if possible;
Mount AWAY FROM METAL ductwork or concentration of electric wires;
Keep metal ducts, chimneys, and wires BEHIND the HotelSpot™;
When mounting 2 or more HotelSpots™ in the same area:
1)
Always keep them least 20 feet apart when they are inside the same building and keep
them at least 10 feet apart outside;
2)
Always face them at least 90 degrees in different directions;
3)
Always polarize them differently when they are in the same area;
4)
Always power only one of them at a time to take measurements and to test signal strength
and speed. If speed degrades when the second one is powered, relocate or re-polarize one
of them;
5)
Always use the same SSID, but program the HotelSpots™ to broadcast at least 3 channels
apart from one another.
HotelSpot™ Operation
It is normal for a Windows wireless client computer to show low signal strength when indicating the
presence of the OMNI-WiFi HotelSpot™. A signal strength indication of only one or two bars can still
give outstanding performance. This is because the OMNI-WiFi HotelSpot™ gives speedy connections by
enhancing the client signals returning back to it, increasing client input strength, not by over-powering
the output. You may have to explain this to wireless users, and have them perform a speed test to see
for themselves.
The HotelSpot™ has a “keep-alive” feature, whereby it will automatically re-boot every morning at 4:44
am, when most people are not on-line.
This action clears the memory buffers, clears deformed packets, re-freshes the dns table, and reinitiates a handshake with the broadband network, getting a new IP address for itself if necessary. At
re-boot, the HotelSpot™ will automatically connect new clients at its fastest connection rate of 125mbs
(turbo mode) or 54mbs (802.11g).
Page 4,
HotelSpot™ Control Panel Settings
The HotelSpot™ can be programmed to “ping” Google every few minutes, and to re-boot itself as a
keep-alive feature, if Google does not respond.
It can ping any IP device on the inside wireless network, inside wired network, outside wired network,
or Internet.
As a default setting, the HotelSpot™ is dhcp disabled. It must be connected to a router or dhcp server
for clients to automatically get an ip address. The HotelSpot™ provides SPI security (stateful packet
inspection) to help keep wireless users from viewing or hacking each other’s computers and workspace.
Changing SSID, Adding Encryption, Applying Access Restrictions
Wait 3 days before making any changes to the default programming.
This is so you can monitor performance before making changes, which
might cause or be confused with performance degradation.
Log into the HotelSpot™ wirelessly by entering its IP address into the URL bar in your browser; i.e.,
http://192.168.1.x
SEE THE BACK OF THE HotelSpot™ FOR IP ADDRESS
The default username is root
The pre-programmed password is omniomni
We strongly recommend that you write down the password. If the password is lost, the HotelSpot™
must be sent back to the distributor.
To change SSID, go to the Wireless Menu;
To add encryption, go to the Wireless Menu, Wireless Security submenu; To restrict access, go to
Access Restrictions;
The most common access restrictions are specific web sites, the bit torrent protocol, lime wire, and
high-bandwidth Internet games
To see common screens in the control panel please look at the Control Panel Instructions that follow.
Note that IF the SSID is not what has been programmed, then your HotelSpot™ has received a physical
or electrical shock, and must be re-programmed.
Note: When setting up or changing wireless settings it is a good idea to be plugged into the HotelSpot™ with
your network cable and not your wireless connection.
If you are using your wireless connection and make any changes you will lose you wireless connection.
Open the Control Panel by typing the URL of the HotelSpot address: http://192.168.1.x
Username: root
Password: omniomni
Select WIRELESS from the left hand menu
Select Wireless Security from the new menu
Note that security is disabled
ENABLE wireless security by clicking on the “ENABLE” radio button
Select WPA, WPA2 or WEP as the security type
Type the passcode into the KEY field
Be careful! Write the KEY down so you do not forget it. HotelSpots™ with Forgotten Keys must be sent back to
the factory for factory reset
Click SAVE SETTINGS at the top left
The HotelSpot™ will reboot
The new key will be required to connect to the HotelSpot™ to access the Internet
Page 5,
HotelSpot™ Control Panel Settings
Step 1.
Open your favorite web browser and input your HotelSpot™ ip address in the address bar.
Please note that you must have the http:// in order to connect to your HotelSpot™ properly.
Step 2.
Once logged into your HotelSpot™ click on "Wireless" Tab.
Wait for the page to finish loading.
You should be on 'Basic Settings' if not click it now.
For 'Wireless Mode' choose 'AP'
For 'Wireless Network Mode' choose 'Mixed'
For 'Wireless Network Name (SSID)' set a name you would like to call your wireless.
What you put here is what will show up when you are searching for a wireless connection.
For 'Wireless Channel' you can choose channels 3 through 8. If you have a 2.4 GHz cordless phone and it uses the
same channel then your wireless connection will get dropped.
Choose 'Enable' for 'Wireless SSID Broadcast'
For 'Sensitivity Range (ACK Timing)' leave at the default.
Click 'Save'
Click 'Apply Settings'
Step 3.
Click on 'Wireless Security'
Wait for the new page to load..
For 'Security Mode' choose 'WPA Shared Key'
For 'WPA Algorithms' choose 'TKIP'
For 'WPA Shared Key' put in a password of your liking, min 8 chars long.
Once all setting are set click 'Save'
Click 'Apply Settings'
Page 6,
HotelSpot™ Control Panel Settings
To Allow or Disallow Particular Computers on an OMNI-WiFi network
Open the Control Panel using the IP address for the HotelSpot™ whose access you want to
restrict
Example: http://192.168.1.x
Username
root
Password
omniomni
See Control Panel Main Menu
Now determine the MAC address of the unauthorized users
Select “Status” from the left side menu, at bottom
Under “Status” select “Wireless”
See active connections, determine the MAC address of the unauthorized user
Next,
Select “Wireless Menu”, left side, then
Select “MAC Filter”
Wireless Menu
MAC Filter
Next, Select “Enable” to enable the MAC Filter
If you want to prevent unauthorized access,
Select “Prevent” PCs listed from accessing the wireless network “
Wireless MAC Filter
wl - MAC Filter
Use Filter
Enable
Disable
Filter Mode
Prevent PCs listed from accessing the wireless network
Permit only PCs listed to access the wireless network
Select, “Edit MAC Filter List “
Enter MAC address from PCs you wish to prevent, in the format shown:
Enter MAC Address in this format : xx:xx:xx:xx:xx:xx
After Entering addresses,
Click on the “Save Settings” button on the Filter Screen
Close the Filter Screen
Click on the “Save Settings” Button on the screen behind the Filter Screen
After the OMNI-WiFi transmitter re-boots, computers with MAC addresses you have listed in
the MAC address table above will/will not be able to access the wireless network.
Page 7,
HotelSpot™ Control Panel Settings
Please Note:
If the HotelSpot™ does not broadcast its correct SSID;
If the username and password written on the invoice will NOT gain access; or
If the HotelSpot™ begins to issue IP addresses on the 192.168.1.1 network:
Then it has most likely been shocked, either physically or electrically and has defaulted to a
basic configuration. Follow these instructions to program a HotelSpot™ to its original
configuration,
Please call 800-610-6711 for free technical support.
Log into the HotelSpot™ by connecting to it with a wireless computer.
There will be no encrypted security password needed to connect. However, the original
username and password used for authentication will no longer be valid.
To log in, use these credentials:
Default username root
Default password admin
Your will see the CONTROL PANEL, INTERNET SETUP page
Do not make changes to this page yet. First go to the Administration menu by clicking on
Administration on the left side menu.
It is easiest to re-program in the order given here, beginning with the ADMINISTRATION
menu, PASSWORD
Program this page exactly as below.
Leave username at “root”
To maintain original password, type “omniomni”
Click “SAVE” (top left side), before leaving the page.
Page 8,
HotelSpot™ Control Panel Settings
Administration Menu, Management (Main Page)
Please Note: When you click on the “SAVE” button, the new password will take effect.
You will be asked to re-enter your password when you click on the SERVICES menu
under the Administration menu (next).
Page 9,
Administration Menu, Services
HotelSpot™ Control Panel Settings
Page 10,
Administration Menu, Keep Alive
HotelSpot™ Control Panel Settings
Page 11,
HotelSpot™ Control Panel Settings
Wireless Menu, Main Page
Please Note: When the SSID is changed, the HotelSpot™ will go off-line and you will
need to refresh the list of available wireless networks on your computer, and then reconnect wirelessly to the new SSID.
IMPORTANT: Be sure there are NO spaces in the SSID. Instead of Best Western, use
Best_Western Many laptop computers cannot connect to an SSID if there are spaces in it.
Page 12,
Setup Menu, Main Page
HotelSpot™ Control Panel Settings
Page 13
HotelSpot™ Specifications
patent pending
Key Features
Functionalities
VPN Pass-Thru, DHCP Server, Firewall with Network Address Translation
Interfaces
Built-In
Built-in Wireless Management
WLAN Interfaces
802.11b + 802.11g mixed 1, 2, 5.5, 6, 9, 11, 12, 24, 36, 48, 54, 125mbs Wireless
WAN Interfaces
1 x 10/100 Base-T
Standards and Protocols
Standards
IEEE 802.3 Ethernet, IEEE 802.3u Fast Ethernet, IEEE 802.11b, IEEE 802.11g
Routing Protocols
RIP Version 1, RIP Version 2, Static Routing
Protocols
DHCP, IP, TCP
Management Protocol
HTTP, Telnet, HTTPS, (Remote Management Standard)
MAC address filtering to 128 addresses by group, by individual, and by group policy.
Wireless
802.11g Data Rates
125Mbps, 54 Mbps, 48 Mbps, 36 Mbps, 24 Mbps, 12 Mbps, 9 Mbps, 6 Mbps, 5.5 Mbps, 2
Mbps, 1 Mbps
802.11b Data Rates
11 Mbps, 5.5 Mbps, 2 Mbps, 1 Mbps
Modulation
Transmitter Output
DSSS, CCK, DBPSK, DQPSK, OFDM, BPSK, QPSK, 16QAM, 64QAM
20mw to 233mw fixed EIRP: 2000 – 5000mw
Page 14,
HotelSpot™ Specifications, Continued
WEP, WPA, WPA2 Encryption
64 bit or 128 bit
Security
IPSec Pass-Thru, PPTP Pass-Thru, SPI (Stateful Packet Inspection), URL Content
Filtering, DMZ, Port Filtering, Time of day 128 MAC addresses filtering
Additional Features
Auto Crossover (MDI/MDI-X)
50’ cables or 100’ cables plus Power-over-Ethernet, standard
Dimensions
Width
11.19 in.
Depth
4.6 in.
Height
11.19 in.
Weight
5.3 lb.
Warranty
Limited Warranty
30 days cash-back return policy, 2-year free replacement, and
2 years free technical support via toll-free number
Environment: Operating temperature: -30 degrees F to +120 degrees F
Storage temperature: -40 degrees F to +140 degrees F
Humidity 5% to 85% non condensing
Product meets current FCC Radio frequency Exposure Guidelines under FCC Rules and Regulations Part 15.247 for IEEE
802.11 transmitter and receiver Wi-Fi devices. FCC Equipment authorization ID: WS7-HS28V10. OMNI-WiFi HotelSpot™ is a
service trademark of OMNI-WiFi, LLC. OMNI-WiFi is a federally registered trademark.