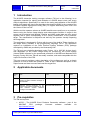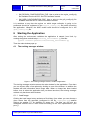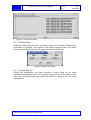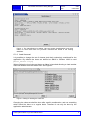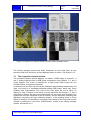
1
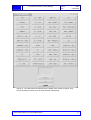
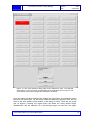
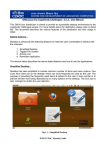
The AVHRR Interactive Training Manager
Ref: SMHI-BPF/TEC/AVHRR/2
Version:
2.01
Date:
02/04/2005
The AVHRR Interactive Training
Manager
Version 2.01
Adam Dybbroe, SMHI
Igor Giunta, MeteoSwiss
April 2005
Adam Dybbroe/SMHI & Igor Giunta/MeteoSwiss
1
The AVHRR Interactive Training Manager
Ref: SMHI-BPF/TEC/AVHRR/2
Version:
2.01
Date:
02/04/2005
1
Introduction ...........................................................................................................4
2
Applicable documents...........................................................................................4
3
Pre-requisites........................................................................................................4
4
Installation.............................................................................................................5
5
Initialising the environment ...................................................................................5
6
Starting the Application .........................................................................................6
6.1
7
The training manager window........................................................................6
6.1.1
Load Image.................................................................................................. 6
6.1.2
RGB selection.............................................................................................. 7
6.1.3
Classification list .......................................................................................... 7
6.1.4
Load class-set ............................................................................................. 8
6.1.5
Edit classes ................................................................................................. 9
6.1.6
Select class ............................................................................................... 11
6.1.7
Quit ............................................................................................................ 11
A training session step by step ...........................................................................11
7.1
The composite channel window...................................................................12
7.1.1
Neutral mode ............................................................................................. 13
7.1.2
Zooming..................................................................................................... 13
7.1.3
Adding and removing coastlines................................................................ 14
7.1.4
Focusing .................................................................................................... 14
7.1.5
Target selection ......................................................................................... 14
7.2
The channel-split window ............................................................................15
7.2.1
7.3
Contrast stretching a layer......................................................................... 16
The target selection procedure ....................................................................16
8
The training target metadata files .......................................................................19
9
Data collection ....................................................................................................19
9.1
Training target file format.............................................................................20
9.1.1
Training target ATTRIBUTE “header”:....................................................... 20
9.1.2
Training target GROUP “hirlam” ................................................................ 21
9.1.3
Training target Hirlam H5T_COMPOUND “header” .................................. 21
9.1.4
Training target Hirlam profile ATTRIBUTE “info” ....................................... 21
9.1.5
Training target DATASET “layer0”… “layer6”............................................ 21
10
Reading the training data from Python............................................................21
11
Frequently Asked Questions ...........................................................................21
11.1
GUI...........................................................................................................21
Adam Dybbroe/SMHI & Igor Giunta/MeteoSwiss
2
The AVHRR Interactive Training Manager
Ref: SMHI-BPF/TEC/AVHRR/2
Version:
2.01
Date:
02/04/2005
11.2
NWP-model..............................................................................................21
11.3
Selection Classes.....................................................................................21
11.4
User not authorized..................................................................................21
Cover figure:
A screen dump of a training session with the Training Manager GUI. It shows the
Training manager main dialog, the Composite channel window widget, and the
Splitted channel window widget. A daytime RGB using AVHRR channels 1, 2, and 4
over southern Sweden is shown in the composite channel window.
Adam Dybbroe/SMHI & Igor Giunta/MeteoSwiss
3
The AVHRR Interactive Training Manager
1
Ref: SMHI-BPF/TEC/AVHRR/2
Version:
2.01
Date:
02/04/2005
Introduction
The AVHRR interactive training manager software (TM tool in the following) is an
application intended for training and validation of AVHRR based cloud (and snow)
analysis algorithms. Specifically it is used for the tuning and validation of the AVHRR
based cloud mask and cloud type algorithms developed at SMHI in the context of the
Eumetsat Satellite Application Facility (SAF) to support Nowcasting and VSRF and
the Ocean & Sea Ice SAF.
With the tool the operator selects an AVHRR satellite scene and focus on a particular
feature using the various image display and enhancement facilities. A target in the
scene can be selected and labelled. Satellite and NWP model data are then stored
together with a label corresponding to the (cloud) classification of the particular
target. The classification is subjective and done by the operator visually inspecting
the image data.
The application is developed in Python with the use of the built-in Tkinter interface to
the image library available in the programming language Tk/Tcl. The application
requires an installation of the Polar Platform System Software (PPS) package
developed by SMHI and provided by the Nowcasting SAF.
The TM tool was originally developed under Python 1.4 in 1997-98. At that time it
was dependent on the IFUNC image library as provided by the Prosat system
(internal SMHI software for the operational production of AVHRR and Meteosat VIRI
images). During 2001 the TM tool was totally rewritten, and made compatible with the
output file formats of the PPS.
This user manual provides a short description of the software as well as a simple
guidance of how to install and operate it. There is also a detailed description of the
output format and how to access and read the target-files.
2
Applicable documents
Refere
nce
Title
Code
Vers
Date
[AD.1.]
Product Output Format for the Polar
Platform System Software Package of
the SAFNWC
SAF/NWC/SMHI/SW/ICD/3
0.3.0
17/11/03
[AD.2.]
Interface Control Document for the
External and Internal Interfaces for the
Polar Platform System Software
Package of the SAFNWC
SAF/NWC/SMHI/SW/ICD/1
0.3.0
17/11/03
3
Pre-requisites
The TM tool requires
•
ACPG – The AVHRR Cloud Products Generation software - part of the
NWCSAF
PPS
package.
Licensed
software
available
via
http://nwcsaf.inm.es/.
Adam Dybbroe/SMHI & Igor Giunta/MeteoSwiss
4
The AVHRR Interactive Training Manager
•
Ref: SMHI-BPF/TEC/AVHRR/2
Version:
2.01
Date:
02/04/2005
ExtractNwpProfile – Software to extract profile data from a NWP model state
stored in Grib format. NWP models supported are HIRLAM and output from
the ECMWF model. Available from SMHI.
ACPG requires the successful installation of a number of third party software
packages. For these see the PPS manual (Thoss and Dybbroe, 2004). However, in
order for the TM tool to run it is not necessary to have a full installation of ACPG
available. For the purpose of the TM tool ACPG may be compiled and installed
without support for the following 3rd party software packages:
•
AHAMAP
•
RTTOV-7
•
AAPP
Example of an ACPG installation satisfying the TM tool:
>
./configure --without-ahamap --without-aapp --withoutrttov
--prefix=/local_disk/opt/ACPG_TRUNC
--withproj=/usr/local/include,/usr/local/lib
--withhlhdf=/local_disk/opt/HLHDF
--withemos=/prog/proj/SAF/Mandrake9.1/include,/prog/proj/S
AF/Mandrake9.1/lib
> make
> make install
ExtractNwpProfile requires ACPG (at least as built and installed as above).
4
Installation
The building and installation of both the ExtractNwpProfile and the TM tool is done
following the usual configure-make-make-install mantra, provided by the Gnu
Autoconf tool. For online help try ./configure –-help.
To install ExtractNwpProfile one need to point to an existing installation of ACPG.
Then the procedure is as in the example below:
> ./configure --prefix=/local_disk/opt/ExtractNwpProfile -with-acpg=/local_disk/opt/ACPG_TRUNC
To install the TM tool:
> ./configure --prefix=/local_disk/opt/TrainingManager -with-acpg=/local_disk/opt/ACPG_TRUNC
--withphysiography=/data/prod/SAF/ACPG/import/AUX_data/rem
apped
--withprofiler=/local_disk/opt/ExtractNwpProfile
-datadir=/data/proj/saf/data/TrainingManagerData
5
Initialising the environment
Prior to launching the application a few environment variables need to be set:
Adam Dybbroe/SMHI & Igor Giunta/MeteoSwiss
5
The AVHRR Interactive Training Manager
Ref: SMHI-BPF/TEC/AVHRR/2
Version:
2.01
Date:
02/04/2005
•
SM_REGION_CONFIGURATION_FILE: Has to point to the region_config.cfg
file available from the ACPG. See PPS software manual.
•
SM_GRIB_CONFIGURATION_FILE: Has to point to the grib_config.cfg file
available from the ACPG. See PPS software manual.
It is needless to say that the regions on which target collection is going to be
performed should be registered in the region_config.cfg file before launching
the application. Likewise, the NWP model used should be configured for in the
grib_config.cfg file.
6
Starting the Application
After setting the environment variables the application is started, from Unix, by
running the python module/script training_environment.py like this:
python <install-prefix>/lib/training_environment.py
Then the main window pops up.
6.1
The training manager window
Figure 1: The training manager window, at start of application
The training manager window acts as the main window for the application. From here
you can choose from a few options by clicking on one of the buttons. In addition the
window will hold information about image data. When no image has been loaded
before, that is when the application has just been launched, the training manager
window only has three active buttons.
6.1.1 Load Image
Clicking the load image button activates a file dialog, from where you can choose a
given scene from the specified (configured in the file configure.py) satellite
archive (se section ??? for definition of areas etc.). The files you can see are
remapped AVHRR files in hdf5 format according to the PPS specifications (see
[AD.2.]).
Adam Dybbroe/SMHI & Igor Giunta/MeteoSwiss
6
The AVHRR Interactive Training Manager
Ref: SMHI-BPF/TEC/AVHRR/2
Version:
2.01
Date:
02/04/2005
Figure 2: The Load File dialog.
6.1.2 RGB selection
Clicking the RGB selection button, when active, will provide a dialog for selecting the
combination of channels to be applied in the RGB composite image. The button
becomes active after the first time an image scene has been loaded.
Figure 3: RGB selection dialog.
6.1.3 Classification list
Clicking the classification list button launches a dialog listing all the target
classifications available for the current training session (all users). A training session
ends when the actual target data (satellite and NWP) is collected using the target
metadata files.
Adam Dybbroe/SMHI & Igor Giunta/MeteoSwiss
7
The AVHRR Interactive Training Manager
Ref: SMHI-BPF/TEC/AVHRR/2
Version:
2.01
Date:
02/04/2005
Figure 4: The Classification list dialog. Here two target classifications have been
made, for which data have not yet been collected and stored in the training
database.
6.1.4 Load class-set
It is possible to change the set of classes (and their numbering) considered for the
application. By default the class set defined at SMHI in October 1998 is used
(meteo_981022.clsys).
When clicking the load class-set button a dialog is launched allowing to load another
class-set different from the default one. See Figure 5.
Figure 5: Dialog for loading the class-set.
Changing the class-set shall be done after careful consideration, and not something
which should be done on a regular basis. Therefore it can only be done by the
application administrator.
Adam Dybbroe/SMHI & Igor Giunta/MeteoSwiss
8
The AVHRR Interactive Training Manager
Ref: SMHI-BPF/TEC/AVHRR/2
Version:
2.01
Date:
02/04/2005
Typically a new class-set would be defined interacting with the Edit classes button
(see below). Then the configure.py would be updated specifying the new classset file instead of the previous default version, and the next time the TM tool is
launched the new class-set is loaded by default. A class-set different from
meteo_981022.clsys may e.g. be motivated if performing training with volcanic
plumes, forest fires, or over terrain (or surface types) much different from the
conditions over Northern Europe (for instance northern Africa). If changing/updating
the class-set of October 1998, please consider adding new classes, instead of
changing existing classes!
6.1.5 Edit classes
The current class-set may be altered clicking the Edit classes button. From the dialog
shown in Figure 6 one is able to change both the meaning and the description of
existing classes, or new classes may be added.
Adam Dybbroe/SMHI & Igor Giunta/MeteoSwiss
9
The AVHRR Interactive Training Manager
Ref: SMHI-BPF/TEC/AVHRR/2
Version:
2.01
Date:
02/04/2005
Figure 6: The Edit classes dialog.
Figure 7 shows the dialog when the Add button has been activated.
Adam Dybbroe/SMHI & Igor Giunta/MeteoSwiss
10
The AVHRR Interactive Training Manager
Ref: SMHI-BPF/TEC/AVHRR/2
Version:
2.01
Date:
02/04/2005
Figure 7: Adding a new class: The dialog as it appears when having clicked the
Add button in the Edit classes dialog. An index number one higher than the current
highest class number is suggested, and the name of the class is new_class until a
more appropriate name is chosen.
6.1.6 Select class
When clicking the select class button, when active, a dialog pops up providing a large
set of options corresponding to the, currently defined, possible classes to choose
from. This button is not active until a target has been identified by the user, by
choosing the target selection mouse mode and drawing a polygon in one of the
windows. See 7.1.5 and 7.3 for further explanation.
6.1.7 Quit
Pressing the Quit button quits the application - without asking you to confirm the
action.
7
A training session step by step
When loading an image clicking the load image button, two more windows will
appear besides the training manager window. These are the composite channel
window, and a socalled splitted channel window, hereafter called the channel-split
window. The view of the application after loading the satellite scene is pictured in
Figure 8.
Adam Dybbroe/SMHI & Igor Giunta/MeteoSwiss
11
The AVHRR Interactive Training Manager
Ref: SMHI-BPF/TEC/AVHRR/2
Version:
2.01
Date:
02/04/2005
Figure 8: A snapshot of a training session, just after loading a satellite scene.
The training manager window now holds information on the image data, as may
almost be seen from the figure, and an additional button is active - see section 6.1.2.
7.1
The composite channel window
The composite channel window displays, on default, a RGB image of channel 3, 4
and 5, during night-time and a RGB image composition using channel 1, 2, and 4
during daytime. The scene is classified as a night scene when having the sun
elevation below 10 degrees everywhere.
In cases around sun-rise and sun-set this threshold, discriminating between day and
night, may result in a somewhat awkward looking RGB image, which may cause
problems with interpretation. This may be the case when the sun is above 10
degrees in only a fraction of the scene. In these situations the channel 1, 2 and 4
composite is chosen. But due to poor illumination the two short wave channels only
contain little contrast compared to the IR channel, and the automatic stretching has
difficulties composing the three channels properly. If the resulting image is found
difficult to interpret, it is possible to re-configure the settings of the composite channel
window by clicking the, now active, RGB selection button in the training manager
window, see section 6.1.2.
Adam Dybbroe/SMHI & Igor Giunta/MeteoSwiss
12
The AVHRR Interactive Training Manager
Ref: SMHI-BPF/TEC/AVHRR/2
Version:
2.01
Date:
02/04/2005
Figure 9: The composite channel window, with a control panel with buttons, and a
label at the bottom describing date and time, satellite, and area identification. The
focus mode is selected here, and the focus rectangle is shown in green
In Figure 9 a view of the composite channel window is presented. A label holding
information about the date and time, satellite, and the area for which data have been
processed is shown at the bottom of the window. This information is actually not
displayed before the mouse pointer has been visiting the image, and the information
is only updated when entering the image.
7.1.1 Neutral mode
When examining the image the cursor can be in four different modes. When in the
neutral mode, by selecting the arrow button (using the left mouse button), the mouse
pointer becomes an arrow. In this mode pixel information bound to the position of the
mouse pointer in the image is displayed in the training manager window, but no other
action is bound to the mouse buttons.
7.1.2 Zooming
Zooming in the image can be accomplished by selecting the button with the
magnifying glass. The mouse pointer now becomes a cross, and by clicking the left
mouse button you will zoom in, and to zoom out again you should click the right
mouse button. The middle mouse button is here reserved for moving the image
around in the window, which may be necessary when zooming. To move the image
in the direction of the upper left corner one should hold down the middle button while
moving the mouse pointer towards the lower right corner. You are actually moving
the window around while the image is fixed.
Adam Dybbroe/SMHI & Igor Giunta/MeteoSwiss
13
The AVHRR Interactive Training Manager
Ref: SMHI-BPF/TEC/AVHRR/2
Version:
2.01
Date:
02/04/2005
7.1.3 Adding and removing coastlines
Coast lines and political boundaries can be added as an overlay to the image by
selecting the central button on the control panel, again using the left mouse button of
course. A file dialog pops up and one may select between a number of standard
overlays. You should of course choose the one corresponding to the image (check
the area identification tag in the label at the bottom of the window). The overlay can
be deleted by clicking the right mouse button on the coastlines button.
7.1.4 Focusing
By choosing the focus button in the control panel the mouse pointer becomes an
"eye" and one can now choose an area of interest in the image by clicking the left
mouse button. A rectangle appears centred around the "eye", and the content of the
channel-split window now corresponds to this sub area. See Figure 8.
In a usual training session the user will select the focus option and select an
interesting area, and then go to the channel-split window and select the training
target area from there.
7.1.5 Target selection
The last button in the control panel is for target selection. When choosing this, the
mouse pointer becomes a black dot. By pressing the left mouse button and holding it
down while dragging a rectangular shaped polygon will define the target area, on
which a training sample can be defined. Releasing the mouse button finishes the
action, and the training manager window now holds statistics on the spectral content
of the selected area. Also an additional button is now active, namely the class
selection button. In Figure 8 the application view after target selection is pictured.
Adam Dybbroe/SMHI & Igor Giunta/MeteoSwiss
14
The AVHRR Interactive Training Manager
Ref: SMHI-BPF/TEC/AVHRR/2
Version:
2.01
Date:
02/04/2005
Figure 10: The application view after applying focusing and then target selection in
the composite channel window. The training manager window now shows one more
active button, namely the select class button.
Further details on the target selection procedure can be found below.
7.2
The channel-split window
The channel-split window consists of 7 smaller single channel windows1. Starting
from upper left corner and going right row by row the layers/windows contain AVHRR
channel 1, channel 2, channel 3 (3a or 3b), channel 4, channel 5, land use map, and
a topography map. The values displayed in the training manager window, as shown
in Figure 11, are K for the three IR channels, and the two short wave channels
represent the reflectance, not normalised by the sun elevation, and given in percent.
The land use map is extracted from the Global 1km USGS Land Cover
Characterization (GLCC) database (see http://edcwww.cr.usgs.gov/), and we have
applied the 24 classes USGS Land Use/Land Cover Scheme. Here class 16
corresponds to water (sea/lakes).
The topography data are taken from the Global 30 Arc-Second Elevation Dataset
(GTOPO30) from USGS (see http://edcwww.cr.usgs.gov/). The elevation is given in
meters above mean sea level.
1
The application can be re-configured so that e.g. one or both the ancillary data layers are
not included, and similar more additional layers can be added if available.
Adam Dybbroe/SMHI & Igor Giunta/MeteoSwiss
15
The AVHRR Interactive Training Manager
Ref: SMHI-BPF/TEC/AVHRR/2
Version:
2.01
Date:
02/04/2005
Figure 11: The training manager window when image data has been loaded.
Information on pixel data is displayed to the right of the button-array
The control panel is, except for the lack of the button for the adding and removing of
coast lines, equal to that of the composite channel window. But there exists some
additional options, concerning image display, bound to the mouse buttons. See
below.
7.2.1 Contrast stretching a layer
A simple linear stretch can be applied to a single channel/layer by clicking the left
mouse button when the mouse pointer is in the image and is in neutral mode. This is,
however, done already on default when loading an image. Returning to the default
contrast stretch can be accomplished by clicking the right mouse button.
If the linear stretch according to the above is found insufficient a more elaborate
procedure is possible. If one holds down the middle mouse button while moving it
horizontally the offset of the applied linear stretch is changed. Moving towards the
right increases the offset. Moving vertically changes the slope of the LUT, so that
moving the mouse pointer upwards will increase the slope. Be aware that once the
mouse button is pressed, one can, and will often need to, move it far away out of the
actual image. One might move the mouse e.g. both to the right and upwards and at
the same time altering both contrast and brightness.
7.3
The target selection procedure
Once an interesting area in the image has been identified the target selection mode
is chosen, and a rectangle is drawn as described in section 7.1.5. Now, click the
active select class button in the training manager window to get a class selection
dialog as shown in Figure 12. When the mouse is being moved over a button it then
becomes highlighted, and a short explanatory text is shown in the frame below.
Adam Dybbroe/SMHI & Igor Giunta/MeteoSwiss
16
The AVHRR Interactive Training Manager
Ref: SMHI-BPF/TEC/AVHRR/2
Version:
2.01
Date:
02/04/2005
Figure 12: The class selection dialog with the possible class selection options. Only
the cancel button is active since no class has been selected yet.
Adam Dybbroe/SMHI & Igor Giunta/MeteoSwiss
17
The AVHRR Interactive Training Manager
Ref: SMHI-BPF/TEC/AVHRR/2
Version:
2.01
Date:
02/04/2005
Figure 13: The class selection dialog after having selected a class. The selected
class button is now red and a corresponding short explanatory text is shown in the
frame below. Now only the Regret and Ok buttons are active.
Once the class has been selected by clicking the right button, the particular button
becomes red (see Figure 13) and all the others are becoming inactive. Now, the two
other of the three buttons at the bottom of the dialog is active. These are the regret
and ok buttons. Pressing the regret button will delete the newly written targetmetadata-file, and the selection of a new training target can start all over again.
Adam Dybbroe/SMHI & Igor Giunta/MeteoSwiss
18
The AVHRR Interactive Training Manager
Ref: SMHI-BPF/TEC/AVHRR/2
Version:
2.01
Date:
02/04/2005
Clicking the ok button closes the dialog leaving the newly created training targetmetadata-file as it is.
8
The training target metadata files
Training data selected by the user during the interactive sessions are stored into light
metadata files. Within
<install-prefix>/etc/batchjobs.dat
each training target appears as file-block containing the AVHRR-filename, the
geographical parameters and the classification chosen by the user (provided with the
absolute processing time in seconds). The format is python-friendly and the
information can easier be consulted from its twin file:
<install-prefix>/etc/ascii_batchjobs.dat
Here below an example of one target block:
CLASSIFICATION [
USER: adybbroe
FILENAME:
/data/proj/saf/data/TrainingManagerData/avhrr/noaa16_20050115_1124_22
251.sswe.avhrr.hdf
AREAEXTENT:
3598977.392882)
(172770.090538,-3610829.244734,185412.065846,-
CLASS: Open sea
PROCTIME: 1105908414.586356
]
These target metadata files are automatically updated at the end of each target
selection procedure.
9
Data collection
Once the target information from the user has been gathered, the next step consists
in collecting all necessary input data and to insert them into the database. The
module
<source-prefix>/util/process_batchjobs.py
reads the metadata file, locates and extracts the correspondent satellite (AVHRR,
sun-sat angles), physiography and model data.
Input data should reside within following dedicated folders:
<data-dir>/avhrr/
<data-dir>/angles/
<physiography-dir>/
<data-dir>/nwp1/
Adam Dybbroe/SMHI & Igor Giunta/MeteoSwiss
19
The AVHRR Interactive Training Manager
Ref: SMHI-BPF/TEC/AVHRR/2
Version:
2.01
Date:
02/04/2005
<data-dir>/nwp2/
<data-dir>/nwp3/
The optional folder for nwp-files let the freedom of using different sources (such as
archived and real-time data) with different priorities.
The data are then written into database files, namely into separated target-class files:
<installation-dir>/database/tbd_<class>.hdf
At the end of this processing the original metadata file is cleaned and ready for new
target selection sessions (one copy of it will be saved into date-referenced file).
9.1
Training target file format
The whole training database is a directory containing one single database file for
each training selection class (tdb_Land.hdf, tdb_Opensea.hdf, ….). Internally they
are hierarchically structured into nested GROUPs, where the training target file
occupies the lowest file-unit:
Date Satellite observer processing time training target files
The result of a usual one-day classification activity is therefore distributed into
several database files, the exact insert location of which depends on the satellite and
observer ID.
The training target file is itself organized in a header containing area and satellite
angle parameters, one NWP data group and 7 datasets for AVHRR and auxiliary
data:
9.1.1 Training target ATTRIBUTE “header”:
Mapping, satellite geometry and further definition data are packed into the headerunit.
Type
Description
H5T_COMPOUND
Area and satellite List of target definition parameters
angle parameters
[DATATYPE]
9.1.1.1 Parameter
Type
observer
string
target_type
string
target_des
string
tle1
string
tle2
string
satellite
string
Content
Ref
9.1.1.1
Remarks
Target class description
Adam Dybbroe/SMHI & Igor Giunta/MeteoSwiss
20
Ref: SMHI-BPF/TEC/AVHRR/2
Version:
2.01
Date:
02/04/2005
The AVHRR Interactive Training Manager
Pcs_id
string
Pcs_def
string
origin_areaid
string
target_code
integer
time_1970
integer
nl
integer
lon_0
float
lat_0
float
lat_ts
float
Area_extent
float[4]
center_angles
float[4]
Number of vertical levels
sun-zenith,
sat-zenith,
azimuth difference
sun-sat
9.1.2 Training target GROUP “hirlam”
NWP data are stored into this node.
Comment: The name hirlam is here somewhat misleading, but kept for historical
reasoning. It is possible, and very likely, that other type of model data (e.g. from
ECMWF) will be stored here instead of data from the HIRLAM model. The name
should rather have been something like nwp or model.
Type
Name
Description
ATTRIBUTE
header
NWP
parameter
Content
cell Scalar parameters
“header”
DATASET
prof0
NWP-profiles
vertical profiles:
prof1
0: pressure
- DATA float array
prof2
9.1.3.1
1:geopotential height
2:temperature
prof3
Ref
-“info”
9.1.4.1
3: relative humidity
9.1.3 Training target Hirlam H5T_COMPOUND “header”
9.1.3.1 Parameter Type
Remarks
Adam Dybbroe/SMHI & Igor Giunta/MeteoSwiss
21
The AVHRR Interactive Training Manager
projection
string
center
string
ana_time
string
flen
integer
nlon
integer
nlat
integer
nprof
integer
latitude
float
longitude
float
dlambda
float
dtheta
float
alonw
float
alats
float
splon
float
splat
float
pg
float
gg
float
tg
float
t2m
float
rh2m
float
wspeed
float
wdir
float
snow_depth
float
land_cover
float
Ref: SMHI-BPF/TEC/AVHRR/2
Version:
2.01
Date:
02/04/2005
WMO code for current NWP model
9.1.4 Training target Hirlam profile ATTRIBUTE “info”
9.1.4.1
Type
Description
H5T_COMPOUND
NWP
Adam Dybbroe/SMHI & Igor Giunta/MeteoSwiss
Content
Ref
profile List of profile definition 9.1.4.2
22
The AVHRR Interactive Training Manager
[DATATYPE]
9.1.4.2
characteristics
Parameter
Type
profile
String
element_size
Integer
element_type
Integer
nl
integer
Ref: SMHI-BPF/TEC/AVHRR/2
Version:
2.01
Date:
02/04/2005
parameters
Remarks
number levels
9.1.5 Training target DATASET “layer0”… “layer6”
These DATASET are used for storing radiometric and physiography data.
Type
Name
Description
Content
DATASET
layer0
AVHRR-data
channel data
layer1
0: channel 1
(reflectance/temperature
depending on channel)2
layer2
1: channel 2
2: channel 3A/3B
layer3
DATASET
Ref
data
- DATA integer array
3: channel 4
layer4
4: channel 5
-“info”
layer5
Auxiliary data
Elevation[m] or
layer6
5: topography
surface type data[code]
6:land-mask
9.1.5.1
- DATA integer array
-“info”
9.1.6.1
9.1.5.1 Training target DATASET “layer0”… “layer4”
AVHRR data from channel 1 to 5 are stored into separated DATASET called layers.
Each one of them is structured as following.
2
NB: true values of reflectance [%] (channels 1,2,3A) and brightness temperature [K]
(channels 3B,4,5) are calibrated with gain and intercept parameter of the “info” ATTRIBUTE
Adam Dybbroe/SMHI & Igor Giunta/MeteoSwiss
23
The AVHRR Interactive Training Manager
9.1.5.1.1
Ref: SMHI-BPF/TEC/AVHRR/2
Version:
2.01
Date:
02/04/2005
Type
Description
Content
H5T_COMPOUN
D
AVHRR
channel List
of
characteristics
parameters
Ref
channel 9.1.5.1.2
[DATATYPE]
9.1.5.1.2
Parameter
Type
Remarks
layer
string
“AVHRR 1” … “AVHRR 5”
element_size
Integer
element_type
Integer
nr
integer
np
integer
gain
Float
Calibration gain
intercept
Float
Calibration offset
9.1.5.2 Training target DATASET “layer5”, “layer6”
A similar layer-structure is used for storing auxiliary data, such as topography and
land-mask.
9.1.5.2.1
Type
Description
Content
H5T_COMPOUND
Field
characteristics
List
of
parameters
[DATATYPE]
9.1.5.2.2
Parameter
Type
Remarks
layer
string
“TOPOGRAPHY” or “LANDUSE”
element_size
Integer
element_type
Integer
nr
integer
np
integer
Adam Dybbroe/SMHI & Igor Giunta/MeteoSwiss
Ref
fields 9.1.5.2.2
24
The AVHRR Interactive Training Manager
gain
Float
1 (fictitious channel)
intercept
Float
0 (fictitious channel)
Adam Dybbroe/SMHI & Igor Giunta/MeteoSwiss
Ref: SMHI-BPF/TEC/AVHRR/2
Version:
2.01
Date:
02/04/2005
25
The AVHRR Interactive Training Manager
Ref: SMHI-BPF/TEC/AVHRR/2
Version:
2.01
Date:
02/04/2005
10 Reading the training data from Python
The python module ´training_db.py´ defines classes and implements methods for
managing training database files, using the specific hdf-interface ´training_formathdf´.
Following python instructions read one training database file, i.e. assign to the object
´tbd´ the content of all training target files which share the same user selected
classification:
>> import training_db
>> tdb= training_db.get_training_db(<training database file>)
Single training target files can then be accessed by using the method
´getTrainingFile(<training target file name>)´. Next example shows how to extract
one training target of the selection class Snow in open land conditions:
>> tdb= training_db.get_training_db(´tdb_Snow-openland.hdf´)
>> target_names=tdb.getTrainingFileNames()
>> training_target_file=tdb.getTrainingFile(target_names[0])
The content (the attributes) of the object ´training_target_file´ reflects the same data
hierarchy of the input hdf-file (see section 9.1). Following sparse examples can thus
be easy deduced from the training target file format.
Satellite and sun angle data:
>> training_target_file.header.center_angles[0..3]
NWP relative humidity at 2m:
>> training_target_file.hirlam.header.rh2m
Profile NWP-temperature, level 20:
>> training_target_file.hirlam.prof[2].data[19]
AVHRR-channel 4 temperatures, with correspondent calibration coefficients:
>> training_target_file.layers[3].data
>> training_target_file.layers[3].info.gain
>> training_target_file.layers[3].info.intercept
Topography data:
>> training_target_file.layers[5].data
Adam Dybbroe/SMHI & Igor Giunta/MeteoSwiss
26
The AVHRR Interactive Training Manager
Ref: SMHI-BPF/TEC/AVHRR/2
Version:
2.01
Date:
02/04/2005
11 Frequently Asked Questions
11.1 GUI
I am finished in collecting training targets on one AVHRR image and I want to start
again with a new one. By closing the composite channel window however, I am
prevented to do anything else. What is going wrong?
For loading a new image into the composite channel window do not close the
Window, but simply select a new file from the “Load Image” button of the Training
Manager Window.
11.2 NWP-model
How do I find out which model has been used for the training data-base?
This indication (as WMO-code) is reported within the hdf-target database file: nwpheader/center parameter.
In Python:
>> training_target_file.hirlam.header.center
11.3 Selection Classes
I want to edit a new selection class, but the “Edit Class-Set” button on the Training
Manager Window is not active. How do I do?
Firstly the permissions of Application Administrator must be set, adding your user-id
to the administrators list within the file [installation-dir]/lib/security.py. Then follow
§6.1.4.
11.4 User not authorized
When starting the application I am prompted for a username:
When providing my username (e.g. “adybbroe”) and clicking the “ok” button I get the
dialog:
I seem not to be registered as an authorized user for the application. What do I need
to do in order to be able to run the application?
Adam Dybbroe/SMHI & Igor Giunta/MeteoSwiss
27
The AVHRR Interactive Training Manager
Ref: SMHI-BPF/TEC/AVHRR/2
Version:
2.01
Date:
02/04/2005
If you are not an authorized user then have the administrator add your username to
the file security.py under <install-root>/lib.
Adam Dybbroe/SMHI & Igor Giunta/MeteoSwiss
28
The AVHRR Interactive Training Manager
Ref: SMHI-BPF/TEC/AVHRR/2
Version:
2.01
Date:
02/04/2005
References
Dybbroe, A., Karlsson, K.-G. and Thoss, A., 2005a. NWCSAF AVHRR cloud
detection and analysis using dynamic thresholds and radiative transfer
modelling - part one: Algorithm description, J. Appl. Meteor., Vol. 44, No. 1,
pp. 39-54.
Dybbroe, A., Karlsson, K.-G. and Thoss, A., 2005b. NWCSAF AVHRR cloud
detection and analysis using dynamic thresholds and radiative transfer
modelling - part two: Tuning and validation, J. Appl. Meteor. Vol. 44, No. 1,
pp. 55-71.
Thoss, A., and Dybbroe, A., (2004) Scientific User Manual for the AVHRR/AMSU
cloud and precipitation products of the NWCSAF. Available at
http://nwcsaf.inm.es. Code = SAF-NWC-IOP-SMHIPPS-SW-SUM-2_v1.0.0.
pp 89.
Adam Dybbroe/SMHI & Igor Giunta/MeteoSwiss
29