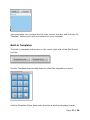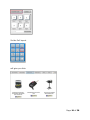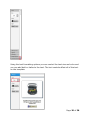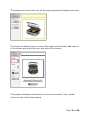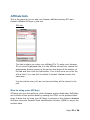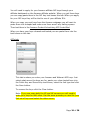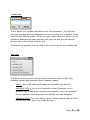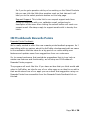
1
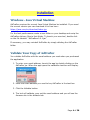
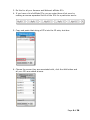
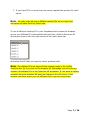
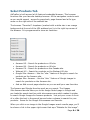
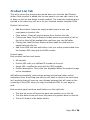
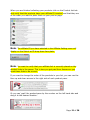
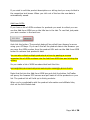
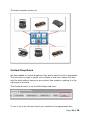
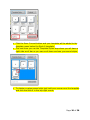
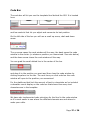
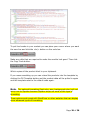
AdCrafter v2.0.1 User Manual v1.0 Page 1 of 38 Contents AdCrafter v2.0.1 User Manual ............................................................... 1 About ............................................................................................... 3 What is AdCrafter? .......................................................................... 3 How It Works ................................................................................. 3 Installation ....................................................................................... 4 Windows - Java Virtual Machine ........................................................ 4 Validate Your Copy of AdCrafter ........................................................ 4 Using AdCrafter ................................................................................. 5 Enter Your Amazon Affiliate Tracking ID(s) ......................................... 5 Select Products Tab ......................................................................... 8 Product List Tab ............................................................................ 12 Edit Module Tab ............................................................................ 15 Module Preview Tab ...................................................................... 29 AdCrafter Settings ........................................................................... 30 Global Settings ............................................................................. 31 Affiliate Info ................................................................................. 33 How to setup your API keys ........................................................... 33 IM Workbench Rewards Points ........................................................ 36 Resources that compliment AdCrafter ................................................. 38 Page 2 of 38 About What is AdCrafter? AdCrafter is a Graphical User Interface, “GUI”, application that automates the task of gathering Amazon and Walmart product information so you can generate the HTML to paste into the content area of a WordPress page/post, Blogger page , SirGo page, Weebly page, Squidoo lens, Bubblews page, Joomla page, Drupal page or a static HTML page. This automation saves you the time it would normally take to copy and paste affiliate links, product image links, and product description information to manually build that content yourself. AdCrafter also has lots of built-in templates and styles you can apply with a few mouse clicks that will save you even more time. Additional features also improve efficiency: Storage of multiple Amazon and Walmart tracking IDs and API keys. Ability to create copies of the text templates with your own HTML for borders, fonts, and colors and save them for use with AdCrafter. Built-in templates that enable custom formatting using point and click controls. The ability to ‘save’ product data that you have not used in a template and retrieve it from use the next time you are working with AdCrafter. How It Works AdCrafter works on one product content template at a time. Using the built in browser, you will find products on Amazon/Walmart you wish to include in your template, click a single button to add each product, edit the product info (if necessary), then select and fill a template from a drop down list. If the product layout looks good in the Preview tab, copy the code with the click of a button and paste into your page. Clear the products from your list and repeat the process for your next product template. Page 3 of 38 Installation Windows - Java Virtual Machine AdCrafter requires the current Java Virtual Machine be installed. If you need the current version you can download it for free here: https://java.com/en/download/index.jsp For the best performance create a new folder on your desktop and unzip the AdCrafter delivery files to that folder. To launch your new tool, double click on the file labeled: “AdCrafterv2.0.1.jar” If necessary, you may uninstall AdCrafter by simply deleting the AdCrafter folder. Validate Your Copy of AdCrafter You validate AdCrafter with the email address you used when you purchased the application. 1. To enter your email address, launch the app by double clicking on the AdCrafter jar. When the app opens the validation text box will display. 2. Enter the email address you used to buy AdCrafter in the text box 3. Click the Validate button 4. The tool will validate, gray out the email address and you will see the Amazon site in the browser tab. Page 4 of 38 Using AdCrafter Enter Your Amazon Affiliate Tracking ID(s) 1. Click the Menu down arrow in the top left corner of the app. Click the Settings tab then the ID’s tab. 2. Enter your affiliate tracking ID in the text box, select the appropriate server from the Server drop down at the bottom. Then click the Add button. Page 5 of 38 3. Do this for all your Amazon and Walmart affiliate ID’s. 4. If you have a lot of affiliate ID’s you can enter them all at once by making a comma separated list of all the ID’s for a particular server. 5. Copy and paste that string of ID’s into the ID entry text box. 6. Choose the server they are associated with, click the Add button and all your ID’s are added at once. Page 6 of 38 7. If you have ID’s on more than one server repeat that process for each server. Note: You may enter ad many affiliate tracking IDs as you have and AdCrafter will save them for future use. To use a different tracking ID in your templates first browse the Amazon server your Affiliate ID is associated with and then click the Select an ID drop down arrow in the top right corner of the main menu bar and select the ID that you want to collect products with. Note: The affiliate ID’s are keyed to the browser page in the Collect Products tab. So if you are on the Amazon US homepage you will only see Amazon US affiliate ID’s in the Select an ID dropdown. If you want to collect products from the Amazon UK site just change to the UK server in the browser and then select your UK affiliate ID(s) from the drop down. Page 7 of 38 Select Products Tab AdCrafter is built around a full-featured embedded browser. This browser functions like your favorite desktop browser. All the navigation controls work as you would expect: arrows for page back, page forward and a Go type arrow on the right side of the address bar. The browser “Favorite’s” dropdown (marked with a white star in an orange background at the end of the URL address box) is in the right top corner of the browser. It is programmed to show six favorites: Amazon US – Search for products on US site. Amazon UK – Search for products on UK site. Amazon CA – Search for products on the Canada site. Walmart US – Search for products on the Walmart US site. Google Site: Amazon – Use the “site:” feature of Google to search for products on the Amazon site. Images Site: Amazon – Use the “site:” feature of Google images to search for products on the Amazon site. And an Add current page selection so you can add your own favorites. The Amazon and Google favorites work as you expect. The Images Site:Amazon favorite takes you to the Image Search page in Google and pre-loads the search text box with site:amazon.com which makes it quicker to search Google Images for Amazon products. Just put your cursor in front of or after the text in the search bar and enter a phrase to search for your products. Same for the Google Site:amazon.com favorite. When you click on an image in the Google Images search results page, you’ll be shown a link in the upper right corner that says “Website for this image”. Page 8 of 38 Click that link to navigate to the Amazon product detail page for that item where you can then click the Add button to add the product to your Product List. The Add current page functions like you would expect. There is also a home page button and Set current page as home page drop down: that work like you would expect them to. Multiple Browser Tabs We have added the ability to have multiple browser tabs so you can have six product detail pages in the Select Products window at once. First make sure the Browser Tabs Enabled check box is checked on the Settings > General tab. To open extra windows you click on the little plus sign by the first tab. This adds another tab to the right of the existing tab. Page 9 of 38 You can do this five times, for a total of six tabs open at once. The product tool bar default position is replicated as new browser tabs are opened. Note: The extra tabs will open with the same search as the primary tab. That allows you to do a product search in the main tab and then replicate that search results across all of the tabs as you open them. So you can find a product search results that contains lots/all of the products you want to add to your template, open five more tabs and then switch to those tabs and click the Add Product button for each product you want on your list. That saves the time spent clicking on the product detail page and then click the back arrow to go back to your original search so you can navigate to the next product detail page. To collect products browse to the product site you want to collect products from and then use the Select an ID drop down in the top right corner to select the aff ID you want in your product html. Using the Select Products tab, search Amazon/Walmart for the products you wish to use in your product html: Click on the image of a product to bring up the Amazon product details page. Page 10 of 38 Click the blue Add button, in the top left corner of the browser window, to add the product to the Product List tab. In the bottom right corner of the browser window you will see that the products selected icon has incremented by one to confirm your selected product has been added to the product list. Continue to add products until you have enough to fill the template you are building. If you try to add a product you have already placed on the product list the notification pop-up will advise the product is already in the list. You can add up to thirty products to the list. When filling the template only the required number will be used. A small Image Template will load with the first, or top, six items. You may then delete the first six items, build another six item module from the next six on the list and so on. Page 11 of 38 Product List Tab This tab is where the products are stored when you click the Add Product button. Each product is added into its own pane so you can edit, move it up or down on the list and delete a single product. The order the products are in this tab is the order they will be in on your finished module template HTML. Product List tool bar: Add New button. Inserts an empty product pane so you can copy/paste in product info. Clear button. Clears all product panes from Product List tab. Clicking the Save Current Session button saves any product(s) left on the list so they will be available the next time you use AdCrafter. Clicking the Load Previous Session button loads the products you saved back into the list. Add from ASIN text box and button. Lets you collect product data from the Amazon API using just the ASIN number. Product pane: Each product has four text boxes. Alt tag text. Product URL with your affiliate ID number at the end. Image URL, modified to work with the SPQ template. Product description. This is the text displayed below the product image on the templates. AdCrafter automatically cleans single quotes (and several other control characters) from the alt tag text but you still want to check to be sure there isn’t anything that will mess up your alt tags because that will mess up the rendering of the HTML when you copy the module HTML to your page or post. Each product pane has three small buttons on the right side. The blue up arrow will move the pane one position up on the list. The blue down arrow will move the pane one position down on the list. The red X button is the delete button. Page 12 of 38 When you are finished collecting your products click on the Product List tab and verify that the products have your affiliate ID inserted and that they are in the order you want to place them on your post or page. Note: The affiliate ID you have selected in the Affiliate Setting menu will display on the Select an ID drop down face plate. Note: You want to verify that your affiliate link is correctly placed on the product links in the panes. This is how you get paid from Amazon so you need these links to be correct. If you want to change the order of the products in your list, you can use the blue up and down arrows in the right side of each product pane. Or you can ‘grab’ the product pane by the number on the left hand side and drag it to the desired location. Page 13 of 38 If you wish to edit the product descriptions or alt tag text you may do that in the respective text boxes. When you click out of the box the new data is automatically saved. Add from ASIN: If you have a list of ASIN numbers for products you want to collect you can use the Add from ASIN box on the title bar in the tab. To use that just paste your asin number in the text box. And click the button. The product data will be pulled from Amazon’s server using your API keys. If you can’t find all the product data in the Browser you can copy the ASIN number from the product URL and use the Add from ASIN button to retrieve that product’s data. You can also collect multiple products at a time by pasting a comma separated list of ASIN numbers into the Add from ASIN box and clicking the button. So you make a list of ASIN numbers that look like this: B001AQEPMM,B0000AZK85,B00004W499,B001ANXQQ6,B00005YXC0 Paste that list into the Add from ASIN box and click the button. AdCrafter will query the Amazon ECS servers and pull back all of the products on your list. The product list will hold up-to thirty products. When you’re comfortable with the product information and affiliate links, click on the Edit Module tab. Page 14 of 38 Edit Module Tab Click on the Edit Module tab. Select the template you are working on from the Select Template dropdown. These templates are from Erica Stone’s Squid Pro Quo course that she so graciously allowed us to use; the keyword strategy in the course combined with the power of AdCrafter will give you a cutting edge in building Amazon affiliate lenses on Squidoo, pages/posts on WordPress, posts on Blogger or topics on SirGo. There are two types of templates in AdCrafter v2.0. The basic template pack that has been used in earlier versions of AdCrafter and built-in templates that enable a multitude of formatting options. Standard Base Text Templates There are three base templates included in your delivery files along with many variations that were created by Leiif Aurumsonn and are loaded automatically by AdCrafter: The Intro Module Template does not include any Amazon products. This template is for text to include in your Squidoo Intro Module. The Small Image Template includes an intro text box for your written content and six Amazon products laid out in two rows of three products. The Large Image Template includes space for your written product description and one Amazon product. Click on the Text Templates drop down and choose the template you want to use on your page or post. Page 15 of 38 Click the Fill Template button and your products will be loaded from the Products List tab. To add your content to the text templates you can use the Content drop down on the Edit Module tool bar. Page 16 of 38 Just type/paste your content into the intro module text box and click the Fill Template button and it will be inserted into your template. Built-in Templates The built-in template buttons are on the center right side of the Edit Module tool bar. Use the Template Layouts drop down to select the template you want. And the Template Styles drop down to select a starting template format. Page 17 of 38 So the 3x1 layout will give you this. Page 18 of 38 And the square corner drop shadow 1 px border will add: Now that you have a built-in template populated you can use the retractable text, background, border, shadow, image buttons and custom buttons controls on the left margin tool bar. Page 19 of 38 Using the text formatting options you can control the text size and color and you can add bold or italics to the text. The text controls affect all of the text on the template. Page 20 of 38 The background control lets you set the page and product background colors The border formatting lets you control the weight of the border, add radius’s to the border and select the color and style of the border. The shadow formatting options let you choose the position, blur, spread, color and style of the drop shadow. Page 21 of 38 The image buttons control allows you to change the images buttons that your selected template uses. Just open the control, make sure the little radio button on the header is selected and click on the image button you want to use with your selected template. You can add your own image buttons by expanding the app until you see the Add text box and button at the bottom of the image buttons control. Page 22 of 38 You just paste in the url to your custom button, click the Add button and your button shows up on the button list. Custom text buttons work the same except you add your own text and style the buttons with the text, background, border and drop shadow controls. Page 23 of 38 The basic template styles are: Content Drop Down We have added a Content dropdown that works with the built-in templates. This tool lets you type or paste your content in and then inserts that text into the html without having to worry about line breaks or getting it in the right spot in the html. That Content button is on the Edit Module tab here: To use it you just click and insert your content in the appropriate box Page 24 of 38 Intro text will be inserted in the intro module and the intro (top) content box on most of the templates Product text will be inserted in the product text box on the Feature Left, Feature Right, 3X1 and 2X1 templates. The Product Info box is only used with the templates that have is a text box for a product description How to ‘Save’ the templates styles you want to reuse. If you format a template and want to save it to use again just do this. Gather your products, choose the template layout and style the template with your new format. Click the Template Styles drop down and enter a name for your custom templates in the Style Title box. Page 25 of 38 Click the Save Current button and your template will be added to the template menu below the Style 6 template. The next time you use the Template Styles drop down you will have a right side scroll bar so you can scroll down and see your saved styles. To delete a custom saved style just hold your mouse over the template and click the little X in the top right corner. Page 26 of 38 Code Bar The code bar will let you see the template html behind the GUI. It is located here: and has controls that let you adjust and memorize its last position. On the left side of the bar you will see a small up arrow, dash and down arrow. The up arrow opens the code window all the way; the dash opens the code window to the center (or whatever position you memorized. See note below) and the down arrow closes the code window all the way. You can grab the small dotted line in the center of the bar and drag it to the position you want and then close the code window by clicking anywhere on the bar. The next time you click code bar the code window will open to the position you memorized. For the platforms that limit the amount of test in a template we’ve included a character count display on the code bar that shows how many text characters are in the template. We have also implemented code colorizing for the html in the code window so it’s much easier to see where the different elements are and where to make your edits. Page 27 of 38 To put line breaks in your content you can place your cursor where you want the new line and click the <br/> button on the code bar. Make any edits that are required to make the module look good. Then click the Copy Code button. Which copies all the product html to your clipboard. If you mess something up you can reload the products into the template by clicking the Fill Template button and the product data will be pulled in again and the template reset to the default code again. Note: The optional formatting (font color, size, background color) will not carry over to Squidoo because Squidoo strips out most of this type of formatting. These options work great with WordPress or other websites that can display more advanced types of formatting. Page 28 of 38 Module Preview Tab Click on the Module Preview tab and the populated template will be displayed in a variable width window enabling you to make a last visual check before you copy the HTML to your post. This window is adjustable so you can adjust the width of the preview module to match the width of your page and then see how your templates display at that width. When you close AdCrafter the last used width is saved. This becomes the default width and will remain so until manually changed. If some aspect of your layout needs to be adjusted click back to the Edit tab, fix it and check the preview again. If everything looks good click the “Copy Template HTML” button at the top right corner and the module HTML is copied to your clip board. You’re done with that module. Page 29 of 38 AdCrafter Settings The settings menu is behind the AdCrafter version text on the top left corner of the main title bar Clicking that drop down will display the News, Settings, Validate and Help tabs. Those tabs functionality are: News: This tab displays the most current AdCrafter news as posted on our website. This is where we’ll be announcing update releases and any other pertinent events associated with the app. Clicking in this tab will open your browser and display the App News page on our site. Page 30 of 38 Global Settings The global settings are found on this tab. Settings: General tab: Tab Side: This drop down menu lets you move where the task tabs are located in the app. The selections are Top, Bottom, Left and Right. Tab Size: This lets you choose between Small and Large tab sizes. Browser Tabs Enabled: This lets you show/hide the extra browser tabs on the Select Products task tab. GUI Color: This is a color chooser that lets you set the GUI color to anything you want. Auto Return Enabled: Checking this box will do an automatic back button click when you Add a product in the Collect Products tab. This seems like a simple little enhancement but it saves a LOT of time/clicks when you’re collecting products in the browser mode. Page 31 of 38 Clear Settings: Clicking this button will reset all the AdCrafter settings back to factory default, except your validation email. Small blue question icon: This is the default in app help link. It is context sensitive so clicking the ‘help’ link while you’re in the Settings tab will open your desktop browser and take you to the online help for AdCrafter Settings. Validation tab: This tab lets you enable/disable the second validation on your license. To enable your second validation check the check box. To send instructions and a download link to your VA enter their email in the text box and click the Send Instructions button. To disable and reset your second validation, uncheck the check box. To remove the validation in AdCrafter click the Clear My Validation button. This lets you revalidate the app on your machine but does not reset the validation on our server. Page 32 of 38 Affiliate Info This is the place for you to add your Amazon affiliate tracking ID’s and Amazon Affiliate API keys to the tool. ID’s tab: This tab is where you enter your affiliate ID’s. To enter your Amazon ID you would type/paste the id in the Affiliate Id text box, choose the appropriate Amazon server in the server drop down at the bottom of the tab and then click the Add button. Your id will show up on the list with a little X you can click to delete if needed. Walmart works the same way. You can add as many id’s as you have and they will be stored in the tool. How to setup your API keys API keys give you the ability to collect Amazon product data when AdCrafter can’t collect all the product data by reading the HTML on the product detail page. It does this by using your API keys to connect to the Amazon database and then using the Amazon Stock Identification Number (ASIN) to query the product data. Page 33 of 38 You will need to apply for your Amazon affiliate API keys through your affiliate dashboard on the Amazon affiliate website. When you get those keys you can copy/paste them in the API key text boxes this tab. When you apply for your API keys they will be tied to one of your affiliate ID’s. When you copy your api keys from the Amazon webpage you will want to paste them into notepad and make sure there aren’t any trailing spaces. Then test them in the Amazon Product Advertising API ScratchPad. When you have your keys cleaned and tested you can paste them into the text boxes on this tab. API’s tab: This tab is where you enter your Amazon and Walmart API keys. Just select what server the keys are for, paste your clean tested keys into the Public Key and Secret Key text boxes, select the link type and click the Save button. To remove the keys click the Clear button. Note: If you are using both the US and UK servers you will need to enter your keys for both sites. Use the same process you used for your first set of keys and select the other server. Page 34 of 38 Validate tab: This is where you validate AdCrafter when you purchase it. The first time you open the app this tab is displayed for you to enter your validation email and click the Validate button. When the app verifies that your email is in our validation database the email text box will gray out and you will see the Amazon site in the Select Products tab. The small blue question icon is a link to the online help for the validate tab. Help tab: This tab is where you will find links to the AdCrafter About, FAQ, Help, Request Support and Rewards Points Feedback pages. About: About AdCrafter and credits for included code libraries. AdCrafter FAQ: A link to the Frequently Asked Questions on our website. I’ve included the questions and answers to all the ‘standard’ things customers ask when they are starting out with AdCrafter. AdCrafter Help: This is the online version of this manual that is linked to from the small help icons inside the app. Page 35 of 38 So if you’ve got a question while you’re working on the Select Products tab you can click the little blue question mark on that tab and it will take you to the select products section on this help page. Request Support: This is the link to our request support web form. Filling out that form with your validation email, subject and a description of the issue then clicking the submit button will send us a support email. We always reply to support emails with in twenty four hours. IM Workbench Rewards Points Rewards Points Feedback: We’re really excited to offer this new rewards points feedback program. As I was talking with my partner about the AdCrafter development path we came to the realization that the ideas for a big part of our value adding new features and updates came from suggestions from our customers. So, to reward customers that contribute suggestions that in-turn help us create new features and functionality, we’ve setup our IM Workbench Rewards Points program. The program will work like this. If you have an idea that you think would add value to AdCrafter, an idea for any of our other apps or an idea for an add-in that would extend one of our apps you can submit that suggestion using our Rewards Points form accessible from the Rewards Points Feedback link on this tab. Page 36 of 38 Clicking on that link will open the points suggest form and pass it your validation email (so we can credit you with the resulting point(s)), provides a drop down select you can use to indicate what app your suggestion is for and a text box where you can make your suggestion. It will also display the name you used when you purchased the app, the number of rewards points you have credited to you already and your validation email. When you complete this form and click Submit you will be taken to a thank you page and a summary of your suggestion and the number of rewards points you have will be sent to your validation email. Submitting a suggestion will be worth one initial point. Then each week we will manually review all of the suggestions received and evaluate them for possible inclusion in the appropriate app. If we determine that the suggestion will add value and will fit into our development strategy we will manually credit you with up to four additional points. So there is a total of five possible points for each suggestion. These rewards points will be redeemable for some good discounts on premium plug-ins for AdCrafter or one of our other applications. The above rewards rules and details about the discounts are available on the Rewards Points Suggestion form. Page 37 of 38 Resources that compliment AdCrafter Extreme Review: This is Erica’s flagship product and the cornerstone of her Amazon affiliate business model. If you want to learn how to find low competition product niches, how to find low competition long tail keywords without spending loads of time or money, how to find products that are bought online, if you want learn how to research your products so you reviews stand out from the competition then this product is for you. And on top of all that, buying Extreme Review will make you Erica Stone’s customer which means that you’ll experience the best customer service you’ve ever seen. Reviewers Edge: If you have Extreme Review (or not) and have been creating converting reviews for your site you will find some great new ideas of ways to increase your click through rate and conversions in Reviewers Edge. This product is a very popular follow up to ER that gives you a review outline that is custom tailored to your niche and lots more valuable tips and pointers. If writing product reviews is how you make money on the internet then you will want a copy of Reviewers Edge. Flip Your World - Amazon Social Marketing: Have you ever wondered how you could use Face Book to drive traffic to your affiliate offers? If so then consider these quotes from Erica and Flip Your World. Facebook MEMBERS decide what they want to see – not Facebook and (better yet) not Google. On Facebook if you get one person to Like your page you have a doorway to all the connections to that person. Since when do you get that with Google? If you already know Erica’s products then you know this course will be good. If you are new to Erica’s products click the link above and get your copy today. You will not regret it. AdCrafter Mega Templates: Take AdCrafter to a new level with sophisticated templates that add new border colors around your content and buy buttons. Coordinate the colors of your lens or post layouts with the products being shown or the theme of your page. These templates will really make your products stand out. Page 38 of 38