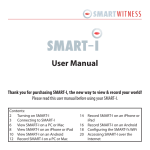
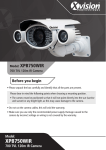
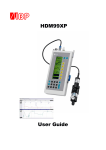
1
HD 960H
Professional HD 960H
30x Zoom Speed Dome
User Manual
Thank you for purchasing the XC960S30 camera from Xvision.
Please ensure that you read and understand this User Guide before operating the camera.
Please store this User Guide in an easily accessible location.
Version 1
XC960S30
Contents
2
1. Product Overview ..................................................................................
4
1.1 Features ........................................................................................
1.2 Package Contents...........................................................................
4
4
2. Installation ............................................................................................
2.1 Conncetions ..................................................................................
5
6
3. Hardware Installation ............................................................................
7
4. Operation Instructions ...........................................................................
8
4.1 Preset Functions ............................................................................
4.2 Keyboard Operation ......................................................................
4.2.1 Preset Location Scan ......................................................
4.2.2 Area Scanning .................................................................
4.2.3 Start Area Scanning ........................................................
4.2.4 Pattern Scanning .............................................................
8
10
10
10
11
11
5. Menu Setting .........................................................................................
5.1 System Information .......................................................................
5.2 Camera Setting 1 ...........................................................................
5.3 Camera Setting 2 ...........................................................................
5.4 Auxiliary Setting .............................................................................
5.5 Scanning Set ..................................................................................
5.6 Title Set .........................................................................................
5.7 Alarm Linkage ................................................................................
5.8 Language Setting ...........................................................................
5.9 Default Setting ...............................................................................
12
6. Specification ..........................................................................................
17
www.xvision.com
12
13
13
14
14
15
16
16
16
XC960S30
Safety Precautions
1. Do not install the equipment in an environment with too much moisture, dust or smoke dust as this
may result in fire or electric shock.
2. In the unlikely event that the equipment should malfunction and emit an abnormal smell or smoke,
please immediately stop it, shut off the power and contact your supplier.
3. Please do not place this equipment near a heat source to avoid risk of fire.
4. Please do not store, install and use this product in danger areas with inflammable or explosive
substances.
5. Please make sure the power is turned off when installing the product.
6. Please ensure that you install the camera in an area with good ventilation.
7. When installing the camera, please make sure that it does not face any objects giving out strong lights
as this will damage the CCD of the camera.
8. Please do not use the camera in an environment where temperatures exceed either -20°C to +55°C.
3
www.xvision.com
XC960S30
ProductOverview
Overview
1.1.Product
Thank you for purchasing the HD 960H XC960S30 from Xvision. Please read through this manual
carefully and make sure you understand before operating the camera.
1.1 Features
•
•
•
•
•
•
•
•
•
Sony 960H CCD Sensor
Xvision X2K DSP
High Speed (Up to 360°) and reliable panning and tilting
Auto Iris Auto Focus 30x Zoom Lens
Viewing Angle between (1 - 60°)
Maximum 256 Presets
50m Number Plate Recognition
Designed for Wall or Ceiling Mount
Weatherproof - IP66 Rated
1.2 Package Contents
The packaged box for the XC960S30 comes with the following items:
4
XC960S30
Camera
Bracket
Installation Pack
User Manual
Power Supply
Including: Screws to
attach camera to
bracket and green
RS485 terminal block
Optional Accessories
Corner Mount
Ceiling Bracket
Pole Mount
Alarm Box
www.xvision.com
Mini Speed
Dome
Keyboard
& Joystick
XC960S30
Installation
1.2.Product
Overview
The XC960S30 camera can be wall mounted, please follow the steps below for installation.
1. Using the bracket as a stencil, mark out the drill
holes needed in the wall.
2. If feeding wires through the wall, you will need
to drill a hole through the wall for the wires to
go. However, if placing through the bracket, you
can just feed through the side or bottom (shown
below).
3. Drill the holes in the wall where you have made
the marks and insert the wall plugs if required.
4. Now, thread the cable from the main camera
back through the bracket.
5
5. Then, re-attach the main camera bracket to the
base. To do this, use a cross head screw driver and
turn the screws clockwise.
6. Lastly, screw the bracket into the wall.
www.xvision.com
XC960S30
2.1. Connections
BNC Socket for Video
DC Socket for Power
RS485 Terminal for Speed
Dome Control
6
www.xvision.com
XC960S30
3.Product
Hardware
Installaton
1.
Overview
3.1 Address Setting
The address of the camera can be set in 2 ways:
1. Address Dial Switch: To do this, adjust the dial switch on the camera to the desired address.
2. Soft Address: To set by soft address, you will need to go to the OSD Menu. For more information, please
go to section 5.6 on page 14.
Please see the table below to see how to set the address on the camera.
7
www.xvision.com
XC960S30
4.Product
Operation
Instruction
1.
Overview
4.1 Preset Functions
Please Note: Not all functions are supported (we recommend using our XSDA-2 for alarm in and out
functions).
8
Preset Location
Function
95+CALL
Entering the main menu
XXX+PRESET
Saving a preset point
XXX+CALL
Calling a preset point
40+CALL
Operating the first group of preset location scanning
41+CALL
Operating the second group or preset location scanning
42+CALL
Operating the third group or preset location scanning
43+CALL
Operating the fourth group or preset location scanning
44+CALL
Set the left boundary of area scanning 1
45+CALL
Set the right boundary of area scanning 1
46+CALL
Set the left boundary of area scanning 2
47+CALL
Set the right boundary of area scanning 2
48+CALL
Set the left boundary of area scanning 3
49+CALL
Set the right boundary of area scanning 3
50+CALL
Set the left boundary of area scanning 4
51+CALL
Set the right boundary of area scanning 4
52+CALL
Operating area scanning 1
53+CALL
Operating area scanning 2
54+CALL
Operating area scanning 3
55+CALL
Operating area scanning 4
56+CALL
Start the setting of pattern scan
57+CALL
Save the setting of the first group of pattern scan
58+CALL
Save the setting of the second group of pattern scan
59+CALL
Save the setting of the third group of pattern scan
60+CALL
Save the setting of the fourth group of pattern scan
61+CALL
Operating the first group of pattern 1
www.xvision.com
XC960S30
62+CALL
Operating the second group of pattern 2
63+CALL
Operating the third group of pattern 3
64+CALL
Operating the fourth group of pattern 4
65+CALL
Starting 360° continuous rotation
67+CALL
Arm Alarm output 1
68+CALL
Arm Alarm output 2
69+CALL
Disarm Alarm output 1
70+CALL
Disarm Alarm output 2
71+CALL
Start alarm output 1
72+CALL
Stop alarm output 2
75+CALL
Start the display status column
76+CALL
Close the display status column
77+CALL
Start vertical flip
78+CALL
Close vertical flip
79+CALL
Start guard function
80+CALL
Close guard function
81+CALL
Start privacy shelter grid
82+CALL
Close privacy shelter grid
83+CALL
Turn on backlight compensation function
84+CALL
Turn off backlight compensation function
85+CALL
Turn on image freezing function
86+CALL
Turn off image freezing function
87+CALL
Start image mirror function
88+CALL
Stop image mirror function
89+CALL
Automatic colour-to-black function
90+CALL
Turn on automatic colour-to-black function
91+CALL
Turn off automatic colour-to-black function
92+CALL
Close the wide dynamic range function
93+CALL
Automatic wide dynamic range function
94+CALL
Manual wide dynamic range function
www.xvision.com
9
XC960S30
97+CALL
Begin image rollover function
98+CALL
Stop image rollover function
101+CALL
Defaulted setting
102+CALL
Switch manual operation speed (Fast/Medium/Slow)
103+CALL
Switch linear scanning speed (Fast/Medium/Slow)
107+CALL, 108+CALL
Calling 107 followed by 108 will restard the dome
109+CALL
Start communication for fault indication
110+CALL
Close communication for fault indication
4.2 Keyboard Operation
4.2.1 Preset Location Scan
There are a total of 4 preset routines and 32 preset locations can be set. To set the preset location;
1. Execute the command of setting a preset location.
10
2. Call the desired set option to the preset location.
3. Then, wait for the length of time you wish that preset point to stay in that position.
4. Call the next routine you want to set a preset location to.
5. Execute the command of setting a preset location and save the set.
4.2.2 Area Scanning
There are 2 ways of setting the area scanning.
1. Using special preset location order
Set the left boundary of region 1 by pressing the ‘44+CALL’ preset.
Set the right boundary of region 1 by pressing the ‘45+CALL’ preset.
www.xvision.com
XC960S30
2. Using the keyboard for setting
Set the left boundary of region 1 by moving the joystick to the left until you have reached the ideal position.
To confirm the position, press the ‘OPEN’ key.
Set the right boundary of region 1 by moving the joystick to the right until you have reached the ideal
position. To confirm the position, press the ‘OPEN’ key.
4.2.3 Start Area Scanning
To being the area scanning function, call the preset location 52-55 which will operate the scanning path 1-4
respectively.
The dome will then rotate from left to right at the speed you have set.
4.2.4 Pattern Scanning
To set the pattern scanning function, follow the steps below;
1. Call the preset location 56 to open the setting.
2. To set your pattern you can use the ‘up’, ‘down’, ‘left’, ‘right’, ‘wide’, ‘tele’, ‘near’, ‘far’, ‘close’ and ‘open’
buttons. These will set the dome to go up, down, zoom etc in the pattern.
3. To save the pattern, call the preset location 57. This can be done up to 4 patterns by calling presets
57-60.
4. To operate the pattern scan, call the preset location 61-64, which will operate 1-4 respectively.
www.xvision.com
11
XC960S30
Menu Setting
1.5.Product
Overview
To access the camera menu, when the camera is on, use the command ‘CALL 95 preset location’. When the
menu has appeared, you will be presented with the following options:
•
•
•
•
•
•
•
•
System Information
Camera Settings
Aux Settings
Scan Settings
Title Settings
Alarm Settings - Not supported (we recommend usgin our XSDA-2 for alarm in and out functions)
Language Settings
Default Set
After the main menu has appeared, you can use the ‘up’/’down’ buttons on the speed dome controller or
the ‘up’/‘down’ key on the DVR to navigate on the menu.
5.1 System Information
Option: Ver / ADDR / BPS / PROT
This option allows you to view the system information from version number, speed dome address,
baudrate and protocol.
Version No.: Version number of the camera
12
Address: Set the dome address using the dial switch
Baudrate: Speed dome automatically sets the baudrate
Protocol: Speed dome automatically sets the protocol
Exit: Save / End and return to the previous menu.
www.xvision.com
VER:
ADDR:
BPS:
PROT:
EXIT
V1.02S
000
AUTO
AUTO
XC960S30
5.2 Camera Setting 1
Option: ZM SPEED / WB / EXPOSURE / B LIGHT / FREEZE
The camera setting option allows you to adjust; zoom speed, white balance, exposure, backlight
compensation or turn on the image freezing function.
Zoom Speed: Set the speed to fast, medium or slow
White Balance: Set the white balance function to automatic
indoor, outdoor or manual
White Balance R Gain: If white balance is set to manual, adjust
the Red Gain from 0-255.
White Balance B Gain: If white balance is set to manual, adjust
the Blue Gain from 0-255.
Exposure: Adjust the lens exposure on the camera (0-14), with
14 being highest exposure.
Backlight Compensation: Turn the function on or off
CAM TYPE:
ZM SPEED:
WB MODE:
WB RGAIN:
WB BGAIN:
EXPOSURE:
B LIGHT:
FREEZE:
XF-S
FAST
AUTO
000
000
07
OFF
OFF
NEXT
EXIT
SAVE
Image Freezing: Turn the function on or off
Next: Go to the next camera setting submenu.
Exit: End and return to the previous menu.
Save: Save the settings and exit the submenu
13
5.3 Camera Setting 2
The camera setting option allows you to adjust; wide dynamic mode, wide dynamic level, mirror image
function, day & night setting, image effect, image flip, OSD display and minimum focus.
Wide Dynamic Mode: Set to automatic, manual or off
Wide Dynamic Level: Set the WDR level (0-128).
Image Mirror: Turn the mirror function on or off.
Day & Night Setting: Turn the day night setting to on, off or
automatic
Image Effect: Turn the image effect to inverse colour,
black & white or off.
WDR MODE:
WDR LEV:
MIRROR:
DAY NIGHT:
EFFECT:
IMG FLIP:
OSD DISP:
OFF
080
OFF
AUTO
OFF
0FF
OFF
MIN FCS:
100CM
NEXT
EXIT
SAVE
Image Flip: Turn the function on or off
OSD Display: Turn the function on or off
www.xvision.com
XC960S30
5.3 Camera Setting 2 CONTINUED
Minimum Focus: Adjust the minimum focus from 1cm, 10cm 30cm and 100cm.
Last Page: Go to the previouscamera setting submenu.
Exit: End and return to the previous menu.
Save: Save the settings and exit the submenu
5.4 Auxiliary Setting
Option: AUTO SPEED / MAN SPEED / AUTO FLIP / START BAR
ZOOM REV / SOFT ADD / SOFT ID / FREE TIME / FREE ACT / POWER
The auxiliary setting allows you to adjust the speed of the pan, tilt & zoom on the camera, auto flip
function, soft address switch, soft ID and the free time.
Auto Speed: Set the automatic speed of the pan, tilt and zoom
to fast, medium and slow.
Manual Speed: Set the manual speed of the pan, tilt and zoom
to fast, medium and slow.
Auto Flip: Turn the auto image flip function on or off.
Start Bar: Turn the start bar function on or off.
14
Zoom Rev: Turn the zoom reverse function on or off.
Soft Address Switch: Turn the address switch on or off.
Soft ID: Set the soft ID on the camera. (001-255)
Free Time: Set the time ....... (0-999)
AUTO SPEED:
MANU SPEED:
AUTO FLIP:
STAT BAR:
ZOOM REV:
SOFT ID SWITCH:
SOFT ID:
FREE TIME:
FREE ACT:
POWER ACT:
MID
FAST
ON
OFF
OFF
OFF
001
015
NONE
NONE
EXIT
SAVE
Free Act: Set the time act ....... to none, preset scan, pattern scan or preset ect.
Power Action: Set the camera to perform an action when it is powered. Set to none, perform preset scan,
pattern scan or preset ect.
Exit: End and return to the previous menu.
Save: Save the settings and exit the submenu
5.5 Scanning Set
Option: SET AREA SCAN / RUN AREA SCAN / RUN PRESET SCAN
/ SET PATTERN SCAN / RUN PATTERN SCAN
The scanning set option allows you to adjust and run the area, preset and pattern scan options.
Setting the area scanning: Set the area scanning (1-4)
Run the area scanning: Run the area scan (1-4)
www.xvision.com
XC960S30
5.5 Scanning Set CONTINUED...
Set the preset scan: Set the preset scanning areas.
Run the preset scan: Run the preset scan (1-4)
Set pattern scan: Set the mode scanning (1-4)
Run pattern scan: Run the mode scan (1-4)
Exit: End and return to the previous menu.
SET AREA SCAN:
1
RUN AREA SCAN:
1
ENTER PRESET SCAN SET
RUN PRESET SCAN: 1
SET PATTERN SCAN: 1
RUN PATTERN SCAN: 1
EXIT
PRESS OPEN TO SET OR RUN
SCAN NO.: 1
SEQ
PRESET
1
001
2
002
3
003
4
004
5
005
6
006
7
007
TIME
015
015
015
015
015
015
015
5.6 Title Set
Option: Area No. / Title X / Title Y / Title
This option allows you to set the title of the camera and position the camera title on screen.
Area No.: Set the area number (1-4)
Title: Set the camera title. To do this, use the joystick on the
speed dome controller or arrow keys on your DVR to navigate.
To exit, either press the ‘up’ key or move the joystick up.
AREA NO:
TITLE X:
TITLE Y:
TITLE:
MODE:
DELETE
Mode: Input method mode, (Capitals, lower case letter,
charachers, symbols or numbers)
EXIT
SAVE
X coordinates: X position of the title on the screen (0-29)
Y coordinates: Y position of the title on the screen (0-14)
Soft Key: Use this to input characters.
Delete: Delete characters in the title
Exit: End and return to the previous menu.
Save: Save the settings and exit the submenu
www.xvision.com
1
00
00
CAMERA 1
A, B......Z
15
XC960S30
5.7 Alarm Linkage - Not supported (we recommend usgin our XSDA-2 for alarm in and out functions)
Option: Alarm Input / Input Type / Arming Time /
Preset Scan / Pattern Scan / Zone Scan / Alarm Output
The alarm linkage option allows you to set an adjust the alarms on the scannning modes.
Alarm Input: Set up to 2 alarm input numbers
Input Type: NO/NC
Arming Time: Set the arming time (Hours:Minutes)
Preset Scanning: Set alarm linkages on the preset location scans.
(0-4). To do this, select ‘1’ to set an alarm for preset scan 1.
For no alarm, select ‘0’.
Pattern Scanning: Set alarm linkages on the pattern location
scans (0-4). To do this, select ‘1’ to set an alarm for pattern
scan 1. For no alarm, select ‘0’.
ALARM IN:
IN TYPE:
ARM STA:
PRESET NO:
PST SCAN:
PATT SCAN:
ZONE SCAN:
ALARM OUT:
1
NO
DISARMING
00
00
00
00
OFF
EXIT
SAVE
Zone Scanning: Set alarm linkages on the zone location scans
(0-4). To do this, select ‘1’ to set an alarm for zone scan 1. For no alarm, select ‘0’.
16
Alarm Output: Turn the alarm output on or off.
Exit: End and return to the previous menu.
Save: Save the settings and exit the submenu
5.8 Language Setting Option: Language set
Open the language settings to change the language displayed on the OSD menu.
Language: Change the language from Chinese or English
Exit: End and return to the previous menu.
Save: Save the settings and exit the submenu
LANGUAGE:
ENGLISH
EXIT
SAVE
5.9 Default Setting
Option: Default Set
Adjust the camera settings back to the factory default.
Cancel: Cancel and exit the submenu
OK: Set the camera back to factory default settings
Clear all presets: Clear all presets set on the camera
www.xvision.com
CANCEL
OK
CLEAR ALL PRESETS
XC960S30
Specifications
1.6.Product
Overview
Model
XC960S30
Picture Standard
PAL
Horizontal Rotation
360°
Resolution
960H
Minimum Illumination
0.01 Lux
Night Vision
N/A
Lens Type
30x Optical Varifocal Lens
Lens Size
3.9-105.3mm (2-64°)
Preset Locations
255
Horizontal Rotation / Speed
360° / 0.1 - 160° per second
Vertical Rotation / Speed
Baud Rate
Protocol
0 - 90° / 0.1 - 120° per second
2400 / 4800 / 9600 / 19200 bps
Pelco-D, Pelco-P
DC 24V 2000mA
(In the next version, this camera will be 12V 5000mA)
-35°C ~ 60°C
210x350x210
4.0
IP66
Power Supply
Operation Temperature
Dimensions in mm (WxHxD)
Weight (Kg)
Weatherproof
17
For more information, please contact our technical team. Contact details are on the back page.
www.xvision.com
XC960S30
1.Notes
Product Overview
18
www.xvision.com
XC960S30
19
www.xvision.com
Manufactured exclusively for:
HD 960H
www.xvision.com
TECHNICAL SUPPORT
For technical support, please contact your local distributor.
Alternatively, call 0871 222 1430.
LIMITED WARRANTY
This product is supplied with a 12 month warranty. The warranty excludes products
that have been misused (including accidental damage) and damage caused by
normal wear and tear. In the unlikely event that you encounter a problem with this
product, it should be returned to the place of purchase.
Xvision UK, Unit 2 Valley Point, Beddington Farm Road, Croydon, Surrey CR0 4WP
www.xvision.com