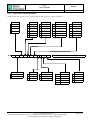
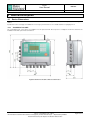
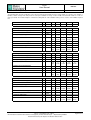
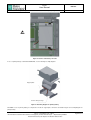
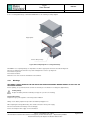
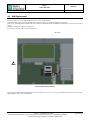
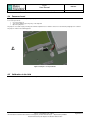
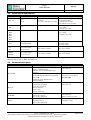
1
FIO 2.0 SMART units for pressure regulators User Manual Edition 0.5 Date 20/06/2014 FIO2 User Manual ENGLISH Electronics and Integrated Systems Division – San Pietro Mosezzo (NO) - Italy ENGLISH Edition Revision Date 0 5 20/06/2014 Index 1 References ...................................................................................................................................................... 4 2 Introduction .................................................................................................................................................... 5 2.1 Contacts 5 2.2 Symbols 5 2.2.1 Symbols contained in this manual 5 2.2.2 Symbols applied on the device 5 Identification of the product 6 2.3 2.3.1 Marking 6 2.3.2 Order codes of finished product 7 2.4 3 Installation provisions in the hazardous area 9 3.1.1 Electrostatic discharges 9 3.1.2 Batteries 9 3.2 Connecting to other devices 10 3.3 IS Parameters 11 3.4 Power supply 12 3.4.1 Power Supply Information 14 General Description ..................................................................................................................................... 15 4.1 Device Dimensions 15 4.1.1 Installation in a cabin 15 4.1.2 Outdoor installation 16 4.2 5 8 Safety instructions ......................................................................................................................................... 9 3.1 4 Packaging content Main components of the device 17 Installation .................................................................................................................................................... 19 5.1 Indoor installation 19 5.1.1 Wall mounting 19 5.1.2 Pipe/pole mounting 20 Outdoor installation 21 5.2 5.2.1 Mounting in auxiliary cabinet 21 5.2.2 Wall mounting 24 5.2.3 Pole mounting 25 5.3 Access to the wiring compartment 26 5.4 Process connections 27 5.4.1 Removing the cover of the wiring compartment 27 5.4.2 Diagram of connections 28 5.4.3 Cables 28 5.4.4 Connections to the RTU / SOLAR devices 29 5.4.5 Operation related to the wiring terminals 30 5.4.6 Wiring of auxiliary sensors 30 FIO 2.0 - User Manual – Ed .0 Rev 5 The information contained in this document is the property of Pietro Fiorentini S.p.A. – Reproduction prohibited The technical data may be subject to modification without notice Page 1 of 74 FIO2 User Manual ENGLISH Electronics and Integrated Systems Division – San Pietro Mosezzo (NO) - Italy 5.4.7 5.5 6 Connecting the power supply 31 Connecting the batteries 31 5.5.2 Connection to an external power source 32 5.6 Characterization of the valves 33 5.7 External antenna connection 33 Main Functions ............................................................................................................................................. 34 6.1 Acquisition of measurements, counting pulses and digital inputs 34 6.2 Calculating volumes and flow rates 34 6.2.1 Lines 1 and 2 34 6.2.2 Station 37 Regulation 37 6.3.1 Emergency button 37 6.3.2 End user management – EUM – Loads disconnection 37 6.3.3 Flow rate limitation: 38 6.3.4 Backpressure 38 6.3.5 Remote/PAS/Compensation 38 6.3.6 TPM 38 6.4 Repetition on the digital output 39 6.5 Alarms, events and diagnostics 39 6.6 Historical storage (log) 40 6.7 Communication 43 Using the device........................................................................................................................................... 44 7.1 Operator interface 44 7.1.1 General structure of the information on the display 44 7.1.2 Field types 45 7.1.3 Interaction via the keyboard 45 7.1.4 Authentication 46 7.1.5 Main list 47 7.1.6 Line 1 49 7.1.7 Line 2 51 7.1.8 Station 51 7.1.9 Device 53 7.1.10 Emergency status 56 7.1.11 Meaning of the icons 57 7.2 8 30 5.5.1 6.3 7 Wiring of the other conductors Communication 61 7.2.1 Bluetooth 61 7.2.2 RS485 ports 61 7.2.3 GSM Communication 61 7.2.4 GPRS communication 61 7.2.5 SMS Management 61 7.2.6 E-mail management 61 7.2.7 Outgoing call management 61 7.2.8 Managing Incoming Calls 61 7.2.9 Alarm signaling and related management 61 7.2.10 Communication protection 62 7.2.11 MODBUS protocol 62 Maintenance ................................................................................................................................................. 63 8.1 Replacement /Installation of the sensors FIO 2.0 - User Manual – Ed .0 Rev 5 The information contained in this document is the property of Pietro Fiorentini S.p.A. – Reproduction prohibited The technical data may be subject to modification without notice 63 Page 2 of 74 FIO2 User Manual ENGLISH Electronics and Integrated Systems Division – San Pietro Mosezzo (NO) - Italy 8.2 8.2.1 9 Replacing the batteries 65 Warnings 67 8.3 SIM Replacement 68 8.4 Password reset 69 8.5 Calibration in the field 69 Technical characteristics ............................................................................................................................ 70 9.1 General 70 9.2 Power supply 70 9.3 Autonomy 71 9.3.1 Reference conditions 71 9.4 Analog Inputs 72 9.5 Digital Inputs and Outputs 73 9.6 Communication ports 73 9.7 Compliance with FCC and IC regulations 74 9.7.1 Information 74 9.7.2 Information concerning the use of the devices 74 FIO 2.0 - User Manual – Ed .0 Rev 5 The information contained in this document is the property of Pietro Fiorentini S.p.A. – Reproduction prohibited The technical data may be subject to modification without notice Page 3 of 74 FIO2 User Manual ENGLISH Electronics and Integrated Systems Division – San Pietro Mosezzo (NO) - Italy 1 References REF. # Document 1 FIO 2.0 – Modbus protocol 2 FIO 2.0 – SMS protocol FIO 2.0 - User Manual – Ed .0 Rev 5 The information contained in this document is the property of Pietro Fiorentini S.p.A. – Reproduction prohibited The technical data may be subject to modification without notice Page 4 of 74 FIO2 User Manual ENGLISH Electronics and Integrated Systems Division – San Pietro Mosezzo (NO) - Italy 2 Introduction FIO 2.0 is a device dedicated to gas metering and regulation in installations of a natural gas distribution network. The system consists of an electronic unit that integrates the metering, volume and flow rate calculation and valve control functions, suitable for installation in a hazardous area. The electronic unit can be fed by a primary lithium battery or, alternatively, by an external source supported by a rechargeable lithium ion battery. In the latter case, the internal battery is recharged via an external power supply provided by units installed in a safe area (associated equipment) which, in turn, are powered by the mains (FIO RTU) or by solar energy (FIO Solar). The equipment FIO RTU and FIO Solar, which can be installed as an alternative to one another, can optionally support serial communication and repetition of the digital output signal in a safe area. The product has a built-in 2G modem (GSM / GPRS) to allow the remote reading and remote control without using additional equipment. FIO 2.0 integrated up to 5 main functions in a single device: - Flow rate measurement (IFM), performed in "indirect" non-intrusive mode, i.e. detecting other parameters such as upstream and downstream pressure values and the opening of the related pressure regulator. - Output pressure modulation (OPC) of the regulator i.e. control of the setpoint of the output pressure remotely or locally according to a daily/weekly program or according to the gas flow rate. - Flow rate limitation (FL), if there is any IFM or direct measurement in HF or BF from the meter. - Remote control (RM) of parameters meaningful for the functionality and safety of the assembly: Inlet and outlet pressure, temperature, flow rate and up to 8 digital alarms (e.g. safety valve, filter clogging, monitor/block tripping, intrusion or presence of gas in the atmosphere, flooding, ...) - Remote disconnection (EUM) of interruptible users, in emergency situations or in case of payment delay The device can handle two independent metering lines, with indirect flow rate or through metering inputs: 1HF/BF + 1BF This document provides information regarding the installation and use of the device. 2.1 Contacts The product is manufactured by the Electronics and Integrated Systems Division Support and sales contacts Via Pasteur 1/3 – 28060 San Pietro di Mosezzo (NO) Italy Tel.: 0321/538111 – Fax: 0321/538150 www.fiorentini.com 2.2 2.2.1 Symbols Symbols contained in this manual Pay attention to the instructions given Use precautionary measures against electrostatic discharges 2.2.2 Symbols applied on the device Point of connection to Protection Ground. FIO 2.0 - User Manual – Ed .0 Rev 5 The information contained in this document is the property of Pietro Fiorentini S.p.A. – Reproduction prohibited The technical data may be subject to modification without notice Page 5 of 74 FIO2 User Manual ENGLISH Electronics and Integrated Systems Division – San Pietro Mosezzo (NO) - Italy 2.3 Identification of the product 2.3.1 Marking On the left side of the device, there is a label that shows the signs to identify the individual device, the certifications and main parameters. • • • • • • Logo and address of the manufacturer Model Name Part Number Serial number CI Certifications Name of the device Product code Numeric code that univocally identifies each individual device product configuration Format of the Serial Number YYAMnnnn YY two digits for year of construction AM device type nnnn sequential number digits CI Format CI (Construction Identification) This field provides information on the configuration of the product. It consists of some characters with the following meaning: • • • • Power supply type R External Power + Rechargeable Battery P Primary battery GSM Module G GSM module installed 0 GSM module not installed 868MHz RF communication module R RF module installed 0 RF module not installed Pressure sensors installed ABCD each character indicates the pressure range for the sensors in the following order A=PU1, B=PD, C=PAux2( PTank1 ), D=PAux1( PU2; PTank2 ) 0 indicates that the sensor is not installed Range Letter 0.1Bar V 3.5Bar G 10Bar M 24Bar R 100Bar Z Example Serial No 13AM0010 Year of construction: 2013, Product Family: AM, serial number: 0010 CI P0MZ00 Type of power supply: Primary battery RF Module: not installed Pressure sensors installed: PU1 (range 10B) and PD (range 100B) FIO 2.0 - User Manual – Ed .0 Rev 5 The information contained in this document is the property of Pietro Fiorentini S.p.A. – Reproduction prohibited The technical data may be subject to modification without notice Page 6 of 74 FIO2 User Manual ENGLISH Electronics and Integrated Systems Division – San Pietro Mosezzo (NO) - Italy 2.3.2 Order codes of finished product The table below shows the order codes of the finished product with reference to possible configurations: Pu S e ns o rs N o . Pd A ux1 A ux2 2 2 (STD) 1 0-0.1bar(g) 1 0-0.1bar(g) X NOT P RESENT X NOT P RESENT 3 2+1A UX 2 0.1-2.5 bar(g) 2 0.1-2.5 bar(g) 1 0-0.1bar(g) 1 0-0.1bar(g) 4 2+2A UX 3 0.5-9 bar(g) 3 0.5-9 bar(g) 2 0.1-2.5 bar(g) 2 0.1-2.5 bar(g) 4 4-23 bar(g) 4 4-23 bar(g) 3 0.5-9 bar(g) 3 0.5-9 bar(g) 5 9-99 bar(g) 5 9-99 bar(g) 4 4-23 bar(g) 4 4-23 bar(g) 5 9-99 bar(g) 5 9-99 bar(g) E D 3 F 4 4 3 F a m ily F FIO 2.0 3 3 R 2 B a t t e ry S STA NDA RD RRECHA RGEA B LE X X 0 M o de m 0 NO M ODEM 2 2G (gprs) R a dio m o dule X NO RA DIO 1 169 M Hz 8 868 M Hz 9 915 M Hz FIO 2.0 - User Manual – Ed .0 Rev 5 The information contained in this document is the property of Pietro Fiorentini S.p.A. – Reproduction prohibited The technical data may be subject to modification without notice O t he r X Reserved Page 7 of 74 FIO2 User Manual ENGLISH Electronics and Integrated Systems Division – San Pietro Mosezzo (NO) - Italy 2.4 Packaging content The package contains the following parts FIO 2.0 device • FIO 2.0 device including o Cable and Pu1 and Pd Pressure Sensors already wired o Cable and Temperature Probe already wired o Cable and PAux1 and PAux2 Pressure Sensors already wired (if forecast upon order) o Battery pack o External dual band antenna o Twelve plugs for cable glands (in the version with all sensors) The battery pack is within the operation seat and not electrically connected The plugs of the cable glands are already installed in the lower glands Manuals and Communication Software • Quick Guide to Installation and Safety Instructions • Local/remote software configuration of the device (Windows OS) The complete manuals and standard communication software are available for free download (after registration) from the website www.fiorentini.com Certificates • Certificate of CE Conformity FIO 2.0 - User Manual – Ed .0 Rev 5 The information contained in this document is the property of Pietro Fiorentini S.p.A. – Reproduction prohibited The technical data may be subject to modification without notice Page 8 of 74 FIO2 User Manual ENGLISH Electronics and Integrated Systems Division – San Pietro Mosezzo (NO) - Italy 3 Safety instructions 3.1 Installation provisions in the hazardous area FIO 2.0 must be installed and maintained according to the following reference standards: EN 60079-14: Electrical installation in hazardous area EN 60079-17: Inspection and maintenance of electrical installations in hazardous area Pay particular attention to: • environmental conditions, suitable for the installation of the devices mentioned above • corresponding parameters (type, manufacturer, electrochemical system, rated voltage and the rated capacity of the battery) that allow a proper and safe battery replacement. 3.1.1 Electrostatic discharges This device is approved for installation in a potentially explosive area. In this area, sparks produced from electrostatic discharges could generate explosions. Although during normal operation there is no presence of dangerous potentials on the device, the use of dissipative footwear and of a damp cloth (ρ% > 65%) is recommended during the installation/maintenance. Further information can be found in CEI 50404. Pay utmost care also when accessing the internal parts (terminals, buttons), also in a non-hazardous area, because the device contains sensitive devices and may be damaged. During the installation or use of this instrument, it is compulsory to take steps to assure protection against electrostatic discharges. 3.1.2 Batteries This device is powered by a lithium battery. Two models with different features and shape are supported. The battery is assembled with protective devices for the cable and terminals, and this assembly is called Battery Pack. Terminals are different for the two batteries on the device there are the corresponding connectors. Precautions for use Do not open the battery Do not expose to flame Do not short-circuit Do not immerse in any liquid Do not let drop Dispose of in special containers after use Replacement The batteries CANNOT be installed or replaced in the danger zone If you need to replace them in the installation area, before replacing them, make sure that the gas concentration is below the ignition limit by using special instruments (explosimeter) FIO 2.0 - User Manual – Ed .0 Rev 5 The information contained in this document is the property of Pietro Fiorentini S.p.A. – Reproduction prohibited The technical data may be subject to modification without notice Page 9 of 74 FIO2 User Manual ENGLISH Electronics and Integrated Systems Division – San Pietro Mosezzo (NO) - Italy 3.2 Connecting to other devices FIO 2.0 can be connected to other communication and power supply devices according to the following block diagram. Figure 1 Block Diagram The associated devices, FIO RTU and Fio Solar, connected to FIO2, must be LOCATED IN A SAFE AREA and be approved as associated devices and, within this framework, they shall be compatible with the SAFETY PARAMETERS (IS) given under section 3.3 FIO 2.0 - User Manual – Ed .0 Rev 5 The information contained in this document is the property of Pietro Fiorentini S.p.A. – Reproduction prohibited The technical data may be subject to modification without notice Page 10 of 74 FIO2 User Manual ENGLISH Electronics and Integrated Systems Division – San Pietro Mosezzo (NO) - Italy While performing this assessment, it is necessary to consider also the connection cable. In particular, the following shall be verified Associated device parameter CONDITION FIO2 parameter Uo ≤ Ui Io ≤ Ii Po ≤ Pi Co ≥ Ci + Ccable Lo ≥ Li + Lcable This condition must be observed even in the opposite direction, where applicable Uo / Io / Po Maximum Voltage / Current / Power supply deliverable at output from the Associated Device Ui / Ii / Pi Maximum Voltage / Current / Power applicable at input to FIO2 Ci / Li Maximum Capacitance / Inductance present at the input terminals of FIO2 Co / Lo Maximum Capacitance / Inductance applicable at the terminals of the Associated Device Ccable, Lcable Maximum Capacitance / Inductance featured by the specific cable (also considering its length) 3.3 IS Parameters The following table shows the electrical parameters related to intrinsic safety. Parameter Uo (V) Io (mA) Po (mW) Co (uF) Lo (mH) Ui (V) Ii (mA) Pi (mW) Ci (uF) Li (mH) External Power Supply Input - - - - - 16 170 2720 0 0 Digital output (Namur) 7.14 5.01 8.94 14.5 1000 15 15 56 0 0 Digital Power Outputs 4.94 845 1043 1000 0.09 -- - - 0 0 Digital Inputs BF counter inputs 7.14 1.34 2.39 14.5 1000 15 110 413 0 0 HF Counter 8.61 15.5 33.4 6.2 500 15 110 413 0 0 Serial Ports (RS485) 5.36 28.2 37.8 1000 85 6.5 65 105.6 0 0 The label of Figure 2 shows the identification data of the individual device, the data relating to IS parameters and their symbols; moreover, it shows the symbols and number of the metric certificate. Figure 2 FIO 2.0 device rating plate FIO 2.0 - User Manual – Ed .0 Rev 5 The information contained in this document is the property of Pietro Fiorentini S.p.A. – Reproduction prohibited The technical data may be subject to modification without notice Page 11 of 74 FIO2 User Manual ENGLISH Electronics and Integrated Systems Division – San Pietro Mosezzo (NO) - Italy Description of the symbols related to intrinsic safety XX Number of the certificate of conformity according to ATEX and IECEx 0722 CE logo (conforming device) Code identifying the notification body (IMQ) II Logo Ex (conforming device) Group II (surface) 2G Device category 2G Ex ib Type of protection IIB gas group T3 temperature class Tamb: -20°C ~ +60°C ambient temperature range within which IS conformity is guaranteed Zones Categories pursuant to the Directive 94/9/EC Gas, mist or vapor Zone 0 1G Gas, mist or vapor Zone 1 2G Gas, mist or vapor Zone 2 3G Table of Categories / Zone correspondence Pietro Fiorentini S.p.A. denies all liabilities resulting from the risks and consequences caused by the non-compliance with these provisions. 3.4 Power supply FIO 2.0 supports two types of power supply • BP Non-Rechargeable battery (Primary) • BR Rechargeable battery + Remote power supply This device is not equipped with any power switch or backup battery To turn it on, simply connect the supplied battery The device is shut off, if the battery is disconnected and the remote power supply for the rechargeable battery is disconnected, too. To replace the battery, there is a planned shutdown procedure that saves the data and puts the device in inactivity status. The two power supplies are mutually exclusive: only one type of power supply can be used at a time The following table shows the effects of incorrect connections Combination Status Signals BP + BR Device OFF BP + Remote power Device ON fed by Primary battery BP + BR + Remote power Device OFF Remote Power icon blinking The connectors for the two batteries are polarized as distinct and incompatible; therefore, it is not possible to install a battery in the connector of the other or reverse the polarity The remote power supply only recharges the rechargeable battery and assures the stand-by status of the device. Therefore, it is not possible to use only the remote power supply. As a matter of fact, batteries are a proprietary assembly consisting of a lithium battery, protection devices and a cable ending with an appropriate connector, encased in a protective sheath and called “LITHIUM (ION) BATTERY PACK” . On the sheath, some information and the identification code are printed • Primary battery AS0670T03M01R00 Hybrid • Rechargeable Battery AS0670T02M01R00 Lithium Ion FIO 2.0 - User Manual – Ed .0 Rev 5 The information contained in this document is the property of Pietro Fiorentini S.p.A. – Reproduction prohibited The technical data may be subject to modification without notice Page 12 of 74 FIO2 User Manual ENGLISH Electronics and Integrated Systems Division – San Pietro Mosezzo (NO) - Italy The batteries use different technologies and have different size and shape. The Remote power supply must come from a certificated associated device. The following devices are approved • FIO RTU 115-230V AS0670T02M01R00 • FIO RTU 24V AS0670T02M02R00 • FIO SOLAR AS0670T03M01R00 Battery packs and remote power supply devices are certified for use exclusively with FIO 2.0 and are the only allowed power supply devices. Caution! Use only batteries of the type and model complying with the original On the sheath of the battery pack the following data are given: • • Manufacturer Type of battery • Model • Date of maximum use (month/year) • Symbol for proper disposal The following figures refer to the two models of battery packs available for FIO 2.0 and to the data available on the PVC coating with respect to the order codes and warnings in case of replacement. Figure Primary battery data Manufacturer's data Figure 3 Primary battery Figure 4 Rechargeable battery data Manufacturer's data Figure 5 Rechargeable battery FIO 2.0 - User Manual – Ed .0 Rev 5 The information contained in this document is the property of Pietro Fiorentini S.p.A. – Reproduction prohibited The technical data may be subject to modification without notice Page 13 of 74 FIO2 User Manual ENGLISH Electronics and Integrated Systems Division – San Pietro Mosezzo (NO) - Italy Date of maximum use Primary battery The date of maximum use is the maximum installation date by which 80% of the initial charge is guaranteed Rechargeable battery The battery is supplied partially charged (between 15% and 50% of the rated charge). The battery has to be installed in the device by the limit date stated on the label, otherwise a remarkable loss of performance may be noticed or it may even be impossible to recharge the battery. Perform a full charge (via the remote power supply) before starting the device. The maximum use dates refer to the pack stored in a dry environment at a temperature not exceeding +20 °C. Storage at high temperatures may reduce even significantly the remaining charge. The rechargeable battery has to be replaced every 5 years. 3.4.1 Power Supply Information The device provides some pieces of information on the power supply status by means of display indications and alarms. Primary battery Low battery indication (<10% initial charge) Rechargeable Battery Indication of charge level (by levels, empty battery symbol contour corresponds to 10%) Remote power supply Indication of the presence or absence of the remote power supply (only when the rechargeable battery is installed) Rechargeable Battery Error Faulty battery to be replaced See chapter 6 for further details FIO 2.0 - User Manual – Ed .0 Rev 5 The information contained in this document is the property of Pietro Fiorentini S.p.A. – Reproduction prohibited The technical data may be subject to modification without notice Page 14 of 74 FIO2 User Manual ENGLISH Electronics and Integrated Systems Division – San Pietro Mosezzo (NO) - Italy 4 General Description 4.1 Device Dimensions Here below there are the overall dimensions of the device with reference to the types of installation in rooms protected from sunlight, and outdoor. In particular, for the second type of installation it is necessary to provide for the use of a suitable cabinet. See paragraph 4.1.2 4.1.1 Installation in a cabin The overall dimensions of the device for installation in rooms protected from direct exposure to sunlight are shown here below for the installation mode with open and closed front door. Figure 6 Overview of the device with closed front door FIO 2.0 - User Manual – Ed .0 Rev 5 The information contained in this document is the property of Pietro Fiorentini S.p.A. – Reproduction prohibited The technical data may be subject to modification without notice Page 15 of 74 FIO2 User Manual ENGLISH Electronics and Integrated Systems Division – San Pietro Mosezzo (NO) - Italy Figure 7 Overview of the device with open front door 4.1.2 Outdoor installation For outdoor installations, the use of a cabinet or an adequate protection is recommended. The figure below illustrates the overall dimensions of a possible solution. Figure 8 Overall dimensions with cabinet for outdoor installation The solution described in Figure 9 provides for the use of the cabinet equipped with slot in the bottom for the passage of cables. FIO 2.0 - User Manual – Ed .0 Rev 5 The information contained in this document is the property of Pietro Fiorentini S.p.A. – Reproduction prohibited The technical data may be subject to modification without notice Page 16 of 74 FIO2 User Manual ENGLISH Electronics and Integrated Systems Division – San Pietro Mosezzo (NO) - Italy 4.2 Main components of the device The detail views of the device and of the main components making it up are given here below. Front door RNameplate Ground connection Input/output Figure 9 Detail view A Front button door opening Pressure and temperature sensors input Figure 10 Detail view B FIO 2.0 - User Manual – Ed .0 Rev 5 The information contained in this document is the property of Pietro Fiorentini S.p.A. – Reproduction prohibited The technical data may be subject to modification without notice Page 17 of 74 FIO2 User Manual ENGLISH Electronics and Integrated Systems Division – San Pietro Mosezzo (NO) - Italy Brackets for wall mounting GSM antenna Figure 11 Detail view C The button that opens the transparent front door (see Figure 5) provides access to the keyboard and the wiring compartment, as described in the following picture. LCD Display Membrane keyboard Wiring compartment Figure 12 View with open door FIO 2.0 - User Manual – Ed .0 Rev 5 The information contained in this document is the property of Pietro Fiorentini S.p.A. – Reproduction prohibited The technical data may be subject to modification without notice Page 18 of 74 FIO2 User Manual ENGLISH Electronics and Integrated Systems Division – San Pietro Mosezzo (NO) - Italy 5 Installation 5.1 5.1.1 Indoor installation Wall mounting The device comes with a wall-mounting installation arrangement. Here below there is the distance between holes to be drilled for fastening. The diameter of the holes is 5 mm. Figure 13 Hole size for wall mounting FIO 2.0 - User Manual – Ed .0 Rev 5 The information contained in this document is the property of Pietro Fiorentini S.p.A. – Reproduction prohibited The technical data may be subject to modification without notice Page 19 of 74 FIO2 User Manual ENGLISH Electronics and Integrated Systems Division – San Pietro Mosezzo (NO) - Italy 5.1.2 Pipe/pole mounting It is possible to mount the device on a pipe or pole using a special adapter plate (not included in the supply). The plate has to be fastened to the back of the device using the 4 self-tapping screws 3.5 x 9.5 mm ISO 7049. The plate is suitable for pipes oriented both vertically and horizontally. To mount the plate proceed as described below: 5.1.2.1 Removing the accessories for wall mounting If necessary, unscrew the 4 screws shown in the following figure and remove the accessories for wall mounting pre-assembled on the device. Holes for fastening the adapter plate for pole/pipe mounting Wall brackets fastening screws Figure 14 Removing accessories for wall mounting 5.1.2.2 Mounting adapter plate for pipe/pole installation Using the holes visible in Figure 9 fasten the adapter plate (not included in the supply) using 4 self-tapping screws 3.5 x 9.5 mm ISO 7049. Fasten it to a pipe with the straps, using the holes visible in the figure below. Adapter plate for pole/pipe mounting Fastening screws adapter plate Mounting holes straps Figure 15 Fastening of the adapter plate for pole/pipe mounting FIO 2.0 - User Manual – Ed .0 Rev 5 The information contained in this document is the property of Pietro Fiorentini S.p.A. – Reproduction prohibited The technical data may be subject to modification without notice Page 20 of 74 FIO2 User Manual ENGLISH Electronics and Integrated Systems Division – San Pietro Mosezzo (NO) - Italy 5.2 Outdoor installation For installations where exposure to direct sunlight is expected, the use of an auxiliary cabinet made of polycarbonate or equivalent material is forecast. Herein the solution with cabinet model UL CAB PC 504020 T3B of the manufacturer's Fibox is shown. The cabinet is equipped with transparent front door made of polycarbonate and provided with slotted holes on the bottom for the passage of cables. 5.2.1 5.2.1.1 Mounting in auxiliary cabinet Drilling of the bottom plate The device FIO 2.0 has to be preliminarily fastened on the bottom plate of the cabinet. The bottom plate has EKIV 54 code. The fastening of the device to the metal bottom plate is carried out through a bolted connection. The metal plate shall then be drilled as shown in the following figure. Figure 16 Drilling of the bottom plate FIO 2.0 - User Manual – Ed .0 Rev 5 The information contained in this document is the property of Pietro Fiorentini S.p.A. – Reproduction prohibited The technical data may be subject to modification without notice Page 21 of 74 FIO2 User Manual ENGLISH Electronics and Integrated Systems Division – San Pietro Mosezzo (NO) - Italy 5.2.1.2 Fastening of FIO 2.0 to the bottom plate Fasten FIO 2.0 to the bottom plate of the cabinet using the components listed in the following picture. Screw M5x14 ISO 7045 Serrated washer DIN 6797A diam.5.3 mm Nut M5 ISO 4032 Figure 17 Fastening of the device to the bottom plate FIO 2.0 - User Manual – Ed .0 Rev 5 The information contained in this document is the property of Pietro Fiorentini S.p.A. – Reproduction prohibited The technical data may be subject to modification without notice Page 22 of 74 FIO2 User Manual ENGLISH Electronics and Integrated Systems Division – San Pietro Mosezzo (NO) - Italy 5.2.1.3 Fastening of the bottom plate to the cabinet Fasten the bottom plate to the cabinet with 6 screws 4.2 x 9.5 mm ISO 7049 as shown in the following picture. Screw 4.2 x 9.5 mm ISO7049 Figure 18 Fastening of the bottom plate to the cabinet FIO 2.0 - User Manual – Ed .0 Rev 5 The information contained in this document is the property of Pietro Fiorentini S.p.A. – Reproduction prohibited The technical data may be subject to modification without notice Page 23 of 74 FIO2 User Manual ENGLISH Electronics and Integrated Systems Division – San Pietro Mosezzo (NO) - Italy 5.2.2 Wall mounting For wall mounting use the provided brackets; drill as per measures shown in the following picture: Figure 19 Wall drilling for outdoor cabinet FIO 2.0 - User Manual – Ed .0 Rev 5 The information contained in this document is the property of Pietro Fiorentini S.p.A. – Reproduction prohibited The technical data may be subject to modification without notice Page 24 of 74 FIO2 User Manual ENGLISH Electronics and Integrated Systems Division – San Pietro Mosezzo (NO) - Italy 5.2.3 Pole mounting It is possible to fasten the outdoor cabinet to a pole by using the kit supplied with the cabinet. For the fastening proceed as described below: Bolt Serrated washer Cabinet bracket Half-moon element for pole fastening Self-locking nut Figure 20 Pole fastening of the outdoor cabinet FIO 2.0 - User Manual – Ed .0 Rev 5 The information contained in this document is the property of Pietro Fiorentini S.p.A. – Reproduction prohibited The technical data may be subject to modification without notice Page 25 of 74 FIO2 User Manual ENGLISH Electronics and Integrated Systems Division – San Pietro Mosezzo (NO) - Italy 5.3 Access to the wiring compartment To access the wiring compartment it is necessary to open the front door and unscrew the plastic cover on the related area of the electronic card where the connection terminals are to be found (see figure below). Opening button Screws for accessing compartment the wiring Screws for accessing compartment the wiring Figure 21 Access to the wiring compartment FIO 2.0 - User Manual – Ed .0 Rev 5 The information contained in this document is the property of Pietro Fiorentini S.p.A. – Reproduction prohibited The technical data may be subject to modification without notice Page 26 of 74 FIO2 User Manual ENGLISH Electronics and Integrated Systems Division – San Pietro Mosezzo (NO) - Italy 5.4 5.4.1 Process connections Removing the cover of the wiring compartment The removal of the plastic cover placed on the wiring compartment allows accessing the connection terminals as described in the following figure: Figure 22 Terminals of the wiring compartment The Pu1, Pd and T sensors are always present and the terminals are not accessible by removing only the cover described in the previous paragraph. If requested upon order, FIO 2.0 can also be supplied with the factory-wired PAux1 and PAux2 sensors; otherwise stick to the procedure described under paragraph "MOUNTING OF THE AUXILIARY SENSORS". FIO 2.0 is provided with cable glands to assure the device IP tightness, provided that cables with a maximum diameter of 7 mm are connected. The arrangement of the cable glands is shown in the following picture: Figure 23 Arrangement of cable glands FIO 2.0 - User Manual – Ed .0 Rev 5 The information contained in this document is the property of Pietro Fiorentini S.p.A. – Reproduction prohibited The technical data may be subject to modification without notice Page 27 of 74 FIO2 User Manual ENGLISH Electronics and Integrated Systems Division – San Pietro Mosezzo (NO) - Italy CAUTION: The cable gland related to Displace2 is shared with a second optional input BF; where the digital inputs 5 and 6 come from the field through a cable other than the one of the digital inputs from 1 to 4, it is necessary to use the cable gland related to BF/HF out. WARNING: take care to tighten the caps of the cable glands after having performed the wiring to assure the IP tightness of the device. The tightening of the caps of the cable glands can be done without the aid of special equipment because they feature an automatic locking mechanism. 5.4.2 Diagram of connections With reference to Figure 22, here below the diagram with the available connections is shown. Figure 24 Diagram of connections 5.4.3 Cables All cables that connect FIO 2.0 to other devices and devices have to meet the following requirements. 5.4.3.1 Cable specifications Type Shielded Insulation ≥ 600Vrms Insulating means thickness ≥ 0.25 mm Maximum temperature > +70°C Inductance / Capacitance see § 3 Safety Instructions Maximum outside diameter = 7 mm Compliance with CEI 20-22/II (flame-retardant and fire-retardant cables) The following are examples of cables that can be used for connecting the device: Cables for data connection (RS485 serial and IN/OUT digital, count) Manufacturer Kabeltronik Model 020202500 Conductors 2x0.25 mm2 Capacitance 120pf /m FIO 2.0 - User Manual – Ed .0 Rev 5 The information contained in this document is the property of Pietro Fiorentini S.p.A. – Reproduction prohibited The technical data may be subject to modification without notice Page 28 of 74 FIO2 User Manual ENGLISH Electronics and Integrated Systems Division – San Pietro Mosezzo (NO) - Italy Alternative Manufacturer AlfaWire Model 3231 Conductors 2 x 0.33 mm2 Inductance 66nH/ m Capacitance 27pf /m Connection of Remote Power Supply and Solenoid Valves Manufacturer AlfaWire Model 3231 Conductors 2 x 0.52 mm2 Inductance 55nH/ m Capacitance 30pf /m Always connect the cable shield to the respective FIO 2.0 terminal marked with Shield Solenoid valves: connect together the shield and the negative terminal and connect it to COM terminal Do not connect the shield to the opposite terminal of the cable and insulate it The cable length is subject to restrictions Functional: see Technical features EX Compatibility: see Safety Instructions (§3). 5.4.4 Connections to the RTU / SOLAR devices Use the shielded cables described in the relevant chapter. Connect using the following table. Refer to the FIO RTU/SOLAR manual for further information FIO2 Signal Remote power supply (EXT. PW SUPPLY) Digital signal (DOUT-N) RS485 (RSA) FIO RTU / SOLAR Terminal M19.1 Positive M19.2 Negative M19.3 Shield RTU 115-230VAC J1 J2 Do not connect M12.1 M12.2 M12.3 Positive Negative Shield J5 J6 Do not connect M13.1 M13.2 M13.3 A+ BShield J3 J4 Do not connect RTU 24VDC J5 J6 Do not connect J9 J10 Do not connect J7 J8 Do not connect SOLAR J1 J2 Do not connect J5 J6 Do not connect J3 J4 Do not connect FIO 2.0 - User Manual – Ed .0 Rev 5 The information contained in this document is the property of Pietro Fiorentini S.p.A. – Reproduction prohibited The technical data may be subject to modification without notice Page 29 of 74 FIO2 User Manual ENGLISH Electronics and Integrated Systems Division – San Pietro Mosezzo (NO) - Italy 5.4.5 Operation related to the wiring terminals The wiring terminals are direct insertion spring-type terminals. Therefore, they accept rigid, tinned wires or wires with end ferrule not requiring the use of any equipment. For disassembly or wiring of flexible conductors not previously tinned or not provided with ferrule, it is necessary to press the button adjacent to the pole that one wants to wire with the help of a screwdriver as described in the following picture. Terminal pole Figure 25 Operation related to the terminals 5.4.6 Wiring of auxiliary sensors The auxiliary sensors PAux1 and PAux2, if not included in the supply configuration requested upon order, can still be installed in the field. The terminals related to PAux1 and PAux2 are shown in paragraph 5.4.2 The cable glands related to PAux1 and PAux2 are shown in Figure 23 For the operation related to the wiring terminal, refer to paragraph 5.4.5 The terminals related to PAux1 and PAux2 accept conductors with a maximum section = 1.5 mm2 5.4.7 1 Wiring of the other conductors For the conductors related to other signals than those relating to PAux1 and PAux2, terminals that accept conductors with a maximum section = 1.5 mm2 are provided 2 The terminals related to the available connections are shown in paragraph 5.4.2 The cable glands related to the available connections are shown in paragraph Figure 23 1 2 Section is meant to include the ferrule, when mounted on the conductor Section is meant to include the ferrule, when mounted on the conductor FIO 2.0 - User Manual – Ed .0 Rev 5 The information contained in this document is the property of Pietro Fiorentini S.p.A. – Reproduction prohibited The technical data may be subject to modification without notice Page 30 of 74 FIO2 User Manual ENGLISH Electronics and Integrated Systems Division – San Pietro Mosezzo (NO) - Italy 5.5 5.5.1 Connecting the power supply Connecting the batteries FIO 2.0 is fed by a proprietary battery pack that can be selected upon order between lithium and rechargeable lithium-ion battery. The battery pack is already housed in its enclosure, but it is disconnected from the circuit. To connect the batteries proceed as follows: Open the transparent front door by pressing the button positioned on the bottom of the device (see Figure 10 ). Unscrew the plastic cover related to the terminals (see Figure 21 ). Unscrew the screws related to the cover of the electronic card, as shown in the following picture. Figure 26 Fastening screws of the front panel FIO 2.0 - User Manual – Ed .0 Rev 5 The information contained in this document is the property of Pietro Fiorentini S.p.A. – Reproduction prohibited The technical data may be subject to modification without notice Page 31 of 74 FIO2 User Manual ENGLISH Electronics and Integrated Systems Division – San Pietro Mosezzo (NO) - Italy Remove the front panel on which the keyboard is installed while paying attention not to damage the flat type connection that connects the keyboard to the display card. The following picture shows the connectors dedicated to connecting the batteries and, in particular: The 2-way connector is dedicated to the connection of the Lithium battery. The 3-way connector is dedicated to the connection of the rechargeable battery. Keyboard flat connection Battery connectors Battery enclosure Figure 27 Battery connectors view Then, connect the free connector of the battery behind to its male counterpart mounted on the card. The connectors are polarized; therefore, it is impossible to reverse the polarity of the connection. Moreover, the connectors are equipped with a mechanical locking connection mechanism; therefore, connect the batteries making sure to insert the connector until the correct position is reached. Reassemble the cover of the card and that of the terminals. 5.5.2 Connection to an external power source Only, when FIO 2.0 is equipped with rechargeable batteries of AS0670T02M01R00 code type, it is possible to connect FIO 2.0 to an external power source. The devices certified as suitable for providing power to FIO 2.0 are FIO RTU and FIO SOLAR. Please refer to the relevant manual for more details. For the connection with FIO 2.0 refer to paragraph 5.4 FIO 2.0 - User Manual – Ed .0 Rev 5 The information contained in this document is the property of Pietro Fiorentini S.p.A. – Reproduction prohibited The technical data may be subject to modification without notice Page 32 of 74 FIO2 User Manual ENGLISH Electronics and Integrated Systems Division – San Pietro Mosezzo (NO) - Italy 5.6 Characterization of the valves The opening time of the valves can be configured and is bound to the calculation cycle. The limitations of the maximum opening time in relation to the cycle time are described in the table: Calculation cycle (S) TOFF min (S) TON max (mS) 1 180 0.82 5 875 4 10-30 1000 4.5 Only one valve is activated at a time; should a parallelism of the command be required (same sign on the two valves), the second is activated just after the end of the command of the first one. 5.7 External antenna connection In case of problems with GSM network coverage, it is possible to replace the pre-assembled rod aerial (only for versions with GSM modem) with a remote antenna. The antenna is located on the upper right side of the device (see Figure 11). To replace the antenna unscrew it and replace it with the wished one. The connection is of SMA type. FIO 2.0 - User Manual – Ed .0 Rev 5 The information contained in this document is the property of Pietro Fiorentini S.p.A. – Reproduction prohibited The technical data may be subject to modification without notice Page 33 of 74 FIO2 User Manual ENGLISH Electronics and Integrated Systems Division – San Pietro Mosezzo (NO) - Italy 6 Main Functions The following paragraphs describe the main features of the device. The device offers the possibility of installing two measurement lines. Therefore, the activities of the system can relate to one or the other of the two lines, which are functionally equivalent or relate to the device as a regulation and metering station. On a case by case basis, it will be indicated whether the described activity concerns the station or the individual metering lines. 6.1 Acquisition of measurements, counting pulses and digital inputs The acquisition activity consists in detecting the raw measure or in reading the inputs, and in the possible conversion of the raw data into the corresponding size. In general, the measures that refer to external sensors require sensor characterization data (bottom scale, type, coefficients, etc.), without which it is not possible to perform the conversion, or a calibration operation to define the scale of the quantity with respect to the measurement. Therefore, the acquisition is performed only for the measurements for which it is possible, thus disabling the ones for which the necessary data are missing. The table shows, for the two lines and the station, the measured and calculated quantities. Line 1 Upstream pressure 1 Pu1 The calculation of the quantity is made after sending the sensor calibration file Displacement sensor 1 (optional) Sp1 The calculation of the quantity is made after the sensor calibration Counting input 1 Cnt1 The input is always acquired; the use of these data depends on the configuration Upstream pressure 2 (optional) PAux1 The calculation of the quantity is made after sending the sensor calibration file Displacement sensor 2 (optional) Sp2 The calculation of the quantity is made after the sensor calibration Counting input 2 Cnt2 The input is always acquired; the use of these data depends on the configuration Downstream pressure Pd The calculation of the quantity is made after sending the sensor calibration file Tank pressure (optional) PAux2 The calculation of the quantity is made after sending the sensor calibration file Gas temperature T The calculation is always performed Atmospheric pressure Patm The calculation is always performed Environment temperature TAmb The calculation is always performed Digital inputs (6) DigIn The acquisition is always performed Line 2 Station 6.2 Calculating volumes and flow rates Depending on the configuration and the available inputs, the calculation activity aims at obtaining the volumes and flow rates (gross, correct, or showing an error) for the two lines separately, and for the station. Here below there is a description of the calculations carried out by the device, subdivided for the two metering lines and the station. The calculated quantities are updated at the end of the calculation cycle, configurable from the user interface or as per protocol to 1, 5, 10, 15 or 30 seconds (default: 30). The involved cycle time defines also the scanning period of the digital inputs. 6.2.1 Lines 1 and 2 The calculation that is carried out depends on the configuration and it is influenced by the following parameters, duplicated for the two lines: Flow rate calculation Direct or indirect Type of input High or low frequency Type of pulses From meter or from correction device Pressure selector for the calculation of the direct flow Pd, Pu1, PAux1 rate Pressure selector for the calculation of the indirect flow Pu1, PAux1 rate Pulse weight M3 FIO 2.0 - User Manual – Ed .0 Rev 5 The information contained in this document is the property of Pietro Fiorentini S.p.A. – Reproduction prohibited The technical data may be subject to modification without notice Page 34 of 74 FIO2 User Manual ENGLISH Electronics and Integrated Systems Division – San Pietro Mosezzo (NO) - Italy The acquisition of the pulses coming from the counting inputs is done anyway, regardless of the configuration, for each cycle period, and added to a pulse totalizer. In case of low frequency input, besides counting, also the distance (in milliseconds) between the last two acquired pulses is detected. This time interval is used to calculate the direct flow rate. Conversion factor: In the case of calculation of the direct flow rate and gross pulse type, the pulses acquired during the cycle period are transformed into pulses corrected by multiplying the same by the conversion coefficient, calculated as follows (formula AGA7 with Z = 1 ratio): Ktvo = Pf Ps × Ts Tf Where: PS and TS reference quantities TF measured temperature PF pressure measured upstream or downstream, depending on the upstream/downstream configuration. Through appropriate selection, both L1 and L2 will be able to use Pu1, PAux1 or Pd for the calculation. If the sensor is not present, this selection is not possible. In different configurations, the coefficient is not calculated. Volumes and totalizers: If the configuration so provides, the pulses in the period are used to calculate the delta volumes to be added to the corresponding totalizers. Direct flow rate measurement: If pulses from meter: DeltaVm = Pulses delta * Pulse weight DeltaVb = DeltaVm * KTVO If pulses from correction device: DeltaVm = 0 DeltaVb = Pulses delta * Pulse weight Indirect flow rate measurement: If pulses from meter: DeltaVm = Pulses delta * Pulse weight DeltaVb = integration of the flow rate, calculated using the indirect method (input from correction device is incompatible with the indirect flow rate measurement) DeltaVx values are then added to the corresponding totalizers. In case of input from meter, in case of error in the measurements (Pu, Pd, T out of range or faulty), DeltaVm is added also to the totalizer of gross volumes subject to error TotVme (DeltaVb is set to 0 because it is not possible to calculate the conversion coefficient). Flow rates: Direct flow rate measurement: If pulses from meter: If high frequency input (line 1 only) Qm = DeltaVm in the cycle time referred to an hour otherwise Qm = Pulse weight / interval between pulses (sec) *3600 Qb = Qm * KTVO If pulses from correction device: Qm = 0 If high frequency input (line 1 only) Qb = DeltaVb in the cycle time referred to an hour otherwise Qb = Pulse weight / interval between pulses (sec) *3600 Indirect flow rate measurement: If high frequency input (line 1 only): FIO 2.0 - User Manual – Ed .0 Rev 5 The information contained in this document is the property of Pietro Fiorentini S.p.A. – Reproduction prohibited The technical data may be subject to modification without notice Page 35 of 74 FIO2 User Manual ENGLISH Electronics and Integrated Systems Division – San Pietro Mosezzo (NO) - Italy Qm = DeltaVm in the cycle time referred to an hour otherwise Qm = Pulse weight / interval between pulses (sec) *3600 Qb = f(K, Cg, Pu, Pd) (indirect flow formula) The formula for calculating the indirect flow rate is the following: In the case of critical pressure change (Pu >= 2*Pd) Qb = 0,410701154 × t r × C g × Pu d × t u × 288,15 In the case of non-critical pressure change (Pu < 2*Pd), the obtained value is multiplied by the factor: P − Pd sin K1 × u Pu where: Tr: reference temperature (K) Tu: use temperature (K) D: gas density Pu: absolute upstream pressure Pd: absolute downstream pressure K1: constant = 106.78 Cg: flow rate coefficient of the regulator, calculated as follows Calculation of Cg: According to the opening percentage X (detected by the displacement sensor of the line in question), the instantaneous coefficient Cg is generated based on the model of the selected regulator. Finally, there are two configurable coefficients, Kf and K0: the first is a multiplier, the second is additive (default Kf=1, K0=0). These coefficients are used to make a correction, if necessary: Qb = Qb * Kf + K 0 Gas velocity: The following formula applies: V f = 345,92 × Qb 1 − 0,002 × Pd × DN 2 1 + Pd where: Vf: gas velocity Qb: converted flow rate Pd: (relative) output pressure DN: nominal diameter of the regulator (configurable) There are two management modes (automatic and manual) for the generation of an alarm when the maximum velocity is exceed. The manual management is selected by setting the maximum threshold value of the velocity to a value other than 0 and the forecast limits are: 0 bar < Pd <= 2 bar V max = 400 m/s 2 bar < Pd <= 25 bar V max = 400-((Pd-2)/23*340) m/s 25 bar < Pd V max = 60 m/s The manual mode is selected by setting to 0 the maximum threshold value and it can be referred back to the alarm management already forecast for the other quantities, configuring the maximum velocity limit in one of the 6 programmable alarms. FIO 2.0 - User Manual – Ed .0 Rev 5 The information contained in this document is the property of Pietro Fiorentini S.p.A. – Reproduction prohibited The technical data may be subject to modification without notice Page 36 of 74 FIO2 User Manual ENGLISH Electronics and Integrated Systems Division – San Pietro Mosezzo (NO) - Italy Setting of the totalizers Using the keyboard, it is possible to set the value of the totalizers under the measurement conditions Vm and the reference conditions Vb, relative to the line 1 and to the line 2, as well as to reset both volume totalizers subject to error Vme (1 and 2). It is not possible to set the station totalizers. 6.2.2 Station The volume and flow rate data related to the station are always the sum of the corresponding data of the two measurement lines. Volumes and totalizers: TotVm = Vm1 + Vm2 TotVme = Vme1 + Vme2 TotVb = Vb1 + Vb2 Flow rates: TotQm = Qm1 + Qm2 TotQb = Qb1 + Qb2 6.3 Regulation The device performs a regulation activity by controlling 4 independent outputs controlling the valves (2 UP commands and 2 DOWN commands). The use of the valves is determined by the configuration: - redundant mode: the commands on a valve of the first pair are repeated on the corresponding (same direction) of the second pair with a delay equal to the time of activation of the valve. - equal partition: the valves of each pair are activated alternatively depending on some configuration information and on the operation quantities The following table shows the priorities of the functions that contribute to determine the triggering. The processing of the regulation cycle will take place according to the programmed cycle time. Priority Function 1 Emergency button 2 End user management (EUM) 3 Flow rate limitation (FL) 4 BackPressure 5 Remote PAS Compensation 6 Tank Pressure Monitoring (TPM) The modes listed above are described briefly here below. 6.3.1 Emergency button Pressing the emergency button for more than 3 seconds starts the stop process of the regulation automatic device, whereby the equipment is forced to enter in maintenance status. The activation of the emergency procedure is recorded by a specific event and alarm. In the emergency status, the operator can command the discharge of the pressure from the tank, which will be implemented according to the same modes for loads disconnection (EUM) described in the next paragraph. A special keyboard command allows quitting the emergency status bringing the regulation automatic device to inactivity. 6.3.2 End user management – EUM – Loads disconnection This feature, if enabled in the configuration, is activated upon expiration of a scheduled date and time. This function involves also a Qlimeum threshold that activates the function only if a flow rate threshold is exceeded beyond the verification time. If Qlimeum=0, the disconnection function related to the flow rate is not considered. The load disconnection functionality involves discharging the tank activating the valve DOWN command according to the table Pdmax - Pdmin Activation time > 0 Bar ≤ 1Bar > 1 Bar ≤ 5Bar 10 S 20 S > 5 Bar ≤ 10Bar 30 S > 10 Bar ≤ 20 Bar 60 S FIO 2.0 - User Manual – Ed .0 Rev 5 The information contained in this document is the property of Pietro Fiorentini S.p.A. – Reproduction prohibited The technical data may be subject to modification without notice Page 37 of 74 FIO2 User Manual ENGLISH Electronics and Integrated Systems Division – San Pietro Mosezzo (NO) - Italy The functionality is actually implemented by activating the valve DOWN command in pulse continuous mode The activation cycle is brought to 5S regardless of the calculation cycle active in that moment and the valve is enabled for 1S per cycle, therefore 1Son - 4Soff (pause) - 1S on ... until at least one of the conditions occurs: Qb= 0 or Pd <= Pdmin This procedure is repeated for a maximum of 5 attempts. If not any of the above conditions is met, the disconnection automatic device is brought to FAIL status. The restoration of the pneumatic equipment is possible only manually. 6.3.3 Flow rate limitation: This function, if enabled, trips in case a upper flow rate threshold is exceeded and causes the activation of the solenoid valves to bring the flow rate back below the threshold, within a tolerance range to prevent oscillations. When the function is active, the pressure regulation activity is suspended until the flow rate is brought back within the set limits. The flow rate to be used for the limitation algorithm is configurable under station Qb1, Qb2, or Qb. The maximum threshold may be configured in a fixed way or depending on the same weekly calendar that can be used to regulate the pressure. The enabling of the valve is subject to a minimum pressure value, below which no triggering occurs. 6.3.4 Backpressure This function allows inhibiting subsequent triggering procedures in the same direction, if the previous triggering resulted in a too high pressure change compared to a set percentage. If PAux2 is present, the value to be kept under observation is the difference Pd-PAux2 assessed in the activation phase of the regulation automatic device (or when leaving the maintenance status). The output to be subject to backpressure is depends on the restoration of the Pd-PAux2 condition stored as reference. If PAux2 is absent, the value to be considered is the difference between the previous value, which resulted in the enabling of the command, and the current value of the pressure being regulated. Also in this case, the backpressure ends when the difference comes back within the limits of the configured percentage. 6.3.5 Remote/PAS/Compensation This function aims at regulating the pressure so as to achieve the required setpoint, within a percentage tolerance. The different configuration modes provide that the setpoint value can be set directly, calculated on the basis of a weekly calendar (PAS), or calculated as a function of the flow rate (compensation). Regardless of how the setpoint is determined, the automatic device enables the UP and DOWN commands on the valves, trying to bring the pressure that is being regulated within the configured limits. If this goal is not attained within a certain period of time (also configurable), the automatic device stops in a FAIL status and the corresponding events and diagnostics are generated. The status remains such until the activity is reprogrammed. 6.3.6 TPM The Tank Pressure Monitoring function (which can be enabled or not) has a different connotation depending on whether the regulation automatic device is working or is stopped for any reason whatsoever. 6.3.6.1 Diagnostic function (active Pd regulation automatic device) When the regulation is active (no idle / no failure / no maintenance) the pressure of the tank stored after 30 seconds from the last up/down command carried out (in the absence of additional commands) is checked against the maximum permissible variation thresholds. In case of anomaly, a diagnostic flag is enabled and an input event is generated. The anomaly signal is delete when quitting the maintenance status, with a related event. 6.3.6.2 Active function (Pd regulation automatic device in idle/fail/maintenance status) With stopped regulation (idle or fail) and machine not in maintenance status, the tank pressure change outside the configured limits must produce an opposite enabling in order to maintain the pressure in the tank to the initial value. In this case, the regulation automatic device acts on PAux2 and excludes Pd. The regulation compared to Pd resume as soon as the operating conditions are restored (maintenance status quitting or restarting of the automatic device with the new setpoint, etc.). The regulation of PAux2 must consider the up and down fluctuations, producing DOWN and UP commands as compensation; The regulation occurs considering the % threshold as a dead range. The activation of the regulation produces an event and an alarm. FIO 2.0 - User Manual – Ed .0 Rev 5 The information contained in this document is the property of Pietro Fiorentini S.p.A. – Reproduction prohibited The technical data may be subject to modification without notice Page 38 of 74 FIO2 User Manual ENGLISH Electronics and Integrated Systems Division – San Pietro Mosezzo (NO) - Italy The function is activated automatically following the execution of a command. 6.4 Repetition on the digital output The digital output with which the device is equipped, can be piloted, depending on the configuration, in order to: - repeat pulses corresponding to one of the volumes calculated by the system, selected from the following ones: Channel number Signal 0 Channel not configured 1 Vm Line 1 2 Vb Line 1 3 Vm Line 2 4 Vb Line 2 5 Vm Station 6 Vb Station - acquire an active status as a function of a set of selectable diagnostic information - repeat the value remotely set In case of repeated pulses, it is possible to divide the repeated volumes by a prescaler in order to change the weight of the output pulse (0.001, 0.01, 0.1, 1, 10, 100, 1000). 6.5 Alarms, events and diagnostics The device keeps track of significant events in three different ways. Diagnostics The system stores a set of diagnostic information, both historical and current. While in the current diagnostic each status indication follows the trend of the corresponding system condition, the historical one reports only the onset of the conditions. Each condition can be reset manually, thereby indicating that it was taken into consideration. The information that the system stores are listed in the table. Bit Number Description 0 Low battery 1 General alarm 2 Alarm - pressure Pu1 3 Alarm - pressure PAux1 4 Alarm - temperature 5 RTC error (time difference > 10 minutes) 6 Alarm - pressure Pd 7 Alarm - pressure PAux2 8 Alarm - displacement 1 9 Alarm - displacement 2 10 Alarm - velocity 1 11 Alarm - velocity 2 12 ECU functions error 13 Irregular regulation (block/ timeout) 14 Back-pressure (ongoing wait) 15 Failure TPM 16 External power present 17 Battery recharge failure 18 Modem signal low 19 Alarms logged 20 Cannot send SMS (no space in queue) 21 Cannot send SMS (configuration missing) FIO 2.0 - User Manual – Ed .0 Rev 5 The information contained in this document is the property of Pietro Fiorentini S.p.A. – Reproduction prohibited The technical data may be subject to modification without notice Page 39 of 74 FIO2 User Manual ENGLISH Electronics and Integrated Systems Division – San Pietro Mosezzo (NO) - Italy 22 Cannot send SMS (other) 23 Ongoing data call 24 HW Reset 25 Programmed maintenance date expired 26 27-31 Modem error unused Alarms and Events Events and alarms contain the same information. The system manages two distinct queues because the presence of alarms may cause the triggering of a call procedure, which is repeated, with the configured modes, until the alarms themselves are not deleted, after reading. Events instead are stored only and their presence does not cause any communication activity. It is possible to configure the generation of an event and/or an alarm for 6 quantities, which can be selected among those listed in the table, specifying for each of them 3 upper and 3 lower thresholds, and a maximum range. When these values are exceeded the event is generated. The event is queued in the list of alarms and/or events depending on how it is configured. Pu1 upstream pressure - line 1 PAux1 upstream pressure - line 2 Pd downstream pressure T temperature Qm1 Line 1 flow rate at metering conditions Qm2 Line 2 flow rate at metering conditions Qmtot Station flow rate at metering conditions Qb1 Line 1 flow rate at basis conditions Qb2 Line 2 flow rate at basis conditions Qtot Station flow rate at basis conditions Vf1 Gas velocity on the flange - line 1 Vf2 Gas velocity on the flange - line 2 PAux2 Pressure in the tank Similarly, it is possible to configure the generation of an event and/or alarm when the thresholds for 2 of the volumes in the table are exceeded. The thresholds are compared with the difference in volume during the configured period. Vm1t measured volume totalizer - line 1 Vb1t basis volume totalizer - line 1 Vme1t volume totalizer error - line 1 Vm2t measured volume totalizer - line 2 Vb2t basis volume totalizer - line 2 Vme2t volume totalizer error - line 2 Vmtot station measured volume totalizer Vbtot station basis volume totalizer Vmetot station measured volume totalizer error Finally, it is possible to generate an event and/or alarm on a selected set of diagnostic information. The event queue is managed in circular manner. When the queue is full, the generation of a new event will erase the oldest event automatically. The alarm queue is managed until filling up, i.e., when the queue is full any new alarms arising are discarded. This occurs because the triggering of calls should allow emptying the queue, thus eliminating the existing alarms well before filling up. 6.6 Historical storage (log) The device allows configuring up to 3 historical log modules, for which it is possible to define the storage period and depth (number of records), in addition to the selection of the quantities to be stored. It is also possible to specify the storage mode: average (a single value) or statistics (4 values: average, minimum, maximum, and standard deviation in the period). Each log module can be enabled or disabled independently. Upon activation, the availability of space required for the amount of information is checked, and, if it is not sufficient, only the available one is allocated. It is also possible to activate a fourth log module containing pre-configured information that cannot be modified, with time period and a depth FIO 2.0 - User Manual – Ed .0 Rev 5 The information contained in this document is the property of Pietro Fiorentini S.p.A. – Reproduction prohibited The technical data may be subject to modification without notice Page 40 of 74 FIO2 User Manual ENGLISH Electronics and Integrated Systems Division – San Pietro Mosezzo (NO) - Italy of 30 days. The quantities can be selected from the list in the table. Identifier Variable Description Unit Format 1 Pu1 Upstream pressure - line 1 bar gauge Float 2 PAux1 Upstream pressure - line 2 bar gauge Float 3 Pd Downstream pressure bar gauge Float 4 T Gas temperature kelvin Float 5 Vm1t Gross volume totalizer – line 1 m3 Long 6 Vb1t Net volume totalizer – line 1 m3 Long 7 Vme1t Error gross volume totalizer – line 1 m3 Long 8 Vm2t Gross volume totalizer – line 2 m3 Long 9 Vb2t Net volume totalizer – line 2 m3 Long 10 Vme2t Error gross volume totalizer – line 2 m3 Long 11 Vmtot Station gross volume totalizer m3 Long 12 Vbtot Station net volume totalizer m3 Long 13 Vmetot Station error gross volume totalizer m3 Long 14 Qm1 Gross flow line 1 m3/h Float 15 Qm2 Gross flow line 2 m3/h Float 16 Qmtot Station Gross flow m3/h Float 17 Qb1 Net flow line 1 m3/h Float 18 Qb2 Net flow line 2 m3/h Float 19 Qtot Station Net flow m3/h Float 20 Vm1 Period Gross Volume – line 1 m3 Long 21 Vm2 Period Gross Volume – line 2 m3 Long 22 Vmtot Station Period Gross Volume m3 Long 23 Vb1 Period Net Volume – line 1 m3 Long 24 Vb2 Period Net Volume – line 2 m3 Long 25 Vbtot Station Period Net Volume m3 Long 26 Vme1 Period Error Gross Volume - line 1 m3 Long 27 Vme2 Period Error Gross Volume - line 2 m3 Long 28 Vmet Station Period Error Gross Volume m3 Long 29 Vf1 Gas velocity – line 1 m/s Float 30 Vf2 Gas velocity – line 2 m/s Float 31 Diagn Diagnostics (station + line 1 + line 2) bit (32) Long 32 PAux2 Tank pressure bar gauge Float 33 Displ 1 Displacement - line 1 % Float 34 Displ 2 Displacement - line 2 % Float 35 PAtm Atmospheric pressure bar Float 36 TEnv Environment temperature kelvin Float FIO 2.0 - User Manual – Ed .0 Rev 5 The information contained in this document is the property of Pietro Fiorentini S.p.A. – Reproduction prohibited The technical data may be subject to modification without notice Page 41 of 74 FIO2 User Manual ENGLISH Electronics and Integrated Systems Division – San Pietro Mosezzo (NO) - Italy The following tables provide an indication of the amount of data produced daily and of the storage depth, as a function of the number of quantities, and the storage mode and period. The total space available for all logs is about 1.6 Mb. The maximum number of records for each log is 65000. The indicated depth is calculated assuming that the entire available memory can be used for each individual reported case. Period 1 min 5 min 15 min 30 min 1 hour Record/dd 1440 288 96 48 24 Daily size (KBytes/day) 31 7 3 2 1 Maximum duration 45 8 23 45 90 days months months months months 99 20 7 4 2 Number of quantities 4 Normal mod. record size (bytes) 22 Maximum record number 65000 Statistic mod. record size (bytes) 70 Maximum record number 23406 Daily size (KBytes/day) Maximum duration Number of quantities 16 3 8 16 33 days months months months months 43 9 3 2 1 6 Normal mod. record size (bytes) 30 Maximum record number 54613 Daily size (KBytes/day) Maximum duration 38 6 19 38 76 days months months months months Daily size (KBytes/day) 144 29 10 5 3 Maximum duration 11 56 6 11 22 days days months months months 65 13 5 3 2 Statistic mod. record size (bytes) 102 Maximum record number 16063 Number of quantities 10 Normal mod. record size (bytes) Maximum record number 46 35617 Daily size (KBytes/day) Maximum duration Statistic mod. record size (bytes) Maximum record number Daily size (KBytes/day) Maximum duration 25 4 12 25 49 days months months months months 234 47 16 8 4 166 9870 7 34 3 7 14 days days months months months FIO 2.0 - User Manual – Ed .0 Rev 5 The information contained in this document is the property of Pietro Fiorentini S.p.A. – Reproduction prohibited The technical data may be subject to modification without notice Page 42 of 74 FIO2 User Manual ENGLISH Electronics and Integrated Systems Division – San Pietro Mosezzo (NO) - Italy 6.7 Communication FIO2 offers the following communication interfaces: • Bluetooth: Bluetooth communication port (Serial Port Profile - SPP) with PIN-protected access • RS485: 2 RS485 ports for device querying and bus connection of MODBUS devices • GSM / GPRS: internal modem for remote GSM / GPRS communications with: o input / output GSM communications o input / output GPRS / TCP IP communications o dynamic IP address notification service via GPRS / UDP o partial device querying and control via SMS o alarm notification via e-mail Communication interfaces with connection (Bluetooth, RS485, GSM / GPRS data) support the MODBUS ASCII, RTU and TCP protocol. For details relating to the management of the MODBUS protocol see the document [1]. The communication via SMS / e-mail uses a proprietary protocol described in the document [2]. FIO 2.0 - User Manual – Ed .0 Rev 5 The information contained in this document is the property of Pietro Fiorentini S.p.A. – Reproduction prohibited The technical data may be subject to modification without notice Page 43 of 74 FIO2 User Manual ENGLISH Electronics and Integrated Systems Division – San Pietro Mosezzo (NO) - Italy 7 Using the device 7.1 Operator interface The figure below shows the layout of the operator interface, consisting of 25 keys and a graphic display. The following paragraphs describe the interaction with the user and the organization of the displayed data. The display is off by default; it is turned on when any key is pressed and it will turn off after a configurable period of keyboard inactivity. Figure 28 Layout of the operator interface 7.1.1 General structure of the information on the display The operator interface consists of a set of pages with a common structure: some general information concerning the system are always present on the screen, along with other ones that can be selected by the operator. The information is organized into 5 hierarchies of pages: • Main list: it shows the main system information, making it immediately accessible • Line 1: it groups the measurement, configuration and calibration data of Line 1 and the operations available for the same • Line 2: Same as above for Line 2 • Station: it provides access to station measurement data and to the configuration, calibration and maintenance data • Device: it provides access to information on diagnostics, communication, system and general operations Each hierarchy is independent from the others and can be quickly reached through special dedicated keys that allow switching from one to another. Each hierarchy stores the current page to be able to return to the previous information when the hierarchy is selected again. The following figure shows the general structure of the pages, highlighting the different areas displayed, as described in the following table. FIO 2.0 - User Manual – Ed .0 Rev 5 The information contained in this document is the property of Pietro Fiorentini S.p.A. – Reproduction prohibited The technical data may be subject to modification without notice Page 44 of 74 FIO2 User Manual ENGLISH Electronics and Integrated Systems Division – San Pietro Mosezzo (NO) - Italy 1 2 3 4 5 Figure 29 Common structure of the pages Ref. Field Notes 1 Date and time The current date and time is updated continuously. Before it is set, it starts by default with 2005-01-01 00:00 and on the right on the same line, the blinking icon for missing synchronization appears 2 Status icons From left to right: • alarm icon, blinking if there is any active error • modem status icon: communicating, recording, initialization, turning on, power off • Bluetooth status icon: on, off • External power supply icon (only with rechargeable battery, indicating the presence or lack of power supply) • battery charge icon: it shows approximately the percentage of charge • emergency icon • calibration icon • maintenance icon • programming icon: it indicates that some parameters have been changed and the configuration has not been saved yet • login icon: if displayed, it indicates that the operator has not logged in providing the password. Not any configuration operation is allowed. The password will be required at the first modification attempt and it will be valid until the expiration of a set period of time of keyboard inactivity (configurable) 3 Data area The first line displays a brief description of the data; the second one shows the value and measurement unit, if any. If the data are not numeric, the full line provides a symbolic description of the value 4 Area indicator It shows the area to which the shown data belong (L1, L2, St, Ap for line 1, line 2, station or device). It remains off on the pages of the main list. 5 Icons of the function They represent the functionality currently associated with the function key below. The available functions keys depend on the displayed page and they will be described in the corresponding paragraphs. In some cases, the associated function allows shifting to a sublist of the current hierarchy; in other cases, it identifies an action to be performed 7.1.2 Field types The data area may contain information of different kind: • numerical data, with or without measurement unit: the value is right-aligned in the field, any measurement unit occupies always the same position to the right of the value. During editing, the value is left-aligned and the digits and any decimal point are entered from left to right • enumerated data (choice): the value is represented by a symbolic description, right-aligned, without measurement units. During editing, the description matching the value is left-aligned. Using the UP and DN keys, it is possible to scroll the values back and forth in circular manner • alphanumeric data: the value is left-aligned in the field. It is not possible to perform changes • digital inputs: each digit (0 or 1) indicates the status of the corresponding input. Each of the inputs, from 1 to 6, is represented by a digit, from the right (input 1) to the left (input 6) 7.1.3 Interaction via the keyboard The interaction with the system occurs via the 25-key keyboard. The function of each key may depend on the interaction status. The main difference lies in the fact that the user is editing an information (editing mode) or not (browsing mode). Outside the editing mode, the keys offer the possibility to move through the hierarchy of pages reaching the needed information or to call up the execution of specific operations. It is not possible to move through the pages or perform operations, without having first completed any editing session already started. Therefore, the use of some keys can be inhibited depending on the active mode. Other keys may instead change their meaning, as shown FIO 2.0 - User Manual – Ed .0 Rev 5 The information contained in this document is the property of Pietro Fiorentini S.p.A. – Reproduction prohibited The technical data may be subject to modification without notice Page 45 of 74 FIO2 User Manual ENGLISH Electronics and Integrated Systems Division – San Pietro Mosezzo (NO) - Italy in the following table. Mode Keys Function UP, DN They allow scrolling through the list of pages currently displayed L1, L2, ST, AP They allow reaching directly the list of pages that describes the corresponding area of the system (line 1, line 2, station, device) ESC It allows going back to the main list ENTER It allows reaching any lower level to access some specific features; in this situation, the ESC key allows returning to the upper level. Browsing If the displayed data is editable, the ENTER key will start an editing session: the value is aligned to the left and the editing mode is entered (the editing mode start may be subject to the request for entering a password) CLR It allows zeroing a diagnostic condition or any other information that can only be zeroed 0..9, decimal point Ignored F1, F2, F3, F4 They allow the execution of shifts or of the available operations, as identified by the corresponding displayed icon UP It deletes the last entered digit (backspace) DN It reverses the sign of the entered number (if the data allows for this) ESC It cancels the editing session, leaving the previous value unchanged ENTER It ends the editing session, confirming the entered value CLR It allows restoring the default value, quitting the editing mode 0..9, decimal point Value entering L1, L2, ST, AP Ignored F1, F2, F3, F4 Ignored UP, DN They allow scrolling through the available values ESC It cancels the editing session, leaving the previous value unchanged ENTER It ends the editing session, confirming the entered value CLR Ignored 0..9, decimal point Ignored L1, L2, ST, AP Ignored F1, F2, F3, F4 Ignored Editing of numeric fields Editing of Choice fields 7.1.4 Authentication Almost all the editable information and system operations require entering a password to acquire the rights to perform changes. The presence of the login icon indicates that the operator does not have the right to perform changes and access to any operation that requires this is subject to the entering of the password, when the operator attempts to perform such changes. In this case, the page prompting for a password is displayed. F1 F2 F3 F4 Figure 30 Password request FIO 2.0 - User Manual – Ed .0 Rev 5 The information contained in this document is the property of Pietro Fiorentini S.p.A. – Reproduction prohibited The technical data may be subject to modification without notice Page 46 of 74 FIO2 User Manual ENGLISH Electronics and Integrated Systems Division – San Pietro Mosezzo (NO) - Italy The interaction sequence is the following: • Pressing the ENTER key, allows enabling the editing in the password field • With the numeric keys allow entering the password value (the default value is 1, any not meaningful zeroes are not required); each digit entered is displayed with an asterisk • After entering the data, pressing the ENTER key confirms the value (the field is right-aligned) • Pressing the F1 key calls up the authentication operation and the entered value is verified: if it is not correct, an error message is displayed; the ESC key allows returning to the page prompting for the password and one can try again; if the value is correct, the user is brought back to the referring page, the login icon is no longer displayed and the user can call up the original operation • At any time, except during editing, it is possible to waive to the authentication, by pressing the ESC key: the operator is then brought back to the original page • The authentication remains in force until the expiry of the period of inactivity, after which the display is turned off; upon the following start, to perform operations that require the authentication, the related authentication procedure shall be repeated After changing the configuration information, it is possible to scroll through the pages at the same page level that contains the changed information (UP and DN) and, if necessary, to make additional changes, but the function keys F1 and F2 respectively acquire the meaning of "save configuration" and "cancel changes". In this way, it is not possible to shift to other hierarchy branches and also the keys allowing direct access to the other hierarchies are disabled Moreover, if there are unsaved changes, the blinking programming icon is displayed. By pressing the F1 key, the changed data are saved; while pressing the F2 key, the changes are canceled. In both cases, the programming icon disappears and the function keys resume their original meaning. F1 F2 F3 F4 Figure 31 Saving the configuration 7.1.5 Main list When the system is started, the first page of the main list is displayed. Using the UP and DN keys, it is possible to scroll through the pages. Using the function keys, it is possible to call up the execution of the available functions. After a configurable time of keyboard functions, the display is turned off and it will be turned back on by pressing a button. The current page of the main list is displayed, i.e. the last one displayed before switching off. It is possible to go back to the main list by pressing the ESC key from the pages of the other hierarchies, provided that the user is not in editing mode or within a sublist of pages. 7.1.5.1 Function keys All pages in the main list allow calling up the same functionalities associated with the function keys F1 .. F4 and identified by the icons shown in the figure. F1 F2 F3 F4 Figure 32 Functions of the main list FIO 2.0 - User Manual – Ed .0 Rev 5 The information contained in this document is the property of Pietro Fiorentini S.p.A. – Reproduction prohibited The technical data may be subject to modification without notice Page 47 of 74 FIO2 User Manual ENGLISH Electronics and Integrated Systems Division – San Pietro Mosezzo (NO) - Italy F1 Date and time setting, if not already set Otherwise, Clock setting F2 Language selection: every time it is pressed, the next language, displayed in circular manner, is selected and applied F3 Backlight ON/OFF F4 Contrast ratio: every time it is pressed, the contrast is increased up to the maximum expected; subsequently, if it is pressed again, the contrast is set back to the minimum value Except for F1, all other commands are implemented immediately and do not involve moving to other pages. The command F1 leads to a subsequent page that depends on the device synchronization status. 7.1.5.1.1 Date and time setting If date and time have not been set yet (blinking sync icon), the following page is displayed: F1 F2 F3 F4 Figure 33 Date and time setting With the editing mode functions common to all fields (ENTER to start, numeric keys, ENTER to confirm), it is possible to edit the six fields for date and time. After editing a field, the following editing operation is automatically performed on the following field. Once editing has ended, pressing the F1 calls up the setting operation, after authentication if not already performed. Using the UP and DN keys, it is still possible to switch now from the setting page to the regulation one, and vice versa. 7.1.5.1.2 Time setting If the date and time have already been set (sync icon not present), the following page is displayed: F1 F2 F3 F4 Figure 34 Time setting With the editing mode functions common to all fields (ENTER to start, numeric keys, DN key to change the sign, ENTER to confirm), the seconds of difference compared to the device time are entered: a positive number indicates that the device's clock is back; negative seconds show that the device's clock is ahead. Once editing has ended, pressing the F1 calls up the setting operation, after authentication if not already performed. The difference in seconds will be recovered with a gradual shift of 2 seconds per minute. Using the UP and DN keys, it is still possible to switch now from the regulation page to the setting one, and vice versa. 7.1.5.2 List of information The main list allows quickly accessing the most important information of the device, as listed below. FIO 2.0 - User Manual – Ed .0 Rev 5 The information contained in this document is the property of Pietro Fiorentini S.p.A. – Reproduction prohibited The technical data may be subject to modification without notice Page 48 of 74 FIO2 User Manual ENGLISH Electronics and Integrated Systems Division – San Pietro Mosezzo (NO) - Italy Qb Correct flow rate - Station Qb1 Correct flow rate - Line 1 Qb2 Correct flow rate - Line 2 Pd Downstream pressure StLim Flow rate limitation status StMod Pressure modulation status Funct List of active functions (pressing ENTER it is possible to access the list, UP and DN are used to scroll it, ESC allows returning to the upper level) DigIn 7.1.6 Status of digital inputs (1 .. 6 from right to left) Pu1 Upstream pressure - Line 1 PAux1 Upstream pressure - Line 2 T Gas temperature Line 1 The hierarchy of the pages of Line 1 is reached by pressing the L1 key. The page that is displayed is the current one of the hierarchy. The indicator of the area shows "L1". The figure below shows the area indicator and the icons of the function keys. F1 F2 F3 F4 Figure 35 Line 1 7.1.6.1 Function keys The hierarchy consists of three branches (Measurements, Settings, Calibration), accessible through the function keys F1..F3, present on all pages. When switching from one branch to another, the displayed page is always the first of the sublist corresponding to the selected branch. The branch Calibration allows accessing lower levels of pages to perform operations relating to the functionality. From these pages, it is not possible to switch to the other branches; it is in fact necessary to return first of all to the upper level using the function keys that allow saving the set data or cancel the performed settings. 7.1.6.2 List of information Measurements branch Pu1 Upstream pressure - Line 1 Pd Downstream pressure Qb1 Correct flow rate - Line 1 Sp1 Percentage of opening (before the calibration, the raw value of ADC is shown) Vf1 Gas velocity Qm1 Gross flow rate - Line 1 TotVm1 Gross volume totalizer - Line 1 TotVb1 Correct volume totalizer - Line 1 TotVme1 Gross volume totalizer error - Line 1 C Conversion factor - Line 1 Dm Diameter - Line 1 Cg Cg Coefficient - Line 1 Reg Regulator type - Line 1 FIO 2.0 - User Manual – Ed .0 Rev 5 The information contained in this document is the property of Pietro Fiorentini S.p.A. – Reproduction prohibited The technical data may be subject to modification without notice Page 49 of 74 FIO2 User Manual ENGLISH Electronics and Integrated Systems Division – San Pietro Mosezzo (NO) - Italy Settings Branch FlowCalc Flow rate calculation - Line 1 (direct, indirect) PulseTy Pulse type - Line 1 (gross volumes, correct volumes) InputTy Input type (low frequency, high frequency) PW Pulse weight - Line 1 Psel Pressure selector for the calculation of the conversion factor of Line 1 (Pu1, PAux1, Pd) Pindir Pressure selector for the calculation of the indirect flow rate (Pu1, PAux1) Dm Diameter - Line 1 Calibration Branch Pu Calib Upstream pressure calibration Span Calib Displacement sensor calibration On these pages, as indicated by the message on the display, it is necessary to press the ENTER key to access the lower pages that perform the calibration activity. Field calibration of the pressure sensor F1 F2 F3 F4 Figure 36 Pressure calibration The calibration of the pressure sensor allows correcting the error due to the aging of the sensor itself, and takes place according to the following procedure: • apply a first pressure setpoint to the sensor • set the applied value in the page data field • press the F1 key to bind the currently calculated pressure value to the set pressure value • apply a second pressure setpoint to the sensor • set the applied value in the page data field • press the F2 key to bind the currently calculated pressure value to the set pressure value • press the F3 key (Save) to confirm and save the calibration data and return to the upper page The F4 key allows returning to the upper page, quitting the calibration task and leaving the previous situation unchanged. The two pairs of pressure values identify a straight line, according to which the value of the pressure calculated by ADC shall be corrected. The order of application and setting of the values is not relevant (the higher or lower value may be associated with either the first or second setpoint). Remark. The calibration of the pressure sensor is not an activity necessary for the operation and the calculation of the pressure value, which is instead enabled by sending the characterization file to the device. This file specifies the characteristics of the sensor: serial number, full scale, type (absolute or relative), coefficients of the calculation formula. Before receiving this file, the sensor is not configured and not any acquisition of the ADC value nor any calculation of the pressure value is carried out, which in any case would not give correct results without the information mentioned above. FIO 2.0 - User Manual – Ed .0 Rev 5 The information contained in this document is the property of Pietro Fiorentini S.p.A. – Reproduction prohibited The technical data may be subject to modification without notice Page 50 of 74 FIO2 User Manual ENGLISH Electronics and Integrated Systems Division – San Pietro Mosezzo (NO) - Italy Calibration of the displacement sensor F1 F2 F3 F4 Figure 37 Displacement calibration Contrary to the pressure calibration, the calibration of the displacement sensor is a activities necessary for normal use, without which it is not possible to calculate the percentage of the opening of the sensor, which remains not configured until this activity is completed. As long as the calibration is not completed, on the pages of the Measurements branch where the displacement value is shown the value read by the ADC will be displayed (very big numerical value). The same value of the ADC is shown on this page on the bottom right corner. The calibration of the displacement sensor can occur in the following two ways, depending on whether it is possible to set the opening percentage to 0: • If this is possible, set the displacement to 0% (fully closed) • press the F1 key (leaving to 0 the value set in the flow rate field) • set the displacement to the maximum value (100%, completely open) • press the F2 key • press the F3 key (Save) to confirm and save the calibration data • If it is not possible to set the displacement to 0% (fully closed), set it to a value close to 0 • With another instrument, measure the correct flow rate that passes through in this situation • Set this value in the flow rate field • press the F1 key: the device will calculate the percentage of opening corresponding to the flow rate value and will use it as the lowest point for the calculation of the calibration straight line • set the displacement to the maximum value (100%, completely open) • press the F2 key • press the F3 key (Save) to confirm and save the calibration data The F4 key allows returning to the upper page, quitting the calibration task and leaving the previous situation unchanged. In both cases, it is possible to reverse the setting order of the minimum and of 100%. The setting of these two values allows calculating the conversion straight line between the value read by the ADC and the corresponding opening percentage. 7.1.7 Line 2 The information relating to the two measurement lines are exactly matching. For line 2, the same information described for line 1 applies, for both the possible operations and the information shown. 7.1.8 Station The hierarchy of the pages of the Station can be reached by pressing the key "St". The page that is displayed is the current one of the hierarchy. The indicator of the area shows "St". The figure below shows the area indicator and the icons of the function keys. FIO 2.0 - User Manual – Ed .0 Rev 5 The information contained in this document is the property of Pietro Fiorentini S.p.A. – Reproduction prohibited The technical data may be subject to modification without notice Page 51 of 74 FIO2 User Manual ENGLISH Electronics and Integrated Systems Division – San Pietro Mosezzo (NO) - Italy F1 F2 F3 F4 Figure 38 Station 7.1.8.1 Function keys The hierarchy consists of four branches (Measurements, Settings, Calibration, Maintenance), accessible through the function keys F1..F4, present on all pages. When switching from one branch to another, the displayed page is always the first of the sublist corresponding to the selected branch. The branch Calibration and the branch Maintenance allow accessing lower levels of pages to perform operations relating to the functionality. From these pages, it is not possible to switch to the other branches; it is in fact necessary to return first of all to the upper level using the function keys that allow saving the set data or cancel the performed settings. 7.1.8.2 List of information Measurements branch Pu1 Upstream pressure - Line 1 PAux1 Upstream pressure - Line 2 Pd Downstream pressure PAux2 Tank pressure PAtm Atmospheric pressure Tamb Environment temperature T Gas temperature Qm Gross flow rate - Station Qb Correct flow rate - Station Vm Gross totalizer - Station Vb Correct totalizer - Station Vme Volume totalizer error - Station Settings Branch PRef Reference pressure TRef Reference temperature RelDens Relative density PresModul Pressure modulation (enabled, disabled) BackPres Back Pressure (enabled, disabled) Setpoint Manual pressure setpoint PdMin Minimum downstream pressure PdMax Maximum downstream pressure Qlim Flow rate limitation (enabled, disabled) LimFlow Flow rate selector to be limited (station, line 1, line 2) QlimMax Maximum flow rate for limitation PlimMin Minimum pressure for limitation LdBreak Loads disconnection (enabled, disabled) TPM Tank pressure monitoring (enabled, disabled) TPMBand TPM threshold percentage VmSet Setting of the totalizers FIO 2.0 - User Manual – Ed .0 Rev 5 The information contained in this document is the property of Pietro Fiorentini S.p.A. – Reproduction prohibited The technical data may be subject to modification without notice Page 52 of 74 FIO2 User Manual ENGLISH Electronics and Integrated Systems Division – San Pietro Mosezzo (NO) - Italy Setting of the totalizers F1 F2 F3 F4 Figure 39 Setting of the totalizers After entering the value in the field, subject to authentication, using the keys F1 or F2 the corresponding totalizer value (line 1 or line 2) is set. By pressing the key F3, the volume totalizers subject to error of both lines are zeroed. The corresponding station totalizers cannot be set or zeroed because they are calculated as the sum of the totalizers of the two lines. Calibration Branch Pd Calib Downstream pressure calibration PAux2 Calib Tank pressure calibration T Calib Temperature calibration On these pages, as indicated by the message on the display, it is necessary to press the ENTER key to access the lower pages that perform the calibration activity so as previously described for the pressure sensor calibration. Maintenance branch MaintStatus Maintenance status (on, off) IncTime UP command duration (ms) DecTime DN command duration (ms) MaintCmd Maintenance commands On the Maintenance commands page, as indicated by the message on the display, press the ENTER key to access the lower page that allows giving these same commands. Maintenance commands F1 F2 F3 F4 Figure 40 Maintenance commands Using the key F1 it is possible to set as pressure regulation setpoint the value entered in the password-protected field. Using the keys F2 and F3, which are also password-protected, the execution of an UP or DN pulse on the opening valve is ordered. 7.1.9 Device The hierarchy of the pages of the Device is reached by pressing the "Ap" key. The page that is displayed is the current one of the hierarchy. The indicator of the area shows "Ap". The figure below shows the area indicator and the icons of the function keys. FIO 2.0 - User Manual – Ed .0 Rev 5 The information contained in this document is the property of Pietro Fiorentini S.p.A. – Reproduction prohibited The technical data may be subject to modification without notice Page 53 of 74 FIO2 User Manual ENGLISH Electronics and Integrated Systems Division – San Pietro Mosezzo (NO) - Italy F1 F2 F3 F4 Figure 41 Device 7.1.9.1 Function keys The hierarchy consists of four branches (Diagnostics, Communications, System, Information), accessible through the function keys F1..F4, present on all pages. When switching from one branch to another, the displayed page is always the first of the sublist corresponding to the selected branch. On some pages, the function keys have different meanings. To access the general functions, it is necessary to move to a different page. 7.1.9.2 List of information Diagnostics branch CurDiag Current diagnostics (ENTER allows accessing the detail list) HistDiag Diagnostics log (ENTER allows accessing the detail list where it is possible to zero the individual conditions using the CLR key, subject to authentication) NumAlm Number of existing alarms NumEvt Number of existing events Communications branch GsmLevel GSM signal level: F1 allows making an immediate call; F2 reboots the modem ModemMsg Modem last message Baud485-1 Baud rate of the first 485 line, used as communication slave Baud485-2 Baud rate of the second 485 line, used for the cascading connection with other devices ChainMode Role of the second 485 (slave, master) Communication activities F1 F2 F3 F4 Figure 42 Operations on the modem With the F1 key an immediate call is made, according to the manner configured for periodic calls. With the F2 key, the modem is reset. FIO 2.0 - User Manual – Ed .0 Rev 5 The information contained in this document is the property of Pietro Fiorentini S.p.A. – Reproduction prohibited The technical data may be subject to modification without notice Page 54 of 74 FIO2 User Manual ENGLISH Electronics and Integrated Systems Division – San Pietro Mosezzo (NO) - Italy Branch System Plantcode Plant code Daystart Gas day start time Dst Daylight Saving Time enabling (disabled, enabled) DstStart DST start (day and month; if day = 0, last Sunday) DstEnd DST end (day and month; if day = 0, last Sunday) ModbusAddr Modbus address of the device Pwd Password authentication/modification UnitStd Measurement unit system (international, imperial) Tunit Temperature measurement unit Puunit Upstream pressure measurement unit Pdunit Downstream pressure measurement unit PAtmunit Atmospheric pressure measurement unit Qunit Flow rate measurement unit Vunit Volume measurement unit PWunit Pulse weight measurement unit Branch Information Maintdate Forecast maintenance date (year, month, day) BattUse Battery usage time (hours) BattLife Estimated remaining battery time (hours): F1 starts the replacement procedure SN Device serial number SNPd Serial number of the sensor Pd SNPu1 Serial number of the sensor Pu1 SNPAux1 Serial number of the sensor PAux1 SNPAux2 Serial number of the sensor PAux2 SNSpan1 Serial number of the displacement sensor 1 SNSpan2 Serial number of the displacement sensor 2 SNT Serial number of the sensor T Replacing the battery The sequence of steps of the procedure is shown in the following figures. F1 F2 F3 F4 Figure 43 Battery time From the page that shows the remaining time, with the F1 key the procedure is started until reaching the confirmation page. FIO 2.0 - User Manual – Ed .0 Rev 5 The information contained in this document is the property of Pietro Fiorentini S.p.A. – Reproduction prohibited The technical data may be subject to modification without notice Page 55 of 74 FIO2 User Manual ENGLISH Electronics and Integrated Systems Division – San Pietro Mosezzo (NO) - Italy F1 F2 F3 F4 Figure 44 Confirm replacement: F1 to stop the system With ESC it is possible to cancel the procedure; while F1 confirms the intention to replace the battery. The system stops all activities, saves all the necessary information, including the timestamp, and displays the final page. F1 F2 F3 F4 Figure 45 Stopped system: replace the battery Upon restart, the system prompts for confirmation of the fact that the battery has been effectively replaced, in order to reset the related time parameters. F1 confirms; F2 cancels. F1 F2 F3 F4 Figure 46 Upon restart, confirmation of the occurred replacement In any case, the system starts again to perform all previous activities, restarting from the timestamp saved before shutting down. The time elapsed between the replacement confirmation and the reboot can be recovered using the time alignment function, accessible from the main list. 7.1.10 Emergency status The emergency button allows stopping the regulation activity, suspending the implementation of the valve commands. The system goes into the emergency status and the page shown in the figure is displayed; on this page, the corresponding icon blinks. In this status, the system performs all normal activities (acquisition, log, communication), excluding the regulation, and the operator can browse the other pages of the user interface. The emergency button is recognized by the system, if it is kept pressed for at least 3 seconds. From any page, by pressing once again the emergency key, it is possible to return to the corresponding page. The function keys allow emptying the tank (F1) and exiting the emergency status (F2). When quitting, the system returns to a normal status, with inactive regulation. FIO 2.0 - User Manual – Ed .0 Rev 5 The information contained in this document is the property of Pietro Fiorentini S.p.A. – Reproduction prohibited The technical data may be subject to modification without notice Page 56 of 74 FIO2 User Manual ENGLISH Electronics and Integrated Systems Division – San Pietro Mosezzo (NO) - Italy F1 F2 F3 F4 Figure 47 Emergency status 7.1.11 Meaning of the icons The meaning of each icon that can appear on the device display is explained here below. Status icons Status icons appear on the top of the display and indicate a number of statuses relevant for the operator. Shown only blinking, it indicates that date and time have not been set Shown only blinking, indicates that at least one error condition is active Modem on Initialized Connected to the network Data communication in progress Bluetooth active ON: Device powered by the rechargeable battery; external power supply ON Blinking: WRONG power supply configuration Device powered by the primary battery and external power supply Remove the external power supply OFF: Device powered by the primary battery ON: device powered by the rechargeable battery; external power supply OFF or insufficient OFF: Device powered by the primary battery Indicator of remaining battery duration ≤ 10% (low battery) ≤ 20% ≤ 40% ≤ 60% ≤ 80% > 80% Emergency status Calibration status FIO 2.0 - User Manual – Ed .0 Rev 5 The information contained in this document is the property of Pietro Fiorentini S.p.A. – Reproduction prohibited The technical data may be subject to modification without notice Page 57 of 74 FIO2 User Manual ENGLISH Electronics and Integrated Systems Division – San Pietro Mosezzo (NO) - Italy Maintenance status Programming status - it indicates that some parameters have been changed and the configuration has not been saved yet Authentication status Area indicators These icons indicate the area to which the currently displayed page belongs, and therefore to which the data shown on it belong. (empty) Main list Hierarchy - Line 1 Hierarchy - Line 1 Hierarchy - Station Hierarchy - Device Function keys These icons will appear on the bottom of the display. They are associated with the function keys F1..F4 laying below them, and hey graphically recall the functionality currently associated with the corresponding button. Main list Date and time setting/adjustment User Interface Language selection Backlight ON/OFF Contrast adjustment Line 1, Line 2 Measurements branch selection Settings branch selection Calibration branch selection Station Measurements branch selection Settings branch selection Calibration branch selection Selection of the Maintenance branch FIO 2.0 - User Manual – Ed .0 Rev 5 The information contained in this document is the property of Pietro Fiorentini S.p.A. – Reproduction prohibited The technical data may be subject to modification without notice Page 58 of 74 FIO2 User Manual ENGLISH Electronics and Integrated Systems Division – San Pietro Mosezzo (NO) - Italy Device Diagnostic Information branch selection Communications branch selection System branch selection Information branch selection Saving the configuration Under any hierarchy, after changing a configuration parameter (marked by the appearance of the programming icon), it is possible to scroll the sublist and modify other parameters, but it is not possible to exit the sublist without confirming or canceling the changes performed. The function keys for selecting the area are therefore inhibited, showing the following ones in their place: Saving the configuration Canceling the changes made In both cases, you will exit the programming mode and the corresponding icon disappears. Calibration The calibration of the sensors is performed in the same way for all of them: First setpoint indication Second setpoint indication Likewise, for the opening sensors: Indication of full or partial closing Indication of full opening In any case, the icons for the functions allowing saving or canceling the changes do appear. Modem Modem initialization Forced call Setting of the totalizers Setting of the gross volume totalizers for Line 1 Setting of the gross volume totalizers for Line 2 Zeroing of all volume totalizers featuring errors FIO 2.0 - User Manual – Ed .0 Rev 5 The information contained in this document is the property of Pietro Fiorentini S.p.A. – Reproduction prohibited The technical data may be subject to modification without notice Page 59 of 74 FIO2 User Manual ENGLISH Electronics and Integrated Systems Division – San Pietro Mosezzo (NO) - Italy Maintenance commands Pressure setpoint setting Implementation of the DOWN command Implementation of the UP command Emergency The emergency status is activated by pressing the dedicated button for at least 3 seconds. The specific commands are: Forced emptying of the tank Exit from the emergency status Battery replacement Command/confirmation of battery replacement Authentication Confirmation of password authentication FIO 2.0 - User Manual – Ed .0 Rev 5 The information contained in this document is the property of Pietro Fiorentini S.p.A. – Reproduction prohibited The technical data may be subject to modification without notice Page 60 of 74 FIO2 User Manual ENGLISH Electronics and Integrated Systems Division – San Pietro Mosezzo (NO) - Italy 7.2 Communication The manners for using the provided communication ports are given here below; the complete configuration of all the communication functionalities is accessible through MODBUS ASCII, RTU and TCP protocol. Every single request message can be indifferently encoded according to the ASCII, RTU or TCP rules; the device will respond accordingly. 7.2.1 Bluetooth The Bluetooth port is turned on together with the LCD display; to use Bluetooth port make sure that the display is turned on; otherwise, press any key to enable it. The device FIO2 will be available in the Bluetooth network with the configured identification name; to access FIO2 it is necessary to have a Bluetooth device that supports the Serial Port Profile (SPP), as well as of the related software for communicating with the device. The Bluetooth connection requires a PIN authentication, according to the configured value. 7.2.2 RS485 ports Both RS485 ports can be used for MODBUS queries using proper software. In addition, it is possible to configure a RS485 port as bus master; In this case, MODBUS communications received on the Bluetooth and GSM/GPRS channel not intended for the master device will be switched to the RS485 bus. 7.2.3 GSM Communication The internal modem allows performing outgoing GSM calls and accepting incoming calls. It is possible to configure a list of allowed phone numbers and inhibit communication with other numbers. 7.2.4 GPRS communication The internal modem allows performing outgoing TCP connections to IP addresses / configurable ports, and accepting TCP connections incoming through servers on a configurable port. The server for incoming connections manages one connection at a time. It is possible to configure a list of allowed IP addresses and reject incoming connections from other addresses. It is possible to configure a periodic notification service of the IP address obtained from the device; This service uses a UDP packet to communicate the IP address and other information about the FIO2 device to a central server. 7.2.5 SMS Management The device can execute simple commands or report diagnostics information in response to the receipt of specific SMS messages; moreover, it is possible to signal the onset or solution of alarm conditions by sending SMS messages; for the syntax of the command and communication SMS messages, see document [2]. 7.2.6 E-mail management The device can signal the onset or solution of alarm conditions by sending e-mail messages, with a similar and alternative mechanism to the sending of SMS messages. 7.2.7 Outgoing call management The device can be configured to perform outgoing calls under the following conditions: 1. Automatic periodic call 2. Onset or solution of given alarm conditions The system managing the outgoing calls uses a configurable list of recipients, which may contain from 1 to 8 phone numbers and/or IP addresses/ports; each individual recipient can be configured as a telephone number or IP address. Once activated, the system managing the outgoing call attempts to calls each recipient on the list, according to the configured strategy. The calling system stops only when one of the following conditions is met: 1. Termination of the recipient list: after making attempts to communicate with all of the recipients on the list, according to the configured strategy, the call status is deemed handled 2. Receipt of a special EOC (end of communication) message: upon receipt of that message, the call status is deemed handled 7.2.8 Managing Incoming Calls The device can be configured to activate the modem at specific times, in order to accept incoming communications via GSM, TCP and SMS. While the modem is ON: • all GSM calls will be accepted, except for those coming from recipients who are not in the list of allowed recipients (if configured). • all received SMS messages will be interpreted, except for those coming from recipients who are not on the list of allowed recipients (if configured). if the TCP server has been activated, all incoming TCP connections will be accepted - one at a time, except for those coming from recipients who are not on the list of allowed recipients (if configured). 7.2.9 Alarm signaling and related management It is possible to configure several independent alarm conditions; the onset of one or more of these conditions can be signaled externally through: FIO 2.0 - User Manual – Ed .0 Rev 5 The information contained in this document is the property of Pietro Fiorentini S.p.A. – Reproduction prohibited The technical data may be subject to modification without notice Page 61 of 74 FIO2 User Manual ENGLISH Electronics and Integrated Systems Division – San Pietro Mosezzo (NO) - Italy • the activation of the system managing outgoing calls: if configured, the system will continue to make calls to the recipients until one of the termination conditions is reached • communication via SMS/e-mail: if configured, the system will send a SMS/e-mail message related to each alarm condition/solution to the recipients, according to the chosen strategy. It is possible to configure the system to have it wait for the confirmation of alarm notice receipt from recipient or consider the condition managed with the mere message sending. 7.2.10 Communication protection There are several protection levels available; each of them is configurable and can be activated independently from one other: • Protection from SIM card tampering: it is possible to configure the CCID of the allowed SIM card: in this case, the modem will only accept the SIM card with the corresponding CCID • Remote connection protection from unauthorized users: it is possible to configure a list of phone numbers / IP addresses for which the connection with the device and the sending of SMS messages are allowed • MODBUS communication protection and access via console through password: • o it is possible to protect the reading/viewing of parameters by means of a password o it is possible to protect the editing of parameters by means of a password SMS communication protection: SMS messages must always specify an authentication password to be accepted 7.2.11 MODBUS protocol FIO2 supports the MODBUS ASCII, RTU and TCP protocol. Every single request message can be indifferently encoded according to the ASCII, RTU or TCP rules; the device will respond accordingly. The supported MODBUS commands are: • 0x03: read holding registers • 0x06: write single register • 0x10: write multiple registers All information available via MODBUS protocol is encoded on one or more holding registers. For a detailed description of the MODBUS protocol implementation on FIO2 see document [1]. FIO 2.0 - User Manual – Ed .0 Rev 5 The information contained in this document is the property of Pietro Fiorentini S.p.A. – Reproduction prohibited The technical data may be subject to modification without notice Page 62 of 74 FIO2 User Manual ENGLISH Electronics and Integrated Systems Division – San Pietro Mosezzo (NO) - Italy 8 Maintenance 8.1 Replacement /Installation of the sensors The temperature sensor and the pressure sensors related to Pu1 and Pd are always forecast and are, therefore, factory-assembled. The sensors related to PAux1 and PAux2 are factory-mounted only if requested upon order. For replacing the sensors PAux1 and PAux2, refer to chapter 5.4 For replacing the sensors related to Pu1 and Pd and the temperature one, follow the procedure described below: Remove the plastic cover of the terminal compartment and of the card as described in paragraphs 5.4.1 and 5.5.1 Disconnect the flat connection of the keyboard whose connector is located under the display card and is visible in the picture below: Figure 48 Position of the keyboard connector Unscrew the cap of the cable gland corresponding to the sensor that is to be replaced. The terminals related to the temperature sensors, Pu1 and Pd, are positioned on the left side of the device and are visible in the picture below: FIO 2.0 - User Manual – Ed .0 Rev 5 The information contained in this document is the property of Pietro Fiorentini S.p.A. – Reproduction prohibited The technical data may be subject to modification without notice Page 63 of 74 FIO2 User Manual ENGLISH Electronics and Integrated Systems Division – San Pietro Mosezzo (NO) - Italy Figure 49 Terminals of the temperature sensors, Pu1 and Pd Disconnect the sensor conductors from the terminal as described in paragraph 5.4.5 Replace the sensor observing the connection diagram visible here below: Figure 50 Connection diagram for temperature sensors, Pu1 and Pd Tighten the corresponding cable gland and re-assemble the keyboard, the plastic cover of the card and that of the wiring compartment (see paragraphs 5.4.1 and 5.5.1 ) In case a pressure sensor is replaced, it is necessary to provide the information for the characterization of the sensor itself, which can be sent to the device through a special external software. FIO 2.0 - User Manual – Ed .0 Rev 5 The information contained in this document is the property of Pietro Fiorentini S.p.A. – Reproduction prohibited The technical data may be subject to modification without notice Page 64 of 74 FIO2 User Manual ENGLISH Electronics and Integrated Systems Division – San Pietro Mosezzo (NO) - Italy If an auxiliary sensor needs to be replaced, refer to the following wiring diagram: Figure 51 Wiring diagram for auxiliary sensors and I/O connections 8.2 Replacing the batteries The batteries are placed in a visible enclosure covering the card / removed keyboard and positioned on the right side of the device, see Figure 27 The batteries along with their wiring and the associated protection devices represent a proprietary pack of Pietro Fiorentini S.p.A. The related replacement is allowed only with one of the codes listed below: AS0670T03M01R00: for lithium battery AS0670T02M01R00: for rechargeable lithium-ion battery To replace the batteries proceed as described below. Remove the plastic cover of the terminal compartment and of the card as described in paragraphs 5.4.1 and 5.5.1 Disconnect the battery connector (see Figure 27 ) Remove the two fastening screws of the battery casing as shown in the following picture and remove the enclosure. FIO 2.0 - User Manual – Ed .0 Rev 5 The information contained in this document is the property of Pietro Fiorentini S.p.A. – Reproduction prohibited The technical data may be subject to modification without notice Page 65 of 74 FIO2 User Manual ENGLISH Electronics and Integrated Systems Division – San Pietro Mosezzo (NO) - Italy Figure 52 Screws of the battery enclosure In case of primary battery code AS0670T03M01R00, use the following assembly diagram: Support plate Slot for cable passage Figure 53 Assembly diagram for primary battery CAUTION: In case of primary battery, it is important to mount the support plate oriented as described in Figure 53 Assembly diagram for primary battery FIO 2.0 - User Manual – Ed .0 Rev 5 The information contained in this document is the property of Pietro Fiorentini S.p.A. – Reproduction prohibited The technical data may be subject to modification without notice Page 66 of 74 FIO2 User Manual ENGLISH Electronics and Integrated Systems Division – San Pietro Mosezzo (NO) - Italy In case of rechargeable battery code AS0670T02M01R00 use the following assembly diagram: Support plate Slot for cable passage Figure 54 Assembly diagram for rechargeable battery CAUTION: In case of primary battery, it is important to mount the support plate oriented as described in Figure 54 Place the assembled enclosure back to its position and tighten the screws as per Figure 52 Reconnect the keyboard. Reconnect the batteries. Mount the cover of the electronic card and that of the terminals. 8.2.1 Warnings BATTERIES CANNOT BE INSTALLED OR REPLACED IN AN ENVIRONMENT WHERE THERE IS A GAS LEAK OR EXPLOSION HAZARD. Before replacing, use special instruments to make sure that the gas concentration is not dangerous (Explosimeter). Primary battery Replace the battery when the low battery icon appears (see the icons meaning) Rechargeable battery Replace it every 5 years regardless of the charge status indication. Always use the battery replacement procedure described in paragraph 7.1.9. When replacing the rechargeable battery, first of all disconnect the remote power supply. Do not insert and remove the battery connector abruptly. Refer to the chapter "Power supply" for more information FIO 2.0 - User Manual – Ed .0 Rev 5 The information contained in this document is the property of Pietro Fiorentini S.p.A. – Reproduction prohibited The technical data may be subject to modification without notice Page 67 of 74 FIO2 User Manual ENGLISH Electronics and Integrated Systems Division – San Pietro Mosezzo (NO) - Italy 8.3 SIM Replacement The SIM port connector is located under the display card. If it is necessary to access the SIM card in the field, proceed as described below: Remove the plastic cover of the terminal compartment and of the card as described in paragraphs 5.4.1 and 5.5.1 Remove the separating plate positioned between the terminal compartment and the compartment containing the electronic card (see figure below). Unlock the opening of the SIM door and replace it. Close the door and lock it with the special locking lever. SIM Holder Figure 55 Replacing the SIM card If the protection against SIM card tampering has been enabled (see 7.2.10) , it is necessary to update the CCID stored in the device, aligning it with the value of the new SIM card. FIO 2.0 - User Manual – Ed .0 Rev 5 The information contained in this document is the property of Pietro Fiorentini S.p.A. – Reproduction prohibited The technical data may be subject to modification without notice Page 68 of 74 FIO2 User Manual ENGLISH Electronics and Integrated Systems Division – San Pietro Mosezzo (NO) - Italy 8.4 Password reset The login passwords can be reset by closing the jumper J8 located on the main card. To reset the passwords: • • • Close the jumper J8 Turn on the display by pressing a key on the keyboard Open the jumper J8 The jumper is accessible only by removing the terminal compartment cover and the card cover as described in paragraphs 5.4.1 and 5.5.1 The jumper is visible in the following picture: Figure 56 Jumper to reset passwords 8.5 Calibration in the field The field calibration of the sensors can be done through the user interface as described in the operator interface. FIO 2.0 - User Manual – Ed .0 Rev 5 The information contained in this document is the property of Pietro Fiorentini S.p.A. – Reproduction prohibited The technical data may be subject to modification without notice Page 69 of 74 FIO2 User Manual ENGLISH Electronics and Integrated Systems Division – San Pietro Mosezzo (NO) - Italy 9 Technical characteristics 9.1 General Parameter Technical data Plastic enclosure with transparent cover Enclosure Upwards opening with lock for keyboard access Separate compartment for terminals access Material Case: ABS, Transparent cover: Polycarbonate Dimensions (overall) L240 x H206 x W117 mm Protection degree IP65 Operating temperature -20°C / +60°C Graphic Display, 128 x 464 pixel, B&W, green background Display Visible area: 71 x 39 mm Backlight: Yellow LED (activation from keypad) Membrane keyboard Keyboard 24 numeric and function keys + Emergency key GSM/GPRS Quad Band modem Remote communication Bluetooth 2.1 868MHz RF module Local communication Two 2-wire RS485 ports Processor Dual processor of Arm Cortex type Flash: 2Mbtye + 2Mbyte (additional) Memory RAM: 64Kbyte + 32Kbyte Management of daylight saving time and leap years Initial accuracy: ±75S/month Thermal drift: -150S/month (+25°C ±35°C) Clock Aging: ±8S/year Retention time in case of power supply failure: ≥ 30S Acquisition and calculation time 0.5S (all sensors) Terminals Spring terminals for quick connection Primary Battery or External + Rechargeable Battery Sources of supply (only one source can be used) Certifications 9.2 ATEX, IECEx, EMC, CSA Power supply Device Type and Model Type of construction Electrical Parameters Notes Primary battery Hybrid lithium Battery pack 3.6V / 19Ah (LiSOCl2 + HCL) Dimensions: D elongated type Installation inside the device Output: R/N wire with 2-pole connector Protections: PTC Rechargeable battery Lithium Ion Battery pack Installation inside the device Dimensions: 67x45x20mm Output: R/N wire with 3-pole connector 3.75V / 4Ah Protection: H/L Voltage/Current circuit, PTC FIO 2.0 - User Manual – Ed .0 Rev 5 The information contained in this document is the property of Pietro Fiorentini S.p.A. – Reproduction prohibited The technical data may be subject to modification without notice Page 70 of 74 FIO2 User Manual ENGLISH Electronics and Integrated Systems Division – San Pietro Mosezzo (NO) - Italy External Power Supply Input EX certified feeder Ui=15.6V, Ii=180mA Device installed in FIO RTU or FIO Solar Full recharge time Rechargeable battery 9.3 Approximately 35 hours Autonomy 9.3.1 Reference conditions Thermal profile The following table shows the temperature values and the retention percentage during the device life-cycle. Temperature (°C) Configurations 1. Rechargeable Namur 2. Rechargeable BF 3. Primary BF Retention time -20 3% 10 15% 0 7% 25 50% 40 15% 50 7% 60 3% configuration with rechargeable battery and input from Namur pulse emitter configuration with rechargeable battery and input from BF emitter (reed contact) configuration with primary battery and input from BF emitter (reed contact) Operation modes For Namur and BF configurations, the activation of the "Energy Saving" (ES) mode is considered after 14 days of absence of main power supply. The return to the "Fully Functional" (FF) mode is deemed to occur after the full recharge of the battery. Operating conditions Fully Functional Activity Rechargeable Namur Rechargeable BF Primary BF Valve drives 100 / day, Timp=100mS 100 / day, Timp=100mS 100 / day, Timp=100mS Local activity 5 minutes / month 5 minutes / month 5 minutes / month Measurements and Calculations Two sensors P, T, DS, DIN Two sensors P, T, DS, DIN Two sensors P, T, DS, DIN 30S Rate 30S Rate 30S Rate Acquisition of HF pulses Continues N/A N/A Acquisition of BF pulses N/A 1Hz 1Hz Pulse repetition Fmax 2.5KHz Fmax 50Hz Fmax 50Hz Data Log Rate 15 minutes 15 minutes 15 minutes RS485 Communication 3.2 minutes / day 4.5 minutes / day 4.5 minutes / day Programmed GSM / SMS receiving 3 / day, duration 5 min 3 / day, duration 5 min N/A GSM Communication 45S / day 45S / day 45S / day Energy Saving Activity Rechargeable Namur Rechargeable BF Valve drives 100 / day, Timp=100mS 100 / day, Timp=100mS Measurements and Calculations Two sensors P, T, DS, DIN Two sensors P, T, DS, DIN 1 / 30S Rate 1 / 30S Rate Pulses acquisition HF BF Pulse repetition Fmax 2.5KHz Fmax 50Hz Data Log Rate 15 minutes 15 minutes FIO 2.0 - User Manual – Ed .0 Rev 5 The information contained in this document is the property of Pietro Fiorentini S.p.A. – Reproduction prohibited The technical data may be subject to modification without notice Page 71 of 74 FIO2 User Manual ENGLISH Electronics and Integrated Systems Division – San Pietro Mosezzo (NO) - Italy RS485 Communication N/A 3.5 minutes / day GSM Communication 60S every 7 days 60S every 7 days Autonomy Configuration Fully Functional Autonomy (days) Energy Saving Autonomy (days) 1 Rechargeable Namur 14 9.5 2 Rechargeable BF 14 650 3 Primary BF 1750 (4.8 years) N/A 9.4 Name Analog Inputs Function FS Measurement MU and Type Measurement Field OVL Conn. Accuracy Reference conditions 3.5 Pu1, PAux1 Upstream pressure 10 24 Bar A 100 450 Pd Downstream pressure mB G 3.5 10 24 Bar A 100 450 PAux2 Tank pressure mB G Bar A 24 Temp Gas temperature DS1, DS2 Opening Pamb Tamb -20°C 3.53B 10.1B 5.0B 24.24B 20B 101B 0 – 101mB 0.6B 0.9B 3.53B 10.1B 5.0B 24.24B 20B 101B 0 – 101mB 2xFS ¼” GAS 3Bar G ¼” NPT 2xFS ¼” GAS 3Bar ¼” NPT G 3.5 10 0.6B 0.9B 0.6B 3.53B 0.9B 10.1B 5.0B 24.24B 2xFS ¼” GAS °C -10°C +50°C 150% % 0% – 100% Environment pressure 1.3 Bar A 750m – 1100m 2Bar Environ. Temperature -40°C +85°C -20°C +60°C +85°C +70°C Operating conditions ±0.2% RDG ±0.5RDG% ±0.5mB ±1mB ±0.2% RDG ±0.5RDG% ±0.5mB ±1mB ±0.2% RDG ±0.5RDG% Ø6x50mm Aging ±0.1% FS / year ±0.5mB / year ±0.1% FS / year ±0.5mB / year ±0.1% FS / year ±0.3°C ±0.6°C ±0.25°C/1Kh ±0.2% RDG ±0.4% RDG included ±1.5mB ±2.5mB 1mB / year ±2°C n/a ± 0.8°C Notes -Reference conditions 20°C ±3°C -Operating conditions -20°C - +60°C -Aging of the displacement transducer: included in the accuracy specification -Aging of the temperature sensor (PT1000): use rate 0.5S/30S, 1000h = about 7 years -Length of cables for Pu1, PAux1, Pd, PAux2, Temp : 3m -Length of cables for DS1, DS2 (permissible): lower than 30m - Penvironment and Tenvironment are not inputs; sensors are within the device FIO 2.0 - User Manual – Ed .0 Rev 5 The information contained in this document is the property of Pietro Fiorentini S.p.A. – Reproduction prohibited The technical data may be subject to modification without notice Page 72 of 74 FIO2 User Manual ENGLISH Electronics and Integrated Systems Division – San Pietro Mosezzo (NO) - Italy 9.5 Digital Inputs and Outputs Signal BF1 / HF Function Physical Interface Technical data Configurable pulse counting input BF: Contact Voltage – Free BF: see BF2 HF: Namur HF: Freq. Max: 5KHz BF/ HF (Closed I ≤ 1.2mA, Open I ≥ 2.1mA) Polarization 8-8.2V / 1KΩ Error Indication (short, opening) Low frequency counting input Voltage Contact – Free BF2 DIN1 Digital status input Voltage Contact – Free Max. Freq.: 2Hz RONmax: 200Ω Polarization: 3V / 30uA Sampling: 30S max DIN2 RONmax: 200Ω DIN3 Polarization: 3V / 30uA DIN4 DIN5 DIN6 Pulse repetition output Dout Compatible Namur Input Configurable BF/HF Vin max: 10V BF: Fmax = 50Hz HF: Fmax: 2.5KHz UP1 Valve control outputs UP2 Pressure increase DOWN1 Valve control outputs DOWN2 Pressure decrease 3.3V rated voltage Power voltage command Max. current: 230mA Rated voltage: 3.3V Power voltage command Max. current: 230mA Notes -Maximum length of cables for BF/HF, Din Valves: 30m 9.6 Communication ports Communication port Technical data Notes Bands: GSM 850/900/1800/1900 (quadband) Proprietary module with connection on the main card Functions: GSM/GPRS/SMS SIM Card: 1.8V / 3V standard SIM, hinged connector Modem GSM Mini-rod panel antenna Bands:GSM 900/1800 UMTS 2100 (pentaband) External connection on the terminal from panel for remote antenna Gain: 2.2dBi Max. gain 2.2dBi Radiation spectrum: Omnidirectional Connector: SMA-F Version: dual mode 2.1 – 4.00 Carrier frequency: 2.4GHz Bluetooth Proprietary module with connection on the main card Profile: SPP (Serial Port) Antenna: Included Range: ≥ 75m Velocity: 57600 baud Carrier: 868MHz RF 868MHz RS485 Antenna: wire, internal Proprietary module with connection on the main card Max. velocity: 38400 baud Module currently not forecast Connection: 2 wires Two electrically identical ports Polarization: Internal Configurable velocity Max. velocity: 38400 baud Maximum length of cables RS485 = 1200m (with recommended cable, check instructions par. 3.2) FIO 2.0 - User Manual – Ed .0 Rev 5 The information contained in this document is the property of Pietro Fiorentini S.p.A. – Reproduction prohibited The technical data may be subject to modification without notice Page 73 of 74 FIO2 User Manual ENGLISH Electronics and Integrated Systems Division – San Pietro Mosezzo (NO) - Italy 9.7 Compliance with FCC and IC regulations 9.7.1 Information This device contains two FCC and IC certified communication devices. The label bearing the "FCC Identifier" and the "Industry Canada Certification Number" marking are applied in a position not visible from outside and difficult to be accessed. Therefore, in compliance with the "Labelling Requirements for Part 15 Devices" (FCC) and "Labelling Requirements for the Host device" (IC) provisions, on each device there is an additional label always visible showing the FCC ID and IC certificate number. 9.7.2 Information concerning the use of the devices For both communication devices, the following guidelines do apply This device complies with Part 15 of the FCC Rules. Operation is subject to the following two conditions: (1) (2) This device cannot cause harmful interferences This device must accept any interference received, including interferences that may cause an undesired operation of the device. Changes or modifications not expressly approved by the party responsible for conformity could invalidate the user's right to use the equipment. This device complies with Part 15 of the FCC Rules. Operation is subject to the following two conditions; (1) this device may not cause harmful interference, and (2) this device must accept any interference received, including interference that may cause undesired operation." Changes or modifications not expressly approved by the party responsible for compliance could void the user's authority to operate the equipment. FIO 2.0 - User Manual – Ed .0 Rev 5 The information contained in this document is the property of Pietro Fiorentini S.p.A. – Reproduction prohibited The technical data may be subject to modification without notice Page 74 of 74