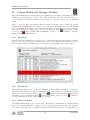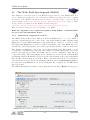
1
Telescope Automation & Remote
Observing System (TAROS)
User’s Manual
Version 2.0
April 2012
Research School of Astronomy and Astrophysics
College of Physical and Mathematical Sciences
The Australian National University
TAROS User’s Manual
Contents
1 Introduction
1.1 Getting Going Quickly . . . . . . . . . . . . . . .
2 System Requirements
2.1 Operating system . . . . . . . . . . . . . . . . . .
2.2 Java version . . . . . . . . . . . . . . . . . . . . .
2.3 CPU/RAM . . . . . . . . . . . . . . . . . . . . .
2.4 Disk space . . . . . . . . . . . . . . . . . . . . . .
2.5 Display . . . . . . . . . . . . . . . . . . . . . . .
2.6 Network connection speed . . . . . . . . . . . . .
3 Running TAROS
3.1 RSAA web site . . . . . . . . . . . . . . . . . . .
3.2 Java Web Start . . . . . . . . . . . . . . . . . . .
3.3 Connecting to the TAROS server . . . . . . . . .
3.3.1 Username, Proposal ID, Password . . . .
3.3.2 Instrument selection . . . . . . . . . . . .
4 The TAROS Main Window
4.1 Privilege . . . . . . . . . . . . . . . . . . . . . . .
4.2 Session . . . . . . . . . . . . . . . . . . . . . . . .
4.3 Preferences – image compression . . . . . . . . .
4.4 Help . . . . . . . . . . . . . . . . . . . . . . . . .
4.5 Alerts . . . . . . . . . . . . . . . . . . . . . . . .
5 Weather Window
5.1 Meteorological data . . . . . . . . . . . . . . . . .
5.2 Weather window alarms . . . . . . . . . . . . . .
6 The Dome Window
6.1 Summary tab . . . . . . . . . . . . . . . . . . . .
6.2 Controls tab . . . . . . . . . . . . . . . . . . . . .
6.3 Status tab . . . . . . . . . . . . . . . . . . . . . .
6.4 Resets tab . . . . . . . . . . . . . . . . . . . . . .
7 The Telescope Control System (TCS) Window
7.1 Programmable Push-Buttons . . . . . . . . . . .
7.2 TCS Window Menus items . . . . . . . . . . . .
7.2.1 Objects . . . . . . . . . . . . . . . . . . .
7.2.2 Subsystems . . . . . . . . . . . . . . . . .
7.3 Telescope offset control . . . . . . . . . . . . . . .
7.4 Telescope focus control . . . . . . . . . . . . . . .
7.5 Rotator control . . . . . . . . . . . . . . . . . . .
8 Acquisition & Guiding (A&G) Window
8.1 Apertures . . . . . . . . . . . . . . . . . . . . . .
8.1.1 Defining and removing apertures . . . . .
8.1.2 Selecting an aperture . . . . . . . . . . . .
8.2 Beams . . . . . . . . . . . . . . . . . . . . . . . .
8.2.1 Defining a beam . . . . . . . . . . . . . .
8.2.2 Selecting a beam . . . . . . . . . . . . . .
8.3 Acquisition camera exposure settings . . . . . . .
8.4 Initialising camera controllers . . . . . . . . . . .
2
. . . . . . . . . . . . . . . .
.
.
.
.
.
.
.
.
.
.
.
.
.
.
.
.
.
.
.
.
.
.
.
.
.
.
.
.
.
.
.
.
.
.
.
.
.
.
.
.
.
.
.
.
.
.
.
.
.
.
.
.
.
.
.
.
.
.
.
.
.
.
.
.
.
.
.
.
.
.
.
.
.
.
.
.
.
.
.
.
.
.
.
.
.
.
.
.
.
.
.
.
.
.
.
.
.
.
.
.
.
.
.
.
.
.
.
.
.
.
.
.
.
.
.
.
.
.
.
.
.
.
.
.
.
.
.
.
.
.
.
.
.
.
.
.
.
.
.
.
.
.
.
.
.
.
.
.
.
.
.
.
.
.
.
.
.
.
.
.
.
.
.
.
.
.
.
.
.
.
.
.
.
.
.
.
.
.
.
.
.
.
.
.
.
.
.
.
.
.
.
.
.
.
.
.
.
.
.
.
.
.
.
.
.
.
.
.
.
.
.
.
.
.
.
.
.
.
.
.
.
.
.
.
.
.
.
.
.
.
.
.
.
.
.
.
.
.
.
.
.
.
.
.
.
.
.
.
.
.
.
.
.
.
.
.
. . . . . . . . . . . . . . . .
. . . . . . . . . . . . . . . .
.
.
.
.
.
.
.
.
.
.
.
.
.
.
.
.
.
.
.
.
.
.
.
.
.
.
.
.
.
.
.
.
.
.
.
.
.
.
.
.
.
.
.
.
.
.
.
.
.
.
.
.
.
.
.
.
.
.
.
.
.
.
.
.
.
.
.
.
.
.
.
.
.
.
.
.
.
.
.
.
.
.
.
.
.
.
.
.
.
.
.
.
.
.
.
.
.
.
.
.
.
.
.
.
.
.
.
.
.
.
.
.
.
.
.
.
.
.
.
.
.
.
.
.
.
.
.
.
.
.
.
.
.
.
.
.
.
.
.
.
.
.
.
.
.
.
.
.
.
.
.
.
.
.
.
.
.
.
.
.
.
.
.
.
.
.
.
.
.
.
.
.
.
.
.
.
.
.
.
.
.
.
.
.
.
.
.
.
.
.
.
.
.
.
.
.
.
.
.
.
.
.
.
.
.
.
.
.
.
.
.
.
.
.
.
.
.
.
.
.
.
.
.
.
.
.
.
.
.
.
.
.
.
.
.
.
.
.
.
.
.
.
.
.
.
.
.
.
.
.
.
.
.
.
.
.
.
.
.
.
.
.
.
.
.
.
.
.
.
.
.
.
.
.
.
.
.
.
.
.
.
.
.
.
.
.
.
.
.
.
.
.
.
.
.
.
.
.
.
.
.
.
.
.
5
5
6
6
6
6
6
6
6
7
7
8
9
9
9
11
11
11
11
11
11
12
12
12
14
14
14
15
15
17
18
20
20
21
21
22
23
25
25
25
27
27
27
29
29
29
19/06/2012
TAROS User’s Manual
9
10
11
12
13
14
8.5 Telescope focus sequence . . . . . . . . . . . . . .
8.6 Acquisition camera components control . . . . .
8.7 Acquisition camera control . . . . . . . . . . . .
8.8 Guider calibration . . . . . . . . . . . . . . . . .
8.9 Guiding offset plots . . . . . . . . . . . . . . . . .
8.10 Flux and seeing plots . . . . . . . . . . . . . . . .
Image Displays
9.1 Compression . . . . . . . . . . . . . . . . . . . .
9.2 Image menu . . . . . . . . . . . . . . . . . . . . .
9.3 Cut Levels . . . . . . . . . . . . . . . . . . . . . .
9.4 Colours . . . . . . . . . . . . . . . . . . . . . . .
9.5 Brightness adjustment . . . . . . . . . . . . . . .
9.6 Plots . . . . . . . . . . . . . . . . . . . . . . . . .
9.6.1 Region-select mode . . . . . . . . . . . . .
9.6.2 Draw line plot . . . . . . . . . . . . . . .
9.6.3 Calculate region statistics and histogram
9.6.4 Calculate radial profile . . . . . . . . . . .
9.7 Zoom and pan . . . . . . . . . . . . . . . . . . .
System Health and Messages Window
10.1 Messages . . . . . . . . . . . . . . . . . . . . . .
10.2 Health tree . . . . . . . . . . . . . . . . . . . . .
10.3 Alarm indicator . . . . . . . . . . . . . . . . . . .
The Download Manager
Instrument windows
The Wide Field Spectrograph (WiFeS)
13.1 Instrument components control . . . . . . . . . .
13.2 Data acquisition window . . . . . . . . . . . . . .
13.3 WiFeS observing modes . . . . . . . . . . . . . .
13.3.1 Classical observing . . . . . . . . . . . . .
13.3.2 Nod-and-shuffle (N&S) observing . . . . .
13.4 Observation sequence panel . . . . . . . . . . . .
13.4.1 Data Handling . . . . . . . . . . . . . . .
13.4.2 Observation sequence setup . . . . . . . .
13.4.3 Exposure setup . . . . . . . . . . . . . . .
13.4.4 Filter and arc setup . . . . . . . . . . . .
13.4.5 Readout region . . . . . . . . . . . . . . .
13.4.6 Components setup . . . . . . . . . . . . .
13.4.7 Primary and secondary beam centre . . .
13.4.8 Instrument indicators . . . . . . . . . . .
13.4.9 Observations block (OB) files . . . . . . .
13.5 Exposure status . . . . . . . . . . . . . . . . . . .
13.6 Quick-look image display . . . . . . . . . . . . .
13.7 Field-viewing camera . . . . . . . . . . . . . . . .
13.8 Temperatures . . . . . . . . . . . . . . . . . . . .
The 2.3m Echelle Spectrograph
14.1 Instrument components control . . . . . . . . . .
14.2 Data acquisition . . . . . . . . . . . . . . . . . .
3
.
.
.
.
.
.
.
.
.
.
.
.
.
.
.
.
.
.
.
.
.
.
.
.
.
.
.
.
.
.
.
.
.
.
.
.
.
.
.
.
.
.
.
.
.
.
.
.
.
.
.
.
.
.
.
.
.
.
.
.
.
.
.
.
.
.
.
.
.
.
.
.
.
.
.
.
.
.
.
.
.
.
.
.
.
.
.
.
.
.
.
.
.
.
.
.
.
.
.
.
.
.
.
.
.
.
.
.
.
.
.
.
.
.
.
.
.
.
.
.
.
.
.
.
.
.
.
.
.
.
.
.
.
.
.
.
.
.
.
.
.
.
.
.
.
.
.
.
.
.
.
.
.
.
.
.
.
.
.
.
.
.
.
.
.
.
.
.
.
.
.
.
.
.
.
.
.
.
.
.
.
.
.
.
.
.
.
.
.
.
.
.
.
.
.
.
.
.
.
.
.
.
.
.
.
.
.
.
.
.
.
.
.
.
.
.
.
.
.
.
.
.
.
.
.
.
.
.
.
.
.
.
.
.
.
.
.
.
.
.
.
.
.
.
.
.
.
.
.
.
.
.
.
.
.
.
.
.
.
.
.
.
.
.
.
.
.
.
.
.
.
.
. . . . . . . . . . . . . . . .
. . . . . . . . . . . . . . . .
. . . . . . . . . . . . . . . .
.
.
.
.
.
.
.
.
.
.
.
.
.
.
.
.
.
.
.
.
.
.
.
.
.
.
.
.
.
.
.
.
.
.
.
.
.
.
.
.
.
.
.
.
.
.
.
.
.
.
.
.
.
.
.
.
.
.
.
.
.
.
.
.
.
.
.
.
.
.
.
.
.
.
.
.
.
.
.
.
.
.
.
.
.
.
.
.
.
.
.
.
.
.
.
.
.
.
.
.
.
.
.
.
.
.
.
.
.
.
.
.
.
.
.
.
.
.
.
.
.
.
.
.
.
.
.
.
.
.
.
.
.
.
.
.
.
.
.
.
.
.
.
.
.
.
.
.
.
.
.
.
.
.
.
.
.
.
.
.
.
.
.
.
.
.
.
.
.
.
.
.
.
.
.
.
.
.
.
.
.
.
.
.
.
.
.
.
.
.
.
.
.
.
.
.
.
.
.
.
.
.
.
.
.
.
.
.
.
.
.
.
.
.
.
.
.
.
.
.
.
.
.
.
.
.
.
.
.
.
.
.
.
.
.
.
.
.
.
.
.
.
.
.
.
.
.
.
.
.
.
.
.
.
.
.
.
.
.
.
.
.
.
.
.
.
.
.
.
.
.
.
.
.
.
.
.
.
.
.
.
.
.
.
.
.
.
.
.
.
.
.
.
.
.
.
.
.
.
.
.
.
.
.
. . . . . . . . . . . . . . . .
. . . . . . . . . . . . . . . .
29
31
32
32
33
33
34
34
34
35
35
36
36
36
37
37
38
38
39
39
39
39
41
42
43
43
45
45
45
45
45
47
47
48
49
49
49
49
50
50
50
50
51
51
53
53
53
19/06/2012
TAROS User’s Manual
14.2.1 Regions . . . . . . . . . . . . . . . . . .
14.2.2 Temperatures . . . . . . . . . . . . . . .
14.2.3 Counter . . . . . . . . . . . . . . . . . .
14.2.4 Downloads . . . . . . . . . . . . . . . .
15 The 2.3m Imager
15.1 Instrument settings / components control . . .
15.2 Data acquisition . . . . . . . . . . . . . . . . .
A The basics for WiFeS observing with TAROS
A.1 Weather window . . . . . . . . . . . . . . . . .
A.2 Messages window . . . . . . . . . . . . . . . . .
A.3 Principal control windows . . . . . . . . . . . .
A.4 Guide camera focus . . . . . . . . . . . . . . . .
A.5 Obtain daytime instrument calibration frames .
A.6 Starting and configuring the telescope . . . . .
A.7 Focus the telescope . . . . . . . . . . . . . . . .
A.8 Basic procedure for acquisition and guiding . .
A.9 Data acquisition . . . . . . . . . . . . . . . . .
A.10 WiFeS observing guidelines and tips . . . . . .
A.11 Shutting down at the end of the night . . . . .
B MSOTCS Command Summary
B.1 Getting help . . . . . . . . . . . . . . . . . . . .
B.2 Starting up and shutting down . . . . . . . . .
B.3 Hardware control commands . . . . . . . . . .
B.4 Commonly used motion commands . . . . . . .
B.5 Configuration commands . . . . . . . . . . . . .
4
.
.
.
.
.
.
.
.
.
.
.
.
.
.
.
.
.
.
.
.
.
.
.
.
.
.
.
.
.
.
.
.
.
.
.
.
.
.
.
.
.
.
.
.
.
.
.
.
.
.
.
.
.
.
.
.
.
.
.
.
.
.
.
.
.
.
.
.
. . . . . . . . . . . . . . . . .
. . . . . . . . . . . . . . . . .
.
.
.
.
.
.
.
.
.
.
.
.
.
.
.
.
.
.
.
.
.
.
.
.
.
.
.
.
.
.
.
.
.
.
.
.
.
.
.
.
.
.
.
.
.
.
.
.
.
.
.
.
.
.
.
.
.
.
.
.
.
.
.
.
.
.
.
.
.
.
.
.
.
.
.
.
.
.
.
.
.
.
.
.
.
.
.
.
.
.
.
.
.
.
.
.
.
.
.
.
.
.
.
.
.
.
.
.
.
.
.
.
.
.
.
.
.
.
.
.
.
.
.
.
.
.
.
.
.
.
.
.
.
.
.
.
.
.
.
.
.
.
.
.
.
.
.
.
.
.
.
.
.
.
.
.
.
.
.
.
.
.
.
.
.
.
.
.
.
.
.
.
.
.
.
.
.
.
.
.
.
.
.
.
.
.
.
.
.
.
.
.
.
.
.
.
.
.
.
.
.
.
.
.
.
.
.
.
.
.
.
.
.
.
.
.
.
.
.
.
.
.
.
.
.
.
.
.
.
.
.
.
.
.
.
.
.
.
.
.
.
.
.
.
.
.
.
.
.
.
.
.
.
.
.
.
.
.
.
.
.
.
.
.
.
.
.
.
.
.
.
.
54
55
56
56
57
57
57
58
58
58
59
59
59
59
60
60
61
62
62
63
63
63
63
63
64
19/06/2012
TAROS User’s Manual
1.
Introduction
The Telescope Automation and Remote Observing System (TAROS) has been developed by
the ANU Research School of Astronomy and Astrophysics (RSAA) to allow remote control
and/or automation of its telescopes at Siding Spring Observatory.
Currently, TAROS is used for remote and on-site operation of the 2.3m telescope and to
provide automated, queue-scheduled operation of the SkyMapper telescope. The instruments
available via TAROS at the 2.3m are the WiFeS integral-field spectrograph, the Imager and
the Echelle spectrograph.
TAROS is comprised of several sub-systems which handle detector control, acquisition and
guiding, instrument component control, telescope control, data archiving and communications. All data taken with TAROS is archived to secure storage on the ANU main campus
in Canberra.
For remote observing, a Java user interface has been developed with the aim of allowing
the observer to work from home over a broadband connection (minimum 8 Mbps). For
automated observing, an observation scheduler has been developed in a way that allows
specialised schedulers to be developed to suit individual observing programmes.
This manual is concerned with the operation of TAROS for interactive remote
and on-site observing.
1.1
Getting Going Quickly
The Sections in this manual provide detailed operating instructions for each component of
the TAROS system. The Appendices at the end of the manual provide basic, bullet-point
instructions for getting started quickly with the 2.3m telescope and instruments.
5
19/06/2012
TAROS User’s Manual
2.
System Requirements
2.1
Operating system
The TAROS Graphical User Interface (GUI) is a Java application and will run on any modern
operating system. It has been developed and tested on Mac OSX (10.4-10.7), Linux (Fedora
Core 5, Ubuntu 8.04), Solaris 10 (x86 and Sparc) and Microsoft Windows (XPSP3 and 7).
2.2
Java version
The TAROS GUI will run with a Java Runtime Environment (JRE) of at least version 1.6.
To find out which version you have installed, open a terminal window and run the command
java -version. If you need to update your JRE, visit java.oracle.com.
2.3
CPU/RAM
The TAROS GUI will run on any reasonably modern (< 3-year-old) laptop or desktop
computer. It needs approximately 300MB of RAM.
2.4
Disk space
The amount of disk space required to store the GUI, local settings and log files is approximately 30MB. This does not include any FITS data that you choose to download from the
server.
2.5
Display
It is not essential, but highly recommended that two displays are available. TAROS uses a
lot of screen real-estate.
2.6
Network connection speed
The recommended minimum connection speed is 8 Mbps. This allows for TAROS to be used
over some home broadband connections, however the asymmetric nature of home connections
and the unpredictability of congestion can result in very poor performance of the TAROS
GUI software. The capacity of the connection affects the TAROS GUI in the following ways:
· if you choose to download a local copy of your data as you acquire it, the connection
·
·
speed will affect the rate at which images become locally available. Note that the
TAROS server archives a copy of your data so it is not necessary to download everything
as it is acquired – you can retrieve your data at a later stage, perhaps using a faster
internet connection.
the real-time display of images in the TAROS Display window will be affected by
connection speed and other traffic on the connection (e.g., downloading a local copy of
the data)
status updates from the TAROS server to the GUI may be affected if the connection
is heavily loaded. This could result in lost messages or problems in the way that the
GUI reflects the state of the server (e.g., displaying an incorrect filter position).
6
19/06/2012
TAROS User’s Manual
3.
3.1
Running TAROS
RSAA web site
For TAROS users connected to the RSAA network (directly or via VPN), the TAROS web
page at http://www.mso.anu.edu.au/local/observing/taros is the place to go to download
and run the TAROS GUI. Follow the “Access TAROS for...” link for your scheduled instrument. [TAROS users who are not directly connected to the RSAA network should contact
[email protected] for instructions about how to connect.] This will take you to a web
page (see Illustration 1) where there will be links for viewing the current weather at Siding
Spring, starting the TAROS GUI, restarting the TAROS server, viewing the TAROS server
state and closing the dome in the event of TAROS communications problems. There are
also sections on this page showing current system messages (e.g. relating to problems with
the telescope or instrument) and messages from previous observers. You can add your own
message to be displayed to future observers once you are running the TAROS GUI. From the
TAROS Main Window, select Help→TAROS Notes and then select the Virtual Whiteboard tab(see Illustration 2) . Edit or add to messages on the Virtual Whiteboard, then
click the Submit Changes button.
Illustration 1: The TAROS server web page.
7
19/06/2012
TAROS User’s Manual
Illustration 2: The TAROS Virtual Whiteboard editor.
3.2
Java Web Start
TAROS uses Java Web Start as its way of distributing the GUI software and starting it up.
Web Start ensures that TAROS users always load the latest version of the TAROS GUI.
To start the TAROS GUI, click the link on the TAROS instrument access page labelled
“Launch the TAROS GUI”. Depending on your operating system and web browser, at this
stage you might see a pop-up asking you to confirm that you want to open the file with Java
Web Start (e.g., Illustration 3). If you see this pop-up, click OK.
Illustration 3: Web browser confirmation pop-up window: click OK to open the file.
You will then see the application downloaded and started. It may take a few minutes to
download the GUI depending on your connection speed. If you have recently downloaded
the GUI, then the application will be launched from a locally cached copy (i.e., it won’t
download it every time you run it). If the version of the GUI in your local cache is different
8
19/06/2012
TAROS User’s Manual
Illustration 4: Self-signed certificate security warning
to the current version on the TAROS web site, a fresh copy will be downloaded. Java Web
Start manages this.
The next pop-up you see will be a security warning, like the one shown in Illustration 4.
This is generated because the GUI is a “signed” Java application. Being “signed” allows the
application to read and write files to the local hard disk (e.g., the disk in your laptop). In
the case of the TAROS GUI, this is necessary for saving settings, preferences and data from
the instrument.
The warning is generated because RSAA has “self-signed” the application. i.e., we haven’t
purchased a security certificate from a source known to the browser. To proceed with starting
the GUI, select Always trust content from this publisher and click Run.
3.3
3.3.1
Connecting to the TAROS server
Username, Proposal ID, Password
The first stage of connecting to the TAROS server is observer identification and authentication (Illustration 5). Username, Proposal ID and Password details were sent to you in
the letter you received from the RSAA Time Assignment Committee (TAC) advising you of
your successful application.
As well as preventing unauthorised access to the TAROS server, authentication allows
TAROS to read information from the RSAA TAC database about which instrument to
connect. i.e., if the proposal ID is scheduled to use WiFeS, then TAROS will configure itself
for that instrument.
3.3.2
Instrument selection
The next stage of connecting to the TAROS server is to select the instrument that you will be
using (Illustration 6). You may be scheduled to use more than one instrument, in which case
you will need to select the instrument you wish to use from the Instrument drop-down list.
The other fields are read-only and are there to provide reassurance that you are connecting
to the correct TAROS server for your observing session.
9
19/06/2012
TAROS User’s Manual
Illustration 5: TAROS authentication window
Illustration 6: TAROS server and instrument selection
10
19/06/2012
TAROS User’s Manual
4.
The TAROS Main Window
The Main window (shown in Illustration 7) is the hub that provides access to the various
TAROS windows that interact with the sub-systems at the telescope. In the window, from
left to right, these sub-systems are Weather Data, Dome/Building Control, Telescope Control System (TCS), Science Instrument Settings, Acquisition/Guide camera control (A&G),
Science Instrument Data Acquisition, TAROS Image Display, and TAROS Health and Messages. Click the relevant icons to access the windows for these sub-systems.
The sub-systems in common to all instruments are described in the following
sections. Separate sections describe the different components control and data
acquisition windows of each instrument (Sections 13 WiFeS, 14 Echelle spectrograph, and 15 Imager).
Illustration 7: TAROS Main window connected to the WiFeS instrument and displaying an alert.
4.1
Privilege
TAROS uses a User Privilege Level to control access to certain operations. At the moment
there are only Observer and Engineer levels. The current user privilege level is shown by the
Privilege indicator at the bottom of the main window.
4.2
Session
The status of the connection to the TAROS server is shown at the bottom of the main
window by the Session. Should you become disconnected from the TAROS server, you
should quit the GUI and restart.
4.3
Preferences – image compression
The TAROS menu provides access to the Preferences dialog, from which you can control
the level of compression used by the various image displays in the instrument and A&G
windows. More information about the image displays is found in Section 9.
4.4
Help
The Help menu provides access to the TAROS Notes dialog, where you can see TAROS
Release Notes and the Virtual Whiteboard containing messages from previous observers
and where you can update and add information that could be useful to future observers.
4.5
Alerts
The Main window will show an alert to draw your attention to any problems that will prevent observing from proceeding (e.g., dome shutter closed by rain). The TAROS Health and
Messages icon in the main window will be overlaid with a warning triangle (e.g., Illustration 7), the icon will blink, and the main window will be raised above all other windows on
your desktop. To see the cause of the problem, click on the blinking icon.
11
19/06/2012
TAROS User’s Manual
5.
Weather Window
5.1
Meteorological data
The Weather window contains seven tabs that display meteorological data and imagery.
These include the HAT-South webcam, the 2.3m webcam (dome interior and shutter), the
Australian Bureau of Meteorology (BoM) rain radar map from the nearest radar to SSO, a
satellite IR cloud-cover image, data from the 2.3m meteorological system (Illustration 9), an
all-sky image from the UNSW APT CONCAM system (Illustration 8), and an all-sky image
from the HAT-South all-sky camera. The images and data are automatically refreshed every
few minutes.
The TAROS WeatherViewer GUI (also run via Java Web Start) is available from the TAROS
website and provides a convenient display of the camera and imaging data available in the
weather window independently of the TAROS GUI and an active TAROS session.
5.2
Weather window alarms
The Weather window will display warnings to alert you to situations at the telescope which
can result in damage to equipment unless acted upon. For example, high humidity or high
wind-speeds that exceed the operational limits for the telescope will be highlighted Illustration 9.
The Weather window will also display an alert if the dome shutter is closed by the rain
detector. It’s important to note that the “dome closed by rain” condition is not a softwarebased decision. The rain-sensor→dome-shutter link is a system independent of any software
systems, and TAROS simply reports that the sensor has triggered and the shutter has closed.
The Dome window has a facility (on the Resets tab, Section 6.4) that allows you to reset the
“rain latch” once you are certain that it is safe to open the dome shutter again.
Illustration 8: The TAROS Weather window showing UNSW all-sky camera image
12
19/06/2012
TAROS User’s Manual
Illustration 9: The Weather Window showing data from SSO telescopes and alerts about rain.
13
19/06/2012
TAROS User’s Manual
6.
The Dome Window
The Dome window displays the status and allows control of the 2.3 m building/dome systems.
It is this window that allows you to control the building shutter, ventilation fans, building
lights and to reset the axis servo drives if necessary. The window is divided into a series of
tabbed panes that each contain a grouping of controls or status indicators.
6.1
Summary tab
The Summary tab (Illustration 10) gives an overall view of health and status of each of the
dome and building sub-groups.
Illustration 10: The TAROS dome window summary tab
6.2
Controls tab
The Controls tab (Illustration 11) provides control of each of the individual components
of the dome: the control console (On / Off), the internal building lights (On / Off), the
building shutter (Open / Closed), the primary mirror cover (Open / Closed), the tertiary
mirror station (Nasmyth A / Nasmyth B / stowed), the rotator selection (Nasmyth A /
Nasmyth B / Cassegrain), the building ventilation fans (On / Off), and the dome flat-field
lamp for obtaining dome flats (On / Off). The current status of each component is shown in
the right column of the tab. Drop-down menus or (buttons in the case of the dome lights)
are used to change the position or status of each component. The change is implemented as
soon as an option is selected by clicking with the mouse.
All of the components in this window are also controllable via commands sent to the Telescope
Control System via the Telescope Control System window (see Section 7). e.g., the TCS
command open all opens the building shutter, then opens the mirror cover, and activates
14
19/06/2012
TAROS User’s Manual
the ventilation fans.
Illustration 11: The TAROS dome window controls tab
6.3
Status tab
The Status tab, shown in Illustration 12, provides a summary of the status of other subsystems of the telescope building.
6.4
Resets tab
The Resets tab (Illustration 13) allows you to reset telescope or associated plant control
electronics after a fault has tripped one or more subsystems. Separate buttons reset the
building rotation drive, the axis servo drives, or the ‘shutter closed by rain’ latch. There is
also a Master Reset button that performs a power-off, reset servos and building drive, and
power-on. The Master Reset will clear the error that causes the ”telescope uncontrollable”
messages to appear occasionally.
15
19/06/2012
TAROS User’s Manual
Illustration 12: The TAROS dome window status tab
Illustration 13: The TAROS dome window resets tab
16
19/06/2012
TAROS User’s Manual
7.
The Telescope Control System (TCS) Window
Illustration 14 shows the main TCS window. This window provides direct access to the
telescope control system and in many ways simulates the control panel located in the 2.3m
telescope control room. The top half of the window displays the status of the TCS and
details of the current telescope position and motion. Above the status display is a toolbar
which gives access to dialogs for (from left to right): loading object coordinate files, saving
coordinate files to disk, applying telescope offset commands, telescope focus control, and
rotator control.
At the bottom right of the ‘Status’ panel in the TCS window is a small icon picturing a
pair of spectacles. Clicking this icon will change the status display into a tabbed pane which
provides a more compact view of the TCS status and takes up less room on the computer
display. Between the Objects section and the Command/Response section is a bar which
allows for resizing of the Objects and Command entry/response panels.
Below the status display is the ‘Objects’ panel, including an area where objects that have
been manually added or loaded from a coordinate file are displayed. Above this, there are
buttons for manipulating the object list, selecting an object to track, and for passing a
selected object to the TCS as a beam definition. When multiple entries appear in the object
list, the currently selected object is highlighted in blue. The Move Up and Move Down
buttons can be used to change the position of the selected object in the list, and the Remove
button to delete it. Clicking the Add Object... button will open a dialog box that allows
the coordinates and epoch for a new object to be manually entered. When defined, the new
object will appear in the TCS window object list. The Send to TCS button will send the
current object list to the TCS as a coordinate file.
The track and beam button functions are as follows:
Track - Track the currently selected object.
Track/Next - Track the object that appears immediately after the currently selected
object in the list.
Track/Prev - Track the object that appears immediately before the currently selected
object in the list.
Track/Show - Causes an information message to be displayed about the results of tracking the selected object but without implementing the track command. No motion is
initiated and if the telescope is currently tracking or slewing to track, that motion
proceeds undisturbed. This function can be used to check the behaviour of tracking
an object other than the one being currently tracked. Output messages will appear in
the messages panel at the bottom on the TCS window. This is a useful command if
you are trying to determine whether or not an object can be acquired and tracked.
Define Beam A/B/C - Defines the coordinates of the selected object as a beam (preset position on the celestial sphere, see Section 8.2). The TCS allows for up to
three pre-defined beams, labelled A, B and C. These provide convenient access to
objects/positions and must be used to define the ‘object’ and ‘sky’ offset positions for
the nod-and-shuffle mode of WiFeS observing (see Section 13).
Below the Objects panel, the ‘Command Entry/Response’ section contains a set of buttons that provide shortcuts to commonly-used TCS commands, made to resemble the pushbuttons on the physical TCS console at the telescope. Below these buttons is a text input
field into which any TCS commands can be directly entered. The Send button to the right
of the text field sends the command in the text field to the TCS (or just press the Enter key
on your keyboard). A messages field appears below the input line, displaying responses and
17
19/06/2012
TAROS User’s Manual
messages output by the TCS. Any valid TCS command can be typed into the commandentry field and the TCS responses will appear in the message display area. See Appendix B
for a summary of common TCS commands.
7.1
Programmable Push-Buttons
A brief description of the pushbutton functions and the corresponding TCS commands (semicolons between separate commands) are listed below:
Startup - Starts the telescope system by initializing the TCS processes, loading the central
database with constant parameters and the telescope configuration and turning on the
Illustration 14: The Telescope Control System main window during telescope tracking
18
19/06/2012
TAROS User’s Manual
telescope and plant control electronics. TCS> startup
Open All - Opens the building shutter and primary mirror cover. TCS> open all
Close All - Closes the building shutter and primary mirror cover. TCS> close all
Rot PA - Changes the rotator reference mode to ‘position angle’. In this mode, the rotator
angle will change to maintain a constant angle on the sky between the ‘instrument
principal direction’ and north in the J2000 coordinate system. The TCS rotator
command is then used to select a desired instrument position angle. TCS> rotator
position angle
Rot Vert - Changes the rotator reference mode to ‘vertical angle’. In this mode, the rotator angle will change to maintain a constant angle on the sky between the instrument
principal direction and the upward vertical. The TCS rotator command is then used
to select a specified angle with respect to the vertical. TCS> rotator vertical angle
Rot Stat - Halt the rotator motion. The rotator will remain in a stationary position
unaffected by the motion of the azimuth and altitude axes, but can be driven to a
specified mechanical rotator angle. TCS> rotator reference stationary
Rot NA - Set the rotator mode to one in which the rotator is not controlled at all and is
kept stationary. TCS> rotator not in use
Lights Off - Turn off all of the dome building lights so that it is safe for observing. TCS>
set lighting safe
Lights On - Turn on building lights. TCS> set lighting unsafe
Nasmyth A - Configure the telescope components to use the Nasmyth A focal station
(for WiFeS). TCS> configure focal station nasmyth a
Nasmyth B - Configure the telescope components to use the Nasmyth B focal station
(for the Echelle or Imager). TCS> configure focal station nasmyth b
Cal Point - Calibrate the telescope pointing. This is performed after an object has been
acquired and the telescope has been offset to position the object coordinates precisely at the selected aperture. See the TCS documentation for further details. TCS>
calibrate pointing
Halt - Halt the telescope (and the telescope building and windscreens), interrupting any
other motion that was requested. TCS> halt
Park - Slew the telescope (and the telescope building and windscreens) to the park position. The instrument rotator, focuser and other mechanisms are not moved. TCS>
park
Shutdown - Initiates the ‘End-of-night’ shutdown sequence: parks the telescope, stows the
tertiary mirror, closes the primary mirror cover, turns off the ventilation fans, closes the
building/dome shutter, and turns off the telescope systems and control console. TCS>
shutdown all, equivalent to shutdown park tertiary mirror drive mirror cover
fans shutter telsys console
It is possible to define your own set of push-buttons. The software first reads the standard set
in from a standard location - everyone gets these and they cannot be changed programmatically. A user configurable set is then read from the file ∼/.taros/TelescopePushButtons.properties
on the machine that is running the GUI. Adding button definitions to this file simply appends extra buttons to the list of standard ones - starting on row 3. Here is an example of
extra push-buttons:
#
# Telescope PushButton properties
#
# Format of this file is:
19
19/06/2012
TAROS User’s Manual
#
#
#
#
#
#
#
#
#
#
#
* One button definition per line
* Button_Name = Actual telescope command
* comment lines begin with #
where Button_Name is a dot separated Java property name with the "leaf" or last part of
the name used to label the button. Any ’_’ characters in this leaf node are replaced
with spaces in the button name.
Buttons are alphabetically sorted so to get a sort order to your liking use numbering or
something in the higher order segments of the name.
# The standard set of buttons
# with user-defined buttons.
Generic.PushButton17.Wifes_PA
Generic.PushButton18.Acq_Vert
Generic.PushButton19.Ech_NasB
use the first 16 button positions, so start at 17
= aper wifes; rotator position_angle
= aper acq; rotator vertical_angle; rotator 180
= configure focal_station nasmyth_b; aper ech; rotator not_in
# PushButtons for Imager
Imager2m3.PushButton.Offset_Size30 = Offset Step 30
# PushButtons for WiFeS
WiFeS.PushButton.Offset_Size30 = Offset Step 30
7.2
7.2.1
TCS Window Menus items
Objects
- Load a coordinate list, - Save current list as coordinate file
A file of coordinates can be loaded into the TCS window and sent to the TCS if desired (this
allows use of TRACK/NEXT and TRACK/PREV commands). The format of the file is as
follows:
!
! Coordinate file
!
=A1204=
=A1204_sky=
--
WiFeS
11 13 20.5
11 13 26.80
+17 35 41
+17 36 30.6
=M87=
12 30 49.4
+12 23 28
J2000
=M87_sky= 12 31 14.50
+12 26 56.5
=NGC4696=
12 48 49.3
=NGC4696_sky= 12 48 34.72
=NGC4696-f1= 12 48 48.48
=NGC4696-f2= 12 48 50.15
J2000
J2000
! z 0.0044
J2000
-41 18 40
-41 21 10.8
-41 18 34.7
-41 18 47.7
J2000
J2000
J2000
J2000
! z 0.1706
Virgo cluster, PA = 120 deg
!
!
!
z 0.0099
Centaurus cluster
NW field, PA 35 deg
SE field, PA 35 deg
Anything after an exclamation mark (!) is considered to be a comment.
20
19/06/2012
TAROS User’s Manual
Illustration 15: Telescope offset control window, accessed through the main TCS window.
7.2.2
Subsystems
These menu items give access to the features available from the toolbar. The following
sections document the offset, focus and rotator subsystems.
7.3
Telescope offset control
The third button in the toolbar at the top of the TCS window, or selecting ‘Offset...’
from the ‘Subsystems’ menu of the TCS menu bar opens a new window that provides
an interface for entering and applying offsets to the telescope pointing on the celestial sphere,
shown in Illustration 15. R.A. and Dec. offsets can be entered directly into the text input
fields, or offsets can be applied incrementally using the ‘Pushbutton Control’ panel.
To directly select numerical offset values, type the R.A. and Dec. offsets into the respective
fields, and apply using either the Offset Base or Offset buttons below the offset fields. The
function of these, and the other buttons are outlined below:
Offset Base - Applies the specified offset in R.A. and Dec. to the telescope base position.
Any previously applied offsets are effectively zeroed before applying the offset values
entered.
Offset - Applies the specified offsets to the current tracking position and so consecutive
offset commands are cumulative in their effect.
Track Base - Acquires and tracks the current base coordinates by zeroing any celestial
offsets. Note that if the Track Zero command has been used to change the base
coordinates since the commencement of tracking, the telescope will move to the new
base coordinates not the original source coordinates of the object.
Track Zero - Establishes the current tracking coordinates as a new base position (the
21
19/06/2012
TAROS User’s Manual
telescope is not moved). The base coordinates are replaced by the current tracking
coordinates and the accumulated offsets zeroed.
The pushbutton control panel simulates the telescope offset controls found on the physical
control console at the 2.3 m telescope. The right half of the panel contains a rosette of yellow
and orange Fast
offset direction buttons for applying incremental offsets. The
Slow
options in the left half of the panel control the types of offsets that will be selected by the
rosette buttons. These apply only to the pushbutton offset controls in this window, and do
not affect the mode for the TCS offset commands.
In Jog mode, the telescope moves continuously on the sky as long as a rosette button is
pressed and with a speed which is defined by the value in the Jog Speed field. The yellow
Slow rosette buttons will then move the telescope at the selected speed and the orange Fast
buttons move the telescope at a speed equal to the selected jog speed scaled by the ratio
defined in the Fast/Slow Ratio field.
In Offset mode, the telescope is stepped by the distance defined in the Offset Step field
(in arcseconds) in the particular direction on the sky each time a yellow Slow rosette button
is pressed and released again. Clicking an orange Fast offset rosette button will offset the
telescope in the specified direction by a distance equal to the offset step value scaled by the
ratio specified in the Fast/Slow Ratio field.
The ‘Coordinate System’ radio buttons enable the observer to select the coordinate system
in which the offset pushbuttons operate:
RA/DEC selects the accepted equatorial coordinate system; the cardinal directions N, W,
S, E, are labelled on the rosette.
XY selects a rectangular coordinate system which matches the abscissa and ordinate of the
Acquisition display.
Az/Alt selects azimuth/altitude coordinates in such a manner that the buttons move the
telescope up, down, counterclockwise and clockwise in the expected sense.
Slit selects a rectangular coordinate system such that the horizontal or EW buttons coincide
with the instrument principal direction (e.g., spectrograph slit) in the focal plane.
7.4
Telescope focus control
Clicking the fourth button in the toolbar at the top of the TCS window, or selecting
’Focus...’ from the ’Subsystems’ menu, will open a new window that provides an
interface for manually setting the telescope focus, as shown in Illustration 16. Again, these
simulate the manual focus control provided by pushbuttons on the 2.3 m control console.
To adjust the focus, the controls in this window must be ‘unlocked’ by clicking the Unlock
Controls button at the top right. This is a precaution to help prevent accidental changes
to the telescope focus.
The focus can be changed by clicking and dragging the ‘Specific Focus’ slider to a selected
position, or entering a focal position in the text field next to the slider. Alternatively, the
pushbuttons below the slider can be used to incrementally move the focus position. Clicking
and holding the OUT
or IN
pushbuttons will change the focus position at the speed
shown in the Jog Speed field. The buttons only operate in ‘jog’ mode; ‘offset’ mode is not
provided as for the telescope offset control described above in Section 7.3.
The ‘Focus Mode’ buttons change the behaviour of the focus control. In Manual mode, the
OUT/IN pushbuttons give the observer direct control of the focuser drive motor. When
the Automatic or Compensated mode has been selected, the focuser pushbuttons do not
drive the focuser motor directly but instead jog the reference value or setpoint to which
22
19/06/2012
TAROS User’s Manual
Illustration 16: The Focus Control window, accessed through the TCS window.
the focus is servoed. (This reference value can also be set by the TCS command focus
position). In Compensated mode, the encoded focus position is augmented by a temperature compensation term before it is displayed to the observer or used for focus control.
7.5
Rotator control
The last button in the toolbar at the top of the TCS window, or selecting the ‘Rotator
control...’ item in the subsystems menu, opens a new window that provides an interface
for manually controlling the selected instrument field rotator, shown in Illustration 17. Again,
these include functions to simulate the rotator control provided by pushbuttons on the control
console at the telescope.
The top panel in the window shows the current configuration of the rotator and rotator
control. A text input field below that allows the rotator angle to be directly entered and
applied using the Set Angle button.
The options in the ‘Rotator Pushbuttons’ panel operate in a very similar way to those in
the Telescope Offset window, described in Section 7.3 above. The yellow Slow and orange
Fast clockwise CW
and counter-clockwise CCW
jog buttons are used for
manual control of the selected instrument rotator. They function only in jog mode; rotator
offsetting is not provided. The jog speed is controlled by the values in the Fast/Slow Ratio
and Jog Speed fields, as for the telescope offsetting. The actual angle that is controlled
by the buttons (and the ‘Set Angle’ panel) depends upon the rotator mode, which can be
selected by the ‘Rotator Mode’ buttons:
Not In Use - the rotator is not controlled at all and is kept stationary.
Stationary - the rotator remains stationary but can be driven to a specified mechanical
rotator angle.
Position Angle - the rotator is controlled so as to maintain a specified position angle
with respect to north in the current tracking coordinate system.
Vertical Angle - the rotator is controlled so as to maintain a specified angle with respect
23
19/06/2012
TAROS User’s Manual
Illustration 17: The Rotator Control window, accessed through the TCS window.
to the vertical.
24
19/06/2012
TAROS User’s Manual
8.
Acquisition & Guiding (A&G) Window
Illustration 18 shows the main Acquisition and Guiding window. The large image display
panel on the right shows images from the acquisition camera with markers and information
about defined apertures and guiding positions overlaid. The smaller image display in the
‘Guide Window’ panel displays the guide region readouts during guiding.
The toolbar at the top of the window consists of buttons for (from left to right): reinitialising
the guide camera detector controller, accessing the telescope focus procedure, guide camera
components control, guide camera control, guider calibration, guiding offset plots display,
and flux and seeing plots display.
Note: At the start of your run, you should check that the acquisition/guide camera is
correctly focussed. For WiFeS users, open the WiFeS Component Control window, select
the WiFeS Common CC tab and set the Aperture Wheel position to “Coronagraph” (See
Section 13.1). During the day there should be enough light that you can see the coronographic
wire in the image display of the A&G window after obtaining a short exposure with the
acquisition/guide camera. Now adjust the focus of the acquisition/guide camera so that the
coronographic wire is sharp. Use the focusing control which can be found in the Acquisition
Camera Components Control window, which is opened from the third button in the toolbar
at the top of the A&G window (see Section 8.6). There is no encoded position - use the left
and right
(yellow arrow) focus buttons at the top of the window to jog the focus.
A basic example procedure for acquiring a target and setting up guiding is outlined in
Section A.8. The sections below define and elaborate on some of the concepts introduced
there, and describe how the A&G functions are accessed through the various panels and
windows of the A&G window.
8.1
Apertures
An aperture, in the context of the TAROS/TCS acquisition and guiding system, represents a
fixed reference position in the instrument focal plane, and does not relate to real instrument
apertures unless you define them to do so. The TCS implements a virtual telescope control
loop which constantly maps the tracking position on the celestial sphere to whichever of these
apertures has been selected thus ensuring that the light from the science object is imaged at
the desired place in the focal plane. The aperture name ‘0’ (zero) is reserved for the centre
of the rotator and cannot be deleted or re-defined by the observer. Up to 15 apertures may
be defined by the observer for each focal station.
There are some pre-defined apertures that are useful with the WiFeS instrument. These can
be used by sending the command load wifes from the TCS window.
Apertures can be defined interactively through the guide camera image display of the A&G
window or directly using TCS aperture commands (see the TCS documentation for a description of the latter method).
In the A&G window, if the Show Telescope Apertures checkbox in the ‘Display’ panel
next to the image display is checked, all of the currently defined apertures are shown by
green circles and labels overlaid on the A&G image display, other than the currently-selected
aperture, which is coloured red.
8.1.1
Defining and removing apertures
To define an aperture in the TAROS A&G window, take a guide camera exposure to display
the focal plane image in the A&G image display. Position the cursor at the desired aperture
centre and click once to select the position. If the Use cursor checkbox in the ‘Telescope
25
19/06/2012
TAROS User’s Manual
Illustration 18: Acquisition and Guiding main window
26
19/06/2012
TAROS User’s Manual
Apertures’ panel of the A&G window is selected, a white square will appear at the cursor
location. If not, the exact position will be determined by centroiding on the image in the
vicinity of the cursor position. Simply move the cursor and reselect to change the selection.
Enter an aperture name in the Define Aperture text input field of the ‘Telescope Apertures’
panel and press the Define button to save the aperture definition.
An aperture definition (other than the reserved ‘0’ aperture) can be removed using the
TCS aperture command. e.g., send the command: aperture clear aperture-name or
aperture clear all from the TCS window Command input field.
8.1.2
Selecting an aperture
To select a previously-defined aperture, choose the aperture name from the drop-down menu
in the ‘Telescope Apertures’ panel of the A&G window. Click the Select button to the
right of the menu to implement the new selection. The telescope will be offset to place the
coordinates (of the current object or beam) that are currently being tracked at the position
corresponding to that aperture in the focal plane. You may wish to take another exposure
to confirm the offset.
The Move Here and Move to Aperture buttons in the ‘Science Object’ panel can be
used to apply further offsets or reposition an object in the focal plane with respect to the
current aperture. Once again, the Use cursor checkbox determines if the cursor click selects
a position in the image directly or using a centroiding routine on the image close to the cursor
position.
Move Here - a position in the focal plane is selected by clicking in the guide image with
the cursor, and this button will move the telescope to offset the coordinates that map
to the current aperture to this newly selected position.
Move to Aperture - the telescope will be offset to move the sky position selected using
the cursor in the guide image display to the current aperture.
8.2
Beams
‘Beams’ are pre-defined positions on the celestial sphere. Beams are convenient for storing several current objects/coordinates of interest for easy return, particularly because a
guide star position can also be included in a beam definition, so that auto-guiding can be
immediately resumed when the beam is tracked.
8.2.1
Defining a beam
In TAROS, beams can be defined from the ‘Define Beams’ dialog window, which is opened
when you click the Define Beam... button to the right in the ‘Beam’ panel at the top of
the A&G window. The properties of the three beam definitions that can be made are shown
in the top panel of this dialog, including the coordinates and epoch of the beam itself, and
the details of a guide star position and guide-window exposure that may be associated with
the beam.
In the bottom ‘Define Beam’ panel, the details for a new beam definition can be entered
directly, or obtained from currently-selected object and/or guide details. Select the beam
identifier to be defined from the drop-down Beam menu at the top of the pane. The RA
and Dec can be typed directly in to the text input fields, with at least the main beam
Position required. Optionally, add the coordinates of a guide star to be used with the
beam. The exposure time (in milliseconds), window size and binning for the guide image
exposure can also be entered here. The default equinox value: J2000.0, is assigned if the
Equinox field is left blank.
27
19/06/2012
TAROS User’s Manual
Illustration 19: ‘Define beams’ window
Alternatively, the positions of the beam object and guide star can be obtained from those currently defined in the system (e.g., through the A&G window). The buttons within the ‘Fetch
from current’ panel allow a new beam definition to be set from the current object/guiding
settings:
Science Object - obtain the coordinates (with accumulated offsets?) of the currentlytracked object for the beam Position only.
Guide Object - obtain the coordinates of the currently-selected guide position for the
Guide Star position of the beam.
Entire Beam Definition - performs both functions of the above two buttons simultaneously, and fetch all the details of the new beam definition from the currently-acquired
positions.
The object and guide positions can also be set from the selected cursor position in the A&G
image display. After obtaining an acquisition camera image (from the main A&G window),
and clicking to select a sky position in the image display, this selection can be assigned to
the object or guide position of a beam definition by using the Science Object or Guide
Object buttons in the ‘Set from cursor’ panel of the Define Beam window.
28
19/06/2012
TAROS User’s Manual
As when the values are directly entered, the fetched values will appear in the appropriate
input fields above, but the beam definition is not assigned until the Define Beam button
has been pressed to store the entered values. The beam settings will then be updated in the
top panel of the window. All of the input fields can be cleared using the Clear button, and
the Dismiss button closes the Define Beam window.
8.2.2
Selecting a beam
To select and track a beam that has already been defined, click the button labelled with
the relevant beam identifier – A, B, or C – in the ‘Beam’ pane of the A&G window. Make
sure that the Guiding check box is selected before pressing the beam button if you wish to
activate guiding when the beam is selected (if a guide object is associated with the beam in
the definition, as described above),
The current beam, if one is selected, is displayed in the bottom row of the ‘Telescope System’
panel of the A&G window, below the coordinates of the current telescope pointing and guide
star (which will correspond to those of the beam). This panel also shows the current status
of the telescope motion, and will display ‘TRACKING’, after a beam has been selected
8.3
Acquisition camera exposure settings
The settings for exposures obtained with the guide camera (both when obtaining single
images, and when reading out the guide star window during autoguiding) are usually set
through the ‘Exposure Settings’ panel of the A&G window. The exception occurs when a
beam is tracked and the guide window settings are obtained from the beam definition, as
described above in Section 8.2.
The total exposure time is entered in the first input field, and the units are chosen from
the adjacent drop-down menu. The pixel binning used with reading out the guide camera
detector (along both the rows and columns) is chosen from the XY Binning drop-down
menu. A larger binning will decrease the readout time, but decrease the accuracy of centroid
measurements and other analysis of the guide images. The unbinned pixel scale of the
detector is 0.2500 per pixel (4 pixels per arcsec).
The size of the small, square guide star window region that is read-out continuously during
autoguiding and from which the guide star position is measured is set using the Size (pixels)
input field. The image from this region will be displayed in the small ‘Guide Window’ image
display in the A&G window when guiding is initiated. The size of 32 pixels corresponds to
an 4 × 400 region, with 2× pixel binning, which should be appropriate during normal seeing
conditions.
The region of the detector that will be read out during guide camera exposures that are
obtained directly using the Expose button in the A&G window is selected using the Region
drop-down menu. This offers several preset regions that are appropriate for the different
instruments. The Expose button takes a single exposure. The Start Acquiring button
will take continuous exposures until Stop Acquiring is pressed.
8.4
Initialising camera controllers
The first icon in the A&G window toolbar at the top right of the window begins a
re-initialisation of the acquisition camera controller. You may need to do this if errors
have occurred or the camera does not respond to commands.
8.5
Telescope focus sequence
29
19/06/2012
TAROS User’s Manual
The A&G system includes a semi-automated procedure for determining the best telescope focus position using the acquisition/guide camera. The process involves taking
a series of exposures, moving the focus between each exposure, then processing the images
using SExtractor (Source Extractor) to find a suitable number of stars and finally fitting a
curve to the resulting FWHM measurements. Obviously, the success of the process depends
on the initial starting focus position and the focus step-size that is chosen, so you may have
to run the process more than once to get a good result. It’s a good idea to point the telescope
at a field with lots of stars to choose from, so an open or globular cluster makes a good focus
target. The system will work with just a few stars as long as they are reasonably bright.
Illustration 20: The A&G telescope focus window for running the automated procedure to determine
the telescope focus.
The second button in the toolbar at the top-left of the A&G window opens the A&G window
Focus dialog (shown in Illustration 20). The current focus position and focus mode are shown
in the status panel at the top of this window. Below this, the starting position for the focus
run, the step size for each focus adjustment and the number of steps away from the starting
position that the process should take can be specified. When the sequence is initiated, the
telescope focus will be changed ”Number of focus step” times by ”Focus position step” and
a single guide camera image obtained at each focus position. You can, for example, run
an initial sequence of coarse spacings: e.g., with the default sequence: -100mm, -90mm,
-80mm, -70mm, -60mm, before narrowing the search using a starting position closer to the
best focus position, and a smaller step size. The guide camera images will be obtained using
the settings selected in the main A&G window (i.e., exposure time, binning, etc.).
After the image sequence is complete, SExtractor is used to identify a set of stellar sources
that appear in each of these images and measure the full-width at half maximum (FWHM)
of their images. The images are stacked for visual inspection in the image display of the
main A&G window (Illustration 21, and the stars selected by Sextractor are circled in green.
A quadratic function is then fit to the FWHM measurements as a function of the focus
position, and the position of the minimum is reported. The fit is shown in a new window
(Illustration 22) so that the user can verify that the fit and trend is appropriate (e.g., that
a reasonable minimum exists and the image measurements have not been affected by cloud
cover during the imaging sequence). The telescope focus will be moved to this optimal
value after the sequence is complete if the ‘Set to optimal focus automatically’ check-box is
30
19/06/2012
TAROS User’s Manual
Illustration 21: During the procedure for setting the telescope focus, the acquisition images obtained
at each focus position are stacked in the A&G window image display and the stars extracted for the
focus fit measurements are marked.
selected in the focus window. The ‘Focus Mode’ (Automatic or Compensated), as described
in Section 7.4, can also be selected using the radio buttons at the bottom of this window.
It is recommended to leave this in Compensated mode to enable automated temperature
compensation.
8.6
Acquisition camera components control
The third button in the A&G window toolbar displays the Acquisition Camera Components Control window, from which the focus, filter and slide position for the acquisition
camera itself can be adjusted (Illustration 23).
and right
jog buttons,
The camera focus is controlled using the yellow triangle left
which move the focus in or out. The mechanism is unencoded so some trial-and-error will
be required to find the right focus.
A filter can be used to vary the passband of the guide image: the available filters are neutral
density (ND), I, B, V, or R-band filter and are selected from the ‘Acquisition/Guiding
Filter’ drop-down menu, or no filter used (select Clear). No filter is required, unless the user
specifically wishes to isolate objects that are brighter/dimmer in a particular waveband or
reduce the throughput of the camera. The filter that is currently inserted in the aperture is
displayed next to the toolbar in the A&G main window.
The camera is mounted on a slide mechanism that moves it in or out of the telescope beam,
31
19/06/2012
TAROS User’s Manual
Illustration 22: The FWHM measured from the stars in the series of A&G images at different focus
positions are plotted in a new ‘Focus Plot’ window.
and the position may be altered moving the sliding bar or by entering a new position in
the ‘Acquisition/Guiding Slide’ input field, and pressing the Go button. comment about
when/if these need to be used/changed
Illustration 23: Acquisition camera components control window
8.7
Acquisition camera control
The fourth icon in the A&G window toolbar opens the Acquisition Camera Control
window which shows the status of the acquisition/guide camera. This window is shown
in Illustration 24. If the status of the camera shown in the top panel is not ‘Connected’,
click the Connect button to re-establish the connection.
The camera uses a Peltier cooler and the camera temperature is shown in the ‘Cooler’ panel.
The temperature should be close to the displayed setpoint. If the temperature is too warm,
click the On button to turn on the cooling system. The setpoint temperature can be changed
from this window, but should not normally need to be altered from the default temperature
(242.0 K).
8.8
Guider calibration
The calibration window for the guider system is accessed through the fifth icon of
the toolbar at the top of the A&G window. The calibration window (Illustration 25)
displays the current calibration parameters, and fields for adjusting the gain settings.
The Calibrate Guider... button opens a dialog that takes you through a recalibration
sequence. NOTE: The guider system is already calibrated to give the best guiding performance. It should not be necessary to perform a recalibration. It is strongly recommended
32
19/06/2012
TAROS User’s Manual
Illustration 24: Acquisition camera control window.
that observers do not attempt recalibration without first consulting RSAA technical staff.
The process takes approximately an hour and is quite complex.
Illustration 25: Acquisition camera guider calibration window
8.9
Guiding offset plots
Plots of the offsets that are calculated and applied by the autoguiding system during
guiding to maintain the tracking of the reference guide star position over time are
presented in the Guiding Offsets Plots window, opened by clicking the second last icon
(sixth) in the toolbar.
These are useful for monitoring the performance of the autoguider, particularly in poor
weather when cloud may obscure the guide star and prevent detection or accurate measurements of the centroid.
8.10
Flux and seeing plots
Plots of the full-width at half-maximum of the reference guide star are also generated
when autoguiding is active. The window displaying these is opened by selecting the
final (seventh) icon in the A&G window toolbar.
33
19/06/2012
TAROS User’s Manual
9.
Image Displays
The TAROS Image Display is based on the JSky components from ESO. It has been modified
for TAROS to provide some data analysis/plotting facilities and to allow the interaction
required to select guide stars, etc.
9.1
Compression
The TAROS image displays use H-Compression to reduce the amount of data that needs to
travel from the TAROS server to the client GUI when an image is displayed. The level of
compression is controllable by the client GUI, so that if you have a fast internet connection,
you can reduce the level of compression. H-compression was developed by STScI and was
used to compress the STScI Digitized Sky Survey – it is tuned to do a good job at compressing
astronomical FITS images.
NOTE: If you use the Save As facility of the image display to save your compressed image,
you should not use this image for photometry or astrometry as the lossy nature of the
compression will affect your results.
You can access the compression settings using the Preferences option from the TAROS
main window File menu. The default settings used by TAROS are for no compression.
Compression may only be required for home broadband connections.
9.2
Image menu
Press the right mouse button while the cursor is positioned within the image to display the
image menu (shown in Illustration 26). From here you can load an image from the Open
dialog or save the current image or image display to disk (in either FITS, JPEG, TIFF,
PNM, or BMP format) using the Save/Save As... dialogs. The image can also be printed.
For FITS images (which is the format of the images loaded in the displays after exposures),
you can view the image header by selecting the Fits Keywords option from the menu.
Illustration 26: Image display showing menu that is opened by right-clicking the image.
The Colors and Cut Levels dialogs are also accessed through this image menu and allow
the scales and range of levels used in the image display to be adjusted. These are described
in more detail in the following sections.
34
19/06/2012
TAROS User’s Manual
9.3
Cut Levels
Right-click in the display and select the Cut Levels menu item to display a dialog box
that allows the range of intensity levels that is displayed in the image to be adjusted
(see Illustration 27).
A histogram of the pixel intensities in the image is displayed at the top of the window.
The ‘Cut Levels’ are shown under the plot and grey slide bar. These are the minimum and
maximum displayed pixel values and define the display range, or range of intensities that
are mapped to the colourmap. Pixels with a value less than the minimum are displayed as
black (or the colour corresponding to the the low end of the colourmap) and those with a
value greater than the maximum are displayed as white (or that corresponding to the high
end of the colourmap). The pixel intensity values on the histogram abscissa also reflect the
display range in the image and change as the cut levels are adjusted.
The buttons at the bottom perform an automatic selection of the levels, selecting the cut
levels so that the fraction of pixels with intensity values within the new range is that specified
on the button; the 100% button thus adjusts the cut levels to include all pixel values in the
image, so the lower level will have the minimum intensity in the image and the upper level
will be the maximum pixel intensity. This is the default when the image is loaded.
The range of intensity levels that are displayed can be interactively adjusted to custom
settings using the grey bar beneath the histogram. Clicking and dragging the grey bar
moves the selected cut levels together, both to higher (moving right) or lower (moving left)
values, maintaining the size of the range. Click and drag the yellow arrows at the left and
right ends of the grey slide bar to move the lower and upper bounds of the display range
independently.
The Median Filter button applies a smoothing or noise-reducing transformation to the
image in the display.
Illustration 27: Cut levels dialog window showing the default case using the full range of image
values on the left, and after applying the auto-adjust that restricts the range to contain the intensity
values of 95% of the image pixels.
9.4
Colours
The ‘Colours’ dialog that is accessed from the image menu allows you to alter the
colour scale, or how the pixel intensity levels are mapped to the colour table used in
the display. It is shown in Illustration 28. By default, when an image is loaded, a linear
mapping to a grey-scale colourmap is applied.
Common transfer functions can be selected using the radio buttons in the left panel of
the window. These include logarithmic and square root mapping, which may be useful
35
19/06/2012
TAROS User’s Manual
Illustration 28: Colours dialog window.
for accentuating faint features, as they assign more colours to low intensity values, and a
histogram equalisation, which increases the image contrast (a broader range of colours is
used to map the intensities in the image).
A range of colourmaps, or colour lookup tables are available and are selected from the
‘Colourmap’ list. When images are loaded in the displays, the greyscale Ramp map is used,
but if you use the Reset button, the colourmap is set to Real, which is a black-orange-white
colour scale.
The final ‘Intensity’ column provides a variety of other options for the distribution of the
colours within the colourmap.
9.5
Brightness adjustment
The colourbar at the bottom of the display provides some interactive brightness (and maybe
contrast?) adjustment of the display.
Click and hold the left mouse button while the cursor is positioned over the scale bar to
change the brightness (or bias): moving the cursor to the left increases the dominance of the
‘brighter’ colours and vice-versa to the right.
Clicking and dragging to the left and right with the right mouse button changes contrast.
Right-click once with the cursor in the colour bar display to reset the scale.
9.6
Plots
NOTE. The plotting modes in the image displays are there for limited quick-look analysis of
an image. The modal nature of the plot interface is not ideal and most people will probably
find it easier to use their favourite plotting tool outside the TAROS GUI environment.
The image displays provide several plotting functions that are selected from the toolbar
buttons at the top left of the displays. The first four buttons in the toolbar toggle between
the three plotting functions and the ‘region-select’ mode. The icon turns red when the
corresponding mode is selected. The cursor function in the display varies in the different
modes. The plotting modes are briefly described below.
9.6.1
Region-select mode
This is the mode that is selected by default (coloured red). After using plotting
function, clicking this button disables the plotting mode and returns the display/cursor
back to ‘region-select’ mode. In this mode, clicking and dragging the cursor within the
display traces out an image region. For some instruments this allows the marking of a region
36
19/06/2012
TAROS User’s Manual
of interest on the detector (e.g. for Imager. Not for WiFeS).
9.6.2
Draw line plot
This function is used to produce a plot of the image intensity data along the image rows
or columns. When the line plot mode is selected, the dialog box shown in Illustration 29
appears for setting the plotting preferences. In this mode, click and drag the cursor within
the display to trace out and select a rectangular sub-region of the image. The longest side of
the region that is marked is used to determine whether the plot will show Rows or Columns
as the abscissa of the plot.
Illustration 29: Line plot dialog with plot, shown next to a section of the image display with the
selected region.
When the Plot button in the dialog is pressed, the data from each row (or column) of this
region will be combined by sum, median, or mean, as selected in the drop-down menu in the
line plot dialog, and a plot of the levels along the column (or row) appears in the top panel
of the dialog (the window expands to include the plotting panel).
9.6.3
Calculate region statistics and histogram
When selected the dialog shown in Illustration 30 appears. If a region has previously
been select (in this or the line plotting mode, it will appear in the image display. To
select a new region, click and drag the cursor within the display to mark the region, as in the
line plot mode. When the Plot button of the statistics dialog is pressed, various statistical
Illustration 30: Image region statistics dialog, shown next to a section of the image display with
the selected region.
37
19/06/2012
TAROS User’s Manual
properties are calculated for the pixel values within the selected region and displayed in the
top panel of the window. In addition, a histogram plot of the pixel intensities is displayed
in the right panel of the dialog (the window expands to include the plotting panel). The
number of histogram bins is specified using the drop-down menu in the statistics dialog and
the frequency will be displayed on a log scale if the Log Plot check box is checked.
9.6.4
Calculate radial profile
When selected the dialog shown in Illustration 31 appears. The cursor is used to select
a circular region of the image centred at the position clicked in the display and with
the radius specified in the Radius input field of the radial profile dialog. When the Plot
Profile button is selected, the pixel intensity data from within this region is plotted as a
function of distance from the region centre in the top panel of the dialog. A Gaussian fit is
also calculated and plotted with the data. The coordinates of the image centroid and the
FHWM of the fit is displayed in the dialog box.
Illustration 31: Radial plot dialog and plot, shown next to a section of the image display with the
selected region.
9.7
Zoom and pan
Use the magnifying-glass symbols in the Image Display toolbar to zoom in
and out
.
You can fit the image to the size of the display using the ‘Zoom to Fit the Window’
toolbar item (next to the Zoom Out magnifying glass). The Zoom Normal
sets the zoom
back to the default ’full size’ or 1× zoom scale.
The upper right of each display has pan and magnifier windows where it is possible to ”grab”
the small rectangle by clicking and dragging within it, then to move it around the panner
window and inspect different parts of the zoomed image. You can hide/show the panner and
in the upper right of the image display.
magnifier by pressing the triangle button
38
19/06/2012
TAROS User’s Manual
10.
System Health and Messages Window
The System Health and Messages window (see Illustration 32) is where all messages from the
TAROS server and GUI are collected. The window has three tabbed panes that allow you
to view messages, a system health tree and the list of observers connected to the TAROS
server.
It is a good idea to have the messages window visible at all times and to watch out for any
warning messages (highlighted in orange) or error messages (highlighted in red). The Health
tab is an indication of faults or problems that may affect your ability to use the system to
take data. Warnings are indicated by a yellow exclamation mark
and serious problems
by a red cross
. The overall health is summarised at the root of the health tree and also
displayed in the Health Tab label.
10.1
Messages
The Messages tab (Illustration 32) shows a log of status and information messages from the
telescope and other control sub-systems and provides extra diagnostic information in error
and warning conditions. Warning and error messages are highlighted in orange and red.
Illustration 32: The System Health and Messages window, showing the Messages tab.
10.2
Health tree
The Health tab (Illustration 33) shows a summary of the health by subsystem, to assist the
user in quickly tracking the origin of faults and errors. The status of a subsystem is shown
indicates that the system is functioning
at the base of the subsystem branch. A green tick
normally, a yellow exclamation mark
indicates a warning, and a red cross
indicates a
problem that may prevent normal use and observing.
10.3
Alarm indicator
The TAROS Main Window (see Section 4) also displays an overall indication of system health
in the form of the traffic light icon that provides access to the messages window. Green means
all is OK, Yellow indicates a warning is current and Red indicates that observing may not
39
19/06/2012
TAROS User’s Manual
Illustration 33: The System Health and Messages window Health tab.
be possible due to hardware or software failure. If the signal goes red, the main window will
be brought to the front and a flashing warning triangle will indicate that you should consult
the Health and Messages Window for more information (see Illustration 7).
40
19/06/2012
TAROS User’s Manual
11.
The Download Manager
The Download Manager window (Illustration 34) displays a list of FITS files that have been
downloaded to your local directory since the TAROS GUI was started (i.e., it doesn’t remember downloads from previous runs of the GUI). The Download Manager window appears
when you select the ”Save a local copy of my data” option in the data acquisition window
of the TAROS GUI. TAROS will remember your selection for this option and pop-up the
Download Manager the next time you run the GUI.
The TAROS GUI will only download files to a local directory (e.g., to your laptop) if you have
selected Save a local copy of my data in the ‘Data Handling’ section of the instrument
Data Acquisition window and specified a save location using the Browse button also in this
window. All your data is stored on the TAROS server whether or not you decide to download
a local copy, so you will always be able to retrieve your data from the TAROS data archive
at a later date.
Settings in the Download Manager window allow you to control the bandwidth devoted to
your data downloads. The settings window is accessed through the toolbar icon
. You can
also Pause
, Stop
, and Resume
downloads using the buttons in the toolbar. These
settings and controls are mainly useful to users on slow internet connections, for whom the
bandwidth required for data downloads may affect overall GUI performance.
Illustration 34: The Download Manager window
41
19/06/2012
TAROS User’s Manual
12.
Instrument windows
Each of the instruments that can be used with TAROS has its own set of control windows
within the TAROS GUI. The windows for the instrument to which TAROS is currently
connected (selected during startup as described in Section 3.3.2) are accessed through the
TAROS main window (Section 4).
The Instrument Components Control window for the current instrument is opened by
clicking the fourth icon in the TAROS Main window. It provides access to directly
change the status/position of the various instrument and camera components, independently
of configuring an exposure.
The main Instrument Data Acquisition window is opened from the sixth button in the
TAROS Main window, and provides the interface for configuring the instrument for
observations, initiating and monitoring observations, and viewing quicklook image displays
and inspectors.
The operation of each of the telescope instruments through TAROS is described individually
in the following sections.
42
19/06/2012
TAROS User’s Manual
13.
The Wide Field Spectrograph (WiFeS)
This Chapter is a brief description of the WiFeS Control windows of the TAROS GUI. It is
not a comprehensive manual for use of the various WiFeS observing modes. For a complete
description of the WiFeS instrument and its various observing modes, as well as typical
usage examples, please see ‘Observing with the Wide Field Spectrograph’ by Prof. Mike
Dopita, which is available from the WiFeS observing web page:
http://rsaa.anu.edu.au/observers/observing-rsaa/wifes-information-observers.
This is essential reading for anyone intending to use WiFeS.
Hint: See Appendix A for a quick-start guide to using WiFeS - a useful checklist
if you’ve used the instrument before.
13.1
Instrument components control
The WiFeS Components Control window is shown in Illustrations 35 – 37. It consists of
four tabbed panes that provide control of the components within the DBS calibration unit
(Illustration 35), the WiFeS instrument components that are common to both the red and
blue light paths (Illustration 36), the red camera and grating components (Illustration 37),
and the blue camera and grating components, respectively from left to right across the tabs.
The displays are similar for each of the components in all the tabs. Each panel of a tab
corresponds to an individual component and consists of a status display (left), drop-down
menu for selecting a new setting, and a Set button to send a command to apply the new
component setting. The status display shows a health icon, as used in the System Health
and Messages window Health Tree (Section 10), the current status of the component (middle
line) and the current setting (bottom line). If the component has been moved, but has not
yet reached the selected position, the status line will show the words In motion highlighted
in orange (as seen in Illustration 36). A new setting will only be applied once the Set button
has been pressed.
The WiFeS instrument and camera components panels also include a Home button (greyed
Illustration 35: WiFeS components control window, showing the DBS turret components tab
43
19/06/2012
TAROS User’s Manual
Illustration 36: WiFeS components control window, showing the WiFeS common components tab
while the Interceptor is in motion after applying a new setting.
out in Illustrations 36 and 37. In future, this will allow you to send a command for the
controller to ‘re-home’ or initialise the position of the component, in the case that the
instrument is not reporting the correct positions of a component. This functionality has not
yet been implemented in the TAROS server software.
The Camera Focus positions for the WiFeS red and blue cameras are set by a slider, or
directly through an input text field, rather than a drop-down menu, as seen in Illustration 37.
Once again the command to change the focus position will only be sent when the Focus
button is pressed.
Illustration 37: WiFeS components control window, showing the red camera/grating components
tab (similar for blue camera tab)
44
19/06/2012
TAROS User’s Manual
13.2
Data acquisition window
The WiFeS data acquisition instrument control window is shown in Illustration 38. The
window is comprised of five tabs that show, from left to right: the observation sequence
settings, status of a current exposure, the quick-look image display, field-viewing camera
controls and display, and the camera temperatures display.
13.3
WiFeS observing modes
Below is a brief summary of the modes of observing that are set up for the WiFeS instrument.
See the WiFeS observing manual for a more detailed explanation of these modes.
13.3.1
Classical observing
Classical Equal observing is defined as simply exposing both the red and blue cameras
simultaneously for the same length of time.
Classical Unequal observing allows for one camera to make a single long integration while
the other camera takes several shorter exposure/readout cycles. The WiFeS observation
sequencer assists with setting the exposure times in this mode. The observer specifies which
camera will take the short exposures (the master camera – usually the red), the length of the
long exposure (usually the blue camera integration time) and the number of short exposures.
The short, master exposure time is then automatically calculated.
13.3.2
Nod-and-shuffle (N&S) observing
Nod-and-shuffle (N&S) observing involves repeated alternate exposures of a science object
and a nearby sky position. After each short each object and sky exposure, the telescope is
“nodded” to sky (or object) and the charge is “shuffled” on the detector so that all object
exposures fall on the same pixels and all sky exposures fall on their own set of pixels. The
observer selects an exposure time and a number of nod-and-shuffle cycles. For example 30s
exposures and 20 cycles will result in a total of 600s on the science object and 600s on the
sky.
Sub-Nod-and-Shuffle observing is useful for stellar observations. As in normal N&S observing, the observer specifies an exposure time and the number of nod-and-shuffle cycles. In
this case, however, the telescope is nodded so that the object is moved within the WiFeS
aperture (the offset is applied along the length of the slitlets and over a distance of half the
slitlet length, so that a star placed at the centre of the top half of the aperture is shifted to
the centre of the bottom half of the aperture).
13.4
Observation sequence panel
The ‘WiFeS Observation Sequence’ pane operates as an observation sequencer. That is,
the components and observation parameters are set to their desired values and when the
Expose button is clicked, an observation block is sent to the TAROS server which positions
the components for the observation, and then carries out the exposure. This means that the
WiFeS window shows both a series of component control panels, and a display of the current
state of each of the instrument components. The state of each component is shown in the
row of information boxes in the ‘Instrument State’ panel above the action buttons at the
bottom of the window. The observation settings and controls appear in the panels above
the state display – it is important to bear in mind that the control panels do not
show the current state – they show the desired state for the next observation.
No configuration changes will be initiated until the Expose button is pressed (e.g., no
components will be moved simply by selecting a new position in the sequencer).
45
19/06/2012
TAROS User’s Manual
Illustration 38: WiFeS main window during an exposure
46
19/06/2012
TAROS User’s Manual
It is possible to directly control the WiFeS components individually using the components
control window, as described in Section 13.1.
Hint: Always double-check the exposure and component settings, image type and object/comment before clicking the Expose button – it is very easy to carry over an unwanted
setting from a previous exposure. e.g., the Repeats setting is easily forgotten.
The Stop button halts the progress of an observation at the next suitable stopping point. If
the exposure has not yet begun, it will stop any reconfiguration of the instrument components
at the current state (but will complete any component motion that is in progress). If the
exposure is in progress, it will be stopped and a readout will take place. Check and adjust
the Run Numbers if required before your next exposure.
At the top right corner of the panel, there are two buttons that are used to re-initialise the
red
and blue
camera controllers. You may need to initialise one or both controllers if
you see strange values in your images (e.g. all zeroes or all saturated) or if you see strange
temperature values displayed in the WiFeS instrument window.
The control panels in the observation sequencer are each discussed in the following sections.
13.4.1
Data Handling
The ‘Data Handling’ panel (centre top) provides control over whether the data files from the
instrument will be downloaded and saved to the local disk on the computer where you are
running the TAROS GUI (e.g. your laptop), through the Save a local copy of my data
checkbox. When checked, the data will be downloaded to the save location displayed (select
using the Browse... button), and the file names of the most recently-generated data files
from the red, blue and field-viewing cameras displayed in this panel. See Section 11 for more
information about download and data management.
13.4.2
Observation sequence setup
The observing mode, exposure times and some observation metadata are entered in the
‘Observation Sequence Setup’ panel at the top left of the window.
The observing mode, selected from the Type drop-down menu, determines which of the
following input values are required for the exposure (other input fields will be greyed out).
Master camera
Only used in classical-unequal mode – select the camera that will control the
shutter and readout a number of shorter exposures while the other camera makes
a single long integration. This is usually the red camera.
Repeats
All modes – set the total number of times to carry out the exposure sequence
(e.g., for N&S observing, if > 1 the entire N&S sequence will be repeated)
Exposure time
Classical-equal mode – enter the total exposure time for integration on both cameras
Classical-unequal mode – becomes Blue (long) exp time: enter the total ‘openshutter’ exposure time for the long/slave camera exposure.
Nod-and-shuffle mode – becomes Object exposure time: enter the length of
the exposure time at the primary (object) position at each nod/shuffle cycle.
Sub-nod-and-shuffle mode – enter
Sky exposure time
Only used in nod-and-shuffle mode – enter the length of the exposure at the
secondary/offset (sky) position at each nod/shuffle cycle.
·
·
·
·
·
·
·
47
19/06/2012
TAROS User’s Manual
Num nod/shuffle cycles
N&S modes only – enter the number of N&S cycles to complete (number of times
the telescope will be nodded to the offset/sky position and back again)
Classical-unequal – becomes Num Red exposures, where the number of short
exposures that are to be made by the master camera is specified. A checkbox
labelled Only keep one also appears, and if checked only the last of the short
exposure files will be saved (no readouts of the preceding short exposures are
carried out).
·
·
The exposure times for both cameras during the observation are shown below the exposure
input fields. In sub-nod-and-shuffle mode, this is stated as an integration time + dark time,
to indicate the total time that the slave camera will be integrating: nominated exposure time
plus dark time when the shutter is closed for reading out the short exposures (other than
the last, which is read out at the same time as the long exposure). Note that the readout
time (and hence the total length of the observation) depends on the region of the CCDs that
is read, as selected in the ‘Readout region’ panel of the sequencer (Section 13.4.5 below).
Two input fields are also located in this panel for user-entered information about the observation that will be included in the image header.
Object – input field for target descriptor that will included in the image header (OBJECT
keyword); drop-down menu fills with previously-entered values.
Comment – a text input field for other user-entered information that will written in a
COMMENT field in the image header. Again previous values are stored in the dropdown menu.
13.4.3
Exposure setup
The exposure type is assigned using the pushbuttons in this panel. This sets the image type
in the image file header (IMAGETYP keyword), which is used to determine the file type
by the data reduction scripts in the WiFeS IRAF package. Details of the behaviour of each
selection are given below.
Object – sets IMAGETYP = OBJECT but has no other effect (allows any other settings to
be changed).
Arc – changes the Arc Mirror setting to ‘In’ and sets IMAGETYP = ARC. You need to
select the arc lamp to be used.
Flat – changes the Arc Mirror setting to ‘In’ and sets IMAGETYP = FLAT. You need to
select the flat-field lamp to be used.
Sky Flat – changes the Arc Mirror setting to ‘Out’ and sets IMAGETYP = SKYFLAT.
Bias – changes and fixes the Exposure Time to 0 secs and sets IMAGETYP = ZERO. Required to observe bias/zero second calibration frames.
Wire – changes the Aperture Wheel selection to ‘Science - Coronograph’ and the Arc
Mirror setting to ‘In’, and sets IMAGETYP = WIRE.
Dark – prevents the shutter from opening during the exposure so that an exposure with
no illumination can be recorded sets IMAGETYP = DARK. Required to obtain ‘dark’,
unexposed frames that record detector dark current levels, but such frames are not
required for WiFeS data reduction.
‘Run numbers’ are also assigned to the observation in this panel. These are appended to the
image filenames as the last element of the name before the file extension, and are stored in
the image headers (in keyword RUN). The run numbers may be set manually for each of the
red and blue images, but are incremented automatically after each exposure.
48
19/06/2012
TAROS User’s Manual
The binning applied to the science data on readout may be changed for the ‘Y’ axis of the
detector only, and is set in the Y binning field in this panel. This corresponds to the spatial
direction of the slices, along which the pixel size is 0.5 arcsec. Binning is most likely to be
useful to people doing stellar observations.
13.4.4
Filter and arc setup
The ‘Filters and arc lamp setup’ panel is used to set up the instrument to obtain calibration
data using the lamps in the DBS calibration turret. The Main Beam Filter and calibration
lamps are activated by selecting the required values from the drop-down menus.
Main Beam Filter Neutral density filters can be placed in the main beam of the instrument. This may be useful for bright star acquisition using the Field Viewing Camera.
The choices are Clear (no filter), or reflective coated 25%, 5%, 1%, 0.1%, and 10%
filters. These filters are not calibrated.
Arc Mirror To use the calibration lamps as the light source, the arc mirror must be moved
into the beam, by selecting ‘In’ from this menu. For sky exposures, this must be set
to ‘Out’.
Arc Lamp The choice of lamps is QI-1 and QI-2 (quartz-iodine lamps for flat-field frames
- either may be used but are of different brightness so exposure times will differ), NeAr (neon-argon-iron arc lamp), Cu-Ar (copper-argon arc lamp), Fe-Ar (iron-argon arc
lamp), and Cu-He (copper-helium arc lamp). The Ne-Ar and Cu-Ar arc lamps are
generally used in WiFeS calibration data sets, suggested exposure times are found on
the WiFeS observing web site.
13.4.5
Readout region
This panel provides a drop-down menu that allows the user to select one of two regions of
interest to be read-out:
FullFrame The full image frame is read out and written to the data files
Stellar Only half of the frame is read out and written to the final data files. The detector
layout means that this includes the part of the image that corresponds to half of the
IFU slices. This is useful if only half of the field of view, with dimensions 12.500 × 3800 ,
is required (e.g., for point-source observations) as it halves the read-out time. Objects
should be placed in the top half of the WiFeS aperture as seen in the A&G image
display.
13.4.6
Components setup
The gratings, dichroic and WiFeS aperture wheel position are set from the drop-down menus
in this panel.
The standard combinations of dichroics, blue and red gratings are RT480 + U7000 + R7000;
RT615 + B7000 + I7000, RT560 + B3000 + R3000 and RT560 + B7000 + R7000. Other
combinations are also possible, but the calibration data may not be present in the data
reduction package.
When the ‘Science - Full Field’ aperture is selected, the entire WiFeS field is illuminated.
A narrow wire masks the field in the ‘Science - Coronograph’ setting, extending across all
of the IFS slices, approximately half-way along their (38 arcsec.) length. Pinhole and Slit
apertures are also available.
13.4.7
Primary and secondary beam centre
For nod-and-shuffle observations, the pointing coordinates that are defined as beams (see
Section 8.2) are selected in this panel (the panel contents are ‘greyed out’ when a classical
49
19/06/2012
TAROS User’s Manual
mode is selected).
For nod-and-shuffle mode, the primary beam centre will be the first position (normally
defined as the coordinates of the object) to be observed in the cycle. This will usually
be the one for which guiding is used, in which case the guide box should be checked. The
secondary beam centre is the alternate offset/nod position (usually the coordinates of the sky
background reference). Guiding is also available for this beam. The primary and secondary
beam centres are assigned to existing beam definitions from the respective drop-down menus.
The coordinates of a beam centre (object) and associated guide star are displayed in the
panels for the selected beam.
When the subaperture nod-and-shuffle mode is selected, the primary beam centre is used
to define the target coordinates, and the offset coordinates are automatically selected to be
offset by 19 arcsec. along the length of the slitlets.
13.4.8
Instrument indicators
The WiFeS red and blue camera CCD temperatures are displayed at all times in this panel,
together with the read-out or exposure status.
13.4.9
Observations block (OB) files
The commands to configure the instrument for an observation (or observation block), can be
saved to disk as an ‘OB’ file, which may then be later loaded into the observation sequencer
to obtain an observation with the same instrument settings.
Use the Save Current OB... button to save an OB to a file once you have configured the
instrument controls as required. A dialog box appears so that you can select a location to
save the OB file on disk.
To implement an observation from a previously-saved OB file, click the Open & Send OB...
button. This opens a file browser dialog that allows you to select the OB file. When you
click OK, the OB file will be loaded and the commands to reconfigure the instrument and
start the exposure are sent immediately to the system. As during any observation sequence,
the ‘Instrument State’ panel indicators will change to reflect the new configuration during
the observation. However, note that when an OB file is used to initiate an observation, the
instrument input control panels will no longer necessarily reflect the settings used for the
most recent observation.
13.5
Exposure status
A large display showing the progress of each observation is provided in the ‘Exposure Status’
tab (Illustration 39. For each camera, the repeat number of the sequence that has been
reached is displayed by the yellow counter (on the left) and the red and blue counters (on
the right) show the elapsed exposure time in seconds.
13.6
Quick-look image display
‘Quick-Look Image Display’ tab allows the observer to inspect the raw data as it is obtained.
These images are updated after each read-out from the science cameras.
Two image displays show the raw data frame from the blue (left) and red (right) cameras.
Beneath these displays, a second display shows a projected image through a data cube
that has been constructed by simply extracting the data from each slitlet and restacking to
reconstruct the spatial information. This is summed through the whole data cube.
The use of the displays and the zoom and plotting functions are described in Section 9.
50
19/06/2012
TAROS User’s Manual
Illustration 39: WiFeS exposure status counters
13.7
Field-viewing camera
The ‘Field Viewing Camera’ tab allows you to set up exposures of the below-aperture fieldviewing camera. This camera directly images what is being projected onto the image slicer,
and so can be used to set up the instrument, or can be used in both acquisition and reacquisition of faint targets. The pane consists of control and status regions and an image
display where the field-viewing camera images are displayed. The images are also saved to
disk and will be downloaded to your local disk if downloads are activated.
The number of exposures, the exposure time and a run number are assigned through the
input fields in the top ‘Exposure Settings’ panel. The run number is appended to the image
filenames, and is automatically incremented.
Pressing the Expose button at the bottom of the panel initiates the observation sequence,
first moving the flip mirror or Interceptor into the beam above the slicer, to reflect the
image to the field-viewing camera. The camera read-out or exposure progress and status
is displayed at all times in the ‘Status’ panel of the window, with the CCD temperature.
When a normal WiFeS exposure is activated, the flip mirror is automatically removed from
the beam after using the field-viewing camera. The status of the interceptor and arc mirror
are shown in the ‘Instrument State’ panel.
13.8
Temperatures
A detailed display of the monitored camera temperatures is presented in the ‘Temperatures’
tab for the red and blue WiFeS cameras.
51
19/06/2012
TAROS User’s Manual
Illustration 40: WiFeS window quick-look image display
52
19/06/2012
TAROS User’s Manual
14.
14.1
The 2.3m Echelle Spectrograph
Instrument components control
The components control window for the Echelle is shown in Illustration 41. This provides
control of the arc lamp calibration components. To set up to observe an arc lamp exposure,
set the Flip Mirror position to ‘In’ using the drop-down menu and select the required arc
lamp from the Arc Lamp drop-down menu. These components will be reconfigured as soon
as the selection is made in the menu. Then you can use the data acquisition window to set
up and obtain the exposure (see Section 14.2).
Illustration 41: The Echelle components control window
14.2
Data acquisition
Illustration 42 shows the data acquisition window for the Echelle spectrograph. The toolbar
at the top of the window panels provides access to various peripheral controls and displays.
You can reinitialise the detector controller using the first button in the toolbar. The controls
in the panels of the window set up the configuration of the instrument for an observation.
The ‘Data Handling’ panel at the top allows you to select whether the data files from the
instrument will be downloaded and saved to the local disk, through the Save a local copy
of my data checkbox. When checked, the data will be downloaded to the save location
displayed (select using the Browse... button), and the file names of the most recentlygenerated data files from the red, blue and field-viewing cameras displayed in this panel. See
Section 11 for more information about data management.
Select the observation type for your exposure using the buttons in the ‘Image Type’ panel.
This setting sets the value of the OBSTYPE keyword that is written to the output FITS file
image header. To enter a custom value, select the User button and enter a string into the
adjacent text input field.
Selecting Bias sets the exposure time to zero automatically. Choosing the Dark image type
prevents the shutter from being opened when the exposure is taken. Choosing Flat sets the
image type in the header, but does not affect the behaviour of the exposure. Set the type to
Object for science exposures.
The Exposure Settings panel provides several fields for setting the image metadata and
exposure configuration. The current readout region of the detector is shown in the panel
heading and is controlled from the regions dialog that is accessed by selecting the second
button in the toolbar at the top of the window (Section 14.2.1).
The Run Num displays the run number that is appended to the output image file name
and written in the header to identify the exposure. It is incremented automatically after
each exposure, but can also be manually changed. The Object and Comment text fields
53
19/06/2012
TAROS User’s Manual
Illustration 42: The Echelle data acquisition main window
are provided for user-entered information to further identify the observation. The content of
these fields are written to the OBJECT and COMMENT FITS header keyword values, respectively.
Set the exposure time for the observations using the Exp. Time input field and the units
of time for this value using the drop-down menu next to the input field. The Num. Exp.
sets the number of times the exposure will be repeated.
There are three check boxes at the bottom of the panel that change the way the detector is
read out and whether a preview of the image is displayed, as described below:
No pre-flush – when checked, the detector will not be flushed before the exposure starts
No readout – when checked, an exposure will be taken, but the detector will not be read
out (automatically also selects No pre-flush)
Save Only – when checked, the image will be saved, but won’t be displayed as a preview
in the image display.
The buttons at the bottom of the window start and stop data acquisition actions.
Expose – Start an exposre
Readout – Read out the detector immediately
Flush – Manually flush the detector
Abort – Aborts the current operation
14.2.1
Regions
54
19/06/2012
TAROS User’s Manual
The region of the detector that is read out at the end of an exposure can be altered
from the ‘Regions’ dialog window that is opened when the second button of the data
acquisition window toolbar is pressed. This dialog is shown in Illustration 43.
Illustration 43: The Echelle regions dialog window
The toolbar at the top of the window consists of three buttons that allow you to: i)
load
an existing regions file, ii)
save defined regions to a file, and iii)
read a region from
the image display.
From this dialog, you can define one or two regions of the detector to read out by entering
the pixel coordinates that define the region in the input fields. These include the coordinates
of the bottom-left corner of the region (X0 and Y0), the size of the region in the X (width)
and Y directions (height), the pixel binning (X Bin and Y Bin and the number of rows
(X) and columns (Y) of overscan to be generated.
When reading a region from the image display, open the image display window from the
TAROS Main window, load or acquire a full-frame image, and use the mouse to click and
drag from one corner to select the required region. A rectangular box will appear outlining
the selection. Return to the Regions dialog and use the read from image display button
to obtain the region parameters.
14.2.2
Temperatures
The camera temperature can be monitored from the temperatures window shown in
Illustration 44. This is opened from the third icon in the Echelle data acquisition
window toolbar.
Illustration 44: The Echelle CCD temperature display
55
19/06/2012
TAROS User’s Manual
14.2.3
Counter
Illustration 45 shows the exposure progress counter window that is accessed from the
Echelle data acquisition window toolbar. The elapsed time of the current exposure
is displayed by the green figures on the right, and the current repeat number (if a series of
exposures is being observed) is shown by the yellow figure on the left.
Illustration 45: The Echelle exposure counter display
14.2.4
Downloads
The download monitor window is also opened from the Data Acquisition window
toolbar (last icon). This displays details of files that have been downloaded and the
progress of downloads that are currently occurring. See Section 11 for more information
about the TAROS download manager.
56
19/06/2012
TAROS User’s Manual
A.
The basics for WiFeS observing with TAROS
Once the GUI is started, you will see the TAROS Main window from which you access the
control subsystems. Each button opens a new control/status window for the section as described below:
Weather information – provides weather status and meteorological monitoring data, and access to all-sky and webcam images (see Section 5).
Dome components control – provides status display and control of telescope building functions, including the shutter, ventilation fans, and lights.
This is where to go to reset telescope and building faults. (see Section 6).
Telescope Control System (TCS) – send command to the TCS, load object/coordinate files; simulates the TCS control panels in the physical control
room of the 2.3m telescope (see Section 7).
Instrument components control – direct access to monitor the status and
individually change the configuration of current science instrument components (see Section 12).
Acquisition and Guiding (A&G) system – control of the acquisition/guiding camera and autoguiding system (see Section 8).
Science data acquisition - configure and execute an observation with the
selected science instrument (see Section 12.
Image display – opens an image display window (see Section 9)
Systems health and messages window – provides displays of the status
and health of the telescope and instrument systems and a log of activity and
messages (see Section 10).
If there are any alerts you will see a blinking red triangular warning overlaid on the alerts and
messages icon. Additionally, alerts related to the weather will result in a warning triangle
placed over the Weather information icon.
A.1
Weather window
Open the weather window to check and monitor the weather at the observatory - there are a
number of tabbed panes in this window that provide different data, including all-sky camera
images, meteorological and weather monitoring data and the image from the webcam that
monitors the interior of the telescope dome.
A.2
Messages window
Open the System Health and Messages window (it is recommended to keep this window
open to monitor the messaging and logging information about the health of the telescope
subsystems).
57
19/06/2012
TAROS User’s Manual
A.3
Principal control windows
Open the Telescope Control System (TCS), Acquisition and Guiding, and the Instrument
Data Acquisition windows by selecting each of these icons. These are the main channels
for controlling the telescope and instrument and for setting up the system to obtain science
observations.
A.4
Guide camera focus
At the start of your run, you should check that the acquisition/guide camera is correctly
focussed. For WiFeS users this can be done in the afternoon before your first night, without
starting the telescope systems.
1. Open the WiFeS Instrument Component Control window, select the WiFeS Common
CC tab, and set the Aperture Wheel position to ”Coronagraph” (See Section 13.1).
2. Obtain a short exposure with the acquisition/guide camera: during the day there
should be enough light that you can see the coronographic wire in the image display
of the A&G window.
3. Open the Acquisition Camera Components Control window, using the third button in
the toolbar at the top of the A&G window (see Section 8.6).
4. Now adjust the focus of the acquisition/guide camera so that the coronographic wire
is sharp. There is no encoded position; use the left
and right
(yellow arrow)
focus buttons at the top of the window to iteratively jog the focus and then check the
wire image in a new guide camera exposure.
A.5
Obtain daytime instrument calibration frames
Open the WiFeS Data Acquisition window and configure daytime calibration frames such as
lamp flat-field frames, arc lamp frames and biases.
A.6
Starting and configuring the telescope
1. Start up the telescope systems from the TCS window by pressing the purple Startup
pushbutton in the Command Entry/Response panel of the window, or by typing the
TCS command startup into the Command text input and pressing <Enter> or
clicking the Send button to send the command. Logging messages will be printed in
the messages panel below the command field reporting progress and status as systems
are turned on. It takes two to three minutes for everything to start up so be patient.
2. If you have a pre-prepared coordinates file, you can load it into the TCS using the
‘Load file’ option from the ‘Objects’ menu at the top of the TCS window. The object
entries from the file will appear in the ‘Object List’ section of the ‘Objects’ panel. You
can also manually define individual object coordinates, as described in Section 7.
3. Press the green Lights Off pushbutton (or type and send the command set lighting
safe) to turn all the interior building lights off for observing.
4. Take dome flats if required: dome flat-field lamp illumination can be turned on and
adjusted from the Dome window. Configure exposure in the WiFeS Data Acquisition
window.
5. Open the dome shutters and mirror cover and start the ventilation fans by pressing
the green Open All pushbutton in the TCS window (or enter and send the command
open all). When these processes complete, you are ready to begin observing.
58
19/06/2012
TAROS User’s Manual
A.7
Focus the telescope
The A&G system includes a semi-automated procedure to find the best telescope focus
position at the beginning of the night. The process involves taking a series of guide camera
exposures of a stellar field, moving the focus between each exposure, then processing the
images using SExtractor (Source Extractor) to find a suitable number of stars, measure the
FWHM of the sources, and fit a quadratic to the FWHM against focus position. Obviously,
the success of the process depends on the initial starting focus position and the focus stepsize that is chosen, so you may have to run the process more than once to get a good result.
It’s a good idea to point the telescope at a field with lots of stars to choose from: open or
globular cluster makes a good focus target. The system will work with just a few stars as
long as they are reasonably bright.
Section 8.5 describes this process in some detail. The basic steps involved are:
1. Locate and track an appropriate star cluster and position in the guide camera field so
that a number of stars are visible.
2. Open focus sequence dialog from A&G window: 2nd button in toolbar at window top
left.
3. Set the number of focus steps, starting focus position and step size in the input fields:
the default values are probably a good place to start.
4. Check that the focus mode selected is Compensated.
5. Press Do Focus Sequence button to start the process.
6. If the process is successful: there is a good fit to the FWHM and the sequence clearly
passes through the best focus position, refine the step size and starting focus to more
closely bracket the best focus.
7. Repeat focus sequence with new values, and iterate the steps above until you are
satisfied that the focus is close to optimal.
8. Close the focus sequence dialog window and begin observing.
A.8
Basic procedure for acquisition and guiding
The following example describes a typical acquisition, and setting up autoguiding for an
observation of an extended object. See Section 8 for more information about using the A&G
system.
1. Select the acquisition aperture by choosing it from the drop-down menu in the ‘Telescope Apertures’ panel of the A&G window and clicking the Select button, or by
sending the TCS command: aperture acq (for acquisition aperture named ‘acq’) from
the TCS window.
2. Use the TCS window to enter/select the coordinates of your object and the desired
rotator angle and start tracking the object.
3. Obtain a guide camera image: set the exposure time, binning and exposure region from
the ‘Exposure Settings’ panel of the A&G window, then click the Expose button at
the bottom-left of the window.
4. When the image is displayed, you should see your object on or near the acquisition
(e.g., ‘acq’)aperture marked on the A&G image display (as seen in Illustration 18). If
you can not see objects that you expect to be in the acquisition image, check whether
there is a filter in the camera aperture - this is displayed at the top of the A&G window,
next to the toolbar.
5. If your object is not centred at the acquisition aperture, click once on the centre of
your object in the image (a white box should appear at this position). You may need
to select the Use cursor (instead of centroid) checkbox in the ‘Science Object’ A&G
panel if your object is not well-centred within the white box. Then click the Move to
59
19/06/2012
TAROS User’s Manual
6.
7.
8.
9.
10.
11.
12.
A.9
Aperture button in the A&G ‘Science Object’ panel. The telescope will be offset so
that your object is now centred at the acqusition aperture.
For the first acquisition, you can at this point calibrate the telescope pointing model
to improve the accuracy of the pointing: press the purple Cal Point pushbutton in
the TCS window (or type and send the command calibrate pointing).
You can now offset the object to the instrument field by selecting the appropriate
aperture from the drop-down menu in the ‘Telescope Apertures’ panel of the A&G
window and clicking the Select button, or using the TCS aperture command. e.g., in
Illustration 18, the ‘wifes’ aperture is located at the centre of the full WiFeS instrument
aperture and can be used to position an object in the field of view. When the new
aperture has been selected, the telescope will be offset to position your object at the
new focal-plane position.
Further telescope offsets may be applied at this point to move the object with respect
to the defined aperture. You can also use the Move here button to offset the telescope:
select a position in the image by clicking with the cursor and move the coordinates in
the current aperture to that position by selecting the Move Here button.
To set up for autoguiding, you now need to specify a guide star. Obtain a new guide
camera image by clicking the Expose button in the A&G window. Select a guide
star by clicking at the position of a suitable star in the A&G image display, and then
pressing the Set Guide Reference button at the bottom of the A&G window. A
green square will appear around the new reference guide star. Again, check the Use
cursor checkbox next to the button if the star is not centred in the box.
Check the settings in the ‘Exposure Settings’ panel (these will apply to the sub-region
guide camera images that are read out during guiding), including the Size option,
which sets the size of the guide image region in pixels. Click the Start Guiding
button to begin autoguiding using this reference star. The successive images from the
guide sub-region readout will appear in the small ‘Guide Window’ image display (see
Illustration 18). If all goes well and the system successfully determines the centroid
position of your chosen reference star, the star will remain centred in this image. The
measured offsets required to maintain the position of the reference star are displayed
at each update in the ‘Last Offsets’ panel (you can also monitor the offsets over time
in the Guide Offsets Plot window, from the sixth button in the toolbar at the top
of the A&G window). Note that during guiding, only the guide-star image display is
refreshed the acquisition display remains static.
Use the instrument Data Acquisition window to set up and obtain your science observations.
Click the Stop Guiding button (previously labelled Start Guiding when guiding is
inactive) to stop the autoguider, before acquiring a new target.
Data acquisition
The instrument Data Acquisition windows operate as an observation sequencer. That is,
the components and observation parameters are set to their desired values and when the
Expose button is pressed, an observation block is sent to the TAROS server which positions
the components for the observation, and then carries out the exposure – it is important to
bear in mind that the control panels do not show the current state – they show
the desired state for the next observation. No configuration changes made through the
sequencer windows will be initiated until the Expose button is pressed (e.g., no components
will be moved simply by selecting a new position in the sequencer control panels).
It is possible to directly control the instrument components individually using the Components Control window, accessed through the fourth icon of the TAROS Main window.
60
19/06/2012
TAROS User’s Manual
Hint: Always double-check the exposure and component settings, image type and object/comment before clicking the Expose button – it is very easy to carry over an unwanted
setting from a previous exposure. e.g., the Repeats setting is easily forgotten.
A.10
WiFeS observing guidelines and tips
· It is important to bear in mind that the control panels do not show the current state
·
·
·
they show the desired state for the next observation. The series of status blocks along
the bottom of the WiFeS sequencer window show the current state of the components.
Long exposure times in guided N&S observations can cause problems if there is no
guide star for the sky beam; e.g., use a sky beam guide star for exposure times > 200 s.
Using guiding with short N&S exposures can cause problems due to the time it takes
the guider to re-acquire the guide star and to turn guiding on and off. e.g., don’t guide
for exposure times < 30 s.
Before you click that Expose button, it is a good idea to always double-check:
Components – are your component Setup items the way you want them for this exposure? Remember, they will be moved to the values shown in the Setup sections of the
window when you click Expose.
Repeats – have you forgotten to reset the number of repeats to 1 after those 10 biases
you just took?
Beams – you need to define beams for the N&S modes of observing.
Guide on/off – for N&S observations, do you want autoguiding enabled for either of
your beams?
Object type, name and comment – check these are set correctly (they will appear in
your image headers)
A.11
Shutting down at the end of the night
After finishing your last observation of the sky, stow the telescope, close mirror cover and
building shutters, and turn off the ventilation fans and telescope systems using the green
Shutdown pushbutton in the TCS window (or type and send the command shutdown all).
If you are temporarily suspending observing, e.g. in the case of bad weather, you can simply
use Halt, Close All. The Park button will move the telescope to the parked position.
61
19/06/2012
TAROS User’s Manual
B.
MSOTCS Command Summary
The following is a very brief summary of the most commonly used MSOTCS commands that
are relevant to observers. These commands may be typed into the command entry box of
the TCS window within the TAROS GUI. They may also be typed directly into the 2.3m
TCS console computer. Several of the TAROS windows make use of these commands: the
Dome Window (see Section 6), the TCS Window (see Section 7), and the A&G Window
(see Section 8). Because of this it is not strictly necessary to know any of these commands
in order to observe when using the TAROS GUI but it can be helpful. Note that not all
commands are described here, nor are all the various command parameters explained. For
more detail please see the complete MSOTCS manual.
B.1
Getting help
The help command will, by default, list all of the telescope control system command. For
example if you wanted to see the syntax for the track command you would type help track.
The help given by this command is very brief and is really only suitable as a reminder when
you have forgotten the syntax.
B.2
Starting up and shutting down
Normally the first command you would issue to the TCS would be the startup command.
If you wish to use a particular configuration file then you can provide the filename as a
parameter to the command. For example startup wifes would cause the system to start
up and load the wifes.cfile configuration file.
To shut down the TCS you use the shutdown command. By default this leaves the telescope
in a safe state by stowing the tertiary, closing the mirror covers and closing the building
shutter. At the end of the night you will probably want to use the shutdown all command
which will also park the telescope.
B.3
Hardware control commands
The TCS controls all the hardware associated with the telescope. In order to observe you
will want to use the commands open shutter and open cover. Of course you can always
close shutter and close cover too.
On occasion it is necessary to use the reset command to reset the telescope systems when
hardware has tripped.
You can set the focus mode with focus manual | automatic | compensated and set the
focus setpoint with focus n (where n is the position in mm).
The dome lights can be switched off with set lighting safe and back on again with set
lighting unsafe. The flatfield lights can be switched on and off with set flatfield on
| off.
B.4
Commonly used motion commands
Before moving the telescope it is important to remember the halt command as this causes
the telescope to stop, regardless of any other motion command in progress.
The telescope can be moved to a fixed position by using the slew command. It takes two
parameters - the azimuth and the altitude in degrees. The park command puts the telescope
back in its park position. It’s the same as slew 233.84 89.
The rotator reference can be configured with:
62
19/06/2012
TAROS User’s Manual
rotator not in use | stationary | position angle | vertical angle
The configured angle is set with rotator theta (where theta is the angle in degrees, the
meaning of which depends on the reference chosen).
The track command has a large number of options. The command to track an object for
which you have celestial coordinates is perhaps best illustrated with an example:
track coord "alpha cru" 12 26 35.895 -63 05 56.73 j2000 -0.528 -1.486
This shows the object name, RA and Dec, equinox, proper motion in RA (in seconds of
time per century), and proper motion in Dec (in arcseconds per century). The various other
parameters and options are described in full in the MSOTCS manual.
When the telescope tracks an object, it attempts to place the image of that object onto
a specified position on the focal plane. This position is known as the pointing origin or
aperture. Aperture 0 (zero) is always available and corresponds to the optical axis of the
telescope. To create a new aperture called ”myap” at position (xa,ya) in the focal plane
use the command aperture define myap xa ya, where xa and ya are in arcseconds from
aperture 0 in the focal plane. To select this new aperture use the command aperture myap.
To remove the aperture use aperture clear myap.
To offset the telescope on the sky use the offset command. By default it will offset in
RA and Dec in arcseconds in the tangent plane, but you can specify a different coordinate
system or a different direction if you want.
To calibrate the local pointing offsets (known as xc and yc) first track a star with well known
coordinates. Centre the star in the currently selected aperture. Now use the calibrate
pointing command.
There are several other less commonly used motion commands that are not be discussed
here. Whilst the use of the beam command is essential to WiFeS nod-and-shuffle exposures,
it is best configured and sent via the TAROS GUI.
B.5
Configuration commands
The default configuration for the TCS is adequate for most observers. It is possible to change
the configuration to suit your own needs. There are many configuration parameters but this
is not the place to list them. Perhaps the most useful configuration command is:
configure focal station nasmyth a
This ensures that the TCS is internally configured for the given focal station and also that the
telescope hardware (that is, the tertiary mirror and the selected rotator) are appropriately
configured.
To save the complete current configuration to the file ”myconfig.cfile” use the command save
myconfig. To load it again use load myconfig.
63
19/06/2012