1
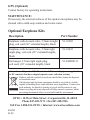
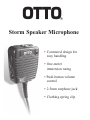
Storm Speaker Microphone
• Contoured design for
easy handling
• One-meter
immersion rating
• Push-button volume
control
• 2.5mm earphone jack
• Clothing spring clip
INSTALLATION:
1. Turn radio off
2. Remove any dust caps or covers from radio accessory
connector
3. Attach speaker microphone to the radio accessory
connector
4. Tighten mounting thumbscrew if required
Antenna versions only (Optional):
5. Remove antenna from 2-way radio
6. Attach antenna to the connector on top of the speaker
microphone
PUSHBUTTON
EMERGENCY OPTION
2
OPERATION:
Turn the radio on and operate it as explained in the operating instructions supplied with the radio. Installing the speaker microphone (1)
bypasses the radio’s speaker and routes the speaker output to the
speaker microphone and (2) disables the radio’s microphone and
enables the speaker microphone. To enable the microphone, press the
large PTT actuator located on the side of the speaker microphone.
Earphone Jack
• Remove the protective cover from the earphone jack
• Insert the audio accessory with 2.5 mm plug into the earphone jack.
Audio will be muted in the speaker microphone and routed to the
accessory.
CAUTION: to maintain the environmental seal, replace the
protective cover when the plug is not in use.
Volume Control Button
• Push the volume control button to high or low as required for your
application. The “IN” position is high output and “OUT” position is
low output.
Light Control Button (Optional)
• To turn on light press “Off” or “On” button.
Note: Based on using a 1500 mah battery, one hour of Storm (lights on)
operation is equal to about 30 seconds of radio transmit time. Actual
results will vary based on battery condition and other factors.
Antenna versions only: (Optional)
The speaker microphone assembly will perform best when worn above
the shoulder.
Auxiliary Connector (Optional)
Contact factory for operating instructions.
3
GPS (Optional)
Contact factory for operating instructions.
MAINTENANCE:
If necessary, the external surfaces of the speaker microphone may be
cleaned with a mild soap solution and warm water.
Optional Earphone Kits
Description
Part Number
Earphone with Acoustic tube, 2.5mm straight
plug, coil cord (30” extended length), black
V1-10282
Earphone with Acoustic tube, 2.5mm right
angle plug, coil cord (30” extended length),
black
V1-10432
Ear hanger, 2.5mm right angle plug,
coil cord, (30” extended length), black
V1-EH22R131
Information on Disposal of Old Electrical and Electronic Equipment (applicable
for EU countries that have adopted separate waste collection systems)
Products with the symbol (crossed-out wheeled bin) cannot be disposed
as household waste.
Old electrical and electronic equipment should be recycled at a facility
capable of handling these items and their waste byproducts. Contact your
local authority for details in locating a recycle facility nearest to you.
Proper recycling and waste disposal will help conserve resources whilst
preventing detrimental effects on our health and the environment.
OTTO • 10 West Main Street • Carpentersville, IL 60110
Phone 847-428-7171 • Fax 847-428-1956
Toll Free 1-888-234-OTTO • Internet: www.ottoexellence.com
804195
01/08