1
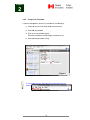
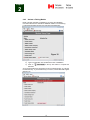
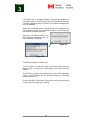
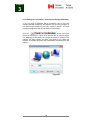
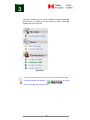
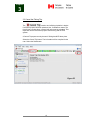
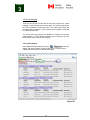
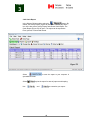
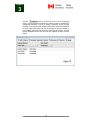
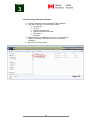
Version 1.0 Fisheries and Oceans Canada 1 DFO ELog User Manual Pacific Salmon Gillnet Edition Cover image (Sockeye Salmon) source: 1 MacPhail J.D. and R. Carveth. 1998. Field key to the freshwater fishes of British Columbia. Department of Zoology, University of British Columbia. Published online by the Province of British Columbia Resources Inventory Committee. Available Online at http://www.ilmb.gov.bc.ca/risc/pubs/aquatic/freshfish/assets/fresh.pdf Pacific Salmon Gillnet Commercial Electronic Log Book User Manual © 2013 Government of Canada. All rights reserved. Fisheries and Oceans Canada www.dfo-mpo.gc.ca Chapter 1 ................................................................................................... 1 Quick Guide ............................................................................................... 1 1.0 Getting Started ....................................................................................... 1 1.0.1 Opening the Program .................................................................... 1 1.0.2 Access ............................................................................................ 4 1.1 Frequently Asked Questions ................................................................... 6 1.2 About ELog ............................................................................................. 7 1.3 Technical Support ................................................................................... 7 Chapter 2 ................................................................................................... 8 Set‐Up ....................................................................................................... 8 2.0 The Setup Menu ..................................................................................... 8 2.0.1 Language Option ........................................................................... 9 2.0.2 Change Your Password ................................................................ 10 2.0.3 Activate a Fishing Module ........................................................... 11 2.1 Fishing Module Settings ....................................................................... 13 2.1.1 General Settings .......................................................................... 14 2.2 Connection Settings ............................................................................ 17 2.2.1 Configure Satellite ....................................................................... 17 2.2.2 Configure LAN .............................................................................. 19 2.2.3 Configure Dial Up (Globalstar) ..................................................... 22 2.2.4 Globalstar Call Times Tool ........................................................... 27 2.2.5 Common Globalstar Errors .......................................................... 28 2.2.6 Configure GPS Settings ................................................................ 31 2.2.7 Accessing Email ............................................................................ 32 2.2.8 Update Elog Software .................................................................. 33 2.2.9 Change Homepage Photograph ................................................... 34 Chapter 3 ................................................................................................. 35 Using the Program ................................................................................... 35 3.0 Communication General ...................................................................... 35 3.1 Start Fishing .......................................................................................... 36 3.1.1 FOS Confirmation......................................................................... 37 3.1.2 Waiting for Confirmation / Connected to LAN or Satellite .......... 37 3.1.3 Waiting for Confirmation / Connected to Dial‐Up (Globalstar) ... 39 3.2 Cancel the Fishing Trip ......................................................................... 41 3.3 Pause the Fishing Trip ........................................................................... 42 3.4 Daily Catch Forms ................................................................................. 43 3.4.1 Catch Review ............................................................................... 44 3.5 End a Trip .............................................................................................. 46 3.6 Record Keeping..................................................................................... 47 3.6.1 Activity Report ............................................................................ 47 3.6.2 Catch Report ............................................................................... 48 3.6.3 Export a Trip................................................................................ 49 3.6.4 Filter and or Sort a Report .......................................................... 50 3.7 Backup or Uninstall Elog ....................................................................... 52 3.7.1 Backing up the Elog Database ...................................................... 52 3.7.2 Re‐inserting a Backed Up Database ............................................. 53 3.7.3 Uninstall Elog ............................................................................... 54 Chapter 1 Chapter 1 Quick Guide Getting Started Frequently Asked Questions About ELog Technical Support 1.0 Getting Started 1.0.1 Opening the Program Option 1 Locate the Elog Program icon on your desktop and double click the icon with your left mouse button or right click the icon and select “open”. Option 2A From the Windows XP, Vista or Windows 7 Start Menu button or in the bottom left corner of your desktop: 1. Open a list of all programs by going to “Programs” or “All Programs”. 2. Select the “Fisheries and Oceans Canada” folder. 3. Click on the “DFO Elog” program. 1 Chapter 1 Opttion 2B From the Window ws 8 Start Me enu. Fiigure 1 1. Loca ate the Elog Program P icon on your startt menu and cllick the icon once with h your right m mouse button 2. If the e Elog Progra am icon is nott attached to yyour Windows 8 Startt Menu, click k on the icon n for the Dessktop once w with yourr right mouse button. 3. From m the desktop p, move your mouse curso or to the top rig ght hand d corner. A se econd menu w will appear on n the right. Cllick the search s button n once with yo our right hand d mouse butto on. 4. Type e “Elog” into the search bo ox. 5. Click k the Elog Pro ogram icon on n the left once e with your rig ght mouse button when it comes u up. 2 Chapter 1 Figure 2 Figure 3 3 Chapter 1 Figure 4 1.0.2 Access Use the mouse to place the cursor in the field you wish to fill. Type your user name and password into the fields provided. When complete, hit the “Enter” key on your keyboard or select the Login button. The first time you log on your user name and password are provided: Username: user Password: changeme 4 Chapter 1 It is recommended that you change your password and record it somewhere confidential yet accessible to you. Refer to Section 2.0.2 for directions on changing your password. Forget your Password? If you have forgotten your password, please contact ELog Support (Section 1.3). You will be asked questions to verify your identity and the support team will reset your password remotely. The next time you open DFO ELog select Once a window has been displayed stating that the remote update has been applied you can continue. Enter the new password that was supplied to you by ELog Support. Change your password to something you will remember and record it somewhere confidential yet accessible to you (Section 2.0.2). 5 Chapter 1 1.1 Frequently Asked Questions Quick Reference to Locate Frequently Asked Questions 1 2 3 4 5 6 7 8 9 10 11 12 13 14 15 16 17 FAQ How do I change my password? What if I forget my password? What do I do if I have not received FOS confirmation and it has been about ten minutes since I sent data? What do I do if my method of communication (i.e. satellite) is working and has coverage yet I have not received FOS confirmation and it has been several hours or overnight since I sent data? How do I start a trip? How do I pause a trip? How do I enter a catch? How do I end a trip? How do I backup information? How do I view, export or print reports? How do I add a second captain? Why won’t my email send? Why can’t I receive email? How do I cancel a trip? Why was the text of my email cut short? Why are my modules not accessible? How can I get help? 6 Answer / Section 2.0.2 1.0.2 Page 10 5 3.1.1 37 Contact Technical Support 7 1.3 3.1 3.3 3.4 3.5 3.7 36 42 43 46 52 3.6.3 49 2.1.1 2.2 2.2 3.2 16 17-33 17-33 41 2.1.1 18 2.0.3 9 1.3 7 Chapter 1 1.2 About ELog g DFO O ELog was created by Fisheries an nd Oceans C Canada to help stre eamline the pa aper logbook approach use ed to report o on catch data. The e fisherman’s electronic log g book (ELog ) is designed to replace ha ard cop py logbooks and fulfill all ca atch reporting g and licence requirementss. Fish hers using ELog E are stilll required to o record and report harvest bas sed on licence e conditions for their gea r type and liccence area a and sub bmit this and other o fishing information e electronically to the Fisherries and d Oceans Can nada (DFO) Fishery F Opera ating System ((FOS). 1.3 Technical Support S If yo ou encounterr any difficulty, obstacle o or error messsage througho out the process plea ase contact: M.C C. Wright and Associates Ltd: L Ema ail support@mcw s wrightonline.ccom Pho one/Fax (250) ( 591-105 56 If yo our communication setting gs and emai l are function ning you can request support via email e (Figure 5) by selectin ng the Help iccon in th he upper rightt corner of the e ELog progra am. F Figure 5 1-250-591-1056 7 Chapter 2 Chapter 2 Set-Up Change the Software Language Change Your Password Activate a Fishing Module General Settings Connection Settings (Internet / GPS / Satellite / Cell) Email Update Elog Software Change the Homepage Photograph 2.0 The Setup Menu To change the software language, your password or activate a fishing module you will first need to locate the setup menu from the homepage. These settings would have been established by an administrator at the time of your Elog program installation. It is recommended that you contact ELog Support (Section 1.3) if you have questions about your fishing module settings. Figure 6 8 Chapter 2 2.0.1 Language Option The ELog program is available in English and French. Locate the Setup Menu (Section 2.0) and select “Language Options” to change the language. Figure 7 Figure 8 9 Chapter 2 2.0..2 Change Your Y Passwo ord Loc cate the Setup p Menu (Section 2.0) and sselect “User S Settings”. 1) Select th he user from the t drop-down n username m menu. 2) Enter the e old passworrd 3) Enter your new passw word (twice). Record it somewhere confidential yyet accessible to you. 4) Save the e changes beffore exiting. 4 1 2 3 Figure 9 To exit the setup s menu: select s the Ho me Page icon n in the top toolbar. 10 Chapter 2 2.0.3 Activate a Fishing Module NOTE: This step was likely completed for you during the installation. Use these instructions to activate an additional module or re-install ELog. Locate the Setup Menu (Section 2.0) and select “Module Setup”. Figure 10 1) 2) Check the box beside the module you wish to activate. Type in the activation key provided at the time of installation. 3) Click on in the top left toolbar to complete the activation. An incorrect activation key will result in an error message (Figure 11). Re-type the activation key. If your activation key is incorrect, contact technical support (Section 1.3). 11 Chapter 2 Figure 12 A successful activation will return you to the homepage where the activated modules are represented by (Figure 12). Refer to Section 2.1 to setup the fishing module settings. If the Module Settings are not accessible (as in Figure 13) you will need to configure the communication and GPS settings before continuing any further. Refer to Section 2.2 to setup the communication settings. Figure 13 12 Chapter 2 2.1 Fishing Mod dule Settings Clic ck to enter the e desired mod dule from the homepage (e example: Pac cific Salmon Gillnet, G Figure e 14). Figure e 14 If you are wo orking on a sm mall screen yo ou can choose e to hide the left in ord der to free up more panel by click king on space for the e main view (F Figure 2.1b). 13 Chapter 2 2.1.1 General Settings Figure 15 Fill in the fields shown in Figure 15 1) Enter the Elog ID (Received from DFO or Elog Support) 2) Enter the Vessel Name 3) Enter the Vessel Registration Number (VRN or CFV) 4) Select the appropriate Time Zone 5) Enter the Captain’s Name 6) Enter the captain’s assigned Fisher Identification Number (FIN) 7) Opportunity to enter a second captain (only one can be active). 8) Select Area(s) to be fished (C, D or E). In the appropriated licence area drop down list, choose AG, FAG or NAG. 9) Enter the fishing licence tab number 10) Enter the vessel’s home port. 11) If the vessel will be using a wireless LAN connection to transmit data, and sending every day is not possible, add a check mark in the box to the left of ”Save Data.” 12) Only an Administrator can add or modify the delivery email. The email address should be [email protected]. Contact Elog Support (Section 1.3) if this field is blank or incorrect. 13) Click the Save button before exiting this screen. 14) By clicking the “End Season” button, all of the previous season’s data will be archived. The next trip started by the fisherman will be Trip #1. 14 Chapter 2 The error message (seen here in Figure 16) will result if a required field has not been filled. Complete the field highlighted in pink and save your edits. Figure 16 After entering correctly entering the information and selecting “Save” (Step 13 Figure: 15). The disclaimer will appear. Read it through and if all data entered is correct, accept the disclaimer by selecting “Yes.” Figure 17 15 Chapter 2 Add ding a Secon nd Captain If yo ou need to ad dd a captain or o wish to upd date a field, you can return n to the General Setttings screen at any time b by selecting “Pacific Salm mon Gilln net” from the left vertical toolbar on the e Home Page e screen (Figu ure 18).. Then selectt the “Setting gs” button to enter the mo odule’s Gene eral Setttings form (Fiigure 15) and d add a secon nd captain (ite em #7 of Figu ure 15).. Figure 18 Recall that only one captain may b e active at an ny one time. 16 Chapter 2 2.2 Connectio on Settings 2.2..1 Configure e Satellite These settings would w have be een establishe ed by an adm ministrator at tthe time e of your Elo og program installation. IIt is recommended that y you contact ELog Sup pport before changing c sate llite settings. 5 6 4 1 2 3 F Figure 19 ect your Interne et/Satellite vend dor company frrom the list of vvendors. Sele 1) Enter the nam me vessel name e. ail associated with that Intern net or Satellite e service accou unt. 2) Enter the ema This is typically the modem identification a and was provid ded at the time e of ontact ELog su upport if you do o not know this email addresss. installation. Co y computerr and it is the p port through wh hich 3) The Com Portt is specific to your your modem connects to the computerr. This setting g will have be een established by y an administra ator at the time of ELog progrram installation. It is recommende ed that you co ontact ELog s support (Sectio on 1.3) if you do not know the COM M Port. You may m be able to deduce the co om port by lookking at your y computer settings. Go to t the Start M Menu, select th he Control Pan nel, sele ect System (orr System and Security, the en System) an nd enter into the Dev vice Manager. From the Device Mana ger window find the list of com mmunication po orts (COM ports s) and expand d the list to see e which has be een assigned to the modem m (e.g. CO OM1). ELog s upport can w walk you throu ugh this process. 4) 5) Save your settings. onnection when the modem h has been connected. Activate the co 17 Chapter 2 When you modem is connected to your computer and powered on, it should look like the following: Figure 20 Configure Satellite should now be in green bold letters. If it is, your Elog program is ready to send and receive data. Figure 21 Be aware that emails sent and received using an Iridium Satellite modem are limited to a maximum of 250 characters. The rest will be cut-off. 18 Chapter 2 2.2.2 Configure LAN These settings would have been established by an administrator at the time of your Elog program installation. It is recommended that you contact ELog Support (Section 1.3) before changing the LAN settings. Figure 22 Figure 23 The Elog program is capable of utilizing any internet connection the computer may have. Possible connections can include but are not limited to: network computer, wireless internet, mobile internet sticks and smart phones. 19 Chapter 2 If you are using a mobile internet device, you must ensure that the device is activated, connected to the computer and turned on. Figure 24 Figure 25 If you are using a smart phone, your phone must be getting a signal and the wireless hotspot app must be turned on. Remember to turn off the hotspot app when you are done sending your data or other people may be able to use your internet and max out your data. You unfortunately would be liable for the overage charges. The following is an example of an IPhone hotspot setup: 20 Chapter 2 Figure 27 Figure 26 Figure 29 Figure 28 21 Chapter 2 2.2.3 Configure Dial Up (Globalstar) These settings would have been established by an administrator at the time of your Elog program installation. It is recommended that you contact ELog Support (Section 1.3) before changing the Dial Up settings. Figure 30 Configure Dial Up, even though it is connected and working properly will be displayed in bold and red. At this point your computer is not actually connected to the internet. When you attempt to send data, the Elog program will send a command prompt to the phone initiating the dial up box. All you will need to do is click the dial button with your left mouse button. 22 Chapter 2 Figure 31 Figure 32 23 Chapter 2 There are currently two Globalstar satellite phone and modem systems available on the market and the DFO Elog program is compatible with both units. Figure 33 Figure 34 24 Chapter 2 Globalstar 1600 Sat Phone: Connected to satellites and ready to send and receive data Figure 35 Globalstar 1600 Sat Phone: Attempting to connect to the network and gain internet access Figure 36 Globalstar 1600 Sat Phone: The phone is connected to the network and your computer should have internet access. The timer indicates the phone has been online for 9 seconds. Figure 37 25 Chapter 2 Globalstar 1700 Sat Phone: The phone is searching for a satellite connection. Figure 38 Globalstar 1700 Sat Phone: Attempting to connect to the network and gain internet access Figure 39 Globalstar 1700 Sat Phone: The phone is connected to the network and your computer should have internet access. The timer indicates the phone has been online for 1 second. Figure 40 26 Chapter 2 2.2.4 Globalstar Call Times Tool Your DFO ELog program can only dial-up and send emails and reports through Globalstar if you are in time window of sufficient satellite coverage. The Globalstar Call Times Tool can help you determine when you will have coverage and when you will not. It is an internet based tool so you must be on the internet to use it. http://calltimes.globalstar.ca/ Go to the website and accept the terms of use. Type the closest city or town into the By Address box and hit the enter key on your keyboard. A report will be generated listing globalstar satellite coverage availability for the next four or five days. This report can be saved to your computer, printed, or emailed. Figure 41 27 Chapter 2 Figure 42 2.2.5 Common Globalstar Errors Figure 43 shows a DFO Elog error. The Elog program has stopped the dial-up attempt. The error can happen when the computer is working in an off-line state. You need to tell the computer to go back online. Figure 43 28 Chapter 2 Internet Explorer Open Internet Explorer Select the file option in the top left corner Scroll down to Work Offline. If there is a check mark there, click on Work Offline. Your computer is now back online. Try resending your report. Mozilla Fire Fox Open Mozilla Fire Fox Select the orange Fire Fox button in the very top left corner. Scroll down to Work Offline. If there is a check mark there, click on Work Offline. Your computer is now back online. Try resending your report. Figure 44 shows an email address error. This error has occurred because the email address or password entered in the Configure Dialup form is incorrect. Try re-entering your information, saving and attempt to re-send your data. This error can also occur on a LAN setup. Figure 44 29 Chapter 2 Figure 45 shows a Globalstar error. This error has occurred because the computer has lost its connection to the phone (the com ports are not communicating). When the globalstar modem is installed, a USB cable will be plugged into your computer. If unplugged, this cable must be plugged back in to the same spot. Try un-plugging the USB cable from your computer and plugging it back in or, if it has been moved, plug it back into the original spot. Figure 45 30 Chapter 2 2.2..6 Configurre GPS Settin ngs THE E GPS ONLY NEEDS TO BE CONFIGU URED IF YOU UR FISHERY IS PAR RTICIPATING IN A VESSEL MONITORING G PROGRAM. These settings would have been established byy an administra ator at 2 1 Figure e 46 am installation n. It is the time of yourr Elog progra ommended th hat you con ntact ELog S Support reco (Sec ction 1.3) befo ore changing GPS G settings. 1) The Com Portt is specific to your compute r and it is the port through which your GPS is conne ects to the h been esta ablished by computer. This setting will have an administra ator at the time of ELog g program installation. It is recommende ed that you co ontact ELog s support (Sectio on 1.3) if you do not know the CO OM Port for the t GPS conn nection. You u may be able e to dedu uce the com port p by looking g at your com mputer settings. Go to the Start Men nu, select the Control C Panel, select System m (or System a and Security, th hen Systtem) and ente er into the Device Manage er. From the Device Manager wind dow find the lis st of communication ports (CO OM ports) and expand the lisst to see which has bee en assigned to the GPS (e.g. COM2). og support can n walk you thrrough this pro ocess ELo 2) Save your ch hanges before e moving to a another scree en. 31 Chapter 2 2.2..7 Accessin ng Email Sele ect View Mes ssages from the t Homepag ge (Figure 47 7) and the em mail Inbo ox will open (Figure 48) Fiigure 47 1 3 2 Fig gure 48 New” to comp pose a new em mail. 1) Select “N 2) For Glo obalStar and d mobile in nternet stick users, select “Receive e” when you have h a conne ection in orde er to prompt tthe email prrogram to retrieve emailss sent to you u. For users of utomatically. other mo odes of comm munication thiss will occur au 3) Manage your addres ss book and organise you ur email folde ers from the “Tools” menu u. 32 Chapter 2 2.2..8 Update Elog E Software e ELo og administtrators may y apply prog gram updates s remotely. You u will receive a notice in the form of a pop p up windo ow (Figure 49). 4 Click OK to continue; the update has h been app plied. Figure 4 49 If yo ou have an internet i connection to the e computer yo ou may wish h to che eck for update es or you may y be instructe ed to do so byy ELog Suppo ort. Sele ect “Check fo or Software Update” U from the Tools m menu on the ttop toolbar (Figure 50). 5 If a down nload is availa able you will b be prompted on how w to proceed (Figure ( 51). Figure 50 Contact EL Log Supportt (S Section 1.3) if you require assistance. a Fig gure 51 Hint: Save the Update file to your ccomputer desktop in order to find it again n easily; when n the Browse e for Folder scre een appears select Desk ktop from me enu. The Zip file e will be save ed as an icon n on the desktop screen, dou uble click to open o it (see F Figure 52). Figure 5 52 33 Chapter 2 2.2.9 Change Homepage Photograph Select Figure 53 A window will appear (Figure 54) and you can browse your computer’s files for a photograph of your choice. Select the Save Photo button when you have selected the file and your homepage will appear with the new photograph (Figure 55). Figure 54 Figure 55 2 Salmon Photo (Figure 2.2.6c) by Ryan Miller and provided courtesy of Miller Marine Diving Services. 34 Chapter 3 Chapter 3 Using the Program Communication General Start Fishing FOS Confirmation Pause the Fishing Trip Daily Catch Forms End a Trip Catch Validation Record Keeping 3.0 Communication General In order for your communication (start, pause, catch and end report messages) to be sent successfully, the method of communication (see red circle in Figure 3.0) must be green. If the wording is red, as in Figure 56, your coverage is not sufficient and the message will not send immediately. Satellite Users The message you wish to send will wait in queue in the modem until coverage is sufficient. Do not turn off the modem and you will not need to resend the communication. Figure 56 The number of messages waiting in queue in the modem (to be sent out or to be read by you) will be indicated in brackets under Modem Status. 35 Chapter C 3 3.1 Start Fishin ng A trrip can be sta arted once a Fishery F Open ing announce ement has be een mad de and a Notice has been sent out. Th e date of you ur start trip must be on or after th he Fishery Opening Date (i.e. not the date you lea ave portt but the date net e you begin to fish).Selecct the Pacific Salmon Gilln mod dule (Section 2.1). If you do d not have a trip in progress you will be able e to select sta art trip from th he top horizon ntal tool bar (F Figure 57). Figuree 57 endar to the rright in the Trrip Date field tto 1) Left click on the small cale open the Trip p Date Calend dar. Use e arrows left (◄ to access previous p montths) and right (► to access the next month) to t change the e month. Placce the mouse cursor on the e date e (it will shade e in blue) and d click to selecct it. 2) Select your Start S Time (24 4hour clock). 3) Select a fishery. Note thatt the areas avvailable will co orrespond to the licence numbers n (Area a C, D or E) tthat you have e filled in unde er General Setttings (Section n 2.1.1) 4) Select the Management Area A 5) Select the Su ub Area you plan p to fish (w within the Man nagement Are ea chosen in ste ep #4) from th he drop-down n list. 6) Send your Start Trip. If the management area you plan to fiish is not in th he drop-down n list, please contact Elog Support (Secction 1.3). 36 Chapter 3 3.1.1. FOS Confirmation When you have successfully sent your start trip communication the ELog program will wait for a confirmation reply from the DFO Fishery Operating System (FOS). It should take the FOS database approximately five minutes to receive your report, process it, and send you a confirmation number. Receipt of your FOS confirmation number is dependent on the satellite / internet / cell reception you currently are getting in the area fishing. 3.1.2. Waiting for Confirmation / Connected to LAN or Satellite You do not need to remain on this screen (Figure 58) nor do you need to keep the Elog program open while you are waiting for confirmation. Figure 58 The button will become available if you have been waiting for FOS confirmation for more than 10 minutes. 37 Chapter 3 If Configure LAN or Configure Satellite is activated and displayed in bold green letters, the DFO ELog program will automatically check for new email messages every 3-5 minutes. This includes messages from the FOS database. When your confirmation email is delivered from the FOS database, a pop-up window (Figure 59) will indicate receipt of the FOS reply and your start trip confirmation number. Select the View Details button to see the information associated with your FOS confirmation (Figure 60). Figure 59 Figure 60 The Reference Number is made up of: Your FIN (4984) – the day and month your communication was sent (ddmm, 1005) – the time your communication was sent (hr:min:sec, 083548). The DFO ELog program will automatically store the FOS confirmation number. This information can be accessed through the DFO Elog reports (Section 3.5). Click the OK button (Figure 59 or Figure 60) to store your confirmation number and continue with your reporting. 38 Chapter 3 3.1.3 Waiting for Confirmation / Connected to Dial-Up (Globalstar) If you are using a Globalstar dial-up connection, you do not have constant internet connectivity and therefor the DFO Elog program is not checking your emails for you every couple of minutes. You must prompt the program to dial-up and check for confirmation. Click the button found near the top of the screen in Figure 58 to start the dial up process (Figure 61). Selecting the Dial button will prompt the phone to connect to the internet. The Elog program will check your email for you. When the program is finished, the phone will automatically disconnect from the internet. Figure 61 39 Chapter 3 If yo ou have an active a trip (i.e.. you have sttarted a trip ssuccessfully a and are paused or are fishing), the icon be side the active module w will app pear green as in Figure 62.. Figure 62 6 Re ecall: If you are working on n a small scre een you can cchoose to hide e the vertical left panel by sele ecting fre ee up more sp pace for the main m view. 40 in orde er to Chapter 3 3.2 Cancel the Fishing Trip The is used to end a fishing trip before it begins. If a Start trip report has been submitted, but, for whatever reason, the trip will now not take place, a Cancel trip report can be submitted. This report will remove the Start trip report from the Elog and the FOS system. A Cancel Trip report can only be sent if fishing has NOT taken place. Select the Cancel Trip button. The information will be compiled for the user. Select the Send button. Figure 63 41 Chapter 3 3.3 Pause the Fishing Trip Select from the top horizontal menu to open the pause trip window (Figure 64). Figure 64 The Pause Trip is to suspend fishing efforts by one day and notify DFO that fishing is not taking place. In other words, if you have not ended your trip and are not currently fishing you will need to pause the trip each day until you resume fishing. 1) The Pause Date is the first date of your trip that fishing is not taking place. 2) Select the reason for pausing the trip from the Comments drop-down menu. If your reason is not listed you can choose to leave this field blank. 3) Check that the information is correct and click on the send button. The Elog program will require FOS confirmation (Section 3.1.1) for your pause trip. 42 Chapter 3 3.4 Daily Catch Forms Enter your catch data daily, at the end of the day. Select from the top horizontal menu to open the catch trip window (Figure 65). Ensure that the catch date is correct (refer to section 3.3 to pause for days where you did not fish). Figure 65 Fill in the following fields: 1) Select the number of hours fished (round to the nearest half hour) from the drop-down menu provided 2) Enter the number of sets made. 3) Specify the management area fished 4) Click on all applicable sub areas within this management area 5) Each sub area clicked will appear in the selected sub areas field. If you have incorrectly entered a sub area, simply click it again or clear all entries and start your selection over. 6) Fill in the amount of each species kept and released (pieces) 7) For additional species, place your cursor in the species name field and select the additional species from the drop-down list provided; fill in the amount of each species kept and released (pieces). 8) Click the button to record catch for a second management area. 9) Check that the information is entered correctly and send. 43 Chapter 3 3.4.1 Catch Review Before the data has been sent a Catch Review screen will be displayed for this trip. Review the Catch Information; ensure that the species and amounts are correct for the catch date as well as for the catch totals. If changes are necessary select cancel (Figure 66: Red Oval) and you will return to the catch page. If the information is correct select send (Figure 66: Green Oval) and your catch will be sent to DFO. Figure 66 The Elog program will require FOS confirmation (Section 3.1.1) of your catch data. If the data transmission (send feature) is successful you will be returned to the daily catch screen for the next day. You are now free to End the trip or to enter another catch. 44 Chapter 3 Afte er you have sent s in your daily d catch re ecords and re eceived an FO OS confirmation num mber in retu urn, the catcch screen wiill automatica ally upd date with the following (ne ext sequentia al) date. If yo ou send toda ay’s catc ch you will be e returned to the t catch scre reen and will rreceive an errror mes ssage (Figure e 67) becaus se it has auto omatically loa aded tomorrow w’s date e and you can nnot enter info ormation for a future date. Figure 67 This s error messa age does not apply to the ssuccessfully ssent catch da ata. It re efers to the fa act that you cannot c enter another catcch, at this point, for tomorrow. Re eturn to this screen tomo orrow and you u can enter tthe catc ch for that day y. Remember to pause the trip for any da ay where you u are not fishing 3). (Section 3.3 If you previo ously choose to t hide the sid de panel you can access it again by selecting from the e top left corner of the Elog g program screen. 45 Chapter 3 3.5 End a Trip Sele ect from th he top horizo ontal menu to o open the e end trip window (Figu ure 68). Figure e 68 nd Date. The end trip date e calendar willl let you choo ose 1) Select the En the same da ate or the day after your lasst activity (i.e. your last catch entry or last pause trip). Select S your en nd trip time Re-call thatt the End Fiishing date a and Time must be within n the Fishery Ope ening. 2) Enter the End Trip time. 3) Select a man nagement are ea 4) Select a sub b area within that manage ement area. Send your E End Trip. It is a good d idea to perio odically backu up your inform mation. If you u have been fishin ng for a while and have en ntered a few ttows now mig ght be a good time e to backup your y fishing da atabase. Refe er to Section 3.7.1. 46 Chapter 3 3.6 Record Keeping There are two specific reports that the user has access to for record keeping, an activity report and a catch report. The activity report stores the FOS confirmation numbers by date. The catch report stores the recorded catch information. These reports can be printed or exported to a Microsoft Excel file. The activity and catch reports are designed to replace the recorded paper logbook. If a C&P Officer requests to see a log book, the user will allow the office to review these reports. 3.6.1 Activity Report In the Salmon Gillnet module, select the button. By default, the Activity Report (Figure 69) will open. The report can be exported to Excel, printed, or sorted and filtered. Figure 69 47 Chapter 3 3.6.2 Catch Report In the Salmon Gillnet module, select the button. By default, the Activity Report (Figure 69) will open. Click the drop down icon in the box next to Activity Report and choose Catch Report. The Catch Report (Figure 70) will open. The report can be exported to Excel, printed, or sorted and filtered. Figure 70 Select spreadsheet format. Select Use to save the report to your computer in to print the report for ease of paper record keeping. and to customize your report… 48 Chapter 3 3.6..3 Export a Trip T from the top horizo Sele ect ontal menu. H Highlight the ttrip you wish to export by clicking it once wit h the left mo ouse button a and then n hit Select Trrips (Figure 71). 7 Hold down the control key k while sel ecting the sp pecific trips yyou wish to expo ort in order to select more than one. T This will outp put the selectted trrip data to an n excel reportt or cssv file. Figurre 71 Alte ernatively you can view our and yo If you notice that you have e accidentallyy sent incorrecct catch data,, port (Section 1.3). please contact ELog Supp 49 Chapter 3 3.6..4 Filter and or Sort a Report to apply a filter and se Use e elect only certtain records. F For example, Figure 72 shows an n activity repo ort filter that would select all reco orded activity after March 1, 1 2010 and b before March 15, 2010. 3 2 1 5 6 4 7 8 9 10 Figurre 72 1) Select your condition c facttors (#’s:5-9).. Click the “Ad dd Filter” buttton to save these e restrictions in field #10. 2) Select a condition factorr in field #10 0, highlight iit and click tthe Remove Sele ected Filter button. The filtter will be rem moved. 3) Select this button b to rem move all save ed condition ffactors from tthe list. 4) If a new con ndition factor has been ad dded to field #10, select tthe Apply button, to apply the e filter to the re eport. 5) The conditio on field is nott required on the first filterr but rather itt is used to spec cify how each subsequent filter relates tto the list. Select “And” to display on nly records tha at meet both filters. Select “Or” to t produce a report that includes all d data that meets one or the otther filter crite eria. 6) Select a filtter from the drop-down list. The filtter choices w will correspond to t the column n headings in the activity orr string reportt 7) Select an op perator from th he drop-down n list. 8) The value fie eld will be spe ecific to the fillter you choosse, for examp ple, if you chose e to filter by date, d a calen ndar will appe ear in the value field to facilitate date selection. Selecct the value tthat the chossen operator (#7) is based upo on. 9) This button will provide a list of va alues currently in the Elog program for the t filter you have chosen . 10) If this field is blank no condition facctors have been saved a and applied to the e report. 50 Chapter 3 Use the button to re-order the rows of your customized report. You can choose more than one column to order in ascending or descending sequence. Figure 73 shows a hierarchy of two re-order requests. The records in this example will first be ordered from earliest to most recent catch date and then by shortest to longest number of hours fished. In other words, where the catch date is the same, the first record displayed will be the one with the smallest number of hours fished. Figure 73 51 Chapter 3 3.7 Backup or Uninstall Elog Accidents happen, computers fail. It is recommended that the user periodically backup the DFO Elog’s database. If a user needs to move his or her Elog program from one computer to another, or, re-install the DFO Elog software, the backed up database can be inserted, repopulating the user’s settings and entered reports. 3.7.1 Backing up the Elog Database Figure 74 1) Insert a USB memory device into one of the computer’s USB ports. 2) Select “Backup Database” from the tools menu (Figure 74). 3) A “Save As” box will open. DO NOT RE-NAME THE DATABASE FILE. Save the file to the USB memory device. 4) Perform this back every other day to make sure the backed up database is up to date. 52 Chapter 3 3.7.2 Re-inserting a Backed Up Database 1) Insert the USB device with the saved DFO Elog database. 2) Copy the file and save it in the following location a. My Computer b. C: Drive c. Required Software Files d. Fisheries and Oceans Canada e. DFO Elog 1.0 f. Database 3) Paste the backed up database in this file. If a warning pops up stating a file already exists, select the option to copy and overwrite it. 4) Open the DFO Elog program. Figure 75 53 Chapter 3 3.7..3 Uninstall Elog ase backup your y databas se and print or save all d desired repo orts Plea befo ore uninstalling the EL Log Book P Program. If you have a any que estions conta act ELog support (Secti on 1.3) befo ore uninstalliing the program. 1) 2) 3) 4) Open the e Control Pan nel. Select Programs and Features Select DFO D Elog 1.0 Click the e “Uninstall” button Figurre 76 Note: If you right click on the deskttop icon and a select delette you will not uninstall the program p but rather will delette the shortcut to the progrram. Figure e 77 54 Chapter 3 The Electronic Log Book software was developed by M.C. Wright and Associates Ltd. and John Blyth (Sizeable Funding Inc.) for Fisheries and Oceans Canada. M.C. Wright and Associates Ltd. Attn: Electronic Log Book 2231 Neil Drive Nanaimo, BC V9R 6T5 [email protected] Phone: (250) 753-1055 Phone / Fax: (250) 591-1056 55