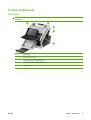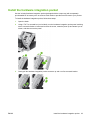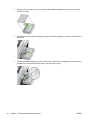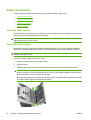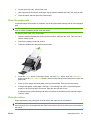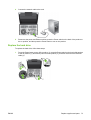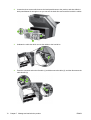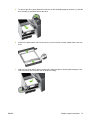
1
HP Scanjet 7000n Series
User Guide
Copyright and License
Trademark Credits
© 2009 Copyright Hewlett-Packard
Development Company, L.P.
Adobe®, Acrobat®, and PostScript® are
trademarks of Adobe Systems Incorporated.
Reproduction, adaptation, or translation
without prior written permission is prohibited,
except as allowed under the copyright laws.
Java™ is a US trademark of Sun
Microsystems, Inc.
The information contained herein is subject
to change without notice.
Microsoft®, Windows®, Windows® XP, and
Windows Vista® are U.S. registered
trademarks of Microsoft Corporation.
The only warranties for HP products and
services are set forth in the express warranty
statements accompanying such products
and services. Nothing herein should be
construed as constituting an additional
warranty. HP shall not be liable for technical
or editorial errors or omissions contained
herein.
UNIX® is a registered trademark of The Open
Group.
Edition 1, 9/2009
iHQC™ compression technology by I.R.I.S.,
copyright 2007-2009, All Rights Reserved
(Patent Pending).
ENERGY STAR and the ENERGY STAR
mark are registered U.S. marks.
OCR Technology by I.R.I.S., copyright
1987-2009, All Rights Reserved.
PDF-iHQC™, XPS-iHQC™ technology by
I.R.I.S. copyright 2007-2009.
Table of contents
1 Product basics
Conventions used in this guide ............................................................................................................ 2
Product features ................................................................................................................................... 3
Product walkaround .............................................................................................................................. 5
Front view ............................................................................................................................ 5
Back view ............................................................................................................................. 6
Serial number and model number location .......................................................................... 6
2 Control panel
Use the control panel ........................................................................................................................... 8
Control-panel layout ............................................................................................................. 8
Home screen ....................................................................................................................... 9
Buttons on the touch screen .............................................................................................. 10
Control-panel help system ................................................................................................. 10
Navigate the Administration menu ..................................................................................................... 11
Jetdirect menus ................................................................................................................. 11
3 Supported utilities for Windows
HP Web Jetadmin .............................................................................................................................. 18
Embedded Web Server ...................................................................................................................... 19
HP Digital Sending Software (HP DSS) ............................................................................................. 20
4 Configure the product
Supported network protocols .............................................................................................................. 22
Configure the product to use the network .......................................................................................... 24
View or change network settings ....................................................................................... 24
Set or change the administrator password ........................................................................ 24
Manually configure IPv4 TCP/IP parameters from the control panel ................................. 25
Manually configure IPv6 TCP/IP parameters from the control panel ................................. 26
Disable network protocols (optional) .................................................................................. 27
Link speed and duplex settings ......................................................................................... 27
Configure e-mail settings .................................................................................................................... 28
Supported protocols ........................................................................................................... 28
ENWW
iii
Configure e-mail options .................................................................................................... 28
Configure other digital sending settings ............................................................................................. 30
5 Load originals
Supported document sizes ................................................................................................................. 34
General document loading tips ........................................................................................................... 35
Document loading tips for mixed-size documents .............................................................................. 37
Load documents ................................................................................................................................. 38
6 Scan and send documents
Sign In ................................................................................................................................................ 42
Preview a scan ................................................................................................................................... 43
Use the Image Preview screen .......................................................................................... 43
Send a scanned document to one or more e-mails ............................................................................ 45
Use the address book ........................................................................................................ 45
Create a recipient list ........................................................................................ 45
Use the Personal or Shared Contacts address book ........................................ 45
Add entries to the Personal or Shared Contacts address books ...... 45
Delete entries from the Personal Contacts address book ................ 46
Use the Send E-mail screen .............................................................................................. 46
Send documents ................................................................................................................ 47
Send a document .............................................................................................. 47
Use the auto-complete function ........................................................................ 47
Fax a scanned document ................................................................................................................... 48
Use the Send Fax screen .................................................................................................. 48
Send a fax .......................................................................................................................... 49
Save to a network folder or USB storage device ................................................................................ 50
Send or save a document using Quick Sets ...................................................................................... 51
Scan to a workflow destination ........................................................................................................... 52
7 Manage and maintain the product
Use information pages ....................................................................................................................... 54
Embedded Web Server ...................................................................................................................... 55
Open the Embedded Web Server ...................................................................................... 55
Embedded Web Server options ......................................................................................... 55
Use HP Web Jetadmin software ........................................................................................................ 57
Controlling digital-sending security ..................................................................................................... 58
Network authentication ...................................................................................................... 58
Secure e-mail ..................................................................................................................... 58
Restrict software access .................................................................................................... 58
Security features ................................................................................................................................ 59
Secure the Embedded Web Server ................................................................................... 59
Manage temporary job files .............................................................................................. 59
iv
ENWW
Secure Storage Erase ....................................................................................................... 60
Data affected ..................................................................................................... 60
Secure File Erase .............................................................................................................. 60
Secure Disk Erase ............................................................................................................ 60
HP High-Performance Secure Hard Disks ......................................................................... 61
Manage certificates ............................................................................................................ 61
Load a certificate ............................................................................................... 61
Load a certificate revocation list (CRL) ............................................................. 61
Authentication and authorization ...................................................................................... 61
Install the hardware integration pocket ............................................................................................... 63
Clean the product ............................................................................................................................... 66
Clean the touch screen ...................................................................................................... 66
Clean the product glass ..................................................................................................... 66
Clean the paper path ......................................................................................................... 67
Clean the rollers ................................................................................................................. 67
Order maintenance and scanning supplies ........................................................................................ 70
Replace supplies and parts ................................................................................................................ 71
Replace the rollers ............................................................................................................. 71
Replace the keyboard overlay ........................................................................................... 71
Replace the Jetdirect card ................................................................................................. 72
Replace the hard drive ....................................................................................................... 73
Upgrade the firmware ........................................................................................................ 76
Upgrade the product firmware .......................................................................... 77
Upgrade the HP Jetdirect Inside firmware ........................................................ 77
8 Solve problems
Error codes ......................................................................................................................................... 80
Basic troubleshooting tips .................................................................................................................. 81
Restore factory settings ...................................................................................................................... 82
Interpret control-panel status lights .................................................................................................... 83
Control-panel message types ............................................................................................................. 84
Control-panel messages .................................................................................................................... 85
Installation problems .......................................................................................................................... 86
Initialization or hardware problems ..................................................................................................... 87
Check the Ethernet connection .......................................................................................... 87
Check the power connection ............................................................................................. 87
Reset the product .............................................................................................................. 88
The product has stopped working correctly ....................................................................... 88
Operation problems ............................................................................................................................ 89
Product will not turn on ...................................................................................................... 89
Lamp stays on ................................................................................................................... 89
Scan does not start right away .......................................................................................... 89
Only one side of a two-sided page scans .......................................................................... 90
ENWW
v
Scanned pages are missing at the scan destination ......................................................... 90
Scanned pages are out of order at the scan destination ................................................... 90
Optimize scanning and task speeds .................................................................................. 90
The scan is completely black or completely white ............................................................. 90
Scanned images are not straight ....................................................................................... 90
Scan files are too large ...................................................................................................... 90
Paper path problems ......................................................................................................................... 92
Paper jamming, skewing, misfeeds, or multiple-page feeds .............................................. 92
Scanning fragile originals .................................................................................................. 92
Paper does not feed correctly ............................................................................................ 92
Originals are curling up in the output tray .......................................................................... 93
The bottom of the scanned image is cut off ....................................................................... 93
The scanned images have streaks or scratches ............................................................... 93
An item loaded in the document feeder jams repeatedly ................................................... 93
Clear jams from the paper path ......................................................................................... 93
Solve e-mail problems ........................................................................................................................ 95
Validate the SMTP gateway address ................................................................................. 95
Validate the LDAP gateway address ................................................................................. 95
Solve network problems ..................................................................................................................... 96
Contact HP Support ........................................................................................................................... 97
Appendix A Supplies and accessories
Order parts, accessories, and supplies ............................................................................................ 100
Part numbers .................................................................................................................................... 101
Accessories ..................................................................................................................... 101
Cables and interfaces ...................................................................................................... 101
Maintenance kits .............................................................................................................. 101
Appendix B Service and support
Hewlett-Packard limited warranty statement .................................................................................... 104
OpenSSL .......................................................................................................................................... 105
Customer self repair warranty service .............................................................................................. 107
Customer support ............................................................................................................................. 108
Appendix C Product specifications
Physical specifications ..................................................................................................................... 110
Power consumption .......................................................................................................................... 110
Environmental specifications ............................................................................................................ 110
Certificate of Volatility ....................................................................................................................... 111
Volatile memory ............................................................................................................... 111
Non-volatile memory ........................................................................................................ 111
Hard-disk-drive memory .................................................................................................. 111
vi
ENWW
Appendix D Regulatory information
Regulatory model number ................................................................................................................ 114
Environmental product stewardship program ................................................................................... 115
Protecting the environment .............................................................................................. 115
Power consumption ......................................................................................................... 115
Plastics ............................................................................................................................ 115
Material restrictions .......................................................................................................... 115
Disposal of waste equipment by users in private households in the European Union .... 116
Chemical substances ....................................................................................................... 116
For more information ....................................................................................................... 116
Safety statements ............................................................................................................................. 116
Index ................................................................................................................................................................. 117
ENWW
vii
viii
ENWW
1
ENWW
Product basics
●
Conventions used in this guide
●
Product features
●
Product walkaround
1
Conventions used in this guide
Throughout this guide, several tips, notes, cautions, and warnings alert you about important information.
TIP: Tips provide helpful hints or shortcuts.
NOTE:
Notes provide important information to explain a concept or to complete a task.
CAUTION: Cautions indicate procedures that you should follow to avoid losing data or damaging the
product.
WARNING! Warnings alert you to specific procedures that you should follow to avoid personal injury,
catastrophic loss of data, or extensive damage to the product.
2
Chapter 1 Product basics
ENWW
Product features
Table 1-1 Features
Resolution
600 pixels per inch (ppi)
Memory
●
512 MB of random-access memory (RAM).
●
Memory Enhancement technology (MEt) automatically compresses data to use RAM more
efficiently.
●
HP Easy Select full color control panel
●
Embedded Web Server to configure the product and gain access to support
●
Document feeder: Holds up to 50 sheets of paper.
●
Two-sided scanning: The document feeder has an automatic duplexer for scanning twosided documents.
●
Blank page suppression: Suppresses blank pages in scanned output (works best with
white or light-colored pages).
●
Standard output tray: The output tray is located near the bottom of the product. This tray
can hold up to 50 sheets of paper.
●
HP Precision Feed technology with multiphase pick process, advanced separation and
intelligent picking technologies, mixed-stack handling, and ultrasonic double-feed
detection.
●
Local area network (LAN) connector (RJ-45) for the embedded HP Jetdirect card
●
One enhanced input/output (EIO) slot, which is occupied by the Jetdirect card
●
USB 2.0 connection for portable storage device
●
Optional HP Digital Sending Software (DSS)
●
Hardware integration pocket
●
Sleep Delay setting saves energy
●
High content of recyclable components and materials
●
Instant-on technology
●
Energy Star® compliance
●
Secure disk erase
●
Secure storage erase
●
Secure file erase
●
Authentication
User interface
Paper-handling
Connectivity
Environmental features
Security features
ENWW
◦
User access code authentication
◦
Windows (Kerberos and NTLM)
Product features
3
Table 1-1 Features (continued)
●
Scanning and sending
4
Chapter 1 Product basics
◦
LDAP
◦
Novell NDS
Jetdirect card
◦
IPsec
◦
Password protection
◦
SSL
◦
TLS
◦
SNMPv3
◦
802.1x authentication
◦
IPP over TLS
●
Secure communication between the product and network servers
●
IPsec security (hardware)
●
Support for HP High-Performance Secure Hard Disk
●
Modes for text, graphics, and mixed text and graphics formats
●
Embedded OCR
●
Job-interrupt feature
●
Control-panel animations (for example, jam recovery)
●
Scan and send to e-mail, fax, network folder, and USB device
◦
Address book for e-mail and fax
◦
Send to digital fax (Internet and LAN fax)
●
Retrieve contacts from a network directory (LDAP)
●
Automatic duplex (two-sided) scanning
ENWW
Product walkaround
Front view
CAUTION:
keyboard.
ENWW
If you need to move the product, always lift the product from the base. Do not lift using the
1
Power button
2
Document feeder latch
3
Hardware integration pocket (HIP) panel
4
USB connector for portable storage device
5
Control panel
Product walkaround
5
Back view
1
Power switch
2
Power connector
3
USB ports
4
Network link speed indicators
5
Ethernet port
6
Covered Ethernet port for service access
7
EIO slot containing a Jetdirect card
Serial number and model number location
Model name
Model number
HP Scanjet Enterprise 7000n
L2709A
L2708A
6
Chapter 1 Product basics
ENWW
2
ENWW
Control panel
●
Use the control panel
●
Navigate the Administration menu
7
Use the control panel
The control panel has an SVGA touch screen that provides access to all product functions, virtual and
physical keyboard, and a keypad with buttons for common tasks. Use the buttons and keyboard to
control jobs and the product status. The LEDs indicate overall product status.
Control-panel layout
The control panel includes a touch screen graphical display, job-control buttons, a keyboard, and three
light-emitting diode (LED) status lights.
8
1
Keyboard
Use the keyboard for entering text and numbers into fields on the touch
screen.
2
Touch screen
Use the touch screen to access product functions.
3
Sleep button
If the product is inactive for a long period of time, it automatically enters a
sleep mode. To place the product into sleep mode or to reactivate the
product, press the Sleep button.
4
Stop button
Stops the active job and opens the Job Status screen.
5
Start button
Starts digital sending (e-mail and fax, for example), or continues a job that
has been interrupted.
6
Attention LED
The Attention LED indicates that the product has a condition that requires
intervention.
7
Data LED
The Data LED indicates that the product is receiving data.
8
Ready LED
The Ready LED indicates that the product is ready to begin processing any
job.
9
Reset button
Resets the job settings to factory or user-defined default values.
10
Touch screen brightnessadjustment control
Use this control to increase or decrease the brightness of the touch screen
display.
Chapter 2 Control panel
ENWW
Home screen
The home screen provides access to the product features, and it indicates the current status of the
product.
1
ENWW
Features
Depending on how the product is configured, the features that appear in this area can include
any of the following items:
●
Fax
●
E-mail
●
Job Status
●
Save to Network Folder
●
Save to USB
●
Quick Sets
●
Workflow
●
Administration
●
Service
2
Product status line
The status line provides information about the overall product status. Various buttons appear
in this area, depending on the current status.
3
Help button
Touch the Help button to open the embedded help system.
4
Scroll bar
Touch the up or down arrows on the scroll bar to see the complete list of available features.
5
Sign In/Sign Out
Touch this button to sign in or sign out of the product. After you sign out, the product restores
all options to the default settings.
6
Network Address
button
Touch the Network Address button to find information about the network connection.
7
Date and time
The current date and time appear here. You can select the format that the product uses to show
the date and time, for example 12-hour format or 24-hour format.
Use the control panel
9
Buttons on the touch screen
The touch screen provides information about the product status. Various buttons can appear in this area.
Home button. Touch this button to go to the Home screen from any other screen.
Start button. Touch this button to begin the action for the feature that you are using.
NOTE: The name of this button changes for each feature. For example, in the digital fax feature, the
button is named Send Fax.
Error button. This button appears whenever the product has an error that requires attention before it can
continue. Touch the Error button to see a message that describes the error. The message also has
instructions for solving the problem.
Warning button. This button appears when the product has a problem but can continue functioning.
Touch the Warning button to see a message that describes the problem. The message also has
instructions for solving the problem.
Help button. Touch this button to open the built-in online Help system.
Control-panel help system
The product has a built-in Help system that explains how to use each screen. To open the Help system,
touch the Help button in the upper-right corner of the screen.
For some screens, the Help opens to a global menu where you can search for specific topics. You can
browse through the menu structure by touching the buttons in the menu.
For screens that contain settings for individual jobs, the Help opens to a topic that explains the options
for that screen.
If the product alerts you of an error or warning, touch the error or warning button to open a message
that describes the problem. The message also contains instructions to help solve the problem.
10
Chapter 2 Control panel
ENWW
Navigate the Administration menu
From the Home screen, touch the Administration button to open the menu structure. You might need to
scroll to the bottom of the Home screen to see this feature.
The Administration menu has several sub-menus that you can use for some setup tasks. (Use the
Embedded Web Server to configure all settings.) Touch the name of a menu to expand the structure.
A plus sign (+) next to a menu name means that it contains sub-menus. Continue opening the structure
until you reach the option that you want to configure. To return to the previous level, touch the Back
button .
To exit the Administration menu, touch the Home button
in the upper-left corner of the screen.
The product has built-in Help that explains each of the features that are available through the menus.
Help is available for many menus on the right-hand side of the touch screen.
The table in this section provides general information about each menu. For information about specific
entries in each menu, see the built-in Help.
Table 2-1 Administration menus
Menu item
Description
Information menu
Use this menu to view information pages and reports that are stored internally on the product.
Default Job Options menu
Use this menu to define the default job options for each function. These are used if the user
does not specify other options when creating the job.
Time/Scheduling menu
Use this menu to set options for setting the time and period of inactivity before the product
enters sleep mode.
Management menu
Use this menu to set up global product-management options.
Initial Setup menu
Use this menu to set networking and I/O parameters for the product. For information about
Jetdirect menu entries, see the Jetdirect Menu section.
Device Behavior menu
Use this menu to set the behavior and language of the display.
Jetdirect menus
Administration > Initial Setup > Networking and I/O > Jetdirect Menu
Table 2-2 Jetdirect menus
Menu item
Sub-menu item
TCP/IP
Enable
Sub-menu item
Values and Description
Off: Disable the TCP/IP protocol.
On (default): Enable the TCP/IP protocol.
Host Name
ENWW
An alphanumeric string, up to 32 characters, used to
identify the product. This name is listed on the
HP Jetdirect configuration page. The default host name
is NPIxxxxxx, where xxxxxx is the last six digits of the
LAN hardware (MAC) address.
Navigate the Administration menu
11
Table 2-2 Jetdirect menus (continued)
Menu item
Sub-menu item
Sub-menu item
Values and Description
IPV4 Settings
Config Method
Specifies the method that TCP/IPv4 parameters will be
configured on the HP Jetdirect server.
Bootp: Use BootP (Bootstrap Protocol) for automatic
configuration from a BootP server.
DHCP: Use DHCP (Dynamic Host Configuration
Protocol) for automatic configuration from a DHCPv4
server. If selected and a DHCP lease exists, DHCP
Release and DHCP Renew menus are available to set
DHCP lease options.
Auto IP: Use automatic link-local IPv4 addressing. An
address in the form 169.254.x.x is assigned
automatically.
Manual: Use the Manual Settings menu to configure
TCP/IPv4 parameters.
Default IP
Specify the IP address to default to when the Jetdirect
server is unable to obtain an IP address from the
network during a forced TCP/IP reconfiguration (for
example, when manually configured to use BootP or
DHCP).
Auto IP: A link-local IP address 169.254.x.x is set.
Legacy: The address 192.0.0.192 is set, consistent
with older HP Jetdirect products.
DHCP Release
This menu appears if the Config Method item was set
to the DHCP value and a DHCP lease for the Jetdirect
server exists.
No (default): The current DHCP lease is saved.
Yes: The current DHCP lease and the leased IP
address are released.
DHCP Renew
This menu appears if the Config Method item was set
to the DHCP value and a DHCP lease for the Jetdirect
server exists.
No (default): The Jetdirect server does not request to
renew the DHCP lease.
Yes: The Jetdirect server requests to renew the current
DHCP lease.
12
Chapter 2 Control panel
ENWW
Table 2-2 Jetdirect menus (continued)
Menu item
Sub-menu item
Sub-menu item
Values and Description
Manual Settings
(Available only if the Config Method item is set to the
Manual value) Configure parameters directly from the
control panel:
IP Address: The unique IP address of the product
(n.n.n.n), where n is a value from 0 to 255.
Subnet Mask: The subnet mask for the product
(m.m.m.m), where m is a value from 0 to 255.
Syslog Server: The IP address of the syslog server
used to receive and log syslog messages.
Default Gateway: The IP address of the gateway or
router used for communications with other networks.
Idle Timeout: The time period, in seconds, after which
an idle TCP data connection is closed (default is 270
seconds, 0 disables the timeout).
IPV6 Settings
Primary DNS
Specify the IP address (n.n.n.n) of a Primary DNS
Server.
Secondary DNS
Specify the IP address (n.n.n.n) of a Secondary
Domain Name System (DNS) Server.
Enable
Use this item to enable or disable IPv6 operation on the
server.
Off (default): IPv6 is disabled.
On: IPv6 is enabled.
Address
Type the server address, a 32 hexadecimal digit IPv6
node address that uses the colon hexadecimal syntax.
DHCPV6 Policy
Router Specified: The stateful auto-configuration
method to be used by the Jetdirect server is determined
by a router. The router specifies whether the Jetdirect
server obtains its address, its configuration
information, or both from a DHCPv6 server.
Router Unavailable: If a router is not available, the
Jetdirect server should attempt to obtain its stateful
configuration from a DHCPv6 server.
Always: Whether or not a router is available, the
Jetdirect server always attempts to obtain its stateful
configuration from a DHCPv6 server.
ENWW
Primary DNS
Use this item to specify an IPv6 address for a primary
DNS server that the Jetdirect server should use.
Secondary DNS
Use this item to specify an IPv6 address for a
secondary DNS server that the Jetdirect server should
use.
Navigate the Administration menu
13
Table 2-2 Jetdirect menus (continued)
Menu item
Sub-menu item
Sub-menu item
Values and Description
Manual
Use this item to manually set IPv6 addresses on the
server.
Enable: Select this item and choose the On setting to
enable manual configuration, or the Off setting to
disable manual configuration.
Address: Use this item to type a 32 hexadecimal digit
IPv6 node address that uses the colon hexadecimal
syntax.
Proxy Server
Specifies the proxy server to be used by embedded
applications in the product. A proxy server is typically
used by network clients for Internet access. It caches
Web pages, and provides a degree of Internet security,
for those clients.
To specify a proxy server, enter its IPv4 address or
fully-qualified domain name. The name can be up to
255 octets.
For some networks, you may need to contact your
Independent Service Provider (ISP) for the proxy
server address.
Proxy Port
Type the port number used by the proxy server for
client support. The port number identifies the port
reserved for proxy activity on your network, and can be
a value from 0 to 65535.
IPX/SPX
Not applicable for HP Scanjet Enterprise 7000n
AppleTalk
Not applicable for HP Scanjet Enterprise 7000n
DLC/LLC
Not applicable for HP Scanjet Enterprise 7000n
Security
Print Sec Page
Not applicable for HP Scanjet Enterprise 7000n
Secure Web
For configuration management, specify whether the
Embedded Web Server will accept communications
using HTTPS (Secure HTTP) only, or both HTTP and
HTTPS.
HTTPS Required: For secure, encrypted
communications, only HTTPS access is accepted. The
Jetdirect server will appear as a secure site.
HTTPS Optional: Access using either HTTP or HTTPS
is permitted.
IPSec or Firewall
Specify the IPSec or firewall status on the Jetdirect
server.
Keep: IPSec or firewall status remains the same as
currently configured.
Disable: IPSec or firewall operation on the Jetdirect
server is disabled.
14
Chapter 2 Control panel
ENWW
Table 2-2 Jetdirect menus (continued)
Menu item
Sub-menu item
Reset Security
Sub-menu item
Values and Description
Specify whether the current security settings on the
Jetdirect server will be saved or reset to factory
defaults.
No (default): The current security settings are
maintained.
Yes: Security settings are reset to factory defaults.
Link Speed
The link speed and communication mode of the
Jetdirect server must match the network. The available
settings depend on the product and installed Jetdirect
server. Select one of the following link configuration
settings:
CAUTION: If you change the link setting, network
communications with the Jetdirect server and network
product might be lost.
Auto (default): The Jetdirect server uses autonegotiation to configure itself with the highest link
speed and communication mode allowed. If autonegotiation fails, either the 100TX Half value or the 10T
Half value is set depending on the detected link speed
of the hub/switch port. (A 1000T half-duplex selection
is not supported.)
10T Half: 10 Mbps, half-duplex operation.
10T Full: 10 Mbps, Full-duplex operation.
100TX Half: 100 Mbps, half-duplex operation.
100TX Full: 100 Mbps, full-duplex operation.
100TX Auto: Limits auto-negotiation to a maximum link
speed of 100 Mbps.
1000TX Full: 1000 Mbps, full-duplex operation.
ENWW
Navigate the Administration menu
15
16
Chapter 2 Control panel
ENWW
3
ENWW
Supported utilities for Windows
●
HP Web Jetadmin
●
Embedded Web Server
●
HP Digital Sending Software (HP DSS)
17
HP Web Jetadmin
HP Web Jetadmin is a simple print and imaging peripheral management software tool that helps optimize
product use, control color costs, secure products, and streamline supplies management by enabling
remote configuration, proactive monitoring, security troubleshooting, and reporting of printing and
imaging products.
To download a current version of HP Web Jetadmin and for the latest list of supported host systems,
visit www.hp.com/go/webjetadmin.
When installed on a host server, a Windows client can gain access to HP Web Jetadmin by using a
supported Web browser (such as Microsoft® Internet Explorer) by navigating to the HP Web Jetadmin
host.
18
Chapter 3 Supported utilities for Windows
ENWW
Embedded Web Server
The product is equipped with an Embedded Web Server, which provides access to information about
product and network activities. This information appears in a Web browser, such as Microsoft Internet
Explorer or Mozilla Firefox.
The Embedded Web Server resides on the product. It is not loaded on a network server.
The Embedded Web Server provides an interface to the product that anyone who has a networkconnected computer and a standard Web browser can use. No special software is installed or
configured, but you must have a supported Web browser on your computer. To gain access to the
Embedded Web Server, type the IP address for the product in the address line of the browser. (To find
the IP address, touch the Network Address button on the Home screen.)
ENWW
Embedded Web Server
19
HP Digital Sending Software (HP DSS)
You can install the optional HP Digital Sending Software. This software runs as a service on a network
server and allows multiple products to send jobs through the server. It is not necessary to install any
software or drivers on individual user's computers. For information about compatible versions of HP
DSS and to purchase the software, see www.hp.com/go/dss.
20
Chapter 3 Supported utilities for Windows
ENWW
4
Configure the product
You might need to configure certain network parameters on the product. You can configure these
parameters from the Embedded Web Server or (for most networks) the HP Web Jetadmin software.
ENWW
●
Supported network protocols
●
Configure the product to use the network
●
Configure e-mail settings
●
Configure other digital sending settings
21
Supported network protocols
The product supports the TCP/IP network protocol, the most widely used and accepted networking
protocol. Many networking services utilize this protocol. The following tables list the supported
networking services and protocols.
Table 4-1 Network device discovery
Service name
Description
SLP (Service Location Protocol)
Device-discovery protocol, used to help find and configure
network devices. Used primarily by Microsoft-based programs.
Table 4-2 Messaging and management
Service name
Description
HTTP (Hyper Text Transfer Protocol)
Allows Web browsers to communicate with the Embedded
Web Server.
EWS (Embedded Web Server)
Allows you to manage the product through a Web browser.
SNMP (Simple Network Management Protocol)
Used by network applications for product management. SNMP
v1, SNMP v3, and standard MIB-II (Management Information
Base) objects are supported.
LLMNR (Link Local Multicast Name Resolution)
Specifies if the product responds to LLMNR requests over IPv4
and IPv6.
TFTP Configuration
Allows you to use TFTP to download a configuration file
containing additional configuration parameters, such as SNMP
or non-default settings, for an HP Jetdirect card.
Table 4-3 IP addressing
22
Service name
Description
DHCP (Dynamic Host Configuration Protocol)
For automatic IPv4 and IPv6 address assignment. The DHCP
server provides the product with an IP address. Generally, no
user intervention is required for the product to obtain an IP
address from a DHCP server.
BOOTP (Bootstrap Protocol)
For automatic IP address assignment. The BOOTP server
provides the product with an IP address. Requires the
administrator to input a product's MAC hardware address on
the BOOTP server for the product to obtain an IP address from
that server.
Auto IP
For automatic IP address assignment. If neither a DHCP
server nor a BOOTP server is present, the product uses this
service to generate a unique IP address.
Manual
For manual IP address assignment. Requires the administrator
to manually assign a static IP address.
Chapter 4 Configure the product
ENWW
Table 4-4 Security features
ENWW
Service name
Description
IPsec/Firewall
Provides network-layer security on IPv4 and IPv6 networks. A
firewall provides simple control of IP traffic. IPsec provides
additional protection through authentication and encryption
protocols.
SNMP v3
Employs a user-based security model for SNMP v3, which
provides user authentication and data privacy through
encryption.
Access control list (ACL)
Specifies the individual host systems, or networks of host
systems, that are allowed to access the server and the
attached network product.
SSL/TLS
Allows you to transmit private documents via the Internet and
guarantee privacy and data integrity between the client and
server applications.
IPsec batch configuration
Provides network-layer security through the simple control of
IP traffic to and from the product. This protocol provides the
benefits of encryption and authentication and allows for
multiple configurations.
Supported network protocols
23
Configure the product to use the network
View or change network settings
You can use the Embedded Web Server to view or change IP configuration settings.
1.
Touch the Network Address button on the Home screen to locate the IP address.
●
If you are using IPv4, the IP address contains only digits. It has this format:
xxx.xxx.xxx.xxx
●
If you are using IPv6, the IP address is a hexadecimal combination of characters and digits.
It has a format similar to this:
xxxx::xxxx:xxxx:xxxx:xxxx
2.
Type the IP address into the address line of a Web browser to open the Embedded Web Server.
3.
Click the Networking tab to obtain network information. You can change settings as needed.
Set or change the administrator password
Use the Embedded Web Server to set an administrator password or change an existing password. When
set, the you must enter this password before you can access and change configuration settings.
NOTE: You can also set a local administrator password from the General Security option on the
Security tab. When set, you must enter this password to change settings within the Embedded Web
Server.
1.
Open the Embedded Web Server and click the Networking tab.
2.
In the left-side pane, click the Authorization option.
NOTE: If a password has previously been set, you are prompted to type the password. Type the
password, and then click the Apply button.
24
3.
Type the new password in the Password box and in the Confirm Password box.
4.
At the bottom of the window, click the Apply button to save the password.
Chapter 4 Configure the product
ENWW
Manually configure IPv4 TCP/IP parameters from the control panel
In addition to using the Embedded Web Server, you can also use the control-panel menus to set an
IPv4 address, subnet mask, and default gateway.
1.
At the product control panel, touch the Administration button.
2.
Touch the Initial Setup menu to open it.
3.
Touch the Networking and I/O menu to open it.
4.
Touch the option for the Jetdirect menu.
5.
Touch the option for TCP/IP.
6.
Touch the option for IPV4.
7.
Touch the option for configuration method.
8.
Touch the option for manual settings.
9.
Touch the option you wish to manually set and follow the onscreen instructions to manually change
the option setting.
10. Touch the Save button to save your changes.
ENWW
Configure the product to use the network
25
Manually configure IPv6 TCP/IP parameters from the control panel
In addition to using the Embedded Web Server, you can also use the control-panel menus to set an
IPv6 address.
1.
At the product control panel, touch the Administration button.
2.
Touch the Initial Setup menu to open it.
3.
Touch the Networking and I/O menu to open it.
4.
Touch the option for the Jetdirect menu.
5.
Touch the option for TCP/IP.
6.
Touch the option for IPV6.
7.
Touch the option for address.
8.
Touch the option for manual settings.
9.
Touch the option for enabling manual settings.
10. Touch the option to turn on manual settings, and then touch the Save button.
11. Touch the option for address and then touch the data entry field.
12. Use the keyboard to enter the address, and then touch the OK button.
26
Chapter 4 Configure the product
ENWW
Disable network protocols (optional)
By factory default, all supported network protocols are enabled. Disabling unused protocols has the
following benefits:
●
Decreases product-generated network traffic
●
Provides only pertinent information on the configuration page
●
Allows the product control panel to display protocol-specific error and warning messages
Link speed and duplex settings
The link speed and communication mode of the product must match the network. For most situations,
leave the product in automatic mode. Incorrect changes to the link speed and duplex settings might
prevent the product from communicating with other network devices. If you need to make changes, use
the product control panel.
NOTE: Making changes to these settings causes the product to turn off and then on. Make changes
only when the product is idle.
1.
At the product control panel, touch the Administration button.
2.
Touch the Initial Setup menu to open it.
3.
Touch the Networking and I/O menu to open it.
4.
Touch the option for the Jetdirect menu.
5.
Touch the down arrow until the option for link speed displays.
6.
Touch the option for link speed.
7.
Touch one of the following options.
8.
ENWW
Setting
Description
Auto
The product automatically configures itself for the highest link speed and
communication mode allowed on the network.
10T Half
10 megabytes per second (Mbps), half-duplex operation
10T Full
10 Mbps, full-duplex operation
100TX Half
100 Mbps, half-duplex operation
100TX Full
100 Mbps, full-duplex operation
100TX Auto
Limits auto-negotiation to a maximum link speed of 100 Mbps
1000TX Full
1000 Mbps, full-duplex operation
Touch the Save button. The product turns off and then on.
Configure the product to use the network
27
Configure e-mail settings
The product offers color-scanning and digital-sending capabilities. By using the control panel, you can
scan black-and-white or color documents and send them to an e-mail address as an e-mail attachment.
To use digital sending, the product must be connected to a local area network (LAN).
Before you can send a document to e-mail, you must configure the product.
NOTE: The instructions that follow are for configuring the product using the Embedded Web Server.
You can also perform a limited set of configuration tasks using the control panel.
Supported protocols
The product supports Simple Mail Transfer Protocol (SMTP) and Lightweight Directory Access Protocol
(LDAP).
SMTP
●
SMTP is a set of rules that define the interaction between programs that send and receive e-mail.
In order for the product to send documents to e-mail, it must be connected to a LAN that has access
to an e-mail server that supports SMTP. The SMTP server must also have Internet access.
●
If you are using a LAN connection, contact your system administrator to obtain the IP address or
host name for your SMTP server. If you are connecting through a DSL or cable connection, contact
the internet service provider to obtain the SMTP server IP address.
●
LDAP is used to gain access to a database of information. When the product uses LDAP, it
searches a global list of e-mail addresses. As you begin to type the e-mail address, LDAP uses an
auto-complete feature that supplies a list of e-mail addresses that match the characters you type.
As you type additional characters, the list of matching e-mail addresses becomes smaller.
●
The product supports LDAP, but a connection to an LDAP server is not required in order for the
product to be able to send to e-mail.
LDAP
NOTE: If you need to change the LDAP settings, you must change them using the Embedded
Web Server.
Configure e-mail options
1.
Start the Embedded Web Server. In a supported Web browser on your computer, type the product
IP address or host name in the address/URL field. To find the IP address or host name, touch the
Network Address button on the Home screen.
2.
Click the Scan/Digital Send tab.
3.
In the left navigation pane, click the E-mail Setup entry.
4.
Select Enable Send to E-mail, follow the wizard to complete the required fields and any additional
fields you want, and then click the Apply button.
TIP: You must specify an outgoing SMTP server and complete the From: field. See the
Embedded Web Server Help for more information.
5.
28
To add addresses to the Address book, click the Address Book entry in the left navigation pane
and then follow the onscreen instructions.
Chapter 4 Configure the product
ENWW
After you have configured the e-mail settings, send an e-mail to yourself by using the digital-send feature.
If you receive the e-mail, you have successfully configured the digital-sending feature.
If you do not receive the e-mail, use these actions to resolve issues:
ENWW
●
Check the SMTP and address to make sure that you typed them correctly.
●
View the configuration page. Verify that the SMTP gateway address is correct.
●
Make sure that the network is operating correctly. Send an e-mail to yourself from a computer. If
you receive the e-mail, the network is operating correctly. If you do not receive the e-mail, contact
your network administrator or Internet service provider (ISP).
Configure e-mail settings
29
Configure other digital sending settings
Use the Embedded Web Server (EWS) to configure e-mail settings and additional features such as:
●
E-mail
●
Quick sets
●
Digital fax
●
Address books
●
Save to network folder
●
●
Authentication for Windows, LDAP, Novell, and local
access codes
Save to USB
When the product is connected to the network, the EWS is automatically available.
To start the EWS, open a web browser on a computer and type the IP address of the product. To find
the IP address or host name, touch the Network Address button on the Home screen.
In addition to the features listed in this section, you can also set up workflows using third-party software
or HP Digital Sending Software that is compatible with the product. For information about setting up
these workflows and using them, see the documentation that came with these products.
Configure digital fax settings
1.
Click the Fax tab.
2.
On the left navigation menu, select the Fax Send Setup entry.
3.
Select Enable Fax Send and then select either the LAN Fax Service or Internet Fax Service
entry (depending on your network configuration).
4.
Follow the onscreen instructions to complete the required fields, and then click the Apply button.
5.
To add fax numbers to the Speed Dial List, click the Speed Dials entry in the left navigation pane,
click a speed dial code and then click the Add button, follow the onscreen instructions, and then
click the Apply button.
Save to Network Folder Setup
Before configuring network folders, set up shared folders following the instructions for your network
operating system.
1.
Click the Scan/Digital Send tab.
2.
On the left navigation menu, click the Save to Network Folder Setup entry.
3.
Select the Enable Save to Network Folder checkbox.
4.
Set the default settings you want for all folders and then click the Apply button.
5.
To specify network folders to which to save documents, click the Add button in the Quick Sets
area and follow the onscreen instructions.
Configure USB storage device settings
30
1.
Click the Scan/Digital Send tab.
2.
On the left navigation menu, click the Save to USB Setup entry.
Chapter 4 Configure the product
ENWW
3.
Select the Enable Save to USB checkbox.
4.
Set the default settings you want.
5.
Click the Apply button.
Configure quick sets
1.
Click the General tab.
2.
On the left navigation menu, click the Quick Sets Setup entry.
3.
Click the Add button, and then follow the onscreen instructions.
4.
When you are done, click the Apply button.
TIP: You can also configure quick sets on other setup pages in the Embedded Web Server.
ENWW
Configure other digital sending settings
31
32
Chapter 4 Configure the product
ENWW
5
ENWW
Load originals
●
Supported document sizes
●
General document loading tips
●
Document loading tips for mixed-size documents
●
Load documents
33
Supported document sizes
The maximum capacity of the document feeder is 50 sheets of 75 g/m2 (20 lb) paper. When using heavier
paper, the maximum capacity is decreased. The maximum capacity of the document feeder with card
stock is 10 cards.
Paper Type
Width
Length
Weight (or Thickness)
Standard stock
52–216 mm (2.1–8.5 in)
74–864 mm (2.9–34 in)
50–120 g/m2 (13.3–32 lb)
Card stock
52–210 mm (2.1–8.3 in)
74–269 mm (2.9–10 in)
253–312 g/m2 (12–15 points)
86 mm (3.4 in)
1.4 mm (0.056 in) or less
Poly vinyl chloride or Polyvinyl 52 mm (2.1 in)
chloride acetate (for ID cards)
34
Chapter 5 Load originals
ENWW
General document loading tips
●
Scanning the following types of documents might result in paper jams or damage to the documents.
Wrinkled or creased documents
Curled documents
Torn documents
Documents with paper clips or
staples
Carbon paper
Coated paper
Extremely thin, translucent paper
Paper with adhesive notes or
flags attached
Photos
Overhead transparencies
Papers that are stuck together
Paper with wet substances such
as glue or correction fluid
●
When scanning multiple pages of the same width and length, set the page size to match the width
and length of the paper that you are scanning.
●
Smooth out any folds or curls in your documents before placing them into the feeder. A document
with a curled or folded leading edge could cause a paper jam.
●
For smaller documents (size A6 or smaller), extend the stop on the angled portion of the output
tray to maintain stack order.
●
When loading items that are smaller than 74 mm (2.9 in) one dimension (such as business cards),
place the items with the long side parallel to the paper guides.
●
To prevent skewed scans when scanning pages longer than 356 mm (14 in), scan them one at a
time.
●
To scan fragile documents (such as photos or documents on wrinkled or very lightweight paper),
place the document in a clear, heavyweight document sleeve no wider than 216 mm (8.5 in) before
loading it into the document feeder.
TIP: If you do not have an appropriately-sized document sleeve, consider using a sleeve intended
for use in a ring binder. Trim the ring-side edge so that the sleeve is no more than 216 mm (8.5 in)
wide. When you scan, touch the More Options button and disable the Misfeed Detection feature.
ENWW
●
Verify that the hatch on the document feeder is latched securely. To properly close the hatch, press
until you hear a click.
●
Adjust the paper guides to the width of the documents. Make sure that the paper guides touch the
edges of the original. If there is any clearance between the paper guides and the edges of the
documents, the scanned image might be skewed.
General document loading tips
35
36
●
When placing a stack of documents into the feeder, gently set the stack in the document feeder.
Do not drop the stack into the feeder and do not tap the top edge of the stack after placing the
stack in the document feeder.
●
Clean the scanning rollers if the rollers are visibly dirty or after scanning a document that has pencil
writing on it.
Chapter 5 Load originals
ENWW
Document loading tips for mixed-size documents
You can load the document feeder with groups of documents that have different widths or lengths. If
your document contains different sized pages, you can scan it using the methods in this section.
●
●
If your documents have the same width but different lengths (legal and letter size, for example),
you can scan them as a single job. The scanned items will have the same length as the original
items in the document.
1.
Touch the appropriate scan button and type the required information.
2.
Touch the More Options button and then touch the Original Size menu.
3.
Touch the Mixed Letter/Legal setting or the setting that matches the length of the longest item
and then touch the OK button.
4.
Touch the Start button.
If you want prevent skewing and ensure that each scanned item has the same width and length as
the original, use the Job Build feature. Each segment of the job build must have documents of the
same width and length.
1.
Touch the appropriate scan button and type the required information.
2.
Touch the More Options button and then touch the Job Build menu.
3.
Touch the Job Build On setting and then touch the OK button.
4.
Insert the first segment into the document feeder and then touch the Start button. The scanner
scans the segment and then prompts you to insert the next segment you want to scan.
NOTE: You can change the Original Size setting for each segment so that it matches the
dimensions for that segment’s documents.
ENWW
Document loading tips for mixed-size documents
37
Load documents
1.
Pull up the document feeder extension and adjust the output tray. Ensure that the output tray does
not extend beyond the surface on which the scanner sits.
2.
Adjust the paper guides to the width of the documents. Take care not to overtighten the guides,
which can restrict paper feeding.
When scanning small originals such as checks, it is especially important that the paper guides fit
snugly against the edges of the original.
3.
38
Fan the stack of document pages to ensure that the pages do not stick together. Fan the edge that
will be pointing into the feeder in one direction, and then fan that same edge in the opposite
direction.
Chapter 5 Load originals
ENWW
4.
Align the edges of the documents by tapping the bottom of the stack against the table top. Rotate
the stack 90 degrees and repeat.
5.
Gently set the stack in the document feeder. Load the pages face down with the top of the pages
pointing into the feeder.
NOTE: For best results, do not drop the stack into the feeder and do not tap the top edge of the
stack after you have placed it in the document feeder.
6.
ENWW
Verify that the paper guides are aligned with the edges of the stack.
Load documents
39
40
Chapter 5 Load originals
ENWW
6
ENWW
Scan and send documents
●
Sign In
●
Preview a scan
●
Send a scanned document to one or more e-mails
●
Fax a scanned document
●
Save to a network folder or USB storage device
●
Send or save a document using Quick Sets
●
Scan to a workflow destination
41
Sign In
Depending on how your administrator has configured access privileges, you might need to sign in before
using the product as well as when you access product features. The access your administrator has set
for you might limit the features available to you.
42
1.
Touch the Sign In button.
2.
Complete the required fields, and then touch the OK button.
Chapter 6 Scan and send documents
ENWW
Preview a scan
Use the touch screen to navigate through the options on the Image Preview screen.
1
Home button
Touch this button to open the Home screen.
2
Start button
Touch this button to scan the document and send it to the
specified destination.
3
Help button
Touch this button for control-panel help.
4
Cancel Job button
Touch this button to cancel your changes and return to previous
screen.
5
Page control field
Type a number to view a page.
6
Zoom button
Touch this button to view the preview magnified.
7
View button
Touch this button to switch between single and multi-page
views and to access more options.
8
Append Pages button
Touch this button to append a newly scanned document to the
end of the document in the preview.
9
Move Pages button
Touch this button to move a selected page or pages.
10
Rotate Pages button
Touch this button to rotate the scan clockwise in increments of
90 degrees.
11
Delete Pages button
Touch this button to delete a selected page or pages.
Use the Image Preview screen
You can preview a document and adjust certain document job options before sending the scan. The
Image Preview screen is available for all scan destinations, but not all document job options are available
for all scan destinations.
ENWW
1.
From a scan screen, touch the Preview button.
2.
To increase the magnification for viewing purposes only, touch the Zoom button. Touch it again to
return to the original magnification. To view parts of the zoomed page that might be off the screen,
place your finger on the image and drag.
Preview a scan
43
3.
To see a multi-page view of the scanned document and move, append, delete, or rotate pages,
touch the View button.
4.
When you are done making changes, touch the Start button to save your changes and send the
scan or the Cancel Job button to cancel your changes and return to the previous screen.
Append pages
1.
From the Image Preview screen, touch the View button.
2.
Touch the Append Pages button.
3.
In the Append New Pages dialog box, select one- or two-sided, and then touch the Scan button.
The pages are appended to the end of the document.
Move pages
1.
From the Image Preview screen, touch the View button.
2.
Touch the pages you want to move. To deselect a page, touch it again. To select contiguous pages,
touch the first and last pages of the group you want.
3.
Touch the Move Pages button.
4.
Touch the Insert icon where you want to move the pages.
Rotate pages
1.
From the Image Preview screen, touch the View button.
2.
Touch the pages you want to rotate. To deselect a page, touch it again. To select contiguous pages,
touch the first and last pages of the group you want.
3.
Touch the Rotate Pages button. The page rotates clockwise in 90-degree increments with each
touch.
Delete pages
44
1.
From the Image Preview screen, touch the View button.
2.
Touch the pages you want to delete. To deselect a page, touch it again.
3.
Touch the Delete Pages button.
Chapter 6 Scan and send documents
ENWW
Send a scanned document to one or more e-mails
The e-mail feature offers the following benefits:
●
Sends documents to multiple e-mail addresses, saving time and delivery costs.
●
Delivers files in black-and-white or in color. Files can be sent in different file formats that the
recipient can manipulate.
In order to use the e-mail feature, the product needs to be connected to a valid SMTP local area network
that includes Internet access.
Use the address book
You can send e-mail to a list of recipients using the address book feature. See your system administrator
for information about configuring address lists.
NOTE: You can also use the Embedded Web Server (EWS) to create and manage the address book.
The EWS address book can be used to add, edit, or delete single addresses or distribution lists.
Create a recipient list
1.
From the Home screen, touch the E-mail button.
2.
Touch the To: field and then type the recipients' e-mail addresses. Separate multiple entries with
a semicolon or by pressing enter on the keyboard.
TIP: You can also use the address book to enter e-mail addresses. For more information, see
the built-in Help.
3.
The names in the recipient list are placed in the text line of the keyboard screen. To add a recipient
that is not found in the address book, type the e-mail address.
4.
Touch the OK button.
5.
Finish typing information in the cc:, bcc:, Subject:, and Message: fields on the Send E-mail screen,
if necessary. To check the list of recipients, touch the down arrow in the To: text line.
6.
Touch the Start button.
Use the Personal or Shared Contacts address book
Use the Personal or Shared Contacts address book to store frequently-used e-mail addresses and to
insert them into the From:, To:, cc:, or bcc: fields.
To open an address book, touch the Address Book button
Contacts or the Shared Contacts entry.
, and then select either the Personal
Add entries to the Personal or Shared Contacts address books
.
1.
Touch the add button
2.
Touch the Name field, and type a name for the new entry.
The name is the alias for the entry.
3.
ENWW
Type the e-mail address for the new entry, complete any additional optional fields, and then touch
the OK button.
Send a scanned document to one or more e-mails
45
Delete entries from the Personal Contacts address book
You can delete entries that you no longer use.
NOTE:
To change an entry, highlight the text you want to change, and then type the new text.
1.
Touch the entry that you want to delete from the Personal Contacts address book.
2.
Touch the remove button
3.
In the confirmation dialog box that appears, touch the Yes button to delete the entry or touch the
No button to return to the Address Book screen.
in the lower right corner.
Use the Send E-mail screen
Use the touch screen to navigate through the options on the E-mail screen.
46
1
Home button
Touch this button to open the Home screen.
2
Send E-mail button
Touch this button to scan the document and send an e-mail file to the specified e-mail addresses.
3
Error/warning button
This button appears only when there is an error or warning in the status line area. Touch it to open
a pop-up screen that will help you resolve the error or warning.
4
Help button
Touch this button for control-panel help.
5
Preview button
Touch this button to display a preview that you can modify before sending the scanned document.
6
Scroll bar
Use the Scroll bar to view and set up the cc:, bcc:, Message:, and File Name: fields. Touch any
of those fields and add the necessary information.
7
Address book buttons
Touch these buttons to use the address book to populate the To:, cc:, or bcc: fields.
8
More Options button
Touch this button to change certain e-mail settings for the current scan job.
9
File Name: field
Touch this field and then type the name of the scanned document.
10
Subject: field
Touch this field and then type a subject title.
11
cc: field
Touch this field and then type the e-mail addresses of those secondary individuals whom you
want to receive the scanned document.
Chapter 6 Scan and send documents
ENWW
12
To: field
Touch this field and then type the e-mail addresses of those primary individuals whom you want
to receive the scanned document.
13
From: field
Touch this field and then type your e-mail address. If the system administrator has configured the
product to do so, this field might automatically insert a default address.
Send documents
The product scans both black-and-white and color originals. You can use default settings or change the
scanning preferences and file formats.
Send a document
1.
Place the document face down in the document feeder.
2.
From the Home screen, touch the E-mail button.
3.
If prompted, type your user name and password.
4.
Complete the From:, To:, and Subject: fields. Scroll down and complete the cc:, bcc:, and
Message: fields if appropriate. Your user name or other default information might appear in the
From: field. If so, you might not be able to change it.
5.
(Optional) Touch the More Options button to change the settings for the document that you are
sending (for example, the document’s original size). If you are sending a two-sided document, you
should select Sides and an option with a two-sided original. For information about other available
features, see the built-in Help.
6.
Touch the Start button to begin sending.
7.
When you are finished, remove the original document from the output tray.
Use the auto-complete function
When you type characters into the To:, cc:, or From: fields on the Send E-mail screen, the auto-complete
function is activated. As you type the required address or name, the product automatically searches the
address book list and completes the address or name by using the first match. You can then select that
name by pressing enter on the keyboard, or continue typing the name until auto-complete finds the
correct entry. If you type a character that does not match any entry in the list, the auto-complete text is
removed from the display to indicate that you are typing an address that is not in the address book.
ENWW
Send a scanned document to one or more e-mails
47
Fax a scanned document
Use the Send Fax screen
Use the touch screen to navigate through the options on the Send Fax screen.
48
1
Home button
Touch this button to open the Home screen.
2
Send Fax button
Touch this button to scan the document and send a fax to the provided fax numbers.
3
Error/warning button
This button appears only when there is an error or warning in the status line area.
Touch it to open a pop-up screen that will help you resolve the error or warning.
4
Help button
Touch this button for control-panel Help.
5
Preview button
Touch this button to display a preview that you can modify before faxing the scanned
document.
6
Speed Dial Code field
Touch this button to type a speed dial code directly.
7
Search button
Touch this button to search for a speed dial code by name.
8
Speed Dials button
Touch this button to edit the speed dial.
9
Scroll bars
Use the scroll bar to view more entries.
10
One Touch Speed Dials list
Touch a button in this area to add the fax number to the Fax Recipients list.
11
More Options button
Touch this button to change certain fax settings for the current scan job.
12
Details button
Touch this button to display more information about the fax number highlighted in the
Fax Recipients list.
13
Delete button
Touch this button to remove the highlighted fax number from the Fax Recipients list.
14
Fax Recipients list
Lists the numbers you have selected to receive the scanned document.
15
Add fax number button
Touch this button to add the fax number in the Fax Number: field to the Fax
Recipients list.
16
Fax Number: field
Touch this field and then type a fax number.
17
Delete character button
Touch this button to backspace and delete numbers in the Fax Number: field.
Chapter 6 Scan and send documents
ENWW
Send a fax
1.
Place the original document face down in the document feeder.
2.
From the Home screen, touch the Fax button.
3.
If prompted, type your user name and password.
4.
Specify the fax numbers by using one or both of these methods:
Use the Fax Number:
field
Type the fax number.
(Optional) Type additional fax numbers separated by semi-colons.
Use a speed dial
ENWW
From the Send Fax screen, touch the code in the One Touch Speed Dials list.
5.
(Optional) Touch the More Options button to change the settings for the document that you are
sending. For information about available features, see the built-in Help.
6.
Touch the Start button to begin sending.
Fax a scanned document
49
Save to a network folder or USB storage device
If the system administrator has made the feature available, the product can scan a file and save it to
either a USB storage device or a network folder. Supported operating systems for folder destinations
include Windows 2000, Windows XP, Windows Server 2003, Windows Server 2008 and Novell.
1.
Place the document face down in the document feeder.
2.
If you are saving to a USB storage device, insert it into the USB connector next to the control panel.
3.
On the Home screen, touch either the Save to Network Folder or the Save to USB button.
4.
In the folders list, touch the folder in which you want to save the document.
5.
Select a quick set or touch the File Name: field, and then type the name of the file.
6.
Touch the More Options button to change the settings for the document you are sending.
7.
Touch the Start button.
NOTE:
50
The additional options are the same as the e-mail options.
Chapter 6 Scan and send documents
ENWW
Send or save a document using Quick Sets
If the system administrator has made the feature available, the product can scan a file using preset
settings for fax numbers, e-mail recipients, network folders, or USB storage devices.
Depending on how your administrator has configured Quick Sets, you can also touch the Quick Sets
button on the Home screen to display a list of available Quick Sets.
ENWW
1.
Place the original document face down in the document feeder.
2.
From the Home screen, touch a Quick Sets button. Those Quick Sets buttons that have a small
Start icon on them start scanning when you touch them.
3.
If prompted, type your user name and password.
4.
If a screen for sending the scanned document to e-mail, fax, or a network folder displays, complete
the fields, and then touch the Start button.
Send or save a document using Quick Sets
51
Scan to a workflow destination
NOTE:
This product feature is provided by the optional Digital Sending Software.
If the system administrator has enabled the workflow functionality, you can scan a document and send
it to a custom workflow destination. A workflow destination gives you the ability to send additional
information, along with the scanned document, to a specified network or file transfer protocol (FTP)
location. Prompts for specific information appear on the control-panel display. The system administrator
can also designate a printer as a workflow destination, which allows you to scan a document and then
send it directly to a network printer for printing.
52
1.
Place the document face down in the document feeder.
2.
From the Home screen, touch a workflow button.
3.
Complete the fields. The fields vary based on how your administrator has configured the workflow.
4.
Touch the Start button.
Chapter 6 Scan and send documents
ENWW
7
Manage and maintain the product
This section presents information about how to care for and maintain the product.
●
Use information pages
●
Embedded Web Server
●
Use HP Web Jetadmin software
●
Controlling digital-sending security
●
Security features
●
Install the hardware integration pocket
●
Clean the product
●
Order maintenance and scanning supplies
●
Replace supplies and parts
Occasional cleaning of the product helps ensure high-quality scans. The amount of care necessary
depends upon several factors, including the amount of use and the environment. You should perform
routine cleaning as necessary.
CAUTION: Before placing an item in the document feeder, make sure that the item does not contain
wet glue, correction fluid, or other substances that can be transferred to the interior of the product.
Make sure there are no curls, wrinkles, staples, paper clips, or any other attached material. Sheets
should not be stuck together.
ENWW
53
Use information pages
From the Home screen, touch the Administration button and then touch the Information option to view
pages that give details about the device and its current configuration and status.
●
●
Configuration/Status Pages
◦
Administration Menu Map
◦
Device Configuration Page
◦
Embedded Jetdirect Page
◦
Embedded Protocol Page
◦
Usage Page
Fax Reports
◦
54
Speed Dial List
Chapter 7 Manage and maintain the product
ENWW
Embedded Web Server
When the HP Scanjet Enterprise 7000n is connected to a network, you can use the Embedded Web
Server to view status information, change settings, and manage the product from your computer.
To use the Embedded Web Server, you must have Microsoft Internet Explorer 5.01 or later or Netscape
6.2 or later for Windows, Mac OS, and Linux (Netscape only). Netscape Navigator 4.7 is required for
HP-UX 10 and HP-UX 11.
The Embedded Web Server works when the product is connected to an IP-based network. You do not
have to have Internet access to open and use the Embedded Web Server.
When the product is connected to the network, the Embedded Web Server is automatically available.
NOTE: Some Embedded Web Server options are only available to the network administrator, and
some settings might require a password.
You can use the Embedded Web Server without being connected to the Internet; however, some
features will not be available.
●
Open the Embedded Web Server
●
Embedded Web Server options
Open the Embedded Web Server
1.
In a supported Web browser on your computer, type the product IP address or host name in the
address/URL field. To find the IP address or host name, touch the Network Address button on the
Home screen.
NOTE:
future.
2.
After you open the URL, you can bookmark it so that you can return to it quickly in the
The Embedded Web Server has six tabs that contain settings and information about the product:
Information, General, Scan/Digital Send, Fax, Security, and Networking. Click the tab that you
want to view.
Embedded Web Server options
The following table describes the types of information you can obtain or tasks you can perform using
the Embedded Web Server tabs. The options that appear on each tab can change when you upgrade
firmware, so refer to the Embedded Web Server Help for detailed information about tabs and their
options.
NOTE:
Each tab also provides a link to Product Support.
Tab
Options
Information
The Information tab provides access to information about the product's operational
status, configuration settings, event logs, and usage statistics.
General
The General tab provides access to the control panel Administration menu. Options on
this tab also allow you to sign up to receive e-mail alerts and configuration and supplies
usage information, record device information, set language and date and time options,
and more.
NOTE: The General tab can be password-protected. If this product is on a network,
always consult with the system administrator before changing settings on this tab.
ENWW
Embedded Web Server
55
Tab
Options
Scan/Digital Send
The Scan/Digital Send tab allows you to set up and configure e-mail, save-to-USB, and
save-to-network-folder options, and to populate an address book.
NOTE: If the product is configured to use the optional HP Digital Sending Software, the
options on these tabs are not available. Instead, all digital-sending configuration is
performed by using the HP Digital Sending Software.
Fax
The Fax tab allows you to set up and configure fax sending and speed dial options.
Security
The Security tab allows you to configure general security, access control, and stored data
protection options, as well as to manage certificates.
Networking
The Networking tab allows you to change network settings from your computer when
both the product and your computer are connected to an IP-based network.
NOTE:
56
The Networking tab can be password-protected.
Chapter 7 Manage and maintain the product
ENWW
Use HP Web Jetadmin software
HP Web Jetadmin is a Web-based software solution for remotely installing, monitoring, and
troubleshooting network-connected peripherals. Management is proactive, allowing network
administrators the ability to resolve issues before users are affected. Download this free, enhancedmanagement software at www.hp.com/go/webjetadmin.
Plug-ins can be installed into HP Web Jetadmin to provide support for specific product features. The
HP Web Jetadmin software can automatically notify you when new plug-ins are available. On the
Product Update page, follow the directions to automatically connect to the HP Web site and install the
latest device plug-ins for your product.
NOTE:
ENWW
Browsers must be Java™-enabled.
Use HP Web Jetadmin software
57
Controlling digital-sending security
The product has been designed with security in mind. It includes a variety of features that work to protect
the security of the digital-sending process.
Network authentication
The product's most basic security feature is its ability to require a network login before a user can use
the digital-sending functions. This prevents unauthorized users from walking up to the product and
sending documents. Additionally, the product supports several authentication methods that offer a high
level of encryption and security.
Secure e-mail
A number of third-party software vendors offer services for secure e-mail delivery. The Secondary email feature is designed to work with one of these third-party software programs for users that require
an extra measure of data security.
Restrict software access
In order to keep the product secure, you must also restrict access to the software programs that can be
used to configure the product.
You can also set a local administrator password using the General Security option on the Security tab
in the Embedded Web Server (EWS) to prevent access to the device-settings tabs. After the password
has been set, users can only see the EWS Information tab.
58
Chapter 7 Manage and maintain the product
ENWW
Security features
The following security features are available on this product.
●
Secure the Embedded Web Server
●
Manage temporary job files
●
Secure Storage Erase
●
Secure File Erase
●
Secure Disk Erase
●
HP High-Performance Secure Hard Disks
●
Manage certificates
●
Authentication and authorization
Secure the Embedded Web Server
Assign a password for access to the Embedded Web Server so that unauthorized users cannot change
the product settings.
1.
Open the Embedded Web Server.
2.
Click the Security tab.
3.
On the left side of the window, click the General Security link.
4.
Type the password in the New Password box, and type it again in the Verify Password box.
5.
Click the Apply button. Make note of the password and store it in a safe place.
Manage temporary job files
To specify how your product manages temporary job files that are created when scans are initiated,
follow these steps.
ENWW
1.
In the Embedded Web Server, click the Security tab, and then click the Protect Stored Data link.
2.
Select a file erase option.
●
Non-Secure Fast Erase. This is a simple file-table erase function. Access to the file is
removed, but actual data is retained on the disk until it is overwritten by subsequent datastorage operations. This is the fastest mode. Non-Secure Fast Erase is the default erase
mode.
●
Secure Fast Erase. Access to the file is removed, and the data is overwritten with a fixed
identical character pattern. This is slower than Non-Secure Fast Erase, but all data is
overwritten. Secure Fast Erase meets the U.S. Department of Defense 5220-22.M
requirements for the clearing of disk media.
●
Secure Sanitize Erase. This level is similar to the Secure Fast Erase mode. In addition, data
is repetitively overwritten by using an algorithm that prevents any residual data persistence.
This mode will impact performance. Secure Sanitize Erase meets standards for clearing disk
Security features
59
media defined in NIST Special Publication 800-88 Guidelines for Media Sanitation and the
U.S. Department of Defense Updated DSS Clearing and Sanitization Matrix.
3.
Click Apply.
Secure Storage Erase
Use the Secure Storage Erase option in the Embedded Web Server to protect deleted data from
unauthorized access on the product hard drive. The Secure Storage Erase option provides two secure
erase types, both of which meet the U.S. NIST Special Publication 800–88 guidelines for media
sanitization.
1.
In the Embedded Web Server, click the Security tab, click the Protect Stored Data option, and
then click the Erase Options button.
2.
Select a storage erase option.
3.
●
Secure Fast Erase. Access to the file is removed, and the data is overwritten one time with
a fixed identical character pattern.
●
Secure Sanitize Erase. This level is similar to Secure Fast Erase but data is overwritten
three times. This will impact performance.
Click the Erase button.
Data affected
Data affected (covered) by the Secure Storage Erase feature includes stored fax files, address books,
and HP and third-party application data.
This feature will not impact data that is stored on flash-based product non-volatile RAM (NVRAM) that
is used to store default settings, page counts, and similar data. This feature does not affect data that is
stored on a system RAM disk (if one is used). This feature does not impact data that is stored on the
flash-based system boot RAM.
Secure File Erase
Changing the Secure File Erase mode does not overwrite previous data on the disk, nor does it
immediately perform a full-disk sanitization. Changing the Secure File Erase mode changes how the
product cleans up temporary data for jobs after the erase mode has been changed.
Secure Disk Erase
Secure Disk Erase permanently erases all the data on the hard drive. If you have an encrypted hard
drive, this function also unlocks the encrypted hard drive, thereby allowing the drive to be read by any
device.
WARNING! Only use this option at product end-of-life. Since Secure Disk Erase permanently erases
all data, the device will not boot up.
You can access the Secure Disk Erase feature from the product's Administrative Tools option on the
Boot menu. To access the Boot menu, press the Power button to turn off the product, press and hold
the Escape key on the keyboard, and then press the Power button to turn on the product while continuing
to hold the Escape key until the Boot menu displays.
60
Chapter 7 Manage and maintain the product
ENWW
HP High-Performance Secure Hard Disks
This product supports an encrypted hard disk that might be installed in the EIO slot, on the formatter
board, or in both locations. The only encrypted hard disk that is supported is the disk that comes bundled
with the product. Encrypted hard disks provide hardware-based encryption so you can securely store
sensitive scan data without impacting product performance. Encrypted hard disks use the latest
Advanced Encryption Standard (AES) and have versatile time-saving features and robust functionality.
Manage certificates
The product has a built-in self-signed certificate, which allows for encryption and a reasonable level of
trust for network communications with entities such as the LDAP server (communication that can include
user names and passwords). However, some networks require trusted certificates. In these cases, you
might be required to install a certificate from the network certificate authority.
The certificate manager also allows you to load certificate revocation lists (CRL).
Load a certificate
1.
From a Web browser, open the Embedded Web Server by typing the IP address of the product.
2.
On the main Embedded Web Server page, click the Security tab, and then select the entry for
managing certificates.
NOTE:
3.
Browse to locate the certificate you want to load.
NOTE:
4.
If the Certificate Management page is unavailable, update the product firmware.
Find certificates at the location where a network administrator created them.
Import the certificate. The certificate will appear in the certificates list after it is loaded.
Load a certificate revocation list (CRL)
1.
From a Web browser, open the Embedded Web Server by typing the IP address of the product.
2.
On the main EWS page, click the Security entry, and then select the Certificate Management
entry.
NOTE:
If the Certificate Management page is unavailable, update the product firmware.
3.
Browse to locate the CRL to load.
4.
Import the CRL. The CRL will appear in the certificate revocation list after it is loaded.
Authentication and authorization
You can secure access to various parts of the control panel menu by establishing passwords. These
passwords can be created to be local to the product, or can be obtained from the network by configuring
Windows, LDAP, or Novell NDS server information.
ENWW
Security features
61
To configure these settings using the Embedded Web Server, follow these steps.
62
1.
In the Embedded Web Server, click the Security tab, and then click the Access Control link.
2.
Configure access control options.
●
Enable and Configure Sign In Methods. This section allows the administrator to configure
the Windows, LDAP, or Novell NDS network settings. The product uses these settings to
obtain user information from the server.
●
Sign In and Permission Policies. This section allows the administrator to manage product
permissions. By default, the product will support Guest, Administrator, and User permission
sets. The administrator can add permission sets, and can configure which sign-in method to
use on control panel applications.
●
Relationships Between Network Users or Groups and Device Permissions. This section
allows the administrator to select the default permission set for Windows, LDAP, and Novell
NDS sign-in methods.
●
Device User Accounts. This section allows the administrator to establish user access codes.
Chapter 7 Manage and maintain the product
ENWW
Install the hardware integration pocket
Use the included hardware integration pocket (packaged with the output tray) with a separatelypurchaseable HP accessory such as a secure card reader to provide secure access to your product.
To install the hardware integration pocket, follow these steps.
ENWW
1.
Open the hatch.
2.
Using a T-8 Torx screwdriver (not included), turn the hardware integration pocket panel retaining
screw counterclockwise to loosen and remove the screw, rotate the panel up and toward you as
shown, and then remove the panel.
3.
Gently pull the hardware integration pocket connector up and out of its recessed location.
Install the hardware integration pocket
63
64
4.
Using a credit card, gently pry up one edge of the hardware integration pocket insert, and then
remove the insert.
5.
Carefully thread the hardware integration pocket connector through the opening in the left side of
the pocket.
6.
Install the hardware integration pocket on the product as shown by rotating the pocket into place,
and then secure the pocket with the screw you removed in Step 2.
Chapter 7 Manage and maintain the product
ENWW
7.
ENWW
Follow the installation instructions that came with the HP accessory, ensuring that you place the
accessory cable such that you can fit the accessory on top of the hardware integration pocket.
Install the hardware integration pocket
65
Clean the product
Cleaning product components helps keep your product in optimal working order.
●
Clean the touch screen
●
Clean the product glass
●
Clean the paper path
●
Clean the rollers
Clean the touch screen
Clean the touch screen whenever it is necessary to remove fingerprints or dust. Wipe the touch screen
gently with a clean, water-dampened, lint-free cloth.
CAUTION: Use water only. Solvents or cleaners can damage the touch screen. Do not pour or spray
water directly onto the touch screen.
Clean the product glass
Both strips of glass in the product should be cleaned periodically, or any time a scanned image has
streaks. The two small strips of gray reflective material should be lightly dusted if debris is present.
TIP: Before cleaning the product glass, press the Power button to turn off the product and allow 10
minutes for the glass to cool.
To clean the strips of glass, follow these steps:
1.
Press the Power button to turn off the product.
2.
Open the hatch.
3.
Clean the glass using a soft, lint-free cloth that has been sprayed with a mild glass cleaner.
CAUTION: Use only glass cleaner to clean the glass. Avoid cleaners that contain abrasives,
acetone, benzene, and carbon tetrachloride, all of which can damage the glass. Avoid isopropyl
alcohol because it can leave streaks on the glass.
Do not spray the glass cleaner directly on the glass. If too much glass cleaner is applied, the cleaner
could leak under the glass and damage the product.
66
Chapter 7 Manage and maintain the product
ENWW
4.
Dry the glass with a dry, soft, lint-free cloth.
5.
With a light touch, dust the two small strips of gray reflective material with a dry, soft, lint-free cloth.
6.
Close the hatch, and then press the Power button.
Clean the paper path
If scanned images have streaks or scratches, use the HP paper-path cleaning cloth to clean the paper
path.
NOTE: If you experience repeated document jams, make sure all rollers are present and that the roller
cover is closed. If problems persist, clean the rollers.
To clean the paper path, follow these steps:
1.
Open the sealed HP paper-path cleaning cloth container, starting at the notch. Take care not to
tear the cleaning cloth.
2.
Remove the cleaning cloth and unfold it.
3.
Place the unfolded cloth into the document feeder.
4.
Touch the Service button on the Home screen, touch the Menu button, touch the Maintenance
button, touch the Clean Paper Path button, and then follow the onscreen instructions to clean the
paper path.
5.
Place up to five pages of printed paper in the document feeder. Scan and view the results.
6.
If streaks still appear, repeat steps 3 through 5. The cleaning cloth can be cycled through the
product up to five times within 30 minutes. After that, the cloth will dry out.
If repeated cycling of the cleaning cloth does not remove the streaks from the scanned images,
clean the rollers.
Clean the rollers
Proper maintenance will prolong the life of the rollers and improve their performance.
TIP: HP recommends cleaning rollers every 10,000 pages, though you may want to clean the rollers
more frequently if you scan pages that are dusty or have pencil lead or ink marks that could transfer to
the rollers.
ENWW
Clean the product
67
Clean the rollers under the following conditions:
●
The maintenance utility indicates that cleaning is needed.
●
If the multipick detector has signalled multiple failures.
●
If you experience repeated document jams.
To clean the rollers, follow these steps:
68
1.
Press the Power button to turn off the product.
2.
Open the hatch.
3.
Open the roller cover on the inside of the hatch and lift the roller up.
4.
Remove any visible lint or dust from the roller and its housing using either compressed air or a
clean lint-free cloth moistened with isopropyl alcohol.
5.
Reinsert the roller into the housing.
Chapter 7 Manage and maintain the product
ENWW
6.
Open the door on the inside of the product, open the roller covers, and then remove the rollers.
7.
Remove any visible lint or dust from the rollers and their housing using either compressed air or a
clean lint-free cloth moistened with isopropyl alcohol.
8.
Reinsert the rollers into the housing. Rotate the rollers as you slide them to the left to match up the
notches on the roller axle and axle holder. Close the roller cover door and then close the door on
the inside of the product.
9.
Clean the non-removable rollers using either compressed air or a clean lint-free cloth moistened
with isopropyl alcohol.
10. Close the hatch.
11. Press the Power button to turn on the product.
12. Update the product maintenance history.
ENWW
a.
Touch the Service button on the Home screen, touch the Menu button, and then touch the
Maintenance button.
b.
Touch the Clean Rollers button and record the maintenance activity.
Clean the product
69
Order maintenance and scanning supplies
You can purchase maintenance parts for your product. HP recommends that you purchase rollers and
cleaning cloths before the existing consumables reach their service life.
70
1.
See the HP parts Web site at www.hp.com/buy/parts.
2.
Select your language, and then click the arrow.
Chapter 7 Manage and maintain the product
ENWW
Replace supplies and parts
●
Replace the rollers
●
Replace the keyboard overlay
●
Replace the Jetdirect card
●
Replace the hard drive
●
Upgrade the firmware
Replace the rollers
Replace the rollers under the following conditions:
●
When the Service menu indicates they are due for maintenance.
●
If you experience repeated document jams and cleaning the rollers did not help.
The roller replacement kit contains rollers and installation instructions. To order the replacement kit, go
to www.hp.com/support.
NOTE: The roller replacement kit is a consumable and is not covered under warranty or standard
service agreements.
To replace the rollers, follow these steps:
1.
Press the Power button to turn off the product.
2.
Replace the rollers as described in the installation instructions that were included with the
replacement kit.
3.
Close the hatch, and then press the Power button to turn on the product.
4.
Update the product maintenance history:
a.
Touch the Service button on the Home screen, touch the Menu button, and then touch the
Maintenance button.
b.
Touch the Replace Rollers button and record the maintenance activity.
NOTE:
HP recommends that you replace the rollers every 100,000 scans.
Replace the keyboard overlay
You can order keyboard overlays in several languages as accessories. Follow the instructions in the
keyboard overlay kit to replace the overlay.
ENWW
Replace supplies and parts
71
Replace the Jetdirect card
To replace the Jetdirect card, follow these steps.
72
1.
Press the Power button to turn off the product (1), press the Power switch on the back of the product
to the off position (2), disconnect power from the product (3), and then disconnect the Ethernet
cable (4).
2.
Loosen the two thumbscrews which secure the Jetdirect card cover plate to the back of the product,
and then grasp the base of the cover plate and pull it toward you to remove the Jetdirect card.
3.
Remove the replacement Jetdirect card from its packaging and insert the card into the card slot.
a.
Align the card with the guide rails in the slot.
b.
Firmly press the card into the slot until the card is seated, and then tighten each thumbscrew
a little at a time until both thumbscrews are secure.
Chapter 7 Manage and maintain the product
ENWW
4.
Connect the network cable to the card.
5.
Reconnect the power and Ethernet cables, press the Power switch on the back of the product to
the on position, and then press the Power button to turn on the product.
Replace the hard drive
To replace the hard drive, follow these steps.
1.
ENWW
Press the Power button to turn off the product (1), press the Power switch on the back of the product
to the off position (2), disconnect power from the product (3), and then disconnect the Ethernet
cable (4).
Replace supplies and parts
73
74
2.
Loosen the three screws which secure the back panel drawer to the product, and then slide the
back panel/drawer far enough out so you can see the hard drive and reach the hard drive cables.
3.
Unfasten the cable ties which secure the cables to the hard drive.
4.
Press the connector tab on the flat cable (1) and disconnect the cable (2), and then disconnect the
cable bundle (3).
Chapter 7 Manage and maintain the product
ENWW
ENWW
5.
To remove the drive, gently lift the drive rail lever on the left leading edge of the drive (1), slide the
drive forward (2), and then remove the drive.
6.
Remove the black plastic rails from the drive you just removed, and then attach them to the new
drive.
7.
Slide the new drive into the drive housing until it snaps into place, ensuring that the pegs on the
side of the drive rails fit into the slot on the drive housing.
Replace supplies and parts
75
8.
Attach the flat cable and the cable bundle to the new drive.
9.
Secure the cables with the cable ties you previously unfastened.
10. Slide the back panel drawer into place (taking care that no cables are pinched) and secure with
the screws you previously loosened.
11. Reconnect the power and Ethernet cables, press the Power switch on the back of the product to
the on position, and then press the Power button to turn on the product.
Upgrade the firmware
You can upgrade both the product firmware and the HP Jetdirect Inside firmware.
76
●
Upgrade the product firmware
●
Upgrade the HP Jetdirect Inside firmware
Chapter 7 Manage and maintain the product
ENWW
Upgrade the product firmware
NOTE:
1.
You must have access to the product's local administrator password to complete this task.
From the Home screen, touch the Service button and note the installed firmware version.
NOTE: Touch the Details button to view additional information about the content of the installed
firmware.
2.
See www.hp.com/support, search for your product, and then look for a link to downloads to see if
there is a newer version of firmware available.
3.
Copy the new firmware file to a USB storage device, and then plug the USB device into the USB
connector beside the control panel.
CAUTION: Make sure to leave the USB storage device plugged into the USB connector until all
upgrades are installed, the product has rebooted, and the Home screen is displayed on the touch
screen.
4.
From the Home screen, touch the Service button, and then touch the Firmware Upgrade button.
NOTE: If more than one upgrade option is available, install the hardware NVRAM upgrade first,
and then install the firmware upgrade.
5.
Touch the upgrade option you want to install, and then touch the Upgrade Now button.
The upgrade process can take a few minutes.
6.
When prompted, touch the Yes button to reboot the product.
Starting the product after a firmware upgrade may take up to 20 minutes.
7.
If necessary, repeat the previous two steps to install a second upgrade.
NOTE:
You can also upgrade firmware using the Embedded Web Server.
Upgrade the HP Jetdirect Inside firmware
The HP Jetdirect Inside network interface in the device has firmware that can be upgraded separately
from the digital-sender firmware. This procedure requires that you have HP Web Jetadmin Version 6.2
or greater installed. Complete the following steps to update the HP Jetdirect firmware with HP Web
Jetadmin.
ENWW
1.
Open the Web Jetadmin program.
2.
Open the Device Management folder in the drop-down list in the Navigation panel. Navigate to
the Device Lists folder.
3.
Select the device that you want to update.
4.
In the Device Tools drop-down list, select Jetdirect Firmware Update.
5.
Under Jetdirect firmware version the Jetdirect model number and current firmware version are
listed. Make a note of these.
6.
See www.hp.com/go/wja_firmware.
7.
Scroll down to the list of Jetdirect model numbers and find the model number that you wrote down.
Replace supplies and parts
77
8.
Look at the current firmware version for the model, and see if it is later than the version that you
wrote down. If it is, right-click on the firmware link, following the instructions on the Web page to
download the new firmware file. The file must be saved into <drive>:\PROGRAM FILES\HP WEB
JETADMIN\DOC\PLUGINS\HPWJA\FIRMWARE\JETDIRECT on the computer that is running the
HP Web Jetadmin software.
9.
In Web Jetadmin, return to the main device list and select the digital sender again.
10. In the Device Tools drop-down list, select Jetdirect Firmware Update again.
11. On the Jetdirect firmware page, the new firmware version appears under Jetdirect Firmware
Available on HP Web Jetadmin. Click the Update Firmware Now button to update the Jetdirect
firmware.
78
Chapter 7 Manage and maintain the product
ENWW
8
Solve problems
This section contains solutions for common problems with the product.
●
Error codes
●
Basic troubleshooting tips
●
Restore factory settings
●
Interpret control-panel status lights
●
Control-panel message types
●
Control-panel messages
●
Installation problems
●
Initialization or hardware problems
●
Operation problems
●
Paper path problems
●
Solve e-mail problems
●
Solve network problems
●
Contact HP Support
For additional troubleshooting, see the Help for the HP scanning program that you are using.
ENWW
79
Error codes
Follow the displayed instructions and, if applicable, video to resolve an error.
80
Error Type
Description
ADF empty
No document was detected in the document feeder.
Automatic calibration failed
A hardware failure occurred when the product attempted to calibrate prior to scanning.
Communication failed
A communication failure occurred between the firmware and the product.
Fan failed
The product's fan failed.
Hardware error
A hardware error occurred.
Hatch open
The hatch on the document feeder is open or not securely latched.
Lamp failed
The product lamp failed.
Mispick
The product has detected a document feeder page mispick.
Multi-pick
The product has detected a multiple-page feed error.
Multi-pick sensor failed
The product's multi-pick paper sensor has failed.
Paper jam
The product has detected a document feeder paper jam.
Chapter 8 Solve problems
ENWW
Basic troubleshooting tips
Simple issues such as smudges on the scanner glass or loose cables can cause your product to produce
fuzzy scans, operate in an unexpected manner, or fail to operate. Always check the following items when
you encounter scanning problems.
●
If scans are fuzzy, check to see if the glass strips inside the document feeder are dirty or smudged.
If so, clean the glass strips.
Make sure that the original document is clear and crisp to ensure a clear scan.
●
Make sure that the Ethernet and power supply cables are firmly seated in their respective
connectors on the back of the product, and that the power supply power cable is plugged into a
working electrical outlet or surge protector.
●
Make sure that the product buttons are enabled.
●
Press the Power button, touch the Restart option, and then touch the OK button.
●
Make sure the product latch is closed.
If you continue to have problems, it is possible that your firmware is out of date or has become corrupted.
See www.hp.com/support to locate firmware updates for your product.
ENWW
Basic troubleshooting tips
81
Restore factory settings
Use the Resets menu to restore factory settings.
82
1.
Touch the Service button, touch the Maintenance button, touch the Menu button, and then touch
the Resets button.
2.
Touch the buttons associated with the subsystems you wish to reset to factory defaults, and then
touch the Reset Settings Now button.
Chapter 8 Solve problems
ENWW
Interpret control-panel status lights
The product has six LEDs on the control panel that indicate product status. The table below explains
how to interpret these LEDs.
LED behavior
Description
All LEDs are off.
The product is turned off.
Sleep LED
is on.
The product is in sleep (power conservation) mode.
Sleep LED
is flashing.
The product is entering or exiting sleep mode.
Sleep LED
is off.
The product is not in sleep mode, nor is it transitioning sleep status (on or off).
Power LED
is on.
The product is powered on.
Power LED
is off.
The power supply is not providing power to the product.
Ready LED
is on.
The product is online and able to accept input.
Ready LED
is flashing.
The product is pausing a request or has stopped receiving input.
Ready LED
is off.
The product is paused and unable to accept input. This may be because the product was
deliberately paused, or because the product is in an error state.
Data LED
is on.
The product has data buffered that it has finished processing and is waiting for more data
to be transmitted, or the product is paused. When the Attention LED is flashing at the
same time, there is an error and there is data waiting to be processed.
Data LED
is flashing.
The product is receiving or processing data.
Data LED
is off.
There is no data for the product to process.
Attention LED
is on.
The product has encountered a critical error, the nature of which is indicated on the
display.
Attention LED
is flashing quickly.
The product has encountered an error which requires user intervention, such as a paper
jam or an open door.
Attention LED
is off.
No error condition exists.
NOTE:
ENWW
Status and error conditions appear on the display.
Interpret control-panel status lights
83
Control-panel message types
Four types of control-panel messages can indicate the status of or problems with the product.
Message type
Description
Status messages
Status messages reflect the current state of the product. They inform you of normal product operation
and require no interaction to clear them. They change as the state of the product changes. Whenever
the product is ready, not busy, and has no pending warning messages, the status message Ready
appears if the product is online.
Warning messages
Warning messages inform you of data and scan errors. These messages typically alternate with the
Ready or status messages and remain until you touch the OK button. Some warning messages are
clearable. If Clearable Warnings is set to Job on the product Device Behavior menu, the next job
clears these messages.
Error messages
Error messages communicate that some action must be performed, such as clearing a jam.
Some error messages are auto-continuable. If Auto-Continue is set on the menus, the product will
continue normal operation after an auto-continuable error message appears for 10 seconds.
NOTE: Pressing any button during the 10-second auto-continuable error message overrides the
auto-continue feature, and the button function takes precedence. For example, pressing the Stop
button pauses the task and offers the option to cancel the job.
Critical-error messages
84
Critical error messages inform you of a product failure. Some of these messages can be cleared by
turning the product off and then on. These messages are not affected by the Auto-Continue setting.
If a critical error persists, service is required.
Chapter 8 Solve problems
ENWW
Control-panel messages
The product provides robust control panel messaging. When a message appears on the control panel,
follow the on-screen instructions to resolve the issue. If the product displays an “Error” or “Attention”
message, and no steps are shown to resolve the issue, turn the product off then on. Contact HP support
if you continue to experience issues with the product.
To get additional information for warnings that appear in the status line, touch the Warning button.
For additional information on a variety of topics, touch the Help button in the upper-right corner of the
Home screen.
ENWW
Control-panel messages
85
Installation problems
Cable type
Action
Power supply cable
The power supply is connected between the product and a power outlet.
Ethernet cable
●
Ensure that the power supply is securely connected to the product.
●
Ensure that the power cable is securely connected between the power supply and a live
electrical outlet or surge protector.
●
If the power cable is connected to a surge protector, ensure that the surge protector is
plugged into an outlet and turned on.
●
Press the Power button, touch the Restart option, and then touch the OK button.
Ensure that the Ethernet cable is securely connected between the product and a network router,
Ethernet jack, or Ethernet switch.
For additional Ethernet troubleshooting information, see www.hp.com/support, select your
country/region, and then use the search tool to find Ethernet or network troubleshooting topics.
86
Chapter 8 Solve problems
ENWW
Initialization or hardware problems
●
Check the Ethernet connection
●
Check the power connection
●
Reset the product
●
The product has stopped working correctly
Check the Ethernet connection
1.
Ensure that the Ethernet cable is firmly connected between the product and a router, Ethernet jack,
or Ethernet switch.
2.
If the Ethernet cable is connected to a network router or Ethernet switch, try connecting it to a
different port on the router or switch.
3.
Verify that the network link speed indicator shows that the network is connected at 10, 100, or 1000
Mbps. The LED corresponding to the link speed should be lit.
4.
Press the Power button, touch the Restart option, and then touch the OK button.
Check the power connection
1.
Ensure that the power cable is securely connected between the product and the power supply, that
the power supply cable is securely connected between the power supply and a power outlet or
surge protector, and that the product is turned on (the Power switch is in the on position, and the
Power button is on).
2.
Verify that the green LED on the power supply case is on.
If the problem persists after verifying the above items, follow these steps:
ENWW
1.
Press the Power button, touch the Shut down option, touch the OK button, and then disconnect
the power cable.
2.
Wait 30 seconds.
3.
Reconnect the power cable, and then press the Power button.
Initialization or hardware problems
87
Reset the product
If you receive an error message indicating that initialization failed or the product could not be found when
trying to use the product, you should reset the product.
To reset the product, follow these steps:
1.
Close the Embedded Web Server and optional HP Digital Sending Software, if they are open.
2.
Press the Power button to turn off the product.
3.
Wait 30 seconds, and then press the Power button to turn on the product.
The product has stopped working correctly
If the product stops scanning, follow these steps. After each step, start a scan to see if the product is
working. If the problem persists, proceed with the next step.
1.
A cable might be loose. Ensure that the Ethernet, power supply, and power cables are properly
connected.
2.
Ensure that the product is receiving power.
3.
88
a.
Check that the green LED on the power supply case is on.
b.
If the green LED is not on, ensure that power is available to the power outlet or surge protector
that the power supply cable is plugged into, and that the power cable is securely connected
to the power supply and the product.
c.
If power is available to the power outlet or surge protector but the green LED is still not on,
the power supply might be defective. See www.hp.com/support for assistance.
Press the Power button, touch the Restart option, and then touch the OK button.
Chapter 8 Solve problems
ENWW
Operation problems
●
Product will not turn on
●
Lamp stays on
●
Scan does not start right away
●
Only one side of a two-sided page scans
●
Scanned pages are missing at the scan destination
●
Scanned pages are out of order at the scan destination
●
Optimize scanning and task speeds
●
The scan is completely black or completely white
●
Scanned images are not straight
●
Scan files are too large
Product will not turn on
If the product will not turn on when you press the control-panel buttons, check the following:
●
The product may be turned off. Be sure the Power switch is in the on position, and that the Power
button LED is lit.
●
The product may have been unplugged. Check to see that the power supply has not become
disconnected from the product or unplugged from the power source.
●
The power supply might not be working.
◦
Check that the green LED on the power supply case is on.
◦
If the green LED is not on, ensure that power is available to the power outlet or surge protector
that the power supply is plugged into.
◦
If power is available to the power outlet or surge protector but the green LED is still not on,
the power supply might be defective. See www.hp.com/support for assistance.
Lamp stays on
The lamp should time out and turn off automatically after a period of inactivity (about 15 minutes).
If the lamp remains on after a long period of inactivity, press the Power button, touch the Restart option,
and then touch the OK button.
Scan does not start right away
Make sure the hatch is closed, that the Power switch is in the on position, and that the product is turned
on.
If the product has not been used for awhile, the lamp might need to go through a warm-up period before
scanning can begin. If the lamp needs to warm up, it takes a moment after pressing a button for scanning
to begin.
ENWW
Operation problems
89
Only one side of a two-sided page scans
Make sure the scan option you select supports two-sided scanning.
Scanned pages are missing at the scan destination
When scanning, pages that stick together are scanned as one item. The hidden pages are not scanned.
Scanned pages are out of order at the scan destination
Verify that the page order of the original document is correct before inserting into the document feeder.
Make sure that there are no staples, paper clips, or any other attached material (such as adhesive notes)
that may cause the pages to feed incorrectly.
Verify that pages are not stuck together.
Place the first page of a multiple page document toward the back of the document feeder.
Optimize scanning and task speeds
Several settings influence the total time for a scanning job. When you want to optimize scanning
performance, consider the following information.
●
Choose a quick set that matches the orientation of the originals in the document feeder.
●
Use a compression setting appropriate for the original you are scanning.
●
Scanning at a higher resolution than necessary increases scanning time and creates a larger file
with no additional benefit. If you are scanning at a high resolution, set the resolution to a lower level
to increase scanning speed.
The scan is completely black or completely white
The original might not be placed correctly in the document feeder. Make sure that the original you are
trying to scan is placed face down.
Scanned images are not straight
Verify that the document feeder guides on the product are centered and set to an appropriate width for
the original being scanned. Make sure the paper guides touch the edges of the original.
Scan files are too large
If the saved scan files are very large, try the following:
●
90
Verify the scan resolution setting:
◦
200 dpi is sufficient for storing documents as images.
◦
For most fonts, 300 dpi is sufficient for using optical character recognition (OCR) to create
editable text.
◦
For Asian fonts and small fonts, 400 dpi is the recommended resolution.
Chapter 8 Solve problems
ENWW
Scanning at a higher resolution than necessary creates a larger file with no additional benefit.
ENWW
●
Color scans create larger files than do black and white scans.
●
If you are scanning a large number of pages at one time, consider scanning fewer pages at a time
to create more, smaller files.
Operation problems
91
Paper path problems
●
Paper jamming, skewing, misfeeds, or multiple-page feeds
●
Scanning fragile originals
●
Paper does not feed correctly
●
Originals are curling up in the output tray
●
The bottom of the scanned image is cut off
●
The scanned images have streaks or scratches
●
An item loaded in the document feeder jams repeatedly
●
Clear jams from the paper path
Paper jamming, skewing, misfeeds, or multiple-page feeds
●
Check that all rollers are in place and that the roller doors and hatch are closed.
●
If the pages look skewed as they feed into the paper path, preview the scan to ensure that the
images are not skewed.
●
The pages might not be placed correctly. Straighten the pages and adjust the paper guides to
center the stack.
●
The paper guides must be touching the sides of the paper stack to work properly. Ensure that the
paper stack is straight and the guides are against the paper stack.
●
The document feeder or output tray might contain more than the maximum number of pages. Load
fewer pages in the document feeder, and remove pages from the output tray.
●
Clean the paper path to help reduce misfeeds. If misfeeds still occur, clean the rollers. If misfeeds
still occur, replace the rollers.
NOTE: For information on roller maintenance, touch the Service button on the Home screen,
touch the Menu button, touch the Maintenance button, touch the Clean Rollers or Replace
Rollers button, and then follow the onscreen instructions.
Scanning fragile originals
To safely scan fragile originals (photographs or documents on wrinkled or very lightweight paper) place
originals in a clear, heavyweight document sleeve that is no more than 216 mm (8.5 in) wide before
inserting into the document feeder.
TIP: If you do not have an appropriately-sized document sleeve, consider using a sheet protector
intended for use in a ring binder. Trim the ring-side edge so the sleeve is no more than 216 mm (8.5 in)
wide.
Paper does not feed correctly
Reload the pages into the document feeder, ensuring that they make contact with the rollers.
The hatch might not be securely latched. Open the hatch and then close it by pressing firmly.
92
Chapter 8 Solve problems
ENWW
A problem with the hardware might exist. Follow this procedure to test the product:
1.
Ensure that the power supply is securely connected between the product and a live electrical outlet
or surge protector. Check that the green LED on the power supply case is on to verify that the
power supply is functional.
2.
If the power supply is connected to a surge protector, ensure that the surge protector is plugged
into an outlet and turned on.
3.
Press the Power button to turn off the product, wait 30 seconds, and then press the Power button
to turn on the product.
4.
Try the scan again.
Originals are curling up in the output tray
Under dry conditions, lightweight originals such as those printed on carbonless copy paper may curl in
the output tray. To minimize curl, flatten curled edges on the originals before placing them in the
document feeder. If you cannot flatten curled edges, make sure the curled edges are facing down when
you place the originals in the document feeder.
The bottom of the scanned image is cut off
By default, the product can scan media that is up to 864 mm (34 in) long. For longer pages, the end of
the document is not included in the scanned image.
Make sure the job option you select reflects the page size of the document you are scanning.
The scanned images have streaks or scratches
After each step, try another scan to see if the streaks or scratches are still apparent. If so, then try the
next step.
●
Check that the originals are clean and unwrinkled.
●
Use a cleaning cloth in the paper path.
●
Clean the glass strips inside the document feeder.
●
Clean the rollers.
An item loaded in the document feeder jams repeatedly
●
The item might not meet the guidelines for acceptable originals.
●
The item might have something on it, such as staples or self-adhesive notes on the original that
must be removed.
●
Make sure the paper guides touch the edges of the original.
Clear jams from the paper path
To clear a paper jam:
1.
ENWW
Remove originals from the document feeder.
Paper path problems
93
94
2.
Open the hatch.
3.
Remove the originals or any obstructions from the paper path.
4.
Remove any debris (paper, staples, clips, etc.) that you see in the paper path.
5.
Close the hatch until it snaps into place.
6.
Reload the unscanned originals in the document feeder.
7.
Resume scanning.
Chapter 8 Solve problems
ENWW
Solve e-mail problems
If you are unable to send e-mails by using the digital-send feature, you might need to reconfigure the
SMTP gateway address or the LDAP gateway address. View a configuration page to find the current
SMTP and LDAP gateway addresses. Use the following procedures to check if the SMTP and LDAP
gateway addresses are valid.
Validate the SMTP gateway address
NOTE:
This procedure is for Windows operating systems.
1.
Open an MS-DOS command prompt: click Start, click Run, and then type cmd.
2.
Type telnet followed by the SMTP gateway address and then the number 25, which is the port
over which the product is communicating. For example, type telnet 123.123.123.123 25
where "123.123.123.123" represents the SMTP gateway address.
3.
Press Enter. If the SMTP gateway address is not valid, the response contains the message Could
not open connection to the host on port 25: Connect Failed.
4.
If the SMTP gateway address is not valid, contact the network administrator.
Validate the LDAP gateway address
NOTE:
ENWW
This procedure is for Windows operating systems.
1.
Open Windows Explorer. In the address bar, type LDAP:// immediately followed by the LDAP
gateway address. For example, type LDAP://12.12.12.12 where "12.12.12.12" represents the
LDAP gateway address.
2.
Press Enter. If the LDAP gateway address is valid, the Find People dialog box opens.
3.
If the LDAP gateway address is not valid, contact the network administrator.
Solve e-mail problems
95
Solve network problems
Check the following items to verify that the product is communicating with the network. Before beginning,
view the information pages.
If you still cannot connect to the network after checking these items, see www.hp.com/support.
1.
Are your power and power supply cables connected properly, and is the product turned on?
2.
Are your network cables connected properly?
Make sure that the product is attached to the network using the appropriate port and cable. Check
each cable connection to make sure it is secure and in the right place. If the problem continues,
try a different cable or ports on the hub or transceiver.
3.
Are the link speed and duplex settings set correctly?
Hewlett-Packard recommends leaving this setting in automatic mode (the default setting).
4.
Can you "ping" the product using its IP address?
Use the command prompt to ping the product from your computer. For example:
ping 192.168.45.39
Ensure that the ping displays round-trip times.
If you are able to ping the product, verify that the IP address configuration for the product is correct
on the computer. If it is correct, delete and then add the product again.
If the ping command failed, verify that the network hubs are on, and then verify that the network
settings, the product, and the computer are all configured for the same network.
5.
Have any software applications been added to the network?
Make sure they are compatible and that they are installed correctly.
6.
Is your protocol enabled?
Use the Embedded Web Server to check the status of protocols.
7.
96
Does the product appear in HP Web Jetadmin or other management application?
●
Verify network settings on the Network configuration screen.
●
Confirm the network settings for the product using the product control panel.
Chapter 8 Solve problems
ENWW
Contact HP Support
For support contact information, see the printed materials that came with the product, or see
www.hp.com/support.
ENWW
Contact HP Support
97
98
Chapter 8 Solve problems
ENWW
A
ENWW
Supplies and accessories
●
Order parts, accessories, and supplies
●
Part numbers
99
Order parts, accessories, and supplies
Several methods are available for ordering parts, supplies, and accessories.
Order genuine HP parts or accessories
www.hp.com/buy/parts
Order through service or support providers
Contact an HP-authorized service or support provider.
Order using HP software
Embedded Web Server on page 55
100 Appendix A Supplies and accessories
ENWW
Part numbers
Ordering information and availability might change during the life of the product.
Accessories
Item
Description
Part number
HP Scanjet 7000n Keyboard overlay
Keyboard overlays available in French,
French (Canadian), German, Russian,
and Spanish
L2710A
Item
Description
Part number
HP Jetdirect 630n IPv6 Gigabit Ethernet
Print Server
Provides support for IPv4 and IPv6
protocol as well as support for Gigabit
and Fast Ethernet networks
J7997G
HP Jetdirect 690n Wireless Card
Provides wireless connection support
J8007G
Item
Description
Part number
7000/5000 Roller Replacement Kit
Replacement kit for feed rollers in the
document feeder
L2707A
10-pack ADF Cleaning Cloth Package
Paper-path sheets for cleaning the
document feeder
C9943B
Cables and interfaces
Maintenance kits
ENWW
Part numbers 101
102 Appendix A Supplies and accessories
ENWW
B
ENWW
Service and support
●
Hewlett-Packard limited warranty statement
●
OpenSSL
●
Customer self repair warranty service
●
Customer support
103
Hewlett-Packard limited warranty statement
HP PRODUCT
DURATION OF LIMITED WARRANTY
HP Scanjet 7000n
One-year limited warranty
HP warrants to you, the end-user customer, that HP hardware and accessories will be free from defects
in materials and workmanship after the date of purchase, for the period specified above. If HP receives
notice of such defects during the warranty period, HP will, at its option, either repair or replace products
which prove to be defective. Replacement products may be either new or equivalent in performance to
new.
HP warrants to you that HP software will not fail to execute its programming instructions after the date
of purchase, for the period specified above, due to defects in material and workmanship when properly
installed and used. If HP receives notice of such defects during the warranty period, HP will replace
software which does not execute its programming instructions due to such defects.
HP does not warrant that the operation of HP products will be uninterrupted or error free. If HP is unable,
within a reasonable time, to repair or replace any product to a condition as warranted, you will be entitled
to a refund of the purchase price upon prompt return of the product.
HP products may contain remanufactured parts equivalent to new in performance or may have been
subject to incidental use.
Warranty does not apply to defects resulting from (a) improper or inadequate maintenance or calibration,
(b) software, interfacing, parts or supplies not supplied by HP, (c) unauthorized modification or misuse,
(d) operation outside of the published environmental specifications for the product, or (e) improper site
preparation or maintenance.
TO THE EXTENT ALLOWED BY LOCAL LAW, THE ABOVE WARRANTIES ARE EXCLUSIVE AND
NO OTHER WARRANTY OR CONDITION, WHETHER WRITTEN OR ORAL, IS EXPRESSED OR
IMPLIED AND HP SPECIFICALLY DISCLAIMS ANY IMPLIED WARRANTIES OR CONDITIONS OF
MERCHANTABILITY, SATISFACTORY QUALITY, AND FITNESS FOR A PARTICULAR PURPOSE.
Some countries/regions, states or provinces do not allow limitations on the duration of an implied
warranty, so the above limitation or exclusion might not apply to you. This warranty gives you specific
legal rights and you might also have other rights that vary from country/region to country/region, state
to state, or province to province.
HP's limited warranty is valid in any country/region or locality where HP has a support presence for this
product and where HP has marketed this product. The level of warranty service you receive may vary
according to local standards. HP will not alter form, fit or function of the product to make it operate in a
country/region for which it was never intended to function for legal or regulatory reasons.
TO THE EXTENT ALLOWED BY LOCAL LAW, THE REMEDIES IN THIS WARRANTY STATEMENT
ARE YOUR SOLE AND EXCLUSIVE REMEDIES. EXCEPT AS INDICATED ABOVE, IN NO EVENT
WILL HP OR ITS SUPPLIERS BE LIABLE FOR LOSS OF DATA OR FOR DIRECT, SPECIAL,
INCIDENTAL, CONSEQUENTIAL (INCLUDING LOST PROFIT OR DATA), OR OTHER DAMAGE,
WHETHER BASED IN CONTRACT, TORT, OR OTHERWISE. Some countries/regions, states or
provinces do not allow the exclusion or limitation of incidental or consequential damages, so the above
limitation or exclusion may not apply to you.
THE WARRANTY TERMS CONTAINED IN THIS STATEMENT, EXCEPT TO THE EXTENT
LAWFULLY PERMITTED, DO NOT EXCLUDE, RESTRICT OR MODIFY AND ARE IN ADDITION TO
THE MANDATORY STATUTORY RIGHTS APPLICABLE TO THE SALE OF THIS PRODUCT TO YOU.
104 Appendix B Service and support
ENWW
OpenSSL
Copyright (c) 1998-2001 The OpenSSL Project. All rights reserved.
Redistribution and use in source and binary forms, with or without modification, are permitted provided
that the following conditions are met:
1. Redistributions of source code must retain the above copyright notice, this list of conditions and the
following disclaimer.
2. Redistributions in binary form must reproduce the above copyright notice, this list of conditions and
the following disclaimer in the documentation and/or other materials provided with the distribution.
3. All advertising materials mentioning features or use of this software must display the following
acknowledgment: "This product includes software developed by the OpenSSL Project for use in the
OpenSSL Toolkit. (http://www.openssl.org/)"
4. The names "OpenSSL Toolkit" and "OpenSSL Project" must not be used to endorse or promote
products derived from this software without prior written permission. For written permission, please
contact [email protected].
5. Products derived from this software may not be called "OpenSSL" nor may "OpenSSL" appear in
their names without prior written permission of the OpenSSL Project.
6. Redistributions of any form whatsoever must retain the following acknowledgment: "This product
includes software developed by the OpenSSL Project for use in the OpenSSL Toolkit (http://
www.openssl.org/)"
THIS SOFTWARE IS PROVIDED BY THE OpenSSL PROJECT ``AS IS'' AND ANY EXPRESSED OR
IMPLIED WARRANTIES, INCLUDING, BUT NOT LIMITED TO, THE IMPLIED WARRANTIES OF
MERCHANTABILITY AND FITNESS FOR A PARTICULAR PURPOSE ARE DISCLAIMED. IN NO
EVENT SHALL THE OpenSSL PROJECT OR ITS CONTRIBUTORS BE LIABLE FOR ANY DIRECT,
INDIRECT, INCIDENTAL, SPECIAL, EXEMPLARY, OR CONSEQUENTIAL DAMAGES (INCLUDING,
BUT NOT LIMITED TO, PROCUREMENT OF SUBSTITUTE GOODS OR SERVICES;
LOSS OF USE, DATA, OR PROFITS; OR BUSINESS INTERRUPTION) HOWEVER CAUSED AND
ON ANY THEORY OF LIABILITY, WHETHER IN CONTRACT, STRICT LIABILITY, OR TORT
(INCLUDING NEGLIGENCE OR OTHERWISE) ARISING IN ANY WAY OUT OF THE USE OF THIS
SOFTWARE, EVEN IF ADVISED OF THE POSSIBILITY OF SUCH DAMAGE.
This product includes cryptographic software written by Eric Young
([email protected]). This product includes software written by Tim Hudson ([email protected]).
/* crypto/mem.c */
/* Copyright (C) 1995-1998 Eric Young ([email protected])
All rights reserved.
This package is an SSL implementation written by Eric Young ([email protected]). The implementation
was written so as to conform with Netscapes SSL.
This library is free for commercial and non-commercial use as long as the following conditions are
adhered to. The following conditions apply to all code found in this distribution, be it the RC4, RSA,
lhash, DES, etc., code; not just the SSL code. The SSL documentation included with this distribution is
covered by the same copyright terms except that the holder is Tim Hudson ([email protected]).
ENWW
OpenSSL 105
Copyright remains Eric Young's, and as such any Copyright notices in the code are not to be removed.
If this package is used in a product, Eric Young should be given attribution as the author of the parts of
the library used. This can be in the form of a textual message at program startup or in documentation
(online or textual) provided with the package.
Redistribution and use in source and binary forms, with or without modification, are permitted provided
that the following conditions are met:
1. Redistributions of source code must retain the copyright notice, this list of conditions and the following
disclaimer.
2. Redistributions in binary form must reproduce the above copyright notice, this list of conditions and
the following disclaimer in the documentation and/or other materials provided with the distribution.
3. All advertising materials mentioning features or use of this software must display the following
acknowledgement: "This product includes cryptographic software written by Eric Young
([email protected])" The word 'cryptographic' can be left out if the routines from the library being used
are not cryptographic related :-).
4. If you include any Windows specific code (or a derivative thereof) from the apps directory (application
code) you must include an acknowledgement: "This product includes software written by Tim Hudson
([email protected])"
THIS SOFTWARE IS PROVIDED BY ERIC YOUNG ``AS IS'' AND ANY EXPRESS OR IMPLIED
WARRANTIES, INCLUDING, BUT NOT LIMITED TO, THE IMPLIED WARRANTIES OF
MERCHANTABILITY AND FITNESS FOR A PARTICULAR PURPOSE ARE DISCLAIMED. IN NO
EVENT SHALL THE AUTHOR OR CONTRIBUTORS BE LIABLE FOR ANY DIRECT, INDIRECT,
INCIDENTAL, SPECIAL, EXEMPLARY, OR CONSEQUENTIAL DAMAGES (INCLUDING, BUT NOT
LIMITED TO, PROCUREMENT OF SUBSTITUTE GOODS OR SERVICES; LOSS OF USE, DATA, OR
PROFITS; OR BUSINESS INTERRUPTION) HOWEVER CAUSED AND ON ANY THEORY OF
LIABILITY, WHETHER IN CONTRACT, STRICT LIABILITY, OR TORT (INCLUDING NEGLIGENCE
OR OTHERWISE) ARISING IN ANY WAY OUT OF THE USE OF THIS SOFTWARE, EVEN IF
ADVISED OF THE POSSIBILITY OF SUCH DAMAGE.
The license and distribution terms for any publically available version or derivative of this code cannot
be changed. i.e. this code cannot simply be copied and put under another distribution license [including
the GNU Public License.]
106 Appendix B Service and support
ENWW
Customer self repair warranty service
HP products are designed with many Customer Self Repair (CSR) parts to minimize repair time and
allow for greater flexibility in performing defective parts replacement. If during the diagnosis period, HP
identifies that the repair can be accomplished by the use of a CSR part, HP will ship that part directly to
you for replacement. There are two categories of CSR parts: 1) Parts for which customer self repair is
mandatory. If you request HP to replace these parts, you will be charged for the travel and labor costs
of this service. 2) Parts for which customer self repair is optional. These parts are also designed for
Customer Self Repair. If, however, you require that HP replace them for you, this may be done at no
additional charge under the type of warranty service designated for your product.
Based on availability and where geography permits, CSR parts will be shipped for next business day
delivery. Same-day or four-hour delivery may be offered at an additional charge where geography
permits. If assistance is required, you can call the HP Technical Support Center and a technician will
help you over the phone. HP specifies in the materials shipped with a replacement CSR part whether
a defective part must be returned to HP. In cases where it is required to return the defective part to HP,
you must ship the defective part back to HP within a defined period of time, normally five (5) business
days. The defective part must be returned with the associated documentation in the provided shipping
material. Failure to return the defective part may result in HP billing you for the replacement. With a
customer self repair, HP will pay all shipping and part return costs and determine the courier/carrier to
be used.
ENWW
Customer self repair warranty service 107
Customer support
Get telephone support, free during your warranty period, for
your country/region
Country/region phone numbers are on the flyer that was in the
box with your product or at www.hp.com/support.
Have the product name, serial number, date of purchase, and
problem description ready.
Get 24-hour Internet support
www.hp.com/support
Download software utilities, drivers, and electronic information
www.hp.com/support
Order additional HP service or maintenance agreements
www.hp.com/go/carepack
108 Appendix B Service and support
ENWW
C
ENWW
Product specifications
●
Physical specifications
●
Power consumption
●
Environmental specifications
●
Certificate of Volatility
109
Physical specifications
Table C-1 Product dimensions
Product
Height
Depth
Width
Weight
HP Scanjet Enterprise 7000n
343 mm (13.5 in)
411 mm (16.2 in)
321 mm (12.6 in)
16.2 kg (35.6 lb)
HP Scanjet Enterprise 7000n (with
trays extended)
508 mm (20 in)
685 mm (26.97 in)
406 mm (15.98 in)
Power consumption
For power consumption information, see the regulatory_supplement.pdf file in the product
documentation.
Environmental specifications
Environmental condition
Recommended
Allowed
Temperature
15° to 27°C (59° to 80.6°F)
0° to 35°C (32° to 95°F)
Relative humidity
20% to 60% relative humidity (RH)
10% to 90% RH
Altitude
N/A
0 to 2500 m (0 to 8000 feet)
110 Appendix C Product specifications
ENWW
Certificate of Volatility
This statement explains the volatility of customer data stored in memory and outlines how to erase
secure data from the device.
Volatile memory
The product utilizes volatile memory (512 MB) to store customer data during the scan process. When
you turn off the product, this volatile memory is erased.
Non-volatile memory
The product utilizes non-volatile flash memory (2 MB) to store system control data and user preference
settings. Non-volatile memory does not store any customer scan data. To clear non-volatile memory
and restore it to factory defaults, use the Embedded Web Server.
Hard-disk-drive memory
The product contains one disk drive (80 GB) that may retain data after you turn off the product, including
customer jobs and temporary data such as stored scan data or fax files. To securely erase the data,
start the Embedded Web Server, click the Security tab, click the Protect Stored Data entry in the left
pane, click the Erase Options button, and then select the Secure Sanitize Erase option. The Secure
Sanitize Erase feature meets standards for clearing disk media defined in NIST Special Publication
800-88 Guidelines for Media Sanitation and the U.S. Department of Defense Updated DSS Clearing
and Sanitization Matrix.
ENWW
Certificate of Volatility 111
112 Appendix C Product specifications
ENWW
D
ENWW
Regulatory information
●
Regulatory model number
●
Environmental product stewardship program
●
Safety statements
113
Regulatory model number
For regulatory identification purposes your product has been assigned a Regulatory Model Number.
The Regulatory Model Number for your product is FCLSD-0807. This regulatory model number should
not be confused with the marketing name (HP Scanjet Enterprise 7000n) or product number (L2708A,
L2709A). Additional regulatory information about your scanner can be found on the
regulatory_supplement.pdf file in the product documentation.
114 Appendix D Regulatory information
ENWW
Environmental product stewardship program
Protecting the environment
Hewlett-Packard Company is committed to providing quality products in an environmentally sound
manner. This product has been designed with several attributes to minimize impacts on our environment.
Power consumption
Hewlett-Packard printing and imaging equipment marked with the ENERGY STAR® logo is qualified to
the U.S. Environmental Protection Agency’s ENERGY STAR specifications for imaging equipment. The
following mark will appear on ENERGY STAR qualified imaging products:
Additional ENERGY STAR qualified imaging product model information is listed at: www.hp.com/go/
energystar
Plastics
Plastic parts over 25 grams are marked according to international standards that enhance the ability to
identify plastics for recycling purposes at the end of the product’s life.
Material restrictions
This HP product contains the following materials that might require special handling at end-of-life:
Mercury in the fluorescent lamp in the scanner and in the display LCD.
Disposal of mercury can be regulated because of environmental considerations. For disposal or
recycling information, please contact your local authorities or the Electronic Industries Alliance (EIA)
(www.eiae.org).
This product’s real-time clock battery or coin cell battery may contain perchlorate and may require
special handling when recycled or disposed of in California. (See www.dtsc.ca.gov/hazardouswaste/
perchlorate.) The batteries contained in or supplied by Hewlett-Packard for this product include the
following:
HP Scanjet 7000n Series
ENWW
Type
Lithium manganese dioxide
Weight
2.9 g
Location
On motherboard
User-removable
No
Environmental product stewardship program 115
For recycling information, you can go to www.hp.com/recycle, or contact your local authorities or the
Electronics Industries Alliance: www.eiae.org.
Disposal of waste equipment by users in private households in the
European Union
This symbol on the product or on its packaging indicates that this product must not be disposed of with
your other household waste. Instead, it is your responsibility to dispose of your waste equipment by
handing it over to a designated collection point for the recycling of waste electrical and electronic
equipment. The separate collection and recycling of your waste equipment at the time of disposal will
help to conserve natural resources and ensure that it is recycled in a manner that protects human health
and the environment. For more information about where you can drop off your waste equipment for
recycling, please contact your local city office, your household waste disposal service or the shop where
you purchased the product.
Chemical substances
HP is committed to providing our customers with information about the chemical substances in our
products as needed to comply with legal requirements such as REACH (Regulation EC No 1907/2006
of the European Parliament and the Council). A chemical information report for this product can be found
at: www.hp.com/go/reach.
For more information
To obtain information about these environmental topics:
●
Product environmental profile sheet for this and many related HP products
●
HP’s commitment to the environment
●
HP’s environmental management system
●
HP’s end-of-life product return and recycling program
●
Material Safety Data Sheets
Visit www.hp.com/go/environment or www.hp.com/hpinfo/globalcitizenship/environment.
Safety statements
WARNING! This product contains motorized parts. Disconnect power to the product before removing
the back cover. Replace and secure the back cover before reconnecting power to the product.
116 Appendix D Regulatory information
ENWW
Index
A
accessories
ordering 100
part numbers 101
address books, e-mail
adding addresses 45
auto-complete function 47
importing 56
LDAP support 28
recipient lists 45
recipient lists, creating 45
ADF
capacity 3
Administration menu, control
panel 11
administrator password 24
Attention light
locating 8
authentication and
authorization 61
B
batteries included 115
bins
locating 5
black scans
troubleshoot 90
blank page suppression 3
browser requirements
Embedded Web Server 55
buttons, control panel
locating 8
touch screen 10
C
capacity
ADF 3
cautions 2
Certificate of Volatility
hard-disk-drive memory 111
ENWW
non-volatile memory 111
volatile memory 111
certificate revocation list 61
clean
about 66
paper path 67
product glass 66
rollers 67
touch screen 66
cleaning cloth 67
Cleaning cloth package
part number 101
configure
digital fax 30
network folders 30
quick sets 31
USB storage device 30
connectivity 3
connectivity features 3
control panel
Administration menu 11
buttons 8
clean touch screen 66
e-mail screen 46
fax screen 48
help 10
Home screen 9
layout 8
lights 8
locating 5
messages, types of 84
security 58
touch screen buttons 10
conventions, document 2
covers, locating 5
CRL 61
crooked images 90
customer support
online 108
cut-off images
troubleshoot 93
D
Data light
locating 8
default gateway, setting 25
device discovery 22
digital fax
configure 30
digital sending
about 28, 45
address books 45
configure e-mail 28
control-panel settings 46, 48
Embedded Web Server
settings 55, 56
folders 50
LDAP support 28
recipient lists 45
sending documents 47
SMTP support 28
USB storage device 50
validating gateway
addresses 95
workflow 52
disabling
network protocols 27
disposal, end-of-life 115
document conventions 2
documents
general loading tips 35
tips for mixed-size
documents 37
E
e-mail address books
deleting addresses 46
electrical specifications 110
Index 117
Embedded Web Server
assigning a password 59
features 55
General tab 55
Information tab 55
Networking tab 56
options 55
Scan/Digital Send tab 56
Security tab 56
end-of-life disposal 115
environment, specifications 110
environmental features 3
Environmental Product
Stewardship Program 115
Error button, control panel touch
screen 10
error messages
control panel 85
types of 84
Ethernet cards 3
European Union, waste
disposal 116
EWS
features 55
General tab 55
Information tab 55
Networking tab 56
options 55
Scan/Digital Send tab 56
Security tab 56
Explorer, versions supported
Embedded Web Server 55
e-mail
about 28, 45
address books 45
auto-complete function 47
configure 28
control-panel settings 46
Embedded Web Server
settings 56
LDAP support 28
problem solving 95
recipient lists 45
scan 28
security 58
sending documents 47
SMTP support 28
validating gateway
addresses 95
118 Index
F
factory settings, restore 82
fax, settings 48
features 3
feed roller
replace 71
feeding problems 92
firmware, upgrading
Jetdirect 77
product 77
folders
sending to 50
fragile items, scanning 92
FTP, sending to 52
G
gateway, setting default 25
gateways
configure 28
validating addresses 95
General tab, Embedded Web
Server 55
glass, clean 66
graphical display, control panel 8
H
hard disks 61
hard drive, replace 73
hardware integration pocket 63
Help button, control panel touch
screen 10
help, control panel 10
Home button, control panel touch
screen 10
Home screen, control panel 9
HP Customer Care 108
HP Digital Sending Software
(HP DSS) 20
HP Jetdirect firmware
upgrades 77
HP Jetdirect server
settings 11
HP paper-path cleaning cloth 67
HP Web Jetadmin 18, 57
humidity requirements 110
I
Image Preview
use 43
information pages 54
Information tab, Embedded Web
Server 55
install the hardware integration
pocket 63
installation
troubleshoot 86
interface ports
included 3
Internet Explorer, versions
supported
Embedded Web Server 55
IP address 25, 26
IP addressing 22
J
jams
troubleshoot 93
Jetadmin, HP Web 18, 57
Jetdirect card, replace 72
Jetdirect Ethernet Print Server
part number 101
Jetdirect firmware upgrades 77
Jetdirect server
settings 11
K
Keyboard overlay
part number 101
keyboard overlay 71
keys, control panel
locating 8
touch screen 10
L
lamp
troubleshoot 89
LAN-connector 3
LDAP servers
connect to 28
Embedded Web Server
settings 56
validating gateway
addresses 95
lights
control panel 8
link speed settings 15
loading documents
general tips 35
tips for mixed-size
documents 37
log in 42
ENWW
M
maintenance
clean paper path 67
clean rollers 67
manage
EWS 55
manage temporary job files 59
managing network 24
material restrictions 115
media
jams 93
misfeeds 92
not feeding 92
troubleshoot 92
memory 3
Menu button 8
menus, control panel
Administration 11
mercury product 115
messages
types of 84
misfeeds
troubleshoot 92
multiple-page feeds 92
N
Netscape Navigator, versions
supported
Embedded Web Server 55
network
settings, changing 24
settings, viewing 24
network folders
configure 30
scan to 50
Networking tab, Embedded Web
Server 56
networks
configuring 21
connectivity features 3
default gateway 25
device discovery 22
disabling protocols 27
HP Web Jetadmin 57
IP address 22, 25, 26
link speed settings 15
protocols supported 22
SMTP servers 28
subnet mask 25
ENWW
TCP/IP settings 11
validating gateway
addresses 95
notes 2
O
on/off switch, locating 5
online help, control panel 10
online support 108
operating environment
specifications 110
order
roller replacement 71
supplies 70
ordering
part numbers for 101
supplies and accessories 100
output bin
locating 5
P
pages missing, troubleshoot 90
pages out of order 90
paper
jams 93
misfeeds 92
not feeding 92
troubleshoot 92
paper, ordering 100
paper-handling 3
paper-path
clean 67
feeding problems 92
part number
Cleaning cloth package 101
Jetdirect Ethernet Print
Server 101
Keyboard overlay 101
Roller replacement kit 101
Wireless card 101
part numbers
accessories 101
images drums 101
parts
order 71, 101
password 24
passwords 58
physical specifications 109
ports
included 3
power
consumption 110
Power Save mode 89
power switch, locating 5
preview scan 43
problem-solving
Error button, control panel touch
screen 10
e-mail 95
messages, types of 84
product info 1
protocols, network 22
Q
quick sets
configure
31
R
Ready light
locating 8
recipient lists 45
regulatory statements
environmental product
stewardship program 115
replace
parts 71
replace keyboard overlay 71
replace rollers 71
replace the hard drive 73
replace the Jetdirect card 72
Reset button 8
reset scanner 88
resolution 3
restore factory settings 82
Roller replacement kit
part number 101
rollers
clean 67
replace 71
S
Save to Folder 50
Save to Network Folder Setup 30
Save to USB 50
scan
feeding problems 92
files too large 90
fragile items 92
preview 43
to e-mail 45
to fax 49
Index 119
to network folder 50
to USB 50
using quick sets 51
Scan/Digital Send tab, Embedded
Web Server 56
scanner
reset 88
scanner lamp
troubleshoot 89
scanning
features 4
scanning to e-mail
about 28, 45
address books 45
configure 28
control-panel settings 46
Embedded Web Server
settings 56
LDAP support 28
recipient lists 45
sending documents 47
settings 28
SMTP support 28
validating addresses 95
scanning to folder 50
scanning to workflow 52
Secure Disk Erase 60
Secure Storage Erase 60
security
authentication and
authorization 61
certificates 61
Embedded Web Server
settings 56
encrypted hard disk 61
EWS 59
load certificate revocation
list 61
load certificates 61
manage certificates 61
manage temporary job
files 59
Secure Disk Erase 60
Secure Storage Erase 60
software access 58
security features 3
Security tab, Embedded Web
Server 56
Send to Workflow 52
120 Index
sending to e-mail
about 28, 45
address books 45
Embedded Web Server
settings 56
LDAP support 28
recipient lists 45
sending documents 47
settings 46
SMTP support 28
validating gateway
addresses 95
sending to fax 49
serial number
locate 6
settings, restore 82
sign in 42
skewed images 90
Sleep button 8
SMTP servers
connect to 28
validating gateway
addresses 95
software
embedded Web server 19
HP Digital Sending Software
(HP DSS) 20
HP Web Jetadmin 18
restricting access 58
uninstall and reinstall 88
solving
network problems 96
specifications
electrical 110
operating environment 110
physical 109
speed
troubleshoot 89
speed, troubleshoot 90
standard output bin
locating 5
Start button 8
Start button, control panel touch
screen 10
status
Home screen, control panel 9
messages, types of 84
Stop button 8
streaks
troubleshoot 93
subnet mask 25
supplies
order 70
ordering 100
replace 71
support
online 108
system requirements
Embedded Web Server 55
T
TCP/IP parameters, manual
configuration 25, 26
TCP/IP settings 11
technical support
online 108
temperature requirements 110
tips 2
touch screen, clean 66
troubleshoot
basic tips 81
black scans 90
check power 87
crooked images 90
cut-off images 93
feeding problems 92
fragile items 92
installation 86
jams 93
lamp stays on 89
large scan files 90
misfeeds 92
page order 90
pages missing 90
paper not feeding 92
power 89
reset scanner 88
scanning fragile items 92
speed 89, 90
stops working 88
streaks 93
two-sided scans 90
uninstall and reinstall
software 88
warm-up time 89
white scans 90
troubleshooting
control panel messages 85
gateway addresses 95
network problems 96
ENWW
turn on product
troubleshoot 89
two-sided scans
troubleshoot 90
U
uninstall and reinstall software 88
upgrading firmware
Jetdirect 77
product 77
USB storage device
configure 30
USB storage device, save to 50
user interface 3
V
validating gateway addresses 95
W
warm-up time 89
Warning button, control panel touch
screen 10
warnings 2
warranty
Customer self repair 107
product 104
Web browser requirements
Embedded Web Server 55
Web sites
customer support 108
HP Web Jetadmin,
downloading 57
order supplies 70
replacement parts 71
white scans
troubleshoot 90
Wireless card
part number 101
workflow, send to 52
ENWW
Index 121
122 Index
ENWW