1
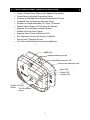
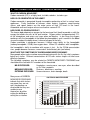
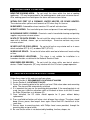
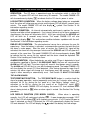
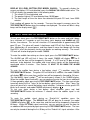
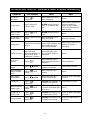
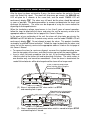
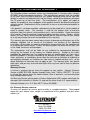
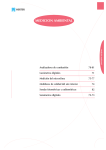
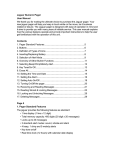
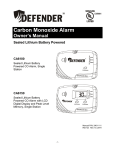
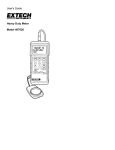
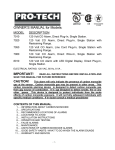
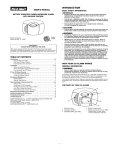
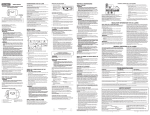
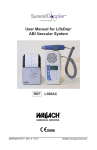
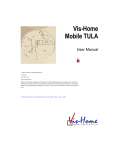
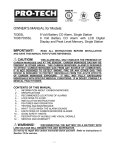
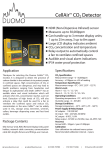
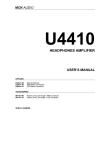
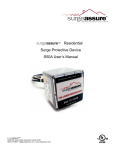
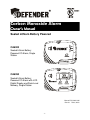
Carbon Monoxide Alarm
Owner’s Manual
Sealed Lithium Battery Powered
CA6000
Sealed Lithium Battery
Powered CO Alarm, Single
Station
CA6050
Sealed Lithium Battery
Powered CO Alarm with LCD
Digital Display and Peak Level
Memory, Single Station
Manual P/N: 240-1104
Rev-03 Feb 6, 2013
-1-
CONTENTS OF THIS MANUAL
1.
2.
3.
4.
5.
6.
7.
8.
9.
10.
11.
12.
13.
14.
15.
IMPORTANT MESSAGE AND INSTRUCTIONS
WARNING MESSAGES
FEATURES AND SPECIFICATIONS
INFORMATION ABOUT CARBON MONOXIDE
RECOMMENDED LOCATIONS OF ALARMS
LOCATIONS TO AVOID
INSTALLATION INSTRUCTIONS
FUNCTIONS AND OPERATION
TEST AND MUTE ALARM
WHAT TO DO WHEN THE ALARM SOUNDS
LIMITATIONS OF CARBON MONOXIDE ALARMS
GOOD SAFETY HABITS
DESCRIPTION OF AUDIBLE AND VISUAL SIGNALS
END-OF-LIFE AND SERVICE
FIVE-YEAR LIMITED WARRANTY
1. IMPORTANT MESSAGE AND INSTRUCTIONS
IMPORTANT!
READ ALL INSTRUCTIONS BEFORE INSTALLATION AND
SAVE THIS MANUAL FOR FUTURE REFERENCE. Do not try to repair this CO
alarm yourself. Refer to the instructions in Section 14 for service.
THIS ALARM WILL ONLY INDICATE THE PRESENCE
! CAUTION!
OF CARBON MONOXIDE GAS AT THE SENSOR. CARBON MONOXIDE GAS MAY
BE PRESENT IN OTHER AREAS. THIS CARBON MONOXIDE ALARM IS
DESIGNED TO DETECT CARBON MONOXIDE GAS FROM ANY SOURCE OF
COMBUSTION. IT IS NOT DESIGNED TO DETECT SMOKE, FIRE OR ANY OTHER
GAS. THIS DEVICE IS DESIGNED TO PROTECT INDIVIDUALS FROM THE ACUTE
EFFECTS OF CARBON MONOXIDE EXPOSURE. IT WILL NOT FULLY
SAFEGUARD INDIVIDUALS WITH SPECIFIC MEDICAL CONDITIONS. IF IN
DOUBT, CONSULT A MEDICAL PRACTITIONER.
! CAUTION!
CO detection is best achieved by the installation of CO
alarms in all rooms and areas of the residence.
IMPORTANT!
Alarm should be replaced after 5 years from installation
date. Write the replacement date onto the “REPLACE by” label affixed to side of
alarm.
Add the telephone numbers of the local emergency service provider and a qualified
technician to the self-adhesive labels provided. Place one label next to the alarm, and
-2-
the other label near a source of fresh air where you plan to gather when the carbon
monoxide alarm signals are activated.
After installation is completed, TEST your alarm by pressing the TEST/RESET/MUTE
button for at least 5 seconds. Detailed testing instructions are outlined in Section 9.
DO NOT TRY TO TEST THIS ALARM IN ANY OTHER WAY: If no alarm sounds, or
low or erratic sound emits from the alarm during a test, the unit may be defective and
should be returned for service. (See Section 14)
CLEANING YOUR ALARM: You can clean your alarm by using a vacuum cleaner
brush to vacuum around the openings on the alarm. The outside of the alarm may be
wiped with a damp cloth. After cleaning, confirm that the green power LED flashes
once every 30 seconds (see Operation in Section 8), and test your alarm by operating
the TEST/RESET/MUTE button.
DO NOT PAINT YOUR ALARM: The paint will block the vents and affect the alarm
function.
DO NOT SPRAY AIR REFRESHER, HOUSEHOLD CLEANER, OR INSECT KILLER
ON OR NEAR YOUR ALARM: Certain kinds of aerosol chemicals will damage the
sensor and cause improper operation. The dwelling must be well ventilated when using
household cleaning supplies or similar contaminants.
2. WARNING MESSAGES
! WARNING!
This product is intended for use in ordinary indoor locations of family living units. It
is not designed to measure compliance with Occupational Safety and Health
Administration (OSHA) commercial or industrial standards. Individuals with
medical problems may consider using warning devices which provide audible
and visual signals for carbon monoxide concentrations under 30 ppm.
!
WARNING!
Actuation of this device indicates the presence of carbon
monoxide (CO) which can KILL YOU.
! WARNING!
Test your CO alarm at least once a week
! WARNING!
Test your CO alarm immediately after your home has been
vacant.
! WARNING!
The loudness of the alarm sound may cause you to feel
uncomfortable. Cover the horn opening with the palm of your hand to reduce the
volume while testing the alarm.
! WARNING!
Constant exposures to high or low temperature, or high
humidity, may shorten battery life.
-3-
3. FEATURES AND SPECIFICATIONS
•
•
•
•
•
•
•
•
•
•
•
•
Factory Sealed Lithium Batteries with Soldered Connections
Unique Battery Activation/Deactivation Switch
Accurate and Reliable Water-Based Electrochemical Sensor
Integrated Filter for Removing Nuisance Gases
Samples for Carbon Monoxide (CO) Every 10 Seconds
Optional Alpha Numeric LCD Readout with Memory
Separate Test and Optional Memory Buttons
Audible and Visual Alarm Signals
Separate Alarm, Power and Service LED’s
Self Diagnostic Circuitry and Sensor Life Monitor
Secure-Lock™ Mounting System
Five Year Limited Warranty for Alarm and Batteries
85dB Horn
Standard Mounting Screw
Large Alpha-numeric LCD
Secure-Lock Mounting Plate
Alarm LED
Power LED
Service LED
Display CO Level
Button
Test/Reset/Mute
Button
-4-
SPECIFICATIONS
CO Response Times:
70 PPM: 60-240 minutes,
150 PPM: 10-50 minutes,
400 PPM: 4-15 minutes,
Sensor Type:
Electrochemical
Operating Temperature:
40oF (4.4oC) to 100oF (37.8oC)
Audible Signal:
Buzzer Horn Sounds 85 dB at 10 feet
Visual Signal:
• Green LED Indicates Power On
• Alarm Red LED Indicates CO Alarm
• Service Red LED Indicates Service Required
Detection Frequency:
Samples for CO every 10 seconds
LCD Display: Model CA6050
• Digital Read-Out of Current and Highest CO Levels Detected
• Peak Level Time Record (the total time Peak CO is detected within 10% of the
peak level)
• Display Tolerance ±20% from 70 to 400 PPM @ 50% RH, 72°F±5° (22°C±3°)
Sensor Life Monitor
Activates sensor expiration signal after five years of operation
Factory Sealed Lithium Batteries
Two non-replaceable, non-removable lithium batteries for minimum 5 years of
operation under normal conditions
Electrical Rating:
6VDC, 0.1 mWatts
-5-
4. INFORMATION ABOUT CARBON MONOXIDE
WHAT IS CARBON MONOXIDE?
Carbon monoxide (CO) is a highly toxic, invisible, odorless, tasteless gas.
HOW IS CO GENERATED IN THE HOME?
Carbon monoxide is generated through incomplete combustion of fuel in various home
appliances. Faulty ventilation of furnaces, water heaters, fireplaces, wood burning
stoves, and space heaters are the major cause of high CO levels in the home.
Automobile and small engine exhaust are another source of CO.
HOW DOES CO POISON PEOPLE?
The human body depends on oxygen for the burning of fuel (food) to provide us with the
energy that allows our cells to live and function. Oxygen makes up approximately 21%
of the atmosphere and enters our lungs when we breathe. In our lungs the oxygen
combines with the hemoglobin in the blood (oxyhemoglobin), and is carried in the blood
stream throughout the body where it releases oxygen to the cells.
Carbon monoxide is dangerous because it bonds more tightly to the hemoglobin
(carboxyhemoglobin, COHb) than oxygen does. When CO combines with hemoglobin,
the hemoglobin's ability to combine with oxygen is lost. As the COHb concentration
rises, people become nauseous, unconscious and ultimately die (see below).
WHAT ARE THE SYMPTOMS OF CARBON MONOXIDE POISONING?
Many people often confuse carbon monoxide poisoning with the flu; the initial symptoms
being very similar. Different concentrations of CO over various lengths of time cause
different symptoms.
The following symptoms may be related to CARBON MONOXIDE POISONING and
should be discussed with ALL members of the household.
MEDIUM EXPOSURE:
EXTREME EXPOSURE:
Many cases of CARBON
MONOXIDE POISONING
indicate that while victims
are aware they are not
well, they become so
disoriented that they are
unable to save
themselves by either
exiting the building or
calling for assistance.
Headaches, running nose, sore eyes, often described
as “flu”-like symptoms.
Dizziness, drowsiness, vomiting.
Unconsciousness, brain damage, death
400 PPM CO GAS EXPOSURE
COHb
MILD EXPOSURE:
55%
PERMANENT BRAIN DAMAGE - DEATH
50%
COMA AND PERMANENT BRAIN DAMAGE
45%
COLLAPSE
40%
VOMITING
35%
DROWSY
30%
HEADACHE AND NAUSEA
25%
HEADACHE
20%
HEADACHE
15%
NONE
10%
NONE
5%
0%
8
15
26
35
45
60
75
Time (minutes)
-6-
90
110
140
5.
RECOMMENDED LOCATION OF ALARMS
The Consumer Products Safety Commission (CPSC) recommends the use of "at least
one CO alarm per household located outside each sleeping area." (See diagrams "A"
and “B”).
CO poisoning can happen anywhere in the home, but because most CO poisoning
cases occur while people are sleeping, the best location for the CO alarm is near the
sleeping area in the home. If there is more than one sleeping area in the home or on a
different floor, or if bedroom doors are closed during the night, you may need more than
one CO alarm.
Carbon monoxide at room temperature [68oF (20°C)] is slightly lighter than air (density
of 0.96716). CO alarms should be mounted five feet off floor, or at eye level, for best
operation and to easily test alarm and view any display.
1. Locate the first alarm in the immediate area of the bedrooms. If more than one
sleeping area exists, locate additional alarms in each sleeping area.
2. Locate an alarm inside every room where someone sleeps with a door closed. The
closed door may prevent the alarm from waking the sleeper.
3. Locate an alarm on every level of the home. (See diagrams “A” and “B”)
DR
TV
ROOM
BEDROOM
K
BR
BR
BEDROOM
BEDROOM
BEDROOM
DIAGRAM “A”
KITCHEN
BEDROOM
BEDROOM
DINNING
LIVING ROOM
BEDROOM
Recommended location
for minimum protection.
Additional CO alarm
location for added protection.
-7-
DIAGRAM “B”
6. LOCATIONS TO AVOID
NEAR THE COOKING AREA: Do not install the alarm within five feet of cooking
appliances. CO may be generated in the cooking process and cause nuisance alarms.
Also, cooking grease can build up on the alarm and cause alarm failure.
WITHIN FIVE FEET OF A FURNACE, WATER HEATER, OR SPACE HEATER:
These devices often spill out small amounts of CO when they first turn on.
IN GARAGES: Automobile exhaust contains CO and will activate alarm.
IN DUSTY AREAS: Dust can build up on alarm and prevent it from working properly.
IN CLEANING SUPPLY ROOMS: Chemicals used in household cleaning and painting
supplies may cause nuisance alarms.
IN UTILITY OR BATH ROOMS: Do not install the alarm inside or within three feet of a
room with a bathtub, shower, spa or washer/dryer. Excessive moisture may cause
nuisance alarms.
IN VERY HOT OR COLD AREAS: Do not install unit on any exterior wall or in areas
which are below 40oF (4.4°C) or above 100oF (37.8°C).
IN DEAD AIR SPACE: Do not install alarm within one foot of where wall meets ceiling
or floor.
IN HAZARDOUS LOCATIONS:
This alarm is not suitable for installation in a
hazardous location, as defined in the National Electrical Code.
NEAR WIRELESS DEVICES:
Do not install the alarm within one foot of wireless
devices. Radio Frequencies (RF) may interfere with the CO alarm’s proper operation.
7. INSTALLATION INSTRUCTIONS
Follow these steps in this order to install your alarm:
1. Review Section 5, RECOMMENDED LOCATIONS OF ALARMS
2. Review Section 6, LOCATIONS TO AVOID
3. Fasten the mounting plate to the wall at eye level. Slide alarm down onto mounting
plate. The alarm will be automatically activated.
4. It is important that you use the mounting plate provided. If the mounting plate is not
used, you must slide the activation switch at the back of alarm to left until it meets
the Stop, ON position, as in diagram (D).
5. Once activated, the CO alarm should operate for 5 years without battery
replacement.
6. Press and hold test button until alarm starts to beep, then release. The alarm should
beep 4 times, pause, then beep 4 times again. Alarm Red LED should flash at the
same time.
7. Secure alarm to mounting plate, with Phillips head screw provided, through the
mounting hole on top of alarm.
8. Be sure that the alarm is not obstructed by bedding, furniture, drapes, etc.
-8-
Mounting hole is closed when
switch is in initial position
Lift up Stop
and slide
to left to
permanently deactivate CO Alarm when
END-OF-LIFE signals are initiated
To activate CO Alarm, slide the
alarm down onto mounting plate, or
slide
to STOP.
CO Concentration and Response Time
400ppm : 4- 15 minutes
(C) Activation switch is not initially in ON position
Mounting hole is open when
switch is in ON position
Lift up Stop
and slide
to left to
permanently deactivate CO Alarm when
END-OF-LIFE signals are initiated
To activate CO Alarm, slide the
alarm down onto mounting plate, or
slide
to STOP.
CO Concentration and Response Time
400ppm : 4- 15 minutes
(D) Alarm is activated when switch is in ON position
If the activation switch is not set to ON position, as in diagram (D), the mounting hole at
top of alarm will be blocked, and the CO alarm will not be activated.
The models CA6000 and CA6050 are a sealed lithium battery powered wall mounted
alarm. Two lithium battery cells are permanently sealed with soldered connections, and
cannot be removed. No battery replacement is required, and the factory sealed
batteries will power the alarm for a minimum of five years under normal operation.
-9-
8. FUNCTIONS AND OPERATION
OPERATION: The CO alarm is operational once the activation switch is slid to ON
position. The green LED will flash once every 30 seconds. The model CA6050 LCD
will also continuously display
to indicate that the CO alarm’s power is active.
LOW BATTERY CONDITION: When the battery voltage drops below an acceptable
level, the alarm will chirp once per minute and the green LED will blink 5 seconds every
minute. The model CA6050 LCD will also display
symbol. See Section 14 for
information regarding service.
SERVICE CONDITION: An internal microcontroller continuously monitors the sensor
function and other critical components. If an internal failure of any of these components
should occur, the alarm will chirp twice (BEEP - BEEP) per minute and the SERVICE red
LED will blink for 5 seconds every minute. The model CA6050 LCD will also
continuously display
. This malfunction condition indicates a problem with the unit.
See Section 14 for information regarding service.
END-OF-LIFE CONDITION: The electrochemical sensor has a minimum five year life
expectancy. Once the battery is activated, a microcontroller monitors the total time that
the alarm is under power. After five years of service, the “End-of-Life” signal will be
activated; the alarm will chirp once per minute and the SERVICE red LED will glow for 3
seconds at the same time. The model CA6050 LCD will also continuously display
to indicate that the sensor life has expired and the alarm should be replaced. See
Section 14 for handling an End-of-Life alarm.
ALARM CONDITION: When the batteries are active, and CO gas is detected at a level
and duration specified in Section 3 CO RESPONSE TIMES, the horn will sound and the
ALARM red LED will light. The alarm signal will sound 4 short beeps every 6 seconds.
The ALARM red LED will flash in sync with the beeping sound. The model CA6050 LCD
will also display the current CO Level detected. After having alarmed for more than 5
minutes, the alarm signal will change to 4 short beeps every 60 seconds. The alarm
signal is either manually or automatically reset. See Section 10 WHAT TO DO WHEN
THE ALARM SOUNDS.
TEST/RESET/MUTE BUTTON: The TEST/RESET/MUTE button is used to check the
alarm for proper operation, and to temporarily mute horn for 5 minutes when alarm is
activated, for 24 hrs. during the first week of a “Low Battery Voltage” signal ( )
activation, or for 60 hrs. during the first month of an “End-of-Life” signal (
)
activation. The model CA6050 LCD will display the current CO level detected when
alarm is being tested, or
when an alarm signal is muted. See Section 9 for Testing
procedure.
LCD DISPLAY FUNCTION (FOR MODEL CA6050):
When alarm is operating
normally, the LCD will continuously display
. If room temperature exceeds 120°F
(48°C), the LCD will display
for 5 seconds every minute. If a CO level of 30 ppm or
more is detected, or alarm is activated, the LCD will automatically display the current
CO level detected. The LCD will display the
symbol if the battery has low voltage.
- 10 -
DISPLAY CO LEVEL BUTTON (FOR MODEL CA6050): To manually display the
current and highest CO level detected, press the DISPLAY CO LEVEL button once. The
LCD will display the recorded data in the following order:
1. The current CO level detected, and
2. The peak or highest CO level detected from 10-999 ppm.
3. The total length of time the alarm has detected the peak CO level, from 0-999
minutes.
Each reading will appear for five seconds. To erase the record in memory, press the
TEST/RESET/MUTE button when the readings are displayed. The alarm will burst a long
beep, and the display reads
.
9. TEST AND MUTE ALARM
To test your alarm, press the TEST/RESET/MUTE button on the cover and hold it down
for a minimum of 2 seconds or until the alarm starts beeping and ALARM red LED
flashes, then release. This test will simulate a CO concentration of approximately 300
ppm CO gas. The alarm will sound 4 short beeps and LED will flash Red at the same
time, followed by a 5 second pause, and then repeat 4 more short beeps with flashing
Red LED if all of the electronic circuitry and buzzer are working correctly. The current
CO level will also be displayed for model CA6050.
To mute the audible horn during an alarm signal, press the TEST/RESET/MUTE button.
for 5
The ALARM red LED will flash 4 times, the model CA6050 will display
seconds, and the horn will be temporarily silenced. If a CO level of 70 ppm or more
continues to be detected, the audible and visual alarm signals will be automatically
reactivated within 5 minutes. See Section 10 WHAT TO DO WHEN THE ALARM
SOUNDS.
To mute the audible horn during a low battery signal ( ) condition, press the
TEST/RESET/MUTE button. The green LED will blink for 5 seconds, the model CA6050
will display
at the same time, and the horn will be temporarily silenced for 24 hours.
will be continuously shown in the CA6050 display.
The low battery signal symbol
When the audible signal reactivates, you can continue to mute the horn for an additional
24 hour period by again pressing the TEST/RESET/MUTE button. The horn can only be
turned off during the first 7 days of the low battery signal activation. After 7 days, the
alarm will return to its normal low battery signal condition; 1 chirp per minute, green LED
blinks for 5 seconds, and model CA6050 continuously displays
.
To test your alarm during a low battery signal condition, press and hold
TEST/RESET/MUTE button for minimum 2 seconds when the audible signal is not
sounding.
To
mute
the
audible signal during an “End-of-Life” condition, press the
TEST/RESET/MUTE button. The SERVICE red LED will glow for 5 seconds, the model
CA6050 will display
at the same time, and the horn will be temporarily silenced for
60 hours. When the audible signal reactivates, you can continue to mute the horn for
an additional 60 hour period by again pressing the TEST/RESET/MUTE button. The horn
can only be turned off during the first 30 days of the “End-of-Life” signal activation. After
- 11 -
30 days, the alarm will return to its normal “End-of-Life” condition; 1 chirp per minute,
SERVICE red LED glows for 5 seconds at the same time, and model CA6050
continuously displays “End”.
To test your alarm during an “End-of-Life” condition, press and hold TEST/RESET/MUTE
button for minimum 2 seconds when audible signal is not sounding.
The audible signal cannot be muted when alarm is in SERVICE condition; chirps twice
(BEEP - BEEP) per minute, SERVICE red LED blinks for 5 seconds, and model CA6050
. See Section 14 for information regarding service.
continuously displays
10. WHAT TO DO WHEN THE ALARM SOUNDS
If alarm signal sounds:
1) Operate test/reset/mute button;
2) Call your emergency services (tel. no. _______________________________)
[fire department or 911];
3) Immediately move to fresh air - outdoors or by an open door or window. Do
a head count to check that all persons are accounted for. Do not re-enter
the premises or move away from the open door/window until the emergency
services responders have arrived, the premises have been aired out, and
your alarm remains in its normal condition.
4) After following steps 1- 3, if your alarm reactivates within a 24 hour period,
repeat steps 1-3 and call a qualified appliance technician (tel. no.
________________________________) to investigate for sources of CO from
fuel burning equipment and appliances, and inspect for proper operation of
this equipment. If problems are identified during this inspection, have the
equipment serviced immediately. Note any combustion equipment not
inspected by the technician and consult the manufacturers' instructions, or
contact the manufacturers directly, for more information about CO safety
and this equipment. Make sure that motor vehicles are not, and have not
been, operating in an attached garage or adjacent to the residence.
MANUAL RESET: You can temporarily silence an audible alarm signal by pressing the
TEST/RESET/MUTE button. The ALARM red LED will flash 4 times, and the model
CA6050 will display
for 5 seconds and then continue to display the current CO
level detected from 30 to 999 ppm. If 70 ppm or more continues to be detected, the
audible and visual alarm signals will be automatically reactivated within 5 minutes. Do
not wait to see if the alarm is reactivated; follow above instructions immediately.
AUTOMATIC RESET: If a CO alarm activation is not manually reset, the horn will
sound for at least 5 minutes. After 5 minutes, the alarm will automatically reset itself
and return to normal operation if the CO which caused the alarm activation has cleared.
- 12 -
IF YOU HAVE BEEN AWAY FROM HOME and you return to find your alarm(s)
sounding, DO NOT ENTER YOUR HOME. Call the Fire Department from a
neighbor's home. DO NOT RE-ENTER YOUR HOME FOR ANY REASON UNTIL
YOU HAVE BEEN ASSURED THAT IT IS SAFE TO DO SO.
Conditions which can result in transient CO situations:
1) Excessive spillage or reverse venting of fuel burning appliances caused by
outdoor ambient conditions, such as:
i) Wind direction and/or velocity, including high gusts of wind. Heavy air in
the vent pipes (cold/humid air with extended periods between cycles).
ii) Negative pressure differential resulting from the use of exhaust fans.
iii) Simultaneous operation of several fuel burning appliances competing for
limited internal air.
iv) Vent pipe connections vibrating loose from clothes dryers, furnaces, or
water heaters.
v) Obstructions in or unconventional vent pipe designs which can amplify
the above situations.
vi) Poorly designed or maintained chimneys and/or vents.
2) Extended operation of unvented fuel burning devices (range, oven, etc.).
3) Temperature inversions which can trap exhaust gases near the ground.
4) Car idling in an open or closed attached garage, or near a home.
If SERVICE or low battery signals are activated, see Section 14 for service and
return instructions.
11. LIMITATIONS OF CARBON MONOXIDE ALARMS
Carbon monoxide alarms respond to the presence of CO. They do not detect smoke. If
the alarm does activate, follow instructions in Section 10 WHAT TO DO WHEN THE
ALARM SOUNDS.
Carbon monoxide alarms are devices that can provide an early warning of the presence
of CO gas at a reasonable cost. However, alarms have sensing limitations and may not
always sound a warning in the presence of CO. The alarm will not operate if the battery
power is low or dead. CO alarms must be tested regularly to ensure that they are
receiving power and operating properly. Carbon monoxide alarms cannot sense CO
that does not reach the alarm, and therefore CO alarms may not detect CO which is in
another area of the home. Furthermore, if the alarm is located on a different level of the
home, or on the other side of a closed door, it may not waken a sound sleeper. The use
of drugs and alcohol may impair ones ability to hear the alarm. If you have a multi-level
home, install CO alarms on each level of the home. If the alarm is installed in a hallway
and the bedroom doors are kept closed at night, install a CO alarm within each
bedroom.
Although CO alarms can help save lives by providing an early warning to the presence
of carbon monoxide, they are not a substitute for an insurance policy. Homeowners and
renters should have adequate insurance to protect their health, lives and property.
- 13 -
12. GOOD SAFETY HABITS
DEVELOP AND PRACTICE A PLAN OF ESCAPE:
Make a floor plan indicating all doors and windows and at least two escape routes from
each room. Second story windows may need a rope or chain ladder.
Have a family meeting to discuss your escape plan, and show everyone what to do in
case an alarm sounds.
Determine a place outside your home where you can all meet if an alarm sounds.
Familiarize everyone with the sound of the alarm and train them to leave the home
when they hear it.
Practice a CO fire drill at least once every six months. Practice allows you to test your
plan before an emergency. You may not be able to reach your children. It is important
that they know what to do.
Discuss the symptoms related to CARBON MONOXIDE POISONING with all members
of the household. (See Section 4 WHAT ARE THE SYMPTOMS OF CARBON MONOXIDE
POISONING?)
- 14 -
13. DESCRIPTION OF AUDIBLE AND VISUAL SIGNALS
Condition
CO alarm is
operational
LCD Readout
LEDs
Horn
Displays
continuously
Green LED flashes once
every 30 seconds
Silence
CO gas alarm
Displays current CO
reading in PPM
ALARM red LED flashes 4
times in synchronous with
horn
Beeps 4 times, pauses for 5
seconds. Repeats this
pattern for first 5 minutes.
Then pause time increases
to 60 seconds.
Mute CO alarm
audible signal
Displays
seconds
ALARM red LED flashes 4
times
Silence
CO gas alarm in
Silence mode
Displays current CO level Green LED flashes once
in PPM
every 30 seconds
Testing alarm
ALARM signals are same as
Beeps 4 times, pauses for 5
Displays Current CO level CO gas alarm condition, and
seconds, then beeps 4
detected
Green LED blinks once
times again
when testing complete
Display CO Level
Displays current and
highest CO levels
detected, and duration of
peak CO level. Each
readout lasts 5 seconds
Green LED blinks once
when CO level display is
completed
Silence
Clear Peak
Memory
Displays
Green LED blinks once
when clear peak memory is
completed
Bursts a long beep
Low battery
voltage
Displays
symbol
Green LED blinks for 5
seconds every minute
Chirps once per minute
Mute “low battery
voltage” audible
signal
Displays
seconds
for 5
Green LED blinks for 5
seconds
Silence
Low battery in
Silence mode
Displays
symbol
Green LED blinks for 5
seconds every minute
Silence for 24 hrs during the
first week
“End-of-Life”
Displays
continuously
Mute “End-of-Life”
audible signal
Displays
seconds
“End-of-Life” in
Silence mode
Displays
continuously
SERVICE red LED glows for Silence for 60 hrs during the
3 seconds every minute
first month
Service required
Displays
continuously
SERVICE red LED blinks for Chirps twice (BEEP-BEEP)
5 seconds every minute
per minute
for 5
Silence for 5 minutes
SERVICE red LED glows for
Chirps once per minute
3 seconds every minute
for 5
SERVICE red LED glows for
5 seconds, then Green LED Silence
blinks once
- 15 -
14. END-OF-LIFE AND SERVICE
After the alarm has been activated for 5 years, the alarm reaches the end of its life and
emits the End-of-Life signal. The alarm will chirp once per minute, the SERVICE red
LED will glow for 3 seconds at the same time, and the model CA6050 LCD will
continuously display
. The alarm may still work, but the alarm should be replaced
as soon as possible. See below procedures to remove and deactivate the alarm, and
discharge the batteries. The alarm can be disposed of using the same method for
disposing of discharged batteries.
When the low battery voltage signal occurs in less than 5 years of normal operation,
follow the steps to deactivate the alarm, and return the unit for warranty service to the
appropriate address listed on the last page of this Owner’s Manual.
In the event of any malfunction of the unit, the alarm will chirp twice per minute, the
SERVICE red LED will blink for 5 seconds every minute, and the model CA6050 LCD will
continuously display
. Do not attempt to repair the alarm. This product should be
serviced by a qualified service technician. Follow the steps to deactivate the alarm, and
return the unit for warranty service to the appropriate address listed on the last page of
this Owner’s Manual.
To remove the alarm for service or disposal, unscrew the standard mounting screw
from the top center of the alarm, and slide the alarm up and off the mounting plate.
Insert a small flat-head screwdriver into the slot, lift up the deactivation Stop, and
slide the switch to the farthest left end to deactivate the alarm. The switch moves in
one direction only, and cannot be moved back. Once the alarm is deactivated, the
sealed lithium batteries will be discharged and the alarm will no longer work.
Insert a small flat-head screw
driver into the slot to lift up the
deactivation STOP
Lift up Stop
and slide
to left to
permanently deactivate CO Alarm when
END-OF-LIFE signals are initiated
To activate CO Alarm, slide the
alarm down onto mounting plate, or
slide
to STOP.
CO Concentration and Response Time
400ppm : 4- 15 minutes
(E) Alarm is activated and “ON” when switch is at STOP
and mounting hole is open
Mounting hole is closed when
switch is slid to Deactivate.
Lift up Stop
and slide
to left to
permanently deactivate CO Alarm when
END-OF-LIFE signals are initiated
To activate CO Alarm, slide the
alarm down onto mounting plate, or
slide
to STOP.
CO Concentration and Response Time
400ppm : 4- 15 minutes
(F)
Alarm is permanently deactivated when switch is moved to left past STOP
and mounting hole is closed.
- 16 -
15. FIVE-YEAR LIMITED WARRANTY
The Defender carbon monoxide alarms are manufactured in Canada under stringent
ISO 9001 quality management practices. The manufacturer warrants that, for a period
of five years from the date of purchase, this carbon monoxide alarm will be free from
defects in material and workmanship, and the factory sealed lithium batteries will power
the CO alarm for at least five years. The manufacturer, at its option, will repair or
replace this product or any component of the product found to be defective during the
warranty period. Replacement will be made with a new or re-manufactured product or
component.
If the product is no longer available, replacement may be made with a similar product of
equal or greater value. This warranty is valid for the original retail or end-user
purchaser from the date of initial purchase and is not transferable. Keep the original
sales receipt. Proof of purchase is required to obtain warranty service. Dealers, service
centers, or retail stores selling Defender products do not have the right to alter, modify
or in any way change the terms and conditions of this warranty.
This warranty does not cover normal wear of parts or damage resulting from any of the
following: negligent use or misuse of the product, use contrary to the operating
instructions, disassembly, or repair or alteration by anyone other than the manufacturer
or an authorized service center. Further, the warranty does not cover acts of God, such
as fire, flood, hurricanes and tornadoes.
The manufacturer shall not be liable for any incidental or consequential damages
caused by the breach of any express or implied warranty. Except to the extent
prohibited by applicable law, any implied warranty of merchantability or fitness for a
particular purpose is limited in duration to the duration of the above warranty. Some
states, provinces, or jurisdictions do not allow the exclusion or limitation of incidental or
consequential damages or limitations on how long an implied warranty lasts, so the
above limitations or exclusion may not apply to you. This warranty gives you specific
legal rights, and you may also have other rights that vary from state to state, or province
to province.
Warranty Service:
If service is required, do not return the product to your retailer. Contact Customer
Service at (800) 253-1529, Monday through Friday, from 7 AM to 4 PM PST. To assist
in serving you, please have the model number, date of purchase, and manufacturing
date available when calling.
For Warranty Service, please obtain a Return Authorization (RA) number, deactivate the
alarm per the instructions in Section 14, and mail the alarm to our U.S. representative:
Defender Detectors Inc., P.O. Box 60177, Reno, NV 89506
For Warranty Service return to:
To return this product for service, pack carefully in a padded container. Ship prepaid
along with your original sales receipt, an explanation of the problem and your return
address to:
Defender Detectors Inc.
P.O. Box 60177
Reno, NV 89506
(800) 253-1529
www.defenderdetectors.com
- 17 -