1
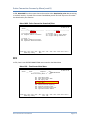
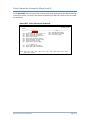
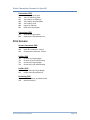
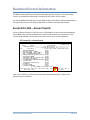
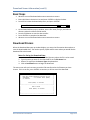
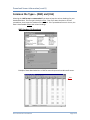
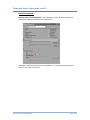
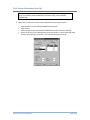
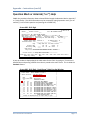
Entire Connection User Manual Version 2.2 February 2011 FAMIS Services The Texas A&M University System 2011 The Texas A&M University System – All Rights Reserved Entire Connection User Manual Page I-2 Introduction ENTIRE CONNECTION for Windows is used by the Texas A&M University System (TAMUS) to provide report printing and downloading capabilities from on-line Natural applications, such as the Financial Accounting Management Information System (FAMIS). ENTIRE CONNECTION offers users the following features: Data Download / Print Using ENTIRE CONNECTION, the user can download and print financial information from FAMIS. 3270 Terminal Emulation The emulation features of ENTIRE CONNECTION may be used to access any application that uses the IBM 3270 method for screen display. Therefore this product could be used to access TAMU Resources such as FAMIS, SIMS, NOTIS, or ACCESS. However, only the connection to FAMIS will be covered in this manual. Why Entire Connection? ENTIRE CONNECTION has been chosen because of its capability to work the NATURAL, the programming language used to write FAMIS and because it uses NATURAL security. For purchase and additional information, contact: Software Evaluation and Licensing Library (SELL) (979) 862-4104 E-Mail: [email protected] Entire Connection User Manual Page I-3 Table of Contents PAGE I Introduction II Moving Around Entire Connection III Entire Connection Screens by Menu .............................................. III‐3 Entire Connection Screens List ....................................................... III‐7 Download Screen Information ....................................................... III‐9 Print Screen Information ................................................................ III‐18 Purchase / Installation Notes V Open Entire Connection Session .................................................... II‐3 Terminal Emulation Features ......................................................... II‐3 Close Entire Connection Session .................................................... II‐4 FAMIS Menus / Screens IV Introduction to Entire Connection ................................................. I‐3 Basic Concepts ................................................................................ I‐5 Hardware/Software Requirements ................................................ IV‐3 Copyright and License Information ................................................ IV‐4 Support and Installation Assistance ............................................... IV‐6 Appendix Instructions ..................................................................................... V‐3 Standard PF Keys ............................................................................ V‐8 Glossary .......................................................................................... V‐10 Entire Connection User Manual Page I‐4 Basic Concepts – Entire Connection Entire Connection is a microcomputer product of Software AG that provides report printing and downloading capabilities from FAMIS. While Entire Connection has many features, it is not the primary choice for terminal emulation when using FAMIS. Hummingbird (a separate product available from the CIS at TAMU) is the software of choice for frequent use of FAMIS. Entire Connection is offered as an adjunct product as it does report printing to a local printer and downloads data more effectively. To give the complete picture, most FAMIS users logon to FAMIS using Hummingbird for terminal emulation. A select number of users will also want to have Entire Connection to augment the times that downloads and printing to a local printer is required. Features of Entire Connection include: 3270 Terminal Emulation to use FAMIS screens Data Download/Print from designated FAMIS screens. This manual details the FAMIS screens that are coded with the ability to download and/or print data from FAMIS using Entire Connection. Entire Connection User Manual Page I-5 Basic Concepts – Entire Connection (cont’d) Entire Connection User Manual Page I-6 Section II Moving Around Entire Connection Entire Connection User Manual Page II-2 Open and Close Entire Connection Session To establish communication with the host environment, the terminal emulation must be activated. This is done by performing the following instructions: 1. Choose Session from the ENTIRE CONNECTION menu bar. 2. Choose Open. The Terminal Emulation Screen will fill the application window. A sample of an active terminal emulation window is shown below: SYSTEM: IBM 2098 E10 - MVSA - z/OS 01.11.00 node: TAMT1701 TTTTTTTTTTTTTTTTTTTTTTTTTTT TTTTTTTTTTTTTTTTTTTTTTTTTTT TTT TTT TTT TTT AAAAA TTT M M AAAAAAA TTT MM MM AA AA TTT MMM MMM AA AA TTT MM MMM MM AAAAAAAAA TTT MM M MM AAAAAAAAA TTT MM MM AA AA TTT MM MM AA AA TTTTT MM MM AA AA TTTTT MM MM ******NOTICE******NOTICE******NOTICE****** This computer system and data herein are available only for authorized purposes by authorized users. Use for any other purpose may result in administrative/disciplinary actions or criminal prosecution against the user. Usage may be subject to security testing and monitoring. Applicable privacy laws establish the expectations of privacy. For additional information please see: http://cis.tamu.edu/security/tos/ TEXAS A & M UNIVERSITY STATEWIDE NETWORK ******NOTICE******NOTICE******NOTICE****** enter application or EXIT CLAIM, PHONBOOK, TSO, or WYLBUR 4AÛ 24,002 At this point you logon and use FAMIS functionality as you would from Hummingbird or any other terminal emulator that is properly configured. You should contact the training/security officer for your TAMUS Member if you need training with using FAMIS. A list of the Security Officers is available on the FAMIS Services website: http://www.tamus.edu/offices/famis/ Entire Connection User Manual Page II-3 Open and Close Entire Connection Session (cont’d) Quit Entire Connection To close your TPX / FAMIS Session, you should: 1. Choose Session from the ENTIRE CONNECTION menu bar. 2. Choose Close. To exit from Entire Connection, you should: 1. Choose Session from the ENTIRE CONNECTION menu bar. 2. Choose Exit. Entire Connection User Manual Page II-4 Section III FAMIS Entire Connection Menus / Screens Entire Connection User Manual Page III-2 Entire Connection Screens by Menu ENTIRE CONNECTION functionality is available in the FAMIS modules of FRS, SPR, and FFX. All FAMIS screens with Entire Connection functionality perform similarly. There may be different pop-up windows depending on the data that you are asking to print or download. FRS In FRS, the Main Menu directs you to two ENTIRE CONNECTION menus. Menu 001 - FRS Main Menu 001 FRS Main Menu Screen: ___ Account: ______ ____ 06/13/08 14:59 FY 2008 CC 02 FAMIS APPLICATION Active Processing Month: 6 June * ---- Financial Accounting ---- * * --------- Purchasing --------- * M01 Account Information M20 Purchasing System Menu M02 FA Transactions * ---- Routing and Approval ---- * M03 Inquiry - Dollar Information M90 Routing and Approval Menu M05 Support Accounting * ---------- Payroll ----------- * M07 Departmental Planning Budgets M70 Payroll System Menu M08 Entire Connection Download * ------- Other Menus ---------- * M09 Entire Connection Print M58 Budget Preparation Module M52 Departmental Budget Requests B01 Bulletin Board News Menu S01 FA/AP System Tables * ------ Accounts Payable ------ * S02 Miscellaneous Tables M10 Accounts Payable System Menu S03 Miscellaneous Tables Continued M21 Vendor Information Menu AFR Annual Financial Reporting FFX Fixed Assets Module * ----- Accounts Receivable ---- * GCP General Construction Projects M61 Accounts Receivable SPR Sponsored Research Module Enter-PF1---PF2---PF3---PF4---PF5---PF6---PF7---PF8---PF9---PF10--PF11--PF12--Hmenu Help EHelp Pers SOR Menu M08 displays the screens that provide DOWNLOAD capabilities. On each of the screens listed below you will find a PF key to use to initiate the download. Menu M08 - Entire Connection Download M08 Entire Connection Download 06/13/08 15:00 FY 2008 CC 02 Screen: ___ *------------* Accounts *-----------* 029 Account Search 068 Support Account Search 018 GL 6 Digit List 019 SL 6 Digit List W Category Totals 069 SA 11 Digit List W Category Total *---------* Transactions *----------* 023 Trans Inquiry by Account 046 Trans for Month By Refer. 047 Trans Inquiry on Reference 048 Trans Inquiry Acct/Sbcd/Mon 063 Trans Inquiry by SA 080 Inquiry by Subcode 081 Detail Trans by Subcode *-------------* Batch *-------------* 027 FA Trans Inquiry by Batch 127 AP Trans Inquiry by Batch 627 AR Trans Inquiry by Batch *--------------* Flags *------------* 805 Maintain GL Control Description 806 Maintain SL Subcode Description 860 Department Table Maintenance Enter-PF1---PF2---PF3---PF4---PF5---PF6---PF7---PF8---PF9---PF10--PF11--PF12--Hmenu Help EHelp Entire Connection User Manual Page III-3 Entire Connection Screens by Menu (cont’d) Menu M09 displays screens that can be used to PRINT the desired data. On each of the screens listed below you will find a PF key to use to initiate the download. Menu M09 - Entire Connection Print M09 Entire Connection Print 06/13/08 15:00 FY 2008 CC 02 Screen: ___ *-------* Account Statements *------* 018 GL 6 Digit List 049 Detail Acct Statement - Month 079 SA Detail Acct Statement - Month *------------* 721 SL Summ by 722 SL Summ by 731 SA Summ by 732 SA Summ by *----------* Purchasing *-----------* 276 Document Inquiry w/Paid Amounts 278 Document Inquiry Profiles *-----------* Target Budget User Defined Categ. Target Budget User Defined Categ. Enter-PF1---PF2---PF3---PF4---PF5---PF6---PF7---PF8---PF9---PF10--PF11--PF12--Hmenu Help EHelp SPR In SPR, there is one ENTIRE CONNECTION menu noted on the Main Menu Menu 001 – SPR Main Menu Screen 001 SPR Main Menu Screen 06/13/08 15:00 FY 2008 CC 02 Screen: ___ M01 M02 M03 Sponsor and Researcher Menu Proposal Maintenance Menu Proposal Inquiry Menu M06 Entire Connection Download/Print M10 M11 M12 M13 Project / Proposal Transfer Menu Project Maintenance Menu Project Inquiry Menu Cost Sharing Menu S01 S02 SPR System Table Menu Batch Submission Menu AFR FFX FRS GCP Annual Financial Reporting Fixed Assets Module Financial Records System General Construction Projects Enter-PF1---PF2---PF3---PF4---PF5---PF6---PF7---PF8---PF9---PF10--PF11--PF12--Hmenu Help EHelp Next Pers SOR Entire Connection User Manual Page III-4 Entire Connection Screens by Menu (cont’d) In SPR, Menu M06 lists the screens that can be used to either download or print data pertaining to research activity. On each of the screens listed below you will find a PF key to use to initiate the download or print function. Menu M06 - Entire Connection Download/Print M06 Entire Connection Download/Print 06/13/08 15:01 FY 2008 CC 02 Screen: ___ *-----------* DOWNLOAD *-----------* *-------------* PRINT *-------------* *** Projects/Proposals *** 011 Proposal General Information *** Profiles *** 161 Project Summ By Target Budget 162 Project Summ By Defined Cat. *** Tables *** 804 Federal Domestic Assistance 860 Department Table Maintenance Enter-PF1---PF2---PF3---PF4---PF5---PF6---PF7---PF8---PF9---PF10--PF11--PF12--Hmenu Help EHelp Next FFX In FFX, there is one ENTIRE CONNECTION menu noted on the Main Menu Menu 001 – Fixed Assets Main Menu 001 Fixed Assets Main Menu 06/13/08 15:01 FY 2008 CC 02 Screen: ___ Asset: __________ Component: __ Seq: _____ FAMIS FFX MODULE Active Processing Month: 6 June M51 M52 M53 M55 S01 Fixed Assets Menu Asset Transactions Menu FFX Inquiry Menu Entire Connection Download/Print Table Menu AFR FRS GCP SPR Annual Financial Reporting Financial Records System General Construction Projects Sponsored Research Module Enter-PF1---PF2---PF3---PF4---PF5---PF6---PF7---PF8---PF9---PF10--PF11--PF12--Hmenu Help EHelp Pers SOR Entire Connection User Manual Page III-5 Entire Connection Screens by Menu (cont’d) In FFX, Menu M55 lists the screens that can be used to either download or print data pertaining to inventory activity. On each of the screens listed below you will find a PF key to use to initiate the download. Menu M55 - Entire Connection Download M55 Entire Connection Download 06/13/08 15:02 FY 2008 CC 02 Screen: ___ *-------------* Download *------------* *** Assets *** 532 Asset Search By Dept & Class Cd 534 Asset Search By Department 547 Sequence Search by Purch Acct 581 Class Table Display 582 Capitalization Rules Display 583 Acq/Disp Method Controls Disp. 584 Inflation Codes Display 585 Depreciation Rules Display 537 860 *---------* Other *---------* M51 FFX Add/Update Menu M52 FFX Transaction Menu M53 FFX Inquiry Menu *** Tables *** Asset Search by Attribute Department Table Maintenance Enter-PF1---PF2---PF3---PF4---PF5---PF6---PF7---PF8---PF9---PF10--PF11--PF12--Hmenu Help EHelp Entire Connection User Manual Page III-6 Entire Connection Screens List Download Screens Accounts (FRS) 029 068 018 019 069 Account Search Support Account Search GL 6 Digit List SL 6 Digit List W Category Totals SA 11 Digit List W Category Total Assets (FFX) 532 534 547 581 582 583 584 585 Asset Search By Dept & Class Cd Asset Search By Department Sequence Search by Purch Acct Class Table Display Capitalization Rules Display Acq/Disp Method Controls Disp. Inflation Codes Display Depreciation Rules Display Batch (FRS) 027 127 627 FA Trans Inquiry by Batch AP Trans Inquiry by Batch AR Trans Inquiry by Batch Flags (FRS) 805 806 860 Maintain GL Control Description Maintain SL Subcode Description Department Table Maintenance Projects/Proposals (SPR) 011 Proposal General Information Tables (FFX) 537 860 Asset Search by Attribute Department Table Maintenance Tables (SPR) 804 860 Federal Domestic Assistance Department Table Maintenance Entire Connection User Manual Page III-7 Entire Connection Screens List (cont’d) Transactions (FRS) 023 046 047 048 063 080 081 Trans Inquiry by Account Trans for Month By Refer. Trans Inquiry on Reference Trans Inquiry Acct/Sbcd/Mon Trans Inquiry by SA Inquiry by Subcode Detail Trans by Subcode Transactions (FFX) 537 860 Asset Search by Attribute Department Table Maintenance Print Screens Account Statements (FRS) 018 049 079 GL 6 Digit List Detail Acct Statement - Month SA Detail Acct Statement - Month Profiles (FRS) 721 722 731 732 SL Summ by Target Budget SL Summ by User Defined Categ. SA Summ by Target Budget SA Summ by User Defined Categ. Profiles (SPR) 161 162 Project Summ By Target Budget Project Summ By Defined Cat. Purchasing (FRS) 276 278 Document Inquiry w/ Paid Amounts Document Inquiry Entire Connection User Manual Page III-8 Download Screen Information All FAMIS screens with Entire Connection functionality perform similarly. You can see which screens are available with download in the Menu/Screen section of this manual. For each available download, there may be different pop-up windows that display depending on the type of data that you are asking to download. A couple of examples will illustrate. Screen 29 in FRS – Account Search Screen 29 (Account Search) is the first screen in FRS listed on the Entire Connection download menu (M08). Note that PF9 is labeled with “Dload” which means you use that key for Entire Connection downloads. The PF9 key on the screen is the F9 key on most keyboards. FRS Screen 29 – Account Search 029 Account Search 02/05/08 13:31 FY 2008 CC AM Screen: ___ Account: ______ ____ Title Search: ____________________ Dept/SDept Search: _____ _____ Resp Person Search: ____________________ Include Deleted Accts: N Sel Description Account Dept SDept Responsible Person _ TAMU TRAINING BANK B00001 _ FAB LOCAL FUNDS - DEMAND B00060 _ TAMU INVESTMENT - MONEY MARKET B00401 _ TAMU - CONCENTRATION ACCOUNT B00601 _ FEDERAL FUNDS-NSF LETTER OF CREDIT B01006 _ LOCAL FUNDS DEMAND B01060 _ TAMU DIRECT DEPOSIT 56 LOCAL FUNDS B01065 _ CCA-GRAPHIC ART SERVICES B01100 _ CCA-VETERINARY CONTINUING EDUCATION B01101 _ CCA-TAMU PRESS B01102 _ CCA-ATHLETIC TICKET OFFICE B01103 _ CCA-KAMU TV B01104 _ CCA-GOLF COURSE B01105 _ CCA-PARKING PERMITS B01106 *** Press ENTER To View More Accounts *** Enter-PF1---PF2---PF3---PF4---PF5---PF6---PF7---PF8---PF9---PF10--PF11--PF12--Hmenu Help EHelp Dload Left Right Each screen listed on the Entire Connection menus displays the PF9 key to indicate the download or print capability. Entire Connection User Manual Page III-9 Download Screen Information (cont’d) Warning Screen Displays When you press the PF9 key to activate a download or print, a pop-up window displays letting you know that you must be logged in using Entire Connection for the functionality to work properly. If you are logged in using Entire Connection, press <Enter> otherwise press PF4 to cancel the action. Example from Screen 29 in FRS – Account Search +------------------------------------------------------+ | | | This feature is only available with Entire | | Connection. If you are not currently running | | Entire Connection, press PF4 to cancel this | | request or press (Enter) to continue. | | | | PF4 to Cancel | | | | Press (Enter) to continue | | | +------------------------------------------------------+ Pop-up Windows for Criteria Each FAMIS screen contains different data to be printed or downloaded, so each may have a different pop-up window that allows you to enter the criteria that you need. In this example using Screen 29, the pop-up window allows you to enter a range of accounts. You will notice that the maximum for this download is 1000 accounts, so you may need to give various ranges to get the complete set of data you wish to retrieve. Example from Screen 29 in FRS – Account Search +----------------------------------------------------+ | | | Enter a range of accounts to process or use | | the default values that are shown. Maximum | | range is now set for 1000 accounts. Press | | PF4 to cancel this request or press (Enter) | | to continue. | | | | From Account: ______ | | To Account: ______ | | | | PF4 to Cancel | | | | Press (Enter) to continue | | | | | +----------------------------------------------------+ Entire Connection User Manual Page III-10 Download Screen Information (cont’d) Pop-up Window for Expected Results In this example, the desired account range contains 163 records. This window calculates the number of records and displays the total for you. To proceed, press the <Enter> key or to press the PF4 key to cancel. Example from Screen 29 in FRS – Account Search +----------------------------------------------------+ | | | With the current parameters you have set you | | will try to download 163 records. | | To cancel this request press PF4 or press | | (Enter) to continue. | | | | PF4 to Cancel | | | | Press (Enter) to continue | | | +----------------------------------------------------+ Screen 46 in FRS – Transaction Inquiry by Account Note that Screens 23, 46, 47, and 48 download accounting transactions. These screens display transactions in several different formats. However, the information downloaded from these screens is identical, regardless of which screen is used. FRS Screen 46 – Transactions for a Month by Reference Number 2 or 4 046 Transactions for a Month by Reference Number 2 or 4 02/05/08 10:49 SHUTTLE BUS OPERATIONS FY 2008 CC AM Screen: ___ Account: 300920 Month: 1_ Search On Ref: 2 Ref Nbr: _______ Display Ref: 2 Bank Option: N Sbcd TC Ref 2 Date Description Amount I BatRef Offset Acct ---- --- ------- ----- ------------------ --------------- - ------ ----------5511 061 W700208 12/01 MAINTENANCE 55,188.48 FITR01 270620 0496 5511 061 W700208 12/01 VEHICLE DETAILING 130.00 FITR01 270620 5511 5840 061 W700208 12/01 PERM VEHICLE RENTA 5,175.00 FITR01 270620 0435 4030 061 W700208 12/01 TSC FUEL 91,591.82 FITR01 270620 0499 5840 061 W700209 12/01 DAILY VEHICLE RENT 1,416.00 FITR01 270620 0435 5511 061 W700209 12/01 MAINTENANCE 13,757.75 FITR01 270620 0496 5511 061 W700209 12/01 VEHICLE DETAILING 10.00 FITR01 270620 5511 4030 061 W700209 12/01 TSC FUEL 10,391.59 FITR01 270620 0499 5511 061 W701171 01/01 VEHICLE DETAILING 120.00 FITR01 270620 5511 5511 061 W701171 01/01 MAINTENANCE 46,708.72 FITR01 270620 0496 4030 061 W701171 01/01 TSC FUEL 46,129.67 FITR01 270620 0499 5840 061 W701171 01/01 PERM VEHICLE RENTA 5,175.00 FITR01 270620 0435 5840 061 W701172 01/01 DAILY VEHICLE RENT 60.00 FITR01 270620 0435 5511 061 W701172 01/01 MAINTENANCE 3,625.49 FITR01 270620 0496 * Continued * Enter-PF1---PF2---PF3---PF4---PF5---PF6---PF7---PF8---PF9---PF10--PF11--PF12--Hmenu Help EHelp View DLoad Left Right Entire Connection User Manual Page III-11 Download Screen Information (cont’d) Basic Steps • • • Advance to one of the download account transactions screens. Enter valid data in the Action Line and press <ENTER> to display the data. Press PF9 to initiate the download process, and press <ENTER>. Some of the Entire Connection Download screens use Dload key as PF8. • • • • On the Download Data pop-up window, enter a file name, file type, and select a directory where the data should be saved. Press the OK button to start the data transfer. Press <ENTER> to complete the download. Advance to one of the download account transactions screens. Download Process When the Download Data pop up window displays, you enter the information about where to save the downloaded data. You need to specify a path and file name where you would like the download file to be located. Notes for Saving the Download Data: 1. 2. 3. 4. In the Save In: find and choose the folder/directory where the file is to be saved. Type the name you want for the download file in the File Name: box. Select a file type from the Save as Type: drop down box. Click on Download button to begin the download. The next screen tells you how many records will be transferred to the filename you have chosen. If this is correct, press <ENTER> to continue, or PF4 to cancel the download. +----------------------------------------------------+ | | | With the current parameters you have set you | | downloaded 23 records. Press (Enter) | | to continue. | | | | | | Press (Enter) to continue | | | +----------------------------------------------------+ | PF4 to Cancel | | | | Press (Enter) to continue | | | | | | | +----------------------------------------------------+ Entire Connection User Manual Page III-12 Download Screen Information (cont’d) Common File Types – (DBF) and (XLS) Selecting the .DBF format is recommended if you want to keep the column headings for your downloaded data. This file type includes the titles. Then if you want the titles in an Excel spreadsheet, then import the database file into Excel. If the spreadsheet format is chosen, the data is downloaded without the column headings. (DBF) Database File Download: Example of data downloaded into a .DBF format and imported into Microsoft Access: Titles Entire Connection User Manual Page III-13 Download Screen Information (cont’d) Excel File Download: Note the bullet “Excel application” - by choosing this bullet, the download process opens Excel and displays the data in the application. Excel opens and places the data in the spreadsheet. You can then manipulate it and save it as you normally use Excel. Entire Connection User Manual Page III-14 Download Screen Information (cont’d) The .NCF File Each download creates two files: the one you name with the extension (.dbf or .xls) and an .NCF file. The .NCF file is created in the same directory as your downloaded data file. For example, if you download screen29.dbf, ENTIRE CONNECTION will create screen29.ncf describing the download. The .NCF file contains information about the download procedures, including the name of the file download file, the date and time of the download, and the download status. The following shows a partial example of an .NCF file: File name: C:\MYDOCU~1\DOWNLOAD\TEST.DBF Status : Terminated Successfully Start : 06/24/99 16:19:35 End : 06/24/99 16:19:37 Basic information Records : 24 Userid : XXX999 about the download Library : IAFRS Program : FNSPDNTR Buffers : 3 Globals : .,= Format : N04.0A02A06A05A04A06A05A04A06N08.0A03A23R07A07A05A02A0BR03P0B.2 Names : DOWNLOAD-FILE.FISCAL_YY Column headings DOWNLOAD-FILE.CAMPUS_CD in column order DOWNLOAD-FILE.ACCOUNT_6 Download Field Descriptions Using Screen 23 as an example of data downloaded through ENTIRE CONNECTION, the following shows a list of fields created using the .DBF file format. As you can see, the column headers on the download file closely match the field names on the screen. So if you see a column header that you don’t recognize, check the screen that is the origin of the data. You should be able to match the field and header. Selecting this format type will create the titles shown in the column on the right. For example: Fiscal Year: 4 digits Indicates the fiscal year of the selected transaction. Campus Code: 2 digits Identifies the TAMUS member that owns the account. CAMPUS_CD Account: 6 digits Identifies the account number. ACCOUNT_6 Support Account: 5 digits Identifies the Support Account number selected. Entire Connection User Manual FISCAL_YY SUPP_ACCT Page III-15 Download Screen Information (cont’d) Subcode: 4 digits If the account downloaded is a GL account, this field will contain the GL Account Control. If the account is an SL account, this field will contain the revenue or expense Object Code. SUBCODE 6-Digit Offset Account: 6 digits Identifies the offsetting account for direct double-sided transactions. OFFSET_6 Offset Support Account: 5 digits Identifies the offsetting support account for direct double-sided transactions. Offset Subcode: 4 digits Identifies the offsetting subcode for direct double-sided transactions. Batch Reference: 6 characters/digits Identifies the batch reference used to enter the transaction. Batch Date: 8 digits (yyyymmdd) Identifies the date the batch was processed. This is the official accounting effective date. Transaction Code: 3 digits Specifies code for transaction as budget, receipt, disbursement, or encumbrance. For example: 02 = Budget Transactions 03 = Receipts 04 = Disbursements 06 = Journal Entries TRANS_CODE Transaction Description: 35 characters Detailed description for the transaction. TRANS_DESC Reference 1: 7 characters/digits System defined reference number used primarily to reference an encumbrance. Examples include: Purchase Order numbers and salary encumbrances. REF_1 Reference 2: 7 characters/digits System defined reference number. Refers to the originating document. Examples include: Voucher Number. REF_2 Reference 3: 7 characters/digits System defined reference number. Usually blank. REF_3 Entire Connection User Manual OFFSET_SA OFFSET_4 BATCH_REF BATCH_DT Page III-16 Download Screen Information (cont’d) Reference 4: 7 characters/digits User defined reference number (usually the departmental reference number). Cost Reference 1: 7 characters/digits User defined reference number. COST_REF_1 Cost Reference 2: 7 characters/digits User defined reference number. COST_REF_2 Cost Reference 3: 7 characters/digits User defined reference number. COST_REF_3 Bank Number: 5 digits Identifies the bank used on the transaction. Processing Month: 2 digits Shows the month of the fiscal year in which the transaction was processed. For example: September = 01, January = 05. Vendor ID: 11 digits Identifies the vendor associated with the transaction. Budget Amount: 13 digits (11 digits + 2 decimal places) The amount this transaction changes the budget for the account. BUDGET Actual Amount: 13 digits (11 digits + 2 decimal places) The actual amount this transaction changed revenue (object codes <1000) or expense (object codes >1000). ACTUAL Encumbrance Amount: 13 digits (11 digits + 2 decimal places) The amount this transaction changed the currently encumbered amount for this account. Entire Connection User Manual REF_4 BANK_NBR PROCESS_MM VENDOR_ID ENCUMB Page III-17 Print Screen Information Screen information can also be printed on your local printer using ENTIRE CONNECTION. Screens on Menu M09 provide print capability using ENTIRE CONNECTION. Note that while logged into FAMIS through ENTIRE CONNECTION, you may not use “print screen” button on your keyboard. The PF9 key (on most keyboards) has been designated as the key to use for Entire Connection Print capability. In the following example, Screen 49 is used to display the transactions posted against a Subsidiary Ledger (SL) account in any given month. Screen 49 - Detail Account Statement for a Month 49 Detail Account Statement For A Month 02/15/08 09:22 IMAGE ANALYSIS SERVICE CENTER FY 2008 CC 02 Screen: ___ Account: 271060 Month: 9_ Ref: 4 Rev/Exp: E Page: 1__ Of 2 Sales or Date Description Ref 4 Budget Expenses Encumbrances ----- ------------------- ------- -------------- -------------- -------------09/01 Balance Forward 09/01 09/24 09/24 09/01 09/24 09/01 09/01 09/01 09/01 09/26 09/26 09/26 OPER & MAINT 70,000.00 Transportation Serv 50.00 SPECTRA-PHYSICS LAS 11025 9,500.00CARL ZEISS MICROIMA 17999 19,350.00 CARL ZEISS MICROIMA 17999 19,350.00PRAXAIR-Liquid nitr 3366149 64.81PRAXAIR-Liquid Nitr 3366149 64.81IVG*INV-Dye for Ima 0733898 692.00EMD CHE-nonhazardou 0733898 131.00PRAXAIR-Liquid nitr 3366149 64.81 PRAXAIR-Liquid Nitr 3366149 64.81 IVG*INV-Dye for Ima 0733898 692.00 * Continued on next page * Enter-PF1---PF2---PF3---PF4---PF5---PF6---PF7---PF8---PF9---PF10--PF11--PF12--Hmenu Help EHelp Bkwd Fwrd Print Left Right The account statement is either a revenue or expense statement, depending on the value of the Rev/Exp: flag. To get both revenue and expense statements, enter “R” or “E” and print once for each type. Basic Steps • • • • • Advance to Screen 49. Enter a valid account number and press <ENTER> to display account information. To properly print the data, you may need to make selections: o Select the printer to be used for printing the report. o Paper orientation should be LANDSCAPE. o Select a fixed pitch font such as LINE PRINTER or COURIER NEW and 8 points or smaller to accommodate 132 characters across the width of the page. Press PF9 to print. Type ‘X’ beside your choice for the report (Detail, Summary or Open Commitment) and press <ENTER>. Entire Connection User Manual Page III-18 Print Screen Information (cont’d) Screen 49 - Account Statement with Print - Pop-Up Window +----------------------------------------------------+ ! ! ! This feature is only available with Entire ! ! Connection. If you are not currently running ! ! Entire Connection, press PF12 to cancel the ! ! request. ! ! ! ! Select Report(s) to DownLoad with an 'X' ! ! ! ! Detail _ ! ! Summary _ ! ! Open Commitment _ ! ! PF12 to Cancel ! ! ! +----------------------------------------------------+ The requested data will print to the printer. Printer Setup Before using ENTIRE CONNECTION to print account information from FAMIS screens, certain settings must be made to print the data properly on your printer. These selections need to accommodate printing 132 characters across the width of the page. Print Manager or Printer Settings For assistance with your printer settings, contact your computer administrator. These items may or may not be helpful to the current set up. 1. Following the directions for your particular printer and computer's operating system, select LANDSCAPE orientation: Entire Connection User Manual Page III-19 Print Screen Information (cont’d) After you have printed the selected report(s), don't forget to change your printer's orientation back to PORTRAIT orientation after you exit ENTIRE CONNECTION. 2. Make sure a fixed pitch font has been selected before printing the report. • • • • Select Profiler from the ENTIRE CONNECTION menu bar. Click on User Select the User ID for your ENTIRE CONNECTION session and click on Modify Select the Printer Fonts tab and select either LinePrinter or Courier New and make sure the size is 8 points or smaller. Click on OK to save these settings. Entire Connection User Manual Page III-20 Section IV Purchase and Installation Notes Entire Connection User Manual Page IV-2 Hardware/Software Requirements ENTIRE CONNECTION is a product of Software AG. The Texas A&M University System has established a license agreement with Software AG of North America, Inc. for use of ENTIRE CONNECTION on TAMUS computers. Under the terms of that agreement, TAMUS must pay Software AG for each copy we use. TAMUS also agrees to provide its own technical support. In order to use Entire Connection, each TAMUS Member must have an installation coordinator who is responsible for software installation, license tracking and support. Purchase Information Entire Connection is available through the TAMU CIS Software Evaluation and Loan Library (SELL) office at $50 for each copy/user. You only need to send the number of CDs that are needed to perform the installation. The same CD can be used for multiple installations. It is available for Windows only. To order a licensed copy of Entire Connection software, go to the following web site: http://cis.tamu.edu/customer-sales/sell/entire.php • • • Click on the Order Forms for Purchases link on the left side of the web page. Click on the Departmental Order Form link and fill out the web form with the required information: o Name/department/phone/building and room o Type of PC and operating system o Type of network connection o Account number to be charged and signature of person with authority for that account o Whether you want to install it yourself or take advantage of CIS installation services. NOTE: The installation can be very tricky, so the added installation service fee of $50 (for College Station users only) is usually worth it. Print the form and mail it with blank CD(s) to: Texas A&M University Software Evaluation and Licensing Library, Room 1105 Mail Stop 3363 College Station, TX 77843-3363 Phone: E-Mail: (979) 862-4104 [email protected] The form can also be delivered to Room 1105 of the Computing Services Center, sent to Mail Stop 3363, or faxed to (979) 845-2074. Entire Connection User Manual Page IV-3 Hardware/Software Requirements (cont’d) Notification of Copyright ENTIRE CONNECTION (“Software”) is a proprietary product of Software AG and is protected by copyright laws and international treaty. You must treat the Software like any other copyrighted material, except that you may either make one copy of the Software either for backup or archival purposes, or you may place the Software on a single hard disk provided that you keep the original Software solely for backup or archival purposes. Copyright laws prohibit making additional copies of the Software for any other reason. License Information 1. Software AG grants you the right to use one copy of the Software on a single-user computer, or on a workstation of a multi-user computer or local area network. Each workstation on a multi-user computer or a local area network must have a valid license from Software AG. 2. You may not sublicense, rent, lease or otherwise convey the right to use the Software; any attempt to do so (whether or not successful) terminates this license to use the Software without any refund of any fees paid. 3. Software AG further grants you the right to make a backup/archival copy of the software diskettes as set forth in the Notification of Copyright above. You may not decompile, disassemble, reverse engineer, copy, transfer, or otherwise use the Software except as stated in this agreement. Documentation Information Full online documentation is available with the software: http://www.softwareag.com/corporate/products/natural_2010/default.asp Entire Connection User Manual Page IV-4 Hardware/Software Requirements (cont’d) The following information is taken from Version 4.4.1 of ENTIRE CONNECTION. Hardware Requirements PC Type: Disk Space: Any PC capable of running Microsoft Windows. Approximately 20 MB of free disk space. During installation, additional 40 MB are required in the Temp directory. Supported Communication Methods At least one of the following PC-to-host communications boards or modes: TN3270(E) Telnet VTxxx BS2000 BS2000 TCP/IP HLLAPI Serial, SAG-NPA Serial, VTxxx Microsoft SNA Server VT100 Protocol Converter BS2000 hardware Entire Connection User Manual Page IV-5 Support and Installation Assistance Technical Support and Installation For technical support or help with installation settings, please contact: Software Evaluation and Licensing Library (SELL) (979) 862‐4104 E‐Mail: [email protected] You should refer to the full documentation to complete installation tasks. Using Entire Connection with FAMIS If you need help using ENTIRE CONNECTION with FAMIS, call: FAMIS Hotline (979) 458‐6464 Entire Connection User Manual Page IV‐6 Section V Appendix Entire Connection User Manual Page V-2 Instructions Listed below are general instructions that will make your job easier as you use FAMIS to input or view document information. Please become familiar with the information in this reference as it can make your navigation in FAMIS more efficient. 3270 Emulation Keys Special keys and key combinations must be used when working with FAMIS. These keys are known as 3270 emulation keys and may be defined differently by each 3270 terminal or PC emulation software that you are using. Contact your computer support person if you do not know how to identify the following keys on your computer. PF Keys When a key is listed as PFn , PF represents Program Function. Many PCs use the function keys labeled Fn for these PF keys. Others have special combinations of keys to represent the PF keys, for example, on a Memorex emulation, a combination of the ALT key and the number 1 will represent the PF1 key. At the bottom of the FAMIS screens, there are PF keys listed that can assist in the use of the screen. For example, on Screen 104, Voucher Create, the bottom of the screen shows the PF7 with the word ‘Bkwd’ under it. This means that by pressing the PF7 key, the screen listing will scroll backwards. TAB and BACKTAB Keys Use the TAB and BACKTAB keys on a 3270 terminal to move from field to field. This will position the cursor at the start of each field. Most PCs have a key labeled TAB, while the BACKTAB is a combination of the SHIFT/TAB keys. Using the arrow keys, instead of the TAB keys, to move around the screen may lock the computer keyboard. Use the RESET key, then the TAB key, to position the cursor and unlock the keyboard. CLEAR Key The CLEAR key on many PC keyboards is the PAUSE key. This key is often used to clear, or refresh, the screen before typing. RESET Key After pressing <ENTER> to process data information, note the status bar at the bottom of the screen. When the system is processing information, the symbol "X ( )" or will appear. You cannot enter additional information until the system is finished processing. If any other symbols appear, press your RESET key -- often the ESCAPE key on a PC. Entire Connection User Manual Page V-3 Appendix – Instructions (cont’d) ERASE END OF FIELD Key To erase all the information in a field with one stroke, the ERASE EOF key on a 3270 keyboard is helpful. For example, a vendor name is held in context when moving from screen to screen. To change to a different vendor, use this key and the current vendor name in the Action Line will be removed. Now the new vendor name can be input. On most PCs, the correct key to use is the END key on the numeric keypad. HOME Key From anywhere on the screen, the most efficient way to take the cursor back to the Screen: field on the Action Line is by pressing certain keys. For the 3270 terminals, the correct combination is the ALT/RULE keys. On most PCs, the HOME key on the numeric keypad will work. Protected Area The Protected Area is the area of the screen that will not allow the user to enter information. Typing information in the protected area may freeze the screen. Use your reset key and then tab key to release your system when it freezes. Action Line/Context The Action Line is usually the first line of information on each screen. The Screen: field is used to navigate from screen to screen by entering the number of the screen desired. Fields such as screen, vendor, voucher number, account, etc. are often found on the Action Line. Data that is entered on the Action Line will be carried in ‘context’ from screen to screen until changed. For example, the GL account number 032365 is entered on the Action Line of the screen below. That account will be carried in ‘context’ until the user keys a different account in the field. The <ENTER> key must be pressed after entering Action Line data. If a user does not follow this step, all information entered on the screen may be lost and must be re-entered. After pressing <ENTER>, a message will be given at the top of the screen asking for modifications or providing further processing instructions. F0002 Record has been successfully added 002 GL 6 Digit Screen: ___ Account: 032365 ____ 03/03/94 14:56 FY 1994 CC AA NAVSO, INC. Account Title: NAVSO, INC.________________________ Entire Connection User Manual Page V-4 Appendix – Instructions (cont’d) Message Line The line above the Action Line is used to display messages to the user. These messages may be error messages or processing messages, such as the one below. F6537 Please enter a valid six digit GL account 002 GL 6 Digit 01/20/92 11:26 Scrolling Through Data Pressing the <ENTER> key will scroll through information listed on a screen. On some screens, there are PF keys to use to scroll forward, backward, left and right. These PF keys are displayed at the bottom on the screens with that function. Help HELP functions are available for many screen fields in FAMIS. Placing a "?" in the blank beside the desired field and hitting <ENTER> will access a pop-up window with specified field information. Another way is to place your cursor in the desired field and press the F2 key. To get out of the HELP function, either select a value and press <ENTER> or hit the PF4 key. The distinction on which key to use will normally be designated in the pop-up window (EX: PF4 = Exit). Escaping from a Pop-Up Window When in a pop-up window, pressing PF4 will usually take you back to the original screen. There are a few screens when pressing <ENTER> will take you back to the original screen. Entire Connection User Manual Page V-5 Appendix – Instructions (cont’d) Field Help Using the F2 Program Function Key On selected fields, additional information can be displayed using the PF2 key. This HELP information is accessed by moving the cursor to the field in question and pressing the F2 Key. For example, place the cursor in the Year-end Process: field and press PF2. The first screen displayed explains the purpose of the field. Sometimes you will be shown the values immediately, without a definition or explanation. Screen 002 - GL 6 Digit 002 GL 6 Digit Screen: ___ Account: 014000 ____ 06/30/99 10:09 FY 1999 CC AM MEDICINE Account Title: MEDICINE___________________________ Resp Person: _________ Old Acct: 0284___________ Year-end Process: F Reclassify: _ Reporting Group: __ Aux Code: ___ AFR Fund Group: 10 Fund Group: FG Sub Fund Group: Sub-Sub: __ Flag to indicate what action to take with balance at year end. From the definition screen, press <ENTER> to view the valid values for the field. +------------------------------------------------------------------+ | | | *** D I C T I O N A R Y - H E L P *** | | | | VALUES MEANING | | -------------------------------- ----------------------------- | | F Fiscal Year | | P Project Year | | E Encumbrance Only (SL's only) | | T Transfer BBA (SL's Only) | | D BBA to Different account (SL) | | | | | | | | | | | | Rule : IAFRS-FG-FS-YY-END-PROC Default value is: | | View : IAFRS-GENERAL-SUBSIDIARY-LEDGER | | Field: FG-FS-YY-END-PROC | | | | PF1=Menu PF4=Exit | +------------------------------------------------------------------+ Entire Connection User Manual Page V-6 Appendix – Instructions (cont’d) Question Mark or Asterisk (? or *) Help FAMIS also provides information about selected fields through the Question Mark or Asterisk (? or *) Help facility. This HELP information may be accessed by typing a question mark (?) or an asterisk (*) in the field in question and pressing the <ENTER> key. Screen 002 - GL 6 Digit 002 GL 6 Digit Screen: ___ Account: 010100 ____ 02/16/04 10:12 FY 2004 CC 02 ED & GEN INCOME-TUITION Account Title: ED & GEN INCOME-TUITION____________ Resp Person: 4uuuuuuuu0 MASON, MOLLY M Old Acct: NA_____________ Year-end Process: F Reclassify: _ Reporting Group: __ Aux Code: ___ AFR Fund Group: ? Fund Group: FG Sub Fund Group: Sub-Sub: __ Function: __ Default Bank: 03000 Override: Y SL Mapped Count: 18 Alternate Banks: ***** _____ _____ _____ _____ Security: ______ Dept Primary: REV__ Secondary: VTEA_ S-Dept Exec Div _____ UN AD _____ AA CD Coll Mail Cd Stmt C6000 N VM C4457 Y Fund Source: __ ________________________________________ Long Title: EDUCATIONAL AND GENERAL INCOME - TUITION ________________________________________ Account Letter: Y Setup Date: 08/26/1991 Enter-PF1---PF2---PF3---PF4---PF5---PF6---PF7---PF8---PF9---PF10--PF11--PF12--Hmenu Help EHelp Next A pop-up window is displayed with the valid values for the field. By typing an ‘X’ next to the desired value and pressing <ENTER> that value is passed to the main screen. This is called the Passback feature. Screen 002 - GL 6 Digit - Fund Group ?-Help Pop-Up Window +----------------------------------------------------------+ | ** More Codes - Press <ENTER> to View ** | | | | Search Criteria: AFR Fund Group: __ | | | | AFR Sub | | Fund Fund Fund Description | | _ 01 CLEARING ACCOUNTS | | X 10 FG FUNCTIONAL AND GENERAL | | _ 20 DS DF DESIGNATED/FUNCTIONAL & GENERAL | | _ 21 DS DS DESIGNATED/SERVICE DEPARTMENTS | | _ 22 DS ST DESIGNATED/SERV DEPT-MATERIAL & SUP | | _ 23 DS SM DESIGNATED/SERV DEPT-COMM & UTIL | | _ 24 DS SU DESIGNATED/SERV DEPT-REPAIRS & MAIN | | _ 25 DS SR DESIGNATED/SERV DEPT-RENTALS & LEAS | | _ 26 DS SL DESIGNATED/SERV DEPT-PRINTING & REP | | _ 27 DS SP DESIGNATED/SERV DEPT-CLAIMS & LOSSE | | _ 28 DS SC DESIGNATED/SERV DEPT-OTHER OPER EXP | | _ 29 DS SO DESIGNATED/SERV DEPT-OTHER OPER EXP | | -- IASYS-AFR-FUND-GROUP -| | Select an AFR Fund Group or Press <PF4> to Quit | +----------------------------------------------------------+ Entire Connection User Manual Page V-7 Standard PF Keys PF Keys are used in the FAMIS modules to access additional information. Wherever possible the same assignment has been given to the same PF key, such as PF9 always being the key used for NOTES. Occasionally this has not been possible and a different assignment has been made. The following list is to help you identify the functionality behind the PF keys that you will see on the many screens in FAMIS. Many screens have extended information windows assigned to various function keys that are designated at the bottom of each screen or pop-up window. Placing the cursor (using the cursor arrow keys) on a particular line and pressing the extended information function key will display the pop-up window information for the document or item on that line. To exit a pop-up window, press <PF4> to return to the previous window or inquiry screen. If multiple windows have been opened pressing <PF3> will return you directly to the screen where you started. From within many of the pop-up window an additional set of extended function keys may appear to further inquire on the document or item. Extended Function Keys Bkwd Backwards Advances backward to the previous screen or scrolls one page back for an item. Frwd Forward Advances forward to the next screen or scrolls one page forward for an item. Left Scroll Left Some windows are made up of several adjacent panels. These will be designated by the word Panel: ## appearing in the window. Pressing this key scrolls the panel to the left. More Desc More Description Displays complete description text for a document or an item. +--------------------------------------------------------------+ | R R400007 **Document Item Inquiry ** | | Item: 1.0 | | | | Line Descriptions | | -----------------------------------------------| | 1 1.6 GB FORMATTED (USEABLE) FAST SCSI-2 DISK | | 2 DRIVE FOR SGI INDIGO WITH INTERNAL MOUNTING | | | | Press <PF4> to Exit | +--------------------------------------------------------------+ Entire Connection User Manual Page V-8 Appendix – Standard PF Keys (cont’d) Next Next Screen Advances to the next screen required. Notes Notes Displays any notes attached to the document header. Use the Position at Line: field to start the text at a particular line. The Page (F/B/E): field scrolls Forward, and Backwards through the text, or End to exit the window. +------------------------------------------------------------------+ | F0013 Please enter desired modifications | | P600026 1.0 Position at line: ___ | | Line ******** Note Text ******** | | 1 >>Notes Entered 10/12/95 BY CARSON, CARL C____ | | | | 2 THE DEPARTMENT REQUESTS TO REVIEW ALL BIDS___ | | 3 PRIOR TO THE AWARD.__________________________ | | 4 _____________________________________________ | | 5 CONTACT DR. WILL W. WADDLESWORK FOR FURTHER__ | | 6 DETAILS/CLARIFICATION ABOUT THE REQUESTED____ | | 7 ITEMS._______________________________________ | | 8 _____________________________________________ | | 9 _____________________________________________ | | 10 _____________________________________________ | | 11 _____________________________________________ | | 12 _____________________________________________ | | PF4=Exit PF7=PItem PF8=NItem Page (F/B/E): _ | +------------------------------------------------------------------+ Right Scroll Right Some windows are made up of several adjacent panels. These will be designated by the word Panel: ## appearing in the window. Pressing this key scrolls the panel to the right. Entire Connection User Manual Page V-9 Glossary A Account A functional unit, identified by an account ID, which serves a particular accounting purpose where one person has primary responsibility for it. Accounts may include balance sheets (GL accounts) and revenue/expenditure accounts (SL accounts). Account Control The last four digits in the account number for a General Ledger account. The account control designates a specific asset, liability, fund balance, fund addition, fund deduction or summary control. AUTOEXEC.BAT The batch file containing commands loaded during the start up of the computer. This file contains normal DOS commands and may be used for additional system configuration, such as setting paths and variables. D DOS A single-user operating system designed by Microsoft Corp. Download To transfer data from one computer to another. The term download refers to transfer from a larger host system (usually a mainframe) to a smaller client system (usually a microcomputer). E Encumbrance An obligation incurred in the form of a purchase order or contract. Also referred to as an open commitment. Ethernet A local area network transmission technology. F FAMIS Financial Accounting Management Information System. FAMIS is an accounting system that responds to financial regulations applicable to educational institutions. File A storage area established within a computer system or data base for the purpose of organizing similar kinds of data. Function Key Allows access to extended account and/or document information in FAMIS. Also called PF Keys. G General Ledger (GL) A balance sheet account for the institution. All GL account numbers begin with “0” (zero). H Hardware The physical components of a computer. HLLAPI High Level Language Application Programming Interface. Entire Connection User Manual Page V-10 Appendix – Glossary (cont’d) Host A computer to which one connects using a terminal emulator (such as ENTIRE CONNECTION). M Menu A screen containing a list of available processes, screens or other menus. N NATURAL The programming language used to write FAMIS. .NCF File Contains information about ENTIRE CONNECTION download procedures including: the name of the file the information was downloaded into, the date and time of the download, and the status of the download. NET3270 A 3270 terminal emulation software package necessary to provide security to regular Ethernet users wanting to use ENTIRE CONNECTION. O Object Code A four-digit number identifying specific items of revenue/expense or attribute records. Open Commitment See Encumbrance. S Software Computer programs, as opposed to the computers on which they run (i.e. the "hardware"). Subcode Four digits appended to the account ID to identify attributes and dollar records within an account. Subsidiary Ledger Revenue and expenditure accounts for the institution. All SL account numbers begin with a ledger number of 1 through 9. T TCP/IP Transmission Control Protocol over Internet Protocol. Terminal Emulator A program that allows a computer to act like a particular type of terminal (i.e. a 3270 terminal). The computer then appears as a terminal of the host computer and accepts the same escape sequences/commands as functions. U Update Screen A screen that allows a user to enter data for updating the files. Entire Connection User Manual Page V-11 Appendix – Glossary (cont’d) K:\FA\DOC\WRKNPRCS\Entire-C\EntireConncurrNF.docx Last Revised: 2/11/2011 3:00 PM Entire Connection User Manual Page V-12