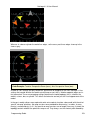
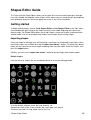
1
NetLogo 4.1.3 User Manual
NetLogo 4.1.3 User Manual
Table of Contents
What is NetLogo?.............................................................................................................................1
Features..................................................................................................................................1
Copyright and License Information................................................................................................3
How to reference.....................................................................................................................3
Acknowledgments...................................................................................................................3
NetLogo license......................................................................................................................3
BehaviorSpace license...........................................................................................................3
Extension licenses..................................................................................................................3
Third party licenses.................................................................................................................4
Scala.................................................................................................................................4
MersenneTwisterFast........................................................................................................4
Colt....................................................................................................................................5
MRJ Adapter.....................................................................................................................5
Quaqua.............................................................................................................................5
JHotDraw..........................................................................................................................5
MovieEncoder...................................................................................................................6
JpegImagesToMovie.........................................................................................................6
JOGL.................................................................................................................................7
Matrix3D............................................................................................................................8
ASM..................................................................................................................................8
Log4j.................................................................................................................................9
PicoContainer....................................................................................................................9
JTS Topology Suite.........................................................................................................10
JScience..........................................................................................................................10
JAVA Advanced Imaging API, Version 1.1.3..................................................................11
Apache Commons Codec...............................................................................................11
Apache Jakarta HttpClient..............................................................................................11
Apache Commons Logging.............................................................................................12
What's New?....................................................................................................................................13
Version 4.1.3 (April 2011).....................................................................................................13
Version 4.1.2 (December 2010)............................................................................................13
Version 4.1.1 (August 2010).................................................................................................14
Version 4.1 (December 2009)...............................................................................................15
Version 4.0.5 (December 2009)............................................................................................17
Version 4.0.4 (November 2008)............................................................................................17
Version 4.0 (September 2007)..............................................................................................17
Version 3.1 (April 2006)........................................................................................................19
Version 3.0 (September 2005)..............................................................................................19
Version 2.1 (December 2004)...............................................................................................19
Version 2.0.2 (August 2004).................................................................................................20
Version 2.0 (December 2003)...............................................................................................20
Version 1.3 (June 2003)........................................................................................................20
Version 1.2 (March 2003).....................................................................................................20
Version 1.1 (July 2002).........................................................................................................20
Version 1.0 (April 2002)........................................................................................................20
i
NetLogo 4.1.3 User Manual
Table of Contents
System Requirements....................................................................................................................21
System Requirements: Application.......................................................................................21
Windows..........................................................................................................................21
Mac OS X........................................................................................................................21
Other platforms...............................................................................................................21
System Requirements: Saved Applets.................................................................................21
System Requirements: 3D....................................................................................................21
Technical Java Details for Windows Users...........................................................................21
Known Issues..................................................................................................................................23
Known bugs (all systems).....................................................................................................23
Language/engine bugs...................................................................................................23
Other bugs......................................................................................................................23
Extensions.......................................................................................................................23
Windows-only bugs...............................................................................................................23
Macintosh-only bugs.............................................................................................................24
Linux/UNIX-only bugs...........................................................................................................24
Known issues with HubNet...................................................................................................24
Contacting Us.................................................................................................................................25
Web Site...............................................................................................................................25
Feedback, Questions, Etc.....................................................................................................25
Reporting Bugs.....................................................................................................................25
Sample Model: Party......................................................................................................................27
At a Party..............................................................................................................................27
Challenge..............................................................................................................................29
Thinking With Models............................................................................................................30
What's Next?.........................................................................................................................30
Tutorial #1: Models.........................................................................................................................31
Sample Model: Wolf Sheep Predation..................................................................................31
Controlling the Model: Buttons..............................................................................................32
Controlling speed: Speed Slider...........................................................................................33
Adjusting Settings: Sliders and Switches..............................................................................33
Gathering Information: Plots and Monitors...........................................................................35
Plots................................................................................................................................35
Monitors..........................................................................................................................36
Controlling the View..............................................................................................................36
The Models Library...............................................................................................................40
Sample Models...............................................................................................................40
Perspective Demos.........................................................................................................40
Curricular Models............................................................................................................40
Code Examples...............................................................................................................40
HubNet Computer Activities............................................................................................40
What's Next?.........................................................................................................................40
ii
NetLogo 4.1.3 User Manual
Table of Contents
Tutorial #2: Commands..................................................................................................................41
Sample Model: Traffic Basic.................................................................................................41
The Command Center..........................................................................................................41
Working With Colors.............................................................................................................44
Agent Monitors and Agent Commanders..............................................................................46
What's Next?.........................................................................................................................50
Tutorial #3: Procedures..................................................................................................................51
Agents and procedures.........................................................................................................51
Making the setup button........................................................................................................51
Making the go button............................................................................................................54
Experimenting with commands.............................................................................................55
Patches and variables...........................................................................................................56
Turtle variables.....................................................................................................................57
Monitors................................................................................................................................59
Switches and labels..............................................................................................................61
More procedures...................................................................................................................63
Plotting..................................................................................................................................64
Tick counter..........................................................................................................................67
Some more details................................................................................................................68
What's next?.........................................................................................................................69
Appendix: Complete code.....................................................................................................70
Interface Guide................................................................................................................................73
Menus...................................................................................................................................73
Chart: NetLogo Menus....................................................................................................73
Tabs......................................................................................................................................75
Interface Tab.........................................................................................................................76
Working with Interface Elements.....................................................................................76
Chart: Interface Toolbar..................................................................................................77
The 2D and 3D Views.....................................................................................................78
Command Center............................................................................................................82
Plots................................................................................................................................84
Sliders.............................................................................................................................85
Agent Monitors................................................................................................................85
Information Tab.....................................................................................................................87
Information Tab Markup..................................................................................................88
WHAT IS IT...........................................................................................................................88
Procedures Tab....................................................................................................................88
Includes Menu.......................................................................................................................91
Caution............................................................................................................................91
Indent Automatically..............................................................................................................92
Programming Guide.......................................................................................................................93
Agents...................................................................................................................................93
Procedures............................................................................................................................94
Variables...............................................................................................................................96
Colors....................................................................................................................................97
iii
NetLogo 4.1.3 User Manual
Table of Contents
Programming Guide
Ask......................................................................................................................................100
Agentsets............................................................................................................................102
Breeds.................................................................................................................................104
Link Breeds...................................................................................................................105
Buttons................................................................................................................................106
Lists.....................................................................................................................................107
Math....................................................................................................................................112
Random Numbers...............................................................................................................114
Auxiliary generator........................................................................................................115
Local randomness.........................................................................................................115
Turtle shapes......................................................................................................................115
Link Shapes........................................................................................................................116
Tick Counter........................................................................................................................116
When to tick..................................................................................................................116
Fractional ticks..............................................................................................................117
View Updates......................................................................................................................117
Continuous updates......................................................................................................117
Tick-based updates.......................................................................................................118
Choosing a mode..........................................................................................................118
Plotting................................................................................................................................119
Strings.................................................................................................................................122
Output.................................................................................................................................123
File I/O................................................................................................................................124
Movies.................................................................................................................................125
Perspective.........................................................................................................................126
Drawing...............................................................................................................................126
Topology.............................................................................................................................128
Links....................................................................................................................................132
Ask-Concurrent...................................................................................................................135
Tie.......................................................................................................................................136
Multiple source files............................................................................................................137
Syntax.................................................................................................................................137
Colors............................................................................................................................137
Notice............................................................................................................................138
Keywords......................................................................................................................138
Identifiers.......................................................................................................................138
Scope............................................................................................................................138
Comments.....................................................................................................................138
Structure........................................................................................................................138
Commands and reporters.............................................................................................139
Compared to other Logos.............................................................................................139
Transition Guide...........................................................................................................................141
Since NetLogo 4.0..............................................................................................................141
Combining set and of....................................................................................................141
Applets..........................................................................................................................142
Since NetLogo 3.1..............................................................................................................142
iv
NetLogo 4.1.3 User Manual
Table of Contents
Transition Guide
Who numbering.............................................................................................................142
Turtle creation: randomized vs. "ordered".....................................................................142
Adding strings and lists.................................................................................................143
The -at primitives...........................................................................................................143
Links..............................................................................................................................143
New "of" syntax.............................................................................................................145
Serial ask......................................................................................................................145
Tick counter...................................................................................................................146
View update modes.......................................................................................................146
Speed slider..................................................................................................................147
Numbers........................................................................................................................148
Agentset building...........................................................................................................149
RGB Colors...................................................................................................................149
Tie.................................................................................................................................149
HubNet Clients..............................................................................................................149
Performance of Lists.....................................................................................................150
Since NetLogo 3.0..............................................................................................................150
Agentsets......................................................................................................................150
Wrapping.......................................................................................................................150
Random turtle coordinates............................................................................................150
Applets...........................................................................................................................................153
Making an applet.................................................................................................................153
Additional files...............................................................................................................153
Extensions.....................................................................................................................153
Using an alternate jar location.......................................................................................153
Java requirements..............................................................................................................154
Getting the right version...............................................................................................154
Increasing the available memory.................................................................................154
Features not supported in applets......................................................................................154
Shapes Editor Guide....................................................................................................................155
Getting started....................................................................................................................155
Importing shapes...........................................................................................................155
Creating and editing turtle shapes......................................................................................157
Tools.............................................................................................................................157
Previews........................................................................................................................158
Overlapping shapes......................................................................................................158
Undo.............................................................................................................................158
Colors............................................................................................................................158
Other buttons................................................................................................................158
Shape design................................................................................................................158
Keeping a shape...........................................................................................................159
Creating and editing link shapes.........................................................................................159
Changing link shape properties.....................................................................................159
Using shapes in a model.....................................................................................................160
v
NetLogo 4.1.3 User Manual
Table of Contents
BehaviorSpace Guide...................................................................................................................161
What is BehaviorSpace?.....................................................................................................161
Why BehaviorSpace?....................................................................................................161
How It Works.......................................................................................................................162
Managing experiment setups........................................................................................162
Creating an experiment setup.......................................................................................162
Special primitives for BehaviorSpace experiments.......................................................164
Running an experiment.................................................................................................164
Advanced usage.................................................................................................................166
Running from the command line...................................................................................166
Setting up experiments in XML.....................................................................................169
Controlling API..............................................................................................................169
Source code........................................................................................................................170
System Dynamics Guide..............................................................................................................171
What is the NetLogo System Dynamics Modeler?..............................................................171
Basic Concepts.............................................................................................................171
Sample Models.............................................................................................................172
How it Works.......................................................................................................................172
Diagram Tab.................................................................................................................172
Procedures Tab.............................................................................................................175
The System Dynamics Modeler and NetLogo...............................................................176
Tutorial: Wolf-Sheep Predation...........................................................................................176
Step 1: Sheep Reproduction.........................................................................................176
Step 2: NetLogo Integration..........................................................................................179
Step 3: Wolf Predation..................................................................................................180
HubNet Guide................................................................................................................................183
Understanding HubNet.......................................................................................................183
NetLogo........................................................................................................................183
HubNet Architecture......................................................................................................183
Computer HubNet...............................................................................................................184
Activities........................................................................................................................184
Clients...........................................................................................................................184
Requirements................................................................................................................184
Starting an activity.........................................................................................................184
HubNet Control Center..................................................................................................185
Client Applets................................................................................................................186
Troubleshooting............................................................................................................186
Known Limitations.........................................................................................................187
Calculator HubNet...............................................................................................................187
Calculator HubNet for TI-Navigator...............................................................................187
Teacher workshops.............................................................................................................188
HubNet Authoring Guide.....................................................................................................188
Getting help.........................................................................................................................188
vi
NetLogo 4.1.3 User Manual
Table of Contents
HubNet Authoring Guide..............................................................................................................189
Coding HubNet activities.....................................................................................................189
Setup.............................................................................................................................189
Receiving messages from clients..................................................................................190
Sending messages to clients........................................................................................191
Examples......................................................................................................................192
How to make a client interface............................................................................................192
View updates on the clients................................................................................................193
Clicking in the view on clients.............................................................................................193
Customizing the client's view..............................................................................................194
Plot updates on the clients..................................................................................................194
Logging..........................................................................................................................................195
Starting logging...................................................................................................................195
Mac OS X or Windows..................................................................................................195
Linux and others............................................................................................................195
Using logging......................................................................................................................195
Where logs are stored...................................................................................................195
How to configure the logging output..............................................................................197
Advanced Configuration......................................................................................................198
Controlling Guide.........................................................................................................................199
Starting a Java VM for NetLogo..........................................................................................199
Recommended options for both GUI and headless......................................................199
Additional recommended options for GUI only..............................................................199
Current working directory..............................................................................................200
Example (with GUI).............................................................................................................200
Example (headless)............................................................................................................201
Example (embedding).........................................................................................................203
Conclusion..........................................................................................................................204
Mathematica Link..........................................................................................................................205
What is it?...........................................................................................................................205
What can I do with it?..........................................................................................................205
Installation...........................................................................................................................205
Usage..................................................................................................................................206
Known Issues......................................................................................................................207
Credits.................................................................................................................................207
Introducing NetLogo 3D...............................................................................................................209
Introduction.........................................................................................................................209
3D Worlds.....................................................................................................................209
Tutorial................................................................................................................................211
Step 1: Depth................................................................................................................211
FAQ (Frequently Asked Questions)....................................................................................216
Can I make patches or turtles translucent?...................................................................216
Commands and Reporters..................................................................................................217
Turtle-related primitives.................................................................................................217
vii
NetLogo 4.1.3 User Manual
Table of Contents
Introducing NetLogo 3D
Built-In Variables.................................................................................................................217
Turtles...........................................................................................................................218
A..........................................................................................................................................218
at-points........................................................................................................................218
D.........................................................................................................................................218
distancexyz distancexyz-nowrap...................................................................................218
F..........................................................................................................................................219
face facexyz..................................................................................................................219
L..........................................................................................................................................219
left.................................................................................................................................219
M.........................................................................................................................................220
max-pzcor min-pzcor.....................................................................................................220
N.........................................................................................................................................220
neighbors neighbors6....................................................................................................220
O.........................................................................................................................................221
orbit-down orbit-left orbit-right orbit-up..........................................................................221
P..........................................................................................................................................221
patch.............................................................................................................................221
R.........................................................................................................................................223
random-pzcor................................................................................................................223
S..........................................................................................................................................224
setxyz............................................................................................................................224
T..........................................................................................................................................225
tilt-down tilt-up...............................................................................................................225
W.........................................................................................................................................226
world-depth...................................................................................................................226
Z..........................................................................................................................................226
zcor...............................................................................................................................226
Extensions Guide.........................................................................................................................229
Using Extensions................................................................................................................229
Where extensions are located.......................................................................................229
Applets..........................................................................................................................230
Writing Extensions..............................................................................................................230
Summary.......................................................................................................................230
Examples......................................................................................................................230
Tutorial..........................................................................................................................231
Scala Tutorial................................................................................................................234
Extension development tips..........................................................................................236
Conclusion....................................................................................................................237
Array and Table Extensions........................................................................................................239
When to use........................................................................................................................239
How to use..........................................................................................................................239
Limitation on table keys.................................................................................................239
Array example.....................................................................................................................239
Table example....................................................................................................................240
viii
NetLogo 4.1.3 User Manual
Table of Contents
Array and Table Extensions
Array primitives...................................................................................................................240
array:from-list................................................................................................................240
array:item......................................................................................................................240
array:set........................................................................................................................240
array:length...................................................................................................................241
array:to-list....................................................................................................................241
Table Primitives..................................................................................................................241
table:clear......................................................................................................................241
table:from-list.................................................................................................................241
table:get........................................................................................................................241
table:has-key?...............................................................................................................241
table:keys......................................................................................................................241
table:length...................................................................................................................242
table:make.....................................................................................................................242
table:put........................................................................................................................242
table:remove.................................................................................................................242
table:to-list.....................................................................................................................242
Matrix Extension...........................................................................................................................243
When to use........................................................................................................................243
How to use..........................................................................................................................243
Matrix example....................................................................................................................243
Matrix Primitives..................................................................................................................244
Matrix creation & conversion to/from lists.....................................................................244
Matrix data retrieval and manipulation..........................................................................244
Math operations............................................................................................................244
Advanced features........................................................................................................244
Matrix creation & conversion to/from lists...........................................................................244
matrix:make-constant....................................................................................................244
matrix:make-identity......................................................................................................244
matrix:from-row-list........................................................................................................245
matrix:from-column-list..................................................................................................245
matrix:to-row-list............................................................................................................245
matrix:to-column-list......................................................................................................245
matrix:copy....................................................................................................................245
matrix:pretty-print-text...................................................................................................246
Matrix modification and math operations............................................................................246
matrix:get......................................................................................................................246
matrix:get-row...............................................................................................................246
matrix:get-column..........................................................................................................246
matrix:set.......................................................................................................................246
matrix:set-row................................................................................................................246
matrix:set-column..........................................................................................................247
matrix:swap-rows..........................................................................................................247
matrix:swap-columns....................................................................................................247
matrix:set-and-report.....................................................................................................247
matrix:dimensions.........................................................................................................247
ix
NetLogo 4.1.3 User Manual
Table of Contents
Matrix Extension
matrix:submatrix............................................................................................................247
matrix:times-scalar........................................................................................................248
matrix:times...................................................................................................................248
matrix:times-element-wise............................................................................................248
matrix:plus-scalar..........................................................................................................248
matrix:plus.....................................................................................................................248
matrix:inverse................................................................................................................248
matrix:transpose............................................................................................................248
matrix:real-eigenvalues.................................................................................................249
matrix:imaginary-eigenvalues.......................................................................................249
matrix:eigenvectors.......................................................................................................249
matrix:det......................................................................................................................249
matrix:rank....................................................................................................................249
matrix:cond....................................................................................................................249
matrix:trace...................................................................................................................249
Advanced features..............................................................................................................249
matrix:solve...................................................................................................................250
matrix:forecast-linear-growth.........................................................................................250
matrix:forecast-compound-growth.................................................................................250
matrix:forecast-continuous-growth................................................................................251
matrix:regress...............................................................................................................252
Credits:................................................................................................................................253
Sound Extension..........................................................................................................................255
Using the Sound Extension.................................................................................................255
MIDI support.......................................................................................................................255
Primitives............................................................................................................................255
sound:drums.................................................................................................................255
sound:instruments.........................................................................................................256
sound:play-drum...........................................................................................................256
sound:play-note.............................................................................................................256
sound:play-note-later....................................................................................................256
sound:play-sound..........................................................................................................256
sound:play-sound-and-wait...........................................................................................256
sound:play-sound-later..................................................................................................257
sound:start-note............................................................................................................257
sound:stop-note............................................................................................................257
sound:stop-instrument...................................................................................................257
sound:stop-music..........................................................................................................258
Sound names......................................................................................................................258
Drums............................................................................................................................258
Instruments...................................................................................................................258
NetLogoLab and the GoGo Board Extension............................................................................261
What is NetLogoLab?.........................................................................................................261
The GoGo Board NetLogo extension............................................................................261
GoGo Board: a low-cost robotics and data-logging board............................................261
x
NetLogo 4.1.3 User Manual
Table of Contents
NetLogoLab and the GoGo Board Extension
Sensor and actuator toolkits..........................................................................................261
NetLogo models............................................................................................................263
How to get a GoGo Board?.................................................................................................263
Installing and testing the GoGo Extension..........................................................................264
Windows........................................................................................................................264
Mac OS X......................................................................................................................264
Linux.............................................................................................................................264
Using the GoGo Extension.................................................................................................265
Examples of NetLogoLab models.......................................................................................265
Controlling a car............................................................................................................265
A simple sensing project...............................................................................................267
Primitives............................................................................................................................269
gogo:burst-value...........................................................................................................269
gogo:close.....................................................................................................................269
gogo:open.....................................................................................................................269
gogo:open?...................................................................................................................270
gogo:ports.....................................................................................................................270
gogo:output-port-coast..................................................................................................270
gogo:output-port-off.......................................................................................................270
gogo:output-port-on.......................................................................................................270
gogo:output-port-reverse...............................................................................................271
gogo:output-port-[that/this]way......................................................................................271
gogo:talk-to-output-ports...............................................................................................271
gogo:ping......................................................................................................................272
gogo:sensor..................................................................................................................272
gogo:set-burst-mode.....................................................................................................272
gogo:set-output-port-power...........................................................................................273
gogo:stop-burst-mode...................................................................................................273
Profiler Extension.........................................................................................................................275
Caution................................................................................................................................275
Usage..................................................................................................................................275
Example........................................................................................................................275
Primitives............................................................................................................................275
profiler:calls...................................................................................................................275
profiler:exclusive-time...................................................................................................276
profiler:inclusive-time....................................................................................................276
profiler:start...................................................................................................................276
profiler:stop...................................................................................................................276
profiler:reset..................................................................................................................276
profiler:report.................................................................................................................276
GIS Extension...............................................................................................................................279
How to use..........................................................................................................................279
Known issues......................................................................................................................280
GIS primitives......................................................................................................................280
Coordinate System Primitives.......................................................................................280
xi
NetLogo 4.1.3 User Manual
Table of Contents
GIS Extension
Dataset Primitives.........................................................................................................280
VectorDataset Primitives...............................................................................................280
RasterDataset Primitives...............................................................................................280
Drawing Primitives........................................................................................................280
Coordinate System Primitives.............................................................................................281
gis:set-transformation....................................................................................................281
gis:set-transformation-ds...............................................................................................281
gis:set-world-envelope..................................................................................................282
gis:set-world-envelope-ds.............................................................................................282
gis:world-envelope........................................................................................................282
gis:envelope-of..............................................................................................................282
gis:envelope-union-of....................................................................................................283
gis:load-coordinate-system...........................................................................................283
gis:set-coordinate-system.............................................................................................283
Dataset Primitives...............................................................................................................284
gis:load-dataset.............................................................................................................284
gis:store-dataset............................................................................................................284
gis:type-of......................................................................................................................284
gis:patch-dataset...........................................................................................................284
gis:turtle-dataset............................................................................................................285
gis:link-dataset..............................................................................................................285
VectorDataset Primitives.....................................................................................................285
gis:shape-type-of...........................................................................................................285
gis:property-names.......................................................................................................285
gis:feature-list-of............................................................................................................285
gis:vertex-lists-of...........................................................................................................285
gis:centroid-of................................................................................................................286
gis:location-of................................................................................................................286
gis:property-value..........................................................................................................286
gis:find-features.............................................................................................................286
gis:find-one-feature.......................................................................................................286
gis:find-less-than...........................................................................................................287
gis:find-greater-than......................................................................................................287
gis:find-range................................................................................................................287
gis:property-minimum....................................................................................................287
gis:property-maximum...................................................................................................287
gis:apply-coverage........................................................................................................288
gis:coverage-minimum-threshold..................................................................................288
gis:set-coverage-minimum-threshold............................................................................288
gis:coverage-maximum-threshold.................................................................................288
gis:set-coverage-maximum-threshold...........................................................................288
gis:intersects?...............................................................................................................289
gis:contains?.................................................................................................................289
gis:contained-by?..........................................................................................................289
gis:have-relationship?...................................................................................................290
gis:relationship-of..........................................................................................................291
gis:intersecting..............................................................................................................292
xii
NetLogo 4.1.3 User Manual
Table of Contents
GIS Extension
RasterDataset Primitives....................................................................................................292
gis:width-of....................................................................................................................293
gis:height-of...................................................................................................................293
gis:raster-value..............................................................................................................293
gis:set-raster-value........................................................................................................293
gis:minimum-of..............................................................................................................293
gis:maximum-of.............................................................................................................293
gis:sampling-method-of.................................................................................................293
gis:set-sampling-method...............................................................................................294
gis:raster-sample...........................................................................................................294
gis:raster-world-envelope..............................................................................................295
gis:create-raster............................................................................................................295
gis:resample..................................................................................................................295
gis:convolve..................................................................................................................295
gis:apply-raster..............................................................................................................296
Drawing Primitives..............................................................................................................296
gis:drawing-color...........................................................................................................296
gis:set-drawing-color.....................................................................................................297
gis:draw.........................................................................................................................297
gis:fill.............................................................................................................................297
gis:paint.........................................................................................................................297
gis:import-wms-drawing................................................................................................297
Acknowledgments...............................................................................................................298
FAQ (Frequently Asked Questions)............................................................................................299
Questions............................................................................................................................299
General.........................................................................................................................299
Downloading.................................................................................................................299
Applets..........................................................................................................................299
Running.........................................................................................................................299
Usage............................................................................................................................300
Programming.................................................................................................................300
BehaviorSpace..............................................................................................................301
Extensions.....................................................................................................................301
General...............................................................................................................................301
Why is it called NetLogo?..............................................................................................301
How do I cite NetLogo in an academic publication?.....................................................301
How do I cite a model from the Models Library in a publication?..................................301
Where and when was NetLogo created?......................................................................301
What programming language was NetLogo written in?................................................301
What's the difference between StarLogo, MacStarLogo, StarLogoT, and NetLogo?...302
Under what license is NetLogo released? Is the source code available?.....................302
Do you offer any workshops or other training opportunities for NetLogo?....................302
Are there any NetLogo textbooks?................................................................................303
Is NetLogo available in a Spanish version, Chinese version, (your language here)
version, etc.?...........................................................................................................303
Is NetLogo compiled or interpreted?.............................................................................303
xiii
NetLogo 4.1.3 User Manual
Table of Contents
FAQ (Frequently Asked Questions)
Has anyone built a model of <x>?.................................................................................303
Are NetLogo models runs scientifically reproducible?..................................................303
Will NetLogo and NetLogo 3D remain separate?..........................................................304
Downloading.......................................................................................................................304
Can I have multiple versions of NetLogo installed at the same time?...........................304
I'm on a UNIX system and I can't untar the download. Why?.......................................304
How do I install NetLogo unattended?..........................................................................305
On Windows, how do I configure the Java installation that the without-Java
installer uses?.........................................................................................................305
Applets................................................................................................................................305
I tried to run one of the applets on your site, but it didn't work. What should I do?.......305
When running my model as an applet, I get the following error:
java.lang.OutOfMemoryError: Java heap space.....................................................305
Can I make my model available as an applet while keeping the code secret?.............305
Can a model saved as an applet use import-world, file-open, and other commands
that read files?.........................................................................................................306
When I tried loading my model as an applet I get an error like:
java.lang.ClassFormatError: Incompatible magic value..........................................306
Running...............................................................................................................................306
Can I run NetLogo from a CD, a network drive, or a USB drive?..................................306
Why is NetLogo so much slower when I unplug my Windows laptop?.........................306
How come NetLogo won't start up on my Linux machine?...........................................307
When I try to start NetLogo on Windows I get an error "The JVM could not be
started". Help!..........................................................................................................307
Can I run NetLogo from the command line, without the GUI?......................................307
Does NetLogo take advantage of multiple processors?................................................307
Can I distribute NetLogo model runs across a cluster or grid of computers?...............308
Is there any way to recover lost work if NetLogo crashes or freezes?..........................308
Usage..................................................................................................................................308
When I move the speed slider all the way to the right, why does my model seem to
stop?.......................................................................................................................308
Can I use the mouse to "paint" in the view?..................................................................308
How big can my model be? How many turtles, patches, procedures, buttons, and
so on can my model contain?.................................................................................309
Can I use GIS data in NetLogo?...................................................................................309
My model runs slowly. How can I speed it up?.............................................................309
Can I have more than one model open at a time?........................................................310
Can I change the choices in a chooser on the fly?.......................................................310
Can I divide the code for my model up into several files?.............................................310
Programming......................................................................................................................310
How is the NetLogo language different from the StarLogo and StarLogoT
languages? How do I convert my StarLogo or StarLogoT model to NetLogo?.......310
How does the NetLogo language differ from other Logos?...........................................311
How come my model from an earlier NetLogo doesn't work right?...............................311
Why does my code have strange characters in it?.......................................................311
How do I take the negative of a number?.....................................................................311
My turtle moved forward 1, but it's still on the same patch. Why?................................311
xiv
NetLogo 4.1.3 User Manual
Table of Contents
FAQ (Frequently Asked Questions)
How do I keep my turtles on patch centers?.................................................................311
patch-ahead 1 is reporting the same patch my turtle is already standing on. Why?.....312
How do I give my turtles "vision"?.................................................................................312
Can agents sense what's in the drawing layer?............................................................312
I'm getting numbers like 0.10000000004 and 0.799999999999 instead of 0.1 and
0.8. Why?................................................................................................................313
The documentation says that random-float 1 might return 0 but will never return 1.
What if I want 1 to be included?..............................................................................313
How can I keep two turtles from occupying the same patch?.......................................313
How can I find out if a turtle is dead?............................................................................313
Does NetLogo have arrays?.........................................................................................313
Does NetLogo have hash tables or associative arrays?...............................................313
How can I use different patch "neighborhoods" (circular, Von Neumann, Moore,
etc.)?.......................................................................................................................314
How can I convert an agentset to a list of agents, or vice versa?.................................314
How do I stop foreach?.................................................................................................314
BehaviorSpace....................................................................................................................314
Why are the rows in my BehaviorSpace table results out of order?.............................314
How do I measure runs every n ticks?..........................................................................315
I'm varying a global variable I declared in the Procedures tab, but it doesn't work.
Why?.......................................................................................................................315
Why are some of my results cut off in Excel?...............................................................315
Extensions..........................................................................................................................315
I'm writing an extension. Why does the compiler say it can't find org.nlogo.api?..........315
NetLogo Dictionary.......................................................................................................................317
Categories...........................................................................................................................317
Turtle-related.................................................................................................................317
Patch-related.................................................................................................................317
Agentset........................................................................................................................317
Color..............................................................................................................................317
Control flow and logic....................................................................................................318
World.............................................................................................................................318
Perspective...................................................................................................................318
HubNet..........................................................................................................................318
Input/output...................................................................................................................318
File................................................................................................................................318
List................................................................................................................................318
String.............................................................................................................................319
Mathematical.................................................................................................................319
Plotting..........................................................................................................................319
Links..............................................................................................................................319
Movie.............................................................................................................................319
BehaviorSpace..............................................................................................................319
System..........................................................................................................................319
Built-In Variables.................................................................................................................320
Turtles...........................................................................................................................320
xv
NetLogo 4.1.3 User Manual
Table of Contents
NetLogo Dictionary
Patches.........................................................................................................................320
Links..............................................................................................................................320
Other.............................................................................................................................320
Keywords............................................................................................................................320
Constants............................................................................................................................320
Mathematical Constants................................................................................................320
Boolean Constants........................................................................................................320
Color Constants............................................................................................................320
A.........................................................................................................................................321
abs................................................................................................................................321
acos..............................................................................................................................321
all?................................................................................................................................321
and................................................................................................................................322
any?..............................................................................................................................322
approximate-hsb...........................................................................................................322
approximate-rgb............................................................................................................323
Arithmetic Operators (+, *, -, /, ^, <, >, =, !=, <=, >=).....................................................323
asin...............................................................................................................................324
ask................................................................................................................................324
ask-concurrent..............................................................................................................324
at-points........................................................................................................................324
atan...............................................................................................................................325
autoplot?.......................................................................................................................325
auto-plot-off auto-plot-on...............................................................................................325
B..........................................................................................................................................325
back bk..........................................................................................................................326
base-colors....................................................................................................................326
beep..............................................................................................................................326
behaviorspace-run-number...........................................................................................326
both-ends......................................................................................................................327
breed.............................................................................................................................327
breed.............................................................................................................................327
but-first butfirst bf but-last butlast bl..............................................................................328
C.........................................................................................................................................329
can-move?....................................................................................................................329
carefully.........................................................................................................................329
ceiling............................................................................................................................329
clear-all ca.....................................................................................................................330
clear-all-plots.................................................................................................................330
clear-drawing cd............................................................................................................330
clear-links......................................................................................................................330
clear-output...................................................................................................................330
clear-patches cp............................................................................................................330
clear-plot.......................................................................................................................331
clear-turtles ct................................................................................................................331
color..............................................................................................................................331
cos................................................................................................................................332
xvi
NetLogo 4.1.3 User Manual
Table of Contents
NetLogo Dictionary
count.............................................................................................................................332
create-ordered-turtles cro create-ordered-<breeds>.....................................................332
create-<breed>-to create-<breeds>-to create-<breed>-from create-<breeds>-from
create-<breed>-with create-<breeds>-with create-link-to create-links-to
create-link-from create-links-from create-link-with create-links-with........................332
create-turtles crt create-<breeds>.................................................................................334
create-temporary-plot-pen.............................................................................................335
D.........................................................................................................................................335
date-and-time................................................................................................................335
die.................................................................................................................................335
diffuse...........................................................................................................................336
diffuse4.........................................................................................................................336
directed-link-breed........................................................................................................336
display...........................................................................................................................337
distance.........................................................................................................................338
distancexy.....................................................................................................................338
downhill downhill4.........................................................................................................338
dx dy.............................................................................................................................339
E..........................................................................................................................................339
empty?..........................................................................................................................339
end................................................................................................................................339
end1..............................................................................................................................340
end2..............................................................................................................................340
error-message...............................................................................................................340
every.............................................................................................................................340
exp................................................................................................................................341
export-view export-interface export-output export-plot export-all-plots export-world....341
extensions.....................................................................................................................342
extract-hsb....................................................................................................................342
extract-rgb.....................................................................................................................343
F..........................................................................................................................................343
face...............................................................................................................................343
facexy............................................................................................................................343
file-at-end?....................................................................................................................344
file-close........................................................................................................................344
file-close-all...................................................................................................................344
file-delete.......................................................................................................................344
file-exists?.....................................................................................................................345
file-flush.........................................................................................................................345
file-open........................................................................................................................345
file-print.........................................................................................................................346
file-read.........................................................................................................................346
file-read-characters.......................................................................................................346
file-read-line..................................................................................................................347
file-show........................................................................................................................347
file-type..........................................................................................................................348
file-write.........................................................................................................................348
xvii
NetLogo 4.1.3 User Manual
Table of Contents
NetLogo Dictionary
filter...............................................................................................................................348
first................................................................................................................................349
floor...............................................................................................................................349
follow.............................................................................................................................349
follow-me.......................................................................................................................349
foreach..........................................................................................................................349
forward fd......................................................................................................................350
fput................................................................................................................................350
G.........................................................................................................................................350
globals...........................................................................................................................351
H.........................................................................................................................................351
hatch hatch-<breeds>...................................................................................................351
heading.........................................................................................................................351
hidden?.........................................................................................................................352
hide-link.........................................................................................................................352
hide-turtle ht..................................................................................................................352
histogram......................................................................................................................353
home.............................................................................................................................353
hsb................................................................................................................................353
hubnet-broadcast..........................................................................................................353
hubnet-broadcast-clear-output......................................................................................354
hubnet-broadcast-message..........................................................................................354
hubnet-broadcast-view..................................................................................................354
hubnet-clear-override hubnet-clear-overrides...............................................................354
hubnet-enter-message?................................................................................................354
hubnet-exit-message?...................................................................................................355
hubnet-fetch-message..................................................................................................355
hubnet-message...........................................................................................................355
hubnet-message-source...............................................................................................355
hubnet-message-tag.....................................................................................................355
hubnet-message-waiting?.............................................................................................356
hubnet-reset..................................................................................................................356
hubnet-reset-perspective..............................................................................................356
hubnet-send..................................................................................................................356
hubnet-send-clear-output..............................................................................................357
hubnet-send-follow........................................................................................................357
hubnet-send-message..................................................................................................357
hubnet-send-override....................................................................................................357
hubnet-send-watch........................................................................................................358
hubnet-set-client-interface.............................................................................................358
I...........................................................................................................................................358
if....................................................................................................................................358
ifelse..............................................................................................................................358
ifelse-value....................................................................................................................359
import-drawing..............................................................................................................359
import-pcolors...............................................................................................................360
import-pcolors-rgb.........................................................................................................360
xviii
NetLogo 4.1.3 User Manual
Table of Contents
NetLogo Dictionary
import-world..................................................................................................................360
in-cone..........................................................................................................................361
in-<breed>-neighbor? in-link-neighbor?........................................................................361
in-<breed>-neighbors in-link-neighbors........................................................................362
in-<breed>-from in-link-from..........................................................................................362
__includes.....................................................................................................................362
in-radius........................................................................................................................362
inspect...........................................................................................................................363
int..................................................................................................................................363
is-agent? is-agentset? is-boolean? is-<breed>? is-directed-link? is-link?
is-link-set? is-list? is-number? is-patch? is-patch-set? is-string? is-turtle?
is-turtle-set? is-undirected-link?...............................................................................363
item...............................................................................................................................364
J..........................................................................................................................................364
jump..............................................................................................................................364
L..........................................................................................................................................364
label..............................................................................................................................365
label-color......................................................................................................................365
last................................................................................................................................365
layout-circle...................................................................................................................365
__layout-magspring.......................................................................................................366
layout-radial...................................................................................................................367
layout-spring..................................................................................................................368
layout-tutte....................................................................................................................368
left lt..............................................................................................................................369
length............................................................................................................................369
let..................................................................................................................................369
link.................................................................................................................................370
link-heading...................................................................................................................370
link-length......................................................................................................................370
link-set...........................................................................................................................370
link-shapes....................................................................................................................371
links...............................................................................................................................371
links-own <link-breeds>-own.........................................................................................371
list..................................................................................................................................371
ln...................................................................................................................................372
log.................................................................................................................................372
loop...............................................................................................................................372
lput................................................................................................................................372
M.........................................................................................................................................372
map...............................................................................................................................373
max...............................................................................................................................373
max-n-of........................................................................................................................373
max-one-of....................................................................................................................374
max-pxcor max-pycor....................................................................................................374
mean.............................................................................................................................374
median..........................................................................................................................375
xix
NetLogo 4.1.3 User Manual
Table of Contents
NetLogo Dictionary
member?.......................................................................................................................375
min................................................................................................................................375
min-n-of.........................................................................................................................375
min-one-of.....................................................................................................................376
min-pxcor min-pycor......................................................................................................376
mod...............................................................................................................................377
modes...........................................................................................................................377
mouse-down?................................................................................................................377
mouse-inside?...............................................................................................................378
mouse-xcor mouse-ycor................................................................................................378
move-to.........................................................................................................................378
movie-cancel.................................................................................................................378
movie-close...................................................................................................................379
movie-grab-view movie-grab-interface..........................................................................379
movie-set-frame-rate.....................................................................................................379
movie-start....................................................................................................................379
movie-status..................................................................................................................379
my-<breeds> my-links...................................................................................................380
my-in-<breeds> my-in-links...........................................................................................380
my-out-<breeds> my-out-links......................................................................................381
myself............................................................................................................................381
N.........................................................................................................................................381
n-of................................................................................................................................381
n-values.........................................................................................................................382
neighbors neighbors4....................................................................................................382
<breed>-neighbors link-neighbors................................................................................383
<breed>-neighbor? link-neighbor?................................................................................383
netlogo-applet?.............................................................................................................383
netlogo-version..............................................................................................................383
new-seed.......................................................................................................................384
no-display......................................................................................................................384
nobody..........................................................................................................................384
no-links..........................................................................................................................385
no-patches....................................................................................................................385
not.................................................................................................................................385
no-turtles.......................................................................................................................385
O.........................................................................................................................................385
of...................................................................................................................................385
one-of............................................................................................................................386
or...................................................................................................................................386
other..............................................................................................................................386
other-end.......................................................................................................................387
out-<breed>-neighbor? out-link-neighbor?....................................................................387
out-<breed>-neighbors out-link-neighbors....................................................................387
out-<breed>-to out-link-to..............................................................................................388
output-print output-show output-type output-write.........................................................388
P..........................................................................................................................................388
xx
NetLogo 4.1.3 User Manual
Table of Contents
NetLogo Dictionary
patch.............................................................................................................................388
patch-ahead..................................................................................................................389
patch-at.........................................................................................................................389
patch-at-heading-and-distance.....................................................................................390
patch-here.....................................................................................................................390
patch-left-and-ahead patch-right-and-ahead.................................................................390
patch-set.......................................................................................................................391
patch-size......................................................................................................................391
patches.........................................................................................................................391
patches-own..................................................................................................................391
pcolor............................................................................................................................392
pen-down pd pen-erase pe pen-up pu..........................................................................392
pen-mode......................................................................................................................392
pen-size.........................................................................................................................393
plabel............................................................................................................................393
plabel-color....................................................................................................................393
plot................................................................................................................................393
plot-name......................................................................................................................393
plot-pen-exists?.............................................................................................................394
plot-pen-down plot-pen-up............................................................................................394
plot-pen-reset................................................................................................................394
plotxy.............................................................................................................................394
plot-x-min plot-x-max plot-y-min plot-y-max..................................................................394
position..........................................................................................................................395
precision........................................................................................................................395
print...............................................................................................................................395
pxcor pycor....................................................................................................................396
R.........................................................................................................................................396
random..........................................................................................................................396
random-float..................................................................................................................396
random-exponential random-gamma random-normal random-poisson........................397
random-pxcor random-pycor.........................................................................................398
random-seed.................................................................................................................398
random-xcor random-ycor.............................................................................................398
read-from-string.............................................................................................................399
reduce...........................................................................................................................399
remainder......................................................................................................................400
remove..........................................................................................................................400
remove-duplicates.........................................................................................................401
remove-item..................................................................................................................401
repeat............................................................................................................................401
replace-item..................................................................................................................401
report.............................................................................................................................402
reset-perspective rp......................................................................................................402
reset-ticks......................................................................................................................402
reset-timer.....................................................................................................................402
resize-world...................................................................................................................402
xxi
NetLogo 4.1.3 User Manual
Table of Contents
NetLogo Dictionary
reverse..........................................................................................................................403
rgb.................................................................................................................................403
ride................................................................................................................................403
ride-me..........................................................................................................................403
right rt............................................................................................................................404
round.............................................................................................................................404
run.................................................................................................................................404
runresult........................................................................................................................405
S..........................................................................................................................................405
scale-color.....................................................................................................................405
self................................................................................................................................405
; (semicolon)..................................................................................................................406
sentence se...................................................................................................................406
set.................................................................................................................................406
set-current-directory......................................................................................................407
set-current-plot..............................................................................................................407
set-current-plot-pen.......................................................................................................407
set-default-shape..........................................................................................................407
set-histogram-num-bars................................................................................................408
__set-line-thickness......................................................................................................408
set-patch-size................................................................................................................409
set-plot-pen-color..........................................................................................................409
set-plot-pen-interval......................................................................................................409
set-plot-pen-mode.........................................................................................................409
set-plot-x-range set-plot-y-range...................................................................................409
setxy..............................................................................................................................410
shade-of?......................................................................................................................410
shape............................................................................................................................410
shapes..........................................................................................................................411
show..............................................................................................................................411
show-turtle st.................................................................................................................411
show-link.......................................................................................................................411
shuffle...........................................................................................................................412
sin.................................................................................................................................412
size................................................................................................................................412
sort................................................................................................................................412
sort-by...........................................................................................................................413
sprout sprout-<breeds>.................................................................................................413
sqrt................................................................................................................................414
stamp............................................................................................................................414
stamp-erase..................................................................................................................414
standard-deviation.........................................................................................................414
startup...........................................................................................................................414
stop...............................................................................................................................415
subject...........................................................................................................................415
sublist substring............................................................................................................415
subtract-headings..........................................................................................................415
xxii
NetLogo 4.1.3 User Manual
Table of Contents
NetLogo Dictionary
sum...............................................................................................................................416
T..........................................................................................................................................416
tan.................................................................................................................................416
thickness.......................................................................................................................416
tick.................................................................................................................................417
tick-advance..................................................................................................................417
ticks...............................................................................................................................417
tie..................................................................................................................................417
tie-mode........................................................................................................................418
timer..............................................................................................................................418
to...................................................................................................................................418
to-report.........................................................................................................................419
towards..........................................................................................................................419
towardsxy......................................................................................................................419
turtle..............................................................................................................................420
turtle-set........................................................................................................................420
turtles............................................................................................................................420
turtles-at <breeds>-at....................................................................................................420
turtles-here <breed>-here.............................................................................................421
turtles-on <breeds>-on..................................................................................................421
turtles-own <breeds>-own.............................................................................................421
type...............................................................................................................................422
U.........................................................................................................................................422
undirected-link-breed....................................................................................................422
untie..............................................................................................................................423
uphill uphill4..................................................................................................................423
user-directory................................................................................................................424
user-file.........................................................................................................................424
user-new-file..................................................................................................................424
user-input......................................................................................................................424
user-message...............................................................................................................425
user-one-of....................................................................................................................425
user-yes-or-no?.............................................................................................................425
V..........................................................................................................................................425
variance.........................................................................................................................425
W.........................................................................................................................................426
wait................................................................................................................................426
watch.............................................................................................................................426
watch-me.......................................................................................................................426
while..............................................................................................................................427
who...............................................................................................................................427
with................................................................................................................................427
<breed>-with link-with...................................................................................................428
with-max........................................................................................................................428
with-min.........................................................................................................................428
with-local-randomness..................................................................................................428
without-interruption........................................................................................................429
xxiii
NetLogo 4.1.3 User Manual
Table of Contents
NetLogo Dictionary
word..............................................................................................................................429
world-width world-height...............................................................................................430
wrap-color.....................................................................................................................430
write...............................................................................................................................430
X..........................................................................................................................................431
xcor...............................................................................................................................431
xor.................................................................................................................................431
Y..........................................................................................................................................431
ycor...............................................................................................................................431
?..........................................................................................................................................431
?, ?1, ?2, ?3, ................................................................................................................431
xxiv
What is NetLogo?
NetLogo is a programmable modeling environment for simulating natural and social phenomena. It
was authored by Uri Wilensky in 1999 and has been in continuous development ever since at the
Center for Connected Learning and Computer-Based Modeling.
NetLogo is particularly well suited for modeling complex systems developing over time. Modelers
can give instructions to hundreds or thousands of "agents" all operating independently. This makes
it possible to explore the connection between the micro-level behavior of individuals and the
macro-level patterns that emerge from the interaction of many individuals.
NetLogo lets students open simulations and "play" with them, exploring their behavior under
various conditions. It is also an authoring environment which enables students, teachers and
curriculum developers to create their own models. NetLogo is simple enough that students and
teachers can easily run simulations or even build their own. And, it is advanced enough to serve as
a powerful tool for researchers in many fields.
NetLogo has extensive documentation and tutorials. It also comes with a Models Library, which is a
large collection of pre-written simulations that can be used and modified. These simulations address
many content areas in the natural and social sciences, including biology and medicine, physics and
chemistry, mathematics and computer science, and economics and social psychology. Several
model-based inquiry curricula using NetLogo are currently under development.
NetLogo can also power a classroom participatory-simulation tool called HubNet. Through the use
of networked computers or handheld devices such as Texas Instruments graphing calculators, each
student can control an agent in a simulation. Follow this link for more information.
NetLogo is the next generation of the series of multi-agent modeling languages that started with
StarLogo. It builds off the functionality of our product StarLogoT and adds significant new features
and a redesigned language and user interface. NetLogo runs on the Java virtual machine, so it
works on all major platforms (Mac, Windows, Linux, et al). It is run as a standalone application, or
from the command line. Models and HubNet activities can be run as Java applets in a web browser.
Features
• System:
♦ Cross-platform: runs on Mac, Windows, Linux, et al
• Language:
♦ Fully programmable
♦ Simple language structure
♦ Language is Logo dialect extended to support agents
♦ Mobile agents (turtles) move over a grid of stationary agents (patches)
♦ Link agents connect turtles to make networks, graphs, and aggregates
♦ Large vocabulary of built-in language primitives
♦ Double precision floating point math
♦ Runs are exactly reproducible cross-platform
• Environment:
♦ View your model in either 2D and 3D
♦ Scalable and rotatable vector shapes
What is NetLogo?
1
NetLogo 4.1.3 User Manual
♦ Turtle and patch labels
♦ Command center for on-the-fly interaction
♦ Interface builder w/ buttons, sliders, switches, choosers, monitors, text boxes, notes,
output area
♦ Speed slider lets you fast forward your model or see it in slow motion
♦ Powerful and flexible plotting system
♦ Info tab for annotating your model
♦ HubNet: participatory simulations using networked devices
♦ Agent monitors for inspecting and controlling agents
♦ Export and import functions (export data, save and restore state of model, make a
movie)
♦ BehaviorSpace, an open source tool used to collect data from multiple parallel runs
of a model
♦ System Dynamics Modeler
♦ Experimental NetLogo 3D application allows modeling 3D worlds
♦ Headless mode allows doing batch runs from the command line
• Web:
♦ Models and HubNet clients can be saved as applets to be embedded in web pages
(note: some features are not available in applets, for example 3D)
• APIs:
♦ controlling API allows embedding NetLogo in a surrounding application
♦ extensions API allows adding new commands and reporters to the NetLogo
language; open source example extensions are included
2
What is NetLogo?
Copyright and License Information
How to reference
To reference NetLogo in academic publications, please use: Wilensky, U. (1999). NetLogo.
http://ccl.northwestern.edu/netlogo/. Center for Connected Learning and Computer-Based Modeling,
Northwestern University, Evanston, IL.
Acknowledgments
The CCL gratefully acknowledges over a decade of support for our NetLogo work. Much of that
support came from the National Science Foundation -- grant numbers REC-9814682 and
REC-0126227, with further support from REC-0003285, REC-0115699, DRL-0196044,
CCF-ITR-0326542, DRL-REC/ROLE-0440113, SBE-0624318, EEC-0648316, IIS-0713619,
DRL-RED-9552950, and DRL-REC-9632612. Additional support came from the Spencer
Foundation, Texas Instruments, and the Brady Fund.
NetLogo license
Copyright 1999-2011 by Uri Wilensky. All rights reserved.
The NetLogo software, models and documentation are distributed free of charge for use by the
public to explore and construct models. Permission to copy or modify the NetLogo software, models
and documentation for educational and research purposes only and without fee is hereby granted,
provided that this copyright notice and the original author's name appears on all copies and
supporting documentation. For any other uses of this software, in original or modified form, including
but not limited to distribution in whole or in part, specific prior permission must be obtained from Uri
Wilensky. The software, models and documentation shall not be used, rewritten, or adapted as the
basis of a commercial software or hardware product without first obtaining appropriate licenses from
Uri Wilensky. We make no representations about the suitability of this software for any purpose. It is
provided "as is" without express or implied warranty.
BehaviorSpace license
Copyright 2009-2011 by Uri Wilensky. All rights reserved.
BehaviorSpace is free and open source software. You can redistribute it and/or modify it under the
terms of the GNU Lesser General Public License (LGPL) as published by the Free Software
Foundation, either version 3 of the License, or (at your option) any later version.
A copy of the LGPL is included in the NetLogo distribution. See also http://www.gnu.org/licenses/.
Extension licenses
The extensions included with NetLogo are free and open source software. The exact copyright and
licensing information varies from extension to extension. See the README file in each extension
directory.
Copyright and License Information
3
NetLogo 4.1.3 User Manual
Third party licenses
Scala
Some parts of NetLogo are written in the Scala language and use the Scala standard libraries. The
license for Scala is as follows:
Copyright (c) 2002-2008 EPFL, Lausanne, unless otherwise specified. All rights reserved.
This software was developed by the Programming Methods Laboratory of the Swiss Federal
Institute of Technology (EPFL), Lausanne, Switzerland.
Permission to use, copy, modify, and distribute this software in source or binary form for any
purpose with or without fee is hereby granted, provided that the following conditions are met:
1. Redistributions of source code must retain the above copyright notice, this list of conditions
and the following disclaimer.
2. Redistributions in binary form must reproduce the above copyright notice, this list of
conditions and the following disclaimer in the documentation and/or other materials provided
with the distribution.
3. Neither the name of the EPFL nor the names of its contributors may be used to endorse or
promote products derived from this software without specific prior written permission.
THIS SOFTWARE IS PROVIDED BY THE REGENTS AND CONTRIBUTORS ``AS IS'' AND ANY
EXPRESS OR IMPLIED WARRANTIES, INCLUDING, BUT NOT LIMITED TO, THE IMPLIED
WARRANTIES OF MERCHANTABILITY AND FITNESS FOR A PARTICULAR PURPOSE ARE
DISCLAIMED. IN NO EVENT SHALL THE REGENTS OR CONTRIBUTORS BE LIABLE FOR ANY
DIRECT, INDIRECT, INCIDENTAL, SPECIAL, EXEMPLARY, OR CONSEQUENTIAL DAMAGES
(INCLUDING, BUT NOT LIMITED TO, PROCUREMENT OF SUBSTITUTE GOODS OR
SERVICES; LOSS OF USE, DATA, OR PROFITS; OR BUSINESS INTERRUPTION) HOWEVER
CAUSED AND ON ANY THEORY OF LIABILITY, WHETHER IN CONTRACT, STRICT LIABILITY,
OR TORT (INCLUDING NEGLIGENCE OR OTHERWISE) ARISING IN ANY WAY OUT OF THE
USE OF THIS SOFTWARE, EVEN IF ADVISED OF THE POSSIBILITY OF SUCH DAMAGE.
MersenneTwisterFast
For random number generation, NetLogo uses the MersenneTwisterFast class by Sean Luke. The
copyright for that code is as follows:
Copyright (c) 2003 by Sean Luke.
Portions copyright (c) 1993 by Michael Lecuyer.
All rights reserved.
Redistribution and use in source and binary forms, with or without modification, are permitted
provided that the following conditions are met:
• Redistributions of source code must retain the above copyright notice, this list of conditions
and the following disclaimer.
• Redistributions in binary form must reproduce the above copyright notice, this list of
conditions and the following disclaimer in the documentation and/or other materials provided
4
Copyright and License Information
NetLogo 4.1.3 User Manual
with the distribution.
• Neither the name of the copyright owners, their employers, nor the names of its contributors
may be used to endorse or promote products derived from this software without specific
prior written permission.
THIS SOFTWARE IS PROVIDED BY THE COPYRIGHT HOLDERS AND CONTRIBUTORS "AS
IS" AND ANY EXPRESS OR IMPLIED WARRANTIES, INCLUDING, BUT NOT LIMITED TO, THE
IMPLIED WARRANTIES OF MERCHANTABILITY AND FITNESS FOR A PARTICULAR
PURPOSE ARE DISCLAIMED. IN NO EVENT SHALL THE COPYRIGHT OWNERS OR
CONTRIBUTORS BE LIABLE FOR ANY DIRECT, INDIRECT, INCIDENTAL, SPECIAL,
EXEMPLARY, OR CONSEQUENTIAL DAMAGES (INCLUDING, BUT NOT LIMITED TO,
PROCUREMENT OF SUBSTITUTE GOODS OR SERVICES; LOSS OF USE, DATA, OR
PROFITS; OR BUSINESS INTERRUPTION) HOWEVER CAUSED AND ON ANY THEORY OF
LIABILITY, WHETHER IN CONTRACT, STRICT LIABILITY, OR TORT (INCLUDING
NEGLIGENCE OR OTHERWISE) ARISING IN ANY WAY OUT OF THE USE OF THIS
SOFTWARE, EVEN IF ADVISED OF THE POSSIBILITY OF SUCH DAMAGE.
Colt
Parts of NetLogo (specifically, the random-gamma primitive) are based on code from the Colt library
(http://acs.lbl.gov/~hoschek/colt/). The copyright for that code is as follows:
Copyright 1999 CERN - European Organization for Nuclear Research. Permission to use, copy,
modify, distribute and sell this software and its documentation for any purpose is hereby granted
without fee, provided that the above copyright notice appear in all copies and that both that
copyright notice and this permission notice appear in supporting documentation. CERN makes no
representations about the suitability of this software for any purpose. It is provided "as is" without
expressed or implied warranty.
MRJ Adapter
NetLogo uses the MRJ Adapter library, which is Copyright (c) 2003-2005 Steve Roy
<[email protected]>. The library is covered by the Artistic License. MRJ Adapter is available from
https://mrjadapter.dev.java.net/.
Quaqua
NetLogo uses the Quaqua Look and Feel library, which is Copyright (c) 2003-2005 Werner
Randelshofer, http://www.randelshofer.ch/, [email protected], All Rights Reserved.
The library is covered by the GNU LGPL (Lesser General Public License). The text of that license is
included in the "docs" folder which accompanies the NetLogo download, and is also available from
http://www.gnu.org/copyleft/lesser.html .
JHotDraw
For the system dynamics modeler, NetLogo uses the JHotDraw library, which is Copyright (c) 1996,
1997 by IFA Informatik and Erich Gamma. The library is covered by the GNU LGPL (Lesser
General Public License). The text of that license is included in the "docs" folder which accompanies
the NetLogo download, and is also available from http://www.gnu.org/copyleft/lesser.html .
Copyright and License Information
5
NetLogo 4.1.3 User Manual
MovieEncoder
For movie-making, NetLogo uses code adapted from sim.util.media.MovieEncoder.java by Sean
Luke, distributed under the MASON Open Source License. The copyright for that code is as follows:
This software is Copyright 2003 by Sean Luke. Portions Copyright 2003 by Gabriel Catalin Balan,
Liviu Panait, Sean Paus, and Dan Kuebrich. All Rights Reserved.
Developed in Conjunction with the George Mason University Center for Social Complexity
By using the source code, binary code files, or related data included in this distribution, you agree to
the following terms of usage for this software distribution. All but a few source code files in this
distribution fall under this license; the exceptions contain open source licenses embedded in the
source code files themselves. In this license the Authors means the Copyright Holders listed above,
and the license itself is Copyright 2003 by Sean Luke.
The Authors hereby grant you a world-wide, royalty-free, non-exclusive license, subject to third
party intellectual property claims:
to use, reproduce, modify, display, perform, sublicense and distribute all or any portion of the source
code or binary form of this software or related data with or without modifications, or as part of a
larger work; and under patents now or hereafter owned or controlled by the Authors, to make, have
made, use and sell ("Utilize") all or any portion of the source code or binary form of this software or
related data, but solely to the extent that any such patent is reasonably necessary to enable you to
Utilize all or any portion of the source code or binary form of this software or related data, and not to
any greater extent that may be necessary to Utilize further modifications or combinations.
In return you agree to the following conditions:
If you redistribute all or any portion of the source code of this software or related data, it must retain
the above copyright notice and this license and disclaimer. If you redistribute all or any portion of
this code in binary form, you must include the above copyright notice and this license and disclaimer
in the documentation and/or other materials provided with the distribution, and must indicate the use
of this software in a prominent, publically accessible location of the larger work. You must not use
the Authors's names to endorse or promote products derived from this software without the specific
prior written permission of the Authors.
THE SOFTWARE IS PROVIDED "AS IS", WITHOUT WARRANTY OF ANY KIND, EXPRESS OR
IMPLIED, INCLUDING BUT NOT LIMITED TO THE WARRANTIES OF MERCHANTABILITY,
FITNESS FOR A PARTICULAR PURPOSE AND NONINFRINGEMENT. IN NO EVENT SHALL
THE AUTHORS OR COPYRIGHT HOLDERS, NOR THEIR EMPLOYERS, NOR GEORGE MASON
UNIVERSITY, BE LIABLE FOR ANY CLAIM, DAMAGES OR OTHER LIABILITY, WHETHER IN AN
ACTION OF CONTRACT, TORT OR OTHERWISE, ARISING FROM, OUT OF OR IN
CONNECTION WITH THE SOFTWARE OR THE USE OR OTHER DEALINGS IN THE
SOFTWARE.
JpegImagesToMovie
For movie-making, NetLogo uses code adapted from JpegImagesToMovie.java by Sun
Microsystems. The copyright for that code is as follows:
6
Copyright and License Information
NetLogo 4.1.3 User Manual
Copyright (c) 1999-2001 Sun Microsystems, Inc. All Rights Reserved.
Sun grants you ("Licensee") a non-exclusive, royalty free, license to use, modify and redistribute
this software in source and binary code form, provided that i) this copyright notice and license
appear on all copies of the software; and ii) Licensee does not utilize the software in a manner
which is disparaging to Sun.
This software is provided "AS IS," without a warranty of any kind. ALL EXPRESS OR IMPLIED
CONDITIONS, REPRESENTATIONS AND WARRANTIES, INCLUDING ANY IMPLIED
WARRANTY OF MERCHANTABILITY, FITNESS FOR A PARTICULAR PURPOSE OR
NON-INFRINGEMENT, ARE HEREBY EXCLUDED. SUN AND ITS LICENSORS SHALL NOT BE
LIABLE FOR ANY DAMAGES SUFFERED BY LICENSEE AS A RESULT OF USING, MODIFYING
OR DISTRIBUTING THE SOFTWARE OR ITS DERIVATIVES. IN NO EVENT WILL SUN OR ITS
LICENSORS BE LIABLE FOR ANY LOST REVENUE, PROFIT OR DATA, OR FOR DIRECT,
INDIRECT, SPECIAL, CONSEQUENTIAL, INCIDENTAL OR PUNITIVE DAMAGES, HOWEVER
CAUSED AND REGARDLESS OF THE THEORY OF LIABILITY, ARISING OUT OF THE USE OF
OR INABILITY TO USE SOFTWARE, EVEN IF SUN HAS BEEN ADVISED OF THE POSSIBILITY
OF SUCH DAMAGES.
This software is not designed or intended for use in on-line control of aircraft, air traffic, aircraft
navigation or aircraft communications; or in the design, construction, operation or maintenance of
any nuclear facility. Licensee represents and warrants that it will not use or redistribute the Software
for such purposes.
JOGL
For 3D graphics rendering, NetLogo uses JOGL, a Java API for OpenGL. For more information
about JOGL, see http://jogl.dev.java.net/. The library is distributed under the BSD license:
Copyright (c) 2003-2006 Sun Microsystems, Inc. All Rights Reserved.
Redistribution and use in source and binary forms, with or without modification, are permitted
provided that the following conditions are met:
- Redistribution of source code must retain the above copyright notice, this list of conditions and the
following disclaimer.
- Redistribution in binary form must reproduce the above copyright notice, this list of conditions and
the following disclaimer in the documentation and/or other materials provided with the distribution.
Neither the name of Sun Microsystems, Inc. or the names of contributors may be used to endorse
or promote products derived from this software without specific prior written permission.
This software is provided "AS IS," without a warranty of any kind. ALL EXPRESS OR IMPLIED
CONDITIONS, REPRESENTATIONS AND WARRANTIES, INCLUDING ANY IMPLIED
WARRANTY OF MERCHANTABILITY, FITNESS FOR A PARTICULAR PURPOSE OR
NON-INFRINGEMENT, ARE HEREBY EXCLUDED. SUN MICROSYSTEMS, INC. ("SUN") AND
ITS LICENSORS SHALL NOT BE LIABLE FOR ANY DAMAGES SUFFERED BY LICENSEE AS A
RESULT OF USING, MODIFYING OR DISTRIBUTING THIS SOFTWARE OR ITS DERIVATIVES.
IN NO EVENT WILL SUN OR ITS LICENSORS BE LIABLE FOR ANY LOST REVENUE, PROFIT
Copyright and License Information
7
NetLogo 4.1.3 User Manual
OR DATA, OR FOR DIRECT, INDIRECT, SPECIAL, CONSEQUENTIAL, INCIDENTAL OR
PUNITIVE DAMAGES, HOWEVER CAUSED AND REGARDLESS OF THE THEORY OF
LIABILITY, ARISING OUT OF THE USE OF OR INABILITY TO USE THIS SOFTWARE, EVEN IF
SUN HAS BEEN ADVISED OF THE POSSIBILITY OF SUCH DAMAGES.
You acknowledge that this software is not designed or intended for use in the design, construction,
operation or maintenance of any nuclear facility.
Matrix3D
For 3D matrix operations, NetLogo uses the Matrix3D class. It is distributed under the following
license:
Copyright (c) 1994-1996 Sun Microsystems, Inc. All Rights Reserved.
Sun grants you ("Licensee") a non-exclusive, royalty free, license to use, modify and redistribute
this software in source and binary code form, provided that i) this copyright notice and license
appear on all copies of the software; and ii) Licensee does not utilize the software in a manner
which is disparaging to Sun.
This software is provided "AS IS," without a warranty of any kind. ALL EXPRESS OR IMPLIED
CONDITIONS, REPRESENTATIONS AND WARRANTIES, INCLUDING ANY IMPLIED
WARRANTY OF MERCHANTABILITY, FITNESS FOR A PARTICULAR PURPOSE OR
NON-INFRINGEMENT, ARE HEREBY EXCLUDED. SUN AND ITS LICENSORS SHALL NOT BE
LIABLE FOR ANY DAMAGES SUFFERED BY LICENSEE AS A RESULT OF USING, MODIFYING
OR DISTRIBUTING THE SOFTWARE OR ITS DERIVATIVES. IN NO EVENT WILL SUN OR ITS
LICENSORS BE LIABLE FOR ANY LOST REVENUE, PROFIT OR DATA, OR FOR DIRECT,
INDIRECT, SPECIAL, CONSEQUENTIAL, INCIDENTAL OR PUNITIVE DAMAGES, HOWEVER
CAUSED AND REGARDLESS OF THE THEORY OF LIABILITY, ARISING OUT OF THE USE OF
OR INABILITY TO USE SOFTWARE, EVEN IF SUN HAS BEEN ADVISED OF THE POSSIBILITY
OF SUCH DAMAGES.
This software is not designed or intended for use in on-line control of aircraft, air traffic, aircraft
navigation or aircraft communications; or in the design, construction, operation or maintenance of
any nuclear facility. Licensee represents and warrants that it will not use or redistribute the Software
for such purposes.
ASM
For Java bytecode generation, NetLogo uses the ASM library. It is distributed under the following
license:
Copyright (c) 2000-2005 INRIA, France Telecom. All rights reserved.
Redistribution and use in source and binary forms, with or without modification, are permitted
provided that the following conditions are met:
1. Redistributions of source code must retain the above copyright notice, this list of conditions and
the following disclaimer.
8
Copyright and License Information
NetLogo 4.1.3 User Manual
2. Redistributions in binary form must reproduce the above copyright notice, this list of conditions
and the following disclaimer in the documentation and/or other materials provided with the
distribution.
3. Neither the name of the copyright holders nor the names of its contributors may be used to
endorse or promote products derived from this software without specific prior written permission.
THIS SOFTWARE IS PROVIDED BY THE COPYRIGHT HOLDERS AND CONTRIBUTORS "AS
IS" AND ANY EXPRESS OR IMPLIED WARRANTIES, INCLUDING, BUT NOT LIMITED TO, THE
IMPLIED WARRANTIES OF MERCHANTABILITY AND FITNESS FOR A PARTICULAR
PURPOSE ARE DISCLAIMED. IN NO EVENT SHALL THE COPYRIGHT OWNER OR
CONTRIBUTORS BE LIABLE FOR ANY DIRECT, INDIRECT, INCIDENTAL, SPECIAL,
EXEMPLARY, OR CONSEQUENTIAL DAMAGES (INCLUDING, BUT NOT LIMITED TO,
PROCUREMENT OF SUBSTITUTE GOODS OR SERVICES; LOSS OF USE, DATA, OR
PROFITS; OR BUSINESS INTERRUPTION) HOWEVER CAUSED AND ON ANY THEORY OF
LIABILITY, WHETHER IN CONTRACT, STRICT LIABILITY, OR TORT (INCLUDING
NEGLIGENCE OR OTHERWISE) ARISING IN ANY WAY OUT OF THE USE OF THIS
SOFTWARE, EVEN IF ADVISED OF THE POSSIBILITY OF SUCH DAMAGE.
Log4j
For logging, NetLogo uses the Log4j library. The copyright and license for the library are as follows:
Copyright 1999-2005 The Apache Software Foundation
Licensed under the Apache License, Version 2.0 (the "License"); you may not use this file except in
compliance with the License. You may obtain a copy of the License at
http://www.apache.org/licenses/LICENSE-2.0
Unless required by applicable law or agreed to in writing, software distributed under the License is
distributed on an "AS IS" BASIS, WITHOUT WARRANTIES OR CONDITIONS OF ANY KIND,
either express or implied. See the License for the specific language governing permissions and
limitations under the License.
PicoContainer
For dependency injection, NetLogo uses the PicoContainer library. The copyright and license for the
library are as follows:
Copyright (c) 2003-2004, PicoContainer Organization All rights reserved.
Redistribution and use in source and binary forms, with or without modification, are permitted
provided that the following conditions are met:
• Redistributions of source code must retain the above copyright notice, this list of conditions
and the following disclaimer.
• Redistributions in binary form must reproduce the above copyright notice, this list of
conditions and the following disclaimer in the documentation and/or other materials provided
with the distribution.
Copyright and License Information
9
NetLogo 4.1.3 User Manual
• Neither the name of the PicoContainer Organization nor the names of its contributors may
be used to endorse or promote products derived from this software without specific prior
written permission.
THIS SOFTWARE IS PROVIDED BY THE COPYRIGHT HOLDERS AND CONTRIBUTORS "AS
IS" AND ANY EXPRESS OR IMPLIED WARRANTIES, INCLUDING, BUT NOT LIMITED TO, THE
IMPLIED WARRANTIES OF MERCHANTABILITY AND FITNESS FOR A PARTICULAR
PURPOSE ARE DISCLAIMED. IN NO EVENT SHALL THE COPYRIGHT OWNER OR
CONTRIBUTORS BE LIABLE FOR ANY DIRECT, INDIRECT, INCIDENTAL, SPECIAL,
EXEMPLARY, OR CONSEQUENTIAL DAMAGES (INCLUDING, BUT NOT LIMITED TO,
PROCUREMENT OF SUBSTITUTE GOODS OR SERVICES; LOSS OF USE, DATA, OR
PROFITS; OR BUSINESS INTERRUPTION) HOWEVER CAUSED AND ON ANY THEORY OF
LIABILITY, WHETHER IN CONTRACT, STRICT LIABILITY, OR TORT (INCLUDING
NEGLIGENCE OR OTHERWISE) ARISING IN ANY WAY OUT OF THE USE OF THIS
SOFTWARE, EVEN IF ADVISED OF THE POSSIBILITY OF SUCH DAMAGE.
JTS Topology Suite
Copyright (c) 2001 Vivid Solutions
The library is covered by the GNU LGPL (Lesser General Public License). The text of that license is
included in the "docs" folder which accompanies the NetLogo download, and is also available from
http://www.gnu.org/copyleft/lesser.html.
JScience
Java(TM) Tools and Libraries for the Advancement of Sciences. Copyright (C) 2006 - JScience All
rights reserved.
Redistribution and use in source and binary forms, with or without modification, are permitted
provided that the following conditions are met:
• Redistributions of source code must retain the above copyright notice and include this
license agreement.
• Redistributions in binary form must reproduce the above copyright notice, this list of
conditions and the following disclaimer in the documentation and/or other materials provided
with the distribution.
THIS SOFTWARE IS PROVIDED BY THE COPYRIGHT HOLDERS AND CONTRIBUTORS "AS
IS" AND ANY EXPRESS OR IMPLIED WARRANTIES, INCLUDING, BUT NOT LIMITED TO, THE
IMPLIED WARRANTIES OF MERCHANTABILITY AND FITNESS FOR A PARTICULAR
PURPOSE ARE DISCLAIMED. IN NO EVENT SHALL THE COPYRIGHT OWNER OR
CONTRIBUTORS BE LIABLE FOR ANY DIRECT, INDIRECT, INCIDENTAL, SPECIAL,
EXEMPLARY, OR CONSEQUENTIAL DAMAGES (INCLUDING, BUT NOT LIMITED TO,
PROCUREMENT OF SUBSTITUTE GOODS OR SERVICES; LOSS OF USE, DATA, OR
PROFITS; OR BUSINESS INTERRUPTION) HOWEVER CAUSED AND ON ANY THEORY OF
LIABILITY, WHETHER IN CONTRACT, STRICT LIABILITY, OR TORT (INCLUDING
NEGLIGENCE OR OTHERWISE) ARISING IN ANY WAY OUT OF THE USE OF THIS
SOFTWARE, EVEN IF ADVISED OF THE POSSIBILITY OF SUCH DAMAGE.
10
Copyright and License Information
NetLogo 4.1.3 User Manual
JAVA Advanced Imaging API, Version 1.1.3
DISTRIBUTION BY DEVELOPERS. Subject to the terms and conditions of the Software License
Agreement and the obligations, restrictions, and exceptions set forth below, You may reproduce and
distribute the portions of Software identified below ("each a Redistributable"), provided that you
comply with the following (note that You may be entitled to reproduce and distribute other portions
of the Software not defined here as a Redistributable under certain other licenses as described in
the THIRDPARTYLICENSEREADME):
(a) You distribute the Redistributable complete and unmodified and only bundled as part of Your
applets and applications ("Programs"),
(b) You do not distribute additional software intended to replace any component(s) of the
Redistributable,
(c) You do not remove or alter any proprietary legends or notices contained in or on the
Redistributable.
(d) You only distribute the Redistributable subject to a license agreement that protects Sun's
interests consistent with the terms contained in the Software License Agreement, and
(e) You agree to defend and indemnify Sun and its licensors from and against any damages, costs,
liabilities, settlement amounts and/or expenses (including attorneys' fees) incurred in connection
with any claim, lawsuit or action by any third party that arises or results from the use or distribution
of any and all Programs and/or Redistributable.
Apache Commons Codec
Copyright 2001-2008 The Apache Software Foundation
Licensed under the Apache License, Version 2.0 (the "License"); you may not use this file except in
compliance with the License. You may obtain a copy of the License at
http://www.apache.org/licenses/LICENSE-2.0
Unless required by applicable law or agreed to in writing, software distributed under the License is
distributed on an "AS IS" BASIS, WITHOUT WARRANTIES OR CONDITIONS OF ANY KIND,
either express or implied. See the License for the specific language governing permissions and
limitations under the License.
Apache Jakarta HttpClient
Copyright 1999-2007 Apache Software Foundation
Licensed under the Apache License, Version 2.0 (the "License"); you may not use this file except in
compliance with the License. You may obtain a copy of the License at
http://www.apache.org/licenses/LICENSE-2.0
Unless required by applicable law or agreed to in writing, software distributed under the License is
distributed on an "AS IS" BASIS, WITHOUT WARRANTIES OR CONDITIONS OF ANY KIND,
either express or implied. See the License for the specific language governing permissions and
Copyright and License Information
11
NetLogo 4.1.3 User Manual
limitations under the License.
Apache Commons Logging
Copyright 2003-2007 Apache Software Foundation
Licensed under the Apache License, Version 2.0 (the "License"); you may not use this file except in
compliance with the License. You may obtain a copy of the License at
http://www.apache.org/licenses/LICENSE-2.0
Unless required by applicable law or agreed to in writing, software distributed under the License is
distributed on an "AS IS" BASIS, WITHOUT WARRANTIES OR CONDITIONS OF ANY KIND,
either express or implied. See the License for the specific language governing permissions and
limitations under the License.
12
Copyright and License Information
What's New?
Feedback from users is very valuable to us in designing and improving NetLogo. We'd like to hear
from you. Please send comments, suggestions, and questions to [email protected],
and bug reports to [email protected].
Version 4.1.3 (April 2011)
• improvements:
♦ the GIS extension now works in applets
♦ new Code Example: Label Position Example
• fixes:
♦ fixed bug in diffuse primitive causing it to fail in vertical cylinder worlds
♦ fixed bugs where aborting a BehaviorSpace experiment could cause an error or
memory leak
♦ fixed bug where a turtle forever button could fail if multiple buttons were pressed
quickly
♦ fixed bug in scale-color primitive where rounding could cause an out-of-range
color to be reported
♦ fixed matrix extension bug where matrix creation primitives didn't sanity check their
inputs
♦ fixed GoGo extension bug where failed initialization of GoGo led to subsequent
errors
♦ fixed intermittent plotting bug
♦ for Windows users, bundle Java 6 Update 24
• API changes:
♦ controlling API now allows a new model to be opened in an existing
InterfaceComponent
♦ controlling API now supports attaching listeners to receive notifications of user
actions
Version 4.1.2 (December 2010)
• fixes:
♦ Windows installer now adds NetLogo 3D to the Start menu
♦ fixed BehaviorSpace issue where compile errors in experiment setups caused
exceptions
♦ fixed regression in 4.1.1 where extension-defined data types could cause errors in
the GUI (e.g. in agent monitors)
♦ fixed extensions issues where NetLogo could get confused about what extensions
are active
♦ fixed NetLogo 3D so the stamp command works for links
♦ fixed bug where pow primitive could give NaN result
♦ fixed bug where the F1 key didn't work on several primitives
♦ fixed bitmap extension so importing works in applets
♦ fixed bugs where typing certain combinations of keys or characters in the Command
Center caused exceptions
♦ fixed agentset building primitives to give correct error messages on invalid inputs
♦ fixed bug where logging of global variables didn't work under Java Web Start
What's New?
13
NetLogo 4.1.3 User Manual
♦ fixed matrix extension issue where matrix:dimensions was incorrectly typed
♦ HubNet clients now limit the rate at which they send messages, to conserve
bandwidth
♦ for Windows users, bundle Java 6 Update 22
♦ GIS extension now includes license information
• API changes:
♦ extensions API: deprecated runCommand and runReporter methods
♦ controlling API: added possibleViewUpdate() and tickCounterChanged() methods to
NetLogoListener
♦ logging: changes to the tick counter are now logged (exactly as if ticks was a
global variable)
Version 4.1.1 (August 2010)
• additions:
♦ new matrix extension for matrix manipulation
♦ new behaviorspace-run-number reporter
♦ new biology model: Flocking Vee Formations
♦ new Donate item on Help menu
• fixes:
♦ fixed models: Dining Philosophers, Sandpile 3D, Shepherds, Connected Chemistry 8
Gas Particle Sandbox
♦ on Windows, bundle Java 6 Update 21
♦ fixed embedding API bug where two models could not be embedded in the same
window
♦ fixed bug where in worlds with certain unusual combinations of settings, passing
specific unusual inputs (involving patch boundaries) to primitives including
patch-at and patch-at-heading-and-distance could cause a Java
exception
♦ fixed bug causing some models with plots to intermittently produce spurious error
messages
♦ fixed (we hope) intermittent bug where editing code in the procedures tab or
command center could cause spurious ArrayIndexOutOfBoundsException errors
♦ fixed bug in 2D view where partially transparent turtles were sometimes rendered
incorrectly in some sizes
♦ fixed bug where saved applets that used extensions didn't load additional jars used
by the extension
♦ fixed bug where closing a browser window containing applet could cause a spurious
error dialog to appear
♦ fixed bug where the link primitive could fail when given a non-existent turtle number
♦ fixed bug where the mini views in agent inspectors could have incorrect appearance
with very small patch grids
♦ fixed bug where the context menu on the view in applets contained some
non-working items
♦ fixed bug where movie primitives didn't fail gracefully when used in parallel
BehaviorSpace runs
♦ fixed bug where changing a plot pen's mode on the fly didn't refresh the plot
♦ fixed bug causing models using links not to work in the NetLogo Logging application
♦ fixed bug where new-seed primitive could theoretically return duplicate seeds in a
parallel BehaviorSpace experiment
14
What's New?
NetLogo 4.1.3 User Manual
♦ fixed sound extension bug where the wrong instrument sometimes played
♦ fixed bug where using follow could cause turtle labels not to be drawn
♦ fixed bug where the remove primitive didn't fail gracefully if given incorrect input
♦ fixed HubNet bug where the drawing layer wasn't always mirrored to clients
♦ fixed GIS extension bug where clipping of coordinates to user's GIS envelope was
causing errors saving link datasets
♦ fixed bitmap extension so it works in applets
♦ on Mac OS X, always force use of the Quartz renderer not the Sun renderer
Version 4.1 (December 2009)
• system:
♦ NetLogo 3D is no longer a separate download (but is still a separate application)
♦ Java 5 or higher is now required
♦ NetLogo and its applets no longer support Mac OS X 10.2, Mac OS X 10.3, Windows
98, or Windows ME
♦ the Windows installer and launcher are new and should be compatible with more
systems
♦ on Windows, we now bundle Java 6 (instead of Java 5)
♦ on 64-bit Linux, 3D now works
♦ on Mac OS X, the application now works with 64-bit Java (though by default it still
runs in 32-bit)
♦ BehaviorSpace is now free and open source software (under the LGPL)
• features:
♦ BehaviorSpace is now multi-threaded so runs happen in parallel
♦ Controlling API now supports embedding of models in a surrounding application
♦ automatic indenter for code in the Procedures tab
♦ Models Library dialog now offers searching
♦ links, turtles, and the drawing may now be partially transparent (RGB colors only, 2D
view only)
♦ agent monitors now include a mini-view centered on the agent
♦ extensions that use additional jars now work in applets
♦ the sound extension is now supported in applets
♦ new resize-world and set-patch-size commands allow changing the
dimensions of the patch grid
♦ applet web pages now include color-coded Procedures tab contents
♦ new bitmap and QTJ (QuickTime for Java) extensions allow importing image and
video data
♦ the GoGo extension now supports "burst mode"
• language changes:
♦ set [variable] of ... is no longer allowed; use ask ... [ set variable
... ] instead
♦ the with-min and with-max primitives now have the same precedence as with
• user interface changes:
♦ new menu item on Tools menu closes all agent monitors
♦ new NetLogo Users Group item on Help menu
♦ the snap-to-grid setting in the Interface tab is now saved with the model
♦ turning off turtle and link shapes is no longer supported
♦ the 3D and 2D views may now both be active at the same time (for 2D models)
♦ improved fonts on Windows
What's New?
15
NetLogo 4.1.3 User Manual
♦ improved look-and-feel on Linux
• bug fixes:
♦ a single web page may now contain multiple NetLogo applets
♦ the __includes keyword now works in applets
♦ the profiler extension is now much faster
♦ fixed system dynamics modeler bug where incorrectly parenthesized code was
generated for some expressions
♦ fixed system dynamics modeler bug where some models did not work correctly when
run in headless mode
♦ the array and table extensions are now fully compatible with exporting and importing
worlds
♦ some link primitives are now faster on dense networks
♦ fixed bug where using the precision primitive with negative precisions could give
non-integer results
♦ improved error detection on extremely large integers
♦ fixed bug in forward primitive in non-toroidal worlds
♦ fixed bug where link agentsets sometimes behaved incorrectly when links died
♦ fixed bug in world importing where links stored in agent variables weren't imported
correctly
♦ fixed bug in run and runresult primitives where running the same string from
different procedures could cause a Java exception
♦ fixed bug where in some situations zero wasn't always considered equal to itself (e.g.
in the remove-duplicates primitive)
♦ fixed bug affecting 3D models where layout-circle and tie could cause a Java
exception
♦ fixed bug where the NetLogo window tended to jump between monitors on
multiple-monitor systems
♦ fixed bug in text editing where a single edit sometimes required multiple Undo
actions to undo
♦ fixed bug where export-interface didn't always work properly on Windows and
Linux
♦ fixed bug where extensions that use native libraries (e.g. GoGo) could not be
reloaded
• HubNet:
♦ the HubNet client is now available as a Java applet which can be embedded in web
pages, so users can participate in an activity without installing NetLogo
♦ new feature: support for individualized client views, via:
◊ client overrides (hubnet-send-override)
◊ client perspectives (hubnet-send-watch, hubnet-send-follow)
♦ new commands hubnet-send-message, hubnet-broadcast-message,
hubnet-send-clear-output, and hubnet-broadcast-clear-output
♦ new event type: mouse up events are now sent
♦ fixed longstanding performance issue that was causing activities to use excessive
amounts of bandwidth (especially activities with many monitors)
♦ assorted bugfixes to view mirroring and plot mirroring
♦ removed obsolete hubnet-send-view command
♦ new activity: Memory HubNet
♦ improved activity: Sampler (overhauled, now verified)
♦ improved Code Example: Template
♦ new Code Examples: Client Perspective Example, Client Overrides Example
• models:
16
What's New?
NetLogo 4.1.3 User Manual
♦ NIELS suite of electromagnetism models expanded and revamped, and is now found
in Curricular Models
♦ new biology model: Sunflower Emergent
♦ new social science models: Sugarscape 1, 2 and 3
♦ new computer science models: Simulated Annealing, PageRank
♦ new game: Projectile Attack
♦ new code examples: Move Towards Target Example, Transparency Example
♦ new evolution model: Bug Hunt Drift (in Curricular Models)
♦ new ProbLab probability models (in Curricular Models): Histo Blocks, 4 Blocks, 4
Block Stalagmites, 4 Block Two Stalagmites, Sampler Solo
♦ improved evolution models: Bug Hunt Camouflage (includes RGB genes, measure of
genetic variance), Bird Breeder (conceptual fix), Bug Hunt Speeds (overhaul)
♦ improved Biology models: Daisyworld (bugfix), Flocking (bugfix), Wolf Sheep
Predation (bugfix)
♦ improved Earth Science model: Percolation (colors, clarified info)
♦ improved Computer Science models: Artificial Neural Net (code overhaul), Dining
Philosophers (simplified)
♦ improved chemistry models: Simple Kinetics 1 & 2 (bugfix), Connected Chemistry 3
Circular Particles (bugfix)
♦ improved code examples: Moore and Von Neumann Example (simpler code)
• BehaviorSpace fixes:
♦ stop conditions now run without affecting the main random generator
♦ reduced memory usage when not generating spreadsheet output
♦ aborting an experiment no longer discards accumulated spreadsheet output
♦ the options for running from the command line have changed (table output is no
longer generated by default)
♦ improved error reporting when running headless
• extensions API:
♦ the interfaces in org.nlogo.api involving agents and agentsets now have many
additional methods
♦ extensions that define custom data types can now add support for import and export
of those types
♦ extension primitives may now take a variable number of inputs
♦ an example extension written in Scala is now included
Version 4.0.5 (December 2009)
• bugfixes
Version 4.0.4 (November 2008)
• GIS extension for handling geographic data
• applets now include "powered by NetLogo" notice, linked to NetLogo site
• bugfixes
Version 4.0 (September 2007)
• features:
♦ most models now run somewhat faster:
What's New?
17
NetLogo 4.1.3 User Manual
◊ while results vary from model to model, typical speedup is around 1.5x
◊ the speedup comes from an improved compiler that now partially compiles
NetLogo code into Java byte code
♦ links are now their own type of agent, alongside turtles and patches; this is useful for
network models, geometry models, and much else
♦ new Link Shapes Editor lets you control the appearance of links
♦ logging allows researchers to record students' actions for later analysis
♦ built in tick counter for keeping track of model time (see language changes, below)
♦ new view update system:
◊ there are now two view update modes, tick-based and continuous
◊ continuous is the default when you start up NetLogo; tick-based is the default
for most models in the Models Library; continuous update mode is useful for
non-tick based models like Termites, but may also be useful during
debugging
◊ tick-based updates are faster for most models and avoid displaying
intermediate state
◊ buttons no longer have a "force view update" checkbox; most models should
use tick and/or display instead
♦ improved speed slider:
◊ you can now use the slider to "fast forward" a model (by updating the view
less often)
◊ in tick-based update mode, going slower pauses between ticks rather than
showing intermediate states
◊ in continuous update mode, going slower shows intermediate states; you can
even go so slow you can watch agents move one at a time
♦ new input boxes in Interface tab permit entering text, numbers, colors, or NetLogo
code as model parameters
♦ arrays and hash tables are now supported via extensions (see Arrays & Tables
section of User Manual)
♦ new profiler extension lets you measure the running times of your procedures
♦ new experimental __includes keyword allows splitting model code into multiple
source files
♦ color variables can now contain either a NetLogo color or an RGB color (as a list of
three numbers)
♦ programmable slider bounds (you can now use any NetLogo reporter as the min,
max, or increment of a slider)
♦ exporting the world now includes all plot data, and when you import a world the
contents of plots are restored
♦ the sound extension can now play audio files in addition to MIDI sounds
♦ notes, monitors and output areas now have editable font size
♦ the color of text in notes is now editable, and a note's background may now
optionally be transparent
♦ "Snap to Grid" in Interface tab
♦ added menu items (and F1 keyboard shortcut) for quickly accessing NetLogo
Dictionary
♦ sliders may now be vertical or horizontal
♦ model files with unsaved changes are auto-saved to a temporary files directory, in
case of freezes/crashes
♦ HubNet clients are much easier to edit now (the client is no longer a separate model)
♦ Mathematica-NetLogo link provides a real-time link between Mathematica and
NetLogo, for controlling model runs and visualizing and analyzing results after the
18
What's New?
NetLogo 4.1.3 User Manual
fact or in real time
♦ the run and runresult primitives are now drastically faster when called repeatedly
on the same string
♦ internally, lists are now represented as linked lists, not arrays
♦ plotting is now supported when running headless
• language changes:
♦ the ask command now always runs "without interruption"; if you need the old-style
concurrent behavior, use ask-concurrent
♦ turtle who numbers are now never reused until clear-turtles or clear-all
♦ all numbers are now represented internally using double precision floating point
♦ the + operator only adds numbers now; it doesn't work on strings or lists anymore;
models must be changed by hand to use word instead for strings and sentence
instead for numbers
♦ create-turtles now makes turtles with random headings and colors; to get
evenly spaced turtles with sequential colors and id numbers use
create-ordered-turtles (cro for short)
♦ extension primitives must now (by default) be referred to using the extension name,
e.g. sound:drums instead of just drums
♦ new uphill, uphill4, downhill, and downhill4 commands for doing
hill-climbing replace old reporters with same names
♦ new tick counter primitives: tick, ticks, tick-advance, reset-ticks
♦ new primitive of replaces VARIABLE-of, value-from, values-from
♦ other new primitives: all?, other, move-to, turtle-set, patch-set,
link-set, no-turtles, no-patches, no-links, tie, untie, min-n-of,
max-n-of, with-local-randomness, file-flush, base-colors,
plot-pen-exists?, import-pcolors-rgb, netlogo-applet?
Version 3.1 (April 2006)
• topologies (wrapping at world edges now optional)
• automatically randomized ordering of agentsets
• experimental link primitives
Version 3.0 (September 2005)
• 3D view (for 2D models)
• System Dynamics Modeler
• follow, ride and watch commands for tracking particular agents
• "drawing layer" for marks left by turtles
• GoGo extension for robotics and devices
• buttons take turns now (instead of interleaving their code with each other)
Version 2.1 (December 2004)
• "headless" mode for command line operation
• "action keys" let buttons be triggered by keypresses
• makes QuickTime movies of models
• add "output area" to models
• new primitives including let and carefully
What's New?
19
NetLogo 4.1.3 User Manual
Version 2.0.2 (August 2004)
• extensions API for writing commands and reporters in Java
• controlling API for controlling NetLogo from external Java code
• sound extension for making sounds and music
Version 2.0 (December 2003)
• full support for Mac OS X and Linux
• Windows 95, MacOS 8/9 no longer supported
• fast, flicker-free, non-grid-based graphics
• strict math mode for identical results cross-platform
Version 1.3 (June 2003)
• view control strip
• choosers
• new primitives including run, runresult, map, foreach, filter, reduce
• some primitives accept a variable number of inputs
Version 1.2 (March 2003)
• computer HubNet
Version 1.1 (July 2002)
• "Save as Applet"
• printer support
• Procedures menu
• scrollable Interface tab
Version 1.0 (April 2002)
• initial release (after a series of betas)
20
What's New?
System Requirements
NetLogo runs on almost any current computer.
If you have any trouble with NetLogo not working, write [email protected].
System Requirements: Application
Windows
NetLogo runs on Windows 7, Vista, 2000, and XP.
The NetLogo installer for Windows installs Java 6 for NetLogo's private use only. Other programs on
your computer are not affected.
Mac OS X
Mac OS X 10.4 or newer is required. (NetLogo 4.0 was the last version to support 10.3 and 10.2.)
We recommend you use Software Update to ensure that you have the latest Java.
Other platforms
NetLogo should work on any platform on which Java 5 or later is installed. Java 6 or later is strongly
recommended. (If you have any trouble, you may want to make sure that you are using the official
Java from Sun, and not some alternate implementation.)
You start NetLogo by running the provided netlogo.sh script. (Double-clicking NetLogo.jar may
appear at first to work, but is not recommended.)
System Requirements: Saved Applets
NetLogo models saved as Java applets should work in any web browser where Java 5 (or later) is
installed.
System Requirements: 3D
Occasionally an older, less powerful system is not able to use the 3D view or NetLogo 3D. Try it and
see.
Some systems can use 3D but can't switch to full-screen mode. It depends on the graphics card or
controller. (For example, the ATI Radeon IGP 345 and Intel 82845 probably will not work.)
Technical Java Details for Windows Users
Most Windows users should choose the standard NetLogo download, which includes a bundled
Java 6 which is for NetLogo's private use only; other programs on your computer are not affected.
System Requirements
21
NetLogo 4.1.3 User Manual
There are two reasons you might want to use the alternate download, without bundled Java:
1. You want a smaller download so it arrives faster and uses up less space on your hard drive.
2. For specific technical reasons of your own, you want to run NetLogo using a different Java
than the one we bundle.
If you think the alternate download might be appropriate for you, please read the following.
Even if you already have Java installed on your computer, using that Java may make NetLogo run
slowly.
For maximum performance, NetLogo uses a special option called the "server" VM. The default Java
Runtime Environment (JRE) installer from Sun does not install this option. It is only included in
Sun's Java Development Kit (JDK).
If you are not a Java developer, then you probably have the JRE, not the JDK, and if you use it with
NetLogo, models will run substantially slower.
22
System Requirements
Known Issues
If NetLogo malfunctions, please send us a bug report. See the "Contacting Us" section for
instructions.
Known bugs (all systems)
Language/engine bugs
• export-world and import-world don't save or restore the default shapes set by
set-default-shape
• import-world doesn't work on arrays or tables that contain other arrays or tables
• The run and runresult primitives are often not able to read or set variables created with
let.
• Not all mathematical operations are checked, so it's possible to get "Infinity" or "NaN" (Not a
Number) as an answer without a runtime error being signaled
• A bug in Java causes patch colors imported using import-pcolors to be brighter than the
original if the original image has a grayscale palette. To work around this issue, convert the
image file to an RGB palette.
• import-pcolors may give slightly different results when running on Java 6 as compared
to Java 5.
Other bugs
• Out-of-memory conditions are not handled gracefully
• the "Snap to Grid" feature is disabled when zoomed in or out
• Drawing and then erasing a line in the drawing may not erase every pixel exactly.
• 3D graphics don't work on some graphics configurations; on others 3D works but 3D full
screen mode doesn't.
• The size of the fonts used in a model's interface can vary somewhat from computer to
computer and from platform. As a result, text that fits in a given space on one computer may
not fit in another. To avoid this problem, it is advisable to leave some extra space in the
sizes of buttons, sliders, etc.
• When running a model headless (from the command line), if the model was created in an
earlier NetLogo version, it may not work properly. Use the GUI to open and resave the
model in the current NetLogo version before running it headless.
Extensions
• The GIS extension does not work in applets. (It hard-codes the assumption that data files
are stored locally, not on the server.)
Windows-only bugs
• If you re-install a specific NetLogo version on a machine where it is already installed, the
installer will get confused and print several error messages. To re-install while avoiding this
issue, first uninstall, then re-install. (This issue does not arise when installing a different
version of NetLogo, only when re-installing the same exact version.)
Known Issues
23
NetLogo 4.1.3 User Manual
• On some laptops, the Procedures and Info tabs may become garbled when you scroll them.
To avoid this bug, reduce the size of the NetLogo window and/or reduce the color depth of
your monitor (e.g. change from 32-bit to 16- or 8-bit color). This is a bug in Java itself, not in
NetLogo per se. For technical details on the bug, see
http://developer.java.sun.com/developer/bugParade/bugs/4763448.html (free registration
required). NetLogo users are encouraged to visit that site and vote for Sun to fix this bug.
Macintosh-only bugs
• When opening a model from the Finder (by double-clicking on it, or dragging it onto the
NetLogo icon), if NetLogo is not already running, then the model may or may not open; the
bug is intermittent. (If NetLogo is already running, the model always opens.)
Linux/UNIX-only bugs
• We have discovered a problem on Linux where the "exp" reporter sometimes returns a
slightly different answer (differing only in the last decimal place) for the same input.
According to an engineer at Sun, this should only happen on Linux kernel versions 2.4.19
and earlier, but we have observed the problem on more recent kernel versions. We assume
the problem is Linux-specific and does not happen on other Unix-based systems. We are not
sure if the problem ever occurs in practice during actual NetLogo model runs, or only occurs
in the context of our testing regimen. The bug in the Sun's Java VM, and not in NetLogo
itself. We hope that only the "exp" reporter is affected, but we can't be entirely certain of this.
NetLogo users are encouraged to visit
http://developer.java.sun.com/developer/bugParade/bugs/5023712.html (free registration
required) and vote for Sun to fix this bug.
• If NetLogo cannot find the font Lucida, menus will be illegible. This has been known to
happen on Fedora Core 3, after upgrading packages. Restarting the X Font Server (xfs) has
resolved the problem in all reported cases.
Known issues with HubNet
See the HubNet Guide for a list of known HubNet issues.
24
Known Issues
Contacting Us
Feedback from users is very valuable to us in designing and improving NetLogo. We'd like to hear
from you.
Web Site
Our web site at ccl.northwestern.edu includes our mailing address and phone number. It also has
information about our staff and our various research activities.
Feedback, Questions, Etc.
For help using NetLogo, try this group: http://groups.yahoo.com/group/netlogo-users/.
If you have feedback, suggestions, or questions, you may write us at
[email protected].
Reporting Bugs
If you would like to report a bug that you find in NetLogo, write to [email protected].
When submitting a bug report, please try to include as much of the following information as
possible:
• A complete description of the problem and how it occurred.
• The NetLogo model or code you are having trouble with. If possible, attach a complete
model.
• Your system information: NetLogo version, OS version, Java version, and so on. (This
information is available from NetLogo's "About NetLogo" menu item, then clicking the
System tab. In saved applets, the same information is available by control-clicking (Mac) or
right-clicking the white background of the applet.)
• Any error messages that were displayed. Please copy and paste the entire error message
into your email, or make a screen capture if you are unable to copy and paste.
Contacting Us
25
NetLogo 4.1.3 User Manual
26
Contacting Us
Sample Model: Party
This activity is designed to get you thinking about computer modeling and how you can use it. It also
gives you some insight into the NetLogo software. We encourage beginning users to start with this
activity.
At a Party
Have you ever been at a party and noticed how people cluster in groups? You may have also
noticed that people do not stay within one group, but move throughout the party. As individuals
move around the party, the groups change. If you watched these changes over time, you would
notice patterns forming.
For example, in social settings, people tend to exhibit different behavior than when they are at work
or home. Individuals who are confident within their work environment may become shy and timid at
a social gathering. And others who are quiet and reserved at work may be the "party starter" with
friends.
The patterns may also depend on what kind of gathering it is. In some settings, people are trained
to organize themselves into mixed groups; for example, party games or school-like activities. But in
a non-structured atmosphere, people tend to group in a more random manner.
Is there any type of pattern to this kind of grouping?
Let's take a closer look at this question by using the computer to model human behavior at a party.
NetLogo's "Party" model looks specifically at the question of grouping by gender at parties: why do
groups tend to form that are mostly men, or mostly women?
Let's use NetLogo to explore this question.
What to do:
1. Start NetLogo.
2. Choose "Models Library" from the File menu.
3. Open the "Social Science" folder.
4. Click on the model called "Party".
Sample Model: Party
27
NetLogo 4.1.3 User Manual
5. Press the "open" button.
6. Wait for the model to finish loading
7. (optional) Make the NetLogo window bigger so you can see everything.
8. Press the "setup" button.
In the view, you will see pink and blue lines with numbers:
These lines represent mingling groups at a party. Men are represented in blue, women in pink. The
numbers are the total number of people in each group.
Do all the groups have about the same number of people?
Do all the groups have about the same number of each sex?
Let's say you are having a party and invited 150 people. You are wondering how people will gather
together. Suppose 10 groups form at the party.
How do you think they will group?
Instead of asking 150 of your closest friends to gather and randomly group, let's have the computer
simulate this situation for us.
What to do:
1. Press the "go" button. (Pressing "go" again will stop the model manually.)
2. Observe the movement of people until the model stops.
3. Watch the plots to see what's happening in another way.
Now how many people are in each group?
Originally, you may have thought 150 people splitting into 10 groups, would result in about 15
people in each group. From the model, we see that people did not divide up evenly into the 10
groups -- instead, some groups became very small, whereas other groups became very large. Also,
the party changed over time from all mixed groups of men and women to all single-sex groups.
What could explain this?
There are lots of possible answers to this question about what happens at real parties. The designer
of this simulation thought that groups at parties don't just form randomly. The groups are determined
by how the individuals at the party behave. The designer chose to focus on a particular variable,
called "tolerance":
28
Sample Model: Party
NetLogo 4.1.3 User Manual
Tolerance is defined here as the percentage of people of the opposite sex an individual is
"comfortable" with. If the individual is in a group that has a higher percentage of people of the
opposite sex than their tolerance allows, then they become "uncomfortable" and leave the group to
find another group.
For example, if the tolerance level is set at 25%, then males are only "comfortable" in groups that
are less than 25% female, and females are only "comfortable" in groups that are less than 25%
male.
As individuals become "uncomfortable" and leave groups, they move into new groups, which may
cause some people in that group to become "uncomfortable" in turn. This chain reaction continues
until everyone at the party is "comfortable" in their group.
Note that in the model, "tolerance" is not fixed. You, the user, can use the tolerance "slider" to try
different tolerance percentages and see what the outcome is when you start the model over again.
How to start over:
1. If the "go" button is pressed (black), then the model is still running. Press the
button again to stop it.
2. Adjust the "tolerance" slider to a new value by dragging its red handle.
3. Press the "setup" button to reset the model.
4. Press the "go" button to start the model running again.
Challenge
As the host of the party, you would like to see both men and women mingling within the groups.
Adjust the tolerance slider on the side of the view to get all groups to be mixed as an end result.
To make sure all groups of 10 have both sexes, at what level should we set the tolerance?
Test your predictions on the model.
Can you see any other factors or variables that might affect the male to female ratio within each
group?
Make predictions and test your ideas within this model. Feel free to manipulate more than one
variable at a time.
As you are testing your hypotheses, you will notice that patterns are emerging from the data. For
example, if you keep the number of people at the party constant but gradually increase the
tolerance level, more mixed groups appear.
How high does the tolerance value have to be before you get mixed groups?
What percent tolerance tends to produce what percentage of mixing?
Sample Model: Party
29
NetLogo 4.1.3 User Manual
Thinking With Models
Using NetLogo to model situations like this party scenario allows you to experiment with a system in
a rapid and flexible way that would be difficult to do in a real world situation. Modeling also gives
you the opportunity to observe a situation or circumstance with less prejudice -- as you can examine
the underlying dynamics of a situation. You may find that as you model more and more, many of
your preconceived ideas about various phenomena will be challenged. For example, a surprising
result of the Party model is that even if tolerance is relatively high, a great deal of separation
between the sexes occurs.
This is a classic example of an "emergent" phenomenon, where a group pattern results from the
interaction of many individuals. This idea of "emergent" phenomena can be applied to almost any
subject.
What other emergent phenomena can you think of?
To see more examples and gain a deeper understanding of this concept and how NetLogo helps
learners explore it, you may wish to explore NetLogo's Models Library. It contains models that
demonstrate these ideas in systems of all kinds.
For a longer discussion of emergence and how NetLogo helps learners explore it, see "Modeling
Nature's Emergent Patterns with Multi-agent Languages" (Wilensky, 2001).
What's Next?
The section of the User Manual called Tutorial #1: Running Models goes into more detail about how
to use the other models in the Models Library.
If you want to learn how to explore the models at a deeper level, Tutorial #2: Commands will
introduce you to the NetLogo modeling language.
Eventually, you'll be ready for Tutorial #3: Procedures, where you can learn how to alter and extend
existing models to give them new behaviors, and build your own models.
30
Sample Model: Party
Tutorial #1: Models
If you read the Sample Model: Party section, you got a brief introduction to what it's like to interact
with a NetLogo model. This section will go into more depth about the features that are available
while you're exploring the models in the Models Library.
Throughout all of the tutorials, we'll be asking you to make predictions about what the effects of
making changes to the models will be. Keep in mind that the effects are often surprising. We think
these surprises are exciting and provide excellent opportunities for learning.
Some people have found it helpful to print out the tutorials in order to work through them. When the
tutorials are printed out, there's more room on your computer screen for the NetLogo model you're
looking at.
Sample Model: Wolf Sheep Predation
We'll open one of the Sample Models and explore it in detail. Let's try a biology model: Wolf Sheep
Predation, a predator-prey population model.
• Open the Models Library from the File menu.
• Choose "Wolf Sheep Predation" from the Biology section and press "Open".
The Interface tab will fill up with lots of buttons, switches, sliders and monitors. These interface
elements allow you to interact with the model. Buttons are blue; they set up, start, and stop the
model. Sliders and switches are green; they alter model settings. Monitors and plots are beige; they
display data.
If you'd like to make the window larger so that everything is easier to see, you can use the zoom
menu at the top of the window.
When you first open the model, you will notice that the view is empty (all black). To begin the model,
you will first need to set it up.
Tutorial #1: Models
31
NetLogo 4.1.3 User Manual
• Press the "setup" button.
What do you see appear in the view?
• Press the "go" button to start the simulation.
As the model is running, what is happening to the wolf and sheep populations?
• Press the "go" button to stop the model.
Controlling the Model: Buttons
When a button is pressed, the model responds with an action. A button can be a "once" button, or a
"forever" button. You can tell the difference between these two types of buttons by a symbol on the
face of the button. Forever buttons have two arrows in the bottom right corners, like this:
Once buttons don't have the arrows, like this:
Once buttons do one action and then stop. When the action is finished, the button pops back up.
Forever buttons do an action over and over again. When you want the action to stop, press the
button again. It will finish the current action, then pop back up.
Most models, including Wolf Sheep Predation, have a once button called "setup" and a forever
button called "go". Many models also have a once button called "go once" or "step once" which is
like "go" except that it advances the model by one tick (time step) instead of over and over. Using a
once button like this lets you watch the progress of the model more closely.
Stopping a forever button is the normal way to stop a model. It's safe to pause a model by stopping
a forever button, then make it go on by pressing the button again. You can also stop a model with
the "Halt" item on the Tools menu, but you should only do this if the model is stuck for some reason.
Using "Halt" may interrupt the model in the middle of an action, and as the result the model could
get confused.
• If you like, experiment with the "setup" and "go" buttons in the Wolf Sheep
Predation model.
Do you ever get different results if you run the model several times with the same
settings?
32
Tutorial #1: Models
NetLogo 4.1.3 User Manual
Controlling speed: Speed Slider
The speed slider allows you to control the speed of a model, that is, the speed at which turtles
move, patches change color, and so on.
When you move the slider to the left the model slows down so there are longer pauses between
each tick (time step). That makes it easier to see what is happening. You might even slow the
model down so far as to see exactly what a single turtle is doing.
When you move the speed slider to the right of the center the model will speed up. NetLogo will
start skipping frames, that is, it won't update the view at the end of every tick, only some ticks.
Showing the state of the world takes time, so showing it less often means the model progresses
faster.
Note that if you push the speed slider well to the right, the view update may update so frequently
that the model appears to have slowed down. It hasn't, as you can see by watching the tick counter.
Only the frequency of updates has lessened.
Adjusting Settings: Sliders and Switches
The settings within a model give you an opportunity to work out different scenarios or hypotheses.
Altering the settings and then running the model to see how it reacts to those changes can give you
a deeper understanding of the phenomena being modeled. Switches and sliders give you access to
a model's settings.
Here are the switches and sliders in Wolf Sheep Predation:
Let's experiment with their effect on the behavior of the model.
Tutorial #1: Models
33
NetLogo 4.1.3 User Manual
• Open Wolf Sheep Predation if it's not open already.
• Press "setup" and "go" and let the model run for about a 100 time-ticks.
(Note: there is a readout of the number of ticks right above the plot.)
• Stop the model by pressing the "go" button.
What happened to the sheep over time?
Let's take a look and see what would happen to the sheep if we change one of the
settings.
• Turn the "grass?" switch on.
• Press "setup" and "go" and let the model run for a similar amount of time as
before.
What did this switch do to the model? Was the outcome the same as your previous
run?
Just like buttons, switches have information attached to them. Their information is set up in an on/off
format. Switches turn on/off a separate set of directions. These directions are usually not necessary
for the model to run, but might add another dimension to the model. Turning the "grass?" switch on
affected the outcome of the model. Prior to this run, the growth of the grass stayed constant. This is
not a realistic look at the predator-prey relationship; so by setting and turning on a grass growth
rate, we were able to model all three factors: sheep, wolf and grass populations.
Another type of setting is called a slider.
Sliders are a different type of setting then a switch. A switch has two values: on or off. A slider has a
range of numeric values that can be adjusted. For example, the "initial-number-sheep" slider has a
minimum value of 0 and a maximum value of 250. The model could run with 0 sheep or it could run
with 250 sheep, or anywhere in between. Try this out and see what happens. As you move the
marker from the minimum to the maximum value, the number on the right side of the slider changes;
this is the number the slider is currently set to.
Let's investigate Wolf Sheep Predation's sliders.
• Read the contents of the Information tab, located above the toolbar, to learn
what each of this models' sliders represents.
The Information tab offers guidance and insight into the model. Within this tab you will find an
explanation of the model, suggestions on things to try, and other information. You may want to read
the Information tab before running a model, or you might want to just start experimenting, then look
at the Information tab later.
What would happen to the sheep population if there was more initial sheep and less
initial wolves at the beginning of the simulation?
• Turn the "grass?" switch off.
• Set the "initial-number-sheep" slider to 100.
34
Tutorial #1: Models
NetLogo 4.1.3 User Manual
• Set the "initial-number-wolves" slider to 20.
• Press "setup" and then "go".
• Let the model run for about 100 time-ticks.
Try running the model several times with these settings.
What happened to the sheep population?
Did this outcome surprise you? What other sliders or switches can be adjusted to
help out the sheep population?
• Set "initial-number-sheep" to 80 and "initial-number-wolves" to 50. (This is
close to how they were when you first opened the model.)
• Set "sheep-reproduce" to 10.0%.
• Press "setup" and then "go".
• Let the model run for about 100 time ticks.
What happened to the wolves in this run?
When you open a model, all the sliders and switches are on a default setting. If you open a new
model or exit the program, your changed settings will not be saved, unless you choose to save
them.
(Note: in addition to sliders and switches, some models have a third kind of setting, called a
chooser. The Wolf Sheep Predation doesn't have any of these, though.)
Gathering Information: Plots and Monitors
A purpose to modeling is to gather data on a subject or topic that would be very difficult to do in a
laboratory situation. NetLogo has two main ways of displaying data to the user: plots and monitors.
Plots
The plot in Wolf Sheep Predation contains three lines: sheep, wolves, and grass / 4. (The grass
count is divided by four so it doesn't make the plot too tall.) The lines show what's happening in the
model over time. To see which line is which, click on "Pens" in the upper right corner of the plot
window to open the plot pens legend. A key appears that indicates what each line is plotting. In this
case, it's the population counts.
When a plot gets close to becoming filled up, the horizontal axis increases in size and all of the data
from before gets squeezed into a smaller space. In this way, more room is made for the plot to
grow.
If you want to save the data from a plot to view or analyze it in another program, you can use the
"Export Plot" item on the File menu. It saves this information to your computer in a format that can
by read back by spreadsheet and database programs such as Excel. You can also export a plot by
control-clicking (Mac) or right-clicking (Windows) it and choosing "Export..." from the popup menu.
Tutorial #1: Models
35
NetLogo 4.1.3 User Manual
Monitors
Monitors are another method of displaying information in a model. Here are the monitors in Wolf
Sheep Predation:
The monitor labeled "time-ticks" tells us how much time has passed in the model. The other
monitors show us the population of sheep and wolves, and the amount of grass. (Remember, the
amount of grass is divided by four to keep the plot from getting too tall.)
The numbers displayed in the monitors update continuously as the model runs, whereas the plots
show you data from the whole course of the model run.
Note that NetLogo has also another kind of monitor, called "agent monitors". These will be
introduced in Tutorial #2.
Controlling the View
If you look at the interface tab, you'll see a strip of controls along the top edge in the toolbar. These
controls change various aspects of the view.
Let's experiment with the effect of these controls.
• Press "setup" and then "go" to start the model running.
• As the model runs, move the speed slider to the left.
What happens?
This slider is helpful if a model is running too fast for you to see what's going on in
detail.
• Move the speed slider to the middle.
• Try moving the speed slider to the right.
• Now try checking and unchecking the view updates checkbox.
What happens?
Fast forwarding the model and turning off view updates are useful if you're impatient and want a
model to run faster. Fast forwarding (moving the speed slider to the right) drops view updates so the
model can run fast, since updating the view takes time that could be used for running the model
itself.
When view updates are off completely, the model continues to run in the background, and plots and
monitors still update; but if you want to see what's happening, you need to turn view updates back
on by rechecking the box. Many models run much faster when view updates are off; for others, it
makes little difference.
36
Tutorial #1: Models
NetLogo 4.1.3 User Manual
The size of the view is determined by five separate settings: Min and Max X, Min and Max Y and
Patch Size. Let's take a look at what happens when we change the size of the view in the "Wolf
Sheep Predation" model.
There are more model settings than there's room for in the toolbar. The "Settings..." button lets you
get to the rest of the settings.
• Press the "Settings..." button in the toolbar.
A dialog box will open containing all the settings for the view:
What are the current settings for max-pxcor, min-pxcor, max-pycor, min-pycor, and
Patch size?
• Press "cancel" to make this window go away without changing the settings.
• Place your mouse pointer next to, but still outside of, the view.
You will notice that the pointer turns into a crosshair.
• Hold down the mouse button and drag the crosshair over the view.
Tutorial #1: Models
37
NetLogo 4.1.3 User Manual
The view is now selected, which you know because it is now surrounded by a gray
border.
• Drag one of the square black "handles". The handles are found on the edges
and at the corners of the view.
• Unselect the view by clicking anywhere in the white background of the
Interface tab.
• Press the "Settings..." button again and look at the settings.
What numbers changed?
What numbers didn't change?
The NetLogo world is a two dimensional grid of "patches". Patches are the individual squares in the
grid.
In Wolf Sheep Predation, when the "grass?" switch is on the individual patches are easily seen,
because some of them are green, while others are brown.
Think of the patches as being like square tiles in a room with a tile floor. By default, exactly in the
middle of the room is a tile labeled (0,0); meaning that if the room was divided in half one way and
then the other way, these two dividing lines would intersect on this tile. We now have a coordinate
system that will help us locate objects within the room:
How many tiles away is the (0,0) tile from the right side of the room?
How many tiles away is the (0,0) tile from the left side of the room?
In NetLogo, the number of tiles from right to left is called world-width. And the number of tiles from
top to bottom is world-height. These numbers are defined by top, bottom, left and right boundaries.
38
Tutorial #1: Models
NetLogo 4.1.3 User Manual
In these diagrams, max-pxcor is 3 , min-pxcor is -3, max-pycor is 2 and min-pycor is -2.
When you change the patch size, the number of patches (tiles) doesn't change, the patches only get
larger or smaller on the screen.
Let's look at the effect of changing the minimum and maximum coordinates in the world.
• Using the Settings dialog that is still open, change max-pxcor to 30 and
max-pycor value to 10. Notice that min-pxcor and min-pycor change too.
That's because by default the origin (0,0) is in the center of the world.
What happened to the shape of the view?
• Press the "setup" button.
Now you can see the new patches you have created.
• Edit the view by pressing the "Settings..." button again.
• Change the patch size to 20 and press "OK".
What happened to the size of the view? Did its shape change?
Editing the view also lets you change other settings. Feel free to experiment with these.
Tutorial #1: Models
39
NetLogo 4.1.3 User Manual
Once you are done exploring the Wolf Sheep Predation model, you may want to take some time just
to explore some of the other models available in the Models Library.
The Models Library
The library contains five sections: Sample Models, Perspective Demos, Curricular Models, Code
Examples, and HubNet Computer Activities.
Sample Models
The Sample Models section is organized by subject area and currently contains more than 210
models. We are continuously working on adding new models to it, so come visit this section at a
later date to view the new additions to the library.
Some of the folders in Sample Models have folders inside them labeled "(unverified)". These
models are complete and functional, but are still in the process of being reviewed for content,
accuracy, and quality of code.
Perspective Demos
These models are all models that are also in Sample Models, however, they are slightly modified to
demonstrate NetLogo's perspective features.
Curricular Models
These are models designed to be used in schools in the context of curricula developed by the CCL
at Northwestern University. Some of these are models are also listed under Sample Models; others
are unique to this section. See the info tabs of the models for more information on the curricula they
go with.
Code Examples
These are simple demonstrations of particular features of NetLogo. They'll be useful to you later
when you're extending existing models or building new ones. For example, if you wanted to put a
histogram within your model, you'd look at "Histogram Example" to find out how.
HubNet Computer Activities
This section contains participatory simulations for use in the classroom. For more information about
HubNet, see the HubNet Guide.
What's Next?
If you want to learn how to explore models at a deeper level, Tutorial #2: Commands will introduce
you to the NetLogo modeling language.
In Tutorial #3: Procedures you can learn how to alter and extend existing models and build your
own models.
40
Tutorial #1: Models
Tutorial #2: Commands
In Tutorial #1, you had the opportunity to view some of the NetLogo models, and you have
successfully navigated your way through opening and running models, pressing buttons, changing
slider and switch values, and gathering information from a model using plots and monitors. In this
section, the focus will start to shift from observing models to manipulating models. You will start to
see the inner workings of the models and be able to change how they look.
Sample Model: Traffic Basic
• Go to the Models Library (File menu).
• Open up Traffic Basic, found in the "Social Science" section.
• Run the model for a couple minutes to get a feel for it.
• Consult the Information tab for any questions you may have about this model.
In this model, you will notice one red car in a stream of blue cars. The stream of cars are all moving
in the same direction. Every so often they "pile up" and stop moving. This is modeling how traffic
jams can form without any cause such as an accident, a broken bridge, or an overturned truck. No
"centralized cause" is needed for a traffic jam to form.
You may alter the settings and observe a few runs to get a full understanding of the model.
As you are using the Traffic Basic model, have you noticed any additions you would
like to make to the model?
Looking at the Traffic Basic model, you may notice the environment is fairly simple; a black
background with a white street and number of blue cars and one red car. Changes that could be
made to the model include: changing the color and shape of the cars, adding a house or street light,
creating a stop light, or even creating another lane of traffic. Some of these suggested changes are
cosmetic and would enhance the look of the model while the others are more behavioral. We will be
focusing more on the simpler or cosmetic changes throughout most of this tutorial. (Tutorial #3 will
go into greater detail about behavioral changes, which require changing the Procedures tab.)
To make these simple changes we will be using the Command Center.
The Command Center
The Command Center is located in the Interface Tab and allows you to enter commands or
directions to the model. Commands are instructions you can give to NetLogo's agents: turtles,
patches, links, and the observer. (Refer to the Interface Guide for details explaining the different
parts of the Command Center.)
Tutorial #2: Commands
41
NetLogo 4.1.3 User Manual
In Traffic Basic:
• Press the "setup" button.
• Locate the Command Center.
• Click the mouse in the white box at the bottom of the Command Center.
• Type the text shown here:
• Press the return key.
What happened to the View?
You may have noticed the background of the View has turned all yellow and the street
has disappeared.
Why didn't the cars turn yellow too?
Looking back at the command that was written, we asked only the patches to change their
color. In this model, the cars are represented by a different kind of agent, called "turtles".
Therefore, the cars did not received these instructions and thus did not change.
What happened in the Command Center?
You may have noticed that the command you just typed is now displayed in the white box
in the middle of the Command Center as shown below:
• Type in the white box at the bottom of the Command Center the text shown below:
42
Tutorial #2: Commands
NetLogo 4.1.3 User Manual
Was the result what you expected?
Your View should have a yellow background with a line of brown cars in the middle:
The NetLogo world is a two dimensional world that is made up of turtles, patches and an observer.
The patches create the ground in which the turtles can move around on and the observer is a being
that oversee everything that is going on in the world. (For a detailed description and specifics about
this world, refer to the NetLogo Programming Guide.)
In the Command Center, we have the ability to give the observer a command, the turtles a
command, or the patches a command. We choose between these options by using the popup menu
located in the bottom left corner of the Command Center. You can also use the tab key on your
keyboard to cycle through the different options.
• In the Command Center, click on the "observer>" in the bottom left corner:
• Choose "turtles" from the popup menu.
• Type set color pink and press return.
• Press the tab key until you see "patches>" in the bottom left corner.
• Type set pcolor white and press return.
What does the View look like now?
Do you notice any differences between these two commands and the observer
commands from earlier?
Tutorial #2: Commands
43
NetLogo 4.1.3 User Manual
The observer oversees the world and therefore can give a command to the patches or turtles using
ask. Like in the first example (observer> ask patches [set pcolor yellow]), the observer
has to ask the patches to set their pcolor to yellow. But when a command is directly given to a group
of agents like in the second example (patches> set pcolor white), you only have to give the
command itself.
• Press "setup".
What happened?
Why did the View revert back to the old version, with the black background and white road? Upon
pressing the "setup" button, the model will reconfigure itself back to the settings outlined in the
Procedures tab. The Command Center is not often used to permanently change the model. It is
most often used as a tool to customize current models and allows for you to manipulate the
NetLogo world to further answer those "What if" questions that pop up as you are investigating the
models. (The Procedures tab is explained in the next tutorial, and in the Programming Guide.)
Now that we have familiarized ourselves with the Command Center, let's look at some more details
about how colors work in NetLogo.
Working With Colors
You may have noticed in the previous section that we used two different words for changing color:
color and pcolor.
What is the difference between color and pcolor?
• Choose "turtles" from the popup menu in the Command Center (or use the
tab key).
• Type set color blue and press return.
What happened to the cars?
Think about what you did to make the cars turn blue, and try to make the patches
turn red.
If you try to ask the patches to set color red, an error message occurs:
• Type set pcolor red instead and press return.
44
Tutorial #2: Commands
NetLogo 4.1.3 User Manual
We call color and pcolor "variables". Some commands and variables are specific to turtles and
some are specific to patches. For example, the color variable is a turtle variable, while the
pcolor variable is a patch variable.
Go ahead and practice altering the colors of the turtles and patches using the set command and
these two variables.
To be able to make more changes to the colors of turtles and patches, or shall we say cars and
backgrounds, we need to gain a little insight into how NetLogo deals with colors.
In NetLogo, all colors have a numeric value. In all of the exercises we have been using the name of
the color. This is because NetLogo recognizes 16 different color names. This does not mean that
NetLogo only recognizes 16 colors. There are many shades in between these colors that can be
used too. Here's a chart that shows the whole NetLogo color space:
To get a color that doesn't have its own name, you just refer to it by a number instead, or by adding
or subtracting a number from a name. For example, when you type set color red, this does the
same thing as if you had typed set color 15. And you can get a lighter or darker version of the
same color by using a number that is a little larger or a little smaller, as follows.
• Choose "patches" from the popup menu in the Command Center (or use the
tab key).
• Type set pcolor red - 2 (The spacing around the "-" is important.)
Tutorial #2: Commands
45
NetLogo 4.1.3 User Manual
By subtracting from red, you make it darker.
• Type set pcolor red + 2
By adding to red, you make it lighter.
You can use this technique on any of the colors listed in the chart.
Agent Monitors and Agent Commanders
In the previous activity, we used the set command to change the colors of all the cars. But if you
recall, the original model contained one red car amongst a group of blue cars. Let's look at how to
change only one car's color.
• Press "setup" to get the red car to reappear.
• If you are on a Macintosh, hold down the Control key and click on the red car.
On other operating systems, click on the red car with the right mouse button.
• If there is another turtle close to the red turtle you'll see more than one turtle
listed at the bottom of the menu. Move your mouse over the turtle selections,
notice when your mouse highlights a turtle menu item that turtle is highlighted
in the view. Select "inspect turtle" from the sub-menu for the red turtle.
A turtle monitor for that car will appear:
46
Tutorial #2: Commands
NetLogo 4.1.3 User Manual
The mini-view at the top of the agent monitor will always stay centered this agent. You can zoom
the view in and out using the slider below the view and you can watch this turtle in the main view by
pressing the "watch me" button.
Taking a closer look at this turtle monitor, we can see all of the variables that belong to the red car.
A variable is a place that holds a value that can be changed. Remember when it was mentioned
that all colors are represented in the computer as numbers? The same is true for the agents. For
example, every turtle has an ID number we call its "who number".
Let's take a closer look at the turtle monitor:
Tutorial #2: Commands
47
NetLogo 4.1.3 User Manual
What is this turtle's who number?
What color is this turtle?
What shape is this turtle?
This turtle monitor is showing a turtle who that has a who number of 0, a color of 15 (red -- see
above chart), and the shape of a car.
There are two other ways to open a turtle monitor besides right-clicking (or control-clicking,
depending on your operating system). One way is to choose "Turtle Monitor" from the Tools menu,
then type the who number of the turtle you want to inspect into the "who" field and press return. The
other way is to type inspect turtle 0 (or other who number) into the Command Center.
You close a turtle monitor by clicking the close box in the upper left hand corner (Macintosh) or
upper right hand corner (other operating systems).
Now that we know more about Agent Monitors, we have three ways to change an individual turtle's
color.
One way is to use the box called an Agent Commander found at the bottom of an Agent Monitor.
You type commands here, just like in the Command Center, but the commands you type here are
only done by this particular turtle.
• In the Agent Commander of the Turtle Monitor for turtle 0, type set color
pink.
What happens in the View?
Did anything change in the Turtle Monitor?
A second way to change one turtle's color is to go directly to the color variable in the Turtle Monitor
and change the value.
• Select the text to the right of "color" in the Turtle Monitor.
• Type in a new color such as green + 2.
What happened?
The third way to change an individual turtle's or patch's color is to use the observer. Since, the
observer oversees the NetLogo world, it can give commands that affect individual turtles, as well as
groups of turtles.
48
Tutorial #2: Commands
NetLogo 4.1.3 User Manual
• In the Command Center, select "observer" from the popup menu (or use the
tab key).
• Type ask turtle 0 [set color blue] and press return.
What happens?
Just as there are Turtle Monitors, there are also Patch Monitors. Patch monitors work
very similarly to Turtle Monitors.
Can you make a patch monitor and use it to change the color of a single patch?
If you try to have the observer ask patch 0 [set pcolor blue], you'll get an error message:
To ask an individual turtle to do something, we use its who number. But patches don't have who
numbers, therefore we need to refer to them some other way.
Remember, patches are arranged on a coordinate system. Two numbers are needed to plot a point
on a graph: an x-axis value and a y-axis value. Patch locations are designated in the same way as
plotting a point.
• Open a patch monitor for any patch.
Tutorial #2: Commands
49
NetLogo 4.1.3 User Manual
The monitor shows that for the patch in the picture, its pxcor variable is -19 and its
pycor variable is 0. If we go back to the analogy of the coordinate plane and wanted
to plot this point, the point would be found in the lower left quadrant of the coordinate
plane where x=-19 and y=0.
To tell this particular patch to change color, use its coordinates.
• In the bottom of the patch monitor, enter set pcolor blue and press
return.
Typing a command in a turtle or patch monitor addresses only that turtle or patch.
You can also talk to a single patch from the Command Center:
• In the Command Center, enter ask patch -19 0 [set pcolor green]
and press return.
What's Next?
At this point, you may want to take some time to try out the techniques you've learned on some of
the other models in the Models Library.
In Tutorial #3: Procedures you can learn how to alter and extend existing models and build your
own models.
50
Tutorial #2: Commands
Tutorial #3: Procedures
This tutorial leads you through the process of building a complete model, built up stage by stage,
with every step explained along the way.
Agents and procedures
In Tutorial #2, you learned how to use the command center and agent monitors to inspect and
modify agents and make them do things. Now you're ready to learn about the real heart of a
NetLogo model: the Procedures tab.
You've already used types of agents you can give commands to in NetLogo: patches, turtles, links,
and the observer. Patches are stationary and arranged in a grid. Turtles move over that grid. Links
connect two turtles. The observer oversees everything that's going on and does whatever the
turtles, patches and links can't do for themselves.
All four types of agents can run NetLogo commands. All four can also run "procedures". A
procedure combines a series of NetLogo commands into a single new command that you define.
You will now learn to write procedures that make turtles move, eat, reproduce, and die. You will also
learn how to make monitors, sliders, and plots. The model we'll build is a simple ecosystem model
not unlike parts of Wolf Sheep Predation from Tutorial #1.
Making the setup button
To start a new model, select "New" from the File menu. Then begin by creating a setup button:
• Click the "Add" icon in the toolbar at the top of the Interface tab.
• On the menu next to Add, select Button (if it isn't already selected).
• Click wherever you want the button to appear in the empty white area of the
Interface tab.
• A dialog box for editing the button opens. Type setup in the box labeled
"Commands".
• Press the OK button when you're done; the dialog box closes.
Now you have a setup button. Pressing the button runs a procedure called "setup". A procedure is a
sequence of NetLogo commands that we assign a new name. We haven't defined that procedure
yet (we will soon). Because the button refers to a procedure that doesn't exist yet, the button turns
red:
Tutorial #3: Procedures
51
NetLogo 4.1.3 User Manual
If you want to see the actual error message, click the button.
Now we'll create the "setup" procedure, so the error message will go away:
• Switch to the Procedures tab.
• Type the following:
to setup
clear-all
create-turtles 100
ask turtles [ setxy random-xcor random-ycor ]
end
When you're done, the Procedures tab looks like this:
Note that the lines are indented different amounts. Most people find it helpful to indent their code
like this, but it is not mandatory. It makes the code easier to read and change. Your procedure
began with the word to and ended with the word end. Every new procedure you create will begin
and end with these two words.
Let's look at what you typed in and see what each line of your procedure does:
• to setup begins defining a procedure named "setup".
• clear-all resets the world to an initial, empty state. All the patches turn black and any
turtles you might have created disappear. Basically, it wipes the slate clean for a new model
52
Tutorial #3: Procedures
NetLogo 4.1.3 User Manual
run.
• create-turtles 100 creates 100 turtles. They start out standing at the origin, that is, the
center of patch 0,0.
• ask turtles [ ... ] tells each turtle to run, independently, the commands inside the
brackets. (Every command in NetLogo is run by some agent. ask is a command too. Here,
the observer is running the ask command itself, in turn causing the turtles to run
commands.)
• setxy random-xcor random-ycor is a command using "reporters". A reporter, as
opposed to a command, reports a result. First each turtle runs the reporter random-xcor
which will report a random number from the allowable range of turtle coordinates along the X
axis. Then each turtle runs the reporter random-ycor, same for the Y axis. Finally each
turtle runs the setxy command with those two numbers as inputs. That makes the turtle
move to the point with those coordinates.
• end completes the definition of the "setup" procedure.
When you're done typing, switch to the Interface tab and press the setup button you made before.
You will see the turtles scattered around the world:
Press setup a couple more times, and see how the arrangement of turtles is different each time.
Note that some turtles may be right on top of each other.
Think a bit about what you needed to do to make this happen. You needed to make a button in the
interface and make a procedure that the button uses. The button only worked once you completed
both of these separate steps. In the remainder of this tutorial, you will often have to complete two or
more similar steps to add another feature to the model. If something doesn't appear to work after
you completed what you thought is the final step for that new feature, continue to read ahead to see
if there is still more to do. After reading ahead for a couple of paragraphs, you should then go back
Tutorial #3: Procedures
53
NetLogo 4.1.3 User Manual
over the directions to see if there is any step you might have missed.
Making the go button
Now make a button called "go". Follow the same steps you used to make the setup button, except:
• For Commands enter go instead of setup.
• Check the "forever" checkbox in the edit dialog.
The "forever" checkbox makes the button stay down once pressed, so its commands run over and
over again, not just once.
• Then add a go procedure to the Procedures tab:
to go
move-turtles
end
But what is move-turtles? Is it a primitive (in other words, built-in to NetLogo), like clear-all
is? No, it's another procedure that you're about to add. So far, you have introduced two procedures
that you added yourself: setup and go.
• Add the move-turtles procedure after the goprocedure:
to go
54
Tutorial #3: Procedures
NetLogo 4.1.3 User Manual
move-turtles
end
to move-turtles
ask turtles [
right random 360
forward 1
]
end
Note there are no spaces around the dash in move-turtles. In Tutorial #2 we used red - 2,
with spaces, in order to subtract two numbers, but here we want move-turtles, without spaces.
The "-" combines "move" and "turtles" into a single name.
Here is what each command in the move-turtles procedure does:
• ask turtles [ ... ] says that each turtle should run the commands in the brackets.
• right random 360 is another command that uses a reporter. First, each turtle picks a
random whole number between 0 and 359. (random doesn't include the number you give it
as a possible result.) Then the turtle turns right this number of degrees.
• forward 1 makes the turtle move forward one step.
Why couldn't we have just written all of these commands in go instead of in a separate procedure?
We could have, but during the course of building your project, it's likely that you'll add many other
parts. We'd like to keep go as simple as possible, so that it is easy to understand. Eventually, it will
include many other things you want to have happen as the model runs, such as calculating
something or plotting the results. Each of these things to do will have its own procedure and each
procedure will have its own unique name.
The 'go' button you made in the Interface tab is a forever button, meaning that it will continually run
its commands until you shut it off (by clicking on it again). After you have pressed 'setup' once, to
create the turtles, press the 'go' button. Watch what happens. Turn it off, and you'll see that all the
turtles stop in their tracks.
Note that if a turtle moves off the edge of the world, it "wraps", that is, it appears on the other side.
(This is the default behavior. It can be changed; see the Topology section of the Programming
Guide for more information.)
Experimenting with commands
We suggest you start experimenting with other turtle commands.
Type commands into the Command Center (like turtles> set color red), or add commands
to setup, go, or move-turtles.
Note that when you enter commands in the Command Center, you must choose turtles>,
patches>, or observer> in the popup menu on the left, depending on which agents are going to
run the commands. It's just like using ask turtles or ask patches, but saves typing. You can
also use the tab key to switch agent types, which you might find more convenient than using the
menu.
Tutorial #3: Procedures
55
NetLogo 4.1.3 User Manual
You might try typing turtles> pen-down into the Command Center and then pressing the go
button.
Also, inside the move-turtles procedure you can try changing right random 360 to right
random 45.
Play around. It's easy and the results are immediate and visible -- one of NetLogo's many strengths.
When you feel you've done enough experimenting for now, you're ready to continue improving the
model you are building.
Patches and variables
Now we've got 100 turtles aimlessly moving around, completely unaware of anything else around
them. Let's make things a little more interesting by giving these turtles a nice background against
which to move.
• Go back to the setup procedure. We can rewrite it as follows:
to setup
clear-all
setup-patches
setup-turtles
end
• The new definition of setup refers to two new procedures. To define
setup-patches, add this:
to setup-patches
ask patches [ set pcolor green ]
end
The setup-patches procedure sets the color of every patch to green to start with.
(A turtle's color variable is color; a patch's is pcolor.)
The only part remaining in our new 'setup' that is still undefined is setup-turtles.
• Add this procedure too:
to setup-turtles
create-turtles 100
ask turtles [ setxy random-xcor random-ycor ]
end
Did you notice that the new setup-turtles procedure has most of the same
commands as the old setup procedure?
• Switch back to the Interface tab.
• Press the setup button.
Voila! A lush NetLogo landscape complete with turtles and green patches appears:
56
Tutorial #3: Procedures
NetLogo 4.1.3 User Manual
After seeing the new setup procedure work a few times, you may find it helpful to read through the
procedure definitions again.
Turtle variables
So we have some turtles running around on a landscape, but they aren't doing anything with it. Let's
add some interaction between the turtles and the patches.
We'll make the turtles eat "grass" (the green patches), reproduce, and die. The grass will gradually
grow back after it is eaten.
We'll need a way of controlling when a turtle reproduces and dies. We'll determine that by keeping
track of how much "energy" each turtle has. To do that we need to add a new turtle variable.
You've already seen built-in turtle variables like color. To make a new turtle variable, we add a
turtles-own declaration at the top of the Procedures tab, before all the procedures. Call it
energy:
turtles-own [energy]
to go
move-turtles
eat-grass
end
Let's use this newly defined variable (energy) to allow the turtles to eat.
Tutorial #3: Procedures
57
NetLogo 4.1.3 User Manual
• Switch to the Procedures tab.
• Rewrite the go procedure as follows:
to go
move-turtles
eat-grass
end
• Add a new eat-grass procedure:
to eat-grass
ask turtles [
if pcolor = green [
set pcolor black
set energy (energy + 10)
]
]
end
We are using the if command for the first time. Look at the code carefully. Each turtle, when it runs
these commands, compares the value of the patch color it is on (pcolor) to the value for green.
(A turtle has direct access to the variables of the patch it is standing on.) If the patch color is green,
the comparison reports true, and only then will the turtle run the commands inside the brackets
(otherwise it skips them). The commands make the turtle change the patch color to black and
increase its own energy by 10. The patch turns black to signify that the grass at that spot has been
eaten and the turtle is given more energy, from having just eaten the grass.
Next, let's make the movement of turtles use up some of the turtle's energy.
• Rewrite move-turtles as follows:
to move-turtles
ask turtles [
right random 360
forward 1
set energy energy - 1
]
end
As each turtle wanders, it will lose one unit of energy at each step.
• Switch to the Interface tab now and press the setup button and the go button.
You'll see the patches turn black as turtles travel over them.
58
Tutorial #3: Procedures
NetLogo 4.1.3 User Manual
Monitors
Next you will create two monitors in the Interface tab with the Toolbar. (You make them just like
buttons and sliders, using the Add icon on the Toolbar.) Let's make the first monitor now.
• Create a monitor by clicking the Add icon on the Toolbar, selecting Monitor
next to it, and clicking on an open spot in the Interface.
A dialog box will appear.
• In the dialog box type: count turtles (see image below).
• Press the OK button to close the dialog box.
Tutorial #3: Procedures
59
NetLogo 4.1.3 User Manual
turtles is an "agentset", the set of all turtles. count tells us how many agents are in that set.
Let's make the second monitor now:
• Create a monitor by clicking the Add icon on the Toolbar, selecting Monitor
next to it, and clicking on an open spot in the Interface.
A dialog box will appear.
• In the Reporter section of the dialog box type: count patches with
[pcolor = green] (see image below).
• In the Display name section of the dialog box type: green patches
• Press the OK button to close the dialog box.
60
Tutorial #3: Procedures
NetLogo 4.1.3 User Manual
Here we're using count again to see how many agents are in an agentset. patches is the set of
all the patches, but we don't just want to know how many patches there are total, we want to know
how many of them are green. That's what with does; it makes a smaller agentset of just those
agents for whom the condition in the brackets is true. The condition is pcolor = green, so that
gives us just the green patches.
Now we have two monitors that will report how many turtles and green patches we have, to help us
track what's going on in our model. As the model runs, the numbers in the monitors will
automatically change.
• Use the setup and go buttons and watch the numbers in the monitors change.
Switches and labels
The turtles aren't just turning the patches black; they're also gaining and losing energy. As the
model runs, try using a turtle monitor to watch one turtle's energy go up and down.
It would be nicer if we could see every turtle's energy all the time. We will now do exactly that, and
add a switch so we can turn the extra visual information on and off.
• Click on the Add icon on the Toolbar (in the Interface tab).
• Select Switch from the menu next to Add.
• Click on an open spot in the Interface.
A dialog box will appear.
Tutorial #3: Procedures
61
NetLogo 4.1.3 User Manual
• In the Global variable section of the dialog box type: show-energy? Don't
forget to include the question mark in the name. (See image below.)
• Now go back to the 'go' procedure using the Procedures tab with the Toolbar.
• Rewrite the eat-grass procedure as follows:
to eat-grass
ask turtles [
if pcolor = green [
set pcolor black
set energy (energy + 10)
]
ifelse show-energy?
[ set label energy ]
[ set label "" ]
]
end
The eat-grass procedure introduces the ifelse command. Look at the code carefully. Each
turtle, when it runs these new commands, checks the value of show-energy? (determined by the
switch). If the switch is on, comparison is true and the turtle will run the commands inside the first
set of brackets. In this case, it assigns the value for the energy to the label of the turtle. If the
comparison is false (the switch is off) then the turtle runs the commands inside the second set of
brackets. In this case, it removes the text labels (by setting the label of the turtle to be nothing).
(In NetLogo, a piece of text is called a "string". A string is a sequence of letters and other
characters, written between double quotes. Here we have two double quotes right next to each
other, with nothing in between them. That's an empty string. If a turtle's label is an empty string, no
text is attached to the turtle.)
• Test this in the Interface tab, by running the model (using the setup and go
buttons) switching the show-energy? switch back and forth.
When the switch is on, you'll see the energy of each turtle go up each time it eats grass. You'll also
see its energy going down whenever it moves.
62
Tutorial #3: Procedures
NetLogo 4.1.3 User Manual
More procedures
Now our turtles are eating; let's make them reproduce and die, too. Let's also make the grass grow
back. We'll add all three of these of these behaviors now, by making three separate procedures,
one for each behavior.
• Go to the Procedures tab.
• Rewrite the go procedure as follows:
to go
move-turtles
eat-grass
reproduce
check-death
regrow-grass
end
• Add the procedures for reproduce, check-death, and regrow-grass as
shown below:
to reproduce
ask turtles [
if energy > 50 [
set energy energy - 50
hatch 1 [ set energy 50 ]
]
]
Tutorial #3: Procedures
63
NetLogo 4.1.3 User Manual
end
to check-death
ask turtles [
if energy <= 0 [ die ]
]
end
to regrow-grass
ask patches [
if random 100 < 3 [ set pcolor green ]
]
end
Each of these procedures uses the if command. Each turtle, when it runs check-death it will
check to see if its energy is less or equal to 0. If this is true, then the turtle is told to die (die is a
NetLogo primitive).
When each turtle runs reproduce, it checks the value of the turtle's energy variable. If it is greater
than 50, then the turtle runs the commands inside the first set of brackets. In this case, it decreases
the turtle's energy by 50, then 'hatches' a new turtle with an energy of 50. The hatch command is a
NetLogo primitive which looks like this: hatch number [ commands ]. This turtle creates number
new turtles, each identical to its parent, and asks the new turtle(s) that have been hatched to run
commands. You can use the commands to give the new turtles different colors, headings, or
whatever. In our case we run one command. We set the energy for the newly hatched turtle to be
50.
When each patch runs regrow-grass it will check to see if a random integer from 0 to 99 is less
than 3. If so, the patch color is set to green. This will happen 3% of the time (on average) for each
patch, since there are three numbers (0, 1, and 2) out of 100 possible that are less than 3.
• Switch to the Interface tab now and press the setup and go buttons.
You should see some interesting behavior in your model now. Some turtles die off, some new
turtles are created (hatched), and some grass grows back. This is exactly what we set out to do.
If you continue to watch your monitors in your model, you will see that the count turtles and green
patches monitors both fluctuate. Is this pattern of fluctuation predictable? Is there a relationship
between the variables?
It'd be nice if we had a easier way to track the changes in the model behavior over time. NetLogo
allows us to plot data as we go along. That will be our next step.
Plotting
To make plotting work, we'll need to create a plot in the Interface tab, and set some settings in it.
Then we'll add one more procedure to the Procedures tab, which will update the plot for us.
Let's do the Procedures tab part first.
64
Tutorial #3: Procedures
NetLogo 4.1.3 User Manual
• Change setup to call the new procedure, do-plots, which we're about to
add:
to setup
clear-all
setup-patches
setup-turtles
do-plots
end
• Also, change go to call the do-plots procedure:
to go
move-turtles
eat-grass
check-death
reproduce
regrow-grass
do-plots
end
• Now add the new procedure. What we're plotting will be be the number of
turtles and the number of green patches versus time. At each time step (a
single run through the go procedure) these values are added to the plot.
to do-plots
set-current-plot "Totals"
set-current-plot-pen "turtles"
plot count turtles
set-current-plot-pen "grass"
plot count patches with [pcolor = green]
end
Note that we use the plot command to add the next point to a plot. However, before doing that, we
need to tell NetLogo two things. First, we need to specify what plot we will be using (since later our
model might have more than one plot) and second, we need to specify which pen we want to plot
with (we will be using two pens on this plot).
The plot command moves the current plot pen to the point that has an X coordinate equal to 1
greater than the previously plotted X coordinate and a Y coordinate equal to the value given in the
plot command (in the first case, the number of turtles, and in the second case, the number of green
patches). As the pens move they each draw a line.
In order for set-current-plot "Totals" to work, you'll have to add a plot to your model in the
Interface tab, then edit it so its name is the same name used in the procedures. Even one extra
space in the name will throw it off -- it must be exactly the same in both places.
• Create a plot by clicking the Add icon on the Toolbar, selecting Plot next to it,
and clicking on an open spot in the Interface.
• Set its Name to "Totals" (see image below)
• Set the X axis label to "time"
• Set the Y axis label to "total"
Tutorial #3: Procedures
65
NetLogo 4.1.3 User Manual
Next you will need to create two pens.
• With the Plot dialog box still open, press the 'Create' button in the Plot dialog,
to create a new pen.
• Enter the name of this pen as "turtles" and press OK in the "Enter Pen Name"
dialog. (see image below)
• Press the 'Create' button in the Plot dialog again, to create a second new pen.
• Enter the name of this pen as "grass" and press OK in the "Enter Pen Name"
dialog. (see image below)
• Select the color for this pen and change it to green.
• Select OK in the Plot dialog box.
66
Tutorial #3: Procedures
NetLogo 4.1.3 User Manual
Note that when you create the plot you can also set the minimum and maximum values on the X
and Y axes. You'll want to leave the "Autoplot?" checkbox checked, so that if anything you plot
exceeds the minimum and maximum values for the axes, the axes will automatically grow so you
can see all the data.
• Setup and run the model again.
You can now watch the plot being drawn as the model is running. Your plot should
have the general shape of the one below, though your plot might not look exactly the
same.
Remember that we left "Autoplot?" on. This allows the plot to readjust itself when it
runs out of room.
If you forget which pen is which, click on the Pens label on the top right corner of the plot. You might
try running the model several times to see what aspects of the plot are the same and which are
different.
Tick counter
To make comparisons between plots from one model run and another, it is often useful to do the
comparison for the same length of model run. Learning how to stop or start an action at a specific
time can help make this happen by stopping the model at the same point each model run. Keeping
track of how many times the go procedure is run is a useful way to cue these actions.
To keep track of this, we will use NetLogo's built-in tick counter.
• Change the go procedure:
to go
if ticks >= 500 [ stop ]
move-turtles
eat-grass
check-death
reproduce
regrow-grass
tick
do-plots
end
Tutorial #3: Procedures
67
NetLogo 4.1.3 User Manual
• Now setup and run the model.
The graph and model won't keep running forever. They should stop automatically when the tick
counter in the Interface tab's toolbar reaches 500.
The tick command advances the tick counter by 1. ticks is a reporter which reports the current
value of the tick counter. clear-all takes care of resetting the tick counter to 0 when a new run
starts.
Note that we put tick before do-plots. That's so if we write plotting code that uses the value of
the tick counter, it will see the new value, not the old value. (In this tutorial we won't actually write
any code like that, but nonetheless, it is generally good practice to call tick after your agents have
done their actions but before you plot.)
Now that your model uses ticks, you'll probably want to use the menu at the top of the Interface tab
to change from "continuous" updates to "tick-based" updates. That means that NetLogo will only
update (that is, redraw) the view (that is, the display area where you see your agents) between
ticks, never in the middle of a tick. This makes your model run faster and ensures a consistent
appearance (since the updates will happen at consistent times). See the Programming Guide for a
fuller discussion of view updates.
Some more details
First, instead of always using 100 turtles, you can have a variable number of turtles.
• Create a slider variable called 'number', (click the Add icon on the Toolbar,
select Slider next to it, and click on an open spot in the Interface). Try
changing the minimum and maximum values in the slider.
• Then inside of setup-turtles, instead of create-turtles 100 you can
type:
to setup-turtles
create-turtles number
ask turtles [ setxy random-xcor random-ycor ]
end
Test this change and compare how having more or fewer turtles initially affect the plots over time.
Second, wouldn't it be nice to adjust the energy the turtles gain and lose as they eat grass and
reproduce?
• Make a slider called energy-from-grass.
• Make another slider called birth-energy.
• Then, inside of eat-grass, make this change:
to eat-grass
68
Tutorial #3: Procedures
NetLogo 4.1.3 User Manual
ask turtles [
if pcolor = green [
set pcolor black
set energy (energy + energy-from-grass)
]
ifelse show-energy?
[ set label energy ]
[ set label "" ]
]
end
• And, inside of reproduce, make this change:
to reproduce
ask turtles [
if energy > birth-energy [
set energy energy - birth-energy
hatch 1 [ set energy birth-energy ]
]
]
end
Finally, what other slider could you add to vary how often grass grows back? Are there rules you
can add to the movement of the turtles or to the newly hatched turtles that happen only at certain
times? Try writing them.
What's next?
So now you have a simple model of an ecosystem. Patches grow grass; turtles wander, eat the
grass, reproduce, and die. You have created an interface containing buttons, sliders, switches,
monitors, and plots. You've even written a series of procedures to give the turtles something to do.
That's where this tutorial leaves off.
If you'd like to look at some more documentation about NetLogo, the Interface Guide section of the
manual walks you through every element of the NetLogo interface in order and explains its function.
For a detailed description and specifics about writing procedures, refer to the Programming Guide.
All of the primitives are listed and described in the the NetLogo Dictionary.
Also, you can continue experimenting with and expanding this model if you'd like, experimenting
with different variables and behaviors for the agents.
Alternatively, you may want to revisit the first model in the tutorial, Wolf Sheep Predation. This is the
model you used in Tutorial #1. In the Wolf Sheep Predation model, you saw sheep move
around, consume resources that are replenished occasionally (grass), reproduce under certain
conditions, and die if they ran out of resources. But that model had another type of creature moving
around -- wolves. The addition of wolves requires some additional procedures and some new
primitives. Wolves and sheep are two different "breeds" of turtle. To see how to use breeds, study
Wolf Sheep Predation.
Alternatively, you can look at other models (including the many models in the Code Examples
section of the Models Library) or even go ahead and build your own model. You don't even have to
model anything. It can be interesting just to watch patches and turtles forming patterns, to try to
create a game to play, or whatever.
Tutorial #3: Procedures
69
NetLogo 4.1.3 User Manual
Hopefully you have learned some things, both in terms of the NetLogo language and about how to
go about building a model. The entire set of procedures that was created above is shown below.
Appendix: Complete code
The complete model is also available in NetLogo's Models Library, in the Code Examples section.
It's called "Tutorial 3".
Notice that this listing is full of "comments", which begin with semicolons. Comments let you mix an
explanation the code right in with the code itself. You might use comments to help others
understand your model, or you might use them as notes to yourself.
In the Procedures tab, comments are gray, so your eyes can pick them out easily.
turtles-own [energy] ;; for keeping track of when the turtle is ready
;; to reproduce and when it will die
to setup
clear-all
setup-patches
setup-turtles
do-plots
end
to setup-patches
ask patches [ set pcolor green ]
end
to setup-turtles
create-turtles number
;; uses the value of the number slider to create turtles
ask turtles [ setxy random-xcor random-ycor ]
end
to go
if ticks >= 500 [ stop ] ;; stop after 500 ticks
move-turtles
eat-grass
check-death
reproduce
regrow-grass
tick
;; increase the tick counter by 1 each time through
do-plots
end
to move-turtles
ask turtles [
right random 360
forward 1
set energy energy - 1
]
end
;; when the turtle moves it looses one unit of energy
to eat-grass
ask turtles [
if pcolor = green [
set pcolor black
;; the value of energy-from-grass slider is added to energy
set energy (energy + energy-from-grass)
70
Tutorial #3: Procedures
NetLogo 4.1.3 User Manual
]
ifelse show-energy?
[ set label energy ] ;; the label is set to be the value of the energy
[ set label "" ]
;; the label is set to an empty text value
]
end
to reproduce
ask turtles [
if energy > birth-energy [
set energy energy - birth-energy ;; take away birth-energy to give birth
hatch 1 [ set energy birth-energy ] ;; give this birth-energy to the offspring
]
]
end
to check-death
ask turtles [
if energy <= 0 [ die ] ;; removes the turtle if it has no energy left
]
end
to regrow-grass
ask patches [ ;; 3 out of 100 times, the patch color is set to green
if random 100 < 3 [ set pcolor green ]
]
end
to do-plots
set-current-plot "Totals" ;; which plot we want to use next
set-current-plot-pen "turtles" ;; which pen we want to use next
plot count turtles ;; what will be plotted by the current pen
set-current-plot-pen "grass" ;; which pen we want to use next
plot count patches with [pcolor = green] ;; what will be plotted by the current pen
end
Tutorial #3: Procedures
71
NetLogo 4.1.3 User Manual
72
Tutorial #3: Procedures
Interface Guide
This section of the manual walks you through every element of the NetLogo interface in order and
explains its function.
In NetLogo, you have the choice of viewing models found in the Models Library, adding to existing
models, or creating your own models. The NetLogo interface was designed to meet all these needs.
The interface can be divided into two main parts: NetLogo menus, and the main NetLogo window.
The main window is divided into tabs.
• Menus
• Tabs
• Interface Tab
♦ Working with Interface Elements
♦ The 2D and 3D Views
♦ Command Center
♦ Plots
♦ Sliders
♦ Agent Monitors
• Information Tab
• Procedures Tab
• Includes Menu
Menus
On Macs, if you are running the NetLogo application, the menubar is located at the top of the
screen. On other platforms, the menubar is found at the top of the NetLogo window.
The functions available from the menus in the menubar are listed in the following chart.
Chart: NetLogo Menus
File
New
Open
Models Library
Save
Save As
Save As Applet
Print
Export World
Interface Guide
Starts a new model.
Opens any NetLogo model on your computer.
A collection of demonstration models.
Save the current model.
Save the current model using a different name.
Used to save a web page in HTML format that has your model
embedded in it as a Java "applet".
Sends the contents of the currently showing tab to your printer.
Saves all variables, the current state of all turtles and patches, the
drawing , the plots, the output area and the random state information to
a file.
73
NetLogo 4.1.3 User Manual
Export Plot
Export All Plots
Export View
Export Interface
Export Output
Import World
Import Patch
Colors
Import Patch
Colors RGB
Import Drawing
Import HubNet
Client Interface
Quit
Saves the data in a plot to a file.
Saves the data in all the plots to a file.
Save a picture of the current view (2D or 3D) to a file (in PNG format).
Save a picture of the current Interface tab. ( in PNG format )
Save the contents of the output area or the output section of the
command center to a file.
Load a file that was saved by Export World.
Load an image into the patches; see the import-pcolors command.
Load an image into the patches using RGB colors; see the
import-pcolors-rgb command.
Load an image into the drawing, see the import-drawing command.
Load the interface from another model into the HubNet Client Editor.
Exits NetLogo. (On Macs, this item is on the NetLogo menu instead.)
Edit
Cut
Copy
Paste
Delete
Undo
Redo
Select All
Find
Find Next
Shift Left /
Shift Right
Comment /
Uncomment
Snap To Grid
Cuts out or removes the selected text and temporarily saves it to the
clipboard.
Copies the selected text.
Places the clipboard text where cursor is currently located.
Deletes selected text.
Undo last text editing action you performed.
Redo last undo action you performed.
Select all the text in the active window.
Finds a word or sequence of characters within the Information or
Procedures tabs.
Find the next occurrence of the word or sequence you last used Find
with.
Used in the Procedures tab to change the indentation level of code.
Used in the Procedures tab to add or remove semicolons from code
(semicolons are used in NetLogo code to indicate comments).
When enabled new widgets stay on a 5 pixel grid so it is easier to line
them up. (Note: this feature is disabled when zoomed in or out.)
Tools
Halt
Globals Monitor
Turtle Monitor
Patch Monitor
74
Stops all running code, including buttons and the command center.
(Warning: since the code is interrupted in the middle of whatever it was
doing, you may get unexpected results if you try to continue running the
model without first pressing "setup" to start the model run over.)
Displays the values of all global variables.
Displays the values of all of the variables in a particular turtle. You can
can also edit the values of the turtle's variables and issue commands to
the turtle. (You can also open a turtle monitor via the View; see the View
section below.)
Displays the values of all of the variables in a particular patch. You can
can also edit the values of the patch's variables and issue commands to
Interface Guide
NetLogo 4.1.3 User Manual
Link Monitor
Close All Agent
Monitors
Hide/Show
Command Center
3D View
Color Swatches
the patch. (You can also open a patch monitor via the View; see the
View section below.)
Displays the values of all of the variables in a particular link. You can
can also edit the values of the link's variables and issue commands to
the link. (You can also open a link monitor via the View; see the View
section below.)
Closes all open agent monitor windows.
Makes the command center visible or invisible. (Note that the command
center can also be shown or hidden, or resized, with the mouse.)
Opens the 3D view. See the Views section for more information.
Opens the Color Swatches. See the Color Section of the Programming
Guide for details.
Draw turtle shapes. See the Shapes Editor Guide for more information.
Turtle Shapes
Editor
Link Shapes Editor Draw link shapes. See the Shapes Editor Guide for more information.
BehaviorSpace
Runs the model over and over with different settings. See the
BehaviorSpace Guide for more information.
System Dynamics Opens the System Dynamics Modeler. See the System Dynamics
Modeler
Modeler Guide for more details.
HubNet Client
Opens the HubNet Client Editor. See the HubNet Authoring Guide for
Editor
more details.
HubNet Control
Disabled if no HubNet activity is open. See the HubNet Guide for more
Center
information.
Zoom
Larger
Normal Size
Smaller
Tabs
Increase the overall screen size of the model. Useful on large monitors
or when using a projector in front of a group.
Reset the screen size of the model to the normal size.
Decrease the overall screen size of the model.
This menu offers keyboard shortcuts for each of the tabs. (On Macs, it's
Command 1 through Command 3. On Windows, it's Control 1 through
Control 3.)
Help
About NetLogo
Information on the current NetLogo version the user is running. (On
Macs, this menu item is on the NetLogo menu instead.)
Opens a browser with the dictionary entry for the selected command or
reporter.
Opens this manual in a web browser.
Look Up In
Dictionary
NetLogo User
Manual
NetLogo Dictionary Opens the NetLogo Dictionary in a web browser.
Tabs
At the top of NetLogo's main window are three tabs labeled "Interface", "Information" and
"Procedures" . Only one tab at a time can be visible, but you can switch between them by clicking
on the tabs at the top of the window.
Interface Guide
75
NetLogo 4.1.3 User Manual
Right below the row of tabs is a toolbar containing a row of controls. The controls available vary
from tab to tab.
Interface Tab
The Interface tab is where you watch your model run. It also has tools you can use to inspect and
alter what's going on inside the model.
When you first open NetLogo, the Interface tab is empty except for the View, where the turtles and
patches appear, and the Command Center, which allows you to issue NetLogo commands.
Working with Interface Elements
The toolbar on the Interface tab contains buttons that let you edit, delete, and create items in the
Interface tab and a menu that lets you select different interface items (such as buttons and sliders).
The buttons in the toolbar are described below.
Adding: To add an interface element, select the element from the the drop down menu. Note that
the Add button becomes pressed. Then click on the white area below the toolbar. (If the menu is
already showing the right type, you can just press the Add button instead of using the menu again.)
Selecting: To select an interface element, drag a rectangle around it with your mouse. A gray
border will appear around the element to indicate that it is selected.
Selecting multiple items: You can select multiple interface elements at the same time by including
them in the rectangle you drag. If multiple elements are selected, one of them is the "key" item,
which means that if you use the "Edit" or "Delete" buttons on the Interface Toolbar, only the key
item is affected. The key item is indicated by a darker gray border than the other items.
76
Interface Guide
NetLogo 4.1.3 User Manual
Unselecting: To unselect all interface elements, click the mouse on the white background of the
Interface tab. To unselect an individual element, control-click (Macintosh) or right-click (other
systems) the element and choose "Unselect" from the popup menu.
Editing: To change the characteristics of an interface element, select the element, then press the
"Edit" button on the Interface Toolbar. You may also double click the element once it is selected. A
third way to edit an element is to control-click (Macintosh) or right-click (other systems) it and
choose "Edit" from the popup menu. If you use this last method, it is not necessary to select the
element first.
Moving: Select the interface element, then drag it with your mouse to its new location. If you hold
down the shift key while dragging, the element will move only straight up and down or straight left
and right.
Resizing: Select the interface element, then drag the black "handles" in the selection border.
Deleting: Select the element or elements you want to delete, then press the "Delete" button on the
Interface Toolbar. You may also delete an element by control-clicking (Macintosh) or right-clicking
(other systems) it and choosing "Delete" from the popup menu. If you use this latter method, it is not
necessary to select the element first.
To learn more about the different kinds of interface elements, refer to the chart below.
Chart: Interface Toolbar
Icon & Name
Description
Buttons can be either once-only buttons or forever buttons. When you click on
a once button, it executes its instructions once. The forever button executes
the instructions over and over, until you click on the button again to stop the
action. If you have assigned an action key to the button, pressing the
corresponding keyboard key will act just like a button press when the button is
in focus. Buttons with action keys have a letter in the upper right corner of the
button to show what the action key is. If the input cursor is in another interface
element such as the Command Center, pressing the action key won't trigger
the button. The letter in the upper right hand corner of the button will be
dimmed in this situation. To enable action keys, click in the white background
of the Interface tab.
Sliders are global variables, which are accessible by all agents. They are used
in models as a quick way to change a variable without having to recode the
procedure every time. Instead, the user moves the slider to a value and
observes what happens in the model.
Switches are a visual representation for a true/false variable. The user is asked
to set the variable to either on (true) or off (false) by flipping the switch.
Choosers let the user choose a value for a global variable from a list of
choices, presented in a drop down menu.
Input Boxes are global variables that contain strings or numbers. The model
author chooses what types of values the user can enter. Input boxes can be
set to check the syntax of a string for commands or reporters. Number input
Interface Guide
77
NetLogo 4.1.3 User Manual
boxes read any type of constant number expression which allows a more open
way to express numbers than a slider. Color input boxes offer a NetLogo color
chooser to the user.
Monitors display the value of any expression. The expression could be a
variable, a complex expression, or a call to a reporter. Monitors automatically
update several times per second.
Plots are real-time graphs of data the model is generating.
The output area is a scrolling area of text which can be used to create a log of
activity in the model. A model may only have one output area.
Notes lets you add informative text labels to the Interface tab. The contents of
notes do not change as the model runs.
The other controls in the Interface Toolbar allow you to control the view updates and various other
model properties.
• The slider lets you control how fast the model runs. Slower can be valuable since some
models run so fast that it's hard to see what's going on. You can also fast forward the model
by moving the slider to the right, and reducing the frequency of view updates.
• The view updates check box controls whether view updates happen at all.
• The update mode menu allows you to switch between continuous and tick-based update
modes.
• The Settings button allows you to change model settings.
"Continuous" updates means that NetLogo updates (that is, redraws) the view many times a
second, regardless of what is going on in the model. "Tick-based" updates means that the view only
updates when the tick counter advances. (For a fuller discussion of view updates, see the
Programming Guide.)
The 2D and 3D Views
The large black square in the Interface tab is the 2D view. It's a visual representation of the NetLogo
world of turtles and patches. Initially it's all black because the patches are black and there are no
turtles yet. You can open the 3D View, another visual representation of the world, by clicking on the
"3D" button in the View Control Strip.
The three sets of black arrows in the upper left let you change the size of the world. When the origin
is centered the world will grow in increments of two, adding one to the maximum and subtracting
one from the minimum. If one of the edges is set to 0 the world will grow by one in the other
direction to keep the origin along the edge. If the origin is at a custom location the black arrows will
be disabled.
There are a number of settings associated with the Views. There are a few ways of changing the
settings: by using the control strip along the top edge of the View, or by editing the 2D View, as
78
Interface Guide
NetLogo 4.1.3 User Manual
described in the "Working With Interface Elements" section above, or pressing the "Settings..."
button in the toolbar.
Notice that the control strip in the 3D View combines the ticks counter from the 2D view control strip
and the controls from the right portion of the interface toolbar.
Here are the settings for the View (accessible by editing the View, or by pressing the "Settings..."
button in the Interface Toolbar):
Notice that the settings are broken up into three groups. There are world, view, and ticks counter
settings. World settings affect the properties of the world that the turtles live in (changing them may
require resetting the world). View and tick counter settings only affect the appearance, changing
them will not affect the outcome of the model.
The world settings allow you to define the boundaries and topology of the world. At the top of the left
side of the world panel you can choose a location for the origin of the world either "Center",
"Corner", "Edge", or "Custom". By default the world has a center configuration where (0,0) is at the
center of the world and the user defines the number of patches from the center to the right and left
boundaries and the number of patches from the center to the top and bottom boundaries. For
Interface Guide
79
NetLogo 4.1.3 User Manual
Example: If you set Max-Pxcor = 10 Min-Pxcor will automatically be set to -10 thus there are 10
patches to the left of the origin and 10 patches to the right of patch 0 0.
A Corner configuration allows the user to define the location of the origin as one of the corners of
the world, upper left, upper right, lower left, or lower right. Then you define the far boundary in the x
and y directions. For example if you choose to put the origin in the lower left corner of the world you
define the right and top (positive) boundaries.
Edge mode allows you to place the origin along one of the edges (x or y) then define the far
boundary in that direction and both boundaries in the other. For example if you select edge mode
along the bottom of the world, you must also define the top boundary, as well as the left and the
right.
Finally, Custom mode allows the user to place the origin at any location in the world, though patch 0
0 must still exist in the world.
As you change the settings you will notice that the changes you make are reflected in the preview
on the right side of the panel which shows the origin and the boundaries. The width and height of
the world are displayed below the preview.
Also below the preview there are two checkboxes, the world wrap settings. These allow you to
control the topology of the world. Notice when you click the check boxes the preview indicates
which directions allow wrapping, and the name of the topology is displayed next to the world
dimensions. See the Topology Section of the Programming Guide for more information.
The view settings allow you to customize the look of the view without changing the world. Changing
view settings will never force a world reset. To change the size of the 2D View adjust the "Patch
Size" setting, measured in pixels. This does not change the number of patches, only how large the
patches appear in the 2D View. (Note that the patch size does not affect the 3D View, as you can
simply make the 3D View larger by making the window larger.)
The "Smooth edges" checkbox controls the use of anti-aliasing in the 3D view only and only
appears when editing from the 3D view. It will make the lines appear less jagged but it will slow
down the model.
Tick counter settings control the appearance of the tick counter which is visible (or not) in the view
control strip.
Turtle, patch and link monitors are easily available through the View, just control-click (Macintosh)
or right-click (other systems) on the turtle or patch you want to inspect, and choose "inspect turtle
..." or "inspect patch ..." from the popup menu. You can also watch, follow or ride a turtle by
selecting the appropriate item in the turtle sub-menu. (Turtle, patch and link monitors can also be
opened from the Tools menu or by using the inspect command.)
Some NetLogo models let you interact with the turtles and patches with your mouse by clicking and
dragging in the View.
Manipulating the 3D View
At the bottom of the window there are buttons to move the observer, or change the perspective from
which you are looking at the world.
80
Interface Guide
NetLogo 4.1.3 User Manual
A blue cross appears at the current focus point as you are adjusting these settings. The little blue
triangle will always point up the positive y-axis, so you can orient yourself in case you get lost. It's
easy to do!
To look at the world from a different angle, press the "rotate" button click and drag the mouse up,
down, left, or right. The observer will continue to face the same point as before ( where the blue
cross is ) but its position in the relation to the xy-plane will change.
To move closer or farther away from the world or the agent you are watching, following or riding,
press the "zoom" button and drag up and down along the 3D View. (Note when you are in follow or
ride mode zooming will switch you between ride and follow, since ride is just a special case of follow
where the distance at which you are following is 0.)
To change the position of the observer without changing the direction it is facing select the "move"
button and drag the mouse up, down, left, and right inside the 3D View while holding down the
mouse button.
To allow the mouse position and state to be passed to the model select the "interact" button and it
will function just as the mouse does in the 2D view.
To return the observer and focus point to their default positions press the "Reset Perspective"
button (or use the reset-perspective command).
Fullscreen Mode
To enter fullscreen mode, press the "Full Screen" button, to exit fullscreen mode, press the Esc key.
Note: Fullscreen mode doesn't work on some computers. It depends on what kind of graphics card
you have. See the System Requirements for details.
3D Shapes
Some shapes have true 3D counterparts ( a 3D circle is actually a sphere ) in the 3D view so they
are automatically mapped to that shape.
Shape name
default
circle
dot
square
triangle
3D shape
3D turtle shape
sphere
small sphere
cube
cone
Interface Guide
81
NetLogo 4.1.3 User Manual
line
3D line
cylinder
3D cylinder
line-half
3D line-half
car
3D car
All other shapes are interpreted from their 2D shapes. If a shape is a rotatable shape it is assumed
to be a top view and it is extruded as if through a cookie cutter and oriented parallel to the xy-plane,
as in Ants.
If a shape is non-rotatable it is assumed to be a side view so it is drawn always facing the observer
(and with no thickness), as in Wolf Sheep Predation.
Command Center
The Command Center allows you to issue commands directly, without adding them to the model's
procedures. (Commands are instructions you give to the agents in your model.) This is useful for
inspecting and manipulating agents on the fly.
(Tutorial #2: Commands is an introduction to using commands in the Command Center.)
Let's take a look at the design of the Command Center.
82
Interface Guide
NetLogo 4.1.3 User Manual
The smaller box, below the large box, is where you type a command. After typing it press the Return
or Enter key to run it.
To the left of where you type is a popup menu that initially says "observer>". You can choose either
observer, turtles, or patches, to specify which agents run the command you type.
Tip: a quicker way to change between observer, turtles, and patches is to use the tab key on your
keyboard.
Accessing previous commands
After you type a command, it appears in the large scrolling box above the command line. You can
use Copy on the Edit menu in this area to copy commands and then paste them elsewhere, such as
the Procedures tab.
You can also access previous commands using the history popup menu, which is the small
downward pointing triangle to the right of where you type commands. Click on the triangle and a
menu of previously typed commands appears, so you can pick one to use again.
Tip: a quicker way to access previous commands is with the up and down arrow keys on your
keyboard.
Clearing
To clear the large scrolling area containing previous commands and output, click "clear" in the top
right corner.
To clear the history popup menu, choose "Clear History" on that menu.
Arranging
You can hide and show the command center using the Hide Command Center and Show Command
Center items on the Tools menu.
To resize the command center, drag the bar that separates it from the model interface. Or, click one
of the little arrows on the right end of the bar to make the command center either very big or hidden
altogether.
To switch between a vertical command center and a horizontal one, click the button with the
double-headed arrow, just to the left of "Clear".
Interface Guide
83
NetLogo 4.1.3 User Manual
Plots
If you move the mouse over the white area of a plot, the x and y coordinates of the mouse location
will appear. (Note that the mouse location might not correspond exactly to any actual data points in
the plot. If you need to know the exact coordinates of plotted points, use the Export Plot menu item
and inspect the resulting file in another program.)
When you create a plot, as with all widgets, the edit dialog automatically appears.
Many of the fields are fairly self explanatory, the name of the plot, labels for the x and y axes, and
ranges for the axes.
If Autoplot is checked the x and y changes will automatically readjust as points are added to the plot
if they are outside the current range.
To show or hide a plot's pens legend, click on the Show Legend checkbox.
In the plot pens section of the dialog you can create and customize different pens in this plot. You
must always have a least one pen in every plot. You start out with one named "default" you
probably want to rename it something that is meaningful in the model.
All the items in the box below the pen name are settings relevant to that particular pen.
• Set the color to one of the NetLogo base hues or a custom color using the color swatches.
• Mode allows you to change the appearance of the plot pen, line, bar (like a bar chart), or
point (like line except the points are not connected)
• Interval is the amount by which x advances every time you use plot y
• If the Show in Legend checkbox is checked the selected pen will be a part of the legend in
the upper right hand corner of the plot.
For more detailed information on how each of these features works you can see the Plotting Section
of the Programming Guide.
84
Interface Guide
NetLogo 4.1.3 User Manual
Sliders
Sliders define global variables, they are provided as an easy way to change the value of these
global variables without changing the underlying code. When you place a slider in the Interface tab
the edit dialog automatically opens, as with all widgets. Most of the fields will be familiar. However, it
is important to notice the the minimum, maximum and increment fields will take any reporter
expression, not just constants. So, for example, you could make the minimum min-pxcor and the
maximum max-pxcor and the slider bounds will automatically adjust when you change the size of
the world.
Agent Monitors
You can open agent monitors though the Tools Menu or by using the inspect command. Agent
monitors display both the values of all the variables for a particular agent and a mini-view that
displays the agent a small radius around it.
Interface Guide
85
NetLogo 4.1.3 User Manual
You can zoom in or out using the slider beneath the view and you can watch the agent using the
watch-me button.
Below the slider the current values of the each agent variable is displayed. You can enter new
values directly into the fields on the right. It will be as if, for example, the code set pcolor ...
had been executed.
Below agent variable area there is a mini-command center. Rather that executing code as the
observer, or talking to all of the turtles, patches, or links the code entered in this command center is
executed by only by this agent.
You can close the agent monitors by clicking the box in the upper left corner or by press escape. If
you hold down shift while you click the box all open agent monitors will close or you can close all the
86
Interface Guide
NetLogo 4.1.3 User Manual
agent monitors using the "Close All Monitors" option in the Tools Menu.
Information Tab
The Information tab provides an introduction to the model and an explanation of how to use it,
things to explore, ways to extend the model, and NetLogo features.
We recommend reading the Information tab before starting the model. The Information tab explains
what system is being modeled and how the model was created. This display of the Information tab
is not editable. To edit the content of the Info tab click the "Edit" button or double click on a word
which will also scroll you to the location you clicked on and highlight the word.
Interface Guide
87
NetLogo 4.1.3 User Manual
You can edit the text in this view as in any text editor. However, a few different forms will be
displayed specially when you switch out of the edit view.
Information Tab Markup
Description
Edit Mode
Lines that come after
blank lines and contain
capital letters and no
WHAT IS IT
lower case letters
become section
headers.
View Mode
WHAT IS IT
Any line that has only
dashes is omitted.
-------------------
Anything beginning
with "http://" becomes
a clickable hyperlink.
http://ccl.northwestern.edu
http://ccl.northwestern.edu
E-mail addresses
become clickable
"mailto:" links.
[email protected]
[email protected]
Lines that begin with
the pipe '|' ( shift +
backslash '\' ) become | this is preformatted text
monospaced text. This | you can put spaces in it
is useful for diagrams
and formulas.
this is preformatted text
you
can
put
spaces in
it
To return to the normal view, click the edit button.
Procedures Tab
This tab is the workspace where the code for the model is stored. Commands you only want to use
immediately go in the Command Center; commands you want to save and use later, over and over
again, are found in the Procedures tab.
88
Interface Guide
NetLogo 4.1.3 User Manual
To determine if the code has any errors, you may press the "Check" button. If there are any syntax
errors, the Procedures tab will turn red and the code that contains the error will be highlighted and a
comment will appear in the top box. Switching tabs also causes the code to be checked and any
errors will be shown, so if you switch tabs, pressing the Check button first isn't necessary.
Interface Guide
89
NetLogo 4.1.3 User Manual
To find a fragment of code in the procedures, click on the "Find" button in the Procedures Toolbar
and the Find dialog will appear.
You may enter either a word or phrase to find or a word or phrase to find and one to replace it with.
The "Ignore case" checkbox controls whether the capitalization must be the same to indicate a
match. If the "Wrap around" checkbox is checked the entire Procedures tab will be checked for the
phrase, starting at the cursor position, when it reaches the end it will return to the top, otherwise
only the area from the cursor position to the end of the Procedures tab will be searched. The "Next"
and "Previous" buttons will move down and up to find another occurrence of the search phrase.
"Replace" changes the currently selected phrase with the replace phrase and "Replace & Find"
changes the selected phrase and moves to the next occurrence. "Replace all" will change all
instances of the the find phrase in the search area with the replace phrase.
90
Interface Guide
NetLogo 4.1.3 User Manual
To find a particular procedure definition in your code, use the "Procedures" popup menu in the
Procedures Toolbar. The menu lists all procedures in alphabetical order.
The "Shift Left", "Shift Right", "Comment", and "Uncomment" items on the Edit menu are used in the
procedures tab to change the indentation level of your code or add and remove semicolons, which
mark comments, from sections of code.
For more information about writing procedures, read Tutorial #3: Procedures and the Programming
Guide.
Includes Menu
When you add the __includes keyword to a model a menu to the right of the procedures menu
appears. This is the includes menu which lists all the NetLogo source files (.nls) included in this file
(either .nlogo or .nls).
You can click on the file names in the menu to open a new tab containing that file, or you can open
new files, or files in the file system using the other New Source File and Open Source File
respectively.
Once you've opened new tabs you can navigate them similarly to the other tabs. They are
accessible from the Tabs menu and you can use the keyboard to move from tab to tab (Command +
number on Mac, Control + number on other operating systems).
Caution
The includes facility is new and experimental. Nonetheless, we think some users will find it useful.
Interface Guide
91
NetLogo 4.1.3 User Manual
Indent Automatically
When the Indent Automatically checkbox is selected NetLogo will automatically attempt to align your
code in an easy to read format. For example, when you open a set of square brackets "[" (perhaps
after an if statement), NetLogo will automatically add spaces so that the following lines of code are
two space further indented than the bracket. When you close the square brackets the closing
bracket will be lined up with the matching open bracket.
NetLogo will try to indent the code as you type but you can also press the tab key anywhere on any
line to manually ask NetLogo to indent the line properly, or you can highlight entire regions of code
and press the tab key to re-indent.
92
Interface Guide
Programming Guide
This section describes the NetLogo programming language.
The Code Example models mentioned throughout can be found in the Code Examples section of
the Models Library.
• Agents
• Procedures
• Variables
• Colors
• Ask
• Agentsets
• Breeds
• Buttons
• Lists
• Math
• Random Numbers
• Turtle Shapes
• Link Shapes
• Tick Counter
• View Updates
• Plotting
• Strings
• Output
• File I/O
• Movies
• Perspective
• Drawing
• Topology
• Links
• Ask-Concurrent
• Tie
• Multiple source files
• Syntax
Agents
The NetLogo world is made up of agents. Agents are beings that can follow instructions. Each agent
can carry out its own activity, all simultaneously.
In NetLogo, there are four types of agents: turtles, patches, links, and the observer. Turtles are
agents that move around in the world. The world is two dimensional and is divided up into a grid of
patches. Each patch is a square piece of "ground" over which turtles can move. Links are agents
that connect two turtles. The observer doesn't have a location -- you can imagine it as looking out
over the world of turtles and patches.
When NetLogo starts up, there are no turtles yet. The observer can make new turtles. Patches can
make new turtles too. (Patches can't move, but otherwise they're just as "alive" as turtles and the
Programming Guide
93
NetLogo 4.1.3 User Manual
observer are.)
Patches have coordinates. The patch at coordinates (0, 0) is called the origin and the coordinates of
the other patches are the horizontal and vertical distances from this one. We call the patch's
coordinates pxcor and pycor. Just like in the standard mathematical coordinate plane, pxcor
increases as you move to the right and pycor increases as you move up.
The total number of patches is determined by the settings min-pxcor, max-pxcor, min-pycor,
and max-pycor When NetLogo starts up, min-pxcor, max-pxcor, min-pycor, and max-pycor
are -16, 16, -16, and 16 respectively. This means that pxcor and pycor both range from -16 to 16,
so there are 33 times 33, or 1089 patches total. (You can change the number of patches with the
Settings button.)
Turtles have coordinates too: xcor and ycor. A patch's coordinates are always integers, but a
turtle's coordinates can have decimals. This means that a turtle can be positioned at any point
within its patch; it doesn't have to be in the center of the patch.
Links do not have coordinates, instead they have two endpoints (each a turtle). Links appear
between the two endpoints, along the shortest path possible even if that means wrapping around
the world.
The way the world of patches is connected can change. By default the world is a torus which means
it isn't bounded, but "wraps" -- so when a turtle moves past the edge of the world, it disappears and
reappears on the opposite edge and every patch has the same number of "neighbor" patches; if
you're a patch on the edge of the world, some of your "neighbors" are on the opposite edge.
However, you can change the wrap settings with the Settings button. If wrapping is not allowed in a
given direction then in that direction (x or y) the world is bounded. Patches along that boundary will
have fewer than 8 neighbors and turtles will not move beyond the edge of the world. See the
Topology section for more information.
Procedures
In NetLogo, commands and reporters tell agents what to do. A command is an action for an agent
to carry out. A reporter computes a result and report it.
Most commands begin with verbs ("create", "die", "jump", "inspect", "clear"), while most reporters
are nouns or noun phrases.
Commands and reporters built into NetLogo are called primitives. The NetLogo Dictionary has a
complete list of built-in commands and reporters.
Commands and reporters you define yourself are called procedures. Each procedure has a name,
preceded by the keyword to. The keyword end marks the end of the commands in the procedure.
Once you define a procedure, you can use it elsewhere in your program.
Many commands and reporters take inputs -- values that the command or reporter uses in carrying
out its actions.
Examples: Here are two command procedures:
94
Programming Guide
NetLogo 4.1.3 User Manual
to setup
clear-all
crt 10
end
;; clear the world
;; make 10 new turtles
to go
ask turtles
[ fd 1
rt random 10
lt random 10 ]
end
;; all turtles move forward one step
;; ...and turn a random amount
Note the use of semicolons to add "comments" to the program. Comments make your program
easier to read and understand.
In this program,
• setup and go are user-defined commands.
• clear-all, crt ("create turtles"), ask, lt ("left turn"), and rt ("right turn") are all primitive
commands.
• random and turtles are primitive reporters. random takes a single number as an input
and reports a random integer that is less than the input (in this case, between 0 and 9).
turtles reports the agentset consisting of all the turtles. (We'll explain about agentsets
later.)
setup and go can be called by other procedures or by buttons. Many NetLogo models have a once
button that calls a procedure called setup, and a forever button that calls a procedure called go.
In NetLogo, you must specify which agents -- turtles, patches, links, or the observer -- are to run
each command. (If you don't specify, the code is run by the observer.) In the code above, the
observer uses ask to make the set of all turtles run the commands between the square brackets.
clear-all and crt can only be run by the observer. fd, on the other hand, can only be run by
turtles. Some other commands and reporters, such as set, can be run by different agent types.
Here are some more advanced features you can take advantage of when defining your own
procedures.
Procedures with inputs
Your own procedures can take inputs, just like primitives do. To create a procedure that accepts
inputs, include a list of input names in square brackets after the procedure name. For example:
to draw-polygon [num-sides len]
pen-down
repeat num-sides
[ fd len
rt 360 / num-sides ]
end
Elsewhere in the program, you could ask turtles to each draw an octagon with a side length equal to
its who number:
ask turtles [ draw-polygon 8 who ]
Programming Guide
95
NetLogo 4.1.3 User Manual
Reporter procedures
Just like you can define your own commands, you can define your own reporters. You must do two
special things. First, use to-report instead of to to begin your procedure. Then, in the body of
the procedure, use report to report the value you want to report.
to-report absolute-value [number]
ifelse number >= 0
[ report number ]
[ report (- number) ]
end
Variables
Agent variables
Agent variables are places to store values (such as numbers) in an agent. An agent variable can be
a global variable, a turtle variable, a patch variable, or a link variable.
If a variable is a global variable, there is only one value for the variable, and every agent can access
it. You can think of global variables as belonging to the observer.
Turtle, patch, and link variables are different. Each turtle has its own value for every turtle variable,
and each patch has its own value for every patch variable, and the same for links.
Some variables are built into NetLogo. For example, all turtles have a color variable, and all
patches have a pcolor variable. (The patch variable begins with "p" so it doesn't get confused with
the turtle variable.) If you set the variable, the turtle or patch changes color. (See next section for
details.)
Other built-in turtle variables including xcor, ycor, and heading. Other built-in patch variables
include pxcor and pycor. (There is a complete list here.)
You can also define your own variables. You can make a global variable by adding a switch or a
slider to your model, or by using the globals keyword at the beginning of your code, like this:
globals [ score ]
You can also define new turtle, patch and link variables using the turtles-own , patches-own
and links-own keywords, like this:
turtles-own [energy speed]
patches-own [friction]
links-own [strength]
These variables can then be used freely in your model. Use the set command to set them. (If you
don't set them, they'll start out storing a value of zero.)
Global variables can be read and set at any time by any agent. As well, a turtle can read and set
patch variables of the patch it is standing on. For example, this code:
ask turtles [ set pcolor red ]
96
Programming Guide
NetLogo 4.1.3 User Manual
causes every turtle to make the patch it is standing on red. (Because patch variables are shared by
turtles in this way, you can't have a turtle variable and a patch variable with the same name.)
In other situations where you want an agent to read a different agent's variable, you can use of.
Example:
show [color] of turtle 5
;; prints current color of turtle with who number 5
You can also use of with a more complicated expression than just a variable name, for example:
show [xcor + ycor] of turtle 5
;; prints the sum of the x and y coordinates of
;; turtle with who number 5
Local variables
A local variable is defined and used only in the context of a particular procedure or part of a
procedure. To create a local variable, use the let command. You can use this command
anywhere. If you use it at the top of a procedure, the variable will exist throughout the procedure. If
you use it inside a set of square brackets, for example inside an "ask", then it will exist only inside
those brackets.
to swap-colors [turtle1 turtle2]
let temp [color] of turtle1
ask turtle1 [ set color [color] of turtle2 ]
ask turtle2 [ set color temp ]
end
Colors
NetLogo represents colors in different ways. First, as numbers in the range 0 to 140, with the
exception of 140 itself. Below is a chart showing the range of colors you can use in NetLogo.
Programming Guide
97
NetLogo 4.1.3 User Manual
The chart shows that:
• Some of the colors have names. (You can use these names in your code.)
• Every named color except black and white has a number ending in 5.
• On either side of each named color are darker and lighter shades of the color.
• 0 is pure black. 9.9 is pure white.
• 10, 20, and so on are all so dark they appear black.
• 19.9, 29.9 and so on are all so light they appear white.
Code Example: The color chart was made in NetLogo with the Color Chart Example
model.
If you use a number outside the 0 to 140 range, NetLogo will repeatedly add or subtract 140 from
the number until it is in the 0 to 140 range. For example, 25 is orange, so 165, 305, 445, and so on
are orange too, and so are -115, -255, -395, etc. This calculation is done automatically whenever
you set the turtle variable color or the patch variable pcolor. Should you need to perform this
calculation in some other context, use the wrap-color primitive.
If you want a color that's not on the chart, more can be found between the integers. For example,
26.5 is a shade of orange halfway between 26 and 27. This doesn't mean you can make any color
in NetLogo; the NetLogo color space is only a subset of all possible colors. It contains only a fixed
set of discrete hues (one hue per row of the chart). Starting from one of those hues, you can either
decrease its brightness (darken it) or decrease its saturation (lighten it), but you cannot decrease
both brightness and saturation. Also, only the first digit after the decimal point is significant. Thus,
color values are rounded down to the next 0.1, so for example, there's no visible difference between
98
Programming Guide
NetLogo 4.1.3 User Manual
26.5 and 26.52 or 26.58.
Color primitives
There are a few primitives that are helpful for working with colors.
We have already mentioned the wrap-color primitive.
The scale-color primitive is useful for converting numeric data into colors.
shade-of? will tell you if two colors are "shades" of the same basic hue. For example, shade-of?
orange 27 is true, because 27 is a lighter shade of orange.
Code Example: Scale-color Example demonstrates the scale-color reporter.
RGB and RGBA Colors
NetLogo also represents colors as RGB (red/green/blue) lists and RGBA (red/green/blue/alpha)
lists. When using RGB colors the full range of colors is available to you. RGBA colors allow all the
colors that RGB allows and you can also vary the transparency of a color. RGB and RGBA lists are
made up of three or four integers, respectively, between 0 and 255 if a number is outside that range
255 is repeatedly subtracted until it is in the range. You can set any color variables in NetLogo
(color for turtles and links and pcolor for patches) to an RGB list and that agent will be rendered
appropriately. So you can set the color of patch 0 0 to pure red using the following code:
set pcolor [255 0 0]
Turtles, links, and labels can all contain RGBA lists as their color variables, however, patches
cannot have RGBA pcolors You can set the color of a turtle to be approximately half transparent
pure red with the following code:
set color [255 0 0 125]
You can convert between RGB, HSB (hue/saturation/brightness), and NetLogo colors using
approximate-hsb and approximate-rgb from RGB/HSB to NetLogo colors, and
extract-hsb and extract-rgb in the opposite direction. You can use rgb to generate rgb lists
and hsb to convert from an HSB color to RGB.
Since many colors are missing from the NetLogo color space, approximate-hsb and
approximate-rgb often can't give you the exact color you ask for, but they try to come as close
as possible.
You can change any turtle from it's existing NetLogo color to a half transparent version of that color
using:
set color lput 125 extract-rgb color
Code Examples: HSB and RGB Example (lets you experiment with the HSB and
RGB color systems), Transparency Example
Programming Guide
99
NetLogo 4.1.3 User Manual
Color Swatches dialog
The Color Swatches dialog helps you experiment with and choose colors. Open it by choosing Color
Swatches on the Tools Menu.
When you click on a color swatch (or a color button), that color will be shown against other colors. In
the bottom left, the code for the currently selected color is displayed (for example, red + 2) so you
can copy and paste it into your code. On the bottom right there are three increment options, 1, 0.5,
and 0.1. These numbers indicate the difference between two adjacent swatches. When the
increment is 1 there are 10 different shades in each row; when the increment is 0.1 there are 100
different shades in each row. 0.5 is an intermediate setting.
Ask
NetLogo uses the ask command to give commands to turtles, patches, and links. All code to be run
by turtles must be located in a turtle "context". You can establish a turtle context in any of three
ways:
• In a button, by choosing "Turtles" from the popup menu. Any code you put in the button will
be run by all turtles.
• In the Command Center, by choosing "Turtles" from the popup menu. Any commands you
enter will be run by all the turtles.
• By using ask turtles.
The same goes for patches, links, and the observer, except that you cannot ask the observer. Any
code that is not inside any ask is by default observer code.
100
Programming Guide
NetLogo 4.1.3 User Manual
Here's an example of the use of ask in a NetLogo procedure:
to setup
clear-all
crt 100
;; create 100 turtles with random headings
ask turtles
[ set color red
;; turn them red
fd 50 ]
;; spread them around
ask patches
[ if pxcor > 0
;; patches on the right side
[ set pcolor green ] ] ;; of the view turn green
end
The models in the Models Library are full of other examples. A good place to start looking is in the
Code Examples section.
Usually, the observer uses ask to ask all turtles, all patches or all links to run commands. You can
also use ask to have an individual turtle, patch or link run commands. The reporters turtle,
patch, link and patch-at are useful for this technique. For example:
to setup
clear-all
crt 3
;; make 3 turtles
ask turtle 0
;; tell the first one...
[ fd 1 ]
;; ...to go forward
ask turtle 1
;; tell the second one...
[ set color green ]
;; ...to become green
ask turtle 2
;; tell the third one...
[ rt 90 ]
;; ...to turn right
ask patch 2 -2
;; ask the patch at (2,-2)
[ set pcolor blue ]
;; ...to become blue
ask turtle 0
;; ask the first turtle
[ ask patch-at 1 0
;; ...to ask patch to the east
[ set pcolor red ] ]
;; ...to become red
ask turtle 0
;; tell the first turtle...
[ create-link-with turtle 1 ] ;; ...make a link with the second
ask link 0 1
;; tell the link between turtle 0 and 1
[ set color blue ]
;; ...to become blue
end
Every turtle created has a who number. The first turtle created is number 0, the second turtle
number 1, and so forth. The turtle primitive reporter takes a who number as an input, and reports
the turtle with that who number. The patch primitive reporter takes values for pxcor and pycor and
reports the patch with those coordinates. The link primitive takes two inputs, the who numbers of
the two turtles it connects. And the patch-at primitive reporter takes offsets: distances, in the x
and y directions, from the first agent. In the example above, the turtle with who number 0 is asked to
get the patch east (and no patches north) of itself.
You can also select a subset of turtles, or a subset of patches, or a subset of links and ask them to
do something. This involves a concept called "agentsets". The next section explains this concept in
detail.
When you ask a set of agents to run more than one command, each agent must finish before the
next agent starts. One agent runs all of the commands, then the next agent runs all of them, and so
on. For example, if you write:
Programming Guide
101
NetLogo 4.1.3 User Manual
ask turtles
[ fd 1
set color red ]
first one turtle moves and turns red, then another turtle moves and turns red, and so on.
But if you write it this way:
ask turtles [ fd 1 ]
ask turtles [ set color red ]
first all of the turtles move. After they have all moved, they all turn red.
(Another form of the ask command, with a different ordering rule, is also available. See
Ask-Concurrent below.)
Agentsets
An agentset is exactly what its name implies, a set of agents. An agentset can contain either turtles,
patches or links, but not more than one type at once.
An agentset is not in any particular order. In fact, it's always in a random order. And every time you
use it, the agentset is in a different random order. This helps you keep your model from treating any
particular turtles, patches or links differently from any others (unless you want them to be). Since
the order is random every time, no one agent always gets to go first.
You've seen the turtles primitive, which reports the agentset of all turtles, the patches primitive,
which reports the agentset of all patches and the links primitive which reports the agentset of all
links.
But what's powerful about the agentset concept is that you can construct agentsets that contain only
some turtles, some patches or some links. For example, all the red turtles, or the patches with pxcor
evenly divisible by five, or the turtles in the first quadrant that are on a green patch or the links
connected to turtle 0. These agentsets can then be used by ask or by various reporters that take
agentsets as inputs.
One way is to use turtles-here or turtles-at, to make an agentset containing only the turtles
on my patch, or only the turtles on some other patch at some x and y offsets. There's also
turtles-on so you can get the set of turtles standing on a given patch or set of patches, or the set
of turtles standing on the same patch as a given turtle or set of turtles.
Here are some more examples of how to make agentsets:
;; all other turtles:
other turtles
;; all other turtles on this patch:
other turtles-here
;; all red turtles:
turtles with [color = red]
;; all red turtles on my patch
turtles-here with [color = red]
;; patches on right side of view
patches with [pxcor > 0]
102
Programming Guide
NetLogo 4.1.3 User Manual
;; all turtles less than 3 patches away
turtles in-radius 3
;; the four patches to the east, north, west, and south
patches at-points [[1 0] [0 1] [-1 0] [0 -1]]
;; shorthand for those four patches
neighbors4
;; turtles in the first quadrant that are on a green patch
turtles with [(xcor > 0) and (ycor > 0)
and (pcolor = green)]
;; turtles standing on my neighboring four patches
turtles-on neighbors4
;; all the links connected to turtle 0
[my-links] of turtle 0
Note the use of other to exclude this agent. This is common.
Once you have created an agentset, here are some simple things you can do:
• Use ask to make the agents in the agentset do something
• Use any? to see if the agentset is empty
• Use all? to see if every agent in an agentset satisfies a condition.
• Use count to find out exactly how many agents are in the set
And here are some more complex things you can do:
• Pick a random agent from the set using one-of. For example, we can make a randomly
chosen turtle turn green:
ask one-of turtles [ set color green ]
Or tell a randomly chosen patch to sprout a new turtle:
ask one-of patches [ sprout 1 ]
• Use the max-one-of or min-one-of reporters to find out which agent is the most or least
along some scale. For example, to remove the richest turtle, you could say
ask max-one-of turtles [sum assets] [ die ]
• Make a histogram of the agentset using the histogram command (in combination with of).
• Use of to make a list of values, one for each agent in the agentset. Then use one of
NetLogo's list primitives to do something with the list. (See the "Lists" section below.) For
example, to find out how rich turtles are on the average, you could say
show mean [sum assets] of turtles
• Use turtle-set, patch-set and link-set reporters to make new agentsets by
gathering together agents from a variety of possible sources.
• Use no-turtles, no-patches and no-links reporters to make empty agentsets.
• Check whether two agentsets are equal using = or !=.
• Use member? to see whether a particular agent is a member of an agentset.
This only scratches the surface. See the Models Library for many more examples, and consult the
NetLogo Dictionary for more information about all of the agentset primitives.
More examples of using agentsets are provided in the individual entries for these primitives in the
NetLogo Dictionary. In developing familiarity with programming in NetLogo, it is important to begin
Programming Guide
103
NetLogo 4.1.3 User Manual
to think of compound commands in terms of how each element passes information to the next one.
Agentsets are an important part of this conceptual scheme and provide the NetLogo developer with
a lot of power and flexibility, as well as being more similar to natural language.
Code Example: Ask Ordering Example
Earlier, we said that agentsets are always in random order, a different random order every time. If
you need your agents to do something in a fixed order, you need to make a list of the agents
instead. See the Lists section below.
Breeds
NetLogo allows you to define different "breeds" of turtles and breeds of links. Once you have
defined breeds, you can go on and make the different breeds behave differently. For example, you
could have breeds called sheep and wolves, and have the wolves try to eat the sheep or you
could have link breeds called streets and sidewalks where foot traffic is routed on sidewalks
and car traffic is routed on streets.
You define turtle breeds using the breed keyword, at the top of the Procedures tab, before any
procedures:
breed [wolves wolf]
breed [sheep a-sheep]
You can refer to a member of the breed using the singular form, just like the turtle reporter.
When printed, members of the breed will be labeled with the singular name.
Some commands and reporters have the plural name of the breed in them, such as
create-<breeds>. Others have the singular name of the breed in them, such as <breed>
The order in which breeds are declared is also the order order in which they are layered in the view.
So breeds defined later will appear on top of breeds defined earlier; in this example, sheep will be
drawn over wolves.
When you define a breed such as sheep, an agentset for that breed is automatically created, so
that all of the agentset capabilities described above are immediately available with the sheep
agentset.
The following new primitives are also automatically available once you define a breed:
create-sheep, hatch-sheep, sprout-sheep, sheep-here, sheep-at, sheep-on, and
is-a-sheep?.
Also, you can use sheep-own to define new turtle variables that only turtles of the given breed
have. (It's allowed for more than one breed to own the same variable.)
A turtle's breed agentset is stored in the breed turtle variable. So you can test a turtle's breed, like
this:
if breed = wolves [ ... ]
104
Programming Guide
NetLogo 4.1.3 User Manual
Note also that turtles can change breeds. A wolf doesn't have to remain a wolf its whole life. Let's
change a random wolf into a sheep:
ask one-of wolves [ set breed sheep ]
The set-default-shape primitive is useful for associating certain turtle shapes with certain
breeds. See the section on shapes below.
Here is a quick example of using breeds:
breed [mice mouse]
breed [frogs frog]
mice-own [cheese]
to setup
clear-all
create-mice 50
[ set color white
set cheese random 10 ]
create-frogs 50
[ set color green ]
end
Code Example: Breeds and Shapes Example
Link Breeds
Link breeds are very similar to turtle breeds, however, there are a few differences.
When you declare a link breed you must declare whether it is a breed of directed or undirected links
by using the directed-link-breed and undirected-link-breed keywords.
directed-link-breed [streets street]
undirected-link-breed [friendships friendship]
once you have created a breeded link you cannot create unbreeded links and vice versa. (You can,
however, have directed and undirected links in the same world, just not in the same breed)
Unlike with turtle breeds the singular breed name is required for link breeds, as many of the link
commands and reports use the singular name, such as <link-breed>-neighbor?.
The following primitives are also automatically available once you define a directed link breed:
create-street-from create-streets-from create-street-to create-streets-to
in-street-neighbor? in-street-neighbors in-street-from my-in-streets
my-out-streets out-street-neighbor? out-street-neighbors out-street-to
And the following are automatically available when you define an undirected link breed:
create-friendship-with create-friendships-with friendship-neighbor?
friendship-neighbors friendship-with my-friendships
Multiple link breeds may declare the same -own variable, but a variable may not be shared
between a turtle breed and a link breed.
Programming Guide
105
NetLogo 4.1.3 User Manual
Just as with turtle breeds the order in which link breeds are declared defines the order in which the
links are drawn, so the friendships will always be on top of streets (if for some reason these breeds
were in the same model). You can also use <link-breeds>-own to declare variables of each link
breed separately.
You can change the breed of links, like turtles, however, you cannot the breed of links to be
unbreeded links, to prevent having breeded and unbreeded links in the same world.
ask one-of friendships [ set breed streets ]
ask one-of friendships [ set breed links ] ;; produces a runtime error
set-default-shape may also be used with link breeds to associate it with a particular link shape.
Code Example: Link Breeds Example
Buttons
Buttons in the interface tab provide an easy way to control the model. Typically a model will have at
least a "setup" button, to set up the initial state of the world, and a "go" button to make the model
run continuously. Some models will have additional buttons that perform other actions.
A button contains some NetLogo code. That code is run when you press the button.
A button may be either a "once button", or a "forever button". You can control this by editing the
button and checking or unchecking the "Forever" checkbox. Once buttons run their code once, then
stop and pop back up. Forever buttons keep running their code over and over again, until either the
code hits the stop command, or you press the button again to stop it. If you stop the button, the
code doesn't get interrupted. The button waits until the code has finished, then pops up.
Normally, a button is labeled with the code that it runs. For example, a button that says "go" on it
usually contains the code "go", which means "run the go procedure". (Procedures are defined in the
Procedures tab; see below.) But you can also edit a button and enter a "display name" for the
button, which is a text that appears on the button instead of the code. You might use this feature if
you think the actual code would be confusing to your users.
When you put code in a button, you must also specify which agents you want to run that code. You
can choose to have the observer run the code, or all turtles, or all patches, or all links. (If you want
the code to be run by only some turtles or some patches, you could make an observer button, and
then have the observer use the ask command to ask only some of the turtles or patches to do
something.)
When you edit a button, you have the option to assign an "action key". This makes that key on the
keyboard behave just like a button press. If the button is a forever button, it will stay down until the
key is pressed again (or the button is clicked). Action keys are particularly useful for games or any
model where rapid triggering of buttons is needed.
Buttons take turns
More than one button can be pressed at a time. If this happens, the buttons "take turns", which
means that only one button runs at a time. Each button runs its code all the way through once while
106
Programming Guide
NetLogo 4.1.3 User Manual
the other buttons wait, then the next button gets its turn.
In the following examples, "setup" is a once button and "go" is a forever button.
Example #1: The user presses "setup", then presses "go" immediately, before the "setup" has
popped back up. Result: "setup" finishes before "go" starts.
Example #2: While the "go" button is down, the user presses "setup". Result: the "go" button
finishes its current iteration. Then the "setup" button runs. Then "go" starts running again.
Example #3: The user has two forever buttons down at the same time. Result: first one button runs
its code all the way through, then the other runs its code all the way through, and so on, alternating.
Note that if one button gets stuck in an infinite loop, then no other buttons will run.
Turtle, patch, and link forever buttons
There is a subtle difference between putting commands in a turtle, patch or link forever button, and
putting the same commands in an observer button that does ask turtles, ask patches or ask
links. An "ask" doesn't complete until all of the agents have finished running all of the commands
in the "ask". So the agents, as they all run the commands concurrently, can be out of sync with each
other, but they all sync up again at the end of the ask. The same isn't true of turtle, patch and link
forever buttons. Since ask was not used, each turtle or patch runs the given code over and over
again, so they can become (and remain) out of sync with each other.
At present, this capability is very rarely used in the models in our Models Library. A model that does
use the capability is the Termites model, in the Biology section of Sample Models. The "go" button
is a turtle forever button, so each termite proceeds independently of every other termite, and the
observer is not involved at all. This means that if, for example, you wanted to add ticks and/or a plot
to the model, you would need to add a second forever button (an observer forever button), and run
both forever buttons at the same time. Note also that a model like this cannot be used with
BehaviorSpace.
Code Example: State Machine Example shows how Termites can be recoded in a
tick-based way, without using a turtle forever button.
At present, NetLogo has no way for one forever button to start another. Buttons are only started
when you press them.
Lists
In the simplest models, each variable holds only one piece of information, usually a number or a
string. The list feature lets you store multiple pieces of information in a single variable by collecting
those pieces of information in a list. Each value in the list can be any type of value: a number, or a
string, an agent or agentset, or even another list.
Lists allow for the convenient packaging of information in NetLogo. If your agents carry out a
repetitive calculation on multiple variables, it might be easier to have a list variable, instead of
multiple number variables. Several primitives simplify the process of performing the same
Programming Guide
107
NetLogo 4.1.3 User Manual
computation on each value in a list.
The NetLogo Dictionary has a section that lists all of the list-related primitives.
Constant lists
You can make a list by simply putting the values you want in the list between brackets, like this: set
mylist [2 4 6 8]. Note that the individual values are separated by spaces. You can make lists
that contain numbers and strings this way, as well as lists within lists, for example [[2 4] [3
5]].
The empty list is written by putting nothing between the brackets, like this: [].
Building lists on the fly
If you want to make a list in which the values are determined by reporters, as opposed to being a
series of constants, use the list reporter. The list reporter accepts two other reporters, runs
them, and reports the results as a list.
If I wanted a list to contain two random values, I might use the following code:
set random-list list (random 10) (random 20)
This will set random-list to a new list of two random integers each time it runs.
To make longer or shorter lists, you can use the list reporter with fewer or more than two inputs,
but in order to do so, you must enclose the entire call in parentheses, e.g.:
(list random 10)
(list random 10 random 20 random 30)
For more information, see Varying number of inputs.
Some kinds of lists are most easily built using the n-values reporter, which allows you to construct
a list of a specific length by repeatedly running a given reporter. You can make a list of the same
value repeated, or all the numbers in a range, or a lot of random numbers, or many other
possibilities. See dictionary entry for details and examples.
The of primitive lets you construct a list from an agentset. It reports a list containing each agent's
value for the given reporter. (The reporter could be a simple variable name, or a more complex
expression -- even a call to a procedure defined using to-report.) A common idiom is
max [...] of turtles
sum [...] of turtles
and so on.
You can combine two or more lists using the sentence reporter, which concatenates lists by
combining their contents into a single, larger list. Like list, sentence normally takes two inputs,
but can accept any number of inputs if the call is surrounded by parentheses.
Changing list items
108
Programming Guide
NetLogo 4.1.3 User Manual
Technically, lists can't be modified, but you can construct new lists based on old lists. If you want
the new list to replace the old list, use set. For example:
set mylist [2 7 5 Bob [3 0 -2]]
; mylist is now [2 7 5 Bob [3 0 -2]]
set mylist replace-item 2 mylist 10
; mylist is now [2 7 10 Bob [3 0 -2]]
The replace-item reporter takes three inputs. The first input specifies which item in the list is to
be changed. 0 means the first item, 1 means the second item, and so forth.
To add an item, say 42, to the end of a list, use the lput reporter. (fput adds an item to the
beginning of a list.)
set mylist lput 42 mylist
; mylist is now [2 7 10 Bob [3 0 -2] 42]
But what if you changed your mind? The but-last (bl for short) reporter reports all the list items
but the last.
set mylist but-last mylist
; mylist is now [2 7 10 Bob [3 0 -2]]
Suppose you want to get rid of item 0, the 2 at the beginning of the list.
set mylist but-first mylist
; mylist is now [7 10 Bob [3 0 -2]]
Suppose you wanted to change the third item that's nested inside item 3 from -2 to 9? The key is to
realize that the name that can be used to call the nested list [3 0 -2] is item 3 mylist. Then the
replace-item reporter can be nested to change the list-within-a-list. The parentheses are added
for clarity.
set mylist (replace-item 3 mylist
(replace-item 2 (item 3 mylist) 9))
; mylist is now [7 10 Bob [3 0 9]]
Iterating over lists
If you want to do some operation on each item in a list in turn, the foreach command and the map
reporter may be helpful.
foreach is used to run a command or commands on each item in a list. It takes an input list and a
block of commands, like this:
foreach [2 4 6]
[ crt ?
show (word "created " ? " turtles") ]
=> created 2 turtles
=> created 4 turtles
=> created 6 turtles
In the block, the variable ? holds the current value from the input list.
Programming Guide
109
NetLogo 4.1.3 User Manual
Here are some more examples of foreach:
foreach [1 2 3] [ ask turtles [ fd ? ] ]
;; turtles move forward 6 patches
foreach [true false true true] [ ask turtles [ if ? [ fd 1 ] ] ]
;; turtles move forward 3 patches
map is similar to foreach, but it is a reporter. It takes an input list and another reporter. Note that
unlike foreach, the reporter comes first, like this:
show map [round ?] [1.2 2.2 2.7]
;; prints [1 2 3]
map reports a list containing the results of applying the reporter to each item in the input list. Again,
use ? to refer to the current item in the list.
Here is another example of map:
show map [? < 0] [1 -1 3 4 -2 -10]
;; prints [false true false false true true]
foreach and map won't necessarily be useful in every situation in which you want to operate on an
entire list. In some situations, you may need to use some other technique such as a loop using
repeat or while, or a recursive procedure.
The sort-by primitive uses a similar syntax to map and foreach, except that since the reporter
needs to compare two objects, the two special variables ?1 and ?2 are used in place of ?.
Here is an example of sort-by:
show sort-by [?1 < ?2] [4 1 3 2]
;; prints [1 2 3 4]
Varying number of inputs
Some commands and reporters involving lists and strings may take a varying number of inputs. In
these cases, in order to pass them a number of inputs other than their default, the primitive and its
inputs must be surrounded by parentheses. Here are some examples:
show list 1 2
=> [1 2]
show (list 1 2 3 4)
=> [1 2 3 4]
show (list)
=> []
Note that each of these special commands has a default number of inputs for which no parentheses
are required. The primitives which have this capability are list, word, sentence, map, and
foreach.
Lists of agents
Earlier, we said that agentsets are always in random order, a different random order every time. If
you need your agents to do something in a fixed order, you need to make a list of the agents
110
Programming Guide
NetLogo 4.1.3 User Manual
instead.
There are two primitives that help you do this, sort and sort-by.
Both sort and sort-by can take an agentset as input. The result is always a new list, containing
the same agents as the agentset did, but in a particular order.
If you use sort on an agentset of turtles, the result is a list of turtles sorted in ascending order by
who number.
If you use sort on an agentset of patches, the result is a list of patches sorted left-to-right,
top-to-bottom.
If you use sort on an agentset of links, the result is a list of links, sorted in ascending order first by
end1 then by end2 any remaining ties are resolved by breed in the order they are declared in the
procedures tab.
If you need descending order instead, you can combine reverse with sort, for example reverse
sort turtles.
If you want your agents to be ordered by some other criterion than the standard ones sort uses,
you'll need to use sort-by instead.
Here's an example:
sort-by [[size] of ?1 < [size] of ?2] turtles
This returns a list of turtles sorted in ascending order by their turtle variable size.
Asking a list of agents
Once you have a list of agents, you might want to ask them each to do something. To do this, use
the foreach and ask commands in combination, like this:
foreach sort turtles [
ask ? [
...
]
]
This will ask each turtle in ascending order by who number. Substitute "patches" for "turtles" to ask
patches in left-to-right, top-to-bottom order.
If you use foreach like this, the agents in the list run the commands inside the ask sequentially, not
concurrently. Each agent finishes the commands before the next agent begins them.
Note that you can't use ask directly on a list of turtles. ask only works with agentsets and single
agents.
Performance of lists
Programming Guide
111
NetLogo 4.1.3 User Manual
If your model makes especially heavy use of lists, especially long lists, you may need to know the
speed of the various NetLogo list operations, to help you write code that runs fast.
NetLogo lists are "singly linked" lists. This is a technical term from computer science that means
that when NetLogo needs to find an item in a list, it must start at the beginning of the list and go
from item to item until it finds the one it wants. For example, to find the 100th item, NetLogo must
step through the previous 99 items, one at a time.
It also means that certain operations are especially efficient, namely operations at the front of the
list. The first, but-first, and fput reporters are all very fast; they take the same amount of
time to run, no matter how long the list is. So if you're building up a list by adding items to it one at a
time, it's much faster to use fput than lput. (If that causes your list to end up backwards from how
you wanted it, you can always use reverse to reverse the list once you're done building it.)
The length reporter is also fast; NetLogo always keeps track of how long every list is, so it never
needs to actually measure.
Examples of reporters which are slower on longer lists include item, lput, but-last, last, and
one-of.
Math
All numbers in NetLogo are stored internally as double precision floating point numbers, as defined
in the IEEE 754 standard. They are 64 bit numbers consisting of one sign bit, an 11-bit exponent,
and a 52-bit mantissa. See the IEEE 754 standard for details.
An "integer" in NetLogo is simply a number that happens to have no fractional part. No distinction is
made between 3 and 3.0; they are the same number. (This is the same as how most people use
numbers in everyday contexts, but different from some programming languages. Some languages
treat integers and floating point numbers as distinct types.)
Integers are always printed by NetLogo without the trailing ".0":
show 1.5 + 1.5
observer: 3
If a number with a fractional part is supplied in a context where an integer is expected, the fractional
part is simply discarded. So for example, crt 3.5 creates three turtles; the extra 0.5 is ignored.
The range of integers is +/-9007199254740992 (2^53, about 9 quadrillion). Calculations that exceed
this range will not cause runtime errors, but precision will be lost when the least significant (binary)
digits are rounded off in order fit the number into 64 bits. With very large numbers, this rounding can
result in imprecise answers which may be surprising:
show 2 ^ 60 + 1 = 2 ^ 60
=> true
Calculations with smaller numbers can also produce surprising results if they involve fractional
quantities, since not all fractions can be precisely represented and roundoff may occur. For
example:
112
Programming Guide
NetLogo 4.1.3 User Manual
show 1 / 6 + 1 / 6 + 1 / 6 + 1 / 6 + 1 / 6 + 1 / 6
=> 0.9999999999999999
show 1 / 9 + 1 / 9 + 1 / 9 + 1 / 9 + 1 / 9 + 1 / 9 + 1 / 9 + 1 / 9 + 1 / 9
=> 1.0000000000000002
Any operation which produces the special quantities "infinity" or "not a number" will cause a runtime
error.
Scientific notation
Very large or very small floating point numbers are displayed by NetLogo using "scientific notation".
Examples:
show 0.000000000001
=> 1.0E-12
show 50000000000000000000
=> 5.0E19
Numbers in scientific notation are distinguished by the presence of the letter E (for "exponent"). It
means "times ten to the power of", so for example, 1.0E-12 means 1.0 times 10 to the -12 power:
show 1.0 * 10 ^ -12
=> 1.0E-12
You can also use scientific notation yourself in NetLogo code:
show 3.0E6
=> 3000000
show 8.123456789E6
=> 8123456.789
show 8.123456789E7
=> 8.123456789E7
show 3.0E16
=> 3.0E16
show 8.0E-3
=> 0.0080
show 8.0E-4
=> 8.0E-4
These examples show that numbers with fractional parts are displayed using scientific notation if the
exponent is less than -3 or greater than 6. Numbers outside of NetLogo's integer range of
-9007199254740992 to 9007199254740992 (+/-2^53) are also always shown in scientific notation:
show 2 ^ 60
=> 1.15292150460684698E18
When entering a number, the letter E may be either upper or lowercase. When printing a number,
NetLogo always uses an uppercase E:
show 4.5e20
=> 4.5E20
Floating point accuracy
Because numbers in NetLogo are subject to the limitations of how floating point numbers are
Programming Guide
113
NetLogo 4.1.3 User Manual
represented in binary, you may get answers that are slightly inaccurate. For example:
show 0.1 + 0.1 + 0.1
=> 0.30000000000000004
show cos 90
=> 6.123233995736766E-17
This is an inherent issue with floating point arithmetic; it occurs in all programming languages that
use floating point numbers.
If you are dealing with fixed precision quantities, for example dollars and cents, a common
technique is to use only integers (cents) internally, then divide by 100 to get a result in dollars for
display.
If you must use floating point numbers, then in some situations you may need to replace a
straightforward equality test such as if x = 1 [ ... ] with a test that tolerates slight
imprecision, for example if abs (x - 1) < 0.0001 [ ... ].
Also, the precision primitive is handy for rounding off numbers for display purposes. NetLogo
monitors round the numbers they display to a configurable number of decimal places, too.
Random Numbers
The random numbers used by NetLogo are what is called "pseudo-random". (This is typical in
computer programming.) That means they appear random, but are in fact generated by a
deterministic process. "Deterministic" means that you get the same results every time, if you start
with the same random "seed". We'll explain in a minute what we mean by "seed".
In the context of scientific modeling, pseudo-random numbers are actually desirable. That's
because it's important that a scientific experiment be reproducible -- so anyone can try it themselves
and get the same result that you got. Since NetLogo uses pseudo-random numbers, the
"experiments" that you do with it can be reproduced by others.
Here's how it works. NetLogo's random number generator can be started with a certain seed value,
which can be any integer. Once the generator has been "seeded" with the random-seed
command, it always generates the same sequence of random numbers from then on. For example,
if you run these commands:
random-seed
show random
show random
show random
137
100
100
100
You will always get the numbers 79, 89, and 61 in that order.
Note, however, that you're only guaranteed to get those same numbers if you're using the same
version of NetLogo. Sometimes when we make a new version of NetLogo the random number
generator changes. (Presently, we use a generator known as the Mersenne Twister.)
To create a number suitable for seeding the random number generator, use the new-seed reporter.
new-seed creates a seed, evenly distributed over the space of possible seeds, based on the
current date and time. It never reports the same seed twice in a row.
114
Programming Guide
NetLogo 4.1.3 User Manual
Code Example: Random Seed Example
If you don't set the random seed yourself, NetLogo sets it to a value based on the current date and
time. There is no way to find out what random seed it chose, so if you want your model run to be
reproducible, you must set the random seed yourself ahead of time.
The NetLogo primitives with "random" in their names (random, random-float, and so on) aren't the
only ones that use pseudo-random numbers. Many other operations also make random choices.
For example, agentsets are always in random order, one-of and n-of choose agents randomly,
the sprout command creates turtles with random colors and headings, and the downhill reporter
chooses a random patch when there's a tie. All of these random choices are governed by the
random seed as well, so model runs can be reproducible.
In addition to the uniformly distributed random integers and floating point numbers generated by
random and random-float, NetLogo also offers several other random distributions. See the
dictionary entries for random-normal, random-poisson, random-exponential, and
random-gamma.
Auxiliary generator
Code run by buttons or from the command center uses the main random number generator.
Code in monitors uses an auxiliary random generator, so even if a monitor does a calculation that
uses random numbers, the outcome of the model is not affected. The same is true of code in
sliders.
Local randomness
You may want to explicitly specify that a section of code does not affect the state of the main
random generator, so the outcome of the model is not affected. The with-local-randomness
command is provided for this purpose. See its entry in the NetLogo Dictionary for more information.
Turtle shapes
In NetLogo, turtle shapes are vector shapes. They are built up from basic geometric shapes;
squares, circles, and lines, rather than a grid of pixels. Vector shapes are fully scalable and
rotatable. NetLogo caches bitmap images of vector shapes size 1, 1.5, and 2 in order to speed up
execution.
A turtle's shape is stored in its shape variable and can be set using the set command.
New turtles have a shape of "default". The set-default-shape primitive is useful for changing
the default turtle shape to a different shape, or having a different default turtle shape for each breed
of turtle.
The shapes primitive reports a list of currently available turtle shapes in the model. This is useful if,
for example, you want to assign a random shape to a turtle:
ask turtles [ set shape one-of shapes ]
Programming Guide
115
NetLogo 4.1.3 User Manual
Use the Turtle Shapes Editor to create your own turtle shapes, or to add shapes to your model from
our shapes library, or to transfer shapes between models. For more information, see the Shapes
Editor section of this manual.
The thickness of the lines used to draw the vector shapes can be controlled by the
__set-line-thickness primitive.
Code Examples: Breeds and Shapes Example, Shape Animation Example
Link Shapes
Link Shapes are similar to turtle shapes, only you use the Link Shape Editor to create and edit
them. Link shapes consist of between 0 and 3 lines which can have different patterns and a
direction indicator that is composed of the same elements as turtle shapes. Links also have a
shape variable that can be set to any link shape that is in the model. By default links have the
"default" shape, though you can change that using set-default-shape. The link-shapes
reporter reports all the link shapes included in the current model.
The thickness of the lines in the link shape is controlled by the thickness link variable.
Tick Counter
In many NetLogo models, time passes in discrete steps, called "ticks". NetLogo includes a built-in
tick counter so you can keep track of how many ticks have passed.
The current value of the tick counter is shown above the view. (You can use the Settings button to
hide the tick counter, or change the word "ticks" to something else.)
In code, to retrieve the current value of the tick counter, use the ticks reporter. The tick
command advances the tick counter by 1. The clear-all command resets the tick counter to 0. If
you want to reset the counter to 0 without clearing everything, use the reset-ticks command.
If your model is set to use tick-based updates, then the tick command will usually also update the
view. See the next section, View Updates.
When to tick
We suggest using the tick command after your agents have completed all their movements and
actions, but before you plot or calculate statistics. That way, if the plotting or calculating code refers
to the tick counter, it will get the new value, reflecting that the tick is now complete. Example:
to go
ask turtles [ move ]
ask patches [ grow ]
tick
do-plots
end
to do-plots
plotxy ticks count turtles
end
116
Programming Guide
NetLogo 4.1.3 User Manual
By putting tick before do-plots, the plotting code gets the right value of the tick counter when it
uses the ticks reporter.
Fractional ticks
In most models, the tick counter starts at 0 and goes up 1 at a time, from integer to integer. But it's
also possible for the tick counter to take on in-between floating point values.
To advance the tick counter by a fractional amount, use the tick-advance command. This
command takes a numeric input specifying how far to advance the tick counter.
A typical use of fractional ticks is to approximate continuous or curved motion. See, for example, the
GasLab models in the Models Library (under Chemistry & Physics). These models calculate the
exact time at which a future event is to occur, then advance the tick counter to exactly that time.
View Updates
The "view" in NetLogo lets you see the agents in your model on your computer's screen. As your
agents move and change, you see them moving and changing in the view.
Of course, you can't really see your agents directly. The view is a picture that NetLogo paints,
showing you how your agents look at a particular instant. Once that instant passes and your agents
move and change some more, that picture needs to be repainted to reflect the new state of the
world. Repainting the picture is called "updating" the view.
When does the view get updated? This section discusses how NetLogo decides when to update the
view, and how you can influence when it gets updated.
NetLogo offers two updates modes, "continuous" updates and "tick-based" updates. You can switch
between NetLogo's two view update modes using a popup menu at the top of the Interface tab.
Continuous updates are the default when you start up NetLogo or start a new model. Nearly every
model in our Models Library, however, uses tick-based updates.
Continuous updates are simplest, but tick-based updates give you more control over when and how
often updates happen.
It's important exactly when an update happens, because when updates happen determines what
you see on the screen. If an update comes at an unexpected time, you may see something
unexpected -- perhaps something confusing or misleading.
It's also important how often updates happen, because updates take time. The more time NetLogo
spends updating the view, the slower your model will run. With fewer updates, your model runs
faster.
Continuous updates
Continuous updates are very simple. With continuous updates, NetLogo updates the view a certain
number of times per second -- by default, 50 times a second when the speed slider is in the default,
middle setting.
Programming Guide
117
NetLogo 4.1.3 User Manual
If you move the speed slider to a slower setting, NetLogo will update more than 50 times a second,
effectively slowing down the model. On a faster setting, NetLogo will update less than 50 times a
second. On the fastest setting, updates will be separated by several seconds.
At extremely slow settings, NetLogo will be updating so often that you will see your agents moving
(or changing color, etc.) one at a time.
If you need to temporarily shut off continuous updates, use the no-display command. The
display command turns updates back on, and also forces an immediate update (unless the user
is fast-forwarding the model using the speed slider).
Tick-based updates
As discussed above in the Tick Counter section, in many NetLogo models, time passes in discrete
steps, called "ticks". Typically, you want the view to update once per tick, between ticks. That's the
default behavior with tick-based updates.
If you want additional view updates, you can force an update using the display command. (The
update may be skipped if the user is fast-forwarding the model using the speed slider.)
You don't have to use the tick counter to use tick-based updates. If the tick counter never advances,
the view will update only when you use the display command.
If you move the speed slider to a faster setting, NetLogo will skip some of the updates that would
ordinarily have happened. Moving the speed slider to a slower setting doesn't cause additional
updates; rather, it makes NetLogo pause after each update. The slower the setting, the longer the
pause.
Even under tick-based updates, the view also updates whenever a button in the interface pops up
(both once and forever buttons) and when a command entered in the Command Center finishes. So
it's not necessary to add the display command to once buttons that don't advance the tick
counter. Many forever buttons that don't advance the tick counter do need to use the display
command. An example in the Models Library is the Life model (under Computer Science -> Cellular
Automata). The forever buttons that let the user draw in the view use the display command so the
user can see what they are drawing, even though the tick counter is not advancing.
Choosing a mode
Advantages of tick-based updates over continuous updates include:
1. Consistent, predictable view update behavior which does not vary from computer to
computer or from run to run.
2. Continuous updates can confuse the user of your model by letting them see model states
they aren't supposed to see, which may be misleading.
3. Increased speed. Updating the view takes time, so if one update per tick is enough, then
enforcing than there is only one update per tick will make your model faster.
4. Since setup buttons don't advance the tick counter, they are unaffected by the speed slider;
this is normally the desired behavior.
As mentioned above, most models in our Models Library now uses tick-based updates.
118
Programming Guide
NetLogo 4.1.3 User Manual
Continuous updates are useful for models in which execution is not divided into short, discrete
phases. An example in the Models Library is Termites. (See also, however, the State Machine
Example model, which shows how to re-code Termites using ticks.)
Even for models that would normally be set to tick-based updates, it may be useful to switch to
continuous updates temporarily for debugging purposes. Seeing what's going on within a tick,
instead of only seeing the end result of a tick, could help with troubleshooting. After switching to
continuous updates, you may want to use the speed slider to slow the model down until you see
your agents moving one at a time. Don't forget to change back to tick-based updates when you are
done, as the choice of update mode is saved with the model.
Plotting
NetLogo's plotting features let you create plots to help you understand what's going on in your
model.
Before you can plot, you need to create one or more plots in the Interface tab. Each plot should
have a unique name. You'll be using its name to refer to it in your code in the Procedures tab.
For more information on using and editing plots in the Interface tab, see the Interface Guide.
Specifying a plot
If you only have one plot in your model, then you can start plotting to it right away. But if you have
more than one plot, you have to specify which one you want to plot to. To do this, use the
set-current-plot command with the name of the plot enclosed in double quotes, like this:
set-current-plot "Distance vs. Time"
You must supply the name of the plot exactly as you typed it when you created the plot. Note that
later if you change the name of the plot, you'll also have to update the set-current-plot calls in
your model to use the new name. (Copy and paste can be helpful here.)
Specifying a pen
When you make a new plot, it just has one pen in it. If the current plot only has one plot pen, then
you can start plotting to it right away.
But you can also have multiple pens in a plot. You can create additional pens by editing the plot and
using the controls in the "Plot Pens" section at the bottom of the edit dialog. Each pen should have
a unique name. You'll be using its name to refer to it in your code in the Procedures tab.
For a plot with multiple pens, you have to specify which pen you want to plot with. If you don't
specify a pen, plotting will take place with the first pen in the plot. To plot with a different pen, use
the set-current-plot-pen command with the name of the pen enclosed in double quotes, like
this:
set-current-plot-pen "distance"
Plotting points
Programming Guide
119
NetLogo 4.1.3 User Manual
The two basic commands for actually plotting things are plot and plotxy.
With plot you need only specify the y value you want plotted. The x value will automatically be 0
for the first point you plot, 1 for the second, and so on. (That's if the plot pen's "interval" is the
default value of 1; you can change the interval.)
The plot command is especially handy when you want your model to plot a new point at every
time step. Example:
to setup
...
plot count turtles
end
to go
...
plot count turtles
end
Note that in this example we plot from both the "setup" and "go" procedures. That's because we
want our plot to include the initial state of the system. We plot at the end of the "go" procedure, not
the beginning, because we want the plot always to be up to date after the go button stops.
If you need to specify both the x and y values of the point you want plotted, then use plotxy
instead.
Code Example: Plotting Example
Other kinds of plots
By default, NetLogo plot pens plot in line mode, so that the points you plot are connected by a line.
If you want to move the pen without plotting, you can use the plot-pen-up command. After this
command is issued, the plot and plotxy commands move the pen but do not actually draw
anything. Once the pen is where you want it, use plot-pen-down to put the pen back down.
If you want to plot individual points instead of lines, or you want to draw bars instead of lines or
points, you need to change the plot pen's "mode". Three modes are available: line, bar, and point.
Line is the default mode.
Normally, you change a pen's mode by editing the plot. This changes the pen's default mode. It's
also possible to change the pen's mode temporarily using the set-plot-pen-mode command.
That command takes a number as input: 0 for line, 1 for bar, 2 for point.
Histograms
A histogram is a special kind of plot that measures how frequently certain values, or values in
certain ranges, occur in a collection of numbers that arise in your model.
For example, suppose the turtles in your model have an age variable. You could create a histogram
of the distribution of ages among your turtles with the histogram command, like this:
120
Programming Guide
NetLogo 4.1.3 User Manual
histogram [age] of turtles
The numbers you want to histogram don't have to come from an agentset; they could be any list of
numbers.
Note that using the histogram command doesn't automatically switch the current plot pen to bar
mode. If you want bars, you have to set the plot pen to bar mode yourself. (As we said before, you
can change a pen's default mode by editing the plot in the Interface tab.)
The width of the bars in a histogram is controlled by the plot pen's interval. You can set a plot pen's
default interval by editing the plot in the Interface tab. You can also change the interval temporarily
with the set-plot-pen-interval command or the set-histogram-num-bars. If you use the
latter command, NetLogo will set the interval appropriately so as to fit the specified number of bars
within the plot's current x range.
Code Example: Histogram Example
Clearing and resetting
You can clear the current plot with the clear-plot command, or clear every plot in your model
with clear-all-plots. The clear-all command also clears all plots, in addition to clearing
everything else in your model.
If you only want to remove only the points that the current plot pen has drawn, use
plot-pen-reset.
When a whole plot is cleared, or when a pen is reset, that doesn't just remove the data that has
been plotted. It also restores the plot or pen to its default settings, as they were specified in the
Interface tab when the plot was created or last edited. Therefore, the effects of such commands as
set-plot-x-range and set-plot-pen-color are only temporary.
Ranges and autoplotting
The default x and y ranges for a plot are fixed numbers, but they can be changed at setup time or
as the model runs.
To change the ranges at any time, use set-plot-x-range and set-plot-y-range. Or, you
can let the ranges grow automatically. Either way, when the plot is cleared the ranges will return to
their default values.
By default, all NetLogo plots have the "autoplotting" feature enabled. This means that if the model
tries to plot a point which is outside the current displayed range, the range of the plot will grow along
one or both axes so that the new point is visible.
In the hope that the ranges won't have to change every time a new point is added, when the ranges
grow they leave some extra room: 25% if growing horizontally, 10% if growing vertically.
If you want to turn off this feature, edit the plot and uncheck the Autoplot checkbox. At present, it is
not possible to enable or disable this feature only on one axis; it always applies to both axes.
Programming Guide
121
NetLogo 4.1.3 User Manual
Temporary plot pens
Most plots can get along with a fixed number of pens. But some plots have more complex needs;
they may need to have the number of pens vary depending on conditions. In such cases, you can
make "temporary" plot pens from code and then plot with them. These pens are called "temporary"
because they vanish when the plot is cleared (by the clear-plot, clear-all-plots, or
clear-all commands).
To create a temporary plot pen, use the create-temporary-plot-pen command. Once the pen
has been created, you can use it like any ordinary pen. By default, the new pen is down, is black in
color, has an interval of 1, and plots in line mode. Commands are available to change all of these
settings; see the Plotting section of the NetLogo Dictionary.
Using a Legend
You can show the legend of a plot by selecting the "Show legend" checkbox in the edit dialog. If you
don't want a particular pen to show up in the legend you can uncheck the "Show in Legend"
checkbox for that pen also in the edit dialog.
Conclusion
Not every aspect of NetLogo's plotting system has been explained here. See the Plotting section of
the NetLogo Dictionary for information on additional commands and reporters related to plotting.
Many of the Sample Models in the Models Library illustrate various advanced plotting techniques.
Also check out the following code examples:
Code Examples: Plot Axis Example, Plot Smoothing Example, Rolling Plot Example
Strings
To input a constant string in NetLogo, surround it with double quotes.
The empty string is written by putting nothing between the quotes, like this: "".
Most of the list primitives work on strings as well:
but-first "string" => "tring"
but-last "string" => "strin"
empty? "" => true
empty? "string" => false
first "string" => "s"
item 2 "string" => "r"
last "string" => "g"
length "string" => 6
member? "s" "string" => true
member? "rin" "string" => true
member? "ron" "string" => false
position "s" "string" => 0
position "rin" "string" => 2
position "ron" "string" => false
remove "r" "string" => "sting"
122
Programming Guide
NetLogo 4.1.3 User Manual
remove "s" "strings" => "tring"
replace-item 3 "string" "o" => "strong"
reverse "string" => "gnirts"
A few primitives are specific to strings, such as is-string?, substring, and word:
is-string? "string" => true
is-string? 37 => false
substring "string" 2 5 => "rin"
word "tur" "tle" => "turtle"
Strings can be compared using the =, !=, <, >, <=, and >= operators.
If you need to embed a special character in a string, use the following escape sequences:
• \n = newline
• \t = tab
• \" = double quote
• \\ = backslash
Output
This section is about output to the screen. Output to the screen can also be later saved to a file
using the export-output command. If you need a more flexible method of writing data to external
files, see the next section, File I/O.
The basic commands for generating output to the screen in NetLogo are print, show, type, and
write. These commands send their output to the Command Center.
For full details on these four commands, see their entries in the NetLogo Dictionary. Here is how
they are typically used:
• print is useful in most situations.
• show lets you see which agent is printing what.
• type lets you print several things on the same line.
• write lets you print values in a format which can be read back in using file-read.
A NetLogo model may optionally have an "output area" in its Interface tab, separate from the
Command Center. To send output there instead of the Command Center, use the output-print,
output-show, output-type, and output-write commands.
The output area can be cleared with the clear-output command and saved to a file with
export-output. The contents of the output area will be saved by the export-world command.
The import-world command will clear the output area and set its contents to the value in
imported world file. It should be noted that large amounts of data being sent to the output area can
increase the size of your exported worlds.
If you use output-print, output-show, output-type, output-write, clear-output, or
export-output in a model which does not have a separate output area, then the commands
apply to the output portion of the Command Center.
Programming Guide
123
NetLogo 4.1.3 User Manual
File I/O
In NetLogo, there is a set of primitives that give you the power to interact with outside files. They all
begin with the prefix file-.
There are two main modes when dealing with files: reading and writing. The difference is the
direction of the flow of data. When you are reading in information from a file, data that is stored in
the file flows into your model. On the other hand, writing allows data to flow out of your model and
into a file.
When a NetLogo model runs as an applet within a web browser, it will only be able to read data
from files which are in the same directory on the server as the model file. Applets cannot write to
any files.
When working with files, always begin by using the primitive file-open. This specifies which file
you will be interacting with. None of the other primitives work unless you open a file first.
The next file- primitive you use dictates which mode the file will be in until the file is closed, reading
or writing. To switch modes, close and then reopen the file.
The reading primitives include file-read, file-read-line, file-read-characters, and
file-at-end? Note that the file must exist already before you can open it for reading.
Code Examples: File Input Example
The primitives for writing are similar to the primitives that print things in the Command Center,
except that the output gets saved to a file. They include file-print, file-show, file-type,
and file-write. Note that you can never "overwrite" data. In other words, if you attempt to write
to a file with existing data, all new data will be appended to the end of the file. (If you want to
overwrite a file, use file-delete to delete it, then open it for writing.)
Code Examples: File Output Example
When you are finished using a file, you can use the command file-close to end your session
with the file. If you wish to remove the file afterwards, use the primitive file-delete to delete it.
To close multiple opened files, one needs to first select the file by using file-open before closing
it.
;; Open 3
file-open
file-open
file-open
files
"myfile1.txt"
"myfile2.txt"
"myfile3.txt"
;; Now close the 3 files
file-close
file-open "myfile2.txt"
file-close
file-open "myfile1.txt"
file-close
Or, if you know you just want to close every file, you can use file-close-all.
124
Programming Guide
NetLogo 4.1.3 User Manual
Two primitives worth noting are file-write and file-read . These primitives are designed to
easily save and retrieve NetLogo constants such as numbers, lists, booleans, and strings. file-write
will always output the variable in such a manner that file-read will be able to interpret it correctly.
file-open "myfile.txt" ;; Opening file for writing
ask turtles
[ file-write xcor file-write ycor ]
file-close
file-open "myfile.txt" ;; Opening file for reading
ask turtles
[ setxy file-read file-read ]
file-close
Code Examples: File Input Example and File Output Example
Letting the user choose
The user-directory, user-file, and user-new-file primitives are useful when you want
the user to choose a file or directory for your code to operate on.
Movies
This section describes how to capture a QuickTime movie of a NetLogo model.
First, use the movie-start command to start a new movie. The filename you provide should end
with .mov, the extension for QuickTime movies.
To add a frame to your movie, use either movie-grab-view or movie-grab-interface,
depending on whether you want the movie to show just the current view, or the entire Interface tab.
In a single movie, you must use only one movie-grab- primitive or the other; you can't mix them.
When you're done adding frames, use movie-close.
;; export a 30 frame movie of the view
setup
movie-start "out.mov"
movie-grab-view ;; show the initial state
repeat 30
[ go
movie-grab-view ]
movie-close
By default, a movie will play back at 15 frames per second. To make a movie with a different frame
rate, call movie-set-frame-rate with a different number of frames per second. You must set the
frame rate after movie-start but before grabbing any frames.
To check the frame rate of your movie, or to see how many frames you've grabbed, call
movie-status, which reports a string that describes the state of the current movie.
To throw away a movie and delete the movie file, call movie-cancel.
Programming Guide
125
NetLogo 4.1.3 User Manual
Code Example: Movie Example
Movies can only be generated from the NetLogo GUI, not when running headless, or by background
runs in a parallel BehaviorSpace experiment.
NetLogo movies are exported as uncompressed QuickTime files. To play a QuickTime movie, you
can use QuickTime Player, a free download from Apple.
Since the movies are not compressed, they can take up a lot of disk space. You will probably want
to compress your movies with third-party software. The software may give you a choice of different
kinds of compression. Some kinds of compression are lossless, while others are lossy. "Lossy"
means that in order to make the files smaller, some of the detail in the movie is lost. Depending on
the nature of your model, you may want to avoid using lossy compression, for example if the view
contains fine pixel-level detail.
One software package that can compress QuickTime movies on both the Mac and Windows
platforms is QuickTime Pro. On Macs, iMovie works as well. PNG compression is a good choice for
lossless compression.
Perspective
The 2D and the 3D view show the world from the perspective of the observer. By default the
observer is looking down on the world from the positive z-axis at the origin. You can change the
perspective of the observer by using the follow, ride and watch observer commands and
follow-me, ride-me and watch-me turtle commands. When in follow or ride mode the observer
moves with the subject agent around the world. The difference between follow and ride is only
visible in the 3D view. In the 3D view the user can change the distance behind the agent using the
mouse. When the observer is following at zero distance from the agent it is actually riding the agent.
When the observer is in watch mode it tracks the movements of one turtle without moving. In both
views you will see a spotlight appear on the subject and in the 3D view the observer will turn to face
the subject. To determine which agent is the focus you can use the subject reporter.
Code Example: Perspective Example
Drawing
The drawing is a layer where turtles can make visible marks.
In the view, the drawing appears on top of the patches but underneath the turtles. Initially, the
drawing is empty and transparent.
You can see the drawing, but the turtles (and patches) can't. They can't sense the drawing or react
to it. The drawing is just for people to look at.
Turtles can draw and erase lines in the drawing using the pen-down and pen-erase commands.
When a turtle's pen is down (or erasing), the turtle draws (or erases) a line behind it whenever it
moves. The lines are the same color as the turtle. To stop drawing (or erasing), use pen-up.
126
Programming Guide
NetLogo 4.1.3 User Manual
Lines drawn by turtles are normally one pixel thick. If you want a different thickness, set the
pen-size turtle variable to a different number before drawing (or erasing). In new turtles, the
variable is set to 1.
Lines made when a turtle moves in a way that doesn't fix a direction, such as with setxy or
move-to, the shortest path line that obeys the topology will be drawn.
Here's some turtles which have made a drawing over a grid of randomly shaded patches. Notice
how the turtles cover the lines and the lines cover the patch colors. The pen-size used here was
2:
The stamp command lets a turtle leave an image of itself behind in the drawing and stamp-erase
lets it remove the pixels below it in the drawing.
To erase the whole drawing, use the observer commmand clear-drawing. (You can also use
clear-all, which clears everything else too.)
Importing an image
The observer command import-drawing command allows you to import an image file from disk
into the drawing.
import-drawing is useful only for providing a backdrop for people to look at. If you want turtles
and patches to react to the image, you should use import-pcolors or import-pcolors-rgb
instead.
Comparison to other Logos
Drawing works somewhat differently in NetLogo than some other Logos.
Notable differences include:
• New turtles' pens are up, not down.
• Instead of using a fence command to confine the turtle inside boundaries, in NetLogo you
edit the world and turn wrapping off.
Programming Guide
127
NetLogo 4.1.3 User Manual
• There is no screen-color, bgcolor, or setbg. You can make a solid background by
coloring the patches, e.g. ask patches [ set pcolor blue ].
Drawing features not supported by NetLogo:
• There is no window command. This is used in some other Logos to let the turtle roam over
an infinite plane.
• There is no flood or fill command to fill an enclosed area with color.
Topology
The topology of the NetLogo world has four potential values, torus, box, vertical cylinder, or
horizontal cylinder. The topology is controlled by enabling or disabling wrapping in the x or y
directions. The default world is a torus, as were all NetLogo worlds before NetLogo 3.1.
A torus wraps in both directions, meaning that the top and bottom edges of the world are connected
and the left and right edges are connected. So if a turtle moves beyond the right edge of the world it
appears again on the left and the same for the top and bottom.
A box does not wrap in either direction. The world is bounded so turtles that try to move off the edge
of the world cannot. Note that the patches around edge of the world have fewer than eight
neighbors; the corners have three and the rest have five.
Horizontal and vertical cylinders wrap in one direction but not the other. A horizontal cylinder wraps
vertically, so the top of the world is connected to the bottom. but the left and right edges are
bounded. A vertical cylinder is the opposite; it wraps horizontally so the left and right edges are
connected, but the top and bottom edges are bounded.
Code Example: Neighbors Example
Since NetLogo 3.0 there have been settings to enable wrapping visually, so if a turtle shape extends
past an edge, part of the shape will appear on the other edge of the view. (Turtles themselves are
points that take up no space, so they cannot be on both sides of the world at once, but in the view,
they appear to take up space because they have a shape.)
Wrapping also affects how the view looks when you are following a turtle. On a torus, wherever the
turtle goes, you will always see the whole world around it:
128
Programming Guide
NetLogo 4.1.3 User Manual
Whereas in a box or cylinder the world has edges, so the areas past those edges show up in the
view as gray:
Code Example: Termites Perspective Demo (torus), Ants Perspective Demo (box)
Instead of 3.0's settings that only control the appearance of wrapping in the view, NetLogo 3.1 has
settings that control whether the world actually wraps or not, that is, whether opposite edges are in
fact connected. These new wrapping settings determine the world topology, that is, whether the
world is a torus, box, or cylinder. This affects the behavior and not just the visual appearance of the
model.
In the past, model authors were required to write extra code to simulate a box world, with the aid of
special "no-wrap" primitives. No-wrap versions were provided for distance(xy), in-radius, in-cone,
face(xy), and towards(xy). In 3.1 the special no-wrap versions are no longer necessary. Instead, the
topology controls whether the primitives wrap or not. They always use the shortest path allowed by
Programming Guide
129
NetLogo 4.1.3 User Manual
the topology. For example, the distance from the center of the patches in the bottom right corner
(min-pxcor, min-pycor) and the upper left corner (max-pxcor, max-pycor) will be as follows for each
topology given that the min and max pxcor and pycor are +/-2:
• Torus - sqrt(2) ~ 1.414 (this will be the same for all world sizes since the patches are directly
diagonal to each other in a torus.)
• Box - sqrt(world-width^2 + world-height^2) ~ 7.07
• Vertical Cylinder - sqrt(world-height^2 + 1) ~ 5.099
• Horizontal Cylinder - sqrt(world-width^2 + 1) ~ 5.099
All the other primitives will act similarly to distance. If you formerly used no-wrap primitives in your
model we recommend removing them and changing the topology of the world instead.
There are a number of reasons to change your model to use topologies rather than no-wrap
primitives.
First, we expect if you are using no-wrap primitives, you are actually modeling a world that is not a
torus. If you use a topology that matches the world you are modeling NetLogo does automatic
bounds checking for you, it should make your life easier, your code simpler to understand and it
adds visual cues to help the model user understand what you are modeling. Note that even with
no-wrap primitives it was very difficult to model cylinders since the no-wrap primitives report the
distance or heading when wrapping is not allowed in either direction.
You might have bugs in your model. If you are using a combination of no-wrap and wrap primitives,
either it doesn't matter for some reason or there is a bug in your model (we found a few bugs in our
models). For example, the Conductor model compared distance-no-wrap to distance to determine
whether the next position is wrapped around the world, in which case the electron exits the system.
This is a clever way to solve the problem, but unfortunately it is flawed. Electrons that wrap in the y
direction were also exiting the system which is incorrect in this case. The only correct way to exit is
to reach the cathode at the left end of the wire.
If you remove no-wrap commands the topology is no longer hard coded into the model so it's easier
to test out your model on a different shape of world without a lot of extra coding (you may have to
add a few extra checks to go from torus to box, this is explained more in-depth in the How to
convert section.)
Note that though we've removed the no-wrap primitives from the dictionary they are still available for
you to use; we did this so that old models don't have to be changed in order to run.
How to convert your model
When you first open up your model in 3.1 NetLogo will automatically change all cases of (
-screen-edge-x ) to min-pxcor and all cases of screen-edge-x to max-pxcor (and
similarly for y) Though this is not directly related to the topology changes, you may also want to
think about whether moving the origin off-center makes sense in your model at this time. Before
NetLogo 3.1 the world had to be symmetrical around the origin, thus, the world had to have an odd
width and height. This is no longer true since you may use any min and max combinations you wish,
given that the point (0,0) still exists in the world. If you are logically only modeling in one or two
quadrants, or if it makes your code simpler to only use positive numbers you might want to consider
changing your model. If you've modeled something that requires and even grid you'll certainly want
to remove the programming hacks required to make that possible in the past.
130
Programming Guide
NetLogo 4.1.3 User Manual
Code Examples: Lattice Gas Automaton, Binomial Rabbits, Rugby
For NetLogo 3.1 we added new primitives which are essential if you change the topology, and quite
convenient even if you don't. random-pxcor, random-pycor, random-xcor, and random-ycor
report random values within the range between maximum and minimum (x and y). In older versions
of NetLogo we often relied on wrapping to place turtles randomly across the world by writing setxy
random-float screen-size-x random-float screen-size-y. However, if wrapping is
not allowed in one direction or the other this no longer works (you get a runtime error for trying to
place turtles outside the world). Regardless of topology, it is simpler and more straight forward to
use setxy random-xcor random-ycor instead.
To convert a model to use a topology you must first decide what settings best describe the world. If
the answer is not immediately obvious to you based on the real world, (a room is a box, a wire is a
cylinder) there are a few clues that will help you. If anywhere in the code you are checking the
bounds of the world or if some patches are not considered neighbors of the patches on the other
side of the view it is likely that you are not using a torus. If you check bounds in both the x and y
directions it's a box, in the x direction only, a horizontal cylinder, the y a vertical cylinder.
If you use no-wrap primitives you are probably not modeling a torus, however, be careful with this
criterion if you use a mix of no-wrap and wrap primitives. It may be that you were using a no-wrap
primitive for a visual element but the rest of the NetLogo world is still a torus.
After you've determined the topology and changed it by editing the view, you may have to make a
few small changes to the code. If you've decided that the world is a torus you probably don't have to
make any changes at all. If your model only uses patch neighbors and diffuse you probably will not
need to make many changes.
If your model has turtles that move around your next step is to determine what happens to them
when they reach the edge of the world. There are a few common options: the turtle is reflected back
into the world (either systematically or randomly), the turtle exits the system (dies), or the turtle is
hidden. It is no longer necessary to check the bounds using turtle coordinates, instead we can just
ask NetLogo if a turtle is at the edge of the world. There are a couple ways of doing this, the
simplest is to use the can-move? primitive.
if not can-move? distance [ rt 180 ]
can-move? merely returns true if the position distance in front of the turtle is inside the NetLogo
world, false otherwise. In this case, if the turtle is at the edge of the world it simple goes back the
way it came. You can also use patch-ahead 1 != nobody in place of can-move?. If you need
to do something smarter that simply turning around it may be useful to use patch-at with dx and
dy.
if patch-at dx 0 = nobody [
set heading (- heading)
]
if patch-at 0 dy = nobody [
set heading (180 - heading)
]
This tests whether the turtle is hitting a horizontal or vertical wall and bounces off that wall.
Programming Guide
131
NetLogo 4.1.3 User Manual
In some models if a turtle can't move forward it simply dies (exits the system, like in Conductor or
Mousetraps).
if not can-move? distance[ die ]
If you are moving turtles using setxy rather than forward you should test to make sure the patch you
are about to move to exists since setxy throws a runtime error if it is given coordinates outside the
world. This is a common situation when the model is simulating an infinite plane and turtles outside
the view should simply be hidden.
let new-x new-value-of-xcor
let new-y new-value-of-ycor
ifelse patch-at
[ hide-turtle
[ setxy new-x
show-turtle
(new-x - xcor) (new-y - ycor) = nobody
]
new-y
]
Several models in the Models Library use this technique, Gravitation, N-Bodies, and Electrostatics
are good examples.
By using a different topology you get diffuse for free (which was fairly difficult to do in the past).
Each patch diffuses and equal amount of the diffuse variable to each of its neighbors, if it has fewer
than 8 neighbors (or 4 if you are using diffuse4) the remainder stays on the diffusing patch. This
means that the overall sum of patch-variable across the world remains constant. If you had special
code to handle diffuse then you can remove it. However, if you want the diffuse matter to still fall off
the edges of the world as it would on an infinite plane you still need to clear the edges each step as
in the Diffuse Off Edges Example.
Links
A link is an agent that connects two turtles. The two turtles are called nodes. The link is always
drawn as a line between the two turtles. Links do not have a location as turtles do, they are not
considered to be on any patch and you cannot find the distance from a link to another point.
There are two flavors of links, undirected and directed. A directed link is out of, or from, one node
and into, or to, another node. The relationship of a parent to a child could be modeled as a directed
link. An undirected link appears the same to both nodes, each node has a link with another node.
The relationship between spouses, or siblings, could be modeled as an undirected link.
There is a global agentset of all links, just as with turtles and patches. You can create undirected
links using the create-link-with and create-links-with commands; and directed links
using the create-link-to, create-links-to, create-link-from, and
create-links-from commands. Once the first link has been created directed or undirected, all
unbreeded links must match (links also support breeds, much like turtles, which will be discussed
shortly); it's impossible to have two unbreeded links where one is directed and the other is
undirected. A runtime error occurs if you try to do it. (If all unbreeded links die, then you can create
links of that breed that are different in flavor from the previous links.)
In general, primitives that work with directed links have "in", "out", "to", and "from" in their names.
Undirected ones either omit these or use "with".
132
Programming Guide
NetLogo 4.1.3 User Manual
A link's end1 and end2 variables contain the two turtles the link connects. If the link is directed, it
goes from end1 to end2. If the link is undirected, end1 is always the older of the two turtles, that is,
the turtle with the smaller who number.
Link breeds, like turtle breeds, allow you to define different types of links in your model. Link breeds
must either be directed or undirected, unlike unbreeded links this is defined at compile time rather
than run time. You declare link breeds using the keywords undirected-link-breed and
directed-link-breed. Breeded links can be created using the commands
create-<breed>-with and create-<breeds>-with for undirected breeds and the commands
create-<breed>-to, create-<breeds>-to, create-<breed>-from, and
create-<breeds>-from for directed links.
There cannot be more than one undirected link of the same breed (or two unbreeded links) between
a pair of agents, nor more than one directed link of the same breed in the same direction between a
pair of agents. You can have two directed links of the same breed (or two unbreeded links) between
a pair if they are in opposite directions.
Layouts
As part of our network support we have also added several different primitives that will help you to
visualize the networks. The simplest is layout-circle which evenly spaces the agents around
the center of the world given a radius.
layout-radial is a good layout if you have something like a tree structure, though even if there
are some cycles in the tree it will still work, though as there are more and more cycles it will
probably not look as good. layout-radial takes a root agent to be the central node places it at
(0,0) and arranges the nodes connected to it in a concentric pattern. Nodes one degree away from
the root will be arranged in a circular pattern around the central node and the next level around
those nodes and so on. layout-radial will attempt to account for asymmetrical graphs and give
more space to branches that are wider. layout-radial also takes a breed as an input so you use
one breed of links to layout the network and not another.
Programming Guide
133
NetLogo 4.1.3 User Manual
Given a set of anchor nodes layout-tutte places all the other nodes at the center of mass of the
nodes it is linked to. The anchor set is automatically arranged in a circle layout with a user defined
radius and the other nodes will converge into place (this of course means that you may have to run
it several times before the layout is stable.)
layout-spring and __layout-magspring are quite similar and are useful for many kinds of
networks. The drawback is that they are relatively slow since they take many iterations to converge.
In both layouts the links act as springs that pull the nodes they connect toward each other and the
nodes repel each other. In the magnetic spring there is also a magnetic field pulling the nodes in a
compass direction you choose. The strength of all of these forces are controlled by inputs to the
primitives. These inputs will always have a value between 0 and 1; keep in mind that very small
changes can still affect the appearance of the network. The springs also have a length (in patch
units), however, because of all the forces involved the nodes will not end up exactly that distance
from each other. The magnetic spring layout also has a boolean input, bidirectional?, which
indicates whether the springs should push in both directions parallel to the magnetic field; if it is true
the networks will be more evenly spaced.
134
Programming Guide
NetLogo 4.1.3 User Manual
Code Examples:Network Example, Network Import Example, Giant Component,
Small Worlds, Preferential Attachment
Ask-Concurrent
In previous versions of NetLogo, ask was concurrent by default. As of NetLogo 4.0, ask is serial,
that is, the agents run the commands inside the ask one at a time.
The following information describes the behavior of the ask-concurrent command, which
behaves the way the old ask behaved.
ask-concurrent produces simulated concurrency via a mechanism of turn-taking. The first agent
takes a turn, then the second agent takes a turn, and so on until every agent in the asked agentset
has had a turn. Then we go back to the first agent. This continues until all of the agents have
finished running all of the commands.
An agent's "turn" ends when it performs an action that affects the state of the world, such as
moving, or creating a turtle, or changing the value of a global, turtle, patch, or link variable. (Setting
a local variable doesn't count.)
The forward (fd) and back (bk) commands are treated specially. When used inside
ask-concurrent, these commands can take multiple turns to execute. During its turn, the turtle
can only move by one step. Thus, for example, fd 20 is equivalent to repeat 20 [ fd 1 ],
where the turtle's turn ends after each run of fd. If the distance specified isn't an integer, the last
fraction of step takes a full turn. So for example fd 20.3 is equivalent to repeat 20 [ fd 1 ]
fd 0.3.
The jump command always takes exactly one turn, regardless of distance.
To understand the difference between ask and ask-concurrent, consider the following two
commands:
ask turtles [ fd 5 ]
ask-concurrent turtles [ fd 5 ]
Programming Guide
135
NetLogo 4.1.3 User Manual
With ask, the first turtle takes ten steps forward, then the second turtle takes ten steps forward, and
so on.
With ask-concurrent, all of the turtles take one step forward. Then they all take a second step,
and so on. Thus, the latter command is equivalent to:
repeat 5 [ ask turtles [ fd 1 ] ]
Code Example: Ask-Concurrent Example shows the difference between ask and
ask-concurrent.
The behavior of ask-concurrent cannot always be so simply reproduced using ask, as in this
example. Consider this command:
ask-concurrent turtles [ fd random 10 ]
In order to get the same behavior using ask, we would have to write:
turtles-own [steps]
ask turtles [ set steps random 10 ]
while [any? turtles with [steps > 0]] [
ask turtles with [steps > 0] [
fd 1
set steps steps - 1
]
]
To prolong an agent's "turn", use the without-interruption command. (The command blocks
inside some commands, such as create-turtles and hatch, have an implied
without-interruption around them.)
Note that the behavior of ask-concurrent is completely deterministic. Given the same code and
the same initial conditions, the same thing will always happen (if you are using the same version of
NetLogo and begin your model run with the same random seed).
In general, we suggest you write your model so that it does not depend on the exact details of how
ask-concurrent works. We make no guarantees that its semantics will remain the same in future
versions of NetLogo.
Tie
Tie connects two turtles so that the movement of one turtles affects the location and heading of
another. Tie is a property of links so there must be a link between two turtles to create a tie
relationship.
When a link's tie-mode is set to "fixed" or "free" end1 and end2 are tied together. If the link is
directed end1 is the "root agent" and end2 is the "leaf agent". That is when end1 moves (using fd,
jump, setxy, etc.) end2 also moves the same distance and direction. However when end2 moves
it does not affect end1.
136
Programming Guide
NetLogo 4.1.3 User Manual
If the link is undirected it is a reciprocal tie relationship, meaning, if either turtle moves the other
turtle will also move. So depending on which turtle is moving either turtle can be considered the root
or the leaf. The root turtle is always the turtle that initiates the movement.
When the root turtle turns right or left, the leaf turtle rotates around the root turtle the same amount
as if a stiff were attaching the turtles. When tie-mode is set to "fixed" the heading of the leaf turtle
changes by the same amount. If the tie-mode is set to "free" the heading of the leaf turtle is
unchanged.
The tie-mode of a link can be set to "fixed" using the tie command and set to "none" (meaning
the turtles are no longer tied) using untie to set the mode to "free" you need to: set tie-mode
"free".
Code Example: Tie System Example
Multiple source files
The __includes keyword allows you to use multiple source files in a single NetLogo model.
The keyword begins with two underscores to indicate that the feature is experimental and may
change in future NetLogo releases.
When you open a model that uses the __includes keyword, or if you add it to the top of a model
and hit the Check button, the includes menu will appear in the toolbar. From the includes menu you
can select from the files included in this model.
When you open included files they appear in additional procedures tabs. See the Interface Guide for
more details.
You can have anything in external source files (.nls) that you would normally put in the procedures
tab: globals, breed, turtles-own, patches-own, breeds-own, procedure definitions, etc.
Note though that these declarations all share the same namespace. That is, if you declare a global
my-global in the procedures tab you cannot declare a global (or anything else) with the name
my-global in any file that is included in the model. my-global will be accessible from all the
included files. The same would be true if my-global were declared in one of the included files.
Syntax
Colors
In the Procedures tab and elsewhere in the NetLogo user interface, program code is color-coded by
the following scheme:
• Keywords are green
• Constants are orange
• Comments are gray
• Primitive commands are blue
• Primitive reporters are purple
• Everything else is black
Programming Guide
137
NetLogo 4.1.3 User Manual
Notice
The remainder of this section contains technical terminology which will be unfamiliar to some
readers.
Keywords
The only keywords in the language are globals, breed, turtles-own, patches-own, to,
to-report, and end, plus extensions and the experimental __includes keyword. (Built-in
primitive names may not be shadowed or redefined, so they are effectively a kind of keyword as
well.)
Identifiers
All primitives, global and agent variable names, and procedure names share a single global
case-insensitive namespace; local names (let variables and the names of procedure inputs) may
not shadow global names or each other. Identifiers may contain letters, digits, and the following
ASCII characters:
.?=*!<>:#+/%$_^'&-
Non-ASCII characters are not currently allowed in identifiers. (We realize this is troublesome for
international users and plan to address the issue in a future release.)
Some primitive names begin with two underscores to indicate that they are experimental and are
especially likely to change or be removed in future NetLogo releases.
Identifiers beginning with a question mark are reserved.
Scope
NetLogo is lexically scoped. Local variables (including inputs to procedures) are accessible within
the block of commands in which they are declared, but not accessible by procedures called by
those commands.
Comments
The semicolon character introduces a comment, which lasts until the end of the line. There is no
multi-line comment syntax.
Structure
A program consists of optional declarations (globals, breed, turtles-own, patches-own,
<BREED>-own) in any order, followed by zero or more procedure definitions. Multiple breeds may
be declared with separate breed declarations; the other declarations may appear once only.
Every procedure definition begins with to or to-report, the procedure name, and an optional
bracketed list of input names. Every procedure definition ends with end. In between are zero or
more commands.
138
Programming Guide
NetLogo 4.1.3 User Manual
Commands and reporters
Commands take zero or more inputs; the inputs are reporters, which may also take zero or more
inputs. No punctuation separates or terminates commands; no punctuation separates inputs.
Identifiers must be separated by whitespace or by parentheses or square brackets. (So for example,
a+b is a single identifier, but a(b[c]d)e contains five identifiers.)
All commands are prefix. All user-defined reporters are prefix. Most primitive reporters are prefix,
but some (arithmetic operators, boolean operators, and some agentset operators like with and
in-points) are infix.
All commands and reporters, both primitive and user-defined, take a fixed number of inputs by
default. (That's why the language can be parsed though there is no punctuation to separate or
terminate commands and/or inputs.) Some primitives are variadic, that is, may optionally take a
different number of inputs than the default; parentheses are used to indicate this, e.g. (list 1 2
3) (since the list primitive only takes two inputs by default). Parentheses are also used to
override the default operator precedence, e.g. (1 + 2) * 3, as in other programming languages.
Sometimes an input to a primitive is a command block (zero or more commands inside square
brackets) or a reporter block (a single reporter expression inside square brackets). User-defined
procedures may not take a command or reporter block as input.
Operator precedences are as follows, high to low:
• with, at-points, in-radius, in-cone
• (all other primitives and user-defined procedures)
•^
• *, /, mod
• +, • <, >, <=, >=
• =, !=
• and, or, xor
Compared to other Logos
There is no agreed-upon standard definition of Logo; it is a loose family of languages. We believe
that NetLogo has enough in common with other Logos to earn the Logo name. Still, NetLogo differs
in some respects from most other Logos. The most important differences are as follows.
Surface differences
• The precedence of mathematical operators is different. Infix math operators (like +, *, etc.)
have lower precedence than reporters with names. For example, in many Logos, if you write
sin x + 1, it will be interpreted as sin (x + 1). NetLogo, on the other hand, interprets
it the way most other programming languages would, and the way the same expression
would be interpreted in standard mathematical notation, namely as (sin x) + 1.
• The and and or reporters are special forms, not ordinary functions, and they "short circuit",
that is, they only evaluate their second input if necessary.
• Procedures can only be defined in the Procedures tab, not interactively in the Command
Center.
Programming Guide
139
NetLogo 4.1.3 User Manual
• Reporter procedures, that is, procedures that "report" (return) a value, must be defined with
to-report instead of to. The command to report a value from a reporter procedure is
report, not output.
• When defining a procedure, the inputs to the procedure must be enclosed in square
brackets, e.g. to square [x].
• Variable names are always used without any punctuation: always foo, never :foo or "foo.
(To make this work, instead of a make command taking a quoted argument we supply a set
special form which does not evaluate its first input.) As a result, procedures and variables
occupy a single shared namespace.
The last three differences are illustrated in the following procedure definitions:
most Logos
NetLogo
to square :x
to-report square [x]
output :x * :x report x * x
end
end
Deeper differences
• NetLogo's local variables and inputs to procedures are lexically scoped, not dynamically
scoped.
• NetLogo has no "word" data type (what Lisp calls "symbols"). Eventually, we may add one,
but since it is seldom requested, it may be that the need doesn't arise much in agent-based
modeling. We do have strings. In most situations where traditional Logo would use words,
we simply use strings instead. For example in Logo you could write [see spot run] (a list
of words), but in NetLogo you must write "see spot run" (a string) or ["see" "spot"
"run"] (a list of strings) instead.
• NetLogo's run command works on strings, not lists (since we have no "word" data type),
and does not permit the definition or redefinition of procedures.
• Control structures such as if and while are special forms, not ordinary functions. You
can't define your own special forms, so you can't define your own control structures.
(NetLogo's run command is no help here.)
• As in most Logos, functions as values are not supported. Most Logos provide similar if less
general functionality, though, by allowing passing and manipulation of fragments of source
code in list form. NetLogo's capabilities in this area are presently limited. A few of our built-in
special forms use UCBLogo-style ``templates'' to accomplish a similar purpose, for example,
sort-by [length ?1 < length ?2] string-list. In some circumstances, using
run and runresult instead is workable, but unlike most Logos they operate on strings, not
lists.
Of course, the NetLogo language also contains many additional features not found in most other
Logos, most importantly agents and agentsets.
140
Programming Guide
Transition Guide
Many models created in earlier versions of NetLogo also work in NetLogo 4.1. However, some
models will need changes. If your old model isn't working, this section of the User Manual may be
able to help you.
What issues you need to be aware of depends on how old your model is. The older the NetLogo
version it was made with, the more issues you may need to be aware of.
This section does not list every change that was made in the NetLogo versions discussed. It covers
only the changes that are most likely to be issues for users. For a complete list of changes, see the
What's New? section.
• Since NetLogo 4.0
• Since NetLogo 3.1
• Since NetLogo 3.0
Since NetLogo 4.0
Combining set and of
The following syntax is no longer supported:
set [<variable>] of <agent> <value>
Commands of this form must be rewritten using ask:
ask <agent> [ set <variable> <value> ]
Or, if the new value must be computed by the asking agent and not by the agent whose variable is
being set:
;; OPTION #1 (using let):
let new-value <value>
ask <agent> [ set <variable> new-value ]
;; OPTION #2 (using myself):
ask <agent> [ set <variable> [value] of myself ]
So for example, this:
set [color] of turtle 0 red
Can be rewritten as:
ask turtle 0 [ set color red ]
It is not necessary to use let or myself since red is red from the point of view of both agents.
However, this:
Transition Guide
141
NetLogo 4.1.3 User Manual
set [color] of turtle 0 color
Must be rewritten as:
let new-color color
ask turtle 0 [ set color new-color ]
or
ask turtle 0 [ set color [color] of myself ]
in order not to change the meaning, since the two agents may have different starting values for
color. The form using myself is briefer, but the former using let may be considered clearer,
depending on context and individual preference.
Applets
Applets created using previous versions of NetLogo will not work unaltered with the 4.1
NetLogoLite.jar. Resave the applet in 4.1 to make it work. Alternately, you may edit the HTML; find
this part:
code="org.nlogo.window.Applet"
and change it to:
code="org.nlogo.lite.Applet"
Since NetLogo 3.1
Who numbering
Prior to NetLogo 4.0, a dead turtle's who number (stored in the who turtle variable) could be
reassigned to a later newborn turtle. In NetLogo 4.0, who numbers are never reused until who
numbering is reset to 0 by the clear-all or clear-turtles command. This change in behavior
may break a few old models.
Turtle creation: randomized vs. "ordered"
NetLogo 4.0 provides two different observer commands for creating turtles, create-turtles
(crt) and create-ordered-turtles (cro).
crt gives the new turtles random colors and random integer headings. cro assigns colors
sequentially and gives the turtles sequential equally spaced headings, with the first turtle facing
north (heading of 0).
Prior to NetLogo 4.0, the crt command behaved the way cro does now. If your old model depends
on the "ordered" behavior, you will need to change your code to use cro instead of crt.
It is common for old models that used crt to contain extra commands to randomize the new turtles'
headings, for example rt random 360 or set heading random 360. These commands are no
142
Transition Guide
NetLogo 4.1.3 User Manual
longer necessary when used inside crt.
Adding strings and lists
Prior to NetLogo 4.0, the + (addition) operator could be used to concatenate strings and join lists. In
current NetLogo, + only works on numbers. To concatenate strings, use the word primitive; to join
lists together, use the sentence primitive. This language change was made to increase the speed
of code that uses +.
Old code:
print "There are " + count turtles + " turtles."
New code:
print (word "There are " count turtles " turtles.")
Likewise, if you need to concatenate lists, use SENTENCE.
This change is not handled automatically when converting old models; users will need to change
their code by hand.
We know this change will be awkward for users who are used to the old syntax. We have made this
change for efficiency and consistency. We can implement an addition operator that only adds
numbers much more efficiently than one that handles several different data types. Because addition
is such a common operation, NetLogo's overall speed is affected.
The -at primitives
The observer may no longer use patch-at, turtles-at, and BREEDS-at. Use patch,
turtles-on patch, and BREEDS-on patch instead. Note that patch now rounds its inputs
(before it only accepted integer inputs).
Links
NetLogo 3.1 had supports for using links to connect turtles to make networks, graphs, and
geometric figures. The links were themselves turtles.
In NetLogo 4.0, instead of links being turtles, links are now an independent fourth agent type, right
alongside observer, turtles, patches. The primitives involving links are no longer considered
experimental; they are now fully part of the language.
Models that use the old, experimental turtle-based link primitives will need to be updated to use link
agents. The differences are not huge, but hand updating is required.
Links are documented in the Links section of the Programming Guide, and in the NetLogo
Dictionary entries for the link primitives. See the Networks section of the Models Library for example
models that use links. There are also some link-based Code Examples.
Transition Guide
143
NetLogo 4.1.3 User Manual
First you will need to remove any breeds called "links" if you are only using one type of links then
you will not have to use breeds at all. If you are using multiple types of links see
undirected-link-breed and directed-link-breed. Commands and reporters that contain
the word "links" (like __create-links-with, etc.) will automatically be converted to the new form
without underscores (create-links-with). However, primitives that use a different breed name
(such as "edges") will not be converted. You will need to remove the underscores by hand and
unless you are declaring a link breed with that name you will need to change the breed designation
to "links".
The commands remove-link(s)-with/from/to no longer exist. Instead you should ask the
links in question to die.
For example:
ask turtle 0 [ __remove-links-with link-neighbors ]
becomes
ask turtle 0 [ ask my-links [ die ] ]
Several of the layout commands have slightly different inputs, the first two inputs are generally a
turtle agentset and a link agentset to perform the layout on. See the dictionary entries for details.
layout-spring, __layout-magspring layout-radial layout-tutte
You may also need to rearrange the declaration of turtles-own variables, since links were once
actually turtles. Any variables that apply to links should be moved into a links-own block.
Since links are no longer turtles they no longer have the built-in turtle variables (though some of the
link variables are the same such as color and label. If you formerly used the location of link
turtles you will now need to calculate the midpoint of the link. This is fairly simple in a non-wrapping
world.
to-report link-xcor
report mean [xcor] of both-ends
end
to-report link-ycor
report mean [ycor] of both-ends
end
it is a little bit trickier in a wrapping world but still fairly straightforward.
to-report link-xcor
let other-guy end2
let x 0
ask end1
[
hatch 1
[
face other-guy
fd [distance other-guy] of myself / 2
set x xcor
die
]
]
144
Transition Guide
NetLogo 4.1.3 User Manual
report x
end
and similarly for ycor.
If you used either the size or heading of the link turtles you can use the reporters link-length
and link-heading instead.
New "of" syntax
We have replaced three different language constructs, -of (with hyphen), value-from, and
values-from with a single of construct (no hyphen).
old
new
color-of turtle 0
[color] of turtle 0
[size * size] of
value-from turtle 0 [size * size]
turtle 0
mean values-from turtles [size]
mean [size] of turtles
When of is used with a single agent, it reports a single value. When used with an agentset, it
reports a list of values (in random order, since agentsets are always in random order).
Note that when opening old models in the new version, -of, value-from, and values-from will
automatically be converted to use "of" instead, but some nested uses of these constructs are too
complex for the converter and must be converted by hand.
Serial ask
The ask command is now serial rather than concurrent. In other words, the asked agents will run
one at a time. Not until one agent completely finishes the entire body of the ask does the next agent
start.
Note that even the old ask was never truly concurrent; we simulated concurrent execution by
interleaving execution among the agents using a turn-taking mechanism described in the NetLogo
FAQ.
We have made this change because in our experience, users often wrote models that behaved in
unexpected ways due to the simulated concurrency, but rarely wrote models that benefited from the
simulated concurrency. Models exhibiting unexpected behavior could usually be fixed by adding the
without-interruption command in the right places, but it was difficult for users to know
whether that command was needed and if so, where.
In NetLogo 4.0, without-interruption is no longer necessary unless your model uses
ask-concurrent (or a turtle or patch forever button containing code that depends on simulated
concurrency). In most models, all uses of without-interruption can be removed.
The simulated concurrency formerly employed by "ask" is still accessible in three ways:
• You may use the ask-concurrent primitive instead of ask to get the old simulated
concurrency
Transition Guide
145
NetLogo 4.1.3 User Manual
• Commands issued in the Command Center directly to turtles, patches, or links have an
implied ask-concurrent.
• Turtle, patch, and link forever buttons have an implied ask-concurrent as well.
Note that ask itself is always serial regardless of the context in which it is used, however.
In our own Models Library, models that make use of this concurrency are rare. A prominent
example, though, is Termites, which uses a concurrent turtle forever button.
Tick counter
NetLogo now has a built-in tick counter for representing the passage of simulated time.
You advance the counter by one using the tick command. If you need to read its value, there's a
reporter called ticks. The clear-all command resets the tick counter; so does reset-ticks.
In most models the tick counter will be integer-valued, but if you want to use smaller increments of
time, you can use the tick-advance command to advance the tick counter by any positive
amount, including fractional amounts. Some Models Library models that use tick-advance are
Vector Fields and the GasLab models.
The value of the tick counter is displayed in the toolbar at the top of the Interface tab. (You can use
the Settings... button in the toolbar to hide the tick counter, or change the word "ticks" to something
else.)
View update modes
In the past, NetLogo always tried to update the view about 20 times a second. We're now calling
that "continuous" view updates. The biggest problem with it was that you usually want updates to
happen between model ticks, not in the middle of a tick, so we had a checkbox on buttons that (by
default) forced a display update after every button iteration. That made sure updates happened
between ticks, but it didn't get rid of the intermediate updates. You had to use no-display and
display to lock them out.
We still support continuous updates. They are the default when you start up NetLogo. But most
Models Library models now use tick-based updates. With tick-based updates, updates happen only
when the tick counter advances. (The display command can be used to force additional updates;
see below.)
The advantages of tick-based updates as we see them are as follows:
1. Consistent, predictable view update behavior which does not vary from computer to
computer or from run to run.
2. Intermediate updates can confuse the user of your model by letting them see things they
aren't supposed to see, which may be misleading.
3. Increased speed. Updating the view takes time, so if one update per tick is enough, then
enforcing than there is only one update per tick will make your model faster.
4. Instead of having a "force view update" checkbox in every button like in NetLogo 3.1, we
only need one choice which applies to the entire model.
146
Transition Guide
NetLogo 4.1.3 User Manual
5. Using the speed slider to slow down a model now just inserts pauses between ticks. So with
tick-based updates, setup buttons are no longer affected by the speed slider. This was a
real annoyance with the old speed slider. (The annoyance persists for models that use
continuous updates, though.)
As mentioned above, most models in our Models Library now use tick-based updates.
Even for models that would normally be set to tick-based updates, it may be useful to switch to
continuous updates temporarily for debugging purposes. Seeing what's going on within a tick,
instead of only seeing the end result of a tick, could help with troubleshooting.
If you switch your model to use tick-based updates, you'll also need to add the tick command to
your code, otherwise the view won't update. (Note that the view still always updates when a button
pops up or a command entered in the command center finishes, though. So it's not like the view will
just stay frozen indefinitely.)
How to make a model use ticks and tick-based updates
Here are the steps to follow to convert your model to use ticks and tick-based updates in NetLogo
4.0:
1. In the Interface tab toolbar, on the right hand side where it says "update view:", change the
setting from "continuously" to "on ticks".
2. Add the tick command to your go procedure, at or near the end. In Models Library models
we always put tick after the agents move but before any plotting commands. That's
because the plotting commands might contain something like plotxy ticks ... and we
want the new value of the tick counter used, not the old one. Most models don't refer to the
tick counter in their plotting commands, but nonetheless, for consistency and to avoid
mistakes we suggest always putting tick before the plotting commands.
Some models will require some additional changes:
1. If your model already has a global "ticks" or "clock" or "time" variable, get rid of it. Use the
tick command and ticks reporter instead. (If your model uses fractional increments of
time, use tick-advance instead of tick.) If you had a monitor for that variable, you can
get rid of it; there's now a tick counter in the toolbar.
2. clear-all resets the tick counter to zero. If you don't use clear-all in your setup
procedure, then you may need to add reset-ticks to reset the counter to zero.
3. If you used no-display and display to prevent view updates from happening in the
middle of go, you can get rid of them.
4. If your model needs to update the view without advancing the tick counter (examples: Party,
Dice Stalagmite, network models with animated layout, models with mouse interaction
buttons), use the display command to force additional view updates so the user can see
what is going on.
Speed slider
Previous versions of NetLogo had a speed slider that could be used to make models run slower, so
you can see what's going on.
Transition Guide
147
NetLogo 4.1.3 User Manual
In NetLogo 4.0, the slider can be used to speed up models as well. It does this by updating the view
less frequently. Updating the view takes time, so the fewer updates, the faster the model runs.
The default position of the slider is in the center. When you're at the center, the slider says "normal
speed".
As you move the slider away from the center position, the model will gradually run faster or slower.
At very high speeds, view updates become very infrequent and may be separated by several
seconds. It may feel like the model is actually running slower, since the updates are so infrequent.
But watch the tick counter, or other indicators such as plots, and you'll see that yes, the model really
is running faster. If the infrequent updates are disconcerting, don't push the slider so far over.
When using tick-based updates, slowing the model down does not cause additional view updates.
Rather, NetLogo simply pauses after each tick.
When using continuous updates, slowing the model down means view updates become more
closely spaced. If you push the speed slider more than halfway to the left, the model will be running
so slowly that you can watch turtles moving one at a time! This is new in NetLogo 4.0; in previous
NetLogo versions, no matter how slowly you ran a model, you would never see the agents in an
ask moving one at a time; all the agents in an ask always appeared to move together.
Numbers
NetLogo no longer maintains an internal distinction between integers and floating point numbers. So
for example:
Old:
observer>
3
observer>
3.0
observer>
3
observer>
3.0
observer>
true
print 3
print 3.0
print 1 + 2
print 1.5 + 1.5
print 3 = 3.0
(The last line shows that although the distinction between integer 3 and floating point 3.0 was
maintained, the two numbers were still considered equal.)
New:
observer>
3
observer>
3
observer>
3
observer>
3
observer>
148
print 3
print 3.0
print 1 + 2
print 1.5 + 1.5
print 3 = 3.0
Transition Guide
NetLogo 4.1.3 User Manual
true
We expect that only rare models will be negatively impacted by this change.
A benefit of this change is that NetLogo now supports a much larger range of integers. The old
range was -2,147,483,648 to 2,147,483,647 (around +/- 2 billion); the new range is
+/-9,007,199,254,740,992 (around +/- 9 quadrillion).
Agentset building
NetLogo 3.1 (and some earlier versions) included primitives called turtles-from and
patches-from that were occasionally useful for building agentsets. In NetLogo 4.0, these
primitives have been replaced with new primitives called turtle-set and patch-set that are
much more flexible and powerful. (link-set exists as well.) See the entries for these primitives in
the NetLogo Dictionary. Models that use the old turtles-from and patches-from will need to
be altered by hand to use the new primitives.
RGB Colors
In NetLogo 3.1 RGB and HSB colors could be approximated as NetLogo colors using the rgb and
hsb primitives. These have been renamed to approximate-rgb and approximate-hsb and
now expect inputs in the range 0-255, not 0-1.
The full RGB spectrum is now available in NetLogo so it may no longer be necessary to use these
primitives at all. You can set any color variable to a three-item RGB list, with values in the 0-255
range, and get that exact color. See the Color section of the Programming Guide for details.
Tie
In previous versions __tie was provided as an experimental feature. As of NetLogo 4.0 links have
a tie-mode variable which can be set to "none", "free", or "fixed". In 4.0 tie is now a
link-only primitive. This means that to tie turtle 1 to turtle 0 you write:
ask turtle 0 [ create-link-to turtle 1 [ tie ] ]
See the Tie section of the programming guide for details.
HubNet Clients
A HubNet activity's client interface is no longer stored in a separate model file. To import a client
from an old model select File -> Import -> Import HubNet Client. Then when asked, import from the
Interface Tab. You will no longer need the external client model and you will no longer need to point
to it when setting the client interface so this:
hubnet-set-client-interface "COMPUTER" [ "my-client.nlogo" ]
becomes:
hubnet-set-client-interface "COMPUTER" []
Transition Guide
149
NetLogo 4.1.3 User Manual
Performance of Lists
The internal implementation of lists has changed which changes some of the performance
properties of lists, see the Programming guide for details on the current implementation. Note that
fput is much faster than lput thus, you may improve performance simply by switching to fput. If
performance is still a problem you may want to consider using the Array & Table extensions
Since NetLogo 3.0
Agentsets
If your model is behaving strangely or incorrectly, perhaps it's because since NetLogo 3.1,
agentsets are now always in random order. In prior versions of NetLogo, agentsets were always in a
fixed order. If your code depended on that fixed order, then it won't work anymore. How to fix your
model to work with randomized agentsets depends on the details of what your code is doing. In
some situations, it is helpful to use the sort or sort-by primitives to convert an agentset (random
order) into a list of agents (fixed order). See "Lists of agents" in the Lists section of the
Programming Guide.
Wrapping
If you are seeing pieces of turtle shapes wrapping around the view edges, it's because NetLogo 3.0
allowed you to turn off such wrapping in the view without affecting the behavior of the model. Since
NetLogo 3.1, if you don't want the view to wrap you must make it so the world doesn't wrap, using
the new topology feature. Making this change may require other changes to your model, though.
See the Topology section of the Programming Guide for a thorough discussion of how to convert
your model to take advantage of this new feature.
Random turtle coordinates
Many models made in NetLogo 3.0 or earlier use setxy random world-width random
world-height to scatter turtles randomly, using either random or random-float. It only works if
world wrapping is on.
(Why? Because when wrapping is on, you can set coordinates of turtles to numbers beyond the
edge of the world and NetLogo will wrap the turtle to the other side. But in worlds that don't wrap
setting the x or y coordinates of a turtle to a point outside the bounds of the world causes a runtime
error. The world wrap settings were added in NetLogo 3.1. See the Topology section of the
Programming Guide for more information.)
To fix your model so that it works regardless of the wrapping settings, use one of these two
commands instead:
setxy random-xcor random-ycor
setxy random-pxcor random-pycor
The two commands are a bit different. The first command puts the turtle on a random point in the
world. The second command puts the turtle on the center of a random patch. An even more concise
way to put a turtle on the center of a random patch is:
150
Transition Guide
NetLogo 4.1.3 User Manual
move-to one-of patches
Transition Guide
151
NetLogo 4.1.3 User Manual
152
Transition Guide
Applets
NetLogo models can be run as Java applets inside a web browser.
Making an applet
You can make a model into an applet by choosing Save As Applet on NetLogo's File menu. If your
model has unsaved changes you will first be prompted to save it. Then you will also be prompted to
save an HTML file containing the applet.
For applets to work, the HTML file, your model file (ending in .nlogo), and the file NetLogoLite.jar
must all be in the same folder. (You can copy NetLogoLite.jar from the folder where you installed
NetLogo.)
On some systems, you can test the applet locally on your computer before uploading it to a web
server. It doesn't work on all systems, though, so if it doesn't work from your hard drive, please try
uploading it to a web server.
You don't need to include everything in the html file in your page. If you want, you can just take the
HTML code beginning with <applet> and ending with </applet>, and paste it into any HTML file you
want. It's even OK to put multiple <applet> tags on a single page.
Additional files
Applets can read files on the web server. If your applet requires additional files, such as text files it
reads, images it imports, and so on, you will also need to put those files in the same folder. These
files should appear in the same location relative to the model file as they appear on your computer.
Applets cannot read or write files on the user's computer, only the web server. Applets cannot
browse web server or the user's computer, meaning, that user-file and user-new-file do
nothing in an applet. All files required to run your model including the model file itself and
NetLogoLite.jar must be readable by the web server user.
Extensions
Many extensions can be used in applets. Simply place the folder containing the extension jar in the
same folder as the model.
Extensions that require native libraries don't work from applets. This includes the QTJ and GoGo
extensions.
Using an alternate jar location
If NetLogoLite.jar and your model are in different directories, you must modify the archive= and
value= lines in the HTML code to point to their actual locations. (For example, if you have multiple
applets in different directories on the same web server, you may want to put a single copy of
NetLogoLite.jar in one central place and change the archive= lines of all the HTML files to point to
that one central copy. This will save disk space for you and download time for your users.)
Applets
153
NetLogo 4.1.3 User Manual
Java requirements
Getting the right version
Current versions of NetLogo require that your web browser support Java 5 or higher. Here's how to
get the right Java:
• If you're on Windows (Vista, XP, or 2000), you need to download the Java browser plugin
from http://www.java.com/en/download/windows_manual.jsp.
• If you're on Mac OS X, you need Mac OS X 10.4 or higher. (NetLogo 4.0 was the last
version to support Mac OS X 10.2 and 10.3.)
• If you're on Linux or another Unix, you will need version 5 (or higher) of the Sun Java
Runtime Environment. It is available for download at http://www.java.com/. Check your
browser's home page for information about installing the Java plugin.
If you think you have the right browser and plugin, but it still doesn't work, check your browser's
preferences to make sure that Java is enabled.
The following web site may be helpful for figuring out what Java you have and getting the right
version running: http://www.javatester.org/.
Increasing the available memory
Some NetLogo applets may require more memory than the browser normally makes available. This
may happen if you have large numbers of agents. On Windows, you can increase the available
memory ("heap") space in the Java Control Panel's applet runtime settings.
Mac OS X 10.4 users, note that Mac OS X 10.4 initially had a rather low memory limit for Java
applets, namely 64 megabytes. Eventually a Java update from Apple raised it to 96 megabytes. You
can get the update through Software Update.
If your browser is using the browser plug-in that comes with the Sun JDK or JRE then instructions
for starting the Java Plug-In Control Panel are available here. In the Advanced tab of the Control
Panel add the following to the Java Runtime Parameters field: "-Xmx1024M".
Features not supported in applets
• Extensions that require native libraries won't work.
• The 3D view is not supported.
• The bytecode generator is not used in applets (which means that some models run
somewhat slower as applets).
• Web servers that return custom error messages may cause Java exceptions. See the FAQ
for the workaround.
154
Applets
Shapes Editor Guide
The Turtle and Link Shape Editors allows you to create and save turtle and link designs. NetLogo
uses fully scalable and rotatable vector shapes, which means you can create designs by combining
basic geometric elements, which can appear on-screen in any size or orientation.
Getting started
To begin making shapes, choose Turtle Shapes Editor or Link Shapes Editor in the Tools menu.
A new window will open listing all the shapes currently in the model, beginning with default, the
default shape. The Shapes Editor allows you to edit shapes, create new shapes, and borrow from
another model. You can also import turtle shapes from a library of pre-existing shapes.
Importing shapes
Every new model in NetLogo starts off containing a small core set of frequently used shapes. Many
more turtle shapes are available by using the Import from library... button. This brings up a dialog
where you can select one or more shapes and bring them into your model. Select the shapes, then
press the Import button.
Similarly, you can use the Import from model... button to borrow shapes from another model.
Default shapes
Here are the turtle shapes that are included by default in every new NetLogo model:
First row: default, airplane, arrow, box, bug, butterfly, car
Second row: circle, circle 2, cow, cylinder, dot, face happy, face neutral
Third row: face sad, fish, flag, flower, house, leaf, line
Shapes Editor Guide
155
NetLogo 4.1.3 User Manual
Fourth row: line half, pentagon, person, plant, sheep, square, square 2
Fifth row: star, target, tree, triangle, triangle 2, truck, turtle
Sixth row: wheel, x
Shapes library
And here are the shapes in the shapes library (including all of the default shapes, too):
156
Shapes Editor Guide
NetLogo 4.1.3 User Manual
By default there is only one Link shape in a model, that is "default". This shape is simply a single
straight line with a simple arrowhead (if the link happens to be directed).
Creating and editing turtle shapes
Pressing the New button will make a new shape. Or, you may select an existing shape and press
Edit.
Tools
In the upper left corner of the editing window is a group of drawing tools. The arrow is the selection
tool, which selects an already drawn element.
To draw a new element, use one of the other seven tools:
• The line tool draws line segments.
• The circle, square, and polygon tools come in two versions, solid and outline.
When using the polygon tool, click the mouse to add a new segment to the polygon. When you're
done adding segments, double click.
After you draw a new element, it is selected, so you can move, delete, or reshape it if you want:
• To move it, drag it with the mouse
• To delete it, press the Delete button.
• To reshape it, drag the small "handles" that appear on the element only when it is selected.
• To change its color, click on the new color.
Shapes Editor Guide
157
NetLogo 4.1.3 User Manual
Previews
As you draw your shape, you will also see it in five smaller sizes in the five preview areas found
near the bottom of the editing window. The previews show your shape as it might appear in your
model, including how it looks as it rotates. The number below each preview is the size of the
preview in pixels. When you edit the view, patch size is also measured in pixels. So for example, the
preview with "20" below it shows you how your shape would look on a turtle (of size 1) on patches
of size 20 pixels.
The rotatable feature can be turned off if you want a shape that always faces the same way,
regardless of the turtle's heading.
Overlapping shapes
New elements go on top of previous elements. You can change the layering order by selecting an
element and then using the Bring to front and Send to back buttons.
Undo
At any point you can use the Undo button to undo the edit you just performed.
Colors
Elements whose color matches the Color that changes (selected from a drop-down menu -- the
default is gray) will change color according to the value of each turtle's color variable in your model.
Elements of other colors don't change. For example, you could create cars that always have yellow
headlights and black wheels, but different body colors.
Other buttons
The "Rotate Left" and "Rotate Right" buttons rotate elements by 90 degrees. The "Flip Horizontal"
and "Flip Vertical" buttons reflect elements across the axes.
These four buttons will rotate or flip the entire shape, unless an element is selected, in which case
only that element is affected.
These buttons are especially handy in conjunction with the "Duplicate" button if you want to make
shapes that are symmetrical. For example, if you were making a butterfly, you could draw the
butterfly's left wing with the polygon tool, then duplicate the wing with the "Duplicate" button, then
turn the copy into a right wing with the "Flip Horizontal" button.
Shape design
It's tempting to draw complicated, interesting shapes, but remember that in most models, the patch
size is so small that you won't be able to see very much detail. Simple, bold, iconic shapes are
usually best.
158
Shapes Editor Guide
NetLogo 4.1.3 User Manual
Keeping a shape
When the shape is done, give it a name and press the Done button at the bottom of the editing
window. The shape and its name will now be included in the list of shapes along with the "default"
shape.
Creating and editing link shapes
Managing link shapes is very similar to managing turtle shapes. So, you can create a new shape
but pressing the New button or you can edit existing shapes, when you are done editing a shape
press Done if you want to keep it.
Changing link shape properties
There are several different properties for each link shape that you are allowed to change:
• Name - link shapes can have the same name as turtle shapes but must be unique among
link shapes.
• Direction Indicator - the direction indicator (the little arrow on directed links) is just like the
turtle vector shapes, you can edit it using the same editor by pressing the Edit button.
• Curviness - this is the amount of bend in a link expressed in patches (this is particularly
useful if you have directed links going in both directions so you can discern both links)
• Number of lines: You can have 1, 2, or 3 lines in each link shape, you control this by
selecting line patterns in the "left line", "middle line", and "right line" selection boxes.
• Dash pattern of lines: There are several dashed line patterns available in the selection boxes
so not all lines need be solid.
Here are a few link shapes with various properties:
Shapes Editor Guide
159
NetLogo 4.1.3 User Manual
Using shapes in a model
In the model's code or in the command center, you can use any of the shapes that are in the model
(though only turtles can have turtle shapes and only links can have link shapes) For example,
suppose you want to create 50 turtles with the shape "rabbit". Provided there is some turtle shape
called rabbit in this model, give this command to the observer in the command center:
observer> crt 50
And then give these commands to the turtles to spread them out, then change their shape:
turtles> fd random 15
turtles> set shape "rabbit"
Voila! Rabbits! Note the use of double quotes around the shape name. Shape names are strings.
Similarly, you can set the shape variable of links. Assuming there is a link shape called "road" in this
model:
observer> crt 5 [ create-links-with other turtles ]
turtles> fd 5
links> set shape "road"
The set-default-shape command is also useful for assigning shapes to turtles and links.
160
Shapes Editor Guide
BehaviorSpace Guide
This guide has three parts:
• What is BehaviorSpace?: A general description of the tool, including the ideas and
principles behind it.
• How It Works: Walks you through how to use the tool and highlights its most commonly
used features.
• Advanced Usage: How to use BehaviorSpace from the command line, or from your own
Java code.
• Source Code: About the source code for BehaviorSpace.
What is BehaviorSpace?
BehaviorSpace is a software tool integrated with NetLogo that allows you to perform experiments
with models.
BehaviorSpace runs a model many times, systematically varying the model's settings and recording
the results of each model run. This process is sometimes called "parameter sweeping". It lets you
explore the model's "space" of possible behaviors and determine which combinations of settings
cause the behaviors of interest.
If your computer has multiple processor cores, then by default, model runs will happen in parallel,
one per core.
BehaviorSpace is free and open source software.
Why BehaviorSpace?
The need for this type of experiment is revealed by the following observations. Models often have
many settings, each of which can take a range of values. Together they form what in mathematics is
called a parameter space for the model, whose dimensions are the number of settings, and in which
every point is a particular combination of values. Running a model with different settings (and
sometimes even the same ones) can lead to drastically different behavior in the system being
modeled. So, how are you to know which particular configuration of values, or types of
configurations, will yield the kind of behavior you are interested in? This amounts to the question of
where in its huge, multi-dimension parameter space does your model perform best?
For example, suppose you want speedy synchronization from the agents in the Fireflies model. The
model has four sliders -- number, cycle-length, flash-length and number-flashes -- that have
approximately 2000, 100, 10 and 3 possible values, respectively. That means there are 2000 * 100 *
10 * 3 = 600,000 possible combinations of slider values! Trying combinations one at a time is hardly
an efficient way to learn which one will evoke the speediest synchronization.
BehaviorSpace offers you a much better way to solve this problem. If you specify a subset of values
from the ranges of each slider, it will run the model with each possible combination of those values
and, during each model run, record the results. In doing so, it samples the model's parameter space
-- not exhaustively, but enough so that you will be able to see relationships form between different
sliders and the behavior of the system. After all the runs are over, a dataset is generated which you
BehaviorSpace Guide
161
NetLogo 4.1.3 User Manual
can open in a different tool, such as a spreadsheet, database, or scientific visualization application,
and explore.
By enabling you to explore the entire "space" of behaviors a model can exhibit, BehaviorSpace can
be a powerful assistant to the modeler.
How It Works
To begin using BehaviorSpace, open your model, then choose the BehaviorSpace item on
NetLogo's Tools menu.
Managing experiment setups
The dialog that opens lets you create, edit, duplicate, delete, and run experiment setups.
Experiments are listed by name and how by model runs the experiment will consist of.
Experiment setups are considered part of a NetLogo model and are saved as part of the model.
To create a new experiment setup, press the "New" button.
Creating an experiment setup
In the new dialog that appears, you can specify the following information. Note that you don't always
need to specify everything; some parts can be left blank, or left with their default values, depending
on your needs.
Experiment name: If you have multiple experiments, giving them different names will help you
keep them straight.
Vary variables as follows: This is where you specify which settings you want varied, and what
values you want them to take. Variables can include sliders, switches, choosers, and any global
variables in your model.
Variables can also include max-pxcor, min-pxcor, max-pycor and min-pycor, world-width,
world-height and random-seed. These are not, strictly speaking, variables, but BehaviorSpace
lets you vary them as if they were. Varying the world dimensions lets you explore the effect of world
size upon your model. Since setting world-width and world-height does not necessarily
define the bounds of the world how they are varied depends on the location of the origin. If the
origin is centered, BehaviorSpace will keep it centered so the values world-width or
world-height must be odd. If one of the bounds is at zero that bound will be kept at zero and the
other bound will move, for example if you start with a world with min-pxcor = 0 max-pxcor =
10 and you vary world-width like this:
["world-width" [11 1 14]]
min-pxcor will stay at zero and max-pxcor will set to 11, 12, and 13 for each of the runs. If
neither of these conditions are true, the origin is not centered, nor at the edge of the world you
cannot vary world-height or world-width directly but you should vary max-pxcor,
max-pycor, min-pxcor and min-pycor instead.
162
BehaviorSpace Guide
NetLogo 4.1.3 User Manual
Varying random-seed lets you repeat runs by using a known seed for the NetLogo random
number generator. Note that you're also free to use the random-seed command in your
experiment's setup commands. For more information on random seeds, see the Random Numbers
section of the Programmer's Guide.
You may specify values either by listing the values you want used, or by specifying that you want to
try every value within a given range. For example, to give a slider named number every value from
100 to 1000 in increments of 50, you would enter:
["number" [100 50 1000]]
Or, to give it only the values of 100, 200, 400, and 800, you would enter:
["number" 100 200 400 800]
Be careful with the brackets here. Note that there are fewer square brackets in the second example.
Including or not including this extra set of brackets is how you tell BehaviorSpace whether you are
listing individual values, or specifying a range.
Also note that the double quotes around the variable names are required.
You can vary as many settings as you want, including just one, or none at all. Any settings that you
do not vary will retain their current values. Not varying any settings is useful if you just want to do
many runs with the current settings.
What order you list the variables in determines what order the runs will be done in. All values for a
later variable will be tried before moving to the next value for an earlier variable. So for example if
you vary both x and y from 1 to 3, and x is listed first, then the order of model runs will be: x=1 y=1,
x=1 y=2, x=1 y=3, x=2 y=1, and so on.
Repetitions: Sometimes the behavior of a model can vary a lot from run to run even if the settings
don't change, if the model uses random numbers. If you want to run the model more than once at
each combination of settings, enter a higher number.
Measure runs using these reporters: This is where you specify what data you want to collect from
each run. For example, if you wanted to record how the population of turtles rose and fell during
each run, you would enter:
count turtles
You can enter one reporter, or several, or none at all. If you enter several, each reporter must be on
a line by itself, for example:
count frogs
count mice
count birds
BehaviorSpace Guide
163
NetLogo 4.1.3 User Manual
If you don't enter any reporters, the runs will still take place. This is useful if you want to record the
results yourself your own way, such as with the export-world command.
Measure runs at every step: Normally NetLogo will measure model runs at every step, using the
reporters you entered in the previous box. If you're doing very long model runs, you might not want
all that data. Uncheck this box if you only want to measure each run after it ends.
Setup commands: These commands will be used to begin each model run. Typically, you will enter
the name of a procedure that sets up the model, typically setup. But it is also possible to include
other commands as well.
Go commands: These commands will be run over and over again to advance to the model to the
next "step". Typically, this will be the name of a procedure, such as go, but you may include any
commands you like.
Stop condition: This lets you do model runs of varying length, ending each run when a certain
condition becomes true. For example, suppose you wanted each run to last until there were no
more turtles. Then you would enter:
not any? turtles
If you want the length of runs to all be of a fixed length, just leave this blank.
The run may also stop because the go commands use the stop command, in the same way that
stop can be used to stop a forever button. The stop command may be used directly in the go
commands, or in a procedure called directly by the go commands. (The intent is that the same go
procedure should work both in a button and in a BehaviorSpace experiment.) Note that the step in
which stop is used is considered to have been aborted, so no results will be recorded for that step.
Therefore, the stopping test should be at the beginning of the go commands or procedure, not at the
end.
Final commands: These are any extra commands that you want run once, when the run ends.
Usually this is left blank, but you might use it to call the export-world command or record the
results of the run in some other way.
Time limit: This lets you set a fixed maximum length for each run. If you don't want to set any
maximum, but want the length of the runs to be controlled by the stop condition instead, enter 0.
Special primitives for BehaviorSpace experiments
Currently there is only one, behaviorspace-run-number. The run number reported by this
primitive matches the run number used in the results files generated by BehaviorSpace.
Running an experiment
When you're done setting up your experiment, press the "OK" button, followed by the "Run" button.
A dialog titled "Run options" will appear.
164
BehaviorSpace Guide
NetLogo 4.1.3 User Manual
Run options: formats
The run options dialog lets you select the formats you would like the data from your experiment
saved in. Data is collected for each run or step, according to the setting of Measure runs at every
step option. In either case, the initial state of the system is recorded, after the setup commands run
but before the go commands run for the first time.
Table format lists each interval in a row, with each metric in a separate column. Table data is written
to the output file as each run completes. Table format is suitable for automated processing of the
data, such as importing into a database or a statistics package.
Spreadsheet format calculates the min, mean, max, and final values for each metric, and then lists
each interval in a row, with each metric in a separate column. Spreadsheet data is more
human-readable than Table data, especially if imported into a spreadsheet application.
(Note however that spreadsheet data is not written to the results file until the experiment finishes.
Since spreadsheet data is stored in memory until the experiment is done, very large experiments
could run out of memory. So you should disable spreadsheet output unless you really want it. If you
do want spreadsheet output, note that if anything interrupts the experiment, such as a runtime error,
running out of memory, or a crash or power outage, no spreadsheet results will be written. For long
experiments, you may want to also enable table format as a precaution so that if something
happens and you get no spreadsheet output you'll at least get partial table output.)
After selecting your output formats, BehaviorSpace will prompt you for the name of a file to save the
results to. The default name ends in ".csv". You can change it to any name you want, but don't
leave off the ".csv" part; that indicates the file is a Comma Separated Values (CSV) file. This is a
plain-text data format that is readable by any text editor as well as by most popular spreadsheet and
database programs.
Run options: parallel runs
The run options dialog also lets you select whether you want multiple model runs to happen in
parallel, and if so, how many are allowed to be simultaneously active. This number will default to the
number of processor cores in your computer.
There are a few cautions associated with parallel runs.
First, if multiple runs are active, only one of them will be in the "foreground" and cause the view and
plots to update. The other runs will happen invisibly in the background.
Second, invisible background runs can't use primitives that only work in the GUI. For example, a
background run can't make a movie.
Third, since parallel runs progress independently of each other, table format output may contain
interleaved, out-of-order results. When you analyze your table data, you may wish to sort it by run
number first. (Spreadsheet format output is not affected by this issue, since it is not written until the
experiment completes or is aborted.)
Fourth, using all available processor cores may make your computer slow to use for other tasks
while the experiment is running.
BehaviorSpace Guide
165
NetLogo 4.1.3 User Manual
Fifth, doing runs in parallel will multiply the experiment's memory requirements accordingly. You
may need to increase NetLogo's memory ceiling (see this FAQ entry).
Observing runs
After you complete the run options dialog, another dialog will appear, titled "Running Experiment". In
this dialog, you'll see a progress report of how many runs have been completed so far and how
much time has passed. If you entered any reporters for measuring the runs, and if you left the
"Measure runs at every step" box checked, then you'll see a plot of how they vary over the course of
each run.
You can also watch the runs in the main NetLogo window. (If the "Running Experiment" dialog is in
the way, just move it to a different place on the screen.) The view and plots will update as the model
runs. If you don't need to see them update, then use the checkboxes in the "Running Experiment"
dialog to turn the updating off. This will make the experiment go faster.
If you want to stop your experiment before it's finished, press the "Abort" button. Any results
generated so far will still be saved.
When all the runs have finished, the experiment is complete.
Advanced usage
Running from the command line
It is possible to run BehaviorSpace experiments "headless", that is, from the command line, without
any graphical user interface (GUI). This is useful for automating runs on a single machine or a
cluster of machines.
No Java programming is required. Experiment setups can be created in the GUI and then run later
from the command line, or, if you prefer, you can create or edit experiment setups directly using
XML.
How to use it
Run Java with the org.nlogo.headless.Main class. The Main.main() method supports these
arguments:
• --model <path>: pathname of model to open (required)
• --setup-file <path>: read experiment setups from this file instead of the model file
• --experiment <name>: name of experiment to run
• --table <path>: pathname to send table output to (or - for standard output)
• --spreadsheet <path>: pathname to send table output to (or - for standard output)
• --threads <number>: use this many threads to do model runs in parallel, or 1 to disable
parallel runs. defaults to one thread per processor.
• --min-pxcor <number>: override world size setting in model file
• --max-pxcor <number>: override world size setting in model file
• --min-pycor <number>: override world size setting in model file
• --max-pycor <number>: override world size setting in model file
166
BehaviorSpace Guide
NetLogo 4.1.3 User Manual
--model is required. If you don't specify --experiment, you must specify --setup-file. By
default no results are generated, so you'll usually want to specify either --table or
--spreadsheet, or both. If you specify any of the world dimensions, you must specify all four.
Examples
It is easiest if you create your experiment setup ahead of time in the GUI, so it is saved as part of
the model. To run an experiment setup saved in a model, here is an example command line:
java -server -Xmx1024M -cp NetLogo.jar \
org.nlogo.headless.Main \
--model Fire.nlogo \
--experiment experiment1 \
--table -
(For this to work, NetLogo.jar must be present along with the lib subdirectory containing
necessary libraries. Both NetLogo.jar and lib are included with NetLogo.)
After the named experiment has run, the results are sent to standard output in table format, as CSV.
("-" is how you specify standard output instead of output to a file.)
When running the headless.Main class as an application, it forces the system property
java.awt.headless to be true. This tells Java to run in headless mode, allowing NetLogo to run
on machines when a graphical display is not available.
Note the user of the -server flag to tell Java to optimize performance for "server" type
applications; we recommend this flag for best performance in most situations.
Note the use of -Xmx to specify a maximum heap size of one gigabyte. If you don't specify a
maximum heap size, you will get your VM's default size, which may be unusably small. (One
gigabyte is an arbitrary size which should be more than large enough for most models; you can
specify a different limit if you want.)
The required --model argument is used to specify the model file you want to open.
The --experiment argument is used to specify the name of the experiment you want to run. (At
the time you create an experiment setup in the GUI, you assign it a name.)
Here's another example that shows some additional, optional arguments:
java -server -Xmx1024M -cp NetLogo.jar \
org.nlogo.headless.Main \
--model Fire.nlogo \
--experiment experiment2 \
--max-pxcor 100 \
--min-pxcor -100 \
--max-pycor 100 \
--min-pycor -100
Note the use of the optional --max-pxcor, --max-pycor, etc. arguments to specify a different
world size than that saved in the model. (It's also possible for the experiment setup to specify values
for the world dimensions; if they are specified by the experiment setup, then there is no need to
specify them on the command line.)
BehaviorSpace Guide
167
NetLogo 4.1.3 User Manual
Since neither --table nor --spreadsheet is specified, no results will be generated. This is useful if the
experiment setup generates all the output you need by some other means, such as exporting world
files or writing to a text file.
Yet another example:
java -server -Xmx1024M -cp NetLogo.jar \
org.nlogo.headless.Main \
--model Fire.nlogo \
--experiment experiment2 \
--table table-output.csv \
--spreadsheet spreadsheet-output.csv
The optional --table <filename> argument specifies that output should be generated in a table
format and written to the given file as CSV data. If - is specified as the filename, than the output is
sent to the standard system output stream. Table data is written as it is generated, with each
complete run.
The optional --spreadsheet <filename> argument specified that spreadsheet output should
be generated and written to the given file as CSV data. If - is specified as the filename, than the
output is sent to the standard system output stream. Spreadsheet data is not written out until all
runs in the experiment are finished.
Note that it is legal to specify both --table and --spreadsheet, and if you do, both kinds of
output file will be generated.
Here is one final example that shows how to run an experiment setup which is stored in a separate
XML file, instead of in the model file:
java -server -Xmx1024M -cp NetLogo.jar \
org.nlogo.headless.Main \
--model Fire.nlogo \
--setup-file fire-setups.xml \
--experiment experiment3
If the XML file contains more than one experiment setup, it is necessary to use the --experiment
argument to specify the name of the setup to use.
In order to run any of these experiments in 3D add -Dorg.nlogo.is3d=true to any of these
startup commands, for example:
java -server -Dorg.nlogo.is3d=true -Xmx1024M -cp NetLogo.jar \
org.nlogo.headless.Main \
--model Fire3D.nlogo \
--experiment experiment1 \
--table -
Note that you should supply a 3D model and there are also 3D arguments --max-pzcor
<number> and --min-pzcor <number>.
The next section has information on how to create standalone experiment setup files using XML.
168
BehaviorSpace Guide
NetLogo 4.1.3 User Manual
Setting up experiments in XML
We don't yet have detailed documentation on authoring experiment setups in XML, but if you
already have some familiarity with XML, then the following pointers may be enough to get you
started.
The structure of BehaviorSpace experiment setups in XML is determined by a Document Type
Definition (DTD) file. The DTD is stored in NetLogo.jar, as system/behaviorspace.dtd. (JAR
files are also zip files, so you can extract the DTD from the JAR using Java's "jar" utility or with any
program that understands zip format.)
The easiest way to learn what setups look like in XML, though, is to author a few of them in
BehaviorSpace's GUI, save the model, and then examine the resulting .nlogo file in a text editor.
The experiment setups are stored towards the end of the .nlogo file, in a section that begins and
ends with a experiments tag. Example:
<experiments>
<experiment name="experiment" repetitions="10" runMetricsEveryStep="true">
<setup>setup</setup>
<go>go</go>
<exitCondition>not any? fires</exitCondition>
<metric>burned-trees</metric>
<enumeratedValueSet variable="density">
<value value="40"/>
<value value="0.1"/>
<value value="70"/>
</enumeratedValueSet>
</experiment>
</experiments>
In this example, only one experiment setup is given, but you can put as many as you want between
the beginning and ending experiments tags.
Between looking at the DTD, and looking at examples you create in the GUI, it will hopefully be
apparent how to use the tags to specify different kind of experiments. The DTD specifies which tags
are required and which are optional, which may be repeated and which may not, and so forth.
When XML for experiment setups is included in a model file, it does not begin with any XML
headers, because not the whole file is XML, only part of it. If you keep experiment setups in their
own file, separate from the model file, then the extension on the file should be .xml not .nlogo, and
you'll need to begin the file with proper XML headers, as follows:
<?xml version="1.0" encoding="us-ascii"?>
<!DOCTYPE experiments SYSTEM "behaviorspace.dtd">
The second line must be included exactly as shown. In the first line, you may specify a different
encoding than us-ascii, such as UTF-8, but NetLogo doesn't support non-ASCII characters in
most situations, so specifying a different encoding may be pointless.
Controlling API
If BehaviorSpace is not sufficient for your needs, a possible alternative is to use our Controlling API,
which lets you write Java code that controls NetLogo. The API lets you run BehaviorSpace
BehaviorSpace Guide
169
NetLogo 4.1.3 User Manual
experiments from Java code, or, you can write custom code that controls NetLogo more directly to
do BehaviorSpace-like things. See the Controlling section of the User Manual for further details on
both possibilities.
Source code
BehaviorSpace is free and open source software. It is made available under the GNU Lesser
General Public License (LGPL), version 3 or later. The source code is included in the NetLogo
distribution, in lib/BehaviorSpace-src.zip.
BehaviorSpace is written in the Scala programming language. Scala code compiles to Java byte
code and is fully interoperable with Java and other JVM languages.
The sources jar includes instructions on how to recompile it.
170
BehaviorSpace Guide
System Dynamics Guide
This guide has three parts:
• What is the System Dynamics Modeler?: A general description of the tool, including the
ideas and principles behind it.
• How It Works: Describes the interface and how you use it.
• Tutorial: Wolf-Sheep Predation (aggregate): Walks you through creating a model with the
System Dynamics Modeler.
What is the NetLogo System Dynamics Modeler?
System Dynamics is a type of modeling where you try to understand how things relate to one
another. It is a little different from the agent-based approach we normally use in NetLogo models.
With the agent-based approach we usually use in NetLogo, you program the behavior of individual
agents and watch what emerges from their interaction. In a model of Wolf-Sheep Predation, for
example, you provide rules for how wolves, sheep and grass interact with each other. When you run
the simulation, you watch the emergent aggregate-level behavior: for example, how the populations
of wolves and sheep change over time.
With the System Dynamics Modeler, you don't program the behavior of individual agents. Instead,
you program how populations of agents behave as a whole. For example, using System Dynamics
to model Wolf-Sheep Predation, you specify how the total number of sheep would change as the
total number of wolves goes up or down, and vice versa. You then run the simulation to see how
both populations change over time.
The System Dynamics Modeler allows you to draw a diagram that defines these populations, or
"stocks", and how they affect each other. The Modeler reads your diagram and generates the
appropriate NetLogo code -- global variables, procedures and reporters -- to run your System
Dynamics model inside of NetLogo.
Basic Concepts
A System Dynamics diagram is made of four kinds of elements: Stocks, Variables, Flows and Links.
A Stock is a collection of stuff, an aggregate. For example, a Stock can represent a population of
sheep, the water in a lake, or the number of widgets in a factory.
A Flow brings things into, or out of a Stock. Flows look like pipes with a faucet because the faucet
controls how much stuff passes through the pipe.
A Variable is a value used in the diagram. It can be an equation that depends on other Variables, or
it can be a constant.
A Link makes a value from one part of the diagram available to another. A link transmits a number
from a Variable or a Stock into a Stock or a Flow.
System Dynamics Guide
171
NetLogo 4.1.3 User Manual
The System Dynamics Modeler figures out how the value of your Stocks change over time by
estimating them over and over. The estimation isn't always perfect, but you can affect its accuracy
by changing the value of dt. As dt decreases, you estimate the model more frequently, so it gets
more accurate. However, decreasing dt also makes but the model run more slowly.
Sample Models
There are four models in the Sample Models section of the NetLogo Models Library that use the
System Dynamics Modeler. All four models explore population growth (and, in models with
predation, population decline).
Exponential Growth and Logistic Growth are simple examples of growth in one stock.
Wolf Sheep Predation (aggregate) is an example of a system with multiple stocks influencing one
another. It models a predator-prey ecosystem using the System Dynamics Modeler.
Wolf Sheep Predation (docked) is an example of a model that runs both the a System Dynamics
model and an agent-based model side-by-side. It runs the System Dynamics implementation of
Wolf-Sheep Predation next to the agent-based Wolf Sheep Predation model from the Biology
section of Sample Models.
How it Works
To open the System Dynamics Modeler, choose the System Dynamics Modeler item in the Tools
menu. The System Dynamics Modeler window will appear.
Diagram Tab
The Diagram tab is where you draw your System Dynamics diagram.
172
System Dynamics Guide
NetLogo 4.1.3 User Manual
The toolbar contains buttons to edit, delete and create items in your diagram.
Creating Diagram Elements
A System Dynamics diagram is made up of four kinds of components: Stocks, Variables, Flows and
Links.
Stock
To create a Stock, press the Stock button in the toolbar and click in the diagram area below.
A new Stock appears. Each Stock requires a unique name, which becomes a global
variable. Stocks also require an Initial value. It can be a number, a variable, a complex
NetLogo expression, or a call to a NetLogo reporter.
Variable
To create a Variable, press the Variable button and click on the diagram. Each Variable in
the System Dynamics Model requires a unique name, which becomes the name of a
procedure, or a global variable. Variables also require an Expression. This expression can
be a number, a variable, a complex NetLogo expression, or a call to a NetLogo reporter.
Flow
To create a Flow, press the Flow button. Click and hold where you want the Flow to begin -either on a Stock or in an empty area -- and drag the mouse to where you want the Flow to
end -- on a Stock or in an empty area. Each Flow requires a unique name, which becomes a
NetLogo reporter. Flows require an Expression, which is the rate of flow from the input to
the output. This expression can be a number, a variable, a complex NetLogo expression, or
a call to a NetLogo reporter. If the value is negative, the flow is in the opposite direction.
When more than one Flow is connected to a Stock, it is important to consider how they
should interact with one another. NetLogo will not enforce that the Flows out of a stock occur
in any particular order. Also, NetLogo will not ensure that the sum of Flows out of a Stock
are less than or equal to the value of the Stock. These behaviors can be implemented
explicitly when creating the Expression for a Flow.
For example, if the Flow is defined as a constant value, 10, you can ensure it never draws
more than the value of the Stock by using the min primitive: min (list stock 10). If I
want Flow A to deplete a Stock before Flow B is calculated, I can link Flow A to Flow B and
modify Flow B to subtract Flow A's value from the stock: min (list (max (list 0
(stock - flow-a))) 10).
Link
To create a Link, click and hold on the starting point for the link -- a Variable, Stock or Flow
-- and drag the mouse to the destination Variable or Flow.
Working with Diagram Elements
When you create a Stock, Variable, or Flow, you see a red question-mark on the element. The
question-mark indicates that the element doesn't have a name yet. The red color indicates that the
Stock is incomplete: it's missing one or more values required to generate a System Dynamics
model. When a diagram element is complete, the name turns black.
System Dynamics Guide
173
NetLogo 4.1.3 User Manual
Selecting: To select a diagram element, click on it. To select multiple elements, hold the shift key.
You can also select one or more elements by dragging a selection box.
Editing: To edit a diagram element, select the element and press the "Edit" button on the toolbar.
Or just double-click the element. (You can edit Stocks, Flows and Variables, but you can't edit
Links).
Moving: To move a diagram element, select it and drag the mouse to a new location.
Editing dt
On the right side of the toolbar is the default dt, the interval used to approximate the results of your
System Dynamics model. To change the value of the default dt for your aggregate model, press the
Edit button next to the dt display and enter a new value.
Errors
When you click the "check" button or when you edit a stock, flow, or variable the modeler will
automatically generate the NetLogo code the corresponds to your diagram and try to compile that
code. If there is an error the Procedures tab will turn red and a message will appear, and the portion
of the the generated code that is causing the trouble will be highlighted.
This should give you a better idea which element in the diagram is causing problem.
174
System Dynamics Guide
NetLogo 4.1.3 User Manual
Procedures Tab
The System Dynamics Modeler generates NetLogo variables and procedures based on the
contents of your diagram. These procedures are what make the diagram actually perform
calculations. The Procedures tab in the System Dynamics Modeler window displays the NetLogo
procedures generated from your diagram.
You can't edit the contents of the Procedures tab. To modify your System Dynamics mode, edit the
diagram.
Let's take a closer look at how the generated code relates to the diagram.:
• Stocks correspond to a global variable that is initialized to the value or expression you
provided in the Initial value field. Each Stock will be updated every step based on the Flows
in and out.
• Flows correspond to a procedure that contains the expression you provided in the
Expression field.
• Variables can either be global variables or procedures. If the Expression you provided is a
constant it will be a global variable and initialized to that value. If you used a more
complicated Expression to define the Variable it will create a procedure like a Flow.
The variables and procedures defined in this tab are accessible in the main NetLogo window, just
like the variables and procedures you define yourself in the main NetLogo Procedures tab. You can
call the procedures from the main Procedures tab, from the Command Center, or from buttons in
the Interface tab. You can refer to the global variables anywhere, including in the main Procedures
tab and in monitors.
There are three important procedures to notice: system-dynamics-setup,
system-dynamics-go, and system-dynamics-do-plot.
system-dynamics-setup initializes the aggregate model. It sets the value of dt, calls
reset-ticks, and initializes your stocks and your converters. Converters with a constant value
are initialized first, followed by the stocks with constant values. The remaining stocks are initialized
in alphabetical order.
system-dynamics-go runs the aggregate model for dt time units. It computes the values of
Flows and Variables and updates the value of Stocks. It also calls tick-advance with the value of
dt. Converters and Flows with non-constant Expressions will be calculated only once when this
procedure is called, however, their order of evaluation is undefined
System Dynamics Guide
175
NetLogo 4.1.3 User Manual
system-dynamics-do-plot plots the values of Stocks in the aggregate model. To use this, first
create a plot in the main NetLogo window. You then need to define a plot pen for each Stock you
want to be plotted. This procedure will use the current plot, which you can change using the
set-current-plot command.
The System Dynamics Modeler and NetLogo
The diagram you create with the System Dynamics Modeler, and the procedures generated from
your diagram, are part of your NetLogo model. When you a save the NetLogo model, your diagram
is saved with it, in the same file.
Tutorial: Wolf-Sheep Predation
Let's create a model of Wolf-Sheep Predation with the System Dynamics Modeler.
Step 1: Sheep Reproduction
• Open a new model in NetLogo.
• Launch the System Dynamics Modeler in the Tools menu.
Our model will have a population of wolves and a population of sheep. Let's start with the sheep.
First, create a Stock that holds a population of Sheep.
• Press the Stock button in the toolbar.
176
System Dynamics Guide
NetLogo 4.1.3 User Manual
• Click in the diagram area.
You see a Stock with a red question-mark in the middle.
• Double-click the Stock to edit.
• Name the stock sheep
• Set the initial value to 100.
• Deselect the Allow Negative Values checkbox. It doesn't make sense to have
negative sheep!
Our sheep population can increase if new sheep are born. To add this to our diagram, we create a
Flow into the stock of sheep.
• Click on the Flow button in the toolbar and press the mouse button in an
empty area to the left of the sheep Stock. Drag the Flow to the right until it
connects to the sheep Stock and let go.
• Edit the Flow and name it sheep-births.
• For now, enter a constant, such as 1, into the Expression field.
The number of sheep born during a period of time depends on the number of sheep that are alive:
more sheep means more reproduction.
• Draw a Link from the sheep Stock to the sheep-births Flow.
The rate of sheep births also depends on some constant factors that are beyond the scope of this
model: the rate of reproduction, etc.
System Dynamics Guide
177
NetLogo 4.1.3 User Manual
• Create a Variable and name it sheep-birth-rate. Set its value to 0.04
• Draw a Link from the sheep-birth-rate Variable to the sheep-births.
Your diagram should look something like this:
The sheep-births Flow has a red label because we haven't given it an expression. Red indicates
that there's something missing from that part of the diagram.
The amount of sheep flowing into our stock will depend positively with the number of sheep and the
sheep birth rate.
• Edit the sheep-births Flow and set the expression to
sheep-birth-rate * sheep.
We now have a complete diagram. To see the NetLogo code generated by our diagram, you can
click on the Procedures tab of the System Dynamics Modeler window. It looks like this:
178
System Dynamics Guide
NetLogo 4.1.3 User Manual
Step 2: NetLogo Integration
Once you create an aggregate model with the System Dynamics Modeler, you can interact with the
model through the main NetLogo interface window. Let's build our NetLogo model to run the code
generated by our diagram. We'll need a setup and go buttons which call the
system-dynamics-setup and system-dynamics-go procedures created by the System
Dynamics Modeler. And we'll want a monitor and a plot to watch the changes in sheep population.
• Select the main NetLogo window
• In the Procedures tab, write:
to setup
ca
system-dynamics-setup
end
to go
system-dynamics-go
system-dynamics-do-plot
end
• Move to the Interface tab
• Create a setup button
• Create a go button (don't forget to make it forever)
System Dynamics Guide
179
NetLogo 4.1.3 User Manual
• Create a sheep monitor.
• Create a plot called "populations" with a pen named "sheep".
Now we're ready to run our model.
• Press the setup button.
• Don't press the "go" button yet. Instead, type go four or five times into the
Command Center
Notice what happens. The sheep population increases exponentially. After four or five iterations, we
have an enormous number of sheep. That's because we have sheep reproduction, but our sheep
never die.
To fix that, let's finish our diagram by introducing a population of wolves which eat sheep.
Step 3: Wolf Predation
• Move back to the System Dynamics window
• Add a stock of wolves
• Add Flows, Variables and Links to make your diagram look like this:
• Add one more Flow from the wolves Stock to the Flow that goes out of the
Sheep stock.
• Fill in the names of the diagram elements so it looks like this:
180
System Dynamics Guide
NetLogo 4.1.3 User Manual
where
initial-value of wolves is 30,
wolf-deaths is wolves * wolf-death-rate ,
wolf-death-rate is 0.15,
predator-efficiency is .8,
wolf-births is wolves * predator-efficiency *
predation-rate * sheep,
predation-rate is 3.0E-4,
and sheep-deaths is sheep * predation-rate * wolves.
Now we're really done.
• Go back to the main NetLogo window
• Add a plot pen named "wolves" to the population plot
• Press setup and go to see your System Dynamics Modeler diagram in
action.
You see a plot of the populations that looks like this:
System Dynamics Guide
181
NetLogo 4.1.3 User Manual
182
System Dynamics Guide
HubNet Guide
This section of the User Manual introduces the HubNet system and includes instructions to set up
and run a HubNet activity.
HubNet is a technology that lets you use NetLogo to run participatory simulations in the classroom.
In a participatory simulation, a whole class takes part in enacting the behavior of a system as each
student controls a part of the system by using an individual device, such as a networked computer
or Texas Instruments graphing calculator.
For example, in the Gridlock simulation, each student controls a traffic light in a simulated city. The
class as a whole tries to make traffic flow efficiently through the city. As the simulation runs, data is
collected which can afterwards be analyzed on a computer or calculator.
For more information on participatory simulations and their learning potential, please visit the
Participatory Simulations Project web site.
Understanding HubNet
NetLogo
NetLogo is a programmable modeling environment. It comes with a large library of existing
simulations, both participatory and traditional, that you can use and modify. Content areas include
social science and economics, biology and medicine, physics and chemistry, and mathematics and
computer science. You and your students can also use it to build your own simulations.
In traditional NetLogo simulations, the simulation runs according to rules that the simulation author
specifies. HubNet adds a new dimension to NetLogo by letting simulations run not just according to
rules, but by direct human participation.
Since HubNet builds upon NetLogo, we recommend that before trying HubNet for the first time, you
become familiar with the basics of NetLogo. To get started using NetLogo models, see Tutorial #1:
Running Models in the NetLogo Users Manual.
HubNet Architecture
HubNet simulations are based on a client-server architecture. The activity leader uses the NetLogo
application to run a HubNet activity. When NetLogo is running a HubNet activity, we refer to it as a
HubNet server. Participants use a client application to log in and interact with the HubNet server.
There are two types of HubNet available. With Computer HubNet, participants run the HubNet
Client application on computers connected by a regular computer network or they use a Java applet
in a web browser. In Calculator HubNet, created in conjunction with Texas Instruments, participants
use Texas Instruments graphing calculators as clients which communicate via the TI-Navigator
system.
We hope to add support for other types of clients such as cell phones and PDA's (Personal Digital
Assistants).
HubNet Guide
183
NetLogo 4.1.3 User Manual
Computer HubNet
Activities
The following activities are available in the Models Library, in the Computer HubNet Activities folder.
Information on how to run the models and activities can be found in the Information Tab of each
model. Additional discussion of educational goals and ways to incorporate many of the activities into
your classroom in the Participatory Simulations Guide on the Participatory Simulations Project web
site.
• Bug Hunters Camouflage - students hunt bugs and camouflaging emerges.
• Dice Stalagmite HubNet - students roll dice and explore the space of dependent and
independent events.
• Disease - A disease spreads through the simulated population of students.
• Disease Doctors - A slight modification to the Disease activity where some students can
recover from the disease.
• Gridlock - Students use traffic lights to control the flow of traffic through a city.
• Polling - Ask students questions and plot their answers.
• Root Beer Game - An adaptation of a popular game created at MIT in the early 1960s that
shows how small delays in a distribution system can create big problems.
• Sampler - Students engage in statistical analysis as individuals and as a classroom.
Through these activities, students discover the meaning and use of basic concepts in
statistics.
• Tragedy of the Commons - Students work as farmers sharing a common resource.
Clients
There are two ways to use the client with computer HubNet, through the client application and as a
Java applet. To use the client application you simply need to launch the HubNet client application
that is bundled with NetLogo. To use the applet you will need to save the client as an applet and put
it on a web server, more detailed instructions can be found in the applets section.
Requirements
To use Computer HubNet, you need a networked computer with NetLogo installed for the server.
When using the client application you will also need a networked computer with NetLogo installed
for each participant. When using in classroom settings we also suggest an attached projector for the
leader to project the entire simulation to the participants. When using client applets you will need to
be running a web server on the same machine that you are running the HubNet server in NetLogo.
Starting an activity
You'll find the HubNet activities in NetLogo's Models Library, in the HubNet Computer Activities
folder. We suggest doing a few practice runs of an activity before trying it in front of a class.
184
HubNet Guide
NetLogo 4.1.3 User Manual
Open a Computer HubNet model. NetLogo will prompt you to enter the name of your new HubNet
session. This is the name that participants will use to identify this activity. Enter a name and press
Start.
NetLogo will open the HubNet Control Center, which lets you interact with the HubNet server.
You, as the leader, should then notify everyone that they may join. To join the activity, participants
launch the HubNet Client application and enter their name. They should see your activity listed and
can join your activity by selecting it and pressing Enter. If the activity you started is not listed the
student can enter the server address manually which can be found in the HubNet Control Center.
HubNet Control Center
The HubNet Control Center lets you interact with the HubNet server. It displays the name, activity,
address and port number of your server. The "Mirror 2D View on clients" checkbox controls whether
the HubNet participants can see the view on their clients, assuming there is a view in the client
setup. The "Mirror plots on clients" checkbox controls whether participants will receive plot
information.
HubNet Guide
185
NetLogo 4.1.3 User Manual
The client list on the right displays the names of clients that are currently connected to you activity.
To remove a participant from the activity, select their name in the list and press the Kick button. To
launch your own HubNet client press the Local button, this is particularly useful when you are
debugging an activity. The "Reset" button kicks out all currently logged in clients and reloads the
client interface.
The lower part of the Control Center displays messages when a participant joins or leaves the
activity. To broadcast a message to all the participants, click on the field at the bottom, type your
message and press Broadcast Message.
Client Applets
Client applets use the same client interface as the clients run in the HubNet application. Client
applets and clients run through the HubNet application can be used at the same time in the same
activity. In order to use a client applet you first have to save the client interface as an applet. You
can do so by pressing the "Save Client As Applet..." button in the HubNet Client Editor toolbar.
To access the client over the Internet you need to put the generated html file and HubNet.jar (you
do not need the model file) somewhere that is web accessible on the machine that you intend to run
the server on. You must run the server on the same computer as you host the client applet or the
client applet will not be able to connect to the server due to security restrictions.
Troubleshooting
I started a HubNet activity, but when participants open a HubNet Client, my activity isn't
listed.
On some networks, the HubNet Client cannot automatically detect a HubNet server. Tell your
participants to manually enter the server address and port of your HubNet server, which appear in
the HubNet Control Center.
Note: The technical details on this are as follows. In order for the client to detect the server,
multicast routing must be available between them. Not all networks support multicast routing. In
particular, networks that use the IPsec protocol typically do not support multicast. The IPsec
protocol is used on many virtual private networks (VPNs).
When a participant tries to connect to an activity, nothing happens (the client appears to
hang or gives an error saying that no server was found).
If your computer or network has a firewall, it may be impeding the HubNet server from
communicating. Make sure that your computer and network are not blocking ports used by the
HubNet server (ports 9173-9180).
The view on the HubNet client is grey.
• Verify that the "Mirror 2D view on clients" checkbox in the HubNet Control Center is
selected.
186
HubNet Guide
NetLogo 4.1.3 User Manual
• Make sure that the display switch in the model is on.
• If you have made changes to the size of the view on the server you may need to press the
"Reset" button in the Control Center to ensure the clients get the new size.
There is no view on the HubNet client.
Some activities don't have a view on the client. If you want to add a view simply select "HubNet
Client Editor" from the Tools Menu and add a view like any other widget. Make sure to press the
"Reset" button before having clients log in.
I can't quit a HubNet client.
You will have to force the client to quit. On OS X, force quit the application by selecting Force Quit...
in the Apple menu. On Windows, press Ctrl-Alt-Delete to open the Task Manager, select HubNet
Client and press End Task.
My computer went to sleep while running a HubNet activity. When I woke the computer up, I
got an error and HubNet wouldn't work anymore.
The HubNet server may stop working if the computer goes to sleep. If this happens, quit the
NetLogo application and start over. Change the settings on your computer so it won't sleep again.
My problem is not addressed on this page.
Please send us an email at [email protected].
Known Limitations
If HubNet malfunctions, please send us an email at [email protected].
Please note that:
• HubNet has not yet been extensively tested with large numbers of clients (i.e. more than
about 25). Unexpected results may occur with more clients.
• Out-of-memory conditions are not handled gracefully
• Sending large amounts of plotting messages to the clients can take a long time.
• NetLogo does not handle malicious clients in a robust manner (in other words, it is likely
vulnerable to denial-of-service type attacks).
• Performance does not degrade gracefully over slow or unreliable network connections.
• If you are on a wireless network or sub-LAN, the IP address in the HubNet Control Center is
not always the entire IP address of the server.
• Computer HubNet has only been tested on LANs, and not on dial-up connections or WANs.
Calculator HubNet
Calculator HubNet for TI-Navigator
The TI-Navigator Classroom Learning System is a wireless classroom network for TI graphing
calculators. TI-Navigator users can install a free NetLogo extension, which integrates with
TI-Navigator and allows the calculators to act as clients for participatory simulations like the ones
HubNet Guide
187
NetLogo 4.1.3 User Manual
that are available for Computer HubNet. The Calculator HubNet extension is available from Inquire
Learning, LLC, in collaboration with Texas Instruments. Inquire Learning also offers support,
curricular materials, and professional development for the Calculator HubNet system. For more
information on the TI-Navigator system itself, please visit the Texas Instruments web site, at
http://education.ti.com/navigator. For more information on the Calculator HubNet extension for
TI-Navigator, please contact Inquire Learning, at [email protected], or visit
http://www.inquirelearning.com/calc-hubnet.html.
Teacher workshops
For information on upcoming workshops and NetLogo and HubNet use in the classroom, please
contact us at [email protected].
HubNet Authoring Guide
To learn about authoring or modifying HubNet activities, see the HubNet Authoring Guide.
Getting help
If you have any questions about Computer HubNet or Calculator HubNet, or need help getting
started, please email us at [email protected].
188
HubNet Guide
HubNet Authoring Guide
This guide shows how to understand and modify the code of existing HubNet activities and write
your own new ones. It assumes you are familiar with running HubNet activities, basic NetLogo code
and NetLogo interface elements. For more general information about HubNet see the HubNet
Guide.
• Coding HubNet activities
♦ Setup
♦ Receiving information from clients
♦ Sending information to clients
♦ Examples
• How to make a client interface
• View updates on the clients
• Clicking in the view on clients
• Customizing the client's view
• Plot updates on the clients
Coding HubNet activities
Many HubNet activities will share bits of the same code. That is the code that it used to setup the
network and the code that is used to receive information from and send information to the clients. If
you understand this code you should be able to easily make modifications to existing activities and
you should have a good start on writing your own activities. To get you started we have provided a
Template model (in HubNet Computer Activities -> Code Examples) that contains the most basic
components that will be in the majority of HubNet activities. You should be able to use this activity
as a starting point for most projects.
Code Example: Template
Setup
To make a NetLogo model into a HubNet activity you must first initialize the network. In most
HubNet activities you will use the startup procedure to initialize the network Startup is a special
procedure, NetLogo will try to run the startup procedure when you open any model. That makes it
a good place to put code that you want to run once and only once (no matter how many times the
user runs the model). For HubNet we put the commands that initialize the network in startup
because once the network is setup we don't need to do so again. First specify the type of clients
using hubnet-set-client-interface, in this case we will be using computer clients:
hubnet-set-client-interface "COMPUTER" []
Then initialize the system using hubnet-reset, which will ask the user for a session name and
open up the HubNet Control Center. NetLogo is now ready to start listening for client messages.
Now that the network is all setup you don't need to worry about calling
hubnet-set-client-interface or hubnet-reset again. Take a look at the setup procedure
in the template model:
HubNet Authoring Guide
189
NetLogo 4.1.3 User Manual
to setup
cp
cd
clear-output
ask turtles
[
set step-size 1
hubnet-send user-id "step-size" step-size
]
end
For the most part it looks like most other setup procedures, however, you should notice that it does
not call clear-all. In this model, and in the great majority of HubNet activities in the Models
Library, we have a breed of turtles that represent the currently logged in clients. In this case we've
called this breed students. Whenever a client logs in we create a student and record any
information we might need later about that client in a turtle variable. Since we don't want to require
users to log out and log back in every time we setup the activity we don't want to kill all the turtles,
instead, we want to set all the variables back to initial values and notify the clients of any changes
we make (more on that later).
Receiving messages from clients
During the activity you will be transferring data between the HubNet clients and the server. Most
HubNet activities will call a procedure in the go loop that checks for new messages from clients in
this case it's called listen clients:
to listen-clients
while [ hubnet-message-waiting? ]
[
hubnet-fetch-message
ifelse hubnet-enter-message?
[ create-new-student ]
[
ifelse hubnet-exit-message?
[ remove-student ]
[ execute-command hubnet-message-tag ]
]
]
end
As long as there are messages in the queue this loop fetches each message one at a time.
hubnet-fetch-message makes the next message in the queue the current message and sets
the reporters hubnet-message-source, hubnet-message-tag, and hubnet-message to the
appropriate values. The clients send messages when the users login and logout any time the user
manipulates one of the interface elements, that is, pushes a button, moves a slider, clicks in the
view, etc. We step through each message and decide what action to take depending on the type of
message (enter, exit, or other), the hubnet-message-tag (the name of the interface element),
and the hubnet-message-source of the message (the name of the client the message came
from).
On an enter message we create a turtle with a user-id that matches the
hubnet-message-source which is the name that each user enters upon entering the activity, it is
guaranteed to be unique.
to create-new-student
190
HubNet Authoring Guide
NetLogo 4.1.3 User Manual
create-students 1
[
set user-id hubnet-message-source
set label user-id
set step-size 1
send-info-to-clients
]
end
At this point we set any other client variables to default values and send them to the clients if
appropriate. We declared a students-own variable for every interface element on the client that
holds state, that is, anything that would be a global variable on the server, sliders, choosers,
switches and input boxes. It is important to make sure that these variables stay synchronized with
the values visible on the client.
When the clients logout they send an exit message to the server which gives you a chance to clean
up any information you have been storing about the client, in this case we merely have to ask the
appropriate turtle to die.
to remove-student
ask students with [user-id = hubnet-message-source]
[ die ]
end
All other messages are interface elements identified by the hubnet-message-tag which is the
name that appears in the client interface. Every time an interface element changes a message is
sent to the server. Unless you store the state of the values currently displayed in the client interface
will not be accessible in other parts of the model. That's why we've declared a students-own
variable for every interface element that has a state (sliders, switches, etc). When we receive the
message from the client we set the turtle variable to the content of the message:
if hubnet-message-tag = "step-size"
[
ask students with [user-id = hubnet-message-source]
[ set step-size hubnet-message ]
]
Since buttons don't have any associated data there is generally no associated turtle variable,
instead they indicate an action taken by the client, just as with a regular button there is often
procedure associated with each button that you call whenever you receive a message indicating the
button has been pressed. Though it is certainly not required, the procedure is often a turtle
procedure, that is, something that the student turtle associated with the message source can
execute:
if command = "move left"
[ set heading 270
fd 1 ]
Sending messages to clients
As mentioned earlier you can also send values to any interface elements that display information:
monitors, sliders, switches, choosers, and input boxes (note that plots and the view are special
cases that have their own sections).
HubNet Authoring Guide
191
NetLogo 4.1.3 User Manual
There are two primitives that allow you to send information hubnet-send and
hubnet-broadcast. Broadcast sends the information to all the clients; send sends to one client,
or a selected group.
As suggested earlier, nothing on the client updates automatically. If a value changes on the server,
it is your responsibility as the activity author to update monitors on the client.
For example, say you have a slider on the client called step-size and a monitor called Step Size
(note that the names must be different) you might write updating code like this:
if hubnet-message-tag = "step-size"
[
ask student with [ user-id = hubnet-message-source ]
[
set step-size hubnet-message
hubnet-send user-id "Step Size" step-size
]
]
You can send any type of data you want, numbers, strings, lists, lists of lists, lists of strings,
however, if the data is not appropriate for the receiving interface element (say, if you were to send a
string to a slider) the message will be ignored. Here are a few code examples for different types of
data:
data type
hubnet-broadcast example
number
hubnet-broadcast "A" 3.14
hubnet-broadcast "STR1" "HI
string
THERE"
list of
hubnet-broadcast "L2" [1 2
numbers
3]
matrix of
hubnet-broadcast "[A]" [[1
numbers
2] [3 4]]
hubnet-broadcast
list of
"user-names" [["jimmy"
strings
"susie"] ["bob" "george"]]
hubnet-send example
hubnet-send "jimmy" "A" 3.14
hubnet-send ["12" "15"] "STR1" "HI
THERE"
hubnet-send hubnet-message-source
"L2" [1 2 3]
hubnet-send "susie" "[A]" [[1 2]
[3 4]]
hubnet-send "teacher" "user-names"
[["jimmy" "susie"] ["bob"
"george"]]
Examples
Study the models in the "HubNet Computer Activities" section of the Models Library to see how
these primitives are used in practice in the Procedures window. Disease is a good one to start with.
How to make a client interface
Open the HubNet Client Editor, found in the Tools Menu. Add any buttons, sliders, switches,
monitors, plots, choosers, or notes that you want just as you would in the interface tab. You'll notice
that the information you enter for each of the widgets is slightly different than in the Interface panel.
Widgets on the client don't interact with the model in the same way. Instead of a direct link to
commands and reporters the widgets send messages back to the server and the model then
determines how those messages affect the model. All widgets on the client have a tag which is a
name that uniquely identifies the widget. When the server receives a message from that widget the
tag is found in hubnet-message-tag
192
HubNet Authoring Guide
NetLogo 4.1.3 User Manual
For example, if you have a button called "move left", a slider called "step-size", a switch called
"all-in-one-step?", and a monitor called "Location:", the tags for these interface elements will be as
follows:
interface element
tag
move left
move left
step-size
step-size
all-in-one-step?
all-in-one-step?
Location:
Location:
Note that you can only have one interface element with a specific name. Having more than one
interface element with the same tag in the client interface will result in unpredictable behavior since
it is not clear which element you intended to send the information to.
View updates on the clients
View mirroring lets views of the world be displayed in clients as well on the server. View mirroring is
enabled using a checkbox in the HubNet Control Center.
When mirroring is enabled, client views update whenever the view on the server does. To avoid
excessive network traffic, the view should not update more often than necessary. Therefore we
strongly recommend using tick-based updates, rather than continuous updates. See the View
Updates section of the Programming Guide for an explanation of the two types of updates.
With tick-based updates, updates happen when a tick or display command runs. We
recommend using these commands only inside an every block, to limit the frequency of view
updates and thus also limit network traffic. For example:
every 0.1
[
display
]
If there is no View in the clients or if the Mirror 2D View on Clients checkbox in the HubNet Control
Center is not checked, then no view updates are sent to the clients.
Clicking in the view on clients
If the View is included in the client, two messages are sent to the server every time the user clicks in
the view. The first message, when the user presses the mouse button, has the tag "View". The
second message, sent when the user releases the mouse button, has the tag "Mouse Up". Both
messages consist of a two item list of the x and y coordinates. For example, to turn any patch that
was clicked on by the client red, you would use the following NetLogo code:
if hubnet-message-tag = "View"
[
ask patches with [ pxcor = (round item 0 hubnet-message) and
pycor = (round item 1 hubnet-message) ]
[ set pcolor red ]
]
HubNet Authoring Guide
193
NetLogo 4.1.3 User Manual
Customizing the client's view
When view mirroring is enabled, by default clients see the same view the activity leader sees on the
server. But you can change this so that each client sees something different, not just a literal
"mirror".
You can change what a client sees in two distinct ways. We call them "client perspectives" and
"client overrides".
Changing a client's perspective means making it "watch" or "follow" a particular agent, much like the
watch and follow commands that work with ordinary NetLogo models. See the dictionary entries
for hubnet-send-watch, hubnet-send-follow, and hubnet-reset-perspective.
Code Example: Client Perspective Example
Client overrides let you change the appearance of patches, turtles, and links in the client views. You
can override any of the variables affecting an agent's appearance, including the hidden? variable
causing a turtle or link to be visible or invisible. See the dictionary entries for
hubnet-send-override, hubnet-clear-override, and hubnet-clear-overrides.
Code Example: Client Overrides Example
Plot updates on the clients
If plot mirroring is enabled (in the HubNet Control Center) and a plot in the NetLogo model changes
and a plot with the exact same name exists on the clients, a message with that change is sent to the
clients causing the client's plot to make the same change. For example, let's pretend there is a
HubNet model that has a plot called Milk Supply in NetLogo and the clients. Milk Supply is the
current plot in NetLogo and in the Command Center you type:
plot 5
This will cause a message to be sent to all the clients telling them that they need to plot a point with
a y value of 5 in the next position of the plot. Notice, if you are doing a lot of plotting all at once, this
can generate a lot of plotting messages to be sent to the clients.
194
HubNet Authoring Guide
Logging
NetLogo's logging facility allows researchers to record students' actions for later analysis.
Logging in NetLogo, once initiated, is invisible to the user. The researcher can choose the type of
events logged through a configuration file.
NetLogo uses the Log4j package for logging. If you have previous experience with this package
you'll find logging in NetLogo familiar.
Logging is only supported in the special NetLogo Logging application; it doesn't work in applets.
Starting logging
This depends on what operating system you are using.
Mac OS X or Windows
There is a special logging launcher in the NetLogo directory called NetLogo Logging. Double click
on the icon.
On Windows, the NetLogo directory can be found at C:\Program Files, unless you chose a
different location when you installed NetLogo.
Linux and others
To enable logging, invoke the netlogo.sh script as follows:
netlogo.sh --logging netlogo_logging.xml
You could also modify the script to include these flags, or copy the script and modify the copy.
You can replace netlogo_logging.xml with any valid log4j xml configuration file, which will be
discussed in more detail later.
Using logging
When NetLogo starts up it will ask for a user name. This name will appear in all the logs generated
during this session.
Where logs are stored
Logs are stored in the OS-specific temp directory. On most Unix-like systems that is /tmp. On
Windows XP, logs can be found in c:\Documents and Settings\<user>\Local
Settings\Temp, where <user> is the logged in user and on Windows Vista the logs can be found
in c:\Users\<user>\AppData\Local\Temp. On Mac OS 10.5 the temp directory varies for
each user, you can determine your temp directory by opening the Terminal application and typing
Logging
195
NetLogo 4.1.3 User Manual
echo $TMPDIR at the prompt. On Mac OS prior to 10.5 the temp directory is the same as on other
Linux-like systems /tmp.
There are two convenience commands that will help you manage the logs. __zip-log-files
filename will gather all the logs in the temp directory and put them in one zip file, at the location
specified. After doing __zip-log-files the existing logs are not deleted, you can do so explicitly
by using __delete-log-files.
The following is a chart describing the name of the loggers available, the type of events each logs,
at what level, and provides a sample output using the XMLLayout. All the loggers are found in
org.nlogo.log.Logger. When referring to the loggers in the configuration file you should use
the fully qualified name. So, for example, the logger GLOBALS would actually be
org.nlogo.log.Logger.GLOBALS
Logger
GLOBALS
Events
a global variable
changes
GREENS
sliders, switches,
choosers, input
boxes are
changed through
the interface
CODE
code is compiled,
including:
command center,
procedures tab,
slider bounds,
and buttons
WIDGETS
BUTTONS
196
Level
Example
info,
debug
<event logger="org.nlogo.log.Logger.GLOBALS"
timestamp="1177341065988"
level="INFO"
type="globals">
<name>FOO</name>
<value>51.0</value>
</event>
info
<event logger="org.nlogo.log.Logger.GREENS"
timestamp="1177341065988"
level="INFO"
type="slider">
<action>changed</action>
<name>foo</name>
<value>51.0</value>
<parameters>
<min>0.0</min>
<max>100.0</max>
<inc>1.0</inc>
</parameters>
</event>
info
<event logger="org.nlogo.log.Logger.CODE"
timestamp="1177341072208"
level="INFO"
type="command center">
<action>compiled</action>
<code>crt 1</code>
<agentType>O</agentType>
<errorMessage>success</errorMessage>
</event>
a widget is added
or removed from info
the interface
<event logger="org.nlogo.log.Logger.WIDGETS"
timestamp="1177341058351"
level="INFO"
type="slider">
<name></name>
<action>added</action>
</event>
a button is
pressed or
<event logger="org.nlogo.log.Logger.BUTTONS"
timestamp="1177341053679"
level="INFO"
info
Logging
NetLogo 4.1.3 User Manual
released
SPEED_SLIDER
TURTLES
the speed slider
changes
turtles die or are
born
type="button">
<name>show 1</name>
<action>released</action>
<releaseType>once</releaseType>
</event>
info
<event logger="org.nlogo.log.Logger.SPEED"
timestamp="1177341042202"
level="INFO"
type="speed">
<value>0.0</value>
</event>
info
<event logger="org.nlogo.log.Logger.TURTLES"
timestamp="1177341094342"
level="INFO"
type="turtle">
<name>turtle 1</name>
<action>born</action>
<breed>TURTLES</breed>
</event>
How to configure the logging output
The default logging configuration (netlogo_logging.xml) looks something like this:
NetLogo defines 8 loggers, all descend directly from the root logger, which means unless you
explicitly set the properties (appender, layout, and output level) in the configuration they will inherit
them from the root. In the default configuration the root is set to level INFO, the appender is
org.nlogo.log.XMLFileAppender and layout is org.nlogo.log.XMLLayout. Together these generate a
nicely formatted XML file as defined in the netlogo_logging.dtd which is based on the log4j dtd. If
the appender is a FileAppender (including the XMLFileAppender) a new file is start each time the
user opens a model.
<?xml version="1.0" encoding="UTF-8" ?>
<!DOCTYPE log4j:configuration SYSTEM "log4j.dtd">
<log4j:configuration debug="false" xmlns:log4j='http://jakarta.apache.org/log4j/'>
<appender name="A1" class="org.nlogo.log.XMLFileAppender">
<layout class="org.nlogo.log.XMLLayout"/>
</appender>
<category name="org.nlogo.log.Logger.WIDGETS">
<priority value="off" />
</category>
<category name="org.nlogo.log.Logger.TURTLES">
<priority value="off" />
</category>
<category name="org.nlogo.log.Logger.LINKS">
<priority value="off" />
</category>
<root>
<priority value ="info" />
<appender-ref ref="A1" />
</root>
Logging
197
NetLogo 4.1.3 User Manual
</log4j:configuration>
This configuration, first defines an appender named "A1" of type XMLFileAppender with an
XMLLayout. The appender defines where the logging data goes, in this case the data goes into a
file. In fact, if NetLogo is given a FileAppender it will automatically start a new file every time the
user opens a new model. The XMLFileAppender also does some formatting and writes the
appropriate headers to the file. The layout defines how to write each individual message. Unless
you are an advanced user there is no need change (or worry about) the appender or the layout.
At the end of the configuration notice the definition of the root logger. All of the other loggers
descend from the root logger and, thus, inherit the properties of the root unless explicitly set. This
case is fairly simple, having set up the appender A1 we make that the default appender for the root
(and all other loggers) and make the default priority "INFO". Messages that are logged at the INFO
level or higher will be written, messages logged at lower levels will not. Note that with only one
exception NetLogo always logs at level INFO. Sets to globals that don't change the value of the
global are logged at level DEBUG. Which means that these messages are disabled by default,
since debug is lower level than info. The rest of the body of the configuration file overrides
properties of the root logger in a few specific loggers (or categories as they are known in the
configuration file, the terms can be assumed to be synonymous for the proposes of this document).
That is it turns off the WIDGET, TURTLES, and LINKS loggers, by default. To re-enable them you
can changes the priority from off to info, like this:
<category name="org.nlogo.log.Logger.TURTLES">
<priority value="info" />
</category>
or you can simply remove the entire reference to the category from the configuration file, as it is not
serving any other purpose.
Advanced Configuration
This is only a basic introduction to configuration files for logging in NetLogo. There are many more
configuration options available through the log4j framework. See the log4j documentation.
198
Logging
Controlling Guide
NetLogo can be invoked and controlled by another program running on the Java Virtual Machine.
For example, you might want to call NetLogo from a small program that does something simple like
automate a series of model runs. Or, you might want to embed NetLogo models in a larger
application.
This section of the User Manual introduces this facility for Java programmers. We'll assume that you
know the Java language and related tools and practices. But note that our API's are also usable
from other languages for the Java Virtual Machine, such as Scala, Clojure, Groovy, JRuby, Jython,
etc.
Note: The controlling facility is considered "experimental". It is likely to continue to change and
grow. Code you write now that uses it may need changes in order to continue to work in future
NetLogo versions.
• Starting a Java VM for NetLogo
• Example (with GUI)
• Example (headless)
• Example (embedding)
• Conclusion
The NetLogo API Specification contains further details.
Starting a Java VM for NetLogo
NetLogo makes several assumptions about the Java VM that it is running in, and therefore there are
arguments which should be given to the VM at startup.
Recommended options for both GUI and headless
-server
Use server VM for highest performance.
-Xmx1024m
Use up to 1 gigabyte of memory for Java VM heap. You may need to grow this number in
order to run some models.
Additional recommended options for GUI only
-XX:MaxPermSize=128m
Prevent the VM from running out of memory when repeatedly compiling a model with very
long code.
-Djava.ext.dir=
Ignore any existing native libraries on the system. This avoids conflicts with other versions of
JOGL. You may need to leave this option out, or modify it to point to your native libraries if
you are using Java VM extensions.
-Djava.library.path=./lib
Not needed on Mac or Windows; may be needed on other OS's such as Linux. Ensures
NetLogo can find native libraries for JOGL and other extensions. If you are not starting the
Controlling Guide
199
NetLogo 4.1.3 User Manual
VM in the top-level NetLogo directory, then ./lib should be changed to point to the lib
subdirectory of the NetLogo installation.
Current working directory
The NetLogo application assumes that the current working directory at startup time is the top level
of the NetLogo installation.
Example (with GUI)
Here is a small but complete program that starts the full NetLogo application, opens a model, moves
a slider, sets the random seed, runs the model for 50 ticks, and then prints a result:
import org.nlogo.app.App;
public class Example1 {
public static void main(String[] argv) {
App.main(argv);
try {
java.awt.EventQueue.invokeAndWait
( new Runnable()
{ public void run() {
try {
App.app.open
("models/Sample Models/Earth Science/"
+ "Fire.nlogo");
}
catch( java.io.IOException ex ) {
ex.printStackTrace();
}
} } );
App.app.command("set density 62");
App.app.command("random-seed 0");
App.app.command("setup");
App.app.command("repeat 50 [ go ]");
System.out.println
(App.app.report("burned-trees"));
}
catch(Exception ex) {
ex.printStackTrace();
}
}
}
The equivalent code in Scala:
import java.awt.EventQueue
import org.nlogo.app.App
object Example1 {
def main(args:Array[String]) {
App.main(args)
wait {
App.app.open("models/Sample Models/Earth Science/Fire.nlogo")
}
App.app.command("set density 62")
App.app.command("random-seed 0")
App.app.command("setup")
App.app.command("repeat 50 [ go ]")
println(App.app.report("burned-trees"))
200
Controlling Guide
NetLogo 4.1.3 User Manual
}
def wait(block: =>Unit) {
EventQueue.invokeAndWait(
new Runnable() { def run() { block } } ) }
}
In order to compile and run this, NetLogo.jar (from the NetLogo distribution) must be in the
classpath. In addition, the lib directory (also from the NetLogo distribution) must be in same
location; it contains additional libraries used by NetLogo.jar.
If you are using Scala, you'll need to make sure you are using exactly the right version of Scala. In
order to run NetLogo in the same class loader with your own Scala code, you must use the specific
Scala build dated 2009-04-16, revision r17517, available here: scala-2.8.0.r17517.zip. We apologize
for the inconvenience of requiring this particular Scala version; in a future version of NetLogo, we
plan to require the final released version of Scala 2.8.0 instead, once it becomes available. (Note
that if you are a JVM wizard, you may actually be able to run your own Scala code using a different
Scala version than NetLogo requires, by using the two Scala versions in different class loaders. At
least, we don't know of a reason why this wouldn't work.)
Note the use of EventQueue.invokeAndWait to ensure that a method is called from the right
thread. This is because most of the methods on the App class may only be called some certain
threads. Most of the methods may only be called from the AWT event queue thread; but a few
methods, such as main() and commmand(), may only be called from threads other than the AWT
event queue thread (such as, in this example, the main thread).
Rather than continuing to discuss this example in full detail, we refer you to the NetLogo API
Specification, which documents all of the ins and outs of the classes and methods used above.
Additional methods are available as well.
Example (headless)
The example code in this case is very similar to the previous example, but with methods on an
instance of the HeadlessWorkspace class substituted for static methods on App.
import org.nlogo.headless.HeadlessWorkspace;
public class Example2 {
public static void main(String[] argv) {
HeadlessWorkspace workspace =
HeadlessWorkspace.newInstance() ;
try {
workspace.open
("models/Sample Models/Earth Science/"
+ "Fire.nlogo");
workspace.command("set density 62");
workspace.command("random-seed 0");
workspace.command("setup");
workspace.command("repeat 50 [ go ]") ;
System.out.println
(workspace.report("burned-trees"));
workspace.dispose();
}
catch(Exception ex) {
ex.printStackTrace();
}
}
Controlling Guide
201
NetLogo 4.1.3 User Manual
}
The equivalent code in Scala:
import org.nlogo.headless.HeadlessWorkspace
object Example2 {
def main(args:Array[String]) {
val workspace = HeadlessWorkspace.newInstance
workspace.open(
"models/Sample Models/Earth Science/Fire.nlogo")
workspace.command("set density 62")
workspace.command("random-seed 0")
workspace.command("setup")
workspace.command("repeat 50 [ go ]")
println(workspace.report("burned-trees"))
workspace.dispose()
}
}
In order to compile and run this, NetLogo.jar must be in your classpath. The lib directory,
containing additional required libraries, must also be present. When running in a context that does
not support a graphical display, the system property java.awt.headless must be true, to force
the VM to run in headless mode.
Since there is no GUI, NetLogo primitives which send output to the command center or output area
now go to standard output instead. export-world can still be used to save the model's state.
export-view works for writing an image file with a snapshot of the (otherwise invisible) 2D view.
The report() method is useful for getting results out of the model and into your extension code.
The files generated by export-world include the contents of all plots. You can also export the
contents of plots individually using export-plot.
You can make multiple instances of HeadlessWorkspace and they will operate independently on
separate threads without interfering with each other.
When running headless, there are some restrictions:
• The movie-* primitives are not available; trying to use them will cause an exception.
• user-* primitives which query the user for input, such as user-yes-or-no will cause an
exception.
The NetLogo API Specification contains further details.
In order to run 3D headless you must make sure that the org.nlogo.is3D property is set, you
can either do this by starting Java with the -Dorg.nlogo.is3d=true option, or you can set it
from within Java by using System.setProperty as follows:
public static void main( String [] args )
{
org.nlogo.awt.Utils.invokeLater
( new Runnable() {
public void run() {
System.setProperty( "org.nlogo.is3d" , "true" ) ;
HeadlessWorkspace workspace =
HeadlessWorkspace.newInstance() ;
202
Controlling Guide
NetLogo 4.1.3 User Manual
try {
workspace.open
("models/3D/Sample Models/"
+ "DLA 3D.nlogo");
workspace.command("set wiggle-angle 70");
workspace.command("random-seed 0");
workspace.command("setup");
workspace.command("repeat 50 [ go ]") ;
System.out.println(workspace.report("count patches with [pcolor = green]"));
workspace.dispose();
}
catch(Exception ex) {
ex.printStackTrace();
}
} } ) ;
}
Note that org.nlogo.is3D must be set before creating the workspace.
Example (embedding)
When your program controls NetLogo using the App class, the entire NetLogo application is
present, including tabs, menubar, and so forth. This arrangement is suitable for controlling or
"scripting" NetLogo, but not ideal for embedding a NetLogo model in a larger application.
We also have a distinct but similar API which allows embedding only the interface tab, not the whole
window, in another application. To access this functionality use the
org.nlogo.lite.InterfaceComponent class, which extends javax.swing.JPanel. You
can use the embedded component much the same way that you use App's static methods. Here is
the App example converted to use InterfaceComponent:
import org.nlogo.lite.InterfaceComponent;
public class Example3 {
public static void main(String[] argv) {
try
{
final javax.swing.JFrame frame = new javax.swing.JFrame();
final InterfaceComponent comp = new InterfaceComponent(frame);
java.awt.EventQueue.invokeAndWait
( new Runnable()
{ public void run() {
frame.setSize(1000,700);
frame.add(comp);
frame.setVisible(true);
try {
comp.open
("models/Sample Models/Earth Science/"
+ "Fire.nlogo");
}
catch(Exception ex) {
ex.printStackTrace();
}
} } ) ;
comp.command("set density 62");
comp.command("random-seed 0");
comp.command("setup");
comp.command("repeat 50 [ go ]");
System.out.println(comp.report("burned-trees"));
Controlling Guide
203
NetLogo 4.1.3 User Manual
}
catch(Exception ex) {
ex.printStackTrace();
}
}
}
The equivalent code in Scala:
import org.nlogo.lite.InterfaceComponent
object Example3 {
def main(args:Array[String]) {
val frame = new javax.swing.JFrame
val comp = new InterfaceComponent(frame)
wait {
frame.setSize(1000,700)
frame.add(comp)
frame.setVisible(true)
comp.open(
"models/Sample Models/Earth Science/Fire.nlogo")
}
comp.command("set density 62")
comp.command("random-seed 0")
comp.command("setup")
comp.command("repeat 50 [ go ]")
println(comp.report("burned-trees"))
}
def wait(block: =>Unit) {
java.awt.EventQueue.invokeAndWait(
new Runnable() { def run() { block } } ) }
}
The embedding API gives you a variety of model control features in addition to those provided in the
App class. You can simulate button presses, enable logging, create and hide widgets, and so on.
See the NetLogo API Specification for details.
To use the embedded component you must have NetLogo.jar in your classpath. If you want to use
logging you must also have the log4j jar from the lib directory in your classpath.
Conclusion
Don't forget to consult the NetLogo API Specification for full details on these classes and methods.
Some API facilities exist, but are not yet documented. So if you don't see the capability you want,
contact us; we may be able to help you do you what you want. Please do not hesitate to contact us
at [email protected] with questions, as we may be able to find a workaround or
provide additional guidance where our documentation is thin.
204
Controlling Guide
Mathematica Link
What is it?
The NetLogo-Mathematica link provides modelers with an easy to use, real-time link between
NetLogo and Mathematica. Together, these tools can provide users with a highly interactive,
self-documenting work flow that neither can provide alone.
Mathematica includes many of the tools that agent-based modelers rely on throughout the research
process: advanced import capabilities, statistical functions, data visualization, and document
creation. With the NetLogo-Mathematica link, you can run all of these tools side-by-side with
NetLogo.
Because all Mathematica documents, or notebooks, contain comments, code, images, annotations,
and interactive objects, the integration of NetLogo and Mathematica provides a more complete
solution for complex model exploration for students and researchers alike.
The basic functionality of the link is much like the NetLogo Controlling API: you can load models,
execute commands, and report back data from NetLogo. Unlike the Controlling API, which is based
on Java, all interactions with the link are interpreted, making it ideal not only for rapidly designing
custom BehaviorSpace-like experiments, but also as a companion to NetLogo in debugging your
model.
For more information about Mathematica, please visit the Wolfram Research web site.
What can I do with it?
Here are a few examples of what you can do with the Mathematica-NetLogo link.
• Analyze your model in real-time with seamless two-way data conversion
• Develop high quality, custom visualizations of model data
• Collect detailed simulation data across large multi-dimensional parameter spaces
• Rapidly develop interactive interfaces for exploring model behavior
• Have direct access to patches and network data with built-in functions
Installation
The NetLogo-Mathematica link requires Mathematica 6 or greater. (Mathematica 7 works.) To install
the NetLogo-Mathematica link:
• Go to the menu bar in Mathematica
• Click on File and select Install...
• In the Install Mathematica Item dialog
• Select Package for Type of item to install
• Click Source, and select From file...
• In the file browser, go to the location of your NetLogo installation,
• click on the Mathematica Link subfolder, and select NetLogo.m.
• For Install Name, enter NetLogo.
Mathematica Link
205
NetLogo 4.1.3 User Manual
You can either install the NetLogo link in your user base directory or in the system-wide directory. If
the NetLogo link is installed in the user base directory, other users on the system must also go
through the NetLogo-Mathematica link installation process to use it. This option might be preferable
if you do not have permission to modify files outside of your home directory. Otherwise, you can
install NetLogo-Mathematica link in the system-wide Mathematica base directory.
Usage
This section will very briefly introduce how to use the NetLogo-Mathematica Link. It will show you
how to load the NetLogo-Mathematica link package, start NetLogo, execute commands, and
retrieve data from NetLogo.
Loading the package: Once the NetLogo-Mathematica link is installed, you can load the package
by entering the following into your Mathematica notebook:
<<NetLogo`
Launching NetLogo from Mathematica: To begin your NetLogo session in Mathematica, type the
following into your notebook:
NLStart["your netlogo path"];
where "your netlogo path" is the directory that netlogo is located in. Typically on a Macintosh
computer this will be "/Applications/NetLogo 4.1/"
Loading a model: To load a model, you must specify the full path of the model. In this example we
will load the Forest Fire model, and the path will be given using the typical Macintosh install
location.
NLLoadModel["/Applications/NetLogo 4.1/models/Sample
Models/Earth Science/Fire.nlogo"];
Executing a NetLogo command: Commands can be executed by passing a string of commands
to NLCommand[]. The NLCommand[] function automatically splices common Mathematica data
types into strings suitable for NetLogo. The following commands set the density using a single
string, or set the density using a Mathematica defined variable, myDensity.
NLCommand["set density 50"];
myDensity = 60;
NLCommand["set density", myDensity];
Reporting information from NetLogo: NetLogo data can be reported back to Mathematica using
NLReport[]. This includes numbers, strings, boolean values, and lists.
NLReport["count turtles"];
206
Mathematica Link
NetLogo 4.1.3 User Manual
NLReport["[(list pxcor pycor)] of n-of 10 patches"]
For more information, see the NetLogo-Mathematica Tutorial notebook included with NetLogo. The
notebook walks you through the process of using the link, with many examples along the way. If you
do not have Mathematica, but are considering using the link, you can download a PDF of the
evaluated tutorial.
Known Issues
• A NetLogo session cannot be quit without exiting J/Link (the Java-Mathematica link) entirely.
This may disrupt other packages that make use of J/Link.
• If a model loaded with the NetLogo-Mathematica link uses a NetLogo extension, the
extension must be located in the same directory as the extension itself. If the extension is
located in NetLogo's application-wide extensions directory, it will not be found.
• Calls to NetLogo, such as NLCommand[] and NLReport[], cannot be aborted.
Credits
The primary developer of the NetLogo-Mathematica link was Eytan Bakshy.
To refer to this package in academic publications, please use: Bakshy, E., Wilensky, U. (2007).
NetLogo-Mathematica Link. http://ccl.northwestern.edu/netlogo/mathematica.html. Center for
Connected Learning and Computer-Based Modeling, Northwestern University, Evanston, IL.
Mathematica Link
207
NetLogo 4.1.3 User Manual
208
Mathematica Link
Introducing NetLogo 3D
NetLogo includes the NetLogo 3D application, a preview release that allows you to create 3D
worlds.
Caution! NetLogo's support for 3D is experimental. Models created with this release may not be
compatible with future versions. While we've made efforts to ensure a quality product, the preview
has not been subject to the same rigorous quality-control processes as 2D NetLogo.
• Introduction
• Tutorial
• FAQ
• Dictionary
Introduction
To get started using NetLogo 3D, launch the NetLogo 3D application and check out the Sample
Models in the 3D section of the Models Library. (On Windows, the NetLogo installer doesn't add a
NetLogo 3D shortcut to your Start menu. You'll find the NetLogo 3D icon in the folder where you
installed NetLogo, which is usually under Program Files.)
When you're ready to write your own 3D model, look at the Code Examples in the 3D section of the
Models Library. "Turtle Perspective Example 3D" helps you learn about the different perspectives.
"Turtle and Observer Motion Example 3D" helps you understand how turtles and the Observer
move in 3D. You can also step through this model with the tutorial below.
3D Worlds
An unspeakable horror seized me. There was a darkness; then a dizzy, sickening sensation of sight
that was not like seeing; I saw a Line that was no Line; Space that was not Space: I was myself,
and not myself. When I could find voice, I shrieked loud in agony, "Either this is madness or it is
Hell."
"It is neither," calmly replied the voice of the Sphere, "it is Knowledge; it is Three Dimensions: open
your eye once again and try to look steadily."
-- Edwin A. Abbott from Flatland: A romance in many dimensions
In 3D the NetLogo world has width, height and depth. In addition to pxcor and pycor, patches
have pzcor.
Turtles have three Cartesian coordinates, instead of two, to describe position. In addition to xcor
and ycor, turtles have zcor.
A turtle's orientation is defined by three turtle variables, heading, pitch and roll. You can
imagine the turtle as having two vectors to define its orientation in 3D space. One vector comes
straight out of the nose of the turtle, this is the direction the turtle will travel when it moves forward.
The second vector is perpendicular to the forward vector and comes out of the right side of the turtle
(as if the turtle were to stick its right arm straight out from its body). Heading is the angle between
the forward vector of the turtle projected onto the xy-plane and the vector [0 1 0]. Pitch is the angle
Introducing NetLogo 3D
209
NetLogo 4.1.3 User Manual
between the forward vector of the turtle and the xy-plane and finally roll is the angle between the
right vector of the turtle and the xy-plane. When turtle turns right or left in 3D space it rotates around
the down vector, that is the vector that is perpendicular to both the forward and right vectors.
Depending on the orientation of the turtle more than one of the internal turtle variables may change
as the result of a turn.
The Observer and the 3D view
The point of view that you see the world from is considered the location and orientation of the
observer. This is similar to the 3D view in NetLogo 2D. However, there are a few more ways to
control the observer. You can set the point that the observer is facing by using face and facexyz
which work the same way as the turtle commands, the Observer turns so the center of the view is
on the given point or the location of the given agent at the time it is called. You can change the
location of the Observer using setxyz. The Observer will move to view the world as if standing on
the given location, the point the observer faces will stay the same. For example create a new model
and Observer will be located at (0, 0, 49.5), that is, on the z-axis 49.5 patch units away from the
origin and the Observer is facing the origin, (0, 0, 0). If you setxyz 0 49.5 0 the Observer will
move so it is on the positive y-axis but it will keep the origin at the center of the view. You can also
move the observer using the rotation primitives that will allow you to move the observer around the
world as if on the surface of a sphere where the center is the location the Observer is facing. You
may notice from the above examples that the Observer is not constrained to be within the bounds of
the world.
Custom Shapes
You can load your own shapes using the load-shapes-3d primitive, which takes a text file as an
input. Once you have loaded the shapes into the model you can use them just like the built-in
shapes.
Note that a 2D shape of the same name must exist as well. You can create the 2D shape in the
Turtle Shapes Editor.
The input file may contain any number of shapes with any number of rectangular or triangular
surfaces. The format of the input file should be as follows:
number of shapes in file
name of first shape
type of surface ( quads or tris )
surface1
surface2
.
.
.
stop
type of surface
surfaceA
.
.
.
stop
end-shape
Each surface is defined by a unit normal vector and the vertices listed in clockwise order, tris should
have three vertices and quads should have four.
210
Introducing NetLogo 3D
NetLogo 4.1.3 User Manual
normal: xn yn zn
x1 y1 z1
x2 y2 z2
x3 y3 z3
x4 y4 z4
A file declaring just a two dimensional, patch-sized, square in the xy-plane centered at the origin
would look like this:
1
square
quads
normal: 0 0 1
0.15 0.15 0
-0.15 0.15 0
-0.15 -0.15 0
0.15 -0.15 0
normal: 0 0 -1
0.15 0.15 0
0.15 -0.15 0
-0.15 -0.15 0
-0.15 0.15 0
stop
end-shape
Tutorial
Step 1: Depth
One of the first things you will notice when you open NetLogo 3D is that the world is a cube instead
of a square.
You can open up the Model Settings, by clicking on the "Settings..." button at the top of the 3D
View. You'll notice in addition to max-pxcor, min-pxcor, max-pycor, and min-pycor, there is
also max-pzcor and min-pzcor.
Introducing NetLogo 3D
211
NetLogo 4.1.3 User Manual
The z-axis is perpendicular to both the x-axis and the y-axis, when you reset-perspective it is
the axis that comes straight out of the screen. In the default position max-pzcor is the face of the
cube nearest to you and min-pzcor is the face farthest from you. As always min-pxcor is on the
left, max-pxcor on the right, min-pycor on the bottom and max-pycor on the top. You'll also
notice on the left side of the Model Settings that there are options for wrapping in all three
directions, however, they are all checked and grayed out. Topologies are not yet functional in
NetLogo 3D so all worlds wrap in all three directions.
• Move to the Command Center and type print count patches.
Is the number smaller or larger than you expected?
In a 3D World the number of patches grows very quickly since count patches = world-width
212
Introducing NetLogo 3D
NetLogo 4.1.3 User Manual
* world-height * world-depth. It's important to keep this in mind when you are building your
model. Lots of patches can slow your model down or even cause NetLogo to run out of memory.
• Type ask patch 1 2 3 [ set pcolor red ] into the Command
Center.
• Use the mouse in the 3D view to rotate the world.
Notice the shape of the patch and its position in relation to the edges of the world. You'll also notice
that you now need three coordinates to address patches in a 3D world.
Step 2: Turtle Movement
• Open the Models Library in the File Menu, (if you are on a Mac and you don't
have a File Menu click on the NetLogo window and it should reappear)
• Open Turtle and Observer Motion Example 3D in 3D/Code Examples
Take a moment to look for the controls and monitors. In the bottom left you'll notice a group of
monitors that describe the location and orientation of the turtle, though until you press the SETUP
button they'll all say "N/A".
• Press the "setup" button
Heading, pitch, and roll are turtle variables that describe the orientation of the turtle. Heading is
absolute in relation to the xy-plane, it is the rotation of the turtle around the z-axis.
Pitch is the angle between the nose of the turtle and the xy-plane, it is relative to heading.
Introducing NetLogo 3D
213
NetLogo 4.1.3 User Manual
Roll is the rotation around the turtle's forward vector, it is relative to heading and pitch.
When a group of turtles are created (using crt 10 for example) the heading will be evenly spaced
around the 360 degrees as in 2D NetLogo, however, pitch and roll will always be zero.
Take a look at the "Turtle Movement" buttons.
• Press the "left 1" button.
How does the turtle move? Is is the same or different from 2D NetLogo? Which of the
turtle variables change?
• Press the "pitch-down 1" button.
How does the turtle move? Which of the turtle variables change?
• Press the "left 1" button again.
How does the turtle move? Is it different than the last time you pressed the "left 1"
button?
214
Introducing NetLogo 3D
NetLogo 4.1.3 User Manual
• Take a little time to play with the Turtle Movement buttons, watching both how
the turtle moves and which of the turtle variables change.
You probably noticed that often more than one of the turtle variables change for a single turn; for
this reason we suggest that you use the turtle commands rather than setting the orientation
variables directly.
Step 3: Observer Movement
At the bottom of the interface you will see a group of buttons labeled "Observer (point of view)". If
you have ever used the 3D view in NetLogo 2D or if you have been using the mouse controls in the
3D view through this tutorial you have been moving the Observer. Changing the point of view in the
3D is actually moving and changing the orientation of the Observer. The Observer has x, y and z
coordinates, just like a turtle or patch, while turtles and patches are constrained to be inside the
world the Observer can be anywhere. Like a turtle the Observer has a heading, pitch and roll, these
variables control where the Observer is looking, that is, what you see in the View.
• Move to the 3D View, and make sure "Orbit" is selected in the bottom left
corner of the view.
• Click and hold the mouse button in the middle of the view, move the mouse
left, right, up, and down.
How does the position and orientation of the Observer change?
• Press the reset-perspective button in the lower right corner of the view and
select "Zoom" in the lower left corner.
• Click and hold the mouse button in the middle of the view and move the
mouse up and down.
Which of the Observer variables change? Which stay the same?
• Try rotating the world a bit and then zoom again.
• Press the "Move" button in the lower left corner of the view.
• Click and hold the mouse button in the middle of the view and move the
mouse up, down, left and right.
How does the view change? How do the Observer variables change?
After you are done exploring the world using the mouse controls you can take a look at the
Observer control buttons in the lower left portion of the interface.
If you are familiar the latest versions of NetLogo you should be familiar with the first three buttons in
the Observer group. Watch, follow, and ride, are special modes that automatically update the
position and orientation of the Observer. When in follow or ride mode, the observer position and
orientation are the same as the turtle's. Note that follow and ride are functionally exactly the same,
the difference is only visual in the 3D view. When in watch mode the Observer does not move but
updates to face the target agent.
Introducing NetLogo 3D
215
NetLogo 4.1.3 User Manual
• Press the "setup" button again so you are back to the default orientation.
• Press the "orbit-right" button.
How did the view change? Was it what you expected? How is it similar or different
from using the mouse controls?
• Take a little time to experiment with orbit, roll and zoom buttons; notice
similarities and differences to the mouse controls.
The direction of the the orbit commands refer to the direction that the Observer moves. That is,
imagine that the Observer is on the surface of a sphere, the center of the sphere is the point that the
Observer is facing represented by the blue cross, by default (0,0,0). The Observer will always face
the center of the sphere and the radius of the sphere will remain constant. The directions, up, down,
left, and right, refer to moving along the lines of latitude and the lines of longitude of the sphere.
When you zoom the radius of the sphere changes but the center and the Observer's orientation in
relation to the center of the sphere will remain the same.
• Press one of the "setxyz" buttons.
How does the view change? How do the Observer variables change?
• Press the "facexyz" button.
How does the view change? How do the Observer variables change?
When you setxyz the center of the sphere remains the same (so the Observer automatically keeps
that point in the center of the view.) However, the radius of the sphere may change as well as the
Observer's orientation in relation to the center. When you facexyz or face, the center of the
sphere changes but the Observer does not move. The radius of the sphere may change, as well as
the orientation of the Observer.
FAQ (Frequently Asked Questions)
• Can I make patches or turtles translucent?
• Can I make a 3D applet?
• Does NetLogo 3D work with my stereoscopic device?
• Can I make custom 3D shapes?
Can I make patches or turtles translucent?
Not at this time. We have tentative plans to make this possible sometime in the future.
Can I make a 3D applet?
Not at this time. We are looking into alternatives to make this possible, however, it may be quite
some time before it is completed.
216
Introducing NetLogo 3D
NetLogo 4.1.3 User Manual
Does NetLogo work with my stereoscopic device?
NetLogo supports fullscreen exclusive mode. If that is all your device needs then, possibly yes.
However, it can be tricky to get it working. We don't have any such devices so it is difficult for us to
make the process easier. If your device needs something else, for example, quadbuffers enabled,
the answer is probably no.
Can I make my own 3D shapes?
NetLogo automatically interprets 2D shapes so they are extruded, like a cookie cutter shape in the
3D view. You can also use the primitive load-shapes-3d to load shapes described in an external
file in a custom format described in the Custom Shapes section. Currently we do not import shapes
in any standard formats, though we may allow this in the future.
Dictionary
Commands and Reporters
Turtle-related primitives
distancexyz distancexyz-nowrap dz left patch-at patch-at-heading-pitch-and-distance tilt-down tilt-up
right roll-left roll-right setxyz towards-pitch towards-pitch-nowrap towards-pitch-xyz
towards-pitch-xyz-nowrap turtles-at
Patch-related primitives
distancexyz distancexyz-nowrap neighbors neighbors6 patch patch-at
patch-at-heading-pitch-and-distance
Agentset primitives
at-points breeds-at turtles-at
World primitives
max-pzcor min-pzcor random-pzcor random-zcor world-depth load-shapes-3d
Observer primitives
face facexyz orbit-down orbit-left orbit-right orbit-up oxcor oycor ozcor setxyz zoom
Link primitives
link-pitch
Built-In Variables
Introducing NetLogo 3D
217
NetLogo 4.1.3 User Manual
Turtles
zcor pitch roll
Patches
pzcor
A
at-points
agentset at-points [[x1 y1 z1] [x2 y2 z2] ...]
Reports a subset of the given agentset that includes only the agents on the patches the given
distances away from this agent. The distances are specified as a list of three-item lists, where the
three items are the x, y, and z offsets.
If the caller is the observer, then the points are measured relative to the origin, in other words, the
points are taken as absolute patch coordinates.
If the caller is a turtle, the points are measured relative to the turtle's exact location, and not from the
center of the patch under the turtle.
ask turtles at-points [[2 4 0] [1 2 1] [10 15 10]]
[ fd 1 ] ;; only the turtles on the patches at the
;; distances (2,4,0), (1,2,1) and (10,15,10),
;; relative to the caller, move
D
distancexyz
distancexyz-nowrap
distancexyz xcor ycor zcor
distancexyz-nowrap xcor ycor zcor
3D versions of distancexy.
Reports the distance from this agent to the point (xcor, ycor, zcor).
The distance from a patch is measured from the center of the patch.
distancexyz-nowrap always reports the in world distance, never a distance that would require
wrapping around the edges of the world. With distancexyz the wrapped distance (around the edges
of the world) is used if that distance is shorter than the in world distance.
if (distancexyz 0 0 0) < 10
[ set color green ]
;; all turtles less than 10 units from
218
Introducing NetLogo 3D
NetLogo 4.1.3 User Manual
;; the center of the screen turn green.
dz
dz
Reports the z-increment (the amount by which the turtle's zcor would change) if the turtle were to
take one step forward at its current heading and pitch.
NOTE: dz is simply the sine of the turtle's pitch. Both dx and dy have changed in this case. So, dx =
cos(pitch) * sin(heading) and dy = cos(pitch) * cos(heading).
See also dx, dy.
F
face
facexyz
face agent
facexyz x y z
Set the caller's heading and pitch towards agent or towards the point (x,y,z).
If the caller and the target are at the same x and y coordinates the caller's heading will not change.
If the caller and the target are also at the same z coordinate the pitch will not change either.
L
left
left number
The turtle turns left by number degrees, relative to its current orientation. While left in a 2D world
only modifies the turtle's heading, left in a 3D world may also modify the turtle's pitch and roll.
See also left, tilt-up, tilt-down
link-pitch
link-pitch
Reports the pitch from end1 to end2 of this link.
ask link 0 1 [ print link-pitch ]
;; prints [[towards-pitch other-end] of end1] of link 0 1
Introducing NetLogo 3D
219
NetLogo 4.1.3 User Manual
See also link-heading, pitch
load-shapes-3d
load-shapes-3d filename
Loads custom 3D shapes from the given file. See the 3D guide for more details. You must also add
a 2D shape of the same name to the model using the Turtle Shapes Editor. Custom shapes
override built-in 3D shapes and converted 2D shapes.
M
max-pzcor
min-pzcor
max-pzcor
min-pzcor
These reporters give the maximum and minimum z-coordinates (respectively) for patches, which
determines the size of the world.
Unlike in older versions of NetLogo the origin does not have to be at the center of the world.
However, the minimum z-coordinate has to be less than or equal to 0 and the maximum
z-coordinate has to be greater than or equal to 0.
Note: You can set the size of the world only by editing the view -- these are reporters which cannot
be set.
See also max-pxcor, max-pycor, min-pxcor, min-pycor, and world-width.
N
neighbors
neighbors6
neighbors
neighbors6
3D versions of neighbors and neighbors4.
Reports an agentset containing the 26 surrounding patches (neighbors) or 6 surrounding patches
(neighbors6).
show sum values-from neighbors [count turtles-here]
;; prints the total number of turtles on the twenty-six
;; patches around this turtle or patch
ask neighbors6 [ set pcolor red ]
;; turns the six neighboring patches red
220
Introducing NetLogo 3D
NetLogo 4.1.3 User Manual
O
orbit-down
orbit-left
orbit-right
orbit-up
orbit-down number
orbit-left number
orbit-right number
orbit-up number
Rotate the observer around the last point faced. Imagine the observer is on the surface of a sphere,
the last point face is the center of that sphere. Up and down orbit along the lines of longitude and
right and left orbit along the lines of latitude. The observer will remain facing the last point faced so
the heading and pitch may change as result of orbiting. However, because we assume an absolute
north pole (parallel to the positive z-axis) the roll will never change.
See also setxyz, face and zoom
oxcor
oycor
ozcor
oxcor
oycor
ozcor
Reports the x-, y-, or z-coordinate of the observer.
See also setxyz
P
patch
patch pxcor pycor pzcor
3D version of patch.
Given three integers, reports the single patch with the given pxcor, pycor and pzcor. pxcor, pycor
and pzcor must be integers.
ask (patch 3 -4 2) [ set pcolor green ]
;; patch with pxcor of 3 and pycor of -4 and pzcor of 2 turns green
See also patch
Introducing NetLogo 3D
221
NetLogo 4.1.3 User Manual
patch-at
patch-at dx dy dz
3D version of patch-at.
Reports the single patch at (dx, dy, dz) from the caller, that is, dx patches east, dy patches north
and dz patches up from the caller.
ask patch-at 1 -1 1 [ set pcolor green ]
;; turns the patch just southeast and up from the caller green
patch-at-heading-pitch-and-distance
patch-at-heading-pitch-and-distance heading pitch distance
3D version of patch-at-heading-and-distance.
patch-at-heading-pitch-and-distance reports the single patch that is the given distance from this
turtle or patch, along the given absolute heading and pitch. (In contrast to patch-left-and-ahead and
patch-right-and-ahead, this turtle's current heading is not taken into account.)
ask patch-at-heading-pitch-and-distance 0 90 1 [ set pcolor green ]
;; turns the patch directly above the caller green.
pitch
pitch
This is a built-in turtle variable. Pitch is the angle between the "nose" of the turtle and the xy-plane.
Heading and pitch together define the forward vector of the turtle or the direction that the turtle is
facing.
This is a number greater than or equal to 0 and less than 360. 0 is parallel to the xy-plane, 90 is
parallel to the z-axis. While you can set pitch we recommend that you use the primitives to turn the
turtle. Depending on the position more than one relative angle (heading, pitch and roll) may change
at once.
Example:
;; assume roll and heading are 0
set pitch 45
;; turtle is now north and up
set heading heading + 10 ;; same effect as "tilt-up 10"
See also heading, roll, tilt-up, tilt-down, right, left
222
Introducing NetLogo 3D
NetLogo 4.1.3 User Manual
pzcor
pzcor
This is a built-in patch variable. It holds the z coordinate of the patch. It is always an integer. You
cannot set this variable, because patches don't move.
pzcor is greater than or equal to min-pzcor and less than or equal to max-pzcor.
All patch variables can be directly accessed by any turtle standing on the patch.
See also pxcor, pycor, zcor.
R
random-pzcor
random-pzcor
Reports a random integer ranging from min-pzcor to max-pxcor inclusive.
ask turtles [
;; move each turtle to the center of a random patch
setxyz random-pxcor random-pycor random-pzcor
]
See also random-pxcor, random-pycor.
random-zcor
random-zcor
Reports a random floating point number from the allowable range of turtle coordinates along the z
axis.
Turtle coordinates range from min-pzcor - 0.5 (inclusive) to max-pzcor + 0.5 (exclusive).
ask turtles [
;; move each turtle to a random point
setxyz random-xcor random-ycor random-zcor
]
See also random-xcor, random-ycor.
right
right number
The turtle turns right by number degrees, relative to its current orientation. While right in a 2D world
only modifies the turtle's heading, right in a 3D world may also modify the turtle's pitch and roll.
Introducing NetLogo 3D
223
NetLogo 4.1.3 User Manual
See also right and left
roll
roll
This is a built-in turtle variable. Roll is the angle between the "wing-tip" of the turtle and the
xy-plane.
This is a number greater than or equal to 0 and less than 360. You can set this variable to make a
turtle roll. Since roll is always from the turtle's point of view, rolling right and left only only change roll
regardless of turtle orientation.
Example:
set roll 45
;; turtle rotated right
set roll roll + 10 ;; same effect as "roll-right 10"
See also heading, pitch, roll-left, roll-right.
roll-left
roll-left number
The wingtip of the turtle rotates to the left number degrees with respect to the current heading and
pitch.
roll-right
roll-right number
The wingtip of the turtle rotates to the right number degrees with respect to the current heading and
pitch.
S
setxyz
setxyz x y z
3D version of setxy.
The agent, a turtle or the observer, sets its x-coordinate to x, its y-coordinate to y and its
z-coordinate to z. When the observer uses setxyz it remains facing the same point so the heading,
pitch, and roll, may also change.
224
Introducing NetLogo 3D
NetLogo 4.1.3 User Manual
For turtles equivalent to set xcor x set ycor y set zcor z, except it happens in one time
step instead of three.
setxyz 0 0 0
;; agent moves to the middle of the center patch
See also face
T
tilt-down
tilt-up
tilt-down number
tilt-up number
The nose of the turtle rotates by number degrees, relative to its current orientation. Depending on
the orientation of the turtle more than one of the relative angles (heading, pitch, and roll) may
change when a turtle turns.
towards-pitch
towards-pitch-nowrap
towards-pitch agent
towards-pitch-nowrap agent
Reports the pitch from this agent to the given agent.
If the wrapped distance (around the edges of the screen) is shorter than the on-screen distance,
towards-pitch will report the pitch of the wrapped path. towards-pitch-nowrap never uses the
wrapped path.
Note: In order to get one turtle to face another you need to use both towards-pitch and towards.
Note: asking for the pitch from an agent to itself, or an agent on the same location, will cause a
runtime error.
See also towards
towards-pitch-xyz
towards-pitch-xyz-nowrap
towards-pitch-xyz x y z
towards-pitch-xyz-no-wrap x y z
Reports the pitch from this agent to the coordinates x, y, z
If the wrapped distance (around the edges of the screen) is shorter than the on-screen distance,
towards-pitch will report the pitch of the wrapped path. towards-pitch-nowrap never uses the
Introducing NetLogo 3D
225
NetLogo 4.1.3 User Manual
wrapped path.
Note: In order to get a turtle to face a given location you need to use both towards-pitch-xyz and
towardsxy.
Note: asking for the pitch from an agent to the location it is standing on will cause a runtime error.
See also towardsxy
turtles-at
<breeds>-at
turtles-at dx dy dz
<breeds>-at dx dy dz
3D versions of turtles-at and breeds-at.
Reports an agentset containing the turtles on the patch (dx, dy, dz) from the caller (including the
caller itself if it's a turtle).
;; suppose I have 40 turtles at the origin
show [count turtles-at 0 0 0] of turtle 0
=> 40
W
world-depth
world-depth
Reports the total depth of the NetLogo world.
The depth of the world is the same as max-pzcor - min-pzcor + 1.
See also max-pzcor, min-pzcor, world-width, and world-height
Z
zcor
zcor
This is a built-in turtle variable. It holds the current z coordinate of the turtle. This is a floating point
number, not an integer. You can set this variable to change the turtle's location.
This variable is always greater than or equal to (- screen-edge-z) and strictly less than
screen-edge-z.
226
Introducing NetLogo 3D
NetLogo 4.1.3 User Manual
See also setxy, xcor, ycor, pxcor, pycor, pzcor
zoom
zoom number
Move the observer toward the point it is facing, number steps. The observer will never move beyond
the point it is facing so if number is greater than the the distance to that point it will only move as far
as the point it is facing.
Introducing NetLogo 3D
227
NetLogo 4.1.3 User Manual
228
Introducing NetLogo 3D
Extensions Guide
NetLogo allows users to write new commands and reporters in Java and other languages and use
them in their models. This section of the User Manual introduces this facility.
The first part discusses how to use an extension in your model once you have written one, or once
someone has given you one.
The second part is intended for programmers interested in writing their own extensions using the
NetLogo Extension API.
• Using Extensions
• Writing Extensions
The NetLogo Extension API Specification contains further details.
Using Extensions
To use an extension in a model, add the extensions keyword at the beginning of the Procedures
tab, before declaring any breeds or variables.
After extensions comes a list of extension names in square brackets. For example:
extensions [sound speech]
Using extensions tells NetLogo to find and open the specified extension and makes the custom
commands and reporters found in the extension available to the current model. You can use these
commands and reporters just as if they were built-in NetLogo primitives.
Where extensions are located
NetLogo will look for extensions in several places:
1. In the folder of the current model.
2. The extensions folder in the same location as the NetLogo application.
Each NetLogo extension consists of a folder with the same name as the extension, entirely in lower
case. This folder must contain a JAR file with the same name as the folder. For example the sound
extension is stored in a folder called sound with a file inside called sound.jar. For more
information about the contents of an extension's folder, please see the section of this manual on
Writing Extensions.
To install a NetLogo extension for use by any model, put the extension's folder in the extensions
directory in the NetLogo directory. Or, you can just keep the extension's folder in the same folder as
the model that uses it.
Some extensions depend on additional files. These files will be in the extension's folder along with
the JAR file. The folder may also contain other files such as documentation and example models.
Extensions Guide
229
NetLogo 4.1.3 User Manual
Applets
Models saved as applets (using "Save as Applet" on NetLogo's File menu) can make use of
extensions. Copy the entire extension directory into the directory that contains the model file.
Applets can use almost any extension, even those that require external jars. However, applets still
cannot use extensions that require native libraries; this includes the GoGo and QuickTime for Java
extensions.
Writing Extensions
This section of the User Manual introduces this facility for Java programmers. We'll assume that you
know the Java language and related tools and practices.
Our API's are also usable from other languages for the Java Virtual Machine, such as Scala.
Following the Java information is a section on how to write an extension in Scala.
Summary
A NetLogo extension consists of a folder with the following contents: Required:
• A JAR file with the same name as the extension, the following contents:
♦ one or more classes that implementation org.nlogo.api.Primitive,
♦ a main class that implements org.nlogo.api.ClassManager, and
♦ a NetLogo extension manifest file, with the following four tags:
◊ Manifest-Version, always 1.0
◊ Extension-Name, the name of the extension.
◊ Class-Manager, the fully-qualified name of a class implementing
org.nlogo.api.ClassManager.
◊ NetLogo-Extension-API-Version, the version of NetLogo Extension
API for which this JAR is intended. If a user opens the extension with
NetLogo that has a different Extension API version, a warning message is
issued. To tell which version of the Extension API your NetLogo supports,
choose the "About NetLogo" item in the "Help" menu and then click on the
System tab. Or, you can launch NetLogo.jar with the
--extension-api-version argument.
Optional:
• One or more NetLogo models demonstrating how the extension is used.
• One or more JAR files which the extension requires.
• A lib directory with any required native libraries.
• A src directory containing the source code for the model
• Documentation.
To build your extension, you must include NetLogo.jar in your class path.
Examples
Several sample extensions with full Java (or Scala) source code are included with NetLogo. Some
230
Extensions Guide
NetLogo 4.1.3 User Manual
others are available for download here.
Tutorial
Let's write an extension that provides a single reporter called first-n-integers.
first-n-integers will take a single numeric input n and report a list of the integers 0 through n 1. (Of course, you could easily do this just in NetLogo; it's only an example.)
1. Create extension folder
Since an extension is a folder with several items, we first need to create our folder. In this example,
it is called example. We will be doing all of our work in that folder. We will also want to create a
src sub-folder to hold our Java code, and a classes sub-folder for the compiled classes.
2. Write primitives
The primitives are implemented as one or more Java classes. The .java files for these classes
should be put in the src sub-folder.
A command performs an action; a reporter reports a value. To create a new command or reporter,
create a class that implements the interface org.nlogo.api.Command or
org.nlogo.api.Reporter, which extend org.nlogo.api.Primitive. In most cases, you
can extend the abstract class org.nlogo.api.DefaultReporter or
org.nlogo.api.DefaultCommand.
DefaultReporter requires that we implement:
Object report (Argument args[], Context context)
throws ExtensionException;
Since our reporter takes an argument, we also implement:
Syntax getSyntax();
Here's the implementation of our reporter, in a file called src/IntegerList.java:
import org.nlogo.api.*;
public class IntegerList extends DefaultReporter
{
// take one number as input, report a list
public Syntax getSyntax() {
return Syntax.reporterSyntax(
new int[] {Syntax.TYPE_NUMBER}, Syntax.TYPE_LIST
);
}
public Object report(Argument args[], Context context)
throws ExtensionException
{
// create a NetLogo list for the result
LogoList list = new LogoList();
Extensions Guide
231
NetLogo 4.1.3 User Manual
int n ;
// use typesafe helper method from
// org.nlogo.api.Argument to access argument
try
{
n = args[0].getIntValue();
}
catch( LogoException e )
{
throw new ExtensionException( e.getMessage() ) ;
}
if (n < 0) {
// signals a NetLogo runtime error to the modeler
throw new ExtensionException
("input must be positive");
}
// populate the list
// note that we use Double objects; NetLogo numbers
// are always doubles
for (int i = 0; i < n; i++) {
list.add(Double.valueOf(i));
}
return list;
}
}
Notes:
• The number objects we put in the list are Doubles, not Integers. All numbers used as
NetLogo values must be of type Double, even if they happen to have no fractional part.
• To access arguments, use org.nlogo.api.Argument's typesafe helper methods, such
as getDoubleValue().
• Throw org.nlogo.api.ExtensionException to signal a NetLogo runtime error to the
modeler.
A Command is just like a Reporter, except that reporters implement Object report(...) while
commands implement void perform(...).
2. Write a ClassManager
Each extension must include, in addition to any number of command and reporter classes, a class
that implements the interface org.nlogo.api.ClassManager. The ClassManager tells NetLogo
which primitives are part of this extension. In simple cases, extend the abstract class
org.nlogo.api.DefaultClassManager, which provides empty implementations of the
methods from ClassManager that you aren't likely to need.
Here's the class manager for our example extension, src/SampleExtension.java:
import org.nlogo.api.*;
public class SampleExtension extends DefaultClassManager {
public void load(PrimitiveManager primitiveManager) {
primitiveManager.addPrimitive
("first-n-integers", new IntegerList());
}
232
Extensions Guide
NetLogo 4.1.3 User Manual
}
addPrimitive() tells NetLogo that our reporter exists and what its name is.
3. Write a Manifest
The extension must also include a manifest. The manifest is a text file which tells NetLogo the name
of the extension and the location of the ClassManager.
The manifest must contain three tags:
• Extension-Name, the name of the extension.
• Class-Manager, the fully-qualified name of a class implementing
org.nlogo.api.ClassManager.
• NetLogo-Extension-API-Version, the version of NetLogo Extension API for which this
JAR is intended. If a user opens the extension with NetLogo that has a different Extension
API version, a warning message is issued. To tell which version of the Extension API your
NetLogo supports, choose the "About NetLogo" item in the "Help" menu. Or, you can launch
the NetLogo.jar with the --extension-api-version argument.
Here's a manifest for our example extension, manifest.txt:
Manifest-Version: 1.0
Extension-Name: example
Class-Manager: SampleExtension
NetLogo-Extension-API-Version: 4.1
The NetLogo-Extension-API-Version line should match the actual version of NetLogo Extension API
you are using.
Make sure even the last line ends with a newline character.
4. Create a JAR
To create an extension's JAR file, first compile your classes as usual, either from the command line
or using an IDE.
Important: You must add NetLogo.jar (from the NetLogo distribution) to your classpath when
compiling.
Here's an example of how compiling your extension might look from the command line:
$ mkdir -p classes
# create the classes subfolder if it does not exist
$ javac -classpath NetLogo.jar -d classes src/IntegerList.java src/SampleExtension.java
You will need to change the classpath argument to point to the NetLogo.jar file from your NetLogo
installation. This command line will compile the .java and put the .class files in the classes
subfolder.
Then create a JAR containing the resulting class files and the manifest. For example:
$ jar cvfm example.jar manifest.txt -C classes .
Extensions Guide
233
NetLogo 4.1.3 User Manual
For information about manifest files, JAR files and Java tools, see java.sun.com.
5. Use your extension in a model
To use our example extension, put the example folder in the NetLogo extensions folder, or in the
same directory as the model that will use the extension. At the top of the Procedures tab write:
extensions [example]
Now you can use example:first-n-integers just like it was a built-in NetLogo reporter. For
example, select the Interface tab and type in the Command Center:
observer> show example:first-n-integers 5
observer: [0 1 2 3 4]
Scala Tutorial
Now let's rewrite the extension in Scala.
First you'll need to make sure you are using exactly the right version of Scala. Extensions written in
Scala must be compiled with the specific Scala build dated 2009-04-16, revision r17517, available
here: scala-2.8.0.r17517.zip.
We apologize for the inconvenience of requiring this particular Scala version; in a future version of
NetLogo, we plan to require the released version of Scala 2.8.0 instead, once it becomes available.
1. Create extension folder
Let's start with a new folder called, example-scala. As with the Java example, create src and
classes sub-folders.
2. Write primitives and a Class Manager
We'll put all of the source code in one file. Here's the implementation of our reporter, and our
ClassManager, in a file called src/IntegerList.scala:
import org.nlogo.api._
import org.nlogo.api.Syntax._
import org.nlogo.api.ScalaConversions._
class SampleScalaExtension extends DefaultClassManager {
def load(manager: PrimitiveManager) {
manager.addPrimitive("first-n-integers", new IntegerList)
}
}
class IntegerList extends DefaultReporter {
override def getSyntax = reporterSyntax(Array(TYPE_NUMBER), TYPE_LIST)
def report(args: Array[Argument], context: Context): AnyRef = {
val n = try {args(0).getIntValue}
catch {
case e: LogoException => throw new ExtensionException(e.getMessage)
}
if (n < 0) throw new ExtensionException("input must be positive")
234
Extensions Guide
NetLogo 4.1.3 User Manual
(0 until n).toLogoList
}
}
Mostly this is a straightforward, line-by-line translation of the Java version.
One difference is worth noting. In the Java version, we explicitly converted ints to Double objects.
As previously mentioned, all numbers used as NetLogo values must be of type Double, even if they
happen to have no fractional part. In the Scala version we leverage implicit conversions to do this
work for us. We do so by importing org.nlogo.api.ScalaConversions._, which provides us
with two new methods via implicit conversions. The first is toLogoList, which converts Scala
Seqs to LogoLists as seen in: (0 until n).toLogoList. The second is toLogoObject, which
converts any supported Scala value to the appropriate NetLogo type. The conversions provided by
toLogoObject are:
Input Type
Output Type
String
String
scala.Boolean, java.lang.Boolean java.lang.Boolean
scala.Char, java.lang.Character
String
scala.Byte, java.lang.Byte
java.lang.Double
scala.Short, java.lang.Short
java.lang.Double
scala.Int, java.lang.Integer
java.lang.Double
scala.Float, java.lang.Float
java.lang.Double
scala.Double, java.lang.Double
java.lang.Double
scala.Long, java.lang.Long
java.lang.Double
org.nlogo.api.Agent
org.nlogo.api.Agent
org.nlogo.api.AgentSet
org.nlogo.api.AgentSet
org.nlogo.api.Nobody
org.nlogo.api.Nobody
org.nlogo.api.ExtensionObject
org.nlogo.api.ExtensionObject
scala.Seq
org.nlogo.api.LogoList
org.nlogo.api.LogoList
org.nlogo.api.LogoList
(anything else)
error
The conversions to LogoList are recursive. Nested collections in the input will be converted to
nested LogoLists in which all elements have been converted by toLogoObject. ExtensionObjects,
on the other hand, are not recursed into.
Using the toLogoObject conversion is simple. Just call the method on an an Any. Example:
7.toLogoObject
3. Create a JAR
To create an extension's JAR file, first compile your classes as usual, either from the command line
or using an IDE.
Important: As when compiling Java, you must add NetLogo.jar (from the NetLogo distribution)
to your classpath when compiling.
Extensions Guide
235
NetLogo 4.1.3 User Manual
Here's an example of how compiling your extension might look from the command line:
$ mkdir -p classes
# create the classes subfolder if it does not exist
$ scalac -classpath NetLogo.jar -d classes src/IntegerList.java
You will need to change the classpath argument to point to the NetLogo.jar file from your NetLogo
installation. This command line will compile the .java and put the .class files in the classes
subfolder.
Then create a JAR containing the resulting class files and the manifest exactly as was done with the
Java classes. For example:
$ jar cvfm example-scala.jar manifest.txt -C classes .
4. Use your extension in a model
Using a Scala extension is the same as using a Java extension. However there is one caveat:
NetLogo ships with a stripped down version of scala-library.jar. While most common classes (Array,
List, Map) are present, it may be best to check, especially if your extension makes use of less
common classes.
To check which classes are present in the scala-library.jar that ships with NetLogo, in the lib
directory inside the NetLogo directory type this at the command line:
$ jar tf scala-library.jar
If you find that a class used by your extension is missing (either by checking manually or via a
ClassNotFound exception), there is still hope. Place a copy of a full version of scala-library.jar into
the root of your extensions directory (in this case example-scala). Or, since the full
scala-library.jar is large (over 4 megabytes), you may wish to prepare a smaller jar containing only
the specific missing classes you need to supply.
Extension development tips
Instantiation
Your class manager is instantiated at the time a model using the extension is loaded.
Command and reporter objects are instantiated whenever NetLogo code is compiled that uses your
commands and reporters.
Classpath
Don't forget to include NetLogo.jar in your class path when compiling. This is the most common
mistake made by new extension authors. (If the compiler can't find NetLogo.jar, you'll get error
messages about classes in the org.nlogo.api package not being found.)
Debugging extensions
There are special NetLogo primitives to help you as you develop and debug your extension. These
are considered experimental and may be changed at a later date. (That's why they have
236
Extensions Guide
NetLogo 4.1.3 User Manual
underscores in their name.)
• print __dump-extensions prints information about loaded extensions
• print __dump-extension-prims prints information about loaded extension primitives
• __reload-extensions forces NetLogo to reload all extensions the next time you compile
your model. Without this command, changes in your extension JAR will not take effect until
you open a model or restart NetLogo.
Third party JARs
If your extension depends on code stored in a separate JAR, copy the extra JARs into the
extension's directory. Whenever an extension is imported, NetLogo makes all the JARs in its folder
available to the extension.
If you plan to distribute your extension to other NetLogo users, make sure to provide installation
instructions.
Supporting old Java versions
NetLogo works with Java 5 and later. If you want your extension to be usable by all NetLogo users,
your extension should support Java 5.
The easiest way is to accomplish this is do all your development with the Java 5 JDK.
It's also possible to develop for Java 5 using the Java 6 or later compiler, but you need to do two
things:
• Use the -source 1.5 -target 1.5 options to javac (or equivalent in your IDE) to tell the
newer compiler to emit class files that are compatible with the older Java versions. This
ensures that your code doesn't use any Java 6-or-later-only Java language features.
• Use the -bootclasspath option to javac (or IDE equivalent) to compile against the Java 5
class libraries. (Note that this requires installing Java 5 anyway. Or, if you're on Mac OS X
10.6, you can't actually install Java 5, so you'll have to get a copy of the Java 5 libraries from
an older Mac OS X version, or from a Java installation bundle for Linux.) This ensures that
your code doesn't make any Java-6-or-later-only Java API calls.
Conclusion
Don't forget to consult the NetLogo API Specification for full details on these classes, interfaces, and
methods.
Note that there is no way for the modeler to get a list of commands and reporters provided by an
extension, so it's important that you provide adequate documentation.
The extensions facility is not yet complete. The API doesn't include everything you might expect to
be present. Some facilities exist but are not yet documented. If you don't see a capability you want,
please let us know. Do not hesitate to contact us at [email protected] with questions,
as we may be able to find a workaround or provide additional guidance where our documentation is
thin.
Extensions Guide
237
NetLogo 4.1.3 User Manual
Hearing from users of this API will also allow us to appropriately focus our efforts for future releases.
We are committed to making NetLogo flexible and extensible, and we very much welcome your
feedback.
238
Extensions Guide
Array and Table Extensions
These extensions add two new data structures to NetLogo, arrays and hash tables.
When to use
In general, anything you can do with an array or table, you could also just use a list for. But you may
want to consider using an array or table instead for speed reasons. All three data structures (list,
array, and table) have different performance characteristics, so you may be able to make your
model run faster by selecting the appropriate data structure.
Arrays are useful when you need a collection of values whose size is fixed. You can quickly access
or alter any item in an array if you know its position.
Tables are useful when you need to do associate values with other values. For example, you might
make a table of words and their definitions. Then you can look up the definition of any word. Here,
the words are the "keys". You can easily retrieve the value for any key in the table, but not vice
versa.
How to use
Both extensions come preinstalled.
To use the array extension in your model, add a line to the top of your procedures tab:
extensions [array]
To use the table extension in your model, add a line to the top of your procedures tab:
extensions [table]
You can use both extensions in the same model if you want, as follows:
extensions [array table]
If your model already uses other extensions, then it already has an extensions line in it, so just
add array and/or table to the list.
For more information on using NetLogo extensions, see the Extensions Guide.
Limitation on table keys
Table keys may only be strings, numbers, booleans, or lists. (Lists may be arbitrarily nested lists as
long as all the items inside are strings, numbers, or booleans.)
Array example
let a array:from-list n-values 5 [0]
print a
Array and Table Extensions
239
NetLogo 4.1.3 User Manual
=> {{array: 0 0 0 0 0}}
print array:length a
=> 5
foreach n-values 5 [?] [ array:set a ? ? * ? ]
print a
=> {{array: 0 1 4 9 16}}
print array:item a 0
=> 0
print array:item a 3
=> 9
array:set a 3 50
print a
=> {{array: 0 1 4 50 16}}
Table example
let dict table:make
table:put dict "turtle" "cute"
table:put dict "bunny" "cutest"
print dict
=> {{table: "turtle" -> "cute", "bunny" -> "cutest" }}
print table:length dict
=> 2
print table:get dict "turtle"
=> "cute"
print table:get dict "leopard"
=> (error)
print table:keys dict
=> ["turtle" "bunny"]
Array primitives
array:from-list array:item array:set array:length array:to-list
array:from-list
array:from-list list
Reports a new array containing the same items in the same order as the input list.
array:item
array:item array index
Reports the item in the given array with the given index (ranging from zero to the length of the array
minus one).
array:set
array:set array index value
Sets the item in the given array with the given index (ranging from zero to the length of the array
minus one) to the given value.
240
Array and Table Extensions
NetLogo 4.1.3 User Manual
Note that unlike the replace-item primitive for lists, a new array is not created. The given array is
actually modified.
array:length
array:length array
Reports the length of the given array, that is, the number of items in the array.
array:to-list
array:to-list array
Reports a new list containing the same items in the same order as the given array.
Table Primitives
table:clear table:from-list table:get table:has-key? table:keys table:length table:make table:put
table:remove table:to-list
table:clear
table:clear table
Removes all key-value pairs from table.
table:from-list
table:from-list list
Reports a new table with the contents of list. list must be a list of two element lists, or pairs. The first
element in the pair is the key and the second element is the value.
table:get
table:get table key
Reports the value that key is mapped to in the table. Causes an error if there is no entry for the key.
table:has-key?
table:has-key? table key
Reports true if key has an entry in table.
table:keys
Array and Table Extensions
241
NetLogo 4.1.3 User Manual
table:keys table
Reports a list of all the keys in table.
table:length
table:length table
Reports the number of entries in table.
table:make
table:make
Reports a new, empty table.
table:put
table:put table key value
Maps key to value in table. If an entry already exists in the table for the given key, it is replaced.
table:remove
table:remove table key
Removes the mapping in table for key.
table:to-list
table:to-list table
Reports a list with the content of table. The list will be a list of two element lists, or pairs. The first
element in the pair is the key and the second element is the value.
242
Array and Table Extensions
Matrix Extension
The Matrix extension adds a new matrix data structure to NetLogo (similar to how the the
array/table data structures were added by their respective extensions).
When to use
A matrix is a 2-dimensional array containing only numeric data. Although it can be used to store
numbers in the same way as a list of lists, or an array of arrays, the primary reason to use the
matrix data type is to take advantage of the mathematical operations associated with matrices. For
instance, matrix multiplication is a convenient way to perform geometric transformations, and the
repeated application of matrix multiplication can also be used to simulate other dynamic processes
(for instance, processes on graph/network structures).
If you'd like to know more about matrices and how they can be used, you might consider a course
on linear algebra, or search the web for tutorials. The matrix extension also allows you to solve
linear algebraic equations (specified in a matrix format), and even to identify trends in your data and
perform linear (ordinary least squares) regressions on data sets with multiple explanatory variables.
How to use
The matrix extension comes preinstalled (since NetLogo 4.1.1; it was not in the initial 4.1 release).
To use the matrix extension in your model, add a line to the top of your procedures tab:
extensions [matrix]
If your model already uses other extensions, then it already has an extensions line in it, so just
add matrix to the list.
For more information on using NetLogo extensions, see the Extensions Guide.
Matrix example
let m matrix:from-row-list [[1 2 3] [4 5 6]]
print m
=> {{matrix: [ [ 1 2 3 ][ 4 5 6 ] ]}}
print matrix:pretty-print-text m
=>
[[ 1 2 3 ]
[ 4 5 6 ]]
print matrix:dimensions m
=> [2 3]
;;(NOTE: row & column indexing starts at 0, not 1)
print matrix:get m 1 2 ;; what number is in row 1, column 2?
=> 6
matrix:set m 1 2 10 ;; change the 6 to a 10
print m
=> {{matrix: [ [ 1 2 3 ][ 4 5 10 ] ]}}
let m2 matrix:make-identity 3
Matrix Extension
243
NetLogo 4.1.3 User Manual
print m2
=> {{matrix: [ [ 1 0 0 ][ 0 1 0 ][ 0 0 1 ] ]}}
print matrix:times m m2 ;; multiplying by the identity changes nothing
=> {{matrix: [ [ 1 2 3 ][ 4 5 10 ] ]}}
;; make a new matrix with the middle 1 changed to -1
let m3 (matrix:set-and-report m2 1 1 -1)
print m3
=> {{matrix: [ [ 1 0 0 ][ 0 -1 0 ][ 0 0 1 ] ]}}
print matrix:times m m3
=> {{matrix: [ [ 1 -2 3 ][ 4 -5 10 ] ]}}
print matrix:to-row-list (matrix:plus m2 m3)
=> [[2 0 0] [0 0 0] [0 0 2]]
Matrix Primitives
Matrix creation & conversion to/from lists
matrix:make-constant matrix:make-identity matrix:from-row-list matrix:from-column-list
matrix:to-row-list matrix:to-column-list matrix:copy matrix:pretty-print-text
Matrix data retrieval and manipulation
matrix:get matrix:get-row matrix:get-column matrix:set matrix:set-row matrix:set-column
matrix:swap-rows matrix:swap-columns matrix:set-and-report matrix:dimensions matrix:submatrix
Math operations
matrix:times-scalar matrix:times matrix:times-element-wise matrix:plus-scalar matrix:plus
matrix:inverse matrix:transpose matrix:real-eigenvalues matrix:imaginary-eigenvalues
matrix:eigenvectors matrix:det matrix:rank matrix:cond matrix:trace
Advanced features
matrix:solve matrix:forecast-linear-growth matrix:forecast-compound-growth
matrix:forecast-continuous-growth matrix:regress
Matrix creation & conversion to/from lists
matrix:make-constant
matrix:make-constant n-rows n-cols number
Reports a new n-rows by n-cols matrix object, with all entries in the matrix containing the same
value (number).
matrix:make-identity
244
Matrix Extension
NetLogo 4.1.3 User Manual
matrix:make-identity n-size
Reports a new square matrix object (with dimensions n-size x n-size), consisting of the identity
matrix (1s along the main diagonal, 0s elsewhere).
matrix:from-row-list
matrix:from-row-list nested-list
Reports a new matrix object, created from a NetLogo list, where each item in that list is another list
(corresponding to each of the rows of the matrix.)
print matrix:from-row-list [[1 2] [3 4]]
=> {{matrix: [ [ 1 2 ][ 3 4 ] ]}}
;; Corresponds to this matrix:
;; 1 2
;; 3 4
matrix:from-column-list
matrix:from-column-list nested-list
Reports a new matrix object, created from a NetLogo list containing each of the columns of the
matrix.
matrix:to-row-list
matrix:to-row-list matrix
Reports a list of lists, containing each row of the matrix.
matrix:to-column-list
matrix:to-column-list matrix
Reports a list of lists, containing each column of the matrix.
matrix:copy
matrix:copy matrix
Reports a new matrix that is an exact copy of the given matrix. This primitive is important because
the matrix type is mutable (changeable). Here's a code example:
let m1 matrix:from-column-list [[1 4 7][2 5 8][3 6 9]] ; a 3x3 matrix
print m1
=> {{matrix: [ [ 1 2 3 ][ 4 5 6 ][ 7 8 9 ] ]}}
let m2 m1 ;; m2 refers to the same matrix object as m1
let m3 matrix:copy m1 ;; m3 is a new copy containing m1's data
matrix:set m1 0 0 100 ;; now m1 is changed
print m1
Matrix Extension
245
NetLogo 4.1.3 User Manual
=> {{matrix:
[ [ 100 2 3 ][ 4 5 6 ][ 7 8 9 ] ]}}
print m2
=> {{matrix: [ [ 100 2 3 ][ 4 5 6 ][ 7 8 9 ] ]}}
;;Notice that m2 was also changed, when m1 was changed!
print m3
=> {{matrix:
[ [ 1 2 3 ][ 4 5 6 ][ 7 8 9 ] ]}}
matrix:pretty-print-text
matrix:pretty-print-text matrix
Reports a string that is a textual representation of the matrix, in a format that is reasonably
human-readable when displayed.
Matrix modification and math operations
matrix:get
matrix:get matrix row-i col-j
Reports the (numeric) value at location row-i,col-j in the given matrix.
matrix:get-row
matrix:get-row matrix row-i
Reports a simple (not nested) NetLogo list containing the elements of row-i of the given matrix.
matrix:get-column
matrix:get-column matrix col-j
Reports a simple (not nested) NetLogo list containing the elements of col-j of the given matrix.
matrix:set
matrix:set matrix row-i col-j new-value
Changes the given matrix, by setting the location row-i,col-j to new-value
matrix:set-row
matrix:set-row matrix row-i simple-list
Changes the given matrix matrix by replacing the row at row-i with the contents of the simple (not
nested) NetLogo list simple-list. The simple-list must have a length equal to the number of columns
in the matrix, i.e., the matrix row length.
246
Matrix Extension
NetLogo 4.1.3 User Manual
matrix:set-column
matrix:set-column matrix col-j simple-list
Changes the given matrix matrix by replacing the column at col-j with the contents of the simple (not
nested) NetLogo list simple-list. The simple-list must have a length equal to the number of rows in
the matrix, i.e., the matrix column length.
matrix:swap-rows
matrix:swap-rows matrix row1 row2
Changes the given matrix matrix by swapping the rows at row1 and row2 with each other.
matrix:swap-columns
matrix:swap-columns matrix col1 col2
Changes the given matrix matrix by swapping the columns at col1 and col2 with each other.
matrix:set-and-report
matrix:set-and-report matrix row-i col-j new-value
Reports a new matrix, which is a copy of the given matrix except that the value at row-i,col-j has
been changed to new-value. A NetLogo statement such as "let mat matrix:set-and-report mat 2 3
10" will result in mat pointing to this new matrix, a copy of the old version of mat with the element at
row 2, column 3 being set to 10. The old version of mat will be "lost".
matrix:dimensions
matrix:dimensions matrix
Reports a 2-element list ([num-rows,num-cols]), containing the number of rows and number of
columns in the given matrix
matrix:submatrix
matrix:submatrix matrix r1 c1 r2 c2
Reports a new matrix object, consisting of a rectangular subsection of the given matrix. The
rectangular region is from row r1 up to (but not including) row r2, and from column c1 up to (but not
including) column c2. Here is an example:
let m matrix:from-row-list [[1 2 3][4 5 6][7 8 9]]
print matrix:submatrix m 0 1 2 3 ; matrix, row-start, col-start, row-end, col-end
; rows from 0 (inclusive) to 2 (exlusive),
; columns from 1 (inclusive) to 3 (exclusive)
=> {{matrix: [ [ 2 3 ][ 5 6 ] ]}}
Matrix Extension
247
NetLogo 4.1.3 User Manual
matrix:times-scalar
matrix:times-scalar matrix factor
Reports a new matrix, which is the result of multiplying every entry in the original matrix by the given
scaling factor.
matrix:times
matrix:times m1 m2
Reports a matrix, which is the result of multiplying matrix m1 by matrix m2 (using standard matrix
multiplication -- make sure your matrix dimensions match up.)
matrix:times-element-wise
matrix:times-element-wise m1 m2
Reports a matrix, which is the result of multiplying each element of matrix m1 by the corresponding
element in m2. (Note: m1 and m2 must have the same dimensions).
matrix:plus-scalar
matrix:plus-scalar matrix number
Reports a matrix, which is the result of adding the constant number to each element of the given
matrix.
matrix:plus
matrix:plus m1 m2
Reports a matrix, which is the result of adding each element of matrix m1 to the corresponding
element in m2. (Note: m1 and m2 must have the same dimensions).
matrix:inverse
matrix:inverse matrix
Reports the inverse of the given matrix, or results in an error if the matrix is not invertible.
matrix:transpose
matrix:transpose matrix
Reports the transpose of the given matrix.
248
Matrix Extension
NetLogo 4.1.3 User Manual
matrix:real-eigenvalues
matrix:real-eigenvalues matrix
Reports a list containing the real eigenvalues of the given matrix.
matrix:imaginary-eigenvalues
matrix:imaginary-eigenvalues matrix
Reports a list containing the imaginary eigenvalues of the given matrix.
matrix:eigenvectors
matrix:eigenvectors matrix
Reports a matrix that contains the eigenvectors of the given matrix. (Each eigenvector as a column
of the resulting matrix.)
matrix:det
matrix:det matrix
Reports the determinant of the matrix.
matrix:rank
matrix:rank matrix
Reports the effective numerical rank of the matrix,obtained from SVD (Singular Value
Decomposition).
matrix:cond
matrix:cond matrix
Reports the matrix condition (2 norm), which is the ratio of largest to smallest singular value
(obtained from SVD).
matrix:trace
matrix:trace matrix
Reports the trace of the matrix, which is simply the sum of the main diagonal elements.
Advanced features
Matrix Extension
249
NetLogo 4.1.3 User Manual
matrix:solve
matrix:solve A C
Reports the solution to a linear system of equations, specified by the A and C matrices. In general,
solving a set of linear equations is akin to matrix division. That is, the goal is to find a matrix B such
that A * B = C. (For simple linear systems, C and B can both be 1-dimensional matrices -- i.e.
vectors). If A is not a square matrix, then a "least squares" solution is returned.
;; To solve the set of equations x + 3y = 10 and 7x - 4y = 20
;; We make our A matrix [[1 3][7 -4]], and our C matrix [[10][20]]
let A matrix:from-row-list [[1 3][7 -4]]
let C matrix:from-row-list [[10][20]]
print matrix:solve A C
=> {{matrix: [ [ 4 ][ 2.0000000000000004 ] ]}}
;; NOTE: as you can see, the the results may be only approximate
;; (In this case, the true solution should be x=4 and y=2.)
matrix:forecast-linear-growth
matrix:forecast-linear-growth data-list
Reports a four-element list of the form: [ forecast constant slope R2 ]. The forecast is the predicted
next value that would follow in the sequence given by the data-list input, based on a linear
trend-line. Normally data-list will contain observations on some variable, Y, from time t = 0 to time t
= (n-1) where n is the number of observations. The forecast is the predicted value of Y at t = n. The
constant and slope are the parameters of the trend-line
Y = constant + slope * t.
The R2 value measures the goodness of fit of the trend-line to the data, with an R2 = 1 being a
perfect fit and an R2 of 0 indicating no discernible trend. Linear growth assumes that the variable Y
grows by a constant absolute amount each period.
;; a linear extrapolation of the next item in the list.
print matrix:forecast-linear-growth [20 25 28 32 35 39]
=> [42.733333333333334 20.619047619047638 3.6857142857142824 0.9953743395474031]
;; These results tell us:
;; * the next predicted value is roughly 42.7333
;; * the linear trend line is given by Y = 20.6190 + 3.6857 * t
;; * Y grows by approximately 3.6857 units each period
;; * the R^2 value is roughly 0.9954 (a good fit)
matrix:forecast-compound-growth
matrix:forecast-compound-growth data-list
Reports a four-element list of the form: [ forecast constant growth-proportion R2 ]. Whereas
matrix:forecast-linear-growth assumes growth by a constant absolute amount each period,
matrix:forecast-compound-growth assumes that Y grows by a constant proportion each period.
The constant and growth-proportion are the parameters of the trend-line
Y = constant * growth-proportiont.
250
Matrix Extension
NetLogo 4.1.3 User Manual
Note that the growth proportion is typically interpreted as growth-proportion = (1.0 + growth-rate).
Therefore, if matrix:forecast-compound-growth returns a growth-proportion of 1.10, that implies that
Y grows by (1.10 - 1.0) = 10% each period. Note that if growth is negative,
matrix:forecast-compound-growth will return a growth-proportion of less than one. E.g., a
growth-proportion of 0.90 implies a growth rate of -10%.
NOTE: The compound growth forecast is achieved by taking the ln of Y. (See matrix:regress,
below.) Because it is impossible to take the natural log of zero or a negative number,
matrix:forecast-compound-growth will result in an error if it finds a zero or negative number in
data-list.
;; a compound growth extrapolation of the next item in the list.
print matrix:forecast-compound-growth [20 25 28 32 35 39]
=> [45.60964465307147 21.15254147944863 1.136621034423892 0.9760867518334806]
;; These results tell us:
;; * the next predicted value is approximately 45.610
;; * the compound growth trend line is given by Y = 21.1525 * 1.1366 ^ t
;; * Y grows by approximately 13.66% each period
;; * the R^2 value is roughly 0.9761 (a good fit)
matrix:forecast-continuous-growth
matrix:forecast-continuous-growth data-list
Reports a four-element list of the form: [ forecast constant growth-rate R2 ]. Whereas
matrix:forecast-compound-growth assumes discrete time with Y growing by a given proportion each
finite period of time (e.g., a month or a year), matrix:forecast-continuous-growth assumes that Y is
compounded continuously (e.g., each second or fraction of a second). The constant and
growth-rate are the parameters of the trend-line
Y = constant * e(growth-rate * t).
matrix:forecast-continuous-growth is the "calculus" analog of matrix:forecast-compound-growth. The
two will normally yield similar (but not identical) results, as shown in the example below. growth-rate
may, of course, be negative.
NOTE: The continuous growth forecast is achieved by taking the ln of Y. (See matrix:regress,
below.) Because it is impossible to take the natural log of zero or a negative number,
matrix:forecast-continuous-growth will result in an error if it finds a zero or negative number in
data-list.
;; a continuous growth extrapolation of the next item in the list.
print matrix:forecast-continuous-growth [20 25 28 32 35 39]
=> [45.60964465307146 21.15254147944863 0.12805985615332668 0.9760867518334806]
;; These results tell us:
;; * the next predicted value is approximately 45.610
;; * the compound growth trend line is given by Y = 21.1525 * e ^ (0.1281 * t)
;; * Y grows by approximately 12.81% each period if compounding takes place continuously
;; * the R^2 value is roughly 0.9761 (a good fit)
Matrix Extension
251
NetLogo 4.1.3 User Manual
matrix:regress
matrix:regress data-matrix
All three of the forecast primitives above are just special cases of performing an OLS
(ordinary-least-squares) linear regression -- the matrix:regress primitive provides a
flexible/general-purpose approach. The input is a matrix data-matrix, with the first column being the
observations on the dependent variable and each subsequent column being the observations on the
(1 or more) independent variables. Thus each row consists of an observation of the dependent
variable followed by the corresponding observations for each independent variable.
The output is a Logo nested list composed of two elements. The first element is a list containing the
regression constant followed by the coefficients on each of the independent variables. The second
element is a 3-element list containing the R2 statistic, the total sum of squares, and the residual sum
of squares. The following code example shows how the matrix:regress primitive can be used to
perform the same function as the code examples shown in the matrix:forecast-*-growth primitives
above. (However, keep in mind that the matrix:regress primitive is more powerful than this, and can
have many more independent variables in the regression, as indicated in the fourth example below.)
;; this is equivalent to what the matrix:forecast-linear-growth does
let data-list [20 25 28 32 35 39]
let indep-var (n-values length data-list [?]) ; 0,1,2...,5
let lin-output matrix:regress matrix:from-column-list (list data-list indep-var)
let lincnst item 0 (item 0 lin-output)
let linslpe item 1 (item 0 lin-output)
let linR2
item 0 (item 1 lin-output)
;;Note the "6" here is because we want to forecast the value at time t=6.
print (list (lincnst + linslpe * 6) (lincnst) (linslpe) (linR2))
;; this is equivalent to what the matrix:forecast-compound-growth does
let com-log-data-list (map [ln ?] [20 25 28 32 35 39])
let com-indep-var2 (n-values length com-log-data-list [?]) ; 0,1,2...,5
let com-output matrix:regress matrix:from-column-list (list com-log-data-list com-indep-var2)
let comcnst exp item 0 (item 0 com-output)
let comprop exp item 1 (item 0 com-output)
let comR2
item 0 (item 1 com-output)
;;Note the "6" here is because we want to forecast the value at time t=6.
print (list (comcnst * comprop ^ 6) (comcnst) (comprop) (comR2))
;; this is equivalent to what the matrix:forecast-continuous-growth does
let con-log-data-list (map [ln ?] [20 25 28 32 35 39])
let con-indep-var2 (n-values length con-log-data-list [?]) ; 0,1,2...,5
let con-output matrix:regress matrix:from-column-list (list con-log-data-list con-indep-var2)
let concnst exp item 0 (item 0 con-output)
let conrate
item 1 (item 0 con-output)
let conR2
item 0 (item 1 con-output)
print (list (concnst * exp (conrate * 6)) (concnst) (conrate) (conR2))
;; example of a regression with two independent variables:
;; Pretend we have a dataset, and we want to know how well happiness
;; is correlated to snack-food consumption and accomplishing goals.
let happiness [2 4 5 8 10]
let snack-food-consumed [3 4 3 7 8]
let goals-accomplished [2 3 5 8 9]
print matrix:regress matrix:from-column-list (list happiness snack-food-consumed goals-accomplished)
=> [[-0.14606741573033788 0.3033707865168543 0.8202247191011234] [0.9801718440185063 40.8 0.808988764044
;; linear regression: happiness = -0.146 + 0.303*snack-food-consumed + 0.820*goals-accomplished
;; (Since the 0.820 coefficient is higher than the 0.303 coefficient, it appears that each goal
252
Matrix Extension
NetLogo 4.1.3 User Manual
;; accomplished yields more happiness than does each snack consumed, although both are positively
;; correlated with happiness.)
;; Also, we see that R^2 = 0.98, so the two factors together provide a good fit.
Credits:
The Matrix extension for NetLogo was originally written by Forrest Stonedahl, with significant
contributions from Charles Staelin (in particular, the forecast & regression primitives). The matrix
extension provides a wrapper around Jama, which is a free/open-source matrix library for Java. The
source code for the Matrix extension is included, and you are more than welcome to modify/improve
upon the existing functionality and features. If you do so, we encourage you to contribute back to
the NetLogo community by sending your patches to [email protected].
Matrix Extension
253
NetLogo 4.1.3 User Manual
254
Matrix Extension
Sound Extension
The Sound Extension for NetLogo provides primitives to add sound to NetLogo models. It supports
two ways of making sound: MIDI sounds, and playback of pre-recorded sound files.
Using the Sound Extension
The sound extension comes preinstalled. To use the extension in your model, add a line to the top
of your procedures tab:
extensions [sound]
If your model already uses other extensions, then it already has an extensions line in it, so just
add sound to the list.
For more information on using NetLogo extensions, see the Extensions Guide.
For examples that use the sound extension, see the Sound section under Code Examples in the
NetLogo Models Library.
MIDI support
The MIDI part simulates a 128-key electronic keyboard with 47 drums and 128 melodic instruments,
as provided by General MIDI Level 1 specification.
It supports 15 polyphonic instrument channels and a single percussion channel. Using more than 15
different melodic instruments simultaneously in a model will cause some sounds to be lost or cut off.
The pitch of a melodic instrument is specified by a key number. The keys on the keyboard are
numbered consecutively from 0 to 127, where 0 is the left-most key. Middle C is key number 60.
The loudness of an instrument is specified by a velocity, which represents the force with which the
keyboard key is depressed. Velocity ranges from 0 to 127, where 64 is the standard velocity. A
higher velocity results in a louder sound.
Primitives
sound:drums sound:instruments sound:play-drum sound:play-note sound:play-note-later
sound:play-sound sound:play-sound-and-wait sound:play-sound-later sound:start-note
sound:stop-note sound:stop-instrument sound:stop-music
sound:drums
sound:drums
Reports a list of the names of the 47 drums for use with "sound:play-drum".
Sound Extension
255
NetLogo 4.1.3 User Manual
sound:instruments
sound:instruments
Reports a list of the names of the 128 instruments for use with "sound:play-note",
"sound:play-note-later", "sound:start-note" and "sound:stop-note".
sound:play-drum
sound:play-drum drum velocity
Plays a drum.
sound:play-drum "ACOUSTIC SNARE" 64
sound:play-note
sound:play-note instrument keynumber velocity duration
Plays a note for a specified duration, in seconds. The agent does not wait for the note to finish
before continuing to next command.
;; play a trumpet at middle C for two seconds
sound:play-note "TRUMPET" 60 64 2
sound:play-note-later
sound:play-note-later delay instrument keynumber velocity duration
Waits for the specified delay before playing the note for a specified duration, in seconds. The agent
does not wait for the note to finish before continuing to next command.
;; in one second, play a trumpet at middle C for two seconds
sound:play-note-later 1 "TRUMPET" 60 64 2
sound:play-sound
sound:play-sound filename
Plays a sound file. It does not wait for the sound file to finish before moving to the next command. It
supports WAV, AIFF, and AU files.
;; plays the beep.wav sample file
sound:play-sound "beep.wav"
sound:play-sound-and-wait
256
Sound Extension
NetLogo 4.1.3 User Manual
sound:play-sound-and-wait filename
Plays a sound file, waiting for it to finish playing before moving to the next command. It supports
WAV, AIFF, and AU files.
;; plays the beep.wav sample file, waiting for it to finish before
;; playing boop.wav
sound:play-sound-and-wait "beep.wav"
sound:play-sound-and-wait "boop.wav"
sound:play-sound-later
sound:play-sound-later filename delay
Plays a sound file after the specified delay, in seconds. It does not wait for the sound file to play or
finish before moving to the next command. It supports WAV, AIFF, and AU files.
;; plays the beep.wav sample file one second from now
sound:play-sound-later "beep.wav" 1
sound:start-note
sound:start-note instrument keynumber velocity
Starts a note.
The note will continue until "sound:stop-note", "sound:stop-instrument" or "sound:stop-music" is
called.
;; play a violin at middle C
sound:start-note "VIOLIN" 60 64
;; play a C-major scale on a xylophone
foreach [60 62 64 65 67 69 71 72] [
sound:start-note "XYLOPHONE" ? 65
wait 0.2
sound:stop-note "XYLOPHONE" ?
]
sound:stop-note
sound:stop-note instrument keynumber
Stops a note.
;; stop a violin note at middle C
sound:stop-note "VIOLIN" 60
sound:stop-instrument
Sound Extension
257
NetLogo 4.1.3 User Manual
sound:stop-instrument instrument
Stops all notes of an instrument.
;; stop all cello notes
sound:stop-instrument "CELLO"
sound:stop-music
sound:stop-music
Stops all notes.
Sound names
Drums
35.
36.
37.
38.
39.
40.
41.
42.
43.
44.
45.
47.
47.
48.
49.
50.
51.
52.
53.
54.
55.
56.
57.
58.
Acoustic Bass Drum
Bass Drum 1
Side Stick
Acoustic Snare
Hand Clap
Electric Snare
Low Floor Tom
Closed Hi Hat
Hi Floor Tom
Pedal Hi Hat
Low Tom
Open Hi Hat
Low Mid Tom
Hi Mid Tom
Crash Cymbal 1
Hi Tom
Ride Cymbal 1
Chinese Cymbal
Ride Bell
Tambourine
Splash Cymbal
Cowbell
Crash Cymbal 2
Vibraslap
59.
60.
61.
62.
63.
64.
65.
66.
67.
68.
69.
70.
71.
72.
73.
74.
75.
76.
77.
78.
79.
80.
81.
Ride Cymbal 2
Hi Bongo
Low Bongo
Mute Hi Conga
Open Hi Conga
Low Conga
Hi Timbale
Low Timbale
Hi Agogo
Low Agogo
Cabasa
Maracas
Short Whistle
Long Whistle
Short Guiro
Long Guiro
Claves
Hi Wood Block
Low Wood Block
Mute Cuica
Open Cuica
Mute Triangle
Open Triangle
Instruments
Piano
1. Acoustic Grand Piano
2. Bright Acoustic Piano
3. Electric Grand Piano
4. Honky-tonk Piano
5. Electric Piano 1
6. Electric Piano 2
7. Harpsichord
8. Clavi
Reed
65. Soprano Sax
66. Alto Sax
67. Tenor Sax
68. Baritone Sax
69. Oboe
70. English Horn
71. Bassoon
72. Clarinet
Chromatic Percussion
9. Celesta
10. Glockenspiel
Pipe
73. Piccolo
74. Flute
258
Sound Extension
NetLogo 4.1.3 User Manual
11.
12.
13.
14.
15.
16.
Music Box
Vibraphone
Marimba
Xylophone
Tubular Bells
Dulcimer
75.
76.
77.
78.
79.
80.
Recorder
Pan Flute
Blown Bottle
Shakuhachi
Whistle
Ocarina
Organ
17. Drawbar Organ
18. Percussive Organ
19. Rock Organ
20. Church Organ
21. Reed Organ
22. Accordion
23. Harmonica
24. Tango Accordion
Synth Lead
81. Square Wave
82. Sawtooth Wave
83. Calliope
84. Chiff
85. Charang
86. Voice
87. Fifths
88. Bass and Lead
Guitar
25. Nylon String Guitar
26. Steel Acoustic Guitar
27. Jazz Electric Guitar
28. Clean Electric Guitar
29. Muted Electric Guitar
30. Overdriven Guitar
31. Distortion Guitar
32. Guitar harmonics
Synth Pad
89. New Age
90. Warm
91. Polysynth
92. Choir
93. Bowed
94. Metal
95. Halo
96. Sweep
Bass
33. Acoustic Bass
34. Fingered Electric Bass
35. Picked Electric Bass
36. Fretless Bass
37. Slap Bass 1
38. Slap Bass 2
39. Synth Bass 1
40. Synth Bass 2
Synth Effects
97. Rain
98. Soundtrack
99. Crystal
100. Atmosphere
101. Brightness
102. Goblins
103. Echoes
104. Sci-fi
Strings
41. Violin
42. Viola
43. Cello
44. Contrabass
45. Tremolo Strings
47. Pizzicato Strings
47. Orchestral Harp
48. Timpani
Ethnic
105. Sitar
106. Banjo
107. Shamisen
108. Koto
109. Kalimba
110. Bag pipe
111. Fiddle
112. Shanai
Ensemble
49. String Ensemble 1
50. String Ensemble 2
51. Synth Strings 1
52. Synth Strings 2
53. Choir Aahs
54. Voice Oohs
55. Synth Voice
56. Orchestra Hit
Percussive
113. Tinkle Bell
114. Agogo
115. Steel Drums
116. Woodblock
117. Taiko Drum
118. Melodic Tom
119. Synth Drum
120. Reverse Cymbal
Brass
57. Trumpet
58. Trombone
59. Tuba
60. Muted Trumpet
Sound Effects
121. Guitar Fret Noise
122. Breath Noise
123. Seashore
124. Bird Tweet
Sound Extension
259
NetLogo 4.1.3 User Manual
61.
62.
63.
64.
260
French Horn
Brass Section
Synth Brass 1
Synth Brass 2
125.
126.
127.
128.
Telephone Ring
Helicopter
Applause
Gunshot
Sound Extension
NetLogoLab and the GoGo Board Extension
What is NetLogoLab?
NetLogoLab is the technological infrastructure that connects NetLogo and the physical world. It can
be used for robotics, interactive art, scientific investigations, and model validation. For more
information, please check the NetLogoLab web site, where you will find academic papers and
demos.
NetLogoLab is comprised of the following software and hardware components:
1. A NetLogo extension to control a robotics or data-logging board.
2. A robotics or data-logging board (also know as a serial interface board, or analog-to-digital
board).
3. Sensor and actuator toolkits.
4. NetLogo models.
NetLogo's robotics/data-logging board of choice is the GoGo Board - an open-source, easy-to-build,
low-cost interface originally designed at the MIT Media Lab by Arnan Sipitakiat. Other robotics
hardware can be used with NetLogo, including those that are commercially available, such as
Vernier and Pasco sensors and actuators, Phidgets, Lego robotics kits, and VEX kits - but specific
extensions still need to be developed for each of those platforms. So far, only the GoGo Board
extension is available with NetLogo's standard distribution.
The GoGo Board NetLogo extension
The GoGo Board extension is a software component that enables the user to connect NetLogo with
the physical world using sensors, motors, light bulbs, LEDs, relays and other devices. The GoGo
Extension for NetLogo provides simple primitives to communicate with a GoGo board.
GoGo Board: a low-cost robotics and data-logging board
A GoGo Board is an open source, easy-to-build, low cost, general purpose serial interface board
especially designed to be used in school and for educational projects. It was created by Arnan
Sipitakiat with the collaboration of Paulo Blikstein at the MIT Media Lab in 2001, and has been
actively developed since then. It is currently used in over 10 countries, such as: the United States,
China, Thailand, Brazil, Portugal, Mexico, Malaysia, and Egypt.
Up to 8 sensors (i.e., temperature, light, pressure) and 4 output devices (i.e., motors, light bulbs,
LEDs, relays) can be connected to the board simultaneously. The board also has a connector for
add-on devices (such as a small display or a wireless communication module). Coupled to a serial
Bluetooth dongle (such as the Iogear or WCSC models), instead of a serial cable, it can be used as
a wireless device as well.
Sensor and actuator toolkits
NetLogo models can interact with the physical world in two ways. First, they can gather data from
the environment. This information can be used by the model to change or calibrate its behavior.
This data is gathered using electronic sensors, which can measure a wide range of phenomena:
NetLogoLab and the GoGo Board Extension
261
NetLogo 4.1.3 User Manual
temperature, light, touch (see pictures below), pH, chemical concentration, pressure, etc.
The second mode of interaction between NetLogo and the physical world is the control of output
devices, or "actuators" - motors, light bulbs (see pictures below), LEDs, and more complex devices
that include these outputs such as toys, remote controlled cars, electrical appliances, and
automated laboratory equipment.
262
NetLogoLab and the GoGo Board Extension
NetLogo 4.1.3 User Manual
For educators willing to start robotics or sensing projects, there are some important considerations
regarding the exact type of sensors and actuators to use - for example, the sturdiness, reliability,
"openness", and cost of these devices. Both vary greatly in price and complexity. For example, for
most educational projects, off-the-shelf, generic, low-cost sensors can be used with very reliable
results. A generic temperature sensor with a precision of 0.5 degrees Celsius can be purchased for
approximately US$ 1.00 at most sensor and electronics retailers. Using generic, low-cost sensors
requires very basic knowledge of electronics. For example, some basic soldering might be needed
to attach a piece of wire to the sensors. While this is feasible in schools and has been tried in
several educational settings, some educators might prefer to buy proprietary sensors and actuators,
which come assembled and ready to be used. Some companies offer proprietary systems for
educational sensing which are more sturdy and reliable than generic sensors, but are also much
more expensive. As a comparison, a proprietary temperature sensor could cost as much as US$
50.00. Actuators follow the same rule: for example, a generic geared motor could cost from US$ 3
to 10, while a proprietary version would retail for US$ 30 or 40.
Sensors and actuators can be found through online retailers such as Digikey, Mouser, Phidgets,
Spark Fun, and Solarbotics. More information about how to make sensors is available from the
"How to Make Sensors" web page on the GoGo board web site.
NetLogo models
To make use of the GoGo Board extension and the NetLogoLab framework, users need to create
NetLogo models using the special primitives made available by the extension. Later in this
document, we will provide examples of models that do this.
How to get a GoGo Board?
The GoGo Board is not a commercial product, and thus cannot be bought at stores. To get a GoGo
Board, you have to build one yourself or ask someone to do it for you. Many companies can
assemble boards, but they normally require a minimum quantity, which can range from 5 to 50. The
board was especially designed to be easy and cheap to build, even if you don't have electronics
skills. The main resource about the GoGo Board is the web site www.gogoboard.org, where you will
find step-by-step instructions on how to buy components, design the printed circuit board, and
assemble it. The GoGo Board mailing list is [email protected], and you can join it by
going to Yahoo groups. The GoGo Board wiki can be found at www.edudesign.org/gogowiki
NetLogoLab and the GoGo Board Extension
263
NetLogo 4.1.3 User Manual
Installing and testing the GoGo Extension
The GoGo Board needs to communicate with the computer in some way, and to do so it uses the
serial port. The choice of this port instead of a USB port was motivated by the board's low cost
principle: the components needed to build a USB compatible board would be more expensive. If
your computer does not have a serial port, you need to purchase a USB-to-Serial adapter, which
can be easily found in computer stores with prices ranging from US$ 15 to US$ 30 (if you have a
Mac or Linux machine, make sure the adapter is compatible with your platform). One brand that
normally works quite well for all platforms is Keyspan (USA-19HS model), although it is one of the
most expensive ones.
If you are using a serial to USB adapter you will need to make sure the drivers are installed before
you begin, the adapter may come with a CD with the appropriate drivers, otherwise you will need to
download them from the company's web site. Make sure to plug the adapter into the computer and
the GoGo board. Turn the GoGo board on using the switch behind the power connector. The GoGo
board will beep and the red light will turn on.
Windows
The GoGo extension requires no special installation on Windows.
Mac OS X
There is a bug either in Mac OS X or in the RXTX library that we use for the serial connection which
requires you to enter the following commands in the Terminal application
(/Applications/Utilities/Terminal.app) before the GoGo board will work:
sudo mkdir /var/lock
sudo chmod 1777 /var/lock
sudo rm /var/spool/uucp/*
Once you've completed the previous step you can start NetLogo. Open the GoGoMonitor example
and press the setup button. A dialog will pop up presenting a list of available ports. Select the port
that the GoGo board is plugged into. It might look something like this:
/dev/tty.KeySerial1
Where the words after /dev/tty. might be something related to the brand of adapter you have
and include the word "serial". If you can't figure out which port is the correct one you can find it in
the System Profiler (Apple Menu -> About This Mac -> More Info)
After you setup press the ping button, it should print true in the command center. You should also
notice values in the sensor monitors that may be fluctuating slightly.
If this does not work please contact us at [email protected].
Linux
You will need to be able to write to the serial devices, normally /dev/ttyS*. In most Linux
distributions this can be set up through the User Manager.
264
NetLogoLab and the GoGo Board Extension
NetLogo 4.1.3 User Manual
Using the GoGo Extension
The GoGo Extension comes preinstalled when you download and install NetLogo. To use the
extension in your model, add this line to the top of your procedures tab:
extensions [gogo]
If your model already uses other extensions, then it already has an extensions line in it, so just
add gogo to the list.
After loading the extension, see what ports are available by typing the following into the command
center:
print gogo:ports
You can open the serial port that the GoGo Board is connected to so that commands can begin to
be sent to the board by using the gogo:open command. To make sure the board is properly
connected, check that it is responding with the ping reporter. Note that in order to communicate
with the board, you need to know which communications port it is connected to. If you are not sure
which port is being used, you can use the gogo:ports primitive (see below), or you can find out by
using the Device Manager on a Windows computer (in the Control Panel, click on the System icon),
or the System Profiler on Macintosh OS X.
On Windows:
gogo:open "COM1"
print gogo:ping
On Linux:
gogo:open "/dev/ttyS01"
print gogo:ping
On Mac:
gogo:open "/dev/tty.KeySerial1"
print gogo:ping
For more information on NetLogo extensions, see the Extensions Guide.
Models saved as applets (using "Save as Applet" from the File menu) cannot use the GoGo
extension. Applets cannot use extensions that require additional libraries nor can they access
external devices. For examples that use the GoGo extension, see the Robotics/NetLogoLab section
under Sample Models in NetLogo's Models Library.
Examples of NetLogoLab models
Controlling a car
The first step when creating a NetLogoLab model is to add the extensions command to
NetLogo's procedure tab. Just go to the procedures tab and add this line:
NetLogoLab and the GoGo Board Extension
265
NetLogo 4.1.3 User Manual
extensions [gogo]
The second step is to create a button to connect NetLogo to the GoGo board using the correct
serial port for your operating system as described above.
gogo:open "COM1" ;; (for Windows machines)
When you are done creating the button, the "edit" dialog should look like this:
Now let's actually start the model. Imagine that we want to control a car with four wheels and two
motors attached to the back wheels. We will assume that you have built such as car and connected
the motors to the output ports "a" and "b" on the GoGo board. One very simple approach could be
to create two buttons for each motor, "on" and "off":
The code associated with these buttons is very simple: for the "on" button, we could simply have
gogo:talk-to-output-ports ["a"]
gogo:output-port-on
266
NetLogoLab and the GoGo Board Extension
NetLogo 4.1.3 User Manual
For the off button, it would be very similar:
gogo:talk-to-output-ports ["a"]
gogo:output-port-off
The other set of "on" and "off" buttons, used to control the second motor, would have very similar
code, except that we would use the second output port ("b"), so:
gogo:talk-to-output-ports ["b"]
We could make our model more interesting by adding a "toggle direction" button, adding a button
with the following code, which would reverse the direction of motors "a" and "b":
gogo:talk-to-output-ports ["a" "b"]
gogo:output-port-reverse
A simple sensing project
To create a simple sensing project, we will assume that you have added the GoGo extension to
your model and successfully opened a connection to the GoGo board, i.e., adding the "extensions"
command to the Procedures Tab and adding a "setup" button as previously described. For this
sensing project we do not need motors, but we will need another device: a temperature sensor
(click to see more information about a typical temperature sensor at Digikey's web site). Instructions
on how to purchase and assemble a temperature sensor can be found in the "Making Sensors"
tutorial on the GoGo Board's web site. This is how a temperature sensor will look after it has been
assembled:
The simplest use of a temperature sensor, obviously, is to display the temperature. We could
achieve this by adding a monitor to the NetLogo interface with this code:
gogo:sensor 1
NetLogoLab and the GoGo Board Extension
267
NetLogo 4.1.3 User Manual
The sensor values shown are arbitrary numbers within a given range, and need to be properly
converted to actual temperature units such as degrees Celsius or Fahrenheit. For all sensors, the
GoGo Board's reporting range is from 0 to 1023. Every sensor comes with a data sheet with a
converting formula or table that will transform the arbitrary 0-1023 range into an actual physical unit.
Let us imagine that the sensor's data sheet contains a conversion formula that looks like this:
degrees = arbitrary value / 30. The monitor on the NetLogo interface could be changed to:
gogo:sensor 1 / 30
The sensor value could also be used to control on-screen objects, such as turtles. For example, let
us create two buttons: a "create one turtle" button, which will clear the world and create a turtle, and
a "move with heat" button, that will cause the turtle to move forwards depending on the temperature
reading from the sensor. The code would look like this:
to create-one-turtle
clear-all
create-turtle
end
to move-with-heat
if gogo:sensor 1 < 500
[ forward 1 ]
end
If the "move with heat" forever button is activated and the user heats up the sensor (by rubbing it, or
slowly bringing a flame near it), the heat threshold will be achieved (< 500) and the turtle will move.
(Note that we are using one kind of temperature sensor for which resistance decreases with
temperature, and so the sensor readings will go down as we heat the sensor up. This is a very
common and inexpensive off-the-shelf sensor).
A more elaborate use of this sensor apparatus would be to control output devices, such as motors.
The user could, for example, turn a motor on when the value from the temperature sensor reaches
500, using the following code:
to turn-motor-on-with-heat
if gogo:sensor 1 < 500
[
gogo:talk-to-output-ports ["a"]
gogo:output-port-on
]
268
NetLogoLab and the GoGo Board Extension
NetLogo 4.1.3 User Manual
end
Another possible use of the sensing primitives is to plot and log data. Logging could be useful for
more elaborate data analysis and comparison, and can be achieved with NetLogo's list commands.
For example, if the user wants to log sensor values from sensor 1 every 0.5 seconds, the code
could look like this:
to log-data-from-sensor
set data-vector lput (gogo:sensor 1) data-vector
wait 0.5
end
Finally, plotting data is straightforward. The following code, for example, would create a graph for
the value of sensor 1:
plot (gogo:sensor 1)
For more information on the GoGo Board's extensions functionalities and primitives, please refer to
these two sample models: GoGoMonitor.nlogo and GoGoMonitorSimple.nlogo.
Primitives
gogo:burst-value gogo:close gogo:open gogo:open? gogo:ports gogo:output-port-coast
gogo:output-port-off gogo:output-port-reverse gogo:output-port-[that|this]way gogo:ping
gogo:sensor gogo:set-burst-mode gogo:set-output-port-power gogo:stop-burst-mode
gogo:talk-to-output-ports
gogo:burst-value
gogo:burst-value sensor
Reads the most recent value that was received by the gogo board from a sensor set to send burst
data.
See also gogo:set-burst-mode and gogo:stop-burst-mode.
gogo:close
gogo:close
Close the connection to the GoGo Board.
See also gogo:open and gogo:open?.
gogo:open
gogo:open port-name
Open a connection to the GoGo Board connected to serial port named port-name. See
gogo:ports for more information about port names.
NetLogoLab and the GoGo Board Extension
269
NetLogo 4.1.3 User Manual
If the GoGo Board is not responding, or you attempt to open a port without a GoGo Board
connected to it, an error will be generated.
Example:
gogo:open "COM1"
See also gogo:open? and gogo:close.
gogo:open?
gogo:open?
Reports true if there is a connection to a GoGo Board open. Reports false otherwise.
gogo:ports
gogo:ports
Reports a list of serial port names that a GoGo Board may be connected to. On certain computers,
you might get a list of two or three different serial ports. In that case, try to open each of them until
the connection is successful.
gogo:output-port-coast
gogo:output-port-coast
Turns off the power of the active ports. When attached to motors, does not apply a braking force as
gogo:output-port-off does. Therefore, the motor will gradually slow down before stopping
completely. This will have the same effect as gogo:output-port-off on most output devices
other than motors. The output-ports affected by this command are determined by the
gogo:talk-to-output-ports command.
The following code will turn on an output port a for 1 second, and then stop the motor gradually:
gogo:talk-to-output-ports ["a"]
gogo:output-port-on
wait 1
gogo:output-port-coast
gogo:output-port-off
gogo:output-port-off
Turns off power to the output ports. If using motors, a braking force is applied. The output ports
affected by this command are determined by the gogo:talk-to-output-ports command.
gogo:output-port-on
270
NetLogoLab and the GoGo Board Extension
NetLogo 4.1.3 User Manual
gogo:output-port-on
Turns on power to the output ports. The output ports affected by this command are determined by
the gogo:talk-to-output-ports command.
gogo:output-port-reverse
gogo:output-port-reverse
Reverses the direction of the output ports. The output ports affected by this command are
determined by the gogo:talk-to-output-ports command.
gogo:output-port-[that/this]way
gogo:output-port-thatway
gogo:output-port-thisway
Apply power to the output port in a given direction. Output ports can be powered in two directions,
arbitrarily called thisway and thatway. The output-ports affected by the command are determined by
the gogo:talk-to-output-ports command. Note that this is different from
gogo:output-port-reverse because thisway and thatway will always be the same direction
provided the connector's polarity is the same.
gogo:talk-to-output-ports
gogo:talk-to-output-ports output-portlist
This command will set the corresponding output ports as active. They will be the ones affected by
the commands such as gogo:output-port-on and gogo:output-port-off. The user can
"talk" to one or multiple ports at the same time. Output ports are typically connected to motors, but
you could also use bulbs, LEDs and relays. Output ports are identified by one letter names: "a", "b",
"c", and "d".
Examples:
;; talk to all output-ports
gogo:talk-to-output-ports [ "a" "b" "c" "d" ]
;; will give power to all output-ports
gogo:output-port-on
;; talk to output-ports A and D
gogo:talk-to-output-ports [ "a" "d" ]
;; will turn off output-ports A and D.
;; The other output-ports will keep
;; their current state
gogo:output-port-off
gogo:talk-to-output-ports [ "c" "b" ]
;; turn off remaining output-ports
gogo:output-port-off
NetLogoLab and the GoGo Board Extension
271
NetLogo 4.1.3 User Manual
gogo:ping
gogo:ping
Checks the status of GoGo board. This is mostly used to make sure the board is connected to the
correct serial port. It reports true if the GoGo Board responds to a diagnostic message, and false
otherwise.
Example:
print gogo:ping
gogo:sensor
gogo:sensor sensor
Reports the numeric value of the sensor named sensor. Sensors are identified by numbers 1 to 8.
Values range between 0-1023. 1023 is returned when there is no sensor attached to the port
(highest resistance), or when the sensor is an "open" state. Zero is returned when the sensor is
short circuited (no resistance).
Examples:
print gogo:sensor 1
;; prints the value of sensor 1
foreach [ 1 2 3 4 5 6 7 8 ]
[print (word "Sensor " ? " = " gogo:sensor ?)]
;; prints the value of all sensors
if gogo:sensor 1 < 500 [ ask turtles [ fd 10 ]]
;; will move all turtles 10 steps forward if sensor 1's value is less than 500.
loop [if gogo:sensor 1 < 500 [ ask turtles [ fd 10 ] ] ]
;; will continuously check sensor 1's value and
;; move all turtles 10 steps forward every time
;; that the sensor value is less than 500.
gogo:set-burst-mode
gogo:set-burst-mode sensor-list high-speed-mode?
Turns on "burst mode" for the sensors in sensor-list. If high-speed-mode? is true then high speed
burst mode will be used. If it is false, then low speed burst mode will be used.
See also gogo:burst-value and gogo:stop-burst-mode.
Examples:
gogo:set-burst-mode [ 1 2 3 ] true
;; turns on high speed burst mode for sensors 1, 2 and 3
gogo:set-burst-mode [ 4 ] false
272
NetLogoLab and the GoGo Board Extension
NetLogo 4.1.3 User Manual
;; turns on low speed burst mode for sensor 4
;; this will also override any previous set-burst-mode calls
;; so there will be no new burst mode data for sensors 1, 2 and 3
gogo:set-output-port-power
gogo:set-output-port-power power-level
Sets the power level of the active output ports. power-level is a number between 0 (off) and 7
(full-power). The output-ports affected by this command are determined by the
gogo:talk-to-output-ports command. Note that for many practical applications it is more
efficient to use mechanical devices, such as gears and pulleys, to control the torque of motors.
Example:
gogo:talk-to-motors ["a" "b" "c" "d"]
gogo:set-motor-power 4
;; will lower the power of all output ports by half of the full power .
gogo:stop-burst-mode
gogo:stop-burst-mode
Turns off "burst mode" for all sensors
See also gogo:burst-value and gogo:set-burst-mode.
NetLogoLab and the GoGo Board Extension
273
NetLogo 4.1.3 User Manual
274
NetLogoLab and the GoGo Board Extension
Profiler Extension
The profiler extension provides information which may help you make your model run faster. It
consists of a set of primitives for measuring how many times the procedures in your model are
called during a run and how long each call takes.
Caution
The profiler extension is new and experimental. It is not yet well tested or user friendly.
Nonetheless, we think some users will find it useful.
Usage
The profiler extension comes preinstalled. To use the extension in your model, add a line to the top
of your procedures tab:
extensions [profiler]
If your model already uses other extensions, then it already has an extensions line in it, so just
add profiler to the list.
For more information on using NetLogo extensions, see the Extensions Guide.
Example
setup
profiler:start
repeat 20 [ go ]
profiler:stop
print profiler:report
profiler:reset
;;
;;
;;
;;
;;
;;
set up the model
start profiling
run something you want to measure
stop profiling
view the results
clear the data
Code Example: Profiler Example
Primitives
profiler:calls profiler:exclusive-time profiler:inclusive-time profiler:start profiler:stop profiler:reset
profiler:report
profiler:calls
profiler:calls procedure-name
Reports the number of times that procedure-name was called. If procedure-name is not defined,
then reports 0.
Profiler Extension
275
NetLogo 4.1.3 User Manual
profiler:exclusive-time
profiler:exclusive-time procedure-name
Reports the exclusive time, in milliseconds, that procedure-name was running for. Exclusive time is
the time from when the procedure was entered, until it finishes, but does not include any time spent
in other user-defined procedures which it calls.
If procedure-name is not defined, then reports 0.
profiler:inclusive-time
profiler:inclusive-time procedure-name
Reports the inclusive time, in milliseconds, that procedure-name was running for. Inclusive time is
the time from when the procedure was entered, until it finishes.
If procedure-name is not defined, then reports 0.
profiler:start
profiler:start
Instructs the profiler to begin recording user-defined procedure calls.
profiler:stop
profiler:stop
Instructs the profiler to stop recording user-defined procedure calls.
profiler:reset
profiler:reset
Instructs the profiler to erase all collected data.
profiler:report
profiler:report
Reports a string containing a breakdown of all user-defined procedure calls. The Calls column
contains the number of times a user-defined procedure was called. The Incl T(ms) column is the
total time, in milliseconds, it took for the call to complete, including the time spent in other
user-defined procedures. The Excl T(ms) column is the total time, in milliseconds, spent within
that user-defined procedure, not counting other user-define procedures it called. The Excl/calls
column is an estimate of the time, in milliseconds, spent in that user-defined procedure for each call.
Here is example output:
276
Profiler Extension
NetLogo 4.1.3 User Manual
Sorted by Exclusive Time
Name
CALLTHEM
CALLME
REPORTME
Calls Incl T(ms) Excl T(ms) Excl/calls
13
26.066
19.476
1.498
13
6.413
6.413
0.493
13
0.177
0.177
0.014
Sorted by Inclusive Time
Name
CALLTHEM
CALLME
REPORTME
Calls Incl T(ms) Excl T(ms) Excl/calls
13
26.066
19.476
1.498
13
6.413
6.413
0.493
13
0.177
0.177
0.014
Sorted by Number of Calls
Name
CALLTHEM
Calls Incl T(ms) Excl T(ms) Excl/calls
13
26.066
19.476
1.498
Profiler Extension
277
NetLogo 4.1.3 User Manual
278
Profiler Extension
GIS Extension
This extension provides the ability to load vector GIS data (points, lines, and polygons), and raster
GIS data (grids) into NetLogo. The extension supports vector data in the form of ESRI shapefiles.
The shapefile (.shp) format is the most common format for storing and exchanging vector GIS data.
The extension supports raster data in the form of ESRI ascii Grid files. The ascii grid file (.asc or
.grd) is not as common as the shapefile, but is supported as an interchange format by most GIS
platforms.
We would love to hear your suggestions on how to improve the GIS extension -- or just about what
you're using it for. Please send all correspondence to Eric Russell and the NetLogo team at
[email protected].
How to use
See the included code example GIS General Examples for general examples of how to use the
extension, or the code example GIS Gradient Example for a more advanced example of raster
dataset analysis.
In general, you first define a transformation between GIS data space and NetLogo space, then load
datasets and perform various operations on them. The easiest way to define a transformation
between GIS space and NetLogo space is to take the union of the "envelopes" or bounding
rectangles of all of your datasets in GIS space and map that directly to the bounds of the NetLogo
world. See GIS General Examples for an example of this technique.
You may also optionally define a projection for the GIS space, in which case datasets will be
re-projected to match that projection as they are loaded, as long as each of your data files has an
associated .prj file that describes the projection or geographic coordinate system of the data. If no
associated .prj file is found, the extension will assume that the dataset already uses the current
projection, regardless of what that projection is.
Once the coordinate system is defined, you can load datasets using the gis:load-dataset primitive.
This primitive reports either a VectorDataset or a RasterDataset, depending on what type of file you
pass it.
A VectorDataset consists of a collection of VectorFeatures, each one of which is a point, line, or
polygon, along with a set of property values. A single VectorDataset may contain only one of the
three possible types of features.
There are several things you can do with a VectorDataset: ask it for the names of the properties of
its features, ask it for its "envelope" (bounding rectangle), ask for a list of all VectorFeatures in the
dataset, search for a single VectorFeature or list of VectorFeatures whose value for a particular
property is less than or greater than a particular value, or lies within a given range, or matches a
given string using wildcard matching ("*", which matches any number of occurrences of any
characters). If the VectorFeatures are polygons, you can also apply the values of a particular
property of the dataset's features to a given patch variable.
There are also several things you can do with a VectorFeature from a VectorDataset: ask it for a list
of vertex lists, ask it for a property value by name, ask it for its centroid (center of gravity), and ask
GIS Extension
279
NetLogo 4.1.3 User Manual
for a subset of a given agentset whose agents intersect the given VectorFeature. For point data,
each vertex list will be a one-element list. For line data, each vertex list will represent the vertices of
a line that makes up that feature. For polygon data, each vertex list will represent one "ring" of the
polygon, and the first and last vertex of the list will be the same. The vertex lists are made up of
values of type Vertex, and the centroid will be a value of type Vertex as well.
There are a number of operations defined for RasterDatasets as well. Mostly these involve sampling
the values in the dataset, or re-sampling a raster to a different resolution. You can also apply a
raster to a given patch variable, and convolve a raster using an arbitrary convolution matrix.
Known issues
The values of type RasterDataset, VectorDataset, VectorFeature, and Vertex are not handled
properly by export-world and import-world. To save datasets, you must use the
gis:store-dataset primitive.
There is currently no way to distinguish positive-area "shell" polygons from negative-area "hole"
polygons, or to determine which holes are associated with which shells.
GIS primitives
Coordinate System Primitives
set-transformation set-transformation-ds set-world-envelope set-world-envelope-ds world-envelope
envelope-of envelope-union-of load-coordinate-system set-coordinate-system
Dataset Primitives
load-dataset store-dataset type-of patch-dataset turtle-dataset link-dataset
VectorDataset Primitives
shape-type-of property-names feature-list-of vertex-lists-of centroid-of location-of property-value
find-features find-one-feature find-less-than find-greater-than find-range property-minimum
property-maximum apply-coverage coverage-minimum-threshold set-coverage-minimum-threshold
coverage-maximum-threshold set-coverage-maximum-threshold intersects? contains?
contained-by? have-relationship? relationship-of
RasterDataset Primitives
width-of height-of raster-value set-raster-value minimum-of maximum-of sampling-method-of
set-sampling-method raster-sample raster-world-envelope create-raster resample convolve
apply-raster
Drawing Primitives
drawing-color set-drawing-color draw fill paint
280
GIS Extension
NetLogo 4.1.3 User Manual
Coordinate System Primitives
gis:set-transformation
gis:set-transformation gis-envelope netlogo-envelope
Defines a mapping between GIS coordinates and NetLogo coordinates. The gis-envelope and
netlogo-envelope parameters must each be four-element lists consisting of:
[ minimum-x maximum-x minimum-y maximum-y ]
The scale of the transformation will be equal to the minimum of the scale necessary to make the
mapping between the ranges of x values and the scale necessary to make the mapping between
the ranges of y values. The GIS space will be centered in NetLogo space.
For example, the following two lists would map all of geographic (latitude and longitude) space in
degrees to NetLogo world space, regardless of the current dimensions of the NetLogo world:
(list -180 180 -90 90 )
(list min-pxcor max-pxcor min-pycor max-pycor)
However, if you're setting the envelope of the NetLogo world, you should probably be using
set-world-envelope below.
gis:set-transformation-ds
gis:set-transformation-ds gis-envelope netlogo-envelope
Does the same thing as set-transformation above, except that it allows the scale for mapping the
range of x values to be different than the scale for y values. The "-ds" on the end stands for
"different scales". Using different scales will cause distortion of the shape of GIS features, and so it
is generally not recommended, but it may be useful for some models.
Here is an example of the difference between set-transformation and set-transformation-ds:
Using set-transformation, the scale
along the x and y axis is the same,
preserving the round shape of the
Earth in this Orthographic
GIS Extension
Using set-transformation-ds, the
scale along the x axis is stretched so
that the earth covers the entire
NetLogo View, which in this case
281
NetLogo 4.1.3 User Manual
projection.
distorts the shape of the Earth.
gis:set-world-envelope
gis:set-world-envelope gis-envelope
A shorthand for setting the transformation by mapping the envelope of the NetLogo world to the
given envelope in GIS space, while keeping the scales along the x and y axis the same. It is
equivalent to:
set-transformation gis-envelope (list min-pxcor max-pxcor min-pycor max-pycor)
This primitive is supplied because most of the time you'll want to set the envelope of the entire
NetLogo world, rather than just a part of it.
gis:set-world-envelope-ds
gis:set-world-envelope-ds gis-envelope
A shorthand for setting the transformation by mapping the envelope of the NetLogo world to the
given envelope in GIS space, using different scales along the x and y axis if necessary. It is
equivalent to:
set-transformation-ds gis-envelope (list min-pxcor max-pxcor min-pycor max-pycor)
See the pictures above for the difference between using equal scales for x and y coordinates and
using different scales.
gis:world-envelope
gis:world-envelope
Reports the envelope (bounding rectangle) of the NetLogo world, transformed into GIS space. An
envelope consists of a four-element list of the form:
[ minimum-x maximum-x minimum-y maximum-y ]
gis:envelope-of
gis:envelope-of thing
Reports the envelope (bounding rectangle) of thing in GIS coordinates. The thing may be an Agent,
an AgentSet, a RasterDataset, a VectorDataset, or a VectorFeature. An envelope consists of a
four-element list of the form:
[ minimum-x maximum-x minimum-y maximum-y ]
282
GIS Extension
NetLogo 4.1.3 User Manual
gis:envelope-union-of
gis:envelope-union-of envelope1 envelope2
(gis:envelope-union-of envelope1 ...)
Reports an envelope (bounding rectangle) that entirely contains the given envelopes. An envelope
consists of a four-element list of the form
[ minimum-x maximum-x minimum-y maximum-y ]
No assumption is made about the coordinate system of the arguments, though if they are not in the
same coordinate system, results will be unpredictable.
gis:load-coordinate-system
gis:load-coordinate-system file
Loads a new global projection used for projecting or re- projecting GIS data as it is loaded from a
file. The file must contain a valid Well-Known Text (WKT) projection description.
WKT projection files are frequently distributed alongside GIS data files, and usually have a ".prj"
filename extension.
Relative paths are resolved relative to the location of the current model, or the user's home directory
if the current model hasn't been saved yet.
The GIS extension does not support all WKT coordinate systems and projections. Only geographic
("GEOGCS") and projected ("PROJCS") coordinate systems are supported. For projected
coordinate systems, only the following projections are supported:
Albers_Conic_Equal_Area
Lambert_Azimuthal_Equal_Area
Azimuthal_Equidistant
Cylindrical_Equal_Area
Equidistant_Conic
Gnomonic
Lambert_Conformal_Conic_2SP
Mercator_1SP
Miller
Oblique_Mercator
hotine_oblique_mercator
Orthographic
Polyconic
Robinson
Stereographic
Transverse_Mercator
See remotesensing.org for a complete list of WKT projections and their parameters.
gis:set-coordinate-system
gis:set-coordinate-system system
Sets the global projection used for projecting or re- projecting GIS data as it is loaded. The system
must be either a string in Well-Known Text (WKT) format, or a NetLogo list that consists of WKT
converted to a list by moving each keyword inside its associated brackets and putting quotes
around it. The latter is preferred because it makes the code much more readable.
GIS Extension
283
NetLogo 4.1.3 User Manual
The same limitations on WKT support apply as described above in the documentation for
load-coordinate-system
Dataset Primitives
gis:load-dataset
gis:load-dataset file
Loads the given data file, re-projecting the data as necessary if a global projection is defined and if
the data file itself has an associated .prj file, then reports the resulting dataset.
If no ".prj" file is present, then load-dataset assumes that the projection of the data being loaded
is the same as the current global coordinate system.
Relative paths are resolved relative to the location of the current model, or the user's home directory
if the current model hasn't been saved yet.
Currently, two types of data file are supported:
• ".shp" (ESRI shapefile): contains vector data, consisting of points, lines, or polygons. When
the target file is a shapefile, load-dataset reports a VectorDataset.
• ".asc" or ".grd" (ESRI ascii grid): contains raster data, consisting of a grid of values. When
the target file is an ascii grid file, load-dataset reports a RasterDataset.
gis:store-dataset
gis:store-dataset dataset file
Saves the given dataset to the given file. If the name of the file does not have the proper file
extension, the extension will be automatically appended to the name. Relative paths are resolved
relative to the location of the current model, or the user's home directory if the current model hasn't
been saved yet.
Currently, this primitive only works for RasterDatasets, and it can only save those datasets as ESRI
ascii grid files.
gis:type-of
gis:type-of dataset
Reports the type of the given GIS dataset: either "VECTOR" or "RASTER".
gis:patch-dataset
gis:patch-dataset patch-variable
Reports a new raster whose cells correspond directly to NetLogo patches, and whose cell values
consist of the values of the given patch variable. This primitive is basically the inverse of
284
GIS Extension
NetLogo 4.1.3 User Manual
apply-raster; apply-raster copies values from a raster dataset to a patch variable, while this
primitive copies values from a patch variable to a raster dataset.
gis:turtle-dataset
gis:turtle-dataset turtle-set
Reports a new, point VectorDataset built from the turtles in the given agentset. The points are
located at locations of the turtles, translated from NetLogo space into GIS space using the current
coordinate transformation. And the dataset's properties consist of all of the turtle variables common
to every turtle in the agentset.
gis:link-dataset
gis:link-dataset link-set
Reports a new, line VectorDataset built from the links in the given agentset. The endpoints of each
line are at the location of the turtles connected by each link, translated from NetLogo space into GIS
space using the current coordinate transformation. And the dataset's properties consist of all of the
link variables common to every link in the agentset.
VectorDataset Primitives
gis:shape-type-of
gis:shape-type-of VectorDataset
Reports the shape type of the given dataset. The possible output values are "POINT", "LINE", and
"POLYGON".
gis:property-names
gis:property-names VectorDataset
Reports a list of strings where each string is the name of a property possessed by each
VectorFeature in the given VectorDataset, suitable for use in gis:property-value.
gis:feature-list-of
gis:feature-list-of VectorDataset
Reports a list of all VectorFeatures in the given dataset.
gis:vertex-lists-of
gis:vertex-lists-of VectorFeature
Reports a list of lists of Vertex values. For point datasets, each vertex list will contain exactly one
vertex: the location of a point. For line datasets, each vertex list will contain at least two points, and
GIS Extension
285
NetLogo 4.1.3 User Manual
will represent a "polyline", connecting each adjacent pair of vertices in the list. For polygon datasets,
each vertex list will contain at least three points, representing a polygon connecting each vertex,
and the first and last vertices in the list will be the same.
gis:centroid-of
gis:centroid-of VectorFeature
Reports a single Vertex representing the centroid (center of gravity) of the given feature. For point
datasets, the centroid is defined as the average location of all points in the feature. For line
datasets, the centroid is defined as the average of the locations of the midpoints of all line segments
in the feature, weighted by segment length. For polygon datasets, the centroid is defined as the
weighted sum of the centroids of a decomposition of the area into (possibly overlapping) triangles.
See this FAQ for more details on the polygon centroid algorithm.
gis:location-of
gis:location-of Vertex
Reports a two-element list containing the x and y values (in that order) of the given vertex translated
into NetLogo world space using the current transformation, or an empty list if the given vertex lies
outside the NetLogo world.
gis:property-value
gis:property-value VectorFeature property-name
Reports the value of the property with the given name for the given VectorDataset. The reported
value may be a number, a string, or a boolean value, depending on the type of the field in the
underlying data file.
For shapefiles, values from dBase CHARACTER and DATE fields are returned as strings, values from
NUMBER and FLOAT fields are returned as numbers, and values from LOGICAL fields are returned
as boolean values. MEMO fields are not supported. DATE values are converted to strings using ISO
8601 format (YYYY-MM-DD).
gis:find-features
gis:find-features VectorDataset property-name string
Reports a list of all VectorFeatures in the given dataset whose value for the property property-name
matches the given string. Value comparison is not case sensitive, and the wildcard character "*" will
match any number of occurrences (including zero) of any character.
gis:find-one-feature
286
GIS Extension
NetLogo 4.1.3 User Manual
gis:find-one-feature VectorDataset property-name string
Reports the first VectorFeature in the dataset whose value for the property property-name matches
the given string. Value comparison is not case sensitive, and the wildcard character "*" will match
any number of occurrences (including zero) of any character. Features are searched in the order
that they appear in the data file that was the source of the dataset, and searching stops as soon as
a match is found. Reports nobody if no matching VectorFeature is found.
gis:find-less-than
gis:find-less-than VectorDataset property-name value
Reports a list of all VectorFeatures in the given dataset whose value for the property property-name
is less than the given value. String values are compared using case-sensitive lexicographic order as
defined in the Java Documentation. Using a string value for a numeric property or a numeric value
for a string property will cause an error.
gis:find-greater-than
gis:find-greater-than VectorDataset property-name value
Reports a list of all VectorFeatures in the given dataset whose value for the property property-name
is greater than the given value. String values are compared using case-sensitive lexicographic order
as defined in the Java Documentation. Using a string value for a numeric property or a numeric
value for a string property will cause an error.
gis:find-range
gis:find-range VectorDataset property-name minimum-value maximum-value
Reports a list of all VectorFeatures in the given dataset whose value for the property property-name
is strictly greater than minimum-value and strictly less than maximum-value. String values are
compared using case-sensitive lexicographic order as defined in the Java Documentation. Using a
string value for a numeric property or a numeric value for a string property will cause an error.
gis:property-minimum
gis:property-minimum VectorDataset property-name
Reports the smallest value for the given property over all of the VectorFeatures in the given dataset.
String values are compared using case-sensitive lexicographic order as defined in the Java
Documentation.
gis:property-maximum
gis:property-maximum VectorDataset property-name
Reports the largest value for the given property over all of the VectorFeatures in the given dataset.
String values are compared using case-sensitive lexicographic order as defined in the Java
GIS Extension
287
NetLogo 4.1.3 User Manual
Documentation.
gis:apply-coverage
gis:apply-coverage VectorDataset property-name patch-variable
Copies values from the given property of the VectorDataset's features to the given patch variable.
The dataset must be a polygon dataset; points and lines are not supported.
For each patch, it finds all VectorFeatures that intersect that patch. Then, if the property is a string
property, it computes the majority value by computing the total area of the patch covered by
VectorFeatures having each possible value of the property, then returning the value which
represents the largest proportion of the patch area. If the property is a numeric property, it computes
a weighted average of property values from all VectorFeatures which intersect the patch, weighted
by the proportion of the patch area they cover.
There are two exceptions to this default behavior:
• If a percentage of a patches' area greater than the coverage-maximum-threshold is covered
by a single VectorFeature, then the property value from that VectorFeature is copied directly.
If more than one VectorFeature covers a percentage of area greater than the threshold, only
the first will be used.
• If the total percentage of a patches' area covered by VectorFeatures is less than the
coverage-minimum-threshold, the target patch variable is set to Not A Number.
By default, the minimum threshold is 10% and the maximum threshold is 33%. These values may
be modified using the four primitives that follow.
gis:coverage-minimum-threshold
gis:coverage-minimum-threshold
Reports the current coverage minimum threshold used by gis:apply-coverage.
gis:set-coverage-minimum-threshold
gis:set-coverage-minimum-threshold new-threshold
Sets the current coverage minimum threshold to be used by gis:apply-coverage.
gis:coverage-maximum-threshold
gis:coverage-maximum-threshold
Reports the current coverage maximum threshold used by gis:apply-coverage.
gis:set-coverage-maximum-threshold
288
GIS Extension
NetLogo 4.1.3 User Manual
gis:set-coverage-maximum-threshold new-threshold
Sets the current coverage maximum threshold to be used by gis:apply-coverage.
gis:intersects?
gis:intersects? x y
Reports true if the given objects' spatial representations share at least one point in common, and
false otherwise. The objects x and y may be any one of
• a VectorDataset, in which case the object's spatial representation is the union of all the
points, lines, or polygons the dataset contains.
• a VectorFeature, in which case the object's spatial representation is defined by the point,
line, or polygon the feature contains.
• A turtle, in which case the spatial representation is a point.
• A link, whose spatial representation is a line segment connecting the two points represented
by the turtles the link is connecting.
• A patch, whose spatial representation is a rectangular polygon.
• An agentset, whose spatial representation is the union of the representations of all of the
agents it contains.
• A list containing of any of the items listed here, including another list. The spatial
representation of such a list is the union of the spatial representations of its contents.
gis:contains?
gis:contains? x y
Reports true if every point of y's spatial representation is also a part of x's spatial representation.
Note that this means that polygons do contain their boundaries. The objects x and y may be any
one of
• a VectorDataset, in which case the object's spatial representation is the union of all the
points, lines, or polygons the dataset contains.
• a VectorFeature, in which case the object's spatial representation is defined by the point,
line, or polygon the feature contains.
• A turtle, in which case the spatial representation is a point.
• A link, whose spatial representation is a line segment connecting the two points represented
by the turtles the link is connecting.
• A patch, whose spatial representation is a rectangular polygon.
• An agentset, whose spatial representation is the union of the representations of all of the
agents it contains.
• A list containing of any of the items listed here, including another list. The spatial
representation of such a list is the union of the spatial representations of its contents.
gis:contained-by?
GIS Extension
289
NetLogo 4.1.3 User Manual
gis:contained-by? x y
Reports true if every point of x's spatial representation is also a part of y's spatial representation.
The objects x and y may be any one of
• a VectorDataset, in which case the object's spatial representation is the union of all the
points, lines, or polygons the dataset contains.
• a VectorFeature, in which case the object's spatial representation is defined by the point,
line, or polygon the feature contains.
• A turtle, in which case the spatial representation is a point.
• A link, whose spatial representation is a line segment connecting the two points represented
by the turtles the link is connecting.
• A patch, whose spatial representation is a rectangular polygon.
• An agentset, whose spatial representation is the union of the representations of all of the
agents it contains.
• A list containing of any of the items listed here, including another list. The spatial
representation of such a list is the union of the spatial representations of its contents.
gis:have-relationship?
gis:have-relationship? x y relationship
Reports true if the spatial representations of the two objects have the given spatial relationship, and
false otherwise. The spatial relationship is specified using a Dimensionally Extended NineIntersection Model (DE-9IM) matrix. The matrix consists of 9 elements, each of which specifies the
required relationship between the two objects' interior space, boundary space, or exterior space.
The elements must have one of six possible values:
• "T", meaning the spaces must intersect in some way
• "F", meaning the spaces must not intersect in any way
• "0", meaning the dimension of the spaces' intersection must be zero (i.e., it must be a point
or non-empty set of points).
• "1", meaning the dimension of the spaces' intersection must be one (i.e., it must be a line or
non-empty set of line segments).
• "2", meaning the dimension of the spaces' intersection must be two (i.e., it must be a
polygon or set of polygons whose area is greater than zero).
• "*", meaning that the two spaces may have any relationship.
For example, this matrix:
x
Interior Boundary Exterior
Interior
T
*
*
y Boundary
*
*
*
Exterior
F
F
*
would return true if and only if some part of object x's interior lies inside object y's interior, and no
part of object x's interior or boundary intersects object y's exterior. This is essentially a more
restrictive form of the contains? primitive; one in which polygons are not considered to contain
their boundaries.
290
GIS Extension
NetLogo 4.1.3 User Manual
The matrix is given to the have-relationship? primitive as a string, whose elements are given
in the following order:
1
2
4
5
7
8
So to use the example matrix above, you would write:
3
6
9
gis:have-relationship? x y "T*****FF*"
A much more detailed and formal description of the DE-9IM matrix and the associated point-set
theory can be found in the OpenGIS Simple Features Specification for SQL.
The objects x and y may be any one of
• a VectorDataset, in which case the object's spatial representation is the union of all the
points, lines, or polygons the dataset contains.
• a VectorFeature, in which case the object's spatial representation is defined by the point,
line, or polygon the feature contains.
• A turtle, in which case the spatial representation is a point.
• A link, whose spatial representation is a line segment connecting the two points represented
by the turtles the link is connecting.
• A patch, whose spatial representation is a rectangular polygon.
• An agentset, whose spatial representation is the union of the representations of all of the
agents it contains.
• A list containing of any of the items listed here, including another list. The spatial
representation of such a list is the union of the spatial representations of its contents.
gis:relationship-of
gis:relationship-of x y
Reports the Dimensionally Extended Nine-Intersection Model (DE-9IM) matrix that describes the
spatial relationship of the two objects. The matrix consists of 9 elements, each of which describes
the relationship between the two objects' interior space, boundary space, or exterior space. Each
element will describe the dimension of the intersection of two spaces, meaning that it may have one
of four possible values:
• "-1", meaning the spaces do not intersect
• "0", meaning the dimension of the spaces' intersection is zero (i.e., they intersect at a point
or set of points).
• "1", meaning the dimension of the spaces' intersection is one (i.e., they intersect along one
or more lines).
• "2", meaning the dimension of the spaces' intersection is two (i.e., their intersection is a
non-empty polygon).
For example, the two polygons x and y shown here:
GIS Extension
291
NetLogo 4.1.3 User Manual
have the following DE-9IM matrix:
x
Interior Boundary Exterior
Interior
2
1
2
y Boundary
1
0
1
Exterior
2
1
2
Which would be reported by the relationship-of primitive as the string "212101212".
A much more detailed and formal description of the DE-9IM matrix and the associated point-set
theory can be found in the OpenGIS Simple Features Specification for SQL.
The objects x and y may be any one of
• a VectorDataset, in which case the object's spatial representation is the union of all the
points, lines, or polygons the dataset contains.
• a VectorFeature, in which case the object's spatial representation is defined by the point,
line, or polygon the feature contains.
• A turtle, in which case the spatial representation is a point.
• A link, whose spatial representation is a line segment connecting the two points represented
by the turtles the link is connecting.
• A patch, whose spatial representation is a rectangular polygon.
• An agentset, whose spatial representation is the union of the representations of all of the
agents it contains.
• A list containing of any of the items listed here, including another list. The spatial
representation of such a list is the union of the spatial representations of its contents.
gis:intersecting
patch-set gis:intersecting data
Reports a new agent set containing only those members of the given agent set which intersect
given GIS data, which may be any one of: a VectorDataset, a VectorFeature, an Agent, an Agent
Set, or a list containing any of the above.
RasterDataset Primitives
292
GIS Extension
NetLogo 4.1.3 User Manual
gis:width-of
gis:width-of RasterDataset
Reports the number of columns in the dataset. Note that this is the number of cells from left to right,
not the width of the dataset in GIS space.
gis:height-of
gis:height-of RasterDataset
Reports the number of rows in the dataset. Note that this is the number of cells from top to bottom,
not the height of the dataset in GIS space.
gis:raster-value
gis:raster-value RasterDataset x y
Reports the value of the given raster dataset in the given cell. Cell coordinates are numbered from
left to right, and from top to bottom, beginning with zero. So the upper left cell is (0, 0), and the
bottom right cell is (gis:width-of dataset - 1, gis:height-of dataset - 1).
gis:set-raster-value
gis:set-raster-value RasterDataset x y value
Sets the value of the given raster dataset at the given cell to a new value. Cell coordinates are
numbered from left to right, and from top to bottom, beginning with zero. So the upper left cell is (0,
0), and the bottom right cell is (gis:width-of dataset - 1, gis:height-of dataset - 1).
gis:minimum-of
gis:minimum-of RasterDataset
Reports the highest value in the given raster dataset.
gis:maximum-of
gis:maximum-of RasterDataset
Reports the lowest value in the given raster dataset.
gis:sampling-method-of
gis:sampling-method-of RasterDataset
Reports the sampling method used to compute the value of the given raster dataset at a single
point, or over an area smaller than a single raster cell. Sampling is performed by the GIS extension
primitives raster-sample, resample, convolve, and apply-raster. The sampling method will be one of
GIS Extension
293
NetLogo 4.1.3 User Manual
the following:
• "NEAREST_NEIGHBOR": the value of the cell nearest the sampling location is used.
• "BILINEAR": the value of the four nearest cells are sampled by linear weighting, according
to their proximity to the sampling site.
• "BICUBIC": the value of the sixteen nearest cells are sampled, and their values are
combined by weight according to a piecewise cubic polynomial recommended by Rifman
(see Digital Image Warping, George Wolberg, 1990, pp 129-131, IEEE Computer Society
Press).
• "BICUBIC_2": the value is sampled using the same procedure and the same polynomial as
with BICUBIC above, but using a different coefficient. This method may produce somewhat
sharper results than BICUBIC, but that result is data dependent.
For more information on these sampling methods and on raster sampling in general, see this
wikipedia article.
gis:set-sampling-method
gis:set-sampling-method RasterDataset sampling-method
Sets the sampling method used by the given raster dataset at a single point, or over an area smaller
than a single raster cell. Sampling is performed by the GIS extension primitives raster-sample,
resample, convolve, and apply-raster. The sampling method must be one of the following:
• "NEAREST_NEIGHBOR"
• "BILINEAR"
• "BICUBIC"
• "BICUBIC_2"
See sampling-method-of above for a more specific description of each sampling method.
gis:raster-sample
gis:raster-sample RasterDataset sample-location
Reports the value of the given raster over the given location. The location may be any of the
following:
• A list of length 2, which is taken to represent a point in netlogo space ([ xcor ycor ]) of
the sort reported by location-of Vertex. The raster dataset is sampled at the point of that
location.
• A list of length 4, which is taken to represent an envelope in GIS space, of the sort reported
by envelope-of. The raster dataset is sampled over the area of that envelope.
• A patch, in which case the raster dataset is sampled over the area of the patch.
• A turtle, in which case the raster dataset is sampled at the location of that turtle.
• A Vertex, in which case the raster dataset is sampled at the location of that Vertex.
If the requested location is outside the area covered by the raster dataset, this primitive reports the
special value representing "not a number", which is printed by NetLogo as "NaN". Using the special
"not a number" value as an argument to primitives that expect a number may cause an error, but
294
GIS Extension
NetLogo 4.1.3 User Manual
you can test the value reported by this primitive to filter out "not a number" values. A value that is
not a number will be neither less than nor greater than a number value, so you can detect "not a
number" values using the following:
let value gis:raster-sample dataset turtle 0
; set color to blue if value is a number, red if value is "not a number"
ifelse (value <= 0) or (value >= 0)
[ set color blue ]
[ set color red ]
If the requested location is a point, the sample is always computed using the method set by
set-sampling-method. If the requested location is an area (i.e., an envelope or patch), the sample is
computed by taking the average of all raster cells covered by the requested area.
gis:raster-world-envelope
gis:raster-world-envelope RasterDataset x y
Reports the GIS envelope needed to match the boundaries of NetLogo patches with the boundaries
of cells in the given raster dataset. This envelope could then be used as an argument to
set-transformation-ds.
There may be more cells in the dataset than there are patches in the NetLogo world. In that case,
you will need to select a subset of cells in the dataset by specifying which cell in the dataset you
want to match with the upper-left corner of the NetLogo world. Cells are numbered from left to right,
and from top to bottom, beginning with zero. So the upper left cell is (0, 0), and the bottom right cell
is (gis:width-of dataset - 1, gis:height-of dataset - 1).
gis:create-raster
gis:create-raster width height envelope
Creates and reports a new, empty raster dataset with the given number of columns and rows,
covering the given envelope.
gis:resample
gis:resample RasterDataset envelope width height
Reports a new dataset that consists of the given RasterDataset resampled to cover the given
envelope and to contain the given number of columns and rows. If the new raster's cells are smaller
than the existing raster's cells, they will be resampled using the method set by
set-sampling-method. If the new cells are larger than the original cells, they will be sampled using
the "NEAREST_NEIGHBOR" method.
gis:convolve
GIS Extension
295
NetLogo 4.1.3 User Manual
gis:convolve RasterDataset kernel-rows kernel-columns kernel key-column key-row
Reports a new raster whose data consists of the given raster convolved with the given kernel.
A convolution is a mathematical operation that computes each output cell by multiplying elements of
a kernel with the cell values surrounding a particular source cell. A kernel is a matrix of values, with
one particular value defined as the "key element", the value that is centered over the source cell
corresponding to the destination cell whose value is being computed.
The values of the kernel matrix are given as a list, which enumerates the elements of the matrix
from left to right, top to bottom. So the elements of a 3-by-3 matrix would be listed in the following
order:
1
2
3
4
5
6
7
8
9
The key element is specified by column and row within the matrix. Columns are numbered from left
to right, beginning with zero. Rows are numbered from top to bottom, also beginning with zero. So,
for example, the kernel for the horizontal Sobel operator, which looks like this:
1
2
0
0
(key)
1
0
-1
-2
-1
would be specified as follows:
let horizontal-gradient gis:convolve dataset 3 3 [ 1 0 -1 2 0 -2 1 0 -1 ] 1 1
gis:apply-raster
gis:apply-raster RasterDataset patch-variable
Copies values from the given raster dataset to the given patch variable, resampling the raster as
necessary so that its cell boundaries match up with NetLogo patch boundaries. This resampling is
done as if using resample rather than raster-sample, for the sake of efficiency. However, patches
not covered by the raster are assigned values of "not a number" in the same way that raster-sample
reports values for locations outside the raster.
Drawing Primitives
gis:drawing-color
gis:drawing-color
Reports the color used by the GIS extension to draw vector features into the NetLogo drawing layer.
Color can be represented either as a NetLogo color (a single number between zero and 140) or an
RGB color (a list of 3 numbers). See details in the Colors section of the Programming Guide.
296
GIS Extension
NetLogo 4.1.3 User Manual
gis:set-drawing-color
gis:set-drawing-color color
Sets the color used by the GIS extension to draw vector features into the NetLogo drawing layer.
Color can be represented either as a NetLogo color (a single number between zero and 140) or an
RGB color (a list of 3 numbers). See details in the Colors section of the Programming Guide.
gis:draw
gis:draw vector-data line-thickness
Draws the given vector data to the NetLogo drawing layer, using the current GIS drawing color, with
the given line thickness. The data may consist either of an entire VectorDataset, or a single
VectorFeature. This primitive draws only the boundary of polygon data, and for point data, it fills a
circle with a radius equal to the line thickness.
gis:fill
gis:fill vector-data line-thickness
Fills the given vector data in the NetLogo drawing layer using the current GIS drawing color, using
the given line thickness around the edges. The data may consist either of an entire VectorDataset,
or a single VectorFeature. For point data, it fills a circle with a radius equal to the line thickness.
gis:paint
gis:paint RasterDataset transparency
Paints the given raster data to the NetLogo drawing layer. The highest value in the dataset is
painted white, the lowest is painted in black, and the other values are painted in shades of gray
scaled linearly between white and black.
The transparency input determines how transparent the new image in the drawing will be. Valid
inputs range from 0 (completely opaque) to 255 (completely transparent).
gis:import-wms-drawing
gis:import-wms-drawing server-url spatial-reference layers transparency
Imports an image into the NetLogo drawing layer using the Web Mapping Service protocol, as
defined by the Open Geospatial Consortium.
The spatial reference and layers inputs should be given as strings. The spatial reference input
corresponds to the SRS parameter to the GetMap request as defined in section 7.2.3.5 of version
1.1.1 of the WMS standard. The layers input corresponds to the LAYERS parameter to the as
defined in 7.2.3.3 of version 1.1.1 of the WMS standard.
You can find the list of valid spatial reference codes and layer names by examining the response to
GIS Extension
297
NetLogo 4.1.3 User Manual
a GetCapabilities request to the WMS server. Consult the relevant standard for instructions on how
to issue a GetCapabilities request to the server and how to interpret the results.
The transparency input determines how transparent the new image in the drawing will be. Valid
inputs range from 0 (completely opaque) to 255 (completely transparent).
Acknowledgments
The GIS extension makes use of the following open-source software libraries, for information on
copyrights and licenses see the copyright section of the manual.
• Java Topology Suite,
• JScience
• Java Advanced Imaging
• Apache Commons Codec
• Apache Jakarta HttpClient
• Apache Commons Logging
The extension also contains elements borrowed from My World GIS.
This documentation and the example NetLogo models are in the public domain, but the GIS
extension itself is not. See the file LICENSE.txt in the extension/gis directory for details.
298
GIS Extension
FAQ (Frequently Asked Questions)
Feedback from users is very valuable to us in designing and improving NetLogo. We'd like to hear
from you. Please send comments, suggestions, and questions to [email protected],
and bug reports to [email protected].
Questions
General
• Why is it called NetLogo?
• How do I cite NetLogo in an academic publication?
• How do I cite a model from the Models Library in an academic publication?
• Where and when was NetLogo created?
• What programming language was NetLogo written in?
• What's the difference between StarLogo, MacStarLogo, StarLogoT, and NetLogo?
• Under what license is NetLogo released? Is the source code available?
• Do you offer any workshops or other training opportunities for NetLogo?
• Are there any NetLogo textbooks?
• Is NetLogo available in a Spanish version, Chinese version, (your language here)
version, etc.?
• Is NetLogo compiled or interpreted?
• Has anyone built a model of <x>?
• Are NetLogo models runs scientifically reproducible?
• Will NetLogo and NetLogo 3D remain separate applications?
Downloading
• Can I have multiple versions of NetLogo installed at the same time?
• I'm on a UNIX system and I can't untar the download. Why?
• How do I install NetLogo unattended?
• On Windows, how do I configure the Java installation that the without-Java installer
uses?
Applets
• I tried to run one of the applets on your site, but it didn't work. What should I do?
• When running my model as an applet, I get the following error:
java.lang.OutOfMemoryError: Java heap space.
• Can I make my model available as an applet while keeping the code secret?
• Can a model saved as an applet use import-world, file-open, and other
commands that read files?
• When I tried loading my model as an applet I get an error like:
java.lang.ClassFormatError: Incompatible magic value.
Running
• Can I run NetLogo from a CD, a network drive, or a USB drive?
FAQ (Frequently Asked Questions)
299
NetLogo 4.1.3 User Manual
• Why is NetLogo so much slower when I unplug my Windows laptop?
• How come NetLogo won't start up on my Linux machine?
• When I try to start NetLogo on Windows I get an error "The JVM could not be started".
Help!
• Can I run NetLogo from the command line, without the GUI?
• Does NetLogo take advantage of multiple processors/cores?
• Can I distribute NetLogo model runs across a cluster or grid of computers?
• Is there any way to recover lost work if NetLogo crashes or freezes?
Usage
• When I move the speed slider all the way to the right, why does my model seem to
stop?
• Can I use the mouse to "paint" in the view?
• How big can my model be? How many turtles, patches, procedures, buttons, and so
on can my model contain?
• Can I use GIS data in NetLogo?
• My model runs slowly. How can I speed it up?
• Can I have more than one model open at a time?
• Can I change the choices in a chooser on the fly?
• Can I divide the code for my model up into several files?
Programming
• How is the NetLogo language different from the StarLogo and StarLogoT languages?
How do I convert my StarLogo or StarLogoT model to NetLogo?
• How does the NetLogo language differ from other Logos?
• How come my model from an earlier NetLogo doesn't work right?
• Why does my code have strange characters in it?
• How do I take the negative of a number?
• My turtle moved forward 1, but it's still on the same patch. Why?
• How do I keep my turtles on patch centers?
• patch-ahead 1 is reporting the same patch my turtle is already standing on. Why?
• How do I give my turtles "vision"?
• Can agents sense what's in the drawing layer?
• I'm getting numbers like 0.10000000004 and 0.799999999999 instead of 0.1 and 0.8.
Why?
• The documentation says that random-float 1.0 might return 0.0 but will never
return 1.0. What if I want 1.0 to be included?
• How can I use different patch "neighborhoods" (circular, Von Neumann, Moore, etc.)?
• How can I keep two turtles from occupying the same patch?
• How can I find out if a turtle is dead?
• Does NetLogo have arrays?
• Does NetLogo have hash tables or associative arrays?
• How can I convert an agentset to a list, or vice versa?
• How do I stop foreach?
300
FAQ (Frequently Asked Questions)
NetLogo 4.1.3 User Manual
BehaviorSpace
• Why are the rows in my BehaviorSpace table results out of order?
• How do I gather data every n ticks?
• I'm varying a global variable I declared in the Procedures tab, but it doesn't work.
Why?
• Why are some of my results cut off in Excel?
Extensions
• I'm writing an extension. Why does the compiler say it can't find org.nlogo.api?
General
Why is it called NetLogo?
The "Logo" part is because NetLogo is a dialect of the Logo language.
"Net" is meant to evoke the decentralized, interconnected nature of the phenomena you can model
with NetLogo, including network phenomena. It also refers to HubNet, the multiuser participatory
simulation environment included in NetLogo.
How do I cite NetLogo in an academic publication?
NetLogo itself: Wilensky, U. 1999. NetLogo. http://ccl.northwestern.edu/netlogo/. Center for
Connected Learning and Computer-Based Modeling, Northwestern University. Evanston, IL.
HubNet: Wilensky, U. & Stroup, W., 1999. HubNet. http://ccl.northwestern.edu/netlogo/hubnet.html.
Center for Connected Learning and Computer-Based Modeling, Northwestern University. Evanston,
IL.
How do I cite a model from the Models Library in a publication?
The correct citation is included in the CREDITS AND REFERENCES section of every model's
Information tab.
Where and when was NetLogo created?
NetLogo was first created in 1999 by Uri Wilensky at the Center for Connected Learning and
Computer-Based Modeling, then at Tufts University in the Boston area. NetLogo grew out of
StarLogoT, which was authored by Wilensky in 1997. In 2000, the CCL moved to Northwestern
University, in the Chicago area. NetLogo 1.0 came out in 2002, 2.0 in 2003, 3.0 in 2005, 4.0 in
2007, and 4.1 in 2009.
What programming language was NetLogo written in?
NetLogo is written mostly in Java.
FAQ (Frequently Asked Questions)
301
NetLogo 4.1.3 User Manual
Some parts, such as BehaviorSpace and the compiler, are written in Scala. Scala code compiles to
Java byte code and is fully interoperable with Java and other JVM languages.
What's the difference between StarLogo, MacStarLogo, StarLogoT, and
NetLogo?
The original StarLogo was developed at the MIT Media Lab in 1989-1990 and ran on a massively
parallel supercomputer called the Connection Machine. A few years later (1994), a single threaded
version was developed for the Macintosh computer. That version eventually became MacStarLogo.
StarLogoT (1997), developed at the Center for Connected Learning and Computer-Based Modeling
(CCL), is essentially an extended version of MacStarLogo with many additional features and
capabilities.
Since then two multi-platform Java-based multi-agent Logos have been developed: NetLogo (from
the CCL) and a Java-based version of StarLogo (from MIT).
The NetLogo language and environment differ in many respects from MIT StarLogo's. Both
languages were inspired by the original StarLogo, but were redesigned in different ways. NetLogo's
design was driven by the need to revise and expand the language so it is easier to use and more
powerful and by the need to support the HubNet architecture. NetLogo incorporates almost all of the
extended functionality of our earlier StarLogoT, as well as many newer features.
Under what license is NetLogo released? Is the source code available?
The license is given in the "Copyright" section of the NetLogo User Manual, as well as in the
application's about box and the README file accompanying the download.
A quick summary of the license is that use is unrestricted, including commercial use, but there are
some restrictions on redistribution and/or modification (unless you contact Uri Wilensky to arrange
different terms).
At present, the source code for most of NetLogo is not publicly available. We are working on
eventually releasing the source under an open source license.
BehaviorSpace, however, is free and open source software under the GNU LGPL license. Also, all
of the extensions currently bundled with NetLogo are free and open source. You will find the source
code for BehaviorSpace and the bundled extensions included in the NetLogo distribution.
NetLogo is not a closed platform. We provide APIs for controlling NetLogo from external code and
extending the language with new commands and reporters. (See "Controlling" and "Extensions" in
the User Manual.) We encourage users to write NetLogo extensions and share them with the
NetLogo user community.
Do you offer any workshops or other training opportunities for
NetLogo?
We offer workshops from time to time. If a workshop has been scheduled, we will announce it on
the netlogo-users group.
302
FAQ (Frequently Asked Questions)
NetLogo 4.1.3 User Manual
Are there any NetLogo textbooks?
See the Textbooks section of our Resources page.
We at the CCL have hoped to write several NetLogo textbooks for quite some time. These could be
aimed at different audiences, such as: middle school, high school, undergraduate course in
modeling or complexity, practical guide for interested adults.
Unfortunately, we have not yet been able to find the time to make these happen. If anyone from the
user community would like to collaborate on such a venture, please let us know. We would welcome
it.
Is NetLogo available in a Spanish version, Chinese version, (your
language here) version, etc.?
At present, NetLogo is available only in English.
We plan to eventually make it possible for users to produce their own foreign-language "packs" for
NetLogo and share them with each other. In order to do this, we need to separate all of the English
text from the rest of the source code, so that is separately editable. We're not sure when this will
happen.
The user manual has been translated into Chinese and Czech. The translated versions are
available from the NetLogo web site.
Is NetLogo compiled or interpreted?
Short answer: partially compiled; we are working towards a full compiler.
Long answer: NetLogo does include a compiler that generates Java byte code. However, this
compiler does not yet support the entire language, so some parts of user code are interpreted. We
are working on expanding the compiler to support the entire language. Note that our compiler
generates Java byte code, and Java virtual machines have "just-in-time" compilers that in turn
compile Java byte code all the way to native code, so much user code is ultimately translated to
native code.
Has anyone built a model of <x>?
Try looking at the NetLogo Models Library, our Community Models page, and our list of references
to NetLogo in outside works.
You might also ask the question on the NetLogo Users Group and/or search past messages on the
group.
Are NetLogo models runs scientifically reproducible?
Yes. NetLogo's agent scheduling algorithms are deterministic, and NetLogo always uses Java's
"strict math" library, which gives bit-for-bit identical results regardless of platform. But keep the
following cautions in mind:
FAQ (Frequently Asked Questions)
303
NetLogo 4.1.3 User Manual
• If your model uses random numbers, then in order to get reproducible behavior, you must
use the random-seed command to set the random seed in advance, so that your model will
receive the exact same sequence of random numbers every time. Remember that agentsets
are always in random order, so anything you do with agentsets uses random numbers.
• If your model uses the every or wait commands in such a way that affects the outcome of
the model, then you may get different results on different computers, or even on the same
computer, since the model may run at a different speed.
• In order to reproduce model runs exactly, you must be using the exact same version of
NetLogo. The details of the agent scheduling mechanism and the random number generator
may change between NetLogo versions, and other changes (bugfixes in the engine,
language changes, and so forth) may also affect the behavior of your model. (Then again,
they may not.)
• We have expended every effort to make NetLogo model runs fully reproducible, but of
course this can never truly be an iron-clad guarantee, due not only to the possibility of
random hardware failure, but also the possibility of human error in the design of: your model,
NetLogo, your Java VM, your hardware, and so on.
Will NetLogo and NetLogo 3D remain separate?
Although NetLogo 3D is now included in the NetLogo download, it is still a separate application.
However, the split is temporary. Eventually a single unified application will support both 2D and 3D
modeling. We will be sure to design the 3D world support in such a way that it doesn't get in the way
when you are building 2D models.
Models built in NetLogo 3D may require changes in order to run in the eventual unified application.
Downloading
Can I have multiple versions of NetLogo installed at the same time?
Yes. When you install NetLogo, the folder that is created contains has the version number in its
name, so multiple versions can coexist.
On Windows systems, whichever version you installed last will be the version that opens when you
double click a model file in Windows Explorer. On Macs, you can control what version opens via
"Get Info" in the Finder.
I'm on a UNIX system and I can't untar the download. Why?
Some of the files in the tarball have long pathnames, too long for the standard tar format. You must
use the GNU version of tar instead (or another program which understands the GNU tar
extensions). On some systems, the GNU version of tar is available under the name "gnutar". You
can find out if you are already using the GNU version by typing tar --version and seeing if the
output says "tar (GNU tar)".
304
FAQ (Frequently Asked Questions)
NetLogo 4.1.3 User Manual
How do I install NetLogo unattended?
It depends on which platform you are using.
• Linux: Untar NetLogo into the appropriate place.
Mac: Copy the NetLogo directory from the disk image into the Applications folder.
• Windows:
Run the installer from the command line using the -q option:
NetLogo4.1.3Installer.exe -q
On Windows, how do I configure the Java installation that the
without-Java installer uses?
The without-Java installer automatically searches for appropriate Java installations on your
machine. If you wish to direct NetLogo to a particular installation you may do so by setting the
environment variable NETLOGO_JAVA to the full path of the installation.
• Go to the Start Menu -> Control Panel -> System.
• Switch to the "Advanced" panel
• Press the "Environment Variables" button.
• Add NETLOGO_JAVA as a variable and set the value to the path of the Java installation.
Applets
I tried to run one of the applets on your site, but it didn't work. What
should I do?
Current versions of NetLogo require that your web browser support Java 5 or later. For more details
about Java requirements see the Applet guide.
Some NetLogo applets may require more memory than the browser normally makes available. See
the memory section of the Applet guide for details on how to change the memory allocation.
When running my model as an applet, I get the following error:
java.lang.OutOfMemoryError: Java heap space.
The Java Plug-In is not allocating sufficient space to run the model. Details on how big a model can
be in NetLogo can be found here. You will need to increase the amount of memory available to the
Java Plug-In. See the instructions here.
Can I make my model available as an applet while keeping the code
secret?
No. In order for the applet to operate, the model file must be accessible also.
FAQ (Frequently Asked Questions)
305
NetLogo 4.1.3 User Manual
When you use "Save as applet" on the File menu, the HTML page generated contains the source
code and a link where the user can download the model file. If you want, you can remove the
source code and the link. Removing the link will make it harder for the user to access the model file,
but not impossible.
Can a model saved as an applet use import-world, file-open, and
other commands that read files?
Yes, but only to read files that are stored in the same directory on your web server as the HTML and
model files. Unsigned Java applets cannot read files on the user's computer, only the web server.
When I tried loading my model as an applet I get an error like:
java.lang.ClassFormatError: Incompatible magic value.
If your web server returns custom error messages in response to requests for non-existent pages it
must also return a status code of 404 Not Found, otherwise, NetLogo thinks the following data is
what it requested and tries to read it as such. This happens even if all the files required to run the
applet are present.
If you don't have control over the error messages on your web server you can use the following as a
workaround:
• Create a directory named META-INF in the same directory as the applet files.
• Create a subdirectory of META-INF called services
• Create a file called org.apache.commons.logging.LogFactory in the services
subdirectory
• Add the following line to org.apache.commons.logging.LogFactory:
org.apache.commons.logging.impl.LogFactoryImpl
Note that all the directory and file names are case sensitive.
Running
Can I run NetLogo from a CD, a network drive, or a USB drive?
Yes. NetLogo runs fine from any file system, including read-only file systems.
Why is NetLogo so much slower when I unplug my Windows laptop?
Your computer is switching to power saving mode when unplugged. It's normal for this to reduce
speed a little, but unfortunately there is a bug in Java that drastically slows down Swing
applications, including NetLogo.
One workaround is to change the power settings on your computer so it doesn't go into power
saving mode when you unplug it. (If you do this, your battery won't last as long.)
Another workaround is to run NetLogo with an option recommended by Sun, by editing the NetLogo
4.1.3.vmoptions file, found in the NetLogo directory (under Program Files on your hard drive, unless
306
FAQ (Frequently Asked Questions)
NetLogo 4.1.3 User Manual
you installed NetLogo in a different location). Add on a new line:
-Dsun.java2d.ddoffscreen=false
You can see the details of the Java bug and vote for Sun to fix it here.
How come NetLogo won't start up on my Linux machine?
We recommend Sun's Java runtime when using NetLogo on Linux.
In theory, any Java 5 or later runtime will run NetLogo. In practice, some Java implementations
aren't high enough quality. OpenJDK doesn't work, nor does GNU libgcj.
Ubuntu users should consult http://help.ubuntu.com/community/Java.
When I try to start NetLogo on Windows I get an error "The JVM could
not be started". Help!
A nearly certain fix is to use a text editor to edit the NetLogo 4.1.3.vmoptions file (found in the
NetLogo directory, by default in C:\Program Files):
-Xmx1024M
Try changing the 1024M a smaller number like 512M. This should permit NetLogo to start, although
the lower heap size limit may affect your ability to run models with very large numbers of agents.
(See How big can my model be?.)
If running with the lower heap size limit is unacceptable, read on.
Some Windows systems have trouble allocating large amounts of contiguous virtual memory.
Upgrading to a newer version of Windows may help.
Running Windows in 64-bit mode instead of 32-bit mode may also help. Double check that Windows
is actually running in 64-bit mode; see Microsoft's FAQ page on 64-bit Windows.
Can I run NetLogo from the command line, without the GUI?
Yes. The easiest way is to set up your model run or runs as a BehaviorSpace experiment. No
additional programming is required. See the BehaviorSpace section of the User Manual for details.
Another option is to use our Controlling API. Some light Java programming is required. See the
"Controlling" section of the User Manual for details and sample code.
Does NetLogo take advantage of multiple processors?
Only when using BehaviorSpace. BehaviorSpace does parallel runs, one per processor.
For a single model run, only one processor is used. The NetLogo engine is single threaded and we
expect it to remain that way. We don't have any plans to make it possible to split a single model run
across multiple processors or multiple computers.
FAQ (Frequently Asked Questions)
307
NetLogo 4.1.3 User Manual
Can I distribute NetLogo model runs across a cluster or grid of
computers?
Many of the same comments in the previous answer apply. It is not possible to split a single model
run across multiple computers, but you can have each machine in a cluster doing one or more
separate, independent model runs, using either BehaviorSpace or our Controlling API. We don't
have automated support for splitting the runs across clusters, so you'll need to arrange that yourself.
Various users are already using NetLogo on clusters, with a variety of hardware and software. You
can seek them out on the NetLogo Users Group.
Is there any way to recover lost work if NetLogo crashes or freezes?
Yes. NetLogo auto-saves files as you are working on them. The auto-save files can be found in your
OS-specific temporary directory. On most Unix-like systems (including MacOS) that is /tmp. On
Windows XP, logs can be found in C:\Documents and Settings\<user>\Local
Settings\Temp, where <user> is the logged in user and on Windows Vista the logs can be found
in C:\Users\<user>\AppData\Local\Temp. The files are named according to the following
format: autosave_yyyy-MM-dd.HH_mm_ss.nlogo where the time and date are the time and
date the model was opened.
Usage
When I move the speed slider all the way to the right, why does my
model seem to stop?
The only way NetLogo can make your model run faster is by updating the view less frequently. As
you move the speed slider to the right, view updates become less and less frequent. Since view
updates take time, that means more speed.
However, fewer updates also means that the updates come farther apart. When several seconds
pass between updates, it may seem like your model has stopped. It hasn't. It's running at full speed.
Watch the tick counter! (If your model uses it. If it doesn't, watch something else, such as a plot.)
To get a feel for what's going on, it may help to gradually move the slider to the right, rather than
moving it all the way to the right all at once. If you find the updates too infrequent at the rightmost
position, just don't push the slider that far.
Can I use the mouse to "paint" in the view?
NetLogo does not have a built-in set of painting tools for painting in the view. But with only a few
lines of code, you can add painting capability to your model. To see how it's done, look at Mouse
Example, in the Code Examples section of the Models Library. The same techniques can be used to
let the user interact with your model using the mouse in other ways, too.
Another possibility is to create an image in another program and import it using the import items on
the File menu or the import-* primitives.
308
FAQ (Frequently Asked Questions)
NetLogo 4.1.3 User Manual
How big can my model be? How many turtles, patches, procedures,
buttons, and so on can my model contain?
We have tested NetLogo with models that use hundreds of megabytes of RAM and they work fine.
We haven't tested models that use gigabytes of RAM, though. Theoretically it should work, but you
might hit some limits that are inherent in the underlying Java VM and/or operating system (either
designed-in limits, or bugs).
The NetLogo engine has no fixed limits on size. By default, though, NetLogo ships with a
one-gigabyte ceiling (or 512K on some Windows systems) on how much total RAM it can use. If
your model exceeds that limit, you'll get an OutOfMemoryError dialog.
If you are using BehaviorSpace, note that doing runs in parallel will multiply your RAM usage
accordingly.
Here's how to raise the limit if you need to:
• Windows: Edit this section of the "NetLogo 4.1.3.vmoptions" file in the NetLogo folder:
-Xmx1024M
• Macintosh: Edit the Contents/Info.plist file in the NetLogo application package. (You can
reach this file by control-clicking the application in the Finder and choosing "Show Package
Contents" from the popup menu.) The relevant section is this; the second number is the
one-gigabyte ceiling:
<key>VMOptions</key>
<string>-XX:MaxPermSize=128m -Xmx1024M</string>
Ordinarily, you can go as high as two gigabytes (2048M) by this method. But if your Mac has
a 64-bit Intel processor and you are running Mac OS X 10.6, you may be able to go even
higher. Select the NetLogo application in the Finder, choose Get Info on the File menu, and
then uncheck the "Open in 32-bit mode" checkbox, to enable 64-bit operation, which should
allow higher -Xmx numbers. (We have not heavily tested 64-bit mode, but it seems to work.)
• Other: Edit the netlogo.sh script (or a copy), changing the -Xmx number to the desired
value.
Can I use GIS data in NetLogo?
Yes, using the GIS extension. See the GIS section of the User Manual.
A simpler way is to use import-pcolors, but that only works for importing maps that are images,
not maps in other formats. It is also possible to write NetLogo code that reads GIS data using our
file I/O primitives such as file-open.
My model runs slowly. How can I speed it up?
Here's some ways to make it run faster without changing the structure of the code:
• Use tick-based view updates, not continuous updates.
FAQ (Frequently Asked Questions)
309
NetLogo 4.1.3 User Manual
• Decrease the frequency of view updates by pushing the speed slider to the right, or turn
updates off using the checkbox.
• If your model is using all available RAM on your computer, then installing more RAM should
help. If your hard drive makes a lot of noise while your model is running, you probably need
more RAM.
• Use turtle size 1, 1.5, or 2, as the 2D renderings for these sizes are cached by NetLogo.
(This only affects graphics speed in the 2D view, not computation speed.)
In many cases, though, if you want your model to run faster, you may need to make some changes
to the code. Usually the most obvious opportunity for speedup is that you're doing too many
computations that involve all the turtles or all the patches. Often this can be reduced by reworking
the model so that it does less computation per time step. The members of the NetLogo Users Group
may be able to help with this.
The profiler extension is useful for identifying which parts of your code are taking the most time.
Unless you are running the exact same strings over and over, using run and runresult are much
slower than running code directly; you should avoid using these primitives on fresh strings in
performance-critical code.
Can I have more than one model open at a time?
One instance of NetLogo can only have one model open at a time. (We plan to change this in a
future version.)
You can have multiple models open by opening multiple instances of NetLogo, though. On Windows
and Linux, simply start the application again. On a Mac, you'll need to duplicate the application (not
the whole folder, just the application itself) in the Finder, then open the copy. (The copy takes up
only a very small amount of additional disk space.)
Can I change the choices in a chooser on the fly?
At present, no. In a future version of NetLogo, we plan to support this.
Can I divide the code for my model up into several files?
Yes, this is available on an experimental basis using the __includes keyword.
Programming
How is the NetLogo language different from the StarLogo and
StarLogoT languages? How do I convert my StarLogo or StarLogoT
model to NetLogo?
We don't have a document that specifically summarizes the differences between these programs. If
you have built models in StarLogo or StarLogoT before, then we suggest reading the Programming
Guide section of this manual to learn about NetLogo, particularly the sections on "Ask" and
"Agentsets". Looking at some of the sample models and code examples in the Models Library may
help as well. The NetLogo Users Group is a useful resource.
310
FAQ (Frequently Asked Questions)
NetLogo 4.1.3 User Manual
How does the NetLogo language differ from other Logos?
This is answered in detail at the end of the Programming Guide in the User Manual.
How come my model from an earlier NetLogo doesn't work right?
See the Transition Guide section of the User Manual for help.
Why does my code have strange characters in it?
NetLogo only works in "en" locales. A locale is a setting which tells NetLogo which language you
are using, as well as how to display dates and numbers. You may need to switch to to an English
locale before launching NetLogo. This is usually done in the "Regional Settings" or
"Internationalization" panel of the operating system.
In a future version of NetLogo we plan to support different languages and locales.
How do I take the negative of a number?
Any of these ways:
(- x)
-1 * x
0 - x
With the first way, the parentheses are required.
My turtle moved forward 1, but it's still on the same patch. Why?
If you have disabled wrapping at the world edges in your model, then the turtle might be at a world
edge and unable to move any further. You can test for this using can-move?.
Assuming the turtle isn't hitting a world edge, moving forward 1 is only guaranteed to take a turtle to
a new patch if the turtle's heading is a multiple of 90 (that is, exactly north, south, east, or west).
It's because the turtle might not be standing in the center of a patch. It might be near the corner of a
patch. For example, suppose your turtle is close to the southwest corner of a patch and is facing
northeast. The length of the patch diagonal is 1.414... (the square root of two), so fd 1 will leave
the turtle near the northeast corner of the same patch.
If you don't want to have to think about these issues, one possibility is to write your model in such a
way that your turtles always come to rest on patch centers. See next question.
How do I keep my turtles on patch centers?
A turtle is on a patch center when its xcor and ycor are integers.
You can move a turtle to the center of its current patch with either of these two equivalent
commands:
FAQ (Frequently Asked Questions)
311
NetLogo 4.1.3 User Manual
move-to patch-here
setxy pxcor pycor
But you'll never need to do that if you never allow turtles off of patch centers in the first place.
The sprout command creates turtles on patch centers. For example:
ask n-of 50 patches [ sprout 1 [ face one-of neighbors4 ] ]
Another way for a turtle to start on a patch center is with a command such as this line of turtle code,
which moves it to the center of a random patch:
move-to one-of patches
Once a turtle is on a patch center, as long as its heading always stays an exact multiple of 90 (that
is to say, due north, east, south, or west), and as it long as it moves forward or back by integer
amounts, it will always land on patch centers.
See Random Grid Walk Example, in the Code Examples section of the Models Library, to see these
code snippets in use.
patch-ahead 1 is reporting the same patch my turtle is already
standing on. Why?
See the answer two answers up. It's the same issue.
This might not be the meaning of "ahead" you were expecting. With patch-ahead, you must
specify the distance ahead that you want to look. If you want to know the next patch a turtle would
cross into if it moved forward continuously, it is possible to find that out. See Next Patch Example, in
the Code Examples section of the Models Library.
How do I give my turtles "vision"?
You can use in-radius to let a turtle see a circular area around it.
Several primitives let the turtle "look" at specific points. The patch-ahead primitive is useful for
letting a turtle see what is directly in front of it. If you want the turtle to look in another direction
besides straight ahead, try patch-left-and-ahead and patch-right-and-ahead.
If you want the turtle to have a full "cone" of vision, use the in-cone primitive.
You can also find out the next patch a turtle would cross into if it moved forward continuously. See
Next Patch Example, in the Code Examples section of the Models Library.
Can agents sense what's in the drawing layer?
No. If you want to make marks that agents can sense, use patch colors.
312
FAQ (Frequently Asked Questions)
NetLogo 4.1.3 User Manual
I'm getting numbers like 0.10000000004 and 0.799999999999 instead of
0.1 and 0.8. Why?
See the "Math" section of the Programming Guide in the User Manual for a discussion of this issue.
The documentation says that random-float 1 might return 0 but will
never return 1. What if I want 1 to be included?
It really doesn't matter. Even if 1 were a possible result, it would only come up approximately 1 in
2^64 tries, which means you'd be waiting hundreds of years before it ever came up exactly 1.
Nonetheless, if you are convinced that it really must be possible to get 1, you can use precision
to round your answer to a certain number of decimal places. For example:
print precision (random-float 1) 10
0.2745173723
(If you use this method, note that 0 and 1 are only half as likely to come up as other answers. To
see why this is so, consider the case where you only keep one digit after the decimal point. Results
between 0 and 0.5 get rounded to 0, but results between 0.5 and 1.5 get rounded to 1; the latter
range is twice as large. If you want 0, 0.1, 0.2, ..., 0.9, and 1 to all be equally likely, an alternative is
to write random 11 / 10; this gives all 11 answers with equal probability.)
How can I keep two turtles from occupying the same patch?
See One Turtle Per Patch Example, in the Code Examples section of the Models Library.
How can I find out if a turtle is dead?
When a turtle dies, it turns into nobody. nobody is a special value used in NetLogo used to
indicate the absence of a turtle or patch. So for example:
if turtle 0 != nobody [ ... ]
You could also use is-turtle?:
if is-turtle? turtle 0 [ ... ]
Does NetLogo have arrays?
In the current version of NetLogo, lists are immutable singly linked lists, rather than having an
array-based underlying implementation as in earlier NetLogo versions.
True arrays are available by using the array extension. See the Arrays & Tables section of the User
Manual.
Does NetLogo have hash tables or associative arrays?
Yes, using the table extension. See the Arrays & Tables section of the User Manual.
FAQ (Frequently Asked Questions)
313
NetLogo 4.1.3 User Manual
How can I use different patch "neighborhoods" (circular, Von Neumann,
Moore, etc.)?
The in-radius primitives lets you access circular neighborhoods of any radius.
The neighbors primitive gives you a Moore neighborhood of radius 1, and the neighbors4
primitive gives you a Von Neumann neighborhood of radius 1.
For Moore or Von Neumann neighborhoods of a larger radius, see Moore & Von Neumann Example
in the Code Examples section of the Models Library.
How can I convert an agentset to a list of agents, or vice versa?
If you want the list in a particular order, use the sort or sort-by primitives. The Lists section of
the Programming Guide explains how to do this. See also Ask Ordering Example, in the Code
Examples section of the Models Library.
If you want the list in a random order, here's how:
[self] of <agentset>
Because all operations on agentsets are in random order, the resulting list is in random order.
To convert a list of agents to an agentset, use the turtle-set, patch-set, or link-set
primitives.
How do I stop foreach?
To stop a foreach from executing you need to define a separate procedure that contains only the
foreach, for example:
to test
foreach [1 2 3] [
if ? = 2 [ stop ]
print ?
]
end
This code will only print the number 1. The stop returns from the current procedure so nothing after
the foreach will be executed either. (If the procedure is a reporter procedure, use report instead of
stop.)
BehaviorSpace
Why are the rows in my BehaviorSpace table results out of order?
This is normal when doing multiple runs in parallel. For a discussion of the issue, see the section on
parallel runs in the BehaviorSpace Guide section of the User Manual.
314
FAQ (Frequently Asked Questions)
NetLogo 4.1.3 User Manual
How do I measure runs every n ticks?
Use repeat in your experiment's go commands, e.g.:
repeat 10 [ go ]
to measure the run after every 10 ticks. Essentially you are making one experiment step equal 10
ticks.
I'm varying a global variable I declared in the Procedures tab, but it
doesn't work. Why?
It's probably because your setup commands or setup procedure are using clear-all, causing the
values set by BehaviorSpace to be cleared.
One possible workaround is to change your experiment's setup commands to preserve the value of
the variable, e.g.:
let old-var1 var1
setup
set var1 old-var1
This works because even clear-all doesn't clear the values of local variables made with let
Another possible workaround is to change your model's setup procedure to use more specific
clearing commands to clear only what you want cleared.
Why are some of my results cut off in Excel?
In some versions of Excel, spreadsheets can't have more than 256 columns. (See a Microsoft
support article on the subject.)
Possible workarounds include:
• Use a newer version of Excel, such as Excel 2007 (Windows) or Excel 2008 (Mac).
• Use a different program besides Excel.
• Ask BehaviorSpace to generate results in table format instead of, or in addition to,
spreadsheet format. (Excel can read our table format, too.)
• Change your experiment so the result has fewer columns.
Extensions
I'm writing an extension. Why does the compiler say it can't find
org.nlogo.api?
You need to add NetLogo.jar to your classpath when compiling. NetLogo.jar is included with
NetLogo.
FAQ (Frequently Asked Questions)
315
NetLogo 4.1.3 User Manual
316
FAQ (Frequently Asked Questions)
NetLogo Dictionary
Alphabetical: A B C D E F G H I J L M N O P R S T U V W X Y ?
Categories: Turtle - Patch - Agentset - Color - Control/Logic - World - Perspective
Input/Output - Files - List - String - Math - Plotting - Links - Movie - System - HubNet
Special: Variables - Keywords - Constants
Categories
This is an approximate grouping. Remember that a turtle-related primitive might still be used by
patches or the observer, and vice versa. To see which agents (turtles, patches, links, observer) can
actually run a primitive, consult its dictionary entry.
Turtle-related
back (bk) <breeds>-at <breeds>-here <breeds>-on can-move? clear-turtles (ct) create-<breeds>
create-ordered-<breeds> create-ordered-turtles (cro) create-turtles (crt) die distance distancexy
downhill downhill4 dx dy face facexy forward (fd) hatch hatch-<breeds> hide-turtle (ht) home inspect
is-<breed>? is-turtle? jump layout-circle left (lt) move-to myself nobody no-turtles of other
patch-ahead patch-at patch-at-heading-and-distance patch-here patch-left-and-ahead
patch-right-and-ahead pen-down (pd) pen-erase (pe) pen-up (pu) random-xcor random-ycor right
(rt) self set-default-shape __set-line-thickness setxy shapes show-turtle (st) sprout sprout-<breeds>
stamp stamp-erase subject subtract-headings tie towards towardsxy turtle turtle-set turtles turtles-at
turtles-here turtles-on turtles-own untie uphill uphill4
Patch-related
clear-patches (cp) diffuse diffuse4 distance distancexy import-pcolors import-pcolors-rgb inspect
is-patch? myself neighbors neighbors4 nobody no-patches of other patch patch-at patch-ahead
patch-at-heading-and-distance patch-here patch-left-and-ahead patch-right-and-ahead patch-set
patches patches-own random-pxcor random-pycor self sprout sprout-<breeds> subject turtles-here
Agentset
all? any? ask ask-concurrent at-points <breeds>-at <breeds>-here <breeds>-on count in-cone
in-radius is-agent? is-agentset? is-patch-set? is-turtle-set? link-heading link-length link-set
link-shapes max-n-of max-one-of min-n-of min-one-of n-of neighbors neighbors4 no-patches
no-turtles of one-of other patch-set patches sort sort-by turtle-set turtles with with-max with-min
turtles-at turtles-here turtles-on
Color
approximate-hsb approximate-rgb base-colors color extract-hsb extract-rgb hsb import-pcolors
import-pcolors-rgb pcolor rgb scale-color shade-of? wrap-color
NetLogo Dictionary
317
NetLogo 4.1.3 User Manual
Control flow and logic
and ask ask-concurrent carefully end error-message every foreach if ifelse ifelse-value let loop map
not or repeat report run runresult ; (semicolon) set stop startup to to-report wait while
with-local-randomness without-interruption xor
World
clear-all (ca) clear-drawing (cd) clear-patches (cp) clear-turtles (ct) display import-drawing
import-pcolors import-pcolors-rgb no-display max-pxcor max-pycor min-pxcor min-pycor patch-size
reset-ticks resize-world set-patch-size tick tick-advance ticks world-width world-height
Perspective
follow follow-me reset-perspective (rp) ride ride-me subject watch watch-me
HubNet
hubnet-broadcast hubnet-broadcast-clear-output hubnet-broadcast-message
hubnet-broadcast-view hubnet-clear-override hubnet-clear-overrides hubnet-enter-message?
hubnet-exit-message? hubnet-fetch-message hubnet-message hubnet-message-source
hubnet-message-tag hubnet-message-waiting? hubnet-reset hubnet-reset-perspective hubnet-send
hubnet-send-clear-output hubnet-send-follow hubnet-send-message hubnet-send-override
hubnet-send-watch hubnet-set-client-interface
Input/output
beep clear-output date-and-time export-view export-interface export-output export-plot
export-all-plots export-world import-drawing import-pcolors import-pcolors-rgb import-world
mouse-down? mouse-inside? mouse-xcor mouse-ycor output-print output-show output-type
output-write print read-from-string reset-timer set-current-directory show timer type user-directory
user-file user-new-file user-input user-message user-one-of user-yes-or-no? write
File
file-at-end? file-close file-close-all file-delete file-exists? file-flush file-open file-print file-read
file-read-characters file-read-line file-show file-type file-write user-directory user-file user-new-file
List
but-first but-last empty? filter first foreach fput histogram is-list? item last length list lput map
member? modes n-of n-values of position one-of reduce remove remove-duplicates remove-item
replace-item reverse sentence shuffle sort sort-by sublist
318
NetLogo Dictionary
NetLogo 4.1.3 User Manual
String
Operators (<, >, =, !=, <=, >=) but-first but-last empty? first is-string? item last length member?
position remove remove-item read-from-string replace-item reverse substring word
Mathematical
Arithmetic Operators (+, *, -, /, ^, <, >, =, !=, <=, >=) abs acos asin atan ceiling cos e exp floor int
is-number? ln log max mean median min mod modes new-seed pi precision random
random-exponential random-float random-gamma random-normal random-poisson random-seed
remainder round sin sqrt standard-deviation subtract-headings sum tan variance
Plotting
autoplot? auto-plot-off auto-plot-on clear-all-plots clear-plot create-temporary-plot-pen export-plot
export-all-plots histogram plot plot-name plot-pen-exists? plot-pen-down plot-pen-reset plot-pen-up
plot-x-max plot-x-min plot-y-max plot-y-min plotxy set-current-plot set-current-plot-pen
set-histogram-num-bars set-plot-pen-color set-plot-pen-interval set-plot-pen-mode set-plot-x-range
set-plot-y-range
Links
both-ends clear-links create-<breed>-from create-<breeds>-from create-<breed>-to
create-<breeds>-to create-<breed>-with create-<breeds>-with create-link-from create-links-from
create-link-to create-links-to create-link-with create-links-with die hide-link in-<breed>-neighbor?
in-<breed>-neighbors in-<breed>-from in-link-neighbor? in-link-neighbors in-link-from
is-directed-link? is-link? is-link-set? is-undirected-link? __layout-magspring layout-radial
layout-spring layout-tutte <breed>-neighbor? <breed>-neighbors <breed>-with link-heading
link-length link-neighbor? link links links-own <link-breeds>-own link-neighbors link-with
my-<breeds> my-in-<breeds> my-in-links my-links my-out-<breeds> my-out-links no-links other-end
out-<breed>-neighbor? out-<breed>-neighbors out-<breed>-to out-link-neighbor? out-link-neighbors
out-link-to show-link tie untie
Movie
movie-cancel movie-close movie-grab-view movie-grab-interface movie-set-frame-rate movie-start
movie-status
BehaviorSpace
behaviorspace-run-number
System
netlogo-applet? netlogo-version
NetLogo Dictionary
319
NetLogo 4.1.3 User Manual
Built-In Variables
Turtles
breed color heading hidden? label label-color pen-mode pen-size shape size who xcor ycor
Patches
pcolor plabel plabel-color pxcor pycor
Links
breed color end1 end2 hidden? label label-color shape thickness tie-mode
Other
?
Keywords
breed directed-link-breed end extensions globals __includes patches-own to to-report turtles-own
undirected-link-breed
Constants
Mathematical Constants
e = 2.718281828459045
pi = 3.141592653589793
Boolean Constants
false
true
Color Constants
black = 0
gray = 5
white = 9.9
red = 15
orange = 25
brown = 35
yellow = 45
green = 55
lime = 65
320
NetLogo Dictionary
NetLogo 4.1.3 User Manual
turquoise = 75
cyan = 85
sky = 95
blue = 105
violet = 115
magenta = 125
pink = 135
See the Colors section of the Programming Guide for more details.
A
abs
abs number
Reports the absolute value of number.
show abs -7
=> 7
show abs 5
=> 5
acos
acos number
Reports the arc cosine (inverse cosine) of the given number. The input must be in the range -1 to 1.
The result is in degrees, and lies in the range 0 to 180.
all?
all? agentset [reporter]
Reports true if all of the agents in the agentset report true for the given reporter. Otherwise reports
false as soon as a counterexample is found.
If the agentset is empty, reports true.
The reporter must report a boolean value for every agent (either true or false), otherwise an error
occurs.
if all? turtles [color = red]
[ show "every turtle is red!" ]
See also any?.
NetLogo Dictionary
321
NetLogo 4.1.3 User Manual
and
condition1 and condition2
Reports true if both condition1 and condition2 are true.
Note that if condition1 is false, then condition2 will not be run (since it can't affect the result).
if (pxcor > 0) and (pycor > 0)
[ set pcolor blue ] ;; the upper-right quadrant of
;; patches turn blue
any?
any? agentset
Reports true if the given agentset is non-empty, false otherwise.
Equivalent to "count agentset > 0", but more efficient (and arguably more readable).
if any? turtles with [color = red]
[ show "at least one turtle is red!" ]
Note: nobody is not an agentset. You only get nobody back in situations where you were expecting
a single agent, not a whole agentset. If any? gets nobody as input, an error results.
See also all?, nobody.
approximate-hsb
approximate-hsb hue saturation brightness
Reports a number in the range 0 to 140, not including 140 itself, that represents the given color,
specified in the HSB spectrum, in NetLogo's color space.
All three values should be in the range 0 to 255.
The color reported may be only an approximation, since the NetLogo color space does not include
all possible colors. (It contains only certain discrete hues, and for each hue, either saturation or
brightness may vary, but not both -- at least one of the two is always 255.)
show approximate-hsb 0 0 0
=> 0 ;; (black)
show approximate-hsb 127.5 255 255
=> 85.2 ;; (cyan)
See also extract-hsb, approximate-rgb, extract-rgb.
322
NetLogo Dictionary
NetLogo 4.1.3 User Manual
approximate-rgb
approximate-rgb red green blue
Reports a number in the range 0 to 140, not including 140 itself, that represents the given color,
specified in the RGB spectrum, in NetLogo's color space.
All three inputs should be in the range 0 to 255.
The color reported may be only an approximation, since the NetLogo color space does not include
all possible colors. (See approximate-hsb for a description of what parts of the HSB color space
NetLogo colors cover; this is difficult to characterize in RGB terms.)
show approximate-rgb 0 0 0
=> 0 ;; black
show approximate-rgb 0 255 255
=> 85.2 ;; cyan
See also extract-rgb, approximate-hsb, and extract-hsb.
Arithmetic Operators (+, *, -, /, ^, <, >, =, !=, <=, >=)
All of these operators take two inputs, and all act as "infix operators" (going between the two inputs,
as in standard mathematical use). NetLogo correctly supports order of operations for infix operators.
The operators work as follows: + is addition, * is multiplication, - is subtraction, / is division, ^ is
exponentiation, < is less than, > is greater than, = is equal to, != is not equal to, <= is less than or
equal, >= is greater than or equal.
Note that the subtraction operator (-) always takes two inputs unless you put parentheses around it,
in which case it can take one input. For example, to take the negative of x, write (- x), with the
parentheses.
All of the comparison operators also work on strings.
All of the comparison operators work on agents. Turtles are compared by who number. Patches are
compared top to bottom left to right, so patch 0 10 is less than patch 0 9 and patch 9 0 is less than
patch 10 0. Links are ordered by end points and in case of a tie by breed. So link 0 9 is before link 1
10 as the end1 is smaller, and link 0 8 is less than link 0 9. If there are multiple breeds of links
unbreeded links will come before breeded links of the same end points and breeded links will be
sorted in the order they are declared in the Procedures tab.
Agentsets can be tested for equality or inequality. Two agentsets are equal if they are the same
type (turtle or patch) and contain the same agents.
If you are not sure how NetLogo will interpret your code, you should add parentheses.
show 5 * 6 + 6 / 3
=> 32
show 5 * (6 + 6) / 3
=> 20
NetLogo Dictionary
323
NetLogo 4.1.3 User Manual
asin
asin number
Reports the arc sine (inverse sine) of the given number. The input must be in the range -1 to 1. The
result is in degrees, and lies in the range -90 to 90.
ask
ask agentset [commands]
ask agent [commands]
The specified agent or agentset runs the given commands.
ask turtles [ fd 1 ]
;; all turtles move forward one step
ask patches [ set pcolor red ]
;; all patches turn red
ask turtle 4 [ rt 90 ]
;; only the turtle with id 4 turns right
Note: only the observer can ask all turtles or all patches. This prevents you from inadvertently
having all turtles ask all turtles or all patches ask all patches, which is a common mistake to make if
you're not careful about which agents will run the code you are writing.
Note: Only the agents that are in the agentset at the time the ask begins run the commands.
ask-concurrent
ask-concurrent agentset [commands]
The agents in the given agentset run the given commands, using a turn-taking mechanism to
produce simulated concurrency. See the Ask-Concurrent section of the Programming Guide for
details on how this works.
Note: Only the agents that are in the agentset at the time the ask begins run the commands.
See also without-interruption.
at-points
agentset at-points [[x1 y1] [x2 y2] ...]
Reports a subset of the given agentset that includes only the agents on the patches the given
distances away from this agent. The distances are specified as a list of two-item lists, where the two
items are the x and y offsets.
If the caller is the observer, then the points are measured relative to the origin, in other words, the
points are taken as absolute patch coordinates.
324
NetLogo Dictionary
NetLogo 4.1.3 User Manual
If the caller is a turtle, the points are measured relative to the turtle's exact location, and not from the
center of the patch under the turtle.
ask turtles at-points [[2 4] [1 2] [10 15]]
[ fd 1 ] ;; only the turtles on the patches at the
;; distances (2,4), (1,2) and (10,15),
;; relative to the caller, move
atan
atan x y
Converts x and y offsets to a turtle heading in degrees (from 0 to 360).
Note that this version of atan is designed to conform to the geometry of the NetLogo world, where a
heading of 0 is straight up, 90 is to the right, and so on clockwise around the circle. (Normally in
geometry an angle of 0 is right, 90 is up, and so on, counterclockwise around the circle, and atan
would be defined accordingly.)
When y is 0: if x is positive, it reports 90; if x is negative, it reports 270; if x is zero, you get an error.
show atan 1 -1
=> 135
show atan -1 1
=> 315
crt 1 [ set heading 30
=> 30
fd 1
print atan xcor ycor ]
In the final example, note that the result of atan equals the turtle's heading.
autoplot?
autoplot?
Reports true if auto-plotting is on for the current plot, false otherwise.
auto-plot-off
auto-plot-on
auto-plot-off
auto-plot-on
This pair of commands is used to control the NetLogo feature of auto-plotting in the current plot.
Auto-plotting will automatically update the x and y axes of the plot whenever the current pen
exceeds these boundaries. It is useful when wanting to show all plotted values in the current plot,
regardless of the current plot ranges.
B
NetLogo Dictionary
325
NetLogo 4.1.3 User Manual
back
bk
back number
The turtle moves backward by number steps. (If number is negative, the turtle moves forward.)
Turtles using this primitive can move a maximum of one unit per time increment. So bk 0.5 and bk
1 both take one unit of time, but bk 3 takes three.
If the turtle cannot move backward number steps because it is not permitted by the current topology
the turtle will complete as many steps of 1 as it can and stop.
See also forward, jump, can-move?.
base-colors
base-colors
Reports a list of the 14 basic NetLogo hues.
print base-colors
=> [5 15 25 35 45 55 65 75 85 95 105 115 125 135]
ask turtles [ set color one-of base-colors ]
;; each turtle turns a random base color
ask turtles [ set color one-of remove gray base-colors ]
;; each turtle turns a random base color except for gray
beep
beep
Emits a beep. Note that the beep sounds immediately, so several beep commands in close
succession may produce only one audible sound.
Example:
beep
repeat 3 [ beep ]
;;
;;
;;
repeat 3 [ beep wait 0.1 ] ;;
;;
emits one beep
emits 3 beeps at once,
so you only hear one sound
produces 3 beeps in succession,
separated by 1/10th of a second
When running headless, this command has no effect.
behaviorspace-run-number
326
NetLogo Dictionary
NetLogo 4.1.3 User Manual
behaviorspace-run-number
Reports the current run number in the current BehaviorSpace experiment, starting at 1.
If no BehaviorSpace experiment is running, reports 0.
both-ends
both-ends
Reports the agentset of the 2 nodes connected by this link.
crt 2
ask turtle 0 [ create-link-with turtle 1 ]
ask link 0 1 [
ask both-ends [ set color red ] ;; turtles 0 and 1 both turn red
]
breed
breed
This is a built-in turtle and link variable. It holds the agentset of all turtles or links of the same breed
as this turtle or link. (For turtles or links that do not have any particular breed, this is the turtles
agentset of all turtles or the links agentset of all links respectively.) You can set this variable to
change a turtle or link's breed.
See also breed, directed-link-breed, undirected-link-breed
Example:
breed [cats cat]
breed [dogs dog]
;; turtle code:
if breed = cats [ show "meow!" ]
set breed dogs
show "woof!"
directed-link-breed [ roads road ]
;; link code
if breed = roads [ set color gray ]
breed
breed [<breeds> <breed>]
This keyword, like the globals, turtles-own, and patches-own keywords, can only be used at the
beginning of the Procedures tab, before any procedure definitions. It defines a breed. The first input
defines the name of the agentset associated with the breed. The second input defines the name of
a single member of the breed.
NetLogo Dictionary
327
NetLogo 4.1.3 User Manual
Any turtle of the given breed:
• is part of the agentset named by the breed name
• has its breed built-in variable set to that agentset
Most often, the agentset is used in conjunction with ask to give commands to only the turtles of a
particular breed.
breed [mice mouse]
breed [frogs frog]
to setup
clear-all
create-mice 50
ask mice [ set color white ]
create-frogs 50
ask frogs [ set color green ]
show [breed] of one-of mice
show [breed] of one-of frogs
end
;; prints mice
;; prints frogs
show mouse 1
;; prints (mouse 1)
show frog 51
;; prints (frog 51)
show turtle 51
;; prints (frog 51)
See also globals, patches-own, turtles-own, <breeds>-own, create-<breeds>, <breeds>-at,
<breeds>-here.
but-first
butfirst
bf
but-last
butlast
bl
but-first list
but-first string
but-last list
but-last string
When used on a list, but-first reports all of the list items of list except the first, and but-last reports all
of the list items of list except the last.
On strings, but-first and but-last report a shorter string omitting the first or last character of the
original string.
;; mylist is [2 4 6 5 8 12]
set mylist but-first mylist
;; mylist is now [4 6 5 8 12]
set mylist but-last mylist
;; mylist is now [4 6 5 8]
328
NetLogo Dictionary
NetLogo 4.1.3 User Manual
show but-first "string"
;; prints "tring"
show but-last "string"
;; prints "strin"
C
can-move?
can-move? distance
Reports true if this turtle can move distance in the direction it is facing without violating the topology;
reports false otherwise.
It is equivalent to:
patch-ahead distance != nobody
carefully
carefully [ commands1 ] [ commands2 ]
Runs commands1. If a runtime error occurs inside commands1, NetLogo won't stop and alert the
user that an error occurred. It will suppress the error and run commands2 instead.
The error-message reporter can be used in commands2 to find out what error was suppressed in
commands1. See error-message.
carefully [ show 1 / 1 ] [ print error-message ]
=> 1
carefully [ show 1 / 0 ] [ print error-message ]
=> division by zero
ceiling
ceiling number
Reports the smallest integer greater than or equal to number.
show ceiling 4.5
=> 5
show ceiling -4.5
=> -4
See also floor, round, precision.
NetLogo Dictionary
329
NetLogo 4.1.3 User Manual
clear-all
ca
clear-all
Resets all global variables to zero, and calls reset-ticks, clear-turtles, clear-patches, clear-drawing,
clear-all-plots, and clear-output.
clear-all-plots
clear-all-plots
Clears every plot in the model. See clear-plot for more information.
clear-drawing
cd
clear-drawing
Clears all lines and stamps drawn by turtles.
clear-links
clear-links
Kills all links.
See also die.
clear-output
clear-output
Clears all text from the model's output area, if it has one. Otherwise does nothing.
clear-patches
cp
clear-patches
Clears the patches by resetting all patch variables to their default initial values, including setting
330
NetLogo Dictionary
NetLogo 4.1.3 User Manual
their color to black.
clear-plot
clear-plot
In the current plot only, resets all plot pens, deletes all temporary plot pens, resets the plot to its
default values (for x range, y range, etc.), and resets all permanent plot pens to their default values.
The default values for the plot and for the permanent plot pens are set in the plot Edit dialog, which
is displayed when you edit the plot. If there are no plot pens after deleting all temporary pens, that is
to say if there are no permanent plot pens, a default plot pen will be created with the following initial
settings:
• Pen: down
• Color: black
• Mode: 0 (line mode)
• Name: "default"
• Interval: 1
See also clear-all-plots.
clear-turtles
ct
clear-turtles
Kills all turtles.
Also resets the who numbering, so the next turtle created will be turtle 0.
See also die.
color
color
This is a built-in turtle or link variable. It holds the color of the turtle or link. You can set this variable
to make the turtle or link change color. Color can be represented either as a NetLogo color (a single
number), or an RGB color (a list of 3 numbers). See details in the Colors section of the
Programming Guide.
See also pcolor.
NetLogo Dictionary
331
NetLogo 4.1.3 User Manual
cos
cos number
Reports the cosine of the given angle. Assumes the angle is given in degrees.
show cos 180
=> -1
count
count agentset
Reports the number of agents in the given agentset.
show count turtles
;; prints the total number of turtles
show count patches with [pcolor = red]
;; prints the total number of red patches
create-ordered-turtles
cro
create-ordered-<breeds>
create-ordered-turtles number
create-ordered-turtles number [ commands ]
create-ordered<breeds> number
create-ordered<breeds> number [ commands ]
Creates number new turtles. New turtles start at position (0, 0), are created with the 14 primary
colors, and have headings from 0 to 360, evenly spaced.
If the create-ordered-<breeds> form is used, the new turtles are created as members of the given
breed.
If commands are supplied, the new turtles immediately run them. This is useful for giving the new
turtles a different color, heading, or whatever. (The new turtles are created all at once then run one
at a time, in random order.)
cro 100 [ fd 10 ]
;; makes an evenly spaced circle
create-<breed>-to
create-<breeds>-to
create-<breed>-from
create-<breeds>-from
create-<breed>-with
create-<breeds>-with
332
NetLogo Dictionary
NetLogo 4.1.3 User Manual
create-link-to
create-links-to
create-link-from
create-links-from
create-link-with
create-links-with
create-<breed>-to turtle
create-<breed>-to turtle [ commands ]
create-<breed>-from turtle
create-<breed>-from turtle [ commands ]
create-<breed>-with turtle
create-<breed>-with turtle [ commands ]
create-<breeds>-to turtleset
create-<breeds>-to turtleset [ commands ]
create-<breeds>-from turtleset
create-<breeds>-from turtleset [ commands ]
create-<breeds>-with turtleset
create-<breeds>-with turtleset [ commands ]
create-link-to turtle
create-link-to turtle [ commands ]
create-link-from turtle
create-link-from turtle [ commands ]
create-link-with turtle
create-link-with turtle [ commands ]
create-links-to turtleset
create-links-to turtleset [ commands ]
create-links-from turtleset
create-links-from turtleset [ commands ]
create-links-with turtleset
create-links-with turtleset [ commands ]
Used for creating breeded and unbreeded links between turtles.
create-link-with creates an undirected link between the caller and agent. create-link-to creates a
directed link from the caller to agent. create-link-from creates a directed link from agent to the caller.
When the plural form of the breed name is used, an agentset is expected instead of an agent and
links are created between the caller and all agents in the agentset.
The optional command block is the set of commands each newly formed link runs. (The links are
created all at once then run one at a time, in random order.)
A node cannot be linked to itself. Also, you cannot have more than one undirected link of the same
breed between the same two nodes, nor can you have more than one directed link of the same
breed going in the same direction between two nodes.
NetLogo Dictionary
333
NetLogo 4.1.3 User Manual
If you try to create a link where one (of the same breed) already exists, nothing happens. If you try
to create a link from a turtle to itself you get a runtime error.
to setup
crt 5
;; turtle 1 creates links with all other turtles
;; the link between the turtle and itself is ignored
ask turtle 0 [ create-links-with other turtles ]
show count links ;; shows 4
;; this does nothing since the link already exists
ask turtle 0 [ create-link-with turtle 1 ]
show count links ;; shows 4 since the previous link already existed
ask turtle 2 [ create-link-with turtle 1 ]
show count links ;; shows 5
end
directed-link-breed [red-links red-link]
undirected-link-breed [blue-links blue-link]
to setup
crt 5
;; create links in both directions between turtle 0
;; and all other turtles
ask turtle 0 [ create-red-links-to turtles ]
ask turtle 0 [ create-red-links-from turtles ]
show count links ;; shows 8
;; now create undirected links between turtle 0 and other turtles
ask turtle 0 [ create-blue-links-with turtles ]
show count links ;; shows 12
end
create-turtles
crt
create-<breeds>
create-turtles number
create-turtles number [ commands ]
create-<breeds> number
create-<breeds> number [ commands ]
Creates number new turtles at the origin. New turtles have random integer headings and the color is
randomly selected from the 14 primary colors.
If the create-<breeds> form is used, the new turtles are created as members of the given breed.
If commands are supplied, the new turtles immediately run them. This is useful for giving the new
turtles a different color, heading, or whatever. (The new turtles are created all at once then run one
at a time, in random order.)
crt 100 [ fd 10 ]
;; makes a randomly spaced circle
breed [canaries canary]
breed [snakes snake]
to setup
clear-all
334
NetLogo Dictionary
NetLogo 4.1.3 User Manual
create-canaries 50 [ set color yellow ]
create-snakes 50 [ set color green ]
end
See also hatch, sprout.
create-temporary-plot-pen
create-temporary-plot-pen string
A new temporary plot pen with the given name is created in the current plot and set to be the
current pen.
Few models will want to use this primitive, because all temporary pens disappear when clear-plot or
clear-all-plots are called. The normal way to make a pen is to make a permanent pen in the plot's
Edit dialog.
If a temporary pen with that name already exists in the current plot, no new pen is created, and the
existing pen is set to the the current pen. If a permanent pen with that name already exists in the
current plot, you get a runtime error.
The new temporary plot pen has the following initial settings:
• Pen: down
• Color: black
• Mode: 0 (line mode)
• Interval: 1
See: clear-plot, clear-all-plots, and set-current-plot-pen.
D
date-and-time
date-and-time
Reports a string containing the current date and time. The format is shown below. All fields are fixed
width, so they are always at the same locations in the string. The potential resolution of the clock is
milliseconds. (Whether you get resolution that high in practice may vary from system to system,
depending on the capabilities of the underlying Java Virtual Machine.)
show date-and-time
=> "01:19:36.685 PM 19-Sep-2002"
die
die
The turtle or link dies.
NetLogo Dictionary
335
NetLogo 4.1.3 User Manual
if xcor > 20 [ die ]
;; all turtles with xcor greater than 20 die
ask links with [color = blue] [ die ]
;; all the blue links will die
See also: clear-turtles clear-links
diffuse
diffuse patch-variable number
Tells each patch to give equal shares of (number * 100) percent of the value of patch-variable to its
eight neighboring patches. number should be between 0 and 1. Regardless of topology the sum of
patch-variable will be conserved across the world. (If a patch has fewer than eight neighbors, each
neighbor still gets an eighth share; the patch keeps any leftover shares.)
Note that this is an observer command only, even though you might expect it to be a patch
command. (The reason is that it acts on all the patches at once -- patch commands act on individual
patches.)
diffuse chemical 0.5
;; each patch diffuses 50% of its variable
;; chemical to its neighboring 8 patches. Thus,
;; each patch gets 1/8 of 50% of the chemical
;; from each neighboring patch.)
diffuse4
diffuse4 patch-variable number
Like diffuse, but only diffuses to the four neighboring patches (to the north, south, east, and west),
not to the diagonal neighbors.
diffuse4 chemical 0.5
;; each patch diffuses 50% of its variable
;; chemical to its neighboring 4 patches. Thus,
;; each patch gets 1/4 of 50% of the chemical
;; from each neighboring patch.)
directed-link-breed
directed-link-breed [<link-breeds> <link-breed>]
This keyword, like the globals and breeds keywords, can only be used at the beginning of the
Procedures tab, before any procedure definitions. It defines a directed link breed. Links of a
particular breed are always all directed or all undirected The first input defines the name of the
agentset associated with the link breed. The second input defines the name of a single member of
the breed. Directed links can be created using create-link(s)-to, and create-link(s)-from, but not
create-link(s)-with
336
NetLogo Dictionary
NetLogo 4.1.3 User Manual
Any link of the given link breed:
• is part of the agentset named by the link breed name
• has its built-in variable breed set to that agentset
• is directed or undirected as declared by the keyword
Most often, the agentset is used in conjunction with ask to give commands to only the links of a
particular breed.
directed-link-breed [streets street]
directed-link-breed [highways highway]
to setup
clear-all
crt 2
;; create a link from turtle 0 to turtle 1
ask turtle 0 [ create-street-to turtle 1 ]
;; create a link from turtle 1 to turtle 0
ask turtle 0 [ create-highway-from turtle 1 ]
end
ask turtle 0 [ show one-of in-links ]
;; prints (street 0 1)
ask turtle 0 [ show one-of out-links ]
;; prints (highway 1 0)
See also breed, undirected-link-breed
display
display
Causes the view to be updated immediately. (Exception: if the user is using the speed slider to
fast-forward the model, then the update may be skipped.)
Also undoes the effect of the no-display command, so that if view updates were suspended by that
command, they will resume.
no-display
ask turtles [ jump 10 set color blue set size 5 ]
display
;; turtles move, change color, and grow, with none of
;; their intermediate states visible to the user, only
;; their final state
Even if no-display was not used, "display" can still be useful, because ordinarily NetLogo is free to
skip some view updates, so that fewer total updates take place, so that models run faster. This
command lets you force a view update, so whatever changes have taken place in the world are
visible to the user.
ask turtles [ set color red ]
display
ask turtles [ set color blue]
;; turtles turn red, then blue; use of "display" forces
;; red turtles to appear briefly
NetLogo Dictionary
337
NetLogo 4.1.3 User Manual
Note that display and no-display operate independently of the switch in the view control strip that
freezes the view.
See also no-display.
distance
distance agent
Reports the distance from this agent to the given turtle or patch.
The distance to or a from a patch is measured from the center of the patch. Turtles and patches use
the wrapped distance (around the edges of the world) if wrapping is allowed by the topology and the
wrapped distance is shorter.
ask turtles [ show max-one-of turtles [distance myself] ]
;; each turtle prints the turtle farthest from itself
distancexy
distancexy xcor ycor
Reports the distance from this agent to the point (xcor, ycor).
The distance from a patch is measured from the center of the patch. Turtles and patches use the
wrapped distance (around the edges of the world) if wrapping is allowed by the topology and the
wrapped distance is shorter.
if (distancexy 0 0) > 10
[ set color green ]
;; all turtles more than 10 units from
;; the center of the world turn green.
downhill
downhill4
downhill patch-variable
downhill4 patch-variable
Moves the turtle to the neighboring patch with the lowest value for patch-variable. If no neighboring
patch has a smaller value than the current patch, the turtle stays put. If there are multiple patches
with the same lowest value, the turtle picks one randomly. Non-numeric values are ignored.
downhill considers the eight neighboring patches; downhill4 only considers the four neighbors.
Equivalent to the following code (assumes variable values are numeric):
move-to patch-here
338
;; go to patch center
NetLogo Dictionary
NetLogo 4.1.3 User Manual
let p min-one-of neighbors [patch-variable]
if [patch-variable] of p < patch-variable [
face p
move-to p
]
;; or neighbors4
Note that the turtle always ends up on a patch center and has a heading that is a multiple of 45
(downhill) or 90 (downhill4).
See also uphill, uphill4.
dx
dy
dx
dy
Reports the x-increment or y-increment (the amount by which the turtle's xcor or ycor would change)
if the turtle were to take one step forward in its current heading.
Note: dx is simply the sine of the turtle's heading, and dy is simply the cosine. (If this is the reverse
of what you expected, it's because in NetLogo a heading of 0 is north and 90 is east, which is the
reverse of how angles are usually defined in geometry.)
Note: In earlier versions of NetLogo, these primitives were used in many situations where the new
patch-ahead primitive is now more appropriate.
E
empty?
empty? list
empty? string
Reports true if the given list or string is empty, false otherwise.
Note: the empty list is written []. The empty string is written "".
end
end
Used to conclude a procedure. See to and to-report.
NetLogo Dictionary
339
NetLogo 4.1.3 User Manual
end1
end1
This is a built-in link variable. It indicates the first endpoint (turtle) of a link. For directed links this will
always be the source for undirected links it will always be the turtle with the lower who number. You
cannot set end1.
crt 2
ask turtle 0
[ create-link-to turtle 1 ]
ask links
[ show end1 ] ;; shows turtle 0
end2
end2
This is a built-in link variable. It indicates the second endpoint (turtle) of a link. For directed links this
will always be the destination for undirected links it will always be the turtle with the higher who
number. You cannot set end2.
crt 2
ask turtle 1
[ create-link-with turtle 0 ]
ask links
[ show end2 ] ;; shows turtle 1
error-message
error-message
Reports a string describing the error that was suppressed by carefully.
This reporter can only be used in the second block of a carefully command.
See also carefully.
every
every number [ commands ]
Runs the given commands only if it's been more than number seconds since the last time this agent
ran them in this context. Otherwise, the commands are skipped.
By itself, every doesn't make commands run over and over again. You need to use every inside a
loop, or inside a forever button, if you want the commands run over and over again. every only limits
how often the commands run.
340
NetLogo Dictionary
NetLogo 4.1.3 User Manual
Above, "in this context" means during the same ask (or button press or command typed in the
Command Center). So it doesn't make sense to write ask turtles [ every 0.5 [ ... ] ],
because when the ask finishes the turtles will all discard their timers for the "every". The correct
usage is shown below.
every 0.5 [ ask turtles [ fd 1 ] ]
;; twice a second the turtles will move forward 1
every 2 [ set index index + 1 ]
;; every 2 seconds index is incremented
See also wait.
exp
exp number
Reports the value of e raised to the number power.
Note: This is the same as e ^ number.
export-view
export-interface
export-output
export-plot
export-all-plots
export-world
export-view filename
export-interface filename
export-output filename
export-plot plotname filename
export-all-plots filename
export-world filename
export-view writes the current contents of the current view to an external file given by the string
filename. The file is saved in PNG (Portable Network Graphics) format, so it is recommended to
supply a filename ending in ".png".
export-interface is similar, but for the whole interface tab.
Note that export-view still works when running NetLogo in headless mode, but export-interface
doesn't.
export-output writes the contents of the model's output area to an external file given by the string
filename. (If the model does not have a separate output area, the output portion of the Command
Center is used.)
export-plot writes the x and y values of all points plotted by all the plot pens in the plot given by the
string plotname to an external file given by the string filename. If a pen is in bar mode (mode 0) and
NetLogo Dictionary
341
NetLogo 4.1.3 User Manual
the y value of the point plotted is greater than 0, the upper-left corner point of the bar will be
exported. If the y value is less than 0, then the lower-left corner point of the bar will be exported.
export-all-plots writes every plot in the current model to an external file given by the string filename.
Each plot is identical in format to the output of export-plot.
export-world writes the values of all variables, both built-in and user-defined, including all observer,
turtle, and patch variables, the drawing, the contents of the output area if one exists, the contents of
any plots and the state of the random number generator, to an external file given by the string
filename. (The result file can be read back into NetLogo with the import-world primitive.)
export-world does not save the state of open files.
export-plot, export-all-plots and export-world save files in in plain-text, "comma-separated values"
(.csv) format. CSV files can be read by most popular spreadsheet and database programs as well
as any text editor.
If you wish to export to a file in a location other than the model's location, you should include the full
path to the file you wish to export. (Use the forward-slash "/" as the folder separator.)
Note that the functionality of these primitives is also available directly from NetLogo's File menu.
export-world "fire.csv"
;; exports the state of the model to the file fire.csv
;; located in the NetLogo folder
export-plot "Temperature" "c:/My Documents/plot.csv"
;; exports the plot named
;; "Temperature" to the file plot.csv located in
;; the C:\My Documents folder
export-all-plots "c:/My Documents/plots.csv"
;; exports all plots to the file plots.csv
;; located in the C:\My Documents folder
If the file already exists, it is overwritten. To avoid this you may wish to use some method of
generating fresh names. Examples:
export-world user-new-file
export-world (word "results " date-and-time ".csv")
export-world (word "results " random-float 1.0 ".csv")
extensions
extensions [name ...]
Allows the model to use primitives from the extensions with the given names. See the Extensions
guide for more information.
extract-hsb
extract-hsb color
Reports a list of three values in the range 0 to 255 representing the hue, saturation and brightness,
respectively, of the given NetLogo color in the range 0 to 140, not including 140 itself.
342
NetLogo Dictionary
NetLogo 4.1.3 User Manual
show extract-hsb red
=> [2.198 206.372 215]
show extract-hsb cyan
=> [127.5 145.714 196]
See also approximate-hsb, approximate-rgb, extract-rgb.
extract-rgb
extract-rgb color
Reports a list of three values in the range 0 to 255 representing the levels of red, green, and blue,
respectively, of the given NetLogo color in the range 0 to 140, not including 140 itself.
show extract-rgb red
=> [215 50 41]
show extract-rgb cyan
=> [84 196 196]
See also approximate-rgb, approximate-hsb, extract-hsb.
F
face
face agent
Set the caller's heading towards agent.
If wrapping is allowed by the topology and the wrapped distance (around the edges of the world) is
shorter, face will use the wrapped path.
If the caller and the agent are at the exact same position, the caller's heading won't change.
facexy
facexy number number
Set the caller's heading towards the point (x,y).
If wrapping is allowed by the topology and the wrapped distance (around the edges of the world) is
shorter and wrapping is allowed, facexy will use the wrapped path.
If the caller is on the point (x,y), the caller's heading won't change.
NetLogo Dictionary
343
NetLogo 4.1.3 User Manual
file-at-end?
file-at-end?
Reports true when there are no more characters left to read in from the current file (that was opened
previously with file-open). Otherwise, reports false.
file-open "my-file.txt"
print file-at-end?
=> false ;; Can still read in more characters
print file-read-line
=> This is the last line in file
print file-at-end?
=> true ;; We reached the end of the file
See also file-open, file-close-all.
file-close
file-close
Closes a file that has been opened previously with file-open.
Note that this and file-close-all are the only ways to restart to the beginning of an opened file or to
switch between file modes.
If no file is open, does nothing.
See also file-close-all, file-open.
file-close-all
file-close-all
Closes all files (if any) that have been opened previously with file-open.
See also file-close, file-open.
file-delete
file-delete string
Deletes the file specified as string
string must be an existing file with writable permission by the user. Also, the file cannot be open.
Use the command file-close to close an opened file before deletion.
Note that the string can either be a file name or an absolute file path. If it is a file name, it looks in
whatever the current directory is. This can be changed using the command set-current-directory. It
is defaulted to the model's directory.
344
NetLogo Dictionary
NetLogo 4.1.3 User Manual
file-exists?
file-exists? string
Reports true if string is the name of an existing file on the system. Otherwise it reports false.
Note that the string can either be a file name or an absolute file path. If it is a file name, it looks in
whatever the current directory is. This can be changed using the command set-current-directory. It
defaults to to the model's directory.
file-flush
file-flush
Forces file updates to be written to disk. When you use file-write or other output commands, the
values may not be immediately written to disk. This improves the performance of the file output
commands. Closing a file ensures that all output is written to disk.
Sometimes you need to ensure that data is written to disk without closing the file. For example, you
could be using a file to communicate with another program on your machine and want the other
program to be able to see the output immediately.
file-open
file-open string
This command will interpret string as a path name to a file and open the file. You may then use the
reporters file-read, file-read-line, and file-read-characters to read in from the file, or file-write,
file-print, file-type, or file-show to write out to the file.
Note that you can only open a file for reading or writing but not both. The next file i/o primitive you
use after this command dictates which mode the file is opened in. To switch modes, you need to
close the file using file-close.
Also, the file must already exist if opening a file in reading mode.
When opening a file in writing mode, all new data will be appended to the end of the original file. If
there is no original file, a new blank file will be created in its place. (You must have write permission
in the file's directory.) (If you don't want to append, but want to replace the file's existing contents,
use file-delete to delete it first, perhaps inside a carefully if you're not sure whether it already exists.)
Note that the string can either be a file name or an absolute file path. If it is a file name, it looks in
whatever the current directory is. This can be changed using the command set-current-directory. It
is defaulted to the model's directory.
file-open "my-file-in.txt"
print file-read-line
=> First line in file ;; File is in reading mode
file-open "C:\\NetLogo\\my-file-out.txt"
NetLogo Dictionary
345
NetLogo 4.1.3 User Manual
;; assuming Windows machine
file-print "Hello World" ;; File is in writing mode
See also file-close.
file-print
file-print value
Prints value to an opened file, followed by a carriage return.
This agent is not printed before the value, unlike file-show.
Note that this command is the file i/o equivalent of print, and file-open needs to be called before this
command can be used.
See also file-show, file-type, and file-write.
file-read
file-read
This reporter will read in the next constant from the opened file and interpret it as if it had been
typed in the Command Center. It reports the resulting value. The result may be a number, list,
string, boolean, or the special value nobody.
Whitespace separates the constants. Each call to file-read will skip past both leading and trailing
whitespace.
Note that strings need to have quotes around them. Use the command file-write to have quotes
included.
Also note that the file-open command must be called before this reporter can be used, and there
must be data remaining in the file. Use the reporter file-at-end? to determine if you are at the end of
the file.
file-open "my-file.data"
print file-read + 5
;; Next value is the number 1
=> 6
print length file-read
;; Next value is the list [1 2 3 4]
=> 4
See also file-open and file-write.
file-read-characters
346
NetLogo Dictionary
NetLogo 4.1.3 User Manual
file-read-characters number
Reports the given number of characters from an opened file as a string. If there are fewer than that
many characters left, it will report all of the remaining characters.
Note that it will return every character including newlines and spaces.
Also note that the file-open command must be called before this reporter can be used, and there
must be data remaining in the file. Use the reporter file-at-end? to determine if you are at the end of
the file.
file-open "my-file.txt"
print file-read-characters 5
;; Current line in file is "Hello World"
=> Hello
See also file-open.
file-read-line
file-read-line
Reads the next line in the file and reports it as a string. It determines the end of the file by a carriage
return, an end of file character or both in a row. It does not return the line terminator characters.
Also note that the file-open command must be called before this reporter can be used, and there
must be data remaining in the file. Use the reporter file-at-end? to determine if you are at the end of
the file.
file-open "my-file.txt"
print file-read-line
=> Hello World
See also file-open.
file-show
file-show value
Prints value to an opened file, preceded by this agent agent, and followed by a carriage return. (This
agent is included to help you keep track of what agents are producing which lines of output.) Also,
all strings have their quotes included similar to file-write.
Note that this command is the file i/o equivalent of show, and file-open needs to be called before
this command can be used.
See also file-print, file-type, and file-write.
NetLogo Dictionary
347
NetLogo 4.1.3 User Manual
file-type
file-type value
Prints value to an opened file, not followed by a carriage return (unlike file-print and file-show). The
lack of a carriage return allows you to print several values on the same line.
This agent is not printed before the value. unlike file-show.
Note that this command is the file i/o equivalent of type, and file-open needs to be called before this
command can be used.
See also file-print, file-show, and file-write.
file-write
file-write value
This command will output value, which can be a number, string, list, boolean, or nobody to an
opened file, not followed by a carriage return (unlike file-print and file-show).
This agent is not printed before the value, unlike file-show. Its output also includes quotes around
strings and is prepended with a space. It will output the value in such a manner that file-read will be
able to interpret it.
Note that this command is the file i/o equivalent of write, and file-open needs to be called before this
command can be used.
file-open "locations.txt"
ask turtles
[ file-write xcor file-write ycor ]
See also file-print, file-show, and file-type.
filter
filter [reporter] list
Reports a list containing only those items of list for which the boolean reporter is true -- in other
words, the items satisfying the given condition.
In reporter, use ? to refer to the current item of list.
show filter [? < 3] [1 3 2]
=> [1 2]
show filter [first ? != "t"] ["hi" "there" "everyone"]
=> ["hi" "everyone"]
See also map, reduce, ?.
348
NetLogo Dictionary
NetLogo 4.1.3 User Manual
first
first list
first string
On a list, reports the first (0th) item in the list.
On a string, reports a one-character string containing only the first character of the original string.
floor
floor number
Reports the largest integer less than or equal to number.
show floor 4.5
=> 4
show floor -4.5
=> -5
See also ceiling, round, precision.
follow
follow turtle
Similar to ride, but, in the 3D view, the observer's vantage point is behind and above turtle.
See also follow-me, ride, reset-perspective, watch, subject.
follow-me
follow-me
Asks the observer to follow this turtle.
See also follow.
foreach
foreach list [ commands ]
(foreach list1 ... [ commands ])
With a single list, runs commands for each item of list. In commands, use ? to refer to the current
item of list.
foreach [1.1 2.2 2.6] [ show (word ? " -> " round ?) ]
=> 1.1 -> 1
NetLogo Dictionary
349
NetLogo 4.1.3 User Manual
=> 2.2 -> 2
=> 2.6 -> 3
With multiple lists, runs commands for each group of items from each list. So, they are run once for
the first items, once for the second items, and so on. All the lists must be the same length. In
commands, use ?1 through ?n to refer to the current item of each list.
Some examples make this clearer:
(foreach [1 2 3] [2 4 6]
[ show word "the sum is: " (?1 + ?2) ])
=> "the sum is: 3"
=> "the sum is: 6"
=> "the sum is: 9"
(foreach list (turtle 1) (turtle 2) [3 4]
[ ask ?1 [ fd ?2 ] ])
;; turtle 1 moves forward 3 patches
;; turtle 2 moves forward 4 patches
See also map, ?.
forward
fd
forward number
The turtle moves forward by number steps, one step at a time. (If number is negative, the turtle
moves backward.)
fd 10 is equivalent to repeat 10 [ jump 1 ]. fd 10.5 is equivalent to repeat 10 [ jump
1 ] jump 0.5.
If the turtle cannot move forward number steps because it is not permitted by the current topology
the turtle will complete as many steps of 1 as it can, then stop.
See also jump, can-move?.
fput
fput item list
Adds item to the beginning of a list and reports the new list.
;; suppose mylist is [5 7 10]
set mylist fput 2 mylist
;; mylist is now [2 5 7 10]
G
350
NetLogo Dictionary
NetLogo 4.1.3 User Manual
globals
globals [var1 ...]
This keyword, like the breed, <breeds>-own, patches-own, and turtles-own keywords, can only be
used at the beginning of a program, before any function definitions. It defines new global variables.
Global variables are "global" because they are accessible by all agents and can be used anywhere
in a model.
Most often, globals is used to define variables or constants that need to be used in many parts of
the program.
H
hatch
hatch-<breeds>
hatch number [ commands ]
hatch-<breeds> number [ commands ]
This turtle creates number new turtles. Each new turtle inherits of all its variables, including its
location, from its parent. (Exceptions: each new turtle will have a new who number, and it may be of
a different breed than its parent if the hatch-<breeds> form is used.)
The new turtles then run commands. You can use the commands to give the new turtles different
colors, headings, locations, or whatever. (The new turtles are created all at once, then run one at a
time, in random order.)
If the hatch-<breeds> form is used, the new turtles are created as members of the given breed.
Otherwise, the new turtles are the same breed as their parent.
hatch 1 [ lt 45 fd 1 ]
;; this turtle creates one new turtle,
;; and the child turns and moves away
hatch-sheep 1 [ set color black ]
;; this turtle creates a new turtle
;; of the sheep breed
See also create-turtles, sprout.
heading
heading
This is a built-in turtle variable. It indicates the direction the turtle is facing. This is a number greater
than or equal to 0 and less than 360. 0 is north, 90 is east, and so on. You can set this variable to
make a turtle turn.
NetLogo Dictionary
351
NetLogo 4.1.3 User Manual
See also right, left, dx, dy.
Example:
set heading 45
;; turtle is now facing northeast
set heading heading + 10 ;; same effect as "rt 10"
hidden?
hidden?
This is a built-in turtle or link variable. It holds a boolean (true or false) value indicating whether the
turtle or link is currently hidden (i.e., invisible). You can set this variable to make a turtle or link
disappear or reappear.
See also hide-turtle, show-turtle, hide-link, show-link
Example:
set hidden? not hidden?
;; if turtle was showing, it hides, and if it was hiding,
;; it reappears
hide-link
hide-link
The link makes itself invisible.
Note: This command is equivalent to setting the link variable "hidden?" to true.
See also show-link.
hide-turtle
ht
hide-turtle
The turtle makes itself invisible.
Note: This command is equivalent to setting the turtle variable "hidden?" to true.
See also show-turtle.
352
NetLogo Dictionary
NetLogo 4.1.3 User Manual
histogram
histogram list
Histograms the values in the given list
Draws a histogram showing the frequency distribution of the values in the list. The heights of the
bars in the histogram represent the numbers of values in each subrange.
Before the histogram is drawn, first any previous points drawn by the current plot pen are removed.
Any non-numeric values in the list are ignored.
The histogram is drawn on the current plot using the current plot pen and pen color. Use
set-plot-x-range to control the range of values to be histogrammed, and set the pen interval (either
directly with set-plot-pen-interval, or indirectly via set-histogram-num-bars) to control how many bars
that range is split up into.
Be sure that if you want the histogram drawn with bars that the current pen is in bar mode (mode 1).
For histogramming purposes the plot's X range is not considered to include the maximum X value.
Values equal to the maximum X will fall outside of the histogram's range.
histogram [color] of turtles
;; draws a histogram showing how many turtles there are
;; of each color
home
home
This turtle moves to the origin (0,0). Equivalent to setxy 0 0.
hsb
hsb hue saturation brightness
Reports a RGB list when given a color in HSB format. Hue, saturation, and brightness are integers
in the range 0-255. The RGB list contains three integers in the same range.
See also rgb
hubnet-broadcast
hubnet-broadcast tag-name value
This broadcasts value from NetLogo to the variable, in the case of Calculator HubNet, or interface
element, in the case of Computer HubNet, with the name tag-name to the clients.
NetLogo Dictionary
353
NetLogo 4.1.3 User Manual
See the HubNet Authoring Guide for details and instructions.
hubnet-broadcast-clear-output
hubnet-broadcast-clear-output
This clears all messages printed to the text area on every client.
See also: hubnet-broadcast-message, hubnet-send-clear-output
hubnet-broadcast-message
hubnet-broadcast-message value
This prints the value in the text area on each client. This is the same functionality as the "Broadcast
Message" button in the HubNet Control Center.
See also: hubnet-send-message
hubnet-broadcast-view
hubnet-broadcast-view
This broadcasts the current state of the 2D view in the NetLogo model to all the Computer HubNet
Clients. It does nothing for Calculator HubNet.
Note: This is an experimental primitive and its behavior may change in a future version.
See the HubNet Authoring Guide for details and instructions.
hubnet-clear-override
hubnet-clear-overrides
hubnet-clear-override client agent-or-set variable-name
hubnet-clear-overrides client
Remove overrides from the override list on client. hubnet-clear-override removes only the
override for the specified variable for the specified agent or agentset. hubnet-clear-overrides
removes all overrides from the specified client.
See also: hubnet-send-override
hubnet-enter-message?
hubnet-enter-message?
Reports true if a new computer client just entered the simulation. Reports false otherwise.
hubnet-message-source will contain the user name of the client that just logged on.
354
NetLogo Dictionary
NetLogo 4.1.3 User Manual
See the HubNet Authoring Guide for details and instructions.
hubnet-exit-message?
hubnet-exit-message?
Reports true if a computer client just exited the simulation. Reports false otherwise.
hubnet-message-source will contain the user name of the client that just logged off.
See the HubNet Authoring Guide for details and instructions.
hubnet-fetch-message
hubnet-fetch-message
If there is any new data sent by the clients, this retrieves the next piece of data, so that it can be
accessed by hubnet-message, hubnet-message-source, and hubnet-message-tag. This will cause
an error if there is no new data from the clients.
See the HubNet Authoring Guide for details.
hubnet-message
hubnet-message
Reports the message retrieved by hubnet-fetch-message.
See the HubNet Authoring Guide for details.
hubnet-message-source
hubnet-message-source
Reports the name of the client that sent the message retrieved by hubnet-fetch-message.
See the HubNet Authoring Guide for details.
hubnet-message-tag
hubnet-message-tag
Reports the tag that is associated with the data that was retrieved by hubnet-fetch-message. For
Calculator HubNet, this will report one of the variable names set with the hubnet-set-client-interface
primitive. For Computer HubNet, this will report one of the Display Names of the interface elements
in the client interface.
See the HubNet Authoring Guide for details.
NetLogo Dictionary
355
NetLogo 4.1.3 User Manual
hubnet-message-waiting?
hubnet-message-waiting?
This looks for a new message sent by the clients. It reports true if there is one, and false if there is
not.
See the HubNet Authoring Guide for details.
hubnet-reset
hubnet-reset
Starts up the HubNet system. HubNet must be started to use any of the other hubnet primitives with
the exception of hubnet-set-client-interface.
See the HubNet Authoring Guide for details.
hubnet-reset-perspective
hubnet-reset-perspective tag-name
Clears watch or follow sent directly to the client. The view perspective will revert to the server
perspective.
See also: hubnet-send-watch hubnet-send-follow
hubnet-send
hubnet-send string tag-name value
hubnet-send list-of-strings tag-name value
For Calculator HubNet, this primitive acts in exactly the same manner as hubnet-broadcast. (We
plan to change this in a future version of NetLogo.)
For Computer HubNet, it acts as follows:
For a string, this sends value from NetLogo to the tag tag-name on the client that has string for its
user name.
For a list-of-strings, this sends value from NetLogo to the tag tag-name on all the clients that have a
user name that is in the list-of-strings.
Sending a message to a non-existent client, using hubnet-send, generates a
hubnet-exit-message.
See the HubNet Authoring Guide for details.
356
NetLogo Dictionary
NetLogo 4.1.3 User Manual
hubnet-send-clear-output
hubnet-send-clear-output string
hubnet-send-clear-output list-of-strings
This clears all messages printed to the text area on the given client or clients (specified in the string
or list-of-strings.
See also: hubnet-send-message, hubnet-broadcast-clear-output
hubnet-send-follow
hubnet-send-follow client-name agent radius
Tells the client associated with client-name to follow agent showing a radius sized Moore
neighborhood around the agent.
See also: hubnet-send-watch, hubnet-reset-perspective
hubnet-send-message
hubnet-send-message string value
This prints value in the text area on the client specified by string.
See also: hubnet-broadcast-message
hubnet-send-override
hubnet-send-override client-name agent-or-set variable-name [ reporter ]
Evaluates reporter for the agent or agentset indicated then sends the values to the client to
"override" the value of variable-name only on client-name. This is used to change the appearance of
agents in the client view, hence, only built-in variables that affect the appearance of the agent may
be selected. For example, you can override the color variable of a turtle:
ask turtles [ hubnet-send-override client-name self "color" [ red ] ]
In this example assume that there is a turtles-own variable client-name which is associated with a
logged in client, and all the turtles are blue. This code makes the turtle associated with each client
appear red in his or her own view but not on anyone else's or on the server.
See also: hubnet-clear-overrides
NetLogo Dictionary
357
NetLogo 4.1.3 User Manual
hubnet-send-watch
hubnet-send-watch client-name agent
Tells the client associated with client-name to watch agent.
See also: hubnet-send-follow, hubnet-reset-perspective
hubnet-set-client-interface
hubnet-set-client-interface client-type client-info
If client-type is "COMPUTER", client-info is an empty list for computer HubNet.
hubnet-set-client-interface "COMPUTER"[]
Future versions of HubNet will support other client types. Even for Computer HubNet, the meaning
of the second input to this command may change.
See the HubNet Authoring Guide for details.
I
if
if condition [ commands ]
Reporter must report a boolean (true or false) value.
If condition reports true, runs commands.
The reporter may report a different value for different agents, so some agents may run commands
and others don't.
if xcor > 0[ set color blue ]
;; turtles in the right half of the world
;; turn blue
See also ifelse, ifelse-value.
ifelse
ifelse reporter [ commands1 ] [ commands2 ]
Reporter must report a boolean (true or false) value.
If reporter reports true, runs commands1.
If reporter reports false, runs commands2.
358
NetLogo Dictionary
NetLogo 4.1.3 User Manual
The reporter may report a different value for different agents, so some agents may run commands1
while others run commands2.
ask patches
[ ifelse pxcor > 0
[ set pcolor blue ]
[ set pcolor red ] ]
;; the left half of the world turns red and
;; the right half turns blue
See also if, ifelse-value.
ifelse-value
ifelse-value reporter [reporter1] [reporter2]
Reporter must report a boolean (true or false) value.
If reporter reports true, the result is the value of reporter1.
If reporter reports false, the result is the value of reporter2.
This can be used when a conditional is needed in the context of a reporter, where commands (such
as ifelse) are not allowed.
ask patches [
set pcolor ifelse-value (pxcor > 0) [blue] [red]
]
;; the left half of the world turns red and
;; the right half turns blue
show n-values 10 [ifelse-value (? < 5) [0] [1]]
=> [0 0 0 0 0 1 1 1 1 1]
show reduce [ifelse-value (?1 > ?2) [?1] [?2]]
[1 3 2 5 3 8 3 2 1]
=> 8
See also if, ifelse.
import-drawing
import-drawing filename
Reads an image file into the drawing, scaling it to the size of the world, while retaining the original
aspect ratio of the image. The image is centered in the drawing. The old drawing is not cleared first.
Agents cannot sense the drawing, so they cannot interact with or process images imported by
import-drawing. If you need agents to sense an image, use import-pcolors or import-pcolors-rgb.
The following image file formats are supported: BMP, JPG, GIF, and PNG. If the image format
supports transparency (alpha), that information will be imported as well.
NetLogo Dictionary
359
NetLogo 4.1.3 User Manual
import-pcolors
import-pcolors filename
Reads an image file, scales it to the same dimensions as the patch grid while maintaining the
original aspect ratio of the image, and transfers the resulting pixel colors to the patches. The image
is centered in the patch grid. The resulting patch colors may be distorted, since the NetLogo color
space does not include all possible colors. (See the Color section of the Programming Guide.)
import-pcolors may be slow for some images, particularly when you have many patches and a large
image with many different colors.
Since import-pcolors sets the pcolor of patches, agents can sense the image. This is useful if
agents need to analyze, process, or otherwise interact with the image. If you want to simply display
a static backdrop, without color distortion, see import-drawing.
The following image file formats are supported: BMP, JPG, GIF, and PNG. If the image format
supports transparency (alpha), then all fully transparent pixels will be ignored. (Partially transparent
pixels will be treated as opaque.)
import-pcolors-rgb
import-pcolors-rgb filename
Reads an image file, scales it to the same dimensions as the patch grid while maintaining the
original aspect ratio of the image, and transfers the resulting pixel colors to the patches. The image
is centered in the patch grid. Unlike import-pcolors the exact colors in the original image are
retained. The pcolor variable of all the patches will be an RGB list rather than an (approximated)
NetLogo color.
The following image file formats are supported: BMP, JPG, GIF, and PNG. If the image format
supports transparency (alpha), then all fully transparent pixels will be ignored. (Partially transparent
pixels will be treated as opaque.)
import-world
import-world filename
Reads the values of all variables for a model, both built-in and user-defined, including all observer,
turtle, and patch variables, from an external file named by the given string. The file should be in the
format used by the export-world primitive.
Note that the functionality of this primitive is also directly available from NetLogo's File menu.
When using import-world, to avoid errors, perform these steps in the following order:
1. Open the model from which you created the export file.
2. Press the Setup button, to get the model in a state from which it can be run.
360
NetLogo Dictionary
NetLogo 4.1.3 User Manual
3. Import the file.
4. Re-open any files that the model had opened with the file-open command.
5. If you want, press Go button to continue running the model from the point where it left off.
If you wish to import a file from a location other than the model's location, you may include the full
path to the file you wish to import. See export-world for an example.
in-cone
agentset in-cone distance angle
This reporter lets you give a turtle a "cone of vision" in front of itself. The cone is defined by the two
inputs, the vision distance (radius) and the viewing angle. The viewing angle may range from 0 to
360 and is centered around the turtle's current heading. (If the angle is 360, then in-cone is
equivalent to in-radius.)
in-cone reports an agentset that includes only those agents from the original agentset that fall in the
cone. (This can include the agent itself.)
The distance to a patch is measured from the center of the patch.
ask turtles
[ ask patches in-cone 3 60
[ set pcolor red ] ]
;; each turtle makes a red "splotch" of patches in a 60 degree
;; cone of radius 3 ahead of itself
in-<breed>-neighbor?
in-link-neighbor?
in-<breed>-neighbor? agent
in-link-neighbor? turtle
Reports true if there is a directed link going from turtle to the caller.
crt 2
ask turtle 0 [
create-link-to turtle 1
show in-link-neighbor? turtle 1
show out-link-neighbor? turtle 1
]
ask turtle 1 [
show in-link-neighbor? turtle 0
show out-link-neighbor? turtle 0
]
NetLogo Dictionary
;; prints false
;; prints true
;; prints true
;; prints false
361
NetLogo 4.1.3 User Manual
in-<breed>-neighbors
in-link-neighbors
in-<breed>-neighbors
in-link-neighbors
Reports the agentset of all the turtles that have directed links coming from them to the caller.
crt 4
ask turtle 0 [ create-links-to other turtles ]
ask turtle 1 [ ask in-link-neighbors [ set color blue ] ] ;; turtle 0 turns blue
in-<breed>-from
in-link-from
in-<breed>-from turtle
in-link-from turtle
Report the directed link from turtle to the caller. If no link exists then it reports nobody.
crt
ask
ask
ask
2
turtle 0 [ create-link-to turtle 1 ]
turtle 1 [ show in-link-from turtle 0 ] ;; shows link 0 1
turtle 0 [ show in-link-from turtle 1 ] ;; shows nobody
See also: out-link-to link-with
__includes
__includes [ filename ... ]
Causes external NetLogo source files (with the .nls suffix) to be included in this model. Included
files may contain breed, variable, and procedure definitions. __includes can only be used once
per file.
in-radius
agentset in-radius number
Reports an agentset that includes only those agents from the original agentset whose distance from
the caller is less than or equal to number. (This can include the agent itself.)
The distance to or a from a patch is measured from the center of the patch.
ask turtles
[ ask patches in-radius 3
[ set pcolor red ] ]
;; each turtle makes a red "splotch" around itself
362
NetLogo Dictionary
NetLogo 4.1.3 User Manual
inspect
inspect agent
Opens an agent monitor for the given agent (turtle or patch).
inspect patch 2 4
;; an agent monitor opens for that patch
inspect one-of sheep
;; an agent monitor opens for a random turtle from
;; the "sheep" breed
int
int number
Reports the integer part of number -- any fractional part is discarded.
show int 4.7
=> 4
show int -3.5
=> -3
is-agent?
is-agentset?
is-boolean?
is-<breed>?
is-directed-link?
is-link?
is-link-set?
is-list?
is-number?
is-patch?
is-patch-set?
is-string?
is-turtle?
is-turtle-set?
is-undirected-link?
is-agent? value
is-agentset? value
is-boolean? value
is-<breed>? value
is-directed-link? value
is-link? value
is-link-set? value
NetLogo Dictionary
363
NetLogo 4.1.3 User Manual
is-list? value
is-number? value
is-patch? value
is-patch-set? value
is-string? value
is-turtle? value
is-turtle-set? value
is-directed-link? value
Reports true if value is of the given type, false otherwise.
item
item index list
item index string
On lists, reports the value of the item in the given list with the given index.
On strings, reports the character in the given string at the given index.
Note that the indices begin from 0, not 1. (The first item is item 0, the second item is item 1, and so
on.)
;; suppose mylist is [2 4 6 8 10]
show item 2 mylist
=> 6
show item 3 "my-shoe"
=> "s"
J
jump
jump number
The turtle moves forward by number units all at once (rather than one step at a time as with the
forward command).
If the turtle cannot jump number units because it is not permitted by the current topology the turtle
does not move at all.
See also forward, can-move?.
L
364
NetLogo Dictionary
NetLogo 4.1.3 User Manual
label
label
This is a built-in turtle or link variable. It may hold a value of any type. The turtle or link appears in
the view with the given value "attached" to it as text. You can set this variable to add, change, or
remove a turtle or link's label.
See also label-color, plabel, plabel-color.
Example:
ask turtles [ set label who ]
;; all the turtles now are labeled with their
;; who numbers
ask turtles [ set label "" ]
;; all turtles now are not labeled
label-color
label-color
This is a built-in turtle or link variable. It holds a number greater than or equal to 0 and less than
140. This number determines what color the turtle or link's label appears in (if it has a label). You
can set this variable to change the color of a turtle or link's label.
See also label, plabel, plabel-color.
Example:
ask turtles [ set label-color red ]
;; all the turtles now have red labels
last
last list
last string
On a list, reports the last item in the list.
On a string, reports a one-character string containing only the last character of the original string.
layout-circle
layout-circle agentset radius
layout-circle list-of-turtles radius
Arranges the given turtles in a circle centered on the patch at the center of the world with the given
NetLogo Dictionary
365
NetLogo 4.1.3 User Manual
radius. (If the world has an even size the center of the circle is rounded down to the nearest patch.)
The turtles point outwards.
If the first input is an agentset, the turtles are arranged in random order.
If the first input is a list, the turtles are arranged clockwise in the given order, starting at the top of
the circle. (Any non-turtles in the list are ignored.)
;; in random order
layout-circle turtles 10
;; in order by who number
layout-circle sort turtles 10
;; in order by size
layout-circle sort-by [[size] of ?1 < [size] of ?2] turtles 10
__layout-magspring
__layout-magspring turtle-set link-set spring-constant spring-length repulsion-constant
magnetic-field-strength magnetic-field-type bidirectional?
Very similar to layout-spring, but with an added layer of complexity. The turtles in turtle-set attract
and repel each other depending on the links (that are in link-set) between them, but there is also a
magnetic field which the links try to align with.
The link-set is the set of links that exert forces on the turtles they are connected to. Turtles that are
connected to links in the link agentset but are not included in the turtle agentset are treated as
anchors. If there are no turtles with fixed positions the entire network will probably collapse on itself.
spring-constant is a measure of the "tautness" of the spring. (See layout-spring)
spring-length is the "zero-force" length or the natural length of the springs. (See layout-spring)
repulsion-constant is a measure of repulsion between the nodes. (See layout-spring)
magnetic-field-strength is the force of the magnetic field. (Reasonable values range from 0 to 1, but
0.05 is a good default.)
magnetic-field-type is a number in the range from 0 to 10. Choices are listed in the table below.
magnetic-field-type
Description
NONE = 0
If no field is used, then this command works just like layout-spring.
NORTH = 1
Magnetic field runs toward the North
NORTHEAST = 2
Magnetic field runs toward the Northeast
EAST = 3
...
SOUTHEAST= 4
...
SOUTH = 5
...
366
NetLogo Dictionary
NetLogo 4.1.3 User Manual
SOUTHWEST= 6
...
WEST = 7
...
NORTHWEST = 8
...
POLAR = 9
Magnetic field runs outward at all angles from the origin.
CONCENTRIC = 10
Magnetic field runs clockwise around the origin in concentric circles.
If bidirectional? is true then links try to align with the magnetic field by pushing attached turtles both
in the direction of the field, and in the opposite direction. Otherwise, the links just push in a single
direction.
to make-a-tree
set-default-shape turtles "circle"
crt 5
ask turtle 0 [
create-link-with turtle 1
create-link-with turtle 2
]
ask turtle 1 [
create-link-with turtle 3
create-link-with turtle 4
]
; layout with a fairly strong SOUTH magnetic field
repeat 50 [ __layout-magspring
turtles with [who != 0] links 0.3 4 1 .50 5 false ]
end
layout-radial
layout-radial turtle-set link-set root-agent
Arranges the turtles in turtle-set connected by links in link-set, in a radial tree layout, centered
around the root-agent which is moved to the center of the world view.
Only links in the link-set will be used to determine the layout. If links connect turtles that are not in
turtle-set those turtles will remain stationary.
Even if the network does contain cycles, and is not a true tree structure, this layout will still work,
although the results will not always be pretty.
to make-a-tree
set-default-shape turtles "circle"
crt 6
ask turtle 0 [
create-link-with turtle 1
create-link-with turtle 2
create-link-with turtle 3
]
ask turtle 1 [
create-link-with turtle 4
create-link-with turtle 5
]
; do a radial tree layout, centered on turtle 0
layout-radial turtles links (turtle 0)
end
NetLogo Dictionary
367
NetLogo 4.1.3 User Manual
layout-spring
layout-spring turtle-set link-set spring-constant spring-length repulsion-constant
Arranges the turtles in turtle-set, as if the links in link-set are springs and the turtles are repelling
each other. Turtles that are connected by links in link-set but not included in turtle-set are treated as
anchors and are not moved.
spring-constant is a measure of the "tautness" of the spring. It is the "resistance" to change in their
length. spring-constant is the force the spring would exert if it's length were changed by 1 unit.
spring-length is the "zero-force" length or the natural length of the springs. This is the length which
all springs try to achieve either by pushing out their nodes or pulling them in.
repulsion-constant is a measure of repulsion between the nodes. It is the force that 2 nodes at a
distance of 1 unit will exert on each other.
The repulsion effect tries to get the nodes as far as possible from each other, in order to avoid
crowding and the spring effect tries to keep them at "about" a certain distance from the nodes they
are connected to. The result is the laying out of the whole network in a way which highlights
relationships among the nodes and at the same time is crowded less and is visually pleasing.
The layout algorithm is based on the Fruchterman-Reingold layout algorithm. More information
about this algorithm can be obtained here.
to make-a-triangle
set-default-shape turtles
crt 3
ask turtle 0
[
create-links-with other
]
ask turtle 1
[
create-link-with turtle
]
repeat 30 [ layout-spring
end
"circle"
turtles
2
turtles links 0.2 5 1 ] ;; lays the nodes in a triangle
layout-tutte
layout-tutte turtle-set link-set radius
The turtles that are connected by links in link-set but not included in turtle-set are placed in a circle
layout with the given radius. There should be at least 3 agents in this agentset.
The turtles in turtle-set are then laid out in the following manner: Each turtle is placed at centroid (or
barycenter) of the polygon formed by its linked neighbors. (The centroid is like a 2-dimensional
average of the coordinates of the neighbors.)
368
NetLogo Dictionary
NetLogo 4.1.3 User Manual
(The purpose of the circle of "anchor agents" is to prevent all the turtles from collapsing down to one
point.)
After a few iterations of this, the layout will stabilize.
This layout is named after the mathematician William Thomas Tutte, who proposed it as a method
for graph layout.
to make-a-tree
set-default-shape turtles "circle"
crt 6
ask turtle 0 [
create-link-with turtle 1
create-link-with turtle 2
create-link-with turtle 3
]
ask turtle 1 [
create-link-with turtle 4
create-link-with turtle 5
]
; place all the turtles with just one
; neighbor on the perimeter of a circle
; and then place the remaining turtles inside
; this circle, spread between their neighbors.
repeat 10 [ layout-tutte (turtles with [link-neighbors = 1]) links 12 ]
end
left
lt
left number
The turtle turns left by number degrees. (If number is negative, it turns right.)
length
length list
length string
Reports the number of items in the given list, or the number of characters in the given string.
let
let variable value
Creates a new local variable and gives it the given value. A local variable is one that exists only
within the enclosing block of commands.
If you want to change the value afterwards, use set.
Example:
NetLogo Dictionary
369
NetLogo 4.1.3 User Manual
let prey one-of sheep-here
if prey != nobody
[ ask prey [ die ] ]
link
link end1 end2 <breed> end1 end2
Given the who numbers of the endpoints, reports the link connecting the turtles. If there is no such
link reports nobody. To refer to breeded links you must use the singular breed form with the
endpoints.
ask link 0 1 [ set color green ]
;; unbreeded link connecting turtle 0 and turtle 1 will turn green
ask directed-link 0 1 [ set color red ]
;; directed link connecting turtle 0 and turtle 1 will turn red
See also patch-at.
link-heading
link-heading
Reports the heading in degrees (at least 0, less than 360) from end1 to end2 of the link. Throws a
runtime error if the endpoints are at the same location.
ask link 0 1 [ print link-heading ]
;; prints [[towards other-end] of end1] of link 0 1
See also link-length
link-length
link-length
Reports the distance between the endpoints of the link.
ask link 0 1 [ print link-length ]
;; prints [[distance other-end] of end1] of link 0 1
See also link-heading
link-set
link-set value
(link-set value1 value2 ...)
Reports an agentset containing all of the links anywhere in any of the inputs. The inputs may be
individual links, link agentsets, nobody, or lists (or nested lists) containing any of the above.
370
NetLogo Dictionary
NetLogo 4.1.3 User Manual
link-set self
link-set [my-links] of nodes with [color = red]
See also turtle-set, patch-set.
link-shapes
link-shapes
Reports a list of strings containing all of the link shapes in the model.
New shapes can be created, or imported from other models, in the Link Shapes Editor.
show link-shapes
=> ["default"]
links
links
Reports the agentset consisting of all links.
show count links
;; prints the number of links
links-own
<link-breeds>-own
links-own [var1 ...]
<link-breeds>-own [var1 ...]
The links-own keyword, like the globals, breed, <breeds>-own, turtles-own, and patches-own
keywords, can only be used at the beginning of a program, before any function definitions. It defines
the variables belonging to each link.
If you specify a breed instead of "links", only links of that breed have the listed variables. (More than
one link breed may list the same variable.)
undirected-link-breed [sidewalks sidewalk]
directed-link-breed [streets street]
links-own [traffic]
;; applies to all breeds
sidewalks-own [pedestrians]
streets-own [cars bikes]
list
list value1 value2
(list value1 ...)
Reports a list containing the given items. The items can be of any type, produced by any kind of
reporter.
NetLogo Dictionary
371
NetLogo 4.1.3 User Manual
show list (random 10) (random 10)
=> [4 9] ;; or similar list
show (list 5)
=> [5]
show (list (random 10) 1 2 3 (random 10))
=> [4 1 2 3 9] ;; or similar list
ln
ln number
Reports the natural logarithm of number, that is, the logarithm to the base e (2.71828...).
See also e, log.
log
log number base
Reports the logarithm of number in base base.
show log 64 2
=> 6
See also ln.
loop
loop [ commands ]
Runs the list of commands forever, or until the current procedure exits through use of the stop
command or the report command.
Note: In most circumstances, you should use a forever button in order to repeat something forever.
The advantage of using a forever button is that the user can click the button to stop the loop.
lput
lput value list
Adds value to the end of a list and reports the new list.
;; suppose mylist is [2 7 10 "Bob"]
set mylist lput 42 mylist
;; mylist now is [2 7 10 "Bob" 42]
M
372
NetLogo Dictionary
NetLogo 4.1.3 User Manual
map
map [reporter] list
(map [reporter] list1 ...)
With a single list, the given reporter is run for each item in the list, and a list of the results is
collected and reported.
In reporter, use ? to refer to the current item of list.
show map [round ?] [1.1 2.2 2.7]
=> [1 2 3]
show map [? * ?] [1 2 3]
=> [1 4 9]
With multiple lists, the given reporter is run for each group of items from each list. So, it is run once
for the first items, once for the second items, and so on. All the lists must be the same length.
In reporter, use ?1 through ?n to refer to the current item of each list.
Some examples make this clearer:
show (map [?1 + ?2] [1 2 3] [2 4 6])
=> [3 6 9]
show (map [?1 + ?2 = ?3] [1 2 3] [2 4 6] [3 5 9])
=> [true false true]
See also foreach, ?.
max
max list
Reports the maximum number value in the list. It ignores other types of items.
show max [xcor] of turtles
;; prints the x coordinate of the turtle which is
;; farthest right in the world
max-n-of
max-n-of number agentset [reporter]
Reports an agentset containing number agents from agentset with the highest values of reporter.
The agentset is built by finding all the agents with the highest value of reporter, if there are not
number agents with that value then agents with the second highest value are found, and so on. At
the end, if there is a tie that would make the resulting agentset too large, the tie is broken randomly.
;; assume the world is 11 x 11
show max-n-of 5 patches [pxcor]
;; shows 5 patches with pxcor = max-pxcor
show max-n-of 5 patches with [pycor = 0] [pxcor]
;; shows an agentset containing:
NetLogo Dictionary
373
NetLogo 4.1.3 User Manual
;; (patch 1 0) (patch 2 0) (patch 3 0) (patch 4 0) (patch 5 0)
See also max-one-of, with-max.
max-one-of
max-one-of agentset [reporter]
Reports the agent in the agentset that has the highest value for the given reporter. If there is a tie
this command reports one random agent with the highest value. If you want all such agents, use
with-max instead.
show max-one-of patches [count turtles-here]
;; prints the first patch with the most turtles on it
See also max-n-of, with-max.
max-pxcor
max-pycor
max-pxcor
max-pycor
These reporters give the maximum x-coordinate and maximum y-coordinate, (respectively) for
patches, which determines the size of the world.
Unlike in older versions of NetLogo the origin does not have to be at the center of the world.
However, the maximum x- and y- coordinates must be greater than or equal to zero.
Note: You can set the size of the world only by editing the view -- these are reporters which cannot
be set.
crt 100 [ setxy random-float max-pxcor
random-float max-pycor ]
;; distributes 100 turtles randomly in the
;; first quadrant
See also min-pxcor, min-pycor, world-width, and world-height
mean
mean list
Reports the statistical mean of the numeric items in the given list. Ignores non-numeric items. The
mean is the average, i.e., the sum of the items divided by the total number of items.
show mean [xcor] of turtles
;; prints the average of all the turtles' x coordinates
374
NetLogo Dictionary
NetLogo 4.1.3 User Manual
median
median list
Reports the statistical median of the numeric items of the given list. Ignores non-numeric items. The
median is the item that would be in the middle if all the items were arranged in order. (If two items
would be in the middle, the median is the average of the two.)
show median [xcor] of turtles
;; prints the median of all the turtles' x coordinates
member?
member? value list
member? string1 string2
member? agent agentset
For a list, reports true if the given value appears in the given list, otherwise reports false.
For a string, reports true or false depending on whether string1 appears anywhere inside string2 as
a substring.
For an agentset, reports true if the given agent is appears in the given agentset, otherwise reports
false.
show member?
=> true
show member?
=> false
show member?
=> true
show member?
=> true
show member?
=> false
2 [1 2 3]
4 [1 2 3]
"bat" "abate"
turtle 0 turtles
turtle 0 patches
See also position.
min
min list
Reports the minimum number value in the list. It ignores other types of items.
show min [xcor] of turtles
;; prints the lowest x-coordinate of all the turtles
min-n-of
NetLogo Dictionary
375
NetLogo 4.1.3 User Manual
min-n-of number agentset [reporter]
Reports an agentset containing number agents from agentset with the lowest values of reporter.
The agentset is built by finding all the agents with the lowest value of reporter, if there are not
number agents with that value then the agents with the second lowest value are found, and so on.
At the end, if there is a tie that would make the resulting agentset too large, the tie is broken
randomly.
;; assume the world is 11 x 11
show min-n-of 5 patches [pxcor]
;; shows 5 patches with pxcor = min-pxcor
show min-n-of 5 patches with [pycor = 0] [pxcor]
;; shows an agentset containing:
;; (patch -5 0) (patch -4 0) (patch -3 0) (patch -2 0) (patch -1 0)
See also min-one-of, with-min.
min-one-of
min-one-of agentset [reporter]
Reports a random agent in the agentset that reports the lowest value for the given reporter. If there
is a tie, this command reports one random agent that meets the condition. If you want all such
agents use with-min instead.
show min-one-of turtles [xcor + ycor]
;; reports the first turtle with the smallest sum of
;; coordinates
See also with-min, min-n-of.
min-pxcor
min-pycor
min-pxcor
min-pycor
These reporters give the minimum x-coordinate and minimum y-coordinate, (respectively) for
patches, which determines the size of the world.
Unlike in older versions of NetLogo the origin does not have to be at the center of the world.
However, the minimum x- and y- coordinates must be less than or equal to zero.
Note: You can set the size of the world only by editing the view -- these are reporters which cannot
be set.
crt 100 [ setxy random-float min-pxcor
random-float min-pycor ]
;; distributes 100 turtles randomly in the
;; third quadrant
See also max-pxcor, max-pycor, world-width, and world-height
376
NetLogo Dictionary
NetLogo 4.1.3 User Manual
mod
number1 mod number2
Reports number1 modulo number2: that is, the residue of number1 (mod number2). mod is is
equivalent to the following NetLogo code:
number1 - (floor (number1 / number2)) * number2
Note that mod is "infix", that is, it comes between its two inputs.
show 62 mod 5
=> 2
show -8 mod 3
=> 1
See also remainder. mod and remainder behave the same for positive numbers, but differently for
negative numbers.
modes
modes list
Reports a list of the most common item or items in list.
The input list may contain any NetLogo values.
If the input is an empty list, reports an empty list.
show modes [1 2 2 3 4]
=> [2]
show modes [1 2 2 3 3 4]
=> [2 3]
show modes [ [1 2 [3]] [1 2 [3]] [2 3 4] ]
=> [[1 2 [3]]
show modes [pxcor] of turtles
;; shows which columns of patches have the most
;; turtles on them
mouse-down?
mouse-down?
Reports true if the mouse button is down, false otherwise.
Note: If the mouse pointer is outside of the current view , mouse-down? will always report false.
NetLogo Dictionary
377
NetLogo 4.1.3 User Manual
mouse-inside?
mouse-inside?
Reports true if the mouse pointer is inside the current view, false otherwise.
mouse-xcor
mouse-ycor
mouse-xcor
mouse-ycor
Reports the x or y coordinate of the mouse in the 2D view. The value is in terms of turtle
coordinates, so it might not be an integer. If you want patch coordinates, use round mouse-xcor
and round mouse-ycor.
Note: If the mouse is outside of the 2D view, reports the value from the last time it was inside.
;; to make the mouse "draw" in red:
if mouse-down?
[ ask patch mouse-xcor mouse-ycor [ set pcolor red ] ]
move-to
move-to agent
The turtle sets its x and y coordinates to be the same as the given agent's.
(If that agent is a patch, the effect is to move the turtle to the center of that patch.)
move-to turtle 5
;; turtle moves to same point as turtle 5
move-to one-of patches
;; turtle moves to the center of a random patch
move-to max-one-of turtles [size]
;; turtle moves to same point as biggest turtle
Note that the turtle's heading is unaltered. You may want to use the face command first to orient the
turtle in the direction of motion.
See also setxy.
movie-cancel
movie-cancel
Cancels the current movie.
378
NetLogo Dictionary
NetLogo 4.1.3 User Manual
movie-close
movie-close
Stops the recording of the current movie.
movie-grab-view
movie-grab-interface
movie-grab-view
movie-grab-interface
Adds an image of the current view (2D or 3D) or the interface panel to the current movie.
;; make a 20-step movie of the current view
setup
movie-start "out.mov"
repeat 20 [
movie-grab-view
go
]
movie-close
movie-set-frame-rate
movie-set-frame-rate frame-rate
Sets the frame rate of the current movie. The frame rate is measured in frames per second. (If you
do not explicitly set the frame rate, it defaults to 15 frames per second.)
Must be called after movie-start, but before movie-grab-view or movie-grab-interface.
See also movie-status.
movie-start
movie-start filename
Creates a new movie. filename specifies a new QuickTime file where the movie will be saved, so it
should end with ".mov".
See also movie-grab-view, movie-grab-interface, movie-cancel, movie-status, movie-set-frame-rate,
movie-close.
movie-status
movie-status
Reports a string describing the current movie.
NetLogo Dictionary
379
NetLogo 4.1.3 User Manual
print movie-status
=> No movie.
movie-start
print movie-status
=> 0 frames; frame rate = 15.
movie-grab-view
print movie-status
1 frames; frame rate = 15; size = 315x315.
my-<breeds>
my-links
my-<breeds>
my-links
Reports an agentset of all undirected links connected to the caller.
crt 5
ask turtle 0
[
create-links-with other turtles
show my-links ;; prints the agentset containing all links
;; (since all the links we created were with turtle 0 )
]
ask turtle 1
[
show my-links ;; shows an agentset containing the link 0 1
]
end
my-in-<breeds>
my-in-links
my-in-<breeds>
my-in-links
Reports an agentset of all the directed links coming in from other nodes to the caller.
crt 5
ask turtle 0
[
create-links-to other turtles
show my-in-links ;; shows an empty agentset
]
ask turtle 1
[
show my-in-links ;; shows an agentset containing the link 0 1
]
380
NetLogo Dictionary
NetLogo 4.1.3 User Manual
my-out-<breeds>
my-out-links
my-out-<breeds>
my-out-links
Reports an agentset of all the directed links going out from the caller to other nodes.
crt 5
ask turtle 0
[
create-links-to other turtles
show my-out-links ;; shows agentset containing all the links
]
ask turtle 1
[
show my-out-links ;; shows an empty agentset
]
myself
myself
"self" and "myself" are very different. "self" is simple; it means "me". "myself" means "the turtle or
patch who asked me to do what I'm doing right now."
When an agent has been asked to run some code, using myself in that code reports the agent
(turtle or patch) that did the asking.
myself is most often used in conjunction with of to read or set variables in the asking agent.
myself can be used within blocks of code not just in the ask command, but also hatch, sprout, of,
with, all?, with-min, with-max, min-one-of, max-one-of, min-n-of, max-n-of.
ask turtles
[ ask patches in-radius 3
[ set pcolor [color] of myself ] ]
;; each turtle makes a colored "splotch" around itself
See the "Myself Example" code example for more examples.
See also self.
N
n-of
NetLogo Dictionary
381
NetLogo 4.1.3 User Manual
n-of size agentset
n-of size list
From an agentset, reports an agentset of size size randomly chosen from the input set, with no
repeats.
From a list, reports a list of size size randomly chosen from the input set, with no repeats. The items
in the result appear in the same order that they appeared in the input list. (If you want them in
random order, use shuffle on the result.)
It is an error for size to be greater than the size of the input.
ask n-of 50 patches [ set pcolor green ]
;; 50 randomly chosen patches turn green
See also one-of.
n-values
n-values size [reporter]
Reports a list of length size containing values computed by repeatedly running reporter.
In reporter, use ? to refer to the number of the item currently being computed, starting from zero.
show n-values 5 [1]
=> [1 1 1 1 1]
show n-values 5 [?]
=> [0 1 2 3 4]
show n-values 3 [turtle ?]
=> [(turtle 0) (turtle 1) (turtle 2)]
show n-values 5 [? * ?]
=> [0 1 4 9 16]
See also reduce, filter, ?.
neighbors
neighbors4
neighbors
neighbors4
Reports an agentset containing the 8 surrounding patches (neighbors) or 4 surrounding patches
(neighbors4).
show sum [count turtles-here] of neighbors
;; prints the total number of turtles on the eight
;; patches around this turtle or patch
show count turtles-on neighbors
;; a shorter way to say the same thing
ask neighbors4 [ set pcolor red ]
;; turns the four neighboring patches red
382
NetLogo Dictionary
NetLogo 4.1.3 User Manual
<breed>-neighbors
link-neighbors
<breed>-neighbors
link-neighbors
Reports the agentset of all turtles found at the other end of undirected links connected to this turtle.
crt 3
ask turtle 0
[
create-links-with other turtles
ask link-neighbors [ set color red ] ;; turtles 1 and 2 turn red
]
ask turtle 1
[
ask link-neighbors [ set color blue ] ;; turtle 0 turns blue
]
end
<breed>-neighbor?
link-neighbor?
<breed>-neighbor? turtle
link-neighbor? turtle
Reports true if there is an undirected link between turtle and the caller.
crt 2
ask turtle 0
[
create-link-with turtle 1
show link-neighbor? turtle 1
]
ask turtle 1
[
show link-neighbor? turtle 0
]
;; prints true
;; prints true
netlogo-applet?
netlogo-applet?
Reports true if the model is running as an applet.
netlogo-version
NetLogo Dictionary
383
NetLogo 4.1.3 User Manual
netlogo-version
Reports a string containing the version number of the NetLogo you are running.
show netlogo-version
=> "4.1.3"
new-seed
new-seed
Reports a number suitable for seeding the random number generator.
The numbers reported by new-seed are based on the current date and time in milliseconds and lie
in NetLogo's allowed range of integers, -9007199254740992 to 9007199254740992.
new-seed never reports the same number twice in succession. (This is accomplished by waiting a
millisecond if the seed for the current millisecond was already used.)
See also random-seed.
no-display
no-display
Turns off all updates to the current view until the display command is issued. This has two major
uses.
One, you can control when the user sees view updates. You might want to change lots of things on
the view behind the user's back, so to speak, then make them visible to the user all at once.
Two, your model will run faster when view updating is off, so if you're in a hurry, this command will
let you get results faster. (Note that normally you don't need to use no-display for this, since you can
also use the on/off switch in view control strip to freeze the view.)
Note that display and no-display operate independently of the switch in the view control strip that
freezes the view.
See also display.
nobody
nobody
This is a special value which some primitives such as turtle, one-of, max-one-of, etc. report to
indicate that no agent was found. Also, when a turtle dies, it becomes equal to nobody.
Note: Empty agentsets are not equal to nobody. If you want to test for an empty agentset, use any?.
You only get nobody back in situations where you were expecting a single agent, not a whole
agentset.
384
NetLogo Dictionary
NetLogo 4.1.3 User Manual
set other one-of other turtles-here
if other != nobody
[ ask other [ set color red ] ]
no-links
no-links
Reports an empty link agentset.
no-patches
no-patches
Reports an empty patch agentset.
not
not boolean
Reports true if boolean is false, otherwise reports false.
if not any? turtles [ crt 10 ]
no-turtles
no-turtles
Reports an empty turtle agentset.
O
of
[reporter] of agent
[reporter] of agentset
For an agent, reports the value of the reporter for that agent (turtle or patch).
show [pxcor] of patch 3 5
;; prints 3
show [pxcor] of one-of patches
;; prints the value of a random patch's pxcor variable
show [who * who] of turtle 5
=> 25
show [count turtles in-radius 3] of patch 0 0
;; prints the number of turtles located within a
;; three-patch radius of the origin
For an agentset, reports a list that contains the value of the reporter for each agent in the agentset
NetLogo Dictionary
385
NetLogo 4.1.3 User Manual
(in random order).
crt 4
show sort
=> [0 1 2
show sort
=> [0 1 4
[who] of turtles
3]
[who * who] of turtles
9]
one-of
one-of agentset
one-of list
From an agentset, reports a random agent. If the agentset is empty, reports nobody.
From a list, reports a random list item. It is an error for the list to be empty.
ask one-of patches [ set pcolor green ]
;; a random patch turns green
ask patches with [any? turtles-here]
[ show one-of turtles-here ]
;; for each patch containing turtles, prints one of
;; those turtles
;; suppose mylist is [1 2 3 4 5 6]
show one-of mylist
;; prints a value randomly chosen from the list
See also n-of.
or
boolean1 or boolean2
Reports true if either boolean1 or boolean2, or both, is true.
Note that if condition1 is true, then condition2 will not be run (since it can't affect the result).
if (pxcor > 0) or (pycor > 0) [ set pcolor red ]
;; patches turn red except in lower-left quadrant
other
other agentset
Reports an agentset which is the same as the input agentset but omits this agent.
show count turtles-here
=> 10
show count other turtles-here
=> 9
386
NetLogo Dictionary
NetLogo 4.1.3 User Manual
other-end
other-end
If run by a turtle, reports the turtle at the other end of the asking link.
If run by a link, reports the turtle at the end of the link that isn't the asking turtle.
These definitions are difficult to understand in the abstract, but the following examples should help:
ask
ask
ask
ask
turtle
turtle
turtle
link 0
0
0
1
1
[
[
[
[
create-link-with turtle 1 ]
ask link 0 1 [ show other-end ] ] ;; prints turtle 1
ask link 0 1 [ show other-end ] ] ;; prints turtle 0
ask turtle 0 [ show other-end ] ] ;; prints turtle 1
As these examples hopefully make plain, the "other" end is the end that is neither asking nor being
asked.
out-<breed>-neighbor?
out-link-neighbor?
out-<breed>-neighbor? turtle
out-link-neighbor? turtle
Reports true if there is a directed link going from the caller to turtle.
crt 2
ask turtle 0 [
create-link-to turtle 1
show in-link-neighbor? turtle 1
show out-link-neighbor? turtle 1
]
ask turtle 1 [
show in-link-neighbor? turtle 0
show out-link-neighbor? turtle 0
]
;; prints false
;; prints true
;; prints true
;; prints false
out-<breed>-neighbors
out-link-neighbors
out-<breed>-neighbors
out-link-neighbors
Reports the agentset of all the turtles that have directed links from the caller.
crt 4
ask turtle 0
[
create-links-to other turtles
ask out-link-neighbors [ set color pink ] ;; turtles 1-3 turn pink
NetLogo Dictionary
387
NetLogo 4.1.3 User Manual
]
ask turtle 1
[
ask out-link-neighbors [ set color orange ]
;; no turtles change colors
;; since turtle 1 only has in-links
]
end
out-<breed>-to
out-link-to
out-<breed>-to turtle
out-link-to turtle
Reports the directed link from the caller to turtle. If no link exists then it reports nobody.
crt 2
ask turtle 0 [
create-link-to turtle 1
show out-link-to turtle 1 ;; shows link 0 1
]
ask turtle 1
[
show out-link-to turtle 0 ;; shows nobody
]
See also: in-link-from link-with
output-print
output-show
output-type
output-write
output-print value
output-show value
output-type value
output-write value
These commands are the same as the print, show, type, and write commands except that value is
printed in the model's output area, instead of in the Command Center. (If the model does not have a
separate output area, then the Command Center is used.)
P
patch
patch xcor ycor
Given the x and y coordinates of a point, reports the patch containing that point. (The coordinates
are absolute coordinates; they are not computed relative to this agent, as with patch-at.)
388
NetLogo Dictionary
NetLogo 4.1.3 User Manual
If x and y are integers, the point is the center of a patch. If x or y is not an integer, rounding to the
nearest integer is used to determine which patch contains the point.
If wrapping is allowed by the topology, the given coordinates will be wrapped to be within the world.
If wrapping is not allowed and the given coordinates are outside the world, reports nobody.
ask patch 3 -4 [ set pcolor green ]
;; patch with pxcor of 3 and pycor of -4 turns green
show patch 1.2 3.7
;; prints (patch 1 4); note rounding
show patch 18 19
;; supposing min-pxcor and min-pycor are -17
;; and max-pxcor and max-pycor are 17,
;; in a wrapping topology, prints (patch -17 -16);
;; in a non-wrapping topology, prints nobody
See also patch-at.
patch-ahead
patch-ahead distance
Reports the single patch that is the given distance "ahead" of this turtle, that is, along the turtle's
current heading. Reports nobody if the patch does not exist because it is outside the world.
ask patch-ahead 1 [ set pcolor green ]
;; turns the patch 1 in front of this turtle
;;
green; note that this might be the same patch
;;
the turtle is standing on
See also patch-at, patch-left-and-ahead, patch-right-and-ahead, patch-at-heading-and-distance.
patch-at
patch-at dx dy
Reports the patch at (dx, dy) from the caller, that is, the patch containing the point dx east and dy
patches north of this agent.
Reports nobody if there is no such patch because that point is beyond a non-wrapping world
boundary.
ask patch-at 1 -1 [ set pcolor green ]
;; if caller is a turtle or patch, turns the
;;
patch just southeast of the caller green
See also patch, patch-ahead, patch-left-and-ahead, patch-right-and-ahead,
patch-at-heading-and-distance.
NetLogo Dictionary
389
NetLogo 4.1.3 User Manual
patch-at-heading-and-distance
patch-at-heading-and-distance heading distance
patch-at-heading-and-distance reports the single patch that is the given distance from this turtle or
patch, along the given absolute heading. (In contrast to patch-left-and-ahead and
patch-right-and-ahead, this turtle's current heading is not taken into account.) Reports nobody if the
patch does not exist because it is outside the world.
ask patch-at-heading-and-distance -90 1 [ set pcolor green ]
;; turns the patch 1 to the west of this patch green
See also patch, patch-at, patch-left-and-ahead, patch-right-and-ahead.
patch-here
patch-here
patch-here reports the patch under the turtle.
Note that this reporter isn't available to a patch because a patch can just say "self".
patch-left-and-ahead
patch-right-and-ahead
patch-left-and-ahead angle distance
patch-right-and-ahead angle distance
Reports the single patch that is the given distance from this turtle, in the direction turned left or right
the given angle (in degrees) from the turtle's current heading. Reports nobody if the patch does not
exist because it is outside the world.
(If you want to find a patch in a given absolute heading, rather than one relative to the current
turtle's heading, use patch-at-heading-and-distance instead.)
ask patch-right-and-ahead 30 1 [ set pcolor green ]
;; this turtle "looks" 30 degrees right of its
;;
current heading at the patch 1 unit away, and turns
;;
that patch green; note that this might be the same
;;
patch the turtle is standing on
See also patch, patch-at, patch-at-heading-and-distance.
390
NetLogo Dictionary
NetLogo 4.1.3 User Manual
patch-set
patch-set value1
(patch-set value1 value2 ...)
Reports an agentset containing all of the patches anywhere in any of the inputs. The inputs may be
individual patches, patch agentsets, nobody, or lists (or nested lists) containing any of the above.
patch-set self
patch-set patch-here
(patch-set self neighbors)
(patch-set patch-here neighbors)
(patch-set patch 0 0 patch 1 3 patch 4 -2)
(patch-set patch-at -1 1 patch-at 0 1 patch-at 1 1)
patch-set [patch-here] of turtles
patch-set [neighbors] of turtles
See also turtle-set, link-set.
patch-size
patch-size
Reports the size of the patches in the view in pixels. The size is typically an integer, but may also be
a floating point number.
See also set-patch-size.
patches
patches
Reports the agentset consisting of all patches.
patches-own
patches-own [var1 ...]
This keyword, like the globals, breed, <breed>-own, and turtles-own keywords, can only be used at
the beginning of a program, before any function definitions. It defines the variables that all patches
can use.
All patches will then have the given variables and be able to use them.
All patch variables can also be directly accessed by any turtle standing on the patch.
See also globals, turtles-own, breed, <breeds>-own.
NetLogo Dictionary
391
NetLogo 4.1.3 User Manual
pcolor
pcolor
This is a built-in patch variable. It holds the color of the patch. You can set this variable to make the
patch change color.
All patch variables can be directly accessed by any turtle standing on the patch. Color can be
represented either as a NetLogo color (a single number) or an RGB color (a list of 3 numbers). See
details in the Colors section of the Programming Guide.
See also color.
pen-down
pd
pen-erase
pe
pen-up
pu
pen-down
pen-erase
pen-up
The turtle changes modes between drawing lines, removing lines or neither. The lines will always be
displayed on top of the patches and below the turtles. To change the color of the pen set the color
of the turtle using set color.
Note: When a turtle's pen is down, all movement commands cause lines to be drawn, including
jump, setxy, and move-to.
Note: These commands are equivalent to setting the turtle variable "pen-mode" to "down" , "up",
and "erase".
Note: On Windows drawing and erasing a line might not erase every pixel.
pen-mode
This is a built-in turtle variable. It holds the state of the turtle's pen. You set the variable to draw
lines, erase lines or stop either of these actions. Possible values are "up", "down", and "erase".
392
NetLogo Dictionary
NetLogo 4.1.3 User Manual
pen-size
This is a built-in turtle variable. It holds the width of the line, in pixels, that the turtle will draw (or
erase) when the pen is down (or erasing).
plabel
plabel
This is a built-in patch variable. It may hold a value of any type. The patch appears in the view with
the given value "attached" to it as text. You can set this variable to add, change, or remove a
patch's label.
All patch variables can be directly accessed by any turtle standing on the patch.
See also plabel-color, label, label-color.
plabel-color
plabel-color
This is a built-in patch variable. It holds a number greater than or equal to 0 and less than 140. This
number determines what color the patch's label appears in (if it has a label). You can set this
variable to change the color of a patch's label.
All patch variables can be directly accessed by any turtle standing on the patch.
See also plabel, label, label-color.
plot
plot number
Increments the x-value of the plot pen by plot-pen-interval, then plots a point at the updated x-value
and a y-value of number. (The first time the command is used on a plot, the point plotted has an
x-value of 0.)
plot-name
plot-name
Reports the name of the current plot (a string)
NetLogo Dictionary
393
NetLogo 4.1.3 User Manual
plot-pen-exists?
plot-pen-exists? string
Reports true if a plot pen with the given name is defined in the current plot. Otherwise reports false.
plot-pen-down
plot-pen-up
plot-pen-down
plot-pen-up
Puts down (or up) the current plot-pen, so that it draws (or doesn't). (By default, all pens are down
initially.)
plot-pen-reset
plot-pen-reset
Clears everything the current plot pen has drawn, moves it to (0,0), and puts it down. If the pen is a
permanent pen, the color and mode are reset to the default values from the plot Edit dialog.
plotxy
plotxy number1 number2
Moves the current plot pen to the point with coordinates (number1, number2). If the pen is down, a
line, bar, or point will be drawn (depending on the pen's mode).
plot-x-min
plot-x-max
plot-y-min
plot-y-max
plot-x-min
plot-x-max
plot-y-min
plot-y-max
Reports the minimum or maximum value on the x or y axis of the current plot.
These values can be set with the commands set-plot-x-range and set-plot-y-range. (Their default
values are set from the plot Edit dialog.)
394
NetLogo Dictionary
NetLogo 4.1.3 User Manual
position
position item list
position string1 string2
On a list, reports the first position of item in list, or false if it does not appear.
On strings, reports the position of the first appearance string1 as a substring of string2, or false if it
does not appear.
Note: The positions are numbered beginning with 0, not with 1.
;; suppose mylist is [2 7 4 7 "Bob"]
show position 7 mylist
=> 1
show position 10 mylist
=> false
show position "in" "string"
=> 3
See also member?.
precision
precision number places
Reports number rounded to places decimal places.
If places is negative, the rounding takes place to the left of the decimal point.
show precision 1.23456789 3
=> 1.235
show precision 3834 -3
=> 4000
See also round, ceiling, floor.
print
print value
Prints value in the Command Center, followed by a carriage return.
This agent is not printed before the value, unlike show.
See also show, type, and write.
See also output-print.
NetLogo Dictionary
395
NetLogo 4.1.3 User Manual
pxcor
pycor
pxcor
pycor
These are built-in patch variables. They hold the x and y coordinate of the patch. They are always
integers. You cannot set these variables, because patches don't move.
pxcor is greater than or equal to min-pxcor and less than or equal to max-pxcor; similarly for pycor
and min-pycor and max-pycor.
All patch variables can be directly accessed by any turtle standing on the patch.
See also xcor, ycor.
R
random
random number
If number is positive, reports a random integer greater than or equal to 0, but strictly less than
number.
If number is negative, reports a random integer less than or equal to 0, but strictly greater than
number.
If number is zero, the result is always 0 as well.
Note: In versions of NetLogo prior to version 2.0, this primitive reported a floating point number if
given a non-integer input. This is no longer the case. If you want a floating point answer, you must
now use random-float instead.
show random 3
;; prints 0, 1, or 2
show random -3
;; prints 0, -1, or -2
show random 3.5
;; prints 0, 1, 2, or 3
See also random-float.
random-float
random-float number
If number is positive, reports a random floating point number greater than or equal to 0 but strictly
less than number.
396
NetLogo Dictionary
NetLogo 4.1.3 User Manual
If number is negative, reports a random floating point number less than or equal to 0, but strictly
greater than number.
If number is zero, the result is always 0.
show random-float 3
;; prints a number at least 0 but less than 3,
;; for example 2.589444906014774
show random-float 2.5
;; prints a number at least 0 but less than 2.5,
;; for example 1.0897423196760796
random-exponential
random-gamma
random-normal
random-poisson
random-exponential mean
random-gamma alpha lambda
random-normal mean standard-deviation
random-poisson mean
Reports an accordingly distributed random number with the mean and, in the case of the normal
distribution, the standard-deviation.
random-exponential reports an exponentially distributed random floating point number. It is
equivalent to (- mean) * ln random-float 1.0.
random-gamma reports a gamma-distributed random floating point number as controlled by the
floating point alpha and lambda parameters. Both inputs must be greater than zero. (Note: for
results with a given mean and variance, use inputs as follows: alpha = mean * mean / variance;
lambda = 1 / (variance / mean).)
random-normal reports a normally distributed random floating point number.
random-poisson reports a Poisson-distributed random integer.
show random-exponential 2
;; prints an exponentially distributed random floating
;; point number with a mean of 2
show random-normal 10.1 5.2
;; prints a normally distributed random floating point
;; number with a mean of 10.1 and a standard deviation
;; of 5.2
show random-poisson 3.4
;; prints a Poisson-distributed random integer with a
;; mean of 3.4
NetLogo Dictionary
397
NetLogo 4.1.3 User Manual
random-pxcor
random-pycor
random-pxcor
random-pycor
Reports a random integer ranging from min-pxcor (or -y) to max-pxcor (or -y) inclusive.
ask turtles [
;; move each turtle to the center of a random patch
setxy random-pxcor random-pycor
]
See also random-xcor, random-ycor.
random-seed
random-seed number
Sets the seed of the pseudo-random number generator to the integer part of number. The seed may
be any integer in the range supported by NetLogo (-9007199254740992 to 9007199254740992).
See the Random Numbers section of the Programming Guide for more details.
random-seed
show random
=> 50
show random
=> 35
random-seed
show random
=> 50
show random
=> 35
47822
100
100
47822
100
100
random-xcor
random-ycor
random-xcor
random-ycor
Reports a random floating point number from the allowable range of turtle coordinates along the
given axis, x or y.
Turtle coordinates range from min-pxcor - 0.5 (inclusive) to max-pxcor + 0.5 (exclusive) horizontally;
vertically, substitute -y for -x.
ask turtles [
;; move each turtle to a random point
setxy random-xcor random-ycor
]
398
NetLogo Dictionary
NetLogo 4.1.3 User Manual
See also random-pxcor, random-pycor.
read-from-string
read-from-string string
Interprets the given string as if it had been typed in the Command Center, and reports the resulting
value. The result may be a number, list, string, or boolean value, or the special value "nobody".
Useful in conjunction with the user-input primitive for converting the user's input into usable form.
show read-from-string "3" + read-from-string "5"
=> 8
show length read-from-string "[1 2 3]"
=> 3
crt read-from-string user-input "Make how many turtles?"
;; the number of turtles input by the user
;; are created
reduce
reduce [reporter] list
Reduces a list from left to right using reporter, resulting in a single value. This means, for example,
that reduce [?1 + ?2] [1 2 3 4] is equivalent to (((1 + 2) + 3) + 4). If list has a single item,
that item is reported. It is an error to reduce an empty list.
In reporter, use ?1 and ?2 to refer to the two objects being combined.
Since it can be difficult to develop an intuition about what reduce does, here are some simple
examples which, while not useful in themselves, may give you a better understanding of this
primitive:
show reduce [?1 + ?2] [1
=> 6
show reduce [?1 - ?2] [1
=> -4
show reduce [?2 - ?1] [1
=> 2
show reduce [?1] [1 2 3]
=> 1
show reduce [?2] [1 2 3]
=> 3
show reduce [sentence ?1
=> [1 2 3 [4] 5]
show reduce [fput ?2 ?1]
=> [5 4 3 2 1]
2 3]
2 3]
2 3]
?2] [[1 2] [3 [4]] 5]
(fput [] [1 2 3 4 5])
Here are some more useful examples:
;; find the longest string in a list
to-report longest-string [strings]
report reduce
[ifelse-value (length ?1 >= length ?2) [?1] [?2]]
strings
NetLogo Dictionary
399
NetLogo 4.1.3 User Manual
end
show longest-string ["hi" "there" "!"]
=> "there"
;; count the number of occurrences of an item in a list
to-report occurrences [x the-list]
report reduce
[ifelse-value (?2 = x) [?1 + 1] [?1]] (fput 0 the-list)
end
show occurrences 1 [1 2 1 3 1 2 3 1 1 4 5 1]
=> 6
;; evaluate the polynomial, with given coefficients, at x
to-report evaluate-polynomial [coefficients x]
report reduce [(x * ?1) + ?2] coefficients
end
;; evaluate 3x^2 + 2x + 1 at x = 4
show evaluate-polynomial [3 2 1] 4
=> 57
remainder
remainder number1 number2
Reports the remainder when number1 is divided by number2. This is equivalent to the following
NetLogo code:
number1 - (int (number1 / number2)) * number2
show remainder 62 5
=> 2
show remainder -8 3
=> -2
See also mod. mod and remainder behave the same for positive numbers, but differently for
negative numbers.
remove
remove item list
remove string1 string2
For a list, reports a copy of list with all instances of item removed.
For strings, reports a copy of string2 with all the appearances of string1 as a substring removed.
set mylist [2 7 4 7 "Bob"]
set mylist remove 7 mylist
;; mylist is now [2 4 "Bob"]
show remove "to" "phototonic"
=> "phonic"
400
NetLogo Dictionary
NetLogo 4.1.3 User Manual
remove-duplicates
remove-duplicates list
Reports a copy of list with all duplicate items removed. The first of each item remains in place.
set mylist [2 7 4 7 "Bob" 7]
set mylist remove-duplicates mylist
;; mylist is now [2 7 4 "Bob"]
remove-item
remove-item index list
remove-item index string
For a list, reports a copy of list with the item at the given index removed.
For strings, reports a copy of string2 with the character at the given index removed.
Note that the indices begin from 0, not 1. (The first item is item 0, the second item is item 1, and so
on.)
set mylist [2 7 4 7 "Bob"]
set mylist remove-item 2 mylist
;; mylist is now [2 7 7 "Bob"]
show remove-item 2 "string"
=> "sting"
repeat
repeat number [ commands ]
Runs commands number times.
pd repeat 36 [ fd 1 rt 10 ]
;; the turtle draws a circle
replace-item
replace-item index list value
replace-item index string1 string2
On a list, replaces an item in that list. index is the index of the item to be replaced, starting with 0.
(The 6th item in a list would have an index of 5.) Note that "replace-item" is used in conjunction with
"set" to change a list.
Likewise for a string, but the given character of string1 removed and the contents of string2 spliced
in instead.
show replace-item 2 [2 7 4 5] 15
NetLogo Dictionary
401
NetLogo 4.1.3 User Manual
=> [2 7 15 5]
show replace-item 1 "cat" "are"
=> "caret"
report
report value
Immediately exits from the current to-report procedure and reports value as the result of that
procedure. report and to-report are always used in conjunction with each other. See to-report for a
discussion of how to use them.
reset-perspective
rp
reset-perspective
The observer stops watching, following, or riding any turtles (or patches). (If it wasn't watching,
following, or riding anybody, nothing happens.) In the 3D view, the observer also returns to its
default position (above the origin, looking straight down).
See also follow, ride, watch.
reset-ticks
reset-ticks
Resets the tick counter to zero.
See also tick, ticks, tick-advance.
reset-timer
reset-timer
Resets the timer to zero seconds. See also timer.
Note that the timer is different from the tick counter. The timer measures elapsed real time in
seconds; the tick counter measures elapsed model time in ticks.
resize-world
resize-world min-pxcor max-pxcor min-pycor max-pycor
Changes the size of the patch grid.
As a side effect, all turtles and links die.
402
NetLogo Dictionary
NetLogo 4.1.3 User Manual
See also set-patch-size.
reverse
reverse list
reverse string
Reports a reversed copy of the given list or string.
show mylist
;; mylist is [2 7 4 "Bob"]
set mylist reverse mylist
;; mylist now is ["Bob" 4 7 2]
show reverse "live"
=> "evil"
rgb
rgb red green blue
Reports a RGB list when three numbers describing an RGB color. The numbers are range checked
to be between 0 and 255.
See also hsb
ride
ride turtle
Set the perspective to turtle.
Every time turtle moves the observer also moves. Thus, in the 2D View the turtle will stay at the
center of the view. In the 3D view it is as if looking through the eyes of the turtle. If the turtle dies,
the perspective resets to the default.
See also reset-perspective, watch, follow, subject.
ride-me
ride-me
Asks the observer to ride this turtle.
See also ride.
NetLogo Dictionary
403
NetLogo 4.1.3 User Manual
right
rt
right number
The turtle turns right by number degrees. (If number is negative, it turns left.)
round
round number
Reports the integer nearest to number.
If the decimal portion of number is exactly .5, the number is rounded in the positive direction.
Note that rounding in the positive direction is not always how rounding is done in other software
programs. (In particular, it does not match the behavior of StarLogoT, which always rounded
numbers ending in 0.5 to the nearest even integer.) The rationale for this behavior is that it matches
how turtle coordinates relate to patch coordinates in NetLogo. For example, if a turtle's xcor is -4.5,
then it is on the boundary between a patch whose pxcor is -4 and a patch whose pxcor is -5, but the
turtle must be considered to be in one patch or the other, so the turtle is considered to be in the
patch whose pxcor is -4, because we round towards the positive numbers.
show round 4.2
=> 4
show round 4.5
=> 5
show round -4.5
=> -4
See also precision, ceiling, floor.
run
run string
This agent interprets the given string as a sequence of one or more NetLogo commands and runs
them.
The code runs in the agent's current context, which means it has access to the values of local
variables, "myself", and so on.
The code must be compiled first which takes time, however, compiled bits of code are cached by
NetLogo and thus using run on the same string over and over is much faster than running on
different bits of code.
See also runresult.
Note that you can't use run to define or redefine procedures.
404
NetLogo Dictionary
NetLogo 4.1.3 User Manual
Note that running code through run or runresult may be many times slower than running the
same code directly.
runresult
runresult string
This agent interprets the given string as a NetLogo reporter and runs it, reporting the result
obtained.
The code runs in the agent's current context, which means it has access to the values of local
variables, "myself", and so on.
The code must be compiled first which takes time, however, compiled bits of code are cached by
NetLogo and thus using runresult on the same string over and over is much faster than running
on different bits of code.
See also run.
Note that running code through run or runresult may be many times slower than running the
same code directly.
S
scale-color
scale-color color number range1 range2
Reports a shade of color proportional to number.
If range1 is less than range2, then the larger the number, the lighter the shade of color. But if
range2 is less than range1, the color scaling is inverted.
If number is less than range1, then the darkest shade of color is chosen.
If number is greater than range2, then the lightest shade of color is chosen.
Note: for color shade is irrelevant, e.g. green and green + 2 are equivalent, and the same spectrum
of colors will be used.
ask turtles [ set color scale-color red age 0 50 ]
;; colors each turtle a shade of red proportional
;; to its value for the age variable
self
NetLogo Dictionary
405
NetLogo 4.1.3 User Manual
self
Reports this turtle or patch.
"self" and "myself" are very different. "self" is simple; it means "me". "myself" means "the turtle or
patch who asked me to do what I'm doing right now."
See also myself.
; (semicolon)
; comments
After a semicolon, the rest of the line is ignored. This is useful for adding "comments" to your code
-- text that explains the code to human readers. Extra semicolons can be added for visual effect.
NetLogo's Edit menu has items that let you comment or uncomment whole sections of code.
sentence
se
sentence value1 value2
(sentence value1 ...)
Makes a list out of the values. If any value is a list, its items are included in the result directly, rather
than being included as a sublist. Examples make this clearer:
show sentence 1 2
=> [1 2]
show sentence [1 2] 3
=> [1 2 3]
show sentence 1 [2 3]
=> [1 2 3]
show sentence [1 2] [3 4]
=> [1 2 3 4]
show sentence [[1 2]] [[3 4]]
=> [[1 2] [3 4]]
show (sentence [1 2] 3 [4 5] (3 + 3) 7)
=> [1 2 3 4 5 6 7]
set
set variable value
Sets variable to the given value.
Variable can be any of the following:
• A global variable declared using "globals"
• The global variable associated with a slider, switch, chooser, or input box.
406
NetLogo Dictionary
NetLogo 4.1.3 User Manual
• A variable belonging to this agent
• If this agent is a turtle, a variable belonging to the patch under the turtle.
• A local variable created by the let command.
• An input to the current procedure.
set-current-directory
set-current-directory string
Sets the current directory that is used by the primitives file-delete, file-exists?, and file-open.
The current directory is not used if the above commands are given an absolute file path. This is
defaulted to the user's home directory for new models, and is changed to the model's directory
when a model is opened.
Note that in Windows file paths the backslash needs to be escaped within a string by using another
backslash "C:\\"
The change is temporary and is not saved with the model.
Note: in applets, this command has no effect, since applets are only allowed to read files from the
same directory on the server where the model is stored.
set-current-directory "C:\\NetLogo"
;; Assume it is a Windows Machine
file-open "my-file.txt"
;; Opens file "C:\\NetLogo\\my-file.txt"
set-current-plot
set-current-plot plotname
Sets the current plot to the plot with the given name (a string). Subsequent plotting commands will
affect the current plot.
set-current-plot-pen
set-current-plot-pen penname
The current plot's current pen is set to the pen named penname (a string). If no such pen exists in
the current plot, a runtime error occurs.
set-default-shape
set-default-shape turtles string
set-default-shape breed string
Specifies a default initial shape for all turtles, or for a particular breed. When a turtle is created, or it
changes breeds, it shape is set to the given shape.
NetLogo Dictionary
407
NetLogo 4.1.3 User Manual
This command doesn't affect existing turtles, only turtles you create afterwards.
The specified breed must be either turtles or a breed defined by the breed keyword, and the
specified string must be the name of a currently defined shape.
In new models, the default shape for all turtles is "default".
Note that specifying a default shape does not prevent you from changing an individual turtle's shape
later; turtles don't have to be stuck with their breed's default shape.
create-turtles 1 ;; new turtle's shape is "default"
create-cats 1
;; new turtle's shape is "default"
set-default-shape turtles "circle"
create-turtles 1 ;; new turtle's shape is "circle"
create-cats 1
;; new turtle's shape is "circle"
set-default-shape cats "cat"
set-default-shape dogs "dog"
create-cats 1
;; new turtle's shape is "cat"
ask cats [ set breed dogs ]
;; all cats become dogs, and automatically
;; change their shape to "dog"
See also shape.
set-histogram-num-bars
set-histogram-num-bars number
Set the current plot pen's plot interval so that, given the current x range for the plot, there would be
number number of bars drawn if the histogram command is called.
See also histogram.
__set-line-thickness
__set-line-thickness number
Specifies the thickness of lines and outlined elements in the turtle's shape.
The default value is 0. This always produces lines one pixel thick.
Non-zero values are interpreted as thickness in patches. A thickness of 1, for example, produces
lines which appear one patch thick. (It's common to use a smaller value such as 0.5 or 0.2.)
Lines are always at least one pixel thick.
This command is experimental and may change in later releases.
408
NetLogo Dictionary
NetLogo 4.1.3 User Manual
set-patch-size
set-patch-size size
Sets the size of the patches of the view in pixels. The size is typically an integer, but may also be a
floating point number.
See also patch-size, resize-world.
set-plot-pen-color
set-plot-pen-color number
Sets the color of the current plot pen to number.
set-plot-pen-interval
set-plot-pen-interval number
Tells the current plot pen to move a distance of number in the x direction during each use of the plot
command. (The plot pen interval also affects the behavior of the histogram command.)
set-plot-pen-mode
set-plot-pen-mode number
Sets the mode the current plot pen draws in to number. The allowed plot pen modes are:
• 0 (line mode) the plot pen draws a line connecting two points together.
• 1 (bar mode): the plot pen draws a bar of width plot-pen-interval with the point plotted as the
upper (or lower, if you are plotting a negative number) left corner of the bar.
• 2 (point mode): the plot pen draws a point at the point plotted. Points are not connected.
The default mode for new pens is 0 (line mode).
set-plot-x-range
set-plot-y-range
set-plot-x-range min max
set-plot-y-range min max
Sets the minimum and maximum values of the x or y axis of the current plot.
The change is temporary and is not saved with the model. When the plot is cleared, the ranges will
revert to their default values as set in the plot's Edit dialog.
NetLogo Dictionary
409
NetLogo 4.1.3 User Manual
setxy
setxy x y
The turtle sets its x-coordinate to x and its y-coordinate to y.
Equivalent to set xcor x set ycor y, except it happens in one time step instead of two.
If x or y is outside the world, NetLogo will throw a runtime error.
setxy 0 0
;; turtle moves to the middle of the center patch
setxy random-xcor random-ycor
;; turtle moves to a random point
setxy random-pxcor random-pycor
;; turtle moves to the center of a random patch
See also move-to.
shade-of?
shade-of? color1 color2
Reports true if both colors are shades of one another, false otherwise.
show shade-of? blue red
=> false
show shade-of? blue (blue + 1)
=> true
show shade-of? gray white
=> true
shape
shape
This is a built-in turtle and link variable. It holds a string that is the name of the turtle or link's current
shape. You can set this variable to change the shape. New turtles and links have the shape
"default" unless the a different shape has been specified using set-default-shape.
Example:
ask turtles [ set shape "wolf" ]
;; assumes you have made a "wolf"
;; shape in NetLogo's Turtle Shapes Editor
ask links [ set shape "link 1" ]
;; assumes you have made a "link 1" shape in
;; the Link Shapes Editor
See also set-default-shape, shapes.
410
NetLogo Dictionary
NetLogo 4.1.3 User Manual
shapes
shapes
Reports a list of strings containing all of the turtle shapes in the model.
New shapes can be created, or imported from the shapes library or from other models, in the
Shapes Editor.
show shapes
=> ["default" "airplane" "arrow" "box" "bug" ...
ask turtles [ set shape one-of shapes ]
show
show value
Prints value in the Command Center, preceded by this agent, and followed by a carriage return.
(This agent is included to help you keep track of what agents are producing which lines of output.)
Also, all strings have their quotes included similar to write.
See also print, type, and write.
See also output-show.
show-turtle
st
show-turtle
The turtle becomes visible again.
Note: This command is equivalent to setting the turtle variable "hidden?" to false.
See also hide-turtle.
show-link
show-link
The link becomes visible again.
Note: This command is equivalent to setting the link variable "hidden?" to false.
See also hide-link.
NetLogo Dictionary
411
NetLogo 4.1.3 User Manual
shuffle
shuffle list
Reports a new list containing the same items as the input list, but in randomized order.
show shuffle [1 2 3 4 5]
=> [5 2 4 1 3]
show shuffle [1 2 3 4 5]
=> [1 3 5 2 4]
sin
sin number
Reports the sine of the given angle. Assumes angle is given in degrees.
show sin 270
=> -1
size
size
This is a built-in turtle variable. It holds a number that is the turtle's apparent size. The default size is
1, which means that the turtle is the same size as a patch. You can set this variable to change a
turtle's size.
sort
sort list
sort agentset
Reports a sorted list of numbers, strings, or agents.
If the input contains no numbers, strings, or agents, the result is the empty list.
If the input contains at least one number, the numbers in the list are sorted in ascending order and a
new list reported; non-numbers are ignored.
Or, if the input contains at least one string, the strings in the list are sorted in ascending order and a
new list reported; non-strings are ignored.
Or, if the input is an agentset or a list containing at least one agent, a sorted list of agents (never an
agentset) is reported; non-agents are ignored. Agents are sorted in the same order the < operator
uses.
show sort [3 1 4 2]
=> [1 2 3 4]
let n 0
412
NetLogo Dictionary
NetLogo 4.1.3 User Manual
foreach sort patches [
ask ? [
set plabel n
set n n + 1
]
]
;; patches are labeled with numbers in left-to-right,
;; top-to-bottom order
sort-by
sort-by [reporter] list
sort-by [reporter] agentset
If the input is a list, reports a new list containing the same items as the input list, in a sorted order
defined by the boolean (true or false) reporter.
In reporter, use ?1 and ?2 to refer to the two objects being compared. reporter should be true if ?1
comes strictly before ?2 in the desired sort order, and false otherwise.
If the input is an agentset or a list of agents, reports a list (never an agentset) of agents.
The sort is stable, that is, the order of items considered equal by the reporter is not disturbed.
show sort-by [?1 < ?2] [3 1 4 2]
=> [1 2 3 4]
show sort-by [?1 > ?2] [3 1 4 2]
=> [4 3 2 1]
show sort-by [length ?1 < length ?2] ["Grumpy" "Doc" "Happy"]
=> ["Doc" "Happy" "Grumpy"]
foreach sort-by [[size] of ?1 < [size] of ?2] turtles
[ ask ? [ do-something ] ]
;; turtles run "do-something" one at a time, in
;; ascending order by size
sprout
sprout-<breeds>
sprout number [ commands ]
sprout-<breeds> number [ commands ]
Creates number new turtles on the current patch. The new turtles have random integer headings
and the color is randomly selected from the 14 primary colors. The turtles immediately run
commands. This is useful for giving the new turtles different colors, headings, or whatever. (The
new turtles are created all at once then run one at a time, in random order.)
If the sprout-<breeds> form is used, the new turtles are created as members of the given breed.
sprout 5
sprout-wolves 10
sprout 1 [ set color red ]
sprout-sheep 1 [ set color black ]
NetLogo Dictionary
413
NetLogo 4.1.3 User Manual
See also create-turtles, hatch.
sqrt
sqrt number
Reports the square root of number.
stamp
stamp
This turtle or link leaves an image of its shape in the drawing at its current location.
Note: The shapes made by stamp may not be pixel-for-pixel identical from computer to computer.
stamp-erase
stamp-erase
This turtle or link removes any pixels below it in the drawing inside the bounds of its shape.
Note: The shapes made by stamp-erase may not be pixel-for-pixel identical from computer to
computer.
standard-deviation
standard-deviation list
Reports the sample standard deviation of a list of numbers. Ignores other types of items.
(Note that this estimates the standard deviation for a sample, rather than for a whole population,
using Bessel's correction.)
show standard-deviation [1 2 3 4 5 6]
=> 1.8708286933869707
show standard-deviation [energy] of turtles
;; prints the standard deviation of the variable "energy"
;; from all the turtles
startup
startup
User-defined procedure which, if it exists, will be called when a model is first loaded.
to startup
414
NetLogo Dictionary
NetLogo 4.1.3 User Manual
setup
end
stop
stop
This agent exits immediately from the enclosing procedure, ask, or ask-like construct (e.g. crt,
hatch, sprout). Only the current procedure stops, not all execution for the agent.
if not any? turtles [ stop ]
;; exits if there are no more turtles
Note: stop can be used to stop a forever button. If the forever button directly calls a procedure, then
when that procedure stops, the button stops. (In a turtle or patch forever button, the button won't
stop until every turtle or patch stops -- a single turtle or patch doesn't have the power to stop the
whole button.)
subject
subject
Reports the turtle (or patch) that the observer is currently watching, following, or riding. Reports
nobody if there is no such turtle (or patch).
See also watch, follow, ride.
sublist
substring
sublist list position1 position2
substring string position1 position2
Reports just a section of the given list or string, ranging between the first position (inclusive) and the
second position (exclusive).
Note: The positions are numbered beginning with 0, not with 1.
show sublist [99 88 77 66] 1 3
=> [88 77]
show substring "apartment" 1 5
=> "part"
subtract-headings
subtract-headings heading1 heading2
Computes the difference between the given headings, that is, the number of degrees in the smallest
angle by which heading2 could be rotated to produce heading1. A positive answer means a
clockwise rotation, a negative answer counterclockwise. The result is always in the range -180 to
NetLogo Dictionary
415
NetLogo 4.1.3 User Manual
180, but is never exactly -180.
Note that simply subtracting the two headings using the - (minus) operator wouldn't work. Just
subtracting corresponds to always rotating clockwise from heading2 to heading1; but sometimes the
counterclockwise rotation is shorter. For example, the difference between 5 degrees and 355
degrees is 10 degrees, not -350 degrees.
show subtract-headings
=> 20
show subtract-headings
=> -20
show subtract-headings
=> 10
show subtract-headings
=> -10
show subtract-headings
=> 180
show subtract-headings
=> 180
80 60
60 80
5 355
355 5
180 0
0 180
sum
sum list
Reports the sum of the items in the list.
show sum [energy] of turtles
;; prints the total of the variable "energy"
;; from all the turtles
T
tan
tan number
Reports the tangent of the given angle. Assumes the angle is given in degrees.
thickness
thickness
This is a built-in link variable. It holds a number that is the link's apparent size as a fraction of the
patch size. The default thickness is 0, which means that regardless of patch-size the links will
always appear 1 pixel wide. You can set this variable to change a link's thickness.
416
NetLogo Dictionary
NetLogo 4.1.3 User Manual
tick
tick
Advances the tick counter by one.
See also ticks, tick-advance, reset-ticks.
tick-advance
tick-advance number
Advances the tick counter by number. The input may be an integer or a floating point number.
(Some models divide ticks more finely than by ones.) The input may not be negative.
See also tick, ticks, reset-ticks.
ticks
ticks
Reports the current value of the tick counter. The result is always a number and never negative.
Most models use the tick command to advance the tick counter, in which case ticks will always
report an integer. If the tick-advance command is used, then ticks may report a floating point
number.
See also tick, tick-advance, reset-ticks.
tie
tie
Ties end1 and end2 of the link together. If the link is a directed link end1 is the root turtle and end2
is the leaf turtle. The movement of the root turtle affects the location and heading of the leaf turtle. If
the link is undirected the tie is reciprocal so both turtles can be considered root turtles and leaf
turtles. Movement or change in heading of either turtle affects the location and heading of the other
turtle.
When the root turtle moves, the leaf turtles moves the same distance, in the same direction. The
heading of the leaf turtle is not affected. This works with forward, jump, and setting the xcor or ycor
of the root turtle.
When the root turtle turns right or left, the leaf turtle is rotated around the root turtle the same
amount. The heading of the leaf turtle is also changed by the same amount.
NetLogo Dictionary
417
NetLogo 4.1.3 User Manual
If the link dies, the tie relation is removed.
crt 2 [ fd 3 ]
;; creates a link and ties turtle 1 to turtle 0
ask turtle 0 [ create-link-to turtle 1 [ tie ] ]
See also untie
tie-mode
tie-mode
This is a built-in link variable. It holds a string that is the name of the tie mode the link is currently in.
Using the tie and untie commands changes the mode of the link. You can also set tie-mode to "free"
to create a non-rigid joint between two turtles (see the Tie section of the Programming Guide for
details. By default links are not tied.
See also: tie, untie
timer
timer
Reports how many seconds have passed since the command reset-timer was last run (or since
NetLogo started). The potential resolution of the clock is milliseconds. (Whether you get resolution
that high in practice may vary from system to system, depending on the capabilities of the
underlying Java Virtual Machine.)
See also reset-timer.
Note that the timer is different from the tick counter. The timer measures elapsed real time in
seconds; the tick counter measures elapsed model time in ticks.
to
to procedure-name
to procedure-name [input1 ...]
Used to begin a command procedure.
to setup
clear-all
crt 500
end
to circle [radius]
crt 100 [ fd radius ]
end
418
NetLogo Dictionary
NetLogo 4.1.3 User Manual
to-report
to-report procedure-name
to-report procedure-name [input1 ...]
Used to begin a reporter procedure.
The body of the procedure should use report to report a value for the procedure. See report.
to-report average [a b]
report (a + b) / 2
end
to-report absolute-value [number]
ifelse number >= 0
[ report number ]
[ report (- number) ]
end
to-report first-turtle?
report who = 0 ;; reports true or false
end
towards
towards agent
Reports the heading from this agent to the given agent.
If wrapping is allowed by the topology and the wrapped distance (around the edges of the world) is
shorter, towards will use the wrapped path.
Note: asking for the heading from an agent to itself, or an agent on the same location, will cause a
runtime error.
set heading towards turtle 1
;; same as "face turtle 1"
See also face.
towardsxy
towardsxy x y
Reports the heading from the turtle or patch towards the point (x,y).
If wrapping is allowed by the topology and the wrapped distance (around the edges of the world) is
shorter, towardsxy will use the wrapped path.
Note: asking for the heading to the point the agent is already standing on will cause a runtime error.
NetLogo Dictionary
419
NetLogo 4.1.3 User Manual
See also facexy.
turtle
turtle number <breed> number
Reports the turtle with the given who number, or nobody if there is no such turtle. For breeded
turtles you may also use the single breed form to refer to them.
ask turtle 5 [ set color red ]
;; turtle with who number 5 turns red
turtle-set
turtle-set value1
(turtle-set value1 value2 ...)
Reports an agentset containing all of the turtles anywhere in any of the inputs. The inputs may be
individual turtles, turtle agentsets, nobody, or lists (or nested lists) containing any of the above.
turtle-set self
(turtle-set self turtles-on neighbors)
(turtle-set turtle 0 turtle 2 turtle 9)
(turtle-set frogs mice)
See also patch-set, link-set.
turtles
turtles
Reports the agentset consisting of all turtles.
show count turtles
;; prints the number of turtles
turtles-at
<breeds>-at
turtles-at dx dy
<breeds>-at dx dy
Reports an agentset containing the turtles on the patch (dx, dy) from the caller. (The result may
include the caller itself if the caller is a turtle.)
create-turtles 5 [ setxy 2 3 ]
show count [turtles-at 1 1] of patch 1 2
=> 5
If the name of a breed is substituted for "turtles", then only turtles of that breed are included.
420
NetLogo Dictionary
NetLogo 4.1.3 User Manual
turtles-here
<breed>-here
turtles-here
<breeds>-here
Reports an agentset containing all the turtles on the caller's patch (including the caller itself if it's a
turtle).
crt 10
ask turtle 0 [ show count turtles-here ]
=> 10
If the name of a breed is substituted for "turtles", then only turtles of that breed are included.
breed [cats cat]
breed [dogs dog]
create-cats 5
create-dogs 1
ask dogs [ show count cats-here ]
=> 5
turtles-on
<breeds>-on
turtles-on agent
turtles-on agentset
<breeds>-on agent
<breeds>-on agentset
Reports an agentset containing all the turtles that are on the given patch or patches, or standing on
the same patch as the given turtle or turtles.
ask turtles [
if not any? turtles-on patch-ahead 1
[ fd 1 ]
]
ask turtles [
if not any? turtles-on neighbors [
die-of-loneliness
]
]
If the name of a breed is substituted for "turtles", then only turtles of that breed are included.
turtles-own
<breeds>-own
NetLogo Dictionary
421
NetLogo 4.1.3 User Manual
turtles-own [var1 ...]
<breeds>-own [var1 ...]
The turtles-own keyword, like the globals, breed, <breeds>-own, and patches-own keywords, can
only be used at the beginning of a program, before any function definitions. It defines the variables
belonging to each turtle.
If you specify a breed instead of "turtles", only turtles of that breed have the listed variables. (More
than one turtle breed may list the same variable.)
breed [cats cat ]
breed [dogs dog]
breed [hamsters hamster]
turtles-own [eyes legs]
cats-own [fur kittens]
hamsters-own [fur cage]
dogs-own [hair puppies]
;; applies to all breeds
See also globals, patches-own, breed, <breeds>-own.
type
type value
Prints value in the Command Center, not followed by a carriage return (unlike print and show). The
lack of a carriage return allows you to print several values on the same line.
This agent is not printed before the value. unlike show.
type 3 type " " print 4
=> 3 4
See also print, show, and write.
See also output-type.
U
undirected-link-breed
undirected-link-breed [<link-breeds> <link-breed>]
This keyword, like the globals and breeds keywords, can only be used at the beginning of the
Procedures tab, before any procedure definitions. It defines an undirected link breed. Links of a
particular breed are always either all directed or all undirected. The first input defines the name of
the agentset associated with the link breed. The second input defines the name of a single member
of the breed.
Any link of the given link breed:
• is part of the agentset named by the link breed name
422
NetLogo Dictionary
NetLogo 4.1.3 User Manual
• has its built-in variable breed set to that agentset
• is directed or undirected as declared by the keyword
Most often, the agentset is used in conjunction with ask to give commands to only the links of a
particular breed.
undirected-link-breed [streets street]
undirected-link-breed [highways highway]
to setup
clear-all
crt 2
ask turtle 0 [ create-street-with turtle 1 ]
ask turtle 0 [ create-highway-with turtle 1 ]
end
ask turtle 0 [ show sort my-links ]
;; prints [(street 0 1) (highway 0 1)]
See also breed, directed-link-breed
untie
untie
Unties end2 from end1 (sets tie-mode to "none") if they were previously tied together. If the link is
an undirected link, then it will untie end1 from end2 as well. It does not remove the link between the
two turtles.
See also tie
See the Tie section of the Programming Guide for more details.
uphill
uphill4
uphill patch-variable
uphill4 patch-variable
Moves the turtle to the neighboring patch with the highest value for patch-variable. If no neighboring
patch has a higher value than the current patch, the turtle stays put. If there are multiple patches
with the same highest value, the turtle picks one randomly. Non-numeric values are ignored.
uphill considers the eight neighboring patches; uphill4 only considers the four neighbors.
Equivalent to the following code (assumes variable values are numeric):
move-to patch-here ;; go to patch center
let p max-one-of neighbors [patch-variable]
if [patch-variable] of p > patch-variable [
face p
move-to p
NetLogo Dictionary
;; or neighbors4
423
NetLogo 4.1.3 User Manual
]
Note that the turtle always ends up on a patch center and has a heading that is a multiple of 45
(uphill) or 90 (uphill4).
See also downhill, downhill4.
user-directory
user-directory
Opens a dialog that allows the user to choose an existing directory on the system.
It reports a string with the absolute path or false if the user cancels.
set-current-directory user-directory
;; Assumes the user will choose a directory
user-file
user-file
Opens a dialog that allows the user to choose an existing file on the system.
It reports a string with the absolute file path or false if the user cancels.
file-open user-file
;; Assumes the user will choose a file
user-new-file
user-new-file
Opens a dialog that allows the user to choose a location and name of a new file to be created. It
reports a string with the absolute file path or false if the user cancels.
file-open user-new-file
;; Assumes the user will choose a file
Note that this reporter doesn't actually create the file; normally you would create the file using
file-open, as in the example.
If the user chooses an existing file, they will be asked if they wish to replace it or not, but the the
reporter itself doesn't cause the file to be replaced. To do that you would use file-delete.
user-input
424
NetLogo Dictionary
NetLogo 4.1.3 User Manual
user-input value
Reports the string that a user types into an entry field in a dialog with title value.
value may be of any type, but is typically a string.
show user-input "What is your name?"
user-message
user-message value
Opens a dialog with value displayed as the message.
value may be of any type, but is typically a string.
user-message (word "There are " count turtles " turtles.")
user-one-of
user-one-of value list-of-choices
Opens a dialog with value displayed as the message and list-of-choices displayed as a popup menu
for the user to select from.
Reports the item in list-of-choices selected by the user.
value may be of any type, but is typically a string.
if "yes" = user-one-of "Set up the model?" ["yes" "no"]
[ setup ]
user-yes-or-no?
user-yes-or-no? value
Reports true or false based on the user's response to value.
value may be of any type, but is typically a string.
if user-yes-or-no? "Set up the model?"
[ setup ]
V
variance
NetLogo Dictionary
425
NetLogo 4.1.3 User Manual
variance list
Reports the sample variance of a list of numbers. Ignores other types of items.
(Note that this computes an unbiased estimate of the variance for a sample, rather than for a whole
population, using Bessel's correction.)
The sample variance is the sum of the squares of the deviations of the numbers from their mean,
divided by one less than the number of numbers in the list.
show variance [2 7 4 3 5]
=> 3.7
W
wait
wait number
Wait the given number of seconds. (This needn't be an integer; you can specify fractions of
seconds.) Note that you can't expect complete precision; the agent will never wait less than the
given amount, but might wait slightly more.
repeat 10 [ fd 1 wait 0.5 ]
See also every.
watch
watch agent
Puts a spotlight on agent. In the 3D view the observer will also turn to face the subject.
See also follow, subject, reset-perspective, watch-me.
watch-me
watch-me
Asks the observer to watch this agent.
See also watch.
426
NetLogo Dictionary
NetLogo 4.1.3 User Manual
while
while [reporter] [ commands ]
If reporter reports false, exit the loop. Otherwise run commands and repeat.
The reporter may have different values for different agents, so some agents may run commands a
different number of times than other agents.
while [any? other turtles-here]
[ fd 1 ]
;; turtle moves until it finds a patch that has
;; no other turtles on it
who
who
This is a built-in turtle variable. It holds the turtle's "who number" or ID number, an integer greater
than or equal to zero. You cannot set this variable; a turtle's who number never changes.
Who numbers start at 0. A dead turtle's number will not be reassigned to a new turtle until you use
the clear-turtles or clear-all commands, at which time who numbering starts over again at 0.
Example:
show [who] of turtles with [color = red]
;; prints a list of the who numbers of all red turtles
;; in the Command Center, in random order
crt 100
[ ifelse who < 50
[ set color red ]
[ set color blue ] ]
;; turtles 0 through 49 are red, turtles 50
;; through 99 are blue
You can use the turtle reporter to retrieve a turtle with a given who number. See also turtle.
with
agentset with [reporter]
Takes two inputs: on the left, an agentset (usually "turtles" or "patches"). On the right, a boolean
reporter. Reports a new agentset containing only those agents that reported true -- in other words,
the agents satisfying the given condition.
show count patches with [pcolor = red]
;; prints the number of red patches
NetLogo Dictionary
427
NetLogo 4.1.3 User Manual
<breed>-with
link-with
<breed>-with turtle
link-with turtle
Report the undirected link between turtle and the caller. If no link exists then it reports nobody.
crt 2
ask turtle 0 [
create-link-with turtle 1
show link-with turtle 1 ;; prints link 0 1
]
See also: in-link-from, out-link-to
with-max
agentset with-max [reporter]
Takes two inputs: on the left, an agentset (usually "turtles" or "patches"). On the right, a reporter.
Reports a new agentset containing all agents reporting the maximum value of the given reporter.
show count patches with-max [pxcor]
;; prints the number of patches on the right edge
See also max-one-of, max-n-of.
with-min
agentset with-min [reporter]
Takes two inputs: on the left, an agentset (usually "turtles" or "patches"). On the right, a reporter.
Reports a new agentset containing only those agents that have the minimum value of the given
reporter.
show count patches with-min [pycor]
;; prints the number of patches on the bottom edge
See also min-one-of, min-n-of.
with-local-randomness
with-local-randomness [ commands ]
The commands are run without affecting subsequent random events. This is useful for performing
extra operations (such as output) without changing the outcome of a model.
Example:
428
NetLogo Dictionary
NetLogo 4.1.3 User Manual
;; Run #1:
random-seed 50 setup repeat 10 [ go ]
;; Run #2:
random-seed 50 setup
with-local-randomness [ watch one-of turtles ]
repeat 10 [ go ]
Since one-of is used inside with-local-randomness, both runs will be identical.
Specifically how it works is, the state of the random number generator is remembered before the
commands run, then restored afterwards. (If you want to run the commands with a fresh random
state instead of the same random state that will be restored later, you can begin the commands with
random-seed new-seed.)
The following example demonstrates that the random number generator state is the same both
before the commands run and afterwards.
random-seed 10
with-local-randomness [ print n-values 10 [random 10] ]
;; prints [8 9 8 4 2 4 5 4 7 9]
print n-values 10 [random 10]
;; prints [8 9 8 4 2 4 5 4 7 9]
without-interruption
without-interruption [ commands ]
The agent runs all the commands in the block without allowing other agents using
ask-concurrent to "interrupt". That is, other agents are put "on hold" and do not run any
commands until the commands in the block are finished.
Note: This command is only useful in conjunction with ask-concurrent.
See also ask-concurrent.
word
word value1 value2
(word value1 ...)
Concatenates the inputs together and reports the result as a string.
show word "tur" "tle"
=> "turtle"
word "a" 6
=> "a6"
set directory "c:\\foo\\fish\\"
show word directory "bar.txt"
=> "c:\foo\fish\bar.txt"
show word [1 54 8] "fishy"
=> "[1 54 8]fishy"
show (word 3)
=> "3"
show (word "a" "b" "c" 1 23)
NetLogo Dictionary
429
NetLogo 4.1.3 User Manual
=> "abc123"
world-width
world-height
world-width
world-height
These reporters give the total width and height of the NetLogo world.
The width equals max-pxcor - min-pxcor + 1 and the height equals max-pycor - min-pycor + 1.
See also max-pxcor, max-pycor, min-pxcor, and min-pycor
wrap-color
wrap-color number
wrap-color checks whether number is in the NetLogo color range of 0 to 140 (not including 140
itself). If it is not, wrap-color "wraps" the numeric input to the 0 to 140 range.
The wrapping is done by repeatedly adding or subtracting 140 from the given number until it is in
the 0 to 140 range. (This is the same wrapping that is done automatically if you assign an
out-of-range number to the color turtle variable or pcolor patch variable.)
show wrap-color 150
=> 10
show wrap-color -10
=> 130
write
write value
This command will output value, which can be a number, string, list, boolean, or nobody to the
Command Center, not followed by a carriage return (unlike print and show).
This agent is not printed before the value, unlike show. Its output also includes quotes around
strings and is prepended with a space.
write "hello world"
=> "hello world"
See also print, show, and type.
See also output-write.
430
NetLogo Dictionary
NetLogo 4.1.3 User Manual
X
xcor
xcor
This is a built-in turtle variable. It holds the current x coordinate of the turtle. You can set this
variable to change the turtle's location.
This variable is always greater than or equal to (min-pxcor - 0.5) and strictly less than (max-pxcor +
0.5).
See also setxy, ycor, pxcor, pycor,
xor
boolean1 xor boolean2
Reports true if either boolean1 or boolean2 is true, but not when both are true.
if (pxcor > 0) xor (pycor > 0)
[ set pcolor blue ]
;; upper-left and lower-right quadrants turn blue
Y
ycor
ycor
This is a built-in turtle variable. It holds the current y coordinate of the turtle. You can set this
variable to change the turtle's location.
This variable is always greater than or equal to (min-pycor - 0.5) and strictly less than (max-pycor +
0.5).
See also setxy, xcor, pxcor, pycor,
?
?, ?1, ?2, ?3, ...
?, ?1, ?2, ?3, ...
These are special local variables. They hold the current inputs to a reporter or command block for
certain primitives (for example, the current item of a list being visited by foreach or map).
NetLogo Dictionary
431
NetLogo 4.1.3 User Manual
? is always equivalent to ?1.
You may not set these variables, and you may not use them except with certain primitives, currently
foreach, map, reduce, filter, sort-by, and n-values. See those entries for example usage.
432
NetLogo Dictionary