1
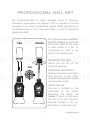
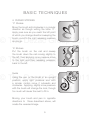
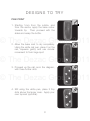
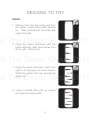
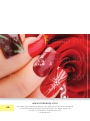
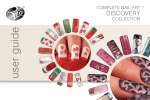
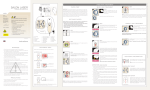
®
PROFESSIONAL
™
NAIL ART
user guide
© The Dezac Group 2011
© The Dezac Group 2011
© The Dezac Group 2011
p r o f e s s i o n a l N a i l AR T
Rio Professional Nail Art offers unlimited scope for stunning,
innovative, customised nail designs. This kit includes 8 colours
(supplied in our unique professional double ended applicators), a
full bodied brush, a pot of fine gold glitter, a pack of rhinestone
jewels and chart.
© The Dezac Group 2011
PEN
The double ended applicator
features detailing pen and fine
line brush. Also on the base
of each bottle is a pin for
unblocking any polish in the
shaft of the detailing pen.
BRUSH
© The Dezac Group 2011
revealing the pen
Simply pull the top off. No
turning is required.
PIN
revealing the brush
Holding the base in one hand,
and the top in the other,
unscrew the top anticlockwise
and reveal the brush.
© The Dezac Group 2011
using the pin
The pin is located on the
underside of the bottle.
Removing the sticker will
release it. Use it to prod down
the nib of the pen should it
become blocked or dry up.
Re-attach to bottle after use.
1
1-IN-NPEN-uk/2.1
before you start advice
• Make sure the surface you are working on is well protected. A
few sheets of newspaper or magazine will do the trick.
• Ensure nails are clean and dry before starting application.
• A
llow the polish to dry before applying another colour. You can
speed up drying time by using Rio Fast Drying Spray.
• H
ave some nail varnish remover close at hand to clean the brush
before applying another colour and for clearing up mistakes.
© The Dezac Group 2011
ome practice will be required for applying polish to the nails on
• S
your writing hand. You may want to get a friend to help.
• S
ome dark nail polish colours can stain the nail. To avoid this,
apply a basecoat of clear polish before painting with your
chosen colour
© The Dezac Group 2011
precautions
!
Not suitable for children under 12.
© The Dezac Group 2011
Do NOT use if you have:
open cuts on or around the cuticle,
or fungal nail infections.
Avoid contact with eyes.
Not to be taken internally.
Do NOT breathe vapours, use in a well ventilated area.
Highly Flammable. Keep away from sources of ignition.
2
applying a base colour
You can use any of the nail art colours as your base colour or,
alternatively, use any ordinary nail polish as a base colour.
1.Do not overload the brush with
polish and remember, best results
are obtained when thin layers of
polish are applied.
© The Dezac Group 2011
© The Dezac Group 2011
2.Starting in the centre and
approximately 1mm from the cuticle,
brush towards the tip.
© The Dezac Group 2011
3. Then proceed with the sides. Once
the nail is complete, recap the bottle
and allow your nails to dry before
proceeding.
3
basic techniques
1. Dots
Dots are produced by using the detailing
pens. Place the pen on the nail with light
pressure and lift straight up. Larger dots
can be created by building up with a circular
motion. To bring the polish to the tip of the
pen, squeeze the bottle gently.
© The Dezac Group 2011
2. strokes
To create tapered strokes, put the brush
down on the nail and using a quick
‘flicking’ action, brush across the nail. For a
standard stroke, move the brush across the
nail slowly, applying gentle pressure.
© The Dezac Group 2011
3. Teardrops
With the brush touching the nail, apply slight
pressure so the brush hairs spread to the
required size. Move the brush across the
nail, releasing pressure as you go, and allow
the stroke to finish at a point.
© The Dezac Group 2011
‘Comma’ shapes can be created in a similar
fashion, only sweep the brush down and
to one side in a circular motion, releasing
pressure as you go.
4
basic techniques
4. curled Strokes
‘C’ Strokes
Move the brush anti-clockwise in a circular
direction as though writing the letter ‘C’.
Apply pres sure as you reach the left point
at which you change direction sweeping the
brush round to the right releasing pressure
as you go.
© The Dezac Group 2011
‘S’ Strokes
Put the brush on the nail and sweep
the brush down the nail moving slightly to
the left, then applying more pressure move
to the right and then releasing pressure,
back to the left.
© The Dezac Group 2011
Swirls
© The Dezac Group 2011
Using the pen or the brush in an upright
position, apply light pressure and with
a circular motion move it outwards and
clockwise. Applying slightly more pressure
with the brush will change the look, though
too much will cause the swirl to fill in.
Moving your brush and pen in opposite
directions to those described above, will
create the reversed image.
5
a p p l y i n g g l i tt e r
Glitter is applied to wet polish. It can be either applied onto the
whole area of the nail, or selected areas.
1.Choose a background colour for the
glitter (this can be the same as your
base colour) and paint the area you
wish the glitter to cover.
© The Dezac Group 2011
© The Dezac Group 2011
2. While the polish is still wet, sprinkle
glitter onto the nail. Have a piece
of paper under the nail to catch
any excess glitter. This can then be
returned to the jar using a clean, dry
brush.
© The Dezac Group 2011
3.A top coat of clear varnish can be
applied to protect the glitter.
6
applying rhinestone
jewels
1.Use the pen to dab some paint onto
the nail.
© The Dezac Group 2011
© The Dezac Group 2011
2.Apply the jewel with gentle pressure
to the wet paint. You may find it
easier to use a dampened cotton
bud or cocktail stick to pick up and
position the jewel. Allow the paint to
dry before continuing.
© The Dezac Group 2011
3.For extra security, apply a coat of
clear nail varnish over the jewel.
7
designs to try
paw print
1.Starting 1mm from the cuticle, and
from the centre, apply the base colour
towards tip. Then proceed with the
sides and recap the bottle.
© The Dezac Group 2011
2.Allow the base coat to dry completely.
Using the white nail pen, place it on the
nail, squeeze gently and use circular
movement to form large spot.
© The Dezac Group 2011
3.Proceed up the nail, as in the diagram,
with three further dots
© The Dezac Group 2011
4.Still using the white pen, place 3 tiny
dots above the larger ones. Apply your
own topcoat (optional).
8
designs to try
zebra
1.Starting 1mm from the cuticle, and from
the centre, brush white polish towards
tip. Then proceed with the sides and
recap the bottle.
© The Dezac Group 2011
2.Using the stroke technique with the
black nail brush, paint three stripes from
left to right. Allow to dry.
© The Dezac Group 2011
3.Using the above technique, paint from
right to left applying two more strokes.
Whilst the polish is still wet, sprinkle the
glitter over.
© The Dezac Group 2011
4.Using a cocktail stick, pick up a jewel
and push into tacky polish.
9
designs to try
flower
1.Starting 1mm from the cuticle, and
from the centre, apply the base colour
towards tip. Then proceed with the
sides and recap the bottle.
© The Dezac Group 2011
2.Using the white nail brush, paint on
the nail using the ‘teardrop’ technique.
Repeat for the 3 remaining petals.
© The Dezac Group 2011
3.Using the black pen, paint a small black
dot for the centre of the flower.
© The Dezac Group 2011
4.Create the leaves using the green
nail brush, again using the teardrop
technique.
10
designs to try
silver with black swirls
1.Starting 1mm from the cuticle, and from
the centre, brush silver polish towards
tip. Then proceed with the sides and
recap the bottle.
© The Dezac Group 2011
2.Using the black nail pen or nail brush,
place on the nail in an upright position
and using the ‘curled stroke’ technique,
create swirls.
© The Dezac Group 2011
3. With the black nail brush, paint to the
left and right of the swirls using a long
sweeping action.
© The Dezac Group 2011
4.Once the polish is dry, use the red nail
pen to fill-in the swirls.
11
aftercare & general
advice
• Once your design is completely dry, a top coat of your usual
clear varnish will make your design last longer.
• If you have used the large brush to apply a base colour, clean
immediately with ordinary nail polish remover.
© The Dezac Group 2011
• Ensure the tops are put back on all the pens so they won’t
dry out.
• Keep bottles cool, dry and away from sources of ignition. Store
with adequate ventilation.
• To remove your nail art, use nail polish remover.
Note: If you are wearing false nails or nail extensions, do not use
a polish remover that contains acetone, as this may damage the
extensions.
© The Dezac Group 2011
• This product is affected by U.V. light – store away from direct
sunlight.
careline
© The Dezac Group 2011
If you have any questions, or if you experience any difficulties please
call our Careline on:
01242 702345
or email us at:
[email protected]
12
© The Dezac Group 2011
© The Dezac Group 2011
© The Dezac Group 2011
www.riobeauty.com
UK
Rio, Dezac and Professional Nail Art are trademarks of The Dezac Group Ltd
© The Dezac Group Ltd 2008 Manufactured by The Dezac Group Ltd
PO Box 17, Cheltenham, England GL53 7ET
1-IN-NPEN-UK/2.1