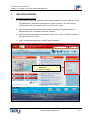
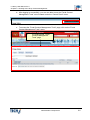
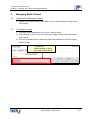
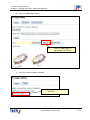
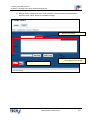
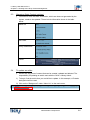
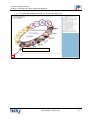
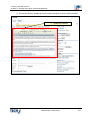
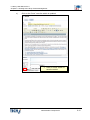
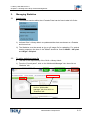
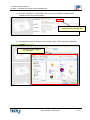
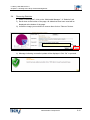
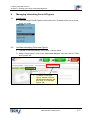
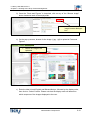
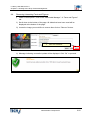
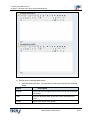
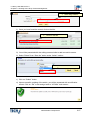
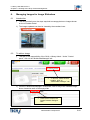
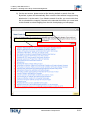
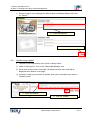
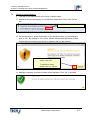
1
ADMINISTRATIVE COMPONENTS CHAPTER 6 Working with Liferay Content Management In this chapter, we will look the task performed by Chief u-Library Admin. These include : How to update static content (article) as well as upload relevant images and files, and manage statistics as well as interesting facts & figures How to manage add, publish as well as remove content from the 4 knowledge pillars How to add, change and delete images for image slideshow on the portal How to update categories under Control Panel CONTENTS 1. Getting Started 6-1 2. Managing Static Content 6-3 3. Managing Statistics 6-13 4. Managing Interesting Facts & Figures 6-17 5. Managing 4 Knowledge Pillars 6-21 6. Managing Images for Image Slideshow 6-28 7. Update category/group information 6-33 Edited 8 Sept 2012 u-Library User Manual V3.0 Chapter 6 : Working with Liferay Content Management 1. GETTING STARTED 1.1 Accessing Control Panel i) As a Chief u-Library administrator, Library administrator or Library staff, you need to populate the u-Pustaka Portal content. In order to do this, you must first log into the portal and have access to the “Control Panel” menu a. Launch a browser and browse to http://www.u-Library.gov.my/portal. Refer to diagram below for u-Pustaka Portal look and feel. b. Once the portal homepage is fully loaded, locate the “Login u-Pustaka” section at the right side of the screen. c. Log in to the portal using your “UserID” and “Password”. 1. Key in your UserID and password 2. Click on “Login” Administrative Components 6-1 u-Library User Manual V3.0 Chapter 6 : Working with Liferay Content Management d. After logging in successfully, you are now able to see the “Portal Content Management Tools” menu located under the “Control Panel” menu. e. To access the “Portal Content Management Tools” page, click on the “Portal Content Management Tools” menu. u-Pustaka portal “Portal Content Management Tools” page Administrative Components 6-2 u-Library User Manual V3.0 Chapter 6 : Working with Liferay Content Management 2. Managing Static Content 2.1 Introduction to Managing Images i) 2.2 Images such as those used under “About Us” can be uploaded to Liferay Portal server easily. To upload an image i) This task is the responsibility of the Chief u-Library Admin ii) Image Gallery is a tool for you to manage the images used in static information on the portal. iii) Click on u-Pustaka Portal to locate the folder and subfolder to which the image shall be stored. To locate the folder/subfolder to which the image shall be stored. Administrative Components 6-3 u-Library User Manual V3.0 Chapter 6 : Working with Liferay Content Management iv) Click on “Add Image” button. Click on “Add Image” to add image to the folder. v) Click on “Use the classic uploader”. Click on “Use the classic uploader”. Administrative Components 6-4 u-Library User Manual V3.0 Chapter 6 : Working with Liferay Content Management vi) Browse for the image from your local hard disk, enter the name and description, and then click “Save” button to upload the image. 1. Browse for image 3. Click “Save” Administrative Components 2. Enter Name and Description of the image 6-5 u-Library User Manual V3.0 Chapter 6 : Working with Liferay Content Management 2.3 Managing Static Content (articles) i) From time to time, the static information, which are those not generated by the system, needs to be updated. These include information shown in the table below. About Us Info Cube Policy Statements Footer 2.4 To update an article i) Articles are any piece of content that can be created, updated and deleted. The responsibility of updating an article rests with the Chief u-Library Admin ii) To begin, find the article that you would like to update. In this example, u-Pustaka background will be used. iii) Click on the “Background” under “About Us” on the main menu. Administrative Components 6-6 u-Library User Manual V3.0 Chapter 6 : Working with Liferay Content Management iv) To update the background write-up, click on the “Edit” icon. Click on “Edit” button Administrative Components 6-7 u-Library User Manual V3.0 Chapter 6 : Working with Liferay Content Management v) On the next screen, update the article content using the rich text editor provided. 1. Update the content Administrative Components 6-8 u-Library User Manual V3.0 Chapter 6 : Working with Liferay Content Management vi) To update link, click on “Insert/Edit Link” button to enter the URL of the link. 1. Click “Insert/Edit Link” 2. Click on “Ok” to save the URL. Administrative Components 6-9 u-Library User Manual V3.0 Chapter 6 : Working with Liferay Content Management vii) To insert and image, click on “Insert/Edit Image” button, a pop-up screen will appear for browsing image from the “Image Gallery”. 2. Click “Insert/Edit Image” 1. Click on “Browse Server” to look for image which is uploaded to the “Image Gallery” Administrative Components 6-10 u-Library User Manual V3.0 Chapter 6 : Working with Liferay Content Management viii) Navigate to the folder containing the image; select it by clicking on the image name. Click on the image name ix) Once the image is selected, you will come back to the screen shown below and click “Ok” button to insert the image to the article. Click on the image name Administrative Components 6-11 u-Library User Manual V3.0 Chapter 6 : Working with Liferay Content Management x) Click on the “Save” once the article is updated. Click on “Save” button to save the article. Administrative Components 6-12 u-Library User Manual V3.0 Chapter 6 : Working with Liferay Content Management 3. Managing Statistics 3.1 Introduction i) The statistics section within the u-Pustaka Portal can be found under Info Cube. ii) It allows Chief u-Library Admin to update statistics that are relevant to u-Pustaka and its services. iii) The Statistics must be saved as jpg or gif image file for uploading. For optimal viewing experince the size of the statistic should be fixed at Width : 600 pixel and Height : 500 pixel. 3.2 To add a statistics image file i) This task is the responsibility of the Chief u-Library Admin. ii) From the “Control panel”, click on the “Multimedia Manager” tab, then click on “Statistics” tab. To launch “Statistics” module, click on “Multimedia manager” tab, then click on “Statistics” tab. Administrative Components 6-13 u-Library User Manual V3.0 Chapter 6 : Working with Liferay Content Management iii) Once the “Statistics” is launched, click on any of the “Browse image” button located at each of the empty slide. Click here to launch the image browser dialogue box iv) On the pop-up screen, browse for the image (*.jpg, *.gif) to upload to Statistics. Search for the image to be uploaded Administrative Components 6-14 u-Library User Manual V3.0 Chapter 6 : Working with Liferay Content Management v) Enter the label in both English and Bahasa Melayu, followed by the display order, then click on “Submit” button. Please note that the display order will determine which sequence of the images displayed to the user. 2. Enter the labels 3. Enter the Display order 1. Click on “Submit” 3.3 Updating Statistics Caption i) This task is the responsibility of the Chief u-Library Admin ii) Under “Control panel”, click on the “Multimedia Manager” “Statistics” tab. iii) Scroll down to the bottom of the page. All images that have been used will be displayed at the bottom of the page. iv) Locate the image you would like to update, enter your new label then click on “Update” button. 1. Enter new label 2. Click on “Update” v) Message indicating successful update will be displayed. Click “Ok” to proceed. Administrative Components 6-15 u-Library User Manual V3.0 Chapter 6 : Working with Liferay Content Management 3.4 Removing Statistics i) Under “Control panel”, click on the “Multimedia Manager” “Statistics” tab. ii) Scroll down to the bottom of the page. All slides that have been used will be displayed at the bottom of the page. iii) Locate the image you would like to remove then click on “Remove” button. Click on “Remove” iv) Message indicating successful update will be displayed. Click “Ok” to proceed. Administrative Components 6-16 u-Library User Manual V3.0 Chapter 6 : Working with Liferay Content Management 4. Managing Interesting Facts & Figures 4.1 Introduction i) 4.2 The Interesting Facts & Figures section within the u-Pustaka Portal can be found under Info Cube. Add New Interesting Facts and Figures i) This task is the responsibility of the Chief u-Library Admin ii) Under “Control panel”, click on the “Multimedia Manager” tab, then click on “Facts and Figures” tab. To launch “Facts and Figure” module, click on “Multimedia manager” tab, then click on “Facts and Figure” tab. Administrative Components 6-17 u-Library User Manual V3.0 Chapter 6 : Working with Liferay Content Management iii) Once the “Facts and Figures” is launched, click on any of the “Browse image” button located at each of the empty slide. Click here to launch the image browser dialogue box iv) On the pop-up screen, browse for the image (*.jpg, *.gif) to upload to Facts and Figures Search for image to be uploaded v) Enter the label in both English and Bahasa Melayu, followed by the display order, then click on “Submit” button. Please note that the display order will determine which sequence of the images displayed to the user. Administrative Components 6-18 u-Library User Manual V3.0 Chapter 6 : Working with Liferay Content Management 5. Enter the labels 6. Enter the Display order 4. Click on “Submit” 4.3 Update Caption for Interesting Facts & Figures i) Under “Control panel”, click on the “Multimedia Manager” “Facts and Figures” tab. ii) Scroll down to the bottom of the page. All images that have been used will be displayed at the bottom of the page. iii) Locate the image you would like to update, enter your new label then click on “Update” button. 3. Enter new label 4. Click on “Update” iv) Message indicating successful update will be displayed. Click “Ok” to proceed. Administrative Components 6-19 u-Library User Manual V3.0 Chapter 6 : Working with Liferay Content Management 4.4 Removing Interesting Facts and Figures i) Under “Control panel”, click on the “Multimedia Manager” “Facts and Figures” tab. ii) Scroll down to the bottom of the page. All slides that have been used will be displayed at the bottom of the page. iii) Locate the image you would like to remove then click on “Remove” button. Click on “Remove” iv) Message indicating successful update will be displayed. Click “Ok” to proceed. Administrative Components 6-20 u-Library User Manual V3.0 Chapter 6 : Working with Liferay Content Management 5. Managing 4 Knowledge Pillars 5.1 Introduction i) The 4 Knowledge Pillars shall be updated by the Chief u-Library Admin or appointed Libraries. ii) The content can be accessed from the animated banner on the portal. An example is shown below 5.2 To add a new 4 knowledge pillars article i) This task is the responsibility of the Chief u-Library Admin. Under “Control Panel > Web Publishing Manager”, click on the “4-Pillar” tab. ii) 5.3 Click on 4-Pillars tab Once the “4-Pillars” module is launched, click on the "Add new" button. Click on “Add new” icon Administrative Components 6-21 u-Library User Manual V3.0 Chapter 6 : Working with Liferay Content Management i) On the loaded article creation form Enter the title in both English and Bahasa Melayu Enter the 4 knowledge pillars content in both English and Bahasa Melayu Enter the Title in English and Bahasa Melayu Enter 4 knowledge pillars content Administrative Components 6-22 u-Library User Manual V3.0 Chapter 6 : Working with Liferay Content Management Administrative Components 6-23 u-Library User Manual V3.0 Chapter 6 : Working with Liferay Content Management ii) Saving the 4 knowledge pillar article After completing the form, you can select to save the form with the following status. Status Description Publish Article has been completed and can be saved and published onto portal Draft Save the article as draft. Article will not be published onto portal. Delete Remove the article from system Administrative Components 6-24 u-Library User Manual V3.0 Chapter 6 : Working with Liferay Content Management Select action to be performed iii) Upon successful adding of article, you will be presented with a notification screen. 5.4 Updating 4 pillars article i) Search Existing Articles Search for the article you have created previously. You can search by keyword or show records by status or search by date range. Keyword search Filtering search Administrative Components Date range search 6-25 u-Library User Manual V3.0 Chapter 6 : Working with Liferay Content Management ii) Once you have found the record, click on the title. Click on the title iii) You will be presented with the editing screen similar to add new article screen. 5.5 Proceed to make changes to the form and then save the form Click on “Submit” button. Upon successful updating of the article, you will be presented with a notification screen. Click on “OK” to exit and go back to “4-Pillars” main screen. Removing a 4 pillars article i) Search for the article you have created previously. You can search by keyword or show records by status or search by date range. Keyword search Filtering search Administrative Components 6-26 u-Library User Manual V3.0 Chapter 6 : Working with Liferay Content Management Date range search ii) Once you have found the record, click on the title. Click on the title iii) You will be presented with the editing screen similar to add new article screen. iv) Select “Delete” from “Save As” option under “Action” section. Select “Delete” status v) Click on “Submit” button. vi) Upon successful updating of the article, you will be presented with a notification screen. Click on “OK” to exit and go back to “4-Pillars” main screen. Administrative Components 6-27 u-Library User Manual V3.0 Chapter 6 : Working with Liferay Content Management 6. Managing Images for Image Slideshow 6.1 Introduction i) This section shall cover the steps required to manage photos or images shown on the u-Pustaka Portal. ii) The images updated can then be viewed by the members here : 6.2 To add an image i) This task is the responsibility of the Chief u-Library Admin. Under “Control panel”, click on the “Multimedia Manager” tab. To launch “Latest events” module, click on “Multimedia manager” tab. ii) Once the “Multimedia Manager” is launched, click on any of the “Browse image” button located at each of the empty slide. Click here to launch the image browser dialogue box Administrative Components 6-28 u-Library User Manual V3.0 Chapter 6 : Working with Liferay Content Management iii) On the next screen, please select a title listed by default or search for a title. By default, system will automatically filter out all the titles without image(s) being attached to it. As the result, if you failed to search for a title, you must revisit that title to upload all the image(s) relevant to the selected title before you come back to this module to select image(s) from the title for displaying on homepage. Search for unlisted title Titles listed by default Administrative Components 6-29 u-Library User Manual V3.0 Chapter 6 : Working with Liferay Content Management iv) Click on the title, then select an image 2. Click on selected title 1. Select an image Administrative Components 6-30 u-Library User Manual V3.0 Chapter 6 : Working with Liferay Content Management v) Enter the caption to be displayed for both English and Bahasa Melayu then click on “Submit”. 8. Enter the captions 7. Click on “Submit” 6.3 Update image caption i) This task is the responsibility of the Chief u-Library Admin ii) Under “Control panel”, click on the “Multimedia Manager” tab. iii) Scroll down to the bottom of the page. All slides that have been used will be displayed at the bottom of the page. iv) Locate the image you would like to update, enter your new caption then click on “Update” button. 5. Enter new caption 6. Click on “Update” Administrative Components 6-31 u-Library User Manual V3.0 Chapter 6 : Working with Liferay Content Management v) Message indicating successful update will be displayed. Click “Ok” to proceed. 6.4 Remove image from slideshow i) This task is the responsibility of the Chief u-Library Admin ii) Under “Control panel”, click on the “Multimedia Manager” tab. iii) Scroll down to the bottom of the page. All slides that have been used will be displayed at the bottom of the page. iv) Locate the image you would like to remove then click on “Remove” button. Click on “Remove” v) Message indicating successful update will be displayed. Click “Ok” to proceed. Administrative Components 6-32 u-Library User Manual V3.0 Chapter 6 : Working with Liferay Content Management 7. Update category/group information 7.1 Introduction i) 7.2 Categories are used by u-Pustaka portal to group information for Links, News, Events, Announcements as well as e-Resources. To update category/group information i) This task is the responsibility of the Chief u-Library Admin ii) Under “Control panel”, click on the “Administrative Panel” button then click on “Category” tab 1. Click on “e-mail” tab 2. To launch “Administrative panel”, click on “Administrative panel” button. iii) From the result listed, click on the module to edit. Click on module to edit Administrative Components 6-33 u-Library User Manual V3.0 Chapter 6 : Working with Liferay Content Management iv) On the next screen, find the category/group you would like update then click on “Edit” link. Click on “Edit” v) On the editing screen, edit the display name and/or display order that you intended to update then click on “Ok”. 2. Update the value 1. Click on “Ok” Administrative Components 6-34 u-Library User Manual V3.0 Chapter 6 : Working with Liferay Content Management vi) Message indicating successful update will be displayed. Click “Ok” to proceed. 7.3 Adding a New Group/Category i) This task is the responsibility of the Chief u-Library Admin ii) The following are differences between “Group” and “Category” Type Description Create Group Is used to create a folder that can be used to store a group of categories that can be grouped under one common grouping Create Category Is used to create a category that can be used to categorize records that will be created iii) The steps for adding group and category are the same. For this example, we will add a group. Click on the “Add Group” link located beside the “Root” level. Click on “Add Group” Administrative Components 6-35 u-Library User Manual V3.0 Chapter 6 : Working with Liferay Content Management iv) On the next screen, complete the form then click on “Ok”. Name(EN) Display name in English Name(BM) Display name in Bahasa Melayu Unique Code A unique identifier code that will be used by system for verification and data retrieval. EG. CATONLINEREF, is used for “Online References” category Display order The display order of this category 2. Complete the form 1. Click on “Ok” v) Message indicating successful update will be displayed. Click “Ok” to proceed. Administrative Components 6-36 u-Library User Manual V3.0 Chapter 6 : Working with Liferay Content Management 7.4 Delete a group/category i) This task is the responsibility of the Chief u-Library Admin ii) Search for the group/category you would like to delete then click on the “Delete” link. Click on “Delete” iii) On the next screen, please think twice on you decision before you proceeding to click on “Ok”. By clicking on “Ok” button, system will automatically delete all child records that are relevant to the group or category that you are deleting. To proceed with this action, click “Ok”. To abort this action, please click on “Cancel” iv) Message indicating successful update will be displayed. Click “Ok” to proceed. Administrative Components 6-37