1
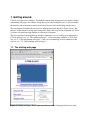
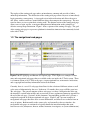
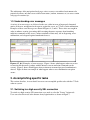
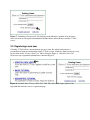
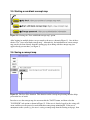
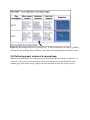
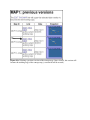
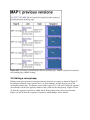
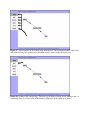
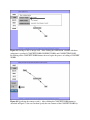
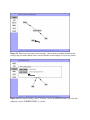
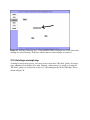
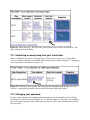
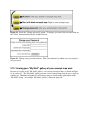
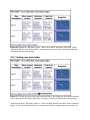
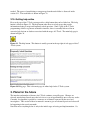
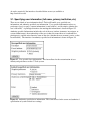
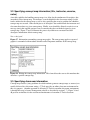
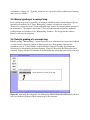
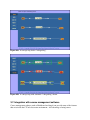
C-TOOLS @ MSU User Manual for http://ctools.msu.edu/ (2002-12-03 Draft) C-Tools Software Version 0.3.0 (not yet released) Manual ID Code: USERMANUAL-0.3.0-1 UNRELEASED DRAFT DOCUMENT Written by Scott Harrison, Software Developer The C-Tools Research Project is led by: Dr. Douglas Luckie, Principal Investigator Dr. Diane Ebert-May, Principal Investigator This project is funded in part by the National Science Foundation. Copyright 2002 Michigan State University Board of Trustees Contents 1. Getting around 1.1. The starting web page 1.2. The navigational web pages 1.3. Understanding error messages 2. Accomplishing specific tasks 2.1. Switching to a high-security SSL connection 2.2. Registering a new user 2.3. Logging in as an existing user 2.4. Determining a forgotten password 2.5. Starting a new blank concept map 2.6. Saving a concept map 2.7. Viewing past versions of a concept map 2.8. Retrieving a past version of a concept map 2.9. Editing a concept map 2.10. Deleting a concept map 2.11. Undeleting a concept map from your trash folder 2.12. Changing your password 2.13. Viewing your "My Stuff" gallery of your concept map work 2.14. Visiting your trash folder 2.15. Getting help online 3. Plans for the future • Specifying user information (full name, primary institution, etc). • Specifying concept map metadata (title, instructor, exercise, notes) • Submitting a concept map for a classroom assignment • Grading a concept map • and many other possibilities 1. Getting around C-Tools is designed to be intuitive. For both the concept map drawing tool (java applet) and the surrounding web pages, the software design has evolved over multiple cycles so as to streamline the interface and to introduce features desired most by users who are building concept maps. This user manual should not be necessary for jumping into and using the C-Tools system. The purpose of this manual is to help interested parties discuss the usage and development of C-Tools as relates to its quick-moving timeline of software development. The user experience can be broken up into three situations: a new or existing user returning to a C-Tools web site (see "1.1. The starting web page"); a user navigating within the C-Tools web site (see "1.2. The navigational web pages"); and a user encountering an error condition on the web site (see "1.3. Understanding error messages"). 1.1. The starting web page Figure 1. Starting web page. This is what users first see when visiting http://ctools.msu.edu/. The top bar of the starting web page makes an introductory comment and provides a link to online help information. The midsection of the starting web page allows any user to immediately begin generating a concept map. A java applet exists in this midsection and allows the user to add, delete, connect, and move around different objects that compose the concept map. The user can also choose to save or print their existing work. The bottom section of the starting web page allows users to login, register, or navigate through tutorial information on the principles of effective concept map construction. Figure 1 shows a picture of the starting web page. The goal of the starting web page is to present a platform for immediate immersion into commonly desired tasks with C-Tools. 1.2. The navigational web pages Figures 2 & 3. Login page and Known user options page. These figures are examples of data entry and navigational web pages that are available to the user inside the C-Tools system. There is a common layout of all C-Tools web pages: a top navigational bar, an interactive midsection, and a copyright and auxiliary information section at the bottom. Currently, there is a set of 12 web pages that allows for the selection of different actions as well as the entry of information by the user. In the next 1-2 months, these pages will like grow into 30+ web pages. The general structure of these web pages is to have a navigation bar at the top, the interactive section in the middle, and on occasion, to have explanatory comments appended to the end of the web page. Section 2 of this document "Accomplishing specific tasks" presents a complete description of all the navigational web pages. Figure 2 and 3 present examples of navigational web pages that allow users to enter information, and allow users to choose from an array of options. Both internally to the source code, and externally to the user interface, the navigational web pages are structured to logically handle the interrelationships that occur between user role (anonymous, known, student, instructor, investigator, or system administrator). The architecture of the navigational web pages exists to create a streamlined environment also protectively allows only those users with relevant status (student, instructor, etc) to access certain web pages in certain ways. 1.3. Understanding error messages A variety of error messages are delivered to the user, either in terms of improperly formatted entries of the user, unsupported web requests against the server, or C-Tools system malfunction. Examples of these error messages are shown in Figures 4, 5, and 6. These errors are caught in order to enhance security (preventing shell-executing character sequences from launching malicious commands on the server), enforce standards of data entry, aid in diagnosing server malfunction, and safeguard against unauthorized access. Figures 4, 5 & 6. Examples of error messages. Figure 4 shows what happens when a user tries to enter invalid characters (perhaps with the intent to execute malicious commands on the system). Figure 5 shows what happens when an incorrect username/password combination is entered. Figure 6 shows an example of what happens when a server malfunction exception occurs. 2. Accomplishing specific tasks This section describes, in exact detail, how users can accomplish specific tasks with the C-Tools software system. 2.1. Switching to a high-security SSL connection To switch to a high-security SSL connection, users need to select the "Secure" login mode. Users can select this mode at the bottom of any login interface as shown in Figure 7. Figure 7. Switching to Secure mode. By clicking on the link that is pointed to by the arrow, users can create an encrypted communication channel between their browser and the C-Tools server. 2.2. Registering a new user Currently, C-Tools allows any anonymous person to enter the website and generate a personalized account and environment on the C-Tools system. From the starting web page, users need to click on the "Create a New User" link as shown in Figure 8. After this, users can fill in necessary registration information as shown in Figure 9. Figure 8. Location of the "Create a New User" link. The arrow in the figure points to the hyperlink that takes the user to a registration page. Figure 9. Registration form. To create a new user, a unique username needs to be specified. To ensure accurate entry, the password and the e-mail address must be entered twice by the person filling in the registration form fields. 2.3. Logging in as an existing user Users who have already created an account (as described in section 2.2) can log in as an existing user from either the starting web page, or inside the navigational web pages. Logging in is simply a matter of specifying a correct username and password combination. The security architecture of C-Tools only allows individual users to login from a single internet location at any one time. Thus, two people cannot simultaneously login with the same account on different machines with differing internet addresses. 2.4. Determining a forgotten password When a user forgets his or her password, the user can choose to have the password be e-mailed to the e-mail address associated with his or her C-Tools account. In the event that the system cannot deliver the password to the user's account, the user can send an e-mail account to the CTools system administrator (currently [email protected]) at which point another remedy will be devised. Figure 10 shows the data form on the C-Tools system that allows users to make a forgotten password request. Figure 10. Forgotten password data form. Finding out a forgotten password is just a matter of entering the username. C-Tools will send a message to the e-mail address associated with the username. 2.5. Starting a new blank concept map Figure 11. Selecting the "Start with blank concept map" option. After logging in, multiple choices are presented to the user as shown in Figure 11. One of these choices is to "start a new blank concept map". Alternatively, the initialization of a new concept map can also be done directly from the starting page by working with the concept map java applet already present there (see Figure 1). 2.6. Saving a concept map Figure 12. The Save Now function. This function on the concept map drawing interface helps prevent the loss of work. In order to save the concept map, the user must hit the "SAVE" button, and then select the "SAVE NOW" sub-option as shown in Figure 12. If the user is already logged in, the saving will occur, and the user can proceed to work with their concept map uninterrupted. If the user is anonymous to the system (e.g. the user is saving a concept map from the starting web page), then the C-Tools system will interrupt the java applet session and ask for authentication information prior to the saving of the concept map as shown in Figure 13. Figure 13. Establish user identity prior to saving a concept map. This C-Tools interface is shown whenever an anonymous user tries to save a concept map. 2.7. Viewing past versions of a concept map As a user follows the cycle of editing and saving the same concept map, C-Tools creates a version history of the user's work. The user never has to worry about overwriting previous work. All versions of a concept map are permanently stored on a properly managed C-Tools system. To view these versions, the user must enter his or her "My Stuff" space (by selecting the "My Stuff" option shown in Figure 14) and then select "Browse History" for a specific concept map as shown in Figure 15. Figure 14. Selection of the "My Stuff" option. To enter the My Stuff gallery, the user needs to click on the Select button indicated by the scribbled arrow. Figure 15. Browsing the history of a concept map. To browse the history of a map (e.g. MAP1), click on the corresponding "Browse History" link such as the link shown by the scribbled arrow. 2.8. Retrieving a past version of a concept map While browsing the history of a concept map (for instructions on how to browse the history, see section 2.7), the user can retrieve any past version of a concept map and make that his or her working copy of the concept map. Figures 16a and 16b illustrates how this process occurs. Figure 16a. Selecting a previous version of the concept map. Once selected, this version will become the working copy of the concept map (a version #6 will be created). Figure 16b. A previous version becomes the new working copy. MAP1.3.cmap has become the new working copy (MAP1.6.cmap). 2.9. Editing a concept map Editing a concept map occurs by using the buttons inside the java applet as shown in Figure 17. By using these buttons, users can add, move, or delete linkages or words that are part of the developing concept map. To illustrate some of this, figures 18, 19, 20, and 21 show the sequence of occurrences on the java applet by which a word is added to the concept map. Figures 22 and 23 show the sequence of actions by which words on the concept map can be moved around. Figures 24 and 25 show the sequence of actions by which linkages can be deleted. Figure 17. Action buttons on the concept map drawing tool. The rectangular buttons on the left side of the drawing tool (pointed to by the thick arrows) can be clicked on by the user. Figure 18. Adding to the concept map. The first step in adding concept words, linking words, or connecting lines, is to click on the ADD button as pointed to by the thick arrow above. Figure 19. Starting to add a concept word. After clicking the ADD button, a bubble with three suboptions is produced (CONCEPT WORD, LINKING WORD, and CONNECTING LINE). By clicking on the CONCEPT WORD button, the user begins the process of adding a CONCEPT WORD. Figure 20. Specifying the concept word(s). After clicking the CONCEPT WORD button as described in Figure 19, the user can then specify the text contents of the CONCEPT WORD (it can be one or more words). The user would then hit the "add to map" button below the text entry box. Figure 21. A new word, "One", is added to the concept map. Figure 22. First step of moving a word on the concept map. To move a word rectangle, the first thing to do is to click on a word, hold down the mouse button, and move to a new position on the concept map screen. Figure 23. Final step of moving a word rectangle. After moving to another location on the concept map, the mouse button can be released and the word rectangle is in its new position. Figure 24. First step in deleting a word. To delete a word, the DELETE button is pressed and a suboption, such as "DELETE LINES" is selected. Figure 25. Deleting connecting lines. If the DELETE LINES suboption was selected, then after clicking on a word rectangle, all the lines which connect to that rectangle are removed. 2.10. Deleting a concept map As multiple concept maps pile up, users may want to empty their "My Stuff" gallery of concept maps which they now consider to be junk. Deleting a concept map is as simple as visiting the "My Stuff" gallery (as described in section 2.13) and clicking on the "Delete This Map" link as shown in Figure 26. Figure 26. Delete this map. The "My Stuff" gallery allows users to delete specific maps. The maps wind up in the trash folder. 2.11. Undeleting a concept map from your trash folder In the event that the user deletes a concept map, and later wants to retrieve it, C-Tools allows users to visit their trash folder and undelete their concept map as shown in Figure 27. Navigating to the trash folder is described in section 2.14. Figure 27. Undeleting a concept map. By clicking on the link indicated in the figure, the user can move a concept map from the trash folder back into their "My Stuff" gallery. 2.12. Changing your password If a user wants to change their authentication information, he or she should select the "Change your Password" option as shown in Figure 28. As shown in Figure 29, the process for changing a password requires entering in the current (old) password as well as twice entering in the desired new password. Figure 28. Select the "Change password" option. To change a password, the user must click on the "Select" button indicated by the scribbled arrow. Figure 29. Change your password interface. This is the interface by which a user can specify a new password. 2.13. Viewing your "My Stuff" gallery of your concept map work In order to view his or her "My Stuff" gallery, a user needs to navigate there as shown in Figure 14 in section 2.7. The "My Stuff" gallery presents a list of concept maps that the user is actively working on. Thumbnail snapshots of each concept map are shown in the right column of the "My Stuff" listing. An example "My Stuff" gallery is shown in figure 30. Figure 30. Example of "My Stuff" gallery. This is an example of what the "My Stuff" gallery would look like to a user. In this gallery, concept maps are presented in a list with information and actions for each concept map. 2.14. Visiting your trash folder Figure 31. The link for recovering maps from trash folder. By clicking on the indicated link, the user is taken to the trash folder where they can inspect currently deleted/trashed concept maps. At the bottom of the "My Stuff" gallery is a "Recover Maps From Trash folder" link as shown in Figure 31. By selecting this link, users can inspect and retrieve concept maps that currently are trashed. The process for undeleting a concept map from the trash folder is discussed inside section 2.11. The trash folder is shown in Figure 32. 2.15. Getting help online Every web page of the C-Tools system provides a help button that can be clicked on. This help button is shown in Figure 33. The help button takes the user to help pages that provide information relating to usage and frequently asked questions. Since a goal of the C-Tools programming effort is to generate an intuitive interface, there is currently little need for an extensive help lexicon or database associated with the usage of C-Tools. The main help page is shown in Figure 34. Figure 33. The help button. This button is usually present in the top right of web pages of the C -Tools system. Figure 34. Help page. This is the main page of online help for the C-Tools system. 3. Plans for the future The interface and number of features for C-Tools continues to rapidly grow. Changes are released onto the http://ctools.msu.edu/ web site at a rate of approximately once every two weeks. Currently, development is guided by a concrete set of features requested by the users and investigators. This section of the user manual is meant to give an advanced preview of what will be happening in the next few months. Note that most everything below is only in the initial stages of testing and implementation. So, do not be surprised if the interfaces described below are not yet available at http://ctools.msu.edu/. 3.1. Specifying user information (full name, primary institution, etc) There are two kinds of user information that C-Tools will handle: user-specified user information, and authority-specified user information. User-specified information relates to preferences (jpeg's or png's), contact information (e-mail address), and descriptive identity (the user's full name). A prototyped interface for entering this information is shown in Figure 35. Authority-specified information includes the role of the user (student, instructor, investigator, or system administrator), the memberships of the user (what classrooms the user is authorized to participate in), and the active/inactive status of the user (whether the user account is active, or has been disabled). The interface for authority-specified user information is shown in Figure 36. Figure 35. User-specified user information. This form allows for the customization of user identity and preferences on the C-Tools system. Figure 36. Authority-specified user information. This form allows for the secure and authorized specification of system-critical user settings. 3.2. Specifying concept map information (title, instructor, exercise, notes) A needed capability for handling concept maps is to allow for the attachment of descriptive data (metadata) to the concept map. For instance, it can be helpful for the classroom setting if a title can be attached to the concept map as well as also specifying the exercise problem for which the concept map was created. Other useful pieces of descriptive data could include the instructor and classroom that relate to a given concept map. Finally, users should be allowed to write in a text message (note) that explains various issues or concerns they have with the design of a given concept map. Figure 37 and 38 illustrate the process by which users can attach and alter descriptive information of their concept map. Not yet designed. Figure 37. Information surrounding concept map applet. The concept map applet or exported graphic is surrounded with metadata which describes important attributes of the concept map. Figure 38. Editing the concept map information. This form allows the user to edit metadata that describes a specific concept map. 3.3. Specifying classroom information Concept map exercises (story problems for which students generate concept maps as answers) are usually delivered in a classroom setting. C-Tools provides an online classroom environment for this very purpose. (Another approach to delivering C-Tools in an online classroom environment is through the usage of course management software as described in section 3.7.) Figure 39 and 40 presents an interface for the creation and maintenance of an online C-Tools classroom. Figure 39. Specifying classroom information. This form allows a classroom to be specified in terms of the students, the exercises, and the name and description of the classroom. Figure 40. Specifying exercise information. An instructor can specify surrounding information for a concept map exercise. 3.4. Submitting a concept map for a classroom assignment Figure 41 shows the button that is used to submit a classroom assignment. Subsequent to clicking on this button, an interface is shown which tells the user about the submission of their assignment (see figure 42). Typically, instructors are expected to allow resubmission of concept maps prior to a deadline. 3.5. Manual grading of a concept map Every concept map exercise created by an instructor will likely involve detailed knowledge not currently present inside the C-Tools "Robograder" database (described in section 3.6). Therefore, it is imperative that C-Tools both enable and "absorb" the manual grading performed by an instructor. "Absorption" means that C-Tools will automatically acquire the instructor's grading actions and add these to the "Robograding" database. The design for this software feature is still under development. 3.6. Robotic grading of a concept map Robotic grading ("Robograding") is meant to provide users with immediate, interactive feedback as to the correct or incorrect portions of their concept map. Robograding represents the penultimate goal of C-Tools which is to have human-to-computer learning approximate the effectiveness of direct human-to-human learning. Figure 43 shows how the robograder can be activated. Figures 44a and 44b illustrate the feedback that the robograder can provide to the user. Figure 43. Activating the robograder. By clicking the SHOW ROBOGRADER button, the user can view automated grading of their concept map by the computer. Figure 44a. A concept map before "robograding". Figure 44b. A concept map with automatic "robograding" shown. 3.7. Integration with course management software Course management software such as Blackboard and Angel can provide many of the features that exist inside the C-Tools classroom environment. A disadvantage of using course management software to handle the C-Tools classroom experience is that it will have added complexity (additional features) not necessary for using C-Tools. This could reduce the desired level of intuitiveness and simplicity for C-Tools users. Advantages of using course management software is twofold: 1) handling of university registrar data is likely to be easier; 2) delivery of CTools software can be done with the same hardware as course management software, thus easing economic and personnel costs of delivering C-Tools across the world. Currently, immediate plans are for C-Tools to conform to the integrative protocols specified by the open knowledge initiative and open courseware initiative (http://web.mit.edu/oki/ and http://ocw.mit.edu/) as well as to operate with an open source course management system such as LON-CAPA (http://www.lon-capa.org/) or ILIAS (http://www.ilias.uni-koeln.de/ios/indexe.html). Long-term plans are for C-Tools to work "anywhere"...or at least support protocols which allow other software technologies a fighting chance to incorporate C-Tools. 3.8. "Big brother" is watching you In a laboratory setting, an idea has been to have a teaching instructor watch a command console which shows, in real-time, the simultaneous development of multiple concept maps by 20-30 students learning in a computer laboratory. Figure 45 shows an example of what this might look like. Figure 45. The "Big brother is watching you" interface. This would be a real-time snapshot of what a teaching instructor might see on his computer screen during a laboratory session.