1
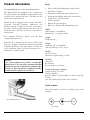
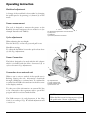
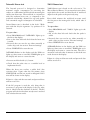
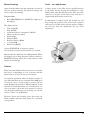
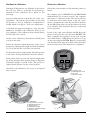
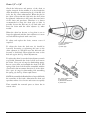
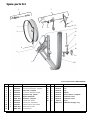
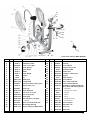
Manual for 928 E
Contents
Monark Exercise AB ��������������������������������������� 4
Product Information ��������������������������������������� 5
Facts��������������������������������������������������������������������� 5
Serial number�������������������������������������������������������� 5
Operating Instruction ������������������������������������� 6
Workload adjustment�������������������������������������������� 6
Power measurement��������������������������������������������� 6
Cycle adjustments������������������������������������������������� 6
Power Connection������������������������������������������������� 6
Connection to an external unit������������������������������ 6
Meter instructions�������������������������������������������������� 7
Basic settings ������������������������������������������������������� 8
METS�������������������������������������������������������������������� 8
View of brake unit������������������������������������������������� 9
Calibration������������������������������������������������������������� 9
Personal settings������������������������������������������������ 10
Heart rate ����������������������������������������������������������� 11
Åstrand's fitness test������������������������������������������� 12
YMCA fitness test������������������������������������������������ 12
Manual training��������������������������������������������������� 13
Calories��������������������������������������������������������������� 13
Scale - zero adjustment�������������������������������������� 13
Mechanical calibration���������������������������������������� 14
Electronic calibration������������������������������������������� 14
Trouble shooting guide �������������������������������� 15
Service ����������������������������������������������������������� 16
Warning��������������������������������������������������������������� 16
Warranty������������������������������������������������������������� 16
Service check and Maintenance������������������������� 16
Batteries�������������������������������������������������������������� 17
Flywheel bearing������������������������������������������������� 17
Flywheel bearing������������������������������������������������� 17
Transportation����������������������������������������������������� 17
Replacement of brake belt���������������������������������� 17
Brake belt contact surface���������������������������������� 17
Chain 1/2“ x 1/8“������������������������������������������������� 18
Freewheel sprocket��������������������������������������������� 19
Spare parts list ��������������������������������������������� 20
Important
Read the manual carefully before using the cycle
and save it for future use.
2013 MONARK EXERCISE AB, Vansbro, Sweden
Monark Exercise AB
Monark has 100 years’ experience of bicycle production. The Monark tradition has yielded
know-how, experience, and a real feel for the product and quality. Since the early 1900s,
Monark’s cycles have been living proof of precision, reliability, strength and service. Those
are the reasons why we are now the world leader in cycle ergometers and the market leader
in Scandinavia in transport cycles.
We manufacture, develop and market ergometers and exercise bikes, transport bikes and
specialized bicycles. Our largest customer groups are within health care, sports medicine,
public authorities, industry and postal services.
For more information: http://www.monarkexercise.se
4
Monark 928 E
Product Information
Facts
Congratulations on your new Ergometer!
• Large, well-balanced flywheel 20 kg (48 lbs)
The Monark 928 E is designed to in a simple way
be used for Max and SubMax cardiovascular tests,
calculate VO2 capacity and more. The bike can also
be used for normal exercise.
• Possible to calibrate
• Adjustable saddle with quick release lever
• Adjustable handlebar with quick release lever
• Stable frame, solid steel tube
• Powder painted
Model 928 E is equipped with a meter with three
programs, Åstrand’s stresstest, YMCA-test and
manual training. A Chip Card can be connected to
the meter which downloads personal data and the
latest test result. The bike can also be connected to a
external unit.
• Wheels for easy transport
For complete directions please read the part
”Operating Instructions”.
Length
1240 mm (49")
Each 928 E is calibrated at the factory. This means
that you can begin to use the ergometer directly after
assembly. However, if the user wishes to verify the
scale calibration please read the instruction for ”
Calibration” in this manual.
NOTE!
Use of the product may involve considerable
physical stress. It is therefore recommended that
people who are not accustomed to cardiovascular
exercise or who do not feel completely healthy,
should consult a physician for advice.
• Electronic display with multiple functions
Width
500 mm (20”) at handlebar
640 mm (25”) at support tubes
Height
1260 mm (50”) at handlebar
780-1170 mm (31"-46”) at seat
Weight
58 kg (127 lbs)
Max user weight 250 kg (551 lbs)
Included
Chest belt
PC software
Power adaptor (12 Vmax)
Technical data power adaptor
Output voltage: +9 V DC
Current: 500 mA
Polarity: Minus (-) in the middle of connector. See Fig:
Polarity.
(Art. No. 9384-650, USA Art. No: 9384-62)
Serial number
1
The serial number is placed according to fig: Serial
number.
Fig: Serial number (1)
Fig: Polarity:
Monark 928 E
5
Operating Instruction
Workload adjustment
1
A change of the workload is done either by changing
the pedal speed or by pressing (+/-)-button (3) on the
meter.
Power measurement
The cycle is designed to measure the power on the
flywheel, because tests/protocols are made for it (for
example Åstand’s and YMCA).
2
Fig: Workload adjustment and connections
1) Chip Card
2) USB-port
3) Increase/decrease workload
3
Cycle adjustments
When adjusting the seat height:
Turn the knob (1) on the seat post and pull it out.
Handlebar settings
To adjust the handlebar loosen the quick release lever
(2). See Fig: Adjustments.
1
Power Connection
2
The bike is designed to be used with the AC adaptor
which is included with the bike. Connected (3) to
cycle as shown in Fig: Adjustments.
3
Connection to an external unit
When a test is active a symbol of the specific test is
flashing. During the test, information downloads
through a USB port to a external unit. To confirm this
a symbol for the USB is shown down in the left corner
in the display window.
Fig: Adjustments
1) Quick release bolt
2) Quick release lever
3) Connection unit
To take part of the information an external PC has
to be connected to the ergometer with a special PC
program which is enclosed with the bike.
NOTE!
The USB-connector (2) and placement of the Chip
Card (1) according to Fig: Workload adjustment and
connections.
6
When the bike is new it is important to tighten
the pedals after 5 hours of pedalling.
Monark 928 E
Meter instructions
Display
RPM
0 – 250
HR
0 - 240
bpm
TIME
0 - 99.59
min:sec
Workload (WATT alt. kpm/min)
15 - 400
Watt
Speed
0 - 99.9
km/h
Distance
0 - 99.9
km
Calories (KCAL)
0 - 999
kcal
% Max HR
50 - 100
%
Personal ID
8 numbers
Batteries:
Storing temperature:
Operating temperature:
Åstrand test
YMCA test
Manual training, MANUAL
rev./min.
4 x 1.5 V, R14
-10º C - +60º C
0º C - +50º C
NOTE! Rechageable batteries can not be used!
6
The computer has following functions:
• Adjustments for units like km alt. miles, km/h
alt. mph, kg alt. lb and workload in kpm/min alt.
watt.
• The computer has a clock function (24 h), a timer
and date.
• Exercise tests like ÅSTRAND, YMCA and
MANUAL training.
• The display shows current pulse in per cent of
HRmax.
9
10
3
11
4
5
14
12
• Personal information like age, HR max, weight,
sex and a personal ID (8 numbers) can be set.
• Functions for downloading latest test result on the
Chip Card. An USB port for continuous output of
data to an external computer.
8
2
• It is possible to calibrate the computer to get the
correct workload.
• The workload is rpm independent.
7
1
15
13
16
Fig: Display
1) First part of personal ID,
time or clock
2) KCAL
3) KG alt. LB or km/h
alt. mph
4) RPM
5) Gender
6) % of max HR
7) Date or last part of ID
8) Heart rate
Monark 928 E
9) km alt. miles
10) Workload in watt alt.
kpm/min
11) Program; Åstrand, YMCA
or Manual
12) START/STOP
13) SELECT
14) PROGRAM
15) ENTER
16) (+/-) button
7
Basic settings
METS
- unit, date, clock
Settings in KG means that speed and distance shows
in km/h and km and LB means that the meter shows
speed and distance in mph and miles.
•Press SELECT for min. 2 seconds
Choose program Åstrand or YMCA Press the
"ENTER" button for two seconds and then "SELECT"
until "ML / MIN / KG" flashes in the middle left of
the display. Toggle between "ML / MIN / KG" and
"METS" by pressing + on (+/-) button.
•”WEIGHT KG” flashes
•Adjust WEIGHT KG alt. WEIGHT LB with (+/-)
button
•Press SELECT to confirm and move on
Date:
•”DATE” flashes. Set month with (+/-) button
•Press SELECT to confirm and move on
•Set day with (+/-)
•Press SELECT to confirm and move on
Clock:
•”CLOCK” flashes. Set hours with (+/-) button
•Press SELECT to confirm and move on
•Set minutes with (+/-) button
•Press SELECT to confirm and move on
If none of the buttons is pressed in 10 seconds during
the settings, the display will go back to normal view
and some of the settings may be lost. If that is the case
press SELECT and make basic settings again.
This settings (unit, time and date) must be repeated
again if all power is broken completely i e. the power
adaptor and the batteries are removed.
Basic data is now set.
8
Monark 928 E
View of brake unit
Calibration
•Push ENTER min. two seconds. ”WATT” flashes.
To enter the calibration mode on the meter, press the
START / STOP and PROGRAM simultaneously for
at least two seconds.
•Adjust the workload in WATT alt. KPM / MIN with
(+/-) button.
•Confirm with SELECT.
•Press START / STOP to leave the command or wait
10 seconds.
For further description see sections "Mechanical"
resp. "Electronic calibration".
It is possible to view the current workload in kp. By
viewing the force in kp the value will change depending
of rpm and workload.
Brake unit can be adjusted while a test is running.
Monark 928 E
9
Personal settings
Alt. 2 Personal settings, Chip Card
Personal settings can be changed either manually on
the display or by first storing them on a Chip Card
and then upload them again. The personal settings
are personal ID, age, max HR, weight, and gender.
The Chip Card can be used to store personal settings
as ID, age, max HR, weight, gender, and test results
from the latest test.
ID-number is only necessary if Chip Card or PC is
connected to the bike.
If there is a chip card, put it in the meter on the right
side and press ENTER.
The display beeps three times and existing data on the
card will be up loaded. The latest test result will be
shown on the display (10 seconds).
Alt. 1 Personal settings, manual
•Press SELECT, ”ID” flashes.
•Set an ID-number with (+/-) button.
•Press ENTER to change position for each number.
•Press SELECT to confirm and move on.
There is a symbol down in the left corner on the
display that confirms that the card is connected to the
meter.
•”AGE” flashes, set the age with (+/-) button.
•Press SELECT to confirm and move on.
Maximum heart rate is calculated relative to the age
input (220 - age). The maximum heart rate can also
be adjusted manually.
•”MAX HR” flashes, adjust the MAX pulse manually
with (+/-) button.
•Press SELECT to confirm and move on.
•”WEIGHT KG” flashes, adjust the weight with (+/-)
button.
•Press SELECT to confirm and move on.
•Symbol of woman alt. symbol of man flashes. See
Fig: Symbols.
•Choose woman or man with (+/-) button.
•Press START/STOP to leave the command or wait
10 seconds.
1
2
Fig: Symbols
1) Woman
2) Man
10
Monark 928 E
Heart rate
A person's heart rate can be measured with a chest
belt that senses the electronic output of the heart. The
chest belt is standard equipment.
Fuss-free HR measurement requires that the belt is
correctly placed. When it is correctly fitted the logo
on the belt will be central and readable, outward
and upright, by another person. Before putting on
the belt, clean the skin where the belt is to be placed.
The chest belt should be secured at a comfortable
tension around the mid section, just below the breast
muscle, see Fig: Placement of the chest belt. Moisten
the electrodes before use, see Fig: Electrodes on the
back of the chest belt. To make contact with the HR
receiver on the bike, the distance should not be more
than 100 cm. It is especially important when first used
to identify the chest belt with the sensor, by standing
close to get the HR (maximum 60 cm).
NOTE! Electromagnetic waves can interfere with the
telemetry system. Cellular phones are not allowed to
be used near the bike during test.
LOGO
Fig: Placement of the chest belt
1
Fig: Electrodes on the back of the chest belt (1)
Monark 928 E
11
Åstrand's fitness test
YMCA fitness test
The Åstrand protocol is designed to determine
maximal oxygen consumption by exercising the
subject at a submaximal workload and measuring the
steady state heart rate. The workload, in conjunction
with the resultant heart rate, is compared to the
predicted relationship, adjusted for age and gender
and a maximal oxygen consumption is calculated.
YMCA fitness test is based on the cycle test in ”Y’s
Way to Physical Fitness”. It’s an automatic test in three
steps where the second and third levels of workload
depend on the pulse on the previously step.
Åstand fitness test is described in the book ”Work
tests with the bicycle ergometer” by professor P O
Åstrand.
Test procedure:
•Press PROGRAM until ”ÅSTRAND” lights up to
the left in the display
•Put on the chest belt and check that the heart rate
is stable
•Personal data can now be set, either manually or
with a chip card. See section ”Personal settings”
•Press START/STOP to start the test
ÅSTRAND flashes in the display and the USB icon
lights up (data starts to transmit). TIME lights up in
the display and starts to count test time.
Every third minutes the workload increases until
the test person has managed 3 levels, which take 9
minutes.
Test procedure:
•Press PROGRAM until ”YMCA” lights up in the
display
•Put on the chest belt and check that the pulse is
stable
•Personal data can now be set, either manually or
with a chip card. See section ”Personal settings”
•Press START/STOP to start the test
ÅSTRAND flashes in the display and the USB icon
lights up (data starts to transmit). TIME lights up in
the display and starts to count test time. The test is
automatic and ends after 9 minutes at which the test
result shows in the display.
If there is a chip card the test result and personal data
will be saved on it.
•Increase workload with (+/-) button.
•Check that the pulse rises to a suitable level to
implement the test.
When the heart rate reaches a stable level (less
variation than 5 bpm) after the 5th minute, press
START/STOP and the test result in ml/kg/min and l/
min will be shown in the display.
If there is a chip card the test result and personal data
will be saved on it.
If the PC program is used the only thing that is
necessary to program in the display is the sex, other
data is taken from the database of the PC. The PC
program will also decide when steady state is reached
and calculate the test result.
12
Monark 928 E
Manual training
Scale - zero adjustment
Apart from the fitness tests the ergometer can also be
used for manual training. Set personal settings, see
section ”Personal settings”.
Connect power to the bike. Loosen possible tension
in the brake belt by moving the pendulum to 4 kp.
Hold it there until the belt feels loose. Then move the
indicator to 0 again. Now check if the indicator is
aligned with the 0-index on the scale.
Test procedure:
• Press PROGRAM until ”MANUAL” lights up in
the display.
The display shows:
•
•
•
•
•
•
•
•
•
Time (CLOCK)
Date (DATE)
Calculated calorie consumption (KCAL)
Heart rate (heart symbol)
Speed (km/h)
Distance (KM)
Pedal revolution (RPM)
% of max HR
Work load (WATT)
If adjustment is needed, loosen the locknut (1) and
then change the position of the scale board, so that it
will have its 0-index in line with the pointer. Tighten
the lock nut after the adjustment. See Fig: Scale
adjustment.
1
•Press START/STOP to start the counter.
•Increase/decrease the workload with (+/-) button.
Max workload is 400 watt alt. 2400 kpm/min. When
the display goes to sleep function it always returns to
MANUAL training, which also is the position of the
display at initial stage.
Fig: Scale adjustment
1) Locking screw
Calories
There have been different theories to how to calculate
this since it is depending on a lot of factors and this
means that it can only be seen as an estimate.
As standard calculation when we display calories on
our calibrated bikes we use: 1 minute with 100W gives
7 kcal. It is easy to convert watts to calories if it was
on the flywheel, the formula is 1W=0,2388x10⁻³ kcal/s
with four decimals. But when you normally show calories you want to show the total amount of calories
your body has used during your training, not only the
calories "burnt" on the flywheel.
We have chosen the formula given above that we
think complies with the results given for a standard
cycle position.
Monark 928 E
13
Mechanical calibration
Electronic calibration
Although all Ergometers are calibrated at the factory
the user may wish to verify this by performing a
mechanical scale calibration. If so please do the
following.
Check that scale 0-index is in line with the pointer as
before.
Loosen possible tension in the brake. See ”Scale - zero
adjustment”. Check that scale 0-index is in line with
the pointer (1), see Fig: Calibration. If adjustment is
needed adjust according to ”Scale -zero adjustment”.
A checked and approved weight (4), 4 kg (Art. No:
9000-211), attached to the calibration hook (5), see
Fig: Calibration. The calibration hook should always
be left in the hook control.
At the correct calibration, the indicator should point
to 4 kp on the scale.
If there is a deviation adjust the pointer to the correct
position by adjusting the weight inside the pendulum
(2). To do this the left cover has to be removed.
the computer, press START/STOP and PROGRAM
simultaneously for at least 2 seconds. The computer
then turns to calibration mode. The meter will turn
to calibration state (CAL). Down in the left corner
shows a potentiometer value that should be between
10 and 100. If the value is not in that interval, it needs
to be adjusted. That should be done by an educated
service personnel.
Down in the right corner flashes 0.0 KP. Keep the
pointer at 0 kp on the scale and press ENTER. The
meter registrate the 0-position of the scale and the
next value flashes, 1.0 KP. Keep the pointer at 1 kp
on the scale and press ENTER. Repeat corresponding
at 2.0 and 4.0. The meter store these values and turns
back to normal view. The calibration is completed.
C
To adjust the position of the weight, the locking screw,
in the center of the pendulum(3), must be loosened.
If the pointer shows too low, the internal weight must
be moved upwards. If the pointer shows too high, the
adjustment weight is moved down. This process is
repeated until pointer is in the correct position.
Check the scale calibration once a year or if required
due to service.
B
A
Fig: Display view
A) Potentiometer value
B) Kp value
C) Version number
6
1
2
3
14
Fig: Calibration
1) The pointer’s 0-position
2) Adjustment weight
3) Locking screw
4) Calibration weight
5) Hook for calibration weight
6) Pointer at 4 kp
Monark 928 E
5
4
Trouble shooting guide
Symptoms
Probable Cause / Corrective Action
The display is not working
•
•
Check that the batteries are OK.
Rechargeable batteries can not be used because they are only at 1.2 V
and the display requires 1.5 V.
No heart rate
•
Check the chest belt (battery). Wet the thumbs and place them on the
electrodes. A low clicking sound will appear near battery lid while you
click on the electrodes with one thumb.
Check that the chest belt is positioned correct on test person and tight
enough. Check that the electrodes are wet, in hard cases it is necessary
to use a contact gel or a mixture of water with a few drops of washingup liquid. The level for HR signal can vary from person to person. Put
chest belt on another known person who has a good pulse rendering.
•
Uneven heart rate
•
Use an external unit for example a HR watch to check if it also indicates irregular pulse. If it is the case there are probably disturbance
in the room. The disturbance may be of electronic fields from power
cables, elevators, lamps etc. or other electronic devices which are
too close (eg. cell phones). Move the bike to a different location in
the room or change rooms. If an irregular HR remains it should be
checked manually If the HR remains irregular at work the person's
health should be examined.
There’s a click noise with every pedalling
(increases with the weight)
•
•
•
The pedals are not tight. Tighten them or change pedals.
The crank arms is loose. Check, tighten.
The base bearing is loose. Contact your dealer for service.
There’s a click noise and a squeak noise
when pedalling
•
Loosen the chain.
Caliberr shows in the display
•
Incorrect calibration or not calibrated at all. Calibrate the Ergometer.
Settings will be lost when the Ergometer is not connected or use batteries.
Pendulum pointer scrapes in the scale
•
Try to bend the scale slightly inwards
Scale plate scrapes in the pendulum
•
Try to bend the scale plate slightly outwards
Monark 928 E
15
Service
Service check and Maintenance
Note that the text about service and maintenance is
universal and that all parts may not be relevant to
your bike.
It is important to carry out a regular service on your
ergometer, to ensure it is kept in good condition.
Service action:
Warning
Make sure the voltage indicated on the appliance
corresponds to the local mains voltage before making
connections.
Warranty
EU countries - Private use
If you are a consumer living in the EU you will have
a minimum level of protection against defects in
accordance with EC Directive 1999/44/EC. In short,
the directive states for that your Monark Dealer will
be liable for any defects, which existed at the time of
delivery. In case of defects, you will be entitled to have
the defect remedied within a reasonable time, free of
charge, by repair or replacement.
EU countries - Professional use
Monark Exercise products and parts are guaranteed
against defects in materials and workmanship for a
period of one year from the initial date of purchase
of the unit. In the event of a defect in material or
workmanship during that period, Monark Exercise
will repair or replace the product. Monark Exercise will
not, however, refund costs for labour or shipping.
Other countries
Monark Exercise products and parts are guaranteed
against defects in materials and workmanship for a
period of one year from the initial date of purchase
of the unit. In the event of a defect in material or
workmanship during that period above, Monark
Exercise will repair or replace (at its option) the
product. Monark Exercise will as above for labour
or shipping.
16
•We recommend isopropyl alcohol to disinfect the
surface of the bike. Use a damp but not wet cloth to
clean the surface you wish to disinfect.
•Always keep the bike clean and well lubricated
(once a week).
•Periodically wipe the surface with a rust preventative,
especially when it has been cleaned and the surface
is dry. This is done to protect the chrome and
zinc parts as well as the painted parts (4 times per
year).
•Check that pedals are firmly tightened. If not, the
threading in the pedal arms will be damaged. Also
check that the pedal arms are firmly tightened on the
crank axle, tighten if necessary (4 times per year).
•Check that the pedal crank is secure to the crank
axle (4 times per year).
•Be sure that the pedals are moving smoothly, and
that the pedal axle is clear of dirt and fibres (4 times
per year).
•When cleaning and lubricating be sure to check that
all screws and nuts are properly tightened (twice a
year).
•Check that the chain is snug and there is no play in
the pedal crank (twice a year).
•Check that pedals, chain and freewheel sprocket are
lubricated (twice a year).
•Be sure that the brake belt does not show significant
signs of wear (twice a year).
•Check that the handlebars and seat adjustment
screws are lubricated (2 times per year).
•Be sure that all moving parts, crank and flywheel
are working normally and that no abnormal play or
sound exists. I.e. play in bearings causes fast wearing
and with that follows a highly reduced lifetime.
•Check that the flywheel is placed in the center and
with plane rotation.
Monark 928 E
Batteries
If the meter is battery-operated, the batteries are in a
separate package at delivery. If the storing time has
been long the battery power can be too low to make
the computer act correctly. Batteries must then be
changed.
Alt. 3: To loosen the brake belt on the bike remove
all tension. Please note how the belt is assembled.
Remove it from the bike. Attach the new brake belt
and assemble the bike in reverse order.
Flywheel bearing
NOTE!
When replacing the brake belt it is recommended
to clean the brake surface. See ”Brake belt contact
surface”.
The crank bearing is long term greased and requires
no supplementary lubrication. If a problem arises,
please contact your Monark dealer.
Flywheel bearing
The bearings in the flywheel are lifetime greased and
require normally no maintenance. If a problem arises,
please contact your Monark dealer.
Transportation
During transport the brake cord should be tightened
to prevent it from falling off the flywheel.
Brake belt contact surface
Deposits of dirt on the brake belt and on the contact
surface may cause the unit to operate unevenly and will
also wear down the brake belt. The contact surface of
the flywheel should be smoothed with fine sandpaper
and any dust removed with a clean dry cloth.
Remove any potential covers and all workload on
the brake belt and then remove it. Grind with a fine
sand paper. Grinding is easier to perform if a second
individual cautiously and carefully pedals the cycle.
Irregularities on the brake belt contact surface are
removed by means of a fine sand paper or an abrasive
cloth. Otherwise unnecessary wear on the brake belt
may occur and the unit can become noisy.
Replacement of brake belt
To replace the brake belt remove covers if necessary.
Make sure that the belt is loose.
Alt. 1: To loosen the brake belt on pendulum bikes
with engine, connect power to the unit and raise the
pendulum to 4 kp. Hold it there until brake belt is
loose. Please note how the belt is assembled. Remove
it from the bike. Attach the new brake belt and
assemble the bike in reverse order.
Always keep the brake belt contact surface clean and
dry. No lubricant should be used. We recommend
replacing the brake belt when cleaning the contact
surface. In regard to assembly and adjustment of the
brake belt, see ”Replacement of brake belt”.
Alt. 2: To loosen the brake cord on cycles with a
weight basket set the basket to its upper position.
Loosen the lock washer that is holding the cord and
remove it from the tension center. Loosen or cut of
the knot in the other end of the cord and then remove
the hole cord from the bike. When assembling a new
brake cord, first enter one end into the hole in the
tension center, and tie a knot and let the knot fall into
the bigger part of the hole. Lock the end of the cord
with the lock washer.
Monark 928 E
Fig: Brake belt
17
Chain 1/2“ x 1/8“
Check the lubrication and tension of the chain at
regular intervals. In the middle of its free length the
chain should have a minimum play (3) of 10 mm (1/4
inch). See Fig: Chain adjustments. When the play in
the chain is about 20 mm (3/4 inch) the chain must
be tightened. Otherwise it will cause abnormal wear
of the chain and sprockets. Therefore it is always
recommended to keep the chain play as little as
possible. Loosen the hub nut (2) on both sides and
tense the chain with the chain adjuster (1) when
needed.
When the chain has become so long that it can no
longer be tightened with the chain adjusters it is worn
out and shall be replaced with a new one.
2
1
3
To adjust and replace the chain, remove covers if
required.
Fig: Chain adjustments
1) Chain adjuster
2) Axle nut
3) Chain play
To adjust the chain the hub nuts (2) should be
loosened. Loosening or tightening the nuts on the
chain adjusters (1) will then move the hub and axle
forward or backward. Then tighten the nuts on the
hub axle again. See Fig: Chain adjustments.
To replace the chain, loosen the chain adjusters as much
as possible. Dismantle the chain lock(6) and remove
the chain. Use a pair of tongs for dismantling spring.
Put on a new chain and assemble the chain lock. The
spring of the chain lock should be assembled with the
closed end in the movement direction(5) of the chain.
Use a pair of tongs for dismantling and assembling
the spring (4). See Fig: Chain replacement.
5
6
4
NOTE! At assembly the flywheel has to be parallell with
the centerline of the frame. Otherwise the chain and
sprockets makes a lot of noise and wears out rapidly.
Then assemble the removed parts as above but in
reverse order.
18
Monark 928 E
Fig: Chain replacement
4) Lock spring
5) Movement direction
6) Chain lock
Freewheel sprocket
When replacing the freewheel sprocket remove frame
covers if necessary. Remove the chain according to
section ”Chain 1/2” x 1/8””.
Loosen the axle nuts and lift off the flywheel. Remove
the axle nut, washer, chain adjuster and spacer on the
freewheel side. Place the special remover (Art. No:
9100-14) in the adaptor and place the spacer and axle
nut outside. See Fig: Special remover.
NOTE! Do not tighten the axle nut completely. It
must be possible to loosen the adapter-sprocket half
a turn.
Replace sprocket-adapter and assemble the new parts
in reverse order according to the above.
The sprocket should be lubricated with a few drops of
oil once a year. Tilt the cycle to make it easier for the
oil to reach the bearing. See Fig: Lubrication.
Fig: Lubrication
Fig: Hub assembly
Fig: Special remover
(Art. No: 9100-14)
Monark 928 E
19
Spare parts list
2
7
8
12
11
13
1
9
10
14
3
15
16
17
4
18
5
19
6
20
From serial number: WBK 285590H
Pos.
Qty.
1
1
2
Art. No.
Description
9300-3
Flywheel complete
9300-24
-Flywheel suspension, complete
Brake belt, complete
Pos.
Qty.
Art. No.
Description
13
1
9328-29
Scale lock, complete
14
1
9328-62
Stop
15
1
9338-19
Stay
16
1
9328-92
Adapter
3
1
9328-64
4
1
9328-25
5
2
9300-99
Pendulum stop, plastic
17
1
9328-79
Tension device, complete
6
1
9328-33
Adaptor M20/M16
18
2
9338-15
Bracket for servo
7
1
9338-100
Pendulum, complete
19
2
9338-16
Bracket for servo
8
1
9338-43
- Brake belt release
20
1
9328-1
- Hook for calibration weight
9
1
9328-93
-Holder pot. adjustment
10
1
9338-62
-Potentiometer with bracket
11
1
9328-803
-Plate with kp-scale
9000-105
-Screw M5x10
12
20
9000-211
Monark 928 E
Frame
Calibration weight, 4 kg
30
31
32
35
36
33
34
37
38
39
42
41
40
43
25
26
Pos.
Qty.
Art. No.
Description
1
1
9328-69
2
1
9328-4
3
1
9328-68
4
9
5675-9
5
21
6
1
7
8
27
28
29
From serial number: WBK 285590H
Pos.
Qty.
Art. No.
Frame cover, left
24
1
9328-187
Aluminium profile
25
1
9309-3
Frame cover, right
26
4
9300-12
Screw M5x6,5
27
1
9328-5
5673-9
Screw M5x12
28
4
5845
4994-5
Saddle
29
4
9328-26
1
5605-1
Screw M8x46
30
1
9328-131
Bushing f. saddle post
1
5864
Washer
31
1
9328-185
Display
9
1
5775
Nut
32
4
2173
Battieries R14
10
1
9328-135
Saddle post
33
1
9000-105
Screw M5x10
11
1
9328-132
Locking knob
34
1
9328-186
Motor cable 1750 mm
12
1
9328-37
Transport wheel compl. (pair)
35
1
9328-188
Power cable 2200 mm
13
1
9328-6
1
9328-78
14
4
9328-51
15
2
8523-115
16
2
8523-2
17
1
18
1
19
20
21
1
9326-55
22
1
8966-175
BB cartridge bearing
23
1
8966-176
Support casing for BB-bracket
Support tube, rear
Description
Sensor with cable 150 mm
Joint list
Screw M8x16
Support tube, front
Locking nut M8
Rubber foot
Handlebar, complete with handles, clamp and locking handle
Plastic cap
36
1
9328-9
Screw M8x1x20
37
1
9328-72
Dust cover for crank
38
1
5864
-Washer
9300-207
Foot straps (pair)
39
1
9127-37
-Spacer
9300-220
Pedal (pair)
40
1
9100-280
-Screw
1
9300-430
Steel crank set, complete
41
1
9328-2
1
9371-16
42
4
9337-38
43
1
9384-650
Power adaptor
1
9338-36
USB cable 3 m
1
9328-150
Screw set
1
9328-190
Chest belt
-Magnet
Chain, 98 L with chain lock
Monark 928 E
-Handlebar
-Handgrip, blue (pair)
-Handlebar clamp
-Screw M8x16
21
Notes:
...........................................................................................................................................................................
...........................................................................................................................................................................
...........................................................................................................................................................................
...........................................................................................................................................................................
...........................................................................................................................................................................
...........................................................................................................................................................................
...........................................................................................................................................................................
...........................................................................................................................................................................
...........................................................................................................................................................................
...........................................................................................................................................................................
...........................................................................................................................................................................
...........................................................................................................................................................................
...........................................................................................................................................................................
...........................................................................................................................................................................
...........................................................................................................................................................................
...........................................................................................................................................................................
...........................................................................................................................................................................
...........................................................................................................................................................................
...........................................................................................................................................................................
...........................................................................................................................................................................
...........................................................................................................................................................................
...........................................................................................................................................................................
...........................................................................................................................................................................
...........................................................................................................................................................................
...........................................................................................................................................................................
...........................................................................................................................................................................
...........................................................................................................................................................................
...........................................................................................................................................................................
...........................................................................................................................................................................
...........................................................................................................................................................................
...........................................................................................................................................................................
22
Monark 928 E
Notes:
...........................................................................................................................................................................
...........................................................................................................................................................................
...........................................................................................................................................................................
...........................................................................................................................................................................
...........................................................................................................................................................................
...........................................................................................................................................................................
...........................................................................................................................................................................
...........................................................................................................................................................................
...........................................................................................................................................................................
...........................................................................................................................................................................
...........................................................................................................................................................................
...........................................................................................................................................................................
...........................................................................................................................................................................
...........................................................................................................................................................................
...........................................................................................................................................................................
...........................................................................................................................................................................
...........................................................................................................................................................................
...........................................................................................................................................................................
...........................................................................................................................................................................
...........................................................................................................................................................................
...........................................................................................................................................................................
...........................................................................................................................................................................
...........................................................................................................................................................................
...........................................................................................................................................................................
...........................................................................................................................................................................
...........................................................................................................................................................................
...........................................................................................................................................................................
...........................................................................................................................................................................
...........................................................................................................................................................................
...........................................................................................................................................................................
...........................................................................................................................................................................
Monark 928 E
23
Version 1306
Art. No: 7950-326
KROONS VÄG 1, SE-780 50 VANSBRO, SWEDEN | WWW.MONARKEXERCISE.SE | TEL: +46(0)281 59 49 40 | FAX: +46(0)281 719 81