1
User Guide
www.CPVLab.com
Page | 1
CPV Lab User Guide - Copyright 2010 - 2012 CPVLab.com
Reproduction or Sharing of this Guide is strictly prohibited without the authorized consent from CPVLab.com
Table of Contents
Get Started with CPV Lab & Configuring your Settings.........................................................................
Change Your Password.............................................................................................................
Add Your Affiliate / CPA Networks..........................................................................................
Add Your CPV Networks...........................................................................................................
Setting Up Your Alerts……………..…….........................................................................................
Setting Up the Alerts App………..…….........................................................................................
Setting Up Your Campaign Optimization Filters........................................................................
5
5
6
7
9
11
13
Navigation, Sections & Pages within CPV Lab…………….........................................................................
Campaigns Page……….……………..…….........................................................................................
Campaign Actions………….………..…….........................................................................................
Add Campaigns………………………………………………........................................................................
Stats……………..……....................................................................................................................
Reports………..…….....................................................................................................................
Trends......................................................................................................................................
Optimize……………..…….............................................................................................................
Upload Reports………..…….........................................................................................................
15
15
16
17
18
18
19
19
19
CPV Lab Campaign Types..................................................................................................................... 20
Setting Up Campaigns in CPV Lab………………........................................................................................
General Campaign Settings…………………....................................................................................
Adding Landing Page & Offer URLs to Campaigns……….............................................................
Nested Conversion Pixel Management…………………………………………………………………………………..
Setting Up Direct Link & Landing Page Campaigns....................................................................
Setting Up Multiple Path Campaigns........................................................................................
Setting Up Multiple Option Campaigns....................................................................................
Setting Up Landing Page Sequence Campaigns.........................................................................
Setting Up Lead Capture Campaigns……...................................................................................
Tracking Subscribers without Using a Thank You Page.............................................................
Tracking Double Opt-In Subscribers……....................................................................................
Setting Up Email Follow-Up Campaigns….................................................................................
Email Follow-Up Campaigns with Landing Pages & Direct Linking to Offers..............................
Improved Accuracy in LPS & MO Campaigns with Multiple Conversions Per Visitor……………..
25
25
30
31
32
34
35
36
38
39
40
41
42
43
Campaign Stats……………......................................................................................................................
Grouping & Un-Grouping Stats……………...................................................................................
Stats for Direct Link & Landing Page “Split” Campaigns………....................................................
Updating Converting SubIDs…………..........................................................................................
The Conversions List…………………….….......................................................................................
45
45
48
49
51
Page | 2
CPV Lab User Guide - Copyright 2010 - 2012 CPVLab.com
Reproduction or Sharing of this Guide is strictly prohibited without the authorized consent from CPVLab.com
Campaign Reports…………………….........................................................................................................
Uploading Reports…………........................................................................................................
Adding & Editing CPV Spending Report Templates...................................................................
Setting Up Bulk Upload Report Templates...............................................................................
Overall Campaign Performance Stats & Reports Pages.............................................................
52
52
55
58
61
CPV Lab Performance Metrics……………………………................................................................................
62
Time & Day Trends……………………......................................................................................................... 66
Optimize…………………………................................................................................................................... 68
Tracking as a Merchant / Product Owner............................................................................................
70
Tracking Clickbank Offers with CPV Lab...............................................................................................
72
Optimizing Your Server for CPV Lab & Volume....................................................................................
73
Other Information………………………………...............................................................................................
The About Page........................................................................................................................
Floating Nav Bar.......................................................................................................................
Backing Up and Restoring CPV Lab...........................................................................................
Backing Up Your CPV Lab Database Manually using phpMyAdmin...........................................
Blocking IP’s and UserAgents from Appearing in the Stats……………………………………………………..
Added Security Feature = Failed Logins Page………………………………………………………………………….
Added Security Feature = Edit Login Page Name…………………………………………………………………….
74
74
74
74
75
77
78
79
Version 2.13 Features..………………………...............................................................................................
New Features and Functions....................................................................................................
Design and Usability Updates…................................................................................................
Coding and Backend Update………............................................................................................
Generate Cloaking Pages within CPV Lab……………………………………............................................
80
80
83
85
86
Version 2.14 Features..………………………...............................................................................................
New Features and Functions....................................................................................................
Linking to Specific Level 2 Landing Pages..................................................................................
Postback Revenue from CPA/Affiliate Networks…………............................................................
Updating Extra Tokens and Prepop……………….……………………………............................................
Capture Referrer as Token Using Javascript (and More)...........................................................
CRON Jobs for Campaign Data to Increase Speed of Stats Dashboard.......................................
88
88
89
92
93
96
98
Page | 3
CPV Lab User Guide - Copyright 2010 - 2012 CPVLab.com
Reproduction or Sharing of this Guide is strictly prohibited without the authorized consent from CPVLab.com
Version 2.15 Features..………………………...............................................................................................
New Features and Functions....................................................................................................
Error Log Page………………………………………..................................................................................
New Stats Features………………………………………….…………............................................................
Mark Conversions from IP Address……………….……………………………............................................
Extra Tokens in Visitor Stats…………………………………………….......................................................
Allow “z” as a Separator instead of “_”…………………………………………….......................................
Include Extra Tokens & Revenue in Additional Pixels….............................................................
Automatically Record Clickbank Conversions………...................................................................
Call Specific Additional Pixels Based on the Offer…………….......................................................
Parsing Templates……………….…………………………….....................................................................
Campaign Priority Settings…………………………………………….........................................................
Adding Revenues from the Conversion Pixel………………………………............................................
102
103
104
105
106
107
108
109
111
112
113
115
117
Frequently Asked Questions………………………….....................................................................................
120
Let Me Know…………………..………………………………..................................................................................
121
Additional Guides and Information..………………...................................................................................
CPV Lab Installation Guide
CPV Lab Visual Campaign Charts
Tracking Direct Traffic with CPV Lab (Organic)
Tracking Facebook & POF with CPV Lab
Tracking Pay Per Click with CPV Lab
Using iFrames & Prepop in CPV Lab
Resizing Landing Page Windows
122
Page | 4
CPV Lab User Guide - Copyright 2010 - 2012 CPVLab.com
Reproduction or Sharing of this Guide is strictly prohibited without the authorized consent from CPVLab.com
Get Started with CPV Lab & Configuring your Settings
1.) After Installation, Change Your Username & Password
Click Settings in the Navigation Bar…as shown below:
Using the Form below, Enter your current Username and Password, which by default after a
new installation are…
Username: admin
Password: admin
Then enter your New Username & Password, Select Your Timezone and set the Session
Timeout which is how long CPV Lab will leave you logged in and Click Save.
Write down, save or use Roboform (or similar) to keep your new login details.
Set your Cookie Length…
This is a newer feature to CPV Lab and allows you choose how long your cookie will last in the
visitors browser…you can set this to 1 day or to 1 year by entering 365 days.
Page | 5
CPV Lab User Guide - Copyright 2010 - 2012 CPVLab.com
Reproduction or Sharing of this Guide is strictly prohibited without the authorized consent from CPVLab.com
2.) Enter Your Affiliate Networks
Mouseover the Settings Button in the Navigation Bar, then click Affiliate Networks…as shown
below:
Enter a Name for your Affiliate Networks, or if using your own offers you can enter anything
you wish. In-House or Private, etc. Then Click Save.
You'll then be able to select the network using a drop-down box when setting up campaign.
This information is also used when uploading reports...CPV Lab will show you what Reports
you need to upload for each campaign.
Once your Affiliate Networks have been added you will see them saved in the Current Affiliate
Networks section of this page. You can edit or delete networks at any time as needed.
Page | 6
CPV Lab User Guide - Copyright 2010 - 2012 CPVLab.com
Reproduction or Sharing of this Guide is strictly prohibited without the authorized consent from CPVLab.com
3.) Enter Your CPV Networks and Traffic Sources
Mouseover the Settings Button in the Navigation Bar, then click CPV Networks…as shown
below:
By Default – Many of the popular CPV Networks are already setup up…
Ad On Network
Clicksor
CPV Marketplace
Direct CPV (Keyword & URL Targeted)
Jema Media
Lead Impact
Media Traffic
Trafficvance
To Add New CPV Networks and Traffic Sources…follow the simple steps below.
Page | 7
CPV Lab User Guide - Copyright 2010 - 2012 CPVLab.com
Reproduction or Sharing of this Guide is strictly prohibited without the authorized consent from CPVLab.com
Adding New CPV Networks or Traffic Sources…
A.)
Source: Enter a Name for Each Traffic Source.
B.)
Enter a unique Source ID for each Traffic Source...This variable is passed in your
SubIDs, so make it random to avoid anyone being able to decipher where the
traffic is coming from.
C.)
Enter Keyword Token for Keyword Pass-through
This will generally always be entered as keyword
With the exception of MediaTraffic which is target_passthrough
D.)
Enter Append Token for Keyword Pass-through
Enter the token used by your specific traffic source to pass the target or keyword
through to CPV Lab. Here are some samples for a few networks and if you’re
unsure of what token to use, you can generally find this in the Traffic Source’s
help section or simply send them an email requesting this information.
Direct CPV (url targeted campaigns)
&keyword={{sm_vurl}}
Direct CPV (keyword targeted campaigns) &keyword={{keyword}}
AdOnNetwork
&keyword=SEARCHTEXT
Clicksor
&keyword=[keyword]
Media Traffic has no Append Token and it’s not required.
E.)
Click Save...Done, Repeat for each Traffic Source you work with.
Page | 8
CPV Lab User Guide - Copyright 2010 - 2012 CPVLab.com
Reproduction or Sharing of this Guide is strictly prohibited without the authorized consent from CPVLab.com
4.) Setting Up Your Alerts
Click Settings in the Navigation Bar…as shown below:
Scroll down the page and you will see the Alert Settings Section…
These settings are used with the Lab Alerts desktop application, to notify you of Run-Away
Targets in your Campaigns. The purpose of Lab Alerts is to avoid situations where you have
one or two targets that destroy your budget with no or little conversions.
You can use all of these options, or only a few. It’s completely up to you.
Page | 9
CPV Lab User Guide - Copyright 2010 - 2012 CPVLab.com
Reproduction or Sharing of this Guide is strictly prohibited without the authorized consent from CPVLab.com
These alert settings are very straight forward.
In the shot above, any Targets that have more than…
200 views and less than 1 Conversion will trigger an alert.
150 views and less than 1 Click will trigger an alert.
200 views and less than 1 Subscriber will trigger an alert.
Once this happens, Lab Alerts will appear in the Desktop System Tray to let you know about
this and you will also see these targets that triggered any of these alerts in RED within your
Stats. Then you can go into your CPV Network and remove the target/s immediately.
The campaign alerts are great to schedule when it’s time to review a campaign or optimize a
campaign. I generally use 2,000 to 3,000 views for both settings as shown above. So the first
time a campaign receives 3,000 views, I will be notified from CPV Lab Alerts in my Desktop
System Tray.
Then I can login to CPV Lab, check out the campaign and determine what to do from there.
The same with the other campaign alerts settings. This way, you know exactly when to review
and optimize a campaign…with no additional effort or wasting time constantly logging in to
your CPV network accounts.
Page | 10
CPV Lab User Guide - Copyright 2010 - 2012 CPVLab.com
Reproduction or Sharing of this Guide is strictly prohibited without the authorized consent from CPVLab.com
5.) Setting Up the Lab Alerts App
First, Double Click “CPVLabAlertsSetup”
Vista / Win7 Users: Right Click and Choose Run as Administrator
Then just follow the simple on-screen instructions to finish the installation.
After the Installation is Complete, you’ll see a new Icon in your System Tray…
Double Click the Icon to Open CPV Lab Alerts.
Page | 11
CPV Lab User Guide - Copyright 2010 - 2012 CPVLab.com
Reproduction or Sharing of this Guide is strictly prohibited without the authorized consent from CPVLab.com
Then Click Settings…
First, Enter the URL to the web application.
Enter the url of your CPV Lab Installation.
Such as http://cpv.yourinstallation.com
or if using a sub-folder
http://yourinstallation.com/cpv
Next, enter your Login Details…user name and
password.
Then, adjust the time…how often the Alerts
will Update. I generally use 20 to 30 minutes.
Once all that is set, simply click SAVE…and
you’re done.
Within CPV Lab Alerts…
You can check for alerts at any time by clicking
“update now”
You can also clear out all of your alerts by
clicking “clear”
Page | 12
CPV Lab User Guide - Copyright 2010 - 2012 CPVLab.com
Reproduction or Sharing of this Guide is strictly prohibited without the authorized consent from CPVLab.com
6.) Setting Up Your Campaign Optimization Filters
One of the most time consuming elements of any paid media campaign is generally the
optimization. You have to look through your targets, check your stats and make decisions
based on the stats and data. Campaign Optimization Filters allow you to make these decisions
ONCE, and then CPV Lab will handle the decision making process from there automatically.
Click Settings in the Navigation Bar…as shown below:
Then scroll down to the Campaign Optimization Filters Section…
Page | 13
CPV Lab User Guide - Copyright 2010 - 2012 CPVLab.com
Reproduction or Sharing of this Guide is strictly prohibited without the authorized consent from CPVLab.com
Similar to the Alerts Settings, enter your details into the text boxes for each line and then click
Save. Done! As with Alerts, you don’t have to use all the options. For the options you don’t
want to use, simply leave them blank.
In your Stats you will see Targets and Keywords…that should be removed or paused in RED and
Winners are displayed in YELLOW.
When you open a campaign in the Optimize section of CPV Lab, it will automatically apply
these filters to the stats and give you a breakdown of what needs to be done within the
campaign, broken down into 3 categories…Winners, In Progress & Remove.
We’ll cover this more in the Optimize section of this User Guide.
You’re Now Ready to Start Using CPV Lab…Recap:
Changed the Default Username and Password
Selected Your Timezone and Session Timeout
Entered Your Affiliate Networks
Entered Your CPV Networks and Traffic Sources
Configured Your Alert Settings
Installed the Lab Alerts Application on your Desktop/Laptop
Configured Your Campaign Optimization Filters
Page | 14
CPV Lab User Guide - Copyright 2010 - 2012 CPVLab.com
Reproduction or Sharing of this Guide is strictly prohibited without the authorized consent from CPVLab.com
Navigation, Sections & Pages within CPV Lab
Campaigns Page…
This is the central page of CPV Lab. You are directed to this page after login and this page
gives you an overview of all your campaigns.
Let’s Start at the top of this page and work our way down.
A = Your Overall Revenue is shown here by Today, Yesterday, This Week and This Month. This
is just to give you a quick “at a glance” view of your overall revenue.
B = This shows the Last time you logged in and also How long ago that was in X Hour, X Minute
format. The reason for this, ties in the columns displayed on this page as well.
On the Campaign Page, you’ll see all of your campaigns separated by the campaign type.
Within each section, you have a quick view of the overall stats for each campaign.
ID
=
Campaign ID
Name
=
Name of the Campaign.
Date Added =
Date and Time the campaign was added to CPV Lab.
Last Update =
Date and Time a Report was created for the campaign.
Views
=
Total Number of Views for this Campaign
New
=
Total Number of New Views since the last time you logged in
P/L
=
Profit / Loss for the Campaign
New
=
The New Profit/Loss since the last time you logged in
ROI
=
Overall ROI (Return on Investment) for the Campaign
These Columns can also be sorted by clicking on the Column Title.
Page | 15
CPV Lab User Guide - Copyright 2010 - 2012 CPVLab.com
Reproduction or Sharing of this Guide is strictly prohibited without the authorized consent from CPVLab.com
Campaign Actions…
The Actions list for each campaign, are direct links to the data for that specific campaign...as
well as specific functions for the selected campaign.
Stats
Links directly to the Stats for the selected campaign.
Reports
Links directly to the Reports for the selected campaign.
Trends
Links directly to the Time & Day Trends for the selected campaign.
Edit
Links directly to the Edit Campaign Page for the selected campaign.
Clone
TIME SAVER! This allows you to create a duplicate of the selected campaign and
takes you to a new edit campaign screen with all the data from the Cloned
campaign entered. This is a real-time saver when you have a successful campaign
you want to expand to other CPV Networks and Traffic Sources. The only settings
you need to edit, are the Campaign Name and General Campaign Settings.
Delete
Removes the selected campaign from CPV Lab.
Reset
This resets and clears all the stats for a specific campaign.
csv
When you click this Action for any campaign, CPV Lab will export a CSV file in the
same format used to Upload New Campaigns. For example if you have any
existing campaign that you want to keep the majority of the pages but have a few
changes to make. You can download the CSV file for the original campaign, edit
the CSV file offline and then upload the CSV file to create a new campaign. Or you
can use this feature to mass edit existing campaigns offline and then upload the
CSV file to make the changes at one time.
Page | 16
CPV Lab User Guide - Copyright 2010 - 2012 CPVLab.com
Reproduction or Sharing of this Guide is strictly prohibited without the authorized consent from CPVLab.com
Add Campaigns…
You have a few options to create new campaigns…
1. Below each Campaign Type on the Campaigns, you can simply click Add New Campaign
under that specific campaign type you wish to create.
2. Mouseover Add Campaign in the Navigation Bar and you’ll see dropdown box with the
campaign types listed. Simply click on the Campaign Type you wish to create.
3. Click the Add Campaign Button in the Navigation Bar to see a visual representation of each
campaign type as shown below. The images where you see and Email icon, shows that this
campaign type can have an Email Follow-Up Campaign assigned to it.
Page | 17
CPV Lab User Guide - Copyright 2010 - 2012 CPVLab.com
Reproduction or Sharing of this Guide is strictly prohibited without the authorized consent from CPVLab.com
Stats…
Stats are in Real-Time and work from the Tracking Pixel placed at your Affiliate Network/s and
Calculate Costs from the Stats CPV you enter during the Campaign Setup. The "Stats" are not
as Accurate at the Reports Feature, but with Stats...you don't need to upload your Reports.
Generally Stats are used to monitor Campaigns on a regular Basis and then Reports are used to
put together the “Hard” data to get Exact Spending and Profit metrics to Optimize the
Campaign further and more in-depth.
Remember with Stats you're setting a general Cost Per View for the campaign, but in most
campaigns you'll have a range of CPV's from $0.015, $0.02, $0.03 and up. The Reports
Feature, calculates your metrics on the Actual Spending...where Stats calculates metrics on a
general Cost Per View you enter during campaign setup.
Reports…
Reports are where you view your uploaded reports and all the data is merged together to
create an accurate metrics report.
As mentioned above, this is Hard data...where the actual spending is calculated. Yes, It can be
a hassle to download your reports, then upload them to CPV Lab...but the benefit is, reports
are more precise and accurate.
Page | 18
CPV Lab User Guide - Copyright 2010 - 2012 CPVLab.com
Reproduction or Sharing of this Guide is strictly prohibited without the authorized consent from CPVLab.com
Trends…
This allows you to spot Time and Day Trends within your Campaigns. Simply select a
campaign, the type of view you want (Time or Day) and the interval / date ranges you want to
view. This gives you the ability to begin dayparting your campaigns for maximum ROI.
Optimize…
Allows you to select a Campaign, then based on Variables you entered in the Campaign
Optimization Filters on the settings page, these will automatically be applied to the campaign.
You can also easily adjust your CPV (increase or lower) on the Optimize page as well.
Then Export this Optimized Report as a CSV. Once exported, you can make these changes
manually at your CPV Network, or depending on the CPV Network you're using...cut and paste
this optimized campaign data into a Bulk Upload spreadsheet if the Network offers it.
Upload Reports…
Upload your Traffic Spending Reports and add your Converting SubIDs to create an accurate
view of your overall spending and profit.
Page | 19
CPV Lab User Guide - Copyright 2010 - 2012 CPVLab.com
Reproduction or Sharing of this Guide is strictly prohibited without the authorized consent from CPVLab.com
CPV Lab Campaign Types
There are 6 Campaign Types you can run within CPV Lab:
1.) Direct Link and Landing Pages
2.) Multiple Option
3.) Multiple Path
4.) Landing Page Sequence
5.) Lead Capture Campaign
6.) Email Follow-Up
These Campaign Types are designed to eliminate the limitations most people have when
running Campaigns due to their tracking.
Many Affiliates / Advertisers drive traffic directly to the offer or to a landing page. Well, you
now have the ability to expand your horizons and creativity within your Campaigns and track
everything, throughout the entire process.
Below are charts to show you visually what you can do with CPV Lab and how each Type of
Campaign works. This is just a primer…further into this guide we’ll go more in-depth into each
Campaign type.
Page | 20
CPV Lab User Guide - Copyright 2010 - 2012 CPVLab.com
Reproduction or Sharing of this Guide is strictly prohibited without the authorized consent from CPVLab.com
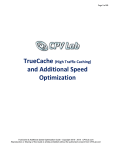
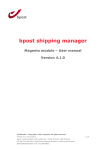
Direct Link & Landing Pages…
This campaign type allows you to do several
things:
You can direct link multiple offers…rotating
through each of them, based on the Share% you
set.
Second, you can add multiple landing pages and rotate through each of them, based on the
Share% you enter for each landing page, while also rotating through multiple offers as
mentioned above on the click through.
Third, you can split the traffic between each of the above. So you can direct link and rotate
through multiple offers and rotate through multiple landing pages at the same time.
This is very effective to identify the best approach for a campaign or offers. “What is better?
Direct Link or Landing Pages?” You can now answer that question with certainty, by splitting
your traffic through each. Then check your stats and Viola! The question is answered, not by
experience or a guess…but using actual data.
A great feature is when you see an offer that isn't converting, just set the Share% to "0" and
increase the Share% to the top performing offers. You don't even need to change anything
within your Campaign at the CPV Network!
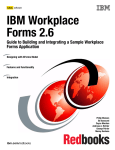
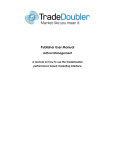
Multiple Option…
This campaign type is ideal for review or catalog
style landing pages that feature multiple offers
on the landing page.
You’ll now be able to track clicks and
conversions for each offer on your landing page,
regardless of how many you have setup on the
page.
And the best part is…you can rotate through each option with multiple offers on the click
through.
Page | 21
CPV Lab User Guide - Copyright 2010 - 2012 CPVLab.com
Reproduction or Sharing of this Guide is strictly prohibited without the authorized consent from CPVLab.com
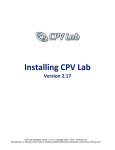
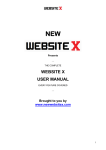
Multiple Path…
A Path is 1 or more landing pages that are built
around 1 offer.
For example…let’s say you are running a
campaign for Weight Loss. And you have 3
offers, Weight Loss ABC, Weight Loss XYZ and
Weight Loss 123.
You can setup branded landing pages for each of
these offers, using pics, testimonials, credibility
sources and so on from each offer.
Then setup each one as its own path…CPV Lab will rotate through each path to determine the
most profitable one. Now a step further…let’s say from the example above, Weight Loss XYZ
has 3 different offer pages you can use. Well, you can rotate through those as well for that
specific path.
Multiple Path Campaigns give you the ability to create multiple paths, each path can rotate
through multiple landing pages and offers…and you can test and track everything from 1
Campaign at your CPV Network.
You can create as many paths as you wish, but keep in mind...the more paths you have the
more traffic you’ll need for proper testing.
Landing Page Sequence…
This campaign type really gives you the ability to
get creative, and it can also track conversions
and opt-ins through multiple capture methods
such as embedded forms, pop-ups and exit-pops
on the landing page.
You have Level 1 Landing Pages…these are the
Pop. As usual you can rotate through multiple
Level 1 Landing pages.
Page | 22
CPV Lab User Guide - Copyright 2010 - 2012 CPVLab.com
Reproduction or Sharing of this Guide is strictly prohibited without the authorized consent from CPVLab.com
Level 2 Landing Pages are where the visitor goes on the click through from a Level 1 Landing
Page. Again, you can rotate through multiple Level 2 Landing Pages as well.
Now, on level 2 landing pages…you can have a link to the offer (you guessed it…which you can
also rotate through multiple offers on the click through) and/or an opt-in offer on the page
either using an embedded form on the page, a pop-up or an exit-pop if the visitor closes the
landing page. CPV Lab will also track each of these options as well, to help you determine
what method brings in the most subscribers.
You can run as many levels as you want…with full tracking all the way through.
OK, so what happens when someone opts-in? You determine that process as well. First you
have to setup a Thank You Page of course, where the visitor is sent after opting-in.
I personally use timed redirects on my thank you pages, to automatically send the visitor to
either an offer or to a landing page.
But, again you can rotate through multiple landing pages and/or offers after the visitor opts-in.
And yes, this is tracked completely. This gives you the ability to test and identify the most
profitable setup after the visitor subscribers to your list.
Lead Capture…
Lead Capture Campaigns give you the ability to
test multiple lead capture pages with only 1
autoresponder form.
A big time-saver and makes the setup and
management process of your lists easier and
more organized as well.
CPV Lab will track subscribers through
Conversion Code placed on your Thank You
Page. It will then return in your Stats, your
subscribers, conversion rate and cost per
subscriber for each target in real-time.
And, just like in the Landing Page Sequence Campaigns…you can track the entire process after
the visitor opts-in as well…rotating through multiple landing pages and/or offers after the
visitor opts-in to test and identify the most profitable setup.
Page | 23
CPV Lab User Guide - Copyright 2010 - 2012 CPVLab.com
Reproduction or Sharing of this Guide is strictly prohibited without the authorized consent from CPVLab.com
Email Follow-Up…
This Campaign Type allows you to further track
your conversions after the visitor has subscribed
to your list.
You can assign each Email Follow-Up Campaign
to the campaign in CPV Lab, that generated the
subscriber list.
This will automatically apply the revenue from
your Emails to the Campaign that generated the
subscribers in the first place.
This gives you the ability to see the true value in building and promoting your mailing lists.
And yet again! You can rotate through multiple landing pages and/or offers within each email.
Page | 24
CPV Lab User Guide - Copyright 2010 - 2012 CPVLab.com
Reproduction or Sharing of this Guide is strictly prohibited without the authorized consent from CPVLab.com
Setting Up Campaigns in CPV Lab
General Campaign Settings…
Below you’ll see an image of the general settings that are a part of every campaign type.
Let’s run through each of these…
Upload Campaign:
Use the Campaign Upload CSV files to enter the details of your campaign offline and then
simply upload the CSV file to enter in all the details of your campaign automatically.
Campaign Name:
Name Your Campaign...pretty self explanatory.
Predefined Source:
Select your CPV Network from this drop-down box...if you have added all your CPV Networks
and Traffic Sources along with their Tokens on the Settings Page, it will auto-fill the Source,
Source ID, URL Append Token and Keyword Token.
Page | 25
CPV Lab User Guide - Copyright 2010 - 2012 CPVLab.com
Reproduction or Sharing of this Guide is strictly prohibited without the authorized consent from CPVLab.com
Source:
Name of the CPV Network or Traffic Source you are using...such as: TrafficVance
If you select a predefined source this will auto-fill on the selection of the Traffic Source.
Source ID:
Enter in an ID for the CPV Network...If you select a predefined source this will auto-fill on the
selection of the Traffic Source.
URL Append Token:
The code appended to your campaign destination url…If you select a predefined source this
will auto-fill on the selection of the Traffic Source.
Keyword Token:
The keyword token to add the target to your destination url...If you select a predefined source
this will auto-fill on the selection of the Traffic Source.
Engage Rate (sec):
This feature gives you an idea of how long your landing page pops are displayed to users in
seconds. You set a variable here such as 3 to 4 seconds, or 0 if you don't wish to use this
feature. This will then show you in the Performance Reports the overall percentage of your
pops that went over your set Engagement Rate time.
Note: This is really only effective when you're using Pop-Ups, with Pop-Unders it's a different
story as they users may not close your pop until closing their browser completely.
Stats CPV:
This is the CPV bid that is used for the Stats section of CPV Lab...here you just enter an average
CPV for your campaign.
A. Pass Target to Landing Page:
This is used when you want to pass the target that triggered your POP to your landing page.
So you could say “Special Offer for TARGET users!” or if Bidding on Keywords, “Looking for
TARGET?” Checking the box, will update your campaign url automatically and also give you
the PHP code to add to your landing pages to make this feature work.
B. Pass Tracking Cookie to Offer: (FOR ADVANCED USERS)
Check to pass the tracking cookie in the offer URL. Useful when you want to control when a
conversion is registered. This cookie can be passed to the ‘adclick.php’ page and will register a
conversion for the current target.
Page | 26
CPV Lab User Guide - Copyright 2010 - 2012 CPVLab.com
Reproduction or Sharing of this Guide is strictly prohibited without the authorized consent from CPVLab.com
This allows you to mark conversions by making a request to your CPV Lab tracking pixel with
the cookie code as a parameter instead of inserting the tracking cookie code. This applies
when there is no actual conversion page and the conversion is considered when someone
installs an application or uses a desktop application...expanding the tracking possibilities of
CPV Lab.
For Example…Let’s say the offer URL entered in CPV Lab is:
http://YourDomain.com/test/1104-path-offer1.htm?s1=
The actual page traffic will be sent to will include the subID and the tracking cookie if the
option is enabled:
http://YourDomain.com/test/1104-pathoffer1.htm?s1=51hlpf_321_4199&cookie=NTFobHBmXzMyMV8xMzA3XzEzMTBfNDE5OV82
You can grab the cookie passed in the URL using PHP, JavaScript or any other language and
make a request to the tracking pixel with the cookie parameter attached in order to mark this
conversion. The request should be made to
http://YourDomain.com/adclick.php?cookie=NTFobHBmXzMyMV8xMzA3XzEzMTBfNDE5OV82
This feature is for Advanced Users and applies to campaigns that don’t have an actual offer
page to track conversions. The tracking cookie can be used for tracking subscribers, ebooks,
file downloads and everything basically, it depends on the setup you create.
For tracking a file download or a PDF opening, we cannot include the tracking cookie in the
files, since those are not HTML files. But users can put the tracking cookie in the page prior to
downloading the file or you can make a request to the tracking pixel with the cookie appended
in the request URL.
C. Direct Redirect / Double Meta Refresh / Redirect Loop:
Choose Direct Redirect to send the Referrer through or use a Double Meta Refresh and blank
the referrer. The default option is Double Meta Refresh. With Direct Redirect the transition
between pages is faster, but the referrer gets passed to the Affiliate Network.
The Redirect Loop option…will check to make sure the referrer is blanked. If it is the redirect
goes straight through. If it’s not however, this feature will loop through the meta refresh until
the referrer is blanked and then send it through as usual. Keep in mind, this feature will add
some additional time to the redirects…which is why this is completely optional and I only
recommend using this feature when security of the referrers is a significant issue.
Page | 27
CPV Lab User Guide - Copyright 2010 - 2012 CPVLab.com
Reproduction or Sharing of this Guide is strictly prohibited without the authorized consent from CPVLab.com
D. Capture Extra Tokens: (FOR ADVANCED USERS)
Simply check this box and the Extra Tokens options will appear. You can also click “add” to use
up to 10 different tokens.
For example…
Each token requires the following details to be entered…
Name – the name that will appear in the header of the token column in the Stats.
URL Append – if the campaign URL needs to contain a placeholder for the extra token,
enter it here, otherwise this should be left blank. It works in the same way as the URL
Append Token from the CPV Network or Traffic Source.
Parameter – the parameter that is passed in the campaign URL and will be captured by
the base.php page.
In the example above the Campaign URL will be:
http://YourDomain.com/base.php?c=321&key=a6ed0211dba3911a026c7cdeffef870e&part=%PART%
The base.php page will read from the URL, all the extra tokens defined and store them in the
database. In Stats you will see each extra token defined as a separate column and data will be
grouped by the values from the Extra Tokens columns.
The extra tokens will appear as columns in the Target Performance Report only when those
are setup for a campaign. The columns for the extra tokens are sortable, but cannot be hidden.
These columns are hidden by default in campaigns that don't use Extra Tokens.
E. Pass Target to Offer:
The target keyword gets passed in the offer URL. Can be used if the Affiliate Network requires
you to pass the target or used when going private and you need transparency between your
own promotions and a client or lead buyer.
F. Pass SubId to Offer:
Checked by default and is necessary for subids to be passed through your affiliate links for
conversions.
Page | 28
CPV Lab User Guide - Copyright 2010 - 2012 CPVLab.com
Reproduction or Sharing of this Guide is strictly prohibited without the authorized consent from CPVLab.com
Some CPV Networks require you to use a link specifically for Contextual (CPV) Traffic, and in
some cases these do not function with SubIDs.
When this happens…Uncheck “Pass SubID to Offer”. The Stats and tracking pixel will work and
show complete Target Performance and Other Performance data including conversions from
the tracking pixel. However you won’t be able to see converting subids in your affiliate reports
since no subids are being passed or not supported by the network.
Page | 29
CPV Lab User Guide - Copyright 2010 - 2012 CPVLab.com
Reproduction or Sharing of this Guide is strictly prohibited without the authorized consent from CPVLab.com
Adding Landing Page & Offer URLs to Campaigns…
Within all the Campaign Types there are a few general rules to follow to ensure CPV Lab is
setup correctly to track your campaigns.
Offer URLs:
Always enter Offer URLs with the subID parameter, but without a value.
For Example: http://www.offer.com/offerpage.html?SID=
Different Affiliate / CPA Networks use different SubID variables, such as SID=, TID=, SD=, etc.
Just make sure you are using the proper variable for the Affiliate / CPA Network you're
working with. Also, if you’re are working with a network or offer that does NOT support the
use of SubIDs…simply Uncheck “Pass SubID to Offer” in the Campaign Settings.
Landing Page URLs:
Always enter Landing Page Urls without a subID parameter. The subID parameter will be
passed automatically by CPV Lab to the landing pages as SID=.
Enter your landing page urls like this: http://www.landing.com/landingpage.html
IMPORTANT:
When setting up campaigns always use the same URL format with all of your own landing
pages, links (base2.php , base3.php , etc).
For Example: http://www.yourdomain.com and http://yourdomain.com
All links inside a campaign and landing pages should be the same type (either with or without
'www.') but NEVER a mix of links with 'www' and links without 'www'.
About Tracking Pixels:
Some Affiliate/CPA Networks require Secure (https://) Pixels…all you’ll need for this is to
install an SSL certificate on your CPV Lab domain. When adding your pixel to the network, just
add “s” to the pixel like this: https://trackingpixelhere.com/adclick.php
Your CPV Lab tracking pixel can also be used as a postback url for networks that do not
support the placement of tracking pixels. Simple enter your postback url as:
http://trackingpixelhere.com/adclick.php
Using your Tracking Pixel to Postback SubIDs:
You can add extra code to your pixel url, when using it as a postback to mark a conversion by
passing the subID to the tracking pixel.
Page | 30
CPV Lab User Guide - Copyright 2010 - 2012 CPVLab.com
Reproduction or Sharing of this Guide is strictly prohibited without the authorized consent from CPVLab.com
When adding a postback url to your cpa/affiliate network, if they support the ability to
postback converting subids…you simply need to add their token for this to the end of your
pixel/postback url.
For example: http://YourDomain.com/adclick.php?subid={subid} and CPV Lab will mark the
conversion for this subID no matter what value is stored in the tracking cookie
In this example, you simply replace {subid} as shown above, with the token your network
supports for this postback feature.
Always “Save Campaign” After Any Changes
After making changes or editing your campaigns, always click the “Save Campaign” Button to
make sure, the changes are updated.
Nested Conversion Pixel Management…
This feature allows you to enter multiple pixels from other sources…such as Traffic Sources.
You simply enter the pixel urls you would like to fire or call, when your CPV Lab pixel is fired.
The additional pixels/postback URLs should be entered only as URLs without any type of HTML
or additional coding. Add one pixel URL per line.
Page | 31
CPV Lab User Guide - Copyright 2010 - 2012 CPVLab.com
Reproduction or Sharing of this Guide is strictly prohibited without the authorized consent from CPVLab.com
Setting Up Direct Link & Landing Page Campaigns
1. Setup the General Settings for the Campaign…Name, Stats CPV, etc.
2. Then choose the Campaign Type (what do you wish to do?):
a. Direct Link = Send Visitors Directly to the Offer/s
b. Landing Pages = Send Visitors to Landing Page/s and then to Offer/s on the Click
Through
c. Split = Rotate traffic through each of the above.
3. Enter your Landing Pages (if using Landing Pages)
a. Enter a Name for each Landing Page
b. Enter the URL for each Landing Page
c. Enter a unique numeric ID for each landing page
d. Set the Share% for each LP. Total Share% must add up to 100%
4. Enter your Offers
a. Enter a Name for each Offer
b. Enter a URL for each offer with the SubID variable added, with no data for the
SubID. Ex. http://www.offer.com/offerpage.html?SID=
c. Select the Affiliate / CPA Network for the Offer
d. Enter the Conversion Payout
5. Click “Save Campaign”
6. Add Code and Links to Landing Pages and Place your Pixel for the Offer at your
Affiliate / CPA Network
If using Landing Pages…
Code your links to the offer/s on your landing pages using the Step 1 link code.
http://YourDomain.com/base2.php
Enter the Step 2 Code directly above the closing body tag </body> on each of your
landing pages.
Page | 32
CPV Lab User Guide - Copyright 2010 - 2012 CPVLab.com
Reproduction or Sharing of this Guide is strictly prohibited without the authorized consent from CPVLab.com
Page | 33
CPV Lab User Guide - Copyright 2010 - 2012 CPVLab.com
Reproduction or Sharing of this Guide is strictly prohibited without the authorized consent from CPVLab.com
Setting Up Multiple Path Campaigns
1. Setup the General Settings for the Campaign…Name, Stats CPV, etc.
2. Enter Your Landing Pages and Offers for each Path.
a. Set the Share% for each Path.
b. Enter your Landing Pages
i. Enter a Name for each Landing Page
ii. Enter the URL for each Landing Page
iii. Enter a unique numeric ID for each landing page
iv. Set the Share% for each LP. Total Share% must add up to 100%
c. Enter your Offers
i. Enter a Name for each Offer
ii. Enter a URL for each offer with the SubID variable added, with no data for
the SubID. Ex. http://www.offer.com/offerpage.html?SID=
iii. Select the Affiliate / CPA Network for the Offer
iv. Enter the Conversion Payout
3. Click “Save Campaign”
4. Add Code and Links to Landing Pages
a. Place your Pixel for the Offer at your Affiliate / CPA Network
b. Code your links to the offer/s on your landing pages using the Step 1 link code.
http://YourDomain.com/base2.php
c. Enter the Step 2 Code directly above the closing body tag </body> on each of your
landing pages.
Page | 34
CPV Lab User Guide - Copyright 2010 - 2012 CPVLab.com
Reproduction or Sharing of this Guide is strictly prohibited without the authorized consent from CPVLab.com
Setting Up Multiple Option Campaigns
1. Setup the General Settings for the Campaign…Name, Stats CPV, etc.
2. Enter your Landing Pages
a. Enter a Name for each Landing Page
b. Enter the URL for each Landing Page
c. Enter a unique numeric ID for each landing page
d. Set the Share% for each LP. Total Share% must add up to 100%
3. Enter your Offers / Options
a. Enter a Name for each Offer
b. Enter a URL for each offer with the SubID variable added, with no data for the
SubID. Ex. http://www.offer.com/offerpage.html?SID=
c. Select the Affiliate / CPA Network for the Offer
d. Enter the Conversion Payout
4. Click “Save Campaign”
5. Add Code and Links to Landing Pages
a. Place your Pixel for the Offer at your Affiliate / CPA Network
b. Code your links to the offer/s on your landing pages using the Step 1 link code.
http://YourDomain.com/base2.php?id=xxx
Replace XXX in the url with the Option number you want to link to.
For example:
http://YourDomain.com/base2.php?id=1
http://YourDomain.com/base2.php?id=2
http://YourDomain.com/base2.php?id=3
c. Enter the Step 2 Code directly above the closing body tag </body> on each of your
landing pages.
Page | 35
CPV Lab User Guide - Copyright 2010 - 2012 CPVLab.com
Reproduction or Sharing of this Guide is strictly prohibited without the authorized consent from CPVLab.com
Setting Up Landing Page Sequence Campaigns
1. Setup the General Settings for the Campaign…Name, Stats CPV, etc.
a. Lead Capture in Sequence: If you have some sort of autoresponder form
throughout the sequence, check Yes.
b. Thank You Page Tracking: Where do you want to send the visitor from the thank
you page? Select either landing page or offers and enter each of these in the
“After Opt-In” Section.
c. Lead Capture Method: Choose whatever method you are using for the opt-in
form. It can be one of these options or all of them.
2. Enter your Landing Pages for Each Level
a. Enter a Name for each Landing Page
b. Enter the URL for each Landing Page
c. Enter a unique numeric ID for each landing page
d. Set the Share% for each LP. Total Share% must add up to 100% Per Level.
3. Enter your Offers / Options
a. Enter a Name for each Offer
b. Enter a URL for each offer with the SubID variable added, with no data for the
SubID. Ex. http://www.offer.com/offerpage.html?SID=
c. Select the Affiliate / CPA Network for the Offer
d. Enter the Conversion Payout
4. Click “Save Campaign”
5. Add Code and Links to Landing Pages
a. Place your Pixel for the Offer at your Affiliate / CPA Network
b. Enter the Step 2 Code directly above the closing body tag </body> on each of your
Level 1 landing pages.
c. Coding your links depends on your setup within the Landing Page Sequence
Campaign. Please review the examples below.
Page | 36
CPV Lab User Guide - Copyright 2010 - 2012 CPVLab.com
Reproduction or Sharing of this Guide is strictly prohibited without the authorized consent from CPVLab.com
Simple Setup:
Level 1 LPs –click-->
base2.php
Level 2 LPs –click-->
base2.php
Setup with Lead Capture:
Level 1 LPs –optin--> Level 2 LPs –click-->
base2.php?adsub=1
base3.php
Offer
Offer
Add Step 2 Code below your Opt-In Form Code
<img src="http://YourDomain.com/adopt.php" />
If using a thank you page after the opt-in
Step 3: Add Code to Thank You Page
<img src="http://YourDomain.com/adsub.php" />
To Link to Offers from your thank you page:
<a href="http://YourDomain.com/base3.php">Click for Offer</a>
If you’re sending subscribers directly to an Offer after the opt-in, set your thank
you page redirect for your opt-in form:
Step 4: Edit Thank You Page Links to LP/Offer (After Opt-In)
(no thank you page and the code from Step 3 isn't used)
http://YourDomain.com/base3.php?adsub=1
Setup with Multiple Options:
Level 1 LPs –click-->
Level 2 LPs –click-->
Offer
base2.php
base3.php?id=xxx (replace xxx with option #)
Page | 37
CPV Lab User Guide - Copyright 2010 - 2012 CPVLab.com
Reproduction or Sharing of this Guide is strictly prohibited without the authorized consent from CPVLab.com
Setting Up Lead Capture Campaigns
1. Setup the General Settings for the Campaign…Name, Stats CPV, etc.
a. Thank You Page Tracking: Where do you want to send the visitor from the thank
you page? Select either landing page or offer.
2. Enter your Landing Pages
a. Enter a Name for each Landing Page
b. Enter the URL for each Landing Page
c. Enter a unique numeric ID for each landing page
d. Set the Share% for each LP. Total Share% must add up to 100% Per Level.
3. Enter your Offers / Options
a. Enter a Name for each Offer
b. Enter a URL for each offer with the SubID variable added, with no data for the
SubID. Ex. http://www.offer.com/offerpage.html?SID=
c. Select the Affiliate / CPA Network for the Offer
d. Enter the Conversion Payout
4. Click “Save Campaign”
5. Add Code and Links to Landing Pages
a. Place your Pixel for the Offer at your Affiliate / CPA Network
b. Enter the Step 1 Code directly above the closing body tag </body> on your landing
pages.
c. Add Step 2 Code below your Opt-In Form Code
d. Coding your links depends on whether or not you’re sending subscribers to a
thank you page after the optin or directly to the offer.
If using a thank you page after the opt-in…Step 3: Add Code to Thank You Page
<img src="http://YourDomain.com/adsub.php" />
To Link to Offers from your thank you page:
<a href="http://YourDomain.com/base3.php">Click for Offer</a>
If you’re sending subscribers directly to an Offer after the opt-in, set your thank
you page redirect for your opt-in form:
Step 4: Edit Thank You Page Links to LP/Offer (After Opt-In)
http://YourDomain.com/base3.php?adsub=1
Page | 38
CPV Lab User Guide - Copyright 2010 - 2012 CPVLab.com
Reproduction or Sharing of this Guide is strictly prohibited without the authorized consent from CPVLab.com
Tracking Subscribers without Using a Thank You Page…
Applies to Landing Page Sequence and Lead Capture Campaigns
Lead Capture (Opt-In / Subscriber) Campaigns generally use a thank you page after the opt-in
(after the user details are captured), that contains a link to the next landing page or the offer
and also tracking code that records the subscriber / opt-in:
<img src="http://YourDomain.com/adsub.php" />
Within CPV Lab you also have the ability to create Landing Page Sequence and Lead Capture
Campaigns without a Thank You page while still being able to track subscribers in real-time.
To Run Lead Capture Campaigns without a Thank You page will require one change: instead of
redirecting to the thank you page each time a subscriber is recorded, simply redirect to
http://YourDomain.com/base3.php?adsub=1’.
Notice the ‘?adsub=1’ which tells the base3.php page that the Thank You page doesn’t exist
and will track a subscriber.
Aweber and other autoresponders allow setting the redirect URL. The Autoresponder redirect
URL should be the Thank You page or the base3.php?adsub=1 page, depending on whether
you have a Thank You page or not .
With Thank You
http://YourDomain.com/
tests/thank-you.htm
Without Thank You
http://YourDomain.com/
base3.php?adsub=1
So, to summarize…we have:
Landing page
Opt-in form redirect or
Aweber redirect URL
Thank You page redirect
With Thank You
Contains opt-in form
Redirects to thank-you
page
Redirects to base3.php
Without Thank You
Contains opt-in form
Redirects to
base3.php?adsub=1
-
You’ll also find your URLs for this, noted in the Campaign Steps on the Add/Edit Campaigns
Page.
Page | 39
CPV Lab User Guide - Copyright 2010 - 2012 CPVLab.com
Reproduction or Sharing of this Guide is strictly prohibited without the authorized consent from CPVLab.com
Tracking Double Opt-In Subscribers…
When using Double Opt-In you have this general visitor flow or path…
Opt-In Landing Page --->
Confirmation Page telling them to check their email --->
Check their email and Click the Confirmation Link -->
Thank You Page with Link to click through to an Offer.
The setup is similar to a standard Lead Capture campaign:
1. Landing Page with opt-in form
2. Redirect to confirmation page that tells users to check email
3. Send email to users with link to the thank you page
4. Thank you page that contains:
a. Code for tracking subscribers:
< img src="<http://YourDomain.com/adsub.php>" / >
b. Link to offer page through the base3.php page
(link provided on campaign setup page):
http://YourDomain.com/base3.php
c. Offer page
The subscribers will be marked in CPV Lab only after confirming their email address through
the confirmation link.
Page | 40
CPV Lab User Guide - Copyright 2010 - 2012 CPVLab.com
Reproduction or Sharing of this Guide is strictly prohibited without the authorized consent from CPVLab.com
Setting Up Email Follow-Up Campaigns
1. Setup the General Settings for the Campaign…Name, Stats CPV, etc.
a. Assign to…Here you can select the campaign that is building the mailing list.
Then when you view the Campaign Performance stats for that campaign…you’ll
also be able to see the amount of revenue the mailing list has generated. This
allows you to quickly determine how effective your list building efforts are long
term.
b. Select Link Redirection: Landing Page or Offer
c. # Emails Sent = Enter the number of emails being sent
d. Email # = Enter a numeric number for each email (1, 2, 3, 4, 5, etc.)
2. Enter your Landing Pages (if using Landing Pages)
a. Enter a Name for each Landing Page
b. Enter the URL for each Landing Page
c. Enter a unique numeric ID for each landing page
d. Set the Share% for each LP. Total Share% must add up to 100%
3. Enter your Offers
a. Enter a Name for each Offer
b. Enter a URL for each offer with the SubID variable added, with no data for the
SubID. Ex. http://www.offer.com/offerpage.html?SID=
c. Select the Affiliate / CPA Network for the Offer
d. Enter the Conversion Payout
4. Click “Save Campaign”
5. Add Code and Links to Landing Pages and Place your Pixel for the Offer at your
Affiliate / CPA Network
If using Landing Pages…
Code your links to the offer/s on your landing pages using the Step 1 link code.
http://YourDomain.com/base2.php
Enter the Step 2 Code directly above the closing body tag </body> on each of your
landing pages.
6. Add Links to your emails
a. Replace 'xxx' with the Email # for the email that you are sending.
b. http://YourDomain.com/base.php?c=106&key=8e20b7a79d2a165&id=xxx
Page | 41
CPV Lab User Guide - Copyright 2010 - 2012 CPVLab.com
Reproduction or Sharing of this Guide is strictly prohibited without the authorized consent from CPVLab.com
Email Follow-Up Campaigns with Landing Pages &
Direct Linking to Offers…
Page | 42
CPV Lab User Guide - Copyright 2010 - 2012 CPVLab.com
Reproduction or Sharing of this Guide is strictly prohibited without the authorized consent from CPVLab.com
Improved Accuracy in Landing Page Sequence and Multiple Option
Campaigns when you have more than 1 conversion per visitor…
This is extremely useful for those running Offer Path or Co-Reg Style campaigns where 1
unique visitor can convert on multiple offers. This feature greatly improves the accuracy while
adding minimal effort to the campaign setup.
Please note…the same exact pixel features are still in place. This new feature only applies to
campaigns where 1 user can convert on multiple offers. And, this feature only applies to
Multiple Option and Landing Page Sequence Campaigns.
You’ll notice on the Add/Edit Campaign pages for these campaign types.
You’ll see in the image above…the pixel varies slightly per offer. This greatly increases the
accuracy when tracking multiple conversions from 1 visitor.
We implemented this feature trying to make the process as easy as possible, again while
making the process of recording multiple conversions per visitor as accurate as possible.
Page | 43
CPV Lab User Guide - Copyright 2010 - 2012 CPVLab.com
Reproduction or Sharing of this Guide is strictly prohibited without the authorized consent from CPVLab.com
In the example below…you’ll see the visitor can potentially convert on 3 different offers. Each
offer is setup as its own option and then assigned an Offer ID as shown in the image above.
When placing your conversion pixel for each offer…you simply add ?ofr=CCC_XXX
CCC is replaced with the Campaign ID and XXX is replaced with the Offer ID (Not the
Option Number, but the ID assigned to the Offer as shown in the image above).
This process does take a few extra seconds when placing your pixels, but when running
campaigns like this…greatly improves the accuracy when recording multiple conversions per
visitor.
Page | 44
CPV Lab User Guide - Copyright 2010 - 2012 CPVLab.com
Reproduction or Sharing of this Guide is strictly prohibited without the authorized consent from CPVLab.com
Campaign Stats
Stats are displayed in real time and work with the Stats CPV you enter when setting up
campaigns, and conversions from the Tracking Pixel placed at your Affiliate/CPA Networks.
A) Select Campaign
Use the drop down menu to choose the campaign you want to view.
B) Interval
Choose the date range you want to view the stats for the selected campaign, using the
preset date ranges from the drop down menu or enter a custom date range.
C) Edit Campaign
Go to the Edit Campaign page for the selected Campaign
D) # Targets
Select the number of targets to view per page
E) Only Alerts
When checked, this will show only the targets that have triggered an alert.
F) Show / Hide
Drop down menu used to show or hide columns of your choice. CPV Lab remembers
your settings and will always use the previous View Settings as the default.
G) Export CSV
When clicked this will export all the target stats in a csv file.
Page | 45
CPV Lab User Guide - Copyright 2010 - 2012 CPVLab.com
Reproduction or Sharing of this Guide is strictly prohibited without the authorized consent from CPVLab.com
Grouping & Un-Grouping Stats…
In order to provide more information about targets, their behavior inside campaigns and
landing pages…we provide 2 types of views in Target Performance and Landing Page
Performance reports: a grouped view and an expanded view.
Target Performance
The grouped or condensed view displays each target once and doesn’t show any information
about the landing pages and offers that the targets followed. This view is obtained when the
following columns are hidden: Page, URL, Offer, Offer URL.
The expanded view shows the full visitor path for each target…in a campaign, the landing
pages and offer pages that the targets visited. The same target may appear multiple times in
the report if it reached different landing pages or different offers. This view is obtained when
at least one of the following columns is Shown: Page, URL, Offer, Offer URL.
Sample Condensed View:
Sample Expanded View:
Page | 46
CPV Lab User Guide - Copyright 2010 - 2012 CPVLab.com
Reproduction or Sharing of this Guide is strictly prohibited without the authorized consent from CPVLab.com
Landing Page Performance
The grouped view displays each landing page once and doesn’t contain information about the
offers that where accessed from the landing pages. This view is obtained when the following
columns are Hidden: Offer, Offer URL
The expanded view shows the offers that were visited from the landing pages. This means that
the same landing page may appear multiple times in the same report if the same landing page
generated traffic for more than one offer. This view is obtained when at least one of the
following columns is Shown: Offer, Offer URL
Sample Condensed View:
Sample Expanded View:
Page | 47
CPV Lab User Guide - Copyright 2010 - 2012 CPVLab.com
Reproduction or Sharing of this Guide is strictly prohibited without the authorized consent from CPVLab.com
Stats for Direct Link & Landing Page “Split” Campaigns…
When you have Split selected in your Direct Link and Landing Page campaigns, you’ll see in
your Stats…the stats and metrics for each a divided for your target performance reports.
See Below…
Page | 48
CPV Lab User Guide - Copyright 2010 - 2012 CPVLab.com
Reproduction or Sharing of this Guide is strictly prohibited without the authorized consent from CPVLab.com
Updating Converting SubIDs…
Mouseover the Stats Button in the Navigation Bar, then click Update Stats with Converting
SubIDs…as shown below:
This feature allows you to update your conversions in your Campaign Stats, which is useful to
update stats where the pixel misfired or in the event you can’t place a tracking pixel.
First, gather all your CONVERTING SUBIDS ONLY from your Affiliate/CPA Network. Then select
the specific campaign these Converting SubIDs apply to or select All Campaigns (A).
Enter your CONVERTING SUBIDS in the text box, 1 per line (B).
Concerned about Pixel Misfires or False Conversions…Then simply remove all existing
converting subids (C) and then upload your Converting SubIDs for the life of the campaign.
If you check this option, make sure the converting subids you're entering are for the entire life
of the campaign. If you don't check "Remove existing conversions" and you upload the same
converting subids twice, it only count as one conversion.
Page | 49
CPV Lab User Guide - Copyright 2010 - 2012 CPVLab.com
Reproduction or Sharing of this Guide is strictly prohibited without the authorized consent from CPVLab.com
Ability to specify different payouts (revenue) for each conversion
On the Stats Update Converting SubIDs you can now enter in unique payouts for each
Converting SubID. To use this feature…When you paste the converting subIDs enter them as
'subId|revenue' and the revenue specified for each conversion will be stored in the database
and used in all calculations for that conversion (Stats, Trends).
For example: lkdiwof_39_elf3|2.15
lkdiwof_39_elf3 (Converting SubID)|(separator)2.15(Unique Payout)
Page | 50
CPV Lab User Guide - Copyright 2010 - 2012 CPVLab.com
Reproduction or Sharing of this Guide is strictly prohibited without the authorized consent from CPVLab.com
The Conversions List…
Mouseover the Stats Button in the Navigation Bar, then click Conversions List…as shown
below:
This Page allows you to sort and view more data regarding your conversions for any of your
campaigns…
Using this page, you can view the Date and Time of your Conversions with Additional Data
such as IP Address, Country, State, City, Offer, Revenue and the SubID for each conversion.
Page | 51
CPV Lab User Guide - Copyright 2010 - 2012 CPVLab.com
Reproduction or Sharing of this Guide is strictly prohibited without the authorized consent from CPVLab.com
Campaign Reports
Reports are very similar to the Stats Section, the only difference is what data is used. Reports
use only hard data, from the CPV Network spending reports and Converting SubIDs you enter.
Uploading Reports…
You will see the Upload Reports interface as shown below:
Page | 52
CPV Lab User Guide - Copyright 2010 - 2012 CPVLab.com
Reproduction or Sharing of this Guide is strictly prohibited without the authorized consent from CPVLab.com
1. Select the Campaign for the Report
Or Select All Campaigns if you are using a bulk formatted CSV.
See below for information on setting up a bulk formatted CSV.
2. Select the Date Interval and Report Name
Make sure the downloaded report from your Traffic source matches this date range.
Once selected, the report name will populate automatically and you can change the
name if needed.
3. Take Spending Data from…
You have 2 options here
o "current Stats on site" which will use the Current data from the Stats in CPV Lab
for this campaign.
o "uploaded Report File" and this is generally what is used for reports so you build
reports using the Hard data for the campaign. When this is selected, you'll need
to upload your spending report to CPV Lab and select the CPV Report Template
that applies to the traffic source the report is from.
Note: Update Stats CPV with Average CPV from upload file
When this is checked, CPV Lab will automatically update the Stats CPV you entered for
this campaign, with a new average that is calculated from the report file you have
uploaded.
When a custom spreadsheet is used, the 'All Campaigns' option is selected and the
Update Average CPV is checked…the process will update the Stats CPV for all campaigns
that have records in the uploaded spending report.
The new CPV value will be calculated as an average of the Uploaded CPV values for each
campaign in the spending report. So, if you upload a spending report with records for 3
campaigns, there will be 3 average CPVs calculated, each one with data from the
corresponding campaign only. And only these 3 campaigns will have the Stats CPV
updated with the corresponding average CPV from the spending report.
Page | 53
CPV Lab User Guide - Copyright 2010 - 2012 CPVLab.com
Reproduction or Sharing of this Guide is strictly prohibited without the authorized consent from CPVLab.com
4. Take Converting SubIDs from…
You have 2 Options here as well:
o "current Stats on site" which will use the Current data from the Stats in CPV Lab
for this campaign.
o "paste subids" and this is generally used, for the purposes of building reports with
hard data. When selected, simply copy all your CONVERTING SUBIDS ONLY from
your Affiliate network reports with the same time frame you selected for the
Interval. And enter then in the text box shown below, 1 subid per line.
5. After All Settings are Correct and Data has been entered…
Click Save...and the report is built and can now be accessed from the Reports section of
CPV Lab.
Page | 54
CPV Lab User Guide - Copyright 2010 - 2012 CPVLab.com
Reproduction or Sharing of this Guide is strictly prohibited without the authorized consent from CPVLab.com
Adding & Editing CPV Spending Report Templates…
Mouseover the Settings Button in the Navigation Bar, then click CPV Spending Report
Templates as shown below:
You’ll see the Current CPV Spending Templates section…which has Spending Templates set up
for several popular CPV Networks…
Let’s go through the process of setting up a CPV Spending Template…
In this example…we’ll use this report format:
Page | 55
CPV Lab User Guide - Copyright 2010 - 2012 CPVLab.com
Reproduction or Sharing of this Guide is strictly prohibited without the authorized consent from CPVLab.com
The 3 Critical Columns to match up are…
Targets | Categories
Views
Amounts
Also note the number of Rows to skip at the top of the report, which in this example…the
actual column titles or headings are on the 3rd row of the report.
You want to skip the first 2 rows in this case...so 2 is entered for this setting.
Now that you have the information required to setup a Spending Report Template…simply
enter this information into the Form…
Report Template Name:
Give the template a name
Rows to Skip at Top:
In this example we need to skip 2 rows
Target Keyword Column:
In this example, it’s Targets|Categories as shown above
Views/Impressions Column:
In this example, it’s Views
Amount/Spend/Cost Column: In this example it’s Amounts
Campaign ID & Name are used for Bulk Consolidated Reports, which is covered below.
Assign Template to:
Select the CPV Network or Traffic Source to assign this
template to
Active:
Check to activate this report template for use
Page | 56
CPV Lab User Guide - Copyright 2010 - 2012 CPVLab.com
Reproduction or Sharing of this Guide is strictly prohibited without the authorized consent from CPVLab.com
And that’s it!
Page | 57
CPV Lab User Guide - Copyright 2010 - 2012 CPVLab.com
Reproduction or Sharing of this Guide is strictly prohibited without the authorized consent from CPVLab.com
Setting Up Bulk Upload Report Templates…
Using Custom Report to Upload Reports for Multiple Campaigns at One Time and Create
New Reports for each Campaign Automatically…
In order to add spending data for more than one campaign you need to create a custom
spreadsheet. The custom spreadsheet is basically a regular Spending Report from any CPV
Network, that has an extra column containing either the CampaignID from CPV Lab or the
CampaignName from CPV Lab.
For example, let’s take the Spending Report from MediaTraffic, that has the following
columns: Targets|Categories, Views, Amounts, ROI.
In order to convert this report to a bulk upload spreadsheet, you will insert a new column in
the report such as CampaignID or CampaignName.
For example using CampaignID:
Then in the newly added CampaignID column…add the Campaign ID next to each target that
goes with that particular campaign. Enter the campaign ID, exactly as it’s assigned in CPV Lab.
You can find this on the individual campaigns Add/Edit Page or on the Campaigns Page.
Page | 58
CPV Lab User Guide - Copyright 2010 - 2012 CPVLab.com
Reproduction or Sharing of this Guide is strictly prohibited without the authorized consent from CPVLab.com
Then simply Go to Settings CPV Networks Edit MediaTraffic and add this new column to
the spending template as shown below:
Or you can use CampaignName:
Then in the newly added CampaignName column…add the Campaign name next to each target
that goes with that particular campaign. Enter the campaign name, exactly as it’s setup within
CPV Lab. You can find this on the individual campaigns Add/Edit Page or the Campaign Page.
Then Go to Settings CPV Networks Edit MediaTraffic and add this new column to the
spending template as shown below:
Page | 59
CPV Lab User Guide - Copyright 2010 - 2012 CPVLab.com
Reproduction or Sharing of this Guide is strictly prohibited without the authorized consent from CPVLab.com
The report will have now the following columns:
CampaignID, Targets|Categories, Views, Amounts, ROI
or CampaignName, Targets|Categories, Views, Amounts, ROI
The next step…go to the Upload Reports page and select ‘All Campaigns’ from the Campaign
dropdown, select the time interval, upload the custom spreadsheet you just created and select
the corresponding CPV Report Template.
Then, paste converting subIDs for all campaigns in the textbox and Click ‘Save’.
A new report will be created for each campaign that has data in the custom spreadsheet.
Note:
The name for the extra column required for the custom spreadsheet is not fixed to
CampaignID or CampaignName.
This can be customized per Spending Report Template from the Spending Report Templates
page. It can be set to whatever you want to use to match your needs.
IMPORTANT:
Upload Reports as quickly as possible after download. For example if you wait 3 days after
downloading, and then upload by selecting 'Today' as the interval, this won’t produce accurate
results. Because data is extracted from the pasted converting subIDs only the ones from today
(as indicated by the selected interval), but the Spending report is now 3 days old, so it doesn't
refer to today anymore.
Remember to upload only fresh generated Spending reports.
Page | 60
CPV Lab User Guide - Copyright 2010 - 2012 CPVLab.com
Reproduction or Sharing of this Guide is strictly prohibited without the authorized consent from CPVLab.com
Overall Campaign Performance Stats & Reports Pages…
These pages allow you to quickly see how all your campaigns are performing on one page.
You also have Overall Performance Pages for both Stats and Reports.
Clicking the Campaign name on either of these pages will take you to the Stats or Reports for
the selected campaign. These pages as accessed as shown below.
Overall Campaign Performance Stats…
Mouseover Stats in the Navigation Bar and click Overall Campaign Performance Stats:
Overall Campaign Performance Reports…
Mouseover Reports in the Navigation Bar and click Overall Campaign Performance Reports:
Page | 61
CPV Lab User Guide - Copyright 2010 - 2012 CPVLab.com
Reproduction or Sharing of this Guide is strictly prohibited without the authorized consent from CPVLab.com
CPV Lab Performance Metrics
For each campaign type you'll have 3 to 7 different performance reports, depending the
campaign type:
Target Performance
Landing Page Performance
Landing Page Opt-In Performance
Thank You Page Performance
Offer Performance
Email Performance
Campaign Performance
(All Campaign Types)
(All Campaign Types, except Direct Link Campaigns)
(Landing Page Sequence Campaigns Only)
(Landing Page Sequence & Lead Capture Campaigns)
(All Campaign Types, except Lead Capture Campaigns)
(Email Follow-Up Campaigns Only)
(All Campaign Types)
Target Performance Metrics:
ID
Offer / Page
URL
Target
Views
Engage%
Cost
CPV
Clicks
CTR
CPC
Conversion
CR
CPA
Revenue
EPV
PPV
P/L
eCPM
ROI
Campaign ID
Offer or Page Name
URL of Offer or Page
Target - URL or Keyword
Number of Views
% of Visitors who reached your set Engagement Rate
Spend on the Target
Cost Per View
Number of Clicks from Landing Page
Click Through Rate from Landing Page
Cost Per Click, calculated from the Cost and # of Clicks
Conversions
Conversion Rate
Cost Per Action, also referred to as Cost Per Conversion
Revenue Generated
Earnings Per View
Profit Per View
Profit / Loss
Earnings Per 1000 Impressions
Return on Investment
Page | 62
CPV Lab User Guide - Copyright 2010 - 2012 CPVLab.com
Reproduction or Sharing of this Guide is strictly prohibited without the authorized consent from CPVLab.com
Landing Page Performance Metrics:
ID
Page
URL
Views
Engage%
Cost
CPV
Clicks
CTR
CPC
Conversion
CR
Revenue
EPV
PPV
P/L
eCPM
ROI
Campaign ID
Page Name
Page URL
Number of Views
% of Visitors who reached your set Engagement Rate
Spend on the Target
Cost Per View
Number of Clicks from Landing Page
Click Through Rate from Landing Page
Cost Per Click, calculated from the Cost and # of Clicks
Conversions
Conversion Rate
Revenue Generated
Earnings Per View
Profit Per View
Profit / Loss
Earnings Per 1000 Impressions
Return on Investment
Landing Page Opt-In Performance Metrics:
ID
Page
Visitors
Embed
Embed %
Popup
Popup %
Exit
Exit %
Subscribers
SR
Campaign ID
Page Name
Number of Visitors to the Page
Number of Opt-Ins from an Embedded Form
Percentage of Opt-Ins from an Embedded Form
Number of Opt-Ins from a Pop-up
Percentage of Opt-Ins from a Pop-up
Number of Opt-Ins from an Exit Pop
Percentage of Opt-Ins from an Exit Pop
Total Opt-Ins
Subscriber Rate %
Page | 63
CPV Lab User Guide - Copyright 2010 - 2012 CPVLab.com
Reproduction or Sharing of this Guide is strictly prohibited without the authorized consent from CPVLab.com
Offer Performance Metrics:
ID
Offer
URL
Cost
Visitors
CPC
Conversion
CR
Revenue
EPV
PPV
P/L
eCPM
ROI
Campaign ID
Offer Name
Offer URL
Spend on the Target
Number of Visitors to the Offer
Cost Per Click
Conversions
Conversion Rate
Revenue Generated
Earnings Per View
Profit Per View
Profit / Loss
Earnings Per 1000 Impressions
Return on Investment
Thank You Page Performance Metrics:
ID
Page
Visitors
Clicks
CTR
Conversions
CR
Revenue
Campaign ID
Page Name
Number of Visitors to the Page
Number of Clicks from Landing Page
Click Through Rate from Landing Page
Total Conversions
Conversion Rate
Revenue Generated
Page | 64
CPV Lab User Guide - Copyright 2010 - 2012 CPVLab.com
Reproduction or Sharing of this Guide is strictly prohibited without the authorized consent from CPVLab.com
Campaign Performance Metrics:
ID
Name
Views
Cost
Revenue
EPV
PPV
P/L
ROI
Campaign ID
Campaign Name
Total Views for the Campaign
Total cost for the campaign
Total revenue generated for the campaign
Total EPV for the campaign
Total PPV for the campaign
Total Profit / Loss for the Campaign
Total ROI for the Campaign
Email Performance Metrics:
ID
Name
# Sent
Clicks
CTR
Conversion
CR
Revenue
P/L
EPS
Campaign ID
Campaign Name
Total Sent
Number of Clicks from Landing Page
Click Through Rate from Landing Page
Conversions
Conversion Rate
Revenue Generated
Profit / Loss
Earnings Per Subscriber
Page | 65
CPV Lab User Guide - Copyright 2010 - 2012 CPVLab.com
Reproduction or Sharing of this Guide is strictly prohibited without the authorized consent from CPVLab.com
Time & Day Trends
Trends allows you to spot peak Times and Days for your campaigns...giving you the ability to
daypart your campaigns for maximum ROI.
On the Trends page…you have many different options available to view your Data.
You can even view Trends for individual targets within your campaign…or the Overall trends
for All Targets.
First Select the Campaign you want to view.
Then select the View Type and the Interval or enter a custom Date Range.
Last…Choose to view Trends for All Targets or a specific Target and choose your charting
options. You can select 2 data points that will then be referenced in the chart as shown
below:
Page | 66
CPV Lab User Guide - Copyright 2010 - 2012 CPVLab.com
Reproduction or Sharing of this Guide is strictly prohibited without the authorized consent from CPVLab.com
Below the Graphic Chart…you also can view this data in line format to easily identify your daily
and hourly trends.
You can export this data as well…by clicking Export CSV.
Page | 67
CPV Lab User Guide - Copyright 2010 - 2012 CPVLab.com
Reproduction or Sharing of this Guide is strictly prohibited without the authorized consent from CPVLab.com
Optimize
This is a HUGE timesaver!
The Optimize Page works from the Settings you have entered in the Campaign Optimization Filters
Section on the Settings Page. This allows you to make decisions once and CPV Lab will always
make that decision for you from then on.
Simply select the campaign you want to optimize…
Then choose the data to use…either the Current Stats or a Report you have uploaded.
You can also adjust your CPV bids on your targets quickly and easily from this page as well.
You’ll see in the Screenshot below…it shows Targets, Landing Pages, Offers and the Overall
Campaign. So you can quickly and easily see what needs to be completed to optimize the campaign,
based on 3 categories…Winner, In Progress and Remove.
In Progress is simply a Target, Landing Page or Offer that is in between your Winner and Remove
settings. Generally In Progress means that not enough data has come in yet to make a decision.
Once all changes have been made, then Export the Optimized Report as a CSV. Once exported, you
can make these changes manually at your CPV Network, or depending on the CPV Network you're
using...cut and paste this optimized campaign data into a Bulk Upload spreadsheet if the Network
offers it.
Page | 68
CPV Lab User Guide - Copyright 2010 - 2012 CPVLab.com
Reproduction or Sharing of this Guide is strictly prohibited without the authorized consent from CPVLab.com
A = Export CSV will export all the Data in the Target Section…Export Targets will export only the
targets that need to be removed.
B = Export All – CSV will export all of the data on the Optimize page.
Page | 69
CPV Lab User Guide - Copyright 2010 - 2012 CPVLab.com
Reproduction or Sharing of this Guide is strictly prohibited without the authorized consent from CPVLab.com
Tracking as a Merchant / Product Owner…
Using CPV Lab to track your own products or offers, is fairly similar to setting your campaign.
Actually, it’s easier since you have full control over all the pages.
In this example, let’s say you have a product and your offer page is at…
http://MyProductOfferPage.com/index.htm
On this offer page, visitors then click “Buy Now” and are taken to the Check out page where
they enter their details for purchase and click through to your payment processor.
http://MyProductOfferPage.com/Checkout.htm
After completing their purchase, visitors are then sent to an order thank you page or order
confirmation page.
http://MyProductOfferPage.com/OrderConfirmation.htm
In this example…the setup is simple. The conversion path is:
Offer Page –click--> Check out Page –click--> Payment Page –purchase--> Thank You Page
So in this example, we’ll use a simple Direct Link & Landing Page Campaign.
#1) Setup your Campaign details usual.
But, since you are the Merchant in this case…you can change the Redirect Type to Direct.
Since you’re the merchant, no need to worry about passing the referrer.
You can also uncheck “Pass SubIDs to Offer” unless, you checkout system support the use of
SubIDs.
Page | 70
CPV Lab User Guide - Copyright 2010 - 2012 CPVLab.com
Reproduction or Sharing of this Guide is strictly prohibited without the authorized consent from CPVLab.com
#2) Next Enter your Offer Page / Sales Page as the Landing Page in CPV Lab…
On this page, add your Step 2: Add Code to Landing Pages
Paste on Landing Page before the </body> tag
Then set the link on the “Buy Now” button or link to: http://YourDomain.com/base2.php
#3) Then Enter your Checkout Page as the Offer…
#4) Place the Tracking Pixel on your Order Thank You / Confirmation Page…
Which in this example is:
http://MyProductOfferPage.com/OrderConfirmation.htm
You’ll add your pixel…
<img src="http://YourDomain.com/adclick.php" width="1" height="1" border="0" />
DONE!
Page | 71
CPV Lab User Guide - Copyright 2010 - 2012 CPVLab.com
Reproduction or Sharing of this Guide is strictly prohibited without the authorized consent from CPVLab.com
Tracking Clickbank Offers with CPV Lab…
Setup Clickbank as an Affiliate Network…
Clickbank is setup in CPV Lab by default, but in the event it’s been removed and you need to
add it again…follow the quick instructions below:
Setting Up Clickbank Offers in your Campaign…
You’ll setup your campaign as you normally would…but when entering your Clickbank offers…
Clickbank must be selected or the SubIDs will not work correctly. CPV Lab generally uses
spacing characters “ _ “ in SubIDs, but these types of characters are not allowed in Clickbank
Tracking IDs. So when Clickbank (exactly as show) is selected CPV Lab will automatically
change the spacing character in the SubIDs to “z” in order to pass correctly to Clickbank.
Page | 72
CPV Lab User Guide - Copyright 2010 - 2012 CPVLab.com
Reproduction or Sharing of this Guide is strictly prohibited without the authorized consent from CPVLab.com
Optimizing Your Server for CPV Lab & Volume…
This information is provided by Tyler from BeyondHosting.net
I highly recommend BeyondHosting to everyone, but if you are a high volume affiliate /
marketer, BeyondHosting is very highly recommended. They offer managed services, top
notch servers and their support is miles ahead of the 100+ hosting companies I have tried over
the past 12 years.
As a CPV Lab User, you’ll also receive 50% off your first month, they’ll also install CPV Lab and
Updates for you. And just so you know, I’m recommending BeyondHosting.net because they
are great, not for a commission. I am NOT paid any commissions for this recommendation.
Check out their services here: http://beyondhosting.net/CPVLab-Hosting/
Server Optimizations…
Setup Apache to allow large numbers of children processes.
It’s recommend to not use apache if you’re running cPanel and Install litespeed, if you’re
on a non-cpanel box nginx + php-fpm makes an awesome combination.
o Apache Optimization:
http://sudomakeinstall.com/linux-systems/optimize-apache-for-heavy-traffic
o Nginx+PHP-FPM
http://wiki.beyondhosting.net/PHP-FPM_and_Nginx
For MySQL you will want to use MySQL tuner to adjust your caching settings as
recommended.
o Tuner:
http://blog.mysqltuner.com
There are many things that can be done with the file system of the server to help increase
speed as well. Tyler at BeyondHosting.net also offers a tuning service for anyone interested in
having their server configuration fully optimized that is not using BeyondHosting Servers.
If you’re interested, simply open a ticket at
https://beyondhosting.net/portal/supporttickets.php
Page | 73
CPV Lab User Guide - Copyright 2010 - 2012 CPVLab.com
Reproduction or Sharing of this Guide is strictly prohibited without the authorized consent from CPVLab.com
Other Information
The About Page…
On the Campaigns Page, click
to go to the About CPV Lab page.
On this page you have links to the Help Desk, User Information and it also shows you the
current version of CPV Lab that you are running.
Floating Nav Bar…
The floating nav bar on the Stats, Reports, Trends and Optimize pages is just another time
saver…if you’re looking through a long list of data and want to jump over to Trends for
example, all you have to do is Click on the Trends Icon in the Floating Nav Bar.
So, really it just saves your from having to scroll up to the main navigation buttons. But, that
takes time…the floating nav bar makes this process faster and easier. If you don’t wish to use
it however, just click the X and it will be hidden.
Backing Up and Restoring CPV Lab…
To create a backup of your CPV Lab database, simply go to the Settings Page, scroll down to
the Backup Database section and Click Save. That’s It!
Page | 74
CPV Lab User Guide - Copyright 2010 - 2012 CPVLab.com
Reproduction or Sharing of this Guide is strictly prohibited without the authorized consent from CPVLab.com
Backing Up Your CPV Lab Database Manually using phpMyAdmin…
Some users may experience issues with the Backup Database feature on the Settings Page
within CPV Lab. The reason for this is generally caused by limited amounts of memory being
assigned to handle PHP on the server. In most cases this can be adjusted by the web host
fairly easily…however, depending on the size your database this can be a very large file and
take some time.
In this case, or if your web host won’t allow you to increase the amount of memory assigned
to PHP you can still back up your CPV Lab data quickly and easily directly within phpMyAdmin.
1. Login to your cPanel
2. Click on the phpMyAdmin link. The phpMyAdmin utility will open.
3. Locate and click on your CPV Lab database from the list of databases on the left
4. Now you will have the database selected. Navigate to the ‘Export’ menu item from the
menu located at the top of the page
Page | 75
CPV Lab User Guide - Copyright 2010 - 2012 CPVLab.com
Reproduction or Sharing of this Guide is strictly prohibited without the authorized consent from CPVLab.com
5. On the Export page leave all the tables selected as they are by default, leave the export
option to SQL and everything else unchanged. Click the ‘GO’ button and you will be
prompted to save the generated database backup.
Page | 76
CPV Lab User Guide - Copyright 2010 - 2012 CPVLab.com
Reproduction or Sharing of this Guide is strictly prohibited without the authorized consent from CPVLab.com
Blocking IP’s and UserAgents from Appearing in the Stats…
This feature allows you to define IPs, IP ranges and Useragents to block from appearing in your
Stats and consists of 2 pages within CPV Lab…
Settings Blocked Traffic Rules
Stats Blocked Traffic Stats
These Blocked Traffic Rules are Global for all campaigns within CPV Lab.
When traffic comes in, it’s checked against the blocking rules and if it matches at least one
rule, then this traffic won't count in Stats. The Landing Page or offer will still be displayed,
because the bots from the networks may find suspicious if the landing page is not found.
A default set of rules have been added for some of the major bots and useragents, primarily
from Google, Yahoo and Bing/MSN. You can also add new rules at any time…
Blocking IPs and IP Ranges
You can enter a single IP to block or an IP range. For example you can enter a rule to block IPs
from 10.0.0.1 to 10.0.0.11
Page | 77
CPV Lab User Guide - Copyright 2010 - 2012 CPVLab.com
Reproduction or Sharing of this Guide is strictly prohibited without the authorized consent from CPVLab.com
Blocking Useragents
You simply enter a string that can be a part of the user agent or the entire user agent.
If this string will be present in the user agent for incoming traffic it will not count in the Stats.
The Blocked Traffic Stats allow you to see the activity and the traffic that has been blocked.
This page shows you the Date/Time, IP, Useragent and the Reason it was blocked. Access this
page from the Stats menu Blocked Traffic Stats
Added Security Feature = Failed Logins Page…
You can view the failed logins to your CPV Lab installation…
You’ll find this page by going to Settings Failed Logins
On this page…you can see the Date/Time of your failed logins as well as the Username and
Password used, the IP address, Country, State and City.
If you start to see a lot of Failed Login activity, you can simply change the location of your login
page by using the steps below.
Page | 78
CPV Lab User Guide - Copyright 2010 - 2012 CPVLab.com
Reproduction or Sharing of this Guide is strictly prohibited without the authorized consent from CPVLab.com
Added Security Feature = Edit Login Page Name…
For increased security you can easily change the name of your login page with 2 simple steps…
First, open your CPV Lab installation on your Server through your FTP Client and Locate the
existing “login.php” file.
Then just right click on the file and select Rename…
Enter the new name for the login page…be sure to end in .php:
That’s it in the FTP Client, next Login to your CPV Lab Installation and navigate to the settings
page…
Enter your existing user name and password in order to save the change…then simply enter
the new name of your login page as shown below and click Save.
Page | 79
CPV Lab User Guide - Copyright 2010 - 2012 CPVLab.com
Reproduction or Sharing of this Guide is strictly prohibited without the authorized consent from CPVLab.com
Version 2.13
New Features & Functions:
Visitors Stats page - with auto-refresh and dynamic columns, also the ability to export
this data as a CSV file.
o Shows the last 500 visitors / Visitors from the last 24 hours for all campaigns and
the page will auto-refresh based on the setting you choose. 10 Seconds, 30
Seconds, 1 Minute, 3 Minutes, 5 Minutes, 10 Minutes, 15 Minutes, 30 Minutes, 1
Hour.
o Many display and viewing options added.
o The number of records to view and refresh interval are saved and used by default
on the next visit to the page.
o Ability to filter data by keyword/target, IP (to identify bots), by country
o Ability to view data by All Visitors, Clicks, Conversions or Clicks & Conversions
o You can even view the exact Date and Time for Clicks and Conversions.
Stats Management page - allows you to remove/delete stats data based on conditions
and adjust offer payout bumps and payout decreases.
Page | 80
CPV Lab User Guide - Copyright 2010 - 2012 CPVLab.com
Reproduction or Sharing of this Guide is strictly prohibited without the authorized consent from CPVLab.com
Simple Checkboxes to control which extra tokens are passed to the LP and to the Offer
page - customizable in the campaign setup pages
Ability to specify the parameter to use for passing target in the campaign setup pages
Failure URL…Entered on the campaign set up page. Visitors are sent to this url in the
event an error or redirect issue occurs within the campaign.
Ability to upload subID|revenue in report upload page - works the same way as
uploading converting subIDs from the Stats Update page
We’ve expanded upon the ability to trigger/call multiple pixels along with your CPV Lab
Tracking pixel. You’ll see IFrame Pixel options on the Campaign Setup Pages.
o Iframe pixel allows additional 3rd party pixels to be called.
o Entered as image, iframe, postback and script tags
image pixels - start with '<img...'
iframe pixels - start with '<iframe...'
script pixels - start with '<script...'
Postback URLs - entered as simple URLs, start with 'http...'
Page | 81
CPV Lab User Guide - Copyright 2010 - 2012 CPVLab.com
Reproduction or Sharing of this Guide is strictly prohibited without the authorized consent from CPVLab.com
Below this section, you’ll see the option to add additional pixel codes, 1 per text box…to
add more simply click “Add Pixel Field”
Page | 82
CPV Lab User Guide - Copyright 2010 - 2012 CPVLab.com
Reproduction or Sharing of this Guide is strictly prohibited without the authorized consent from CPVLab.com
2.13 Design & Usability Updates:
JavaScript date picker control to allow easier date selection - added in all pages where
dates can be entered
Highlight of the mouse-over row in grids
Ability to set campaigns as inactive - in the campaign setup pages
Ability to assign campaigns to groups - in the campaign setup pages; by default
campaigns are not assigned to any group
Filter Campaigns to View from the Campaigns Page by Group or Status (Active/Inactive)
Color Key added to the bottom of the Stats / Reports pages…
Totals for column data on the campaigns page, overall stats page, overall reports page.
Add keyword/target column in Conversions List page
Page | 83
CPV Lab User Guide - Copyright 2010 - 2012 CPVLab.com
Reproduction or Sharing of this Guide is strictly prohibited without the authorized consent from CPVLab.com
Page to manage available campaign groups
Page to generate cloaking pages.
Action Links on the Campaigns Page have been changed to Icons in effort to save space.
New Columns have also been added here…Status, Traffic Source, Group
Page | 84
CPV Lab User Guide - Copyright 2010 - 2012 CPVLab.com
Reproduction or Sharing of this Guide is strictly prohibited without the authorized consent from CPVLab.com
2.13 Coding & Backend Updates:
Display a warning when 'c' or 'key' is used as extra token – as these will conflict with the
default parameters in the Campaign URL
Improvements in the way the visitors IP address is captured, captures the IP from
several server variables including $_SERVER['HTTP_X_FORWARDED_FOR'] and
$_SERVER['HTTP_X_REAL_IP']
Added redirect to custom login page on session timeout
Ability to set default page after login - select the default page from the Settings page
Display warning on login page when install.php or upgrade.php are not removed and/or
when permissions are not reset to 644
Many page and SQL query optimizations
Check that mbstring extension is enabled when accessing the report upload page;
display a warning message otherwise.
Page | 85
CPV Lab User Guide - Copyright 2010 - 2012 CPVLab.com
Reproduction or Sharing of this Guide is strictly prohibited without the authorized consent from CPVLab.com
Using the “Generate Cloaking Pages” Feature in CPV Lab:
When this is used…users can completely replace the links for all CPV Lab setup links using
custom redirects.
For example…if the users CPV Lab installation is at http://mydomain.com , Redirects can be
generated as:
Instead of use http://newwebsite.com/linka
Instead of http://mydomain.com/base3.php use http://newwebsite.com/linkb
To Do this…and maintain the abililty to pass keyword tokens and additional tokens through the
Cloaked pages…use the settings below:
Then click the “Generate” Button and a window will appear to Save the newly created
Index.php file.
Save this file and then simply upload this index.php page to a folder on any domain you wish
to use when calling this base2.php url in CPV Lab.
Passing Tokens when using Cloaked Pages…
If you select the option to pass parameters when you create the cloaking page (this option
works only for PHP and HTML with Javascript), then all the parameters received by the cloak
page are passed to the next page.
So you can use: http://newwebsite.com/linka/?id=1
and traffic will be sent to: http://mydomain.com/base2.php?id=1
The same happens to all other parameters and you can combine any number of parameters in
a single URL separated by ‘&’, like: http://newwebsite.com/linka/?id=1&adsub=1¶m=111
Page | 86
CPV Lab User Guide - Copyright 2010 - 2012 CPVLab.com
Reproduction or Sharing of this Guide is strictly prohibited without the authorized consent from CPVLab.com
Cloaking Campaign URLs…
Campaign URLs can be cloaked as well, but you have to add the keyword token in those URLs if
the traffic source requires it.
For example:
Original URL:
http://mydomain.com/base.php?c=271&key=adsfkajksdfjkwe&keyword=%%KEYWORD%%
Cloak URL: http://newwebsite.com/campaign
But to pass the keyword through to CPV Lab, where this is supported…the keyword token
needs to be in the URL, so you will enter the cloaked campaign URL at the traffic source as:
http://newwebsite.com/campaign/?keyword=%%KEYWORD%%
The other parameters (‘c’ and ‘key’) will be added in the cloak page. In order for this to work
you have to generate the cloak using a method that passes parameters, PHP or HTML with
JavaScript. PHP is the best solution because it is server-based and it is much faster than
JavaScript.
Page | 87
CPV Lab User Guide - Copyright 2010 - 2012 CPVLab.com
Reproduction or Sharing of this Guide is strictly prohibited without the authorized consent from CPVLab.com
Version 2.14
2.14 New Features & Functions:
Allow custom parameters for Pass Tracking Cookie to Offer - added a parameter field in
the campaigns setup pages
Allow passing subID to the LP - added a checkbox control on campaign setup pages
Ability to view “All Campaigns” on the Conversions List and Blocked Traffic pages
Changed IDs in Stats to be the Landing Page ID / Offer ID defined by users instead of the
database IDs
Create page that allows updating the extra tokens - the page is called 'tokens.php' and
must be called in an image tag
Allow linking to specific Level 2+ LP - useful for Coreg setups
Allow posting the revenue through the tracking pixel
Create cron page to perform calculations from campaigns.php - page will load faster
because it won't have to perform all the calculations
Database optimizations and code optimizations for many pages
Chart Optimizations to Increase Load Times
Page | 88
CPV Lab User Guide - Copyright 2010 - 2012 CPVLab.com
Reproduction or Sharing of this Guide is strictly prohibited without the authorized consent from CPVLab.com
Linking to Specific Level 2 Landing Pages:
* Landing Page Sequence Campaigns Only
This feature allows you to link to specific Level 2 Landing Pages instead of rotating through
pages. For example: You can have multiple linking options on 1 page (as shown below), or
rotate through branded/themed landing pages on level 1 that each link to a specific level 2
landing page.
How to Link to specific Level 2+ LPs
Simply append ‘?id=xxx’ to the base2.php link from the previous level, where ‘xxx’ will be the
Landing Page ID defined in the campaign setup page.
Example
Let’s take the following campaign, Level 1 LP, 3 Level 2 LPs and 3 Offer pages.
In order to link to a specific Offer from the Level 2 LPs, we have placed each offer in its own
option group.
Page | 89
CPV Lab User Guide - Copyright 2010 - 2012 CPVLab.com
Reproduction or Sharing of this Guide is strictly prohibited without the authorized consent from CPVLab.com
Page | 90
CPV Lab User Guide - Copyright 2010 - 2012 CPVLab.com
Reproduction or Sharing of this Guide is strictly prohibited without the authorized consent from CPVLab.com
In Level 2 we have 3 links in this example, one for iPad Level 2 LP, one for the Kindle Level 2 LP
and one for the DVD Level 2 LP.
These links redirect to:
iPad link - http://cpvlab/base2.php?id=11
Kindle link - http://cpvlab/base2.php?id=12
DVD link - http://cpvlab/base2.php?id=13
The IDs ‘11’, ‘12’ and ‘13’ are the Level 2 Landing Page IDs defined in the campaign setup page.
Each Level 2 LP then redirects to a specific offer group in this example, with these links:
iPad offer link - http://cpvlab/base3.php?id=1
Kindle offer link - http://cpvlab/base3.php?id=2
DVD offer link - http://cpvlab/base3.php?id=3
Page | 91
CPV Lab User Guide - Copyright 2010 - 2012 CPVLab.com
Reproduction or Sharing of this Guide is strictly prohibited without the authorized consent from CPVLab.com
Postback Revenue from CPA/Affiliate Networks:
* Network must support this feature and provide you with the correct token to use.
* You must also have your pixel url setup as a postback url at the network.
You can now postback the revenue for each conversion through the tracking pixel.
The parameter used for posting the revenue can be configured for each Network from the
‘Affiliate Networks’ page located under the Settings tab.
The default parameter for Networks is ‘revenue’. You’ll need to contact your network
manager to determine the revenue token used for postback in the their system.
The revenue can be added either to the image version or the iframe version of the tracking
pixel in one of the following formats and also requires the subid to postback as well:
<img src="http://cpvlab/adclick.php?subid=%SID%&revenue=%REVENUE%" width="1"
height="1" border="0" />
Or without the additional HTML:
http://cpvlab/adclick.php?subid=%SID%&revenue=%REVENUE%
In this example the Subid and Revenue Tokens are %SID% and %REVENUE%
Again, you need to make sure you use the correct tokens as supported by the affiliate/cpa
network you are using. If no revenue is passed, CPV Lab will use the set payout in the
Campaign setup page as the default.
Page | 92
CPV Lab User Guide - Copyright 2010 - 2012 CPVLab.com
Reproduction or Sharing of this Guide is strictly prohibited without the authorized consent from CPVLab.com
Updating Extra Tokens and Prepop:
* Network must support this feature and provide you with the correct token to use.
* You must also have your pixel url setup as a postback url at the network.
Extra tokens are stored in the database by the campaign URL (base.php page) when visitors
first come to the campaign. Version 2.14 adds the option to update extra tokens from a
landing page or from the offer page.
In order to do this you have to include the following image tag in the page that will update
tokens and you have to replace ‘...’ parts with the actual token values:
<img src="http://cpvlab/tokens.php?token1=...&token2=...&token3=..." border="0"/>
Note: the parameters in the image tag (token1, token2, etc...) remain like this inside the image
tag, they don’t get replace with the extra token parameter names.
Example
The following campaign defines 2 extra tokens called ‘Age’ and ‘Location’.
The landing page has 2 textbox fields where visitors enter their age and location, then these
data are forwarded to the ‘base2.php’ page (through an HTML form tag) and then
automatically forwarded to the offer page.
Page | 93
CPV Lab User Guide - Copyright 2010 - 2012 CPVLab.com
Reproduction or Sharing of this Guide is strictly prohibited without the authorized consent from CPVLab.com
Landing page:
Offer:
The Offer page reads the ‘age’ and ‘loc’ variables from the URL and appends them in the image
tag in order to update the extra tokens. The source of the Offer page will look like:
The extra tokens for this visitor will be updated to Age=27 and Location=Home.
Page | 94
CPV Lab User Guide - Copyright 2010 - 2012 CPVLab.com
Reproduction or Sharing of this Guide is strictly prohibited without the authorized consent from CPVLab.com
And about the extra tokens, yes, they have to remain token1, token2... in the image extra
token update image tag. In the campaign setup page you can set any name for the extra
tokens in order to appear nice in Stats, but the parameters in the image tag are fixed:
<img src="http://cpvlab/tokens.php?token1=...&token2=...&token3=..." border="0" />
Page | 95
CPV Lab User Guide - Copyright 2010 - 2012 CPVLab.com
Reproduction or Sharing of this Guide is strictly prohibited without the authorized consent from CPVLab.com
Capture Referrer as Token using Javascript:
We've made a small change that will allow the referrer to be passed as an extra token and
show it in Stats. We'll have a more customizable solution in the near future...but this will pass
the referrer as needed.
First define a new extra token, enter a name for it ('Referrer' for example) and enter as
parameter the string '{referrer}'.
This is a fixed keyword and tells CPV Lab to store the referrer in that extra token. See the
attached image to configure.
You can also pass additional information using Javascript…and send data to CPV Lab using
Extra Tokens.
This does take some coding knowledge and we going to make this process easier well using a
simple interface to generate the proper code based on what variables you want to attach.
The browser, screen resolution and other variables can be captured from visitors using a little
JavaScript and PHP programming. These are captured in the LP and sent back to CPV Lab
through the extra token update image tag. Possibilities are endless and depend on your coding
knowledge.
Page | 96
CPV Lab User Guide - Copyright 2010 - 2012 CPVLab.com
Reproduction or Sharing of this Guide is strictly prohibited without the authorized consent from CPVLab.com
Here’s an example of the coding…here we’re capturing the visitors screen resolution and
color depth.
Here’s the Code:
<script language="javascript">
document.write('<img src="http://YourDomain.com/tokens.php?token1=' + screen.width +
'x' + screen.height + '&token2=' + window.screen.colorDepth + ' bits" border="0"/>');
</script>
These tokens don’t require a URL Append value since the token won't be displayed in the
Campaign URL, it will be captured by the base.php page instead of being passed from the
Network.
The same thing happens with the extra tokens that get updated from the LP or Offer page, like
'screen' and 'color' in the example. These tokens don't have a URL Append value since they are
not passed from the Network. They have a Parameter defined, because this triggers if an extra
token is displayed in Stats or not.
Page | 97
CPV Lab User Guide - Copyright 2010 - 2012 CPVLab.com
Reproduction or Sharing of this Guide is strictly prohibited without the authorized consent from CPVLab.com
CRON Jobs for Campaign Data:
* Optional and benefits high volume users.
This feature gives you the option to move some operations from the Campaigns page in an
offline process that can be run periodically as a Cron job. These operations calculate data on
the Campaigns Page.
The main advantage is that the amount of time required for the calculations isn't wasted on
the campaigns.php page, it is moved in a separate process, so users won't have long intervals
when logging into the application.
Activation
In order to activate the Cron job in CPV Lab and stop performing those calculations inside the
page, you have to check the option ‘Use Cron Job for data on campaigns.php’ from the
Settings page.
Installation
The CRON job consists of a PHP page (cron-campaigns.php) that will be called periodically and
will perform the calculations. The job can be configured in cPanel by following the next steps:
1. Login into cPanel and find the ‘Cron jobs’ page
Page | 98
CPV Lab User Guide - Copyright 2010 - 2012 CPVLab.com
Reproduction or Sharing of this Guide is strictly prohibited without the authorized consent from CPVLab.com
2. Enter the Cron job details in this page. The recommended interval for the job to run is
‘Every 15 minutes’, meaning you have to enter ‘*/15’ for Minute and ‘*’ for Hour, Day,
Month, Weekday (these options can also be selected from the dropdown controls on
the right).
Then enter the command: php <path_to_cron-campaigns.php-page>
where <path_to_cron-campaigns.php-page> should be replaced with your sever path to
the CPV Lab installation (since the cron-campaigns.php page is in the root of CPV Lab).
It should be something like
‘/home/<server-name>/public_html/cpvlab/cron-campaigns.php’
3. Click the ‘Add New Cron Job’ button and the new Cron job will appear in the jobs list.
Page | 99
CPV Lab User Guide - Copyright 2010 - 2012 CPVLab.com
Reproduction or Sharing of this Guide is strictly prohibited without the authorized consent from CPVLab.com
Checking if the Cron job works
Each time the Cron page runs it will write 2 lines in a log file: one for marking the start of the
process and one for the end of the process. The log files is created in the ‘logger’ folder from
CPV Lab and has the name as: ‘cron<date>.log’
The content of these files looks like in the next image, showing the start and end of the
process, each run of the page having assigned a unique code.
Page | 100
CPV Lab User Guide - Copyright 2010 - 2012 CPVLab.com
Reproduction or Sharing of this Guide is strictly prohibited without the authorized consent from CPVLab.com
Version 2.15
2.15 New Features & Functions:
Allow 'z' as separator for other networks; previously 'z' was used only for Clickbank
Improved Stats page with option to show/hide extra tokens
Added option to show referrer in Stats
Added option to show referrer domain in Stats
Error Log Page to show log errors – this will replace the log files
Option to mark conversions for IP address
Keep extra tokens for all the additional clicks that come from the initial click - useful
when passing extra tokens to offer pages in a campaign that allows multiple conversions
Show extra tokens in visitors stats
Added inactive field in CSV export/import
Added option to include extra tokens in additional pixels
Integrate Clickbank Instant Notifications to mark conversions
Display message to increase the key in php.ini for max inputs - max_input_vars when
there are many input controls in a page.
Added extra tokens to email follow up campaigns
Added campaign priority for direct traffic code
Page | 101
CPV Lab User Guide - Copyright 2010 - 2012 CPVLab.com
Reproduction or Sharing of this Guide is strictly prohibited without the authorized consent from CPVLab.com
Parse keyword from search engine referrers with direct traffic
o Option to create and define parsing templates
o Option to Create Categories for referrers; show the category as an optional
column in Stats.
This is added primarily for future use of upcoming features.
Added export option in overall campaigns pages
Added Option to call specific additional pixels for offers
Added Option to pass revenue to the additional pixels
Added 50 records option in Target Performance
o Save the number of records to be shown in Target Performance on Reload
Added Totals row in Stats
Added Totals row in Reports
Added Totals row in Trends
Option to sum multiple revenues for the same click
Page | 102
CPV Lab User Guide - Copyright 2010 - 2012 CPVLab.com
Reproduction or Sharing of this Guide is strictly prohibited without the authorized consent from CPVLab.com
Error Log Page:
We’ve added a new page that will replace the log files. This page will display all application
errors and warnings as well as the errors that may appear during the upgrade process.
In the event you need support and log files are requested, you will now simply navigate to this
page, select the time interval to see errors for and select to Export Error Log to CSV.
Also for the Update Process as well, the upgrade.php page will write any errors that occur
while upgrading CPV Lab in the new Error Log table.
The page is under the Settings menu Error Logs.
Page | 103
CPV Lab User Guide - Copyright 2010 - 2012 CPVLab.com
Reproduction or Sharing of this Guide is strictly prohibited without the authorized consent from CPVLab.com
New Stats Page:
The Stats page brings many changes, not as much visually as in functionality. Optimizations
have also been made to increase the speed of the data tables so everything moves much
faster.
The primary changes are:
1. Added the option to Show/Hide extra tokens; also added the actual extra
tokens names in the Show/Hide dropdown instead of the generic Extra1,
Extra2... names
2. Added the option to show the Referrer Page (full referrer) and Referrer
Domain in Stats.
a. The referrers are captured automatically by CPV Lab for each click.
3. Improved grouping of stats. Previously we had 2 viewing options for the
Target Performance section:
a. Condensed (when everything is grouped by Target) and
b. Expanded (when grouped by Target, Landing Page, Offer).
The new version automatically groups by the visible columns, so it offers many more
grouping levels. For example, you can group Target Performance data by:
-
Target
Target and any number of Extra Tokens
Target and Landing Page
Target and Offer
Target and Landing Page and Offer
Target and Referrer
Target and Referrer Domain
And any other combination of the above columns; basically data are
grouped each time by the visible columns
Page | 104
CPV Lab User Guide - Copyright 2010 - 2012 CPVLab.com
Reproduction or Sharing of this Guide is strictly prohibited without the authorized consent from CPVLab.com
4. Added a totals row for each table in Stats except the tables that show only
one row like Campaign Performance. The total rows sum up all the metrics
displayed in each data table
5. Added ‘50’ as an option in the dropdown with the number of records to
show and the selection is also saved and prefilled next time you visit this
page.
Page | 105
CPV Lab User Guide - Copyright 2010 - 2012 CPVLab.com
Reproduction or Sharing of this Guide is strictly prohibited without the authorized consent from CPVLab.com
Mark Conversions from IP Address:
Version 2.15 introduces the option to mark conversions from specific IP addresses instead of
subIDs, for users that don’t have access to a list of converting subIDs.
The process is exactly the same: paste a list of converting subIDs in the Stats Update page and
select the corresponding campaign from the dropdown.
It is possible to also set the actual revenues with this method by uploading IP|Revenue
combinations, exactly as it can be done with the subIDs.
This method has one disadvantage: if there are 2 clicks in the same campaign coming from the
same IP address and only one actually converted, when uploading that specific IP address, CPV
Lab won’t know exactly which one of the clicks converted, so both clicks will be marked as
conversions.
But when there is only one click from an IP address, everything functions as usual.
Page | 106
CPV Lab User Guide - Copyright 2010 - 2012 CPVLab.com
Reproduction or Sharing of this Guide is strictly prohibited without the authorized consent from CPVLab.com
Extra Tokens in Visitor Stats:
The Visitors Stats page will now show extra tokens and these extra tokens can be controlled
through the Show/Hide Columns dropdown.
When only one campaign is selected on this page, the Extra Tokens will be displayed with
their custom names for that selected campaign.
But when clicks from all campaigns are displayed, CPV Lab cannot display the extra token
names since you’ll most likely have more than one campaign, so the columns names are
displayed as Extra 1, Extra 2...
Page | 107
CPV Lab User Guide - Copyright 2010 - 2012 CPVLab.com
Reproduction or Sharing of this Guide is strictly prohibited without the authorized consent from CPVLab.com
Allow “z” as a Separator instead of “_”:
Previously ‘z’ was the spacing separator for SubIDs only for Clickbank while ‘_’ was used for all
other networks.
Version 2.15 allows users to choose between ‘_’ and ‘z’ as separator for all the networks.
You can easily customize this from the Affiliate Networks page, by editing the current
networks. CPV Lab will automatically know how to generate subIDs and how to handle existing
subIDs based on the settings from the Affiliate Networks page.
Page | 108
CPV Lab User Guide - Copyright 2010 - 2012 CPVLab.com
Reproduction or Sharing of this Guide is strictly prohibited without the authorized consent from CPVLab.com
Include Extra Tokens and Revenue in Additional Pixels:
We had many demands for this feature, so we included the option to pass Extra Tokens and
the Revenue in the additional pixels that are entered in campaigns.
In order to include one of them in an additional pixel, you will use a placeholder to mark the
position where the item will be included.
For example, let’s say we have the following tracking pixel from another network and we want
to add it as an additional pixel in a campaign:
http://domain.com/pixel.php?info=....&add=...&rev=...
Where we want to pass the value captured by the Extra Token 1 in the ‘info’ parameter, the
value captured by the Extra Token 2 in the ‘add’ parameter and the revenue in the ‘rev’
parameter.
Then we will enter the additional pixel in CPV Lab as:
http://domain.com/pixel.php?info={!token1!}&add={!token2!}&rev={!revenue!}
So we add placeholders such as {!token1!} and {!revenue!} to specify where the extra token or
revenue will be added by CPV Lab.
Page | 109
CPV Lab User Guide - Copyright 2010 - 2012 CPVLab.com
Reproduction or Sharing of this Guide is strictly prohibited without the authorized consent from CPVLab.com
We can do the same thing and include extra tokens in JavaScript pixels, image pixels or any
other type of pixels.
For example:
Page | 110
CPV Lab User Guide - Copyright 2010 - 2012 CPVLab.com
Reproduction or Sharing of this Guide is strictly prohibited without the authorized consent from CPVLab.com
Automatically Recording Clickbank Conversions:
Special Thanks to Guy for feature!
When you have an offer from Clickbank, you can enable Clickbank instant notification by
entering the following CPV Lab page:
http://cpvlab/adclick-cb.php
Clickbank will automatically send to the above URL the following parameters:
- ctid – the Clickbank transaction ID which must be setup to be the CPV Lab
subID
- caccountamount – the conversion revenue
CPV Lab will read those 2 values and mark the correct conversion in the database, as well as
store the actual revenue, then execute any additional pixels setup for that campaign.
If you have script/image/iframe additional pixels in your campaign, you will have to use the
iframe version of the Clickbank pixel as: http://cpvlab/adclicfk-cb.php
Page | 111
CPV Lab User Guide - Copyright 2010 - 2012 CPVLab.com
Reproduction or Sharing of this Guide is strictly prohibited without the authorized consent from CPVLab.com
Call Specific Additional Pixels Based on the Offer:
The new version allows for specific additional pixels to be called based on the offer that
converted.
In order to do this a textbox has been added next to each additional pixel where you can
specify the Offer IDs corresponding to the offers you want each pixel to fire for.
If you want a pixel to fire for all offers, simply leave the Offer IDs textbox blank. If you want it
to fire for multiple offers, enter the Offer IDs separated by comma. The Offer IDs are entered
on the campaign setup page as well.
In this example, we have the following additional pixels:
The first pixel will fire for all offers, while pixels 2 and 4 will fire only for the first offer (the one
with ID=11) and pixels 3 and 5 will fire only for the second offer (ID=22).
Page | 112
CPV Lab User Guide - Copyright 2010 - 2012 CPVLab.com
Reproduction or Sharing of this Guide is strictly prohibited without the authorized consent from CPVLab.com
Parsing Templates:
Parsing templates are used to parse the target from the referrer URL, useful
especially with search engine traffic coming in campaigns that use the direct traffic
code.
We’ve added several predefined parsing templates for the most common referrer
sites, but you can easily define custom templates.
This page is found under the Settings Tab Parsing Templates
It allows you to also define the default behavior when the referrer doesn’t match
any parsing template:
use the referrer, use a default parameter or use a fixed value.
Example of a parsing template:
Let’s say that we have a campaign with direct traffic coming from Google. We want to extract
the search terms from the Google referrer URL and show these terms as the target. In order to
do this we define a parsing template that instructs CPV Lab on how to extract the search terms
from the referrer URL.
When searching on Google for ‘fishing tackle’, the URL for the search results is:
https://www.google.com/#hl=en&gs_nf=1&tok=OoOJ6qG3iiFlkeY1yubzLg&cp=12&gs_id=48&
xhr=t&q=fishing+tackle&pf=p&output=search&sclient=psyab&oq=fishing+tackle&aq=0&aqi=g
4&aql=&gs_l=&pbx=1&bav=on.2,or.r_gc.r_pw.r_qf.,cf.osb&fp=75172bbf586f4a27&biw=1600
&bih=733
The search terms in the above URL are found in the ‘q’ parameter, so this is the parameter
required in the Google parsing template. But if visitors use the Advanced Search in Google,
then the search term is found in the ‘as_q’ parameter. So we can add both parameters in the
parsing template, separated by a comma: ‘q,as_q’.
Page | 113
CPV Lab User Guide - Copyright 2010 - 2012 CPVLab.com
Reproduction or Sharing of this Guide is strictly prohibited without the authorized consent from CPVLab.com
Other Referrer Sources…
Some don’t use specific parameters for search terms, but a url structure…for example:
http://www.metacafe.com/topics/fly_fishing/
The keyword is a part of the actual URL and not in the query string. We've added features to
handle these cases as well and you’ll define the parameter as the fixed text in from of the
keyword, in this case 'topics/'.
CPV Lab will extract the keyword starting after the parameter ('topics/') and until it reaches
either the '/' character, or the end of the referrer URL.
Page | 114
CPV Lab User Guide - Copyright 2010 - 2012 CPVLab.com
Reproduction or Sharing of this Guide is strictly prohibited without the authorized consent from CPVLab.com
Campaign Priority Settings:
When using the direct traffic code, you may have campaigns using the same landing page or
campaigns where visitors may go through multiple landing pages with direct traffic codes from
different campaigns.
We introduced this feature in order to decide which of those campaigns should have priority
of the visitor.
Each campaign setup page has a textbox
where you can enter the campaign priority, a
positive numeric value, where 1 is the highest
priority.
For Example...
Let’s say you have 2 Campaigns...“Campaign1” and “Campaign2”
“Campaign1” has the Priority set to 1 and “Campaign2” has the Priority set to 2.
Here is the Visitor Path or Flow:
“Campaign1” URL LP 1 LP2 (direct traffic code for “Campaign2”) Offer
So in this example, you have Visitors going through the campaign url for “Campaign1” and
then clicking through to Landing Page 1, then to Landing Page 2 which is also used in
“Campaign2” and has the direct traffic code for “Campaign2”. With the Priority setting in CPV
Lab, a check is made on the fly to determine which Campaign has the highest priority and
which way the visitor should go.
In the example above, the visitor will be able to click through from Landing Page 2 and get to
the offer as setup in “Campaign1”.
Page | 115
CPV Lab User Guide - Copyright 2010 - 2012 CPVLab.com
Reproduction or Sharing of this Guide is strictly prohibited without the authorized consent from CPVLab.com
The same thing happens if we use the direct traffic code for “Campaign1” instead of the
Campaign URL:
LP1 (direct traffic code for “Campaign1”) --> LP2 (direct traffic code for “Campaign2”) --> Offer
Now, let's say the campaign priorities are reversed, so “Campaign2” has a higher priority than
“Campaign1”.
Campaign URL for “Campaign1” LP1 LP2 (direct traffic code for “Campaign2”) Offer
In this example, when visitors go through the “Campaign1” URL, they get to LP2 and the direct
code for “Campaign2” executes because “Campaign2” has a higher priority and now when
visitors click through from LP2, they land on the offer as setup in “Campaign2”
Page | 116
CPV Lab User Guide - Copyright 2010 - 2012 CPVLab.com
Reproduction or Sharing of this Guide is strictly prohibited without the authorized consent from CPVLab.com
Adding Revenues from the Conversion Pixel:
The default behavior of the conversion tracking pixel is to record the revenue of the current
click if it receives revenue as a parameter. This means that if the tracking pixel is called again
for the same click (same subID) but with a different revenue value, then CPV Lab will register
the last value as the revenue.
Version 2.15 of CPV Lab adds a feature that allows summing up the revenues passed through
the tracking pixel for the same click, if the tracking pixel fires multiple times.
In order to activate this behavior you will have to add the ‘&cladd=true’ modifier to the
tracking pixel URL.
Example:
Default behavior of the conversion pixel…
If the CPV Lab conversion pixel is called as:
http://cpvlab/adclick?subid=qqqqqq_1_2&revenue=11
This will set the revenue to 11 for the click having ‘qqqqqq_1_2’ as subID.
If the conversion pixel fires again as:
http://cpvlab/adclick?subid=qqqqqq_1_2&revenue=12
Then the revenue for the click with ‘qqqqqq_1_2’ as subID will be set to 12.
The modified behavior to Add Revenues Together
If the tracking pixel is called first like:
http://cpvlab/adclick?subid=qqqqqq_1_2&revenue=11&cladd=true
This will set the revenue to 11 for the click having ‘qqqqqq_1_2’ as subID.
Page | 117
CPV Lab User Guide - Copyright 2010 - 2012 CPVLab.com
Reproduction or Sharing of this Guide is strictly prohibited without the authorized consent from CPVLab.com
If the tracking pixel fires again as:
http://cpvlab/adclick?subid=qqqqqq_1_2&revenue=12&cladd=true
Then the revenue for the click with ‘qqqqqq_1_2’ as subID will be set to the sum of the
above 2 revenues, so 11 + 12 = 23.
This is most useful when you have more than one offer in a campaign that a visitor can convert
on multiples times. Or for example, where you receive a payout for the initial click and also a
conversion on the backend.
The requirements for this feature are that the affiliate network or offer source has to support
sending the revenue in the url using a token and to use the 'cladd=true' parameter in the
conversion pixel.
You’ll enter your conversion pixel at the affiliate network/offer source as:
http://cpvlab/adclick.php?cladd=true&revenue=<revenue-here>
Note: Be sure to double check what parameter and token your network/source uses to pass or
postback the revenue. In the example above, the parameter is “revenue” and the token is
“<revenue-here>
When this pixel is called multiple times from the network/source for each conversion, the
revenue will be added each time it’s passed or posted from the Network/Source.
For example, the first call will be:
http://cpvlab/adclick.php?cladd=true&revenue=10
In CPV Lab $10 revenue.
Then the network calls the tracking pixel again for a new conversion:
http://cpvlab/adclick.php?cladd=true&revenue=$15
revenue
Adding $15 to the First Call = $25
Page | 118
CPV Lab User Guide - Copyright 2010 - 2012 CPVLab.com
Reproduction or Sharing of this Guide is strictly prohibited without the authorized consent from CPVLab.com
This feature will also work regardless of what additional pixel functions you are using, such as:
- with the 'subid' parameter
- with the 'ofr' parameter
- with the tracking cookie parameter 'cpvlabclick'
Don’t forget to the set the parameter and token the affiliate network / offer source uses for
sending the revenue in URL. If you’re uncertain of what your offer source uses, contact your
rep or AM and navigate to Settings Affiliate Networks and add the revenue parameter for
each network and Click Save.
Page | 119
CPV Lab User Guide - Copyright 2010 - 2012 CPVLab.com
Reproduction or Sharing of this Guide is strictly prohibited without the authorized consent from CPVLab.com
Frequently Asked Questions
Why do the offers and landing pages not seem to be rotating when I click the Test Link
multiple times?
Refreshing the campaign url and seeing the same landing page and offers... this is normal. The
offer link is determined one step prior to the landing page, when the traffic is sent from the
CPV Network. Once the user gets to the landing page, the offer URL is already defined and
won't change.
Do I need to Cloak my campaign urls?
Data from the CPV Networks isn’t sent to the Affiliate Network, neither is the keyword and
page name. The traffic (views, visitors, clicks) from the CPV Networks are passed through CPV
Lab first and then out to the set landing pages or offers.
With Multiple Path Campaigns, what if I have 1 Path with 2 landing pages and 1 offer, then
another Path with 1 landing page and 2 offers, then another path with 4 landing pages and 1
offer…Will all the stats and rotation work correctly?
Yes, it will work correctly no matter how many landing pages/offers are in each path.
In Landing Page Sequence campaigns….what if I have level 1 with only 1 landing page, and
level 2 with 5 landing pages…will all the stats and rotation work correctly?
Yes, it will work correctly. As long as the shares on each level add to 100%, CPV Lab will rotate
through one or multiple pages on each level.
How many levels can CPV Lab handle in Landing Page Sequence Campaigns?
There isn’t a limit! On the stats page it will display stats about all levels.
With Multiple Option Campaigns, can I have more than 2 options…such as a review page on
the initial pop, that has links to 4 offers?
Yes, that’s why we have the button to add additional offers!
For Email Links…can they be cloaked…Will the tracking still work?
Yes, the tracking will work with cloaked links because we will have a page at that address
http://whateverdomain.com/page that automatically redirects to the landing page/offer page.
Page | 120
CPV Lab User Guide - Copyright 2010 - 2012 CPVLab.com
Reproduction or Sharing of this Guide is strictly prohibited without the authorized consent from CPVLab.com
Let Me Know…
My team and I developed CPV Lab with the sole purpose of making CPV easier to work with
and make it more profitable. But the key is to remove the common limitations found in most
tracking platforms when it comes to flexibility.
Your creativity and imagination should NEVER be limited by your abilities to track what is
effective and profitable. That’s the common trend found online, especially when it comes to
affiliates.
We’ve made great steps forward to remove these limitations and also have expanded the use
of CPV Lab for other traffic sources far beyond CPV. We have many, many users running CPV
Lab for Pay Per Click, Media Buys, Social, Email Drops and also Organic Traffic…Yes, Organic
Traffic.
We’re constantly developing and improving CPV Lab by adding new features, many of which
are requested by users. So on that note, Please feel absolutely free at any time to let me know
about any features you would like to see added to CPV Lab. Nothing is too crazy!
"What else can You think of?"
Have you ever said…”I wish I could track…” or “I wish I could do…”
I'd love to hear it...just let me know, send me a quick email to [email protected] and I will
personally review each request and see what we can do to get it implemented.
Thank You for your help and ideas to make CPV Lab even more powerful!
Enjoy!
Page | 121
CPV Lab User Guide - Copyright 2010 - 2012 CPVLab.com
Reproduction or Sharing of this Guide is strictly prohibited without the authorized consent from CPVLab.com
Additional Information & Guides
CPV Lab Installation Guide
http://cpvlab.com/forusers/CPV_Lab_Installation_Instructions.pdf
CPV Lab Visual Campaign Charts
http://cpvlab.com/forusers/info/CPV_Lab_Visual_Campaign_Charts.pdf
Tracking Direct Traffic with CPV Lab (Organic)
http://cpvlab.com/forusers/info/Tracking_Direct_Traffic_with_CPV_Lab.pdf
Tracking Facebook & POF with CPV Lab
http://cpvlab.com/forusers/Facebook_and_POF_with_CPV_Lab.pdf
Tracking Pay Per Click with CPV Lab
http://cpvlab.com/forusers/PPC_with_CPV_Lab.pdf
Using iFrames & Prepop in CPV Lab
http://cpvlab.com/forusers/info/Using_iFrames_and_Prepop_with_CPV_Lab.zip
Resizing Landing Page Windows
http://cpvlab.com/forusers/info/Resizing_Windows_After_the_Pop.zip
Page | 122
CPV Lab User Guide - Copyright 2010 - 2012 CPVLab.com
Reproduction or Sharing of this Guide is strictly prohibited without the authorized consent from CPVLab.com

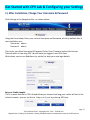
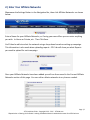
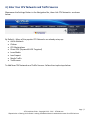
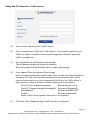

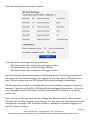
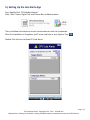
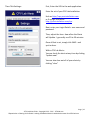
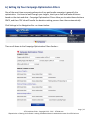
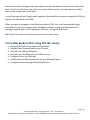
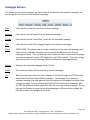
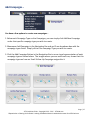

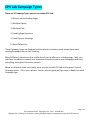
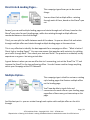
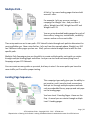
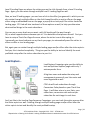
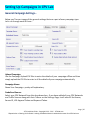


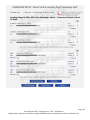
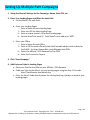
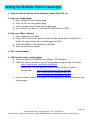
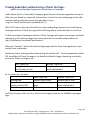
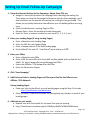


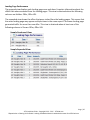
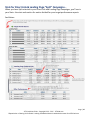
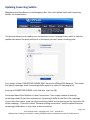

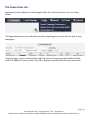
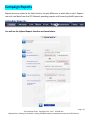
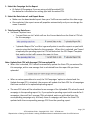
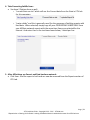

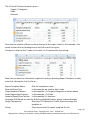
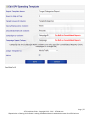
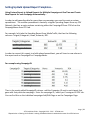
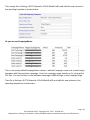
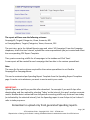

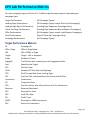
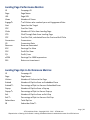
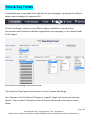

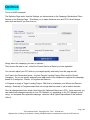


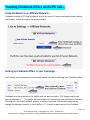
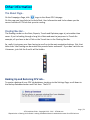
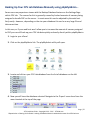
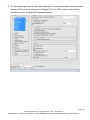

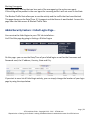
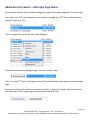
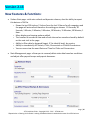
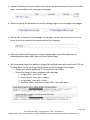

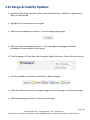
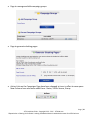
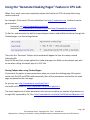
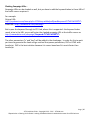
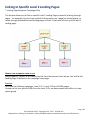

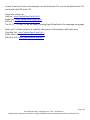
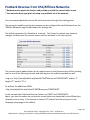
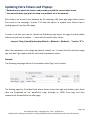


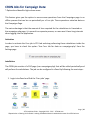
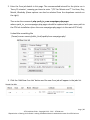
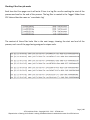

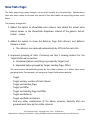
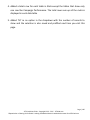
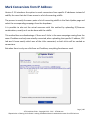
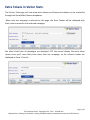

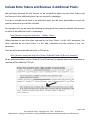
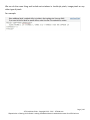

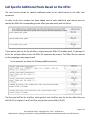


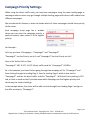

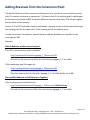
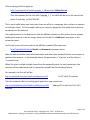


![[ TVS M ASCOT USER M ANUAL ] - TVS-E](http://vs1.manualzilla.com/store/data/005862685_1-4bbb7317613bf954ee62497b52c82516-150x150.png)