1
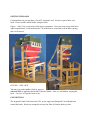
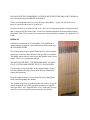
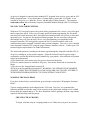
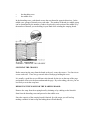
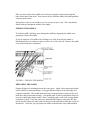
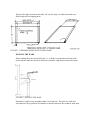
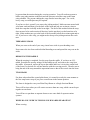
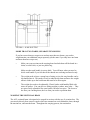
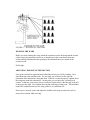
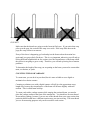
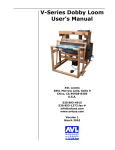
JACQUARD™ LOOM
USER’S MANUAL
AVL Looms
3851 Morrow Lane, Suite 9, Chico, CA 95928-8305
530-893-4915
[email protected]
Version 3.0 ... October 2006
GETTING THE LOOM
Congratulations on your purchase of an AVL Jacquard Loom. It's time to get to know your
loom. Please read the manual before using the loom.
Figure 1 - Side View reveals some of the major components. Note your loom comes with one to
eight Jacquard heads. Each head includes 336 hooks that are connected to the heddles, springs,
and a tie down rod.
FIGURE 1 - SIDE VIEW
Tension is set on the heddles while air pressure
(about 80 PSI.) is applied at the Heddle Tension Cylinder. Later, we will address warping the
loom ... for now, let‟s get the loom set up.
CONNECTIONS
The Jacquard Control Unit houses the CPU, power supply and Integrated Circuit Boards that
control the hooks. Hooks are arranged in twenty-four lines of fourteen hooks per line.
PLEASE NOTE THE NUMBERING SYSTEM STARTS WITH THE REAR LEFT HOOK (as
you're facing the loom) MARKED AS HOOK #1.
This is very important when you set up the loom and software. Again, rear left (first row) is
hook #1; the last hook in row #1 is hook #14.
Rear left, second row is hook #15 and so on. Each set of fourteen hooks has a connection cable
that is connected to the Control Unit. Each row is numbered both on the Jacquard Head and at
the Control Unit. The Control Unit is connected to the controlling computer via a single RS-232
Cable.
HEDDLES
Each hook is connected to its own heddle. Each heddle has a
contact tension spring that is tied at the bottom of the loom with
the TIE-DOWN BARS.
The Comber Strips may be spread farther apart or closer together
to decrease or increase the number of ends per inch or centimeter.
The heddle spacer rods are used to keep the heddles at the correct
height. This is a very important concept:
NO MATTER THE SETT, THE HEDDLES MUST ALWAYS
STAY AT THE SAME HEIGHT TO GET A CLEAN SHED.
Use the rods to keep the heddles at their proper height. Please
note the heddles must slope from front to back to maintain the
proper shed geometry.
Keep the angle necessary to have all the threads go through the
loom without impeding one another.
The Comber Strips may be pushed against one another or may be
spread through the use of the spacing strips that were supplied
with your loom. AVL Jacquards have a very wide range of warp
setts, but you must learn the system to get the sett correctly.
Figure 3 - USING THE ADJUSTABLE SETT
Note the Heddle Spacer Supports have two rows of holes. Use either row of holes with the
Heddle Spacer Rods to keep the heddles at the correct height.
The last part of the heddle adjustment is the Tie-Down Bars. They must be moved to roughly
correspond to the space of each row.
Tension is applied by sending air to the Heddle Tension Cylinder, alternately called the Pin
Frame. Apply air and the heddles will tighten up.
PRESSURE AND OTHER AIR ISSUES
The AVL Jacquard Head
operates, generally, at thirty
to fifty p.s.i. It is important
that you regulate the air
pressure at the Main Flow
Control mounted on the
side of the loom or at the
Control Unit. Set the Main
Flow Control regulator to
80 PSI.
Each hook is controlled by
its own valve located in the head. The valves are sensitive.
Applying more pressure to the unit will help lift a hook, but may make it slow to drop due to a
greater amount of exhaust air. Conversely, reducing the air may help the hook to retract, but
may result in slow action. So it is necessary to find a happy medium. Start at 40 PSI. ... it is a
good beginning.
Remember, different warps may require slightly different pressures. So experimentation is key.
WEAVING
The Shed is opened with the Foot Pedal. Each time the pedal is tapped, the loom will form a
new shed.
The loom is controlled by JacqPoint software. Once in Loom Control, JacqPoint will display
the present pick and the next pick. JacqPoint will display the finished Point Paper, which can be
adjusted at any time.
In order to execute Jacqpoint 1.0.14, the computer to be used must have the capability of an
RS-232 Serial port, or an USB port with the proper USB-Serial Adapter, where the USB
port can be assigned by the PC to either port 1 or 2. .
JACQPOINT 1.0.14 UPGRADE
The following areas of Jacqpoint were changed or revised:
a)
Hook cycling added to ensure that the valves see cool air at each pick.
b)
Added a five minute timeout cylinder de-activation timeout to avoid excessive
temperature build-up on the cylinder pneumatic valves. This upgrade will cause all
Jacquard hooks to drop if a cycle is not performed within five minutes of the previously
issued cycle. NOTE: in case that the timeout does occur, weaving may need to be placed
in „Reverse‟ mode if the timed-out pick was not completed.
c)
Added a 0.5 second delay from the footswitch activation to the time that the
hooks/harnesses are actually raised. This change corrects the tendency of the loom to
execute consecutive picks if the footswitch is held active for an extended period of time.
d)
On „Alternating Dobby‟ mode, corrected bug that caused Jacquard and Dobby to skip
every other pick (advance two picks with each footswitch activation).
CONTROL SYSTEM DESCRIPTION
The computer through Jacqpoint software interacts with the CPU module contained in the
Jacquard Controller. The interaction is simple, two way serial communication, where data for
the position of each hook is passed with the foot pedal selection.
Jacqpoint is designed to operate both a standard AVL Jacquard loom, such as yours, and an AVL
Dobby-Jacquard loom. As you do not have a Compu-Dobby, ensure that „Use Dobby‟ is not
selected in Jacqpoint, (i.e. under the „Weave‟ tab and under „Dobby Options‟). The computer
sends and receives data to/from the Jacquard (Jackrabbit Module) through a RS-232 serial port.
WEAVE CYCLE SHED CONTROL
With most AVL Jacquard systems, the system can be programmed for a weave cycle (close/open
shed or open/close shed). In the case of a single pedal activation programming, the first pedal
activation will result in an open shed. Each pedal activation thereafter will result in a close shedopen shed cycle. For the two foot pedal activations program, the one activation will open the
shed and the next will close the shed. Weave cycle programming is accomplished in the
Jacquard Controller CPU and typically requires the use of a special interface cable to be
connected between the Jacquard Controller and a personal computer. The weave cycle is defined
in the Jacquard Controller CPU using the proper firmware interface software. Contact your AVL
technical support representative for further information.
The footswitch operates by sending an electronic signal through the Jacquard Controller CPU to
Jacqpoint, residing on your personal computer. Select the footswitch and Jacqpoint sends a
command to activate/deactivate the hooks identified by your pattern. Selected hooks will remain
in their up position until:
a) The footswitch is activated to cause Jacqpoint to deactivate the hooks.
b) The five-minute timeout is reached in Jacqpoint. Activate the footswitch to reawaken the
hooks.
c) The power to the Jacquard head is turned off.
d) The air to the Jacquard head is turned off. WARNING: WE STRONGLY RECOMMEND
AGAINST USING THIS TECHNIQUE AS THE JACQUARD VALVES WILL OVERHEAT
WITH REPEATED/PROLONGED ACTIVATION WITHOUT AIR SUPPLY.
WARPING THE PLAIN BEAM
If you have ordered only a sectional beam, proceed to the section titled “Warping the Sectional
Beam”.
Various warping methods can be adapted to the AVL loom. However, we recommend the
following method in which the warp is first wound on to the plain beam with the use of a raddle.
Please study this method and try it. We have found that it aids in getting a uniform warp tension,
especially when dealing with long warps.
CREATING TWO CROSSES
To begin, wind the warp on a warping board or reel. Make sure you put in two crosses:
•
•
the threading cross
the raddle cross
In the threading cross, each thread crosses the next thread in opposite directions. In the
raddle cross, groups of threads cross each other. The number of threads in a raddle group
can be determined by the number of ends to be placed in each section of the raddle or by
the number of threads you are holding in your hand while winding the warping board.
FIGURE 4 - CREATING TWO CROSSES
SECURING THE CROSSES
Before removing the warp from the board or the reel, secure the crosses. Use four ties to
secure each cross. These ties go on each side of both pegs holding the cross.
It is usually a good idea to use different color threads for the ties on the tops of the pegs
and another color to tie the bows underneath the pegs. By color coding your ties, you are
less likely to twist the warp later.
REMOVING THE WARP FOR THE WARPING BOARD
Remove the warp from the warping board by chaining or by winding on the kitestick.
Start from the threading cross and proceed to the raddle cross.
Since the capacity of the warping board is limited, for wide warps you will end up
making a number of mini-warps and taking them off individually.
ADJUSTING THE TENSION DEVICE
Before winding on the warp, there are a few small things to take care of on the loom.
First, check the tension device to make sure the rope is wrapped three times around the
tension drum and that the rope end is clipped to the spring. This will prevent the warp
beam from slipping backwards during winding and threading.
ATTACHING THE RADDLE
Now secure the raddle to the back of the loom. If you have an AVL raddle, simply slip it
into the set of holes in the back of the rear vertical members.
WINDING THE APRON
Put your apron on the beam with velcro and wind your beam in the warping direction so
that your apron is wound on the beam.
ATTACHING THE WARP TO THE APRON
Bring the apron around the separation beam and put the metal rod through. You can also
put your warp section onto that rod or you can attach another one with the warp.
FIGURE 5
INSERTING STICKS IN THE RADDLE CROSS
Place two lease sticks in the raddle cross and secure together with string through the
holes in the ends of the sticks. Now remove the ties from the raddle cross and spread the
warp out on the sticks.
Measure the center of your raddle to use it as a center of your warp. The warp threads
should either go through the middle of the raddle.
FEEDING THE RADDLE
To feed the raddle, distribute yarns through the raddle by dropping each raddle cross
group into a dent in the raddle.
If you are using an AVL raddle with a sliding cover, slide it on after the raddle is
threaded and secure it with two or three cord ties so it can't come off. Remove the raddle
cross sticks when this is completed.
FIGURE 6 - FEEDING THE RADDLE
PREPARING THE PAPER
Prepare the paper for winding between the warp layers. Again, for the most professional
results, and fewer tension problems, we suggest that the warp be as smooth, tight, and
compact as possible. This would mean not using corrugated paper or sticks as they will
make the warp too fate and/or lumpy. Corrugated paper is just too soft and the warp can
never be wound tight enough with it. Heavy wrapping paper works well; seventy pound
craft paper is good. If you are going to be using smooth, slippery warp yarns like fine
linens or perle cottons, the edge yarns are going to need extra help in order not to slip off
themselves. To do this, cut your paper four inches wider than the warp width and then
fold over the edges an inch on each side. Be sure the warp is wound between the two
folded edges not overlapping them.
FIGURE 7 - PREPARED PAPER WITH FOLDED EDGE
WINDING THE WARP
When winding the warp on from the back, i.e., with the warp spread out in back of the
loom, turn the crank in a clockwise direction so that the warp comes in from the bottom.
FIGURE 8 - WINDING THE WARP
Remember, wind the warp on tightly under a lot of tension. This will vary with each
warp material, but a good rule to remember is that the tension of the wound on warp must
be greater than the tension during the weaving operation. You will need one person to
hold a warp under tension on the back and one person to wind the warp on the beam
using a handle. The person winding the warp can also insert the paper. For a wide,
heavy warp, several helpers may be required.
If you have to do it yourself, you can use the jerking method. Make one turn around with
your beam crank and then go to the back of the loom and jerk one section at a time to
make the warp that is already on the beam tight. The idea of this method is that the warp
does not need to be under tension all the time, but the part that is on the beam has to be
tight. Make another turn, go to the back of the loom and jerk all the sections again and so
on. If you have a wide warp, you might need to do up to ten jerking motions after each
turn.
THREADING CROSS
When you come to the end of your warp, insert lease sticks in your threading cross.
Now remove the ties from each individual threading cross and spread the warp out on the
sticks.
REMOVING THE RADDLE
When the warping is completed, free the warp from the raddle. If you have an AVL
raddle, first untie the security strings, lift the raddle top off, and remove the warp from
the raddle. Afterwards, replace the top on the raddle and leave it in its place on the back
of the loom if so desired as it will not interfere with the weaving process. Then be sure to
bring the end of the warp around the separation beam so that it now travels into the loom.
TWO BEAMS
For those who ordered the second plain beam, it is wound in exactly the same manner as
the first warp beam except if you put a second beam in the bottom position.
The loom is designed to carry two Plain Warp Beams or a Single Sectional Beam.
There will be times when you will want to use more than one warp, which can not be put
together on one beam.
You will have to put them on separate beams or use some kind of separate tension
systems.
WHEN DO YOU NEED TO TENSION YOUR WARPS SEPARATELY?
When weaving:
•
Very different size yarns.
•
Yarns with different stretching qualities.
•
Different densities.
•
Different structures.
•
Supplementary warp techniques (because some warp threads do not interlace as
often as others).
•
A group of special yarns for selvedges and borders.
•
Loops, piles, or puckers like seersucker.
•
More then one layer with different setts in each layer.
•
More than one layer with a different pick count in each layer.
SETTING TWO BEAMS
If you are confident in setting one beam, it is just as easy to set up a loom with two
beams. It might take twice as much time and you do need to be more careful not to mix
sequences.
•
Wind each warp on the beam the same way you would do it if there were only one
beam on the loom (plain or sectional). Make a cross and have a pair of lease
sticks with a cross in each warp.
•
See enclosed picture for warp routing.
•
Proceed with a threading as if you only had one beam/one cross, following your
threading instructions and taking special care of which thread from which pair of
lease sticks comes next.
FIGURE 9 - WARP ROUTING
MORE THAN TWO WARPS, SEPARATE TENSIONING
If you have more than two warps to set and not more than two beams, you need to
weight/tension your additional warps separately (do the same if you only have one beam
and more than one warp to set).
•
Make your warp sections on the warping board and take them off the board in a
chain, on a kite stick, or just in a plastic bag.
Make sure that each bundle is not too thick. You will know when you need to
divide each bundle if you feel that all the threads are not being tensioned evenly.
•
The weight needs to have a strong loop of string on it so the warp bundles can be
slip knotted into it. This makes it easy to undo the slip knot and move the weight
when it climbs up to the back beam and must be let down again.
•
The weight also needs to be adjustable. Plastic bottles with handles filled with
water are perfect. You can also use fishing weights, washers, nuts, bolts ... They
are not as easily adjustable like water bottles, but take less space. The lower to
the floor you can hang them, the less often you need to reposition them.
WARPING THE SECTIONAL BEAM
The AVL sectional beam is designed to be warped in sections with the use of a tension box. The
yarn travels directly from cones or spools which are mounted on a rack behind the loom, through
the tension box, and onto the beam. Throughout the warping process, the tension box
automatically keeps a constant and uniform tension on the warp. Not only does this system save
time, but it makes it possible to wind on very long warps which would never fit on a warping
board or reel.
SECTIONAL BEAM CALCULATION
First, you must calculate the number of spools or cones of yarn you will need. Each
section is wound onto the sectional beam separately, therefore, you‟ll need to have one
spool or cone for each end in that section (if your section is 2" wide, with sixteen E.P.I.,
that would be thirty-two spools or cones of yarn).
NOTE: It used to be that all sections were 2" wide. On an AVL sectional beam with
metal pegs, you can decide to use 1", 2", or any number of inches sections. You can
simply add more pegs in the pre-made holes or take them out.
To prepare for sectional beam warping, we need to calculate:
•
how many spools we need to wind
•
how many yards do we need to wind on each spool
•
total yardage for the project
•
NUMBER OF SPOOLS?
Sectional beaming requires the use of as many spools loaded with thread per
individual section as your planned sett in the reed dictates.
To calculate the actual number of spools required, we need to know:
•
how many EPI are we going to use in the fabric
•
what SIZE SELECTION will we have to use in the fabric
If your warp is set at 24 e.p.i. per 1”, you will need 24 spools for a sectional beam
with 1” sections or 48 spools for a beam with 2” sections.
Therefore we can say:
# OF SPOOLS = EPI x SIZE OF THE SECTION
•
NUMBER OF YARDS PER SPOOL?
To calculate the number of yards per each spool, we need to know:
•
the LENGTH OF THE WARP
•
NUMBER OF SECTIONS on the beam
We calculate the number of sections by dividing the WIDTH OF THE WARP by
the SIZE OF THE SECTION. If the warp width is 40” and we are using 2”
sections, our number of sections is 20.
All together, we can say:
# OF YARDS PER SPOOL = LENGTH OF THE WARP x # OF SECTIONS
•
TOTAL YARDAGE?
If it is a single color warp or if a color sequence is repeating in each section, the
same spools or cones can be used to wind all the sections needed for the warp.
TOTAL YARDAGE = # OF SPOOLS x # OF YARDS PER SPOOL
It is important to make these calculations in advance so that you can purchase your yarn
in spools or cones corresponding to the amount of yardage needed on each. Sometimes
this is not possible and you will need to wind your own spools from yarn that is in larger
packages. For doing this, you will need empty plastic spools, a bobbin winder
(preferably electric), and a yardage counter. These items are available from AVL.
EXTENSION CORDS
You might want to make a permanent set of extension cords to use when warping the
sectional beam. Extension cords are also called apron cords and have the same function
as the apron on the plain beam. They give you "reach" from the warp beam and allow
you to weave every possible inch until the end of the warp touches the last shaft you are
using. Make them out of a strong non-stretchable linen or cotton cord. You will need to
make one extension cord for each section in your sectional beam. For each extension
cord, cut a piece of cord. Take the two ends of the cord and knot them together. Measure
to make sure that they are long enough to reach all the way to the harnesses. All
extension cords should be exactly the same size.
When measuring the length of the cords, also check to be sure that when the cords are
wound on to the beam, the end of the loop and any knots in the cords fall between the
crosspieces of the sectional beam, not on them. A sectional beam is usually not solid. It
is a frame that has metal pegs. That way you can keep the warp smooth on the beam
without going over the knots of threads.
FEEDING THE SPOOL RACK
Next, place a spool or cone rack about five or six feet behind your loom. Place the spools
or cones for the first warp sections on the cone rack.
Make sure you put each thread through the metal eye on the spool rack so the threads do
not get tangled.
When arranging the spools on the spool rack, it doesn't matter whether you go top to
bottom or bottom to top, the important thing is to be consistent in vertical columns and to
place the spools in the order that the threads are in the warp.
Before winding the sectional beam, make sure to disengage the tension system so that the
beam will turn counterclockwise swiftly. To do this, unlock the tension rope from the
spring and completely unwrap the plastic cord from around the tension beam drum. Also,
remember to remove the weight from the tension arm, if you have automatic tension on
your loom.
POSITIONING THE TENSION BOX
On the beam on the back of the loom, set the tension box. That position will allow the
tension box to travel from one section to another. The tension box is fastened to the
separation beam with wing nuts. These can be released for the tension box to move.
Once centered properly for a particular section, the tension box needs to be tightened
again (for each section).
TENSION BOX
The tension box is an essential warping tool which:
•
Puts threads under tension.
•
Spreads threads to the proper width.
•
Makes thread-by-thread lease.
TENSION BOX HEDDLE INSTALLATION INSTRUCTIONS
If this is your first time to use a tension box, you need to install heddles on the harnesses.
Your tension box is delivered with one bundle of one hundred heddles. These are held
together with twist ties. Leave these on for now. Refer to the upcoming diagram to
familiarize yourself with the tension box and its parts. Push down on one of the
harnesses until it stops. This causes the other harness to go up. You will use that later
for making a threading cross. Right now we‟ll need to use it to help in the assembly of
the heddles to the harnesses.
•
Remove the “heddle retainer” of the harness that is up, using a phillips head
screwdriver.
•
•
•
•
•
•
•
•
Notice there are four twist ties holding the heddles together. Separate the top two.
Insert the top bar (of the harness that is up) into the space created by pulling apart
the twist ties. Insert the bottom bar (of the harness that is up) into the space
created by pulling apart the bottom two twist ties, making certain that the heddles
aren‟t‟ twisted. Now remove the twist ties.
Count off fifty heddles and cut the loop at the top between the 50th and the 51st
heddle.
Now put the four twist ties back on the fifty heddles that were the last to go on the
harness.
Remove these fifty and reattach the “heddle retainer”.
Now push down on the harness that is up, making the other harness come up.
Remove the heddle retainer.
Pull apart the top two twist ties and insert the top of the harness (which is up) into
the space created. Pull apart the bottom two twist ties and insert the bottom of the
harness into the space created.
Reattach the heddle retainer.
THREADING THE TENSION BOX
The best way to thread the tension box is to take one thread from the cone rack and thread
it all the way through all the parts of the tension box, then the next thread all the way
through. It works best to use the threads from the rack in a vertical order rather than a
horizontal order.
FIGURE 10 - TENSION BOX
Now let‟s go through the sequence for threading the tension box. First, move the two
adjustable tension pegs up above the stationary pegs or remove them completely. Now
sley the thread through the rear (stationary) reed section using a sley hook. Since this
reed is eight dents per inch, you will divide the E.P.I. into eight to find out how many
ends will be in each dent (with sixteen E.P.I, put two ends in a section). If your E.P.I.
does not divide equally by eight, you can either vary the number of ends in each dent
(with twenty E.P.I., alternate two and three ends in the dents) or thread the dents a little
wider than two inches (with twenty E.P.I., put two ends in each dent; with forty ends, the
reed will be sleyed 2 1/2” wide).
Next, bring the thread straight through the tension peg section in-between the larger
adjustable tension pegs and the smaller stationary pegs or just above the smaller
stationary pegs if you have removed the larger ones.
Next, thread the end through the two sets of heddles. The first thread goes through the
front set of heddles and the next thread goes through the rear set of heddles. Repeat this
alternating heddle threading for the rest of the ends. The heddle system will be used later
to create the threading cross.
Now thread the end through the front pivoting reed. Here you have a choice of using an
eight dent or ten dent reed. Pick the one that can be sleyed evenly and as close to the
desired section width. If you can not get the exact width of the section, sley your reed
slightly wider. This will make it just slightly wider than the space between the pegs. The
section will be narrowed down by pivoting the reed. Never sley the reed narrower than
the section on the beam. There is no way to expand it. After the tension box is
completely threaded, the larger pegs are moved downward to apply tension. The further
down they are moved, the more tension will be applied to the yarn. This is an adjustable
system as different yarns require more or less tension. With a heavy wool the pegs may
only need to be moved half way down, whereas with a fine silk, the pegs may need to be
moved all the way down and the yarn wrapped an extra time around one of the stationary
pegs to get the proper tension. Once you have adjusted the tension correctly, do not
change it during the winding of the beam, as long as you are using the same type of yarn.
Once the tension box has been threaded, it is not always necessary to rethread it. If you
need to change spools or cones, simply tie the new ends on to the old ends just before the
rear stationary reed, then gently pull on the old ends until the new ends have come all the
way through the box.
POSITIONING THE SEPARATION BEAM
To adjust the direction of your warp that travels from the tension box to the beam,
remove the breast beam from the front position and place it in the mid-horizontal notch
(see the illustration below).
FIGURE 11 - WINDING ON THE WARP
WINDING THE WARP
Before you start winding the warp, attach the extension cord to the beam and the section
of the warp to an extension cord, tie an overhead knot in the warp threads from one
section and slip that knot into the opening of the larkshead knot you created in the
extension cord.
Pull it tight.
ADJUSTING THE SIZE OF THE SECTION
Line up the tension box approximately behind the section you will be winding. Now
wind about one yard onto the beam. As you wind, you will need to fine tune the
placement of the tension box along the track. When it is centered properly, tighten down
the wing nuts under the tension box. At this point, you can pivot the “pivoting reed
section” so that the yarn comes close to, but doesn‟t quite touch, either the peg to the left
or the peg to the right. Now tighten the wing nut under the pivoting reed. This shouldn‟t
need to be readjusted until you are using yarn of a very different size.
Extra care to correctly center and adjust the width of each warp section will result in
more perfect tension while weaving.
FIGURE 12
Make sure that the threads are going on to the beam in flat layers. If you notice that warp
piles up at the pegs, the section of the warp is too wide. If the warp falls down at the
pegs, the warp section is too narrow.
If any of the above is happening, go back and pivot the front reed on the tension box
again until you get perfectly flat layers. This is very important, otherwise you will end up
having different length threads in one section, since the circumference of the beam within
the section is not going to grow evenly. Therefore, you will end up having lots of tension
problems.
To determine the length of the warp you are putting on the beam, you need to count either
turns, revolutions, or yards.
COUNTING TURNS OR YARDAGE
To count turns, you can do it in your head, but it is more reliable to use a digital or
mechanical revolution counter.
Counting revolutions even with a digital counter will still give the approximate warp
length only, because the circumference of the beam will increase slightly with each
rotation. This is called beam build up.
To count yards with a yardage counter while warping the sectional beam, you need to
place the yardage counter at the front of the tension box. You should use an extra thread
for measuring yardage, because if you use one of the threads from your warp section, that
particular thread would have a different tension once you start weaving. The extra thread
you use for measuring purposes only can be reused for each section.
FIGURE 13 - ATTACHING THE YARDAGE
COUNTER TO THE TENSION BOX
CREATING THE CROSS
When there is about a half yard left to be wound onto the beam, it is time to make the
threading cross. Simply push on the rear heddle frame of the tension box, making half of
the threads go up and the other half go down.
Now slip in an eight inch piece of contrasting thread (called a marking thread) through
the opening (called a shed) created between the threads above and the threads below.
Locate this marking thread about half way between the tension box and the separation
roller.
Now push on the front heddle frame, making the other half of the threads go up. Now
take one end of your marking thread and bring it through this shed. The two ends of the
marking thread should now be together. Tie them in a bow knot. Wind the rest of the
first section on, cut the ends, and secure to the wound on thread using a rubber band over
the pegs.
Continue winding all the sections in the same manner by moving the tension box along
its track.
INSERTING STICKS IN THE TREADING CROSS
When all the winding is complete, remove the rubber bands, unwind a few feet of warp,
and slip one lease stick through the path created by the upper portion of each marking tie.
Now slip another lease stick through the path created by the lower portion of each
marking tie. Secure the lease sticks together, leaving about two inches between them,
using masking tape or string through the end holes of the lease sticks. Now bring the
lease sticks, with the warp ends, around the separation beams, so that warp travels
towards the center of the loom (harnesses). Remove the breast beam from the position
behind the harnesses and place it to its original position on the front of the loom.
Now tie the lease sticks on the side of the loom so that they are at eye level when you are
in your threading position.
READJUSTING THE TENSION
To keep the warp from slipping forward during the threading process, rewind the tension
rope around the pulley and tension drum and clip the rope end to the spring.
COMBINING SECTIONAL AND PLAIN WARPING
If you are winding a very fine warp, say forty ends to the inch or more, and do not have
or do not want to wind a lot of spools or cones, it may be more convenient to wind
separate warp sections on a warping board or reel and go from there directly to the
sectional beam. If you decide to do this, however, your warp will be limited in length by
what will fit on the warping board or reel. If you choose this method, follow these steps:
•
Calculate number of threads for each section on your sectional beam.
On the warping board or on the warping reel, make “baby warps” for each section
on your beam (if you are using a warping board, you will be limited in length).
Make crosses at each end: raddle cross on one side and thread-by-thread cross on
the other.
•
Take the warp off the board or reel by taking off the thread-by-thread cross first.
•
Put the warp threads from a first “baby” warp in the raddle, making sure that
threads are spread evenly and that they are creating flat layers when wound on the
beam. Put the raddle top on or secure warp threads with rubber bands.
Instead of a regular raddle, you can put a mini-raddle in place of the front reed on
the tension box. In this case, the tension box is used only for guiding threads into
the sections. You do not thread threads in the tension box through the harnesses
nor through the back reed and you do not adjust tension with the pegs.
•
Attach each baby warp to the extension cords and proceed as in regular sectional
beaming procedure.
•
Since you are not using the tension box for tension, be sure to keep it taut
manually.
•
When you come close to the end of the section, take the reed cover off and
continue winding the rest of the baby warp.
•
Secure that section to the beam and continue to the next one.
THREADING, SLEYING, AND TYING ON
PREPARATION FOR THREADING
To prepare for threading, tie the threading cross sticks in a comfortable and visible
position for threading.
You may also find it helpful to raise the harnesses. To raise the harnesses, pull the dobby
arm down to the bottom of its slot. To secure the arm in this position, simply insert the
wooden retainer block. On the bottom of the dobby unit are 16 cable ends corresponding
to the 16 harnesses or 24 cables for 24 harnesses. In turn, pull each cable end downward
on each cable into its slot in the arm, thus raising the harnesses. Make sure to lower the
harnesses again when threading is completed. Never remove the block while any
harnesses are lifted as this will cause the harnesses to drop too rapidly.
It is helpful to remove the breast beam, the beater top, and reed for the comfort.
The important thing in threading is your comfort. Take the time to position everything so
that your body feels at ease while threading.
THREADING THE HARNESSES
Now we're ready to thread the loom. If you are right handed, it is recommended to start
at the right side of the warp. Grasp one group of ends in your left hand and your sley
hook in your right hand. Direct the "hook end" of the sley hook through the "eye" of the
first heddle you need to thread. Pull the thread through (for example, if you had a
straight draft on eight harnesses, your first thread would go through the eye of a heddle
on the 8th harness. The second thread would be threaded through the eye of the heddle
on the 7th harness, the third thread through the 6th harness, and so on).
UNUSED HEDDLES
After threading is complete, make sure that the unused heddles are all pushed to the far
sides of the harness sticks between the screw eyes and the ends of the harness sticks. For
balance, there should be approximately equal numbered groups of unused heddles on
both sides of each harness. This is especially the case if you have PES heddles.
In some cases, such as a very wide warp with a lot of unused heddles on the ends of the
harnesses, you may need to tie each group of unused heddles into a tight bundle with tie
tapes or string to keep them from falling off the ends of the harness sticks or you may
need to take heddles off the loom.
In the first six months of using a new loom with polyester heddles, the heddles stretch out
to adjust to the harnesses, and the heddles on each harness get stretched out to different
sizes. For this reason, we do not recommend removing heddles from the loom for six
months. When heddles are removed, they should be marked so they can be returned to
the same harnesses.
For the same reason, once the heddles have been on the loom for awhile, it is not a good
idea to switch heddles to different harnesses. Mixing them up once they have been
stretched would affect the evenness of the shed. What some weavers do with wide
warps, in order to avoid having to take off extra heddles, is to distribute the unused
heddles among the threaded heddles as the threading is taking place.
SLEYING THE REED
Now sley the warp ends through the reed. Some weavers start from the right side; some
from the left; some in the middle. But, in all cases, be sure to measure accurately before
starting so that the warp will be centered in the reed (or offset four inches to the right if
the warp on the beam is already offset). Weavers have various ways of positioning the
reed for sley.
TYING ON TO THE APRON
Now that you have your warp ends ready to tie, we need to prepare the apron. The ends
will be tied to the apron rod.
Notice that the apron has two hemmed ends. One end has openings in it and the other
end has a velcro strip. Take the end with the velcro and secure it to the cloth storage
beam, making sure it is centered. Then wind the apron once around so that it holds itself
in place. Route the apron up and around the cloth beam. Spread it out flat and center it
over the cloth beam and insert the metal rod into the hem.
FIGURE 14 - WARP ROUTING
Now tie the ends to the metal rod. Starting from the middle, bring a first bundle toward
you over the apron rod, then around and under it. Divide it in half and bring one half up
on each side of the bundle. Use the ends to tie a surgeon's knot. It is the same as the first
tie you make tying a shoelace, except you loop the end through twice. This kind of knot
is very good for readjusting the tension.
FIGURE 15
Start with one section in the middle, then the far right and the far left outside ones. Work
your way in.
By now, the sections that were tied first are quite a bit looser than the ones tied last. To
correct this, you do not need to untie the knots, simply grasp the ends and pull them away
from you, then re-tighten the knots. Repeat this until all of the section are at
approximately the same tension.
TYING ON TO AN OLD WARP
A new warp can be tied on to an old warp, thus eliminating the threading and sleying
process, if the new warp introduced into the loom uses the same threading pattern and
E.P.I. as the last warp. This process is especially good for production weavers as it saves
time. It also takes less concentration and there is less chance of making mistakes in
threading.
The tying on process starts when you are finishing the last warp on the loom. Before you
cut off the fabric, make sure to leave enough unwoven warp to extend one foot behind the
harnesses, through the heddles, and about six inches past the reed when the beater is in its
rear position. Now open two opposite tabby sheds and insert the lease sticks into these
sheds behind the harnesses. Secure the sticks together with tie tapes through the holes.
Now carefully cut the fabric from the loom and tie bundles of warp coming through the
reed together so the yarn can‟t slip through. Cut the warp in back (leaving one foot past
the lease sticks) and also tie bundles of yarn together for security.
After winding on the new warp on the beam, you can sit on a small stool placed inbetween the harnesses and the back of the loom and tie corresponding yarns from the two
sets of lease sticks together. An overhand or weaver's knot work well. This may seem
slow at first, but you will work up a faster rhythm with some practice. A good goal to
reach would be to tie 200 to 250 ends together an hour.
When all ends are tied together, go to the front of the loom and gently pull on the bundles
of yarn going through the reed to pull the new warp through the heddles and reed. Then
tie on to an apron.
JACQPOINT INSTRUCTIONS
JacqPoint is a simple program…the vast majority is well explained in the On-Screen Help.
There are a few other key concepts:
J1P FILES
A number of different Jacquard programs can be accessed via J1P files. They include:
1.)
2.)
3.)
ArahWeave
JacCard Master
Pointcarre
4.)
5.)
ScotWeave
SOPHIS
Each will save their files in a J1P format. Then in FILE:OPEN, you should be able to open the
file directly into JacqPoint.
WEAVE MENU
Use Jacquard Options to set the Comm Port from your PC to the Control Unit.
Use Loom Control to start weaving. Make sure you know your repeat.
OPTIONS
In the Options Menu, you must establish the size of your Point Paper in both Ends and Picks.
Picks are adjustable. Ends should be set to the number of hooks in your system.