1
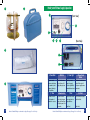
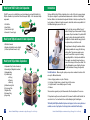
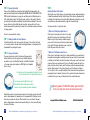
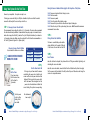
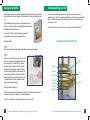
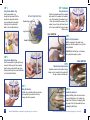
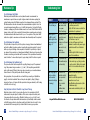
AquaChiFootBath.com
800-349-6962
"RVB-$IJ
Get Energized!
Get Energized!
Model 5400 FB
Hydro-stimulation Spa
User Manual
Congratulations on your purchase of the Aqua-Chi Hydro-stimulation Spa. The Hydro-stimulation Spa is a noninvasive, water
based energy system designed to increase energy levels in living
things. Please read this manual thoroughly before commencing to use
the Hydro-stimulation Spa system. Take careful note of all safety warnings and precautions and only use this equipment as described in this manual.
Contents
SAFETY WARNINGS AND PRECAUTIONS BEFORE USING THE SYSTEM CADDY STORAGE COMPARTMENT
SYSTEM COMPONENT IDENTIFICATION Model 5400 FB POWER SUPPLY EXPLANATION Model 5400 FB GFCI SAFETY Cord Explanation Model 5400 FB Quick Connect DC Cable Explanation
Model 5400 FB Spa Module Explanation
INTRODUCTION SETTING UP THE SYSTEM USING THE SYSTEM CLEANING THE SPA MODULE THE REPLACEABLE RINGS AND STRIP Stages of the Ring Wear
REPLACING THE RINGS AND STRIP MAINTENANCE TIPS TROUBLESHOOTING CHART Removing the Power Pack from the Carry Caddy
SPECIFICATIONS WARRANTY Model 5400 FB Hydro-stimulation Spa, Energy For the Body
PAGE 5
PAGE 6
PAGE 6
PAGE 7
PAGE 9
PAGE 10
PAGE 10
page 10
PAGE 11
PAGE 12
PAGE 16
PAGE 18
PAGE 19
PAGE 20
PAGE 21
PAGE 24
PAGE 25
PAGE 26
PAGE 26
PAGE 27
Please Check your Hydro-stimulation Spa!
The Model 5400 FB Hydro-Stimulation Spa comes packaged with everything you need to begin
sessions. Please check the contents with the list below to ensure you have them all and to
identify the components.
Safety Warnings and Precautions
Read all safety warnings and precautions in full before operating the 5400 FB Hydrostimulation Spa. Be sure to follow all safety and operating instructions.
ALWAYS
FB Package
1. Keep the 5400 FB power supply well away from water. (The Hydro-stimulation Spa comes
with a 10-foot cable to ensure a safe operating distance.)
2. Place the 5400 FB power supply and caddy on a level, stable, dry surface.
3. Dry hands thoroughly before operating the 5400 FB power supply.
4. Use the 5400 FB Hydro-stimulation Spa in a well-ventilated area.
5. Unplug the power cord from the wall when unit is not in use.
• Model 5400 FB Power Supply
• GFCI Safety Power Cord
• 2 Spa Modules
• 2 Quick Connect DC Cables
• User Manual
• 2 Spare Fuses
• 20 Replacement Ring & Strip Sets
• Foot Bath
• 12 Foot Bath Liners
• Carry Caddy
DO NOT
1.
2.
3.
4.
5.
6.
7.
8.
9.
Operate the 5400 FB Hydro-stimulation Spa without the GFCI power cord supplied.
Allow children to operate the 5400 FB Hydro-stimulation Spa.
Handle the 5400 FB Hydro-stimulation Spa with wet hands.
Disassemble the 5400 FB power supply.
Place the 5400 FB power supply in water.
Attempt to repair or service the 5400 FB power supply unit yourself.
Replace fuses with ratings other than specified.
Use the 5400 FB Hydro-stimulation Spa for any purpose other than described in this manual.
Operate the 5400 FB power supply on a surface such as thick carpet where airflow under
the unit would be restricted.
10. Operate the system during electrical storms.
11. Pick up the carry caddy by the power pack handle.
DO NOT use extension cords. Also, should the 5400 FB Hydro-stimulation Spa ever
become damaged in any way, disconnect and contact an authorized repairer.
Storing the 5400 FB Hydro-stimulation Spa
AquaChiFootBath.com
800-349-6962
Model 5400 FB Hydro-stimulation Spa, Energy For the Body
Store the 5400 FB in a cool, dry, dust free
place. If storing for prolonged periods,
place the 5400 FB back in the Foot Bath
supplied. Never place any component of
the 5400 FB back into the Carry Caddy or
Foot Bath when wet. Always allow each
part to dry thoroughly.
Model 5400 FB Hydro-stimulation Spa, Energy For the Body
Before Using Your System for the First Time
System Component Identification
Before using the Model 5400 FB Hydro-stimulation Spa for the first time, familiarize yourself
with the components and controls. This will ensure that when you set up the system you
will be able to follow the instructions confidently and correctly. Also, use this time to check
that the system has arrived without any damage during shipping. Should you find any
component damaged, contact your place of purchase immediately. Also it is important to
become familiar with the restrictions placed on the system before continuing.
Become Familiar with Each of the Individual Components of the System.
Restrictions for Use of the System
1. Any individual that is pregnant or may be pregnant should not use the system.
2. Any individual that has transplanted organs should not use the system.
3. Any individual that has any implanted electronic device; (such as but not limited to a
pacemaker) should not use the system.
4. The system may only be used for a maximum period of 35 minutes per use.
5. The system may only be used every other day.
6. The water used by the system may only be used once (fresh water should be used for
every session.)
7. Only one individual may use the system during any session.
8. DO NOT use any additives in the water other than those recommended in this manual.
1. Model 5400 FB Power Supply
2. GFCI Safety Power Cord
3. Quick Connect DC Cable
4. Replacement Strip
5. Replacement Ring
6. Spa Module
7. Foot Bath
8. 12 Foot Bath Liners
9. Carry Caddy
1
2
3
What Kind of Water Should be Used with the System?
The system may be used with most types of water. Ordinary tap water is the most
commonly used type of water. Distilled or reverse osmosis water is not recommended.
Caddy Storage Compartment
4
5
Located in the caddy storage
compartment are GFCI Power Cord,
Rings, Strips and DC Cables.
Model 5400 FB Hydro-stimulation Spa, Energy For the Body
Model 5400 FB Hydro-stimulation Spa, Energy For the Body
6
7
Model 5400 FB Power Supply Explanation
1
(Front View)
6
2
3
4
5
(Rear View)
8
7
8
9
Model 5400 FB Hydro-stimulation Spa, Energy For the Body
1. Power Meter
2. DC Outlet
3. Power Light
4. Thermal Circuit
Breaker
The power meter
measures and displays
the amount of power
(amperes) flowing to
the Spa Module.
The DC Outlet is where
the Quick Connect DC
supply cable plugs into.
When the power is
connected properly,
the Power Light will be
illuminated when turned
on.
The thermal circuit breaker
shuts off the output if
the power supply becomes
overheated.
5. Timer
6. Power Control
7. Fuses
8. AC Inlet
The timer is used to
set the number of
minutes for a session.
The power control is
used to turn the power
supply on/off and lower
the output power to the
spa module.
Located at the rear, the
power supply has two
replaceable fuses.
The GFCI safety cord plugs
into the AC inlet.
(Rear View)
(Rear View)
Model 5400 FB Hydro-stimulation Spa, Energy For the Body
Model 5400 FB GFCI Safety Cord Explanation
Introduction
The GFCI* power cord is a safety feature and should always be used with the Model 5400
FB Hydro-stimulation Spa. Ground Fault Circuit Interrupters (GFCI) – A UL Laboratories safety
requirement.
The Aqua-Chi Model 5400 FB Hydro-stimulation Spa is a state of the art, bio-energy charger.
The system is designed to operate with water because water is the basis of all biological
functions. Water is also the medium through which all tasks in the body are performed. The
body is made up of millions of smaller components, called cells, which are responsible for all
the different biological processes that occur.
3
1. Test Button
2. Reset Button
3. Power Indicator Light
4. Connector to Power Supply
4
1
Even though there are many different types of
cells in the body, they all have a number of things
in common. They all need water for hydration AND
energy to perform their designated tasks. With
the depletion of either water OR energy, the cells
are deprived and poor health can result.
2
Model 5400 FB Quick Connect DC Cable Explanation
2
1. DC Outlet Connector
2. Negative Spa Module Connector (black)
3. Positive Spa Module Connector (red)
3
The system works through the medium of water
by making available extra energy that the living
cell can utilize. There are many water sources
around the world that are reported as having
invigorating effects on the body when bathed in.
These waters are naturally charged and give up
some of their charge to the body on contact. This
is the fundamental process utilized by the Aqua
Chi; the transference of energy through water.
1
Model 5400 FB Spa Module Explanation
1. Replaceable Strip (Positive Connection)
2. Connecting Rod (Negative Connection)
3. Replaceable Ring
4. Spa Module Legs
a. Slot Leg
b. Plain Leg
c. Track Leg
5, Bottom Housing Plate
3
6. Top Housing Plate
7. Negative Strip
4a
8. Permanent Ring
9. Copper Ring
1
4c
Possible Sensations - When using the system you may notice a number of sensations that
6
7
8
9
5
10
2
4b
Model 5400 FB Hydro-stimulation Spa, Energy For the Body
can vary for different individuals.
1. Various tingling sensations in parts of the body.
2. A shortness of breath during or towards the end of the session.
3. A slight discomfort in an unhealthy region of the body.
4. Tiredness.
These sensations generally only last a few minutes after the completion of the session.
If at any time during the session the need is felt to remove the feet from the footbath, the
user should do so. You should wait 48 hours before attempting the footbath again.
The Model 5400 FB Hydro-stimulation Spa does not diagnose, treat or cure any disease or
condition; nor does it pull, push or force foreign toxins or materials from the body.
Model 5400 FB Hydro-stimulation Spa, Energy For the Body
11
Setting up Your System for the First Time
STEP 1
Place the Model 5400 FB power supply and caddy onto a
stable, dry, level surface away from any water source. Before
going to the next step, check to see if the needle on the
power meter, located on the front of the power supply, is set
to zero. The following illustration shows where the needle
should be set.
The needle should be set pointing to zero (as
shown by the illustration to the right.) If the
needle is not pointing to zero, you will need to
adjust it by turning the adjust knob.
INCORRECT
STEP 3
Connecting the DC Cable to the Spa Module
CORRECT
ADJUST KNOB
Connect the DC cable to the spa module
using the two connectors on the end of the
DC cable. One connector is red and the other
is black. The red connector pushes onto the
flat strip towards the outer edge of the spa
module. The black connector pushes onto
the round rod in the center at the top of the
spa module. Make sure both connectors are
pushed on firmly. Once connected, it should
look like the illustration to the right.
STEP 4
INCORRECT
Connecting the DC Cable to the 5400 FB
Power Supply
Plug the DC cable into the outlet socket
marked DC OUTLET on the front of the 5400
FB power supply. Once connected, it should
look like the illustration to the left.
If your needle looks like the above
illustration, you will need to adjust the
setting. Turn the adjustment knob slowly
to the right until the needle is pointing to
zero.
It your needle looks like the above
illustration, it will need to be adjusted.
Turn the adjustment knob slowly to the
left until the needle is pointing to zero.
STEP 2
Connecting the GFCI Safety Power Cord
Plug the GFCI safety power cord into the AC
inlet located at the rear of the power supply.
Make sure the plug is pushed in all the way
and is firmly in place.
12
Model 5400 FB Hydro-stimulation Spa, Energy For the Body
STEP 5
Testing the GFCI Power Plug
1 Plug GFCI into a grounded receptacle.
2. If light is not on, press reset button - light should come on.
3. Press test button - light must go OFF.
4. When set-up is completed press reset button again to use
the equipment.
TEST
RESET
LIGHT
DO NOT USE THIS EQUIPMENT IF THE ABOVE TEST FAILS!
If the GFCI passes the test, you may continue with the set-up.
Model 5400 FB Hydro-stimulation Spa, Energy For the Body
13
STEP 6 - Preparing the Footbath
Place one of the footbath liners provided into the footbath, fill with warm water to the
water level mark (located inside the footbath.) DO NOT ADD ANY SALT TO THE WATER AT THIS
TIME! Place the footbath where it is going to be used. Make sure the footbath is placed on
a flat, stable surface at least 7 feet from the power supply (for safe operation.) Place the
spa module into the footbath as indicated by the place module here marking. If the correct
amount of water is in the footbath, the water should not rise above the top of the spa
module (even when feet are placed into the water.) The red and black connectors will remain
dry during operation.
The unit is now connected for operation.
STEP 7 - Checking the Water for Correct Operation
To check the water for correct system operation, the power to the unit has to be turned
on. For correct operation, the power meter should display between 1½ (minimum) and 2½
(recommended) for operating the system.
STEP 8 - Turning on the System
The power supply has two controls, the timer and the power control,
and both have to be on for the system to work. The GFCI safety plug
was tested in a prior step. Check that the light on the GFCI is illuminated
so the power supply can be switched on. If GFCI light is not illuminated,
return to step 5.
Turn the timer past 10 to approximately 15 minutes. If you do
not turn the timer past 10, the system will not come on.
Turn the power control to MAX (to the right.)
When both the timer and the power control are
turned on, the green indicator light will be illuminated.
Now that the system is on, check the power meter. To use the system properly, the needle
needs to display between 1½ (minimum) and 2½ (recommended.) If the display is correct,
then setup is complete. Turn the unit off and continue to the user section. If the power
meter is displaying above or below the recommended setting 2½, then continue following
the steps in this section.
14
Model 5400 FB Hydro-stimulation Spa, Energy For the Body
STEP 9
Adjusting the Output of the System
Adjusting the output of the system is only required when the power meter displays above
or below the recommended setting. The initial output of the system is determined by the
conductivity of the water being used in the footbath. When water conductivity is low, the
output will be low, when water conductivity is high the output will be high.
The system must be on to adjust the output.
* What to do if the Display is Higher than 2½
If the output on the display is more than 2½, the output
will need to be lowered. (to prevent damage to the unit)
When the output is high, lowering is achieved using the
power control. Turn the power control knob slowly clockwise
(to the right.) The display will indicate a lower output the
further the power control knob is turned.
* What to do if the Display is Lower than 1½
If the output on the display is lower than 1½, water conductivity is too low and needs to
be increased. Increasing water conductivity increases the power output. To increase water
conductivity, salt will need to be added to the water. Set the power control to the on/max
position and add a very small amount of the salt to the water. The water will need to be
gently stirred. Once stirred, check to see if the display is within the recommended range.
Once the display reaches 2½, the system is ready to use. If the display is still below
1½, the output is still too low and the addition of the salt will need to be repeated until
recommended output is achieved. Should you add too much salt, the water will become too
conductive. If this occurs, dispose of the water and start over with fresh water.
Operating above 2½ DOES NOT produce greater benefits
to the user. Ring wear will be increased unnecessarily.
AquaChiFootBath.com
800-349-6962
Model 5400 FB Hydro-stimulation Spa, Energy For the Body
15
Using Your System for the First Time
During the Session a Number of Rules Apply for the Proper Use of the System.
Now set-up is completed - the system is ready to use.
DO NOT remove and replace the feet during a session.
DO NOT add more water.
DO NOT remove any water.
DO NOT turn the system off and back on again.
DO NOT remove the spa module from the water and place it back again.
DO NOT alter the output of the system during the session. DO NOT exceed the maximum
recommended session time.
If during any session with the 5400 FB Hydro-stimulation Spa the user feels the need to
remove the feet and quit the session they should do so.
STEP 1 - Choosing a Session Time for Adults
The recommended session time for adults is 20 to 35 minutes. The session time requirement
for each individual may be different. Some individuals may only require a 20-minute session
while others may prefer the full 35 minutes. The 5400 FB Hydro-stimulation Spa is based on
a 17-minute system cycle. When using the system for the first time the recommendation is
for the full 35 minutes (equal to 2 system cycles.)
Choosing a Session Time for Children
Session times for children are as follows:
ALWAYS SUPERVISE CHILDREN
DURING THE SESSION
AGE
6 and under
7 – 12 years
13 – 17 years
TIME
NOT RECOMMENDED
15 – 20 minutes
20 – 35 minutes
STEP 3
Turn the Power Control On
STEP 2
Set the Timer
If you have chosen
the full session time,
set the timer for
35 minutes.
Turn the power
control on Max
setting if salt
was added.
16
If during set-up salt was added to increase
conductivity, the power control should be set
on max and the correct power level should be
displayed. If during set-up the power output
had to be lowered, then once again turn the
power control knob clockwise to attain the
correct setting. The system is now operating.
STEP 4
Placing the Feet into the Water
Sit down in a comfortable position before
placing the feet into the water. At the end
of the session, the unit will turn itself off.
STEP 5
End of Session
Once the set time has elapsed, the system will turn off. The green indicator light will go out
indicating the session has ended.
Once the session has ended, remove the feet from the footbath and dry them thoroughly.
Set the power control knob back to the OFF position. Dispose of the water used during the
session in a responsible manner.
Turn clockwise to
lower output.
Model 5400 FB Hydro-stimulation Spa, Energy For the Body
Model 5400 FB Hydro-stimulation Spa, Energy For the Body
17
Cleaning the Spa Module
The Replaceable Rings and Strip
Keeping the spa module clean and free from materials released by the water is important for
optimum trouble-free operation. Cleaning of the spa module should be performed after each
use.
The spa module is fitted with 2 rings and a connecting strip that require periodic
replacement due to wear. The connecting strip attaches to ring 2 and ring 6 as illustrated.
Ring 2 is located in the second position from the top and ring 6 is located in the sixth
position from the top.
The recommended cleaning procedure is to fully immerse the spa
module into a cleaning solution. A most effective cleaning solution is
CLR (Calcium, Lime & Rust remover.)
The amount of wear on the rings and the strip is subject to local water conditions.
(You should first obtain a plastic container large enough to
accommodate the spa module and cleaning solution.)
Cleaning Procedure
Spa Module Ring Position Identification
STEP 1
Rinse the spa module thoroughly under running water to remove any loose material.
STEP 2
Place the spa module into chosen container. Pour CLR
into chosen container until completely covered. Soak
the spa module for 20 minutes. After 20 minutes
remove the module, rinse and inspect to see if all
material and staining has been removed. If staining
is still observable (particularly on the white legs on
the module) place back into container for another 20
minutes. Repeat the process until clean. Once module
is completely clean, rinse thoroughly with running
water to remove cleaning solution.
Cleaning Procedure Precautions
RING 2
Position 1
Position 2
Position 3
Position 4
Position 5
Position 6
Position 7
STRIP
RING 6
DO NOT leave the spa module permanently in the cleaning solution. Damage to some metal
components will occur. Such damage is not covered by warranty.
DO NOT use a toothbrush or any kind of cleaning tool on the spa module.
18
Model 5400 FB Hydro-stimulation Spa, Energy For the Body
Model 5400 FB Hydro-stimulation Spa, Energy For the Body
19
Stages of the Ring Wear
Replacing the Rings and Strip
STEP 1 - Unclip the Old Strip
Before removing the old strip from the spa module,
unclip the strip from the bottom of the number 6
ring. Pull the strip outwards away from the spa
module.
STEP 2 - Removing the Old Strip
STAGE 1 - New Ring
The system is ready to use.
STAGE 2 - Pitting
After some system use, the 2
replaceable rings will start to show some
wear. Small holes or pits forming in the
surface of the ring identify this wear.
Once the strip is unclipped and pulled outwards,
simply remove by pulling the strip downwards or
towards the bottom of the spa module until the
strip comes free from the top plate.
STEP 3 - Removing the Old Number 2 Ring
Remove the number 2 ring from the spa module by
lifting the ring upwards out of the locating cradle,
then slide it out through the long service slot
provided in the support leg.
STEP 4 - Removing the Old Number 6 Ring
STAGE 3 - Jagged
This stage occurs after pitting and is called
jagged. The rings will begin to loose their
circular shape and start to become very rough
around both the inside and outside edges.
20
STAGE 4 - Replace
Model 5400 FB Hydro-stimulation Spa, Energy For the Body
Remove the number 6 ring from the spa module by
pushing the ring downwards out of the locating
cradle, then slide it out through the long service
slot provided in the support leg.
Model 5400 FB Hydro-stimulation Spa, Energy For the Body
21
STEP 5
STEP 7 Continued
Fitting the New Number 2 Ring
Push the new number 2 ring
through the long service slot all the
way into the spa module. Once the
ring is pushed in all the way it will
then drop into the locator cradle.
Refer to slot and cradle illustration.
Fitting the New Strip
Slot and Cradle Illustration
Number 2 Ring Locator Cradle
Long Service Slot
Number 6 Ring Locator Cradle
Push the strip inwards toward the spa module
and connect it to the number 2 and number 6
rings. The connection to the number 6 ring is
on the under side with the connection to the
number 2 ring on the top side. Follow the rest
of the steps to check that the strip has been
fitted correctly.
Ring 2 connection
STEP 8
Check the Top Strip Connection
Check the connection to the number 2 ring
making sure that the connection is on top of the
ring as illustrated.
IMPORTANT: Note that the strip is not touching
the top disc in the number 1 position.
STEP 6
Fitting the New Number 6 Ring
Push the new number 6 ring through the long
service slot all the way into the spa module.
Once the ring is pushed in all the way, it can
then be pushed up into the locator cradle. Refer
to slot and cradle illustration,
STEP 7
Fitting the New Strip
Hold the strip as illustrated, then push the strip
up through the strip locator hole on the top
housing plate of the spa module.
22
Model 5400 FB Hydro-stimulation Spa, Energy For the Body
STEP 9
Ring 6 connection
Check the Bottom Strip Connection
Check the connection to the number 6 ring by
making sure it is connected to the underside of
the ring as shown in the illustration.
STEP 10
Re-check Strip Connection
Re-check the fitting of the strip one more time
to ensure that the strip is only touching rings
number 2 & 6. If the strip is touching any other
rings except 2 & 6, the system will shut down
by blowing the safety fuses.
Model 5400 FB Hydro-stimulation Spa, Energy For the Body
23
Maintenance Tips
Troubleshooting Chart
Tips for Maintaining the DC Cable
When the Quick Connect DC cable is used only above the water as recommended, no
maintenance is required. Some users prefer a higher volume of water when operating the
system, thereby causing the DC cable connections to be submerged during operation. If the
DC cable connections are used under water, then some maintenance is required. Just as the
spa module requires cleaning after use, so do the DC cable connectors. To clean the DC cable
connectors, submerge only the red and black connectors on the end of the DC cable in the CLR
cleaning solution used for the spa module. Not cleaning these connections when used under
the above mentioned conditions would result in poor or non-operation of the system. The DC
cable is also subject to wear when used under water and will eventually need to be replaced.
Tips for Maintaining the Spa Module
The Spa Module is an important part of the system, so keeping it clean and well maintained
will result in efficient long-term operation. Inspecting the spa module regularly for signs of
build-ups or deposits forming on the components is essential. If any build-ups or deposits
are observed, the spa module is not being cleaned sufficiently. These deposits can come from
the water source being used and will need to be removed or the spa module will eventually
cease to function. To remove these deposits, longer soaking in the CLR solution is required.
Tips for Maintaining the Spa Module (cont.)
The spa module should also be inspected for any pitting forming in any of the permanent
rings. The permanent rings are numbers 1, 3, 5 and 7. (The term pitting was identified
earlier in this manual.) Pitting in these rings only occurs when a poor connection between
them is formed or if they are dirty when the unit is being used.
During inspections, the spa module’s two rods with the top connecting rod (identified on
page 6) should also be checked. These rods may also be subject to pitting. If pitting is
observed on these rods, it means that the spa module is being over-cleaned (i.e. left soaking
in the CLR solution too long.)
Using the System for the First Time After a Long Period of Storage
When the system is stored for a long period without use, the spa module and the DC
cable connectors may be subject to oxidation. If this occurs on important contact points,
it may cause either the spa module or DC cable to function poorly or not at all. To avoid
this situation, the spa module and DC cable connections (red and black) should be soaked
in the CLR cleaning solution to clean these contact points before the unit is used. It is also
recommended that a new ring and strip set be installed to ensure proper operation.
24
Model 5400 FB Hydro-stimulation Spa, Energy For the Body
Problem
Possible Cause(s) Action(s)
Indicator light on the GFCI is not switched on.
GFCI not coming on. Power source outlet
has no power.
GFCI not functioning.
Indicator light on
GFCI power cord not
the GFCI is on but
plugged into power
indicator light on the supply firmly.
power supply is not The timer is not turned
coming on.
on past 10.
Power control is not
switched on.
Fuses are blown.
Blows fuses
continuously.
The replaceable strip
in the module may be
fitted incorrectly.
Power supply light is
on but no activity
from the module.
(Power meter display
not moving.)
Spa Module is not
connected correctly.
Loose spa module
connection.
Dirty or corroded
DC cable.
Insufficient water
conductivity.
AquaChiFootBath.com
Press the reset button on the GFCI.
Try another power outlet.
If light still fails to come on contact the
manufacturer for replacement.
Check to see if the GFCI power cord is
plugged into the power supply firmly.
Turn the timer on past 10.
Turn the on/off power control knob
clockwise to switch on the power supply.
Replace fuses with those of identical
rating.
If indicator light still fails to come on
contact the manufacturer.
Check to see that the strip is connected
to the correct rings, e.g. Ring 2 position
2, ring 6 position 6. Check strip to make
sure it is not in contact with any other
rings.
Check to see that the spa module is
connected correctly.
Check to see that the spa module
connections are not loose.
Clean DC cable module connectors (refer
to Maintenance tips.)
Increase water conductivity (refer to set
up.)
800-349-6962
Model 5400 FB Hydro-stimulation Spa, Energy For the Body
25
Removing the Power Pack from the Carry Caddy
Warranty
To remove the power pack from the carry caddy you
will need a phillips head screw driver. Unscrew the
three screws and remove the caddy compartment door
hinge. You can now remove the power pack by sliding
the power pack to the rear of caddy and lifting out.
The Manufacturer of the Aqua-Chi Model 5400 FB Hydro-stimulation Spa warrants to the
original purchaser that the product will be free from defect in workmanship or materials for
the below mentioned period for normal use as described in the User Manual included with
the product at purchase.
Specifications
The warranty begins upon purchase of the Model 5400 FB Hydro-stimulation Spa. To obtain
warranty service, “proof of purchase” must be provided. A copy of a sales receipt or invoice,
which clearly shows the date of purchase and place of purchase, is required.
General
The Henning Innovations Hydro-Stimulation Foot Spa is designed and manufactured in the
USA, The Model 5400 FB represents years of design experience in creating the safest and
most reliable unit. The 5400 FB is well suited to the professional user with its advanced
construction, reliability, and ease of operation. Features include a built in timer, variable
output control and easy to read instrumentation. The Model 5400 FB has the highest level of
safety features, which include:
1.
2.
3.
4.
5.
6.
Double fuse protection
Thermal circuit trip switch
Quick release DC connection
GFCI Safety technology
The 5400 FB is designed and built to comply with UL & CE mark requirements.
The GFCI Safety Feature: (A GFCI is a mandatory electrical safety device required for all
portable spas as specified in the National Electrical Code Article 680.)
7. The GFCI installed on all Aqua-Chi units meets or exceeds the UL trip thresholds.
Testing and Code Compliance
UL Standard 943 Class A GFCI
UL Recognized component (File #48380)
CSA Certified (LR-57811)
Model 5400 FB (Professional)
Model 5400 FB Power Supply, 2 Spa Modules, 2 Quick Connect DC cables, Comprehensive
user manual, Carry Caddy, 20 sets of replacement discs & Spare Fuses (2 x 4 Amp. 250v),
Footbath, 12 Foot Bath Liners.
Technical Information: Model 5400 FB Power Supply
Input: 110 to 120 Vac 50/60Hz, 130W
Output: Isolated, rectified and filtered 24V DC © 5.4Amps
Dimensions: 8½ (215mm)W x 8 (202mm)D x 5 (132mm)H
Weight: 6½ Lbs (2.9 kg)
26
Model 5400 FB Hydro-stimulation Spa, Energy For the Body
The warranty period for Aqua-Chi Model 5400 FB Hydro-stimulation Spa is 1 year. The
warranty period may be extended to a total period of 5 years by simply completing and
returning the warranty registration card, supplied in the back of this manual, to the
manufacturer. The manufacturer must receive the warranty registration card within one
month of the purchase date to obtain the 4-year extended coverage. The manufacturer
reserves the right to repair, and/or replace, and/or substitute any defective product with an
equal or more current model (without charge for parts and labor.)
THE WARRANTY DOES NOT COVER THE FOLLOWING
1.
2.
3.
4.
Product used for a purpose other than that described by the user manual.
Product that has been modified or repaired by anyone other than an authorized repairer.
Product that has been subjected to accident, misuse or abuse.
All accessory and consumable items including: positive ring & strip sets, the copper ring, fuses, DC cable, and the carry caddy.
The product warranty does not cover any shipping charges, nor does the warranty cover
any damages that may occur during shipping. The manufacturer assumes no risk for loss or
damage to shipment.
HOW TO RECEIVE WARRANTY SERVICE
Before returning product for warranty service, authorization must be obtained. For
authorization information, contact your place of purchase.
Model 5400 FB Hydro-stimulation Spa, Energy For the Body
27