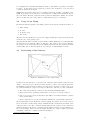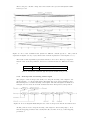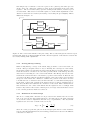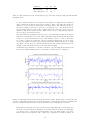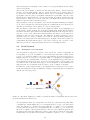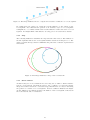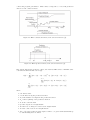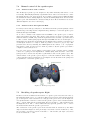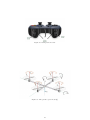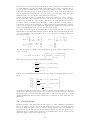
1
Final Report Automatic Control Project Course [EL2421] Ari Hauksson 821214-5331 [email protected] Fredrik Svensson 890419-0199 [email protected] Bashar Mengana 880126-0939 [email protected] Jens Lycke 890407-0557 [email protected] Christina Westermark 850214-1925 [email protected] Joacim Sundberg 870905-0432 [email protected] Kai Imhäuser 881410-T211 [email protected] Sebastian van de Hoef 871204-4232 [email protected] December 23, 2012 Abstract In an 8 week course at KTH, The Royal Institute of Technology, Stockholm, we built a loading dock of the future. We were able to design and build an integrated scenario of three processes; wirelessly controlled trucks and a quadrocopter as well as a stationary tower crane. The three processes are controlled with PID controllers and an MPC controller and they communicate with each other via a messaging scheme we designed. They receive location information from an infrared-camera motion capturing system. The system was finished on schedule and at the planned quality level. The delievered system can be extended further. 1 Contents 1 Introduction 1.1 Background . . . . . . . . . . . . . 1.1.1 EL2421 . . . . . . . . . . . 1.2 Course objectives - Purchase order 1.2.1 Environment . . . . . . . . 1.2.2 Mocap system . . . . . . . 1.2.3 Trucks . . . . . . . . . . . . 1.2.4 Quadrocopters . . . . . . . 1.2.5 Tower crane . . . . . . . . . 1.2.6 Integrated scenario . . . . . 1.3 System overview . . . . . . . . . . . . . . . . . . . . . . . . . . . . . . . . . . . . . . . . . . . . . . . . . . . . . . . . . . . . . . . . . . . . . . . . . . . . . . . . . . . . . . . . . . . . . . . . . . . . . . . . . . . . . . . . . . . . . . . . . . . . . . . . . . . . . . . . . . . . . . . . . . . . . . . . . . . . . . . . . . . . . . . . . . . . . . . . . . . . . . . . . . . . . . . . . . . . . . . . . . . . . . . . . . . . . . . . . . . . . . . . . . . . . . . . . . . . . . . . . . . . . . . . . . . . . . . . . . . . . . . . . . . . . . 7 7 7 7 7 8 8 8 8 8 8 2 System Integration 2.1 Components of the System . . . . . . 2.1.1 Freight Hub . . . . . . . . . . . 2.1.2 Truck Dispatch Centre . . . . . 2.1.3 Trucks . . . . . . . . . . . . . . 2.1.4 Quadrocopter Dispatch Center 2.1.5 Quadrocopter . . . . . . . . . . 2.1.6 Monitoring Unit . . . . . . . . 2.2 Messaging . . . . . . . . . . . . . . . . 2.2.1 Why Messages . . . . . . . . . 2.2.2 Message Structure . . . . . . . 2.2.3 Message Types . . . . . . . . . 2.2.4 Implementation . . . . . . . . . 2.3 The Full Scenario . . . . . . . . . . . . 2.4 Conclusions . . . . . . . . . . . . . . . . . . . . . . . . . . . . . . . . . . . . . . . . . . . . . . . . . . . . . . . . . . . . . . . . . . . . . . . . . . . . . . . . . . . . . . . . . . . . . . . . . . . . . . . . . . . . . . . . . . . . . . . . . . . . . . . . . . . . . . . . . . . . . . . . . . . . . . . . . . . . . . . . . . . . . . . . . . . . . . . . . . . . . . . . . . . . . . . . . . . . . . . . . . . . . . . . . . . . . . . . . . . . . . . . . . . . . . . . . . . . . . . . . . . . . . . . . . . . . . . . . . . . . . . . . . . . . . . . . . . . . . . . . . . . . . . . . . . . . . . . . . . . . . . . . . . . . . . . . . . . . . . . . . . . . . . . . . . . . . . . . . . . . . . . . . . . . . . . . . . . . . . . . . . . . 9 9 9 9 9 9 9 10 10 10 10 11 11 11 12 3 Wireless communication 3.1 Description . . . . . . . . . . . . . . . . . . 3.2 Hardware . . . . . . . . . . . . . . . . . . . 3.2.1 Tmote sky boards . . . . . . . . . . 3.2.2 Serial adapter boards . . . . . . . . 3.2.3 Pololu servo controller boards . . . . 3.2.4 Spektrum remote controller . . . . . 3.2.5 Spektrum remote controller receiver 3.3 Use of Tmotes . . . . . . . . . . . . . . . . 3.3.1 Sending node . . . . . . . . . . . . . 3.3.2 Receiving node . . . . . . . . . . . . 3.4 T-motes and TinyOS . . . . . . . . . . . . . 3.4.1 TinyOS on Xubuntos . . . . . . . . 3.4.2 TinyOS on Ubuntu 12.09 . . . . . . 3.4.3 LabView and T-motes . . . . . . . . . . . . . . . . . . . . . . . . . . . . . . . . . . . . . . . . . . . . . . . . . . . . . . . . . . . . . . . . . . . . . . . . . . . . . . . . . . . . . . . . . . . . . . . . . . . . . . . . . . . . . . . . . . . . . . . . . . . . . . . . . . . . . . . . . . . . . . . . . . . . . . . . . . . . . . . . . . . . . . . . . . . . . . . . . . . . . . . . . . . . . . . . . . . . . . . . . . . . . . . . . . . . . . . . . . . . . . . . . . . . . . . . . . . . . . . . . . . . . . . . . . . . . . . . . . . . . . . . . . . . . . . . . . . . . . . . . . . . . . . . . . . . . . . . . . . . . . . . . . . . . . . . . . . . 13 13 13 13 13 13 13 13 15 15 15 15 16 16 16 4 Motion Capturing System 4.1 Working Principle . . . . . . . . . . . . . . . . 4.2 Usage in our Setup . . . . . . . . . . . . . . . . 4.3 Positioning of the Cameras . . . . . . . . . . . 4.4 Calibration . . . . . . . . . . . . . . . . . . . . 4.5 Choice of the Marker Size . . . . . . . . . . . . 4.6 Placement of the Markers . . . . . . . . . . . . 4.7 Integration in Labview . . . . . . . . . . . . . . 4.8 Sampling Frequency . . . . . . . . . . . . . . . 4.9 Challenges . . . . . . . . . . . . . . . . . . . . . 4.9.1 Small Capturing Volume . . . . . . . . . 4.9.2 Finding Rigid Bodies in Wrong Position 4.9.3 Marker Occlusion . . . . . . . . . . . . . 4.9.4 Mismatching Markers . . . . . . . . . . 4.9.5 General Purpose Tracking Algorithm . . 4.9.6 Daylight Disturbances . . . . . . . . . . 4.9.7 Network Configuration . . . . . . . . . . 4.9.8 Broken Camera . . . . . . . . . . . . . . . . . . . . . . . . . . . . . . . . . . . . . . . . . . . . . . . . . . . . . . . . . . . . . . . . . . . . . . . . . . . . . . . . . . . . . . . . . . . . . . . . . . . . . . . . . . . . . . . . . . . . . . . . . . . . . . . . . . . . . . . . . . . . . . . . . . . . . . . . . . . . . . . . . . . . . . . . . . . . . . . . . . . . . . . . . . . . . . . . . . . . . . . . . . . . . . . . . . . . . . . . . . . . . . . . . . . . . . . . . . . . . . . . . . . . . . . . . . . . . . . . . . . . . . . . . . . . . . . . . . . . . . . . . . . . . . . . . . . . . . . . . . . . . . . . . . . . . . . . . . . . . . . . . . . . . . . . . . . . . . . . . . . . . . . . . . . . . . . . . . 17 17 18 18 19 19 20 20 20 20 20 21 21 21 21 21 21 21 . . . . . . . . . . 2 4.9.9 Not More Than 6 Rigid Bodies Possible . . . . . . . . . . . . . . . . . . . . 4.10 Conclusions . . . . . . . . . . . . . . . . . . . . . . . . . . . . . . . . . . . . . . . . 22 22 5 Scania trucks 5.1 Description . . . . . . . . . . . . . . . . . . . . . . . . . . . . . 5.2 Hardware . . . . . . . . . . . . . . . . . . . . . . . . . . . . . . 5.2.1 Manual control with a remote . . . . . . . . . . . . . . . 5.2.2 Manual control through LabView with a game controller 5.3 Software . . . . . . . . . . . . . . . . . . . . . . . . . . . . . . . 5.4 State Machine . . . . . . . . . . . . . . . . . . . . . . . . . . . . 5.4.1 States of the trucks . . . . . . . . . . . . . . . . . . . . . 5.4.2 Wait for command . . . . . . . . . . . . . . . . . . . . . 5.4.3 Send Quadrocopter request . . . . . . . . . . . . . . . . 5.4.4 Wait for Quadrocopter acknowledgement . . . . . . . . 5.4.5 Goto requested street address . . . . . . . . . . . . . . . 5.4.6 No Longer needed . . . . . . . . . . . . . . . . . . . . . 5.4.7 At location . . . . . . . . . . . . . . . . . . . . . . . . . 5.4.8 Wait for crane command . . . . . . . . . . . . . . . . . . 5.4.9 Goto waypoint . . . . . . . . . . . . . . . . . . . . . . . 5.4.10 Loading completed . . . . . . . . . . . . . . . . . . . . . 5.4.11 Unloading completed . . . . . . . . . . . . . . . . . . . . 5.4.12 Drive extra lap . . . . . . . . . . . . . . . . . . . . . . . 5.5 Truck model . . . . . . . . . . . . . . . . . . . . . . . . . . . . . 5.5.1 Simplified kinematic vehicle model . . . . . . . . . . . . 5.5.2 Transport delay . . . . . . . . . . . . . . . . . . . . . . . 5.5.3 Saturation . . . . . . . . . . . . . . . . . . . . . . . . . . 5.5.4 Rate limiter on steering control signal . . . . . . . . . . 5.5.5 Backlash on steering control signal and the LUT bias . 5.5.6 Look-up table on steering control signal . . . . . . . . . 5.5.7 Look-up table on throttle control signal . . . . . . . . . 5.5.8 Inertia of vehicle . . . . . . . . . . . . . . . . . . . . . . 5.5.9 The extended kinematic vehicle model . . . . . . . . . . 5.6 Creating the roads . . . . . . . . . . . . . . . . . . . . . . . . . 5.6.1 Creating the roads . . . . . . . . . . . . . . . . . . . . . 5.7 Control design . . . . . . . . . . . . . . . . . . . . . . . . . . . 5.7.1 Tuning the initial PID controller . . . . . . . . . . . . . 5.7.2 Adding Feedforward to increase performance . . . . . . 5.7.3 Platooning controller . . . . . . . . . . . . . . . . . . . . 5.7.4 Loosing MoCap tracking . . . . . . . . . . . . . . . . . . 5.7.5 Evaluation of control design . . . . . . . . . . . . . . . . 5.8 Road Network . . . . . . . . . . . . . . . . . . . . . . . . . . . . 5.8.1 Description of a road object . . . . . . . . . . . . . . . . 5.8.2 Map . . . . . . . . . . . . . . . . . . . . . . . . . . . . . 5.8.3 Street address . . . . . . . . . . . . . . . . . . . . . . . . 5.8.4 Navigation . . . . . . . . . . . . . . . . . . . . . . . . . 5.8.5 Comparison to similar existing systems . . . . . . . . . 5.8.6 Collision avoidance in general . . . . . . . . . . . . . . . 5.8.7 Collision avoidance for platooning trucks . . . . . . . . . 5.8.8 Extension to collision avoidance . . . . . . . . . . . . . . 5.8.9 Control information . . . . . . . . . . . . . . . . . . . . 5.9 Future work for the trucks . . . . . . . . . . . . . . . . . . . . . . . . . . . . . . . . . . . . . . . . . . . . . . . . . . . . . . . . . . . . . . . . . . . . . . . . . . . . . . . . . . . . . . . . . . . . . . . . . . . . . . . . . . . . . . . . . . . . . . . . . . . . . . . . . . . . . . . . . . . . . . . . . . . . . . . . . . . . . . . . . . . . . . . . . . . . . . . . . . . . . . . . . . . . . . . . . . . . . . . . . . . . . . . . . . . . . . . . . . . . . . . . . . . . . . . . . . . . . . . . . . . . . . . . . . . . . . . . . . . . . . . . . . . . . . . . . . . . . . . . . . . . . . . . . . . . . . . . . . . . . . . . . . . . . . . . . . . . . . . . . . . . . . . . . . . . . . . . . . . . . . . . . . . . . . . . . . . . . . . . . . . . . . . . . . . . . . . . . . . . . . . . . . . . . . . . . . . . . . . . . . . . . . . . . . . . . . . . . . . . . . . . . . . . . . . . . . . . . . . . . . . . . . . . . . . . . . . . . . . . . . . . . . . . . . . . . . . . . . . . . . . . . . . . . . . . . . . . . . . . . . . . . . . . . . . . . . . . . . . . . . . . . . . . . . . . . . . . . . 23 23 23 23 24 24 24 25 25 25 25 26 26 26 26 26 26 26 27 27 27 28 29 30 31 32 33 34 36 36 36 37 37 38 39 40 40 42 42 43 43 44 45 46 47 47 48 48 6 Tower crane 6.1 Description . . . . . . . . . 6.1.1 Crane . . . . . . . . 6.1.2 Loads . . . . . . . . 6.2 Hardware . . . . . . . . . . 6.3 Software . . . . . . . . . . . 6.4 Modeling and identification 6.5 Control design . . . . . . . 6.5.1 Evaluation of control 6.6 Coordination of Actions . . 6.6.1 State-Machine . . . . . . . . . . . . . . . . . . . . . . . . . . . . . . . . . . . . . . . . . . . . . . . . . . . . . . . . . . . . . . . . . . . . . . . . . . . . . . . . . . . . . . . . . . . . . . . . . . . . . . . . . . . . . . . . . 49 49 49 49 50 50 50 51 54 55 55 . . . . . . . . . . . . . . . . . . . . . . . . . . . . design . . . . . . . . . . . . . . . . . . . . . . . . . . . . . . . . . . . . . . 3 . . . . . . . . . . . . . . . . . . . . . . . . . . . . . . . . . . . . . . . . . . . . . . . . . . . . . . . . . . . . . . . . . . . . . . . . . . . . . . . . . . . . . . . . . . . . . . . . . . . . . . . . . . . . . . . . . . . . . . . . . . . . . . . . . . 6.7 6.6.2 Waypoint planning . . . . . . . . . . . . . . . . . . . . . . . . . . . . . . . . 6.6.3 Trailer Position . . . . . . . . . . . . . . . . . . . . . . . . . . . . . . . . . . Conclusion . . . . . . . . . . . . . . . . . . . . . . . . . . . . . . . . . . . . . . . . 7 Quadrocopter 7.1 Description . . . . . . . . . . . . . . . . . . . . . . . . . 7.1.1 Requirements on the quadrocopter in the loading 7.2 Hardware . . . . . . . . . . . . . . . . . . . . . . . . . . 7.2.1 The ArduCopter platform . . . . . . . . . . . . . 7.3 Software . . . . . . . . . . . . . . . . . . . . . . . . . . . 7.3.1 ArduCopter software . . . . . . . . . . . . . . . . 7.3.2 LabVIEW . . . . . . . . . . . . . . . . . . . . . . 7.4 Manual control of the quadrocopter . . . . . . . . . . . . 7.4.1 Manual control with a remote . . . . . . . . . . . 7.4.2 Manual control through LabVIEW . . . . . . . . 7.5 Modeling of quadrocopter flight . . . . . . . . . . . . . . 7.6 Control design . . . . . . . . . . . . . . . . . . . . . . . 7.6.1 PID controller theory and motivation of choice . 7.6.2 Altitude control . . . . . . . . . . . . . . . . . . 7.6.3 Position control . . . . . . . . . . . . . . . . . . . 7.6.4 Yaw control . . . . . . . . . . . . . . . . . . . . . 7.6.5 Take off and landing . . . . . . . . . . . . . . . . 7.6.6 Handling of loss of motion capture feedback . . . 7.6.7 Trajectory planning to avoid hazardous areas . . 7.6.8 Quadrocopter state machine . . . . . . . . . . . . 7.7 Evaluation of control design . . . . . . . . . . . . . . . . 7.7.1 Altitude controller . . . . . . . . . . . . . . . . . 7.7.2 Position controller . . . . . . . . . . . . . . . . . 7.7.3 Yaw controller . . . . . . . . . . . . . . . . . . . 7.7.4 Take off and landing . . . . . . . . . . . . . . . . . . . . . . . . . . . . . . and unloading scenario . . . . . . . . . . . . . . . . . . . . . . . . . . . . . . . . . . . . . . . . . . . . . . . . . . . . . . . . . . . . . . . . . . . . . . . . . . . . . . . . . . . . . . . . . . . . . . . . . . . . . . . . . . . . . . . . . . . . . . . . . . . . . . . . . . . . . . . . . . . . . . . . . . . . . . . . . . . . . . . . . . . . . . . . . . . . . . . . . . . . . . . . . . . . . . . . . . . . . . . . . . . . . . . . . . . . . . . . . . . . . . . . . . . . . . . . . . . . . . . . . . . . . . . . . . . . . . . . . . . . . . . . . . . . . . . . . . . . . . . . . . . . . . . . . . . . . . . . . . . . . . . . . . . . . . . . . . . . . . . . . . . . . . . . . . . . . . . . . . . . . . . . . . . 56 57 58 60 60 60 60 60 60 60 60 62 62 62 62 64 65 65 65 66 66 66 67 67 67 67 67 68 68 8 Conclusions 72 9 Acknowledgements 73 10 References 74 11 Appendix 11.1 Software versions . . . . . . . . . . . . . . . . . . . . . . . . . . . . . . . . . . . . . 75 75 4 List of Tables 1 2 3 4 5 6 7 8 9 10 11 12 13 14 15 The table contains a description of the notation used in Figure 17. . . . . . The table gives a short description of the notation used in Figure 19. . . . . Parameters found through the system identification process. . . . . . . . . . Parameters found through the system identification process. . . . . . . . . . Parameters found through the system identification process. . . . . . . . . . Parameters found through the system identification process. . . . . . . . . . Parameters found through the system identification process. . . . . . . . . . Parameters found through the system identification process. . . . . . . . . . Parameters found through system identification process. . . . . . . . . . . . Parameters found through system identification process. . . . . . . . . . . . Parameters found through the system identification process. . . . . . . . . . Shows some of the control types from Ziegler-Nichols method. . . . . . . . . The parameters for the tuck regulators, speed, steering and platooning, used final implementation. . . . . . . . . . . . . . . . . . . . . . . . . . . . . . . . Parameters of the cable length dynamics. . . . . . . . . . . . . . . . . . . . PID values of the implemented controllers. . . . . . . . . . . . . . . . . . . . . . . . . . . . . . . . . . . . . . . . . . . . . . . . . . . . . . . . . . . . . . . . . . . . in the . . . . . . . . . . . . 27 29 29 30 31 32 33 34 34 35 36 38 Tmote sky board . . . . . . . . . . . . . . . . . . . . . . . . . . . . . . . . . . . . . Custom-built serial adapter board . . . . . . . . . . . . . . . . . . . . . . . . . . . Pololu servo controller board . . . . . . . . . . . . . . . . . . . . . . . . . . . . . . Spektrum DX6i Remote controller . . . . . . . . . . . . . . . . . . . . . . . . . . . Spektrum AR6210 Receiver . . . . . . . . . . . . . . . . . . . . . . . . . . . . . . . Wireless communication: sending node . . . . . . . . . . . . . . . . . . . . . . . . . Wireless communication: receiving node - quadrocopter . . . . . . . . . . . . . . . Wireless communication: receiving node - truck . . . . . . . . . . . . . . . . . . . . Reflective marker (source: www.qualisys.com) . . . . . . . . . . . . . . . . . . . . . Image of markers seen by one camera . . . . . . . . . . . . . . . . . . . . . . . . . . Illustration of the camera setup . . . . . . . . . . . . . . . . . . . . . . . . . . . . . Calculated covered volume of the MoCap system . . . . . . . . . . . . . . . . . . . Calibration tools for the MoCap system (source: www.qualisys.com) . . . . . . . . Scania truck . . . . . . . . . . . . . . . . . . . . . . . . . . . . . . . . . . . . . . . . Logitech Gamepad F310 . . . . . . . . . . . . . . . . . . . . . . . . . . . . . . . . . The image illustrates the state machine used in the truck process. . . . . . . . . . The notation used in the kinematic model [3]. . . . . . . . . . . . . . . . . . . . . . A block diagram of the kinematic model that the vehicle model is based upon[3], denoted the simple vehicle model. . . . . . . . . . . . . . . . . . . . . . . . . . . . . A block diagram illustrating the affected signals in the delay imposed by the wireless communication. . . . . . . . . . . . . . . . . . . . . . . . . . . . . . . . . . . . . . . A block diagram illustrating saturated control signals. . . . . . . . . . . . . . . . . A block diagram illustrating rate limiting of the steering control signal. . . . . . . A block diagram illustrating the use of the Look-up table and the bias subtraction. Plot of the backlash in the system for different constant speeds vb . The y-axis is expressed in angular velocity of yaw, whereas the x-axis is expressed in control signal ûsteering . . . . . . . . . . . . . . . . . . . . . . . . . . . . . . . . . . . . . . . . . . . A block diagram illustrating the use of the Look-up table and the bias subtraction. A block diagram illustrating the use of the Look-up table. . . . . . . . . . . . . . . Mapping of throttle control signal to velocity. . . . . . . . . . . . . . . . . . . . . . A block diagram illustrating the use of a transfer function that affects the rate of change of the steady state velocity. . . . . . . . . . . . . . . . . . . . . . . . . . . . The plot illustrates a step response. . . . . . . . . . . . . . . . . . . . . . . . . . . The plot illustrates a comparison of a step response. . . . . . . . . . . . . . . . . . The road network with all segments and waypoints. The figure also shows how the local coordinate system in every waypoint points towards the next waypoint in the segment. . . . . . . . . . . . . . . . . . . . . . . . . . . . . . . . . . . . . . . . . . . The feedforward PID for controlling the speed of the truck . . . . . . . . . . . . . . Showing how the deviation between the truck and the road is large when the truck goes from one pair of waypoints into the next pair of waypoints. . . . . . . . . . . 13 13 14 14 14 15 15 15 17 17 18 19 19 23 24 25 27 41 51 65 List of Figures 1 2 3 4 5 6 7 8 9 10 11 12 13 14 15 16 17 18 19 20 21 22 23 24 25 26 27 28 29 30 31 32 5 28 28 30 30 31 32 32 33 33 34 35 35 36 38 39 33 34 35 36 37 38 39 40 41 42 43 44 45 46 47 48 49 50 51 52 53 54 55 56 57 58 59 60 61 62 63 64 The PID controller for the steering of the trucks. The feedforward take the difference between road and truck orientation add maps this to a steering input which sets the wheels in the direction of the road . . . . . . . . . . . . . . . . . . . . . . . . . . . The control environment for the platooning. The second truck gets the reference speed from the first truck as feedforward while the PID controller regulates on the distance between the two trucks, making small adjustments. . . . . . . . . . . . . . The figure shows the deviations from references while driving in the road network. The data is recorded while driving in platoon formation in the road network, following speed limitations on the road which ranges from 0.2 - 0.6 m/s and using a platooning distance of 0.4 m. . . . . . . . . . . . . . . . . . . . . . . . . . . . . . . The image illustrates a simple road network with road segments and the associated properties mentioned in this section. . . . . . . . . . . . . . . . . . . . . . . . . . . The image illustrates how to compute the traveled road distance on a road segment. The image illustrates a map of the road network. . . . . . . . . . . . . . . . . . . . The image illustrates the format of the street addresses used in the road network. . The image illustrates a vehicle in a cross section, in need of navigation information. The image illustrates the kind of road sign information that is encoded in the routing table. . . . . . . . . . . . . . . . . . . . . . . . . . . . . . . . . . . . . . . . . . . . The image illustrates an analogy of the collision avoidance system mentioned in this section. . . . . . . . . . . . . . . . . . . . . . . . . . . . . . . . . . . . . . . . . . . The image illustrates an analogy of the collision avoidance system mentioned in this section. . . . . . . . . . . . . . . . . . . . . . . . . . . . . . . . . . . . . . . . . . . Tower crane. . . . . . . . . . . . . . . . . . . . . . . . . . . . . . . . . . . . . . . . Self made load which can be picked up and moved by the cranes hook. . . . . . . . Schema of the updated sub models. . . . . . . . . . . . . . . . . . . . . . . . . . . . MPC calculated horizons, some text and reference [4]. . . . . . . . . . . . . . . . . MPC update horizons, some text and reference [4]. . . . . . . . . . . . . . . . . . . Output response for the MPC with a predefined setpoint profile. The blue line is the reference and the green line is the output. One can see that the output reacts before the reference and this is due to the prediction in the MPC. It is basically the optimal way to minimize the defined cost function. . . . . . . . . . . . . . . . . . . Output response for the MPC during loading. The blue line is the reference and the green line is the output. The load is picked up after approximately 20 seconds and this can be seen from the spiky behaviour on ↵ and . The truck can be loaded in approximately 35 to 40 seconds. . . . . . . . . . . . . . . . . . . . . . . . . . . . . . Representation of the State Machine for the Crane . . . . . . . . . . . . . . . . . . Simulated trajectories of trailer positions with different initial positions . . . . . . The ArduCopter quadrocopter. . . . . . . . . . . . . . . . . . . . . . . . . . . . . . Mission Planner software [2]. . . . . . . . . . . . . . . . . . . . . . . . . . . . . . . Gamepad top view. . . . . . . . . . . . . . . . . . . . . . . . . . . . . . . . . . . . . Gamepad front view. . . . . . . . . . . . . . . . . . . . . . . . . . . . . . . . . . . . The quadrocopter model [6]. . . . . . . . . . . . . . . . . . . . . . . . . . . . . . . . Figure displaying the performance of the altitude controller where the dashed line is the z position and the solid line is the z reference. . . . . . . . . . . . . . . . . . Figure displaying the performance of the position controller where the dashed line is the x position and the solid line is the x reference. . . . . . . . . . . . . . . . . . Figure displaying the performance of the position controller where the dashed line is the y position and the solid line is the y reference. . . . . . . . . . . . . . . . . . Figure displaying the performance of the yaw controller where the dashed line is the yaw angle and the solid line is the yaw reference angle. . . . . . . . . . . . . . . . . Figure displaying the performance of the land sequence where the dashed line is the x position and the solid line is the x reference. . . . . . . . . . . . . . . . . . . . . Figure displaying the performance of the land sequence where the dashed line is the y position and the solid line is the y reference. . . . . . . . . . . . . . . . . . . . . . Figure displaying the performance of the altitude controller where the dashed line is the z position and the solid line is the z reference. . . . . . . . . . . . . . . . . . 6 39 40 41 42 43 43 44 45 45 46 47 49 50 51 52 52 55 56 57 58 61 61 62 63 63 68 69 69 70 70 71 71 1 Introduction “It is change, continuing change, inevitable change, that is the dominant factor in society today. No sensible decision can be made any longer without taking into account not only the world as it is, but the world as it will be.” - Isaac Asimov. Most people have at one time or another seen movies that portray futuristic glimpses of the autonomous society of tomorrow; robots going to the supermarket for people, cars driving on their own, and large-scale integrated systems that are currently run by people being run by autonomous machines. Society’s interest in automating and simplifying complex processes as well as making new processes possible is the driving force for a plethora of current research projects in the field of automatic control. This project report describes one of those projects, albeit a small one. 1.1 1.1.1 Background EL2421 The “Automatic Control Project Course - EL2421” has been offered at KTH - Royal Institute of Technology, Stockholm, Sweden, for a number of years before under the name “Automatic Control Project Course - EL2420”. What sets the EL2421 apart from the EL2420, is that for the first time, the credits given for finishing the course are 15 ECTS instead of 12 ECTS. This fact has made it possible for the students to fill a whole period only with this course, which has in turn enabled the students to focus their full attention on fulfilling the requirements of the course. In 2012, the task for these 8 students over the course of 8 weeks is to take 3 different processes; trucks, a quadrocopter1 and a tower crane, and combine them with the help of an advanced motion capturing system for creating a loading dock of the future of sorts. The task is not only to design and implement a control strategy for individual processes but also to join the processes into an integrated scenario where the processes interact autonomously with each other. The students involved in this project have different backgrounds including electrical engineering and technical physics and computer science. 1.2 Course objectives - Purchase order At the very beginning of the project, the project group was presented with a purchase order detailing the functionality requirements of the final product to be handed off, i.e. the scope of the project. The text that follows is taken directly from said purchase order: We hereby order a demonstrator of a highly efficient and autonomous goods terminal. The demonstrator should be implemented in the Smart Mobility Lab using the available laboratory hardware; 1) Mocap system, 2) Trucks, 3) Quadrocopters, 4) Tower crane. The demonstrator should be delivered the 17th of December 2012 and all documentation the 7th of January 2013. The customer will provide technical consultancy on request, maximum 80 hours. Specifications 1.2.1 Environment • An environment should be created with a visible road network with multiple paths and with dual goods terminals in the range of the tower crane. The road network 1A quadrocopter is a four rotor aircraft 7 must be designed to allow maneuvering of trucks with trailers. There should also be room for a quadrocopter landing pad. The environment must be designed with respect to the capture volume of the mocap system. • An environment should be created with a visible road network with multiple paths and with dual goods terminals in the range of the tower crane. The road network must be designed to allow maneuvering of trucks with trailers. There should also be room for a quadrocopter landing pad. The environment must be designed with respect to the capture volume of the mocap system. 1.2.2 Mocap system • The mocap system should serve as a global positioning system and its data should be available for the trucks, quadrocopter and tower crane. • The mocap system should log synchronized trajectories of the trucks, quadrocopter and tower crane. 1.2.3 Trucks • The trucks should be able to follow a given path, for example along the roads in the network. • The trucks should be able to plan their trajectories within the road network in order to arrive at a given destination at a given time. • The trucks should be able to keep a constant distance to other trucks ahead, while staying on the road (platooning). If a truck catches up on another truck ahead, it should adapt its speed and maintain a safe distance (cf. adaptive cruise control). 1.2.4 Quadrocopters • The quadrocopter should be stabilized at given position and altitude using the Mocap system and onboard sonar. • The quadrocopter should be able to follow a given path. • The quadrocopter should be able to plan its trajectory in order to arrive at a given destination at a given time, while avoiding obstacles (the crane). 1.2.5 Tower crane • The crane should be able to move its load to a given destination as quickly, accurately, and safely as possible. • The crane should be able to plan the trajectory of the load with respect to other objects or obstacles in the surrounding (e.g., trucks and quadrocopter). • The crane should be able to automatically attach and detach loads with distinct (possibly unknown) masses. (In the current configuration, the load is fixed to the crane.) 1.2.6 Integrated scenario A platoon of trucks travels in the road network. The trucks stop at the goods terminals and get loaded/unloaded by the tower crane. The leading truck will wait until all trucks have been loaded/unloaded before it continues the journey. The quadrocopter is hovering above the leading truck while it travels on the road. When the leading truck approaches the goods terminal the quadrocopter will go to the landing pad and wait there until the loading/unloading is finished. When the platoon starts moving again the quadrocopter resumes its position above the leading truck. 1.3 System overview As the text in the purchase order in Chapter 1.2 indicates, the plan was to create an autonomous system in which platooning trucks go to a loading area to pick up goods that are to be transported to another location to be handed off. 8 2 System Integration Opposed to previous years control project courses we were asked to develop an integrated scenario. That means that the previously described processes should be integrated to work together as one system. In this section we’ll describe how the complete system is build up. We’ll also talk about the system which is actually implemented, which is a bit simplified version but can easily be extended to the full extend described below. 2.1 Components of the System On the highest abstraction level the system consists of six elements: Quadrocopters, Quadrocopter Dispatch Center, Trucks, Truck Dispatch Center, Freight Hub and a Monitoring Unit. 2.1.1 Freight Hub The freight hubs are the nodes in our freight delivery network. They store loads and can send them to other freight hubs. They have the responsibility of sending loads away in time. When they want to send a number of loads somewhere else they request the appropriate number of trucks from the truck dispatch center. They load the trucks and send them to the destination freight hub which unloads them. In our case the crane is used for the loading and as we have only one crane we use the same freight hub for loading and unloading. 2.1.2 Truck Dispatch Centre The truck dipatch centre is responsible of managing the truck fleet and serves requests from different freight hubs. It also requests quadrocopters from the quadrocopter dispatch center for certain trucks. In the current implementation the freight hub is the same program as the one which actually controls the trucks. The two trucks are always in a platoon and the truck dispatch center will only serve platoon requests when the platoon is available at parking position and it will always send the whole platoon. 2.1.3 Trucks The trucks can either be in parking, a platoon leader or a platoon follower mode. They get these rolls assigned by the truck dispatch center. They coordinate the loading/unloading process directly with the freight hub and they are responsible to find their way through the road network. The platoon leader also coordinates with a quadrocopter. We also implemented a circling truck which only servers the purpose of demonstrating collision avoidance. 2.1.4 Quadrocopter Dispatch Center The quadrocopter dispatch center manages a fleet of quadrocopters and serves the requests from the truck dispatch center. Similar to the trucks we have only one quadrocopter such that the quadrocopter dispatch center and a quadrocopter are one program. 2.1.5 Quadrocopter The quadrocopter can follow a truck when it is assigned to do that by the quadrocopter dispatch center. Normally it rests on the landing pad. When it is requested to follow a truck it starts, flies to the truck and informs the truck when it is at position. Then if follows the truck until it is sent away by the truck it flies back to its landing pad and lands. It will (try) not fly into areas it is not allowed to. 9 2.1.6 Monitoring Unit The monitoring unit should be able to display the state of the system. In the current implementation it displays all messages received and sent by the trucks/truck dispatch center which are all the messages sent over the network with some syntax highlighting and plays a sound when it receives a quad request2 . 2.2 Messaging We have four programs running (QTM not counted) on four different computers which communicate via TCP/IP. These are the truck controller, the quadrocopter controller, the crane controller and the monitoring unit. 2.2.1 Why Messages We decided for the design for a number of reasons: Easier Integration Having a well defined set of messages coordinating the systems made integration easier. We only had to write some code to create, send, receive and parse messages once and then each group could implement that in their program. There was no need to merge different programs and it would have been hard to work at the same time at one big program. Testability Like this we could test the different parts on its own with having to run the whole scenario right from the start. We could do this by sending and receiving messages from a test program. Scalability Like this it would be relatively easy to add further components to the system as we are not limited by the processing power of one computer or the number of ports. Even for our setup it was very useful to have more than one screen to monitor each process. 2.2.2 Message Structure Every message has the following fields: ID This was to identify each message during the whole scenario but is currently not used. Source The source of the message. Currently this field serves only human readability but would be necessary in a setup with more components. Destination This specifies the intended recipient of the message and is implemented for similar reasons as the “Source” field. Message Type This specifies what kind of message is sent. Acknowledgement Text It can contain any random text which is supposed to be sent back in an acknowledgement message to confirm the messages has been received. This is currently not implemented. Payload This contains the additional information which depends on the message type. 2 This is both a cool feature but also of real practical use to when the flying lawnmower is about to lift. 10 2.2.3 Message Types We specified 12 different message types of which are seven actually used. This is because the there is no communication of the network between quadrocopter dispatch center and quadrocopter and truck dispatch center and trucks. We will only describe here the ones which are actually used to confuse the reader to much. Platoon Request This is sent to the truck dispatch center to request a platoon. It specifies the requested platoon size and an address the in road network3 to which the platoon is supposed to drive. Quadrocopter Request This is sent to the quadrocopter dispatch center to get a quadrocopter to follow a truck. Which truck to follow is specified as the target. At Location This is sent from the quadrocopter to the truck it is supposed to follow, to indicate that it is at position over the truck. It is also sent from the platoon leader to the freight hub to indicate that it has arrived at the required location. No Longer Needed This is sent from the truck to the quadrocopter if the quadrocopter should return the landing pad. That happens when the trucks are loaded or at parking position. Loading Complete This message is sent from the freight hub to the platoon leader if the loading process is completed. The message payload contains a street address to deliver the freight to. Unloading Complete This is sent from the freight hub to the platoon leader when the unloading process is completed. In contrast to the “Loading Complete” message it does not contain a destination. Go to Waypoint This message is sent from the freight hub to the platoon leader to send the platoon to a certain position in the road network in order to load it. It contains a street address. 2.2.4 Implementation The messages are sent as XML strings. We decided to use XML as it is a human readable format and hence easy to understand and debug. When we implemented the messages we had already some experience with parsing XML in Labview from the road network. With XMPP the usage of XML for messaging has already proven quite useful4 . 2.3 The Full Scenario The full scenario works starts with the freight hub sending a “platoon request”. The trucks waiting on road segment one5 send after that a “quadrocopter request” on which the quadrocopter lifts off and flies the platoon leading truck. As soon as the quadrocopter is stable above the truck it sends an “at location” on which the trucks start to a position outside the crane. When they arrive there they send the quadrocopter to the landing pad with a “no longer needed” command and tell the freight hub that they are “at location”. The freight hub sends the platoon leader a “go to waypoint” command which makes them move under the crane. As soon as they arrive they send “at location” and the crane loads the first load on the first truck. Similarly the second load is loaded on the second truck. When the second load is located on the second truck the freight hub sends a “loading complete” 3 For better understanding see section 5.8.3. didn’t find any nice XMPP library for Labview. Otherwise that might be actually a nice way to pass messages in system. 5 The inner road in negative x-direction. See also section 5.8.2. 4 We 11 command to the platoon leader sending it to a position on the outer road just outside the crane area which triggers a “quadrocopter request”. As soon as the quadrocopter is in position it sends a “at location” message and the platoon starts moving. Unloading works in a similar way to loading only that the procedure finished ended by a “unloading complete” message. This makes the trucks drive with the quadrocopter to rounds to show of the quadrocopters abilities of avoiding the crane when the trucks drive through its range and then parking at the initial position. When the quadrocopter is sent to the landing pad with a “no longer needed” command the system is ready for the next “platoon request”. 2.4 Conclusions We can conclude that the integration of the system worked really well. The messages made it quite easy to follow what is going on in the system and kept the complexity low. We hope that some future groups can continue on the building blocks we created and build more complex and robust scenarios. 12 3 3.1 Wireless communication Description To be able to communicate with the trucks and the quadrocopter, we use commercial wireless sensor nodes called “Tmote sky” 6 . The Tmotes run an operating system called TinyOS7 and we use a serial adapter board8 and Pololu servo controller board9 to get pulse-width modulated control signals from a Tmote to the motors of the truck and to the arduino board on the quadrocopter. 3.2 3.2.1 Hardware Tmote sky boards Figure 1: The Tmote sky board 3.2.2 Serial adapter boards Figure 2: The serial adapter board 3.2.3 Pololu servo controller boards The Pololu servo controller boards’ functionality is simple; they receive a serial signal and output up to 8 pulse-width modulated servo signals. 3.2.4 Spektrum remote controller Available at the SML was a Spektrum DX6i remote controller that could be used in conjunction with a receiver (covered in 3.2.5) to steer servos. 3.2.5 Spektrum remote controller receiver Spektrum AR6210 remote controller receiver is required for using the remote controller covered in the previous section (3.2.4) 6 http://www.eecs.harvard.edu/~konrad/projects/shimmer/references/tmote-sky-datasheet.pdf 7 http://www.tinyos.net/ 8 The serial adapter board is built at KTH. Schematics can be found here: http://kth-wsn.googlecode.com/ svn/trunk/kth-wsn/apps.truck/Schematics/motor_controller 9 http://www.pololu.com/catalog/product/207 13 Figure 3: The Pololu servo controller board Figure 4: Spektrum DX6i Remote controller Figure 5: Spektrum AR6210 Receiver 14 3.3 3.3.1 Use of Tmotes Sending node The sending Tmote is connected to a PC’s USB port, the computer communicates with the Tmote via LabVIEW, to send messages to a receiving node. For communication with a single entity; a truck or a quadrocopter, two Tmotes are needed. The two Tmotes for one process need to be programmed with the same code, on the same radio channel, but with different ID’s. Figure 6: The sending node 3.3.2 Receiving node Figure 7: The receiving node - Quadrocopter Figure 8: The receiving node - Truck 3.4 T-motes and TinyOS The following sections outlines the process of installing software on the T-motes; communication from LabView and gives a brief manual regarding how to use TinyOS on a modern OS such as Ubuntu 12.09. The code (that is installed on the T-motes) used to communicate with the trucks and quadrocopters comes from the KTH-WSN SVN repository10 . 10 http://kth-wsn.googlecode.com/svn/ kth-wsn-read-only, 12/20/12 15 3.4.1 TinyOS on Xubuntos Installing the simple blink example application on the T-motes using the Xubuntos OS was successful, however the code from the KTH-WSN repository did not successfully install on the T-motes. The errors regarded missing files and incompatibility. 3.4.2 TinyOS on Ubuntu 12.09 Installing the T-motes with the software found on the KTH-WSN SVN repository proved to be successful on Ubuntu 12.09. In order to be able to install and use TinyOS on Ubuntu 12.09 the following steps must be followed. 1. Install Ubuntu 12.09. 2. Before installing, you should add the TinyOS repository. Run the following script in the terminal. $ sudo gedit /etc/apt/sources.list 3. Put these lines in the soruces.list file in order to install TinyOs 2.1.2. deb http://tinyos.stanford.edu/tinyos/dists/ubuntu lucid main deb http://tinyos.stanford.edu/tinyos/dists/ubuntu natty main deb http://tinyos.stanford.edu/tinyos/dists/ubuntu maverick main 4. Save and close the file. 5. Update the repository. $ sudo apt-get update 6. Run the following to install TinyOS 2.1.2. $ sudo apt-get install tinyos-2.1.2 (Optional) Before installing TinyOS, check out the versions of TinyOS using this script. $ sudo apt-get install tinyos 7. After the installation, open and edit this file. $ gedit ~/.bashrc 8. Write this text to the bottom of the file. export TOSROOT=/opt/tinyos-2.1.2 export TOSDIR=$TOSROOT/tos export CLASSPATH=$TOSROOT/support/sdk/java/tinyos.jar:.:$CLASSPATH export MAKERULES=$TOSROOT/support/make/Makerules export PATH=/opt/msp430/bin:$PATH #Sourcing the tinyos environment variable setup script source /opt/tinyos-2.1.2/tinyos.sh 9. After installation, check that the installation was success or not. $ tos-check-env 10. Verify by installing the blink application. Note that it is important to carefully consider the channel you send on, and the mote identification number. 3.4.3 LabView and T-motes In order to communicate with the T-motes from LabView we implement a system according to the read me file given in the KTH-WSN SVN repository11 . The LabView implementation is based upon the code on the same repository. Note that our code is only based on the examples on the repository, and that our code base has grown considerably since. 11 http://code.google.com/p/kth-wsn/source/browse/trunk/kth-wsn/apps.truck/trucks/trucks_TinyOS/readme.txt, 12/20/12 16 4 Motion Capturing System In the project we used a Motion Capturing System (short MoCap) from Qualisys. The system does a multi view 3D construction of passive IR markers. We used a demonstration system provided by the company with four cameras. A larger and newer system with 12 cameras is to be installed after of the project. We were the first at the department to use this system in a project. Hence there was hardly any experience with that kind of systems available at the department. 4.1 Working Principle The system is based on the fact that if a point in space is seen from at least two different viewpoints with calibrated cameras of known position the position of the point in 3D can be calculated. The MoCap system therefore looks at the scene with four cameras in our case. The cameras are sensitive in the infrared spectrum and they’re equipped with infrared flash. Figure 9: Reflective marker (source: www.qualisys.com) The objects to be tracked are equipped with markers. This are small reflective balls which are seen in the camera image as small bright dots (see image 9). The image is thresholded on the cameras and position and size of the markers are calculated. This information is sent via Ethernet to a computer running a software called “Qualisys Track Manager” (QTM). In figure 10 you can see a image of this data how it arrives at the computer. Figure 10: Image of markers seen by one camera The QTM tries to match the markers seen in different images and calculates the positions of the markers. Furthermore it is possible to define “rigid bodies”. That are fixed spacial configurations of three markers or more12 . The program then searches 12 If there are more than three markers in a rigid body then the body can be tracked if at least three markers are visible. 17 for configurations of markers matching the rigid bodies within a specified bone length tolerance. If the rigid body is found the position and orientation of an associated coordinate system is calculated. Whilst there is extensive support for recordings we used the realtime capabilities of the QTM. It provides over an own protocol via TCP/IP or UDP/IP the measured data to up to 10 clients. We used a Labview client provided by Qualisys to further process the data. It would also have been possible to implement the protocol ourselves. 4.2 Usage in our Setup We used the MoCap system to determine position and rotation around the z-axis13 of: • Three trucks • A crane • A quadrocopter • Two loads. Therefore the aforementioned objects were equipped with three respectively five markers in the case of the quadrocopter. The system is thought of an indoor replacement for GPS. With respect to the limit time we did however not entirely adhere to this idea. The quadrocopter gets for instance the position of the trucks directly for the QTM and we use also the orientation which can normally only be inferred when an object moves or with multiple receivers. 4.3 Positioning of the Cameras Figure 11: Illustration of the camera setup It turned out that the space covered by four cameras is quite small for what we were asked to do in the project. As the provided absolute accuracy of the system down into the millimeter range was not needed for our purposes we decided to sacrifice some accuracy and reliability for a larger covered space. We had to take into account constraints: • We could only mount the cameras on tripods with maximum height. • Every point in the capturing volume had to be seen by a least two cameras. • Our objects rotate freely around the z-axis which can result in marker occlusion from certain angles. • Every camera has to see the four markers defining the origin during calibration. We decided therefore the mount the cameras as high as possible, one in each corner of the room and in a circular setup. Image 11 illustrates the orientations placement of the cameras in the room. The coordinate system indicates the position of the calibration markers and hence the global coordinate system. Figure 12 gives an approximation of the covered volume. The real covered volume depends on a couple of other factors such as lighting conditions, occlusion, parameter settings etc. 13 The one pointing upwards 18 Figure 12: Calculated covered volume of the MoCap system 4.4 Calibration Frequently, the camera system has to be calibrated. As tripods seem to cause a certain attraction which makes people touch them frequently we had to calibrate approximately every other day. Already minute disturbances in the camera orientation make a recalibration necessary. For the calibration a frame with four markers is placed on the ground (see image 13). This defines the coordinate system. Then a person has to move the calibration wand around in the covered volume ideally covering all positions in all directions. Not moving to quickly and not covering the wand with calibrating persons body is important. The calibration wand is a stick of known length with markers on either side (see image 13). 60 seconds proved to be a good time to cover the whole room. Figure 13: Calibration tools for the MoCap system (source: www.qualisys.com) 4.5 Choice of the Marker Size We use two sizes of reflective markers in the project: Markers with 19 mm diameter for the trucks and quadrocopter and markers with 12 mm diameter for the loads and the crane. The main advantage of the smaller markers are that they are less likely to merge and can thus be placed closer to each other. The bigger markers however can be seen all the way across the room and can thus be used to cover a larger volume. Additionally we had to consider the fact that the demo system consists of three old camera models and a newer one14 . The newer one is more sensitive and sees a greater area of the marker which makes them effectively larger. With the newer camera the 12 mm diameter markers would be prefect whereas the larger markers are a bit too large for the trucks. As we 14 Oqus 300/310 are the older models and Oqus 300+ is the newer. 19 just have one new camera and three old we decided to go for bigger markers for the trucks and quadrocopter. We use the smaller markers for the loads and the crane as they only need to be seen in a region were we have no problems detecting them. The quadrocopter and the trucks are equipped with the bigger markers as they move around in the whole capturing volume. 4.6 Placement of the Markers The placement of the markers is a more complex problem than one would imagine. As we cover most spots only with two cameras merging two markers in one camera image results in loosing the objects position. Therefore we placed the markers on the loads, crane and the trucks in the horizontal plane. For the trucks, merging in the newer camera in certain position could still not be avoided in all positions and we decided on accounting for the problem via position estimation. Any symmetry has to be avoided to ensure that the rigid bodies cannot be found in multiple positions. Obviously makers can also not be placed in line as this would leave one axis of rotation. On the other hand it might be useful to place the markers such that it is easy to align the rigid bodies coordinate system in an nice way using the markers. This however easily introduces symmetry we would like to avoid. Every rigid body has to be unique with respect to the other rigid bodies in the project. If you allow a rigid body to be found when not all its markers are visible then also every subset of at least three markers has to be unique. Placing more markers can result in better tracking results as not all markers have to be visible all the time. This however also increases the possibility for markers to merge and risk for ambiguity. Therefore adding more markers was unfortunately not an easy solution to improve tracking reliability. 4.7 Integration in Labview For the integration into Labview we used the client provided by Qualisys. There is one VI which handles the connection to QTM. This has to run in a “freely running” infinite loop. It is blocking and if called at a lower frequency than the sampling frequency set in QTM data will queue up15 . Then there are different blocks to actually access the latest received data. We used a block which provides the position and rotation expressed in Euler angles, of a certain rigid body. If the rigid body is lost in MoCap the blocks output “NaN”. If the Labview program runs, as in our case, on another computer it might be good to have a fixed IP for the computer running the QTM. We circumvented that problem by using a dynamic DNS provider which gave us domain always resolving the correct machine. 4.8 Sampling Frequency We set the sampling frequency to 100 Hz as the trucks and quadrocopter are only controlled with 10 Hz due to the limited capacity of the wireless connection over the TMotes. The crane needs only the static position of the load. Therefore this was a high enough sampling frequency. It is however possible to run the MoCap system at higher frequencies. When we tried to run the system above 250 Hz it could not maintain the speed all the time. We did however not further investigate that. 4.9 4.9.1 Challenges Small Capturing Volume Given the size of the trucks and the dynamics of the quadrocopter the captured volume was quite small even though we optimized the camera placement. Hence especially the quadrocopter but sometimes also the trucks left the captured volume, so that controller had to able to handle these situations. 15 This means technically to not slow down the loop with timing functions. 20 4.9.2 Finding Rigid Bodies in Wrong Position As explained in 4.6 adding more markers and symmetry can lead to ambiguity in the rigid bodies orientation. That was mainly a problem for the quadrocopter as it has five markers. It is sometimes found flying upside down. This prevented us also from adding more than three markers to the trucks. 4.9.3 Marker Occlusion As most of the space is only seen by two cameras, markers are often hidden either by the object itself or by other objects, for instance the quadrocopter occluding one of the trucks. There are a couple of points on the road network were the trucks are lost. The truck controller has to deal with that. 4.9.4 Mismatching Markers This is another problem which occurs when only two cameras see a marker. Then it can happen that correspondences are not found correctly. This leads to incorrect marker positions. With multiple cameras this would give higher errors and thus be dismissed by the QTM. The problem becomes even more severe if there are markers on the side of the room only seen by one camera as there are more possible mismatches. This is easy to fix by removing these markers from side but happens quite easily. 4.9.5 General Purpose Tracking Algorithm Most of the aforementioned problems could be avoided by using more available information for the rigid body tracking such as knowing that the trucks are always moving horizontally, the input values etc. As the QTM is closed source software which would have meant doing that estimation from scratch we decided working around these issues. These problems will most likely be solved when more cameras are installed. 4.9.6 Daylight Disturbances On sunny days the sun radiation is strong enough to severely disturb the system. We solved this problem by covering the windows first with some card-board boxes and later we had curtains installed. Now in Winter only direct radiation through the sun causes problems. Diffuse ambient light is no issue. 4.9.7 Network Configuration In the first week the system was hardly running because the MoCap system requires the network card connected to the camera system to have a fixed IP-address. Furthermore it runs its own DHCP server to give the cameras IP-addresses which however doesn’t respond to any other requests than those from cameras. For the KTH network the network interface has however to be configured to get an IPaddress via DHCP and the administrators don’t like any other DHCP servers running in their network. After a while we finally had a second Ethernet card installed such that one is connected to the camera system and one the KTH network. 4.9.8 Broken Camera One of the cameras we had in the beginning showed strange behavior. It was much more noisy than the other cameras and an error occurred when we tried to stream the raw video data. We got a replacement from Qualisys which is the newer model we mentioned. 21 4.9.9 Not More Than 6 Rigid Bodies Possible This is an error we became aware of the last week before the final presentation is not solved so far. When we added a seventh rigid body it could not be accessed with the Labview client. A possible reason could be that the connection to Labview most likely uses UDP and that 7 rigid bodies exceed the maximum packet size. This is however just speculation. We wrote an e-mail to the Qualisys support but haven’t gotten any answer yet. We solved the problem by removing the rigid body of the crane and keeping it in a fixed position. However it might be in the interest of future work with the system to resolve that issue. 4.10 Conclusions This is a really nice system to work with and was essential in making this project work. Most of the problems we experienced were related to the small amount of cameras and it will be interesting to see how the system works in a setup with more cameras. We got the impression that the QTM is more designed for capturing and a number of small details could be improved for the use in real time applications. Except for the issue discussed in 4.9.9 we got excellent support from the company. 22 5 Scania trucks Figure 14: Scania truck 5.1 Description For the final scenario there were three TAMIYA Scania model trucks regulated by PID controllers for velocity, steering and platooning. Labview was used for running the logic and control environment which produced input signals for the trucks. The input signals were then forwarded by T-motes, through a serial adapter and a PWM (Pulse Width Modulator) board, into the motor control of the truck. The main objective for the trucks was to work as a transport medium for the loads in the final scenario. Communicating with both the crane and quadrocopter to get a load from A to B in the easiest way. To fullfill this requirement, the trucks needed to be able to follow a certain path and navigate in the road network and arrive at a given destination. To move a number of loads in an efficient way, the truck should also be able to drive in platooning formation. In order to guarantee the safety while transporting the load, the trucks should also be able to avoid collision with other trucks while in the road network. 5.2 Hardware • 3x TAMIYA Scania R620 Highline model truck with trolly • Logitech F310 GamePad • T-mote sky board • Serial adapter board • Pololu servo controller board • Spektrum DX6i Remote controller • Spektrum AR6210 Reciver • SAMARA "Super-Sun-Power" 500 Ni-MH Battery (7.2V 6N 5000 mAh 36Wh) 5.2.1 Manual control with a remote The be able to test the trucks the first few times, it was connected to the Spektrum AR6210 Reciver and controlled with the Spektrum DX6i Remote controller. 23 5.2.2 Manual control through LabView with a game controller To make it easier to relocate, move or test interaction between other processes and the trucks, a Logitech Gamepad, see Figure 15, was connected to LabView. This is possible by a build in VI in LabView which enables communications with external hardware. When the hardware is connected, the VI makes it possible to get hold of the numerical outputs from the hardware. In this case the buttons and triggers on the gamepad. These values can then easily be scales or changed after need by simple mathematical operations inside LabView. This was used to get better sensitivity when steering the trucks with the gamepad. The implementation used in this set-up was to give forward throttle by the right trigger and backwards throttle with the left trigger. Steering was done with one of the joysticks. Figure 15: Logitech Gamepad F310 5.3 Software The software used are enumerated in the list below: 1. LabView 2011 service pack 116 . 2. Matlab and Simulink 201217 . 3. G# module for LabView18 . 5.4 State Machine The state machine acts as a controller, but at a higher abstraction level (as opposed to the PID regulators) and is illustrated in Figure 16. 16 http://sine.ni.com/np/app/main/p/docid/nav-104/lang/sv/, 17 http://www.mathworks.se/products/matlab/, 18 http://www.addq.se/gsharp/, 12/21/12 12/21/12 24 12/21/12 Figure 16: The image illustrates the state machine used in the truck process. Every circle indicates a state; the node arrows indicate a certain action that invokes a change of state according to the direction of the arrow; and the initial state is the wait for command state as indicated in Figure 16. Note that this state machine dictates the states of the trucks. 5.4.1 States of the trucks A truck has four distinct states: 1. 2. 3. 4. Parking: the vehicle is at a standstill. GamePad: the vehicle is controlled with gamepad Platoon master: refer to Chapter 5.7.3. Platoon slave: refer to Chapter 5.7.3. 5.4.2 Wait for command A state machine in this state will only wait for a platoon request - command sent from the crane process. A vehicle’s state will not be affected in this state. Note that even though this state does not actively change a state of a vehicle, it will nonetheless demand that the vehicle is in parking state. 5.4.3 Send Quadrocopter request This state will send a quadrcopter-request to the Quadrocopter process. The vehicle’s state will not be altered in this state. As with the Wait for command state, this state will demand that the vehicles are in parking state. This state does not wait for any action to occur. As soon as a request is sent, the purpose of this state is completed (namely sending a request). 5.4.4 Wait for Quadrocopter acknowledgement As soon as the Send Quadrcopter request state is executed, the state machine will enter this state and wait. The only action that will invoke a change of state is receiving a valid acknowledgement message from the Quadrocopter process. The Goto requested street address state is invoked as soon as a Quadrcopter acknowledgement is received. 25 5.4.5 Goto requested street address At this point the state of the platooning trucks will be altered (the leading vehicle’s state will be Platoon master, whereas the following vehicles’s state will be Platoon slave). The state machine will remain in this state until the platoon of vehicle(s) is at its destination address. Note that if the trucks have received an unloading competed - command the next state will be the Wait for command state, according to Figure 16. 5.4.6 No Longer needed As soon as a platoon of vehicles is at its specified destination address, the state machine will change state from the Goto requested street address state to the No Longer needed state. This state refers to that the Quadrocopter is no longer needed due to the fact that the platoon of vehicles has arrived to the destination address specified in either the platoon request message, loading completed message or unloading completed message. The purpose of this state is to send a No Longer needed message to the quadrocopter. This state will require that the vehicles’ state is set to parking. 5.4.7 At location The purpose of the at location state is to send an at location message to the crane process. This state will require that the vehicle’s state in the platoon are all set to the parking state. As soon as the message is sent, a change of state will be invoked according to Figure 16. 5.4.8 Wait for crane command This state is a waiting state. The state machine will wait for a command from the crane process. This state will require that the state of all the vehicles in the platoon is set to parking. The only action that will invoke a change of state is either a Goto waypoint command, a Loading completed - command or an Unloading completed - command. 5.4.9 Goto waypoint This state is only reachable from the Wait for crane command state.The purpose of this state is to give the crane process total control of the vehicles. As soon as a Goto waypoint - command is sent during the Wait for crane command state, the vehicle will enter this state. This state will alter the vehicle state of the platooning trucks in the exact same manner that the Goto requested street address state did. The only action that will invoke a change of state is the action that indicates that the platoon of vehicles is at the destination address that the crane specified in the Goto waypoint - command. The next state will be the Wait for crane command state. 5.4.10 Loading completed This state is only reachable from the Wait for crane command state. The crane process specify this command when they are done with loading the trucks. This state will set the destination address to the one that is specified in the Loading completed - command. The next state is the Goto requested street address state. 5.4.11 Unloading completed This state is only reachable from the Wait for crane command state. The crane process specify this command when they are done with unloading the trucks. This state will set the destination address to the one that is specified in the Unloading completed command. The next state is the Drive extra lap state. 26 5.4.12 Drive extra lap The purpose of this state is to drive by the crane without stopping and demonstrate the way that the Quadrocopter avoids collision with the crane. As soon as the platoon of vehicles reaches the destination specified in the Unloading completed - message, the next state that is invoked is the Goto requested street address state (while also setting the destination to the same address as the parking lot). 5.5 Truck model The kinematic vehicle model used throughout the project is based on the model given in [3]. The kinematic model is used to describe the behavior of the trucks. The model proposed in that article is based on unicycle dynamics, and the notations are presented in Figure 17. Figure 17: The notation used in the kinematic model [3]. Table 1 references the notations in Figure 17 and gives a short description of them. Notation (xb , yb ) vb l ✓ Description The spatial coordinate of the vehicle Velocity of the vehicle Length between the rear and front wheels Steering angle Orientation of vehicle (yaw) Table 1: The table contains a description of the notation used in Figure 17. 5.5.1 Simplified kinematic vehicle model The model proposed in [3] contains the state 0 xb B yb B B ẋb B B ẏb B @ ✓ space given in (1). 1 C C C C C C A and the proposed model is restated in (2): 0 1 0 1 0 xb 0 0 B yb C B 0 C B 0 B C B C B C B C B d B B ẋb C = B 0 C ˙ + B cos (✓) C B C B sin (✓) dt B B ẏb C B 0 C B @ ✓ A @ 0 A @ 0 1 0 27 1 0 C B C B C B C ab + B C B C B A @ cos (✓) sin (✓) 0 0 tan( ) l 0 (1) 1 C C C C vb , C C A (2) where vb is the velocity and ab is the acceleration according to (3). ab = p (ẍb + ÿb ), vb = p (ẋb + ẏb ) (3) We simplify by assuming that the derivative of the orientation of the vehicle (yaw), i.e. d dt ✓ is given by (4). d ✓ = k vb (4) dt The parameter k is explained in Chapter 5.5.6. The reason as to why this simplification is valid is understood by studying measured ments of dt ✓. There is no clear evidence of a nonlinear term such as tan (·). The simplified model is thus given by (5). 0 1 0 1 0 1 0 1 xb 0 0 cos (✓) B yb C B 0 C B C B sin (✓) C 0 B C B C B C B C C B C B C B C d B ẋ 0 cos (✓) 0 B b C=B C ˙ +B C ab + B C vb C B C B C B C ẏ 0 sin (✓) 0 dt B B b C B C B C B C @ ✓ A @ 0 A @ A @ k A 0 1 0 0 (5) In order to better visualize the dynamic model consider the block diagram illustrated in Figure 18. The illustration contains the elements you would normally expect to find in a kinematic model of a vehicle, and is an expression of (5). From this point on, this kinematic model will be expanded by adding elements like backlash and transport delays. This extended model will here on be denoted as the extended vehicle model. Figure 18: A block diagram of the kinematic model that the vehicle model is based upon[3], denoted the simple vehicle model. The remaining part of this chapter will focus on how the velocity vb , and the steering angle are modeled. 5.5.2 Transport delay A transport delay refers to the delay that is induced when using wireless communication. The delay is as expected situated between the concerned T-mote pair, and the affected signals are illustrated in Figure 19. Figure 19: A block diagram illustrating the affected signals in the delay imposed by the wireless communication. Table 2 references the notation used in Figure 19 and gives a short description of the concerned signals. 28 Notation uthrottle usteering timedelay ũthrottle ũsteering Description Throttle control signal sent from the controller via T-mote on pc. Steering control signal sent from the controller via T-mote on pc. The time delay. The delayed throttle control signal received via T-mote on truck. The delayed steering control signal received via T-mote on truck. Table 2: The table gives a short description of the notation used in Figure 19. In order to identify the time delay parameter in the model, sound was recorded and later analyzed in the computer. Note that the success of a sound recording is dependent on some kind of events indicating specific actions of interest. Two kind of actions were of interest in this sound recording: 1. T-mote starts sending data. 2. Vehicle reacts to the control signal just received via the receiving T-mote. These two actions are coupled with the following two sound events: a. The sound of an Enter-key stroke. b. The sound of the wheels turning or the sound of wheels being affected by the throttle signal, i.e. wheels spinning. In order to do a correct measurement of the time delay of the system, the measurement of the time delay should be initiate immediately after event a and stopped immediately before event b. By utilizing a sound analyzing tool such as Audacity19 , this kind of exact measurement is possible and practicable. The time delay found using this system identification approach is presented in Table 3. Observe that the initial values for these control signals needs to be set in accordance with what the vehicle is expecting as the first sample. The final result is presented in the end of Chapter 5.5. Parameter timedelay Value 0.16 s Description Time delay due to wireless communication Table 3: Parameters found through the system identification process. The control signals ũthrottle and ũsteering are the signals sent from the control application on the computer20 . The control signals (steering and throttle) are represented by an 8-bit number that ranges from 0 127. The first sample sent to an uninitiated servo controller (i.e. the throttle servo and steering servo) will be the bias value. For instance, if the first sample is 63 (a mid range value) then this value will always be mapped to no speed, i.e. 0m/s. This imply that the range 0 63 is reverse movement, whereas 63 127 is forward movement. Our model will replicate this behavior by always letting the initial value be 63. The steering servo behaves analogously. The steering servo controller needs to be initiated with the values that represents straight wheels, i.e. the vehicle moves straight. 5.5.3 Saturation The delayed control signals introduced in Chapter 5.5.2, ũthrottle and ũsteering needs to be limited in the model. As mentioned in Chapter 5.5.2, the control signal is defined by an 8-bit number, ranging from 0 127. This is modeled with a saturation block, as illustrated in Figure 20. 19 Audacity 20 The is an open source software found at http://audacity.sourceforge.net, 12/19/12 control application is implemented in LabView. 29 Figure 20: A block diagram illustrating saturated control signals. The range of the signals ûthrottle and ûsteering is limited to the interval [0, 128), in accordance with the physical limitations of the servos on the trucks (note that the number that defines the control signal in LabView is assumed to be a signed 8-bit number, however an unsigned 5-bit number is just as good). The saturation interval is presented in Table 4 below. Parameter interval Value [0, 128) Description The saturation interval of both control signals Table 4: Parameters found through the system identification process. 5.5.4 Rate limiter on steering control signal In order to further model the limitations of the steering control servo we need to limit the rate of change of the control signal. The rate limiter block illustrated in Figure 21 is intended to reflect this physical limitations of the steering servo. Figure 21: A block diagram illustrating rate limiting of the steering control signal. In order to identify the parameter for this limitation, a system identification experiment similar to the one depicted in Chapter 5.5.2 is conducted. The experiment is conducted by initially giving the steering servo a control signal of 0, i.e. an angle that corresponds to maximal turn to the left. The idea is to calculate the maximal rate of change. The actions of interest are: 1. Give wheels a steering control signal of 127 - wheels starts turning to the right. 2. Wheels have turned to the angle that corresponds to maximal turn to the right. These two actions are coupled with the following sound events: a. A sound that indicats that the wheels are beginning to turn from their initial position. b. A sound indicating that the wheels have reached their end position. By keeping track of the control signal range in which the signal varies, and the time in which the control signal changes it is straightforward to calculate the maximal rate of change, according to the formula in (6). rate of change = maximal range in which the signal varies duration The result of this experiment is presented in Table 5. 30 (6) Parameter ratelimit Value 365 units/s Description Maximum rate of change of steering signal. Table 5: Parameters found through the system identification process. 5.5.5 Backlash on steering control signal and the LUT bias The backlash in this system is defined as the maximum distance through which the part of the system associated with requesting a change of steering can be moved without moving the connected part responsible for the actual executing of the steering request. Figure 22 illustrates the affected signals. The purpose of the bias block is to change the range of the control signal, so that we map the steering control signal according to 55 7! 0. Figure 22: A block diagram illustrating the use of the Look-up table and the bias subtraction. The backlash is measured by plotting the angular velocity of ✓, i.e. the angular velocity of the the vehicle orientation (yaw) against ûsteering . Recall that , the steering angle (the signal we are really interested in mapping the control signal ûsteering to) is a function of ✓˙ according to (4). Let us rewrite (4) to (7). = ✓˙ k vb Note that if we keep the velocity of the truck vb constant than ˙ according to (8). angular velocity ✓, (7) is proportional to the / ✓˙ (8) This implies that we are able to measure the angular velocity of yaw in order to somehow relate the control signal ûsteering , to the steering angle . Recall that we are not able to measure the steering angle with the system we have (MoCap), however, we are ˙ This is the main reason that we easily able to measure the angular velocity of yaw, ✓. need to relate these calculates to yaw, instead of the steering angle. By measuring and plotting the angular velocity ✓˙ against the steering control signal ûsteering we are able to find a good deadband value expressed in the steering control signal (observe that the deadband value is not expressed in radians - it is expressed in control signal units, i.e. in the unit less range of an 8-bit number ranging in [0, 128)). The plots in Figure 23 are the results of the system identification experiment which was redone for different velocity vb . The graphs shows a deadband approximately around 10 control signal units, i.e. 8% of the range [0, 128). Recall that a constant throttle control signal is mapped to a constant velocity. The configuration used is expressed in the list below and the order maps to the graphs in Figure 23. 1. ûthrottle = 80 control signal units, ûsteering = triangle wave of amplitude 20 control signal units. 2. ûthrottle = 90 control signal units, ûsteering = triangle wave of amplitude 20 control signal units. 3. ûthrottle = 80 control signal units, ûsteering = triangle wave of amplitude 40 control signal units. 4. ûthrottle = 90 control signal units, ûsteering = triangle wave of amplitude 40 control signal units. 31 The second plot contains corrupt data and as such it is rejected in this system identification process. Figure 23: Plot of the backlash in the system for different constant speeds vb . The y-axis is expressed in angular velocity of yaw, whereas the x-axis is expressed in control signal ûsteering . The result of this experiment is presented in Table 6. In order to find a good approximation of the deadband parameter, it is set to be the mean value for different velocities vb . Parameter deadband Value 10 units Description The deadband of the backlash element. Table 6: Parameters found through the system identification process. 5.5.6 Look-up table on steering control signal The purpose of the Look-up table (LUT) is to map the steering control signal to the physical signal , i.e. the steering signal. The signal wired out of the backlash block defined in Chapter 5.5.5 is still a steering control signal. The affected signals are illustrated in Figure 24. Note that all our LUT elements use linear interpolation/extrapolation. Figure 24: A block diagram illustrating the use of the Look-up table and the bias subtraction. At this point we need to map the steering control signal to the steering angle . Note that the mapping parameter was actually introduced earlier on in (4), as the mapping parameter k. 32 This parameter is simply the slope of the graphs shown in the backlash plots in Chapter 5.5.5 (in order to find a good approximation of the slope k, the parameter is the mean value of the slopes for different velocities vb in Figure 23). Recall that the plots in Chapter 5.5.5 visualize the relationship between the angular velocity of yaw and the steering control signal. The result of this experiment is presented in Table 7. Parameter k Value 0.22 radians/units Description The parameter that maps ûsteering to . Table 7: Parameters found through the system identification process. 5.5.7 Look-up table on throttle control signal The purpose of this LUT is to map the throttle control signal to the physical signal vb , i.e. the velocity of the vehicle. Figure 25 illustrates the affected signals. Figure 25: A block diagram illustrating the use of the Look-up table. By measuring the control signal ûthrottle and calculating the velocity in which the vehicle moves in for this specific control signal, one is able to find a mapping according to (9). ûthrottle 7! vb (9) The result of this system identification process is visualized in Figure 26. The system identification experiment is conducted for different velocities according to the explanation given. The velocities for the different control signals are summarized in the the graph given in Figure 26. Figure 26: Mapping of throttle control signal to velocity. 33 The result of this experiment is presented in Table 8. The LUT is approximated with a straight line according to (10) and with the parameters in Table 8. (10) y = hx + m Parameter h m Value 0.054158 ms/units 3.7018m/s Description Parameter of (10). Parameter of (10). Table 8: Parameters found through the system identification process. 5.5.8 Inertia of vehicle In order to model the inertia of the vehicle one must use some kind of transfer function to limit the rate of change of velocity. Instead of conducting experiments related to the mass of the truck, a simple step response is conducted to find the required parameter. Figure 27 illustrates the use of the transfer function given in (11). G(s) = 1 ⌧s + 1 (11) Figure 27: A block diagram illustrating the use of a transfer function that affects the rate of change of the steady state velocity. The step response is conducted according to the theory in [10]. The time it takes for the vehicle to reach 63% of its final value (velocity) is the time constant, ⌧ , that we are interested in. Note that there exists two different kinds of time constants depending on whether or not the vehicle’s initial velocity is 0 m/s (which will affect the kind of friction between the floor and the rubber wheels - static friction or kinematic friction). The time constant of a step response of a vehicle from standstill (0 m/s) to a certain velocity is larger than compared to a step response where the initial speed of the vehicle is non zero. Table 9 illustrates different time constants for different end velocities (the initial velocity is 0 m/s). Velocity ( m s ) 0.394 1.112 1.358 1.588 2.11 2.28 2.32 Time constant ⌧ 0.9 1, 1 1.2 1.4 1.5 Table 9: Parameters found through system identification process. The graph in Figure 28 illustrates one of the step responses conducted. The red signal is low pass filtered and both signals are normalized in order to simplify interpretation of the plots. The blue graph indicates the step, and the red graph is the response (the velocity of the vehicle). The first step is from standstill, and the second step is from a non zero initial velocity. 34 Figure 28: The plot illustrates a step response. An initial guess of the time constant is given by the graph in Figure 28 and Table 9. However, considering that there are dynamics that are not modeled here, the initial guess needs to be tuned. The tuning process is conducted in LabView and the idea is to use the initial guess as a good starting point and thereafter fine tune this parameter according to reality. The application in use will feed both the model and the real system (the vehicle) with the same control signal. By comparing the output (i.e. the velocity in this case) we are able to tune the time constant so that it matches reality. This way of fine tuning a parameter is very intuitive since it immediately gives you visual feedback on the choice of parameter. Figure 29 illustrates a compared step response. The red graph is the step response of our tuned model, and the gray graph is the step response of the actual system. Figure 29: The plot illustrates a comparison of a step response. The result of this experiment is presented in Table 10. Parameter ⌧ Value 0.7 s Description Time constant in (11). Table 10: Parameters found through system identification process. 35 5.5.9 The extended kinematic vehicle model The final extended vehicle model that is used to tune the PID regulators is split into two parts in this chapter. The first half is illustrated in Figure 27 and the second half is illustrated in Figure 18. The final list of parameters is given in Table (11). Parameter timedelay interval ratelimiter deadband k h m ⌧ Value 0.16 s [0, 128) 365 units/s 10 units 0.22 radians/units 0.054158 ms/units 3.7018m/s 0.7 s Description Time delay due to wireless communication. The saturation interval of both control signals. Maximum rate of change of steering signal. The deadband of the backlash element. The parameter that maps ûsteering to . Parameter of (10). Parameter of (10). Time constant in (11). Table 11: Parameters found through the system identification process. 5.6 5.6.1 Creating the roads Creating the roads To create the roads for the final presentation, the whole road network was marked out with tape on the floor. A truck was then steered by remote control, following all the roads in the networks, while the MoCap system recorded all its movements. The data was then read into Matlab where all roads were divided into segments. Since the data was sampled, some of the samples were chosen to work as waypoints in order to represent the road. A local coordinate system was then added to every waypoint where the x-axis always pointed towards the next waypoint on the road, see Figure 30. Figure 30: The road network with all segments and waypoints. The figure also shows how the local coordinate system in every waypoint points towards the next waypoint in the segment. When selecting which samples of the road data that should be waypoints, the minimum and maximum distance between two waypoints could be set after need. Another feature that could be limited before creating the road was the maximum angle between two waypoints, meaning that the sharpness of a curve could be changed to some extent. This was necessary because of the low sampling frequency of 10 Hz for the control environment. Meaning that a truck driving at 0.5 m/s with controls running every 100 ms gets about 5 cm in between regulations. If then some delay is add and the fact that the truck will need some iterations to correct its position, the resolution of waypoints along the road is a key factor of controlling the truck. This shows that 36 there is a tradeoff between using to many points so that the truck doesnt have time to adapt before changing to a new waypoint, or using to few waypoints which makes the approximation worse and creates sharp curves in the road. The file which contains the location of every waypoint also contains the distance between two waypoints. The main idea with this representation is that if you know which waypoint you started form, you will get the direction to the next waypoint and are able to follow that direction for a known distance until you arrive at the next waypoint. Navigating in a road segment basicly becomes, start at a waypoint and drive in a certain direction for a certain distance until you arrive at the next waypoint and start over. 5.7 Control design Before any work could be done on building a control environment for the trucks, some basic requirements and boundaries needed to be established. First of all, for the trucks to succeed in the final scenario there were a few requirements that could be identified immediately, such as: The trucks should to be able to... • drive at a reference speed • steer so that it is kept on the road • navigate in the road network and arrive at a given destination • platoon with at least two trucks • avoid collisions in the road network • communicate and interact with the other processes To simplify the task, there were also some limitations imposed on the system. For instance, the roads were one-way streets so the trucks would always go in the same direction, two trucks would never be side by side and a truck would never drive backwards. Furthermore the trucks would never leave the road and would only operate at speeds 0 - 0.6 m/s due to the small road network and the other processes. When taking all the above mentioned requirements and limitations into consideration and the fact that the basic functions of the regulator would be to: 1. Keep a reference speed, 2. Steer the truck to keep it on the road, and 3. Regulate the speed depending on a distance to a truck ahead (if platooning), the choice fell upon using PID21 The PID regulator are easy to implement and straight forward to tune for better results and unlike the MPC (Model Predictive Control) it doesn’t need an exact model in order to perform well. The choice also fell upon using three separate controllers for the speed, steering and platooning, because even though the speed and the steering works as a coupled system, meaning that the speed and steering output effect each other, this coupling was small around the operating point of the truck and wouldn’t effect the end result. 5.7.1 Tuning the initial PID controller Since there were no good transfer functions to base a PID controller on and the fact that the produced model had shown some consistent behaviour with the real trucks, the decision was made to connect a PID controller to the model and tune it base on the model. To get a rough idea of which numerical values to start the hand tuning from, the Ziegler - Nichols method ?? was used. This is done by setting both the integral and derivative gain to zero and then increase the proportional gain until the output oscillates with constant amplitude. This gain is refereed to as Ku and the oscillation period is knows as Tu . These two values were then used to set the initial values of the P, I and D part of the controller. The "no overshoot" model was used in this project, see Table 12 for examples. After the Ziegler-Nichols method had given a starting point, the tuning of parameters continued by hand. 21 The basic theory of PID regulators will not be explained in this report and interested readers are referred to textbooks on the subject like ?? regulators. 37 Control Type Classic PID Pessen Integral Rule Some Overshoot No Overshoot KP 0.60Ku 0.70Ku 0.33Ku 0.2Ku KI 2Kp /Tu 2.5Kp /Tu 2Kp /Tu 2Kp /Tu KD Kp Tu /8 0.15Kp Tu Kp Tu /3 Kp Tu /3 Table 12: Shows some of the control types from Ziegler-Nichols method. After a functional and stable PID controller for both velocity and steering had been achieved for the model, the regulators were connected to a real truck to test the performance for real. This first iteration behaved well enough to continue the control tuning on the real truck. After some more test and parameter tweaks, the truck were able to drive at a constant reference speed and stay on a straight line across the room. 5.7.2 Adding Feedforward to increase performance After a few test runs it became clear that the PID controller had to work hard to control the truck and sometimes the integration part didn’t reset or change direction fast enough. To solve this problem, feedforward was added to both the speed and steering controller. The speed regulator with a feedforward can be seen in Figure 31. Since the input/output relationship for the speed was approximated as linear, the reference speed sent to the PID could also be mapped to an input signal and feedforwarded. The PID output is then simply added to the feedforwarded signal and then sent to the truck. The function of this is that the truck gets an input that would make it to run at the reference speed and the PID then takes care of small divinations from the set speed. Meaning that the speed regulator doesn’t have to work so hard. Truck (Speed controller) Feedforward Throttle input V (ref) PID V Truck Figure 31: The feedforward PID for controlling the speed of the truck A feedforward loop was also added to the steering regulator of the trucks because of how the road segments and waypoints work, see section 5.6.1. For the truck to be able to follow a straight line, the PID regulator only needs to make small adjustments once the truck starts to deviate from the line it is trying to follow. However, road segments are represented by many small straight lines with a small difference in rotation between subsequent lines, the truck will then find itself way of the road when changing lines to follow and the regulator would need to work hard to steer the truck back unto the road, see Figure 32. 38 Direction of the truck (global) Diviation from road Direction of the road (global) Truck x y Figure 32: Showing how the deviation between the truck and the road is large when the truck goes from one pair of waypoints into the next pair of waypoints. In order to solve this fast change in direction which occurs every time the truck moves over a waypoint, a feedforward was added to the steering regulator. This loop takes into consideration how the truck and road are oriented and forwards the difference between them. The difference is then mapped to a steering angle on the wheels, added to the output of the steering PID regulator and fed to the truck as input. This means that the wheels will always point in the direction of the road and the PID regulator only needs to make up for the small deviations and keep the truck on the road, see Figure 33 for steering PID. Truck 1-3 Difference between road direction and truck direction Feedforward Steering angle Maximum deviation (ref) PID Diviation from road Truck Figure 33: The PID controller for the steering of the trucks. The feedforward take the difference between road and truck orientation add maps this to a steering input which sets the wheels in the direction of the road 5.7.3 Platooning controller The basic idea with platooning is to group vehicles together so that they act as one single vehicle. This makes it possible to keep a very small distance between all the vehicles in the platoon and increase the capacity of the roads. In order to make this work, you often share input/output data between vehicles so that everyone knows what the others are doing and can react accordantly. 39 One simple way for vehicles to travel in a platoon is to just keep the same speed as all the other cars. This basic principle is used as the feedforward in the platooning regulator. The second truck (slave) gets the leading trucks (master) reference speed as feedforward. This leaves for the PID regulator to make small adjustments on the distance between the two trucks by increasing or decreasing the speed slightly. This is illustrated in Figure 34. Truck 1 (Master) Feedforward Throttle input V (ref) PID V Truck Truck 2 (Slave) Feedforward Throttle input Distance to master (ref) PID Distance between trucks Truck Figure 34: The control environment for the platooning. The second truck gets the reference speed from the first truck as feedforward while the PID controller regulates on the distance between the two trucks, making small adjustments. 5.7.4 Loosing MoCap tracking When loosing MoCap coverage of the trucks, huge problems occur for the truck controllers. The speed regulator have no way of knowing the actual speed of the trucks, the steering regulator doesn’t know how the truck should steer and the distance to the truck ahead cant be calculated. To solve these problem, filters on the MoCap data was added before forwarding it to the control environment. The MoCap date used for the trucks is the orientation in the room and the x,y position of the trucks. To filter the loss of position, the filter takes the last known samples of the tuck position and calculates the speed of the trucks and continues to estimate the position of the truck. In order to handle the loss of orientation data, the filer takes into account which steering input, speed input, position and orientation the truck had before loosing it. With the help of this data, the filter then estimates the orientation of the truck. These estimations are then forwarded to the control environment and the regulators acts accordingly. This solution only works for shot losses of MoCap data, for longer losses it should be better to use a model predictive method of some sort. 5.7.5 Evaluation of control design The choice of using PID controllers for all processes in the trucks was based on the lack of an exact model and transfer functions. For this purpose the PID controllers are by far the easiest to implement and tune for good performance. The chosen PID regulators were all on the academic form, see in (12) F (s) = Kc ✓ 1 TD s + 1+ TI s s + 1 ◆ (12) where Kc is the proportional gain, KI is the integral gain and KD is the derivative gain. For the final implementation, the following parameters were used for the different controllers: see Table 13 40 Regulator Speed PID Steering PID Platooning PID KP 20 150 15 KI 1 0 10 KD 4 10 1 Table 13: The parameters for the tuck regulators, speed, steering and platooning, used in the final implementation. It can be mentioned that KD was used in every regulator to dampen some oscillations and to handle the deadzone in the speed regulator. This occurs when the trucks are driving at a very low speed and getting a low input signal. The integral gain KI for the speed regulator was used to get rid of a stationary error. The integral gain in the platooning PID is because of the constant change in position in order to keep the distance between two trucks constant. This can be seen as a ramp and the I-part is used to remove any stationary error. The only numerical requirement that any of the controllers had was that the deviation from the road should be below 5 cm. This requirement originated from that the trucks needs to be loaded and that the tower crane should be able to count on the truck to be with a certain area. However, the speed regulators should also be able to keep the velocity within reasonable range and the platooning distance should be as small as possible. For the platoon controller this means that the regulator should react fast enough so that the trucks don’t hit each other when breaking. To illustrate the performance of all three controllers, a plot showing the deviations from the references while driving in the road network are shown below, see Figure 35. Figure 35: The figure shows the deviations from references while driving in the road network. The data is recorded while driving in platoon formation in the road network, following speed limitations on the road which ranges from 0.2 - 0.6 m/s and using a platooning distance of 0.4 m. In the first plot in Figure 35 it can be seen how the trucks handle the road following. For the most part the trucks stays within the previously mentioned deviation requirement of 5 cm but at two occasions the deviations spikes over 6 cm. These spikes occur at the switch between road segment 2 and 3. This can be explained by looking at Figure 30 41 and noticing that road segment 3 only consists of one waypoint which creates a sharp curve for the trucks. The second plot in Figure 35 shows how the platooning distance deviates from the reference of 0.4 m while driving. The two largest deviations can be found at time 32 sec and 71 sec, this is when the trucks accelerate out of road segment 3 which has a speed limit of 0.3 m/s, into road segment 4 which has a speed limit of 0.5 m/s. One should also note that the MoCap coverage is lost in this area which contributes to this large deviation. This error of about 1 dm was a bit higher than expected but still within acceptable levels for the final scenario. The performance of the speed regulator can be seen in the third and final plot in Figure 35. It can be seen that the controller keeps the error within 0.05 m/s for the most part and that speed changes, seen as spikes, are corrected well enough. The performance of the truck control is also highly dependent of the sampling speed of the system. At the moment the program is running with 10 Hz, this means that the truck controllers only regulates every 100 ms. Meaning that the waypoint cant be placed too close to each other if the truck should have any chance of correcting before changing to the next pair of waypoint. The difference in angle between two pair of waypoint cant be too large, see Figure 32, because if a truck is moving with 0.5m/s and the road changes direction with 90 degrees for example, and doesn’t regulate for a full 100 ms, the truck will already be 5 cm of the road before any correction occurs. This was one reason to why feedforward was used for controlling the truck. 5.8 5.8.1 Road Network Description of a road object A road network is composed of a series of road objects, also called road segments. A road segment or object is very similar to a real road in the sense that a vehicle is able to drive on it. However, unlike a real road a road segment does not have the notion of multiple lanes nor does it have a road width. Thus, a road segment is a simplification of a real road. In conformity with a real road, a road segment has properties such as speed limitations, intersection areas, and a property that relates to the fact that only one vehicle is able to fit in the lateral space of a road segment. A speed limitation is imposed in the area around the Crane in order to avoid a collision of any kind. In addition to being a safety measure, a speed limitation is a reflection of real road networks. The illustration in Fig 36 illustrates a simple road network with road segments and the associated properties. Figure 36: The image illustrates a simple road network with road segments and the associated properties mentioned in this section. A road segment is made up of waypoints. Note that two consecutive waypoints define a straight line, which implies that a road segment is more or less a pice-wise linear curve. For instance, to calculate the traveled distance of a vehicle on a road segment (observe that the the start of a road segment has the coordinate x0 = 0), we need to know the coordinate of the waypoint nearest to the rear of the vehicle in question, and the interpolated value that defines the position of the vehicle between two waypoints. Consider Fig 37 below where the traveled road distance equals 3.1 + 2.3 = 5.4 meters. 42 Figure 37: The image illustrates how to compute the traveled road distance on a road segment. By adding these two values, we obtain the travelled distance of the vehicle on the road segment. Note thus that the position of an arbitrary object on a road segment is simplified to a coordinate which is the travelled distance relative the start of a road segment. You might think of this distance as being part of an actual street address. 5.8.2 Map The following illustration visualizes the map structure that is used. The numbers of the line segments indicate the road segment number described in Chapter 5.8.3. The entire road network is specified in a XML-file and parsed into a suitable representation in LabView. Figure 38: The image illustrates a map of the road network. 5.8.3 Street address As with reality, we are faced with the need of being able to define a distinct destination in a road network. As mentioned before, the coordinate of a waypoint and the interpolated value between two consecutive waypoints will serve as a way of describing the position of a vehicle on a road segment. A street address is illustrated in Figure 39 and defined by two numerical values: the number of the road segment of interest in the road network, and a road distance. 43 Figure 39: The image illustrates the format of the street addresses used in the road network. A road distance is associated with the distance that a vehicle has traveled relative to the start of a road segment, and thus also the position of the vehicle on the road segment. This road distance is calculated as described in the section above (traveled distance). Consider the street address given Figure39, where the road distance equals 3.4 meters and the road segment number is 2. If this street address was given as a destination address the vehicle would be required to drive by and possible stop at the indicated point. A street address is used to define a destination of a vehicle. A destination is simply a point on a road segment, in the road network, were the vehicle is expected to drive by and possibly stop. In order to be able to arrive to a certain destination, a vehicle needs to be able to navigate in the road network, and eventually reach the road segment (from an arbitrary staring point) that is defined with a street address. The fashion in which a vehicle navigates in the road network is rooted in reality - as explained in Chapter 5.8.5. 5.8.4 Navigation In order to arrive at a given destination (no time constraints are considered here), a driver needs to observe and follow road signs and plan his or her route in a way that comply with the given navigation information. For instance, when driving from Stockholm to Gothenburg, a driver needs to initially go by the E4 S road when exiting the south of Stockholm. This kind of information is encoded in a predefined routing table. For example, given that you are somewhere on road segment 1 with a predefined destination in mind that is on the middle of road segment 5, the next road you should take is road 2 and not road 3. In other words, this routing table tells you which road you need to take next. The driver needs to eventually pass road segment 4 to finally reach road segment 5, however, as when driving to Gothenburg in real life, the driver needs only to bother about the immediate following road. In other words, a vehicle navigating in this described road network does not now of its entire path when staring off, and it needs to ask the road segment it is currently on: which road segment it should take next? In short, the path planning algorithm is dynamic in the sense that the recommended or optimal route can change at any given moment. Thus, in addition to being a road abstraction, a road segment is an intelligent entity guiding vehicles throughout the road network. Of course, this way of planning your journey is much more dynamic and flexible, and much less coded and static. Consider the opposite scenario, i.e. the entire route is known when leaving your starting position. The drawbacks associated with this static approach ranges from the lack of efficiency (there might be a need to change the route in mid journey due to a car accident) to lack of flexibility related to adding extensions to the system. By decentralizing the decision making, and thus also making the path planning a step-by-step process, each road is responsible of answering the question: which road segment should the vehicle take next to arrive to a given destination? The manner in which the decision making is decentralized makes it easier to implement scenarios where the path planning is more dependent on the environment (for instance, construction work, increased traffic, traffic jam, a newly introduced and quicker route, etc.). 44 5.8.5 Comparison to similar existing systems In order to navigate in a real road network we are dependent on navigation information such as road signs. In order to get a good grip of routing in our road network consider the following analogy: a vehicle arrives at an intersection, and needs to know which road segment it should embark on next in order to eventually arrive at its specified destination street address. Observe that it is not obvious at this point in the road network which of the upcoming road segments in the intersection is the correct one to pick, and that the entire journey is not known when disembarking the start position. This scenario is illustrated in Figure 40. Figure 40: The image illustrates a vehicle in a cross section, in need of navigation information. This problem is solved by introducing a routing table that encodes the kind of information that is usually given by road signs, as illustrated in Figure 41 below. Figure 41: The image illustrates the kind of road sign information that is encoded in the routing table. The routing table could be though of as series of if-statements, each statement guiding the vehicle in the road network. Now consider sending a letter from Stockholm to Gothenburg. There is no reason to specify the intermediate stopping-places, such as Sdertlje and Jnkping in the street address that is specified on the letter. As with our road network, the letter will be rerouted when it arrives at the different routing hubs along the way, and it is sufficient to just write Gothenburg as a destination address and omitting the intermediate stopping-places. A road segment or object should be seen as an intelligent entity that is able to make good decisions depending on its dynamic environment. For instance, a vehicle needs to 45 beforehand request or apply for the right to drive on the upcoming road. The process of applying is automatic and internally handled by these road objects in order to prevent a collisions between two vehicles. 5.8.6 Collision avoidance in general Collision avoidance is handled automatically by the road network. In order to drive on a road segment a vehicle needs to request or apply for the right to drive on it. In other words, a vehicle is not allowed to drive into a road segment if it has not on beforehand applied for it, or if it has received a negative response when applying. A vehicle always hands in this request to the upcoming road segment. A good analogy of this collision avoidance system is the traffic light system illustrated in Figure 42 below. Figure 42: The image illustrates an analogy of the collision avoidance system mentioned in this section. This approach is based on a first come first basis, and is an attempt to avoid a global monitoring system. By implementing collision avoidance in a more local scope, collision avoidance is decentralized and the implementation becomes increasingly uncomplicated and straightforward, as opposed to a more centralized mode of procedure. A centralized approach would imply a need to transfer necessary information to one single point, whereas a decentralized approach does not require this. A truck is associated with a unique identification number, which is mainly used in the road segment application process. As soon as road segment receives an application or request, it needs to check its occupation-status (i.e. if there already is a request from another vehicle). If there is, to start off with, a pending road request from another vehicle, the road segment in question will decline all new applications (i.e. vehicles that want to enter the road segment). As soon as the vehicle with authorized access (i.e. approved road request) leaves the road segment in question, the road segment will automatically dispose the reservation of the leaving truck, and thus making the road segment free for new applications again - as illustrated in Figure 43 below. Observe that a vehicle is only able to have one approved request at any time. 46 Figure 43: The image illustrates an analogy of the collision avoidance system mentioned in this section. If a vehicle applies for the right to drive on a non occupied road segment, the vehicle will receive a positive response and will get its truck identification number registered by the road segment. A vehicle reacts to a negative response by stopping. A vehicle that is given a halt signal from an upcoming road segment will wait until it is able to get a positive response, and will resume its original speed when granted access. Note that a vehicle will re-apply in a predefined interval post receiving a halt signal, until it receives a positive response. 5.8.7 Collision avoidance for platooning trucks A platoon of vehicles will operate in a fashion that is similar to a single vehicle platoon (i.e. a platoon of one truck). The leading truck is denoted platoon master, while the following trucks are denoted platoon slaves. A platoon slave is not authorized to make a road segment request, whereas a platoon master is responsible for registering the truck identification numbers of the platoon slaves. A road segment will dispose of a road segment reservation of a platoon as soon as exactly all of the vehicles associated with the truck identification numbers registered via the road segment request, are no longer on the road segment in question. A second vehicle platoon interested in the occupied road segment will be declined (i.e. the platoon master will receive a halt signal), and thus the platoon will wait in the intersection area where the platoon master did the request. The platoon slaves will halt as a result of the platooning regulator. 5.8.8 Extension to collision avoidance A vehicle is only able to make a road segment request in the vicinity of designated intersection areas. These areas are predefined and is a unique property of a road segment. By limiting the ability to request in this manner, we reduce the load on the entire system. This simple collision avoidance system fulfills the needs we have in our integrated scenario, however it is not complete to the state that it should be used in the future. The collision avoidance system needs a better way of disposing a road segment reservation. The current implementation works fine if the road that is exposed for the risk of a collision is short (about approximately 1 meter). However, as soon as the road segment distance is lengthier, the collision avoidance system will behave in an inefficient way. The reason for this is rooted in the fact that a platoon of vehicle(s) is unregistered only when the last vehicle of the platoon leaves the road segment, i.e. when the entire platoon is on the next road segment. The consequence is that a platoon of vehicles awaiting to enter a road will even though there is no good reason to wait (i.e. there is a safety distance to the last vehicle in the platoon), need to halt until the authorized vehicles’ road segment reservation is disposed. Consider a road segment 47 with a road distance about 10 m. A vehicle requesting authorized entrance should in reality not be rejected if there is a well defined safety distance between all the vehicles (authorized and not) on the road segment in question. The current implementation will demand that we wait for the authorized vehicle to leave the road segment of interest, before a new vehicle is granted access on that road segment. A future extension of this collision avoidance system needs to take the distance between all the concerned trucks into consideration, in order to increase efficiency in the road network. 5.8.9 Control information A road segment is responsible for providing vehicles with control information needed in vehicle regulation. A vehicle simply queries the current road segment it is driving on in order to get the control information mentioned in the vehicle regulation section, e.g. the difference between the vehicle’s heading and the road’s heading. The reason as to why control information is computed in this scope instead of the vehicle scope is rooted in the fact that a road segment knows more about how the vehicle is related to the road segment than the other way around. By calculating for instance the difference of heading between the road and the vehicle in this scope we avoid transferring data back and forth between the road segment scope, and the vehicle scope. Another advantage with hiding all the control information calculation from the part of the implementation that is with the truck entity, is that the structure of the road implementation may evolve in time without there being any need to alter the code that is associated with the truck entity (this also opens up the possibility of implementing a different road implementation while keeping the code associated with the truck entity untouched). 5.9 Future work for the trucks There are several ways in improving the control environment for the truck. The PID parameters could be tuned more to get better performance from all three regulators. Different control strategies, such as MPC, could be tested do see which one that works best. The implementation of the road network could be changed so that the problem with sampling time disappears. There could also be more information exchange between the truck so that all trucks can react to one another. This would especially be useful when platooning. There is also some future work in handling the situation when MoCap is lost. 48 6 6.1 Tower crane Description Figure 44: Tower crane. 6.1.1 Crane The tower crane is widely used today due to its high but compact design and ability to move heavy things in a crowded area such as a construction site. In this project a smaller model of a tower crane has been used. This model can be seen in Figure 44. The main parts of the crane are the tower, the jib, the trolley and the load or hereafter refereed to as the hook. The jib can rotate around the tower (though limited to 180 degrees due to safety measures), the trolley can move back and forward aligned with the jib and the hook can be lowered and raised. This makes it possible to move the hook in 3 dimensions making it possible to move loads and place them at any location around the crane. 6.1.2 Loads In the final scenario, the main task for the crane is to load and unload the trucks in a fast and safe manner. The loads that are used for the final scenario can be seen in Figure 45. The basic procedure to pick up and release the loads is with the MoCap markers determine the position and orientation of the load and thereafter approach the load with the hook with the correct and appropriate trajectory. When the hook has entered the load, the hook is lifted and so is the load. More of how this is done in detail can be found later in Section 6.6.2. 49 Figure 45: Self made load which can be picked up and moved by the cranes hook. 6.2 Hardware Except the crane itself, some other hardware is used which connects the crane to the controlling computer. This can be read about in the folder which belongs to the crane. 6.3 Software For the crane the following software have been used: • LabView • Matlab. The main program for controlling the crane is LabView. LabView works great for realtime implementations. LabView support Matlab scripts but it’s often better to use so called Math Scripts. Math Scripts support most Matlab functions and the syntax is the same. Therefore, some scripts have been developed in Matlab and later just moved into a Math Script. 6.4 Modeling and identification During the previous years there have been some projects and theses done about tower cranes. After analysing the system by ourself with performing some physical modelling and identification, we came to the conclusion that we will use the model derived by Faisal Altaf in his master thesis [1]. Faisal’s model is based on a simplified parametric model proposed by O.Hanafy [9]. As described in Chapter 6.5, we use Model Predictive Control (MPC) which needs a proper model of the system for good performance. It is though desired that the model should be linear since this simplifies the computations for the MPC extremely. To understand how the model works, the schemes of Faisal’s sub-models from [1] are shown in Figure 46. Important informations about this representation is that these two subsystems are assumed to be uncoupled. As well as the inductions of the motors are neglected, the dynamics of the cable angles are linearised. 50 Figure 46: Schema of the updated sub models. The sub system describing the length of the cable was added to the model by ourself. As Faisal, we also neglected the induction of the motor and came up with the physical system dz kmotorz z̈ = ż + uz + g (13) mload mload with g as gravity. The other parameters are shown in Table 14. The input uz does not have a unit since it is a value between -1 and 1 which is mapped to -1023 to 1023 for the PWM for the Crane Control box and later to voltage. Parameter mload dz kmotorz Value 0.32 [kg] 6.3912 [ kg s ] 0.793 [N] Table 14: Parameters of the cable length dynamics. 6.5 Control design As mentioned above in Section 6.3, the software used in this project is mainly LabView. Therefore, the model predictive control is implemented with use of LabView tools, making the controller run efficiently and fast in real-time. All information about the model predictive control in LabView can be seen in [4] but the most important parts of the manual can be found below. Model predictive control (MPC) is a method widely used in industry due to its capabilities to handle complex MIMO-systems [some reference]. The basic idea of MPC is that it minimizes some cost function with respect to some constraints over a predefined horizon which can be seen in Figure 47. For each iteration or sample the optimal output trajectories and the corresponding control inputs are predicted with use of a model of the plant. Only the first control input is applied to the plant for each iteration and the horizon is then moved forward one step in time which can be seen in Figure 48. The horizon can be chosen in any way depending on the plant that should be controlled. It is though required that the control horizon is smaller than the prediction horizon for obvious reasons. By choosing lower horizons makes the MPC more like a regular feedback controller since it only actuates on the momentary output and input [some reference]. In this project the controller for the crane run with a sampling time of 50 ms, it has been proven by trail and error that an approximate horizon for prediction is 40 samples and for control 10 samples. Numbers around these values gives a good combination of 51 control and program performance. These values correspond to a 2 seconds prediction and 0.5 second control horizons. Figure 47: MPC calculated horizons, some text and reference [4]. Figure 48: MPC update horizons, some text and reference [4]. Like always with model predictive control, the LabView MPC tries to minimize some cost function which in this case is J(k): J(k) = Np X [ŷ(k + i|k) i=Nw r(k + i|k)]T · Q · [ŷ(k + 1|k) NX c 1 i=0 Np X [u(k + i|k) i=Nw [ uT (k + i|k) · R · r(k + i)]+ uT (k + i|k)]+ s(k + i|k)]T · N · [u(k + 1|k) s(k + i|k)] where • k is discrete time • i is the index along the prediction horizon • Np is the number of samples in the prediction horizon • Nw is the beginning of the prediction horizon • Nc is the control horizon • Q is the output error weight matrix • R is the rate of change in control action weight matrix • N is the control action error weight matrix • ŷ(k + i|k) is the predicted plant output at time k + 1, given all measurements up to and including those at time k 52 • r(k + i|k) is the output setpoint profile at time k + 1, given all measurements up to and including those at time k • uT (k + i|k) is the predicted rate of change in control action at time k + 1, given all measurements up to and including those at time k • u(k + 1|k) is the predicted optimal control action at time k + 1, given all measurements up to and including those at time k • s(k + i|k) is the input setpoint profile at time k + 1, given all measurements up to and including those at time k. The weight matrices have been tuned by trail and error with the basic intuitive standpoint that oscillations of the load should be minimized for safety reasons. Therefore a high cost is put on errors from the reference value of zero for the angles ↵ and . The output error weight matrix Q is: 0 5 B0 B Q=B B0 @0 0 0 50 0 0 0 0 0 10 0 0 0 0 0 100 0 1 0 0 C C 0 C C 0 A 100 (14) The rate of change in control action weight matrix R is: 0 0.01 R=@ 0 0 0 0.01 0 1 0 0 A 0.10 (15) Last, the control action error weight matrix N is chosen to be zero. Hence we do not care about deviations from the input setpoint profile, basically setting the input free inside defined constraints. With model predictive control one can also specify constraints on the different input and output signals. For the LabView MPC, two different methods could be used. These methods are the barrier function method and the dual function method. We have chosen the dual function method since this gives hard constraints as opposed to the barrier method which gives an extra cost as a penalty for not fulfilling the constraints. With hard constraints it is possible to work with the crane just inside the physical limits of it. This is a useful feature since the MPC is made aware of its limits and can optimize its movement accordingly. This is not the case with ordinary PID-control. The constraints for the outputs are set for the initial and final output values and are chosen as the cranes physical limits as follows: 0 y1 0.5 1 y2 1 0 y3 3.14 (16) 1 y4 1 0 y5 1. Like mentioned above there are also constraints on the input signals. The input signal to the crane is applied voltage between ±24V for the different motors. This has though been normalized in the model to a value in the interval [ 1 : 1]. The constraints for the control signals from the MPC is therefore set to the same values which can be seen in (17). 1 u1 1 1 u2 1 (17) 1 u3 1 There is also the possibility to set constraints on the rate of change in control action. This have been tested and the behaviour is like expected that the movement of the crane gets slower and more smooth. These constraints are though not used for the moment but should be good to include for more smooth control. 53 6.5.1 Evaluation of control design MPC is a good choice for applications where you know your reference values in advance. More specific for the crane, a predefined setpoint profile works better than just an instant unknown change in reference. It does not make sense to not feed the MPC with information about references that will come in the near future since the whole point with the prediction will disappear. In Figure 49, the MPC is evaluated with a predefined setpoint profile for approximately 90 seconds. The weight matrices, the constraints and the horizons are defined as above. The reference for the cable angles ↵ and are always kept at zero, while the references for the trolley’s position, the jib’s rotation and the cable length (the height of the hook) are changed. If one study the figure closely, one can see some interesting remarks. If we first start with the most obvious thing, then we see that the MPC control of the crane shows good performance. The references are followed well and position changes are done fast with relatively small oscillations (less than 10 degrees at most). We should have in mind that the linear model is constructed for a cable length of 0.85m but the behaviour is still good for lengths below 0.5m. The second thing that could be noticed is more interesting and has to do with the behaviour of MPC. If one closely check the output and the reference around the different reference changes, one can see that the output changes before the reference does. This is due to the prediction in the MPC. Basically, it is more optimal to leave the reference early, to catch up faster since over the whole step or horizon, the cost is minimized. This differs from ordinary feedback controllers. If we continue, the third thing we see is that before some steps, the output begins to move in the opposite direction, turns and end with an over- or undershoot which looks like the symmetric opposite to the first bump. This is also due to optimality. Since we want to minimize the swing of the hook, it is better to first move in the "wrong" direction, creating over- and undershoots that can be countered with similar but opposite movements later. The MPC chooses to do this but this behaviour of course depends on the defined cost function and the constraints. The last thing worth to mention is that the MPC works well at the physical limits of the crane. The constraint for the maximum position of the trolley is set to 0.5m. If one compare steps to this reference value with steps of lower reference values, one can notice that the overshoot disappears which is really nice since if there would be an overshoot, there is the possibility that the crane tries to go outside its range, breaking arms, wires or motors. For the final scenario, the purpose of the crane is as mentioned to load and unload the trucks in a fast and safe manner. Therefore, the MPC should be able to carry a load without making it unstable or giving it any other unwanted feature. When a truck is loaded or basically just when a load is moved from one place to another, a script is ran which defines the setpoint profile. An example of this setpoint profile and the corresponding output for loading can be seen in Figure 50. It was mentioned above that sometimes the MPC finds it optimal to give a control signal before the reference and therefore also have an output before the reference. This is not every time consistent with what can be seen in Figure 50. One could believe that the reason was just due to optimality (that it was not optimal to move the load before the reference) but this is not true. The simple reason why it behaves like it is is because the MPC is not aware of the incoming change of reference. Sometimes, the reference depends on the feedback, if for example the hook managed to pick up the load. Therefore the reference value needs to be set depending on the outcome. When this happens, the setpoint profile is changed and the MPC is reinitialized. This could be solved by defining a new setpoint profile in parallel with the MPC and feed that profile to the MPC at the appropriate time. This is not implemented but could be read about in [4]. In Figure 50, one can though see that the behaviour is still stable even though a load is attached to the hook. This happens after 20 seconds and the output gets a bit more spiky when the load is attached to the hook. This is due to the mass of the load. Since the hook’s and the load’s center of mass are not in the same position while attached the whole configuration behaves like a double pendulum. This is not included in the model and therefore not handled as good as it could with the MPC. In the figure we also see that the truck is finally loaded after approximately 40 seconds and the control action stops. 54 Trolley Position [m] [rad] 0.5 0 [rad] Cable Angle Cable Length [m] 0 10 20 30 40 50 60 70 80 90 100 0 10 20 30 40 50 60 70 80 90 100 0 10 20 30 40 50 60 70 80 90 100 0 10 20 30 40 50 60 70 80 90 100 0 10 20 30 40 50 time in [s] 60 70 80 90 100 0.2 0 -0.2 Jib Rotation [rad] Cable Angle 1 4 2 0 -2 0.2 0 -0.2 1 0.5 0 Figure 49: Output response for the MPC with a predefined setpoint profile. The blue line is the reference and the green line is the output. One can see that the output reacts before the reference and this is due to the prediction in the MPC. It is basically the optimal way to minimize the defined cost function. 6.6 Coordination of Actions This section includes all the parts needed to compute the cranes output references to perform all actions during the scenario. Therefor the program needs to know when to do what. This is solved using a state machine coordinating all actions. For the loading and unloading we use a script that computes the output references in the form of way points. Whilst doing this the program also need the information where to place the load on the trucks trailer. The algorithm for this is described in the section trailer position. 6.6.1 State-Machine As stated before a state machine is used to coordinate the cranes actions. A State machine is used since we think it is the easiest and most clearly solution for the problem of coordinating the crane. The representation of the state machine is shown in Figure 51. The state machine takes care about • message sending/receiving, • turning on/off the control, • defining the output reference set In the initial case the parameters for the amount of trucks need to be defined. Other needed variables are a boolean containing the information if the actions should be performed for loading or unloading and an integer variable storing the information which truck needs to be loaded/unloaded. The general flow through the state machine looks like this: Init Waits for a start trigger by the user Hold If the loads are located within the cranes range for a defined time a truck request is sent 55 Trolley Position [m] [rad] 0.4 0.2 0 0 5 10 15 20 25 30 35 40 45 0 5 10 15 20 25 30 35 40 45 0 5 10 15 20 25 30 35 40 45 0 5 10 15 20 25 30 35 40 45 0 5 10 15 20 25 30 35 40 45 Cable Angle 0.2 0 Cable Length [m] Cable Angle [rad] Jib Rotation [rad] -0.2 3 2 1 0 0.2 0 -0.2 1 0.5 0 time in [s] Figure 50: Output response for the MPC during loading. The blue line is the reference and the green line is the output. The load is picked up after approximately 20 seconds and this can be seen from the spiky behaviour on ↵ and . The truck can be loaded in approximately 35 to 40 seconds. Send Truck Request Sending the truck request containing a position in front of the loading terminal with respect to the loading/unloading variable Wait until Trucks are in front of Terminal Wait for acknowledgment Send new Position inside Terminal Request Sends new position for the platoon with respect to the loading/unloading and truck number variable Wait until Trucks are at new Position Wait for acknowledgment Loading/Unloading Runs a waypoit planning script, described in Chapter 6.6.2 which is fed with MoCap data of the loads and placing positions with respect to loading/unloading and the truck number. The truck number is incremented if there are Trucks remaining to be cleared and the loading/unloading loop will be continued with a transition to Send new Position inside Terminal Request. If all trucks are clear the next transition will lead to Send Truck Request after loading and the loading/unloading value is changed to unloading or it will lead to Init if the trucks are unloaded. 6.6.2 Waypoint planning Since we use a MPC it is not needed to compute optimal trajectories. Instead it is sufficient to just compute waypoints for the output references, because the MPC can handle even large steps in the references. As mentioned in the section before the waypoint planning is done in a script which can perform the loading and unloading. The general principle of this script is that it uses the MoCap data to pick up a defined load and places it at a defined position, which can be on a truck or at the unloading area. This informations are given by the state machine. The code can be found at the project documentation. Since we were not able to use the full advantage of a MPC using the LabView tool taking constraints of obstacles into account we use a way easier solution for the problem of collision avoidance. Which is that we perform the Position changes of the loads at a horizontal plane where we know that there are no obstacles in the way. To detect if the load is proper attached a feedback of the load position using MoCap data is used. 56 Init Done && Unloading && Last_Truck Wait until Trucks are infront of Terminal Send Truck Request Hold Send new Position inside Terminal Request Done && Loading && Last_Truck Wait until Trucks are at new Position Done && Not_Last_Truck Loading/ Unloading Figure 51: Representation of the State Machine for the Crane 6.6.3 Trailer Position To place the load at the wanted position on a trucks trailer the trailer position need to be available. Since we don’t measure this position it need to be computed using the data of the truck position. For a sampled system this can be solved using the old trailer position and the old and the new truck position. Using an approximation of the so-called "car kinematics" [7] the position of the trailers center of rear wheels can be described like this: ✓ ◆ xtrailernew = Xtrailernew = Xtrailerold + ~vtrailer (18) ytrailernew Where ~vtrailer can be described by ~vtrailer = d (Xtruckold R (19) Xtrailerold ) with R the distance between the tuck connection and the rear wheels and d the distance the trailer moves torwards its new position, where d needs to be computed. To make sure that the trailer position does not diverge relative to the truck position we can assume that R = kXtrucknew Xtrailernew k (20) and inserting (18) and (19) in this equation we get ✓ d R = Xtrucknew Xtrailerold + (Xtruckold R Xtrailerold ) ◆ . (21) (21) can be written as a quadratic equation d2 + p · d + q = 0 (22) with p and q depending on R, Xtrucknew , Xtrailerold and Xtruckold . The solution of (22) is r p2 p d1/2 = ± q (23) 2 4 and assuming that the difference between Xtrucknew and Xtruckold is smaller or equal R then the wanted d to get the new trailer position is r p p2 d= q. (24) 2 4 57 The only problem left is that an initial trailer position is needed to run this algorithm. Therefor we need to guess a position since it is not measured. We set the initial position on a straight line with the truck orientation. This assumption can be made since the truck has a limited steering range and hence the possible trailer positions are within a known range, as well as the computed trailer position will converge towards the real position after some meters driving. The analysis of the convergence of the trailer position with different initial positions was made in MATLAB. The Figure 52 shows the trajectory of a truck (quarter circle with a radius of 2 m similar to the road segment the truck drives at the beginning of the scenario) and the trajectory of trailers with different initial position as it would be the case for the real scenario with the assumed initial position (start position 1) and a possible real one (start position 2, but also the most extreme start position the trailer can have (physically limit). In the case of this simulation the difference between the first two initial is 20 relative to the truck. One can see that small differences between the assumed and the real initial position of a trailer doesn’t play any role after some meters driving and even for the most extreme case the convergence is quite fast. truck trajectory trailer trajectory with start position 1 trailer trajectory with start position 2 trailer trajectory with phsically limited start position 1.5 y [m] 1 0.5 0 -0.5 0 0.5 1 x [m] 1.5 2 2.5 Figure 52: Simulated trajectories of trailer positions with different initial positions The conclusion is that the algorithm including the assumption for the initial position is sufficient and what we also validated by tests with the real system. With this method the crane is able to place a load on any position on the trailer if the truck drove for some meters and is within the cranes range. 6.7 Conclusion In the end we can say that the crane fulfils all requirements for the final scenario. It was useful to have old reports and files of previous projects involving the crane. Especially the work regarding the modelling which helped us to get started quite fast. In the end it was a good decision to use a MPC. The control showed to be both precise and stable and waypoints as reference could be used instead of optimal pre-computed trajectories. Also, the MPC worked surprisingly good for the linear model with the nonlinear compensations even though the crane is very nonlinear. There is still some further improvements that can be done. Like mentioned it is possible to use a updated MPC, meaning that we update the used model for every sample or change the setpoint profile without reinitializing the MPC. This would improve the performance even more. It is also possible to use Nonlinear Model Predictive Control (NMPC). Some unnecessary work were done regarding the modelling and this is something we want to share with potential future project. It is important to get good understanding 58 of previous work fast, not to try invent your own things first and then find out that the same (or better) work already exists. 59 7 Quadrocopter 7.1 Description A quadrocopter is a rotorcraft where the four rotors can be controlled individually and therefore be manoeuvred by the inputs thrust and the roll, pitch and yaw angles. It has six degrees of freedom, three rotational and three translational. The quadrocopter is an example of an Unmanned Aerial Vehicle, UAV, which has various areas of applications. In this project a UAV’s role in traffic surveillance is investigated. The control design of the quadrocopter in this project is focused exclusively on position control as the existing on-board controllers of the ArduCopter platform are used for stabilization. 7.1.1 Requirements on the quadrocopter in the loading and unloading scenario During the final scenario the quadrocopter will start from rest on the landing pad. A request to follow a truck in the platoon is received and it takes off. Once the quadrocopter is on the operating height it flies to the position of the truck in the platoon and tracks its movements in the road system. As the trucks approaches the loading dock area, either for loading or unloading the quadrocopter is no longer needed and goes to land on the landing pad and awaits a new request. The truck platoon can drive past the loading and unloading area without stopping and then the quadrocopter needs to stay outside a given no-fly zone defined around the crane. In order to succeed with the final scenario the quadrocopter needs to autonomously be able to: • Take off from the landing pad and settle at a reference height. • Follow a reference trajectory. • Go to and land on the landing pad. • Avoid the no-fly zone around the crane • Handle a situation where no position data is received from the motion capturing system. 7.2 7.2.1 Hardware The ArduCopter platform The quadrocopter used in this project is the ArduCopter platform quadrotor containing an autopilot from DIY Drones and an airframe frome jDrones. The autopilot consists of an ArduPilot Mega v1.4 board, based on the open source Arduino project, and a DIY Drones Hotel 1.0 IMU sensor board with accelerometers and gyros. The autopilot has on-board stabilizing PID - controllers and it can be used for different rotor crafts such as helicopters or other types of multirotors. The quadrocopter used in this project is displayed in Figure 53. 7.3 7.3.1 Software ArduCopter software The software Mission Planner 1.2.26 MAV 1.0 is provided by ArduCopter and is used to load the firmware for the different ArduCopter vehicles on the ArduMega Pilot board. Mission Planner is also used to set the PWM limits for different radio controllers and enabling sensors such as sonar [2]. The Mission Planner is also used to configure the levels of the quadrocopter. This is important as the gyroscope and accelerometer offsets are then determined and these values are used by the on-board controllers keeping the quadrocopter stable. 7.3.2 LabVIEW All control algorithms are implemented National Instruments LabVIEW 2011, with the Control Design toolbox and PID and Fuzzy Logic toolbox. 60 Figure 53: The ArduCopter quadrocopter. Figure 54: Mission Planner software [2]. 61 7.4 7.4.1 Manual control of the quadrocopter Manual control with a remote The ArduCopter quadrocoper is designed to fly either manually with remote or autonomously. When flying manually a Spektrum remote and receiver was used to control the inputs throttle, yaw, pitch and roll. It is possible to switch between different flight modes with the remote during flight but only the stabilizing flight mode that levels the quadrocopter and maintains the current heading is used. More information about the different flight modes can be found in [2]. 7.4.2 Manual control through LabVIEW For safety reasons and especially due to the limitations in the present Qualisys camera system setup, it was important to implement the possibility to control the quadrocopter manually through LabVIEW. To be able to emulate radio signals from LabVIEW to the quadrocopter a T-mote and Pololu solution was used. The output of the Pololu board gave a narrower pulse width modulation, PWM, range than the Spektrum remote did and a problem related to this occurred. When giving inputs through LabVIEW the motors would spin at a much higher rate than they would using the Spektrum remote and the rotational speed at this input would be too high to make it possible to start in a proper way. The problem was solved by widening the PWM signal in the T-mote code. A graphical user interface, GUI, was developed to make it possible to fly the quadrocopter with a computer connected keyboard. For ease of use and to better emulate control with a radio controller remote, manual control via a gamepad was implemented. Whilst flying with automatic control the gamepad can be activated at any time to gain manual control of the quadrocopter. The current thrust of the quadrocopter is kept for a smooth transition when taking over control with the gamepad. In Figure 55 and Figure 56 it is shown how the gamepad is programmed to control the quadrocopter. Figure 55: Gamepad top view. 7.5 Modeling of quadrocopter flight In this section the translational movement of a quadrocopter is described in order to show which dynamics are to be controlled. This section is based on the master thesis [8] [5]. A description of the relevant forces acting upon the quad can be seen in Figure 57. A body fixed frame of reference centered at the quadrocopter’s center of mass is defined. The x - axis is defined in the forward flight direction and the y - axis is defined in the left flight direction. The z - axis is defined directly upwards, parallel to the z - axis of the inertial frame when the quadrocopter is level. The orientation of the quadrocopter in the inertial frame is described by the Euler angles as shown in Figure 57. The pitch angle ✓ describes rotation around the y - axis, the roll angle describes rotation around the x - axis and the yaw angle describes rotation around the z - axis. 62 Figure 56: Gamepad front view. Figure 57: The quadrocopter model [6]. 63 Each of the rotors generate an upwards thrust Fi and by varying the rotational velocity !i of the different rotors the movement of the quadrocopter can be controlled. Two of the rotors spin clockwise and the other two spin counter clockwise. The rotors that spin in the same direction are located opposite each other. If the total thrust generated is greater than the downwards force mg, the quadrocopter will rise. If the generated thrust is equal to mg the quadrocopter will hover in the air. Lateral movement is done by varying the roll and pitch angles. In order to change a pitch or roll angle, the rotational velocity of one of the two rotors on opposite sides needs to increase while the other needs to decrease by the same amount. For instance, in order to achieve a forward motion along the x - axis !1 should be decreased while !2 is increased. The rotation around the z - axis is changed by increasing the rotational velocity of two of the rotors that spin in the same direction while the rotational velocity of the rotors which spin in the opposite direction is decreased. In order to derive the equations describing the acceleration in each axis it is needed to find the direction in which the thrust is applied. This is done by transforming the unit vector uZ with the rotational matrices RotX , RotY and RotZ according to the pitch, roll and yaw angles. 2 3 2 3 1 0 0 cos ✓ 0 sin ✓ sin 5 1 0 5 RotX = 40 cos RotY = 4 0 0 sin cos sin ✓ 0 cos ✓ 2 3 2 3 cos sin 0 0 cos 05 RotZ = 4 sin u Z = 4 05 0 0 1 1 The unitary vector uN which points in the direction of the generated thrust is then given as follows 2 3 sin ✓ cos + cos ✓ sin sin cos ✓ sin cos 5 . uN = RotZ · RotX · RotY · uZ = 4sin ✓ sin cos ✓ cos The equations of motion yields the following dynamics P Fi ẍ = (sin ✓ cos + cos ✓ sin sin ) m P Fi ÿ = (sin ✓ sin cos ✓ sin cos ) m P Fi z̈ = cos ✓ cos g m Finally, the following matrix representation of the quadrocopter flight dynamics can be made: 3 2 3 2 vx ẋ P Fi 6v̇x 7 6 + cos ✓ sin sin )7 7 m (sin ✓ cos 6 7 6 6 7 6 ẏ 7 6 v 7 y P 6 7=6 F 7 i 6v̇y 7 6 7 (sin ✓ sin cos ✓ sin cos ) 6 7 6 m 7 4 ż 5 4 v 5 z P Fi v̇z cos ✓ cos g m It should be noted that while direct control of thrust, pitch, roll and yaw angles is assumed here, this is in fact not true in our case as the on-board stabilization controllers manipulate these variables internally. The result of this being that there are certain additional limitation which could be taken into account such as time delay and rate limitation. 7.6 Control design In this section the control strategies used in order to be able to fulfill the requirements put on the quadrocopter are described. The main objective of the controllers designed here is to allow the quadrocopter to track a moving reference in a safe manner at relatively low speeds. Also described is the functionality used to keep the quadrocopter within the motion capture range and trajectory planning used to avoid certain areas in which the quadrocopter is not allowed to fly. 64 Controller Yaw x y z KP 0.04 0.76 0.76 8 KI 0.005 – – 1 KD – 0.69 0.69 0.3 Table 15: PID values of the implemented controllers. 7.6.1 PID controller theory and motivation of choice The main control strategy used to handle the quadrocopter movement was chosen to be PID. This choice was motivated by the fact that PID controllers are very easily implemented, they do not require an accurate physical model to tune and there is extensive previous work regarding quadrocopter control with use of PID controllers. The PID controllers are implemented in a sampled system and are as such discretized with sample time Ts as follows u(t) = KP e(t) + KI Ts t X e(i) + KD i=0 e(t) e(t Ts 1) . If slow manouvering is assumed, meaning small deviations in pitch and roll angles, it is given from the model in Section 7.5 that there will be little to no coupling between x and y displacement. This means that it is possible to use four different PID controllers to control the movement of the quadrocopter, one for altitude, one for orientation and two for x and y displacement. Due to the symmetry of the quadrocopter, the two controllers used for x and y displacement can be assumed to have the same properties. 7.6.2 Altitude control For altitude control a full PID controller is implemented. The design goal for the altitude controller is to keep the quadrocopter stable at a desired height reference. It is desirable for the height controller to have little overshoot as it is important for the quadrocopter to stay within the capturing volume of the positioning system, and thus no requirements are put on speed of this controller. The controller was tuned in flight by first adding a base throttle to the output in order to move the working point to where the quadrocopter is already in the air. Proportional and derivative terms were then tuned such that the quadrocopter was kept stable in the air. At this point the quadrocopter still had a static error from the desired reference and thus an integral part was added to allow the quadrocopter to reach the reference altitude. The actuator signal sent to the wireless mote on the quadrocopter is on the form of an 8 bit number, where 0 is the minimum signal and 127 is the maximum signal. The output range of the controller is defined by the base throttle signal, such that if the base throttle is 50, the controller a range is allowed from 50 to 50. The PID parameters of the altitude or z controller can be found in Table 15. 7.6.3 Position control The control of the x and y position of the quadrocopter has the requirement to be able to track a moving point as well as to remain stable above a given reference. As described above the quadrocopter should move at relatively low speeds due to the small volume available to move inside of. Large overshoots may put the quadrocopter outside this capturing volume. The controllers take as input the displacement error of a reference point in relation to the quadrocopter’s current position in the room. The pitch controller acts on errors along the x axis of the quadrocopter’s local frame of reference while the roll controller acts on errors along the local y axis. Tuning of the position controllers was done in flight by keeping manual control of the pitch while tuning the roll controller. When satisfactory behaviour was found on the roll controller the same parameters were applied to the pitch controller. The proportional part governs how much the quadrocopter should tilt and thus how much 65 speed it gathers while the derivative part acts to dampen the behaviour from set-point changes and reduce overshoot. An additional design parameter for the position control is the saturation limits of the roll and pitch angles. While the roll and pitch angles are defined in an interval of (90 , 90 ), if these limits are reached upwards lift will not be produced and the quadrocopter would crash. Through tests it was found that a roll/pitch interval of ±10 to ±15 yielded satisfactory movement speed. During tests it was also noted that while tracking a static reference, the quadrocopter displayed a static error in both x and y of about 20 cm. This was compensated for by adding these offsets to the reference point. The PD controller is limited in its output from 1 to 1. This outputted value is then mapped linearly to the 8 bit number expected by the wireless mote on the quadrocopter. Here the neutral mode is represented by the value 63 while the maximal outputs are 0 and 127 in the two possible directions. The saturation limit described above is applied by mapping the PD output to values between 44 and 84 instead of the full range. The PD parameters of the x and y controller can be found in Table 15. 7.6.4 Yaw control The yaw controller is designed to keep the orientation of the quadrocopter in the room constant. Due to the design of the quadrocopter full freedom of movement in three dimensions is kept, while keeping the orientation constant. Here a PI controller is designed. The reason for wanting an integral part in the controller is to be able to account for drift of the quadrocopter as well as turbulence present due to the air flow generated by the propellers. The implementation is similar to how the position controllers were implemented. The PI parameters of the yaw controller can be found in Table 15. 7.6.5 Take off and landing Before take off the motors are armed by sending the specific arming servo signal for a few seconds. When the arming procedure is finished the throttle is rapidly increased and the quadrocopter lifts from the ground. At a point where the quadrocopter is approaching the reference height the take off procedure is completed and the altitude PID takes over control. The point at which control should be switched over to the altitude PID is a design parameter to be tuned. Tests showed that switching to PID when the quadrocopter was within 0.4 m of the target height allowed for satisfactory performance. The scenario requires the quadrocopter to be able to land at a given coordinate. This is implemented by sending the x and y reference of the middle point of the landing pad to the quadrocopter while it keeps its current reference height. The quadrocopter is considered to be stable over a reference point if it has stayed within a circle with a radius of 0.4 m around the reference for a given amount of time. After the quadrocopter is considered stable the altitude PID is switched off and it is allowed to decrease its throttle in order to land. While the throttle is decreasing the position controllers are still active to keep the quadrocopter above the landing pad. If the quadrocopter goes outside of the circle area defining the landing pad area during landing it picks its current altitude as reference and switches back to the altitude PID and tries to stabilize above the landing pad in order to land again. 7.6.6 Handling of loss of motion capture feedback During flight with controllers based on feedback from the Qualisys camera system it is necessary to implement functionality to handle situations when the quadrocopter is not recognized in the system or if the quadrocopter flies outside the capturing volume. When the Qualisys system sends a notification that the quadrocopter is no longer recognized, data points from a number of previous samples where the quadrocopter was visible are used to estimate its position using dead reckoning. If the quadrocopter has not been recognized in the camera system for an extended duration the quadrocopter is assumed to be heading outside of the capturing volume. In this case a new reference point is given based on the last known position of the 66 quadrocopter. The new reference is picked such that the quadrocopter heads towards the middle of the capturing volume. A lower altitude reference is also picked to account for the possibility of the quadrocopter leaving the capturing volume in the upwards direction. The time the quadrocopter is allowed to be lost before being told to go back towards the middle was tuned to 0.4 s. This parameter is dependent on the operating speed of the quadrocopter as a faster speed will cause the quadrocopter to fly further outside the capturing volume. 7.6.7 Trajectory planning to avoid hazardous areas The quadrocopter is required to avoid certain areas where there is risk of collision. These areas are pre-defined circles of different size and are regarded as no-fly zones. If the quadrocopter is given a reference to follow which lies inside such a zone, a new reference. 7.6.8 Quadrocopter state machine The control structures described above are implemented in an internal state-machine. The states available to the quadrocopter are listed below • Stand-by • Take off • In flight • Land The quadrocopter’s default state is the stand-by state. This state is active while the quadrocopter is on the ground awaiting orders. When the quadrocopter is given a command to go follow a truck it goes to the take off state. Here the motors are sent the arm command, and after that the throttle ramps up to make the quadrocopter lift from the ground. During the take off state the reference point of the quadrocopter is set to 1 m above the landing pad. As the quadrocopter approaches its reference height it goes in to the in flight state. Here the altitude PID controller becomes active and the position reference switches to track the truck. The quadrocopter remains in the in flight mode until it is supposed to land again. When the quadrocopter is considered to be stable above the landing pad it goes in to the land state. Here the altitude PID is switched off and the throttle ramps down until the quadrocopter is stable on the ground. It then goes back to the stand-by state. 7.7 Evaluation of control design In this section the controllers implemented for the quadrocopter and their performance in the given scenario is evaluated. 7.7.1 Altitude controller The performance of the altitude controller is shown in Figure 58. Here the arm sequence being active during the first 10 seconds can be seen clearly. During this test the quadrocopter was tracking a moving truck through the road network as shown in the final scenario. The performance is considered acceptable, the quadrocopter does not display oscillations greater than ±5 cm in amplitude in this flight sequence. 7.7.2 Position controller In Figure 59 and Figure 60 the performance of the position controllers is shown. In this scenario the quadrocopter is tracking a circular trajectory. This trajectory intersects with a pre-defined no-fly zone which causes the bulges seen in the y reference in Figure 60. The spikes visible in the reference are caused when the quadrocopter is not recognized in the motion capturing system. The performance of the position controller is acceptable for the purpose the quadrocopter has in this scenario. There are some notable overshoots of upwards of 40 cm in 67 Figure 58: Figure displaying the performance of the altitude controller where the dashed line is the z position and the solid line is the z reference. y. These may be caused by deadzones in the pitch actuation which would cause a slow reaction to a change of direction. 7.7.3 Yaw controller The yaw controller is set to track a reference of 90 . In Figure 61 the performance of the yaw controller is shown in a sequence from take off to landing, where the quadrocopter is tracking a truck in the final scenario. The performance is satisfactory, where the largest deviations occur during take off which is to be expected as the ground effects cause difficulties in controlling the quadrocopter. 7.7.4 Take off and landing In Figure 62 and Figure 63 the performance of the landing sequence is displayed. It can be seen that the quadrocopter has difficulties achieving a perfect landing on the given landing pad reference. This is largely due to the ground effects affecting the fly behaviour when the quadrocopter approaches the ground. The position controllers which are active during landing can likely be tuned to better account for these effects. Another approach to handle landing is to tune specific controllers which would activate when landing. The current method of simply ramping down the throttle until the quadrocopter reaches the ground is sometimes the cause of rough landings. The performance of the take off and altitude controller is highly reliant on the level of battery charge of the quadrocopter. In Figure 64 a full sequence of the final scenario is displayed. Three take off procedures are visible and the progression of battery level is clearly visible. The first take off displays a large overshoot while the last take off requires the I part of the altitude controller to work for several seconds to level the quadrocopter near the operating height. In the last sequence the spikes visible in the reference are caused by the quadrocopter leaving motion capturing range and thus is required to lower its altitude. 68 Figure 59: Figure displaying the performance of the position controller where the dashed line is the x position and the solid line is the x reference. Figure 60: Figure displaying the performance of the position controller where the dashed line is the y position and the solid line is the y reference. 69 Figure 61: Figure displaying the performance of the yaw controller where the dashed line is the yaw angle and the solid line is the yaw reference angle. Figure 62: Figure displaying the performance of the land sequence where the dashed line is the x position and the solid line is the x reference. 70 Figure 63: Figure displaying the performance of the land sequence where the dashed line is the y position and the solid line is the y reference. Figure 64: Figure displaying the performance of the altitude controller where the dashed line is the z position and the solid line is the z reference. 71 8 Conclusions The project detailed in this report was delivered as planned, both with regard to time constraints and quality. To achieve this we used a subset of the Agile project management methodology, SCRUM. We had a total of 7 week-long sprints which helped us keep on track and focused on our final goal the whole time. We were able to set up a system that, in addition to being fully functional according to the project course requirements, has every potential to be useful for future work in the Automatic Control department of KTH - Royal Institute of Technology. The system delivered could be extended for example to incorporate more advanced control algorithms for the processes for even faster and more accurate control as well as a number of other examples mentioned earlier in the “Conclusions” chapters of the processes. 72 9 Acknowledgements We would like to thank our project course teacher, Jonas Mårtensson at the Control Theory department at KTH - Royal Institue of Technology, Sweden, for providing us with excellent support while we worked on the project. The same goes for the teaching assistants who were always curious about how we were doing and ready to answer our questions, they are (in alphabetical order): • Martin Andreasson • Meng Guo • Martin Jakobsson • Chithrupa Ramesh • Håkan Terelius • Olle Trollberg. 73 10 References References [1] Faisal Altaf. Modeling and Event-Triggered Control of Multiple 3D Tower Cranes over WSNs. Master’s thesis, KTH, Stockholm, 2010. [2] Arcucopter developers. Arducopter project, 2012. URL http://code.google. com/p/arducopter/. [3] Meng Guo Dimos Dimarogonas Hanna Ohlsson, Mikaela Lokatt. Navigation function based control of dynamically constrained agents. pages 11–13, August 2012. [4] National Instruments. Labview control design user manual. URL http://www. ni.com/pdf/manuals/371057g.pdf. [5] Axel Klingenstein. Multi-agent testbed development, modelling and control of quadrotor uavs. Master’s thesis, KTH, 2012. [6] Institute Mihailo Pupin Robotics Laboratory. Modelling, simulation and control of quadrotor rotorcraft. URL http://www.pupin.rs/RnDProfile/ research-topic28.html. [7] Steven M. LaValle. A simple car. URL http://planning.cs.uiuc.edu/node658. htmll. [8] Alejandro Marzinotto. Cooperative control of ground and aerial vehicles. Master’s thesis, KTH, 2012. [9] Hanafy M. Omar. Control of Gantry and Tower Cranes. PhD thesis, Virginia Polytechnic Institute and State University, Blacksburg, Virginia, 2003. [10] Lennart Ljung Torkel Glad. Reglerteknik, grundläggande teori. Studentlitteratur, 4:5 edition, 2006. 74 11 11.1 Appendix Software versions 75