1
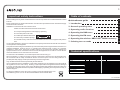
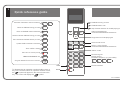
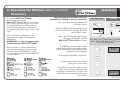
USER’S MANUAL
CC-1157ENG-01
1
Important safety instructions
Table of contents
Before installing the unit, please read and follow the instructions provided in the Installation Manual included
in this kit.
Quick reference guide
2
Before operating the unit, please read and follow the instructions provided in this User´s Manual thoroughly
and save it for future reference.
1. Introduction
3
2. General operating notes
4
3. Operating audio functions
5
4. Operating the DAB tuner
6
5. Operating the FM tuner
8
WARNING - To reduce the risk of fire or electric shock:
install in accordance with the manufacturer’s instructions
do not expose this apparatus to water dripping or splashing
do not use this product near water
do not attempt to disassemble this unit
do not block any ventilation openings
CAUTION
RISK OF ELECTRIC SHOCK
DO NOT OPEN
!
do not install near any heat sources such as radiators, stoves or other equipment that produce
heat.
6. Operating the wireless KBSOUND ® DOCK accessory 11
7. Selecting turn-on mode
12
You are cautioned that any changes or modifications not expressly mentioned in this manual could affect the
normal operation of this equipment.
This product has been designed and tested to provide reasonable protection against harmful interference in
residential installation. However there is no guarantee that interference will not affect in a particular
installation. In these cases, reorient the receiving antenna, try to increase the separation between the
equipment and the source of interference and/or connect the equipment into an outlet on a circuit different
from that to which the source of interference is connected.
The entire risk of the installation, use, results and performance are borne by you.
When a socket plug, or a device connector is used as a mechanism to disconnect from the electrical mains,
the mechanism must be easily accessible at all times. Protect the power cord from being walked on or
pinched particularly at plugs and the point where they exit from the apparatus.
Only use attachments/accessories specified by the manufacturer.
Use a certified technician for installation, repair and/or maintenance of this equipment and comply with all
the regulations in force in each country. Servicing maybe required when the apparatus has been damaged
in any way, such as power-supply cord or plug is damaged, liquid has been spilled or objects have fallen into
the apparatus, the apparatus has been exposed to water dripping or splashing, does not operate normally, or
has been dropped.
To change the batteries remove the cover by pressing on the tab while lifting the cover.
Use batteries type AA 1,5V. Do not discard used batteries with household waste.
Technical specifications
52395
Measurements
Voltage
Consumption demand
Output signal (16 ohms)
Passband
Distortion
Left/right channel separation
Frequency range
MIN
185
45
MAX
265
16
1,5
20.000
0,1
58
87,5
174
Antenna impedance
Antenna sensitivity
-93
FM tuner distortion
Number of station pre-sets
NORMAL
200x53x56
230
108
240
75
1
-96
0,1
0,5
40
80
COMMENTS
mm
Vac
W
W
Hz
%
dB
MHz
MHz
ohms
uV
dBm
%
50Hz, terminal F,N
terminals F,N
terminals L,R
FM
DAB (Band III)
RF connector
FM (SNR=26dB)
DAB (EN50248)
FM
DAB
CC-1157ENG-01
2
Quick reference guide
Automatic FM station search sensitivity
FM/DAB memory pre-sets
2”
1” FM/DAB station scan
Delete all FM/DAB tuning pre-sets
Store all FM/DAB stations detected
6”
Step forward and back for iPod® playing list.
6”
Audio level adjustment
volume/bass/treble/balance/loudness
Delete individual FM/DAB tuning pre-sets
2”
Store individual FM/DAB station pre-sets
Update DAB receivable broadcasts
Store “IDEAL” setting
Store turn-on mode (on/off)
Play/pause for iPod® playing list
2”
DAB
UPDATE DAB
6”
2”
”IDEAL” mode
2”
6”
Program MONO for all sound sources
6”
Select sound source
Select +/- keys function
volume/bass/treble/balance/loudness
AUDIO IN
KBSOUND ® DOCK link
iPOD
Numeric keypad
Directly keying
FM station frequency (e.g. 95.8 MHz)
UPDATE DAB
UPDATE DAB
Clear
To illustrate that an operation requires holding down a
key on the remote control for a specific amount of time,
the
symbol will appear in the manual next to the
key. The screen will display the F symbol.
FM Forced Mono
On/off
F
CC-1157ENG-01
3
1. Introduction
KBSOUND ® iSelect DAB is a sound device specially designed for quick and easy installation. It fits discreetly into the decor of your kitchen, bathroom or
anywhere in your home.
The KBSOUND ® iSelect DAB Kit comprises:
=
Electronic module with built-in FM and DAB+ tuner and power supply.
41,5W + 1,5W stereo audio output.
=
Two 2.5” or two 5" loudspeakers.
=
Remote control with the following functions:
4Volume, bass, treble and balance control.
4'Forced Mono' function.
4FM , RDS and DAB information..
4Ability to directly key-in desired FM station frequency.
4Ability to automatically store into memory stations received with the best reception.
440 FM memory pre-sets.
480 DAB memory pre-sets.
4“Intelligent” loudness: automatic adjustment to the volume level.
When connected with the wireless KBSOUND ® DOCK Accessory (not included in this kit), the user has two additional sound sources: the iPod/iPhone
and an external sound source using a 3,5mm jack input.
The components supplied in this kit are for installation and use in the manner and for the purpose described in the Installation Manual and
the User Manual. The installation must also comply with each country's current regulations. This manual assumes that the KBSOUND ®
iSelect DAB unit has been installed following the instructions provided in the Installation Sheet included in this kit.
CC-1157ENG-01
4
2. General operating notes
1.- None of the functions (except ON/OFF) work unless the remote control is in “on” mode.
2.- Once the KBSOUND ® iSelect DAB is connected to the mains, it will remain powered even it is in OFF state. That means
that the OFF state (as indicated in this manual) really means a “standby” state.
beep
3.- A short BEEP sound signal indicates that the data has been received
5m
4.- The remote control unit exchanges information (transmits and receives data) by
means of the transmission-reception capsule. If at any time there is a failure in the
communication, the screen will display the
symbol. In the event of this
occurring, point the remote control to the transmission-reception capsule at a straightline distance of no greater than 5 meters.
5.- The remote control display will automatically turn off when
there has been no keying activity for more than a few seconds,
ensuring more efficient battery usage. To view the display
information at any time, point the remote control to the
transmission-reception capsule and press the key of the
selected sound source at this time
DAB
The KBSOUND ® iSelect will
turn on with the audio and
station frequency settings
saved as “ideal” mode
settings (see chapters 3 and
6) when the unit is
connected to a power
supply.
iPOD
DIO
AU
B
DA
IN
AUDIO IN
D
iPO
When switched off and on
while connected to the
power supply, the audio and
station frequency settings
will be as when the unit was
switched off with the remote
control ON/OFF key
CC-1157ENG-01
5
3. Operating audio functions
Key Sequence
If the electronic module is off, a brief press on the ON/OFF key will turn on the unit.
The LED will display the word “ON”
When the electronic module is off, the LED will be OFF.
Display
on
vol 58
Increase/decrease in the volume level: The LED will flash
to indicate the desired change in volume.
Increase/decrease in bass/treble levels: The LED will flash
to indicate the desired change in the bass/treble levels.
BAS+06
Loudness: It reinforces the bass level in terms of the volume level, assuming a
greater backing at a lower volume and a lesser backing at a higher volume.
LD on
Mono/stereo reception: When activated, this feature allows the FM stations to be received in stereo.
When deleted this feature only allows for mono reception.
Note: If the electronic module´s configuration is mono, the signal will always be received in mono
even if the signal received by the antenna is in stereo.
STEREO
"IDEAL" mode of operation: To program your "IDEAL" mode of operation, select the sound source
(FM, DAB, iPod, Audio In) and desired levels of volume, bass, treble and loudness. Also, if your choice
is FM or DAB, select your favorite station. Then hold down the IDEAL key for 2 seconds.
Then, this "IDEAL" mode can be instantly accessed by simply pressing the IDEAL key on the remote
control.
2’’
IDEAL
IDEAL
CC-1157ENG-01
6
4. Operating the DAB tuner
4.1. Getting started with DAB
Key Sequence
The first time the DAB option is selected as a sound source, the unit
does not have any service available.
DAB
Press the up/down key and the unit automatically creates a list of
receivable broadcasts.
1”
Take care as this operation may take some time. The display may
turn off to save battery usage. The operation only finishes when you
hear the beep signal.
Display
dab services NOT found
Searching dab stations
beep
4.2. Manual DAB station scan
Once the list of DAB stations is available, you can scan the station
pressing down the up/down for 1" to choose what you would like to
include in the memory (see 4.3).
1”
BBC RADIO 5 LIVE
4.3. Manual storing and deleting of DAB stations in
memory
To store a station in the memory, use the up/down key to select the
station (see 4.2).
Then, press the 9 key for 2”.
The station tuned at that time will be stored in the first vacant memory.
AMAZING RADIO
2’’
MEM 01
To delete a station from the memory, select the station and press the
7 key for 2”. The station will be deleted from the memory. The vacancy
will be filled sequentially by the next stations in the memory.
2’’
DEL MEM
CC-1157ENG-01
7
4.4. Tuning to DAB memory pre-sets
Key Sequence
The up/down key allows you to scroll through the stations stored in the
memory (see chapter 4.3).
MEM 19
The DAB stations are stored in the memory in the same order they have been
stored manually
PLANET ROCK
4.5. Direct key-in of DAB station memory
To directly key-in a DAB station memory, dial the numeric keys of the memory
and then press the DAB key.
For example, to select memory 19, press 1 9 DAB (see chapter 4.3).
MEM 19
DAB
4.6. Updating DAB
PLANET ROCK
To update the list of receivable broadcasts, press the key 8 for 6". If new
stations are found, they will be available to scan them using the up/down
key (see chapter 4.2).
If you wish to store them in the memory, use the procedure described in
chapter 4.3
Display
UPDATE DAB
UPDATING DAB STATIONS
6’’
4.7. Automatically storing and deleting DAB stations
To activate the automatic storing in memory of the DAB stations press key
6 for 6". When the automatic programming begins the screen will display the
word “AUTO”. The electronic module will store in the memory a maximum
of 80 stations.
To activate automatic deleting of DAB stations for all the memory, press
the key 4 for 6". This option deletes all the memories and all the list of
receivable broadcast. Once this has been executed, you will need to follow
the steps described in chapter 4.1 to restart.
6"
6"
AUTO
DEL ALL
CC-1157ENG-01
8
5. Operating the FM Tuner
Key Sequence
Display
5.1 FM Station Scan manually
SCAN
While the search is taking place, the word “SCAN” will appear on the display screen.
The screen will duly display the station frequency of the next station found.
1”
102.50
FM
5.2 Direct Key-in of FM Station Frequency
To directly key-in an FM station frequency, sequentially dial the numeric keys of the station
frequency then press the FM key. For example, to select 94.7, press 9 4 7 FM.
Note: A station frequency can be keyed-in as either 94.7 (9 4 7 FM)
or as 94.70 (9 4 7 0 FM)
94.70
FM
To clear a digit and start a different
frequency, press the C key
and then begin keying-in of the desired
frequency
94.70
FM
CC-1157ENG-01
9
Key Sequence
5.3. Tuning to FM Memory Pre-Sets
The SCAN keys allow you to scroll through the stations stored in the memory (see Chapters 5.5
and 5.6, Storing and Clearing Stations in Memory).
Display
MEM 19
When stations are stored in the memory they are sorted in ascending order; that is, beginning
with 87.5 and ending with 108.0.
102.50
The screen will display the frequency of the station stored in that memory pre-set.
FM
5.4. Direct Key-in of FM Station Memory
To directly key-in an FM station memory sequentially dial the numeric keys of the memory
then press the FM key. For example, to select memory 19, press 1 9 FM (see Chapters
5.5 and 5.6, Storing and Clearing Stations in Memory).
MEM 19
102.50
5.5. Storing and Clearing FM Station Frequencies Manually
FM
To store a station, tune to the station (see
Chapters 5.1. Station Search and 5.2. Direct keyin of Station Frequency).
94.70
FM
Hold down the 9 key for 2 seconds.
The station tuned at that time will be stored in the
memory.
2’’
MEM 07
CC-1157ENG-01
10
Key Sequence
To delete a station from the memory, select the station and hold down the 7 key for 2
seconds. The station will be deleted from the memory.
2’’
Display
DEL MEM
5.6. Storing and Clearing FM Station Frequencies Automatically
To activate the storing station frequencies automatically process, hold down key 6 for 6
seconds. When the automatic programming begins the screen will display the word “AUTO”.
6’’
AUTO
The electronic module will store into the memory the stations that are received with the best
reception, sequentially from lowest frequency (87.5 MHz) to highest frequency (108.0 MHz).
The system will use all the memory slots available, reaching a maximum of 30.
The process can take a few moments. Once the scan has been completed or once the
maximum number of memory slots has been used, the process ends and a BEEP signal
sounds.
To activate the clearing station frequencies automatically process for all the memory slots,
hold down key 4 for 6 seconds.
beep
6’’
DEL ALL
5.7. Adjusting FM Station Search Sensitivity
To adjust the automatic station search sensitivity (see 5.1. Station Search),
press the 1,2 (1=minimum, 2= maximum) for 2 seconds
2’’
2’’
SENS 1
SENS 2
CC-1157ENG-01
11
9
6. Operating the Wireless KBSOUND ® DOCK
Accessory
The wireless KBSOUND ® DOCK
Accessory for use with the
KBSOUND ® iSelect DAB 2,5" or 5" allows
you to enjoy and listen to your music from
all models of iPhone and iPod, and any
other external sound source that can be
connected to the Dock using a 3,5mm jack
input.
When the Dock is powered from the
external power supply, it recharges the
iPod/iPhone.
IMPORTANT: use only the power supply
supplied with the KBSOUND ® DOCK.
When the Dock is not connected to an
external power supply it will be powered
from the connected iPod/iPhone. In this
case, the external audio source AUDIO IN
is not available.
These functions are available only when
the KBSOUND ® DOCK accesory is connected.
Press key 5 for 6 seconds. Speaker led
will flash in blue.
Key Sequence
6”
Power the Dock. Press the LINK key at the
back of the Dock for 6 seconds. The Dock
led will flash in blue.
After a few seconds both leds will stop
flashing and the Dock and the
KBSOUND ® iSelect DAB are linked.
The iPOD key on the remote control
selects the iPod® from the Wireless Dock
as the audio source input. When playing
the Dock led will be green.
Display
6”
the KBSOUND ® DOCK can be linked
ONLY WITH ONE KBSOUND ® iSelect
DAB at any one time
iPOD
IPOD
To play/pause the iPod®, use the key:
To step forward or back the iPod´s
playing list, use the keys:
The Audio-in key on the remote control
allows you to select the external audio
source that is connected by a 3,5mm jack
to the Dock. When playing the Dock led
will be blue.
AUDIO IN
AUDIO IN
CC-1157ENG-01
12
7. Selecting Turn-On Mode
This function is designed for use in the event that the KBSOUND ® iSelect
DAB power supply is fed by a specifically designated switch. In this case, the
automatic activation mode must be programmed in order to automatically
turn on KBSOUND ® iSelect DAB unit when the switch is activated.
These steps must be followed:
1. Supply power to the KBSOUND ® iSelect DAB unit by turning
on the switch. The KBSOUND ® iSelect DAB unit will flicker a
couple of times and turn off.
2. Turn on the KBSOUND ® iSelect DAB unit using the remote
control (ON/OFF key).
3. With the KBSOUND ® iSelect DAB unit turned on, keep the
ON/OFF key pressed down for 2 seconds.
Key Sequence
If the Turn-On mode is set to
“on” in this state, when
power is fed to the unit, it will
turn on in “ideal” mode (see
Chapter 3).
2’’
If the Turn-On mode is set to “off”,
when power is fed to the unit, it will
turn on in “off” mode.
2’’
Display
AUTO x
CC-1157ENG-01
Electrónica Integral de Sonido S.A. is not responsible for any error or omissions that may appear in this
manual, and reserves the right to make changes without prior notice. iPod and iPhone is trademark of Apple
Inc. registered in teh U.S. and other countries. "Made for iPod" and "Made for iPhone" means that an electronic
accessory has been designed to connect specifically to iPod and iPhone and has been certified by Electrónica
Integral de Sonido S.A. to meet Apple performance standards. Apple is not responsible for the operation of this
device or its compliance with safety and regulatory standards. Please note that the use of this accesory with
iPhone may affect wireless performance.
CENTRAL
Polígono Malpica Calle F Oeste
Grupo Gregorio Quejido, 87-88
50016 Zaragoza (SPAIN)
Tel.: 34 976 465 550
Fax: 34 976 465 559
[email protected]
MADRID
Poeta Rafael Morales 2, of.2ºB
28703 San Sebastián de los Reyes
Madrid (SPAIN)
Tel.: 34 91 659 3678
Fax: 34 91 623 9525
[email protected]
www.eissound.com
AENOR
Empresa
Registrada
ER-0634/1998
64460063
CC-1157ENG-01